enables universal access to e-forms and workflows on tablets and smart phones in addition to desktop support on all standard browsers. iOS 6+ devices, iPad and iPhone, running mobile safari are supported. This tutorial will incorporate several features into an Employee On Boarding workflow. For example;
...
What are we going to need?
- A Live Formsfrevvo account on the frevvo Cloud server or a working in-house installation.
- A tablet, mobile device and desktop computer. If you do not have mobile devices, you can perform the Employee On Boarding workflow from your desktop computer.
- You will need to download the W-4 form. You can find the latest version here. Right click and save the form to your desktop. Open the form. Notice the name field is a combination of the new employee's first name and middle initial and there is no writable field in the PDF for the Employee's Signature or the date field next to the signature.
- A PDF viewer such as Adobe Reader or Mac Preview and a PDF editor such as PDFescape.
...
We will not map all the fields on the Acroform PDF for this tutorial. Drag and drop controls for these fields in the W-4 mapper. If you have been naming the controls as suggested in this tutorial, control names should be the same as the Live Form frevvo Control Name column shown in the table.
| Acroform PDF Field | Live Form frevvo Control Name |
|---|---|
| First Name and Middle Initial | FirstPlusInitial |
| Last Name | LastName |
| Address | Street |
| City or town, state and ZIP code | FullAddress |
| Social Security Number | SSN |
| Filing Status | Map each FederalFilingStatus Option to the corresponding checkbox. |
| Multiply the number of qualifying children... | ChildDependentCalculation |
| Multiply the number of other dependents... | OtherDependentCalculation |
| Add the amounts above and enter total... | ClaimDependentsTotal |
| Employee Signature | Signature (from Confirmation step) |
| Date | Signature Date (from Confirmation step) |
| Employer's Name and Address | EmployerSNameAndAddress |
| Employer's EIN | EmployerEIN |
...
- Log in as the designer. Click on the Spaces tab.
- Click
Add to create a new space, type a Space ID and Space Name, and then click Create. You will be directed to the space designer.
- Since we set the state of the Employee On Boarding workflow to Production in a previous step, it will automatically be included, along with the Task List as menu items in the newly created space.
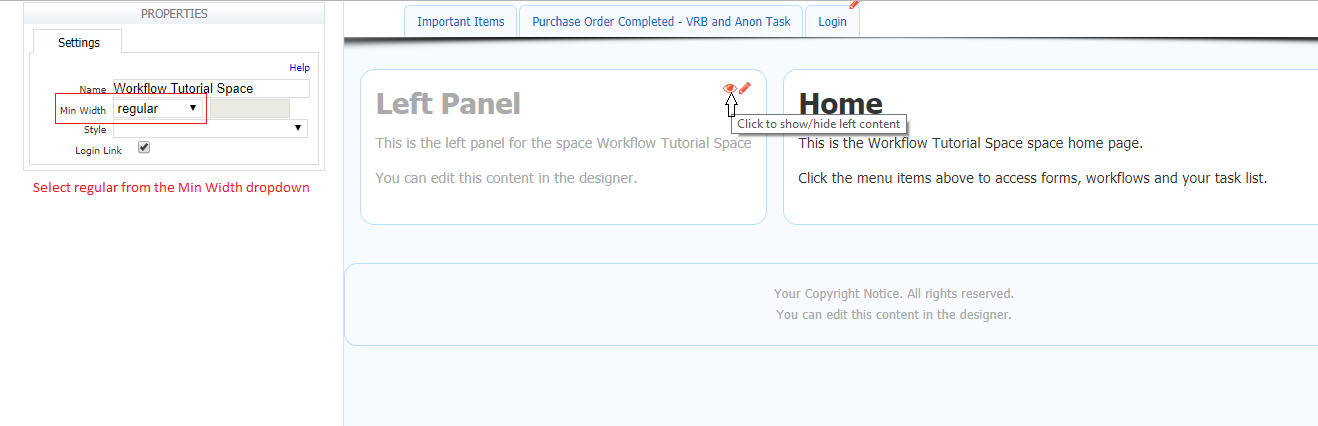
- Verify that the left panel is hidden. If not, click the
- Select regular for the form width from the Min Width dropdown on the Property pane.
- If your tenant is in the cloud, click the
- If you are using an in-house installation,
- Click the
- Click the
- Click the
...
- Logon to your tenant as the designer on your desktop.
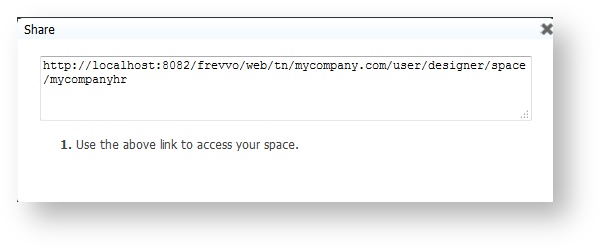
- On the Spaces table, click the
- Live Forms frevvo displays your space's URL — this is the link you distribute to those who you want to view your space. Remember, this workflow is designed to only be accessible to users who are logged into the tenant.
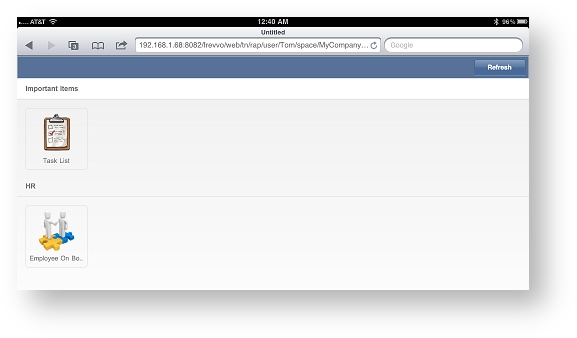
- Type the Share URL for your space into a browser session on the iPad. Your space will look similar to the image below, when accessed from the iPad.
...