| Table of Contents |
|---|
frevvo comes with a built-in submissions repository. The repository can run on top of most SQL databases. By default, your form data is stored in the repository and can be viewed from the Submissions page. Fields in your form/workflow, set up as Searchable fields by the designer, can be used as criteria when searching submissions. You can also filter by default fields such as error, error description, submitter id, lock user id, started date, etc. The Insight Server and the Insight service must be running for the Submission view to work.
...
Searchable Fields can be used as search criteria for submissions and tasks. They also define the columns that will be available in the Submissions Table. Once defined, frevvo can also go back and re-index existing submissions so you can search them using the same fields. Searchable fields and Export fields will be included in the Submission CSV download.
...
Summary Fields can be used to configure the fields shown in the Submissions Detail: Data tab, as a quick view of data in the form/workflow. They will be shown in the order configured with the exception of Repeat controls and table columns, which will be grouped together by repeating control.
...
Export Fields define which controls will be exported, and in which order, in the CSV Download in addition to the metadata and Searchable Fields. The CSV can also be opened as an Excel Document, where the Export Fields selected are displayed as columns. Adding or changing Export fields will take immediate affect; there is no need re-index as with Searchable Fields.
Submissions View
Click the Submissions icon to open the Submissions view, which consists of two sections displays:
...
| Expand | ||||||||||||||||||||||||
|---|---|---|---|---|---|---|---|---|---|---|---|---|---|---|---|---|---|---|---|---|---|---|---|---|
| ||||||||||||||||||||||||
Action Button
|
Submission Table Columns
...
The table list the describes the default columns that appear in the Submission Table. You cannot change the order of the default columns but you can Show or Hide them in the Submission Table.
...
- The Submission Info Section contains summary info about the submission, including the Form/Workflow Name, version, status and if applicable, error details, Submitted by <user> and the submission date and time.

The Form/Workflow name is a clickable link that opens the form/workflow in either read-only or edit mode.- PENDING workflows will only open in read-only mode.
- SUBMITTED forms/workflows will open in read-only mode for users with View Submission permission, and edit mode for user with Edit Submissions permission. In read-only mode, you will see a blue banner at the top of the form/workflow "This form is read only." See Editing Submissions for more details on edit mode.

- In read-only mode, workflows will open at the current step. You can use the navigation toolbar to navigate back to prior steps if needed.

The Data Tab displays controls selected as Summary Fields in the form/workflow settings, and attachments such as the PDF Snapshot, mapped PDF's and attachments uploaded by the user. This tab shows the user’s view of the data. This means for money controls you’ll see dollar signs, decimals and commas, for example. The Label column corresponds to the labels on your form, and the Value column shows you what the user entered in each control. This tab is view-only; you cannot edit any data shown here. If you do not see a specific form field then go back and edit this form to add the field to the Summary Fields tab.
The Summary Fields are shown in the order they were configured in the form/workflow Settings. However, controls that are grouped in a repeating section or a table will be grouped in this view regardless of the order set. This data is available for forms/workflows in SAVED or PENDING state (i.e. not only SUBMITTED) as long as the field contains data.
Attachment links are clickable and will open the attachment in a new browser tab.
- The Signatures Tab shows you all the users that signed the form using frevvo's wet and digital signature features.

- The Documents Tab shows you the exact XML document that was generated when the form was submitted.

...
One of the attachments is a Wet Signature image. Clicking on the SubmissionsDetail 1069263456tab lists the manager, Jerry's digital signture and the and wet signature image of the new employee. The signature image can be downloaded from the Data or Signature tabs of the form submission. There you will find information about any digital signatures that were stored with the form. See Electronic Signatures for more information.
...
The frevvo mail server limits email size to 30MB. If emails sent in Activity Doc Action or Document Actions exceed this limit, your tenant admin may receive an email bounceback from "Mail Delivery System <"MAILER-DAEMON@sysops+stage"@frevvo.com>" that contains an error like this "message size 34559092 exceeds size limit 31457280 of server smtp.sendgrid.net[107.20.8.136]".
The only workaround for this issue at this time is to limit the Upload control max size and/or min # properties in your form. If you have a submission that has hit this error, you must edit the submission, delete some of the attachments and then resubmit.
Editing Submissions
Only submissions in the SUBMITTED state can be edited. If you have the correct permissions, submissions can be edited easily by clicking the form name rendered as a clickable URL on the submission. In this image below click on "Product Order Form" to edit the submission.
...
| Tip |
|---|
Verify that your Export Fields are properly set up in the form/workflow and that you see the expected submissions in the Submissions Table before Downloading to CSV. |
...
- Perform the submission query so the data that you want to download displays in the table. The default columns in the submission table appear in the spreadsheet even if you are not displaying them in the table. Hide the columns in Excel if you do not want to display them in your spreadsheet.
- Click the Download button to save the CSV file.
- Open the file in Microsoft Excel.
- Show/Hide columns in the spreadsheet if desired.
...
The CSV column order will be a) the Submissions table fields, including Searchable Fields in the order they are set, then b) Export fields in the order they are set, then c) additional metadata fields from the Submissions Table. To change the order of the columns in the Submissions CSV file, change the order on the Searchable Fields and Export Fields tabs. The CSV file will reflect the new column order. When editing the file in a spreadsheet application (e.g. Excel) you can easily rearrange the columns if needed.
...
This happens because Excel makes assumptions about the way imported data should be formatted; usually leading zeros are mathematically insignificant, so they are removed. You can keep the leading zeros in CSV files by using Excel's Text Import Wizard. (These instructions may vary based on your Excel version.)
- Launch Excel Spreadsheet. Click the Data tab.
Click the From Text/CSV icon. Use the file manager to locate the CSV file you want to import.
Click Import.
- Select Comma from the Delimiter dropdown.
Click Transform Data.
Select the column(s) that contains the data with leading zeros. Change the Data Type to "Text". The preview will refresh to show your data with leading zeros.
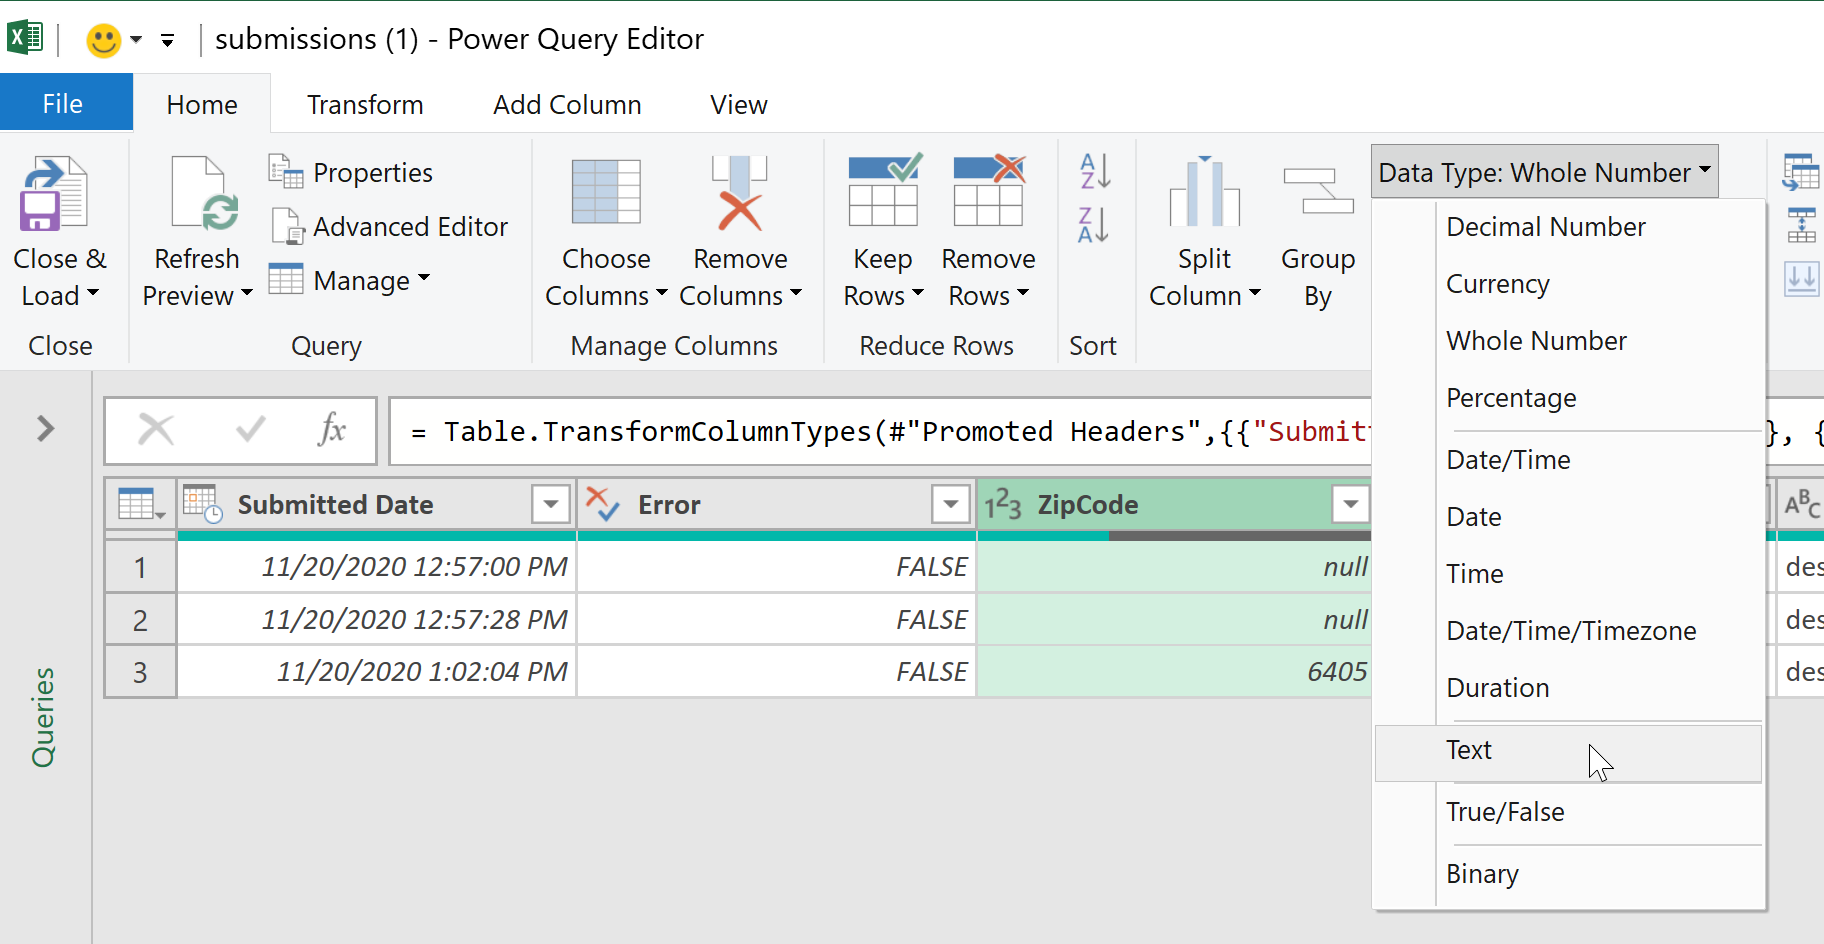
Click Close & Load.
...