| Section | |||||||||||||||
|---|---|---|---|---|---|---|---|---|---|---|---|---|---|---|---|
|
...
- If you use the frevvo Cloud hosted server, you must ensure that the connector is accessible from the frevvo servers. This is done by opening up one of the following ports in your firewall:
- HTTP Ports: 80 or 19080
HTTPs Ports: 443 or 19443
Code Block We recommend that you use https and not http. Https is a secure channel.
- Customers that use firewall white-listing, should make sure the frevvo cloud outgoing server IP 54.86.85.105 (host outgoing.frevvo.com) is added to the list.
- If you want to install the Filesystem Connector in the frevvo In-House tomcat bundle, follow these easy steps: (You don't have to use the frevvo application from this bundle).
- Review the Supported Platforms list.
- Download and install the certified version of the Java Development Kit (JDK) and set the JAVA_HOME environment variable as described here.
- Download the frevvo tomcat bundle
- Unzip the frevvo zip file into a location of your choice: e.g. c:\frevvo. We'll refer to this directory below as <frevvo-home>.
- Install the Filesystem connector inside that same tomcat.
- Download the filesystem zipflile
- Extract the filesystem.war to <frevvo-home>\tomcat\webapps directory.
- Delete the <frevvo-home>\tomcat\frevvo directory.
- Configure the Filesystem Connector
Start frevvo by clicking on the startup.(bat,sh) file for your operating system in the <frevvo-home> directory. It is also possible to configure frevvo as a Windows service
In-house Customers with an existing frevvo tomcat bundle installation
...
Modify the File Connector settings section of the frevvo-config.properties file.
the frevvo.filesystem.connector.url - The location of the Filesystem connector is set for the installation with this property. It defaults to http://localhost:8082/filesystem. Change the <localhost:8082> in the default URL to the <server:port> where you installed the Filesystem connector in your environment.
Uncomment the property by deleting the # that precedes it.
Code Block # File Connector settings frevvo.filesystem.connector.url=http://localhost:8082/filesystem
Add these properties to the <frevvo-home>\tomcat\conf\frevvo-config.properties file. You can add them to the existing File Connector settings section or make a new section with a comment as shown in the example below. Refer to the table for a description of the configurable properties:
Configuration Parameter Description connector.file.root.dir This is the location in your file system where the submission docs will be saved. Set the submissions directory field in the Save to Filesystem wizard as a relative path from the root directory specified by the connector.file.root.dir in the connector deployment configuration. It's value can contain one or more control template strings. For example, if the configuration file contains C:\ for the connector.file.root.dir parameter, enter the name of the directory where you want to save the submissions in the Submissions field in the Save to Filesystem wizard. This will save the submissions in C:\<DIRECTORY NAME>. If not explicitly configured, it defaults to the user home directory. Change the value to reflect the location for your file system. connector.file.name.keep This parameter determines whether the original files names will be retained. If this is set to true, then you either have to make sure that all your files have unique names or else save the documents of each submission under a separate uniquely named folder. If this parameter is not included, or is set to false, submission files will be named with a generated identifier as the prefix suffixed by '_' and a sequence number to make the file name unique. The original filename extension is retained. This is the default behavior. Ex: e454fa08-9a6e-4c54-9743-18f4ba0ad0b4_1.xml instead of form.xml. connector.file.dir.submission This parameter allows you to create a unique new sub-folder for documents of every submission if true. connector.file.descriptor.suffix The metadata descriptor filename is a generic GUID filename, followed by a configurable suffix. The default suffix is '.xml'. Use this parameter to change the suffix.The suffix can make identifying the metadata file easier, particularly if you save the files from all submissions into the same folder.
Ex: 432e0d1f-d084-4cd4-8bbe-50f6e9bd5ee6_desc.txtconnector.file.metadata.subdir This directory must be a child of the root directory i.e. a relative path. When provided, and the directory exists, all metadata files will be created here. The metadata files are uniquely named, so there will be no conflict. Here is an example of the Filesystem Connector properties added to the File Connector settings section of the frevvo-config.properties file. When executed, frevvo submissions will be:
- Saved on the local drive in a directory specified in the wizard that is located under the root directory configured here. Ex: C:\Submissions.
- Individual file names will be retained.
- Attachments in the submission will be saved.
Add the suffix "_desc.txt" to the metadata file for each submission.
Warning In a properties file, a backslash is considered as a continuation character when splitting across lines. Escape it with another backslash i.e. C:\\ or use the forward slash i.e. C:/ when specifying the connector.file.root.dir property.
Code Block # File Connector settings frevvo.filesystem.connector.url=http://localhost:8082/filesystem connector.file.root.dir=C:/ connector.file.name.keep=true connector.file.descriptor.suffix=_desc.txt connector.file.metadata.subdir=metadataFile/
- Start the Insight server first, then start frevvo.
Make sure the directory where you plan to save the submissions is created and and has the appropriate access for the OS you are using. For example:
If you are using Windows, you can map a drive to a server directory (not recommended because Windows mapped drives cannot be reliably accessed from java), or you could use the UNC path i.e. //host-name
If you are using a Unix operating system you could mount a remote filesystem as a directory and use it as your destination directory
Warning To ensure interoperability across file systems, it is recommended that you follow a good naming standard such as POSIX when creating files and folders. For example, folder names can't contain slashes so a folder named '1/2/15' would not be valid.
Browse http://<your server:port>/filesystem/health (replace <your server:port> with your frevvo server:port) to check the status of the connector. If the connector is up and running, you will see { "status" : "UP" }
...
| Excerpt |
|---|
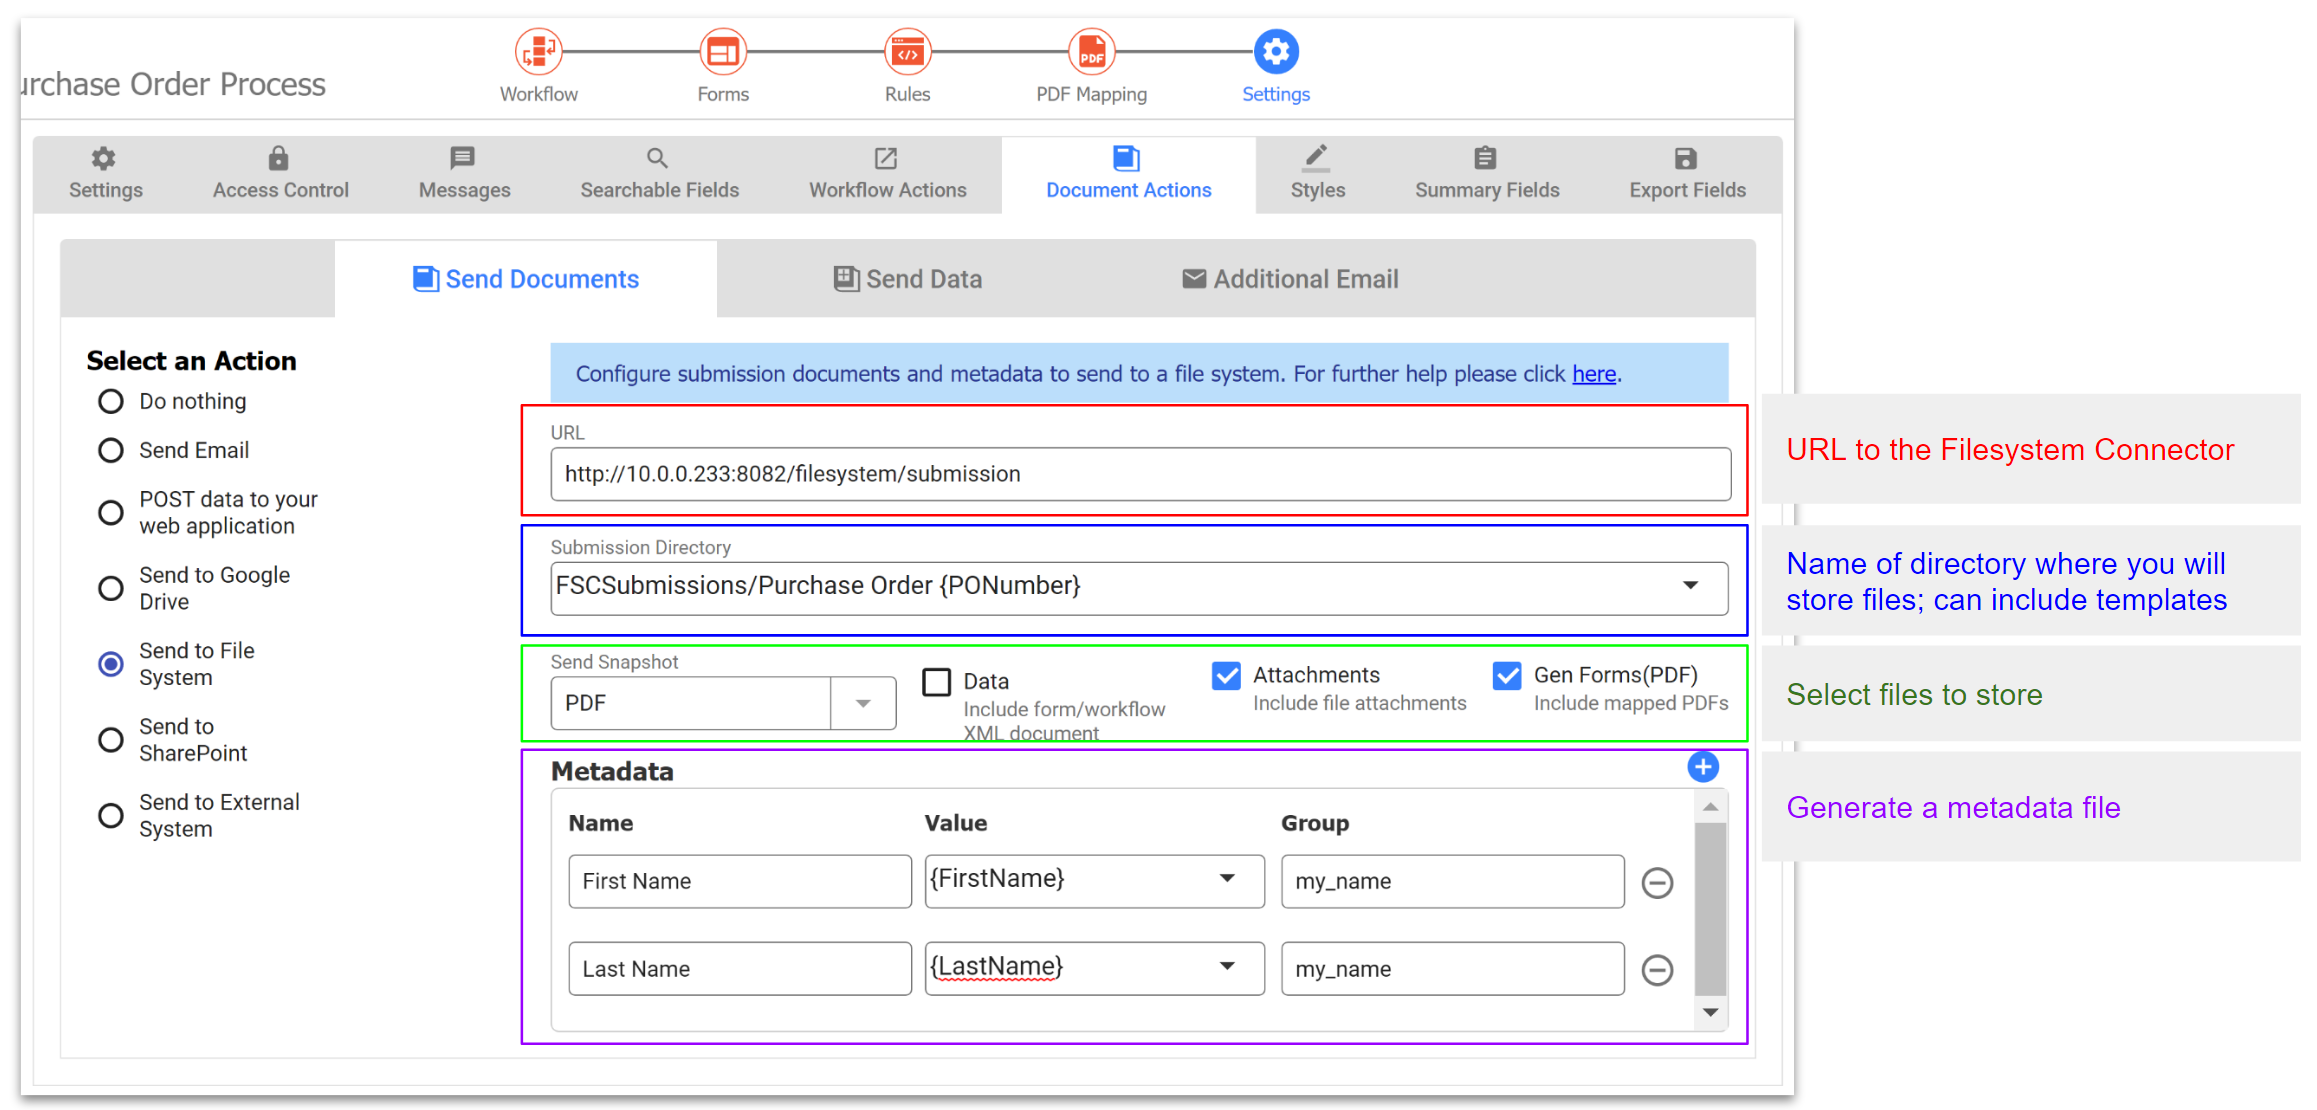
Saving files to a local or remote location is easily done with the Save to File System wizard if generating metadata is not required. Let's begin with a very simple example. Here are the requirements:
Follow these steps to fulfill the requirements by using the doc action Send to Filesystem wizard
|
...