This documentation is for frevvo v10.1. Not for you? Earlier documentation is available too.
Using the Task List
- Former user (Deleted)
- Megan Ellis
Task List

The frevvo Task List is an electronic listing of workflow tasks that require a user's attention. It is similar to an email inbox. Tasks appear on the task list for one of three reasons:
- You clicked the save icon on a form or workflow which had the save/load feature enabled.
- A workflow was assigned to you to perform the next step in the workflow.
- A workflow was assigned to a role (i.e. Manager) to perform the next step in the workflow, and you have that role.
View the Task List
There are several ways to view your Task List. Users must log in to frevvo to access their task list.
- frevvo app:
- Non-designer users will see the task list immediately upon logging in and it serves as their "home page".
- Users with the frevvo.Designer role must click on the My Tasks tab to view your tasks.
- In a frevvo Space, users will click on the Important Items tab to access the Task List.
- It is also possible to embed the Task List on your own website.
Tasks display in a small area on the left side of the screen. Clicking on an icon to perform a task related function will display any associated screens to the right. Selected tasks will display with a blue background.

The Task List automatically reformats for optimal user experience on a mobile device.

My Tasks Menu
The My Tasks page lists your saved forms and workflows and all the workflows pending to be performed by you or pending to be performed by someone with one of your assigned roles. The header provides a menu of actions you can take:

 Toggle the left side navigation bar.
Toggle the User Menu
The
icon expands and contracts the user's navigation menu. When you click it, the left-side menu will appear with the option tabs available based on your frevvo role. Contracting the menu displays just the Task List and any selected tasks, giving you more screen real estate for you tasks.Menu Contracted

Menu Expanded

 Refresh the Task List. The expanded/contracted state of the refreshed task list will not change.
 The Task List does not automatically refresh. Users who rely on their Task List instead of Task Notification emails should manually refresh the list regularly.
 Inbox displays a non-expanded task list.
  Recent displays all tasks you acted upon in the past 7 days. The task list is color coded. Tasks with a green background have been submitted, while those with an white background are pending/saved. A red background indicates tasks that have been aborted. The image shows one submitted task, two aborted tasks and two pending tasks.
 Saved displays all tasks currently saved by you.
 Search for tasks you have performed in the past.
 Embed your task list in another web page.
Task Order
Your tasks will be grouped by workflow. For example, all expense reports waiting for manager approval will be listed under the Expense Report workflow and vacation requests listed under Leave Request. You can manually expand or contract the tasks for a specific workflow by clicking anywhere on the workflow title bar.

Task Details
Each task displays information to help the user identify and prioritize the task.
- The frevvo user that sent the the task to your Task List displays in the top left.
- The date/time that the task was navigated to the user's task list is shown on the top right. Task List time is always displayed in the Task List and Audit Trail in the user's browser local time zone.
- The Task information message provides additional information about the task appears in the bottom left. Task Information messages are configured by the designer for each Workflow Step, and can include run-time data from the workflow.

Pending Task Menu
The Tasks page displays a list of all your pending tasks by form/workflow name. Each task has it's own menu of actions:

 Quick View allows the user to review the task, add a comment, approve or reject, sign and pass it to the next user in the workflow without viewing the entire form. This icon will appear when Quick Approval is enabled by the designer.
 Perform the task. This icon is red when the task is locked by you so that only you can perform it. No other users with your role can perform this task unless you unlock it . The icon is blue
  when the task is shared between multiple users, for example when the task is assigned to a role i.e. group of users.
 Abort the task. The abort icon will only display if the user is a workflow administrator, tenant admin or a designer user.
  Modify allows you to send the task back to a prior step, abort, reassign or reset the task. The Modify icon will only display if the user is a workflow administrator, tenant admin or a designer user.
  Lock the task so you can perform it later. This is visible on tasks assigned to a role, and allows a user to "take" the task.
 Unlock the task and return it to the task pool. This is visible on tasks assigned to a role to the user who locked the task.
 Audit Trail displays the event history for this specific task. For workflows you will see all the users that have participated in the workflow thus far. For saved forms & workflows you will see an entry for each time you clicked save.
Not all tasks have all the action icons listed above. For example saved forms will not have the lock, unlock or modify icons because saved forms can only be performed by the user that saved them. They are inherently locked by you and cannot be unlocked back to any other user. Modify and Abort task icons only display on workflows, and only display if the user is a workflow administrator, tenant admin or the workflow's designer.
When a task step is assigned to a role rather than a specific user, that task will simultaneously appear on the task list of all people with that role. The first person that clicks the perform or lock icon will in effect claim that task, and all other users with this role can no longer perform this task. They will see the perform icon change to light blue and disabled as shown below to a indicate that it cannot be clicked. View the audit trail or hover over the icons to display a tool tip with the username of the person who currently has this task locked, i.e. "locked by: sue".

Perform a Task
The Perform ![]() icon allows you to execute a task in your task list. This icon is red when the task is locked by you and it is blue
icon allows you to execute a task in your task list. This icon is red when the task is locked by you and it is blue ![]() when the task is available to multiple users to perform. Clicking Perform loads the task at it's current step in the display area. When you click the perform icon for a saved task, the form/workflow will load back into your browser with all the form field values as you left them when you last clicked save.
when the task is available to multiple users to perform. Clicking Perform loads the task at it's current step in the display area. When you click the perform icon for a saved task, the form/workflow will load back into your browser with all the form field values as you left them when you last clicked save.
If the Perform icon is disabled, this indicates that the task is currently being performed by another person or that another person has clicked the lock ![]() icon to reserve the task. When this is the case, the only person that can complete this task is the person with the lock. View the audit trail or hover over a locked task to see who holds the lock. You can ask that person to unlock the task if you want to perform it. You can also ask your tenant administrator to unlock a task.
icon to reserve the task. When this is the case, the only person that can complete this task is the person with the lock. View the audit trail or hover over a locked task to see who holds the lock. You can ask that person to unlock the task if you want to perform it. You can also ask your tenant administrator to unlock a task.
If you see the error "Access Denied. Authentication required. Are you trying to access a private form or flow?" when clicking the Perform icon, there may be an error in the task assignment, form/workflow Access Control, or Task List URL in a Space. Notify the form/workflow designer that you are receiving this error.

Quick Approval
The Quick Approval feature is particularly suited to workflows designed for mobile devices. The Quick View icon will only appear for tasks where Quick Approval is enabled by the designer. See Setup Quick Approval for the details. Clicking the ![]() icon shows a Quick View of the task. Quick Approval provides an easy way to add a comment, approve something in your task list and pass the task to the next person, or reject the task and send it back to the previous step.
icon shows a Quick View of the task. Quick Approval provides an easy way to add a comment, approve something in your task list and pass the task to the next person, or reject the task and send it back to the previous step.
Quick Approval does not lock the task.
Let's consider a Leave Approval workflow with two activities: the first step is a form which collects the pertinent information about the Leave request - employee name, starting date and duration of leave, etc. This step is filled out by any employee requesting a leave. The second step is a form that has a section named Manager Approval with a text area control for comments. The designer has setup the Quick Approval feature for this step in the workflow and assigned the role of manager to it. When a manager clicks the Quick View icon, the Manager step displays as shown:

You will see the following on the Quick Approval Screen:
- A summary text area that can be used to give a description of the task at the top. This is configurable by the designer and can include form data. See Setup Quick Approval for the details.
A text area in which the person who is viewing the task can enter a comment. Entering a comment on the Quick View screen is the same as typing the comment directly into the form.
- The Approve button flashes a "Please Wait" message and then displays "Task successfully approved" when clicked. The workflow moves to the next step. The task will disappear from your task list.
- The Reject button returns the task to the step selected from the Prior Activity dropdown. A reason for the rejection must be provided. The message "Task successfully rejected" will display.

- The Details button will display the form as usual. This action is identical to clicking on the perform this task icon. Clicking on the Details button will lock the task.
Quick Approval is not available if you are using the Task List within Confluence.
Audit Trail
Click the Audit Trail ![]() icon to view a task's event history. A new event is added to a task's history each time:
icon to view a task's event history. A new event is added to a task's history each time:
- The form/workflow is saved
- The form/workflow is submitted
- The form/workflow is aborted
- The workflow is continued and becomes pending for the next person
- The workflow is modified and reset back to an earlier step and becomes pending again for the person that previously performed that step.
The Audit Trail has five columns that provide information about the event history.
| Event Icon | Event State w/ Message | Performed By | Date/Time | Assigned To |
|---|---|---|---|---|
| The Event Icon helps you visualize the various events. | Describes the state of the task, i.e. Pending, Saved, Submitted along with the History Message configured for the step. | The user or email who performed the task.* | The date and time the task was performed, displayed in the user's browser local time zone. | The user, email or role to whom the task is now assigned and awaiting action.* |
*The Performed By and Assigned To columns truncate the name of the user, role or email but you can see the full name by hovering your cursor over the text.
In the event an anonymous task for a form in one tenant (Tenant A) is performed by a user who is logged into a different tenant (Tenant B), the audit trail will only show "Anonymous" or their email (if assigned to their email address) rather than their user id. This security measure prevents data from being shared between two separate tenants.
Event Icons
The event icons provide information about what event occurred at this step.
 - The task was or can be performed.
 - The task or form was saved.
 - This task was rejected by the user or reset to this step by the workflow admin. This will display the Reject/Reset Reason message instead of the Task History message.
 - This task was submitted.
 - The task is locked by a user.
 - The task was aborted.
 - The task has been reassigned to another user or role by an administrator. This will display the Reassignment Reason message instead of the Task History message.
 - User can view any completed task that they performed. Refer to View My Task for the details
Event State
The event state describes each audit trail entry. See also the Submission Status documentation.
- SAVED: This will return only those tasks which were created when users clicked the Save button on the form/workflow to save their partially filled forms
- PENDING: This will return all tasks which are pending, meaning someone else put these tasks in the users task list
- SUBMITTED: This will return all tasks which are completed, i.e. the form/workflow for which this task was created has been submitted
- ABORTED: This will return all the tasks that were deleted/aborted so the form/workflow never got submitted
- WAITING: The WAITING status can be used to find workflow tasks that have an HTTP activity. Workflows designed with the pre-v8 Email/Anonymous Task step will also show the task in a WAITING state.
Use the history message property to add custom messages to the audit trail for the steps of a workflow.
Audit Trail Examples
These examples will show some of the different scenarios you might see displayed on the Audit Trail.
Leave Request
Here is the Audit Trail for a Leave Request form. This shows that the workflow was started by Tom, and assigned to Jerry. Jerry rejected it back to Tom asking for more information. Tom saved his step, then updated it and sent the workflow forward to Jerry, who approved it and sent it to the Role "Finance." Sue, who has the Finance role, saved this step to her own task list, then later performed her step. Since Sue's was the final step, the workflow was submitted.

This next Leave Request was submitted by Tom, and assigned to Jerry. Since Jerry is on PTO, the workflow admin, Megan, reassigned the task to Trevor. However, then Tom was feeling better and asked the workflow admin to abort the task altogether.

Mortgage Application
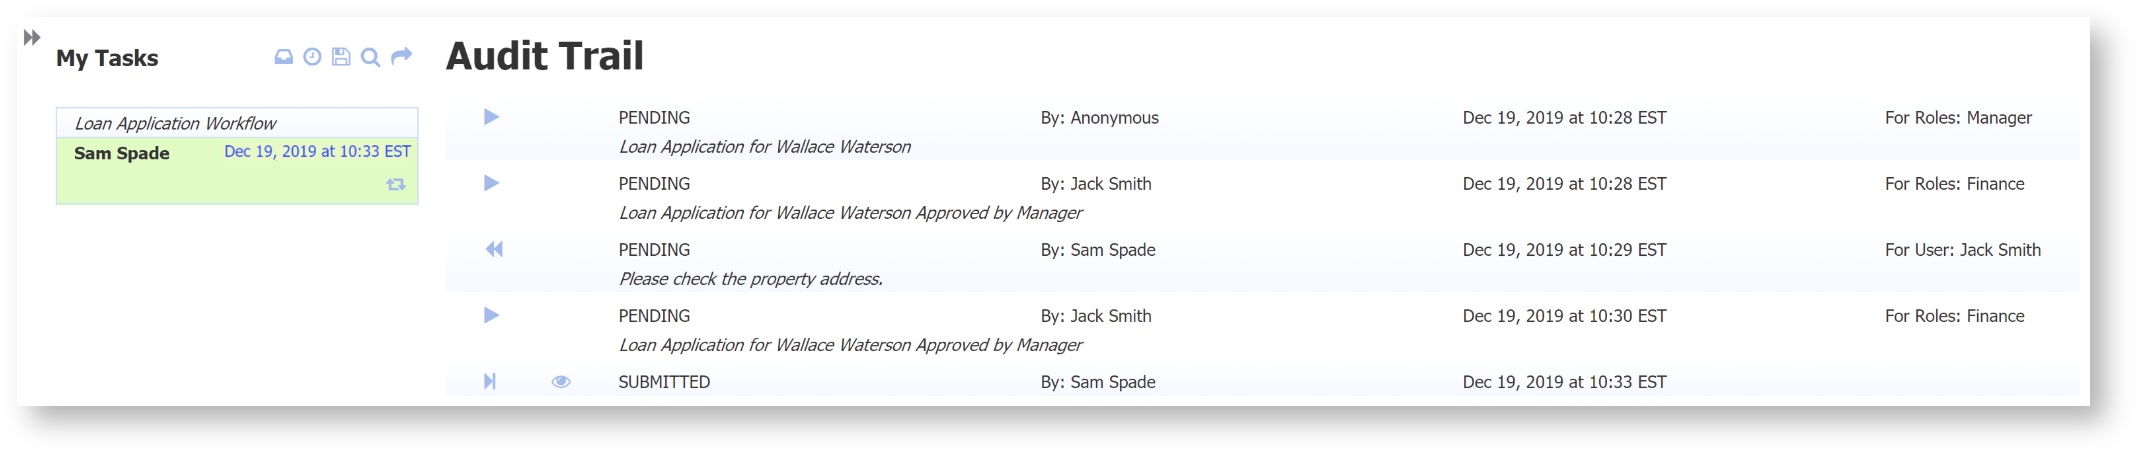
Here is the event history for a Mortgage Application workflow that was initiated by an anonymous user ("By:Anonymous "). Next the task was performed by the manager Jack Smith. Next supervisor Sam Spade rejected the task back to the step previously performed by the manager. This workflow now resides on the manager's Task List. This is Jack Smith's task list view, so Jack has the ![]() View My Task icon on the last step he completed, the second row in the audit trail.
View My Task icon on the last step he completed, the second row in the audit trail.
Here is the event history for the same workflow as above. After the reject, the task was performed again by manager Jack Smith and is now on the task list of all users having the role Finance. Now the designer has configured Task History messages on each step, which provides more detail including form data.

Supervisor Sam Spade, who is assigned the Finance role, performs the final step in the workflow and submits it. We are now seeing Sam Spade's task list view, so notice that the View My Task icon appears on the last completed step he performed, which is the last row of the audit trail.
Here is the event history of a 2nd Mortgage Application workflow. The workflow was initiated by an anonymous user (John Johnston) and then approved by manager Jack Smith. The tenant admin, Carrie Castle, then aborted the task. Abort removes the task from everyone's task list. This task can still be found by any user that performed one or more steps or by the tenant admin via Task List Search.

The audit trail will log an entry each time the workflow navigates to a step with an assignment and each time the current user saves the workflow. The audit trail will log a single entry when the same user performs multiple unassigned steps in a screenflow. Configure the Save on Navigate feature if you want to see an entry in the Audit Trail each time the workflow navigates to a different step even if they are part of a screenflow.
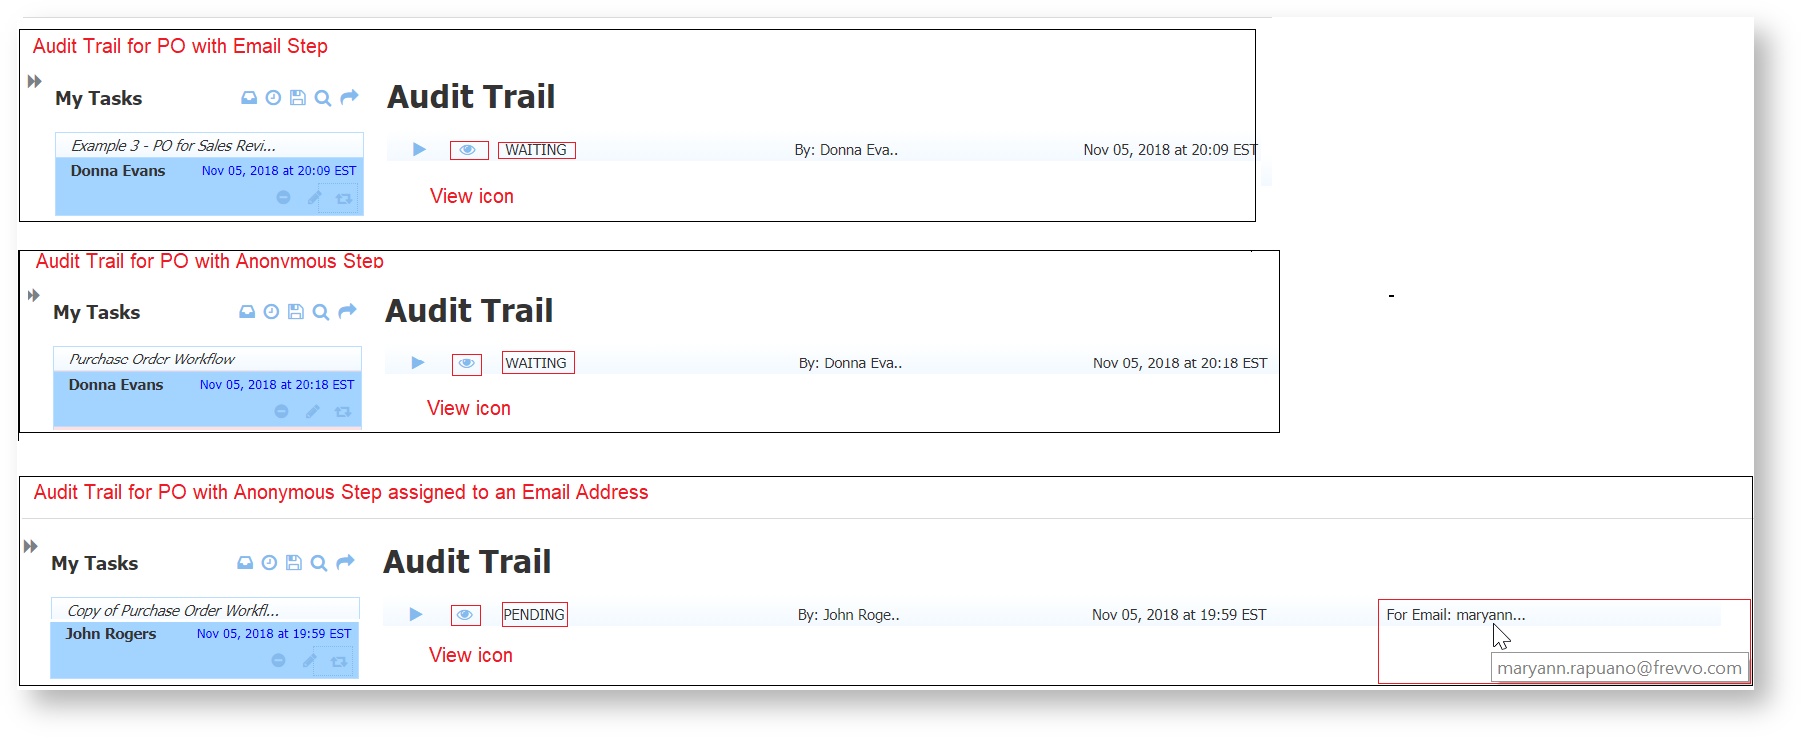
Anonymous Steps and the Audit Trail
If you have workflows that use the Email/Anonymous Task Step (created prior to v8 and not transitioned to the new Email Assignment feature) click the link below to see how these tasks appear in the Audit Trail.
- Workflows designed with the pre-v8 Email/Anonymous Task step will show the task in a WAITING state, as shown in the first two images below.
- Workflows designed with the v8.0+ assign the step to an Email Address feature show the step performed by the customer (anonymous user) in a Pending state and displays the Email address it was sent to.
View My Task
Users logged into frevvo are able to view workflow steps that they performed by clicking the ![]() View My Task icon in the Audit Trail. When you are viewing your task, you may notice the read-only view watermark. This is to remind you that you can view the information but can not make changes to it.
View My Task icon in the Audit Trail. When you are viewing your task, you may notice the read-only view watermark. This is to remind you that you can view the information but can not make changes to it.
You will not see this icon for rejected tasks, tasks that have been reset/reassigned/aborted by a tenant or workflow admin, or tasks that have been saved to your Task List.
You will only be able to view tasks that you have performed.
Let's say you submitted a Leave Approval Request to your manager and you want to view the information that you entered. You are not sure if your manager has approved it or if your request is pending your Manager's approval (pending state).
Here is how you find it:
- Login to your frevvo tenant.
- Click on My Tasks (or if you are using a frevvo space, click the Important Items tab, then Task List.)
- Click the Search icon
- On the "eave the default selection "Participant."
- Type a keyword from the name of the workflow you are looking for, i.e. "time". A list of possible matches appears. Select the correct one. Click Submit.

- Search for your task in the returned List.
- Click the Audit icon to display the Audit Trail. This will show you where the workflow is - in this case, it is still sitting at the Manager step waiting to be approved.

- Click the View icon to display the workflow step. This allows you to see all the information you entered when you filled out the form.

- Click the Audit Trail icon again to return to the Task List.
View a Screenflow Task
Screenflows are sequential workflow steps performed by the same user, and are considered one task. Screenflow tasks always display the ![]() View icon on the last screenflow step only, however, the task opens on the first screenflow step.
View icon on the last screenflow step only, however, the task opens on the first screenflow step.
Consider a New Employee Onboarding workflow with the following steps:
- Personal Information - New employee fills out their personal information
- Allowances - this step collects the new employee"s information for the federal W - 4 form
- I- 9 - this step collects the new employee's information for the federal I - 9 form
- Confirmation - the new employee reviews the entered data and confirms it is correct
- HR - the workflow is sent to the HR department to complete processing.
The new employee completes the first four steps and sends the workflow to HR for processing.

The Audit Trail will show the ![]() View icon on the step pending for HR. By default, the screenflow will appear as a single event in the Audit Trail.
View icon on the step pending for HR. By default, the screenflow will appear as a single event in the Audit Trail.

However, if you have Save on Navigate checked in the Workflow Settings, the Audit Trail will show a SAVED event for each screenflow step. This allows the user to return to the last completed step, even if they navigated away from the workflow. The View icon will be on the last step only but when clicked it will open the screenflow on the first task step.
The employee clicks the ![]() View icon and the workflow opens on the Employee Information step. The employee clicks the Next button to navigate through all four screenflow steps.
View icon and the workflow opens on the Employee Information step. The employee clicks the Next button to navigate through all four screenflow steps.

To return to the beginning of the screenflow from any of the viewed steps, use the navigation bar on the form or click the ![]() Audit Trail icon then the
Audit Trail icon then the ![]() View icon.
View icon.
Sue, an employee in the HR department, completes her workflow step. Sue searches and finds her completed task, clicks the Audit Trail then clicks on the ![]() View icon. Note, Sue only sees the View Icon on the the HR review step that she performed.
View icon. Note, Sue only sees the View Icon on the the HR review step that she performed.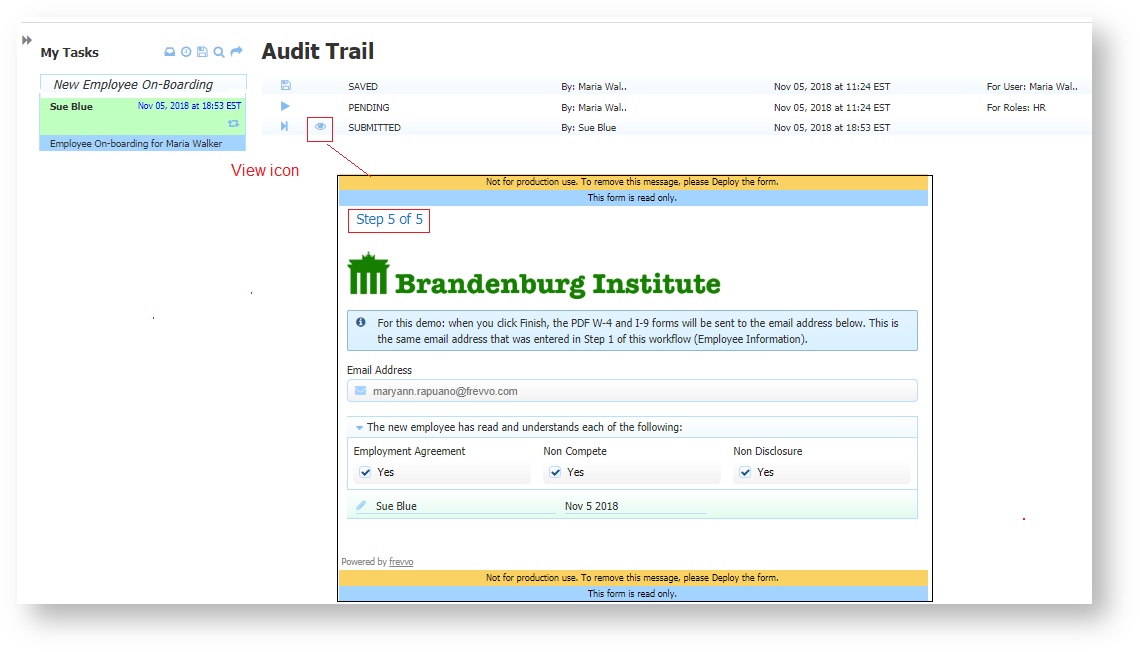
Workflow Design Tip
The View My Task feature eliminates the need to design workflows that send an Email with a PDF attachment after each step is executed to provide users with a way to keep track of submitted data. You can simply use the Task Search to find your workflow and then use the Audit trail to view the information you submitted.
Lock and Unlock a Task
A task becomes locked when you click the lock ![]() or perform
or perform ![]() icons. Perform auto-locks the task to prevent multiple people from mistakenly performing the same task at the same time. If you decide that you do not want to perform this task, click the
icons. Perform auto-locks the task to prevent multiple people from mistakenly performing the same task at the same time. If you decide that you do not want to perform this task, click the ![]() icon to return it to the role (ex: Managers).
icon to return it to the role (ex: Managers).
If a task is loaded from the task list but not submitted, the lock will be released when that user's frevvo session expires or the user logs out. You can set the Session Timeout in your in-house frevvo installation. Tenant Admins can manually end sessions using the Manage Sessions page.
Some tasks do not display lock/unlock icons. A workflow step assigned specifically to you, rather than a role, must be performed by only you. In this sense such a workflow is inherently locked for only you to perform. The same is true for saved forms and tasks. Saved forms must be performed, completed and submitted by the person that saved them. They cannot be unlocked back to a pool of users to complete.

Once a task is locked, all other users with this role can no longer perform this task. They will see the perform icon for this task is light blue to indicate that it cannot be clicked. If you hover over these icons to a tool tip with the username of the person who currently has this task locked displays. If a task is currently locked, the last entry in the Audit Trail will show who locked it and when. You can ask that person or your tenant administrator to unlock the task if you want to perform it.
Lock/Unlock on Mobile
To lock/unlock a task on a mobile device, touch the Edit button on the Task List.

Check the checkbox that appears to the left of the task. Touch Lock to lock the task or Unlock to unlock the task. This checkbox is not available for Saved Forms/Workflows.

A task that is locked by you displays a green dot.

If another user has the task locked, a red dot displays indicating you cannot perform it.

Modify a Task
Tenant/workflow admins and designer users have special modify permissions. They can:
- Reset a task to a prior step
- Abort a pending task
- Reassign a pending task to a different user
- Reassign a pending task to a different role
- Reassign to a different email address
Designer users, tenant admins or workflow admins click the ![]() Modify this Task icon to abort/reassign/reset tasks. This icon only appears on those user's task list.
Modify this Task icon to abort/reassign/reset tasks. This icon only appears on those user's task list.
Non-admin workflow participants have the ability to send the workflow back to a different step by clicking the Reject button. The designer can configure which steps the Reject button is available on, and which steps users can Reject to.
Resetting a Task
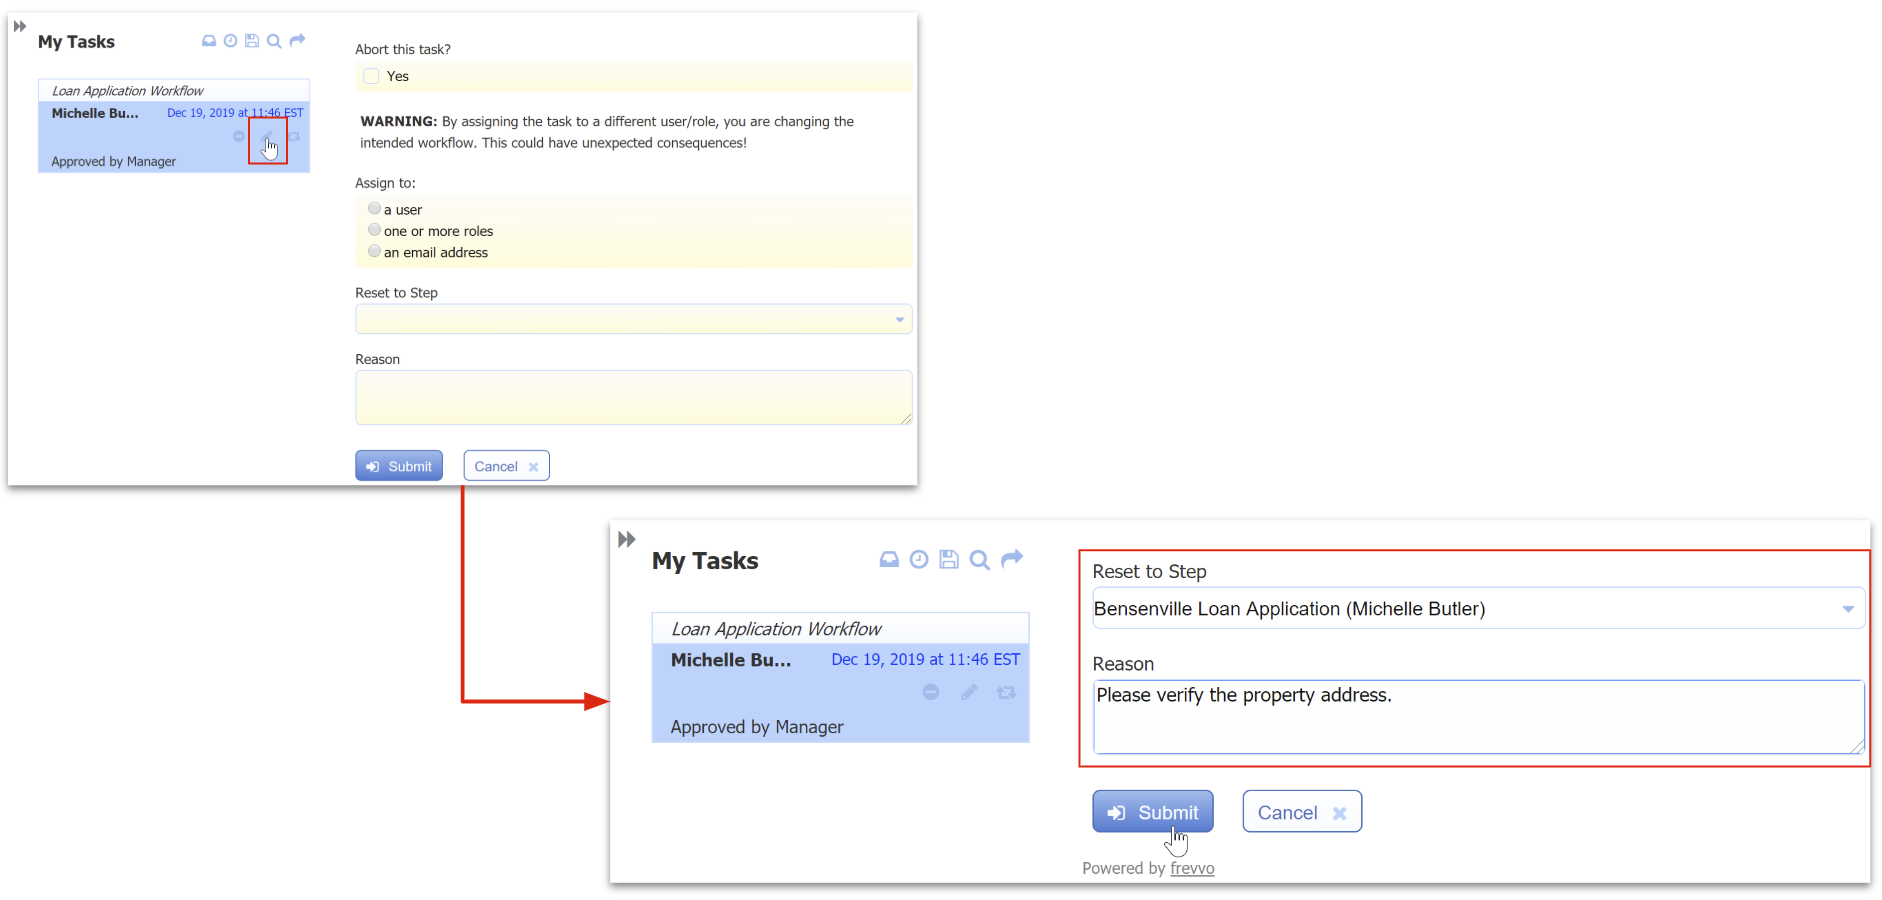
Resetting back to a prior step is useful when the person performing the current step needs to ask one of the people who completed an earlier step to review or fix a problem. For example, perhaps the manager Jerry sees that the property address is incorrect and needs to send the form back to the person who filled in the application.
Designer users and workflow administrators will see the ![]() Modify this Task icon when the task appears on their task list. The tenant/workflow admin/designer user performs a search to locate the task then click the
Modify this Task icon when the task appears on their task list. The tenant/workflow admin/designer user performs a search to locate the task then click the ![]() Modify this Task icon. Clicking the Modify this Task icon on a Saved task presents this screen without the Reset to Step section.
Modify this Task icon. Clicking the Modify this Task icon on a Saved task presents this screen without the Reset to Step section.
The screen shown below displays in all three cases. To reset (reject) a task:
Click on the
Modify this Task icon.- Select the step in the workflow that you want to send the task back to from the Reset to Step dropdown. To send the workflow back to the Loan Application step performed by the user (Sheila Wallace), jerry selects this choice from the dropdown. The sections of the screen for aborting and reassignment collapse.
Fill in the Reason for the modification. Click submit. The task disappears from Jerry's task list and appears on Michelle's task list.
The "Task Successfully Modified" message will display.
User Michelle receives an email informing that she has a new task for the Loan Application workflow. The email contains a link to her task list. She will have to log in to access it.
When a workflow is reset to a prior step that task will appear on the task list of the person that performed that step. Even if this step was configured to be performed by anyone with a given role (ex: Manager) a reset workflow task will appear only on the task list of the manager that previously performed that step.
In many real world workflows such as a loan or job application, the first one or more steps are often performed by people that do not have a user account in the frevvo tenant. You can send the workflow back to this person by selecting Assign to: an email address. All signatures in workflow steps along the way will be removed - the user will have to sign again. You cannot reset a task to a Summary Step.
Aborting a Task
Aborting a task removes it from all task lists. Aborted tasks can never again be performed or submitted so use this action with care. This action is permanent and cannot be reversed.
On occasion, there may be a reason to abort a task. Only the tenant admin, workflow admin or designer user can abort a task. The modify and abort icons only appear on these users' task list.
There are two ways to accomplish this:
- Click the
 abort this task icon
 Click the
modify this task icon, then check "Yes" for Abort this task? 

The tenant admin must perform a search to locate the task then click the ![]() abort this task icon.
abort this task icon.
Clicking abort this task displays the following message to confirm the abort:

The warning message will not be displayed when you abort a task in the ![]() modify this task dialogue. However, the abort action performed this way is still irreversible.
modify this task dialogue. However, the abort action performed this way is still irreversible.
A task can also be aborted by checking the Abort this task checkbox after clicking the ![]() modify this task icon for that task. Checking "Yes" for the Abort this task question collapses the Reset to Step section. A required reason for aborting the task must be entered before clicking Submit. The reason will be visible in the audit trail.
modify this task icon for that task. Checking "Yes" for the Abort this task question collapses the Reset to Step section. A required reason for aborting the task must be entered before clicking Submit. The reason will be visible in the audit trail.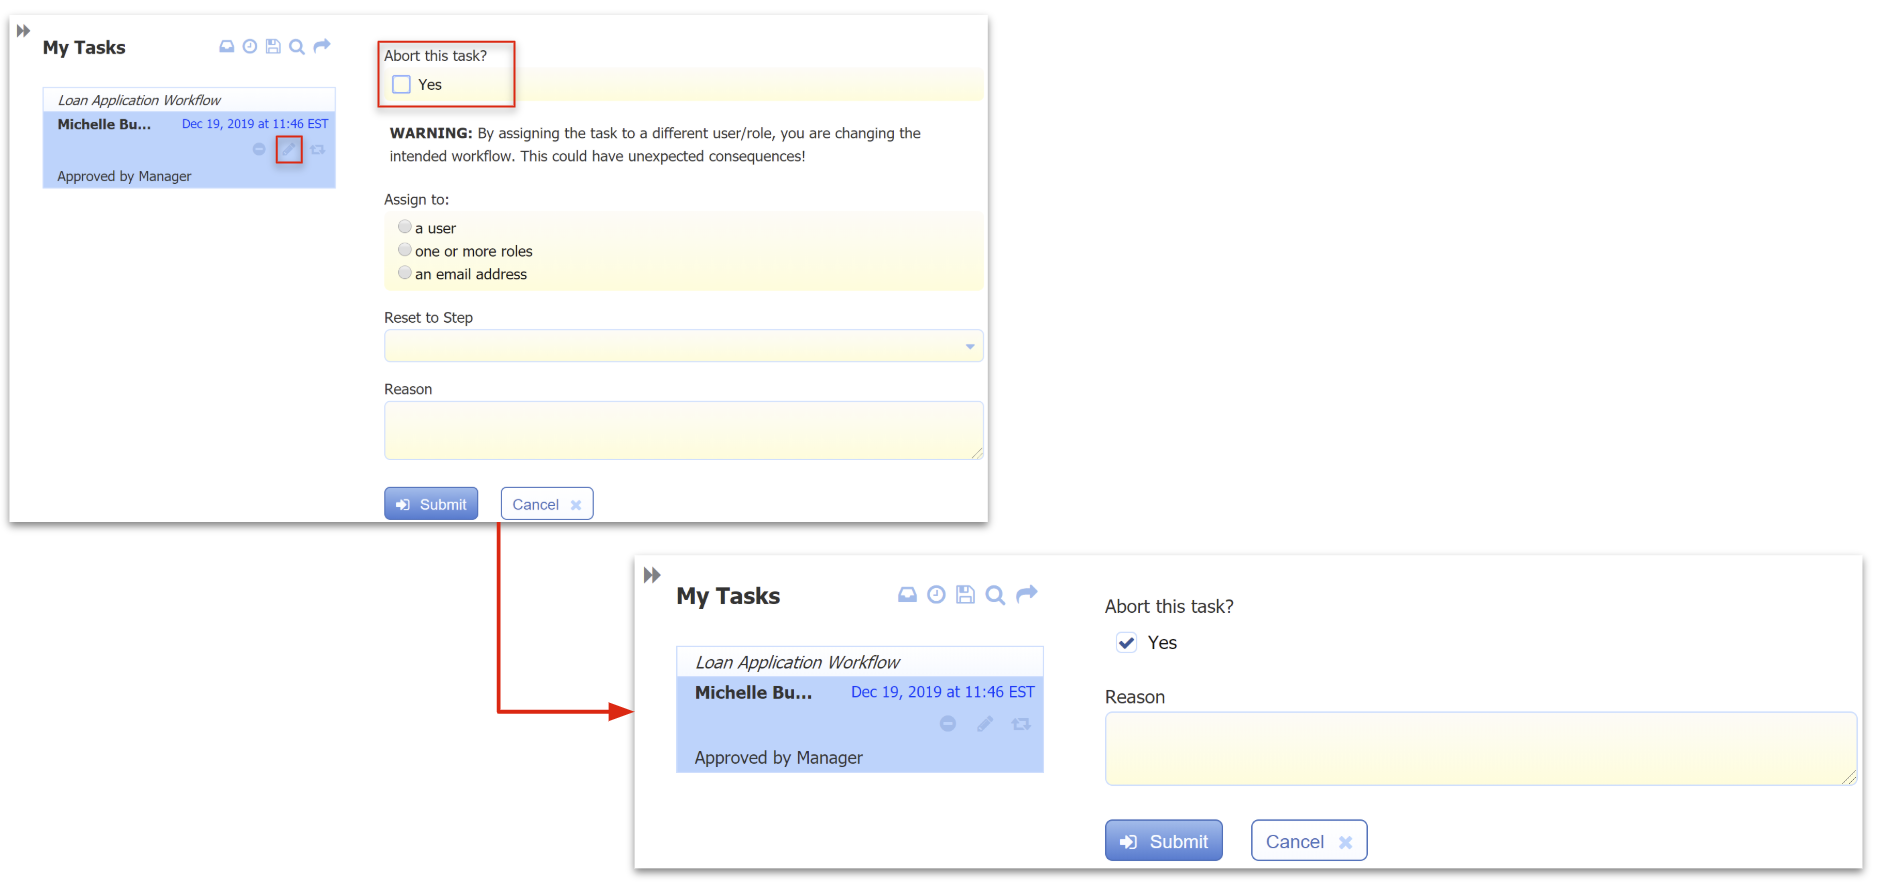
Reassigning a Task
Reassigning a workflow task to another user/role can be done automatically via workflow escalation or performed manually by administrators. Tenant/workflow admin users can modify both workflows and saved forms. This gives the admin the ability to move a saved form or a pending workflow step from one user's task list to another.
Admins should use caution when reassigning a workflow task to another user or role. It is possible to change the workflow in a way that may have been unintended by the person that designed/created the workflow, including giving users permissions to view and edit steps they were not intended to have permission on. This is why only the tenant/workflow admins have the permission to reassign to a specific user or role.
It is not possible to reassign a task that is in the WAITING state to another user.
Assign to User
Imagine that Sally in the mortgage processing department was working on a mortgage application and had saved the loan form. Sally then left for a week vacation. The tenant admin can login and search for all forms saved by Sally. Workflow administrators can search for all saved forms associated with the mortgage application workflow. Here we see the loan application task she was working on.

The tenant/workflow admin clicks the ![]() icon. To move this saved form to a different user's task list, enter the user id of the the person you want to assign it to by checking the user choice radio button in the Assign to: control. Type a username in that field and all users beginning with the letter you have entered appear as dropdown choices. Enter the reason for the reassignment in the Reason field and click submit. In the image below the workflow admin, Jerry has reassigned the task to the username jill.
icon. To move this saved form to a different user's task list, enter the user id of the the person you want to assign it to by checking the user choice radio button in the Assign to: control. Type a username in that field and all users beginning with the letter you have entered appear as dropdown choices. Enter the reason for the reassignment in the Reason field and click submit. In the image below the workflow admin, Jerry has reassigned the task to the username jill.
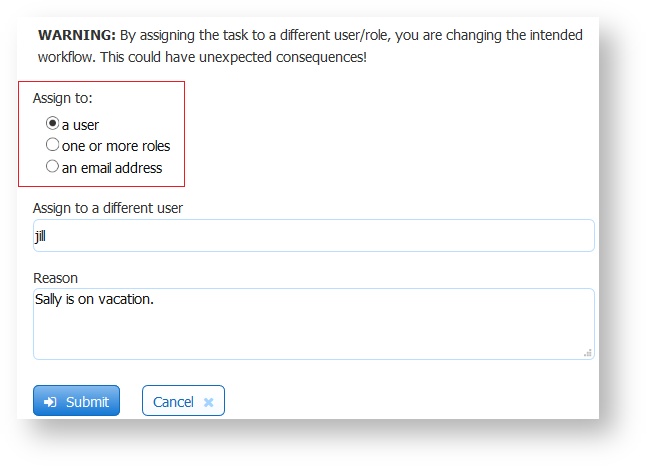
Now when Sally next logs into her frevvo account she'll no longer see this saved form on her task list. When the user jill logs into frevvo she will see Sally's saved form on her task list and can perform, complete and submit the form.
Assign to Role
The tenant/workflow admin can also move a saved form or any saved or pending workflow to one or more roles. In the example above imagine that the user jill is also unavailable. The tenant/workflow admin can again search for the loan application form saved by Sally and click modify but this time check the one or more roles radio button then select a role from the Assign to a different role dropdown. Click the ![]() plus icon to select multiple roles.
plus icon to select multiple roles. 
The saved form will appear on the task list of all users that have that role(s).

Notice that the task history now shows that the form is pending for any user that has the role Processing. Also notice that unlike typical saved forms this task now displays the lock icon which enables one user to lock the task so they can complete this form later.
Assign to Email Address
Tasks assigned to an email address performed by anonymous users can be reassigned to a different email address by the Tenant/workflow admin. Imagine a Purchase Order workflow that is filled in by a Sales person in your company and is then sent to the customer for approval/signature. The customer receives an email with the link to the task to be performed but does not act on it. The Sales person is informed that the original recipient is leaving the company and is provided with the email address of the new person with authority to approve/reject the Purchase Order.
Tenant/workflow admins can reassign the workflow step to a different email address by:
- Searching the workflow to locate the task.
- Click the Modify this Task icon.
- Check email address in the Assign To: field
- Provide the new email address and a reason
- Click Submit.

A "Task Successfully Modified" Message displays.

An email is sent to the new email address with a link to the Approval step of the workflow. If the original recipient clicks the link in the email that they received, they will see a message informing them that the submission has already been processed.
The Audit Trail shows the original and reassigned email addresses.

- The ability to reassign a workflow step to another email address is not available for workflows created in earlier releases that contain an Email/Anonymous Task step.
- The PENDING status shows as WAITING in the Audit Trail for workflows designed with an Email/Anonymous Task step.
Searching the Task List
Click the ![]() icon to search for a form you have saved and want to continue or that you have submitted in the past, or to search for a workflow you have participated in.
icon to search for a form you have saved and want to continue or that you have submitted in the past, or to search for a workflow you have participated in.
The Task Search history only displays forms and workflows which have the Show in History property enabled. This property is configured by the form or workflow designer. If you don't see a form appearing in your history, contact your tenant administrator or the workflow designer and ask them to enable this feature.

You can only search for tasks of one form or workflow. You can search for tasks by:
- A specific date range when you performed that task
- Tasks with a particular Submission status
- Tasks that ended with errors.
- Tasks that meet the criteria specified by Fields in your form/workflow, the selected Condition and the value entered in the Value column
- Customized filter condition logic
Role
Start your search by choosing your role in the workflow you are searching. A Participant is someone who is assigned or completed any step of the workflow. A Workflow Admin is a user who has "Administer the Workflow" Access Control. The default selection is Participant.

Submission Status
Here is an explanation of the available states:
- SAVED: This will return only those tasks which were created when users clicked the Save button on the form/workflow to save their partially filled forms
- PENDING: This will return all tasks which are pending, meaning someone else put these tasks in the users task list
- SUBMITTED: This will return all tasks which are completed, i.e. the form/workflow for which this task was created has been submitted
- ABORTED: This will return all the tasks that were deleted/aborted so the form/workflow never got submitted
- WAITING: The WAITING status can be used to find workflow tasks that have an HTTP activity. Workflows designed with the pre-v8 Email/Anonymous Task step will also show the task in a WAITING state.
Note the Submission Status checkboxes which are all checked by default. Uncheck the checkbox to the left of one or more submission statuses if you want to exclude those tasks from the search result. For example, let's say you have a workflow that generates a lot of task activity that may be cancelled at some point. Simply uncheck the ABORTED check box and aborted tasks will be excluded from the search results. Conversely, if you only want to see ABORTED tasks, uncheck the SAVED, PENDING, SUBMITTED, and WAITING checkboxes. You can select more than one status for your search criteria.
If all the Submission Status boxes are unchecked and the Submit button is clicked, the following warning displays:
This message will clear if you click the Reset button.
Filter Form or Workflow by data
You must select a form/workflow for the Filter Form/Workflow by data table to appear. This table allows the selection of fields in your form/workflow as search criteria. The set of fields available in the Field column of the table displays the Searchable Fields configured for the selected form/workflow. Metadata fields are not included. You can specify up to 100 rows of filter criteria.
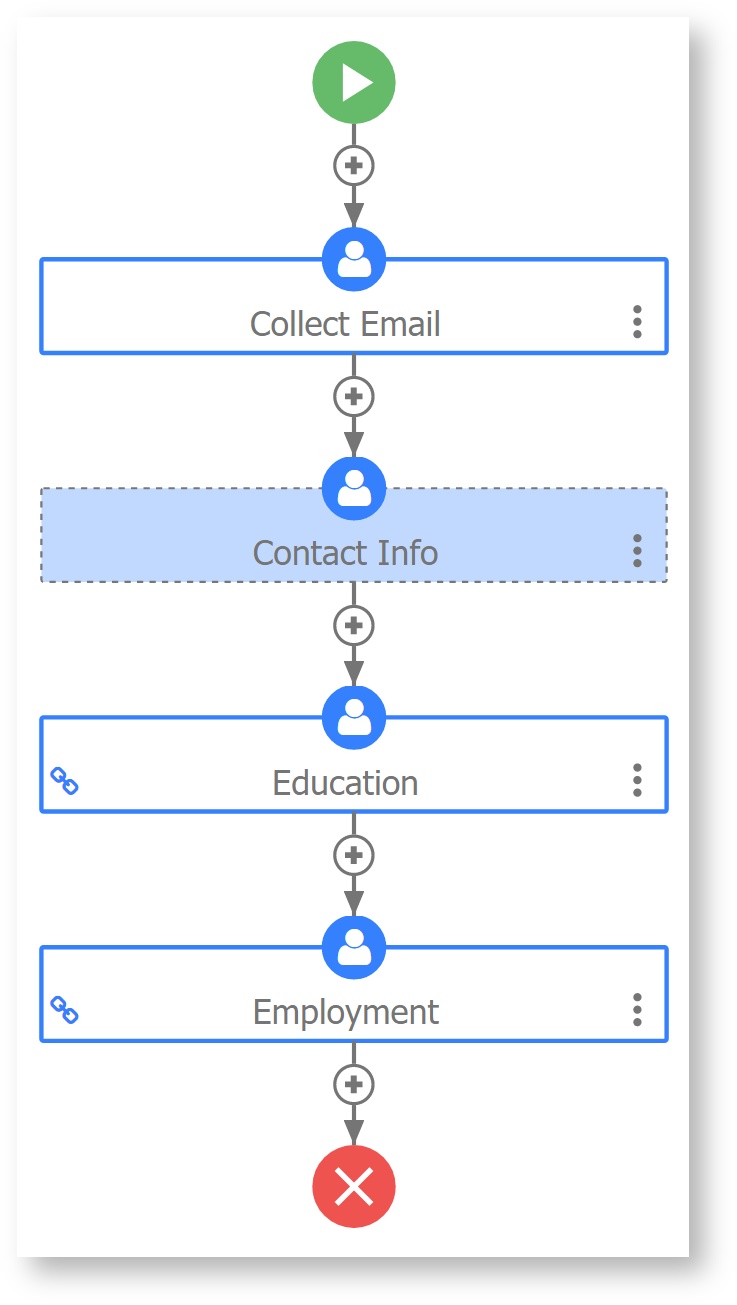
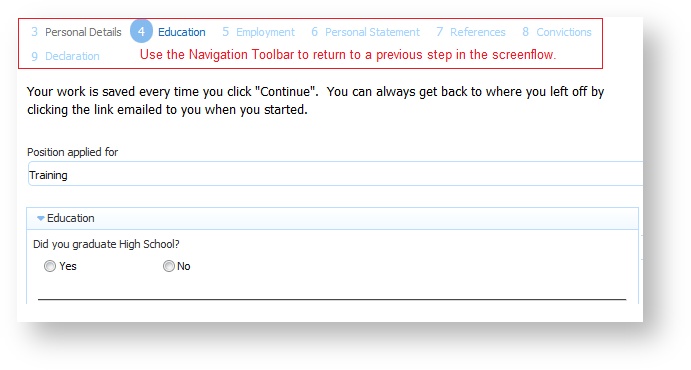
Let's consider a Job Application workflow with the following requirements:
- The workflow is going to be performed by anonymous users. Anonymous users do not sign in to frevvo.
- The anonymous user receives an email that includes a link to the workflow.
- The workflow must collect a lot of information from the applicant: Contact Information, Education and Employment history, References and more. You can create one long form or design a screenflow with an Anonymous Task step and subsequent steps as separate screens to collect the information.
- The user must have the option to compete the screenflow in multiple sessions. Clicking on the email link takes the user back to the last step in the screenflow where the Continue button was clicked.
- The user must be able to navigate back to previous steps to review or update information that was previously entered.
Workflow Designer
- Step 1 of the screenflow has a field named EmailAddress that collects the applicant's email address.
- Step 2 is assigned to an email address. This is the first step that is performed by the anonymous user.
- All remaining steps in the screenflow are designed to collect the applicant's information: Contact Info, Education and Employment history, references etc. Remember, the anonymous user does not login to perform these steps so they cannot have a role, dynamic role or user property assigned to them.
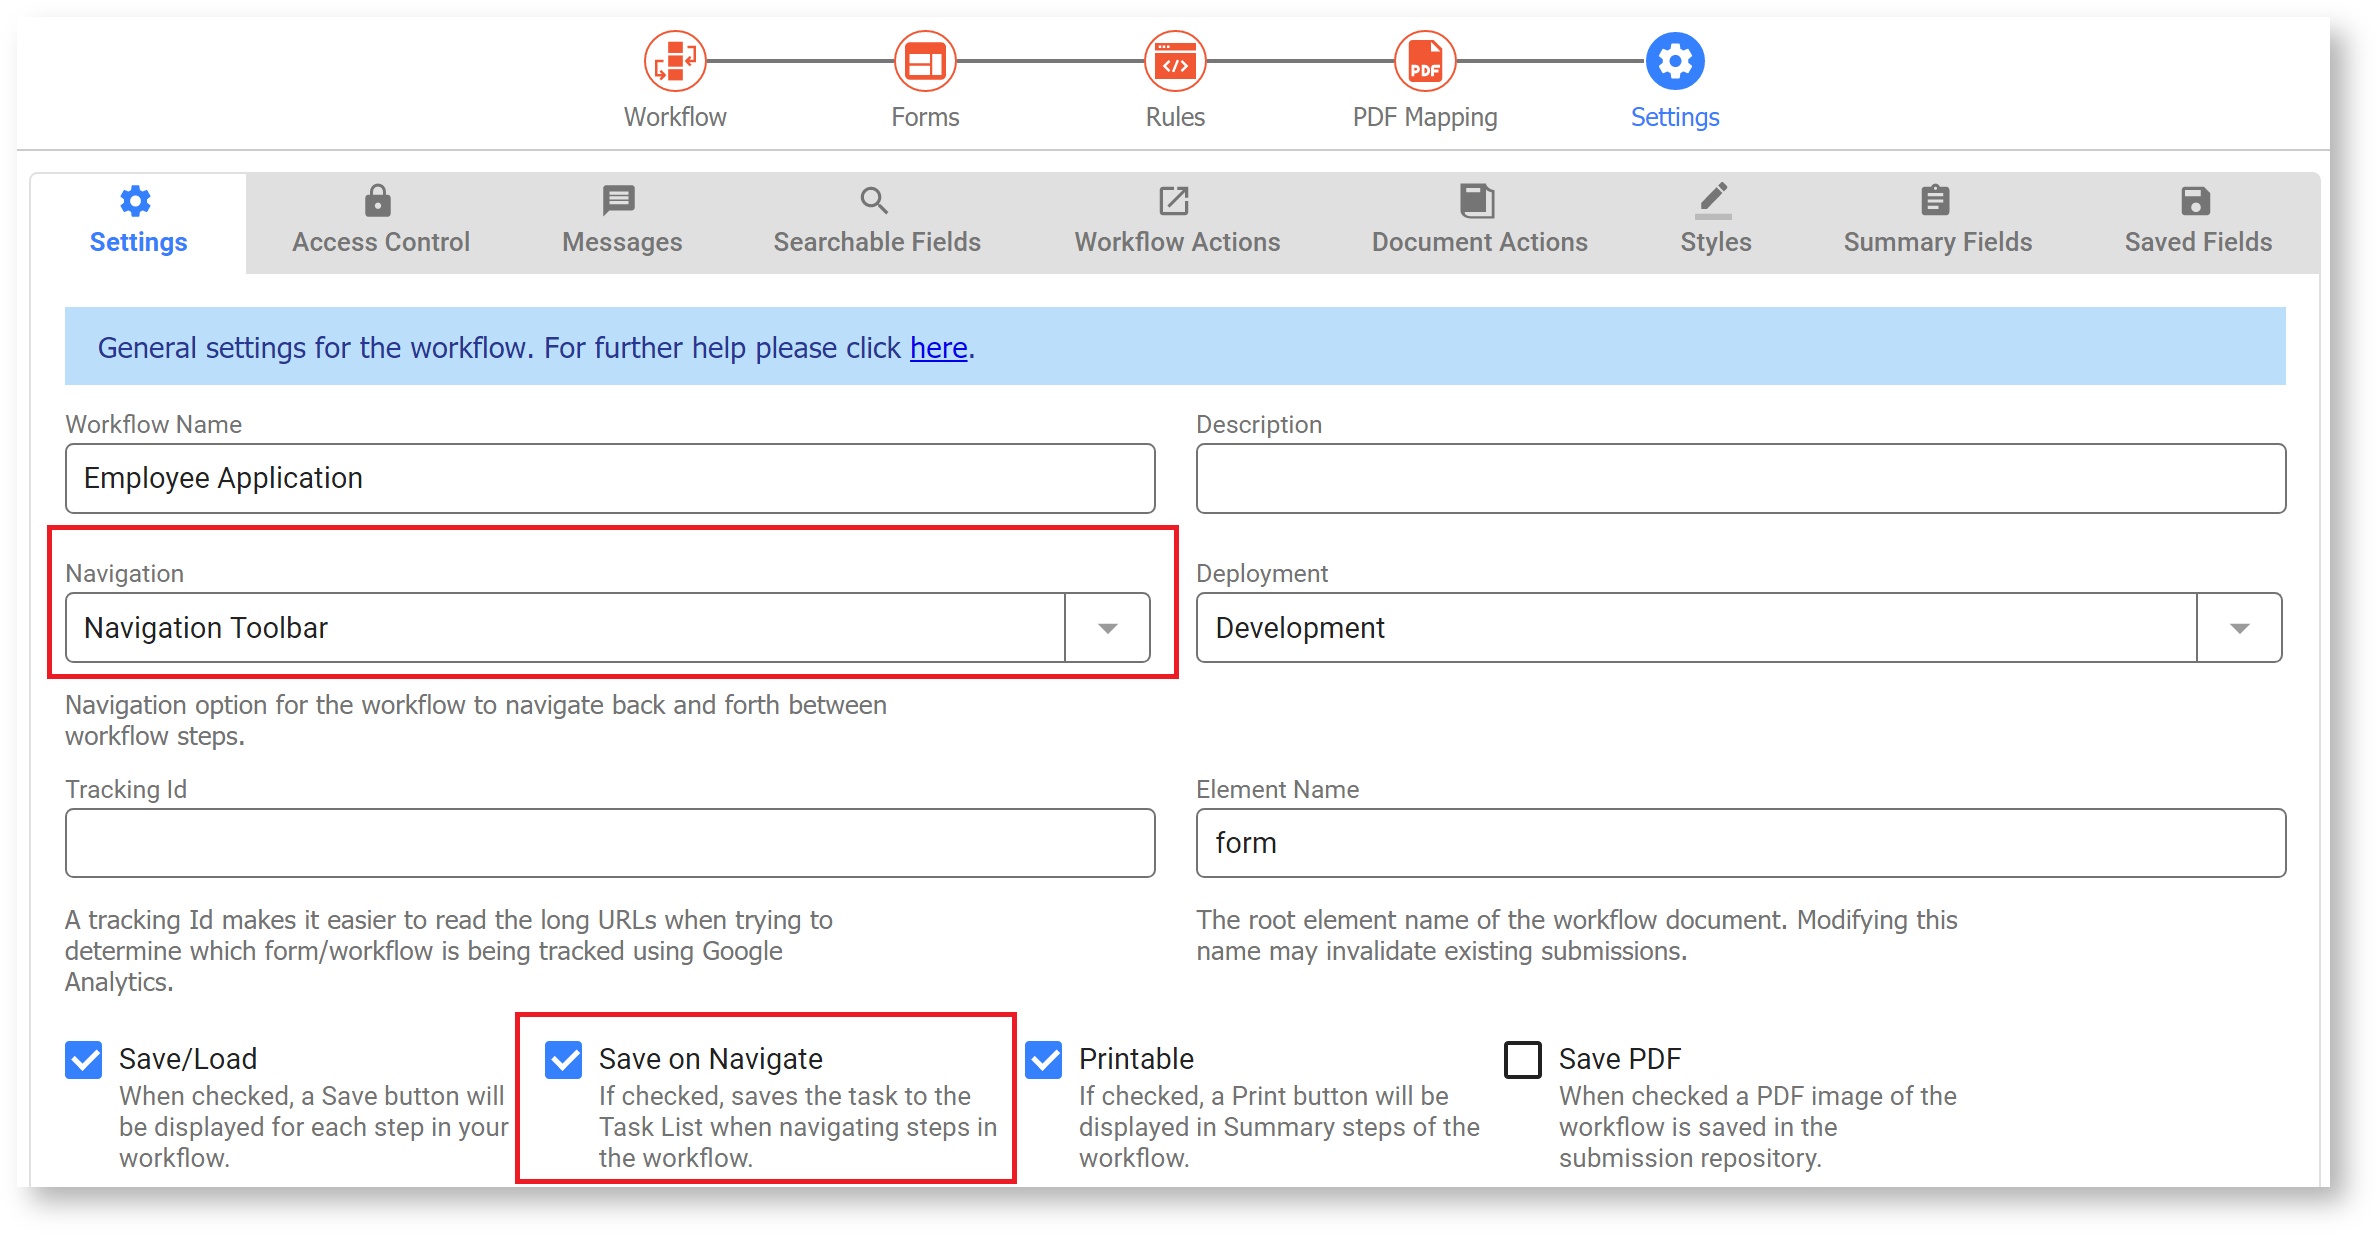
- The Save on Navigate checkbox is checked and the Navigation Toolbar is configured.
The image shows an example of a possible screenflow design:
Use Mode
Anonymous screenflow users return to a previous step by clicking on the Navigation Toolbar..
The Filter Form/Workflow by data section of the Search screen allows you to optionally setup additional search criteria using the Searchable Fields configured for the form/workflow. The Condition column provides the available conditions based on the type of field, and the Value column allows you to enter matching values. The filter logic can be edited using AND and OR, etc.
Condition Column
The Condition column choices depend on the data type of the selected field. The data types and their corresponding options are shown in the table.
| Data Type(s) | Conditions Available in the Dropdown List |
|---|---|
| Date, Time, Date/Time | is equal to |
| is not equal to | |
| is after | |
| is before | |
| is on or before | |
| is on or after | |
| is within last | |
| contains a value | |
| does not contain a value | |
| Number, Money, Quantity | is equal to |
| is not equal to | |
| is greater than | |
| is less than | |
| is greater than or equal to | |
| is less than or equal to | |
| contains a value | |
| does not contain a value | |
| Text, TextArea, Email, DropDown, Radio, Checkbox | contains |
| does not contain | |
| begins with | |
| ends with | |
| is equal to | |
| is not equal to | |
| contains a value | |
| does not contain a value | |
| Boolean Checkbox | is equal to |
Value Column
The values entered into the Value Column depend on the field type and also sometimes upon the condition chosen. The allowed values for Field Type(s) and conditions are listed in the table.
| Field Type | Condition | Value Entry Field Type | Notes |
|---|---|---|---|
| Date | Any except 'is within last' | Date Picker | |
| Time | Any except 'is within last' | Time Entry | |
| DateTime | Any except 'is within last' | Date and Time Picker | |
| Date, Time, DateTime | 'is within last' | Special time duration entry field. | Enter a duration in Years:Months:Days:Hours:Minutes. Any field to the left may be omitted. For example, 2 days and 4 hours may be expressed as 0:0:2:4:0 or as 2:4:0. |
| Number, Money, Quantity | number field | ||
| Text, TextArea, Email, DropDown, Radio, Checkbox | Text field | ||
| Boolean Checkbox | drop down containing true and false options |
For Example, if you select a Date field, the Date Picker is provided to help enter the value. If you select a Text field from your form/workflow, you will be prompted to "Enter text".
A Date, Time or Date/Time field with the "is within last" condition selected, requires a special time duration entry. The duration must be entered in this format: Years:Months:Days:Hours:Minutes. Fields to the left may be omitted. For example, if you were searching for tasks performed in the last 2 hours you can enter 02:00 or as 2:0. To search for tasks within the last 2 months and 12 days, enter 02:12:00:00.
If you enter an invalid value, an error will display with instructions:

Editing the Logical Expression
If you want to modify the logical expression, click the Edit button. The logic expression becomes editable.
The Logic Expression allows you to customize and combine the filter conditions using ANDs and ORs as well as parenthesis () to group terms of the expression.
- Each filter item (expression) is represented by a letter (A for the Date range or B for the State or a number that corresponds to the row of the sub-expression in the Other Filter Items grid).
- Combine the letters and numbers using parenthesis to group items as needed.
- Build the logic of the overall predicate expression using AND and OR as appropriate.
- Click save when done to save the expression. Please correct any indicated parse errors in order to save.
Searches are initialized with the data entered as part of the previous search performed in the current web session. The one exception to that is the Filter Form/Workflow by data table which will always start out empty.
The Reset button clears all filter fields with the exception of Submission Status which is reset to all checkboxes checked.
Task List Search Example
The image shows an example of a Task search screen and the results displayed. Manager Jerry is searching for:
- Tasks in all submission states for Simple PO Workflows for companies named Alpha or Bravo.
- There is a field in the Simple PO Workflow named ClientName that has been set up as a Searchable field.
- The Purchase Order Workflow is selected from the Form/Workflow search box (type in a keyword, then select from matching options).
- The field named ClientName is selected from the Field dropdown.
- The condition for the ClientName field is contains.
- A value of Alpha is entered in the Value column on the first line.
- Jerry clicks the
 icon and adds another line where the value of the ClientName field is Bravo.
 - Jerry clicks the Edit button and changes the logical expression from 1 AND 2 to 1 OR 2 and clicks Save.
- He can also select the Start and End Dates and verifies that all the submission status checkboxes are checked
- He clicks Submit.

The results show a Simple PO Workflow for each company currently in a pending state. Checking the Audit Trail reveals that the task is on his Task List and is locked by him.

Workflows only appear in your search results if you performed one or more steps in the workflow. Workflows will NOT appear in your search results just because it was at one point in time on your task list but was performed by a user other than you. For example if a workflow is on your task list because you have the role (ex: Managers) to which a particular workflow step is assigned, but this step is performed by another user with that role, then this task will not appear in your search list.
When you click the Submit button, the Search Results will display. You may notice the![]() Refresh icon is no longer visible. This is as designed. There is no Refresh capability available for Search results. When you click the Cancel button, you will be asked to confirm and then see the message "Your search was cancelled" after clicking OK.
Refresh icon is no longer visible. This is as designed. There is no Refresh capability available for Search results. When you click the Cancel button, you will be asked to confirm and then see the message "Your search was cancelled" after clicking OK.
If no matching tasks are found as a result of your search, you will see this message:

By Tenant Admin
The tenant admin user is able to search for tasks that were performed by other users. The search history form for the tenant admin has several additional search criteria fields. Tenant admins will not see the "Find tasks for which I am..." radio control.
Select a Form/Workflow from the search box (type a keyword and select from matching options) and the Filter Form/Workflow by data table becomes visible and enabled. The Filter Form/Workflow by data topic explains how to set up filters using form/workflow fields.

The tenant admin search screen includes an additional For Admin User Only section. This section gives the tenant admin the ability to search tasks by user name, tasks by a particular user in a locked state and all locked tasks
One very common function is to search for tasks that are locked by a particular user so that the admin can modify them and reassign them to another user or role. For example, you might search by a user if that person goes on vacation and you need to move a saved or pending form or workflow to another user.
Leave the Locked by User field blank and check the Show only Locked Tasks to view all tasks locked by users.
By Workflow Admin
Users that are designated as Workflow Admins for individual workflows see this screen when they click the ![]() Search icon. When searching for tasks, if a workflow is chosen, and the user is a workflow admin for it, then all tasks for that workflow display. If no workflow is selected, then all tasks, even those that the workflow admin has not participated in, plus tasks for which the user is a workflow admin will display.
Search icon. When searching for tasks, if a workflow is chosen, and the user is a workflow admin for it, then all tasks for that workflow display. If no workflow is selected, then all tasks, even those that the workflow admin has not participated in, plus tasks for which the user is a workflow admin will display.

Embedding Your Task List
The task list can be made conveniently available in your own web site. By embedding the task list you can access your tasks without having to login to the frevvo web UI directly. This gives the feel that the task list is part of your company portal. To do this click on the ![]() Embed icon and copy the task list embed script into your web page.
Embed icon and copy the task list embed script into your web page.

Here is how an embedded tasks list looks. Even when embedded, the task list is always protected by a login dialog. So if you have not already authenticated to frevvo you will be prompted to enter your frevvo username and password. The login then automatically redirects each person to their own personal task list.

LDAP SSO customers must make one change to the script to successfully embed the Task List in your website. Replace the {tn.id} in the script with your tenant id. The example shows a modified script for a tenant named ldap:
Original script:
<script src="https://app.frevvo.com:443/frevvo/web/embed?resize=true&container=true&border=false&url=https://app.frevvo.com:443/frevvo/web/tn/{tn.id}/subject/{subject.id}/tasks%3fembed=true%26container=true%26resize=true"
type="text/javascript"></script>
Script modified with tenant name:
<script src="https://app.frevvo.com:443/frevvo/web/embed?resize=true&container=true&border=false&url=https://app.frevvo.com:443/frevvo/web/tn/ldap/subject/{subject.id}/tasks%3fembed=true%26container=true%26resize=true"
type="text/javascript"></script>
If embedding the task list successfully into an HTML page requires setting its width, see URL Parameters for more details.
Curly Braces in URLs for Embedded Forms, Workflows or Task List
Tomcat 8.5 doesn't allow curly braces in URLs since they are not valid URL chars and deemed a security vulnerability. frevvo currently support parenthesis as well as curly braces. However, if you are embedding forms, workflows or the Task List in your website, change the markup to use parenthesis (). Support for curly braces {} will be dropped in a future release.