| Tip |
|---|
Looking for a section on this page? Hover your cursor over the Table of Contents icon |
...
When you click on any step in the workflow, a series of action icons displays depending on the step type.
- Properties displays tabs to set up Settings, Assignment, Messages, Rejection, Precondition, Escalations, Emails, Web Hook, Quick Approval and Geo Location.
- Edit form takes you to Forms editing mode for the form or parent form of a linked step.
- Download Step allows you to download the step of the workflow as a standalone form. You may want to do this if you update the step in the workflow designer and you want to keep your Forms and Workflow libraries in sync.
- Delete removes a step in a workflow. You will be asked to confirm the deletion.
Summary and HTTP steps only display the Properties and Delete options.
Step Properties Wizard
The Step Properties wizard opens when you click on a workflow step or select Properties from the step's action menu. The workflow outline will slide left but stay visible, and the Step Properties tabs will appear. You can close the Properties wizard by click the X just above it.
...
- You can navigate between tabs and between Guided Designer editing modes as you make edits, and your changes will be temporarily saved. Click the
Save to permanently save your changes and continue working.
- You can switch between steps while remaining on the same properties tab. This may be helpful when making lots of similar changes to workflow steps, such as changing the Task Info message for every step of a workflow.
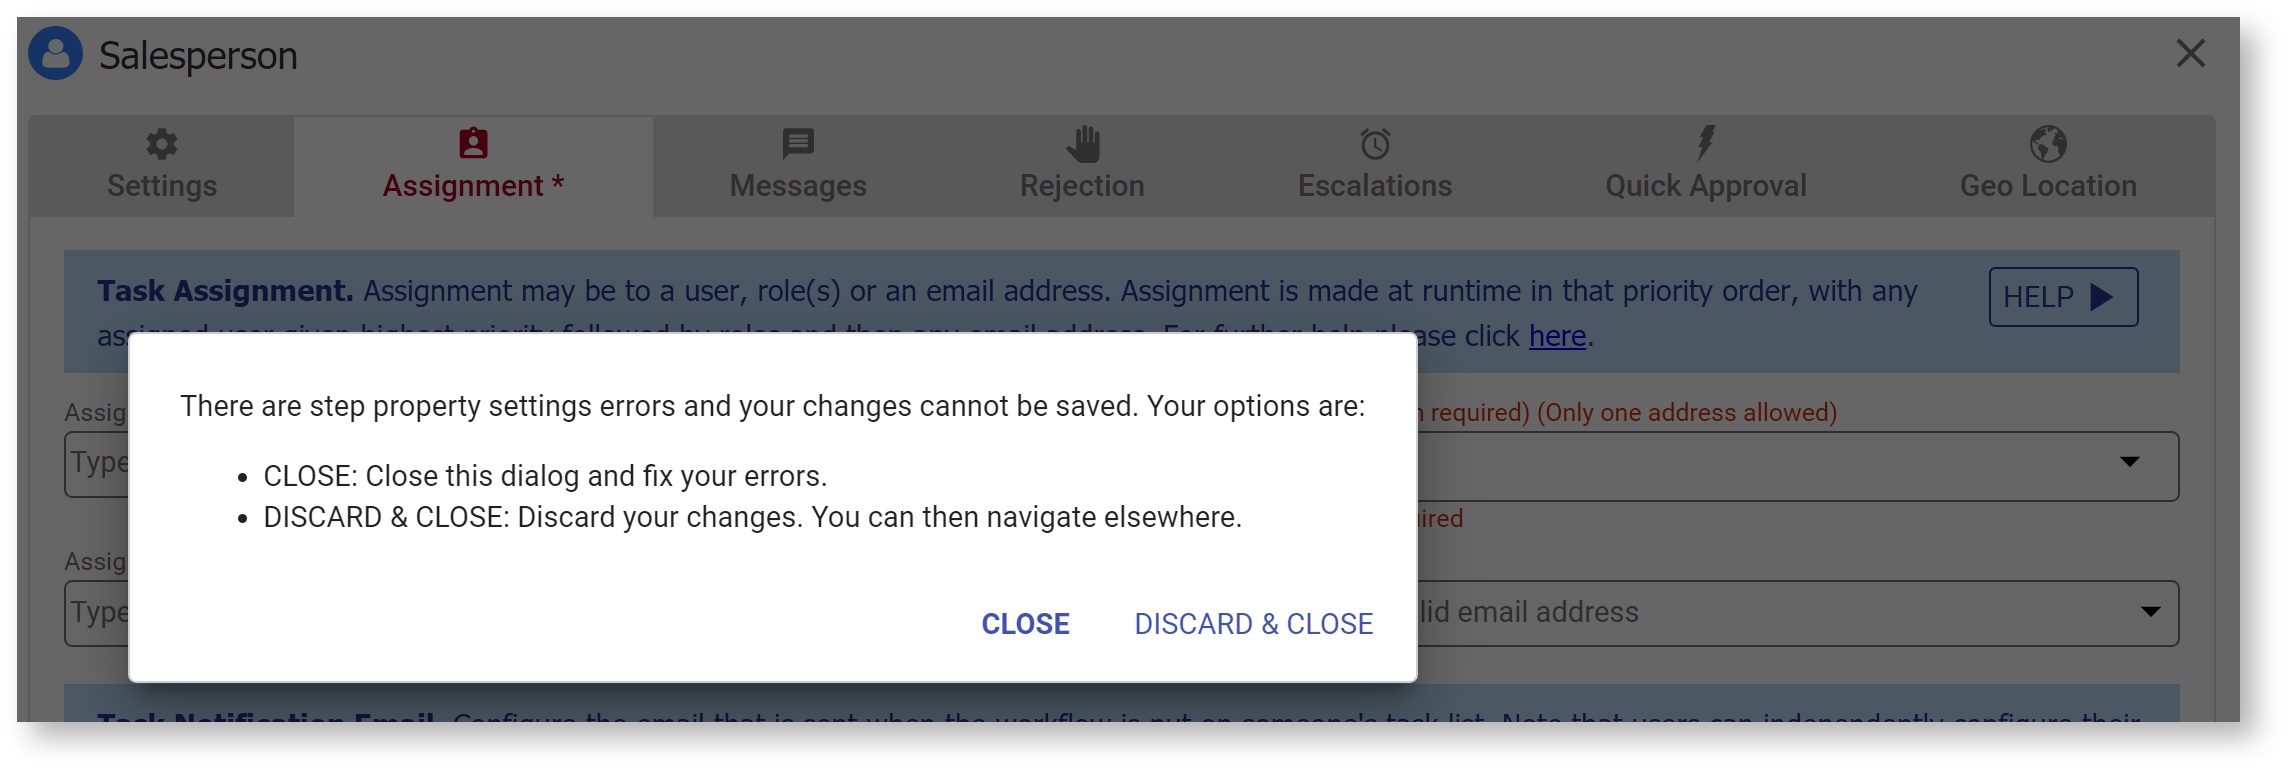
- will validate the Property Settings when you save. If a property value is invalid, the tab(s) will not close and a message will display with two options.
- CLOSE: Close this dialog and fix your errors. Your changes will be saved, but you must correct validation errors shown in order to proceed.
- DISCARD & CLOSE: Discard your changes. You can then navigate elsewhere. Note that this discards all changes made in the properties settings, not just the validation errors.
- The screen will stay on the current tab if there is a validation error. Otherwise, another invalid tab will be auto selected (starting from left to right) if another tab needs attention. Tab labels with invalid entries display in red.
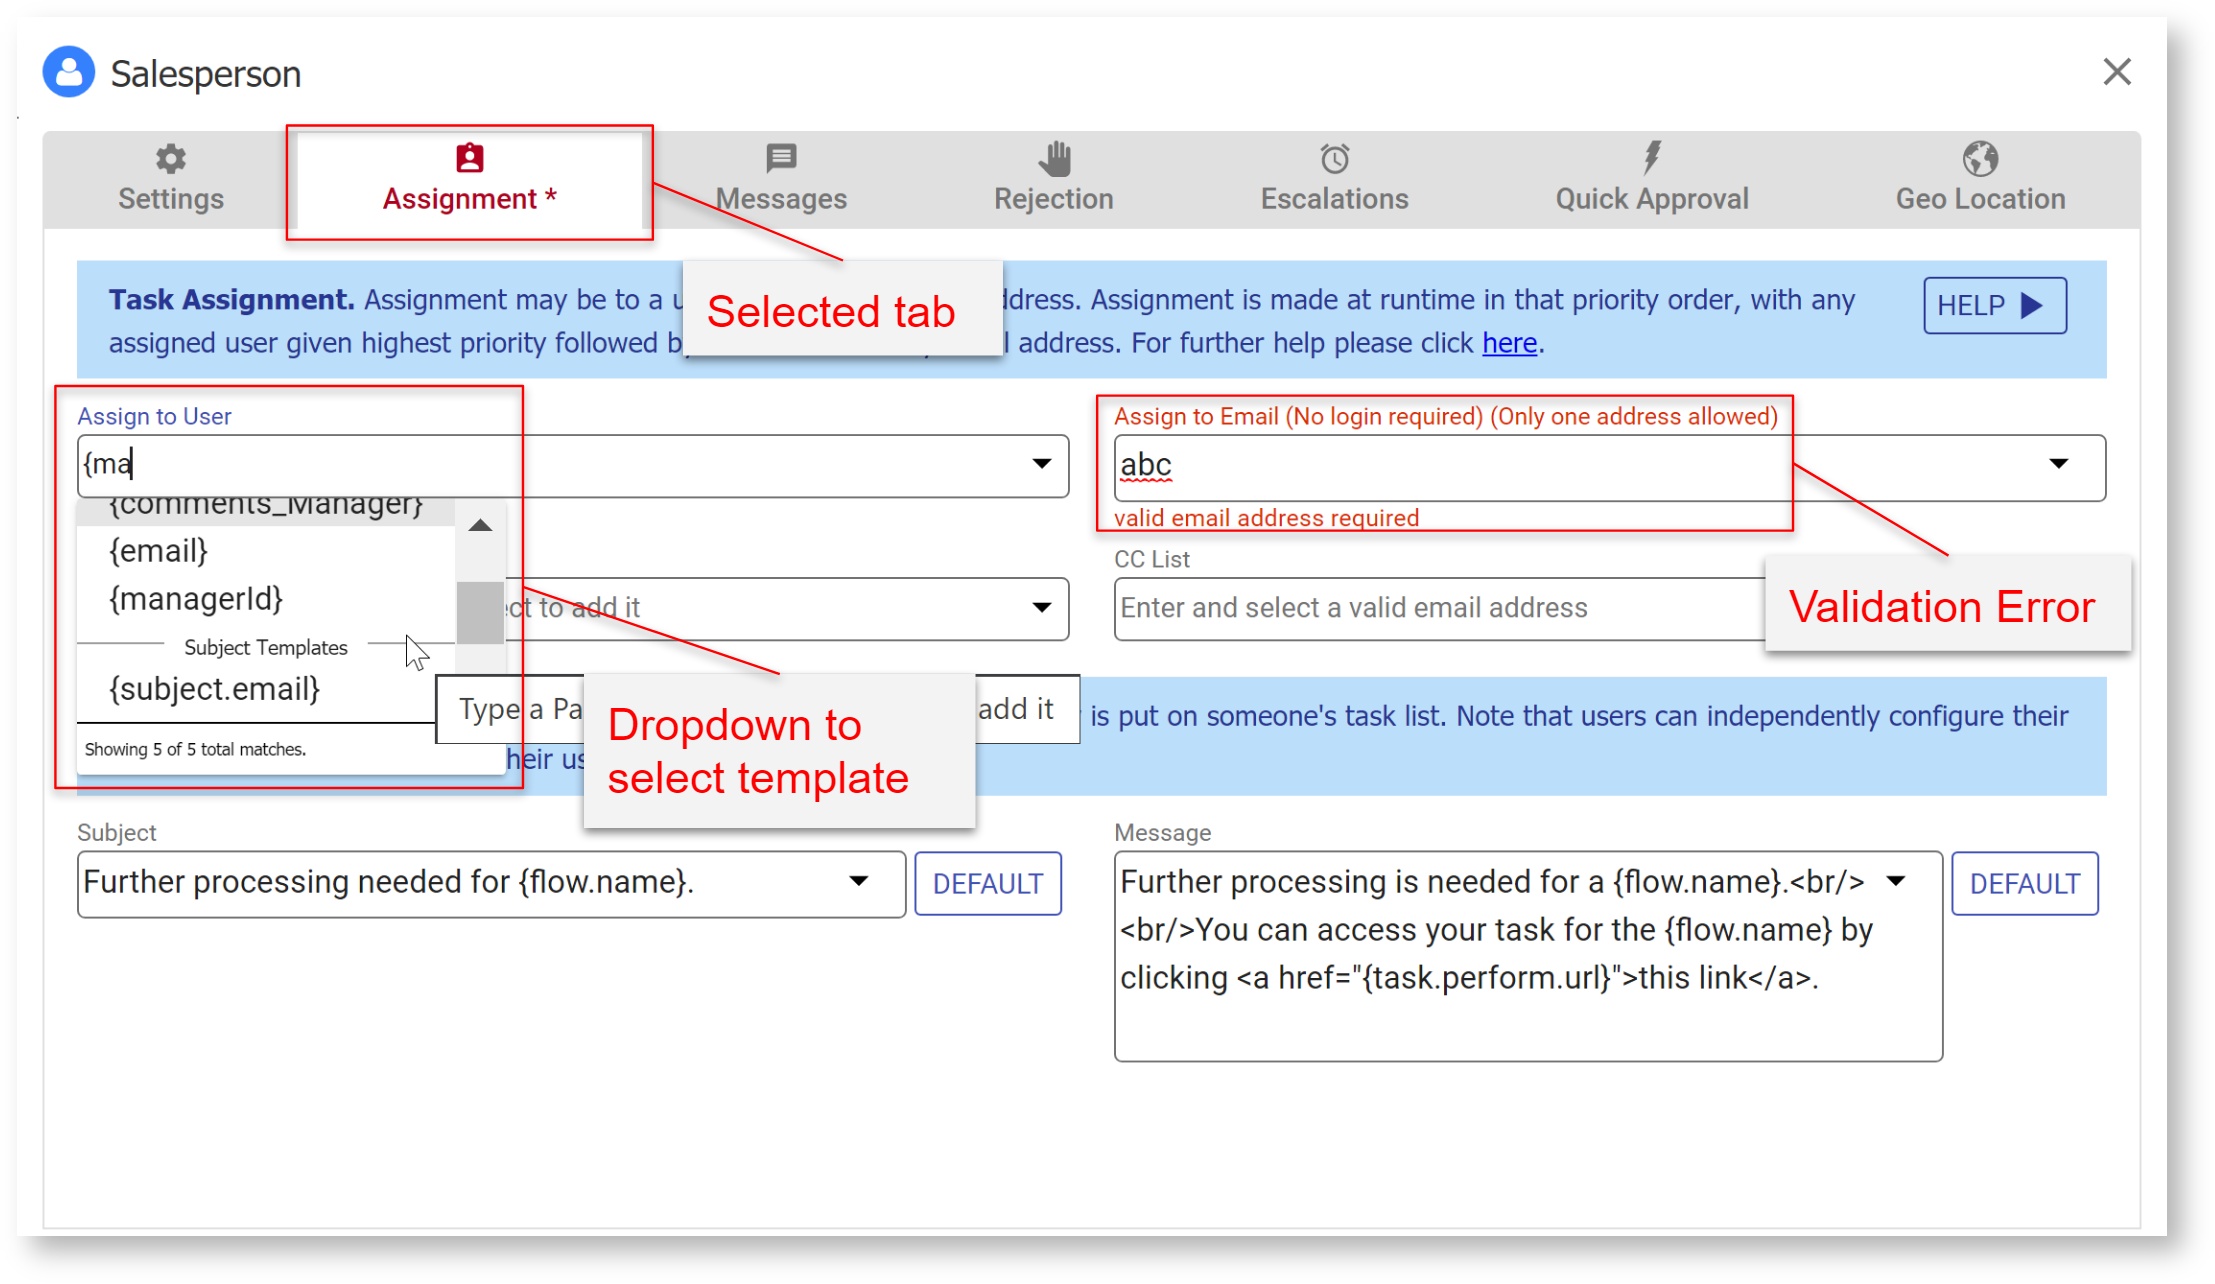
- Hover over any field on the Properties tabs to see a helpful hint providing information about the property. Some fields contain instructions to guide you.
- Clicking on the
- In some cases, you can type ahead to narrow down the list. Use the up/down arrows, the Enter key or click an option with your mouse to select an option. Use the Backspace, Delete or click the x on a selected property to delete it.
- Typing a opening curly brace into some fields, followed by the name of a control, show a list of the fields in your workflow that match the entered text and will be added to the field as a control template.
- On some tabs, you may have to slide the
Each step property setting is described below.
| Tip |
|---|
Click the |
...
Built-in workflow templates
- {flow.id} - The unique workflow instance id. This id is unique for each workflow submission.
- {flow.type.id} - The unique id associated with a given workflow. See Sharing Forms.
- {flow.extid} - Client defined extId passed in the formtype Url parameter.
- {flow.name} - The name of the workflow.
- {flow.description} - Description of the workflow.
- {flow.activity.id} - The Id of the current workflow step.
- {flow.activity.name} - The name of the current workflow step
- {flow.activity.reject.reason} - The reason a workflow step is rejected
...
| Expand | ||||||||||||||
|---|---|---|---|---|---|---|---|---|---|---|---|---|---|---|
| ||||||||||||||
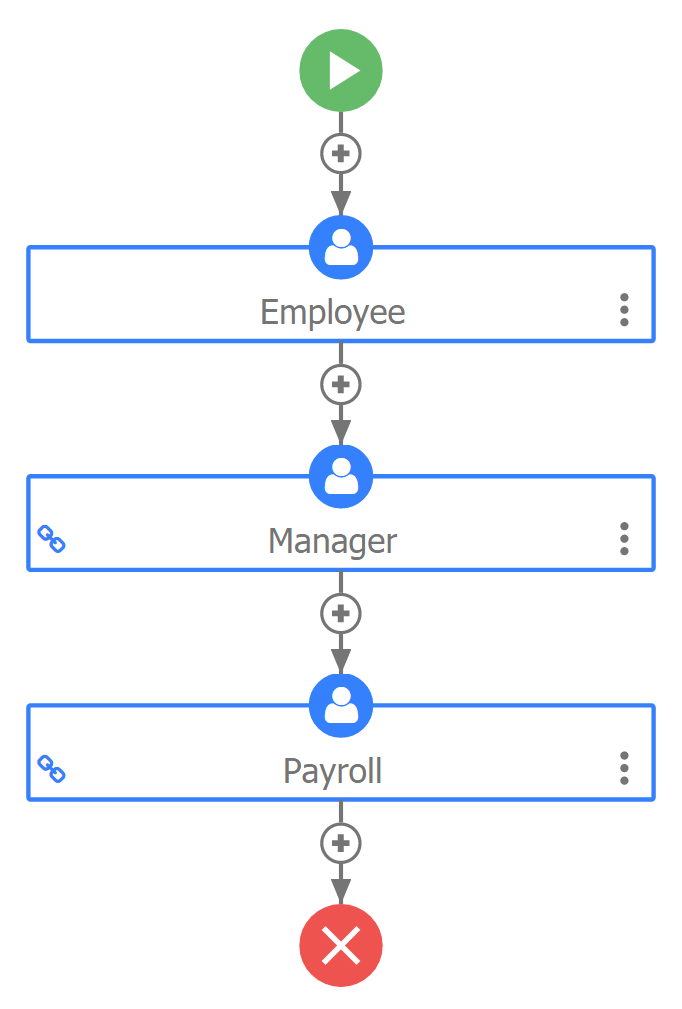
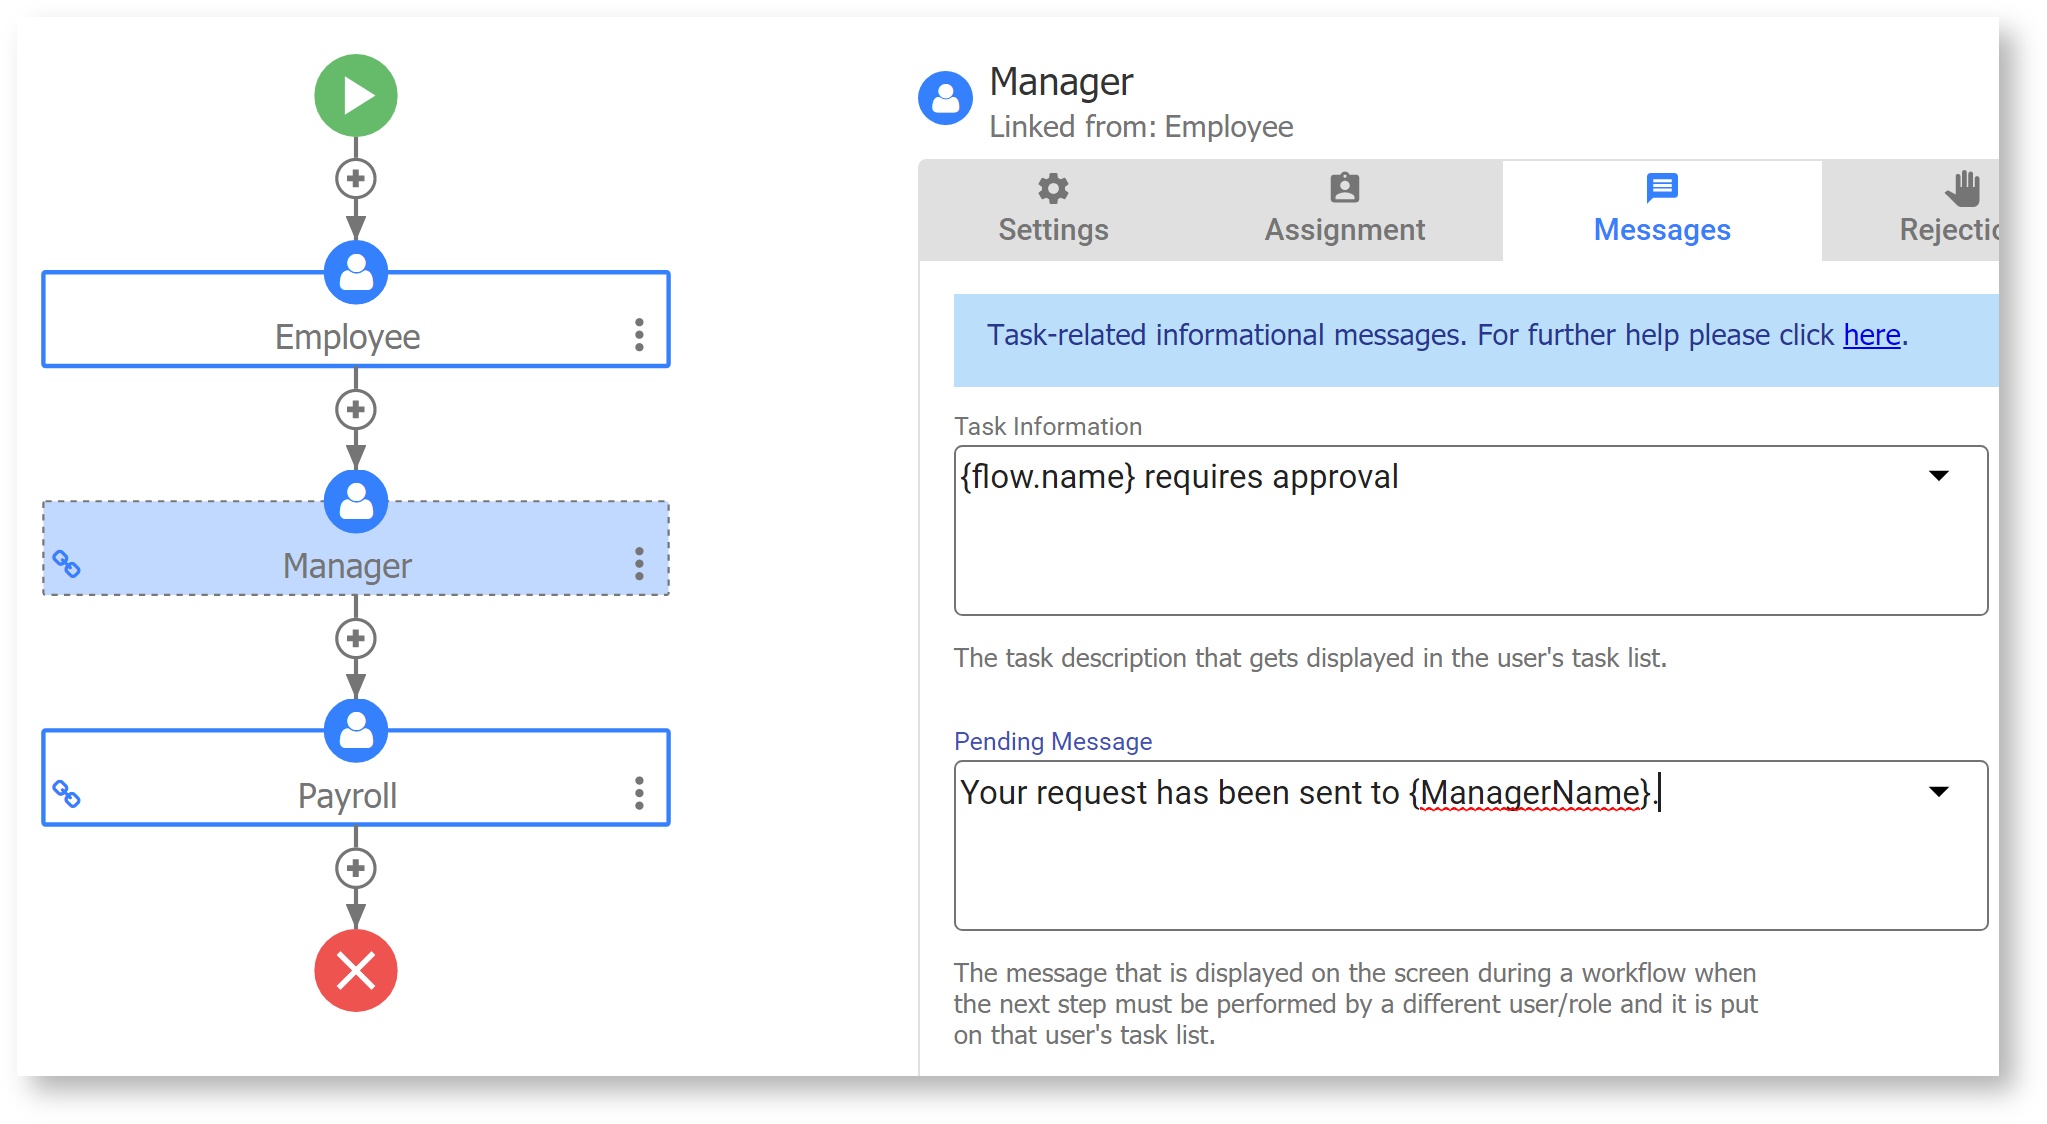
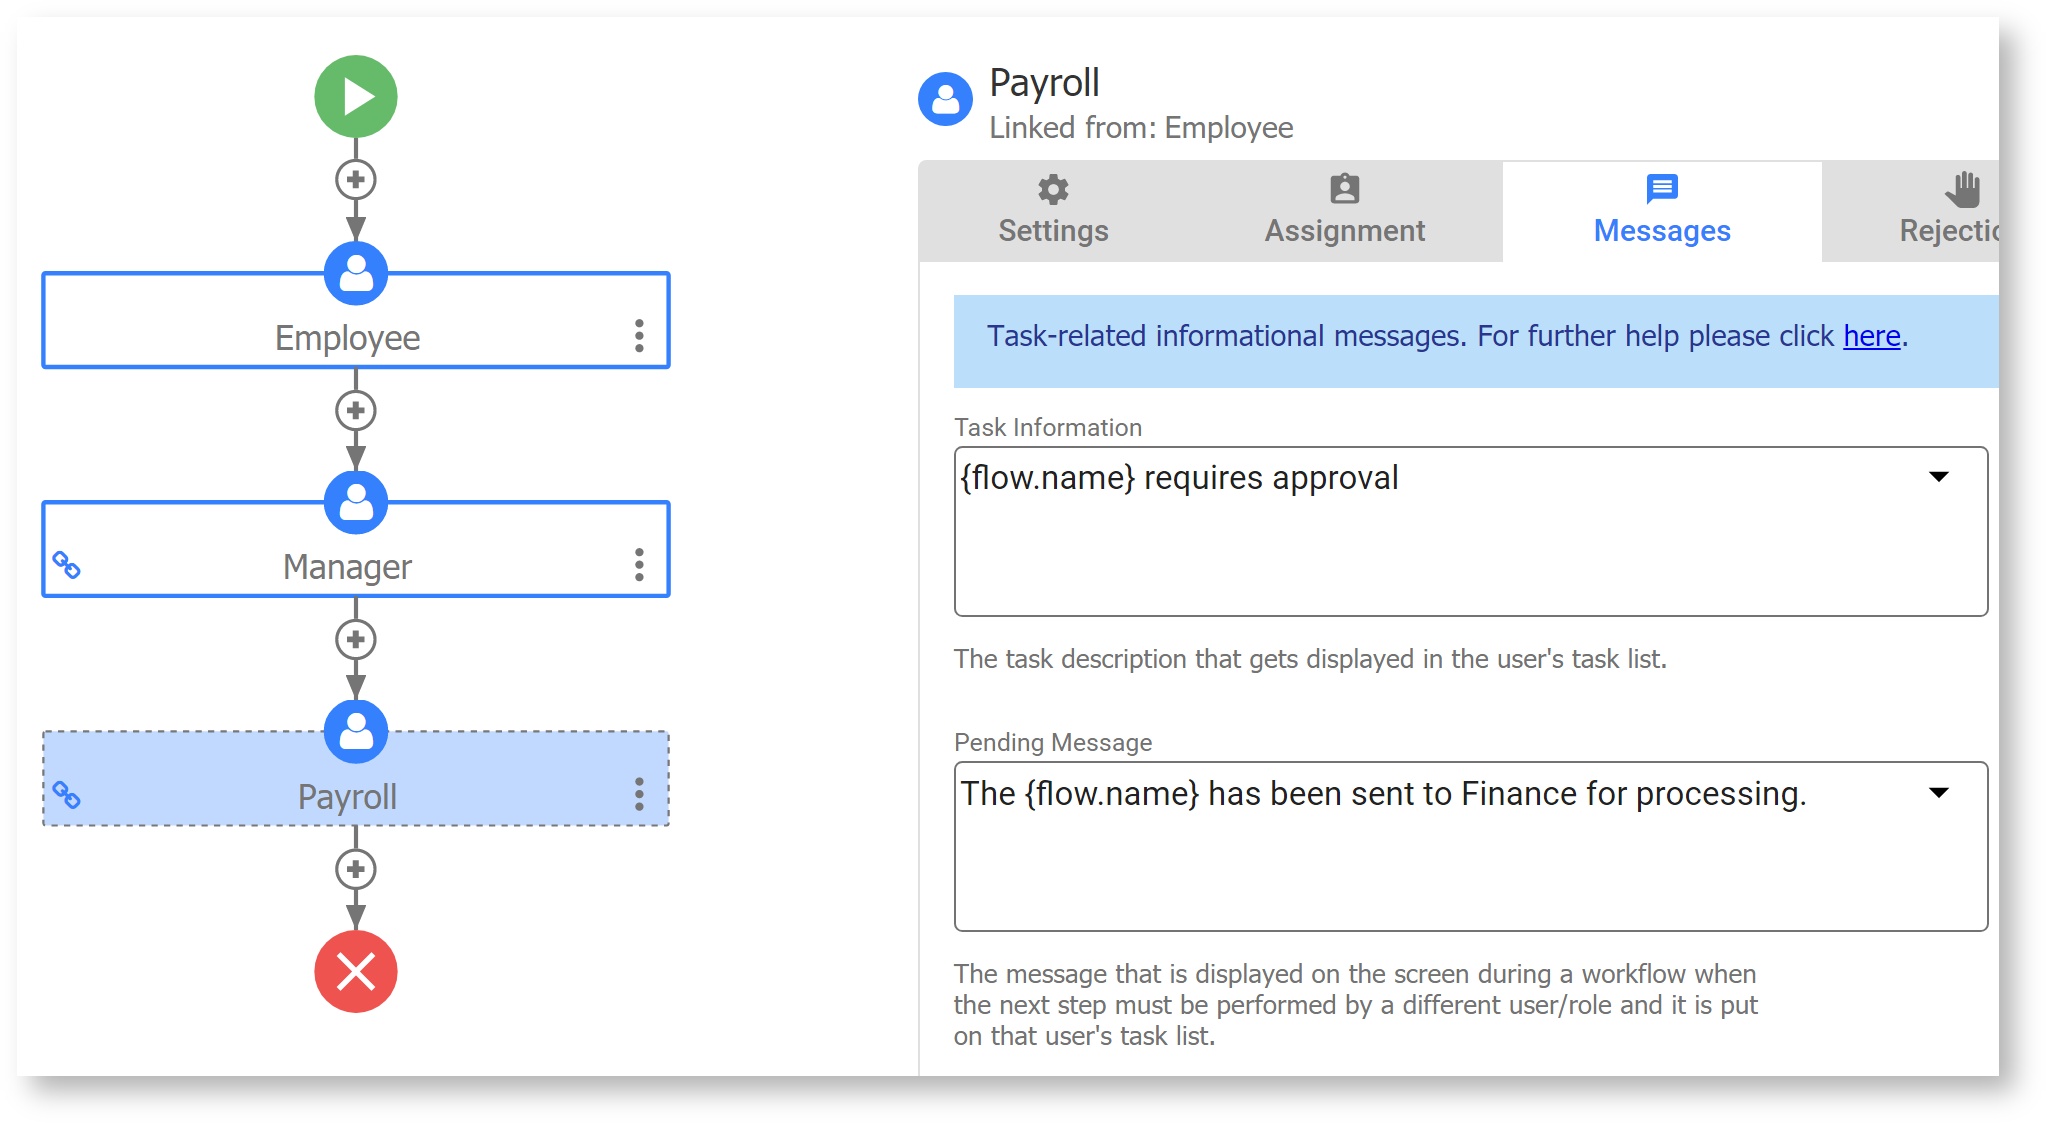
Let's say you have a 3 step Expense Report workflow.
To understand where you type in the text for your messages to get them to display when you want them to, think of the Pending Message property as the message that is displayed when users try to access workflow steps. In our example, when the employee submits Step 1, the workflow moves to Step 2, the manager approval step. The Pending Message configured on Step 2, "Your request has been sent to {Manager name}", is shown to the employee instead of the Step 2 form. When the manager approves the Expense Report and submits Step 2, the Pending Message configured on Step 3, "The Expense Report has been sent to Payroll for processing", is displayed to the manager when the workflow moves to the Payroll department employees instead of the Step 3 form. To set up the Pending messages discussed in our example, follow these steps:
|
...
Steps performed by the same user in a workflow are referred to as a screenflow. The steps of the screenflow are considered one task. The reject functionality will allow users to reject only to the beginning of that screenflow. You cannot reject back to steps after step 1 in the screenflow.
| Tip |
|---|
Steps performed by the same user that are separated by Anonymous Task steps are considered to be a separate workflow tasks. For example, consider a Purchase Order workflow with the following navigation: Step 1 is performed by Sales employee > Step 2 is sent to the customer's Email Address (Anonymous user) > Step 3 is performed by the same Sales employee that performed Step 1. You can configure a Reject button on the Sales step that will show both steps as rejection targets even though Step 1 and 4 were performed by the same user. Refer to the Workflow Tutorial for an example. |
Customize the Rejection Email
It is possible to customize the subject and email message body that is sent when a workflow task is rejected. You will configure this email on the step you are rejecting from. The customized rejection email will be sent when the Reject button is clicked on that workflow step or Quick Approval screen.
You can choose controls from your form which will be added to the Message as templates or you can use built-in templates as described below. Click on thedown arrow shows the list.
- {flow.name} - Name of the workflow
{subject.first.name} - First name of the user who rejected the task.
{subject.last.name} - First name of the user who rejected the task.
{flow.activity.name} - The step of the workflow that was being performed when the task was rejected.
{flow.activity.reject.reason} - The reason for the rejection.
{task.perform.url} - The URL to the rejected task.
...
Troubleshooting the Reject Button
Here are some reasons why you might not see the Reject option on a step where "Reject From Here" is selected:
- If the Reject To Here option is not selected in the previous steps, then user won't be able to see the Reject button on current step.
- When consecutive steps are executed by the same user, treats it as a screenflow. Think of those steps in the screenflow as one task. The reject functionality allows users to reject only to the beginning of that screenflow/task i.e. where the previous user started his work. It won’t allow a reject to the in-between steps.
- If the immediate steps prior to the current step were performed by the same user, then he/she cannot reject to those steps (the user is rejecting the workflow to himself). Users can reject only to those steps performed by other users, or to steps performed by himself that do not come immediately before the current step.
- If a previous step was skipped because its precondition failed, then the user won't be able to reject to such a step.
- If a precondition on previous step passed when that step was being performed, but the control values change causing the precondition to now fail, the user might not be able to reject to that step.
- The Reject button will not be displayed at all if the conditions are such that users cannot reject to any prior steps.
...
- You can skip a task when the deadline expires and the workflow automatically navigates to the next step. This is set up on the Action tab.
- You can reassign the task to another user/role. This is set up on the Action tab.
- You can send notifications to the user(s) that currently have the task that the deadline has been reached and the task has been reassigned. This is set up on the Notifications tab.
- You can use templatized values of controls in any of the Assignee(s) fields in the Escalation setup screen. The username that is filled in as that control's value will be picked up during escalation.
- You can send reminder emails to the user(s) who have the task on their task list at specified intervals reminding them that the deadline for the task is approaching. This is set up on the Reminders tab.
For example. if you wanted to send reminder emails to the user(s) who currently have the task on their Task List that the deadline is approaching and then send an email notification to them when the deadline is reached, you would configure the Notifications and Reminders tabs and check None (Notify Only) on the Action tab. Continue reading for more details.
Escalation Tips
- Multiple escalation triggers can be setup for the same step in a workflow.
- Escalations will use the business calendar and timezone time zone configured by the tenant admin.
- To take full advantage of this feature, make sure email is selected as the notification method for participating users. In-house customers should also make sure email is correctly configured.
- provides built-in templates that can be used in escalation emails.
- {flow.activity.escalation.duedate} - provides the deadline due date in GMT timezonetime zone. The tenant admin can change the timezone time zone by selecting the correct timezone time zone for your tenant when configuring the Business Calendar.
- {flow.activity.escalation.condition} - resolves to either 'start' or 'complete' depending on the condition value.
- {flow.activity.assignee} - current user/role
- {flow.activity.escalation.reassignee} - resolves to the new user/role that the task is assigned to.
...
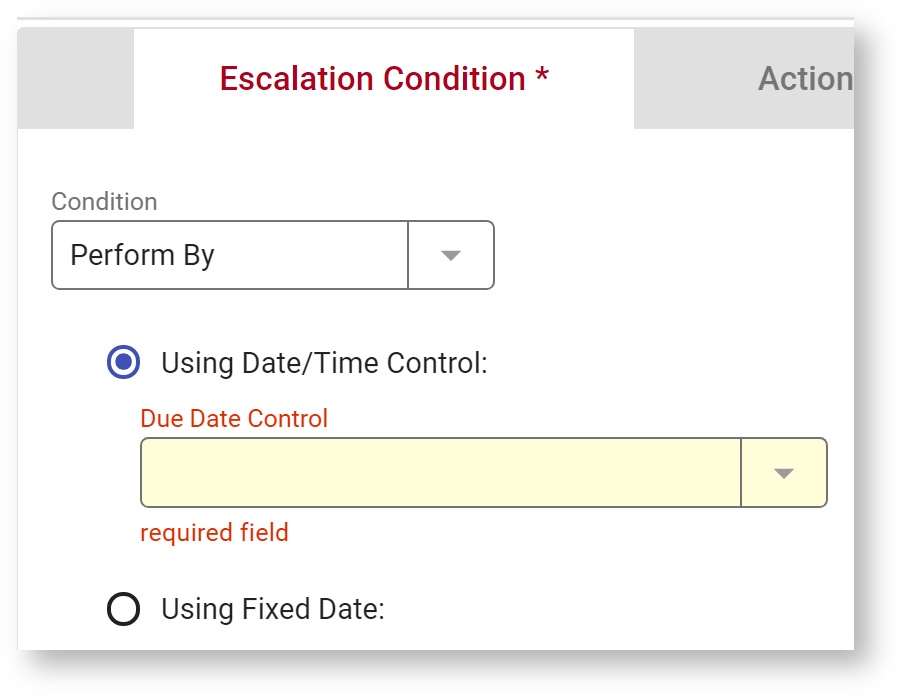
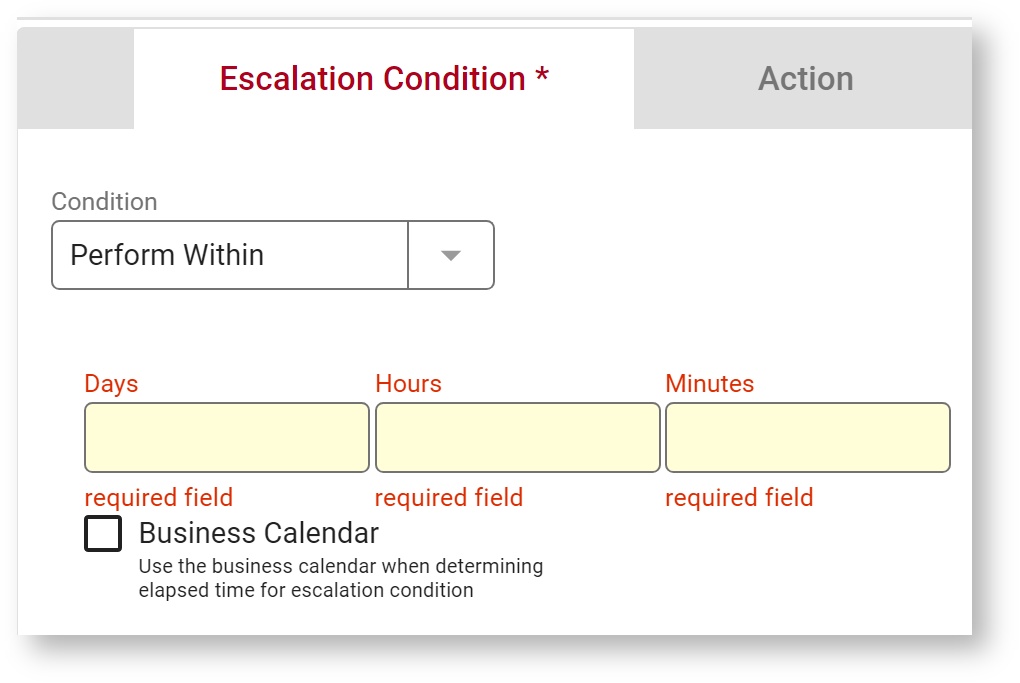
Select a condition from the dropdown. There are 4 choices:
Perform By - This condition is met when the user clicks the
- Perform Within - This condition is met when the user clicks the
- Complete By - This condition is met when the user clicks the Continue/Finish button on a step in a workflow before the configured due date.
Complete Within - This condition is met when the user clicks the Continue/Finish button on a step in a workflow before the configured duration.
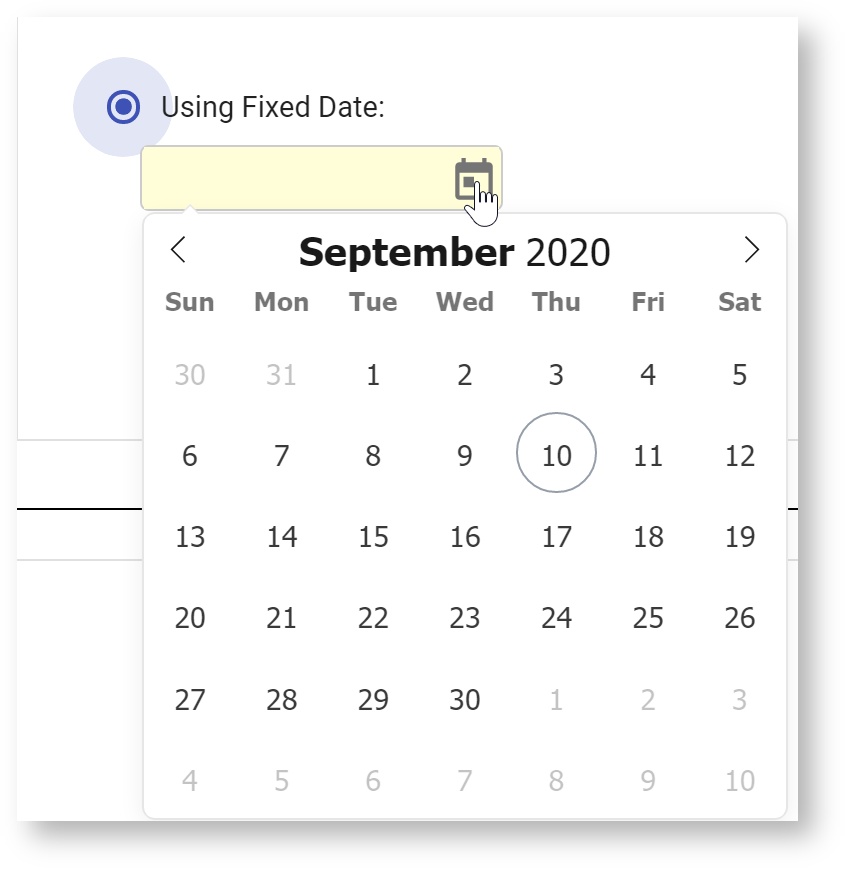
Selecting Perform By or Complete By displays two options.
Using Date/Time Control: The Due Date control dropdown displays all date controls in your form.
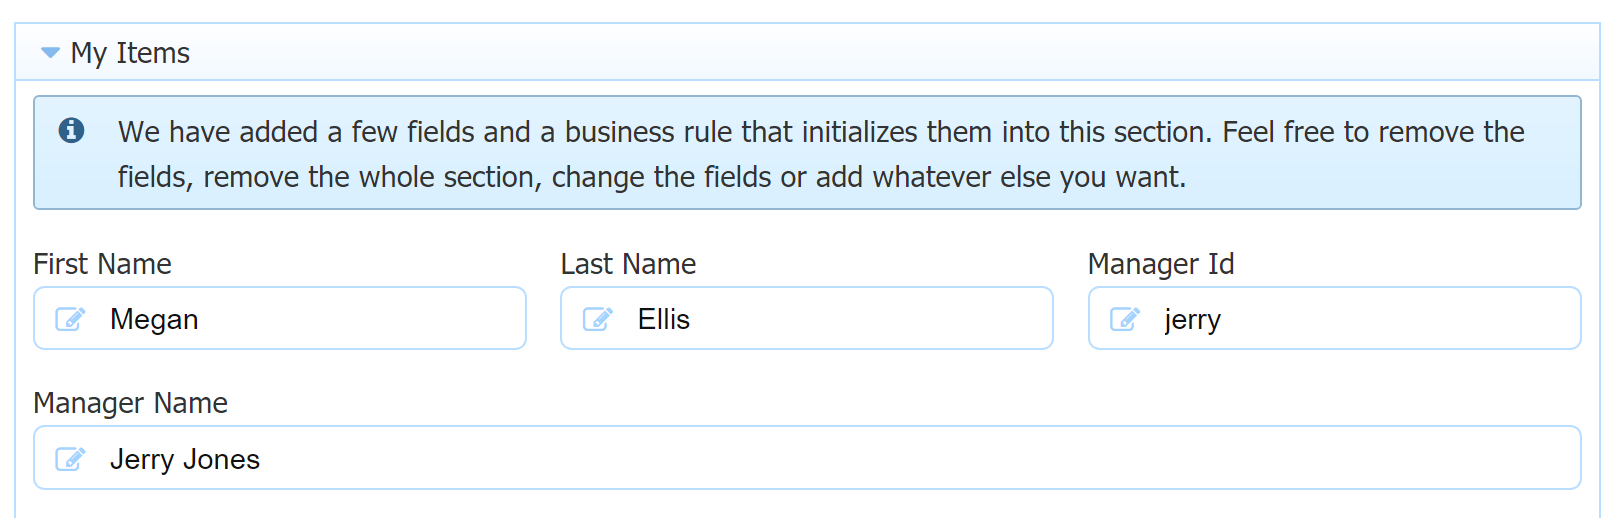
- The control used in the template must have a value before the task is created. For example, a date entered by the user on Step 1 can be used in an escalation condition on any later step. However, that date control template will not work in an escalation on Step 1, because the escalation is created at the moment the Step 1 task is created (when the form loads), and at that moment the control does not yet have a value. The date or date/time control used as a template in an escalation can get it's value a) in use mode or by business rule in a prior step, b) by setting a default value in the designer, or c) using _data when the workflow is initialized.
- An invalid due date template value will resolve to the current time to prevent any use-mode errors. The following message will appear in the frevvo logfile: "Escalation Due Date {DueDate} resolves to an invalid value".
- Date controls will automatically use the end of the day set in your business calendar in UTC, or 11:59 PM if no end of day is set, as the time component.
- Using Fixed Date: Enter a date/time as the deadline.
Selecting Perform Within or Complete Within displays Days, Hours and Minutes and a Business Calendar checkbox.
- Specify the amount of time the user has to perform or complete the task in Days, Hours or Minutes.
- Check the Business Calendar checkbox if you want to use the business days, times and timezone time zone specified for your tenant to calculate a task deadline. The business calendar is set up at the tenant level by the tenant admin.
...
| Expand | ||
|---|---|---|
| ||
Escalation Example 1Let's consider a Time Sheet workflow consisting of 3 steps:
In this example, the designer has configured a 10 minute interval for the Manager to approve/reject the task. The Escalation tabs are shown: 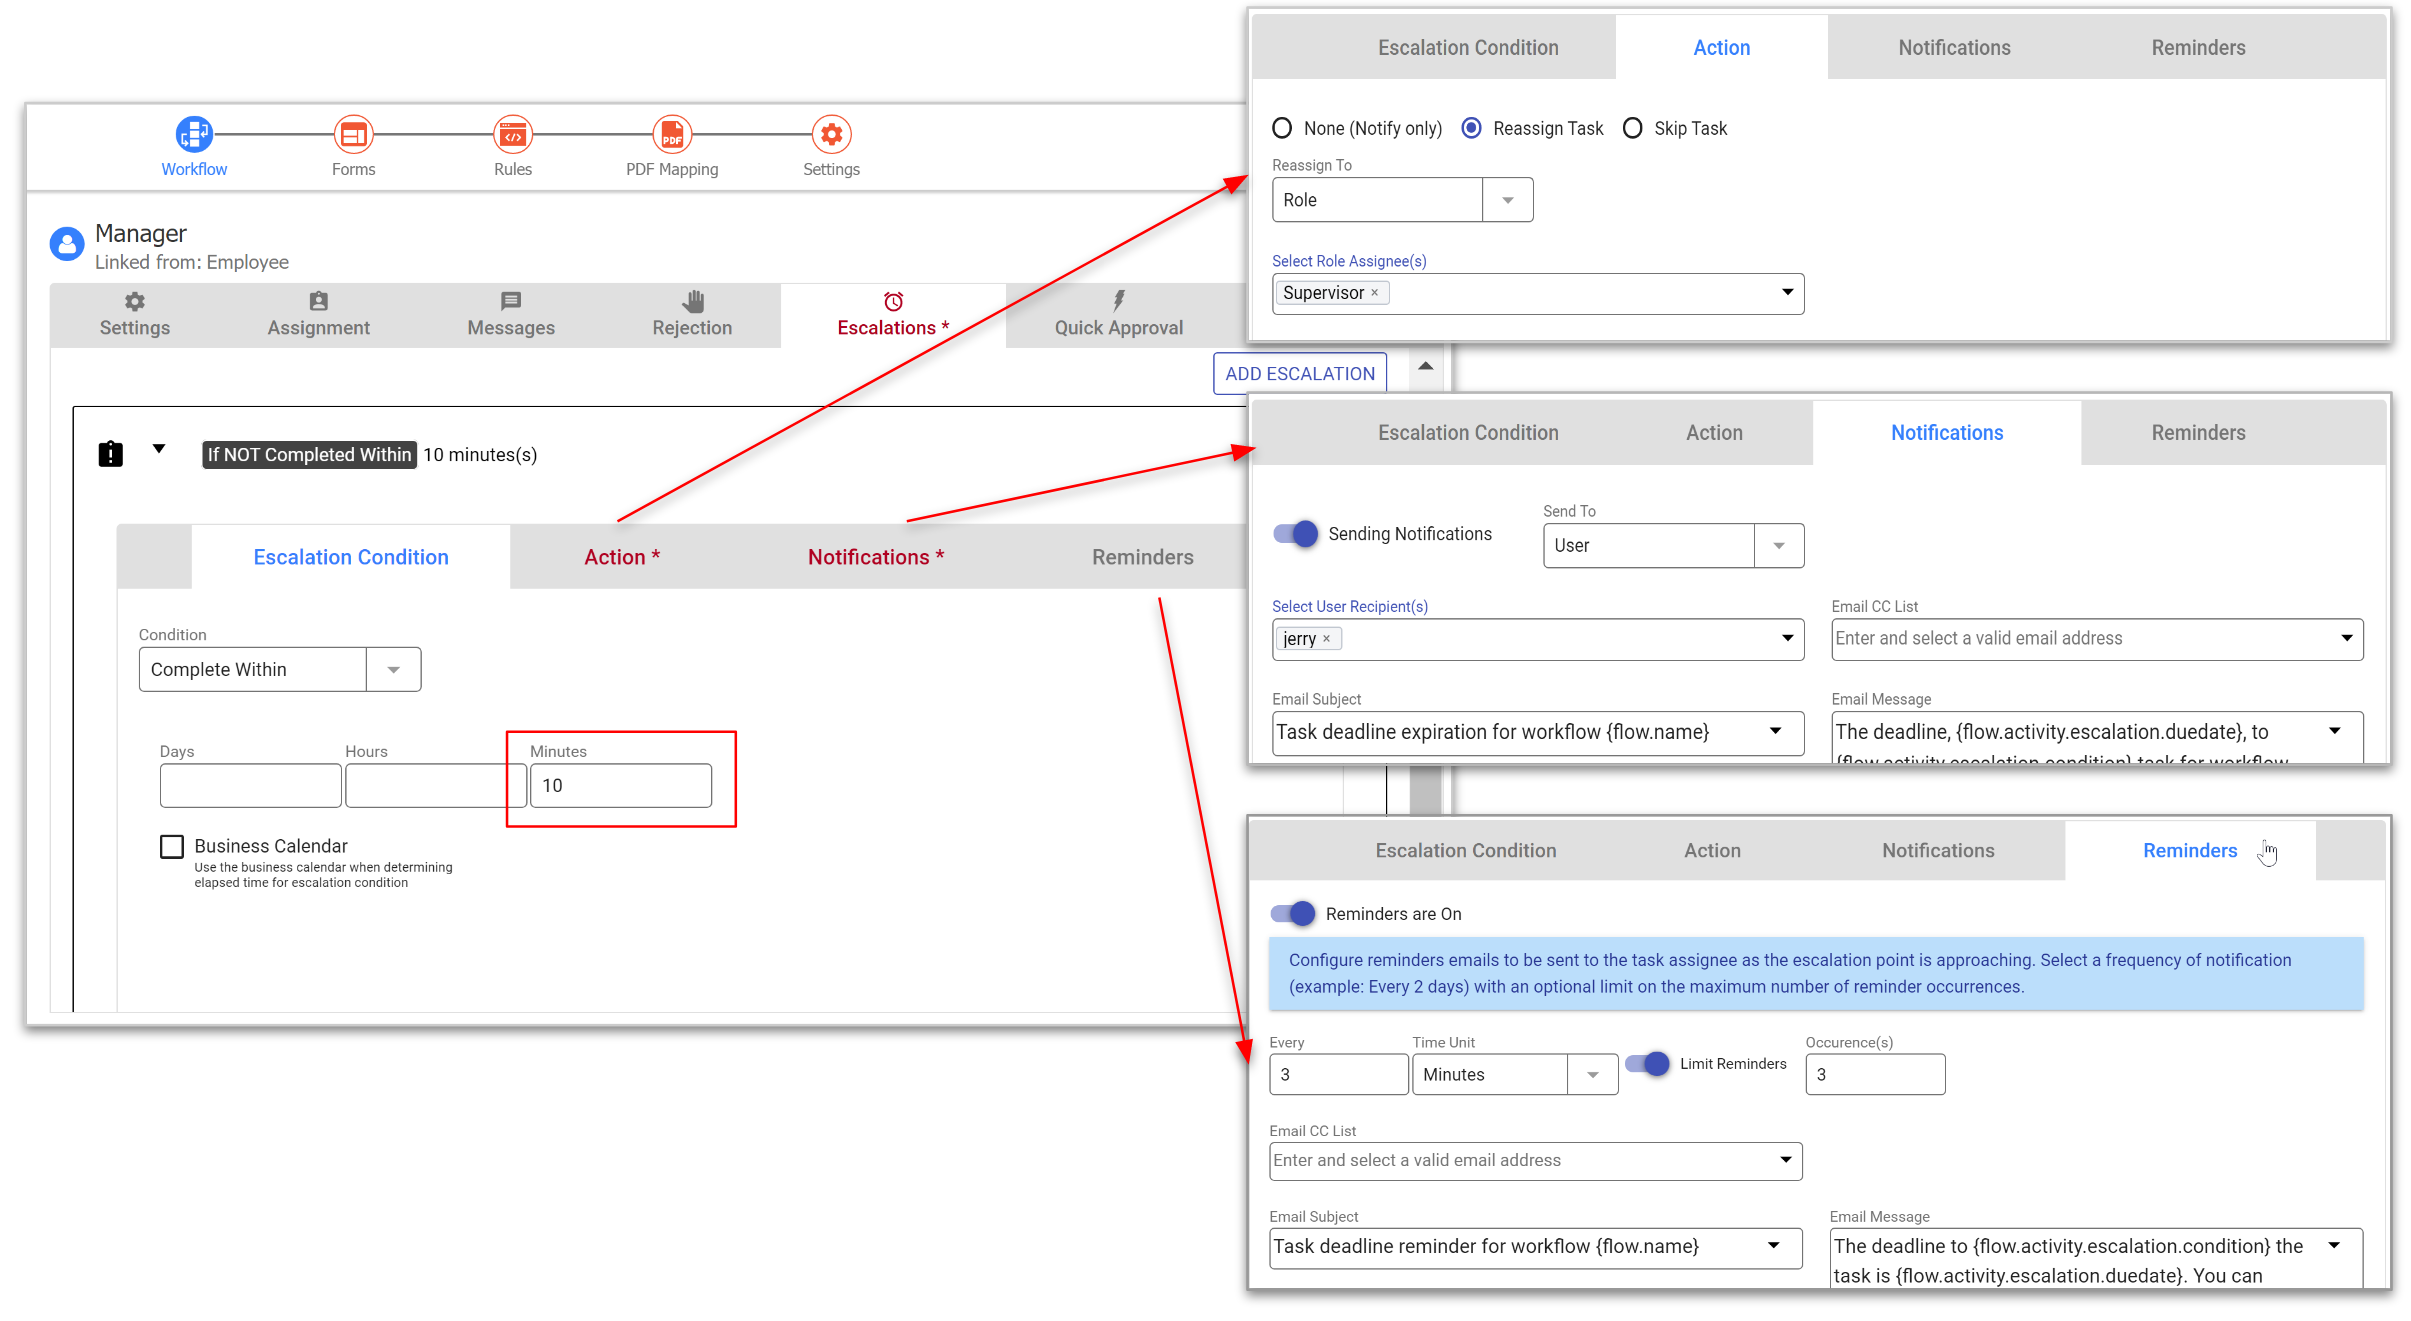 Employee William submits his Time Sheet at 12:55 PM. The deadline to complete this task is 1:05 PM. William's Manager Jerry receives a Task Notification email notifying him there is a task that requires his attention. The email includes a link he can use to access it. In this example, the deadline to complete the task is 1:05 PM. Based on the setup of the Reminder(s) section shown above, Jerry will receive 3 reminders every 3 minutes as the deadline approaches. The emails contain a link that Jerry can click to get to the task. The first one arrives as 12:56 PM, the second at 12:59 PM and the final reminder before the deadline arrives at 1:02 PM. At 1: 05 PM, the task is removed from Jerry's task list since it was not completed in the allotted time and is routed to the task list of any users with the role of Supervisor. Jerry receives an email informing him that the deadline for the task has expired and the task is now assigned to any user with the role of Supervisor. Reassigned users receive the Task Information email specified by the designer. So be sure to Setup the Task Notification Emails. When Jack, a user with the role of Supervisor, access his task list he will see a task sent to him by the system and the Audit Trail shown in the image: Escalation Example 2Let's consider a situation where you might want to skip the task after the deadline has been reached. Imagine a workflow with a requirement that it must be approved by specific users in sequence. To prevent the chain of approvals from being delayed if one user does not perform their approval before the deadline, the designer can check the Skip the Task checkbox on the workflow steps and will automatically complete the current step and create a pending task on the Task List of the next user. The Project Approval workflow shown in the image must be approved by Approver 1 and Approver 2 in that order. The escalation set up on the Approver 2 step automatically skips this step and advances the workflow to the next next step . Notice that notification and reminder emails are also configured. In this example,
Here's what happens: 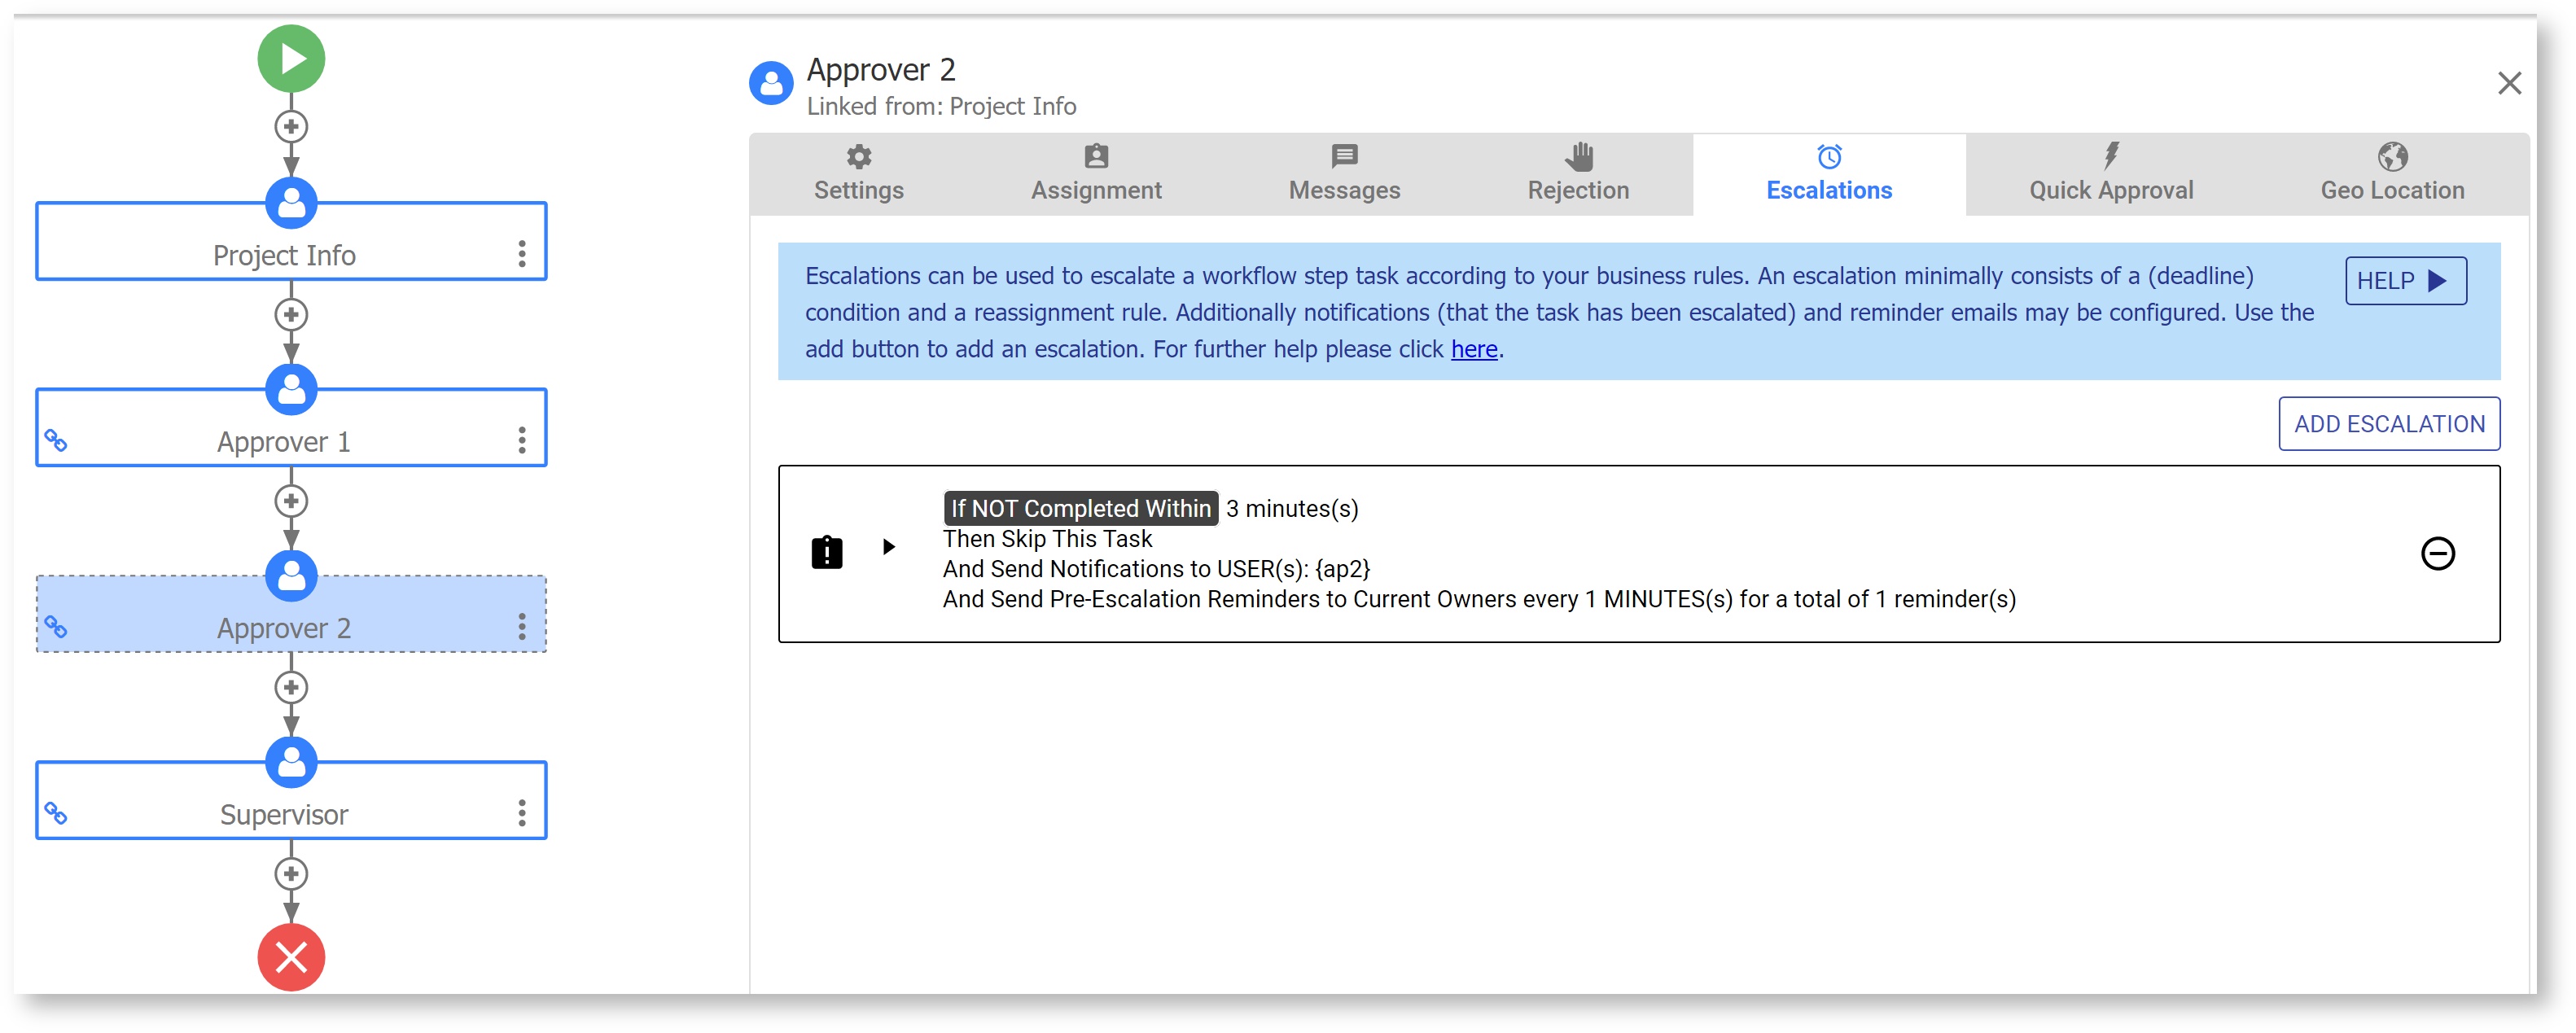
|
...