...
...
...
...
...
...
...
...
...
...
...
...
...
...
...
...
...
...
...
...
...
...
...
...
...
...
...
...
...
...
...
...
...
...
...
...
...
...
...
...
...
...
...
...
...
...
...
...
...
...
...
...
...
...
...
...
...
...
...
...
...
...
...
...
...
...
...
...
| Section | ||||||||||||||||||||||||
|---|---|---|---|---|---|---|---|---|---|---|---|---|---|---|---|---|---|---|---|---|---|---|---|---|
|
...
Please read the following upgrade steps prior to starting the migration.
| Note |
|---|
frevvo recommends that you test the upgrade process on your test server before performing it on your production server. Contact your frevvo Account Manager for information if you do not have a test environment. |
Prepare for the upgrade
- Upgrade Resources
- v10+ will only allow upgrade of resources that are v7 and later. Each user's account and associated resources is upgraded the first time they log in after each upgrade. Users who never log in (old or stale users, perhaps) may have an account that is several versions behind. This can also happen if you are doing a multi-step upgrade from a version prior to v7.
- To help admins manage this, in v9 the User Upgrade Threshold was introduced in the Configuration Checklist screen. The admin can use the information in this table to either delete the non-upgraded users or login as that user to upgrade them.
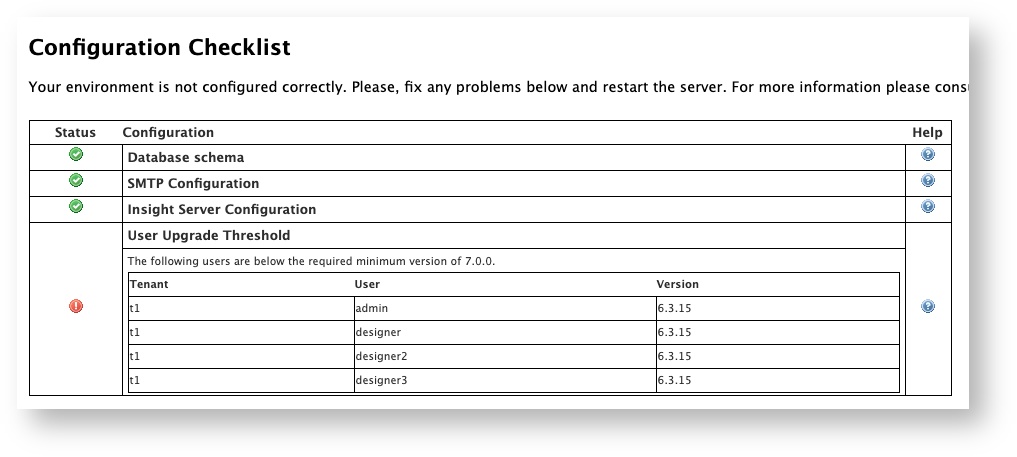
You must login-as each user listed in order to upgrade their resources (or remove them if the accounts are old/stale.) If you skip this step and have pre-v7 resources, your v10+ upgrade will fail.
Note title LDAP Users LDAP Security Manager tenants may see users listed in the Configuration Checklist - User Upgrade Threshold that no longer exist in the AD, and cannot be deleted or upgraded in the UIthe frevvo UI. To resolve this, please contact support@frevvo.com.
Please read and understand the Migration Considerations which may require your action before beginning.
- Install OpenJDK (11.x)before beginning.
Install Chrome on the same server as your installationyour frevvo installation. This is required for PDF Snapshot generation to work in your v10.1 installation.
Expand title Click here for steps to install Chrome... PDF Snapshot Generator: Install Chrome/Chromium
A stable version of chrome or chromium browser needs to be installed on same server where is frevvo is installed. First, check to see if Chrome is already installed. If not, use one of the following links to install Chrome or a Chromium browser.
The snapshot generator looks for chrome browser at following paths. If found, it launches the browser.
/usr/bin/chromium
/usr/bin/chromium-browser
/usr/bin/google-chrome-stable
/usr/bin/google-chrome
/Applications/Chromium.app/Contents/MacOS/Chromium
/Applications/Google Chrome.app/Contents/MacOS/Google Chrome
/Applications/Google Chrome Canary.app/Contents/MacOS/Google Chrome Canary
C:/Program Files (x86)/Google/Chrome/Application/chrome.exe
If the browser is not installed at any of these path then set the CHROME_PATH environment variable to point correct path of browser binary or set frevvo.chrome.path property in frevvo-config.properties file.
Windows Os:
Open the Start Search, type in “env”, and choose “Edit the system environment variables”
Click the “Environment Variables…” button
Click the "New..." button in the "System Variables" section
Set the variable name to "CHROME_PATH" and the value to <path to chromium browser exe>

MacOs/Linux
Set the CHROME_PATH environment variable in system profile files (/etc/profile, ~/.bash_profile, ~/.bashrc)
export CHROME_PATH=/opt/bin/chromium
Stop with frevvo with one of the methods listed below:
Execute <frevvo-home>\stop-frevvo.[bat,sh]
Stop the Insight Server by closing the window or if you are using the tomcat bundle by typing these commands in the <frevvo-home>\solr directory of your existing installation.
bin\solr.cmd stop -allStop frevvo and the Insight Server through the Computer Management Services console if they are running as Window's services.
- Backup the forms database from your current installationfrevvo installation.
Backup the current serverfrevvo server's installation directory so that you have a copy of all custom configuration parameters.
- Request a v10 license if you are upgrading from a version frevvo version prior to v10.0.x.
Install Upgraded Version
- Download the latest v10.1.x software. The download is a zip file. Extract the contents to any folder of your choice. This folder will be referred to as <frevvo-home> (note that the zip already contains a top level frevvo folder).
- Install a JDBC Driver.
- Ensure that Chrome or a Chromium browser is installed on the same server as the installation the frevvo installation for PDF Snapshot generation. See the related Installation Task for details.
- If you increased Memory Settings in your previous installation, make those changes to the appropriate files in the new installation. Refer to Hardware and Memory Requirements for the details.
- Navigate to the server.xml file in the <frevvo-home>\tomcat\conf directory of your v10.1.x installation
Configure the Database and Email
- Select your database type
Refer to the Configure the Connection URL topic to point the v10.1.x frevvo database to your current frevvo database. If you are using SQL Server, remember to add the sendStringParametersAsUnicode property with a value of false to your database connection URL if it is not already there.
- Configure Email
- If you made changes to the Default Port in previous releases, make those changes again in the v10.1.x server.xml file.
- Configure SSL for tomcat if it was configured in prior version of frevvo.
- Save the changes to the server.xml file.
...
- Edit the frevvo-config.properties file in your prior version. This file is usually located in the<frevvo home>/tomcat/conf directory.
- Copy the properties you added or changed.
- Edit the frevvo-config.properties file in the upgraded version, and paste the properties you copied from your prior version.
- Save the frevvo-config.properties file.
Start the Insight Server
Restore the contents of the <frevvo-home>\data\solr directory from the previous installation directory backup that you made in the Prepare for the Upgrade section to your latest version's <frevvo-home>\data directory. Then, follow the steps to start the Insight server BEFORE starting starting frevvo.
Windows:
- Open a command prompt. Navigate to <frevvo-home>\solr. Type bin\solr.cmd start to run the Insight server in the background, listening on the default port 8983.
You will see this message:
Warning If you close the Insight server (Solr) startup window, the server will stop running. Leave the window open or see these instructions to remove existing services and set up frevvo and the Insight Server to run as Windows services:
Browse http://<your server:port>/ solr to verify the Insight server is running. The <server:port> default values are localhost:8983. Change localhost to the server name and 8983 to the port the Insight server is running on if they are different than the defaults. Do not include the angle brackets <>. You will see the Insight server (Solr) dashboard with the current status.
...
- Ensure that the scripts are executable: chmod 755 <frevvo-home>/tomcat/bin/*.sh
- Navigate to <frevvo-home>/solr/bin. Run this command to make the solr startup file executable:
chmod +x solr - Navigate back to the solr directory.
cd .. - Start the Insight server by typing: bin/solr start - this starts the Insight server in the background.
- Browse http:<your server:port>/solr to verify the Insight server is running. The <server:port> default values are localhost:8983. Change localhost to the server name and 8983 to the port the Insight server is running on if they are different than the defaults. Do not include the angle brackets <>. You will see the Insight server (Solr) dashboard with the current status.

...
Start frevvo
Start the v10the frevvo v10.1.x server by running the start-frevvo.bat or start-frevvo.sh files (depends on your Operating system) in the <frevvo-home>\frevvo directory. Then follow these instructions to login and enter your upgrade license key.
...
Ensure you upgrade to the supported version of the connectors for your upgraded version of of frevvo. Version information can be found at the links below.
- If you are using the Database frevvo Database Connector, you must reinstall and configure it again for the v10.1.x installation.
- If you are using the Google connector you must reinstall and configure them for the v10.0.x installation.
- If you are using the Filesystem frevvo Filesystem Connector, you must reinstall and configure it again for the v10.1.x installation.
- If you are using the SharePoint frevvo SharePoint Connector you must reinstall and configure it again for the v10.1.x installation.
- If you are integrating with IIS, review these updated steps to configure Tomcat.
| Info |
|---|
All database initialization and/or required upgrade will be automatically done by frevvo.war as part of the v10frevvo v10.1.x startup. |
sameSiteCookies Attribute
...
Things to Check
Verify that any frevvo Connectors are up and running.
- Login as a tenant admin
- Click on the Configuration Checklist link to verify that all configurations are complete.
- Click on the Reports link. Click on one of the Reports to verify that submission data is displayed.
- Login as a tenant designer user
- View and edit a form/flow
- Verify that your submissions are displayed when you click the
Submissions and
- Test forms/flows
Login as the superuser admin.
- Verify that the Refresh Searchable Items process ran and completed successfully.
Troubleshooting
It is recommended that you do not change or delete the frevvo.users.schemaName property in the frevvo-config.properties file after the first startup of v10.1.x. If the property is changed or deleted post migration you may see this error:
...
If that does not fix the problem, delete all rows from the DATABASECHANGELOG database table and then restart. Use the command: delete from DATABASECHANGELOG.
| Warning |
|---|
If you start before frevvo before the Insight server, you will see this message when you browse the login frevvo login URL. Follow these steps to start the servers in the correct order: Navigate to your <frevvo-home> directory. Run the stop-frevvo.bat or stop-frevvo.sh file depending on your Operating system to stop frevvo. Open a command prompt. Navigate to <frevvo-home>\solr-6.6.2 Start the Insight server. Refer to Start the Insight Server above for the instructions. Browse http://<your server:port>/solr to verify the Insight server is running. The <server:port> default values are localhost:8983. Change localhost to your server name and 8983 to the port the Insight server is running on if they are different from the defaults.Do not include the angle brackets <>. Start frevvo. |
Applying a Minor Patch Update
If you're applying a minor patch update, for example, applying patch 10.1.x to your installed v10.1.0 frevvo server, you can follow these simple steps instead of the more lengthy upgrade steps.
| Note |
|---|
The latest major version frevvo version and the compatible frevvo connectors are available from the frevvo Software Downloads Directory. |
- Unzip the downloaded build zipfile to a temp directory.
- Copy the \temp\frevvo\tomcat\webapps\frevvo directory.
- Stop Stop frevvo.
- Delete the frevvo.war and/or frevvo directory file from your <frevvo-home>\tomcat\webapps directory.
- Paste the frevvo directory copied above in your <frevvo-home>\tomcat\webapps directory.
- Delete everything inside \frevvo\tomcat\temp directory of your installation.
- Start Start frevvo.
Apply a Patch with Tomcat Upgrade
If you are applying a patch release that includes an Apache Tomcat upgrade to your installed v10.1 server1 frevvo server, follow these modified upgrade instructions. Refer to the sections above for detailed steps.
Stop frevvo.
Backup the current serverfrevvo server's installation directory so that you have a copy of all custom configuration parameters.
- Install the Upgraded Version.
- Download the latest v10.1.x software. The download is a zip file. Extract the contents to any folder of your choice. This folder will be referred to as <frevvo-home> (note that the zip already contains a top level frevvo folder).
- Install a JDBC Driver.
- If you increased Memory Settings in your previous installation, make those changes to the appropriate files in the new installation. Refer to Hardware and Memory Requirements for the details.
- Navigate to the server.xml file in the <frevvo-home>\tomcat\conf directory of your v10.1.x installation
- Configure the database and email.
- Install any Connectors that were installed in your previous version.
Restore the contents of the <frevvo-home>\data\solr directory from the previous installation directory backup that you made in Step 2 to your latest version's <frevvo-home>\data directory. Then, start the Insight Server.
- Start Start frevvo.