| Warning |
|---|
This page is deprecated. Please see our new Rule Examples page to find the page you are looking for. |
| Tip |
|---|
Looking for a section on this page? Hover your cursor over the Table of Contents icon |
...
Use the Operators listed below to build the rule expression:
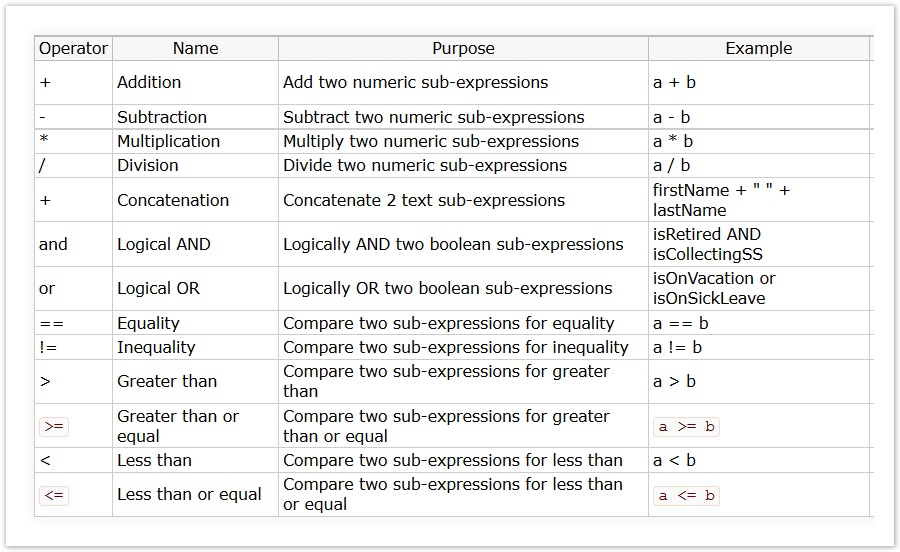
Rules can still be written by manually adding JavaScript in order to build any degree of complex & powerful business logic and integrate with all or your Web Services and frevvo connectors.
Refer to the Visual Rule Builder chapter or watch this webinar for an overview of how to create dynamic forms/workflows without writing code.
Calculate Totals
Forms are easier for your users with business logic that automatically calculates subtotals, total, etc.. Here are several common examples:
- Expense Report Subtotals and Grand Totals.
- Time Sheets Hours per task, per day and week
- Purchase Order line Item Costs
Add two fields
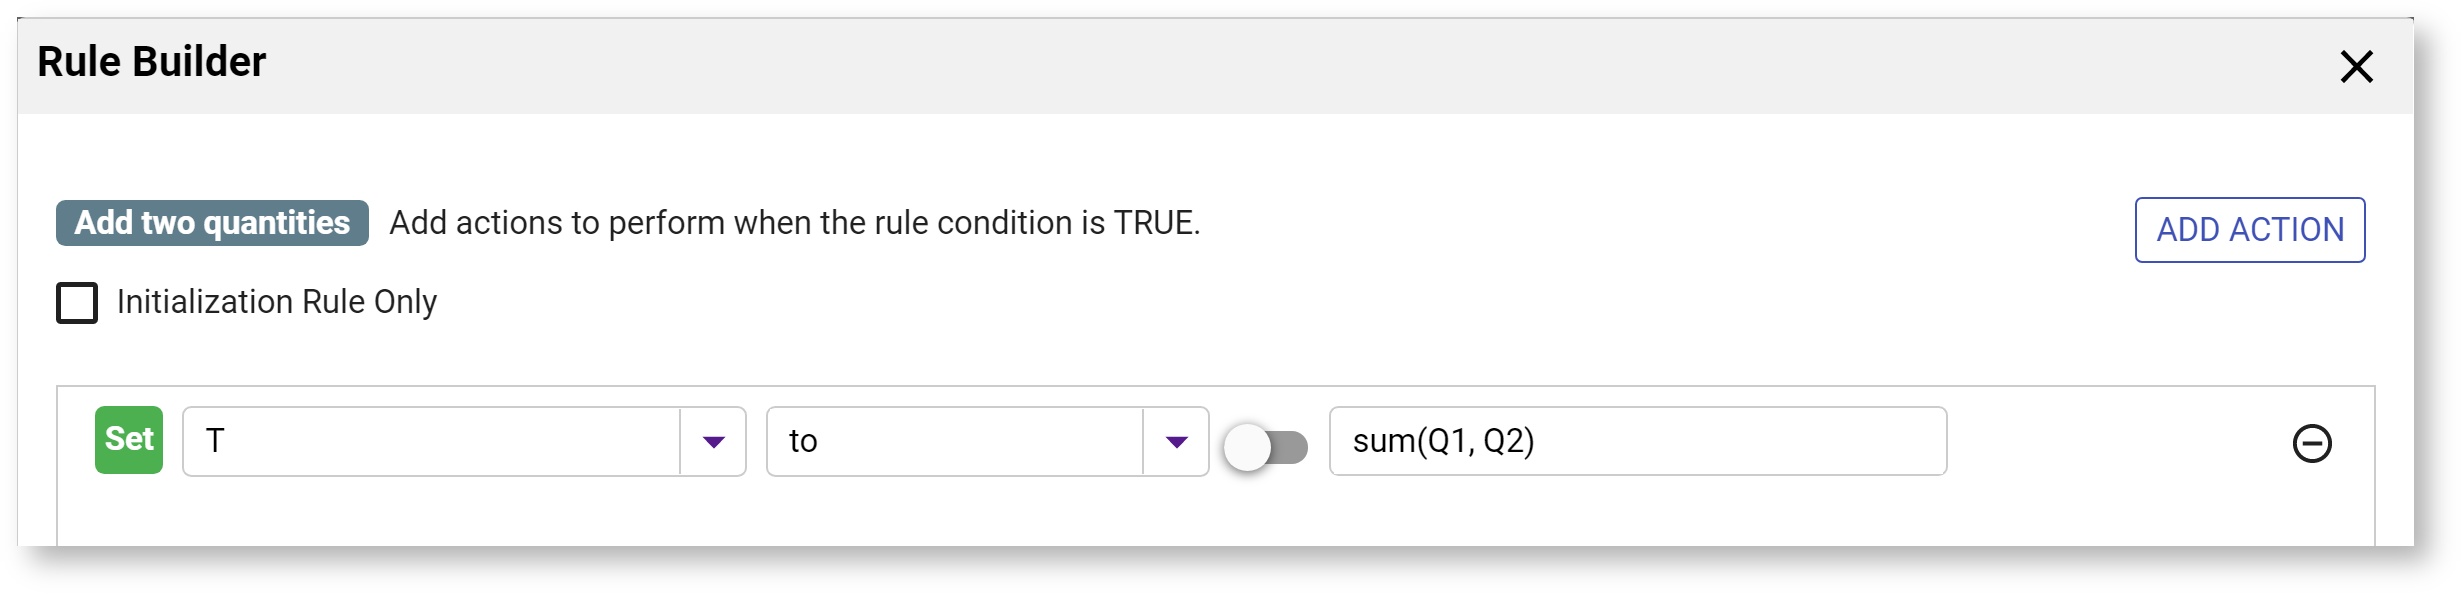
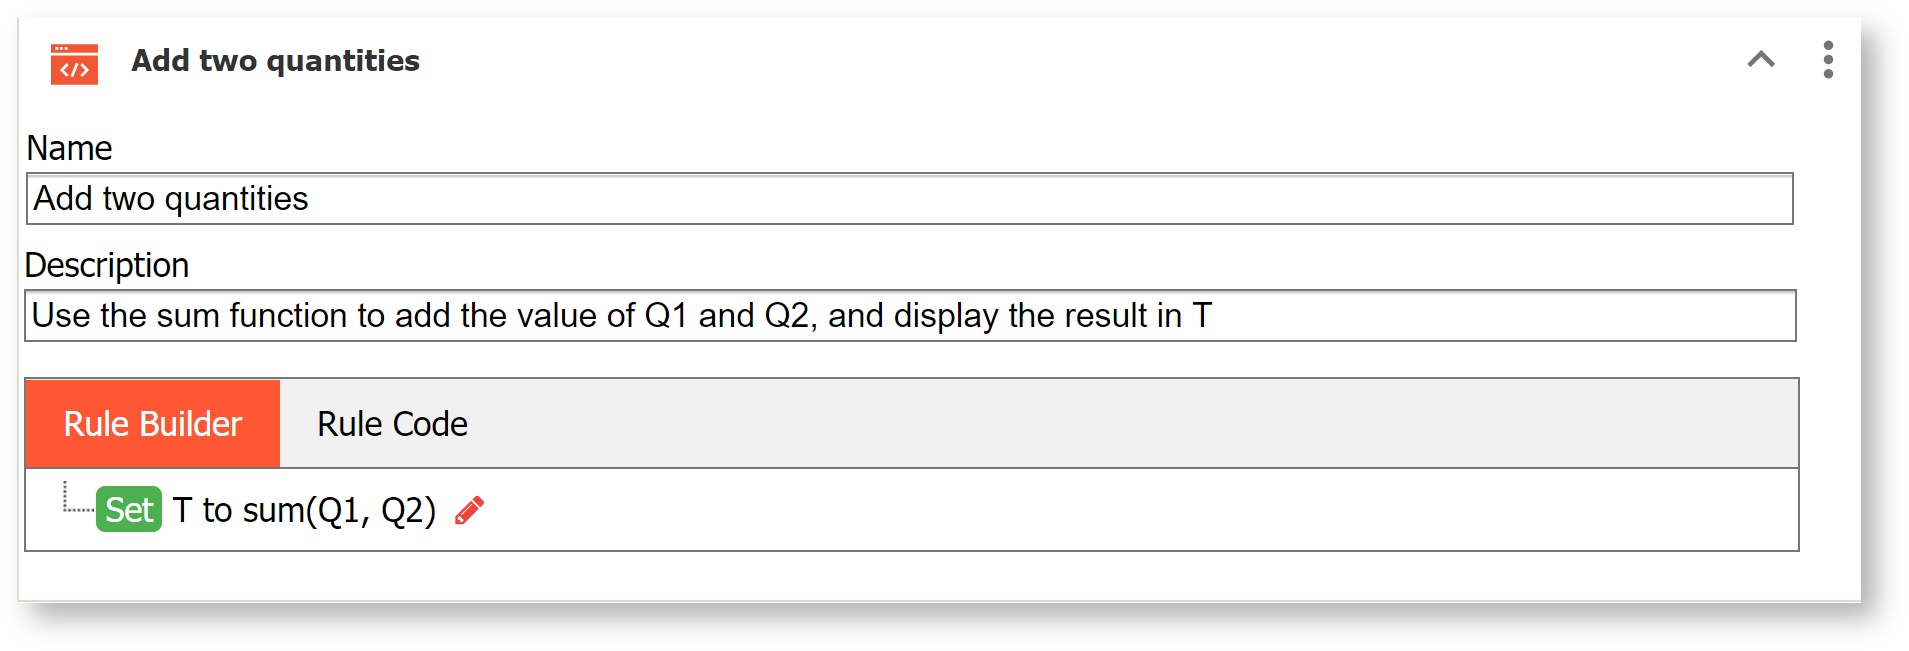
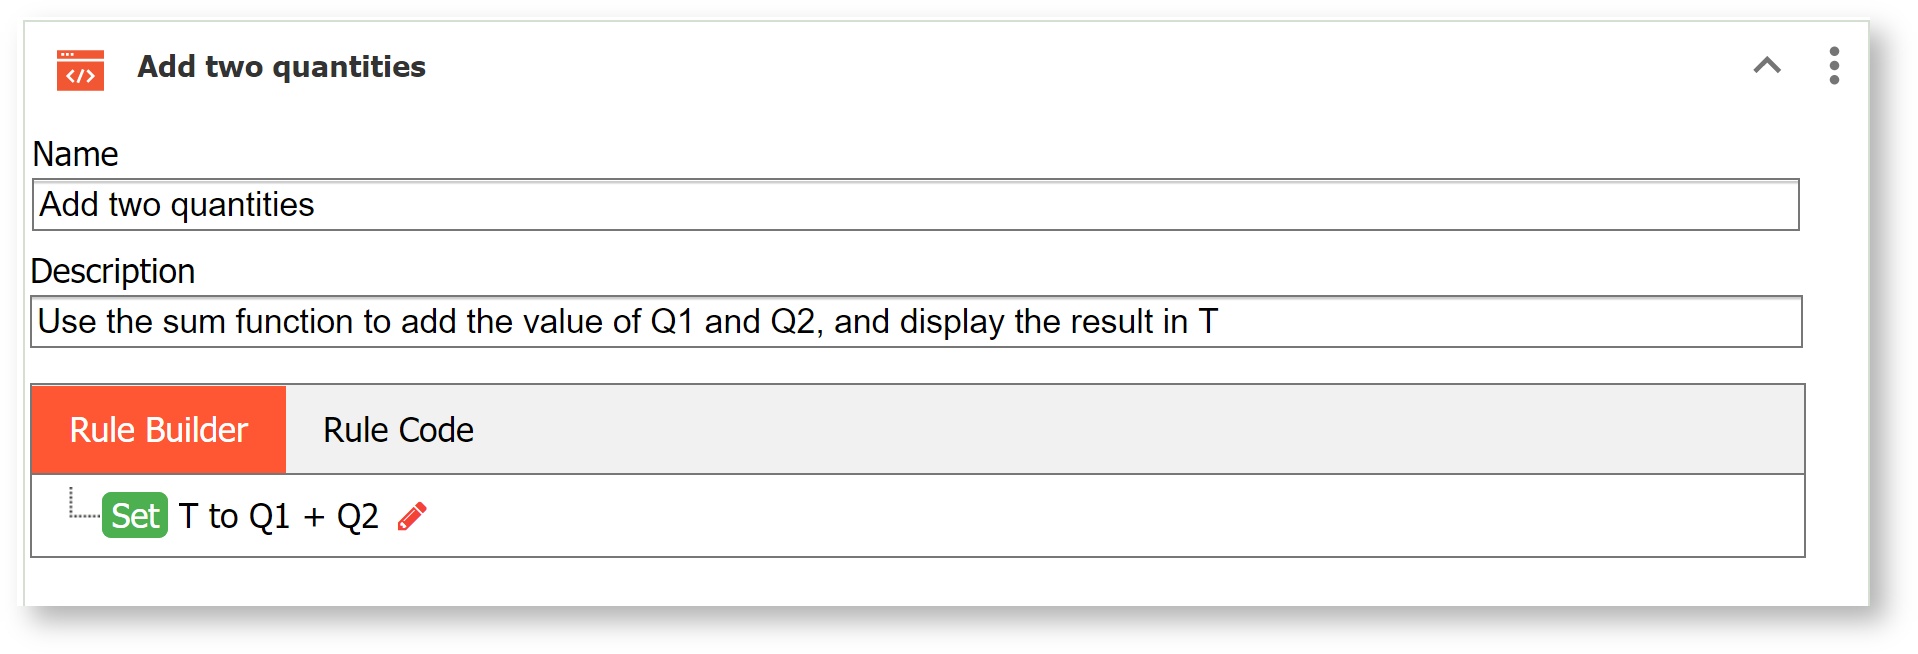
Your form has three Quantity controls named Q1, Q2 and T respectively. You want to add the values in Q1 and Q2 and display the result in the Total Quantity field. This rule will automatically fire whenever the user types something in Q1 or Q2 and will set the value of Total Quantity appropriately. However, it's important to ensure that the calculated value is valid with respect to the type of Total Quantity. For example, if Total Quantity was of type integer and the computed value of the expression was decimal (such as 1.5), then the rule would be attempting to set an invalid value in T. This is an error. The rule will set the value as requested, but will mark the field as invalid and take appropriate action such as disabling the submit button, displaying the control with a red background etc. Also, if controls are added to the form from the palette, it is important to ensure they have the correct type. For example, for a numeric calculation as described above, the controls should be of type Numeric (found in the palette). The Visual Rule Builder supports text to number conversion with the function number(). For example, you may want to calculate a total from two Text controls that contains numbers. Set Total to number(Text1) + number(Text2) to convert the Text control strings to numbers.

You can use the sum function or just type Q1 + Q2 in the expression field
| Section | ||||
|---|---|---|---|---|
|
| Section | ||
|---|---|---|
|
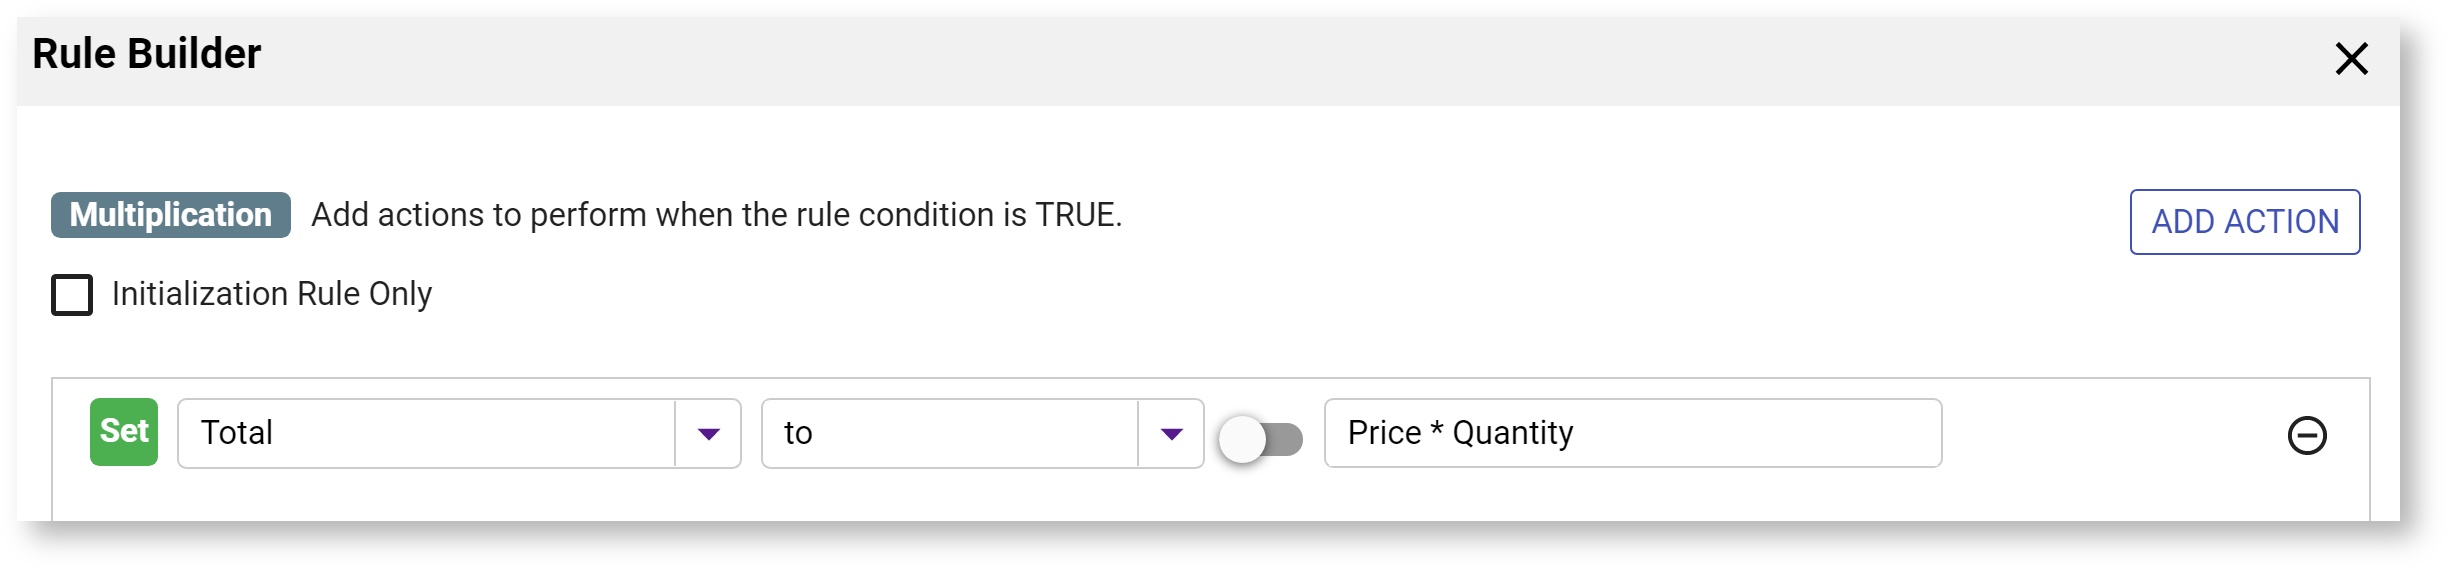
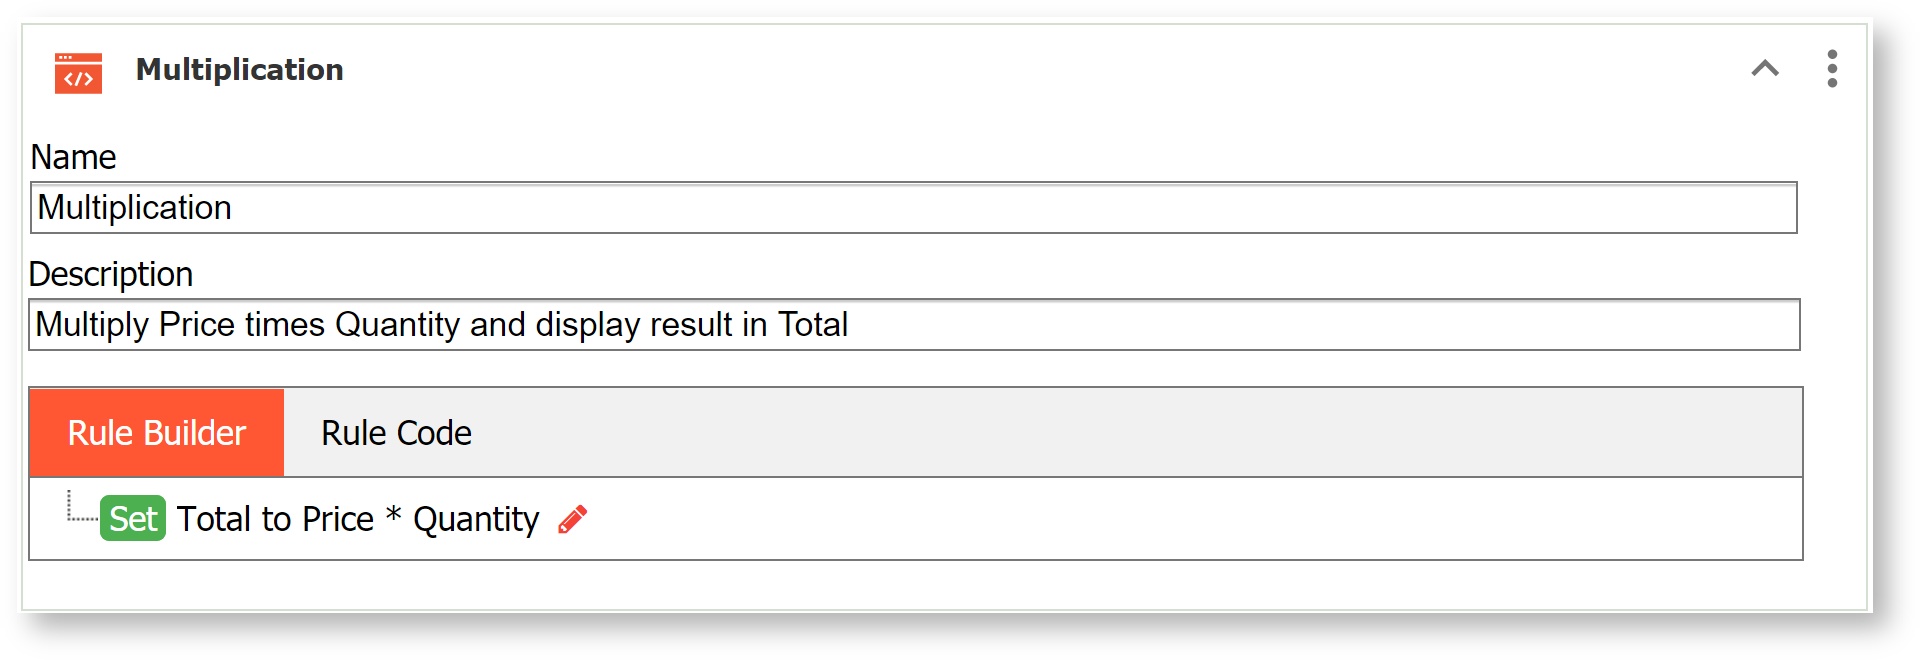
Multiply Price times Quantity and display results in a Total field
Your form/workflow has a Price, Quantity and Total Quantity controls. You want to multiply Price times Quantity and display the results in the Total field.

| Section | ||||
|---|---|---|---|---|
|
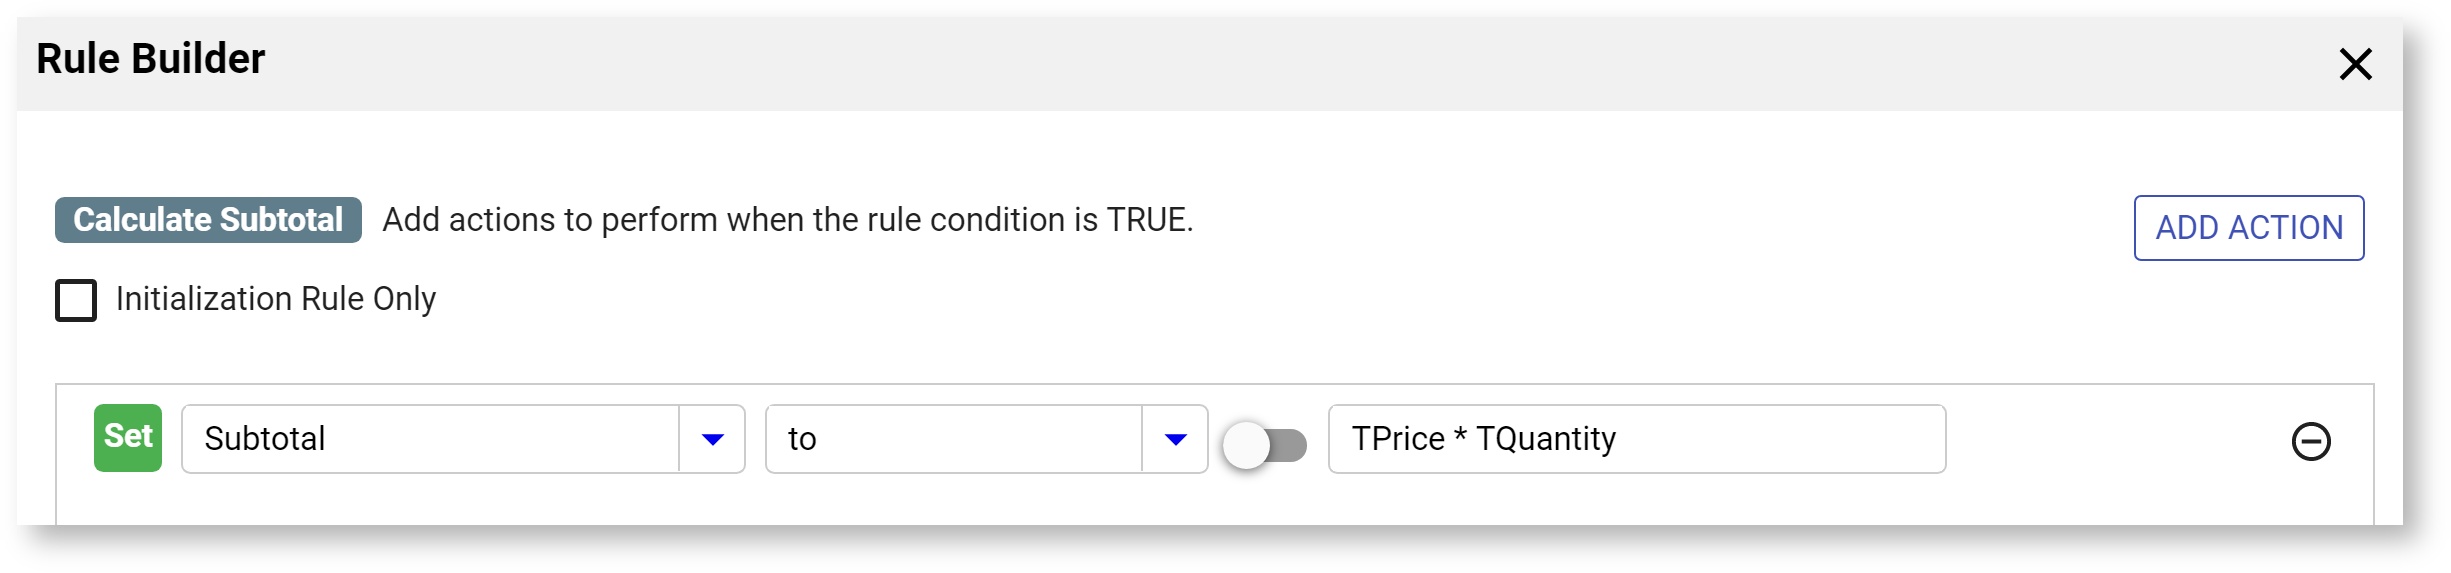
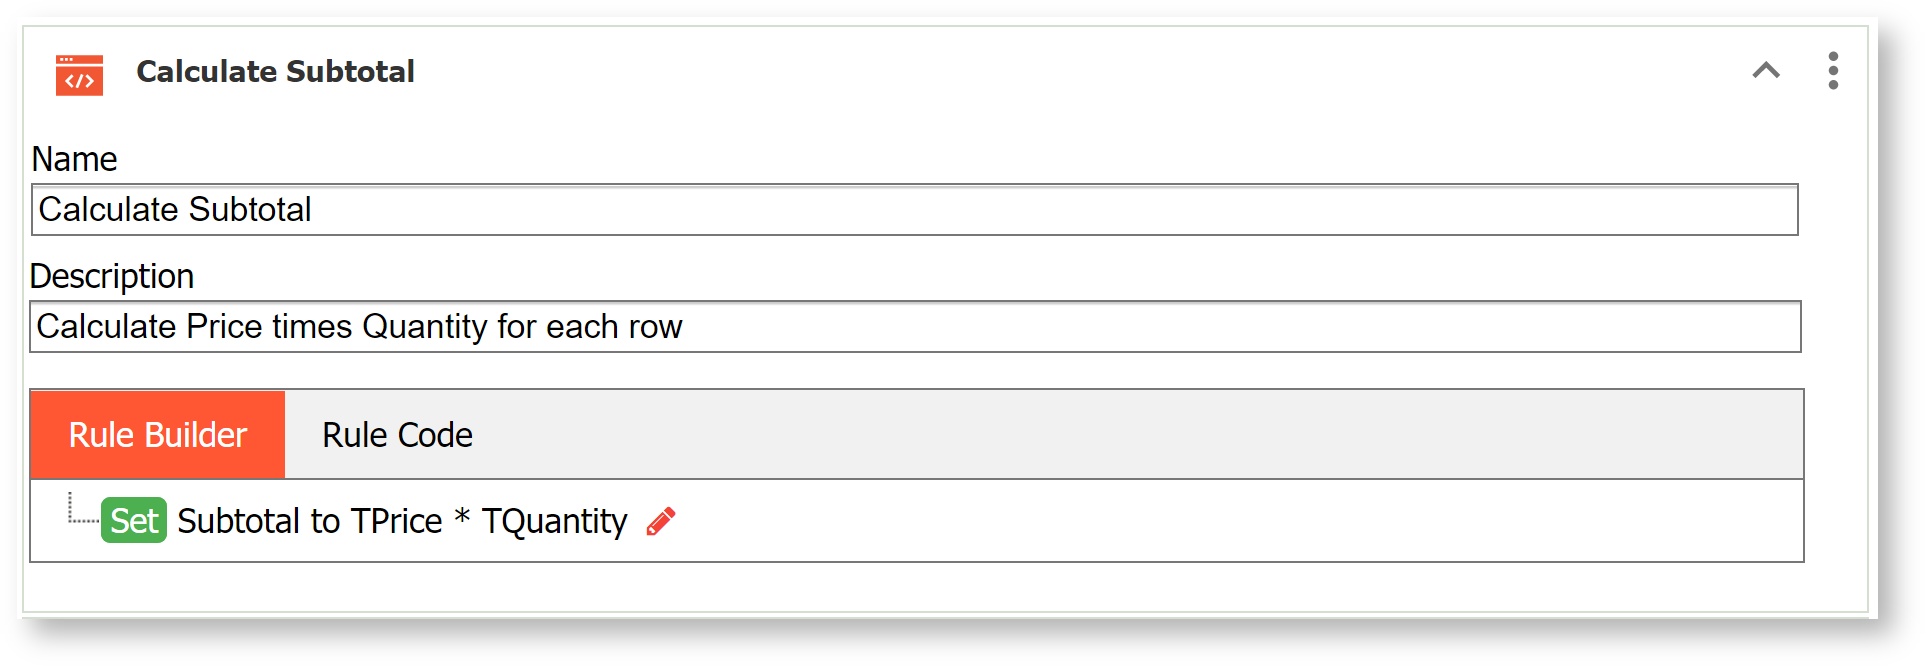
Calculate a Subtotal
Imagine you have an Purchase Order workflow with a Table control. The Table has Price,Quantity and a Subtotal column. The fields are namedTPrice,TQuantity and Subtotal. You want to multiply TPrice timesTQuantity and display the results in the Subtotal fields for all the rows in the table. The Rule Builder automatically creates the code to handle adding/deleting table rows.

| Section | |||||||
|---|---|---|---|---|---|---|---|
|
| Note |
|---|
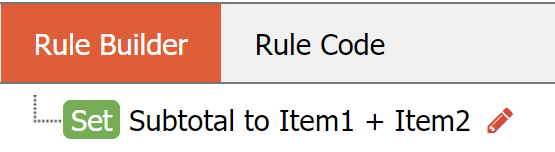
The sum() function mentioned above will calculate over the entire repeat/table. To use addition to subtotal individual rows, use the "+" operator, i.e. Set Subtotal to Item1 + Item2.
|
Calculate a Grand Total
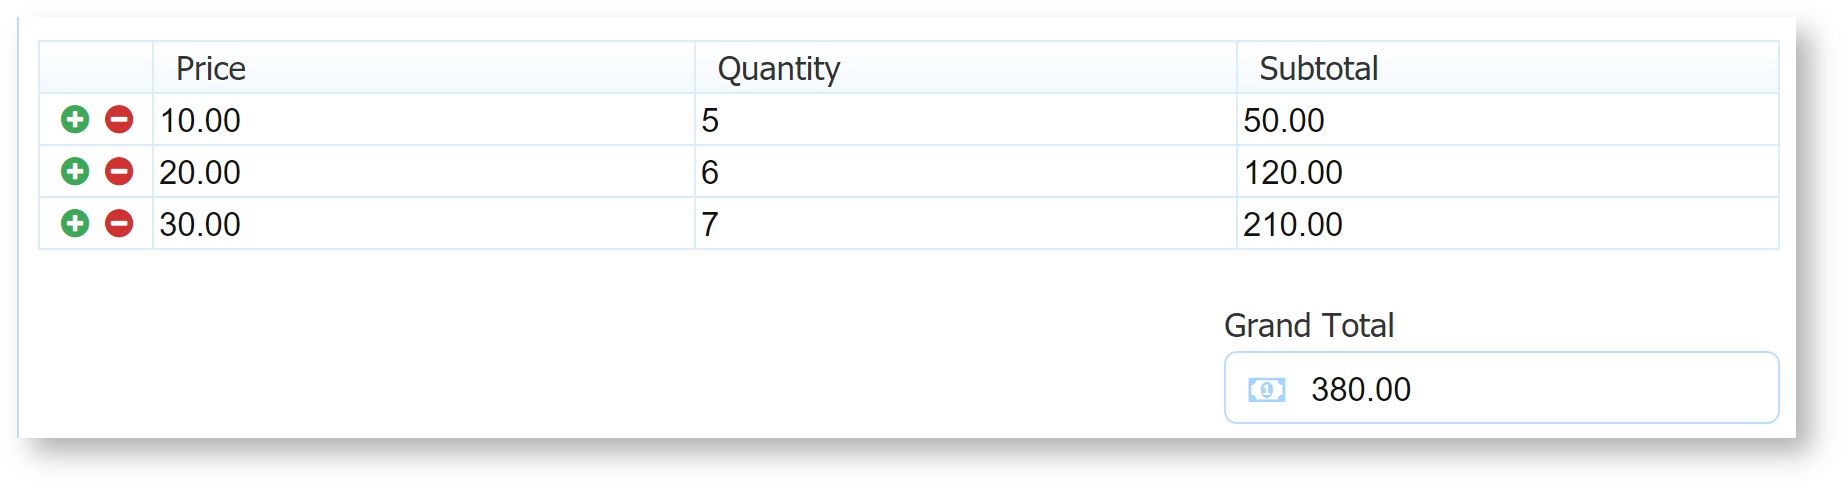
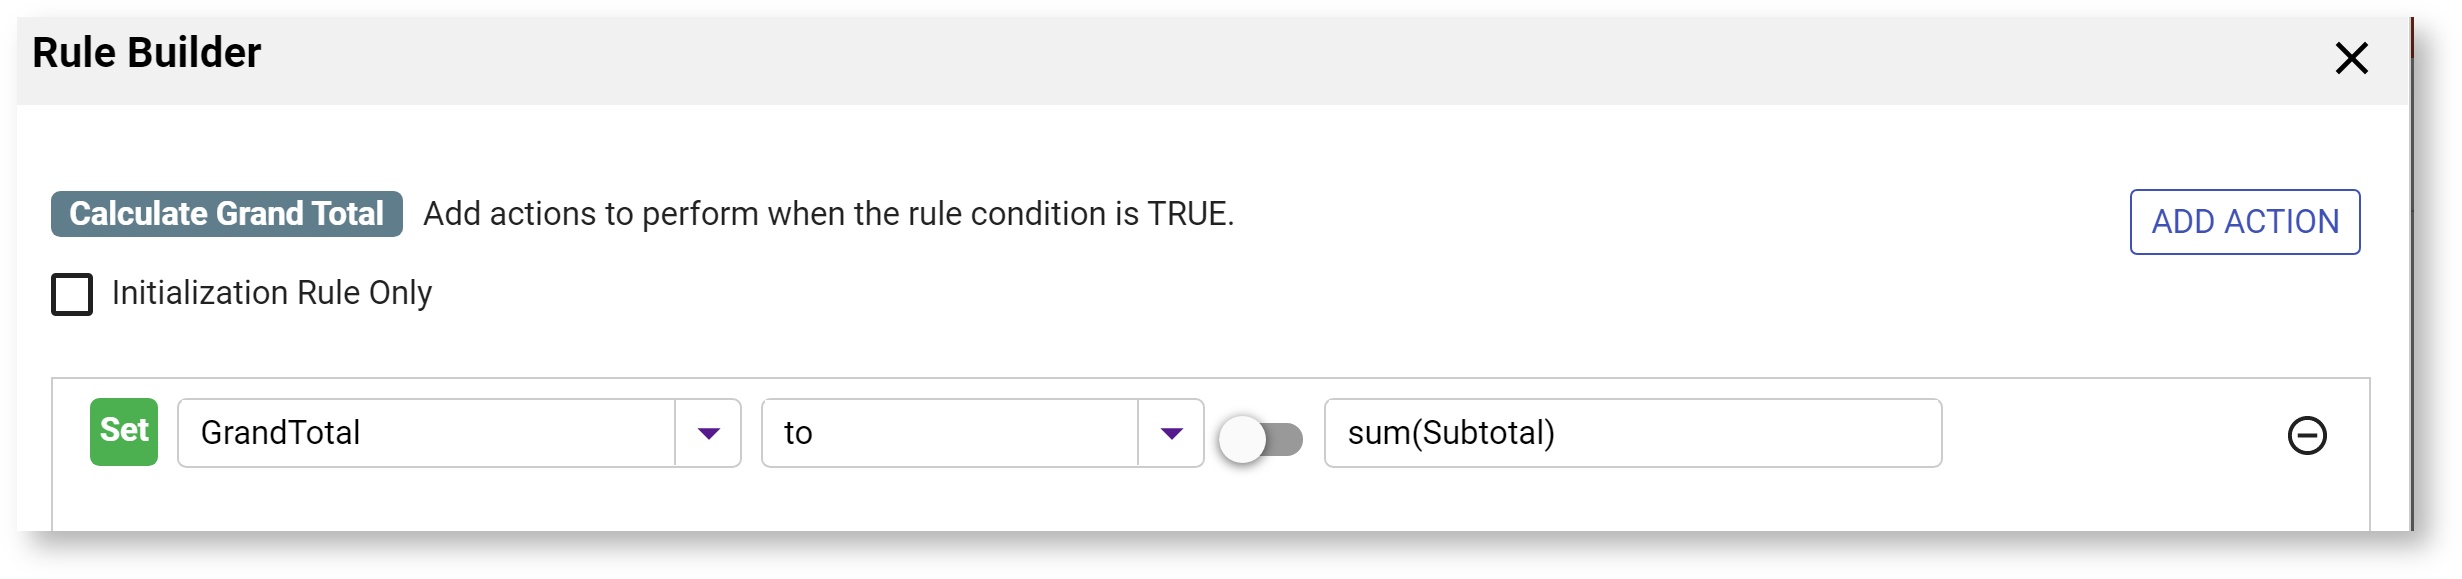
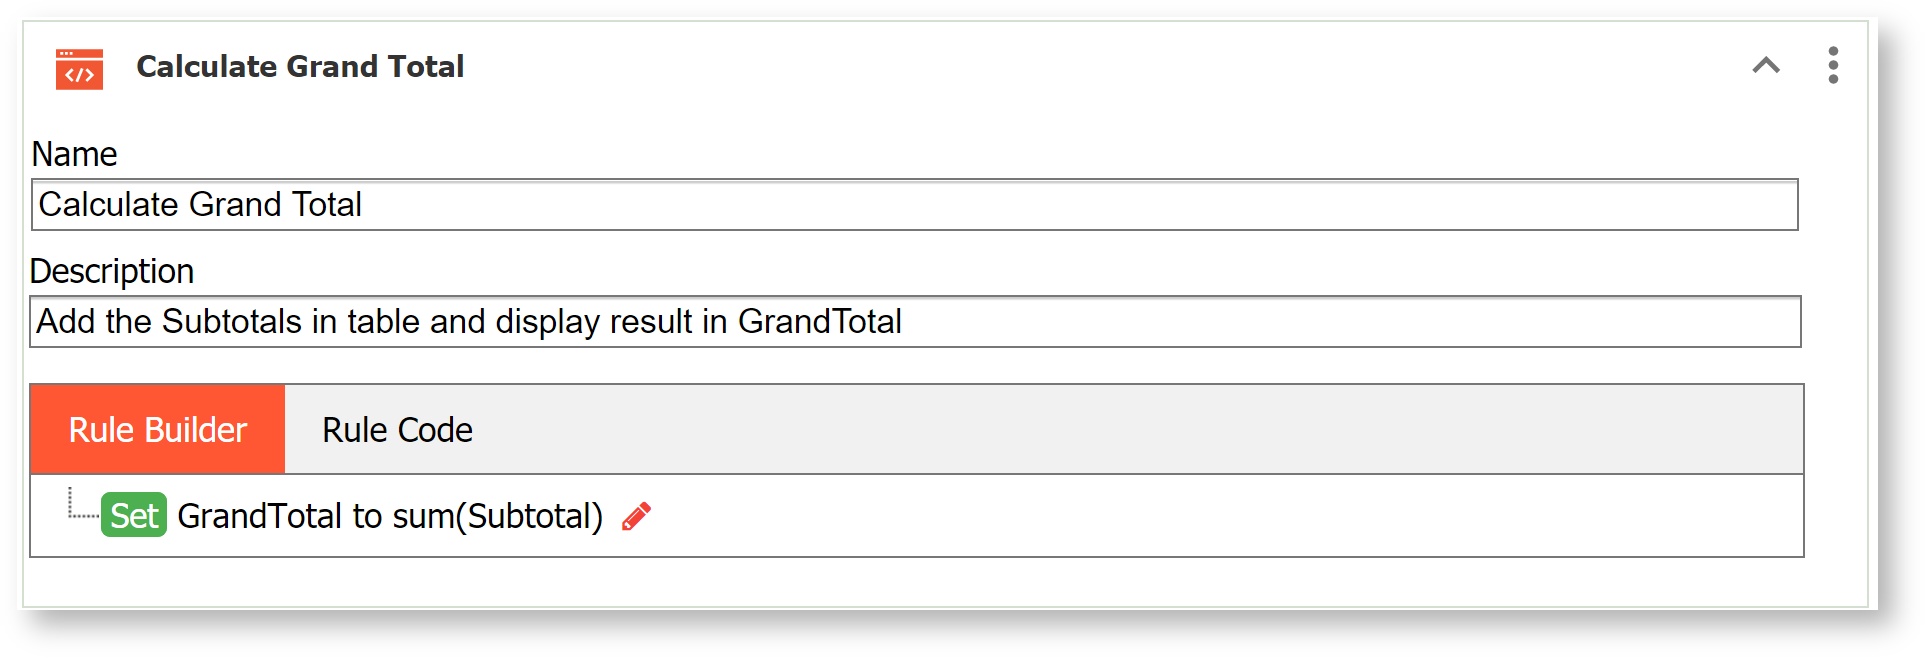
Now you want to add a Grand Total field to your Purchase Order workflow. The Grand Total field contains the sum of the Subtotal fields in each row of the table. Add a Money control to your form/workflow and name it Grand Total. Use the Rule Builder to create the rule. The Rule Builder automatically creates the code to handle adding/deleting table rows.
| Section | |||||||
|---|---|---|---|---|---|---|---|
|
Show or Hide Controls and Workflow Steps
Often forms/workflows need fields that are only used depending on the answers to prior form fields. For example, if your form requires both a Shipping Address and Billing Address but the your form user has checked "Shipping is the same as Billing Address" then it's nice to not clutter the form with the unnecessary Shipping Address input fields. You can use rules to hide the Shipping Address and show it only when the form user says they are different.
...
See the documentation for Data Sources and Schemas for details on implementing a Show/Hide rule with XSD controls.
Show the Shipping Address if it is different from the Billing Address
| Expand | ||||||||||||
|---|---|---|---|---|---|---|---|---|---|---|---|---|
| ||||||||||||
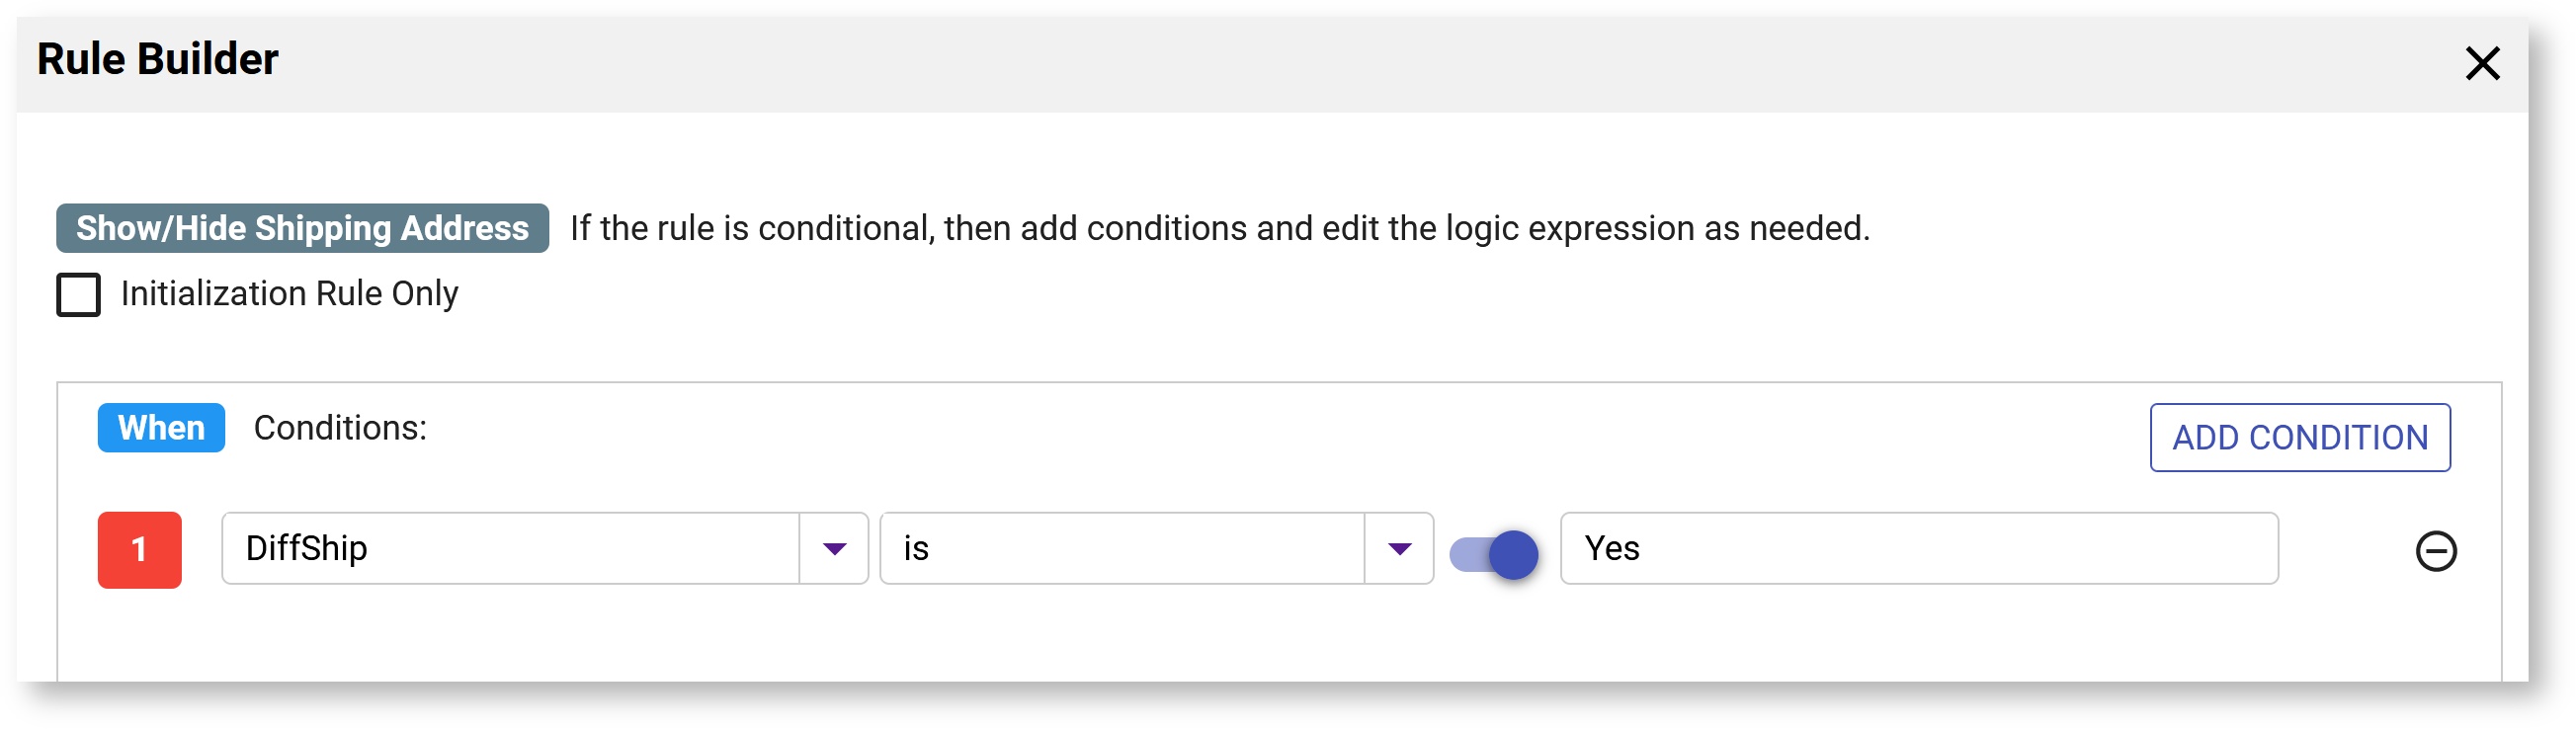
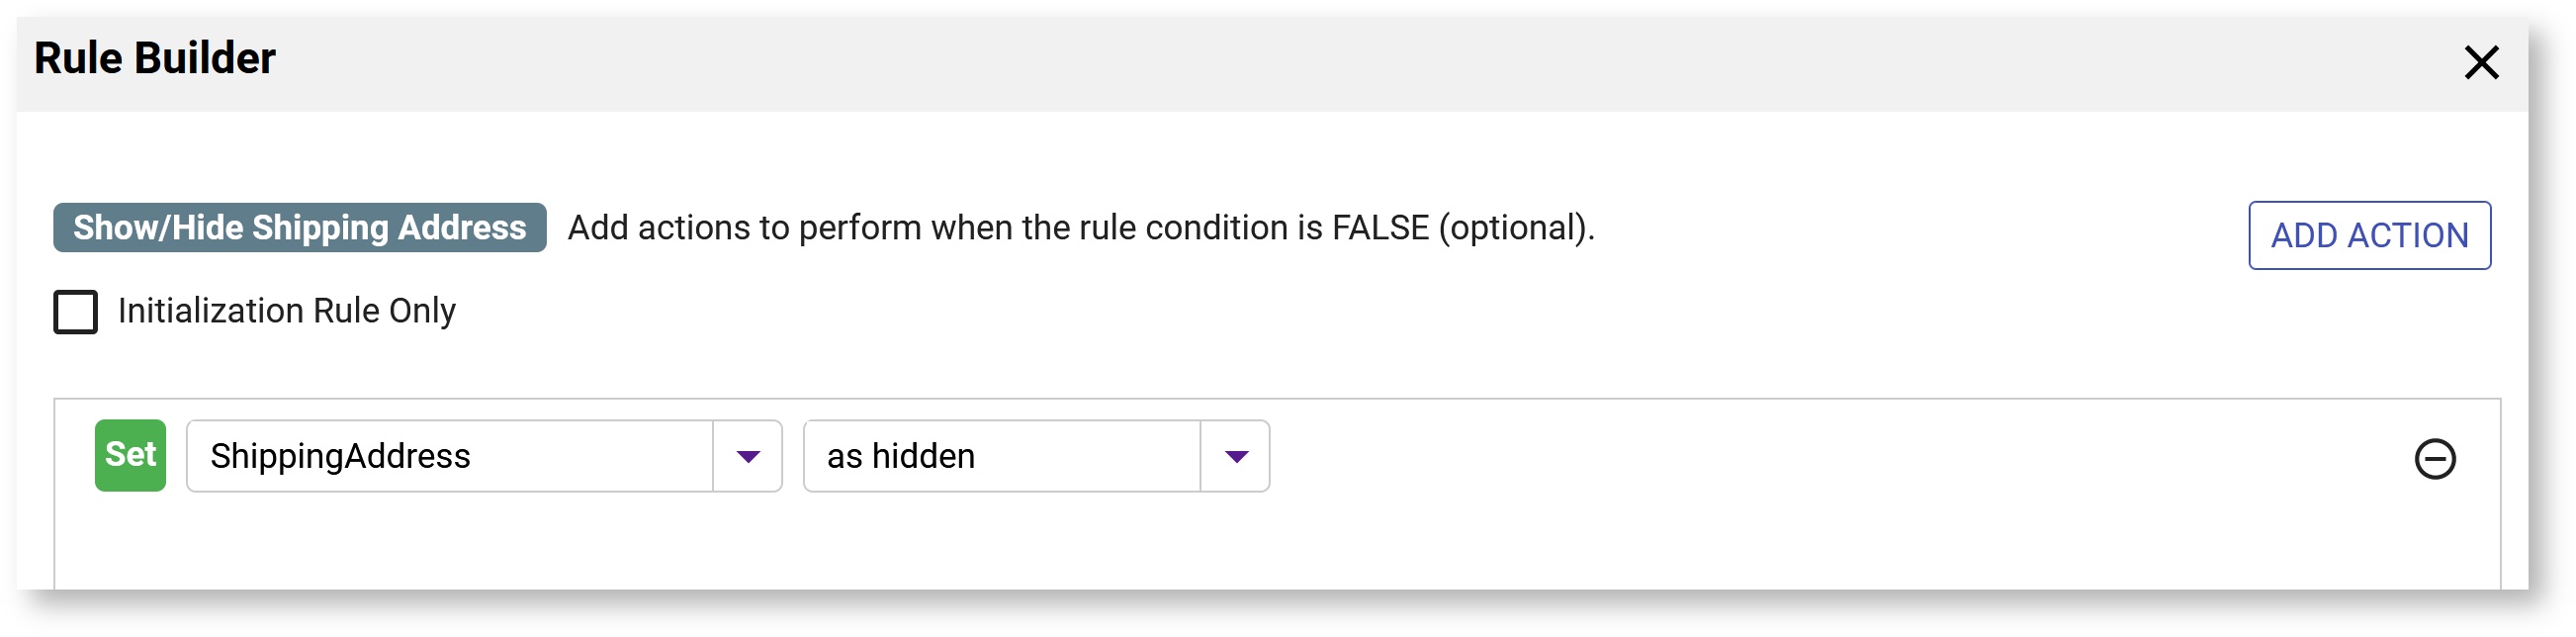
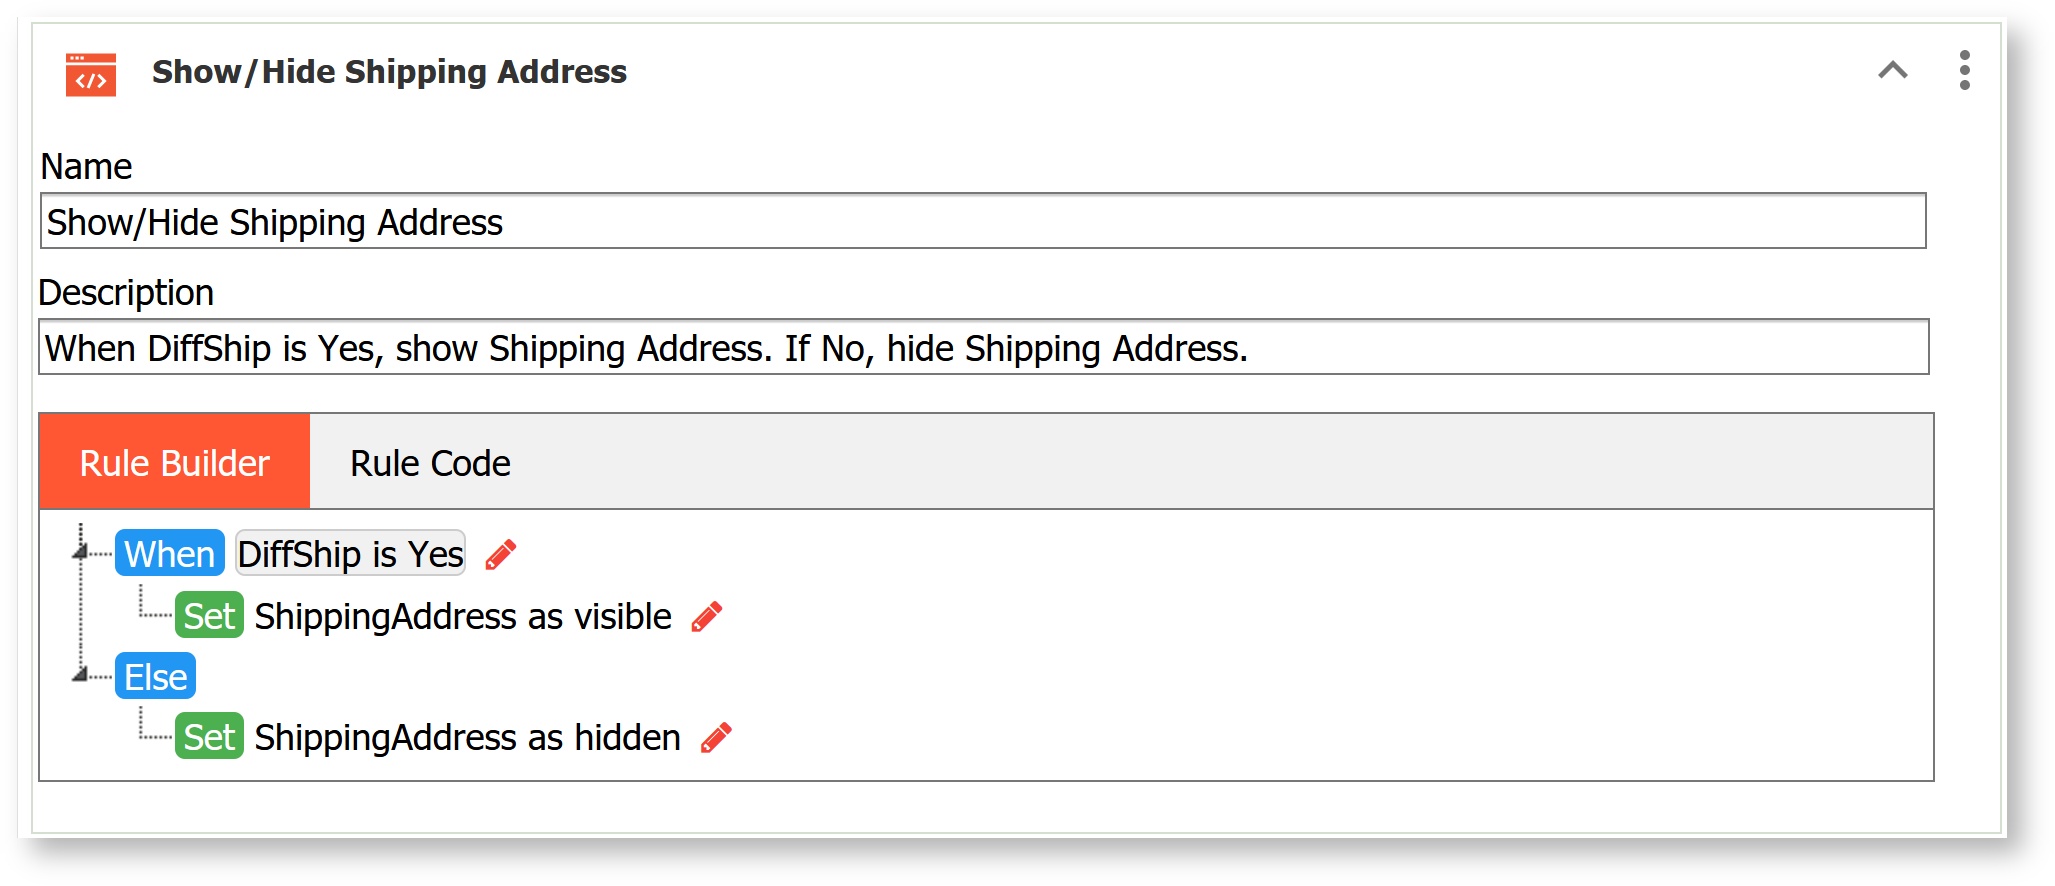
Your form contains a Billing Address section, a hidden Shipping Address section a Radio control named DiffShip that asks the question, "Is the Shipping Address different from the Billing Address?" If the Billing and Shipping addresses are the same there is no need to clutter the form with the unnecessary Shipping Address input fields. You can use rules to hide the Shipping Address and show it only when the form user says they are different. This rule will automatically fire whenever the user changes the response to DiffShip and will show/hide the shipping address section. In this example, an Else Action is helpful so that when the form loads, and if the user changes a Yes response back to No, the section will be hidden. 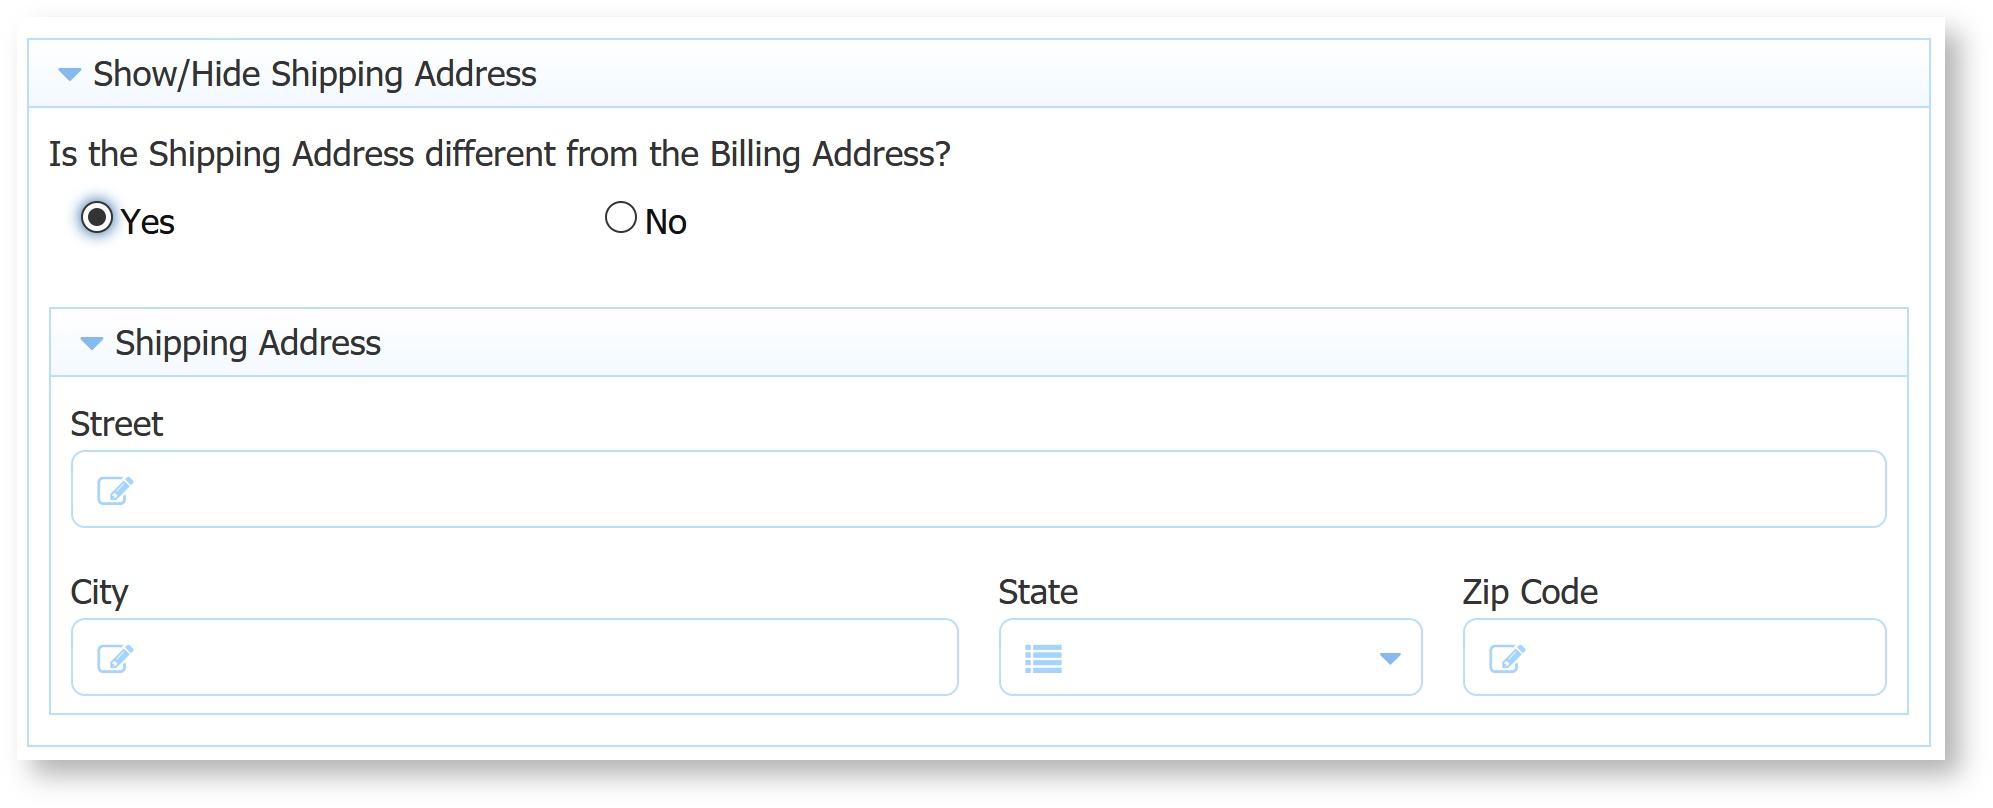
|


Show a Message based on Selections in Other controls
| Expand | ||
|---|---|---|
| ||
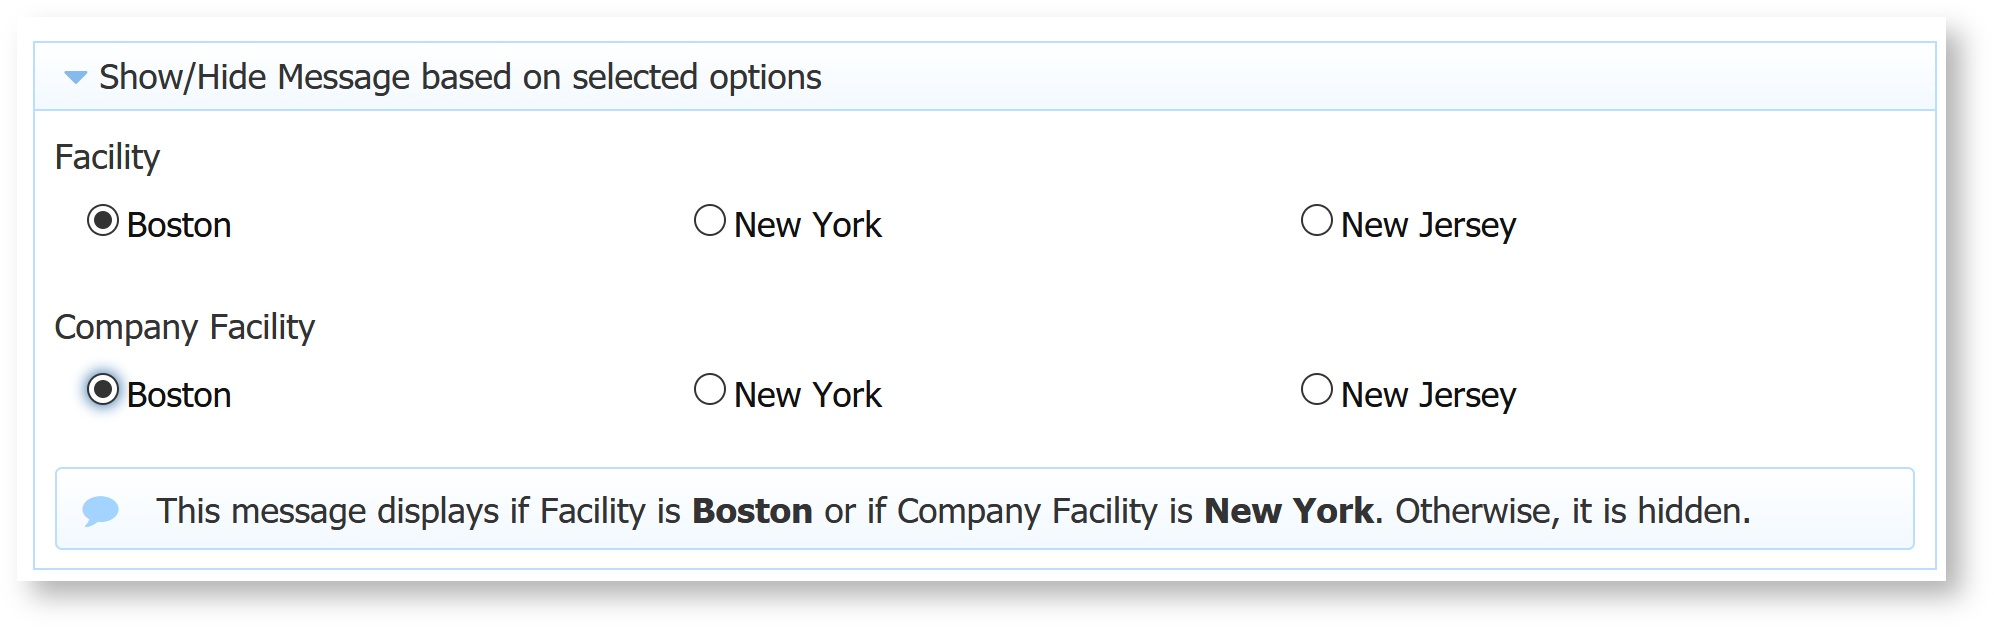
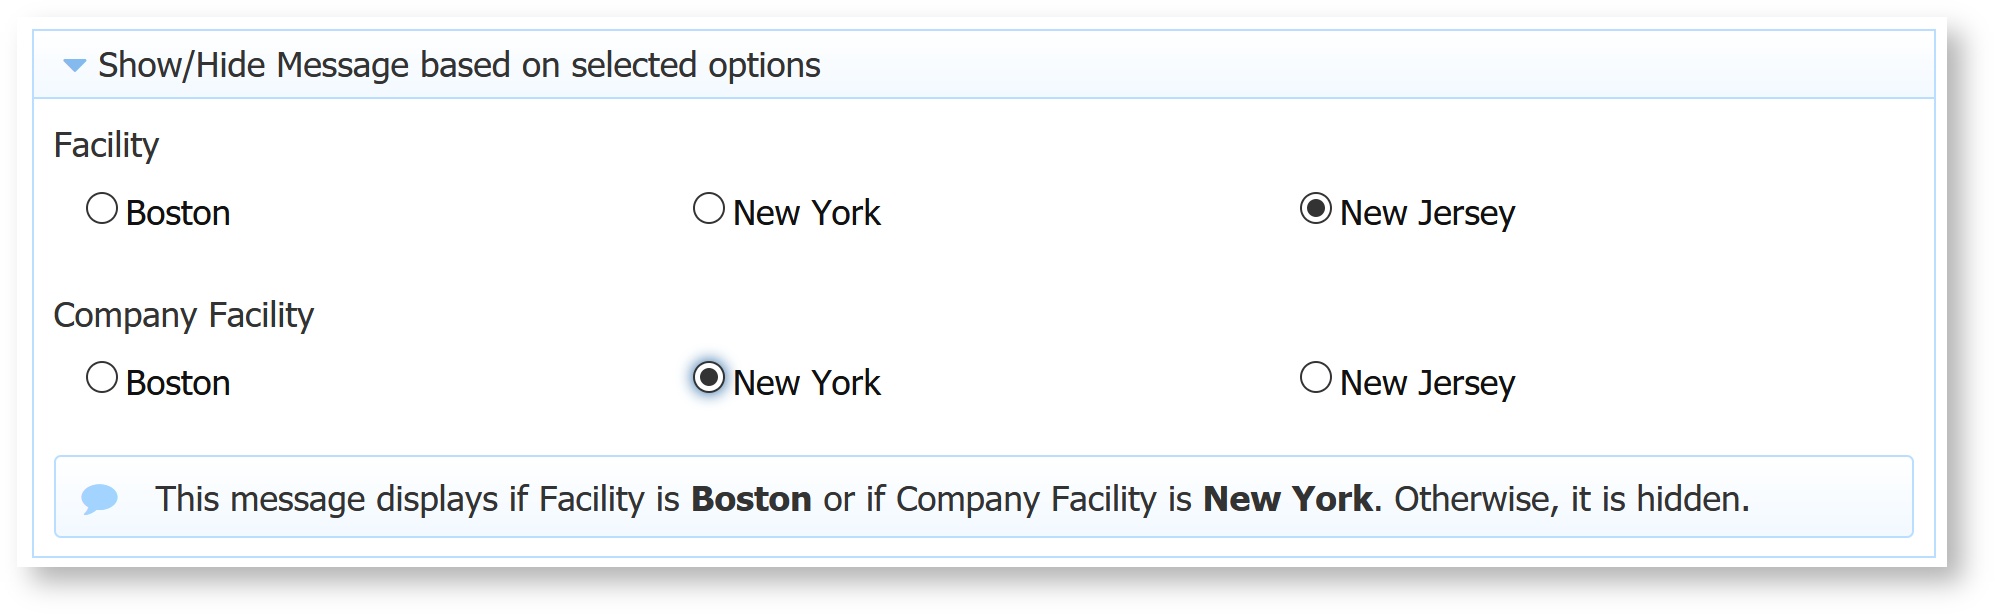
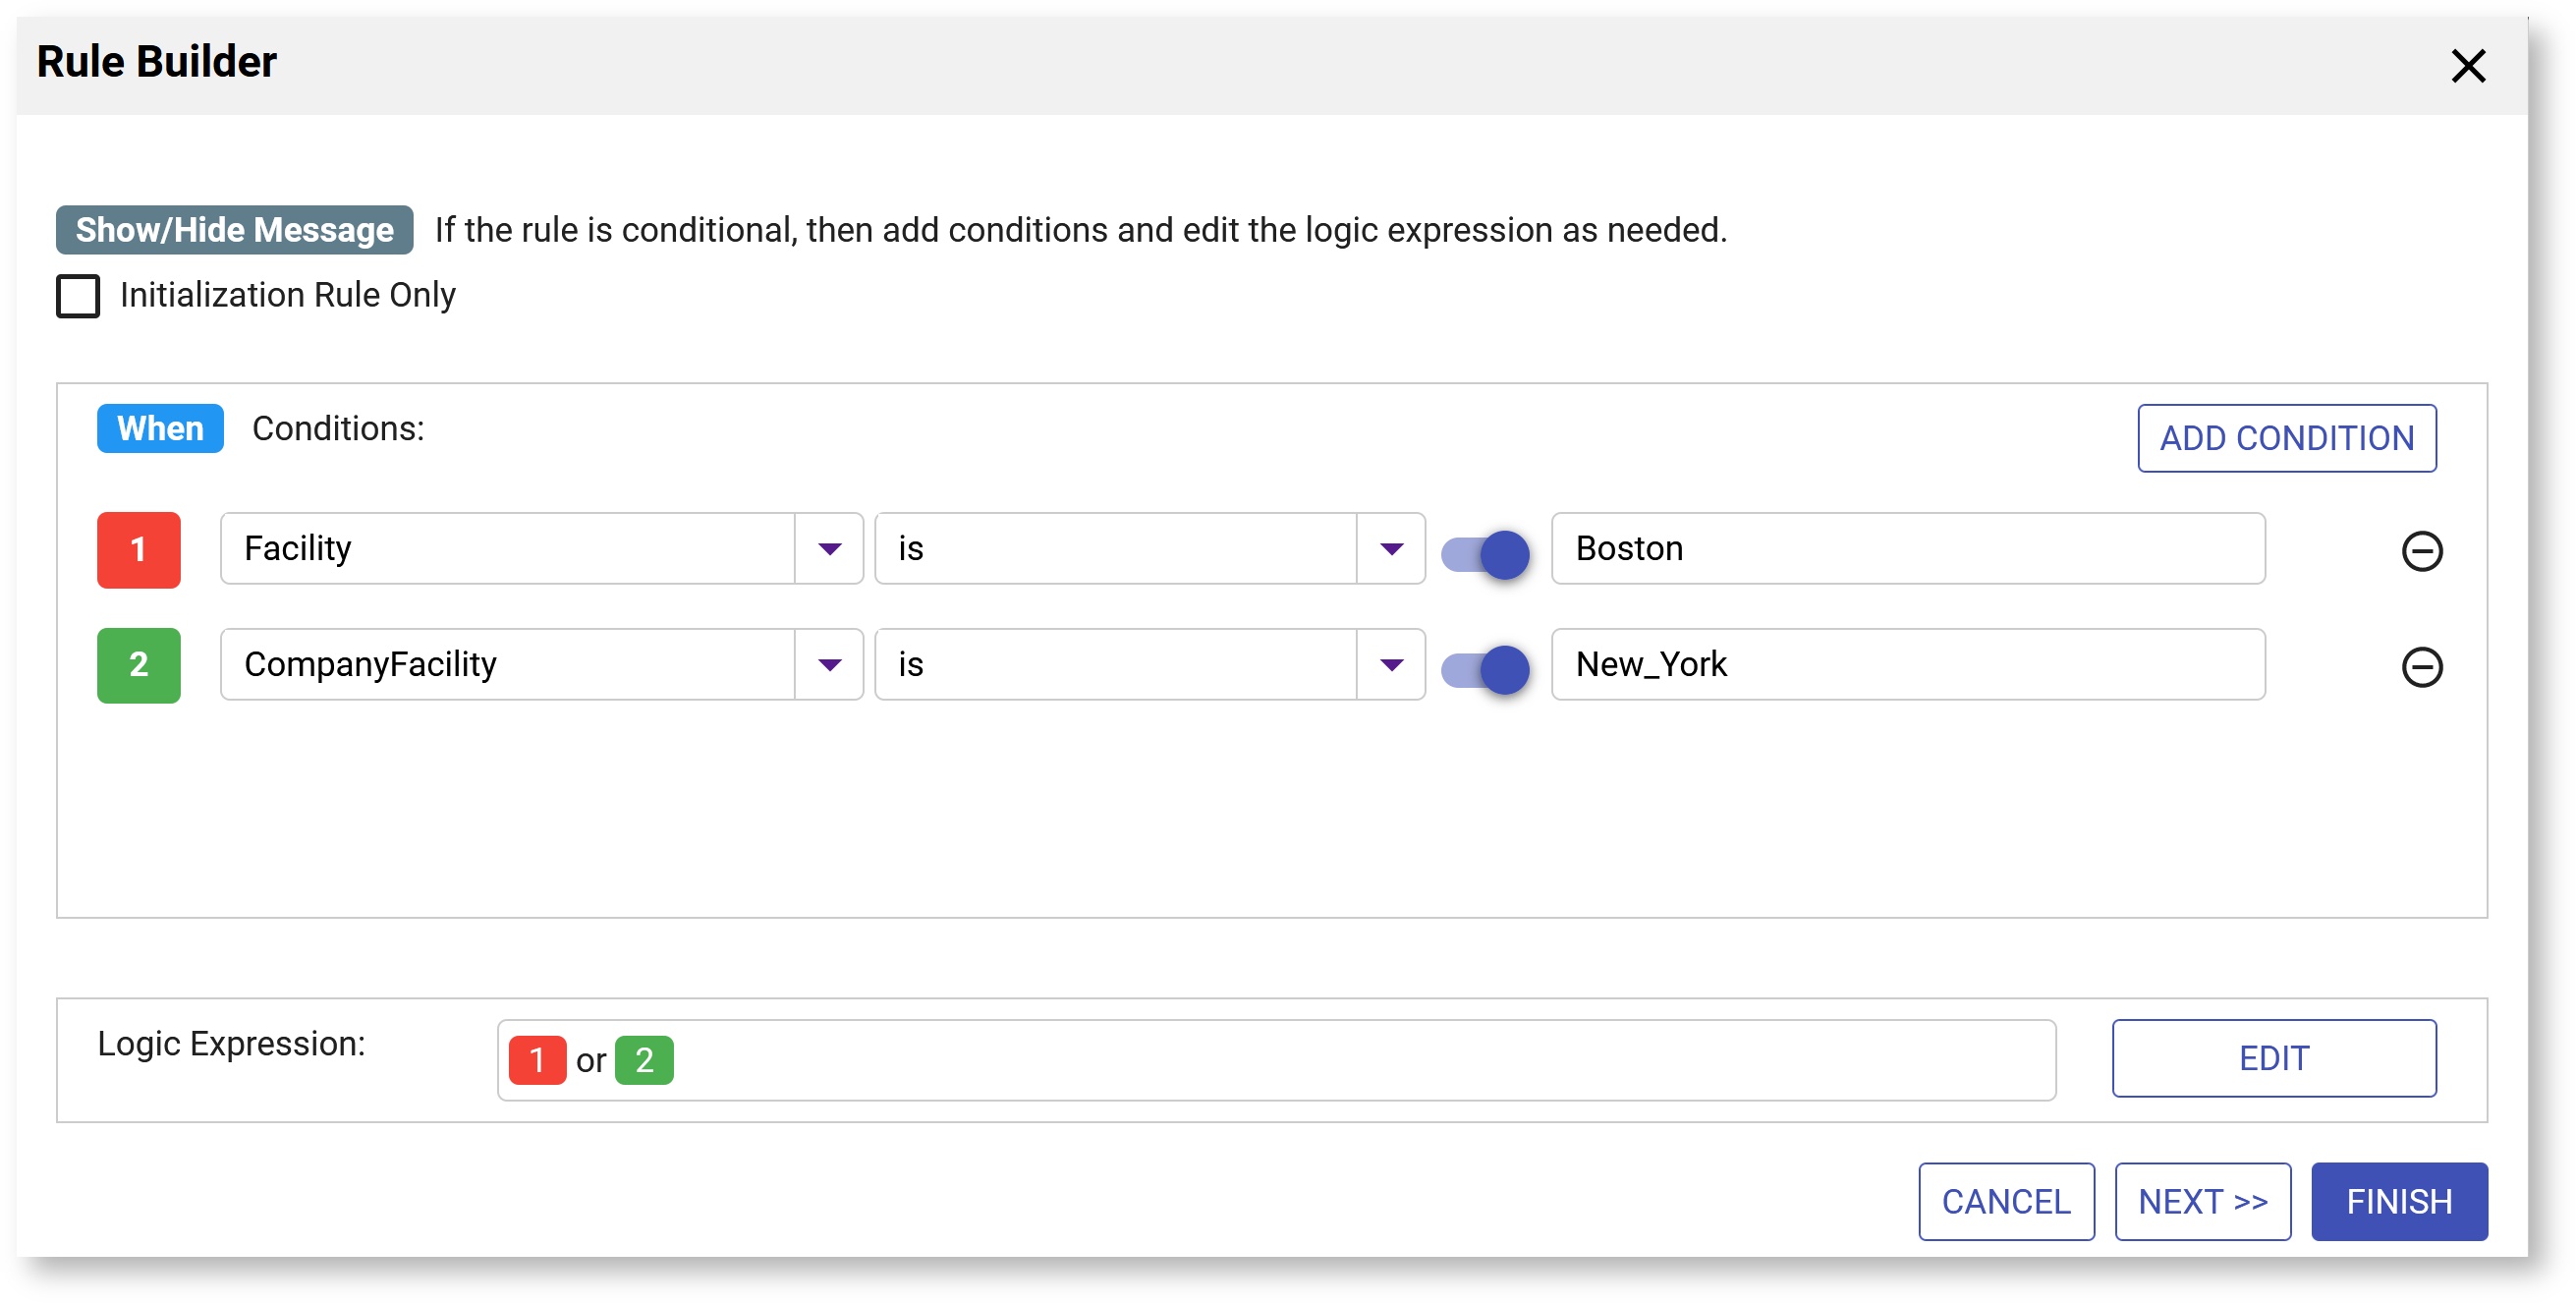
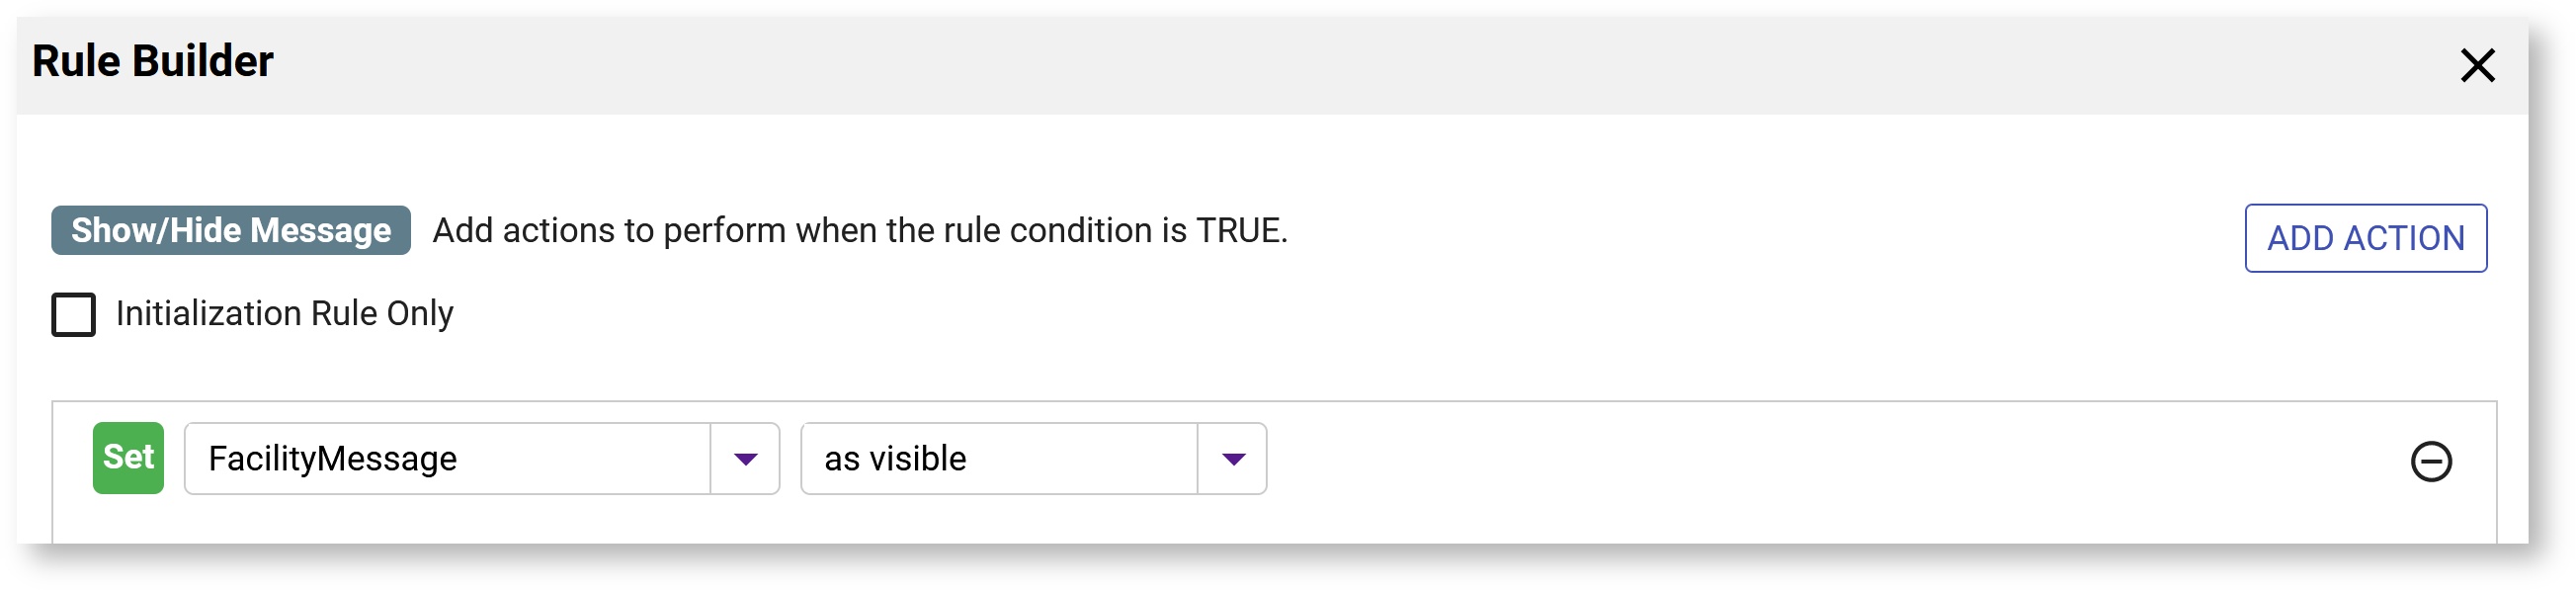
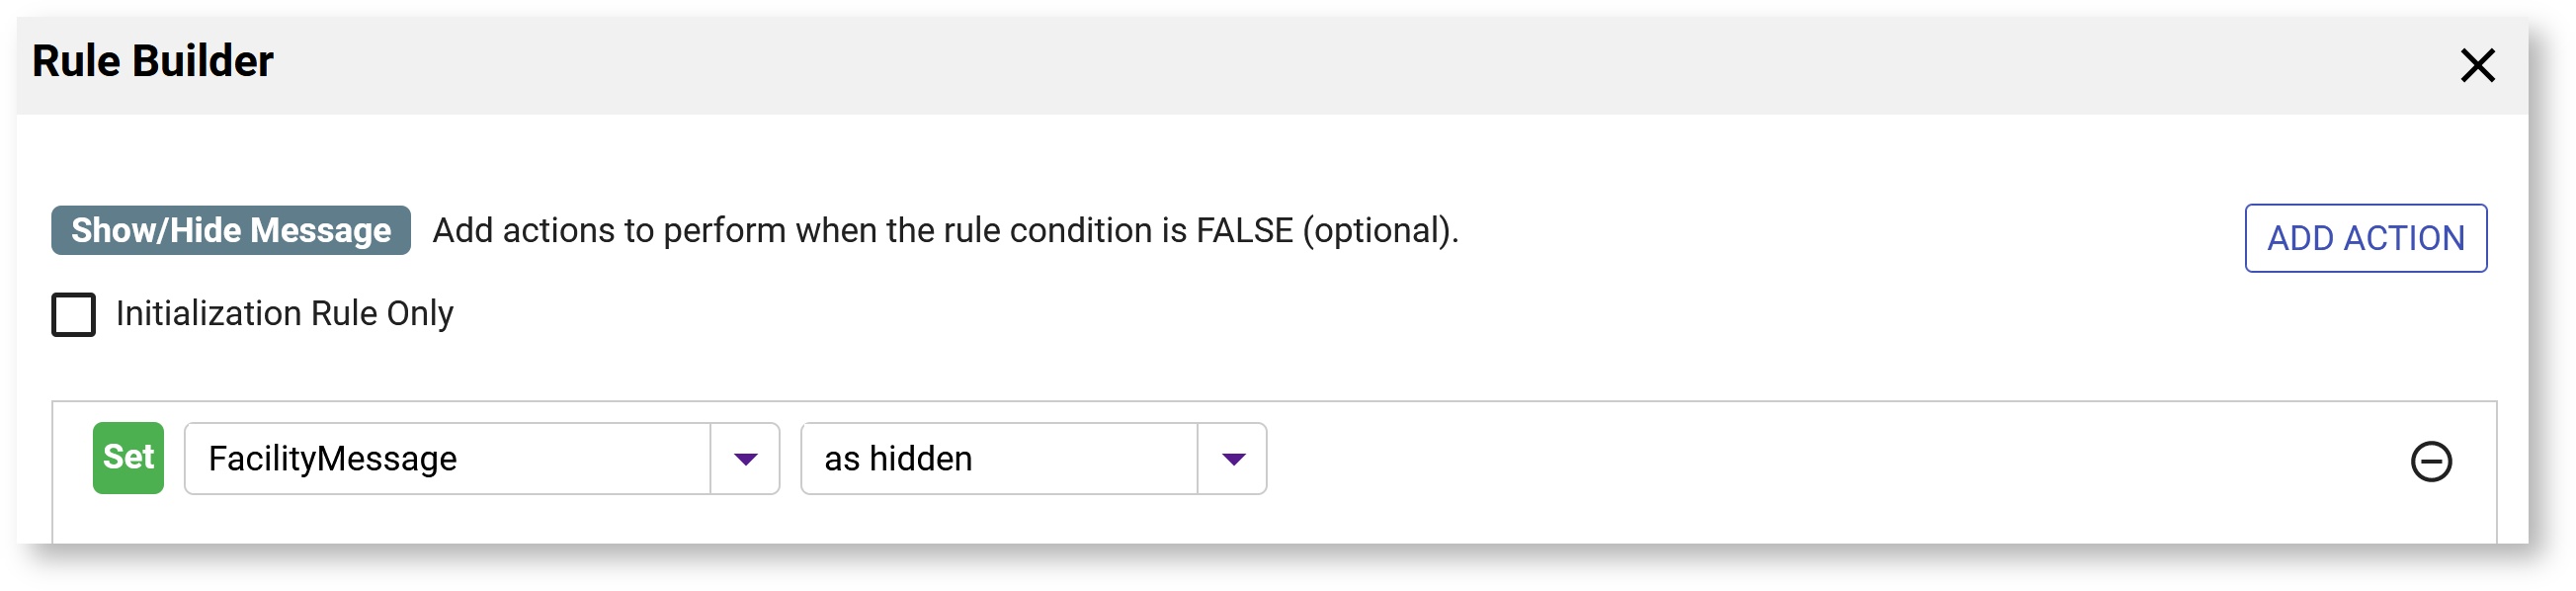
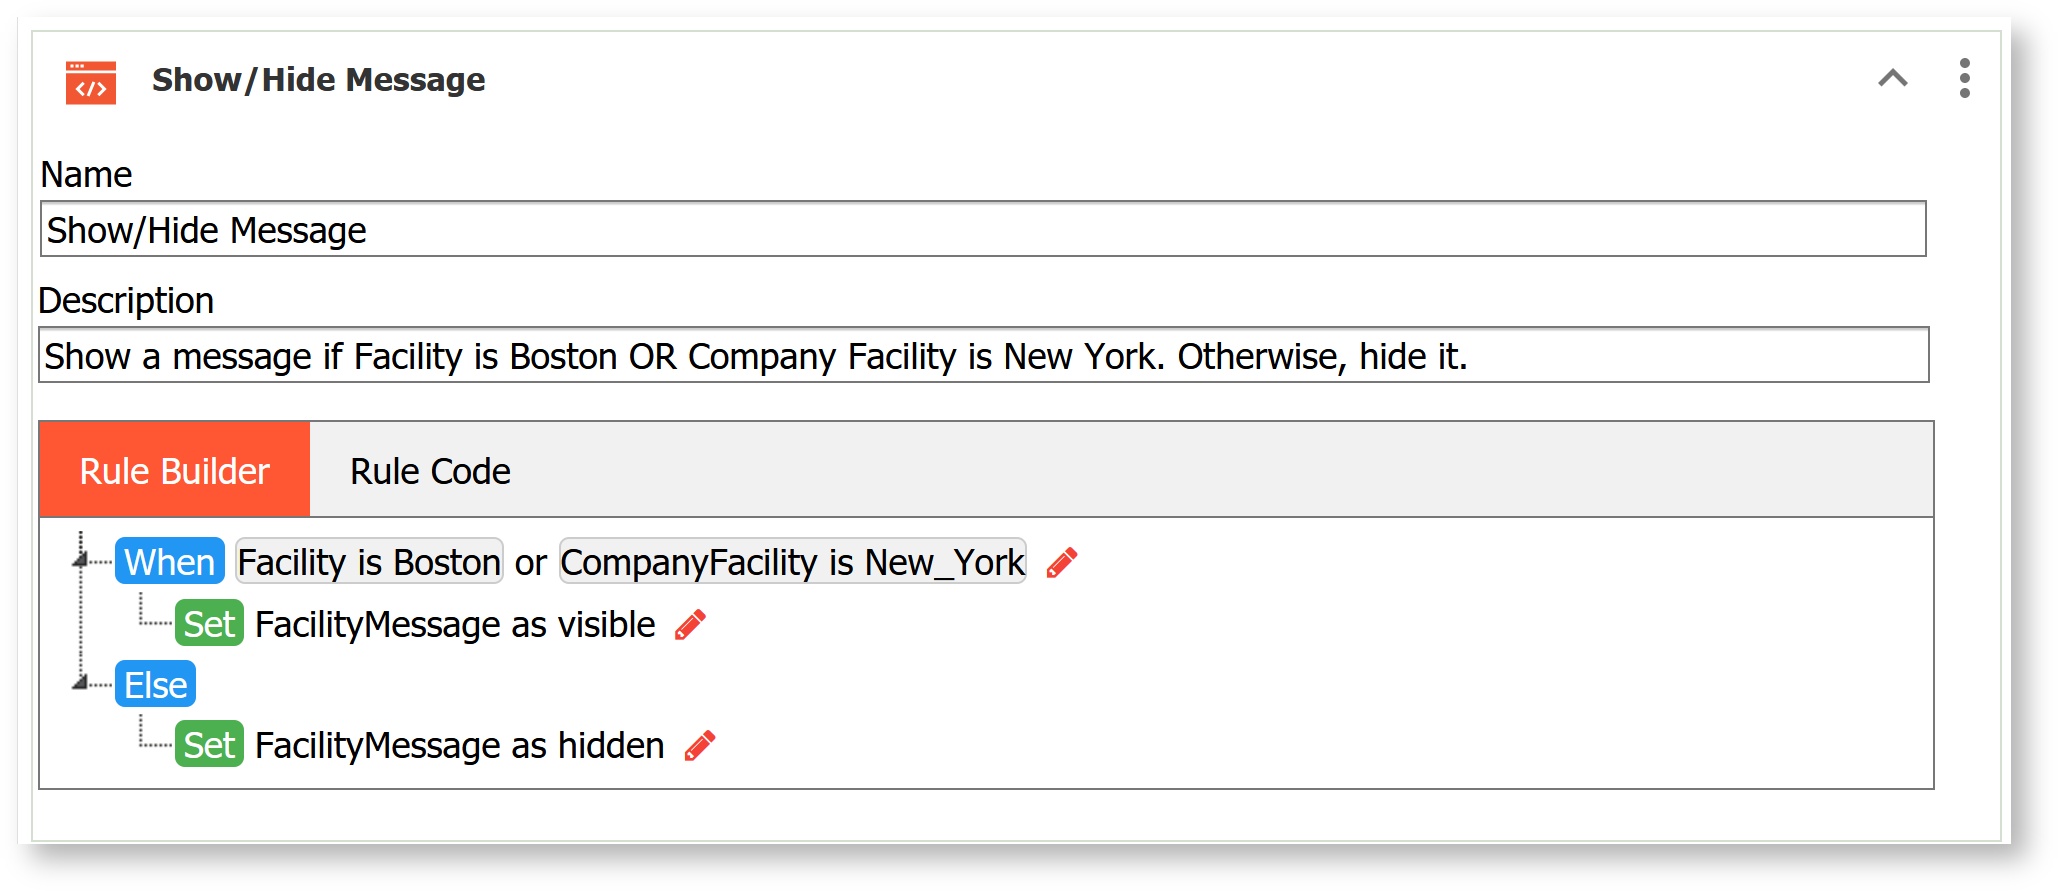
This form has a radio control named Facility and a second radio control named CompanyFacility. This rule makes a message control named FacilityMessage visible depending on the selected options. If Boston is selected for the Facility control OR New York is selected for the the CompanyFacility control, the hidden message control will display. Use the Rule Builder to create this rule - remember to change the "and" to "or" in the Logic expression so the rule will execute if either condition is met.
|
Show a Message if a control contains data
| Expand | ||
|---|---|---|
| ||
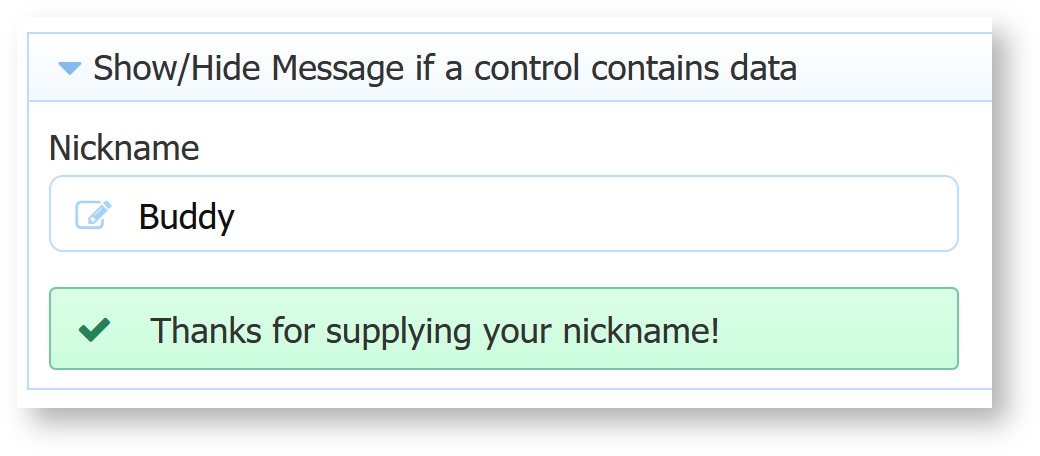
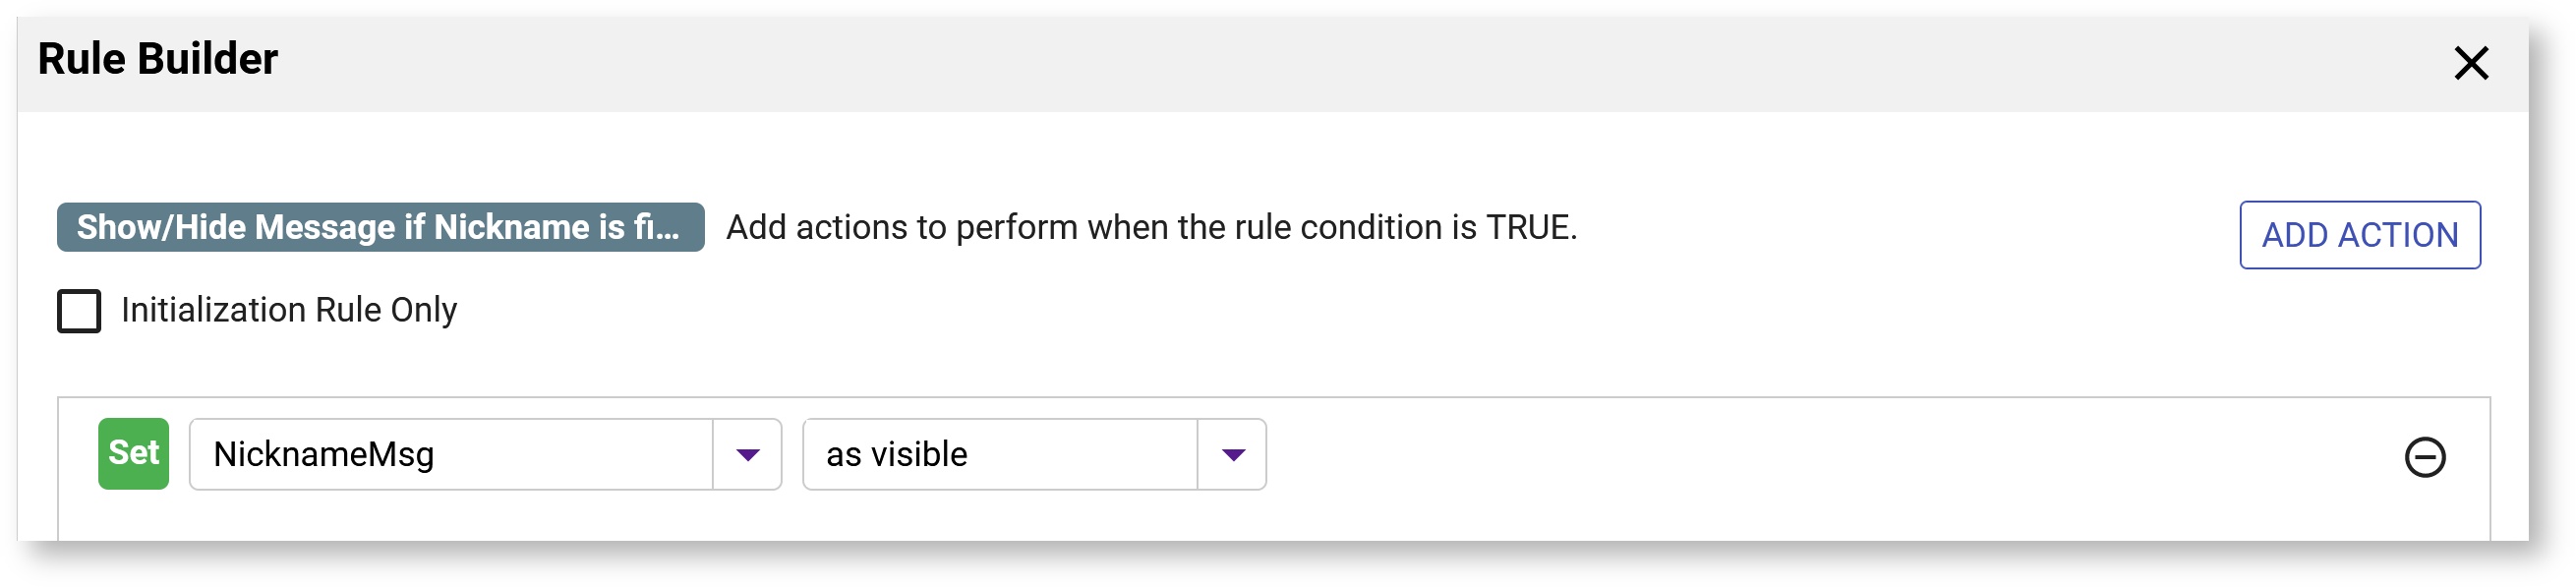
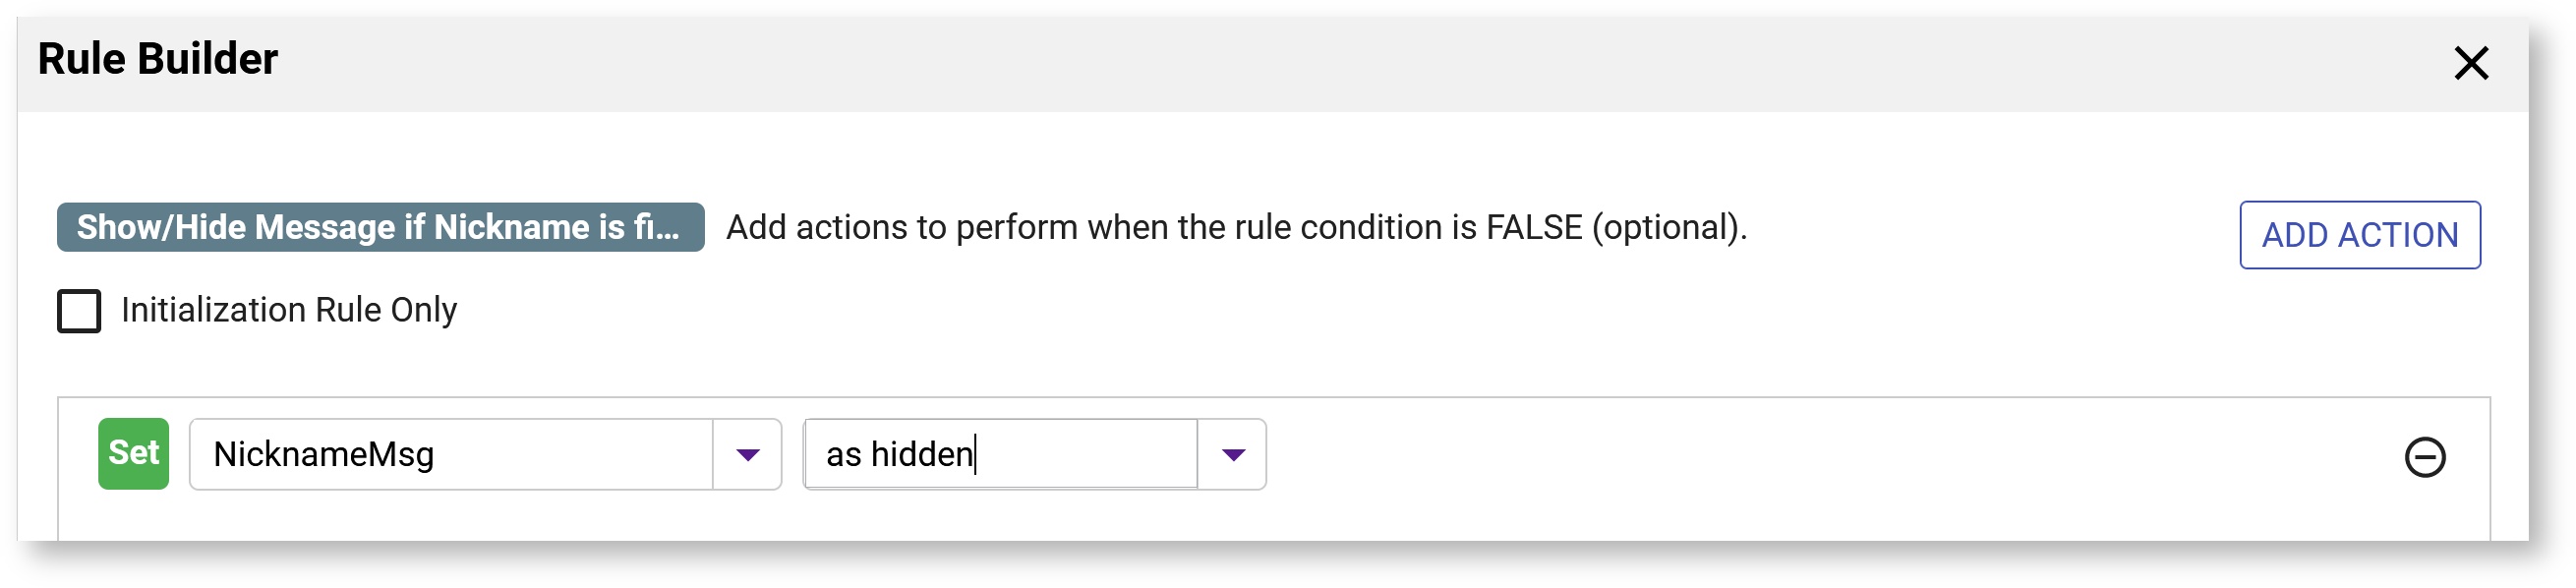
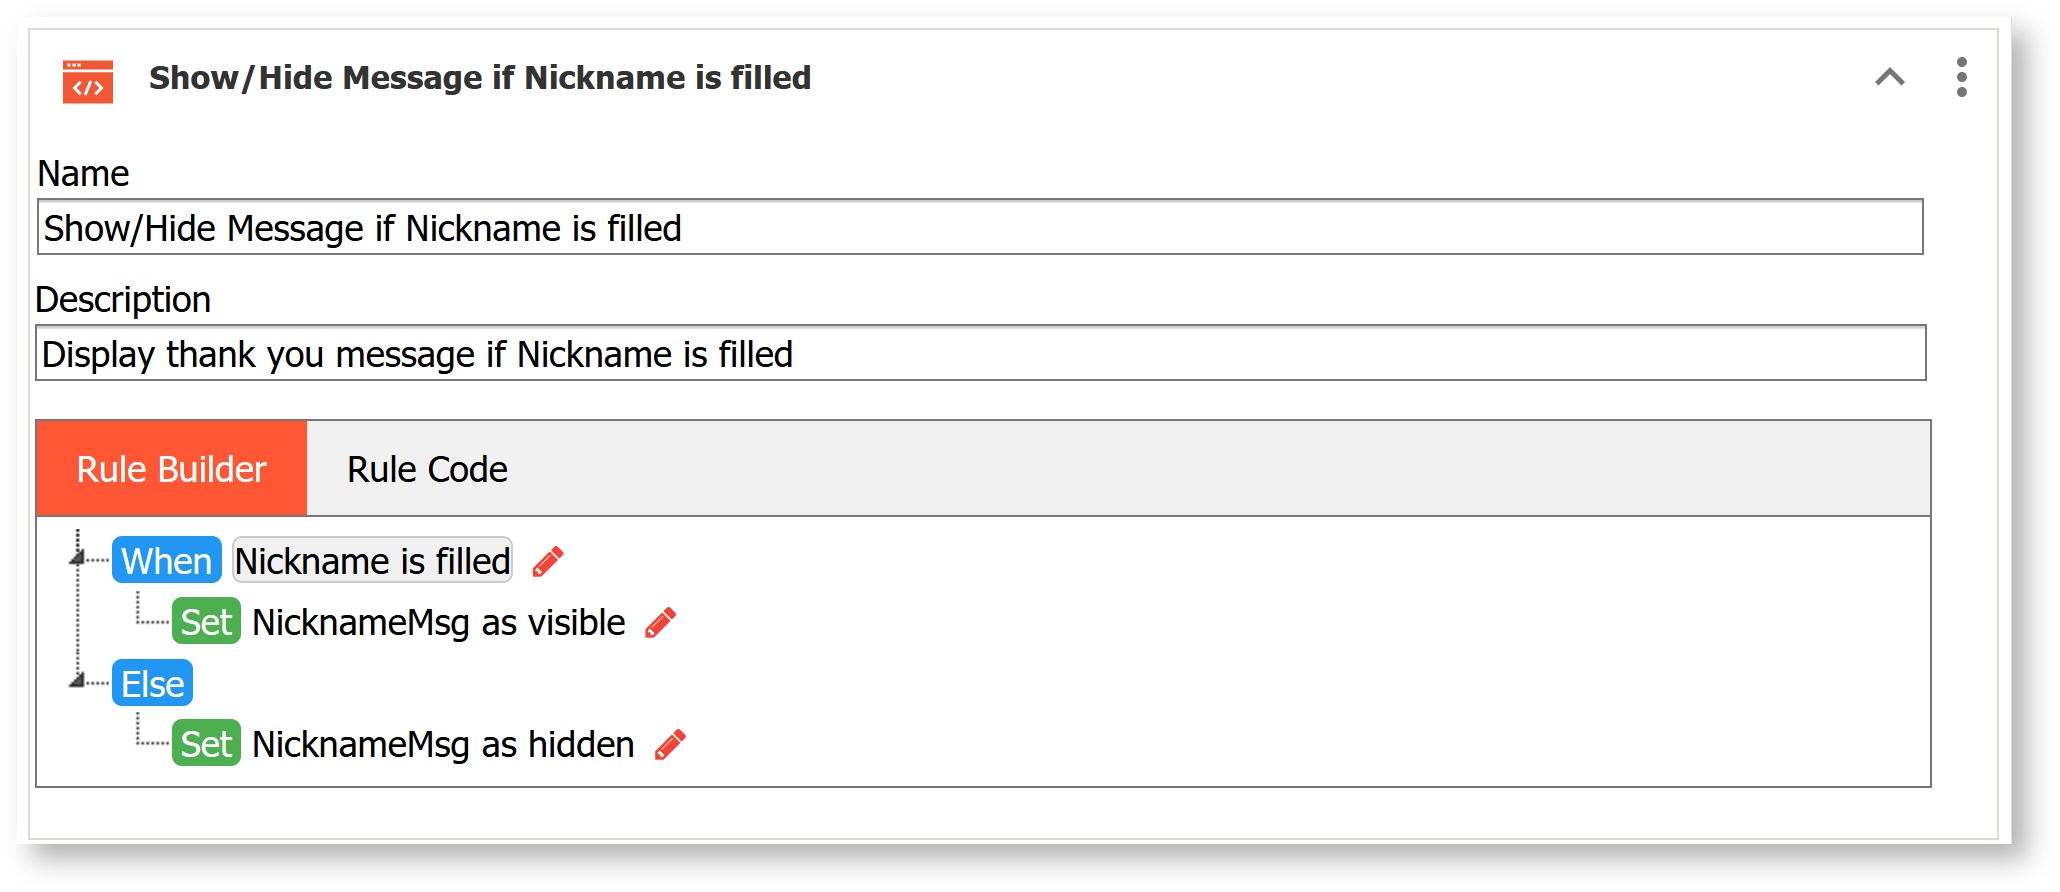
This rule makes the message control NicknameMsg visible when the user enters a value into the Nickname input text control. And then hides the message control if the user deletes the value in Nickname.
|

Show Tabs on specified workflow steps
| Expand | ||
|---|---|---|
| ||
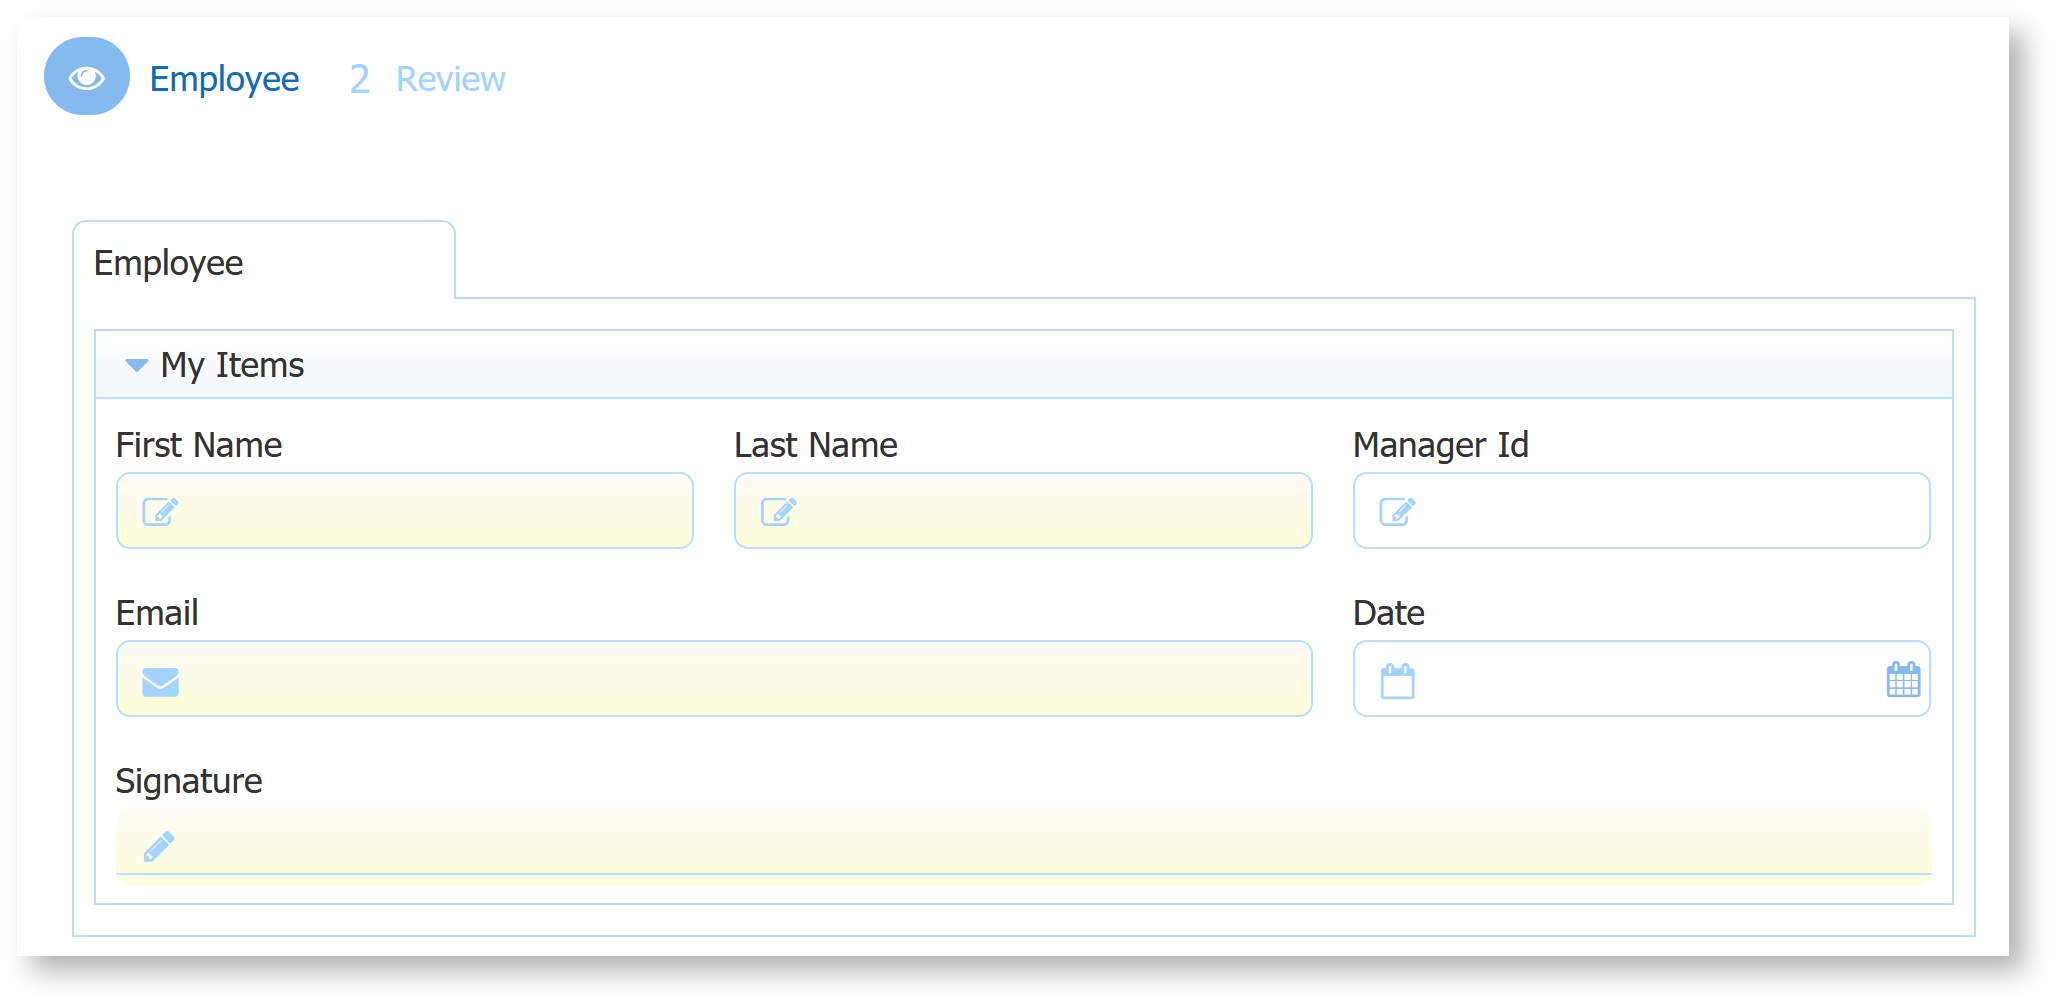
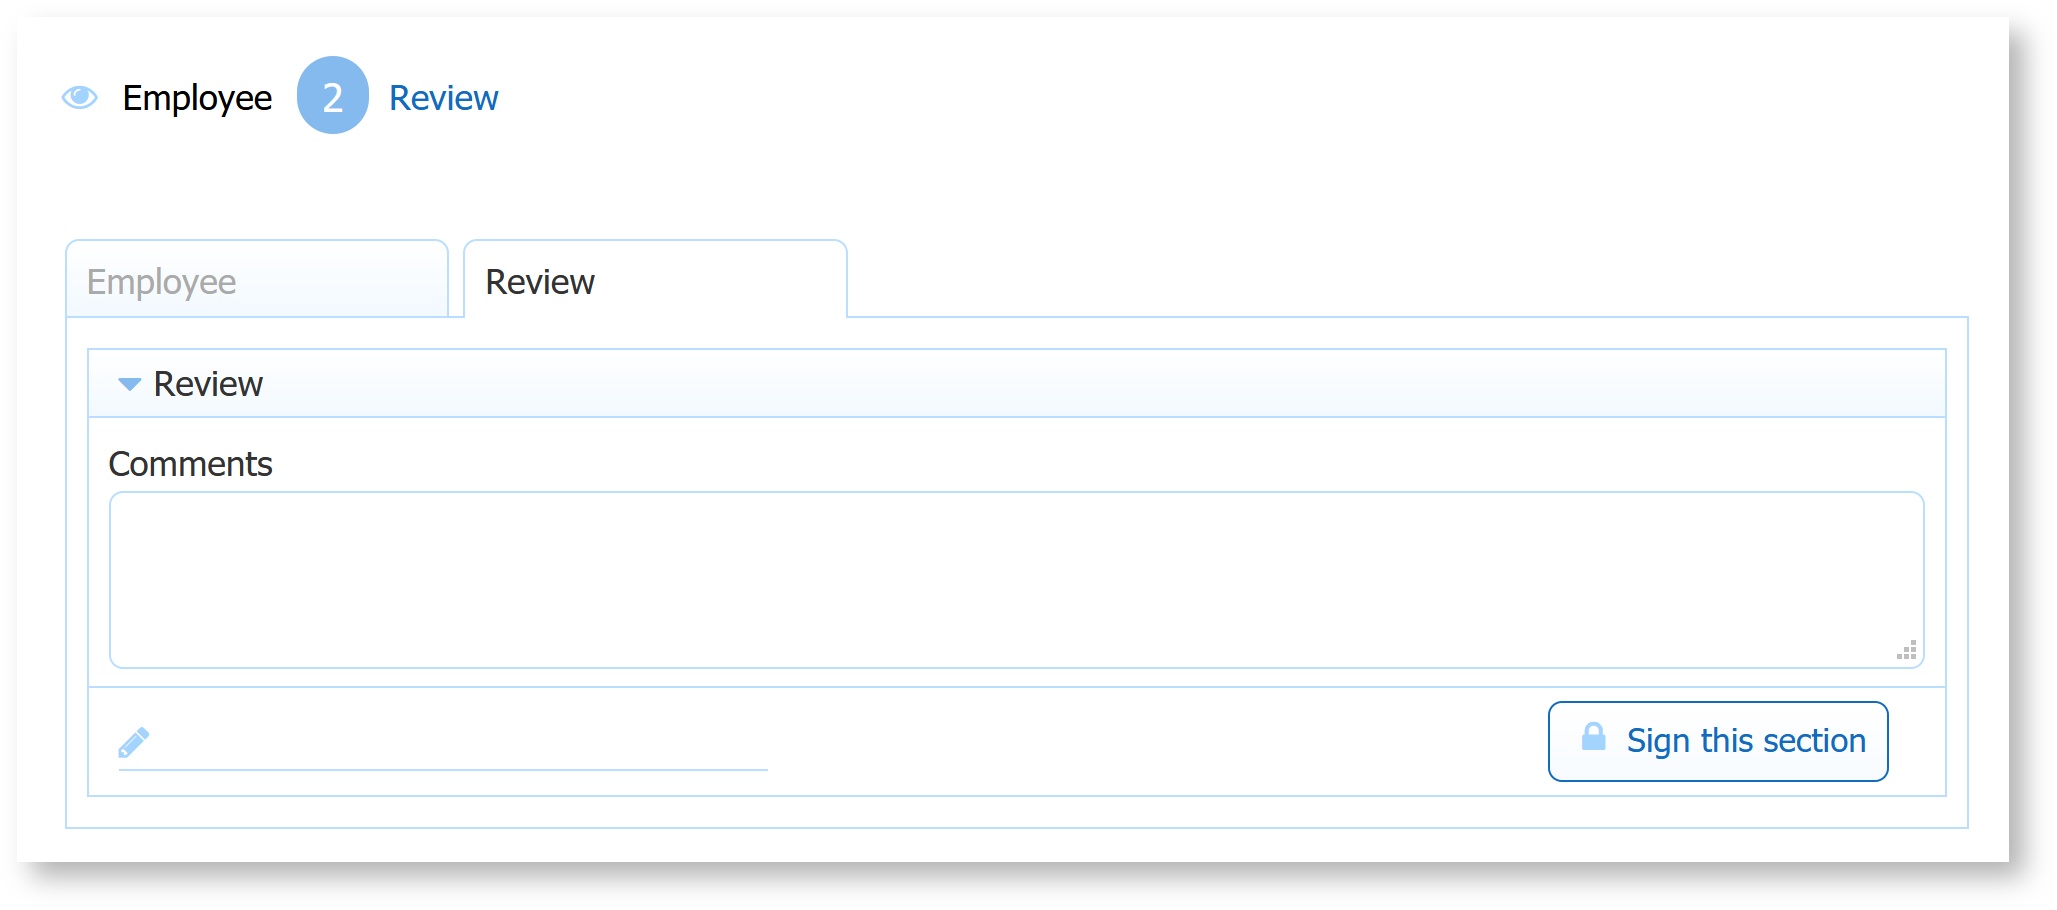
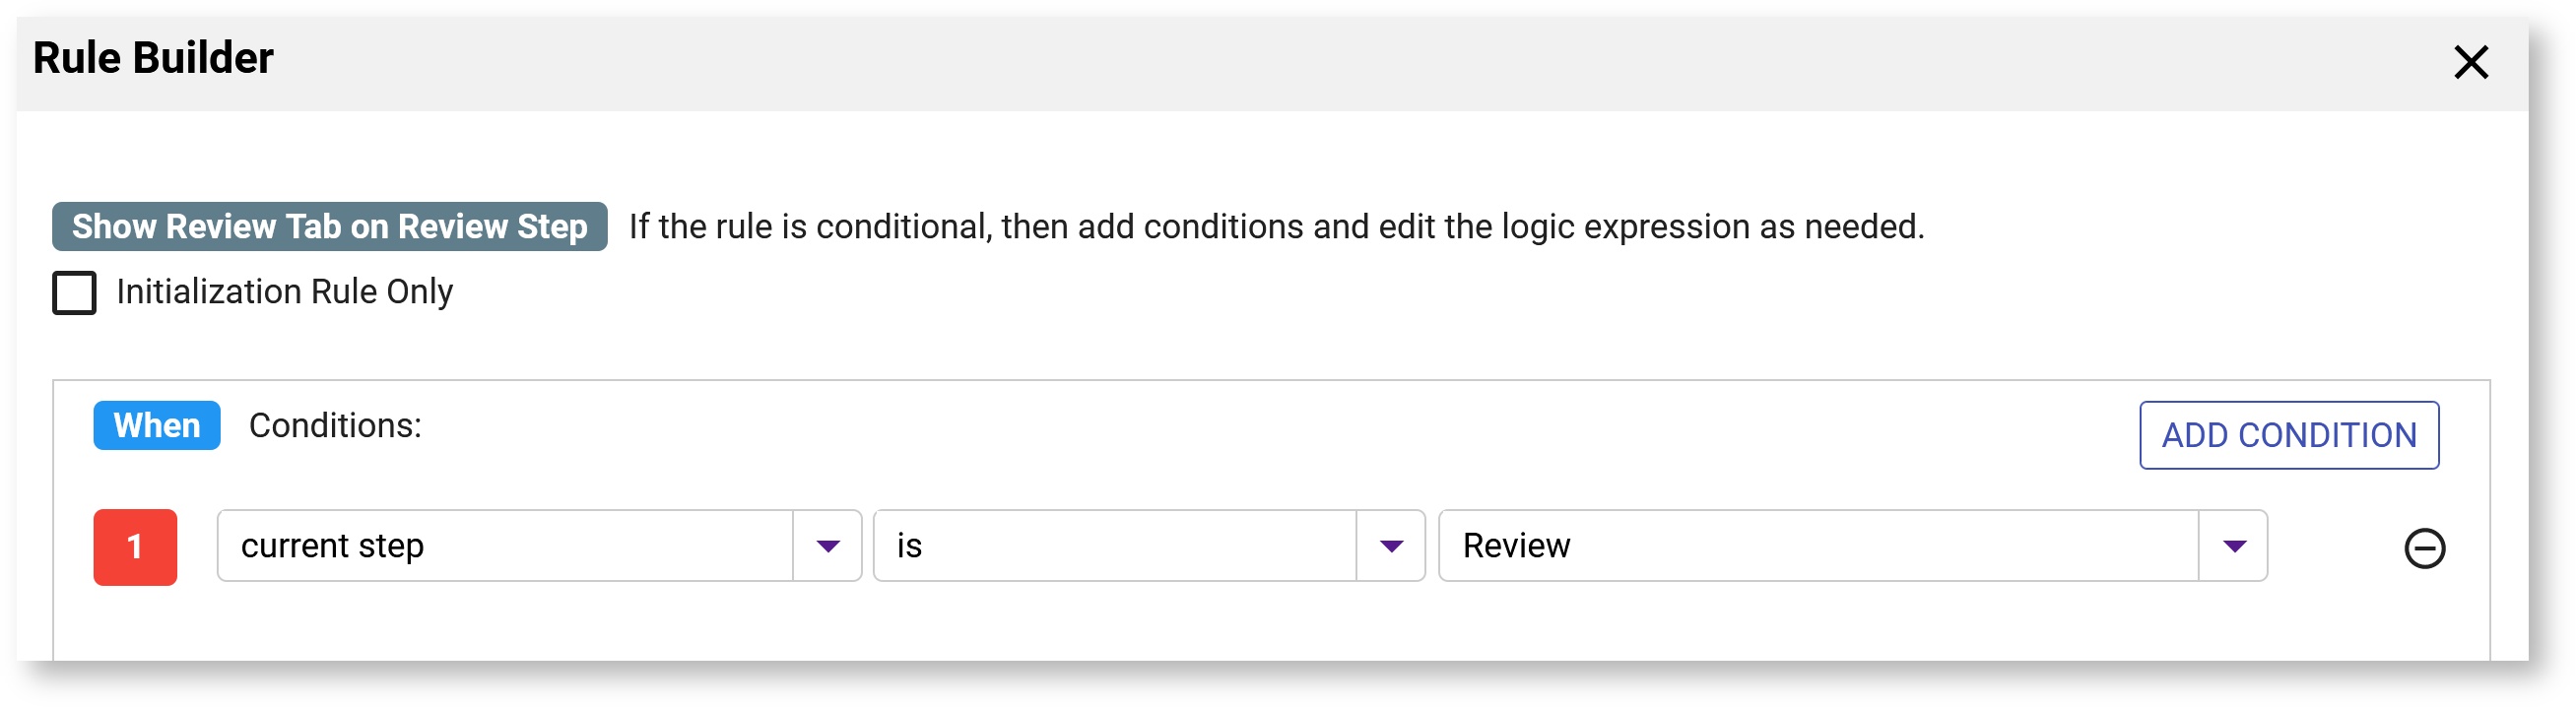
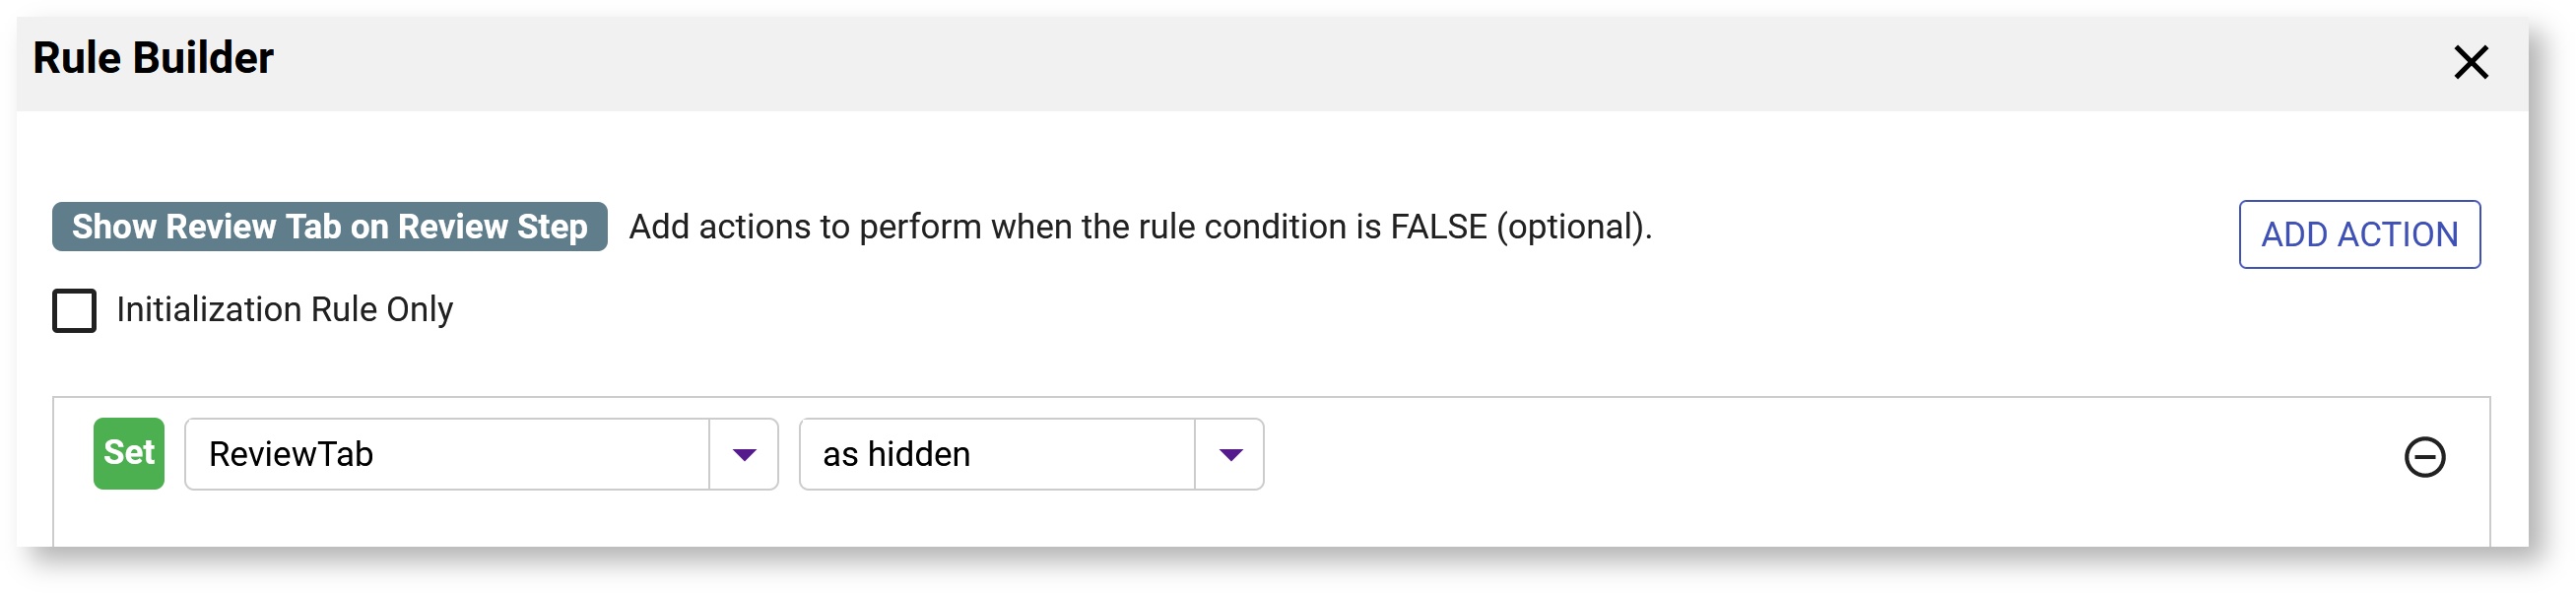
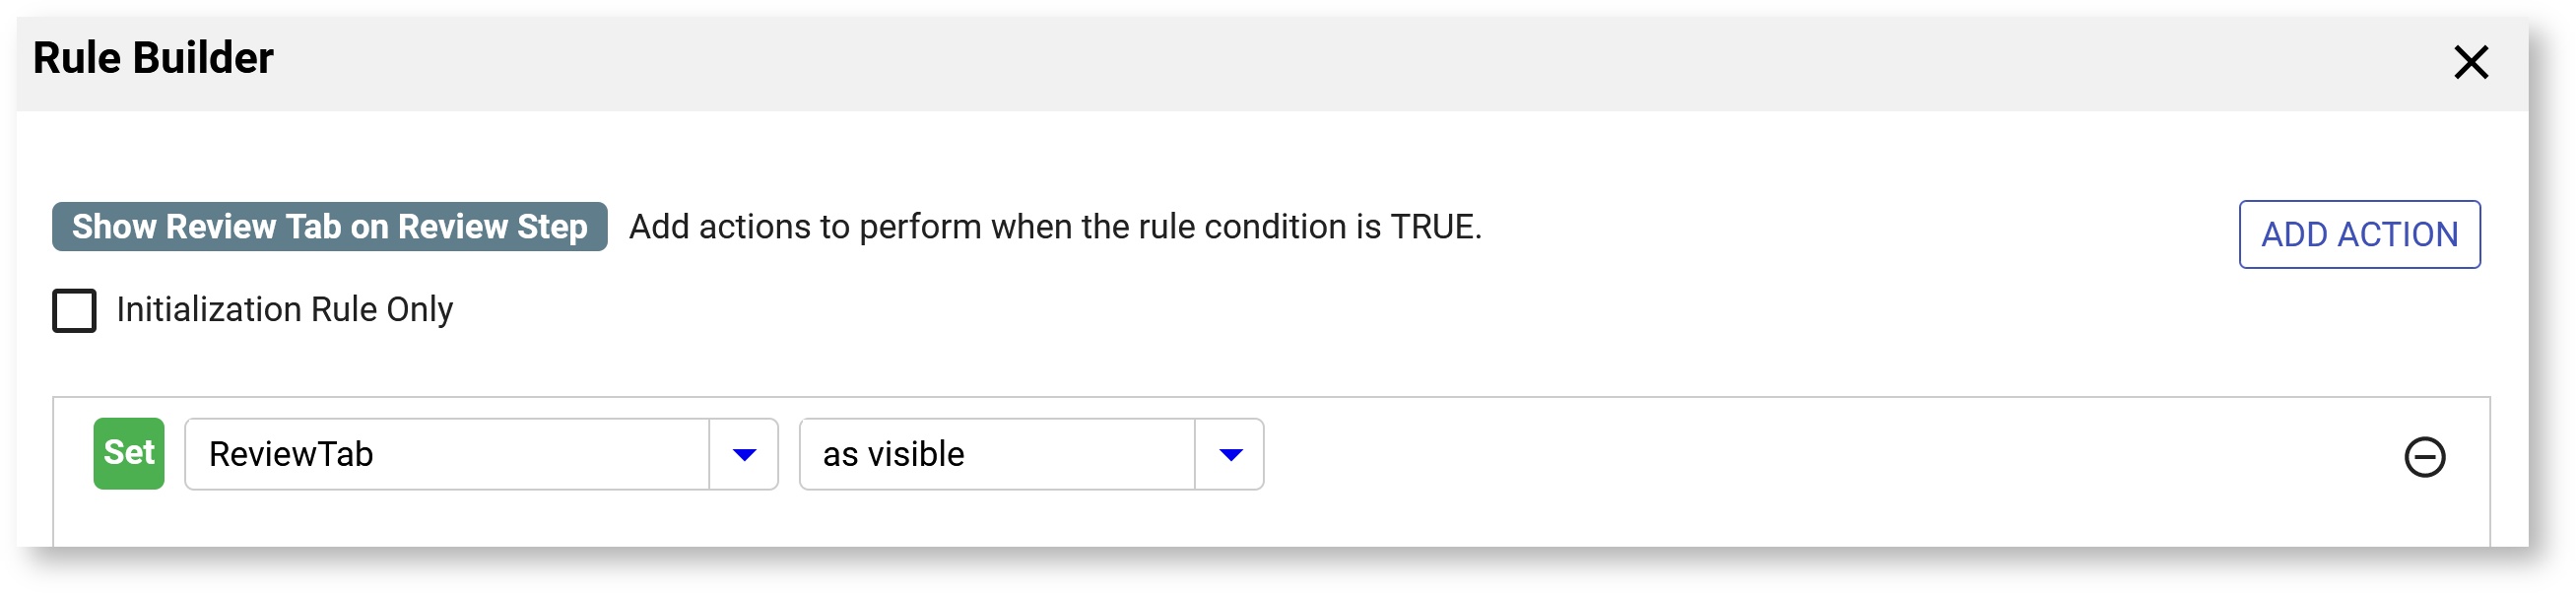
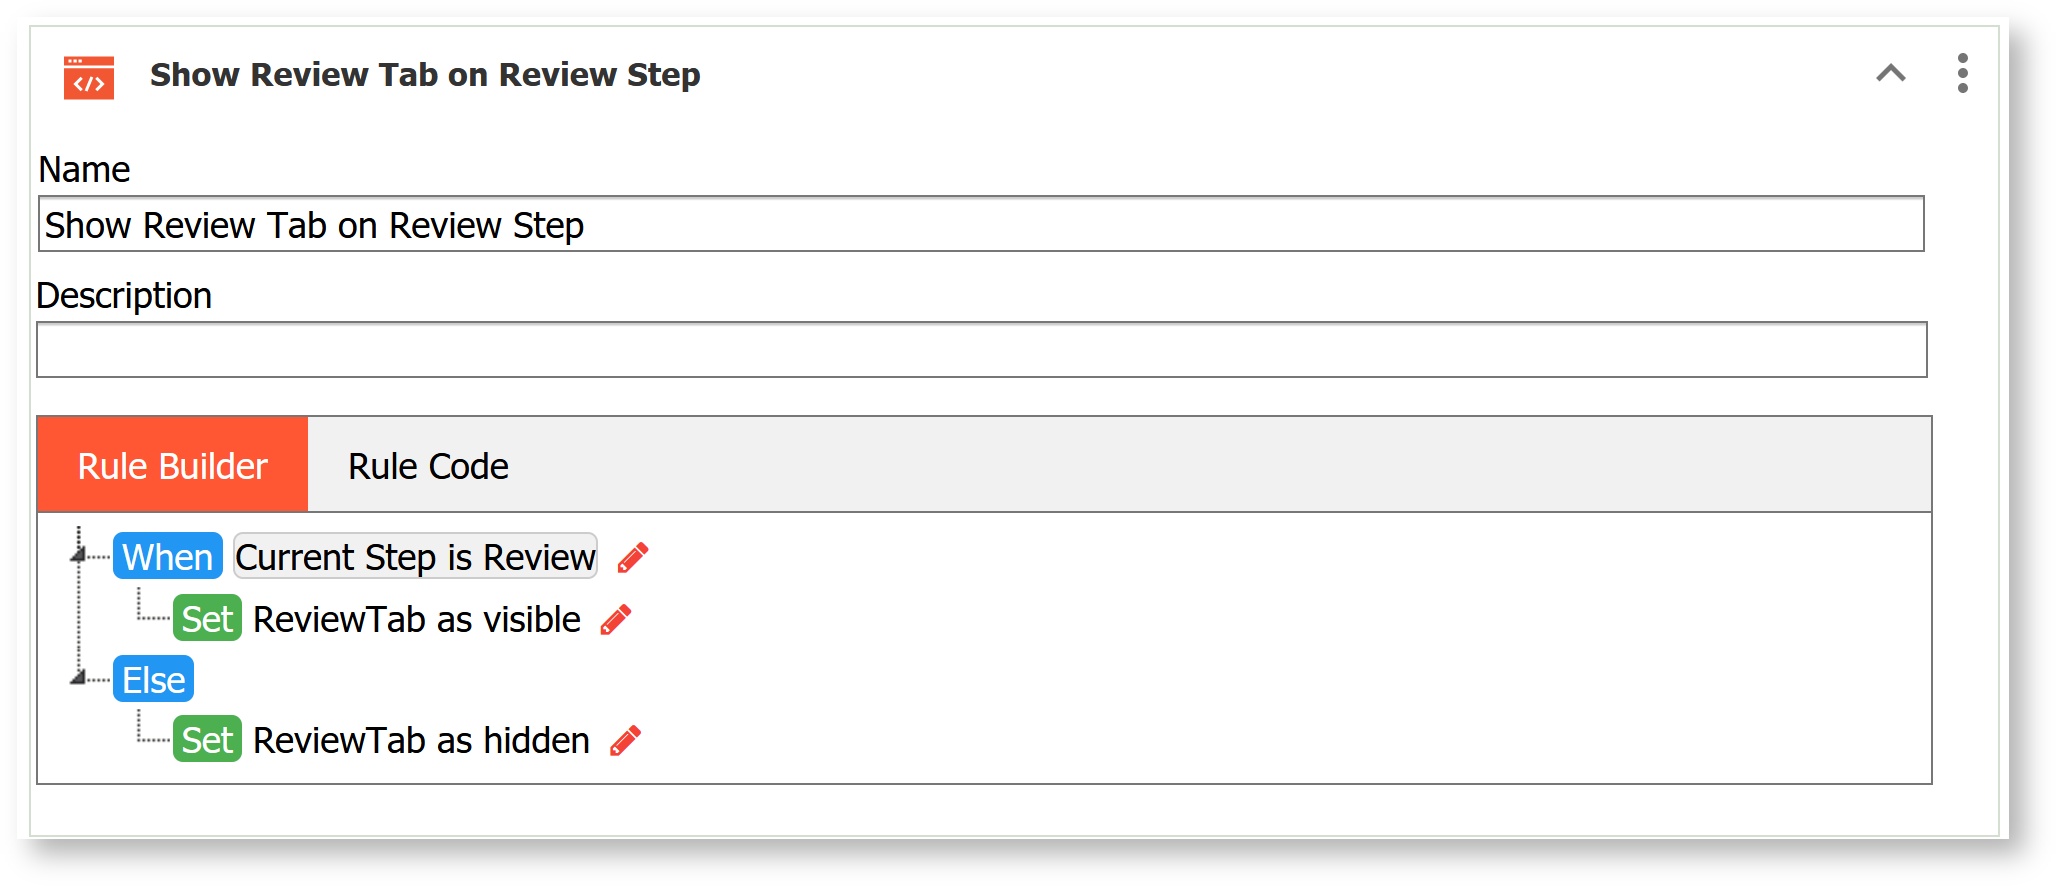
In this workflow, Step 1 has a Tab control with a tab named Employee and a second tab named Review. This rule makes the Review tab visible only when the workflow is on the linked Review step(Step 2).
|
Show/Hide Submit & Cancel
This rule is not yet supported in the Visual Rules Builder and thus still requires some JavaScript.
...
| Section | ||||||||||||||
|---|---|---|---|---|---|---|---|---|---|---|---|---|---|---|
|
Show/Hide Approval Sections on specified workflow steps
| Expand | ||
|---|---|---|
| ||
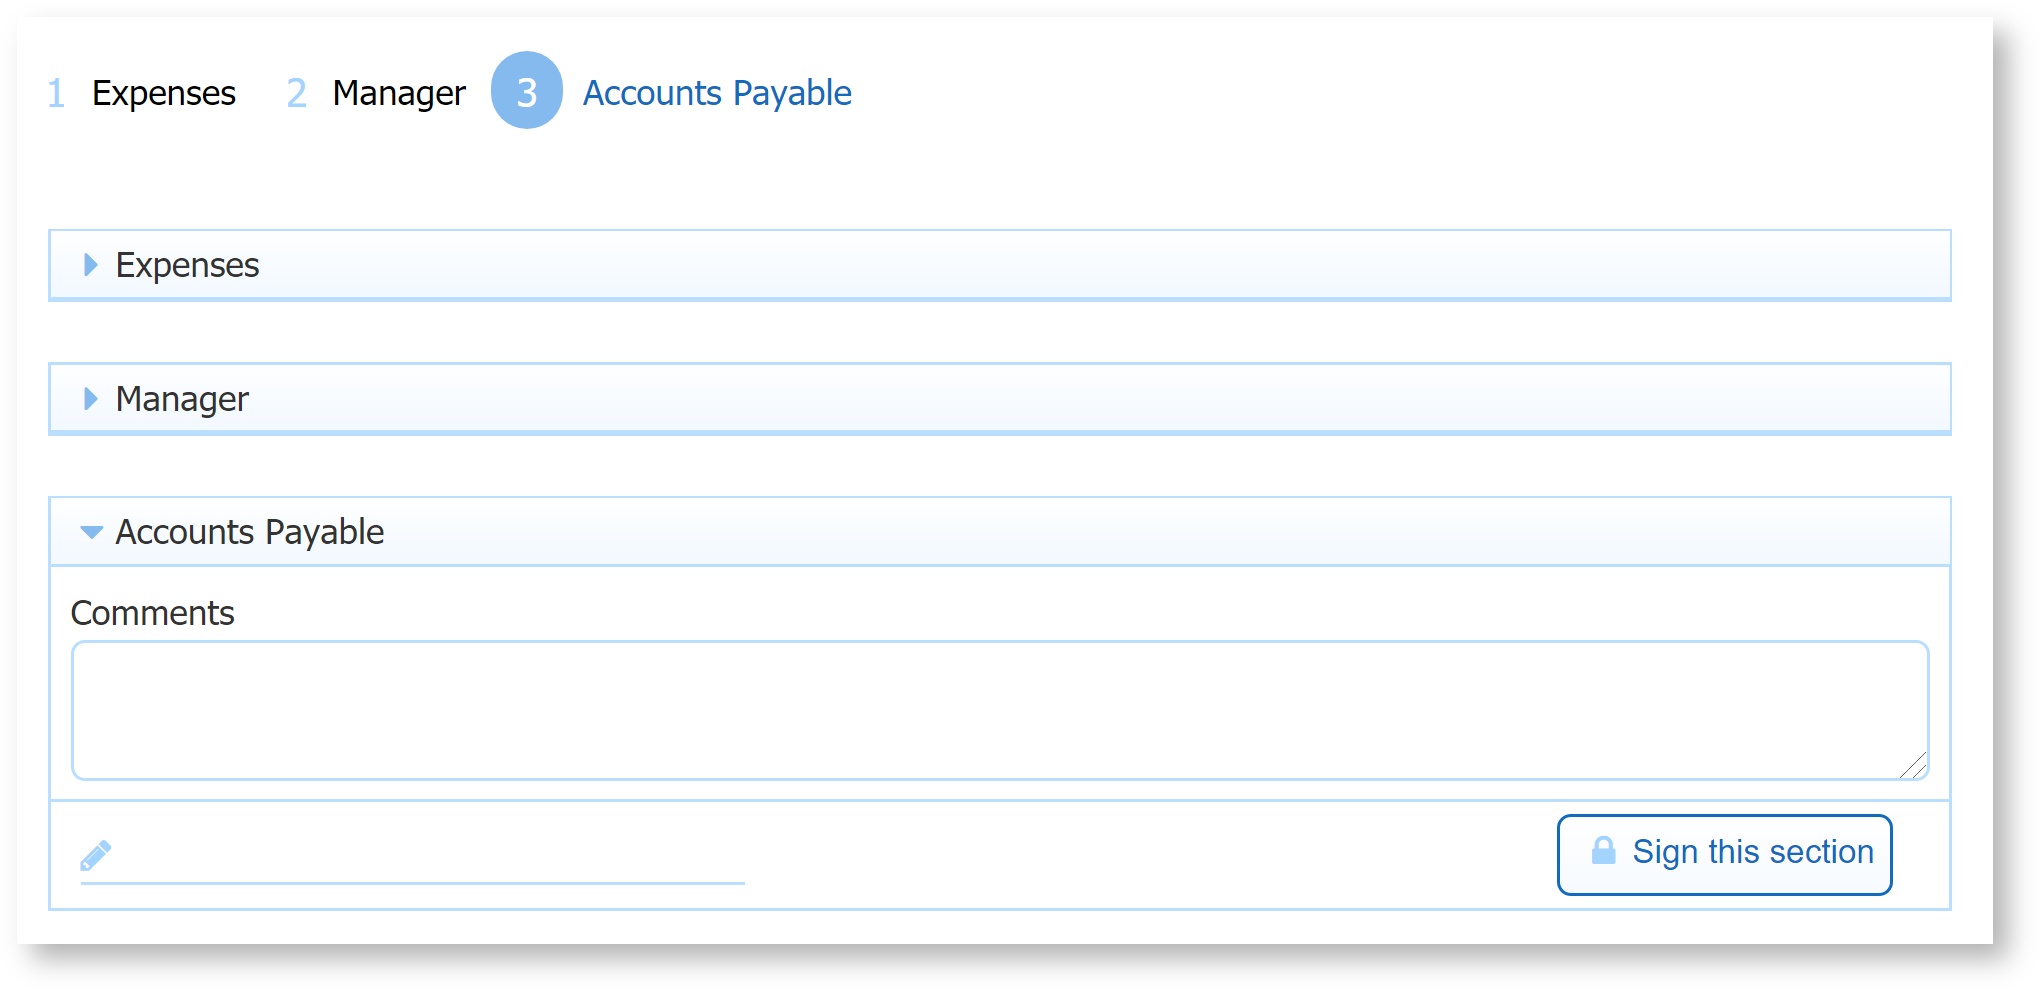
You are designing an Expense Report workflow that has a total of 3 steps. Steps 2 (Manager Approval step) and step 3 (Accounts Payable step) are Linked Steps.
Step 1 has a Section named Manager and a section named Accounts Payable. The Visible property on both these sections is unchecked so they are hidden by default. You want to hide the Manager and Accounts Payable sections for the first step, show the Manager Approval section when the second step is performed by a manager and show the Manager Approval and Accounting sections when the third step is performed by an Accounting department employee.
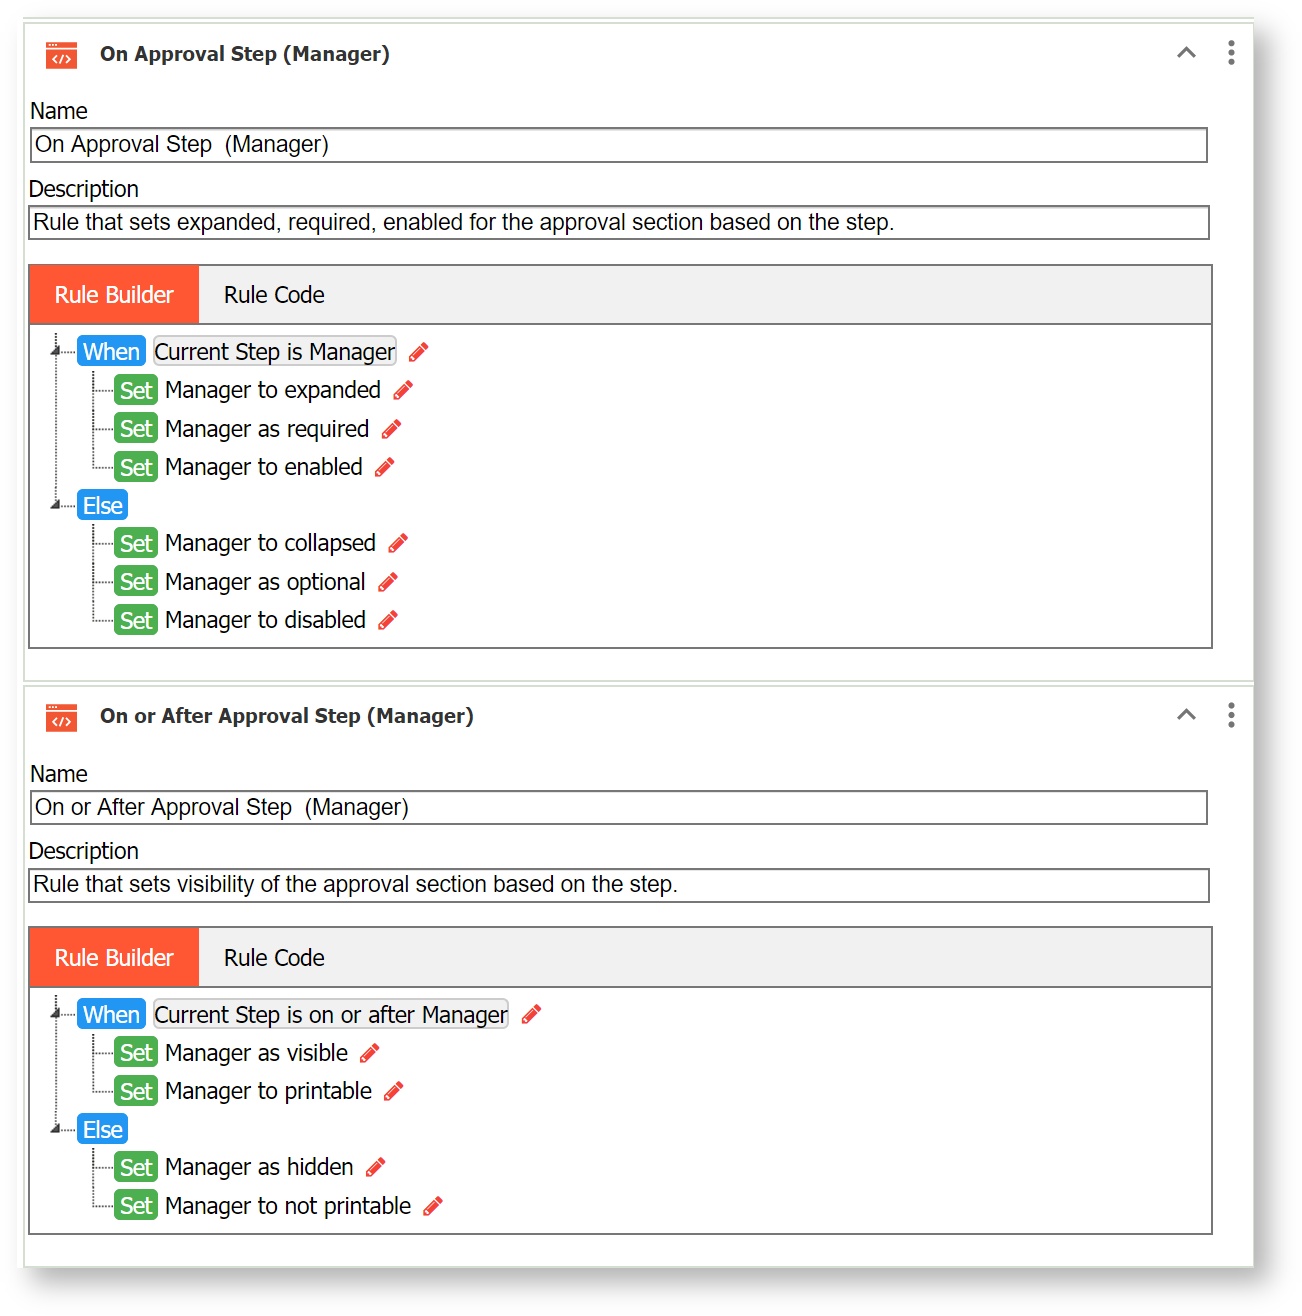
These two rules will show the Manager Approval section on both the Manager and Accounts Payable step. Note the use of the When current step is on or after Manager condition.
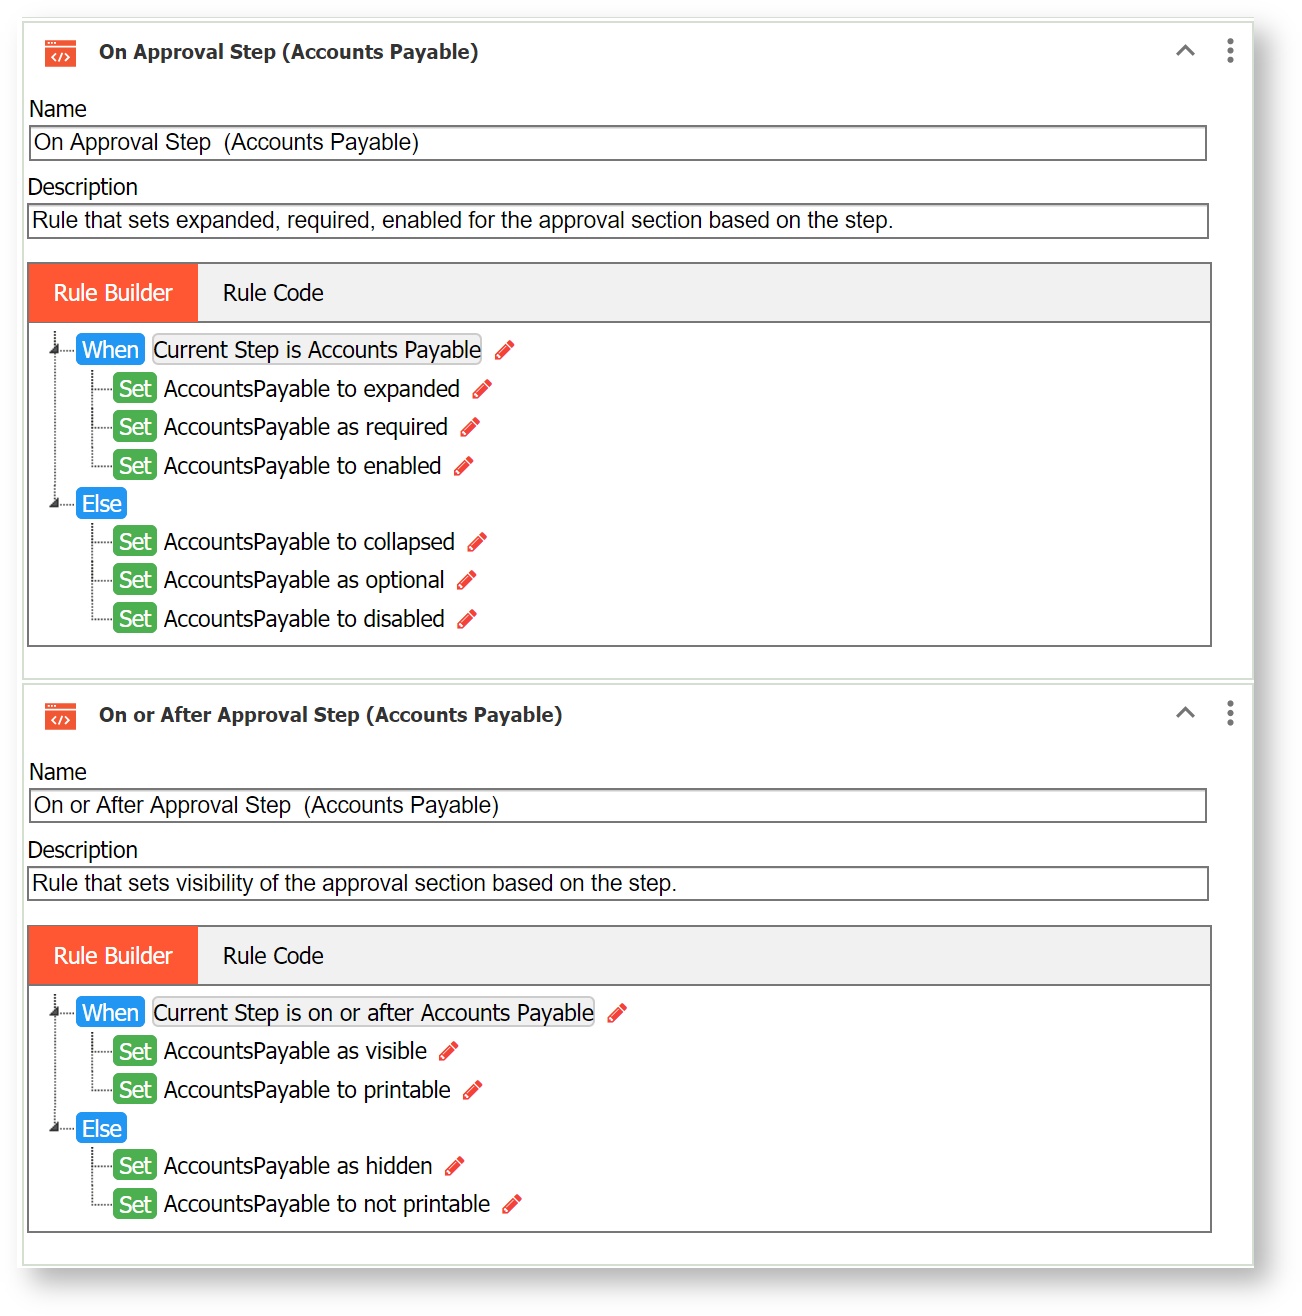
These two rules show the section named Accounts Payable only if the workflow is on the Accounts Payable step. It should not be visible when the workflow is on the steps performed by the employee or the manager.
|
Printable
Business rules often are used to control what is printed to the final form PDF.
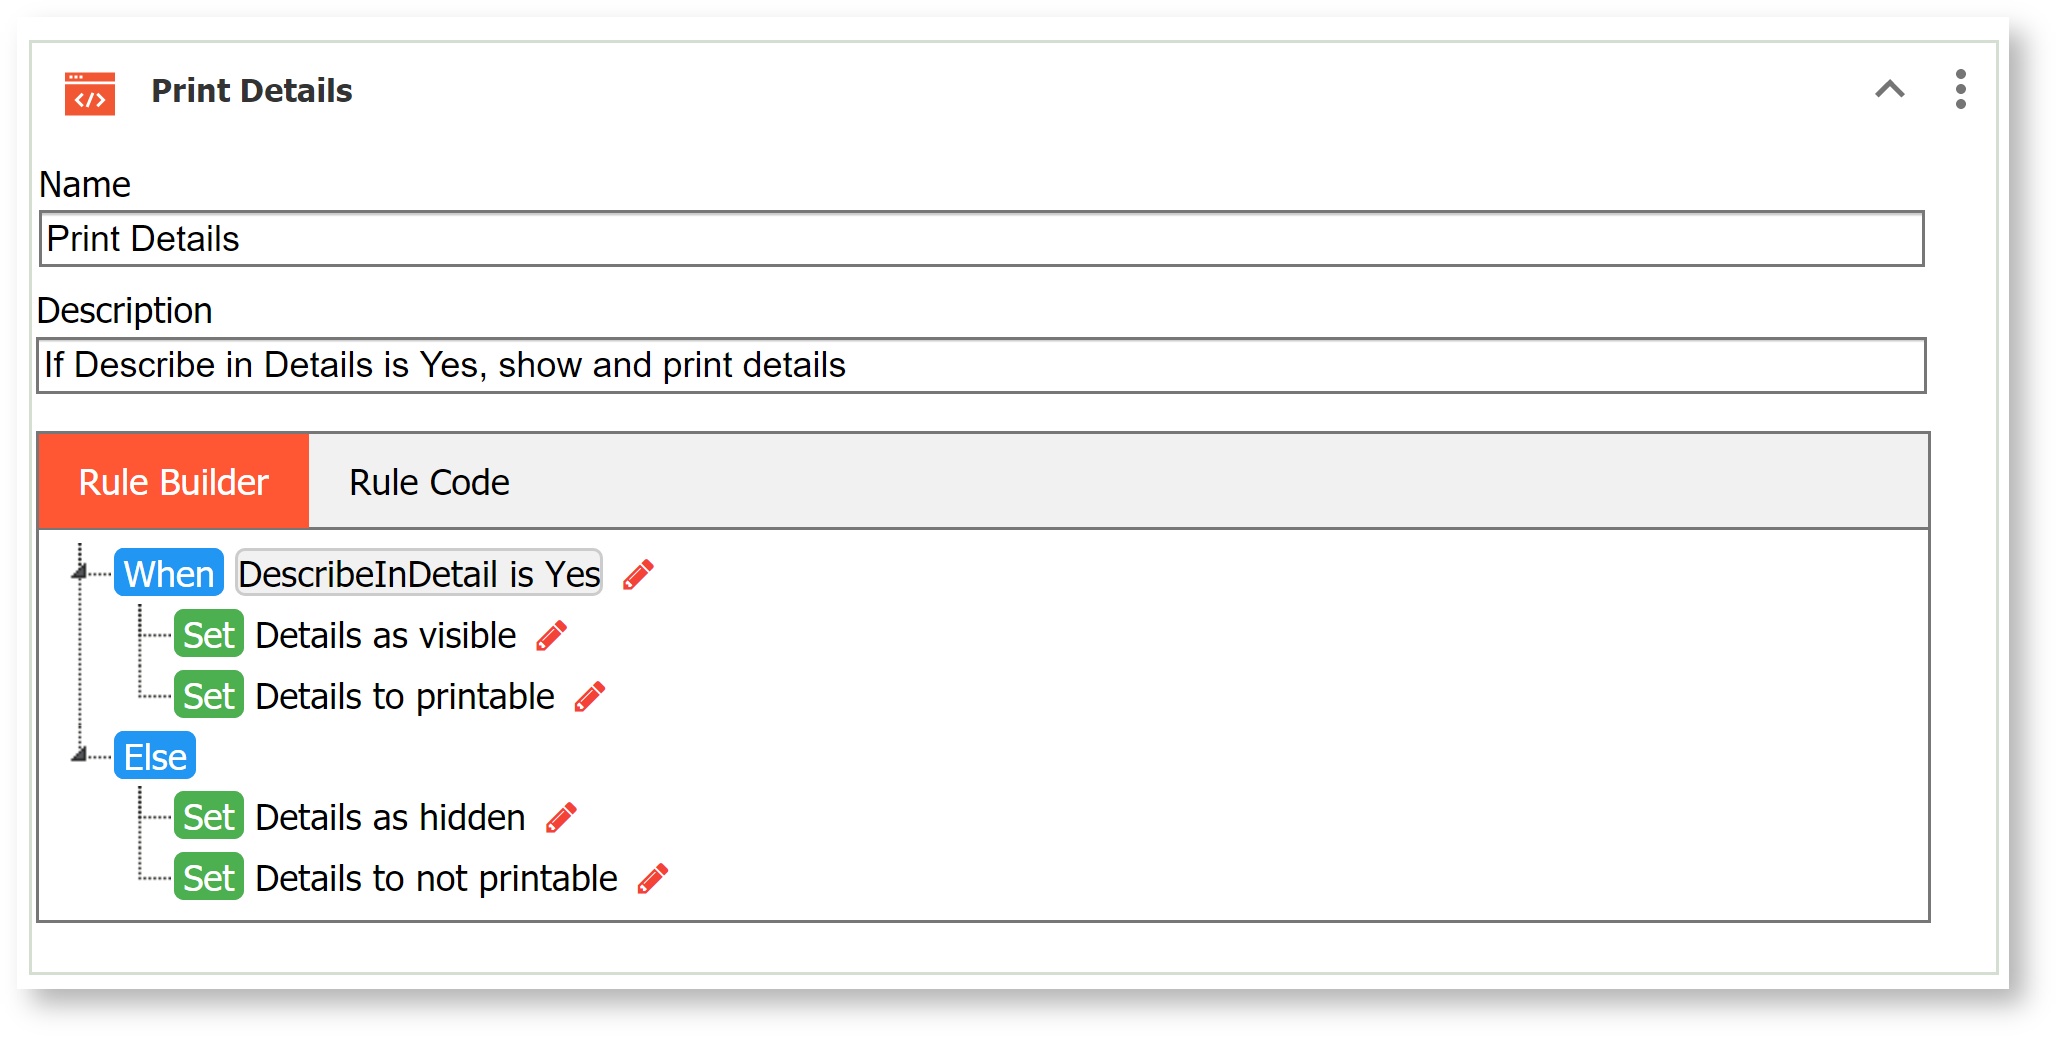
This form has a radio control named DescribeInDetail and a section control named Details. Details is hidden by default and made visible if the user selects 'Yes'.
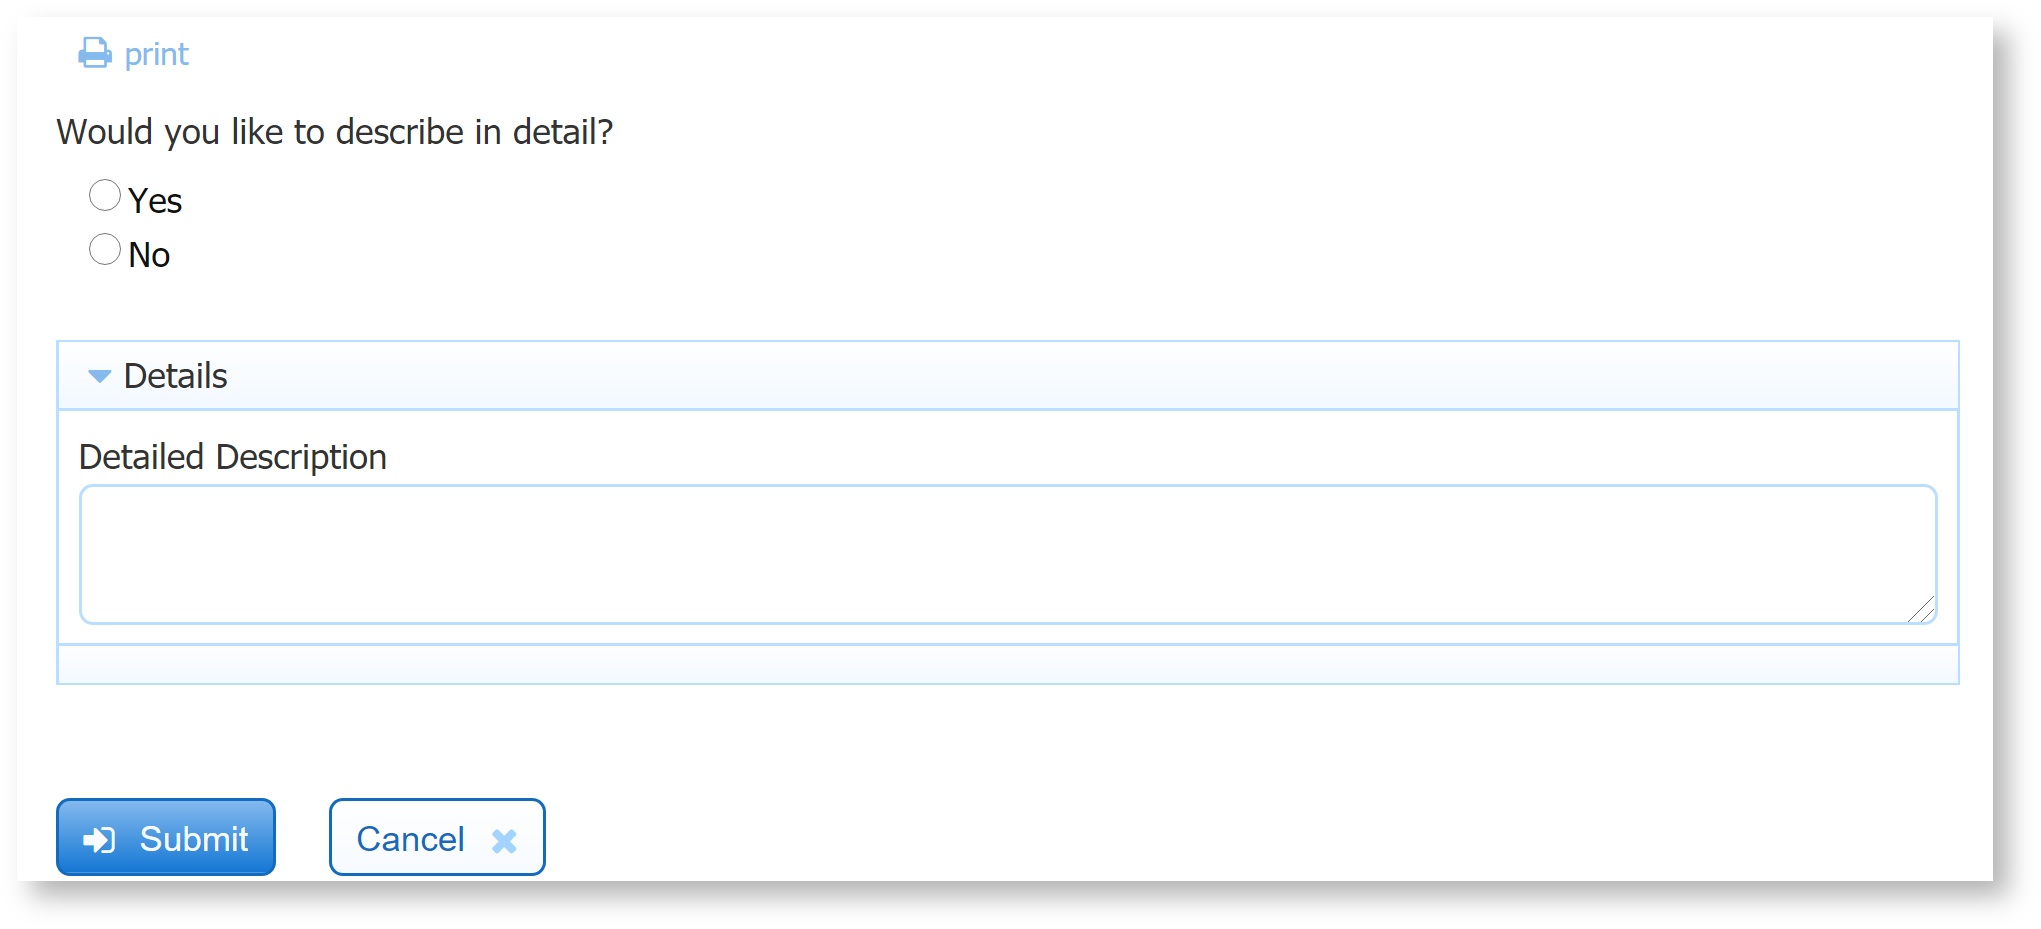
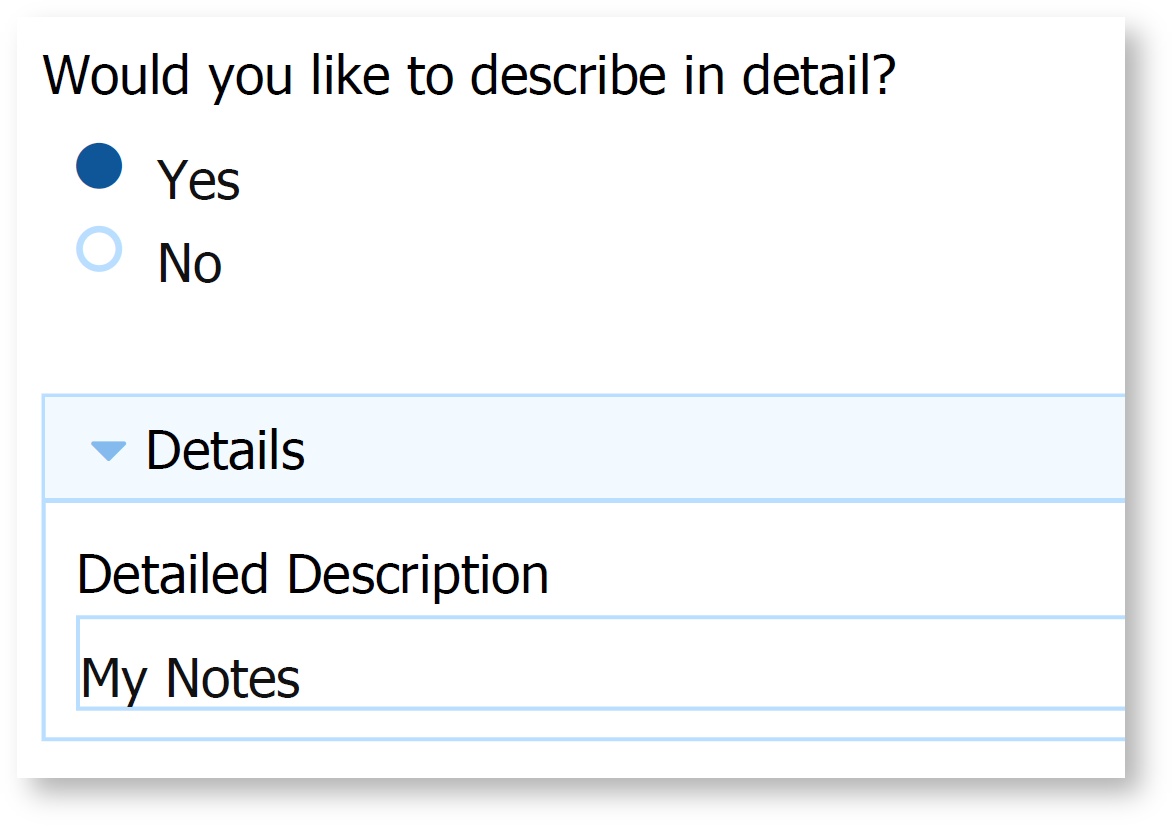
When the form is submitted we've configured to send an email with the form PDF. We only want the Details section to appear on the PDF when the user selects 'Yes'. So we uncheck the printable property on the section control. This property will apply to the section and all controls inside the section. So we do not have to uncheck printable on the inner controls. Then we create this business rule with the Visual Rule Builder. When the section is visible we also set it to be printable. When the section is hidden we also set it to be not printable.
Dynamically Send Email
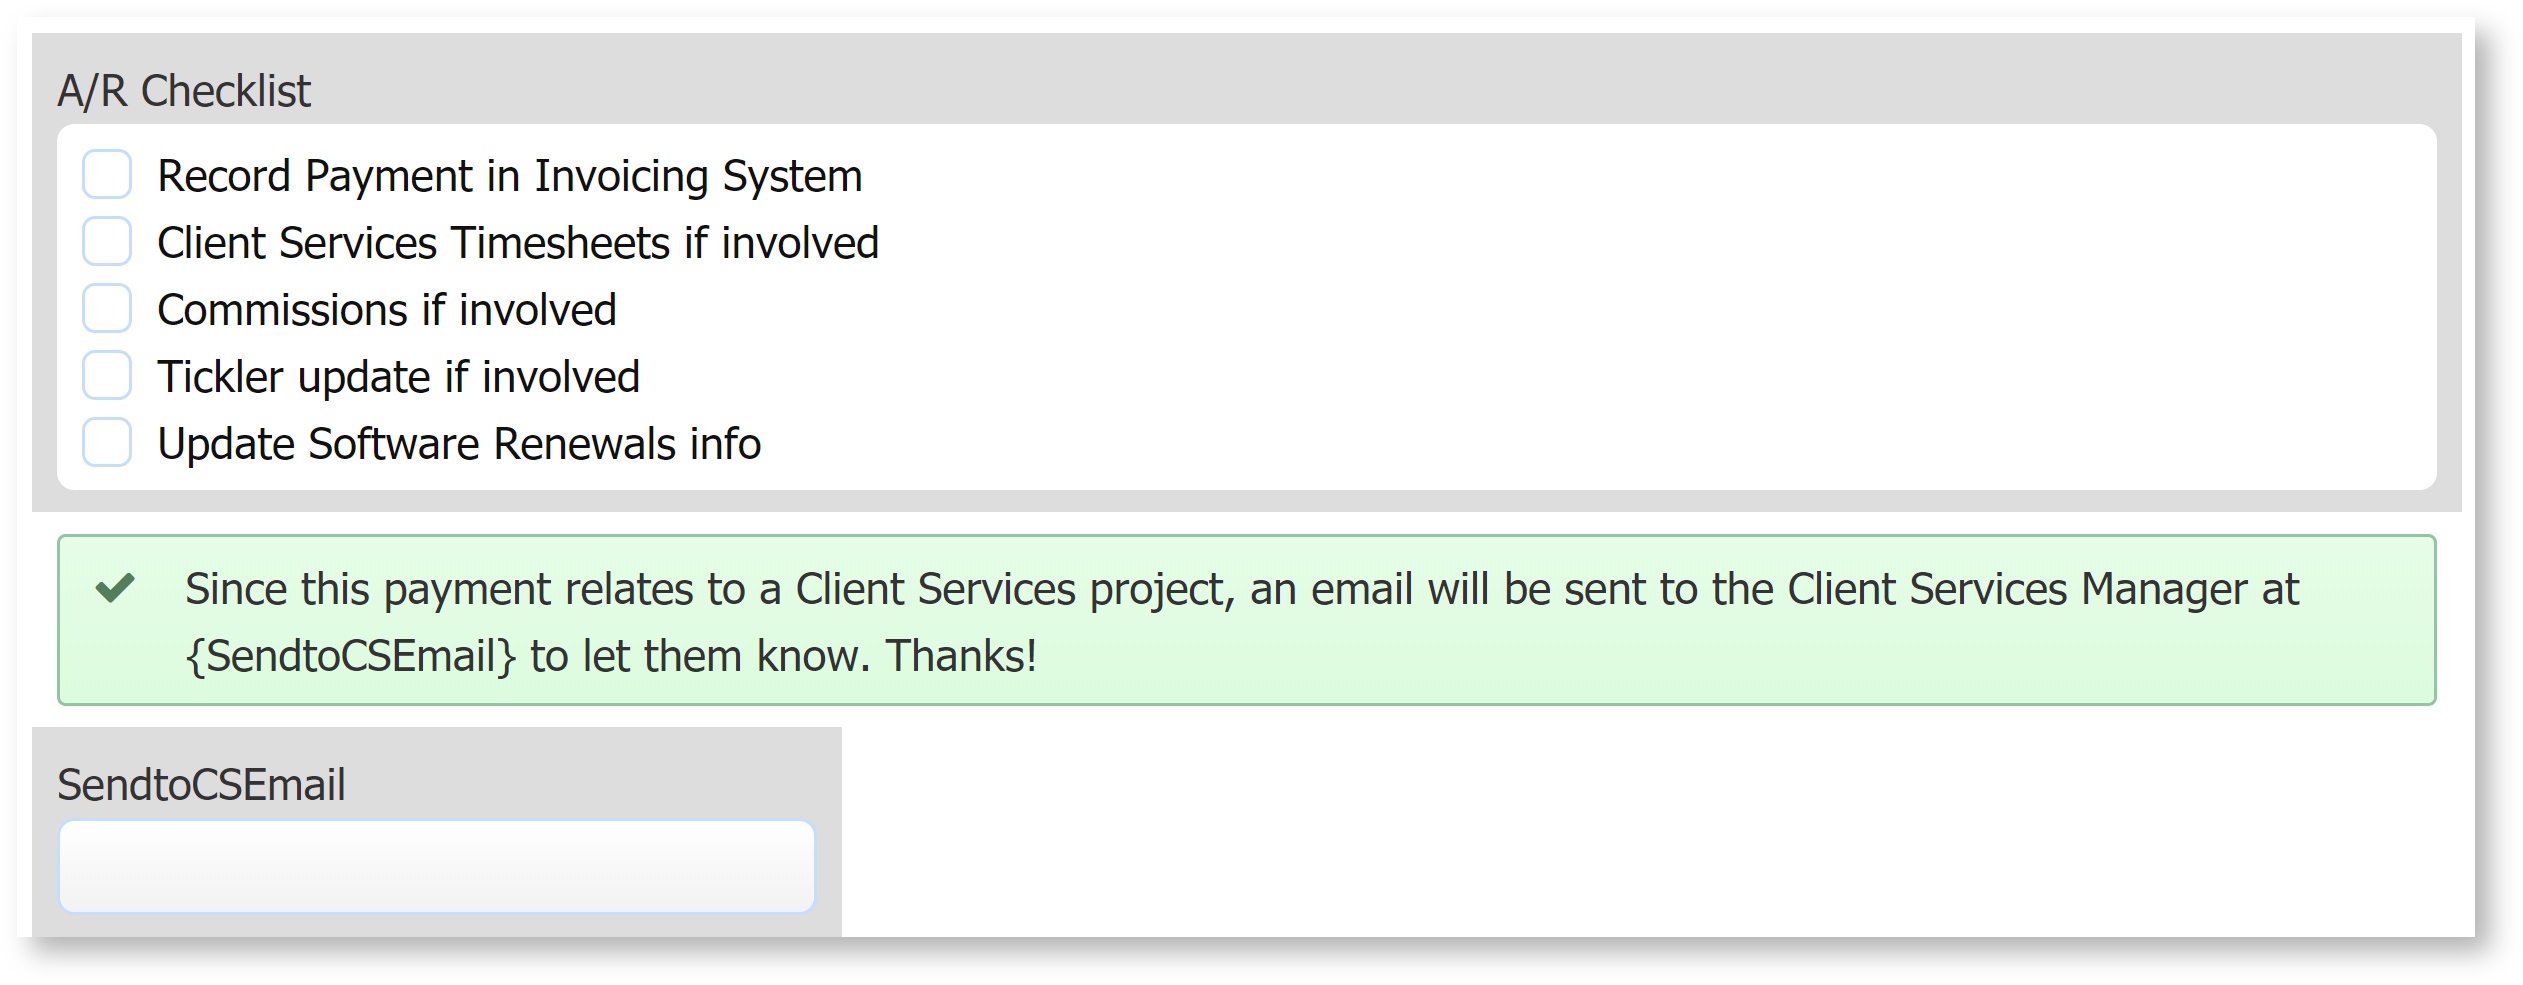
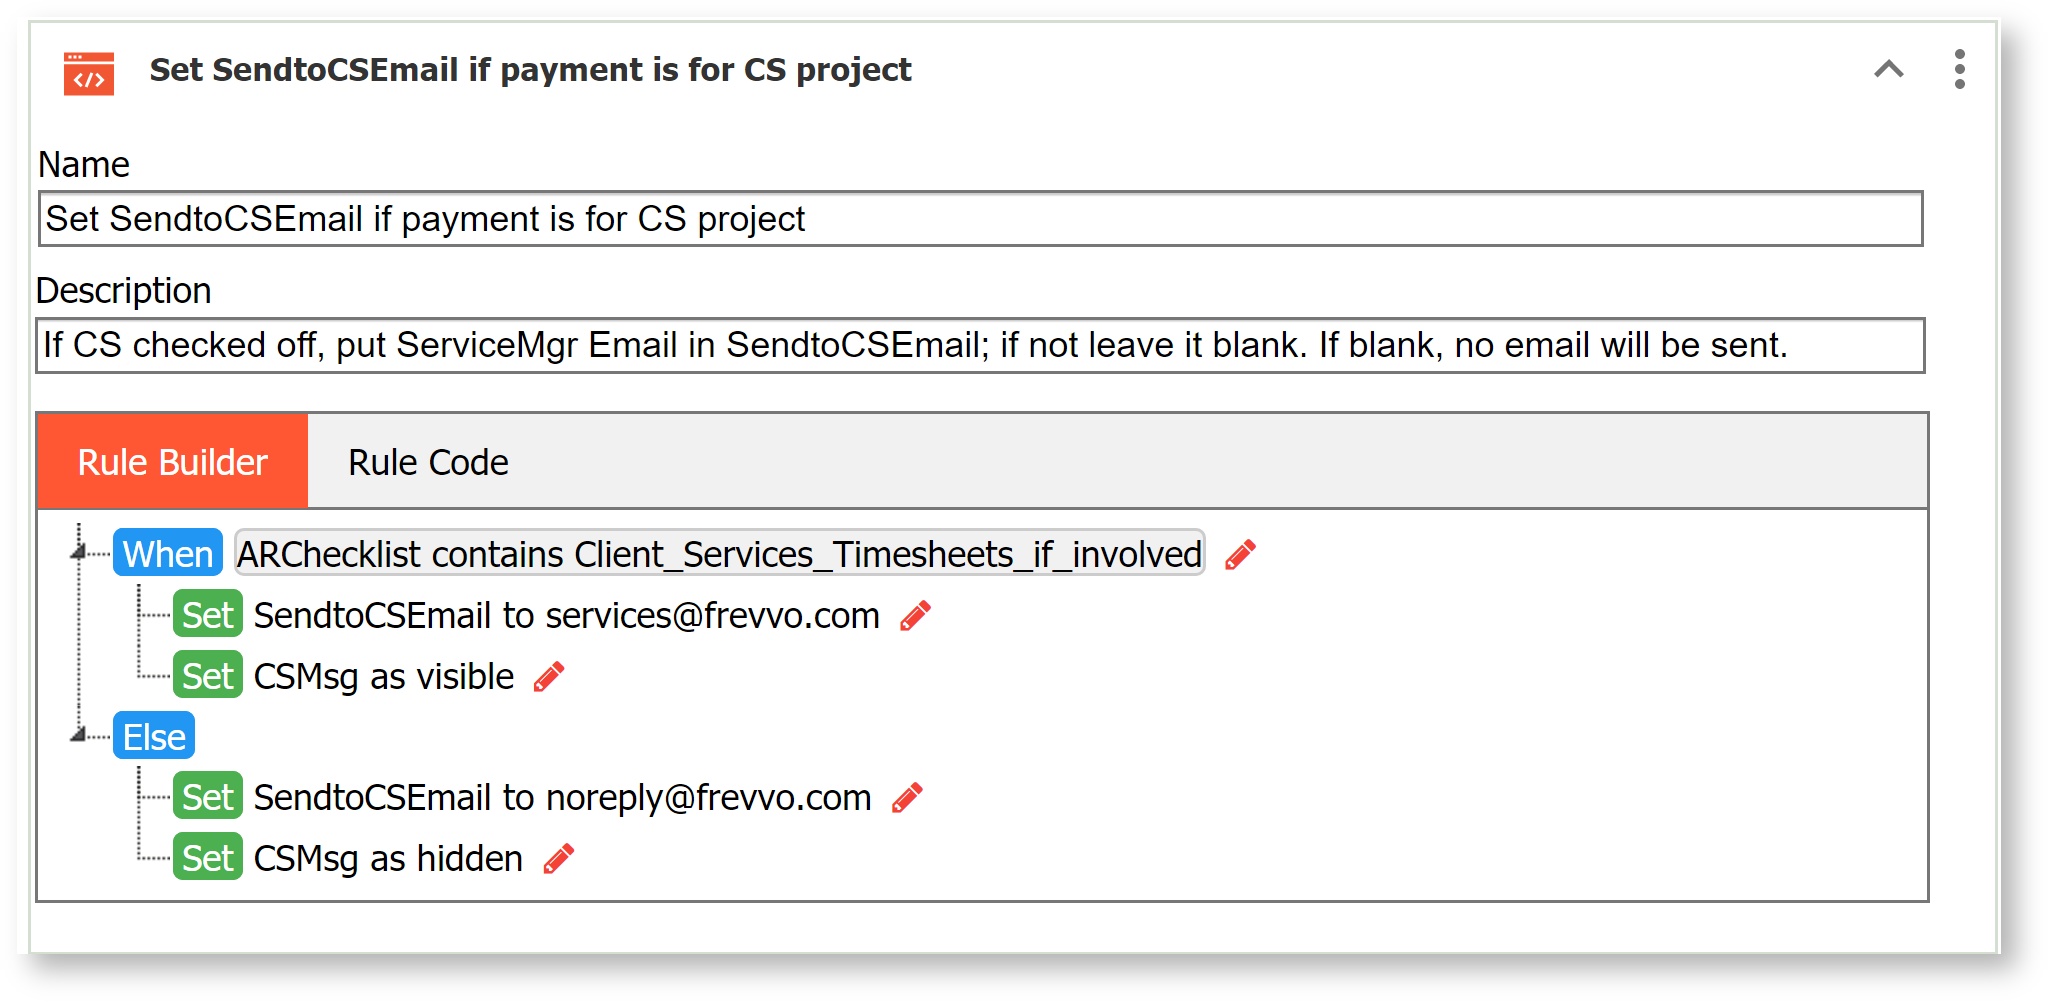
Let's say you have a form or workflow step that should send an email only under certain conditions. In the example below, the Account Receivable form will only send an email to the Client Services Manager if the payment is related to a services project.
| Expand | ||
|---|---|---|
| ||
To dynamically send an email, add a hidden email control (SendtoCSEmail) to your form.
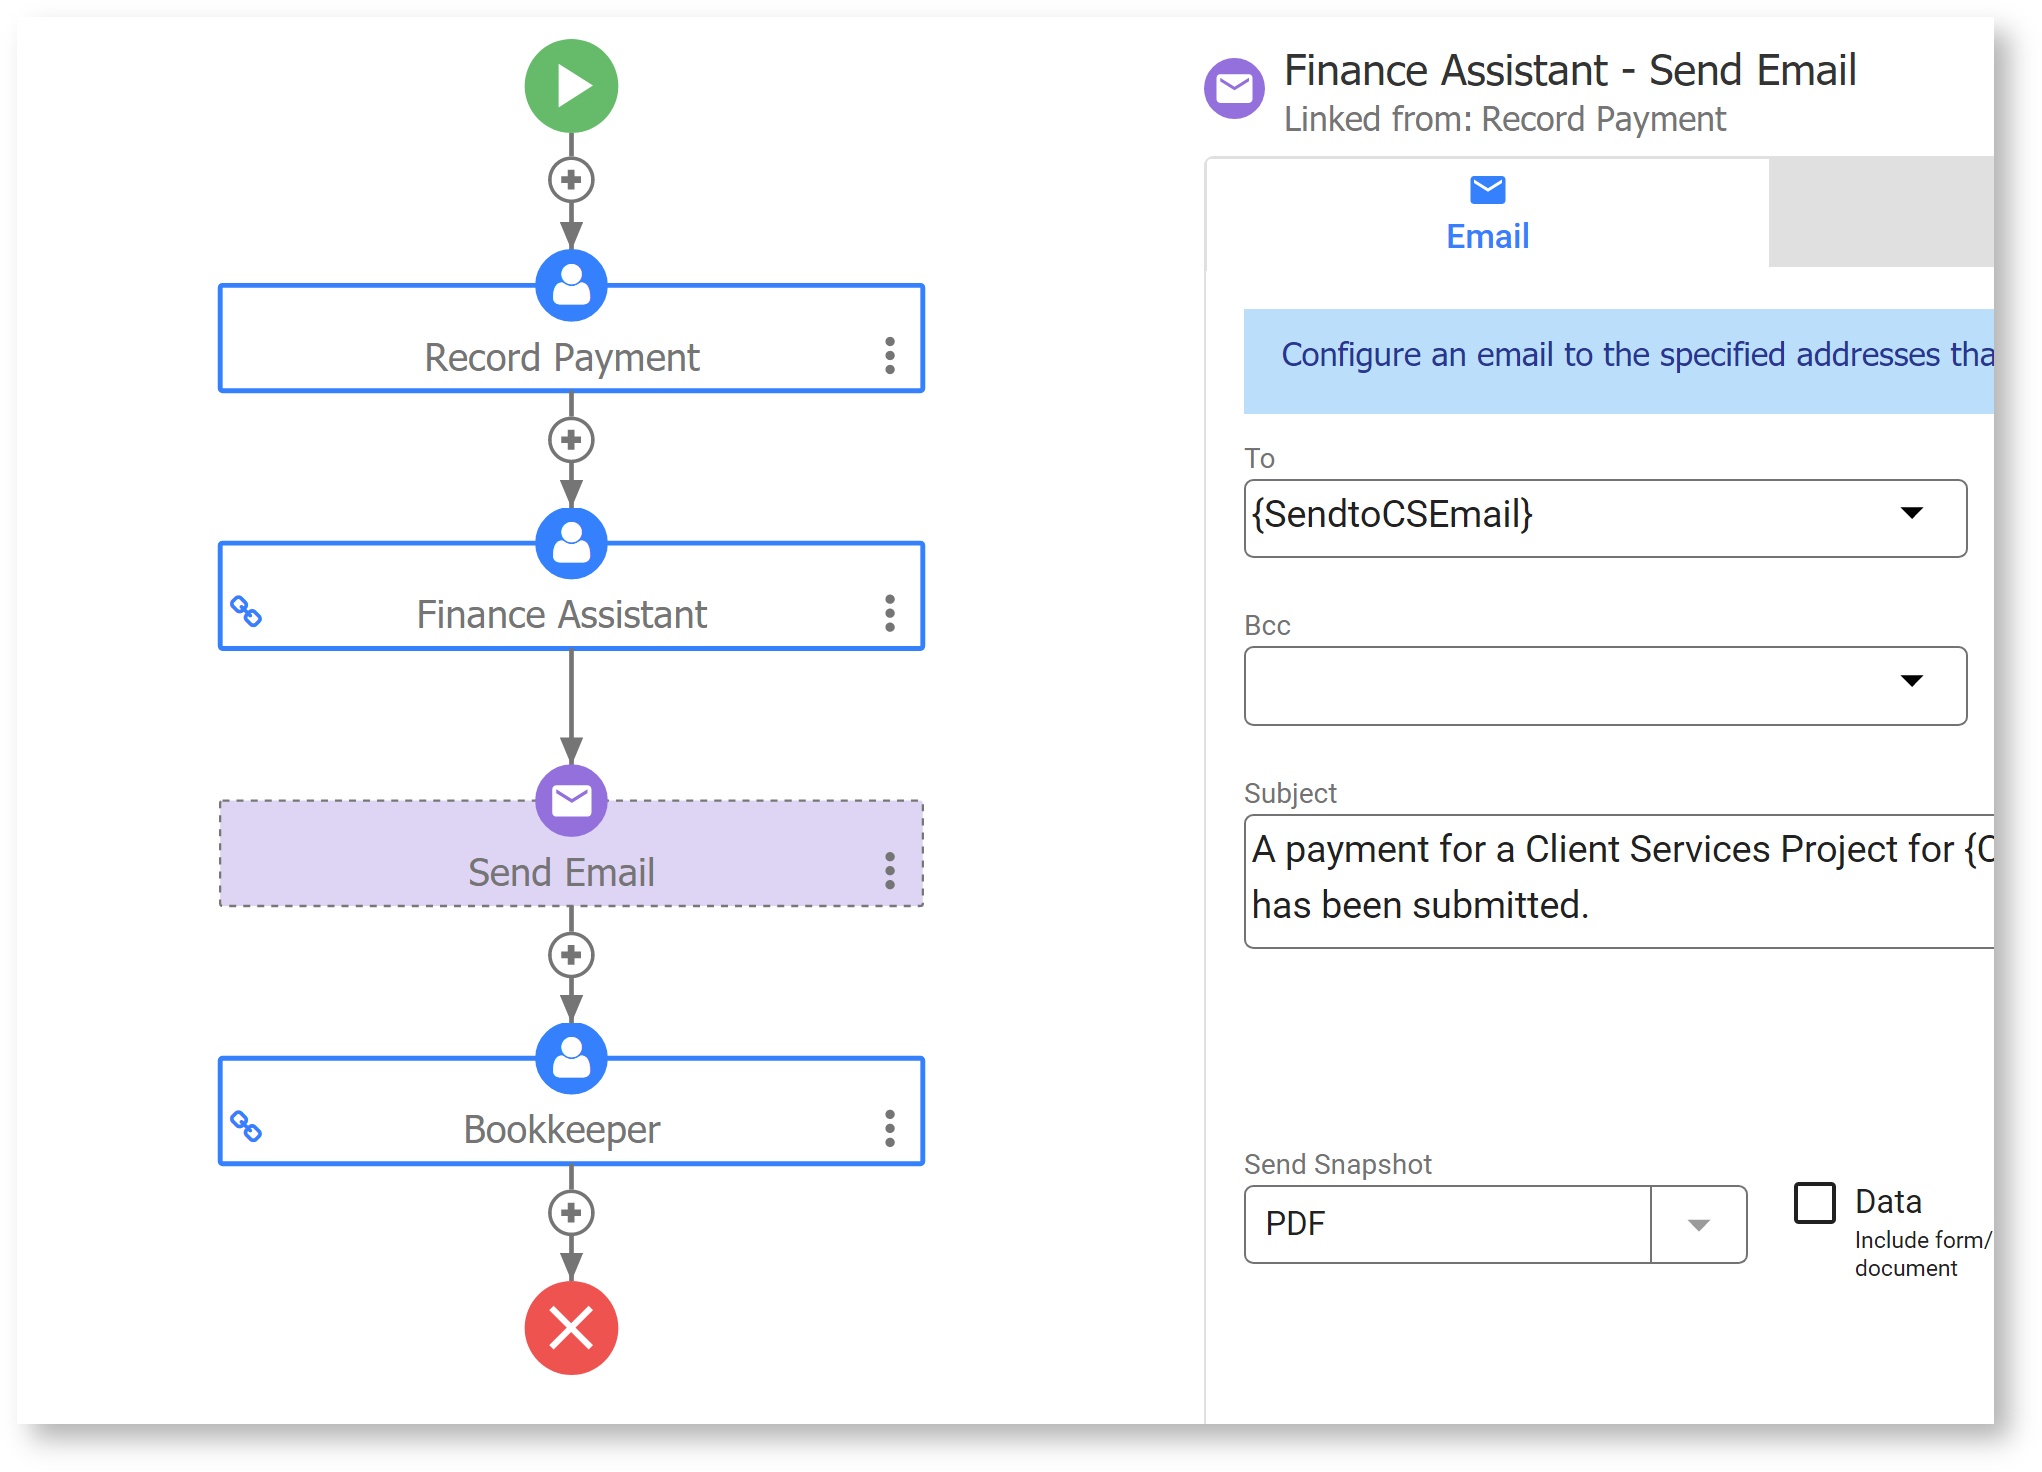
In the Email Doc Action (or Activity Doc Action Email for a workflow step), enter the control name as a template in the "To" field.
Use the Visual Rule Builder to fill the hidden email control with the valid email if the condition is true, and a no-reply email if the condition is false. The Else Action is important here - if you set it to Empty or to an invalid string (any string not using the syntax <name>@<name>.<string>), you will get a submission error.
You can also set the hidden email to a template so that it is evaluated at run time.
When the user clicks Submit or Continue, the email will send to either the valid email (condition=true) or the noreply email (condition=false.) |


Enable/Disable Controls
Submit/Continue Button Disabled
A great feature of is the fact that a form cannot be submitted or a workflow cannot be continued to the next step until all required fields are filled and all filled fields have valid data (eg. a date field must contain a valid date). Sometimes it might not be as obvious to the form/workflow user why the form/workflow will not submit or continue to the next step. provides a built-in feature to show validation errors at the time of submission. Refer to the Invalid Form Notification for Users topic to see how it works.
Enable/disable a question
You have a form with two controls named Attending and Presenter respectively. Attending is a checkbox with a single option, Yes. If checked, you wish to ask the addition question, Presenter. Use the Rule Builder to create this rule. Be sure to slide the toggle icon to enter the literal value Yes on the Condition wizard.
| Expand | ||||
|---|---|---|---|---|
| ||||
|


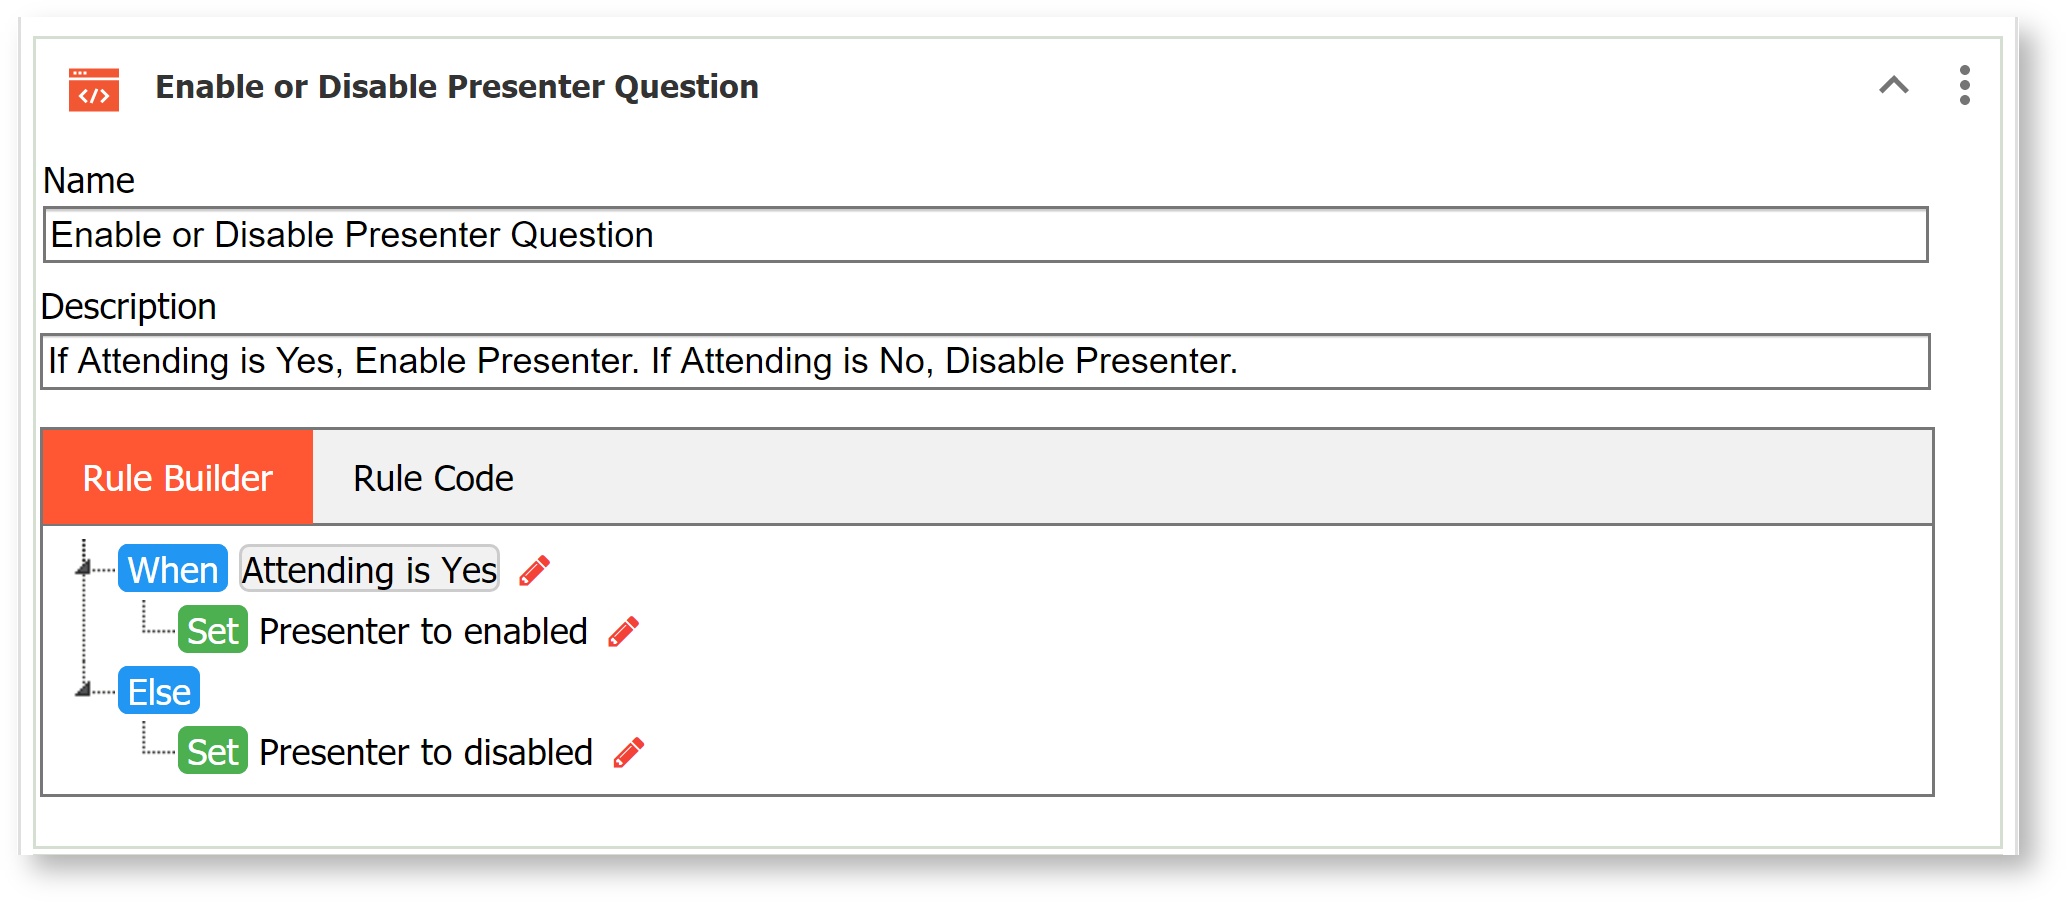
This rule will automatically fire whenever the user checks or unchecks Attending and will enable/disable Presenter. In this example, you would typically set the checkbox Attending to be initially unchecked and the radio control Presenter to be initially disabled.
Formatting money values to display in a Message Control
This rule is not yet supported in the Visual Rules Builder and thus still requires some JavaScript.
...
| Code Block |
|---|
var x, x1, x2;
if (Num.value > 0) {
    var nStr = Num.value.toFixed(2);
    nStr += '';
    x = nStr.split('.');
    x1 = x[0];
    x2 = x.length > 1 ? '.' + x[1] : '';
    var rgx = /(\d+)(\d{3})/;
    while (rgx.test(x1)) {
 x1 = x1.replace(rgx, '$1' + ',' + '$2');
    }
    Message.value = '$' + x1 + x2;
} |
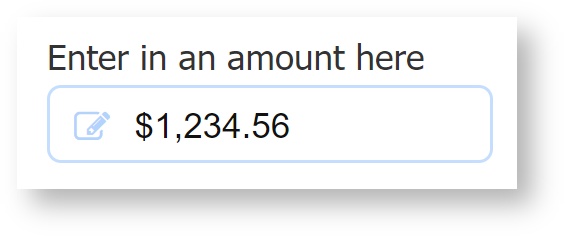
Format Money in Text Controls
This rule is not yet supported in the Visual Rule Builder and thus still requires some JavaScript.
You may want to format money with currency signs, commas, decimals and rounded to two decimal places. This example uses a text control for input and a business rule to format the money value.
| Code Block |
|---|
var x, x1, x2;

var numberWithCommas = function(x) {
  return x.toString().replace(/\B(?=(\d{3})+(?!\d))/g, ",");
};
var formatMoney = function(amt) {
  var decimalAmount = Math.round(amt * 100) / 100;
  return numberWithCommas(decimalAmount.toFixed(2));

};
if (Amount.value.length > 0) {
    var m = Amount.value.replace(/\$/g,"").replace(/,/g, "");
    var formattedMoney = formatMoney(m);
    Amount.value = '$' + formattedMoney;
} |
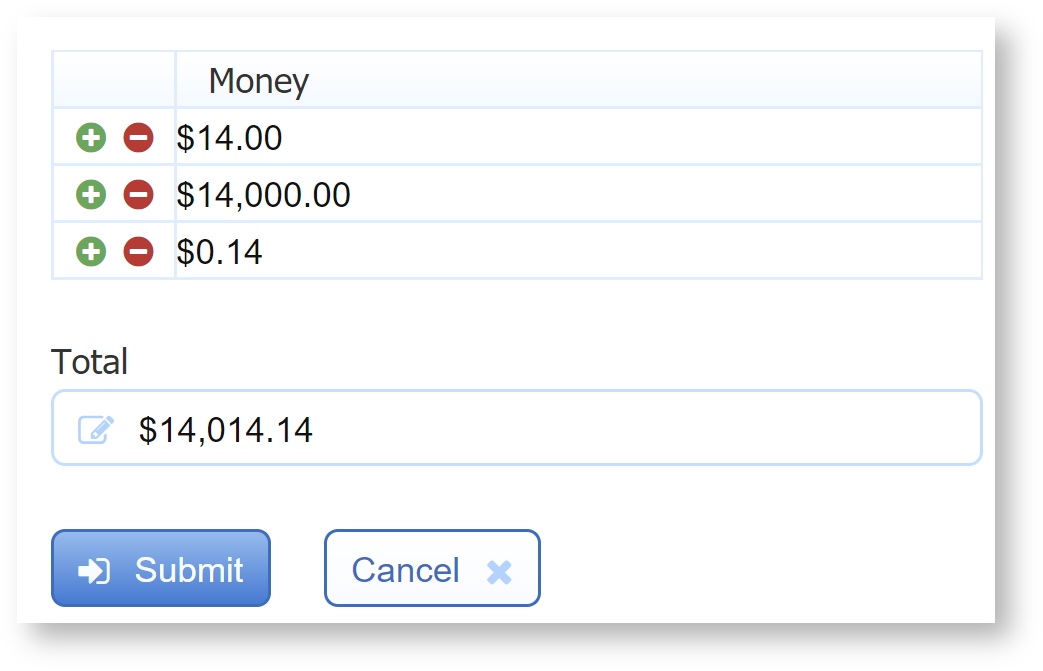
Here is another example showing a text control named "Money" in a table. Another text control named "Total" displays the column total.
| Code Block |
|---|
var x, x1, x2;

var tot = 0;
var numberWithCommas = function(x) {
  return x.toString().replace(/\B(?=(\d{3})+(?!\d))/g, ",");
};
var formatMoney = function(amt) {
  var decimalAmount = Math.round(amt * 100) / 100;
  return numberWithCommas(decimalAmount.toFixed(2));

};

if (Money.value.length > 0) {
  for (var i = 0; i < Money.value.length; i++) {
    var m = Money[i].value.replace(/\$/g,"").replace(/,/g, "");
    var formattedMoney = formatMoney(m);
    Money[i].value = '$' + formattedMoney;
    tot = tot + Number(m);
  }
  var formattedTotal = formatMoney(tot);
  Total.value = '$' + formattedTotal;
}
|
European Number Format
You may need to display numbers in a locale-specific format. While current versions of frevvo do not support javascript locale methods on number controls, you can write a business rule to handle displaying numbers in your desired format. This example displays a number with a period as the thousands separator and a comma as the decimal separator, i.e. 10.000,00. You can modify this rule slightly for other formats, such as using a space as the thousands separator.
...
Here is the form in use mode:
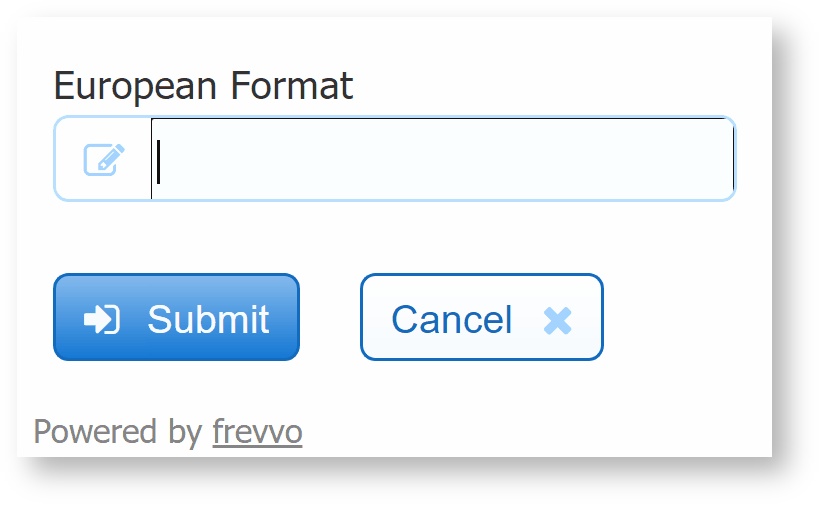
| Info |
|---|
This rule is similar to the format money rule above, in that it adds a decimal with two zeroes behind the number entered, so 12345 displays as 12.345,00. If you'd rather convert the number to a decimal as entered, simply remove the '* 100' from the Math.round() method parameters. This change will display 12345 as 123,45. |
Rounding a Number to a Specified Number of Decimal Places
Let's say you have a Time Sheet where you collect the number of hours worked per day and total them in a Line Total field. Your form consists of Number controls for the hours and a Number control for the total. When testing your form, you enter values with decimal points and notice the total unexpectedly calculates to a number with many decimal places.

| Section | ||||||
|---|---|---|---|---|---|---|
|

Another approach would be to assign Patterns that limit the number of decimal places.
Textarea Max Length
This rule is not yet supported in the Visual Rules Builder and thus still requires some JavaScript.
...
| Code Block |
|---|
Desc.status = 'Invalid. Max 20 chars allowed and you have ' + Desc.value.length; |
Required Field Status in Accessible Forms
This rule is not yet supported in the Visual Rules Builder and thus still requires some JavaScript.
You can build forms/workflows In that meet Section 508 and WCAG 2.0 accessibility standards. Accessible forms/workflows can assist users with visual and motor impairments. When the Accessible property is enabled for a form/workflow, the error, "You can't leave this empty <control name>" displays, if users move ahead from a required field without filling it. The status property for the empty control becomes invalid and sets the error message. Normally, the status property can be used in a business rule. For example, let's say a form has a text control named 't', and a message control named "m". If you write a rule to update the message field (control named m) with the STATUS of the required/invalid control (control named t), as shown below, it will not work because the "You can't leave this empty" message for a required control is not treated as it's status.
| Code Block | ||
|---|---|---|
| ||
if(!t.valid)
  {
    m.value = t.status;
} |
...
| Code Block | ||
|---|---|---|
| ||
if (!t.valid) {
  if (t.value.length === 0) {
    m.value = "You can't leave this empty."
  } else {
    m.value = t.status;
  }
} |
Textarea newline vs break
This rule is not yet supported in the Visual Rules Builder and thus still requires some JavaScript.
...
Remember that in order to reference Message control values in a rule, the control must have Save Value checked in the properties panel.
Textarea Wrap Long URL in PDF Snapshot
This rule is not yet supported in the Visual Rule Builder so still requires some Javascript.
...
| Code Block |
|---|
var str;
if (form.unload) {
str = Source.value; //Source is the name of Text Area where user enters the URL.

var result = '';
while (str.length > 0) {
result += str.substring(0, 20) + '\n'; //The 2nd number '20' is the number of characters per line. Adjust this based on the width of your textarea control.
str = str.substring(20); //See note above
}

Source.value = result;
} |
Selection Controls
Dropdowns, Checkboxes, Radio, ComboBox and T/F controls are selection controls. Populating selection control options to to create dynamic or static pick lists is a very common feature. Here are some of the top reasons you may want to do this:
...
Some of the rules discussed below require a business rule written in JavaScript and other are quickly and easily created with the Visual Rule Builder.
Dropdown Options
This rule is not yet supported in the Visual Rules Builder and thus still requires some JavaScript.
...
| Code Block |
|---|
/*member productCode, productName, resultSet*/
var x;

if (form.load) {
  eval('x=' + http.get('https://app.frevvo.com/database/BIRT/allProducts'));

    var opts1 = [];
    var opts2 = [];

    for (var i=0; i < x.resultSet.length; i++) {
        if (x.resultSet[i]) {
            opts1[i] = x.resultSet[i].productName;
            opts2[i] = x.resultSet[i].productCode;
        }
    }

  Products.options = opts1;
  PID.options = opts2;
  Products.value = opts1[0]; // default to 1st product option
  PID.value = opts2[0];
} |
Finding a Selected Options Index
This rule is not yet supported in the Visual Rules Builder and thus still requires some JavaScript.
...
| Code Block |
|---|
/*member ids products */
var x;

if (S.value.length > 0) {
    eval('x=' + http.get('http://localhost:8182/products/?category=' + S.value));
    P.options = x.products;
    ID.options = x.ids;
} |
Synchronized Selects
This rule is not yet supported in the Visual Rules Builder and thus still requires some JavaScript.
...
| Code Block |
|---|
var i, x;
for (x in Products.options) {
// Determine the index of the selected product in the Products dropdown options
if (Products.value === Products.options[x])
    i = Products.options.indexOf(Products.options[x]);
}

// Changed the selected PID to match the selected Product
PID.value = PID.options[i] + ''; |
Clearing Dropdown Options
This sample resets a dropdown option to the automatically added blank option. For dropdowns added from palette controls and from schema, automatically adds a blank option so the dropdown initially shows no choice by default. To reset the dropdown, set the dropdown control's value to null not the empty string. The empty string will not work since the empty string is not a valid option. This form resets the dropdown named size whenever the value of the product option changes.![]()
Filter Dynamic Options
You may want to filter the dynamic options before setting the value of your dropdown control. For example, perhaps you want to populate options from a database while excluding any option with the value of 0. Use a rule like this.
| Code Block |
|---|
if (tr.clicked) {
  var opts = [];
  var j = 0;
  for (var i=0; i<dd.options.length; i++) {
    var opt = dd.options[i];
    // filter out the one with a 0 for value
    if (opt.split("=")[0] != "0") {
      opts[j] = dd.options[i];
      j++;
    }

  }
  // put the filtered options back
  dd.options = opts;
} |
Default Options
This rule is not yet supported in the Visual Rules Builder and thus still requires some JavaScript. When your options are set dynamically as shown below in a business rule, you cannot set a default in on the form designer. You need to set the default in the rule. If your options have <value>=<label> where value is different from label, make sure you set the <control>.value to <value> not <label> and not <value>=<label>
| Code Block |
|---|
if (form.load) {
    var cc = ['R=Red', 'B=Blue', 'G=Green'];
    Colors.options = cc;
    Colors.value = 'B';
} |
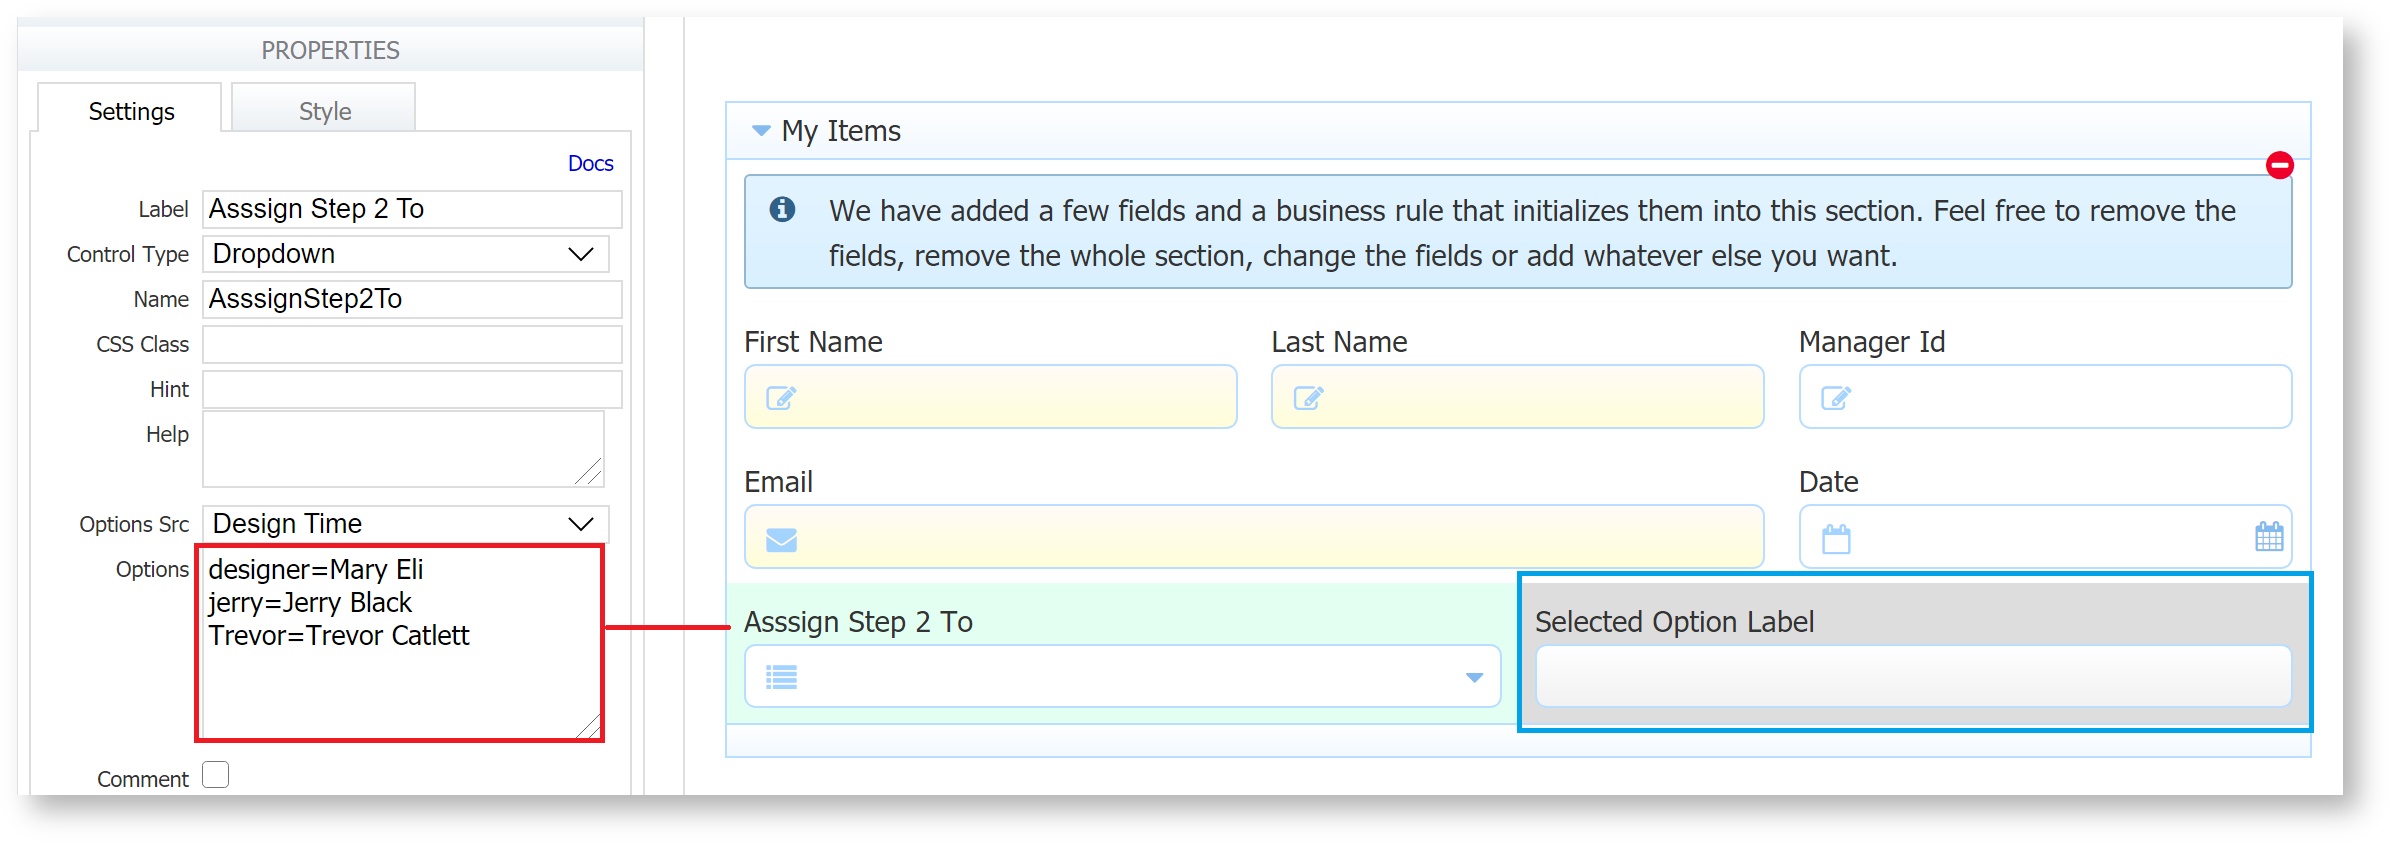
Display Selected Option Label
One common use for the Dropdown control is to allow the person completing the form to select who will perform the next step from a list of users. In this case, the designer may set up the Dropdown options with the userId as the option value (to ensure a valid user assignment when this field is used as a template in the Assignment tab), but a friendly name, such as the user's first and last name, as the option label. However, since the form user does not know that the value does not equal the label, when they search their tasks or submissions for 'First Name Last Name', they see no results because they should be searching for userId.
You can use this business rule to display the Dropdown's option label in a hidden field, and then set that hidden field as the Searchable Field for users to search task list or submissions by. Here's an example of a dropdown where the options value and label are different. Notice that we have a hidden control beside it to collect the selected option's label:
This rule is not yet available in the Visual Rule Builder, and will require some javascript. Create a new rule, click Rule Code, and then Edit Rule Code. Add this code (replacing the control names with your control names.)
...
The result is that when an option is selected from the dropdown, we pass the option value in the dropdown control, and the option label in the hidden control. The Selected Option Label control is visible here in use mode for demo purposes:
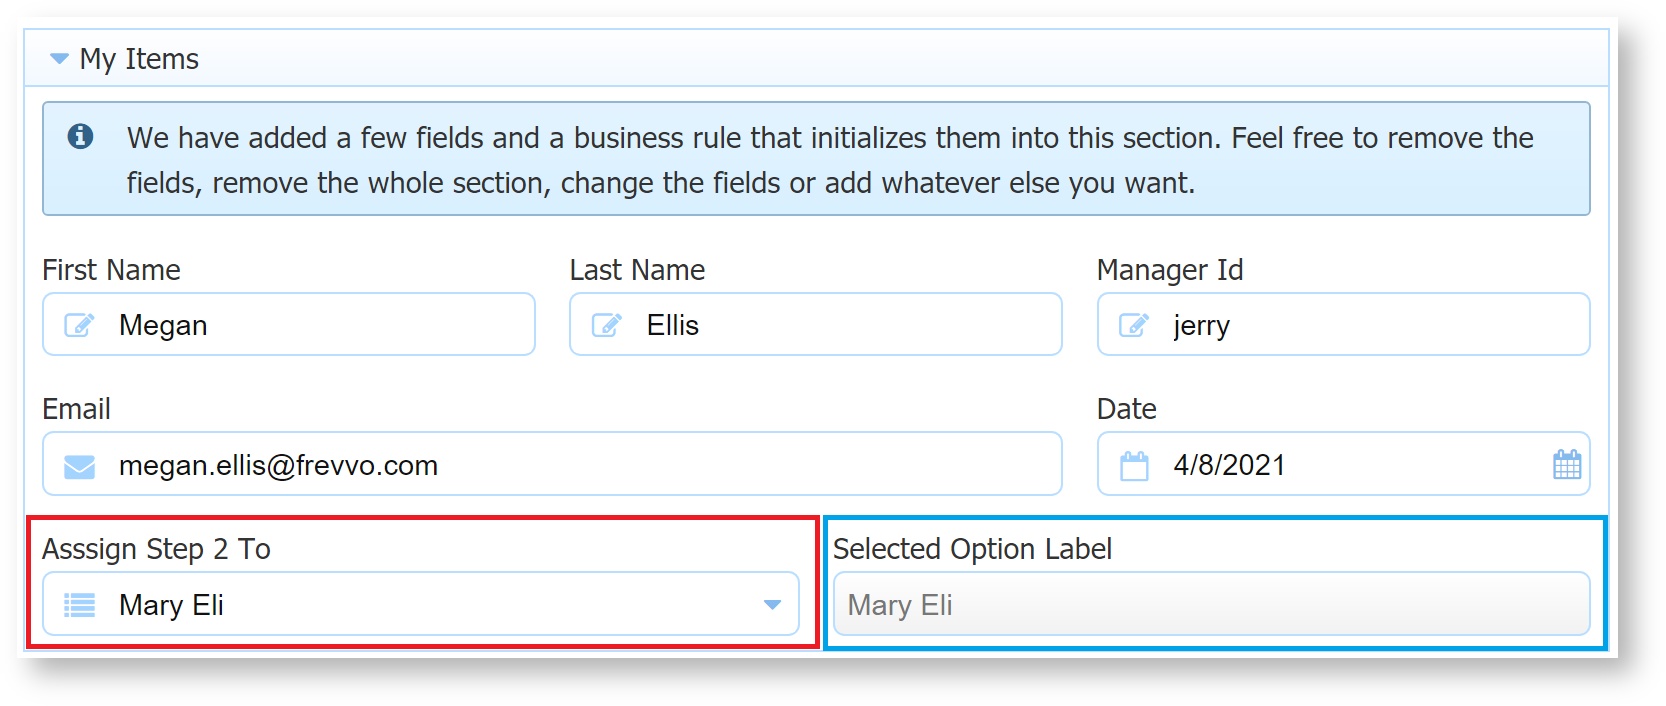
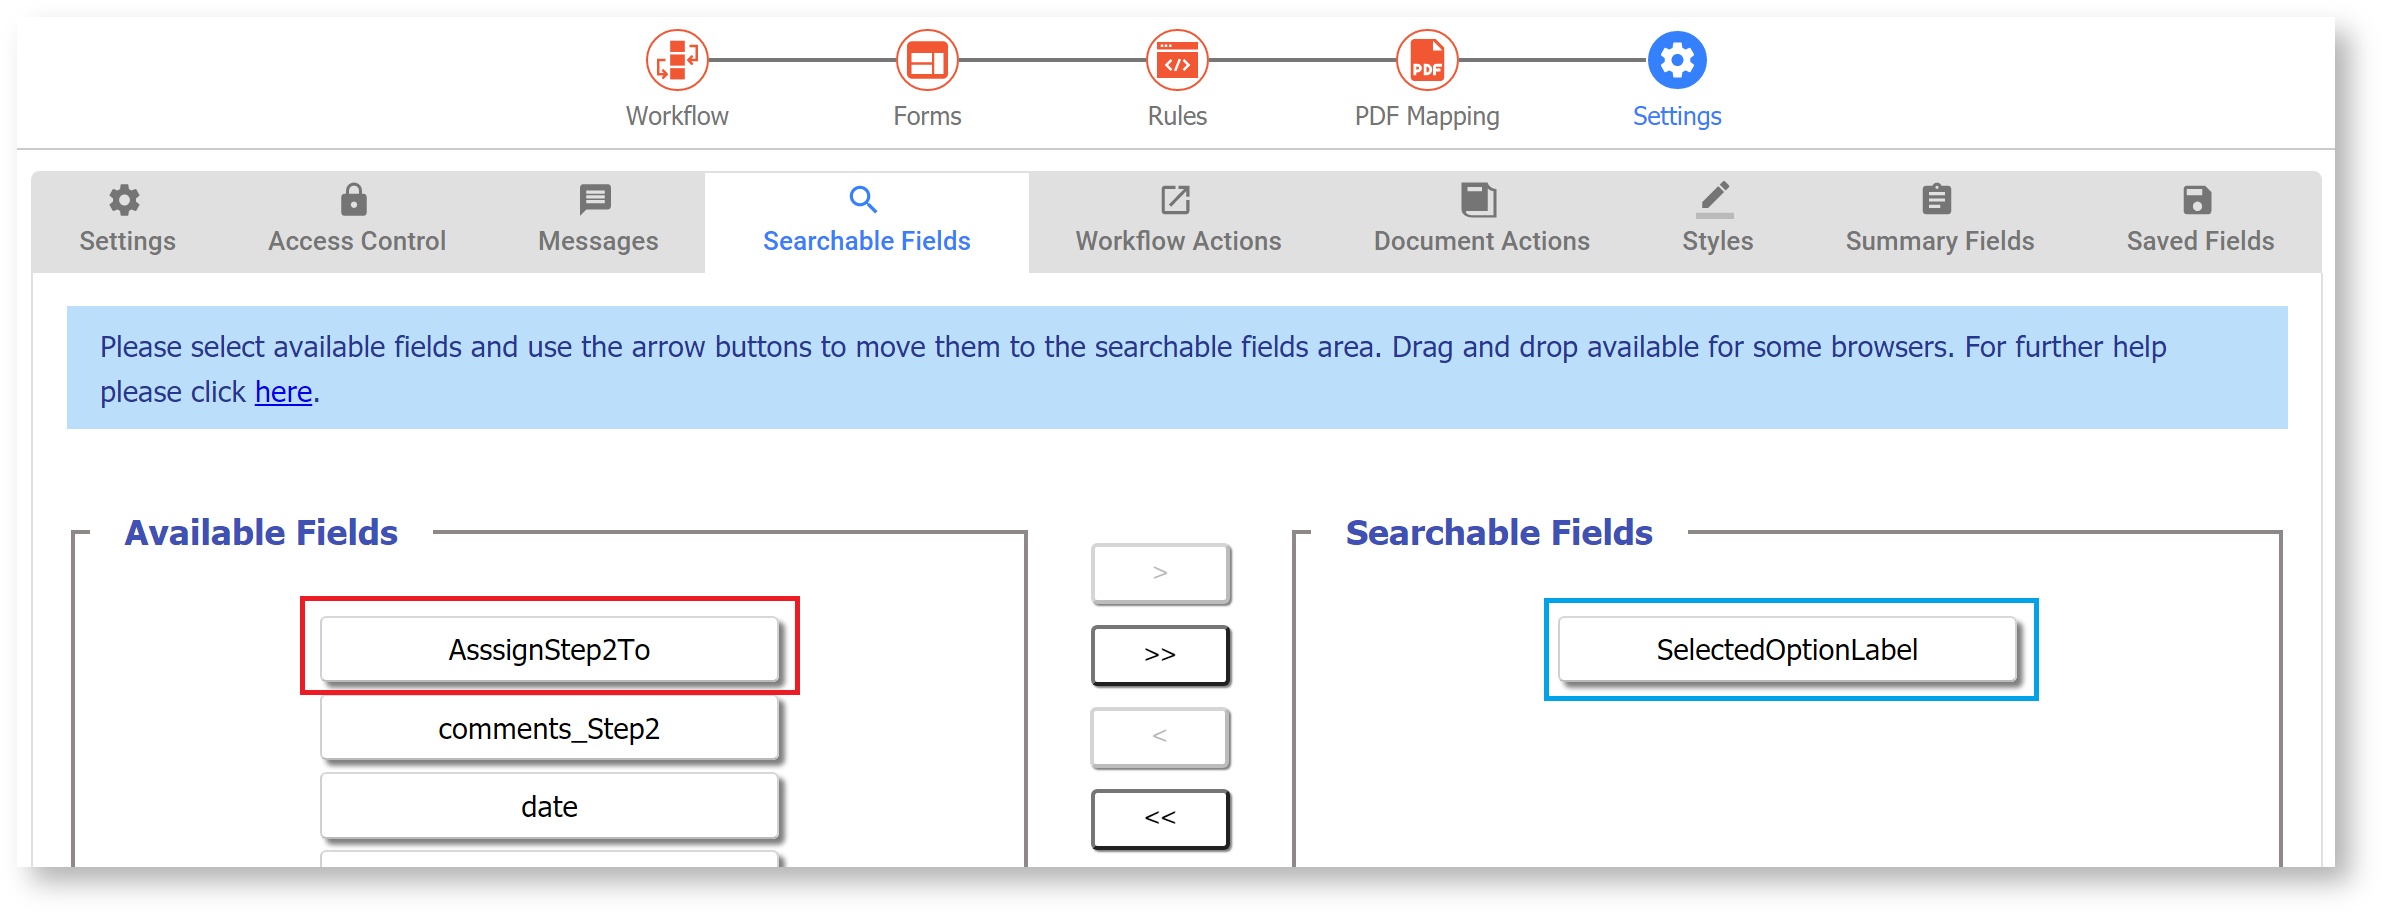
In the Workflow Settings Searchable Fields tab, select the hidden field (in this example, "Selected Option Label") instead of the dropdown control itself. This allows your users to search by the option label, set in the hidden field, rather than the Dropdown value, which they do not know.
| Info |
|---|
For Checkbox controls, see this rule example to display all selected option labels. |
Populate a Pick List from a Google Sheet
Dropdown control options can be dynamically populated from a Google Sheet using a business rule. Refer to Create a Dynamic Pick List from a Google Sheet for the relevant details.
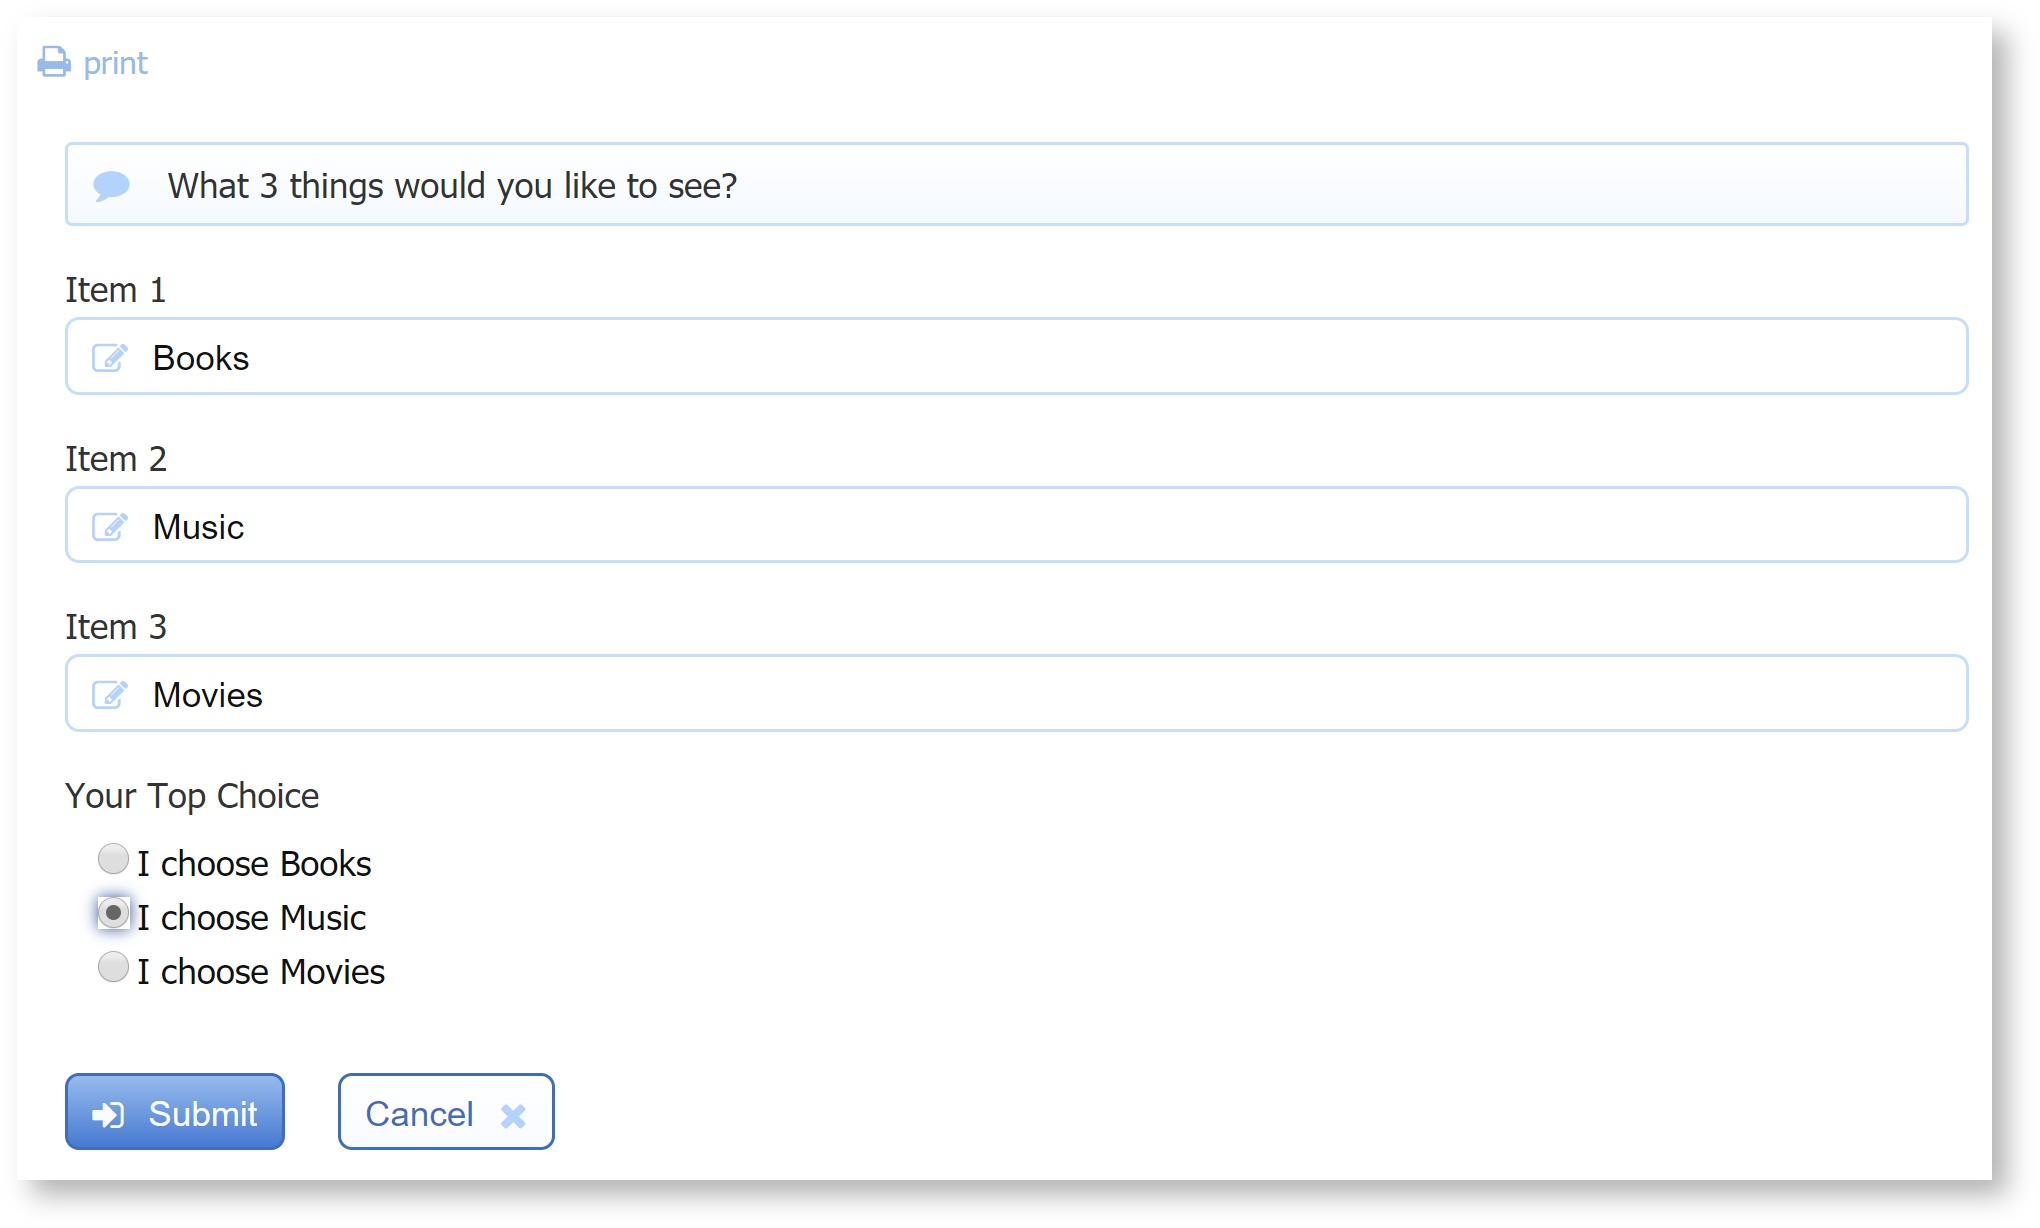
Set Options based on Values from Other Controls
You may wish to customize your selection control options at runtime based on values in other form controls. Unlike other control properties, options do not support templatized strings, so you will have to write a rule to set the options.
...
The run time result will look like this:
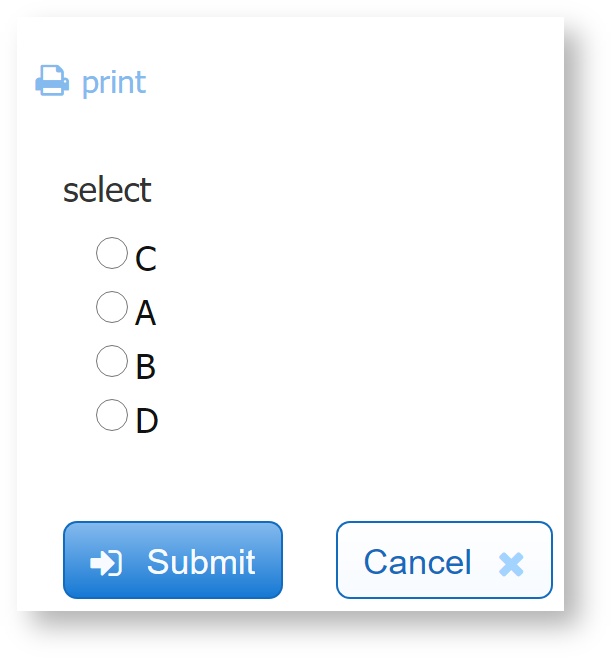
Randomize Options
You may want the options of a selection control to appear at random each time a user opens the form, such as in a quiz. Add your selection control and options.
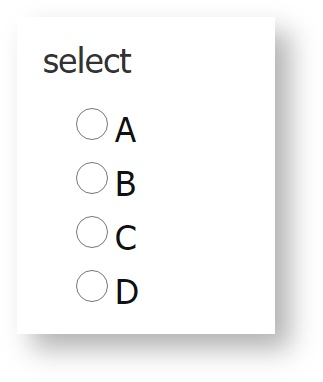
Then, add this rule:
...
Each time you load the form, you will see the options in a different, random order.
Checkbox Options
Checkbox controls are different from all other palette controls in that they are multi-select. Therefore the way to write rules with checkbox controls are in many ways similar to rules with repeat controls.
Checkbox Options - Assigning Colors as Checkbox Options
This rule has a checkbox control named ColorPalette with the options: purple, green, blue, yellow, orange. The form also contains a text control with name ColorChoice. This rule assigns the choices selected from ColorPalette to ColorChoices.
...
Notice that similar to repeat controls, due to an internal evaluation limitation, you must collect the choices in a variable inside the for loop. And then assign that control Name.value to that variable outside the for loop.
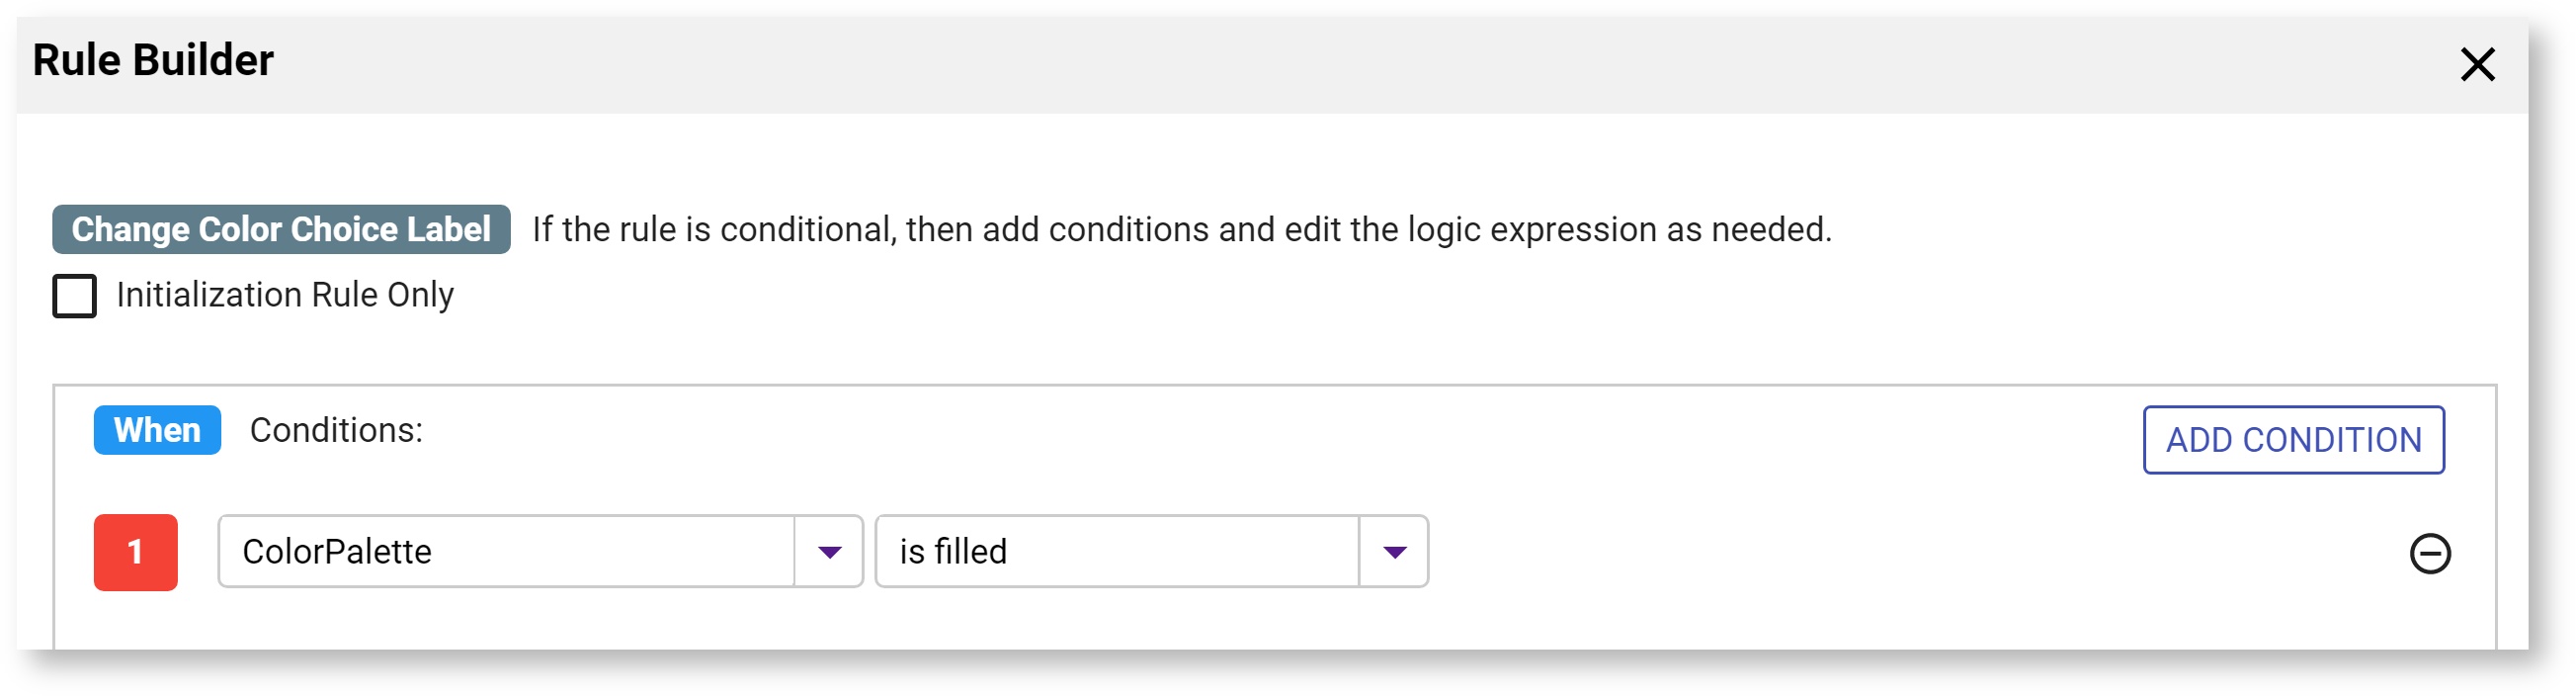
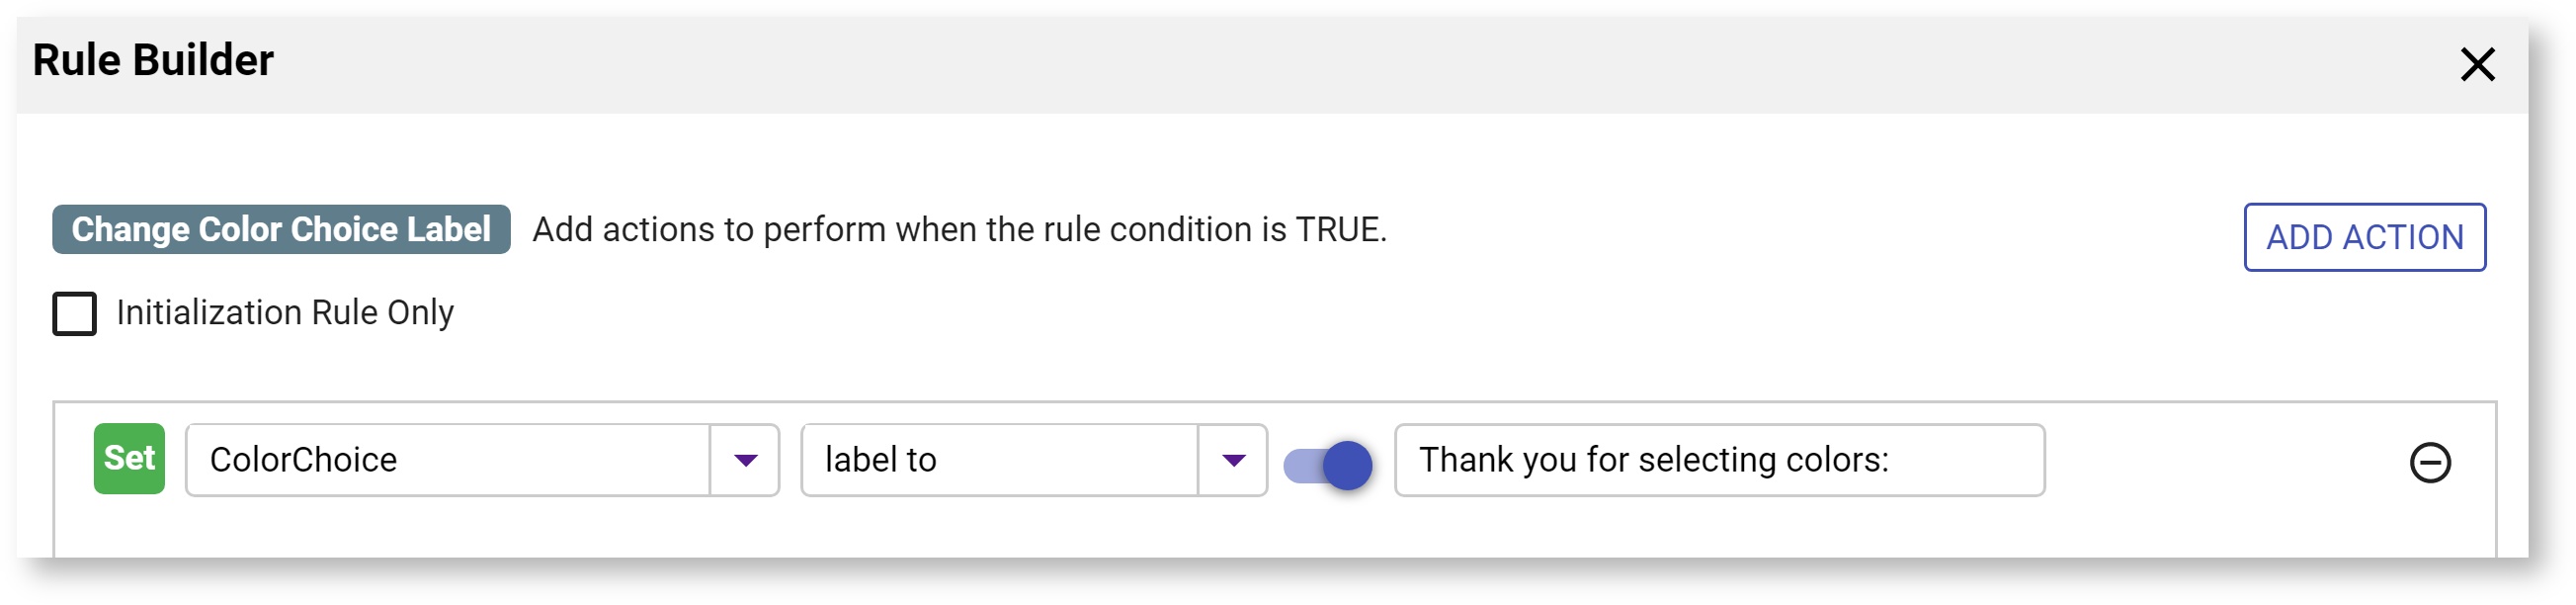
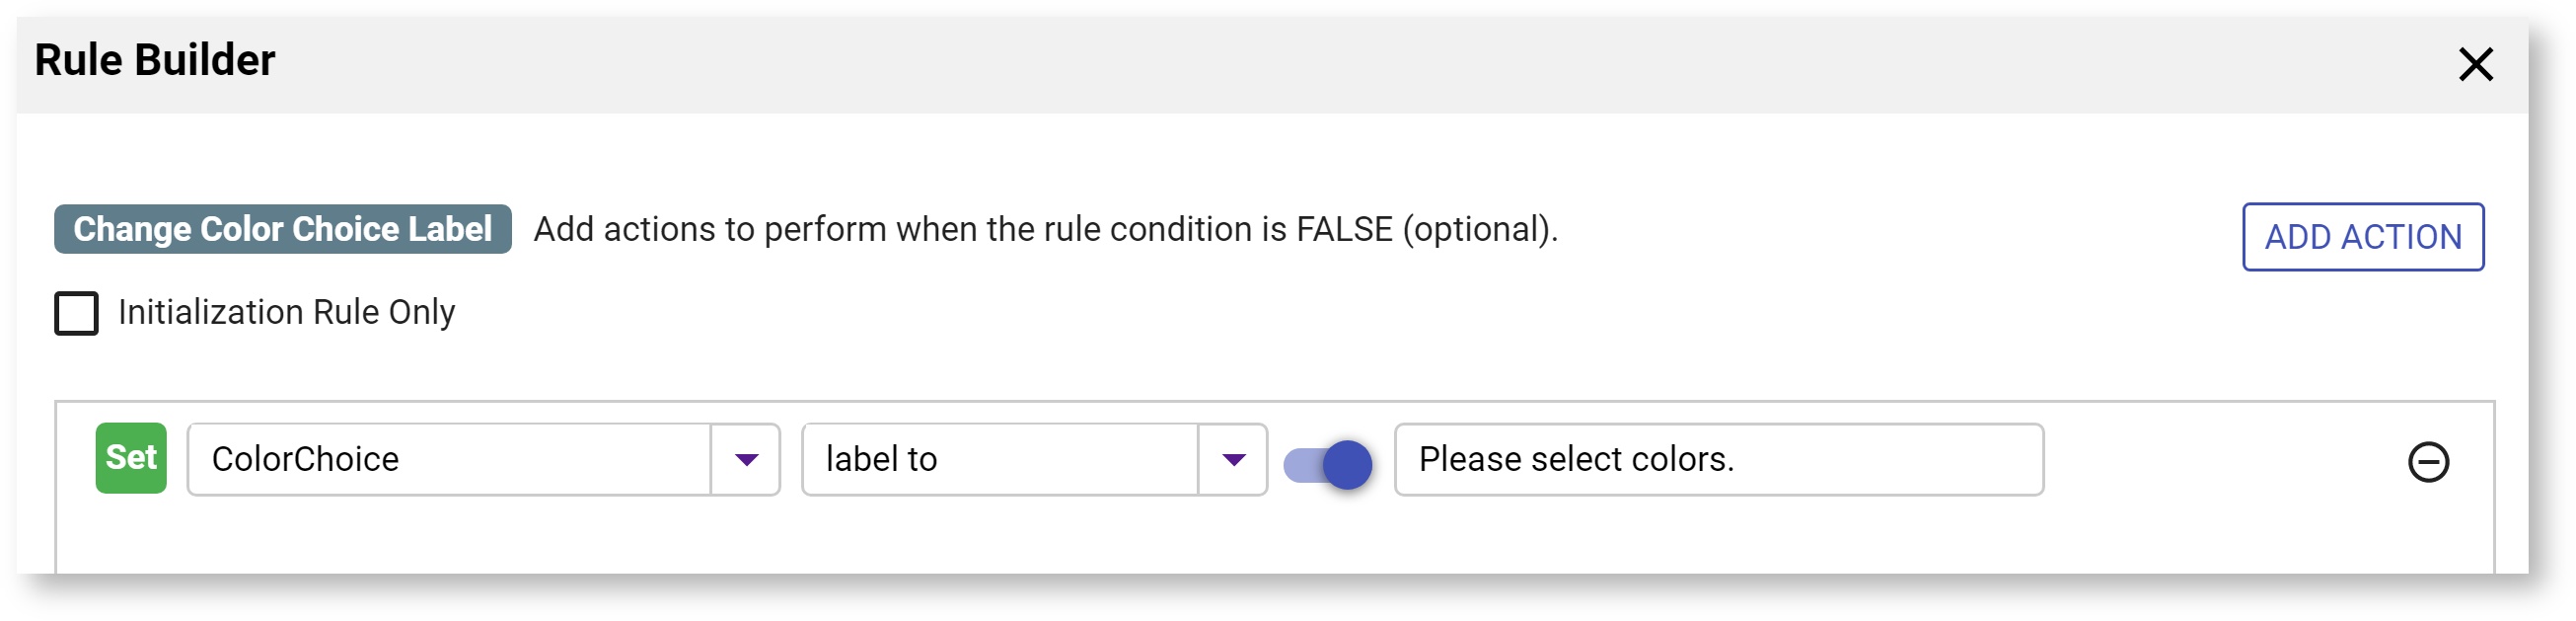
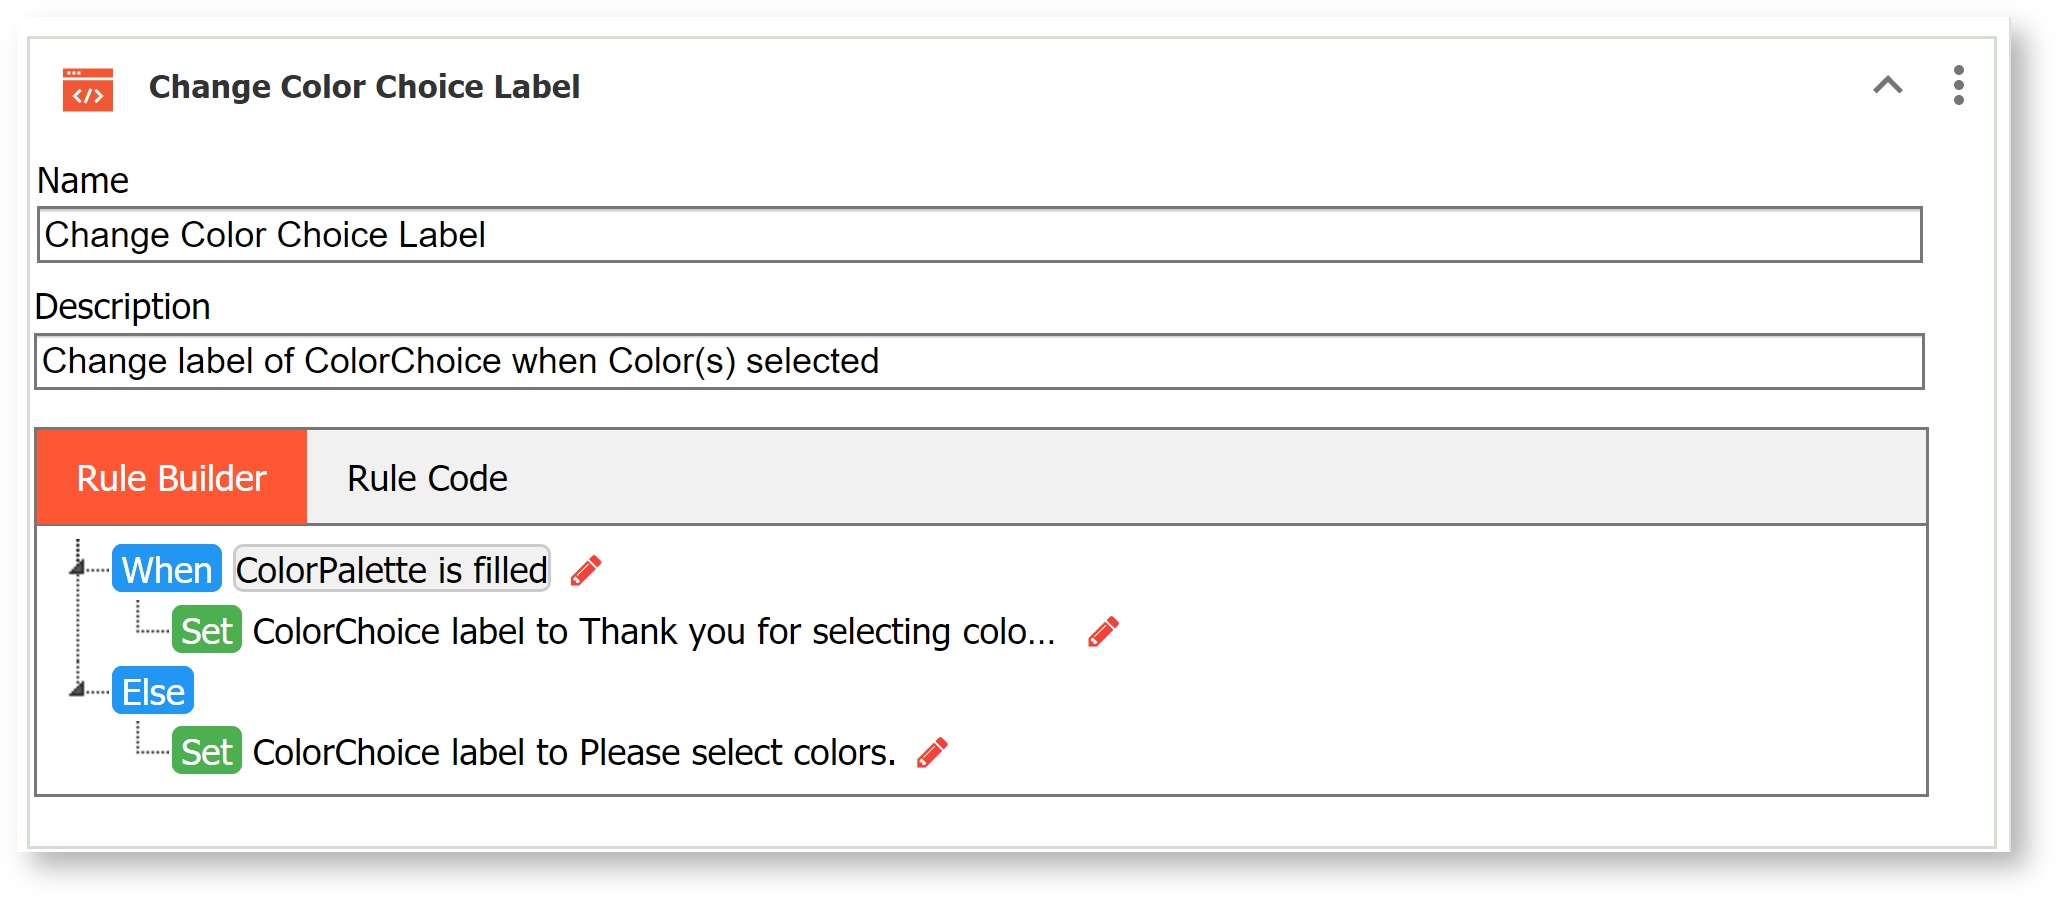
Checkbox Options - Changing the Label of another control
Another example showing how checkbox controls are array types is shown here. This rule can be created with the Rule Builder. Using the same form as the example above, this rule changes the Label of the Color Choice control to "Thank You for choosing colors" if options are checked in the Color Palette control. If there are no options checked then the Label of the Color Choice text control is "Please choose Colors...". The rule shown above assigns the choices selected from the control named ColorPalette to the control named ColorChoices
| Expand | ||
|---|---|---|
| ||
Rule List |

Checkbox Options - Making a Control Visible/Invisible
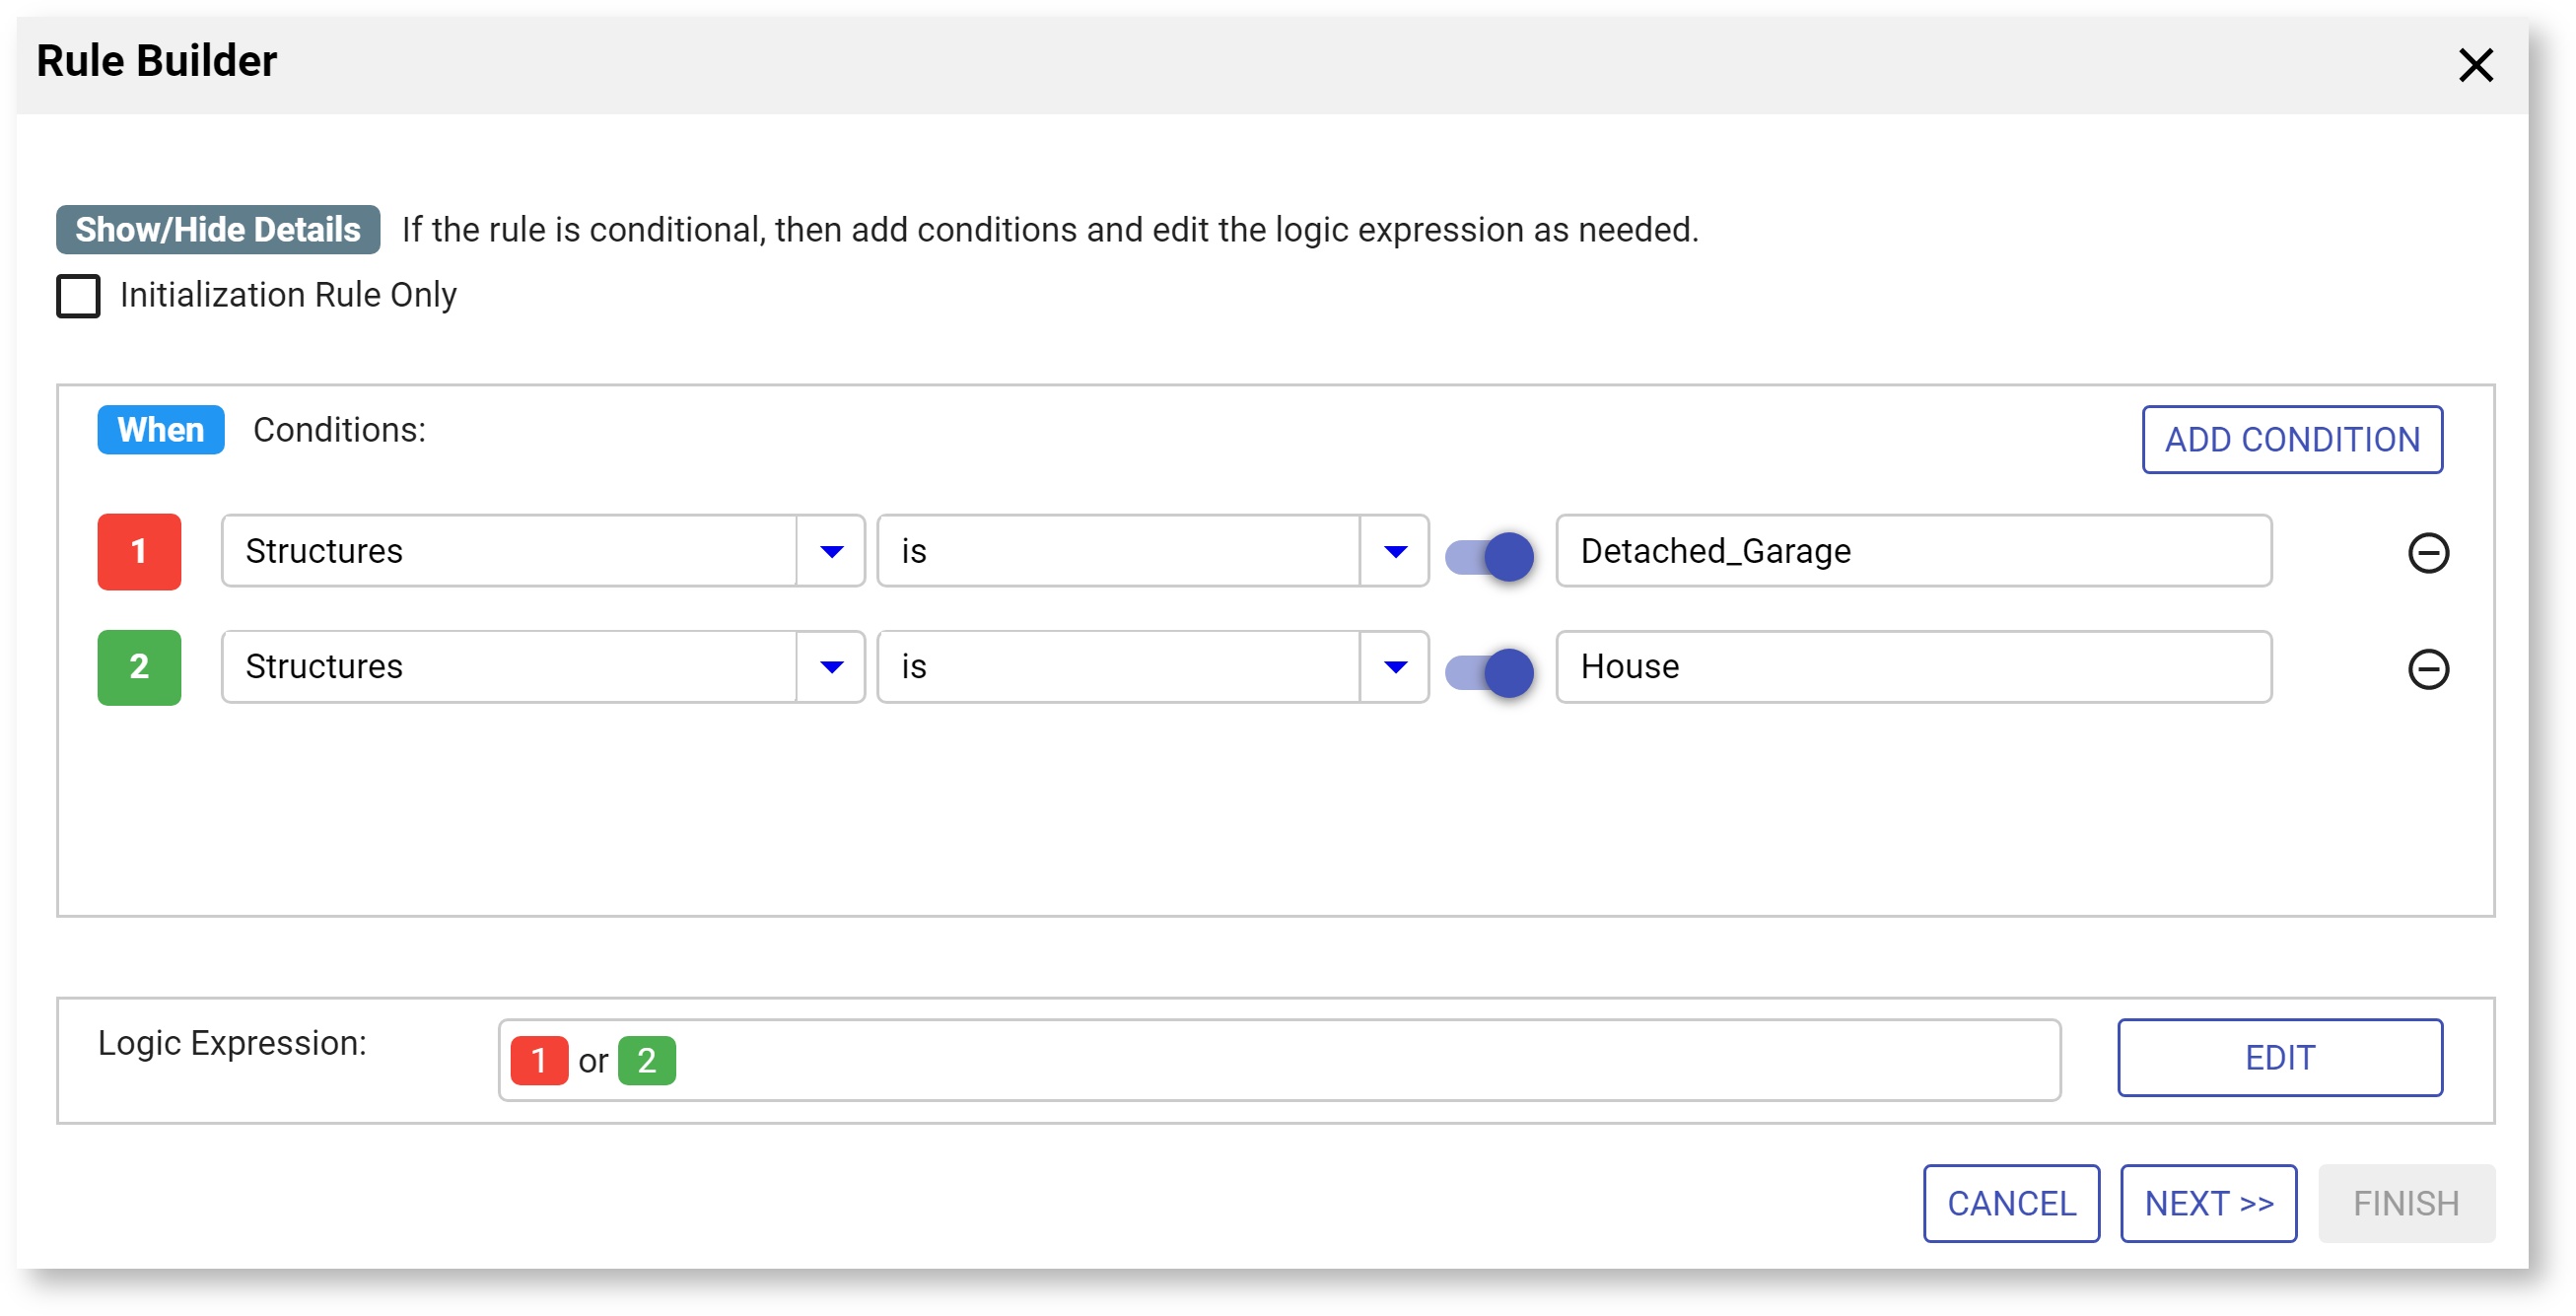
This rule makes visible/invisible a control based on which checkbox options a user selects. This form contains a multi select checkbox named Structures. If the user selects the option "Detached Garage" or "House", we want to make visible a text field named StructureDetails.
...
It is important to note that when a checkbox is added to the form from the palette and its options are multiple words containing spaces, the option array has converted each space character to the '_' character. We must make the comparison as shown below. Checkbox controls from schema do not have space replaced with '_'.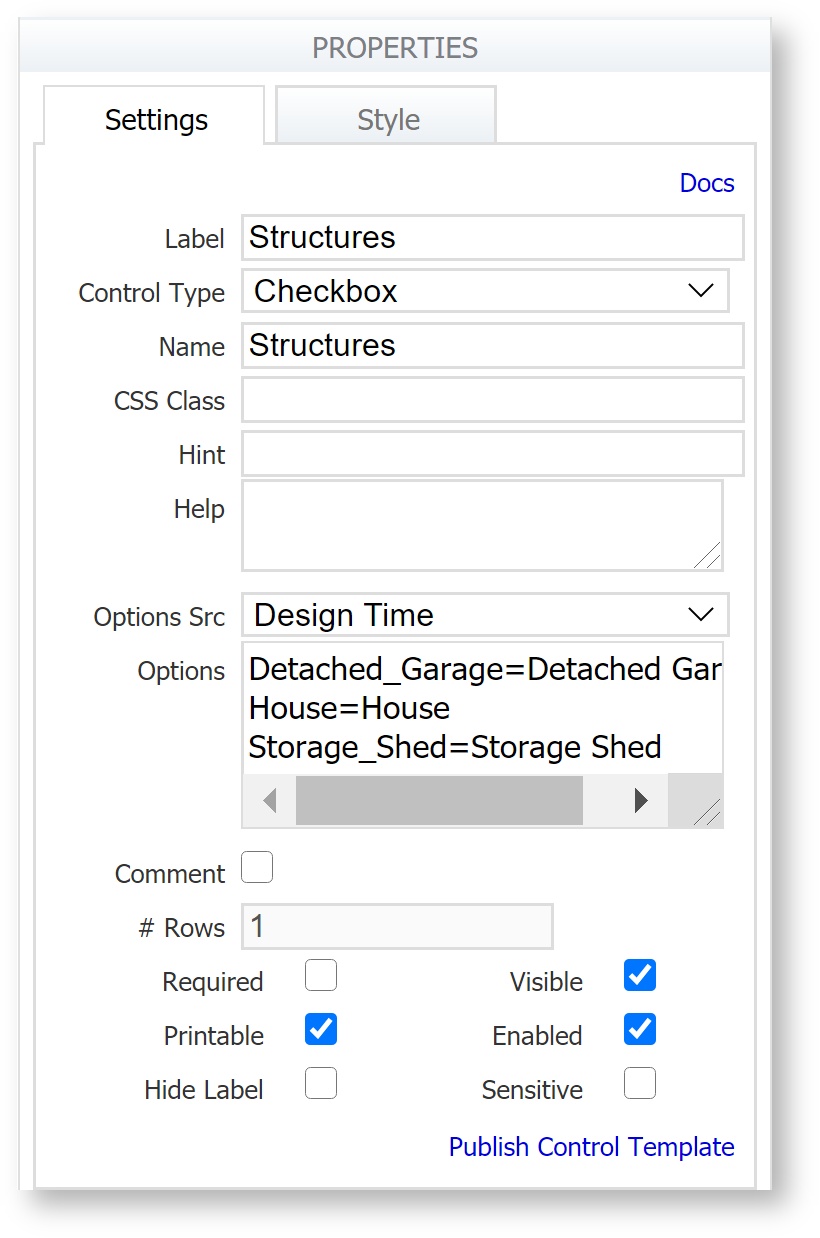
| Expand | ||||||
|---|---|---|---|---|---|---|
| ||||||
|
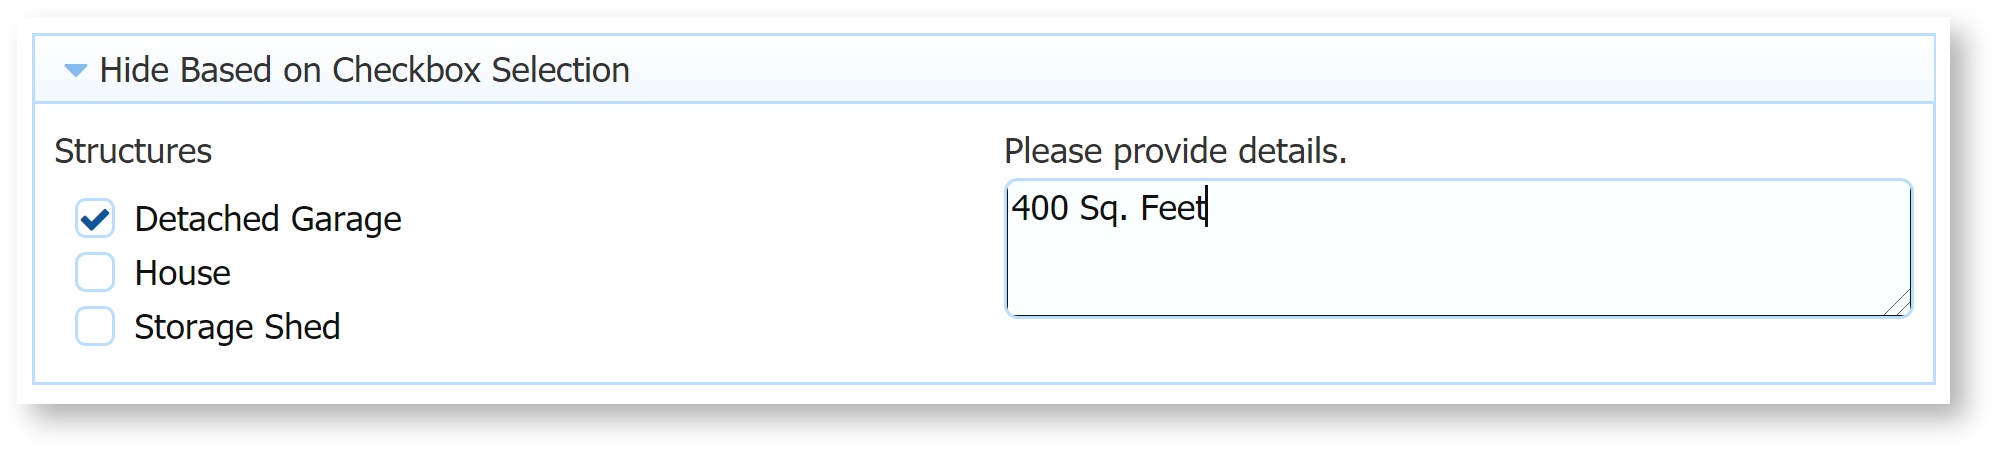
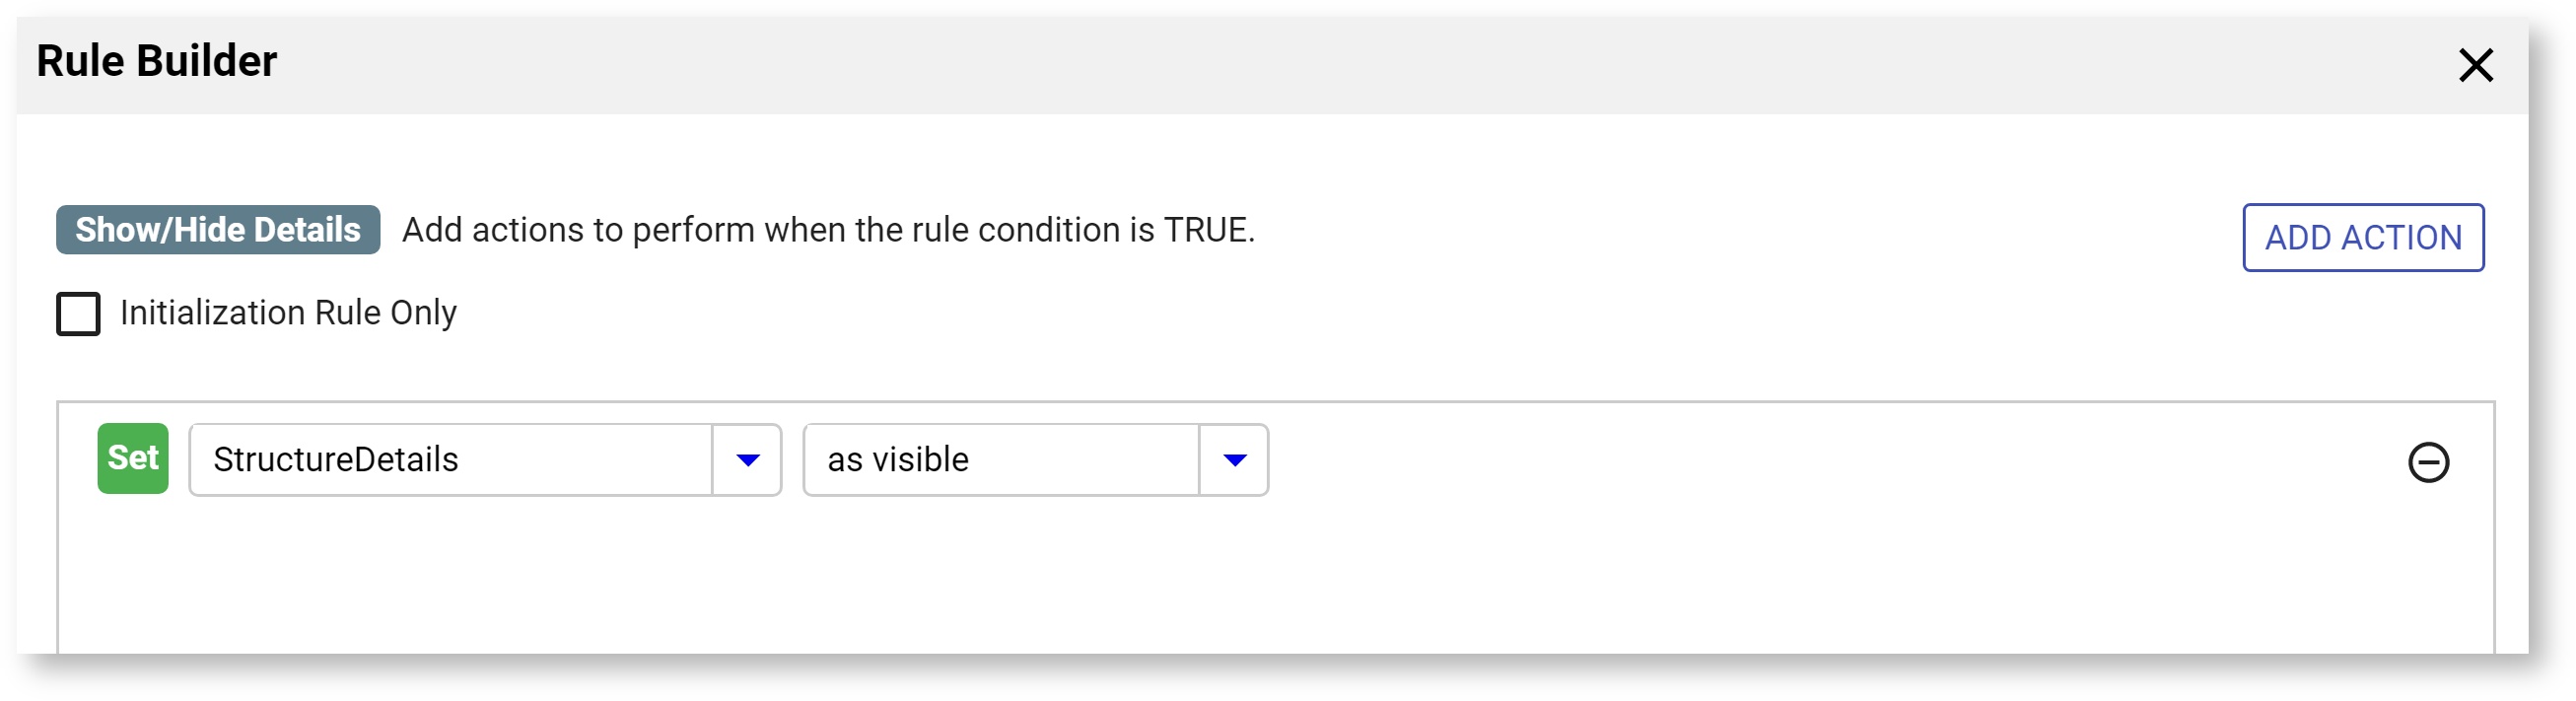
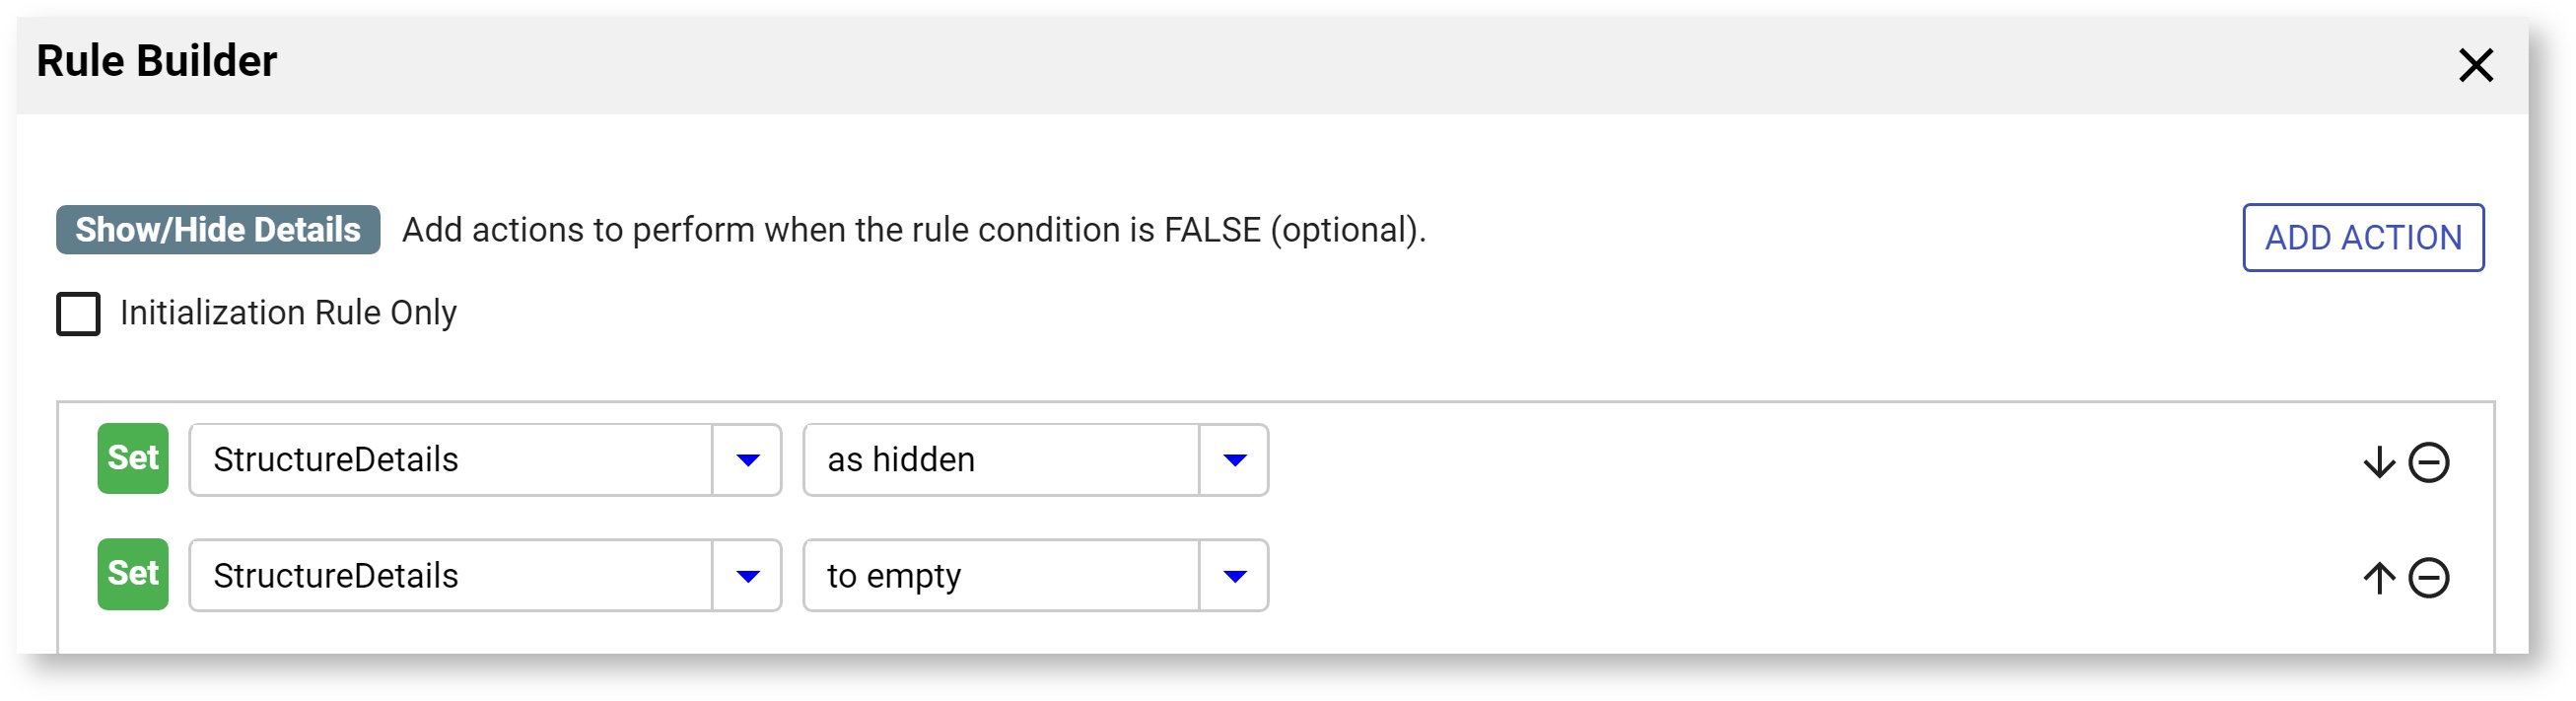
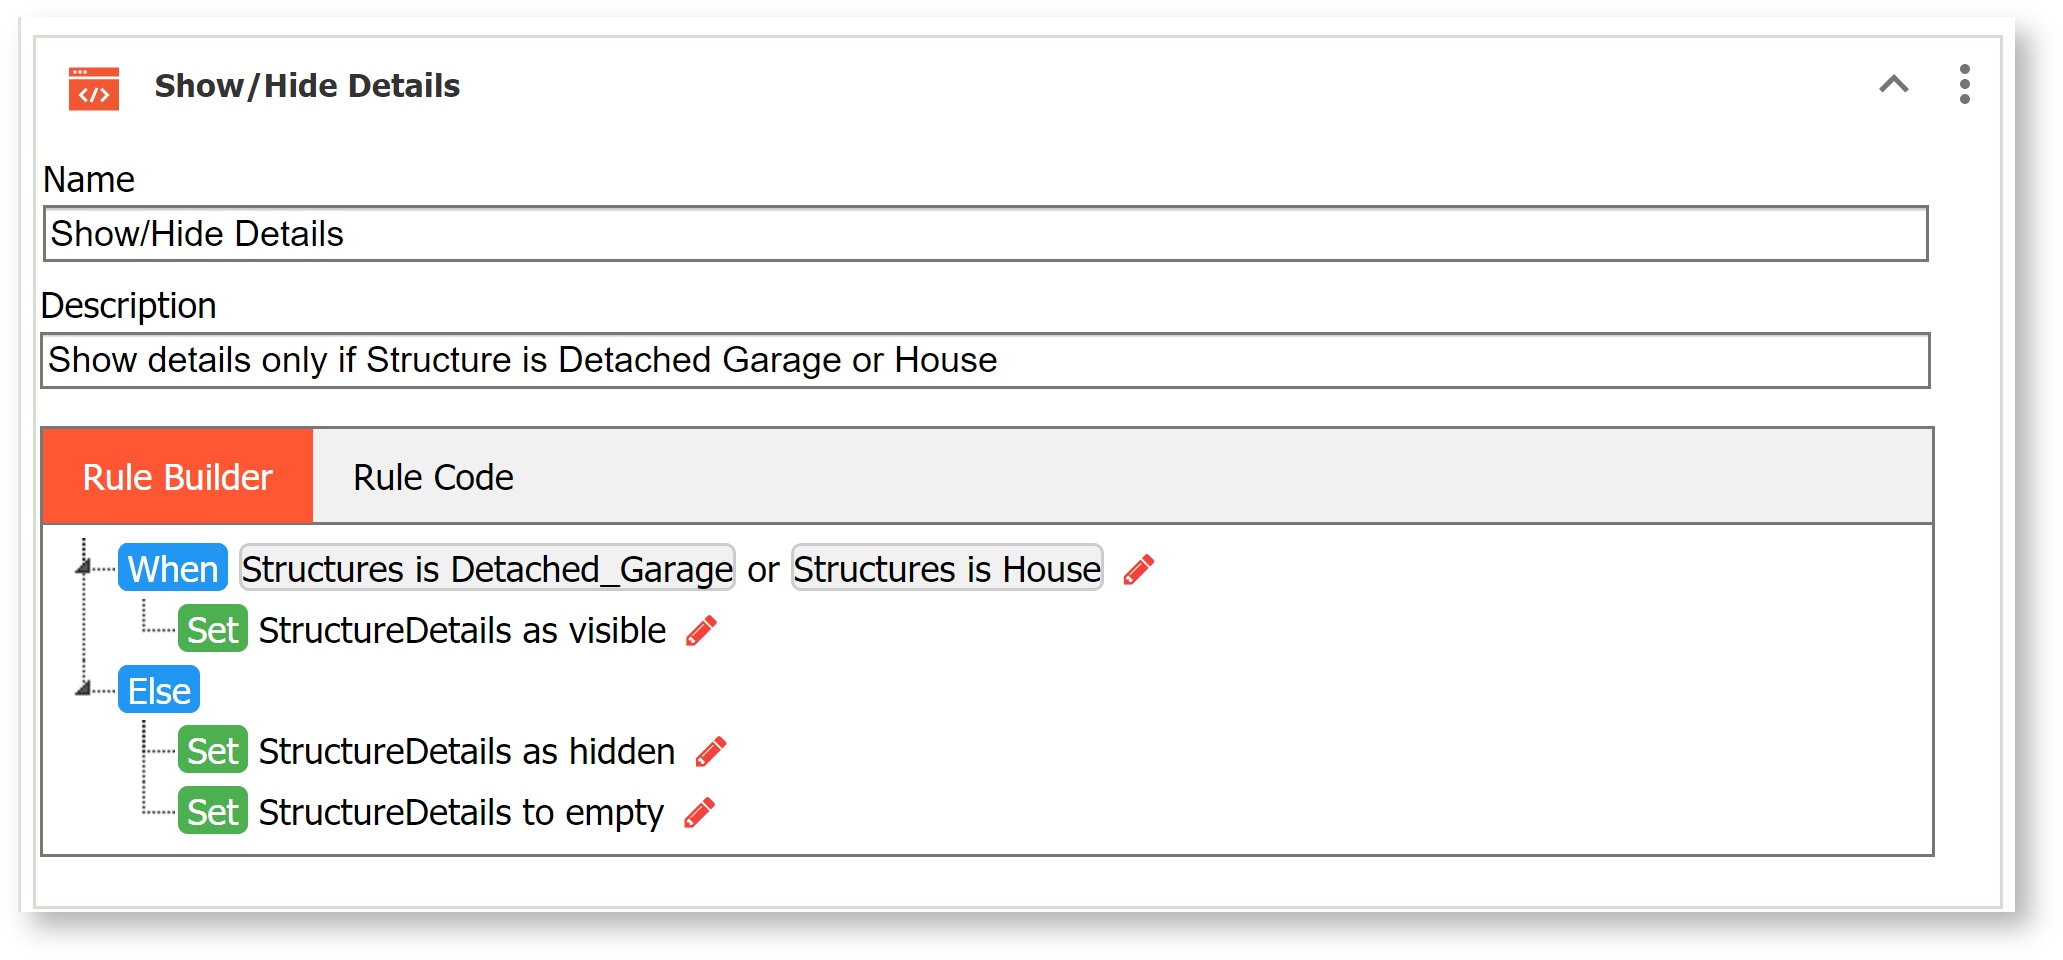
Note that when we hide Details we also clear its value. This is because the user may have selected one of the Structures checkboxes that made Details visible AND entered a value into Details. And then they may have changed their minds and uncheck the option that caused Details to become visible. If you don't want the value entered into Details to be in your form submission, clear the value when hiding it.
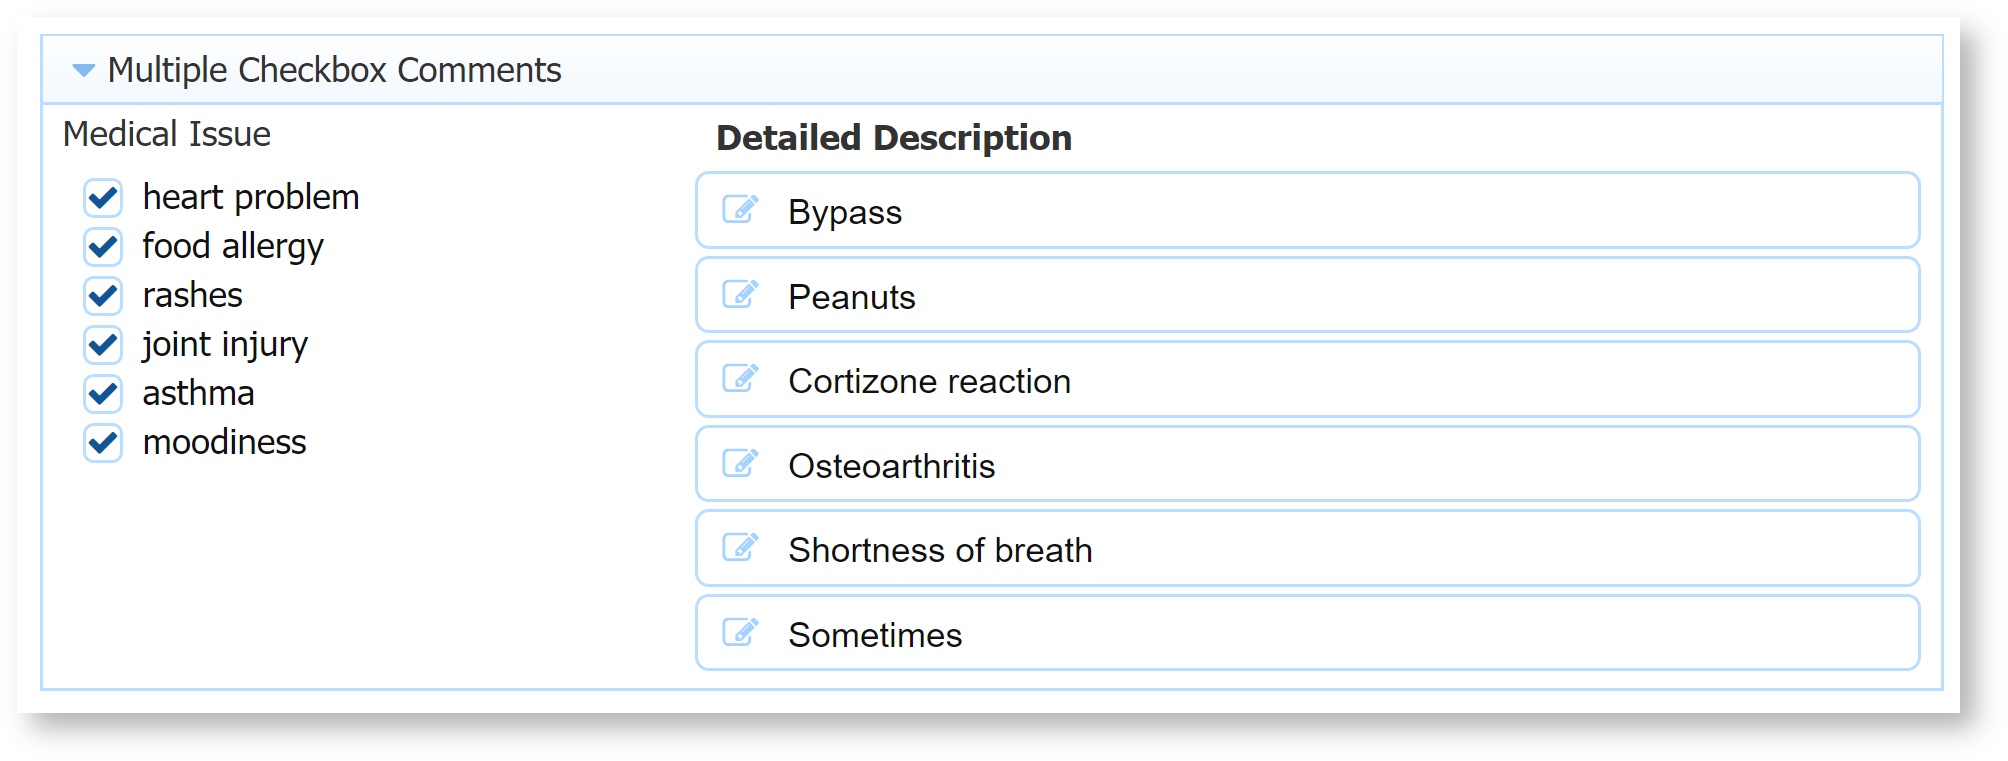
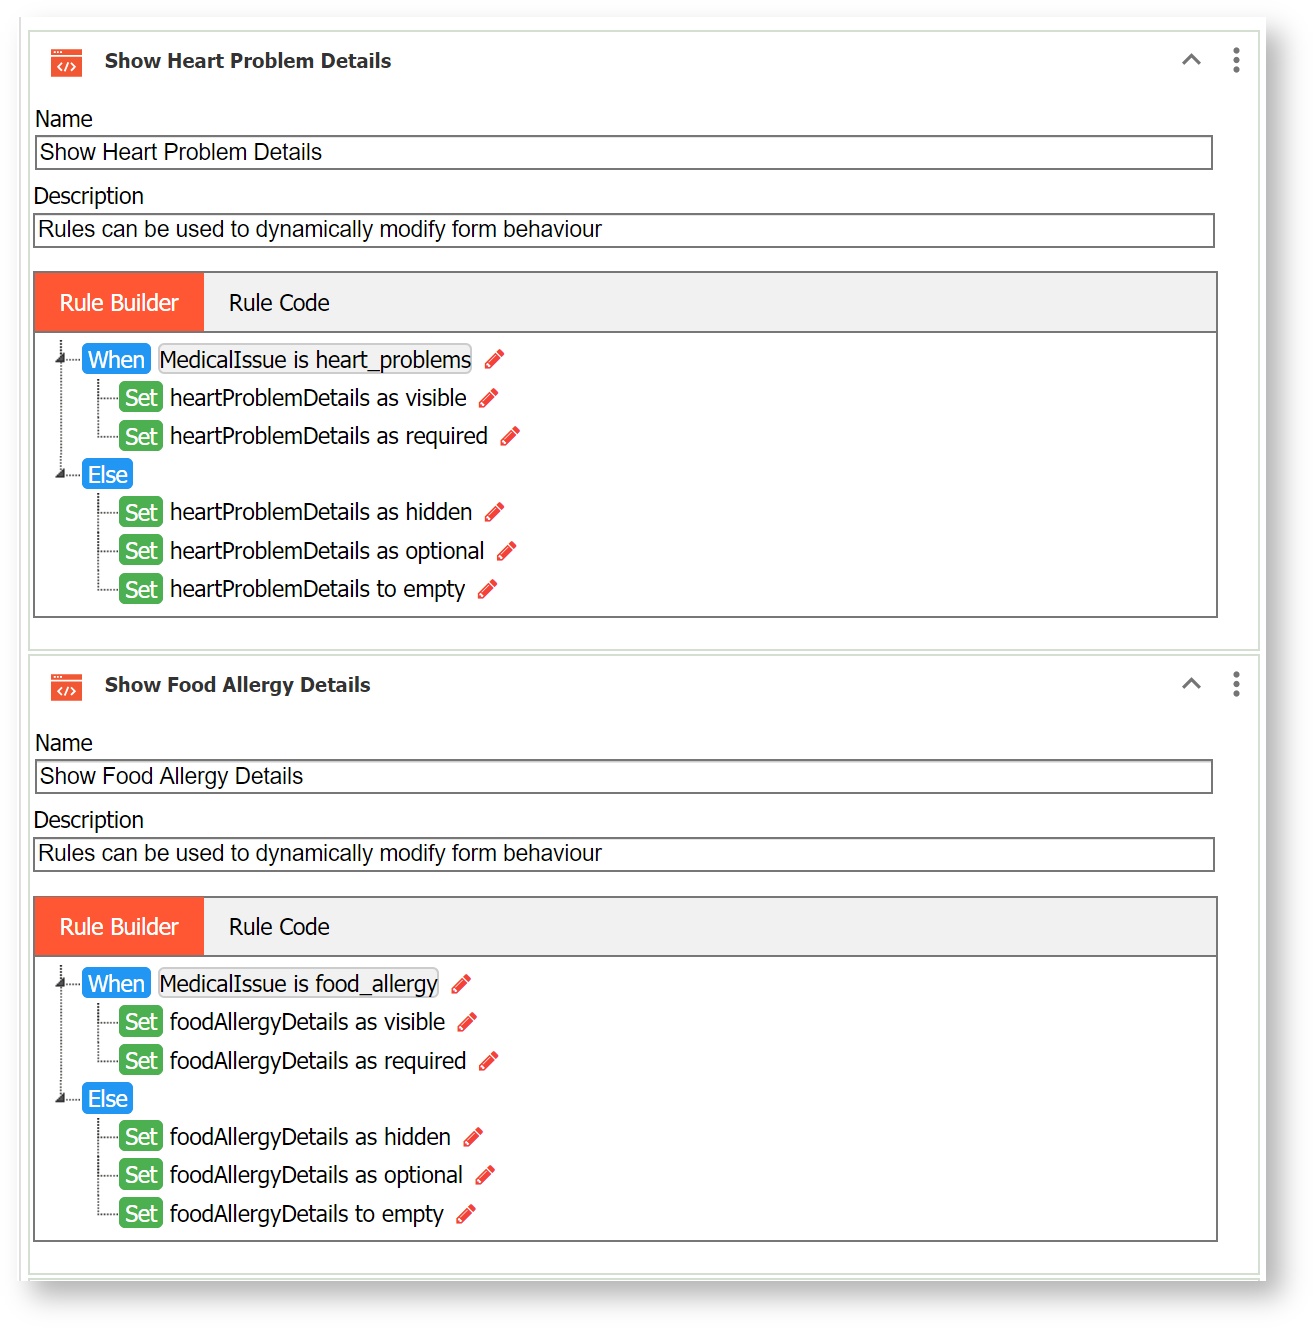
Many Checkbox Comments
This rule, as written, is not yet supported in the Visual Rules Builder and thus still requires some JavaScript. You can achieve the same result in the Rule Builder but you must create a six separate rules to show/hide the details section for each option in your selection control. Expand the section after the example for details about how to create this rule in the Rule Builder.
...
| Expand | ||
|---|---|---|
| ||
 Many Comments screen
|
Checkbox Initialization
This rule is not yet supported in the Visual Rules Builder and thus still requires some JavaScript.
...
To clear all checked options in the control named CB:
| Code Block |
|---|
CB.value = []; |
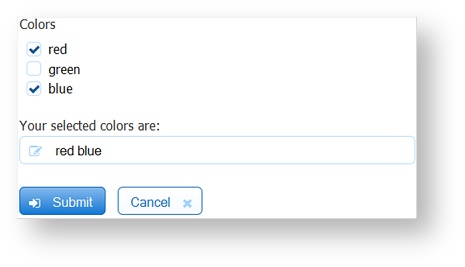
Displaying Selected Checkbox Labels
This rule is not yet supported in the Visual Rules Builder and thus still requires some JavaScript. In this example, the rule displays the labels of the checkboxes the user selects.
| Code Block |
|---|
var x;
var selectedcolors = '';

for (var i = 0; i < RGB.value.length; i++)
{
    var v = RGB[i].value;
    for (x in RGB.options) {

        var opt = RGB.options[x];
        var val= opt.split('=')[0];
        var lab= opt.split('=')[1];
        if (v === val) {
            selectedcolors = selectedcolors + ' ' + lab;
        }
    }
}
SelectedColors.value = selectedcolors; |
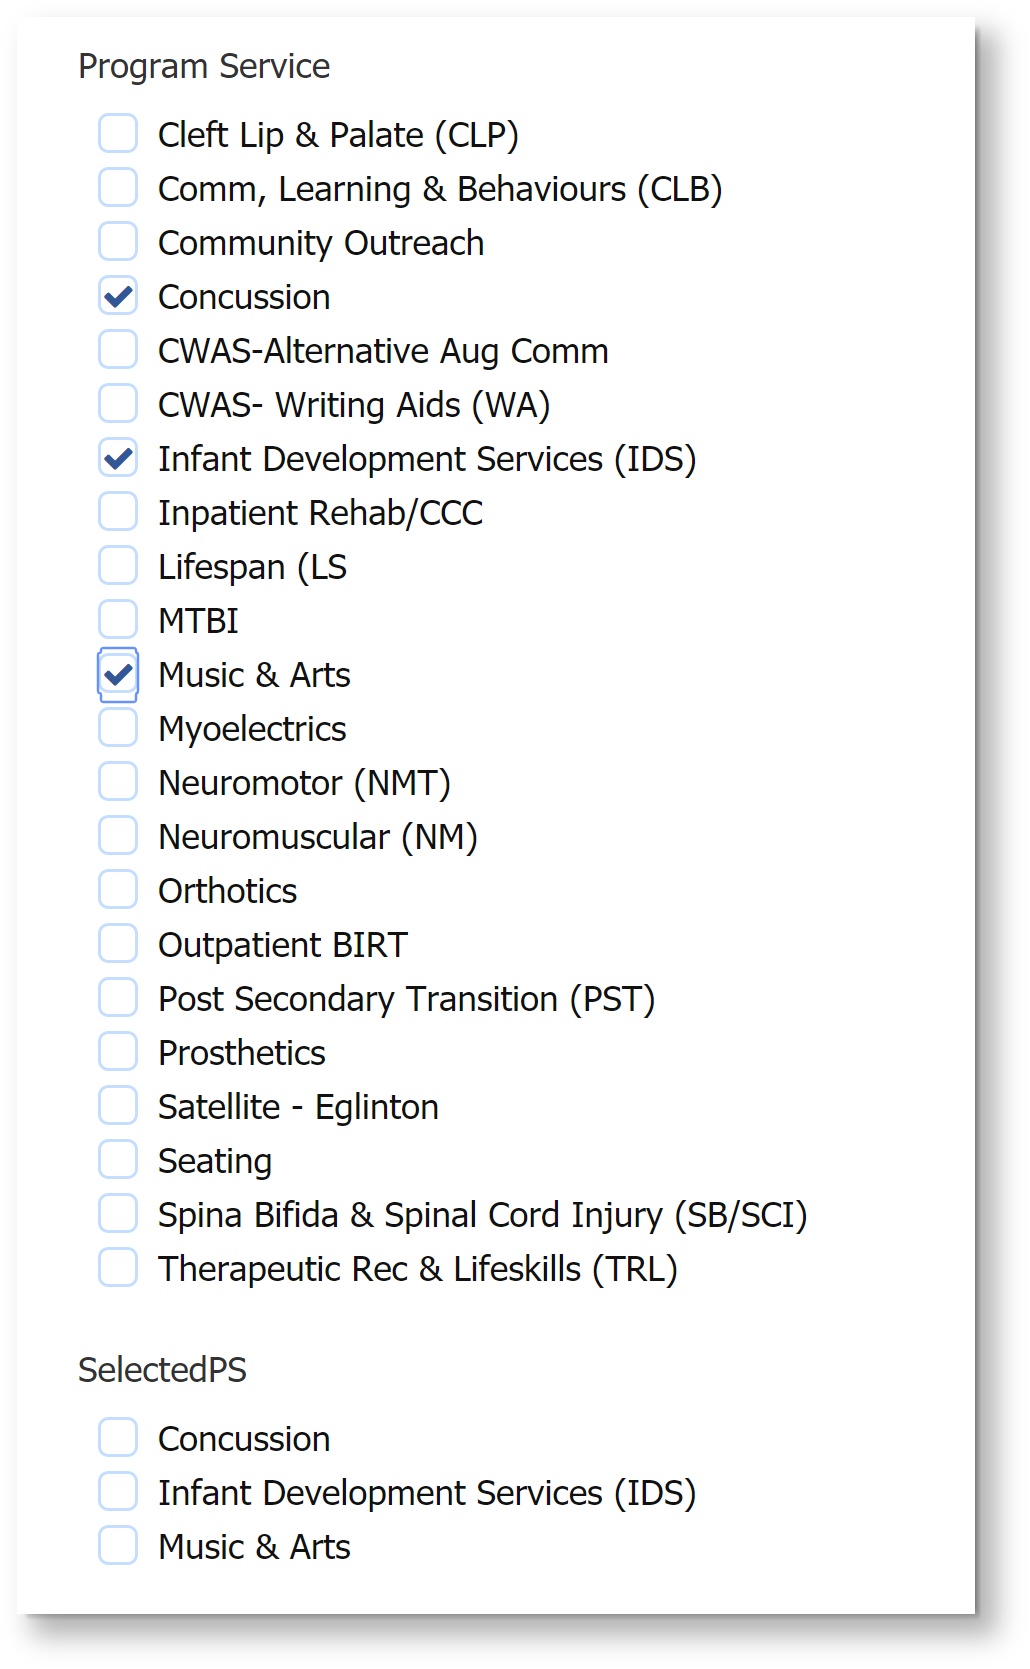
Set Options for a Checkbox based on Values Selected in another Checkbox
This rule is not yet supported in the Visual Rules Builder and thus still requires some JavaScript. This rule will take values selected in one checkbox control and populates those as options in a second checkbox control. For example, a checkbox control (Services) displays all available services. The second checkbox (Selected Services) will display as options the values selected in Services. One scenario you might use this is to customize an employee scheduling form. In Step 1 of the workflow the Coordinator picks the offered services from the full Program Service list. In Step 2 the Employee sees only the smaller list to select from.
| Code Block |
|---|
var opts = [''];

for (var i = 0; i < ProgramService.value.length; i++ ){
  var v = ProgramService.value[i].replace(/_/g,"  ");
  opts[i] = ProgramService[i].value + "=" + v;
}
SelectedPS.options = opts;
var event = form.load; |
Count the Number of Options Selected
There are use cases where you may want a total of how many checkbox options were selected. For example, one or more checkboxes may display a list(s) of products, and you want to know how many total products were selected. A simple rule will count the number of options selected where the checkboxes are named "Accessories," "Shoes," and "Jewelry" and the count is given in a Quantity control named "Quantity":
| Code Block |
|---|
Quantity.value = Accessories.value.length + Shoes.value.length + Jewelry.value.length; |
.PNG?version=1&modificationDate=1622577274000&cacheVersion=1&api=v2&effects=drop-shadow&height=400)
Retrieving or Setting the Comment Property for Selection Controls
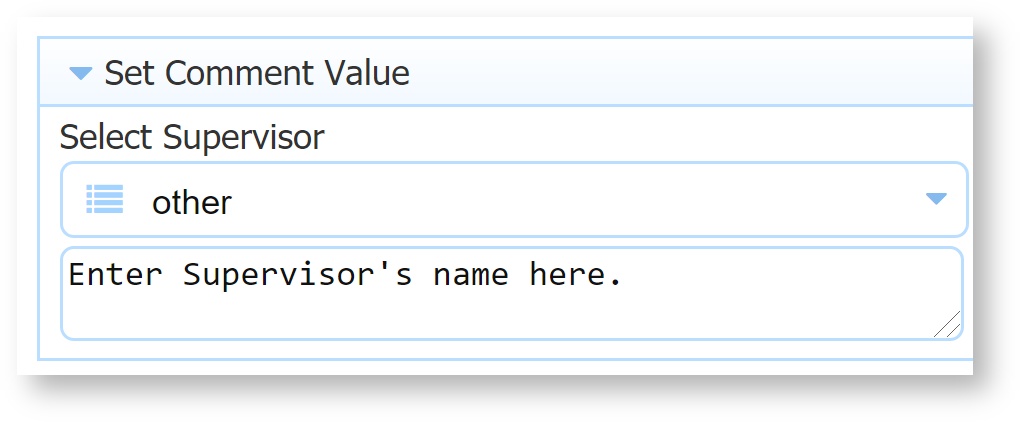
Dropdowns, Checkboxes and Radio controls have the capability to display a Comment field if the user selects the last option. It is most often used as an "Other - please specify" option. In the Forms designer, check the Comment checkbox in the Properties panel and provide a # of rows for the comment area. If the user selects this option, a comment box will appear below asking the user to provide details. Selecting or unselecting the comment property is not supported in rules; however, business rules can be used to set or retrieve the value in the comment field.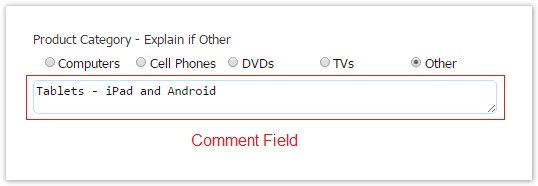
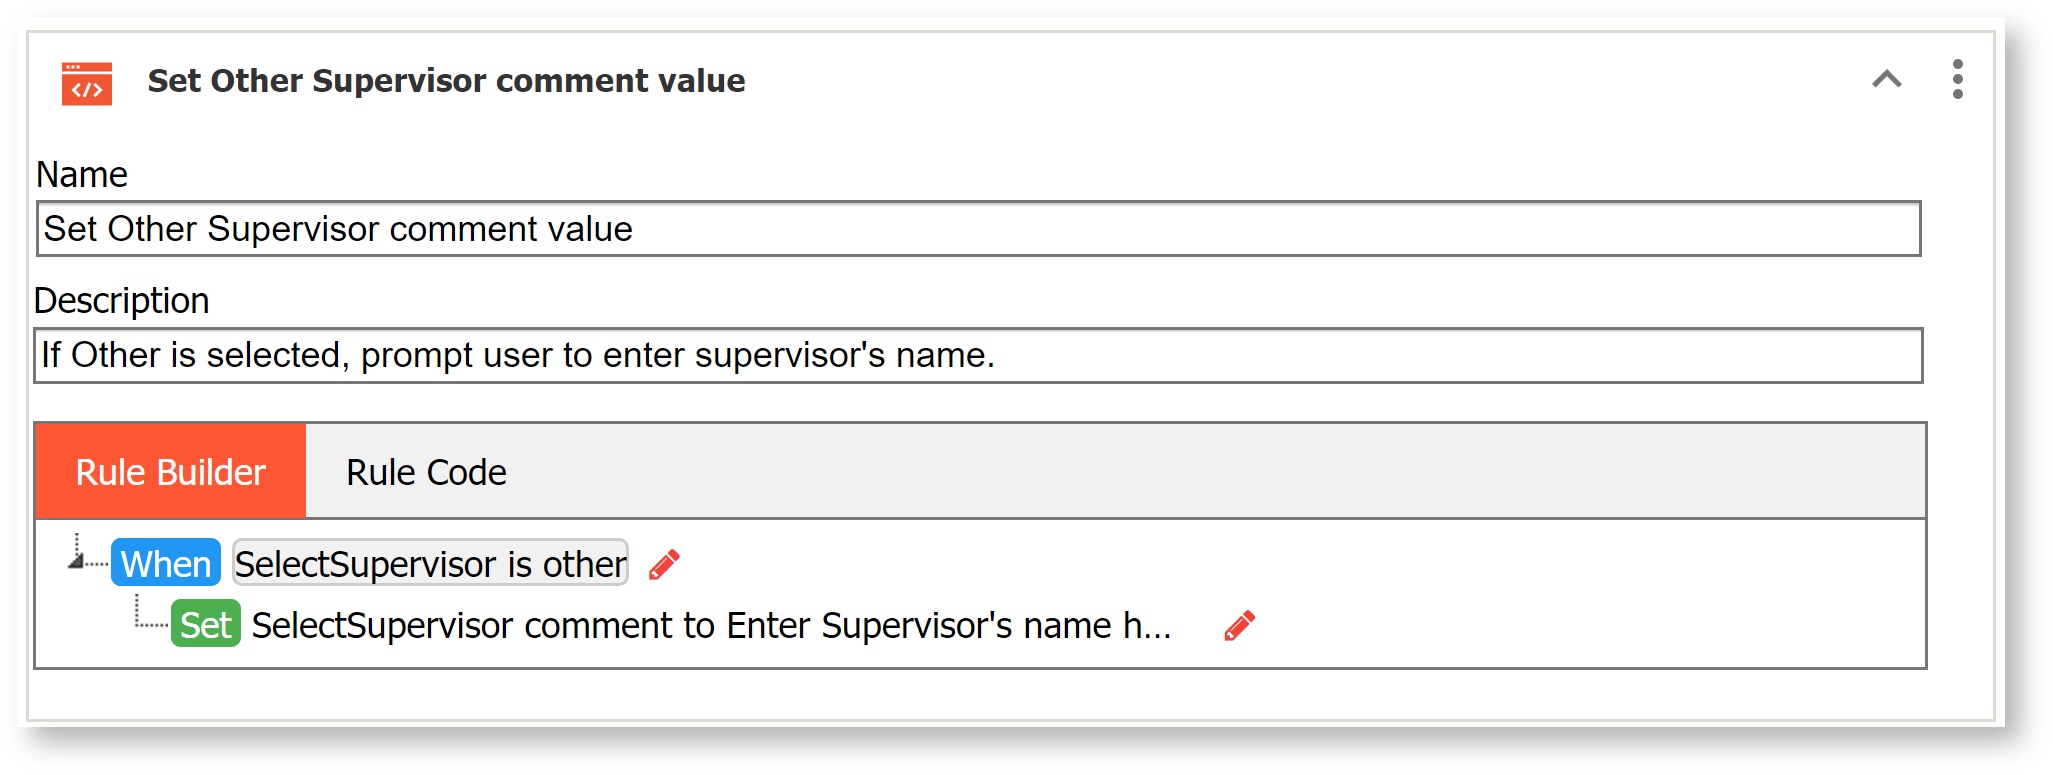
The Visual Rule Builder can be used to set the comment field to a value or expression.

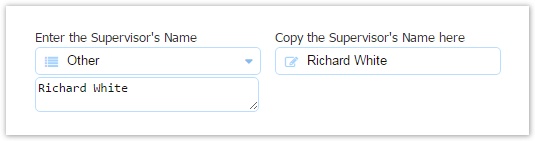
Business rules can be written to retrieve the value of the Comment field using the commentValue property. Note that the initial value of the commentValue is null. Your rules may have to be coded to check for that. This rule is not yet supported in the Visual Rules Builder and thus still requires some JavaScript.
...
| Code Block |
|---|
if(Supervisor.commentValue != null){
  OtherSupervisor.value =Supervisor.commentValue;
} else {
  OtherSupervisor.value = "";
} |
Review this special syntax to reference comment fields in templates.
Set Max Length for Comment Field
This rule is not yet supported in the Visual Rules Builder and thus still requires some JavaScript.
...
| Code Block |
|---|
if(Reason.commentValue){
  if(Reason.commentValue.length > 50 && TransferReason.value){
    Reason.valid = false;
    Reason.status = 'Invalid. Max 50 chars allowed and you have ' + Reason.commentValue.length;
  } else {
    Reason.valid = true;
  }
} |
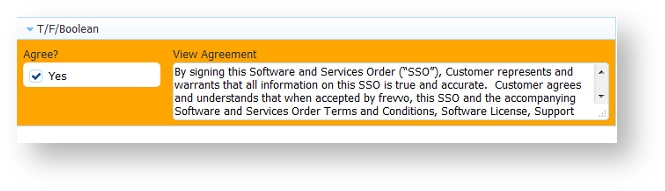
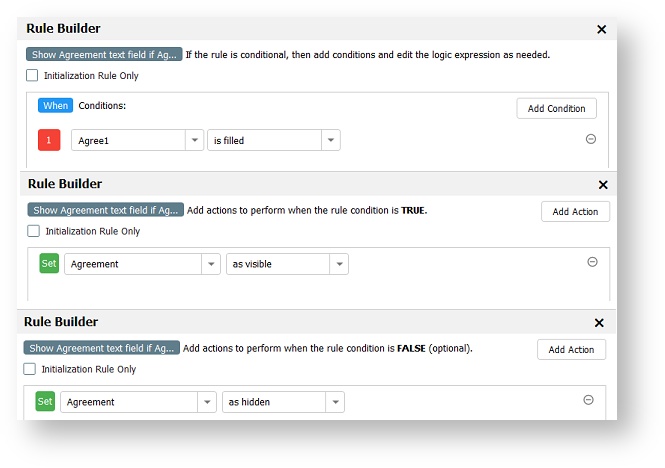
T/F Boolean
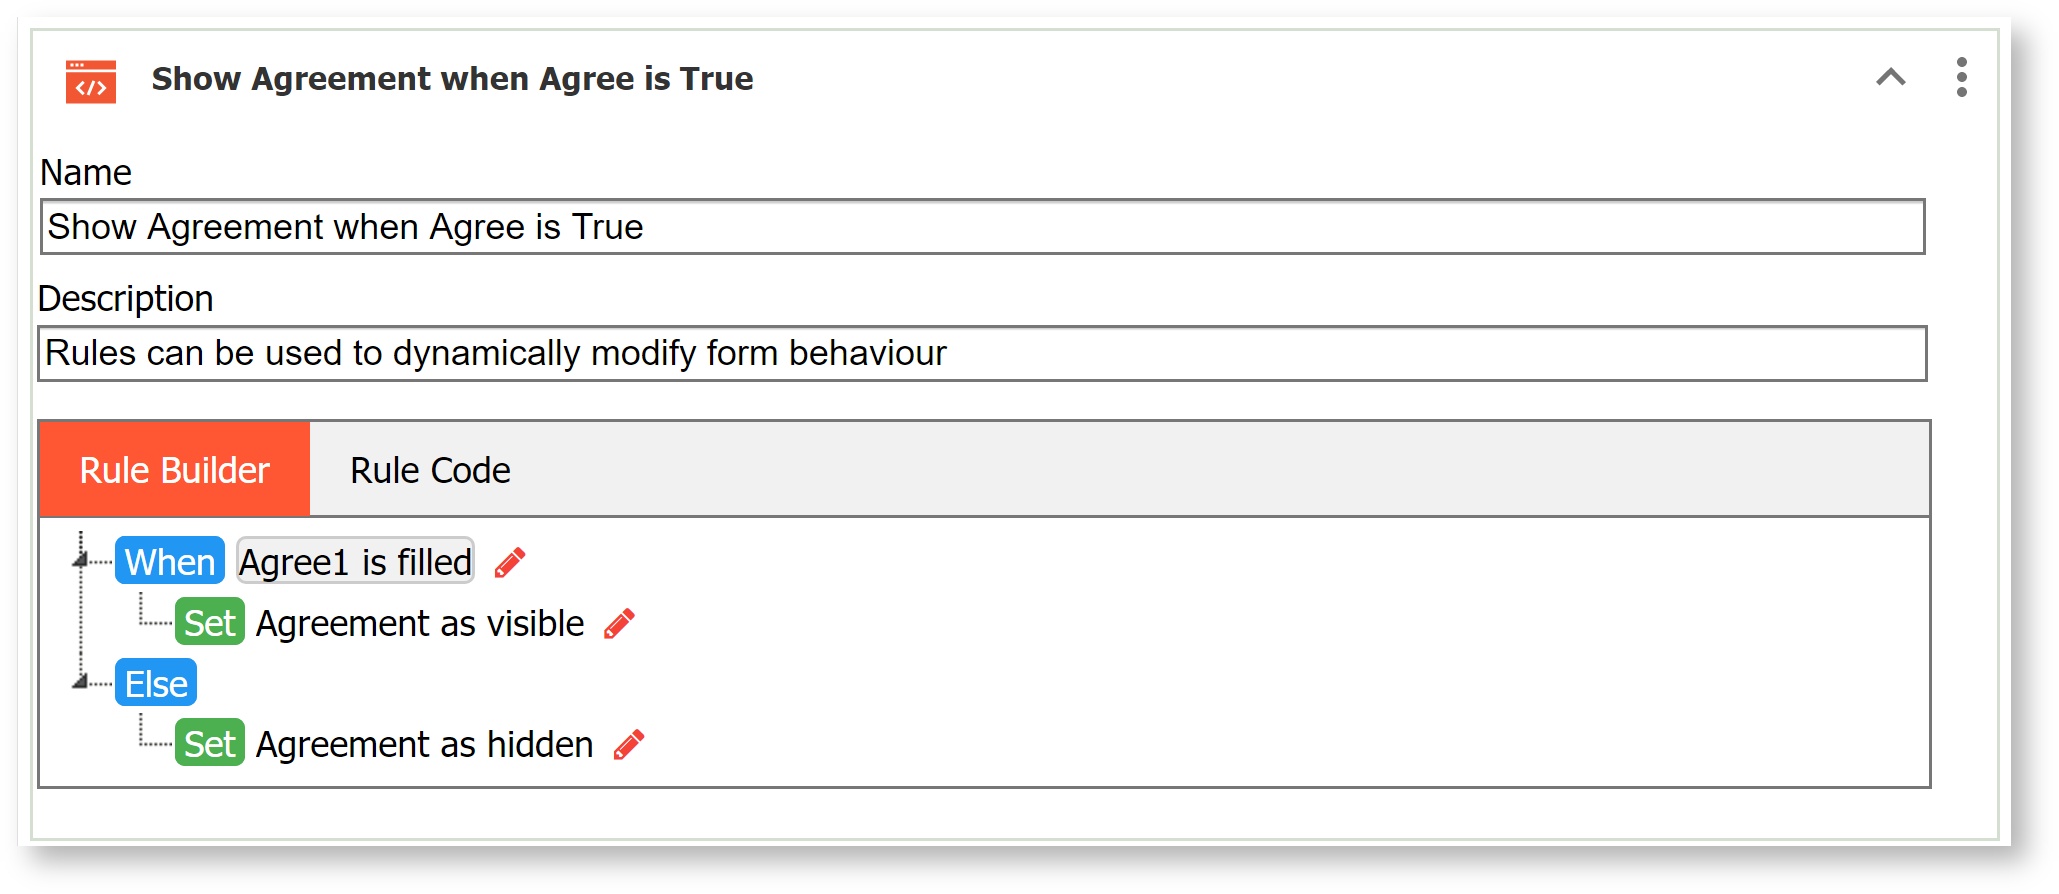
Use the Rule Builder to create a rule involving T/F controls. T/F controls are simplified checkbox controls with only a single visible option. This rule makes the control named "Agreement" visible if the T/F control named "Agree1" is checked and invisible if the T/F control named "Agree1" is unchecked.
| Expand | ||||||
|---|---|---|---|---|---|---|
| ||||||
|
| Expand | ||||||
|---|---|---|---|---|---|---|
| ||||||
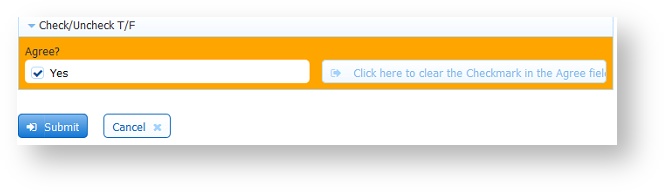
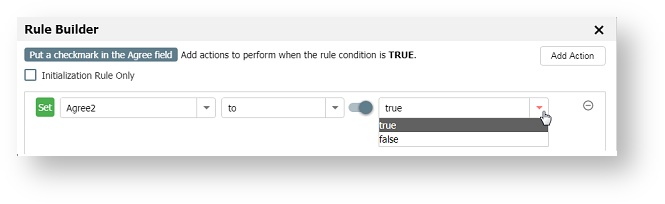
To set the checkmark on a T/F control - Remember to slide the
|
| Expand | ||||||
|---|---|---|---|---|---|---|
| ||||||
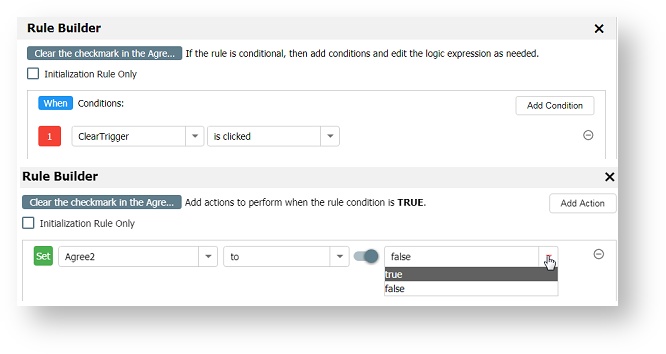
To clear a checkmark from a T/F control you must set the value to null and ensure that the control is not required. This rule clears the checkmark from a field named Agree1 when the Trigger control is clicked:
|
| Tip | ||||
|---|---|---|---|---|
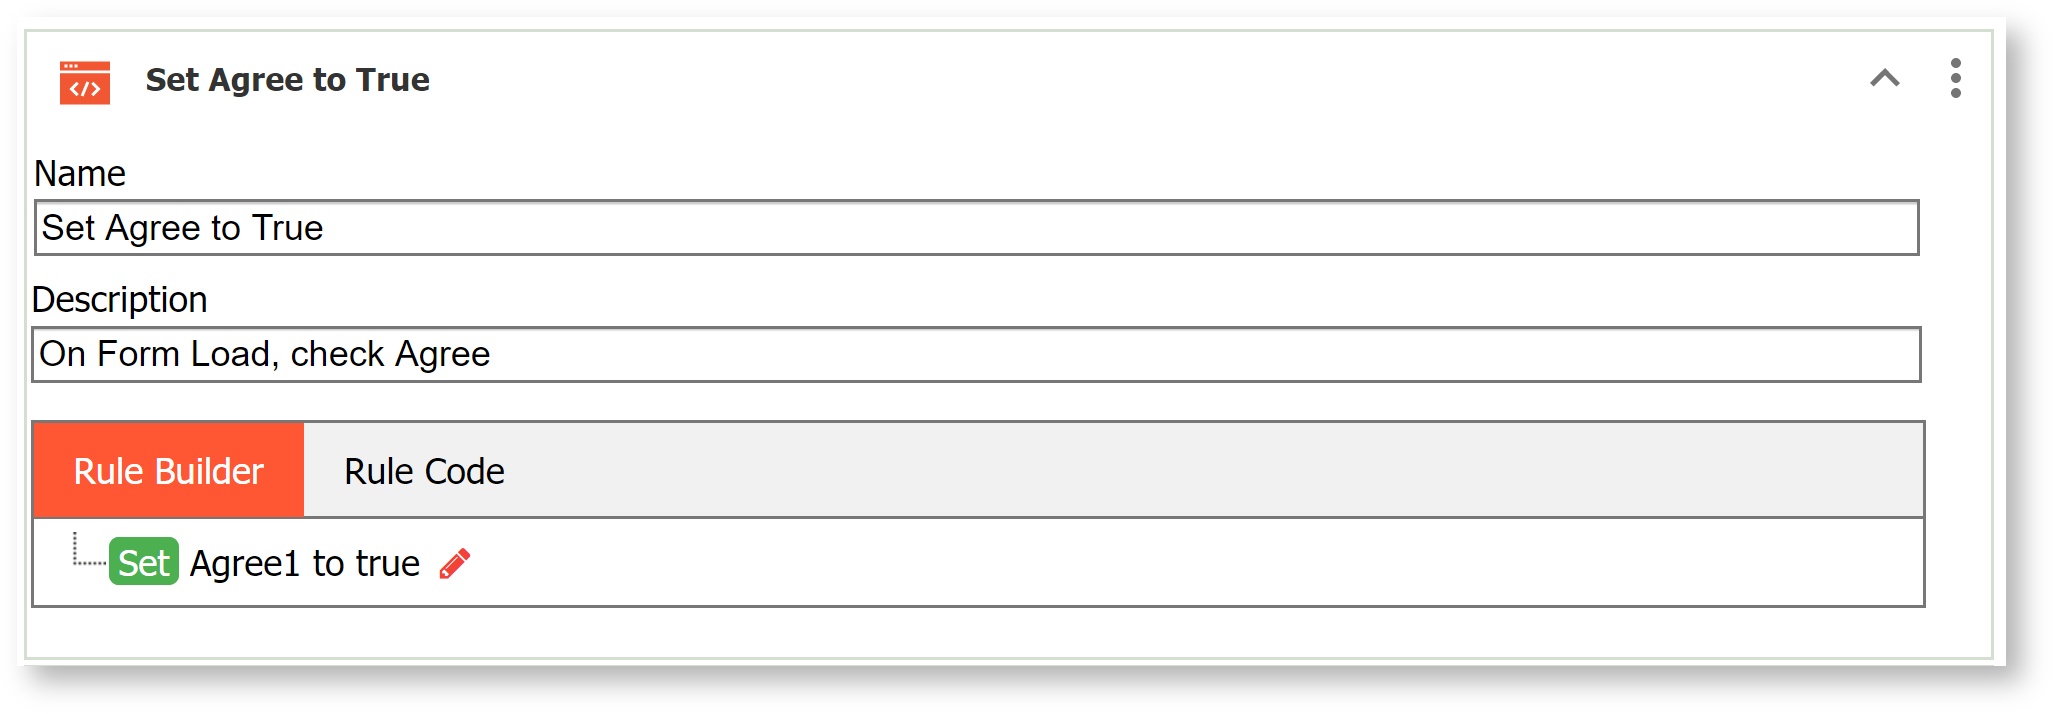
The value property for a Boolean checkbox behaves differently depending on whether it is from schema or not. If the T/F control is from schema, you will see If you use the Rule Builder, this difference will be seamless to the designer. For example, the rule for a Boolean control from schema generated by the Rule Builder looks like this
And the code for a Boolean control from the palette, looks like this. .
|
Repeating Checkboxes
This rule is not yet supported in the Visual Rules Builder and thus still requires some JavaScript. Checkboxes inside repeat controls must be treated as an array (each checkbox control's values) of checkbox option values which is inside another array (the repeating checkbox control itself). This form example has a repeating section containing two controls -- Message which is a text control and AreYouAttending which is a checkbox control with a single option 'yes'. To access the selected options the syntax is:
...
| Code Block |
|---|
for (var i = 0; i < AreYouAttending.value.length; i++)
{
    if (AreYouAttending[i].value[0] === 'yes') {
        Message[i].value = Name.value +
               ' is attending event #' + i;
    }
} |
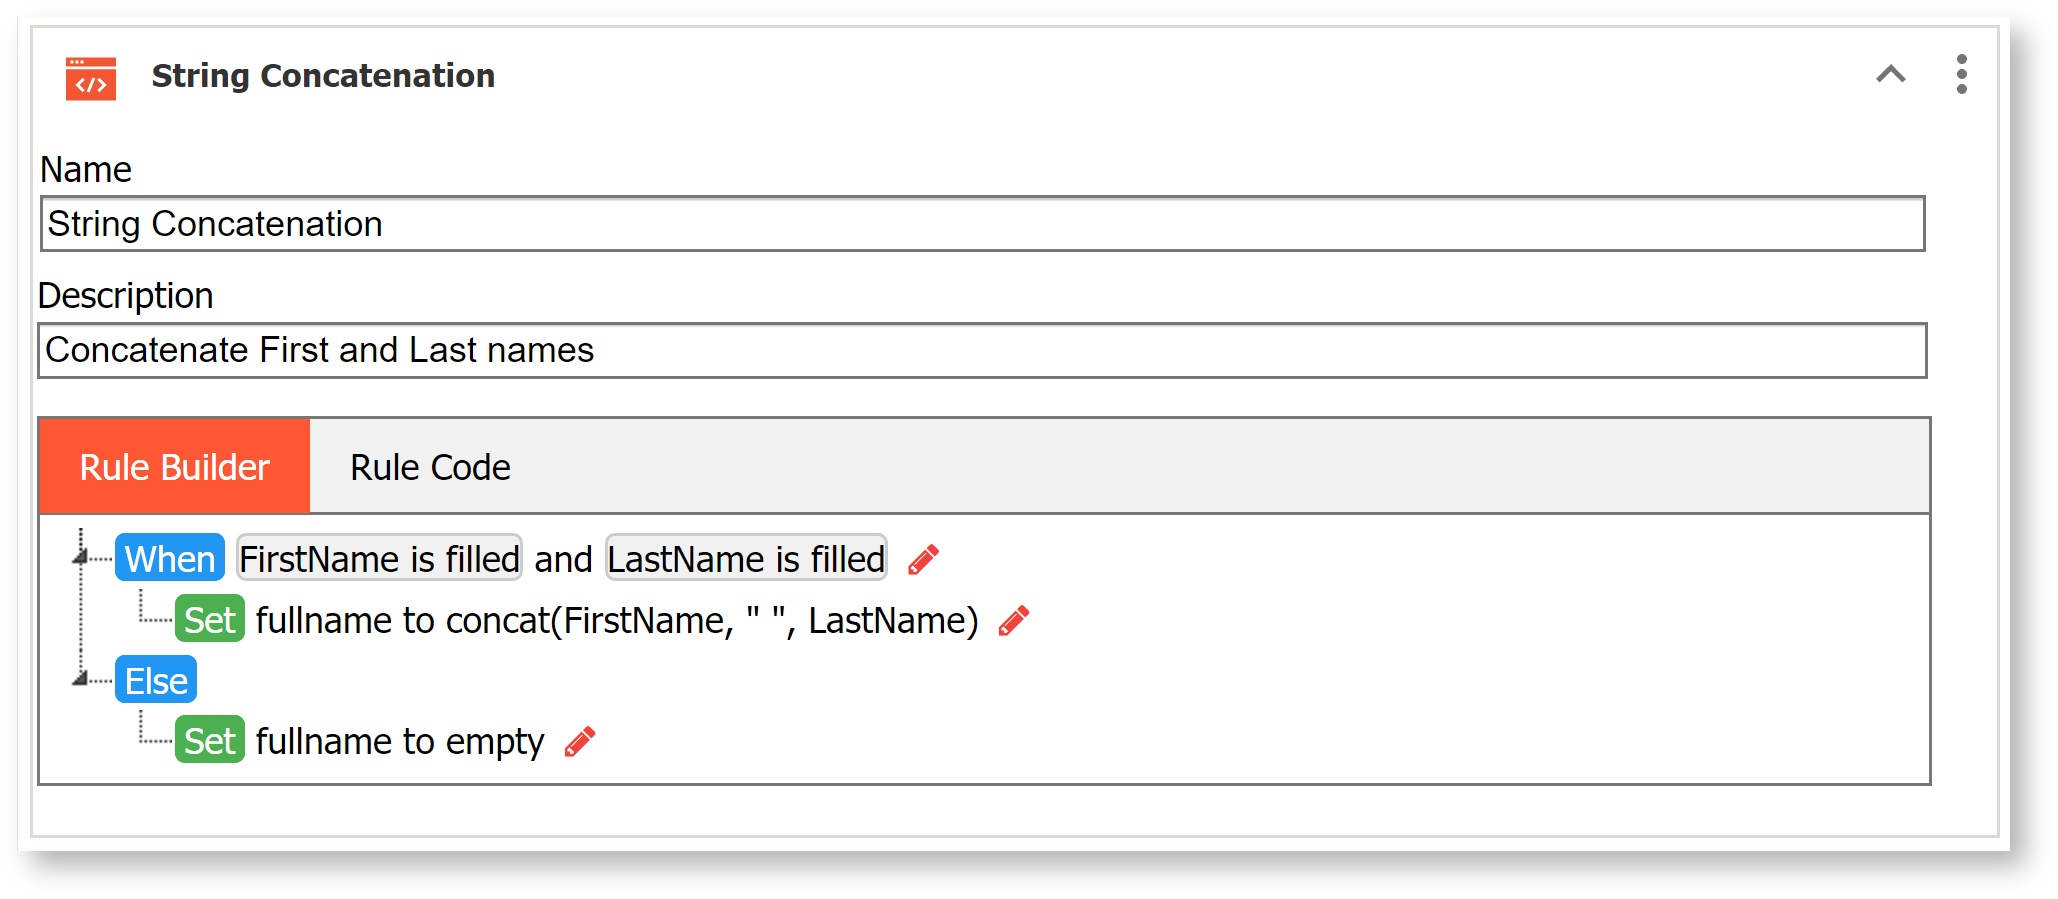
String Concatenation
Message controls can be used in business rules to create Summary information on your form from values entered into earlier form fields. Using templates in the Message control in combination with a business rule created in the Rule Builder make creating the Summary easy.
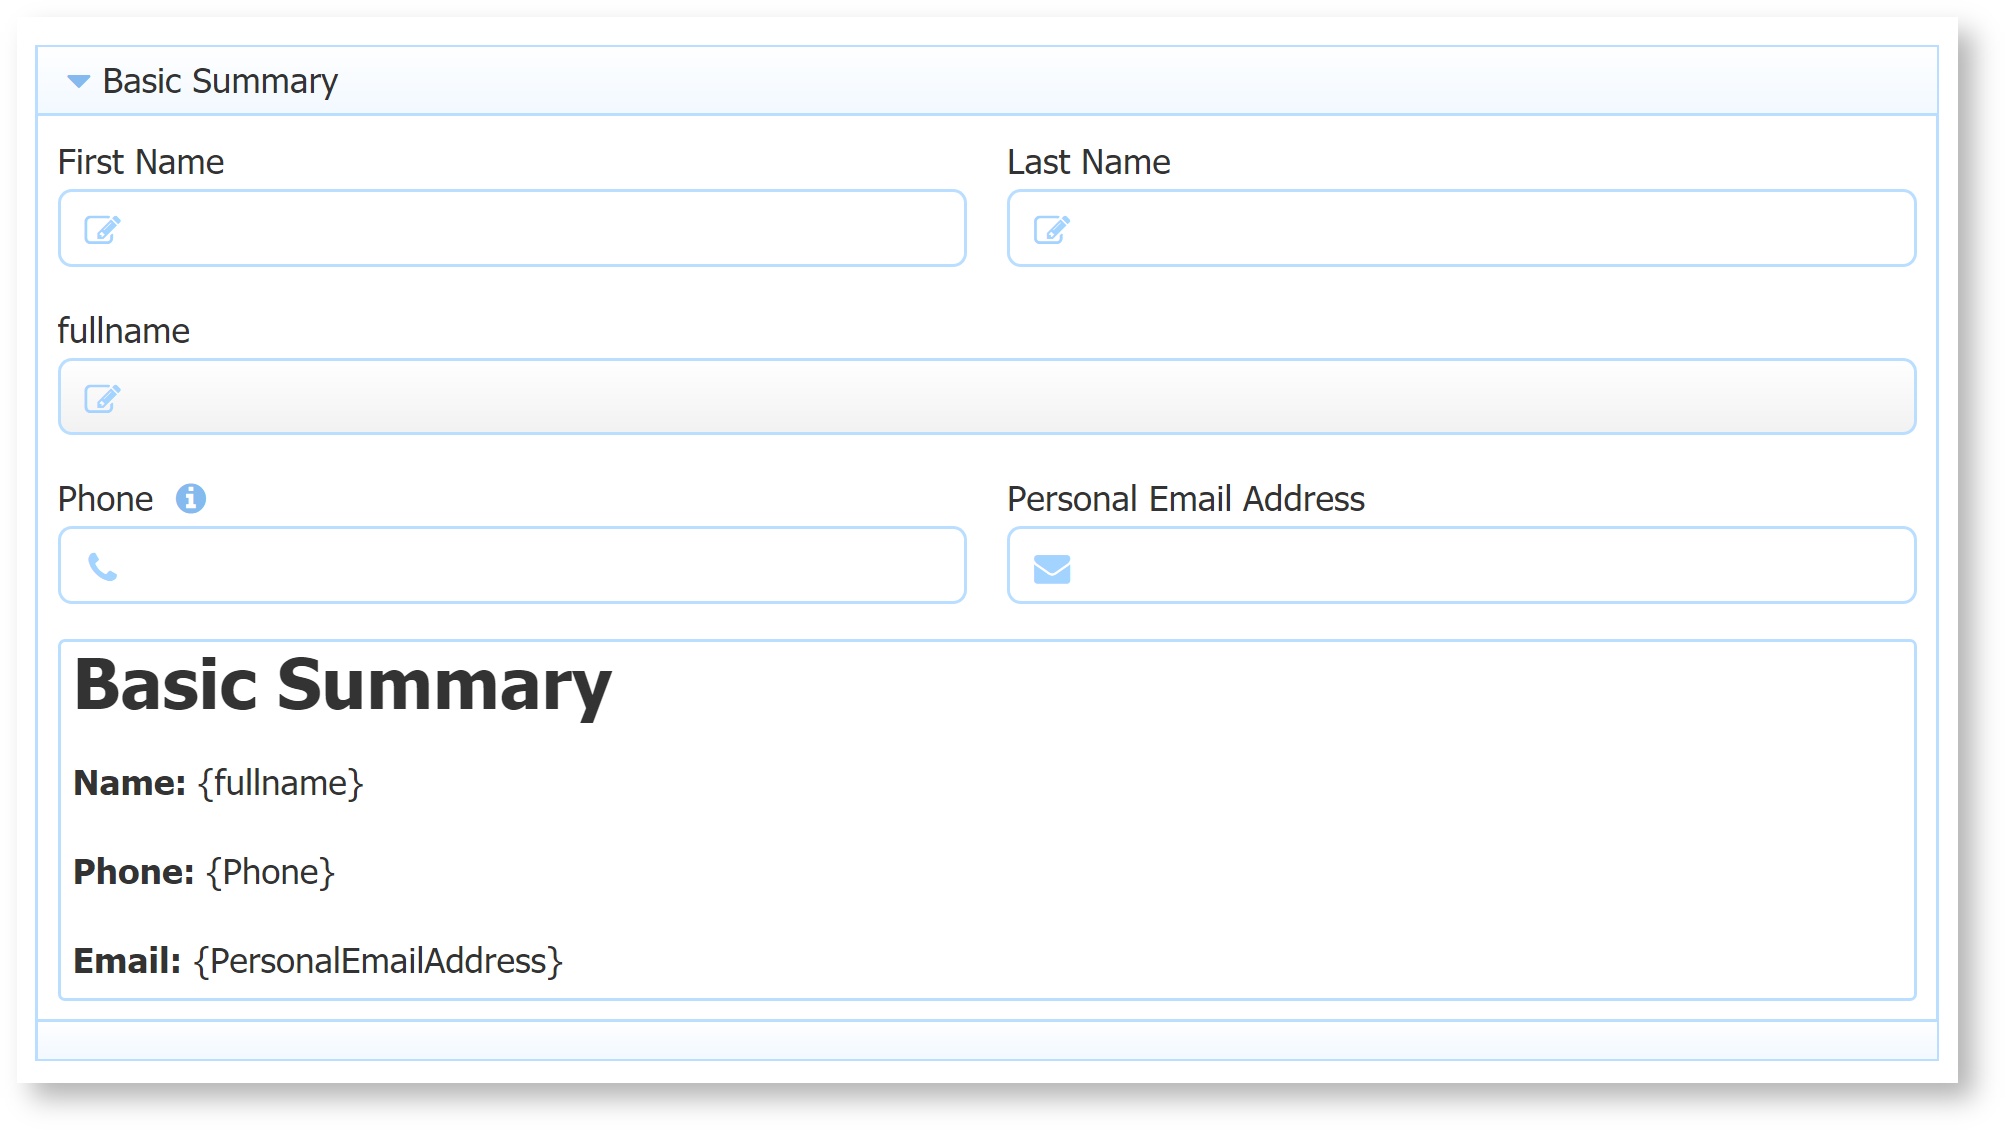
This form has fields to collect First Name, Last Name, Telephone Number, a Personal Email Address, a hidden field named fullname and a Message control named BasicSummaryMsg. The Summary Message control will show the entered Full Name, Telephone Number and Personal Email Address. We would like to show
- Click on the Message control.
- Slide the
toggle switch on the Message control Property panel to turn on the Rich Text Editor. Then click Edit with rich text editor.
- Type the desired text into the Editor - for this example, type Name, Phone and Email labels followed by the {Fullname}, {Phone} and {Fullname} templates
- Select formatting options from the Rich Text Editor menu.

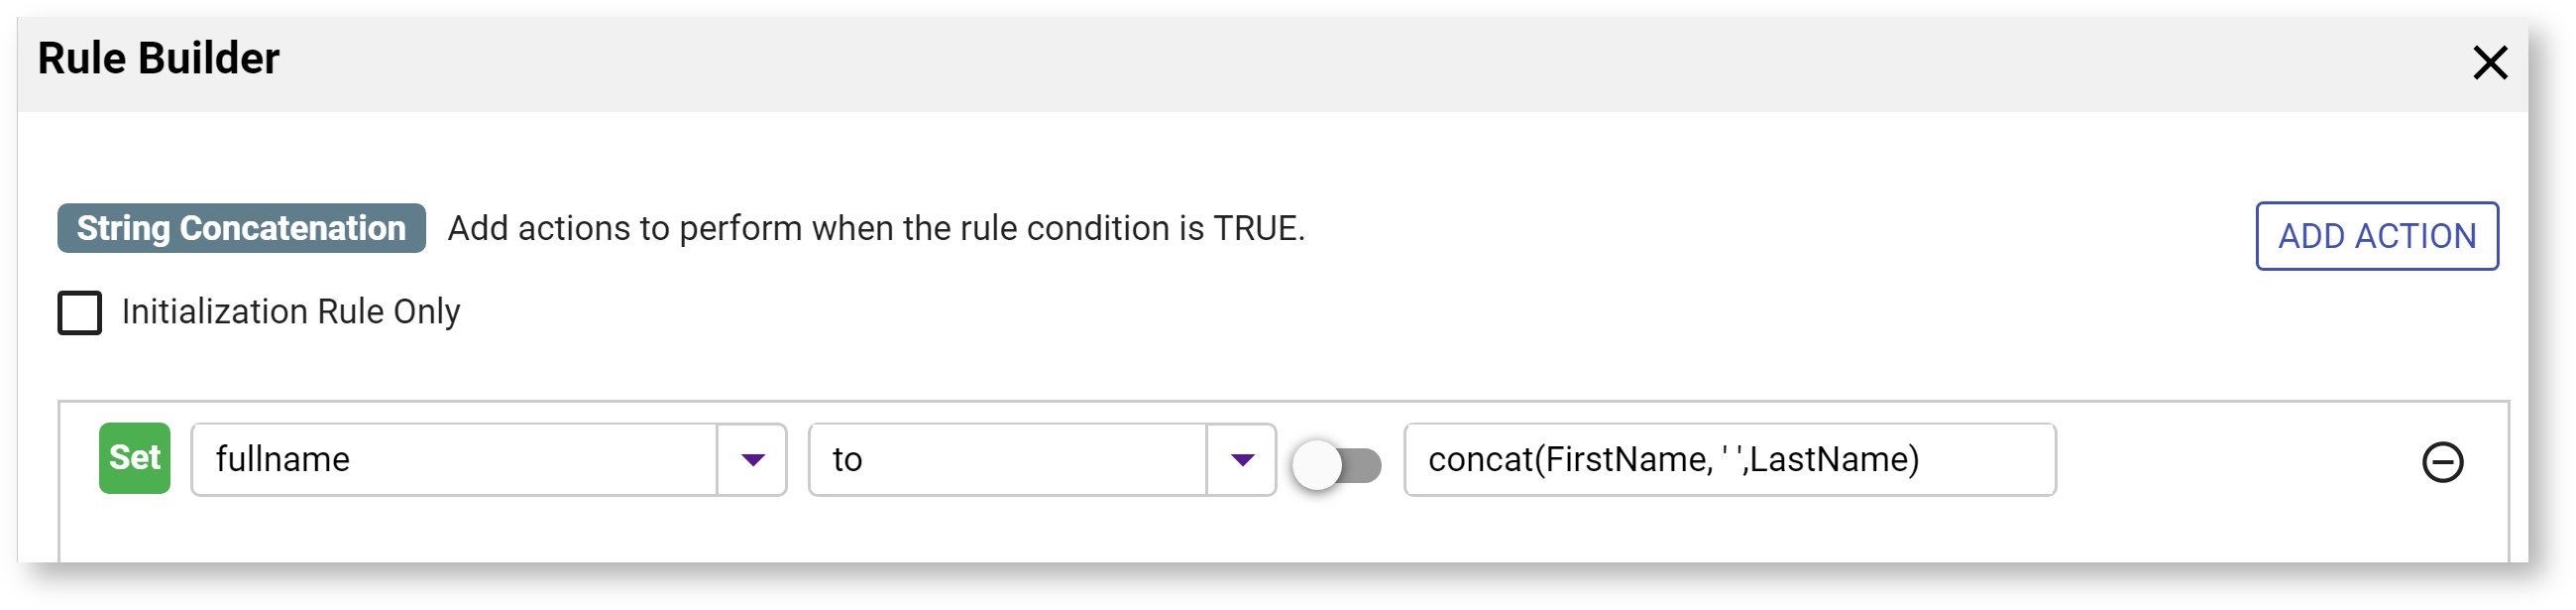
- Create a rule with the Visual Rule Builder to concatenate the First Name and Last Name and display the results in the Fullname field.
| Expand | ||
|---|---|---|
| ||
Condition Wizard:
Action Wizard:
Else Action Wizard: 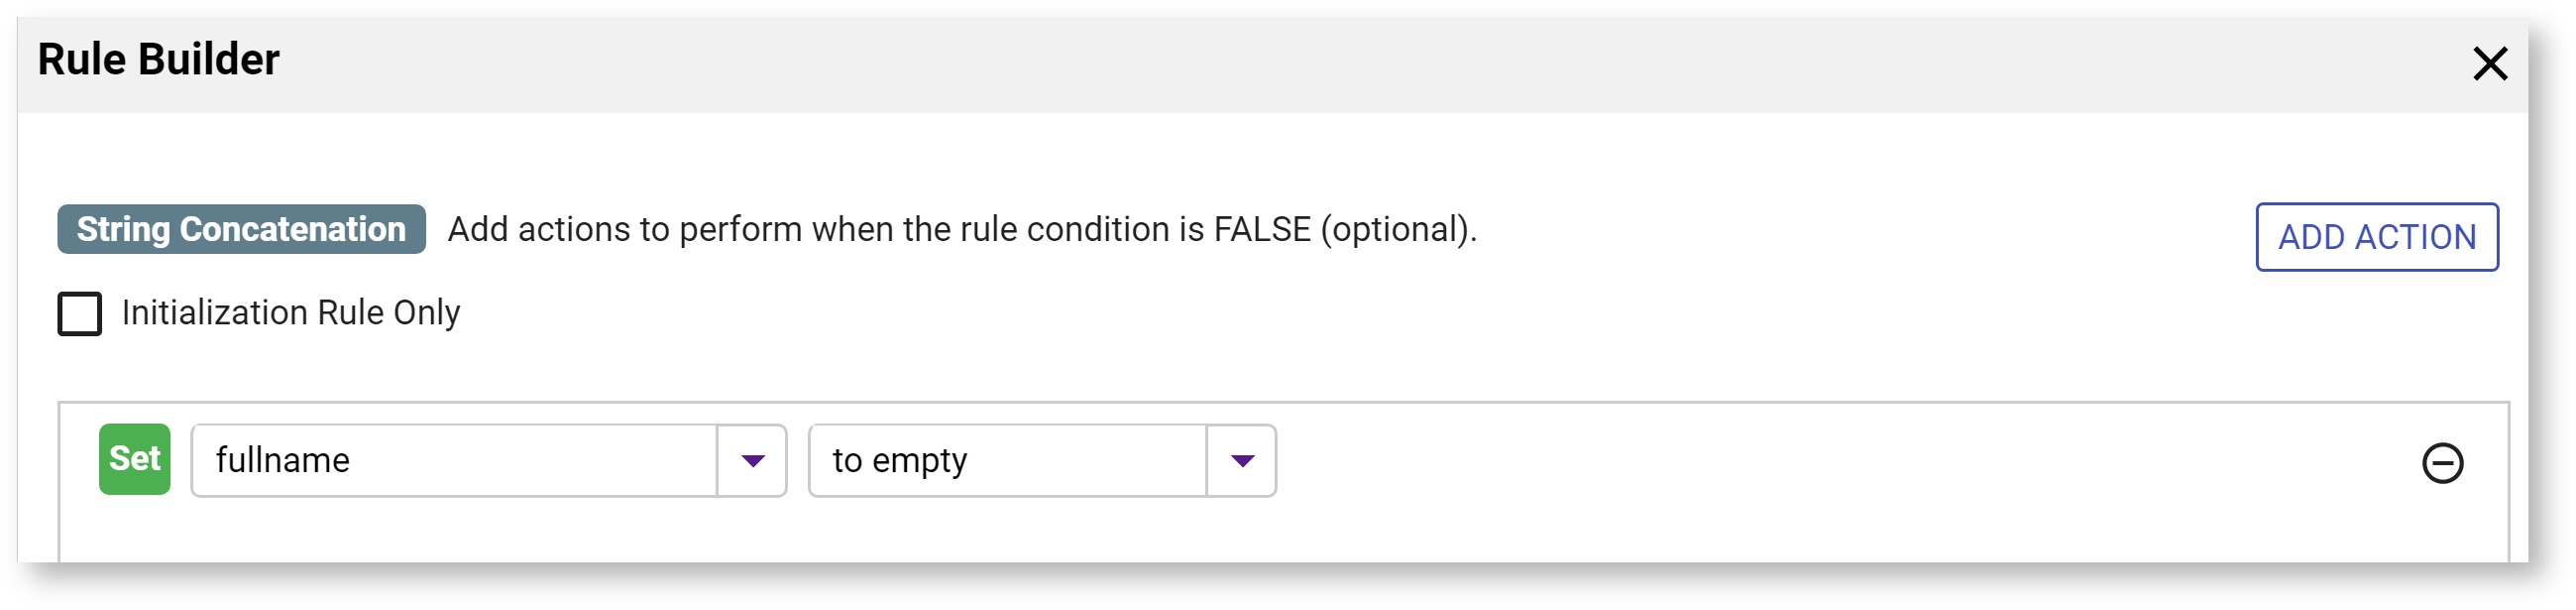 Rule Summary:
Result in Form:
|


Dynamic Labels, Help or Hints
You can set the value of control labels, help and hint dynamically in a rule. For example imagine you do not know the label, help or hint at design time but would rather set it dynamically at run time. Create this rule using the Rule Builder.
In the above example the label, help and hint is still hard-coded. It's just being set from the rule rather than in the form designer control properties. To make this more useful you can initialize these properties from _data parameters:
...
Since _data.getParameter enables access to values passed to the form that are not bound to actual controls this is often a very useful pattern. This rule is not yet supported in the Visual Rules Builder and thus still requires some JavaScript.
Select Tab
This rule is not yet supported in the Visual Rules Builder and thus still requires some JavaScript. This rule makes a specific tab the selected tab based on the choice of a radio control. The radio is named SelectTab and has three options: Person, Auto, Home. The tabs are named personTab, autoTab and homeTab. Tabs also can be selected based on trigger controls or other input controls using the same method show here.
| Code Block | ||
|---|---|---|
| ||
if (SelectTab.value.length > 0)
{
    autoTab.selected = false;
    homeTab.selected = false;
    personTab.selected = false;

    if (SelectTab.value === 'Auto') {
        autoTab.selected = true;
    } else if (SelectTab.value === 'Home') {
        homeTab.selected = true;
    } else {
        personTab.selected = true;
    }
} |
Next Tab
This rule is not yet supported in the Visual Rules Builder and thus still requires some JavaScript. This form contains a trigger control at the bottom of each tab labeled "Next". When "Next" is clicked the trigger rule executes and makes the next tab the selected tab. This assists the user in navigating through the form. The Tabs are named T1, T2, T3, T4. The trigger controls are named C1, C2, C3
| Code Block |
|---|
// Navigate Tabs
if (C1.clicked) {
    T2.selected = true;
} else if (C2.clicked) {
    T3.selected = true;
} else if (C3.clicked) {
    T4.selected = true;
} |
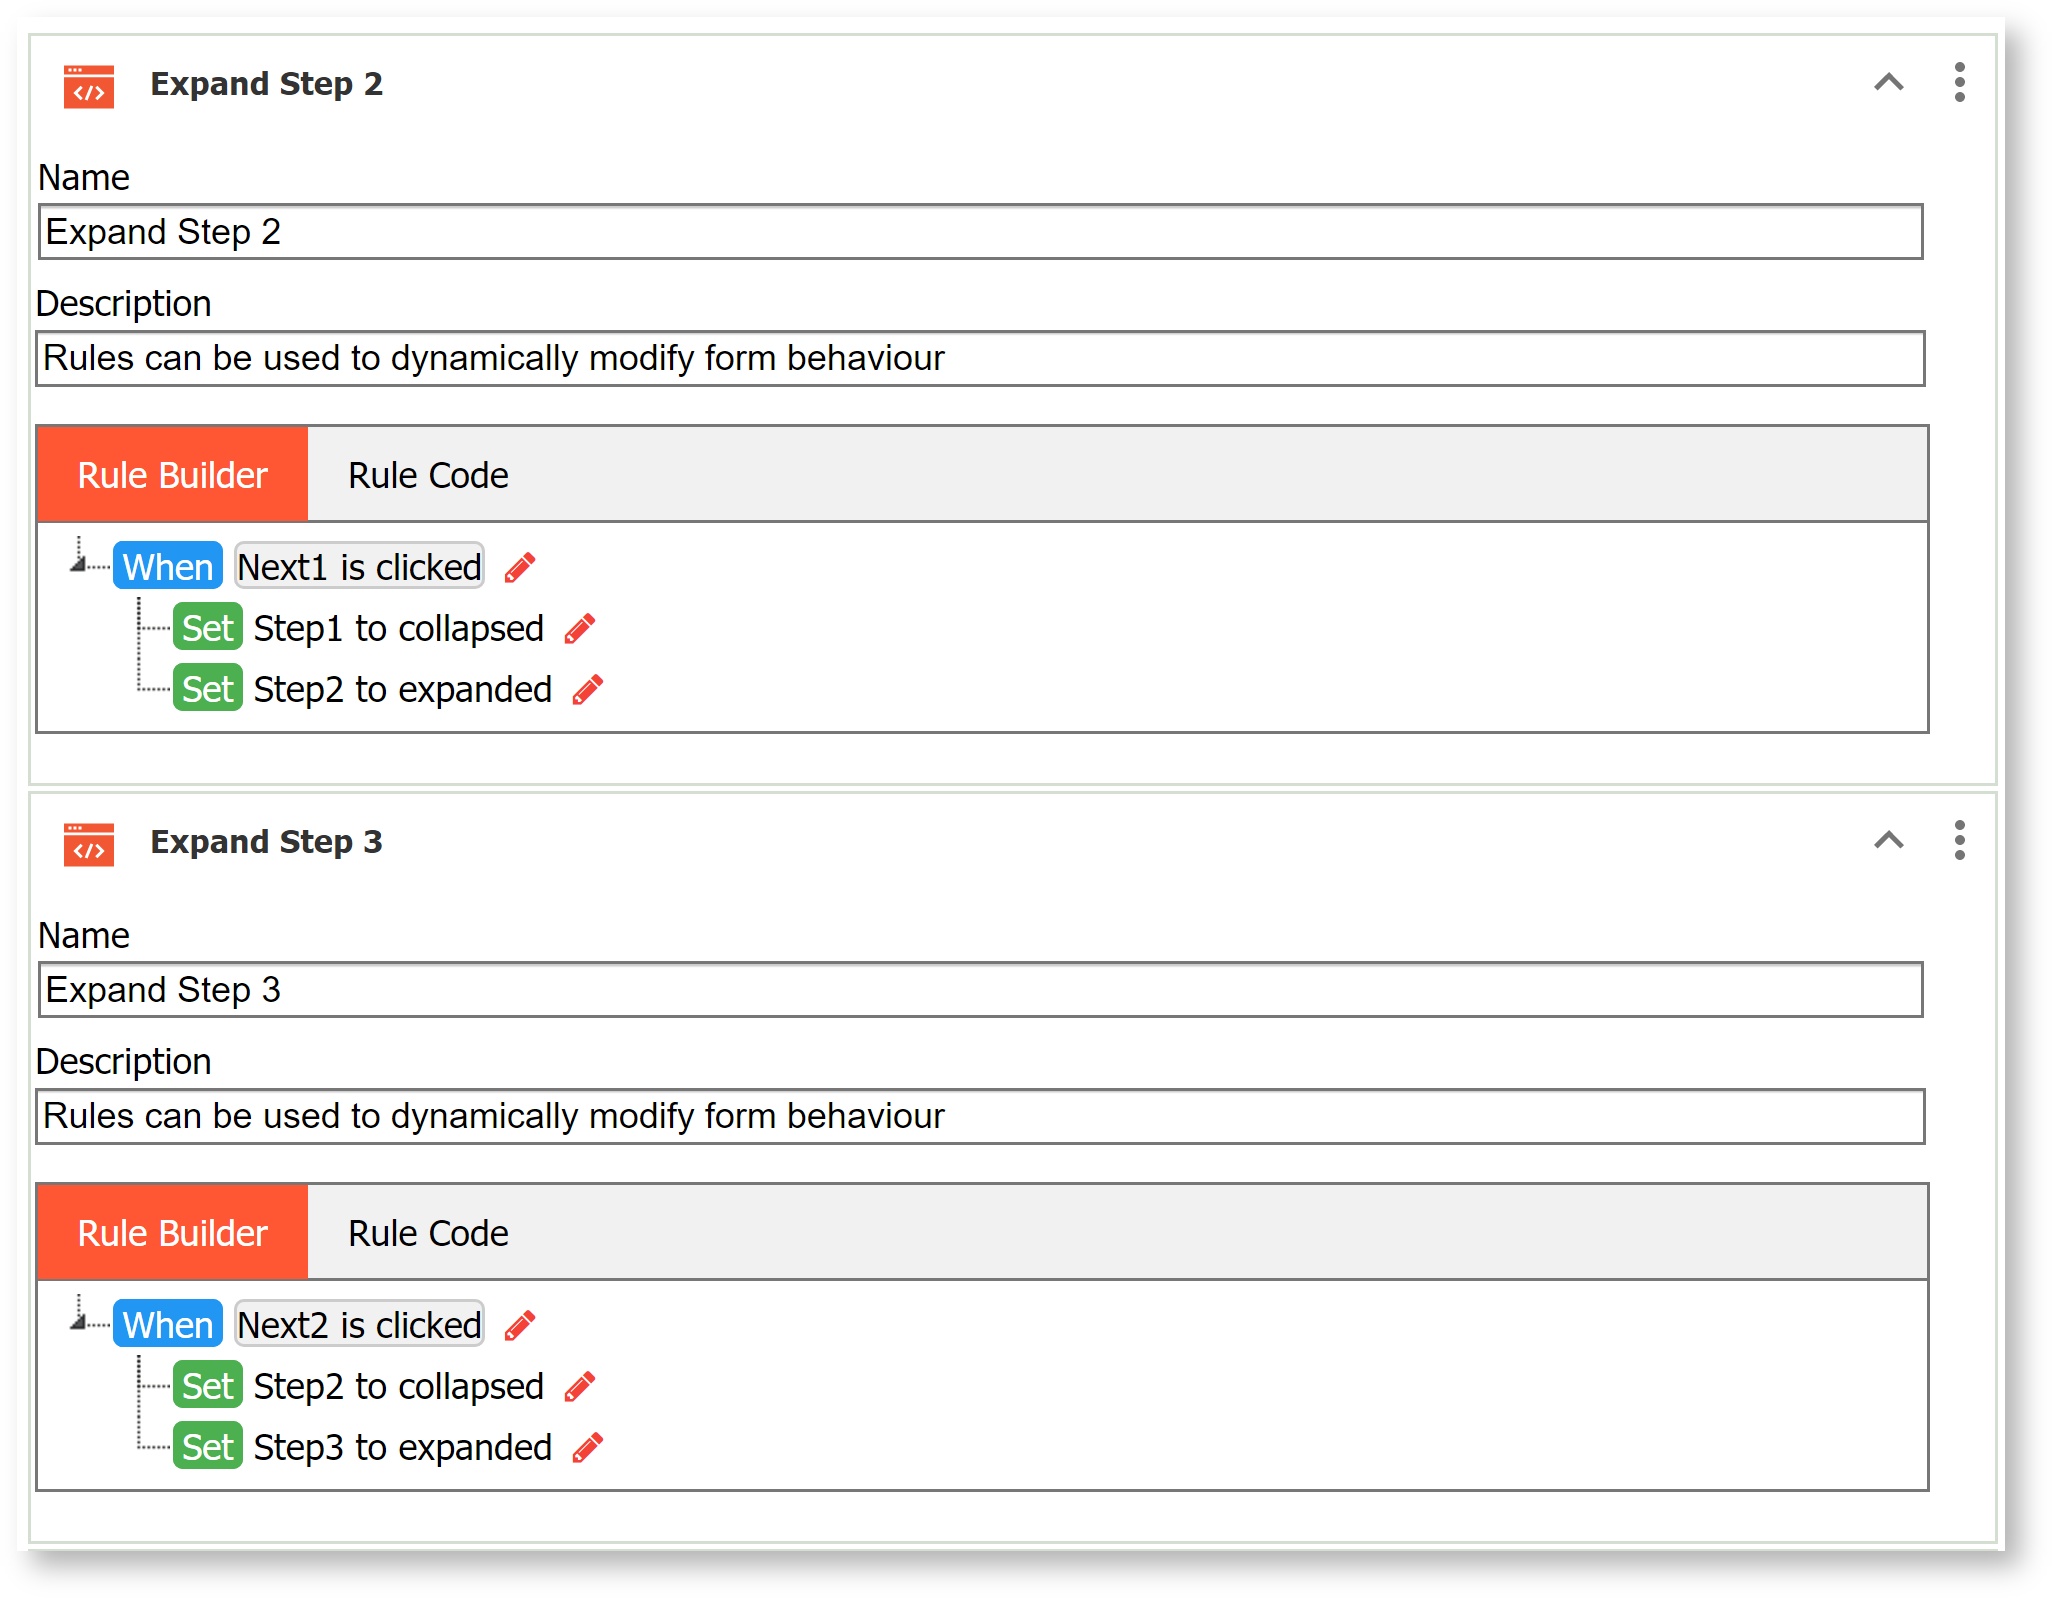
Expand/Collapse Section
This form has three sections. The first section is expanded and the 2nd and 3rd are collapsed. When the user fills in the 1st section they click a "Next" trigger control which causes that section to collapse and the next section to expand. The trigger controls are named next1 and next2. And the sections are named: step1, step2, step3. Use the Rule Builder to create these rules. You will have to create 2 separate rules - one for Step 1 and one for Step2.
| Expand | ||
|---|---|---|
| ||
|
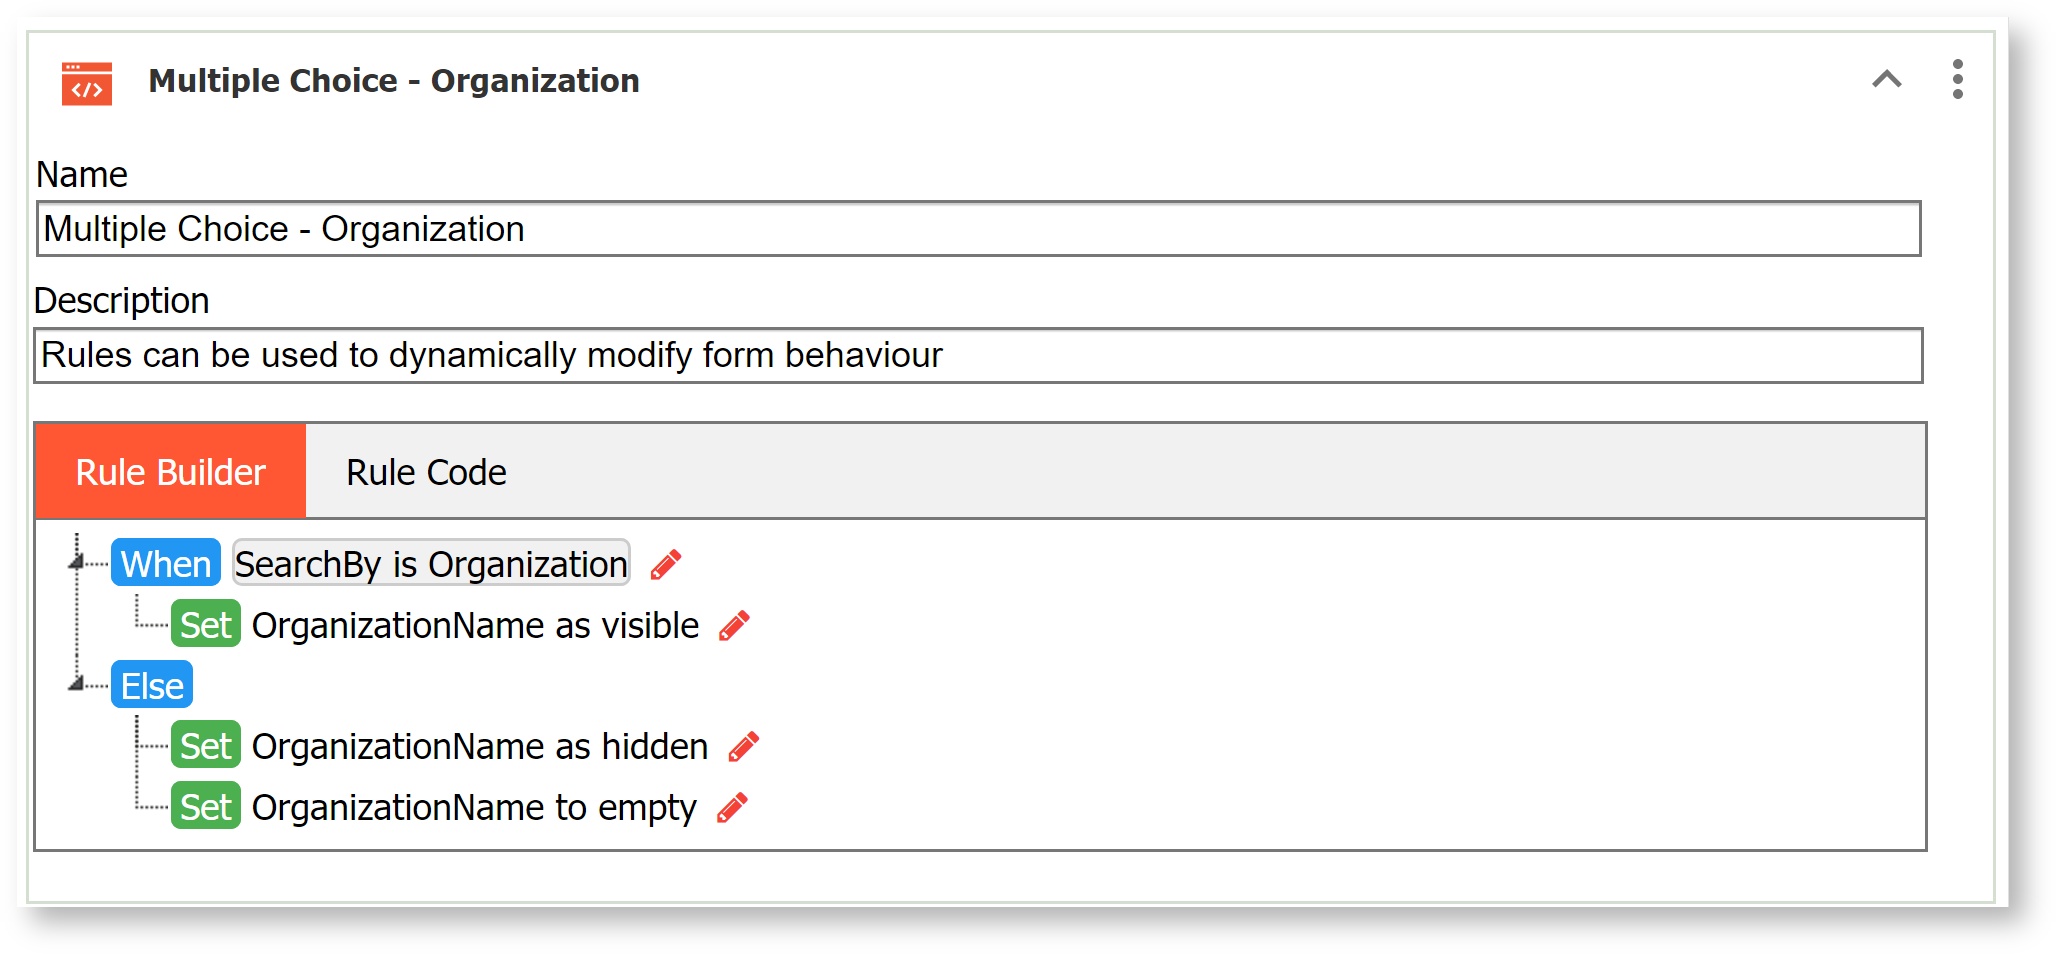
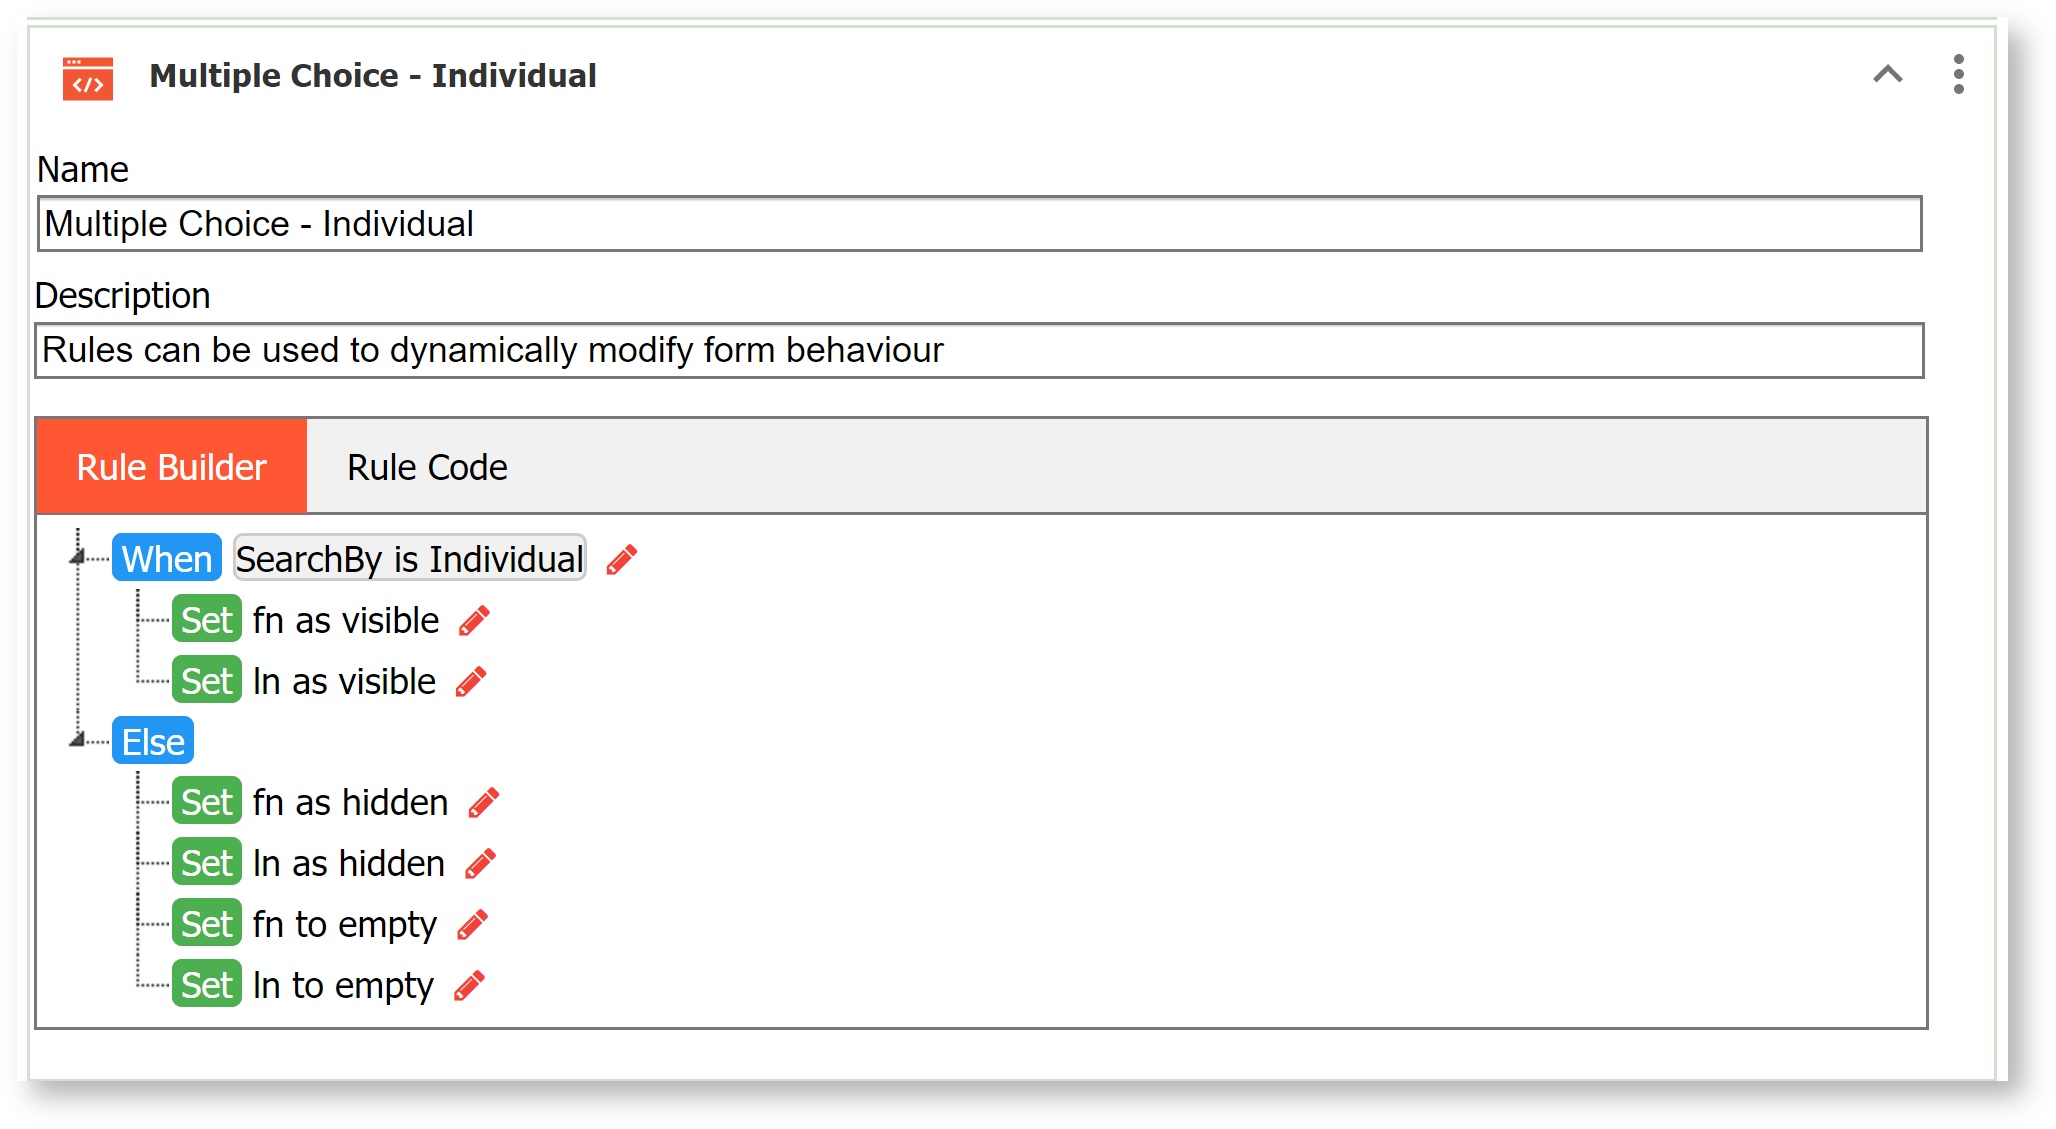
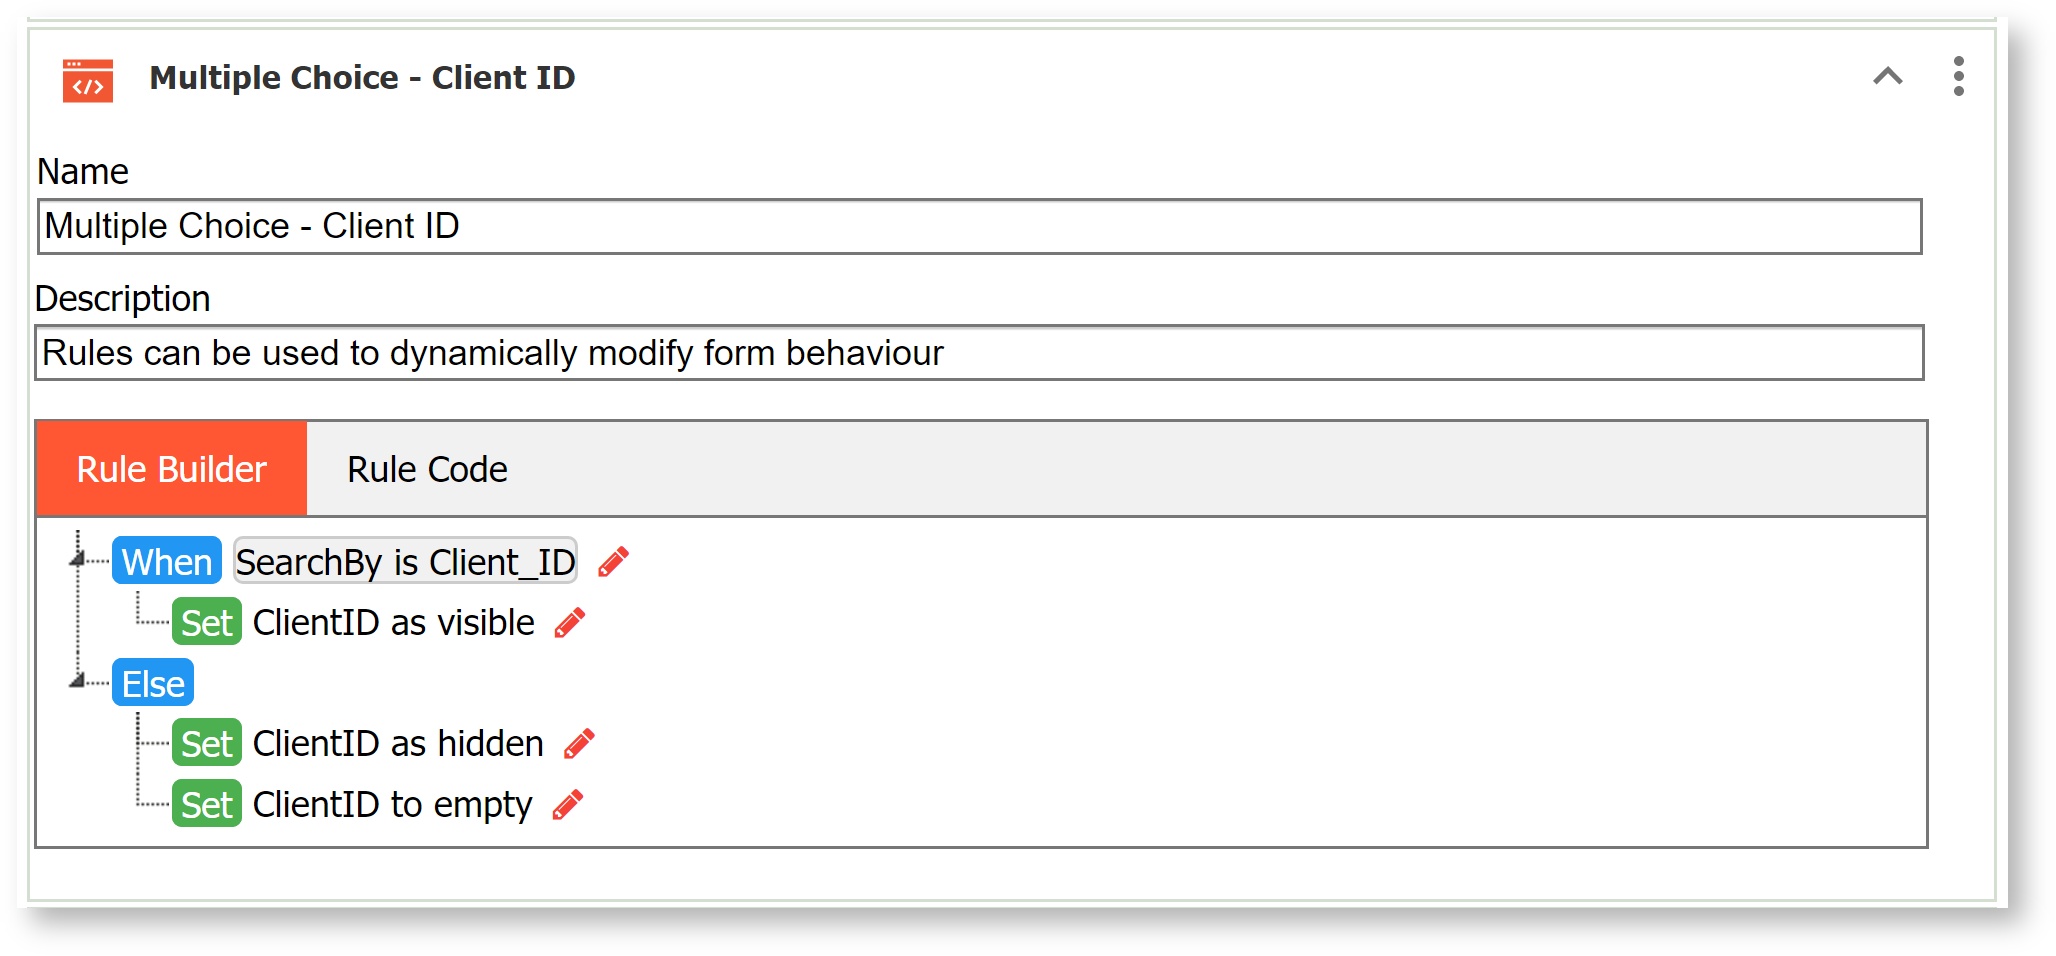
Multiple Choice
This rule makes the appropriate input text controls visible depending on the choice a user makes in a radio option controls searchChoice.
...
| Expand | ||
|---|---|---|
| ||
Rule List |
Dynamic Options
The Dynamic Options rules discussed in this section are not yet supported in the Visual Rules Builder and thus still require some JavaScript.
Selection controls' (radios, checkboxes, dropdowns, T/F) options can be set dynamically via rules rather than statically via the control's options property. However if the control comes from an XSD schema data source rather than one of the standard palette controls, then the designer must take care to not set the options to something outside of what is valid for that schema element. For example if your XSD has a string enumeration and list valid options as 'red', 'green', and 'blue', then you should not use a rule to dynamically set the options to 'small', 'medium', 'large'. If you do then then your form will not work correctly in use mode. If a user selects the option 'small' they will get a validation error on the form. This is because 'small' is not one of the options allowed by your underlying XSD schema.
Triggers & Dynamic Options
This rule is executed when the user clicks the trigger controls with Name ''search''. It then dynamically sets options on a dropdown list control with Name coffeeShopList.
...
| Tip |
|---|
Triggers do not work in repeating items. |
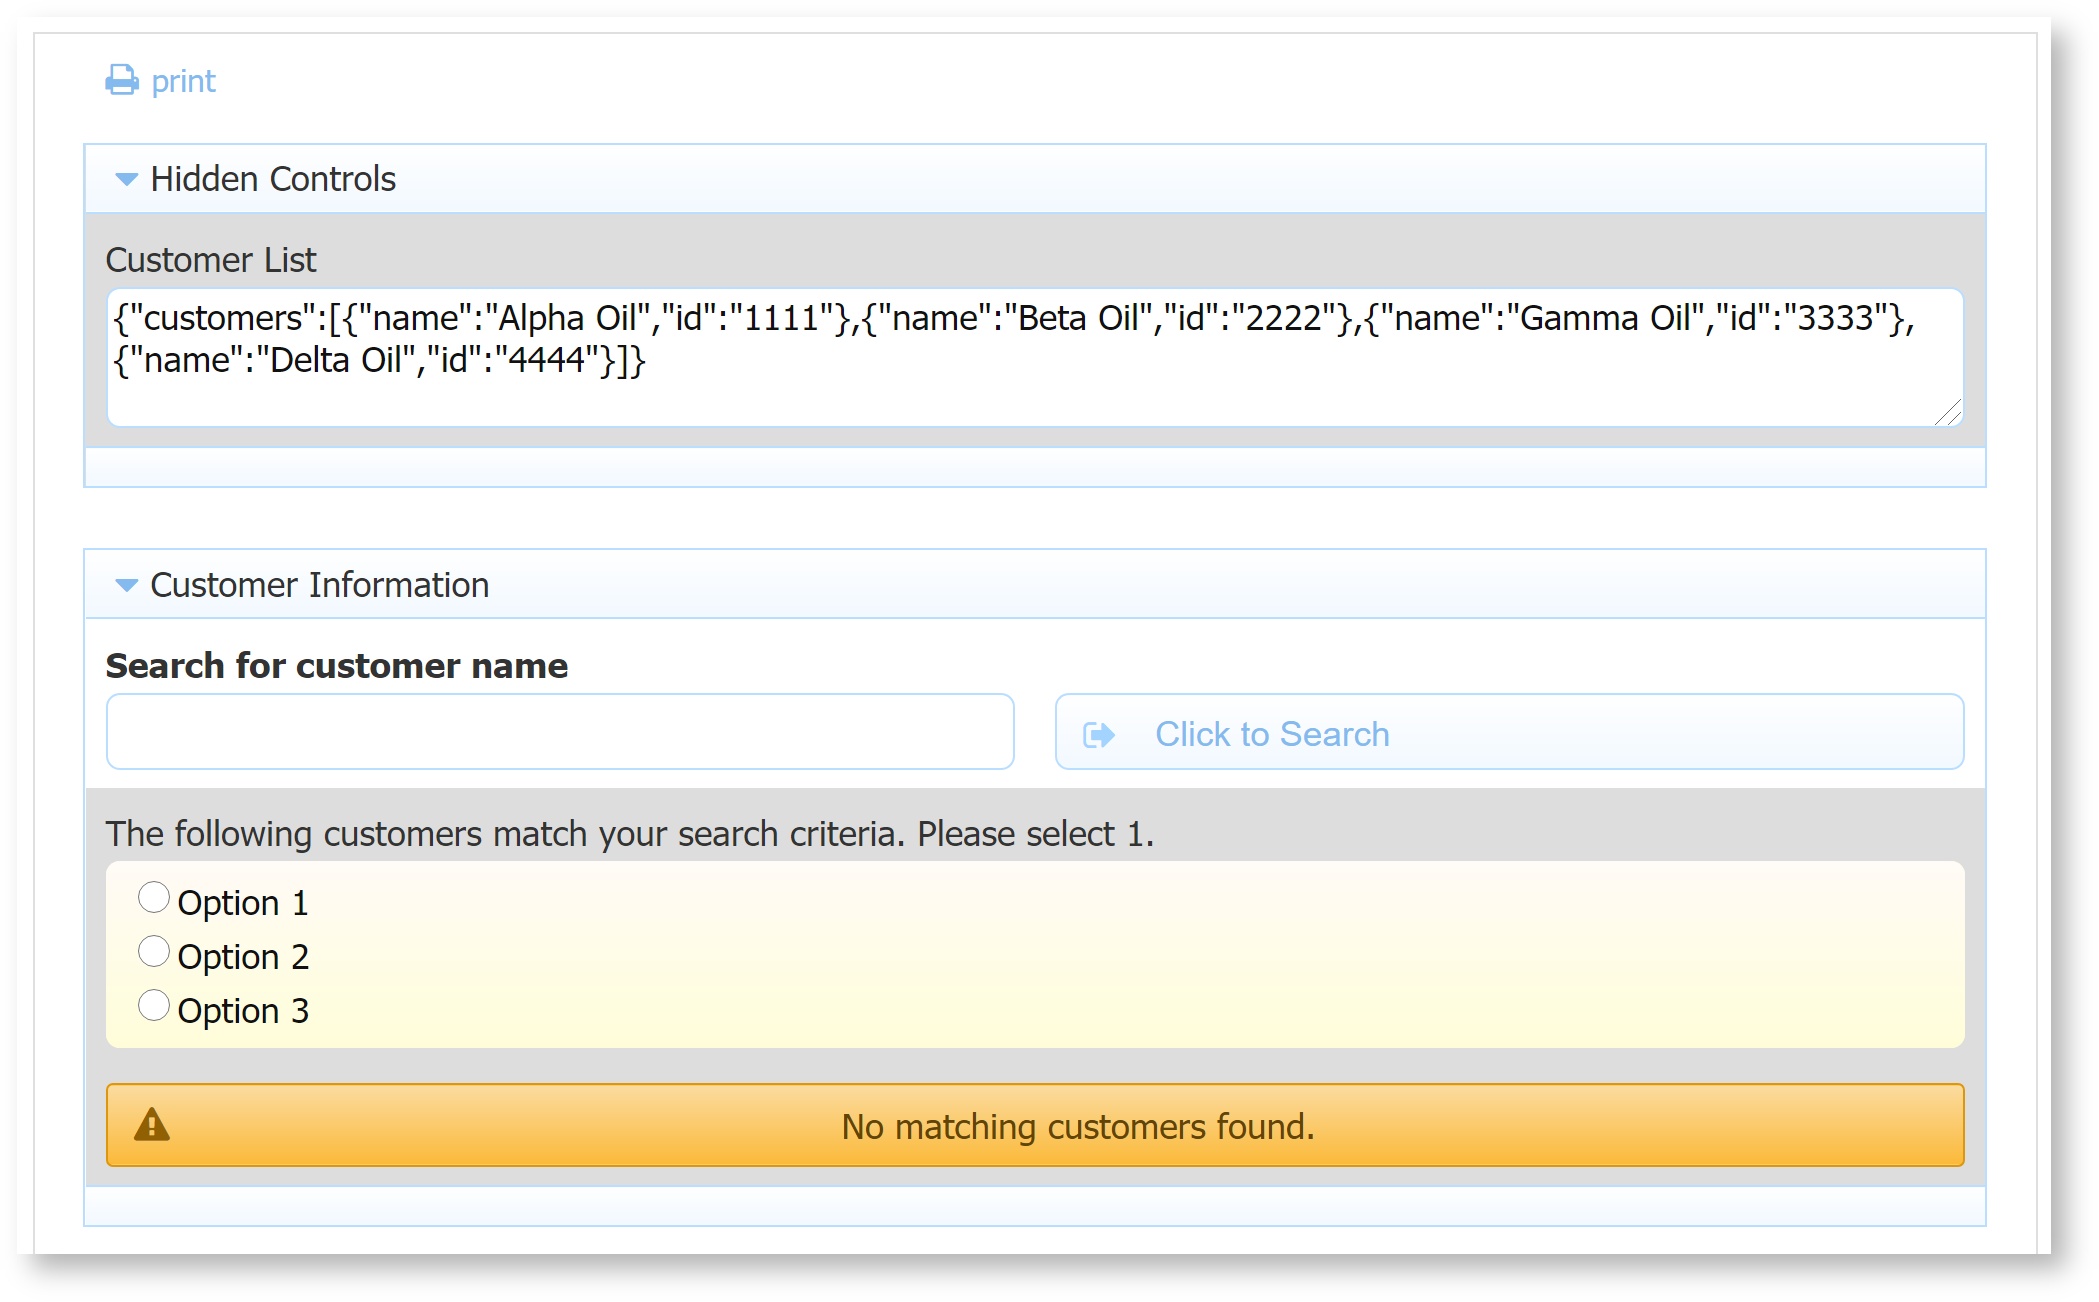
Search a JSON String
This rule searches a JSON string (populated from a database, google sheet, or other webservice) and populates a radio control with matching options. The form has a hidden textarea control, used to save and reuse the JSON string. It also has a text control, trigger, radio control and error message.
- Write a rule to fetch the data from your system and store it in the textarea, as described here.
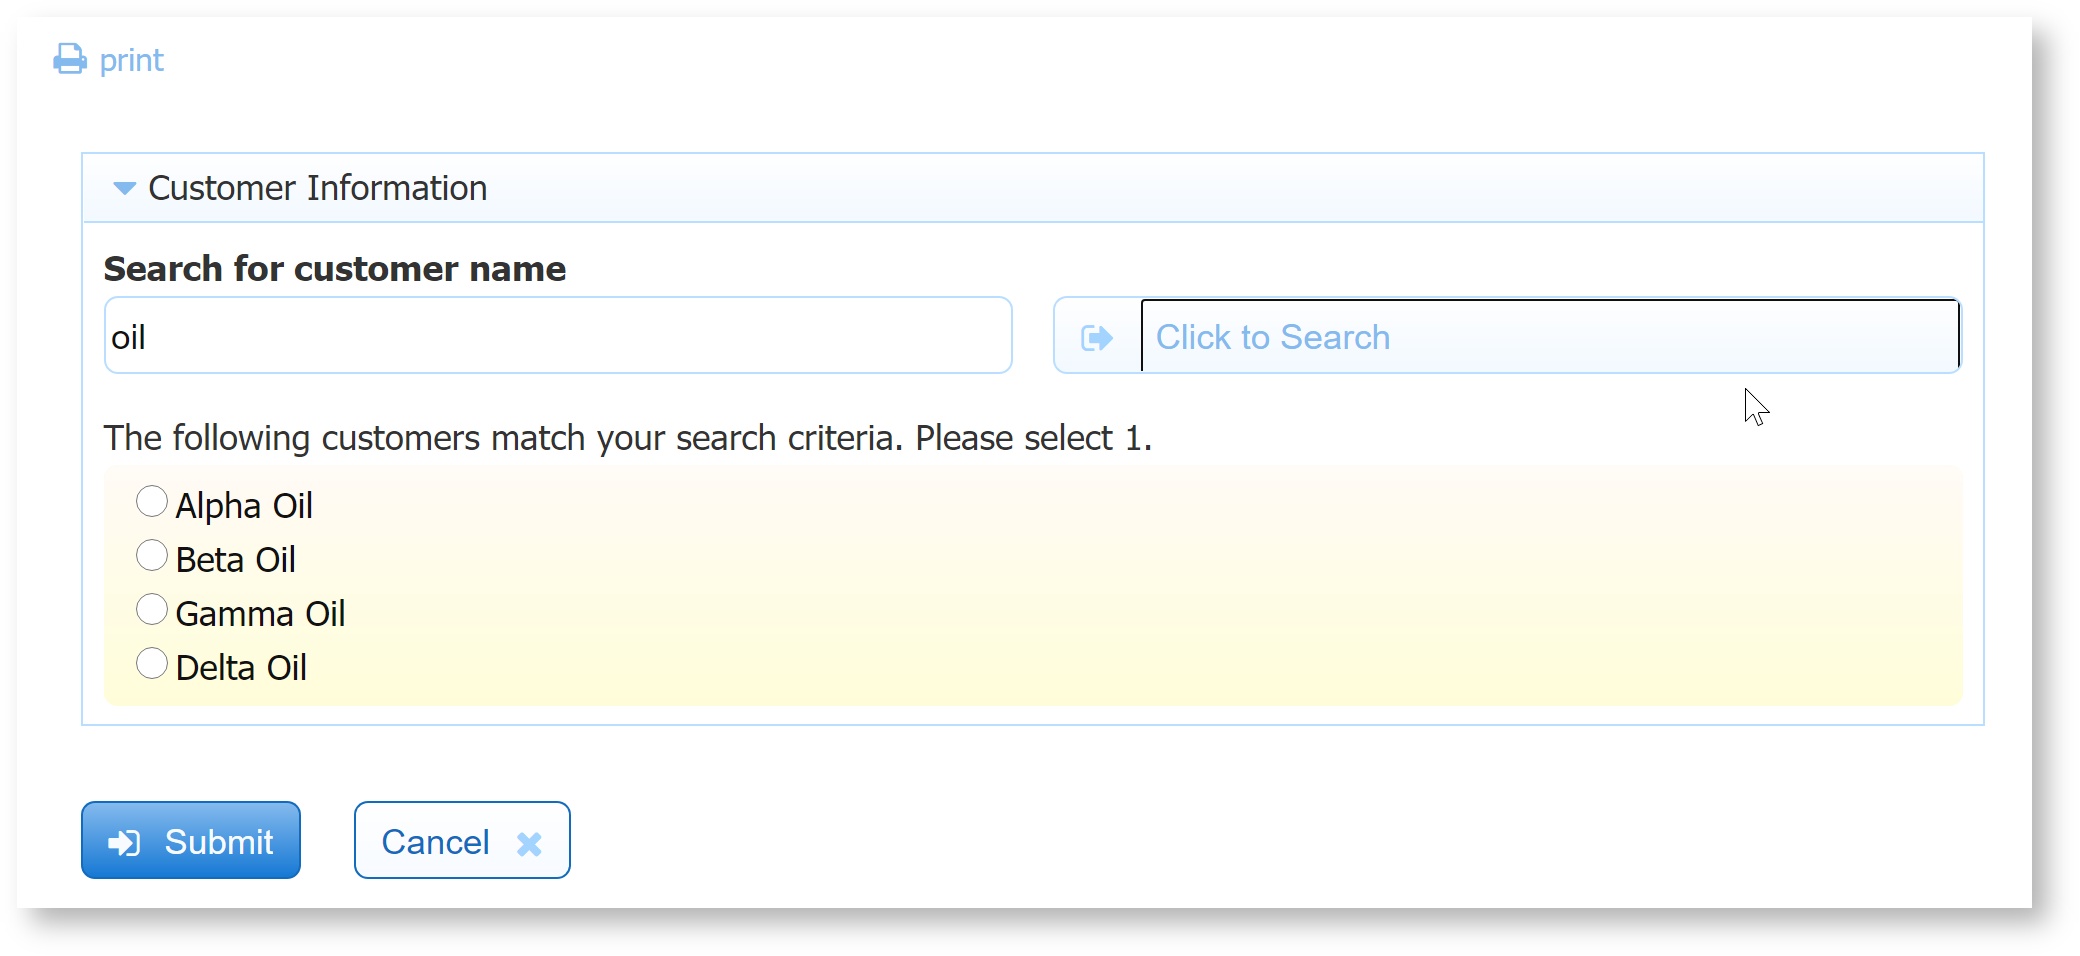
Write the following rule to search the stored JSON string and populate the radio control. This rule uses the conditions of a value change in the custName text control OR a trigger click; you only need to choose one of those conditions.
Code Block /*member customers, id*/ var string; var customerlist = JSON.parse(CustomerListJson.value.trim()); if (custName.value.length > 0 || onClick.clicked){ var matchingcustomers = []; var matchtext = custName.value.toLowerCase(); for (var i=0; i<customerlist.customers.length; i++){ if (customerlist.customers[i].name.toLowerCase().indexOf(matchtext) >= 0){ matchingcustomers.push(customerlist.customers[i].id + '=' + customerlist.customers[i].name); } } if (matchingcustomers.length > 0){ SelectCustomer.visible = true; SelectCustomer.printable = true; SelectCustomer.options = matchingcustomers; noMatches.visible = false; } else { noMatches.visible = true; SelectCustomer.visible = false; SelectCustomer.printable = false; } } else { noMatches.visible = false; SelectCustomer.visible = false; SelectCustomer.printable = false; }
The result is a handy search form:
Value Change & Dynamic Options
This rule dynamically sets the options in a dropdown list based on the value selected in another form field. This form contains three fields named Products, Series and Model. The series options are set dynamically based on the product selection. Also when a new product is selected we enable the series dropdown and both clear and disable the model dropdown. This form contains other rules which set the models based on the selected series.
| Code Block |
|---|
if (product.value === 'Laserjet Printers')
{
    series.options = [' ', 'Laserjet5 series', 'Laserjet6 series'];
    series.enabled = true;
    model.options = [];
    model.enabled = false;
} |
Dynamic Control Initialization using JSON
This rule handles the case of initializing multiple control values based on the selection of a dropdown control. It handles this case better than using a long if/else construct by using a JSON string. First add options to the dropdown named SalesRep in the format <value>=<label> where <value> will be used as an index key into a JSON array of details about each person.
...
Try this simple Clinic Location form which uses this approach to initialize its controls.
Signatures
The following examples demonstrate rules working with wet and digital signatures.
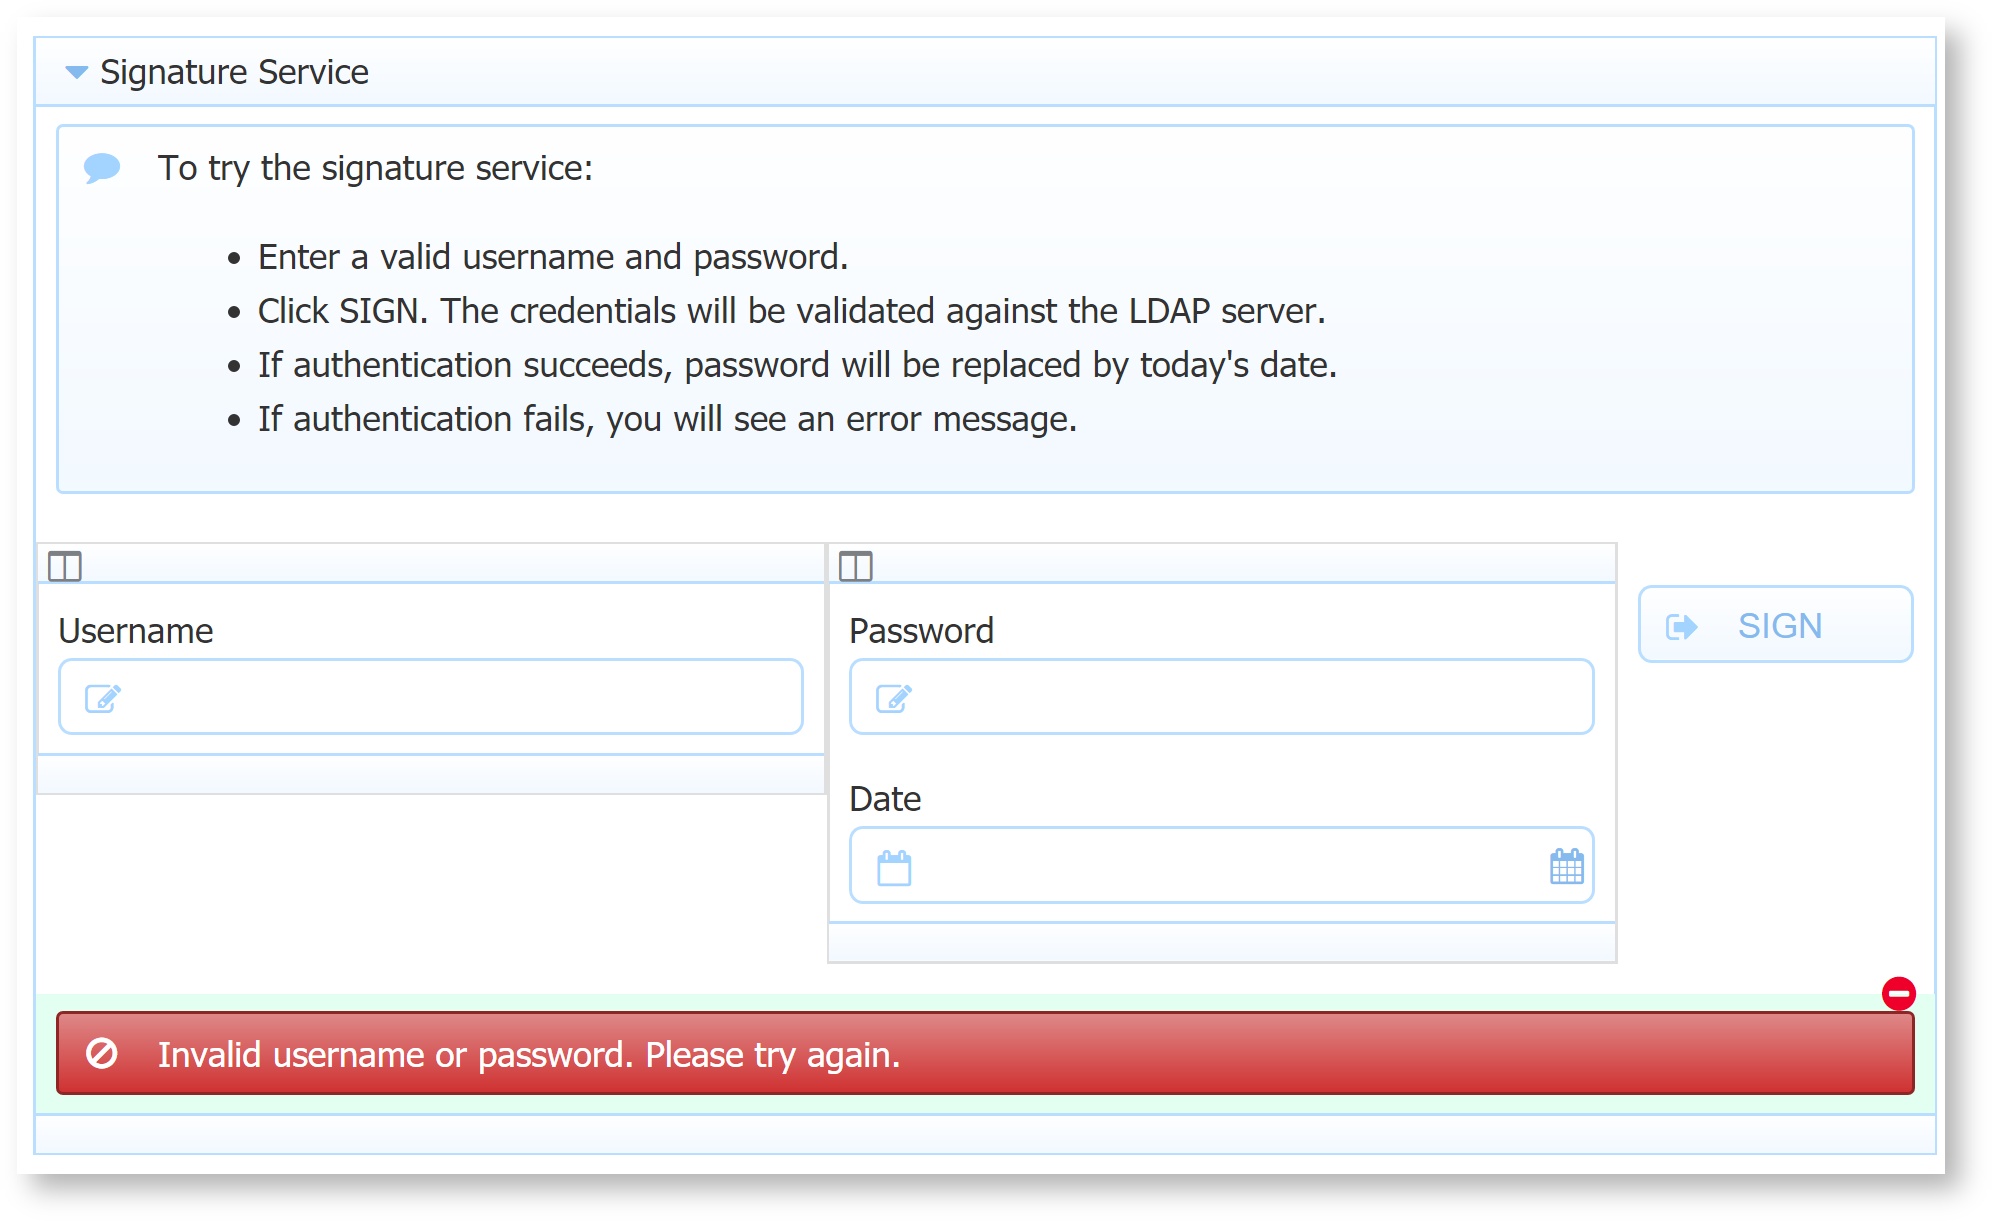
Digital Signature
This form uses a rule to pass a username and password to a LDAP Active Directory authentication service. If authentication fails the form makes an error message control visible. If authentication succeeds the form disables the username form field and replaces the password field with a date field set to the current date. The form contains a trigger control named sign, username and password fields named u and p respectively, a date field named d and a message field named m.
| Code Block | ||
|---|---|---|
| ||
/*member auth */
var x;

if (sign.clicked) {
    // passwords may contain characters that need url encoding
    var p_encode = encodeURIComponent(p.value);

    eval('x=' + http.get('http://(your webhost)/authServices/signForm?username=' +
                          u.value + '&password=' + p_encode));

    if (x.auth) {
        var dt = new Date();
        var day = dt.getDate();
        var month = dt.getMonth() + 1;
        var year = dt.getFullYear();
        d.value = month + '-' + day + '-' + year;

        d.visible = true;
        u.enabled = false;
        p.visible = false;
        sign.visible = false;
        m.visible = false;
    } else {
    m.visible = true;
    }
} |
...
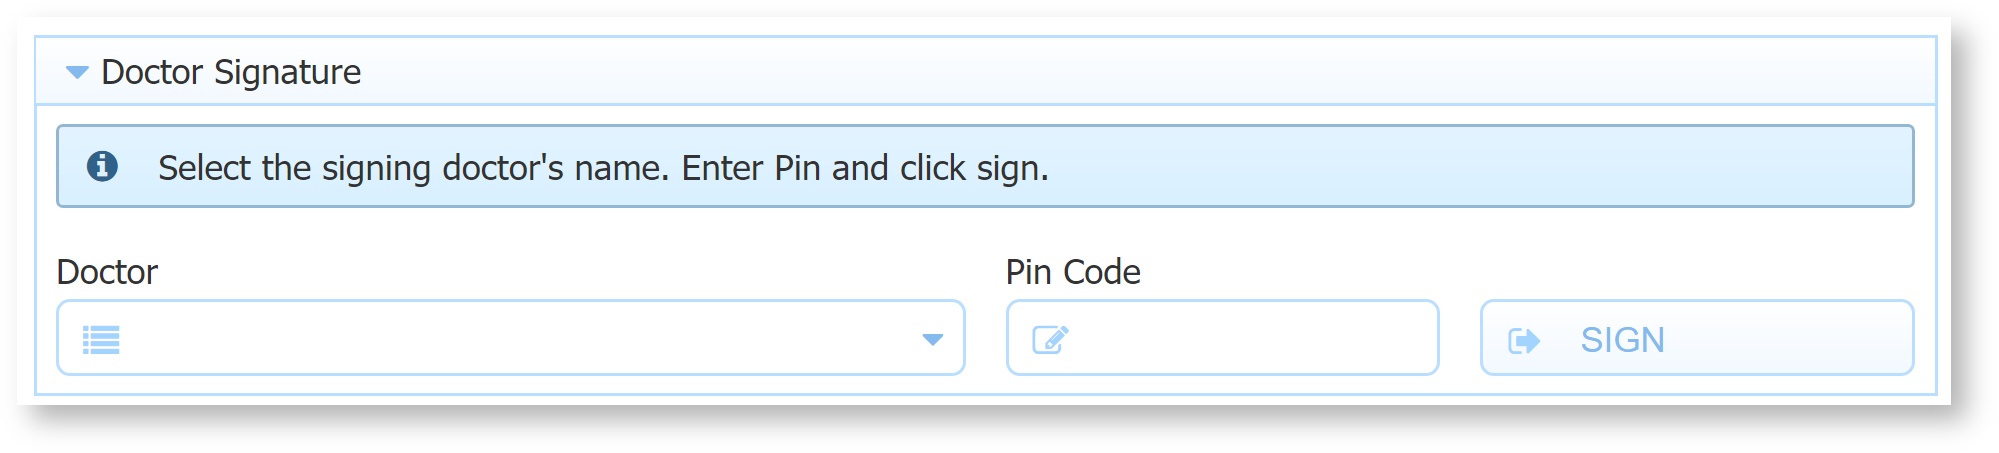
Here's another example form that requires a doctor's signature. This shows how the form works in use mode. The first image contains a dropdown to select one of the doctor's authorized to sign the form and a text control where they enter their PIN code.
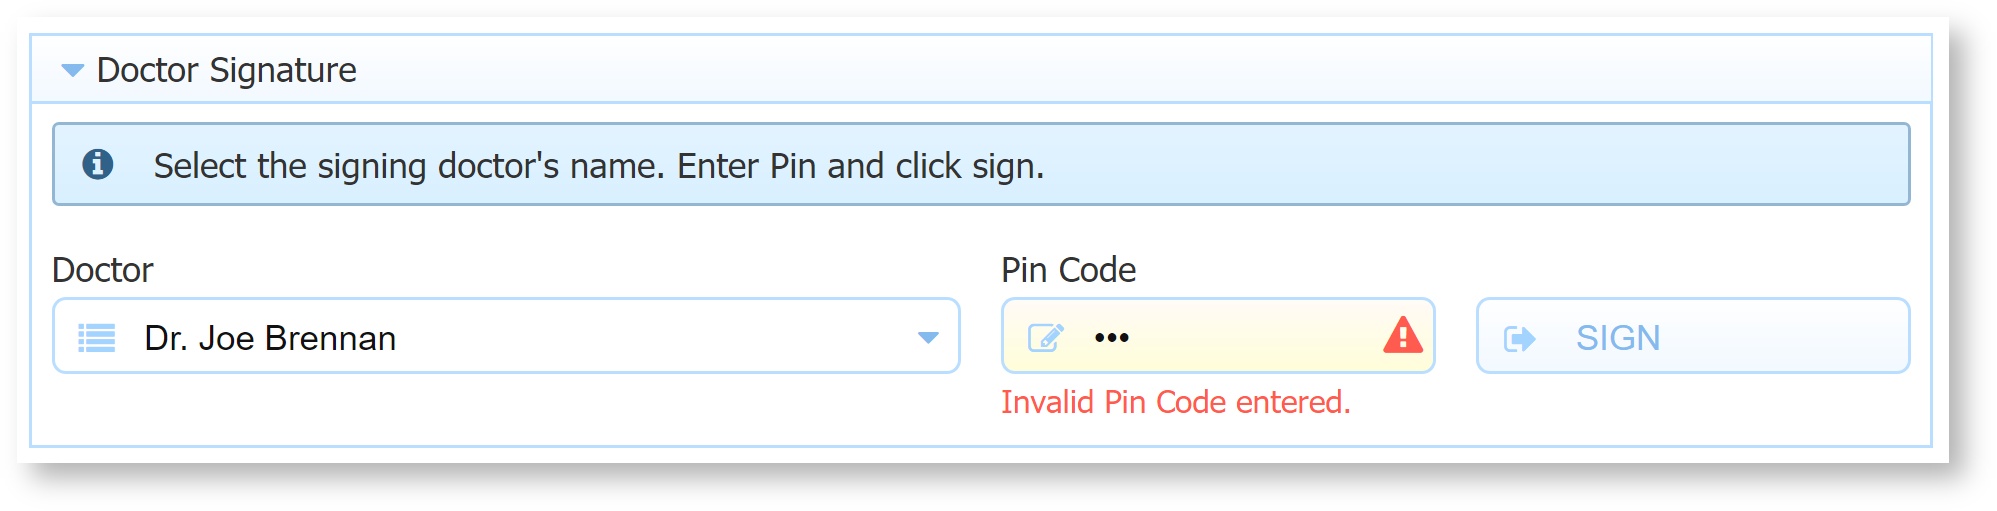
This image shows the case where the doctor entered an invalid PIN and the error message becomes visible.
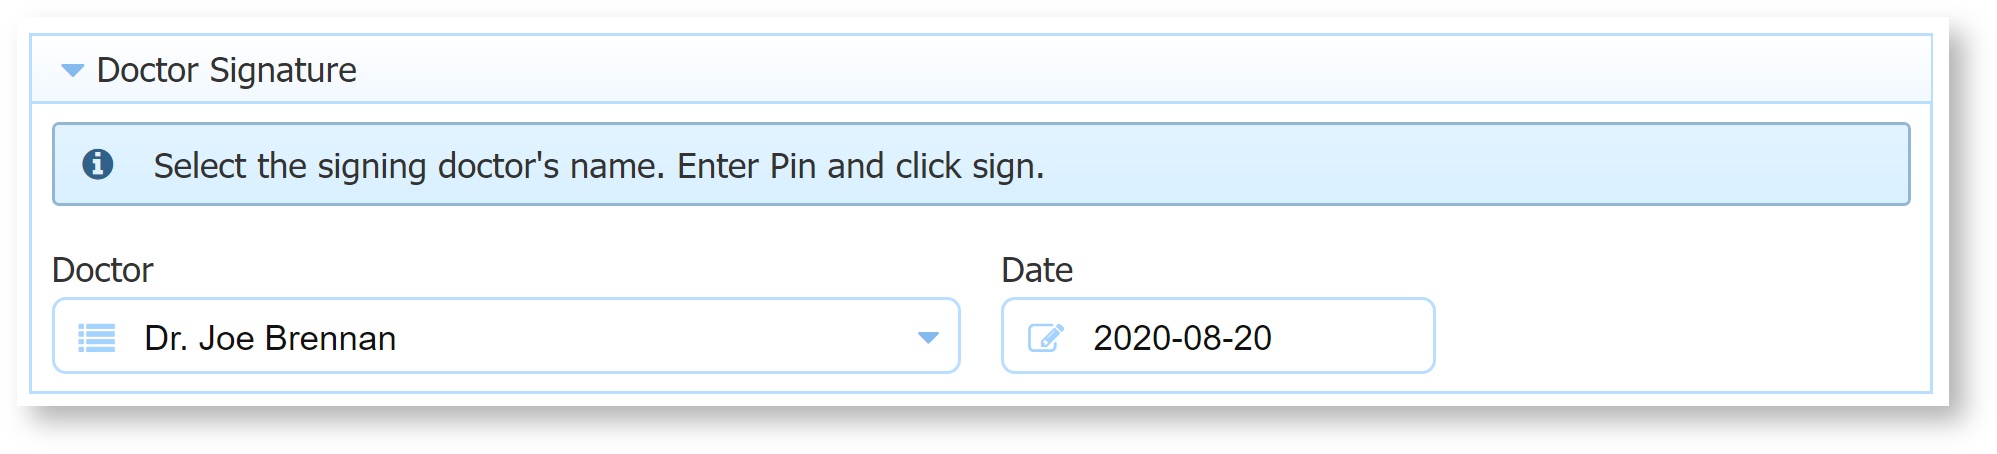
This image shows the case of a valid PIN. Today's date is entered into the date control via the rule and made visible and disabled from edit. The username dropdown is disabled and the PIN and Sign controls are hidden.
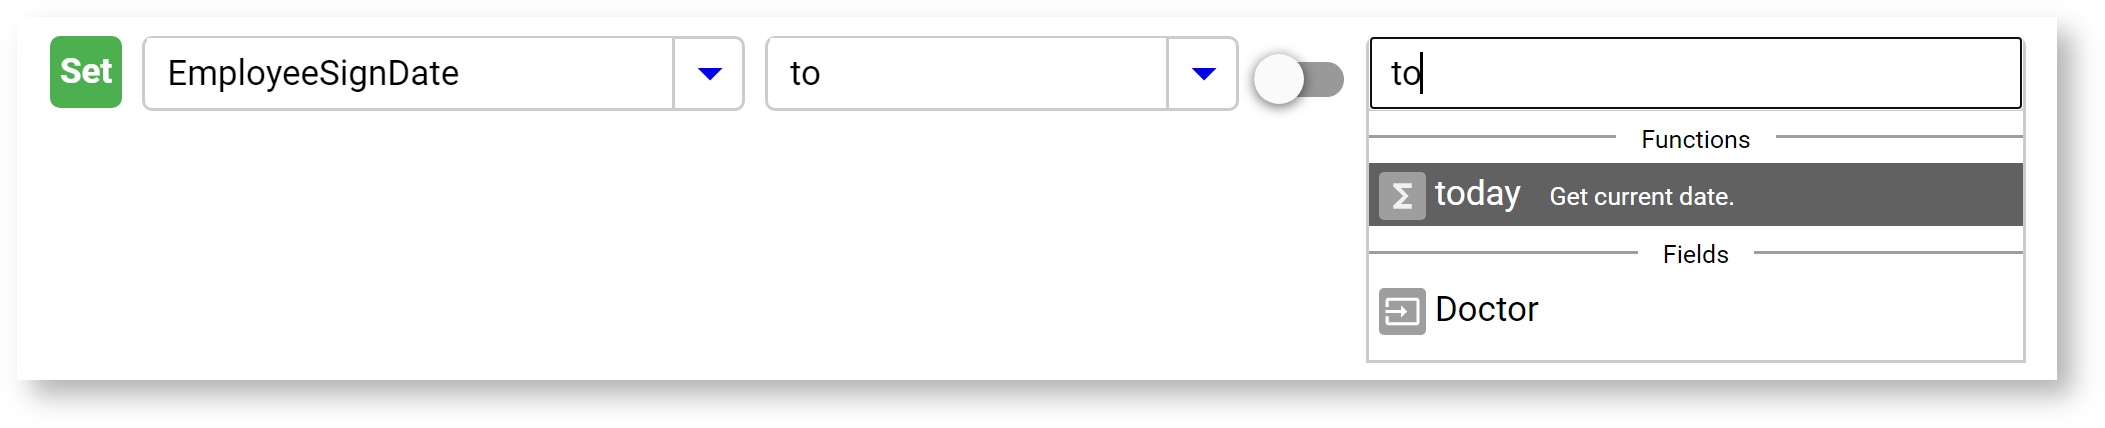
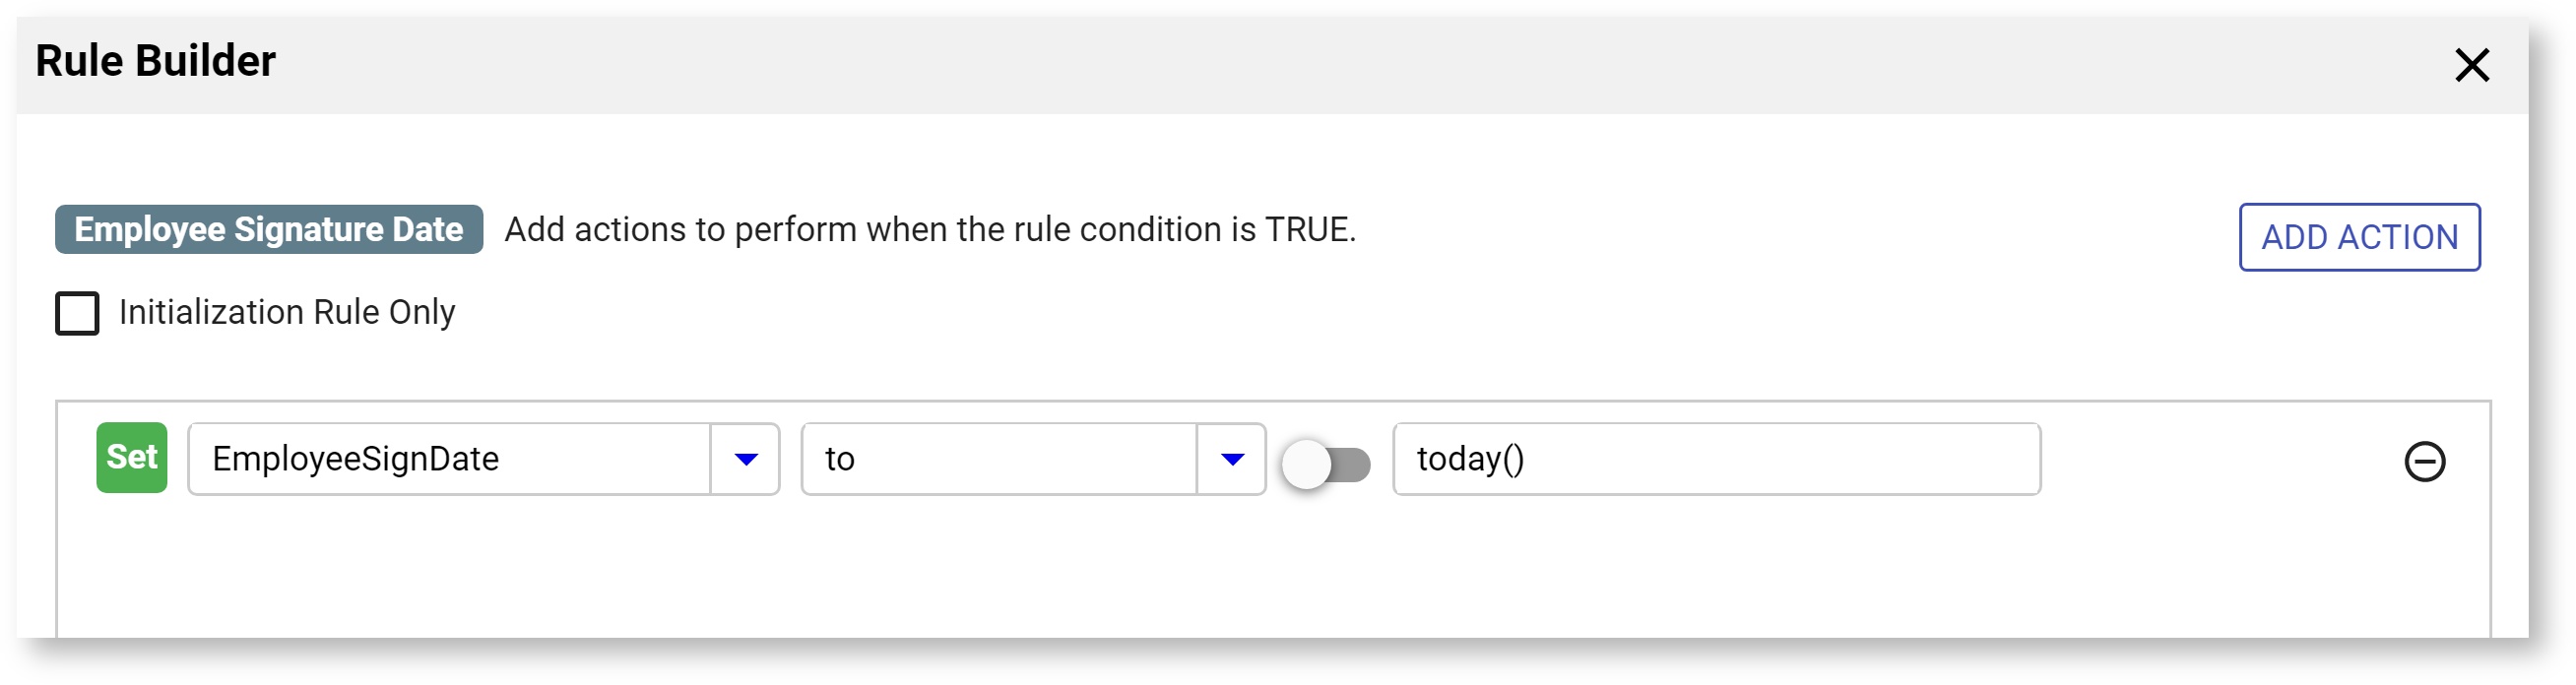
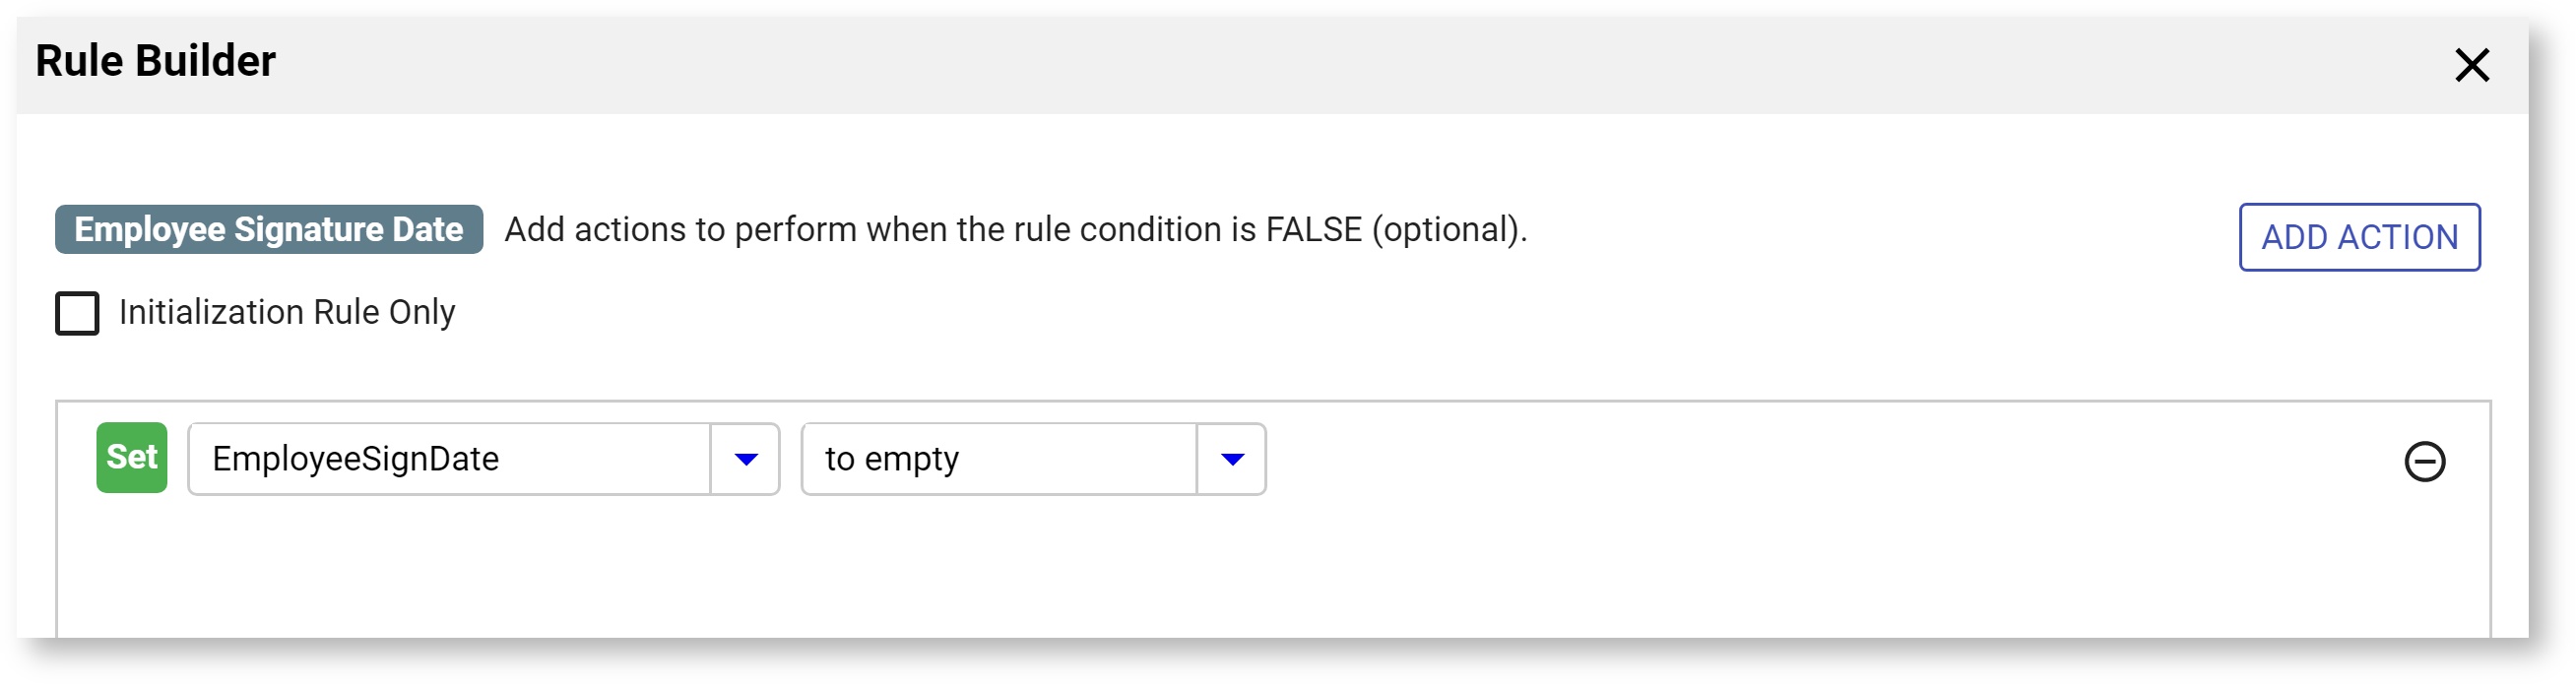
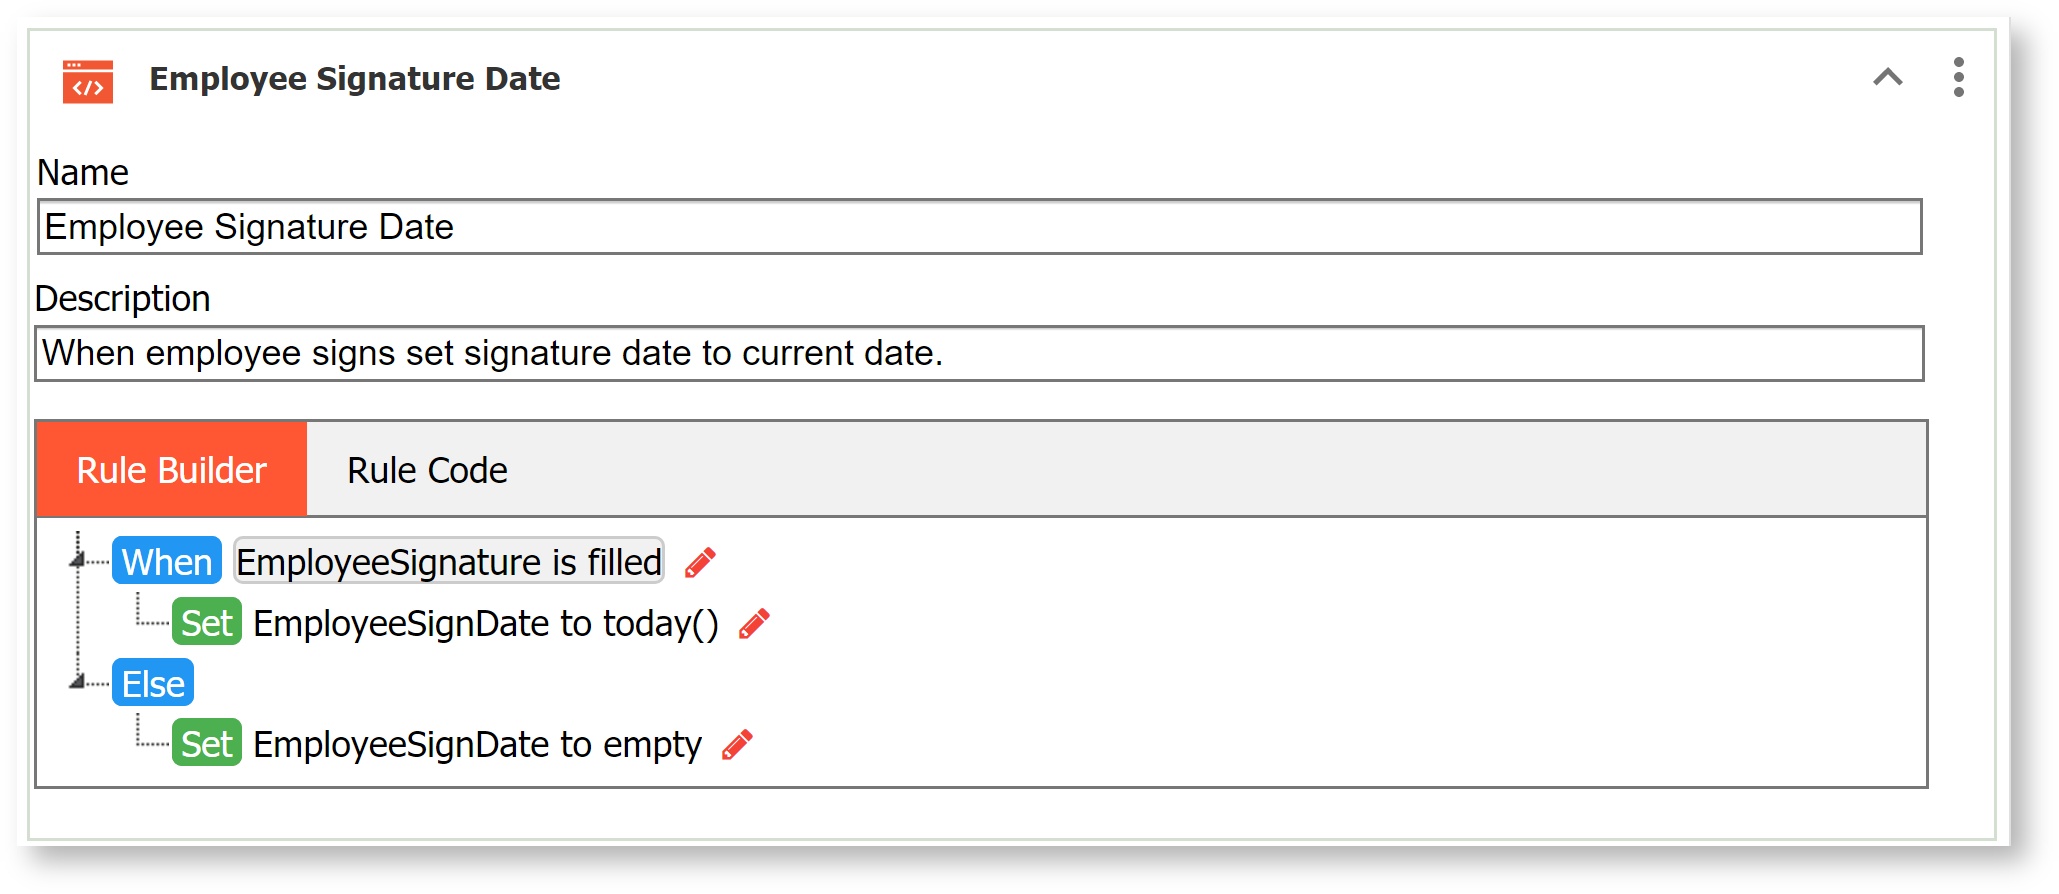
Wet Signature
This example sets a date control to today's date as soon as the user signs the form. The wet signature control is named EmployeeSignature and the date control is named EmployeeSignDate.

Use the today() function in the Rule Builder to create this rule.
| Expand | ||||||
|---|---|---|---|---|---|---|
| ||||||
|

Enable Click to Sign for Anonymous User
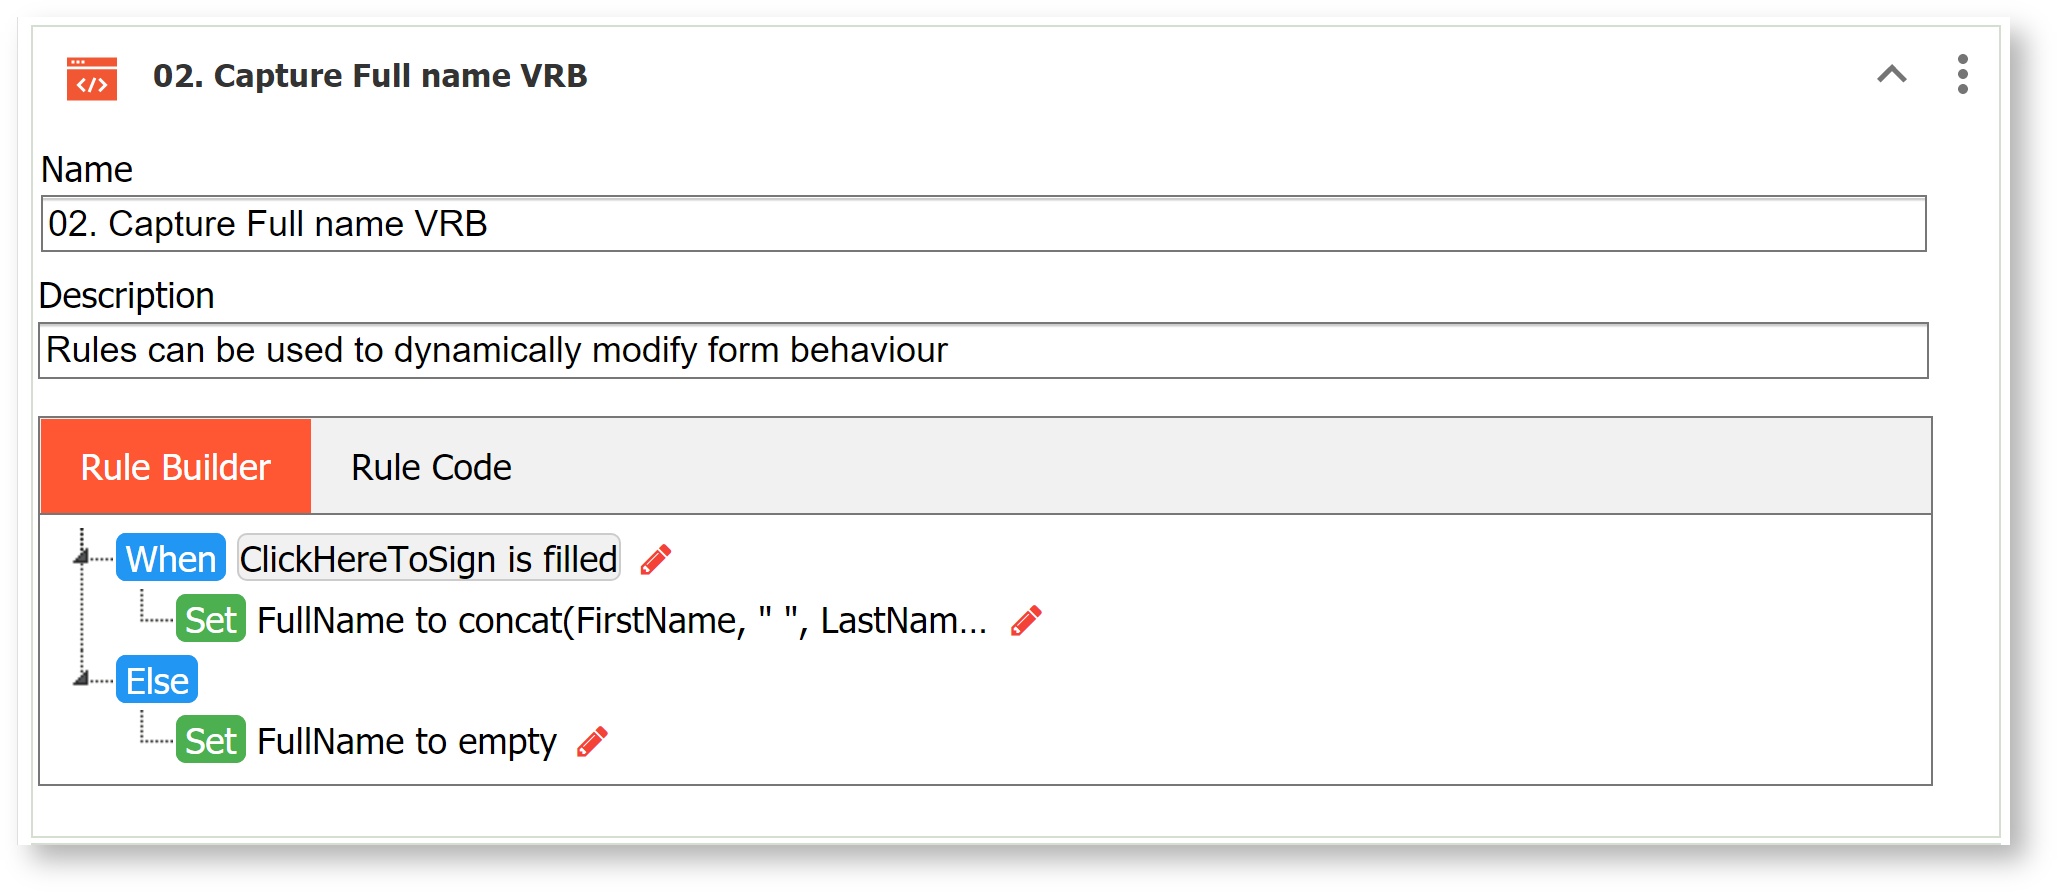
Perhaps you would like your anonymous user to be able to "click to sign" that automatically enters a text signature (similar to the way the authenticated-user signed section works). You can do this using a checkbox control and two business rules.
...
Finally, use the Visual Rule Builder to concatenate the First Name and Last Name the user entered at run-time:
At run time the result looks like this:
Calculate Net Worth
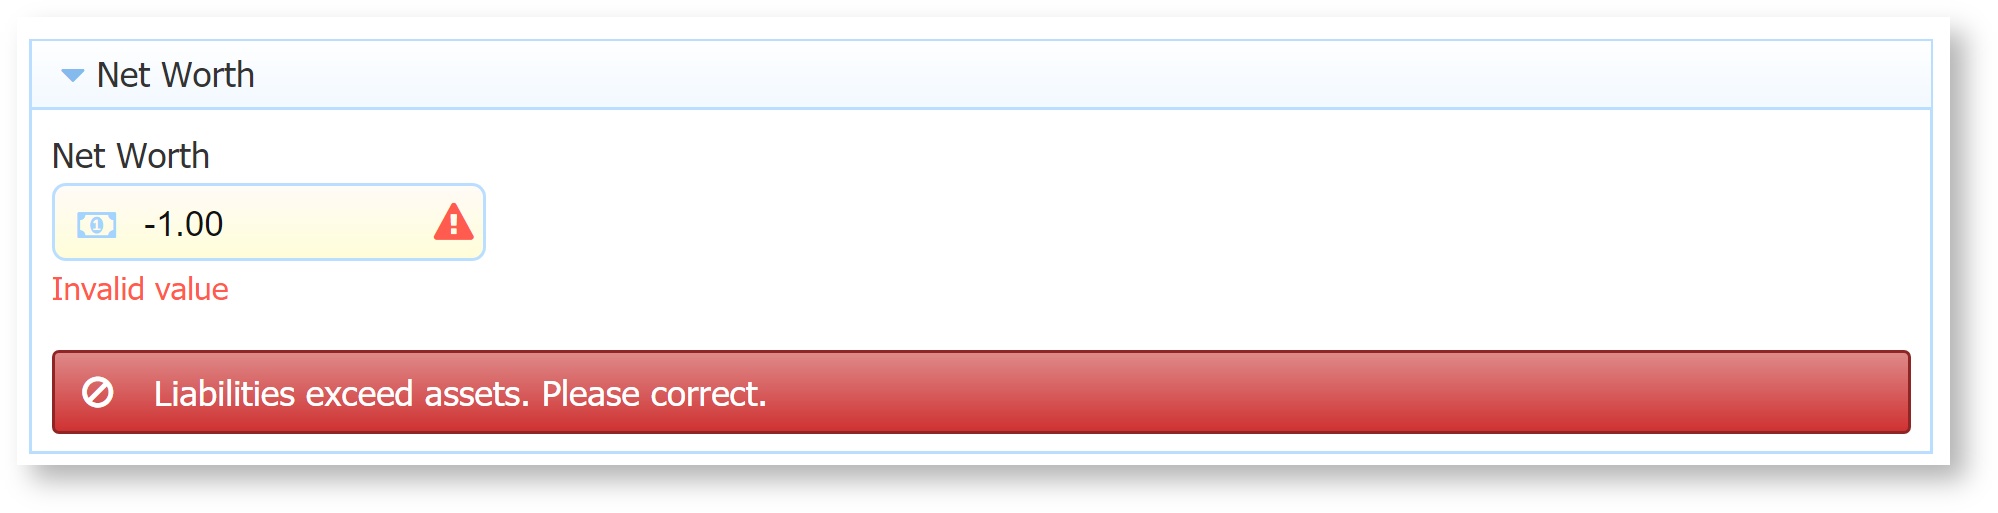
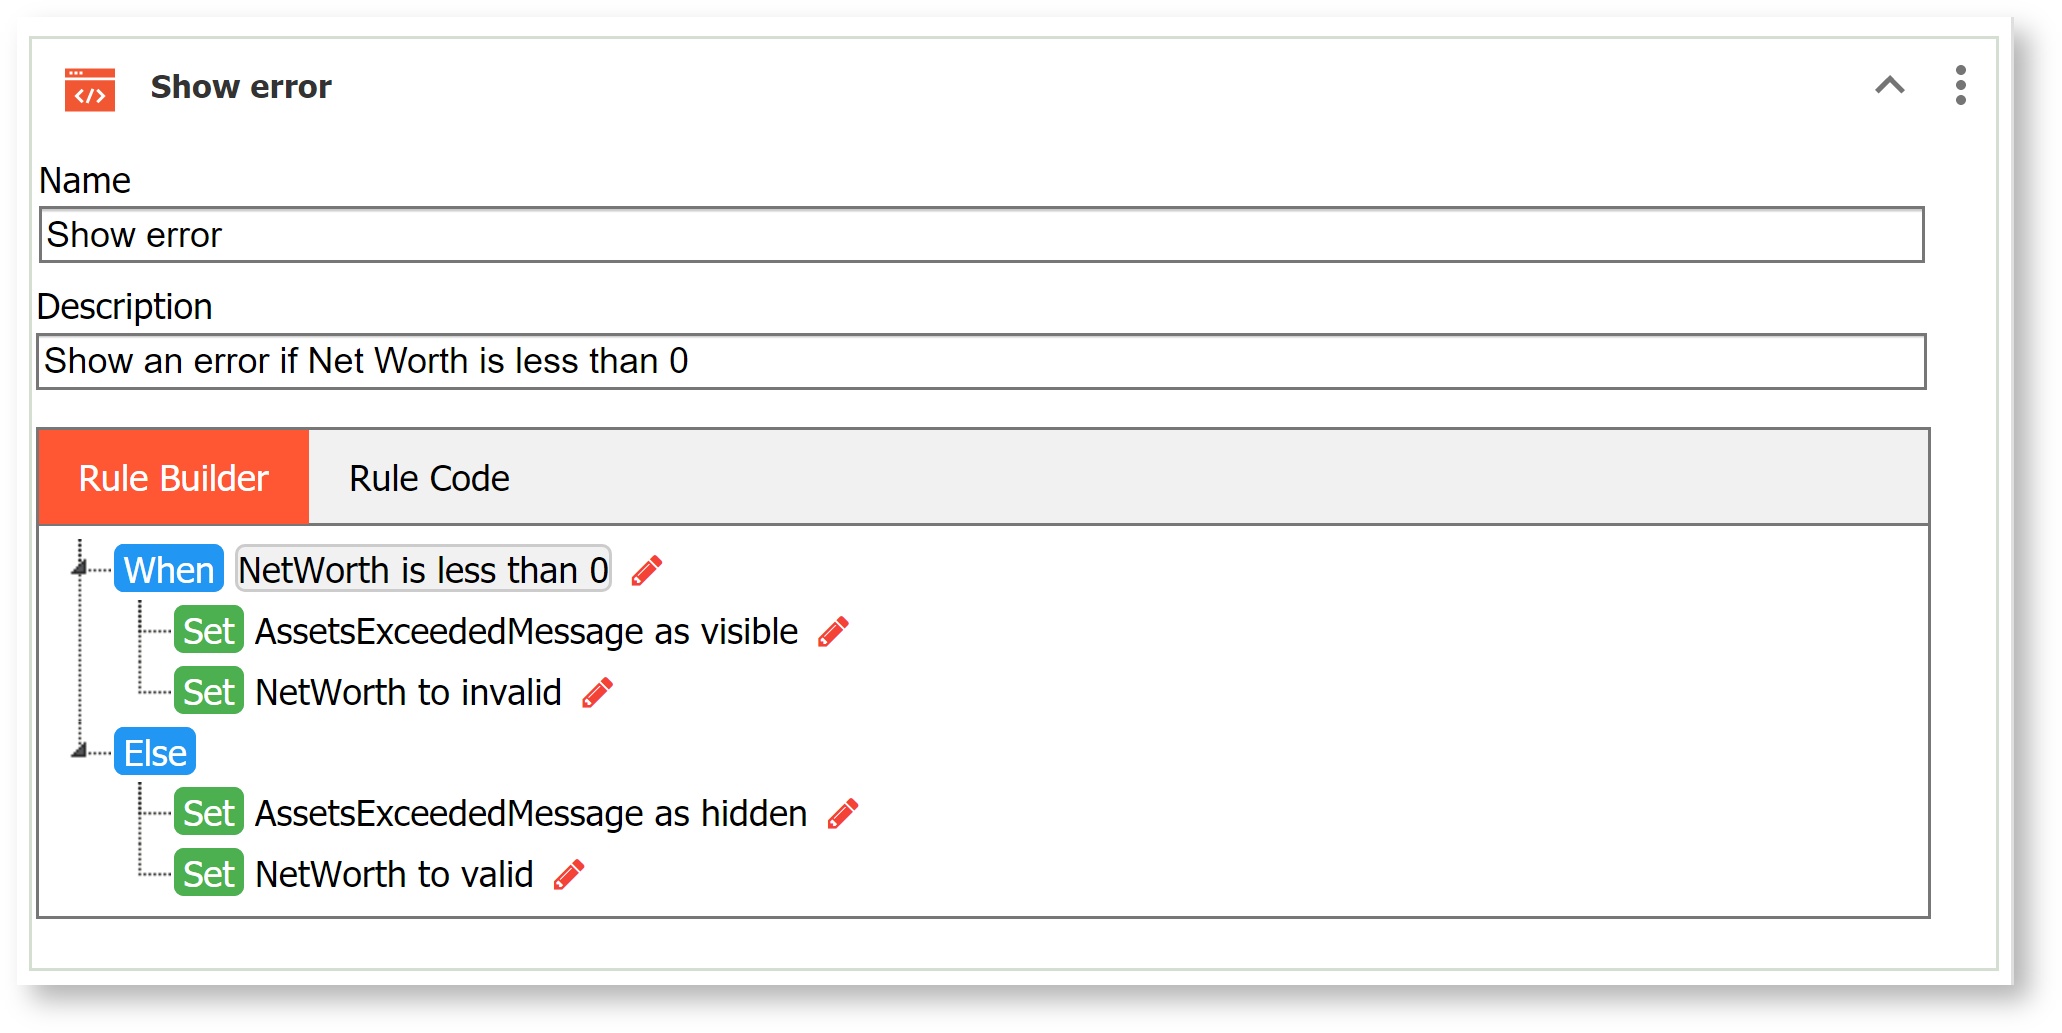
This form contains two rules. One is adding values entered into a column of assets and a column of liabilities and calculating Net Worth. The 2nd rule is checking the value of NetWorth and displaying an error message and marking NetWorth invalid if liabilities exceed assets since the form designer does not want the form to be submitted in that state. When a rule sets the invalid property for a <control>, the background is highlighted with a color (configurable) and the form will not submit just as if the user had entered an invalid value into a phone control. This is a good way to dynamically control your form's valid state. Refer to the Invalid Form Notification for Users for the frevvo built-in method to prevent the submission of forms/workflows with invalid data.
| Expand | ||
|---|---|---|
| ||
Net Worth screen
Rule List |
Dates and Times
Working with dates and times is very common in most forms. Some common scenarios are:
...
The Date/Time control will display an "Invalid Value" error if single digits for the month and/or day are used .
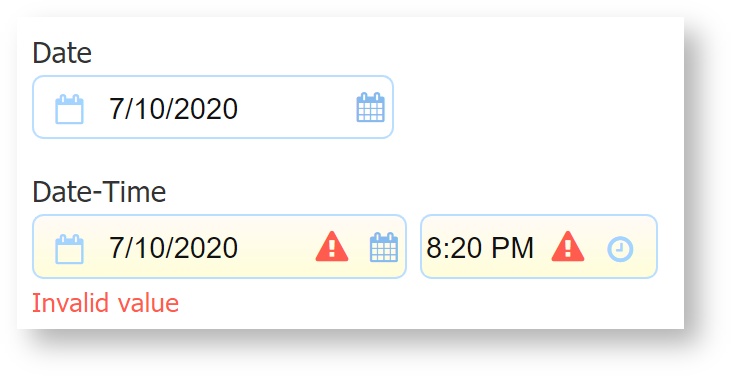
Change the Date_Time.value = "2020-7-10T20:20:20"; to Date_Time.value = "2020-07-10T20:20:20"; in the rule or the xml document for successful initialization.
| Warning |
|---|
Rules initializing time and date/time controls will not work in a form.load rule unless you specify a timezone on the form's Url via the _formTz Url parameter. This is because the form server needs to know the timezone in which to return the date and time. If you do not specify a _formTz the methods will return null and the control values will remain blank. The timezone strings can be found here. For example, to specify Eastern time: &_formTz=America/NewYork. This URL parameter is not needed if your form/workflow only contains Date controls. |
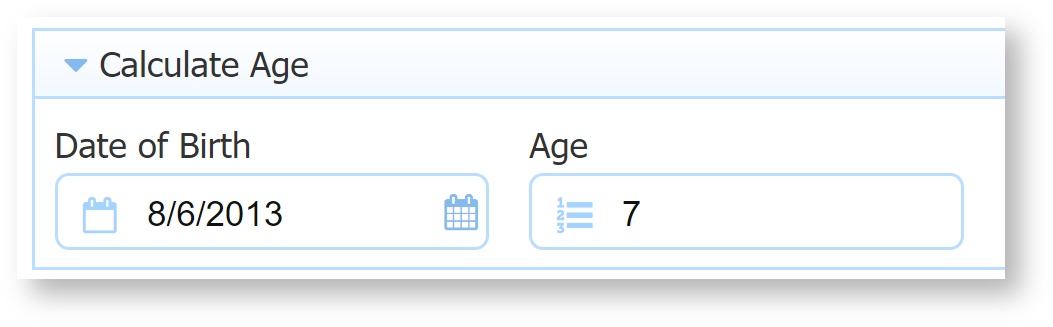
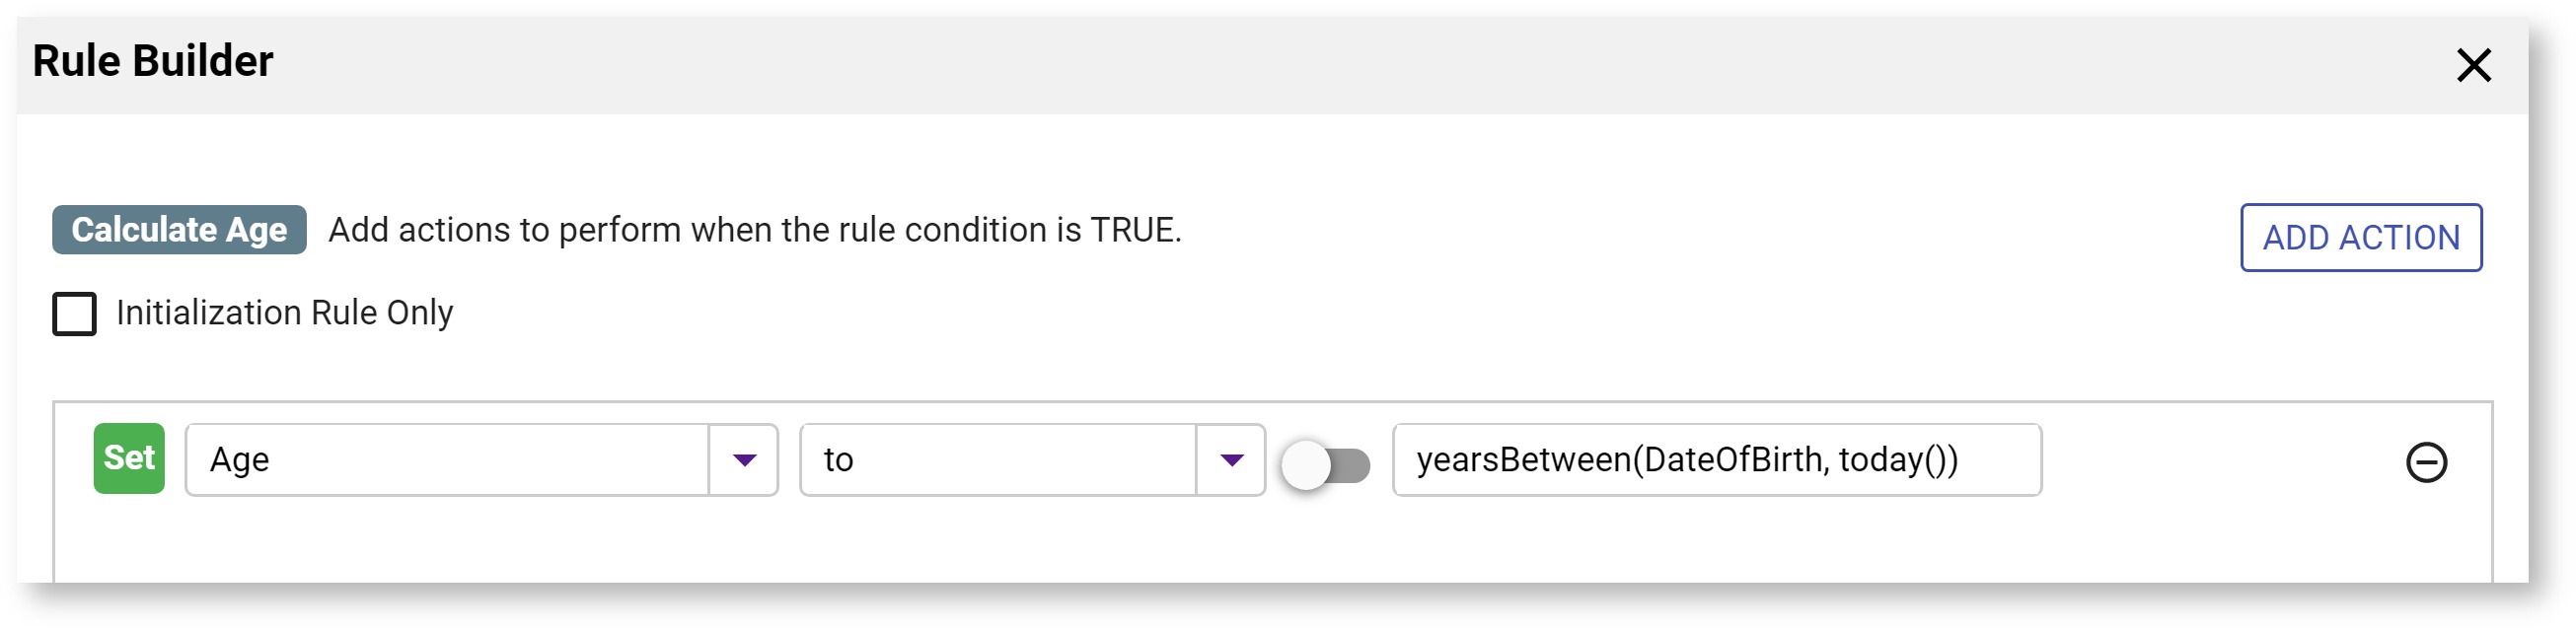
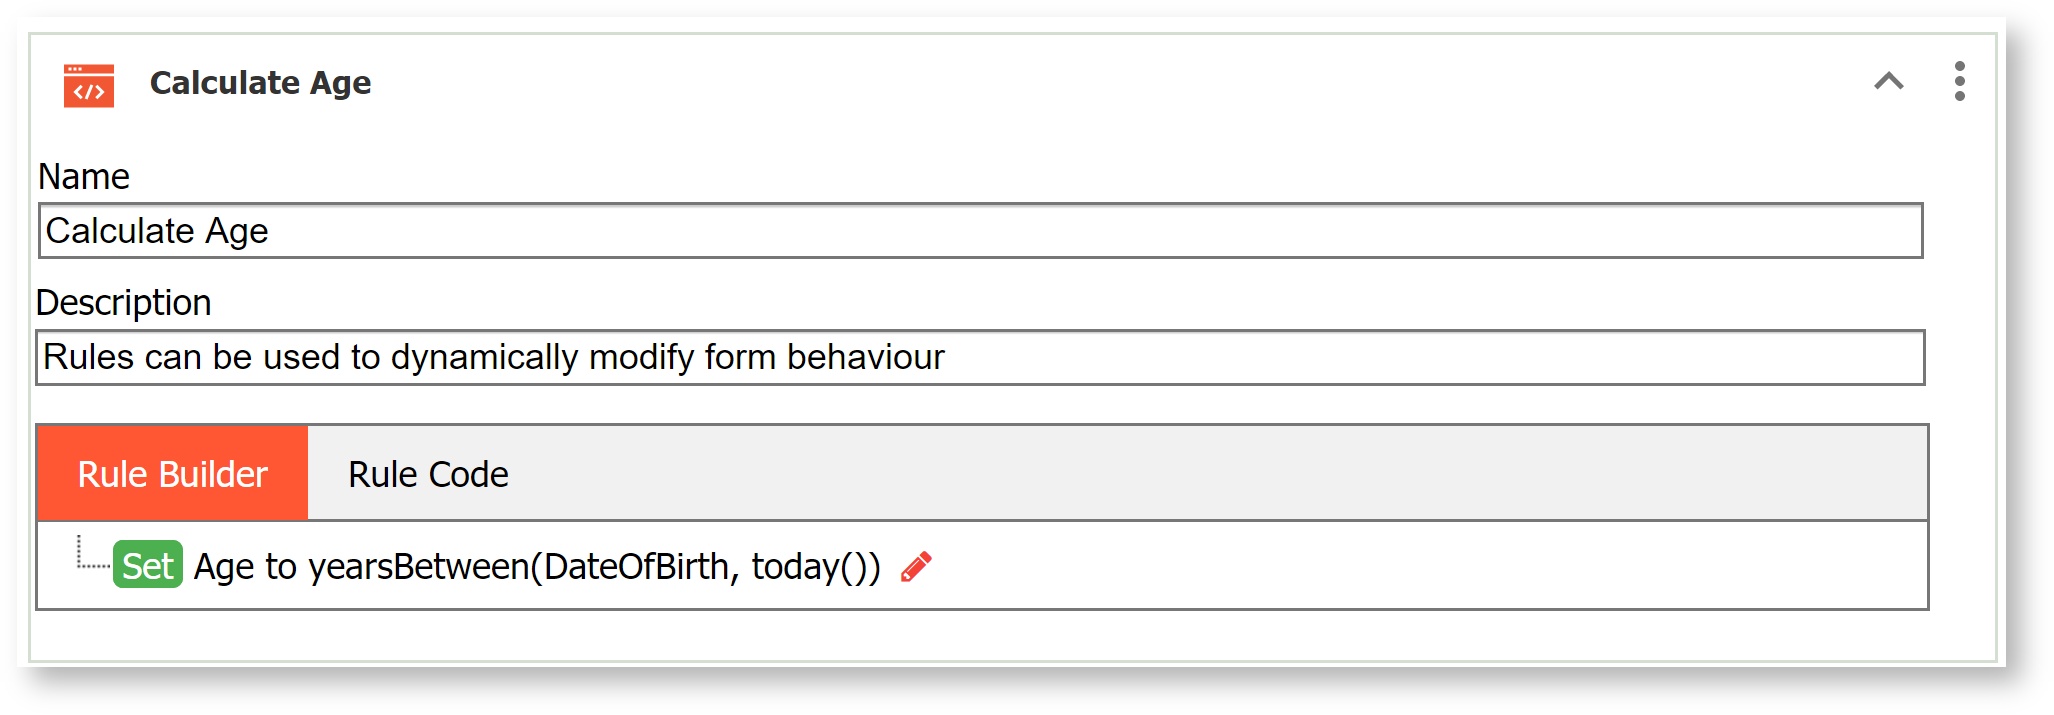
Age
The Visual Rule Builder generates two lines of code to calculate age. This example form automatically determines today's date and then calculates the person's age in the control named 'Age' when they enter their Date of Birth.
| Expand | ||
|---|---|---|
| ||
Action Wizard
Rule List |
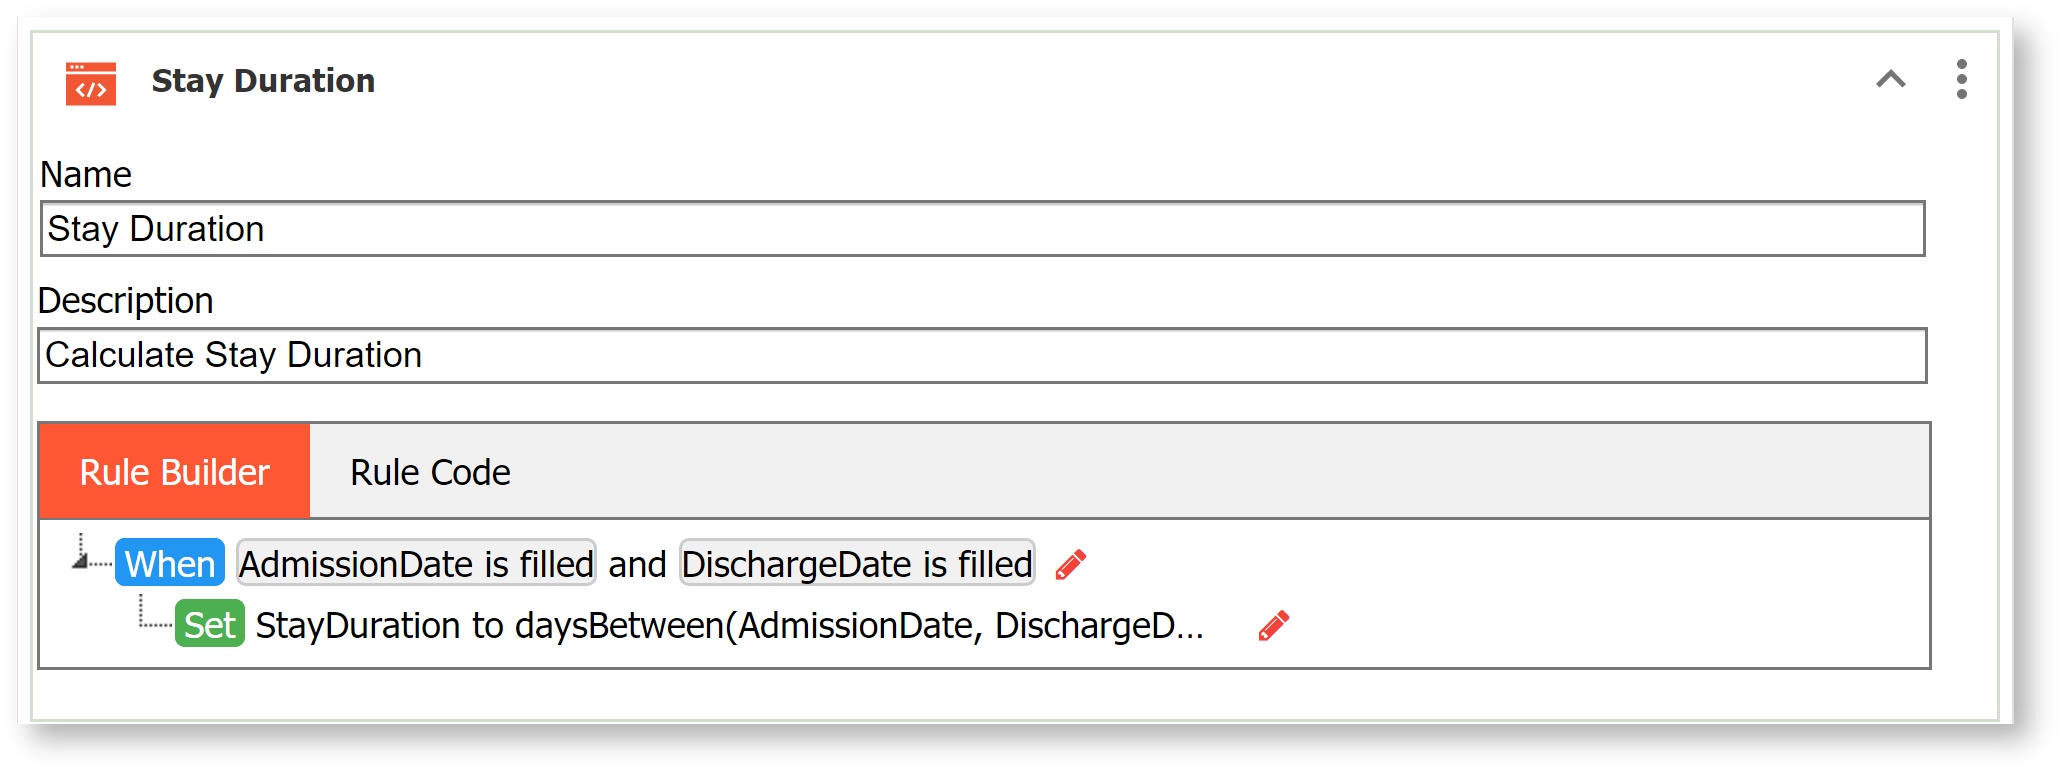
Duration
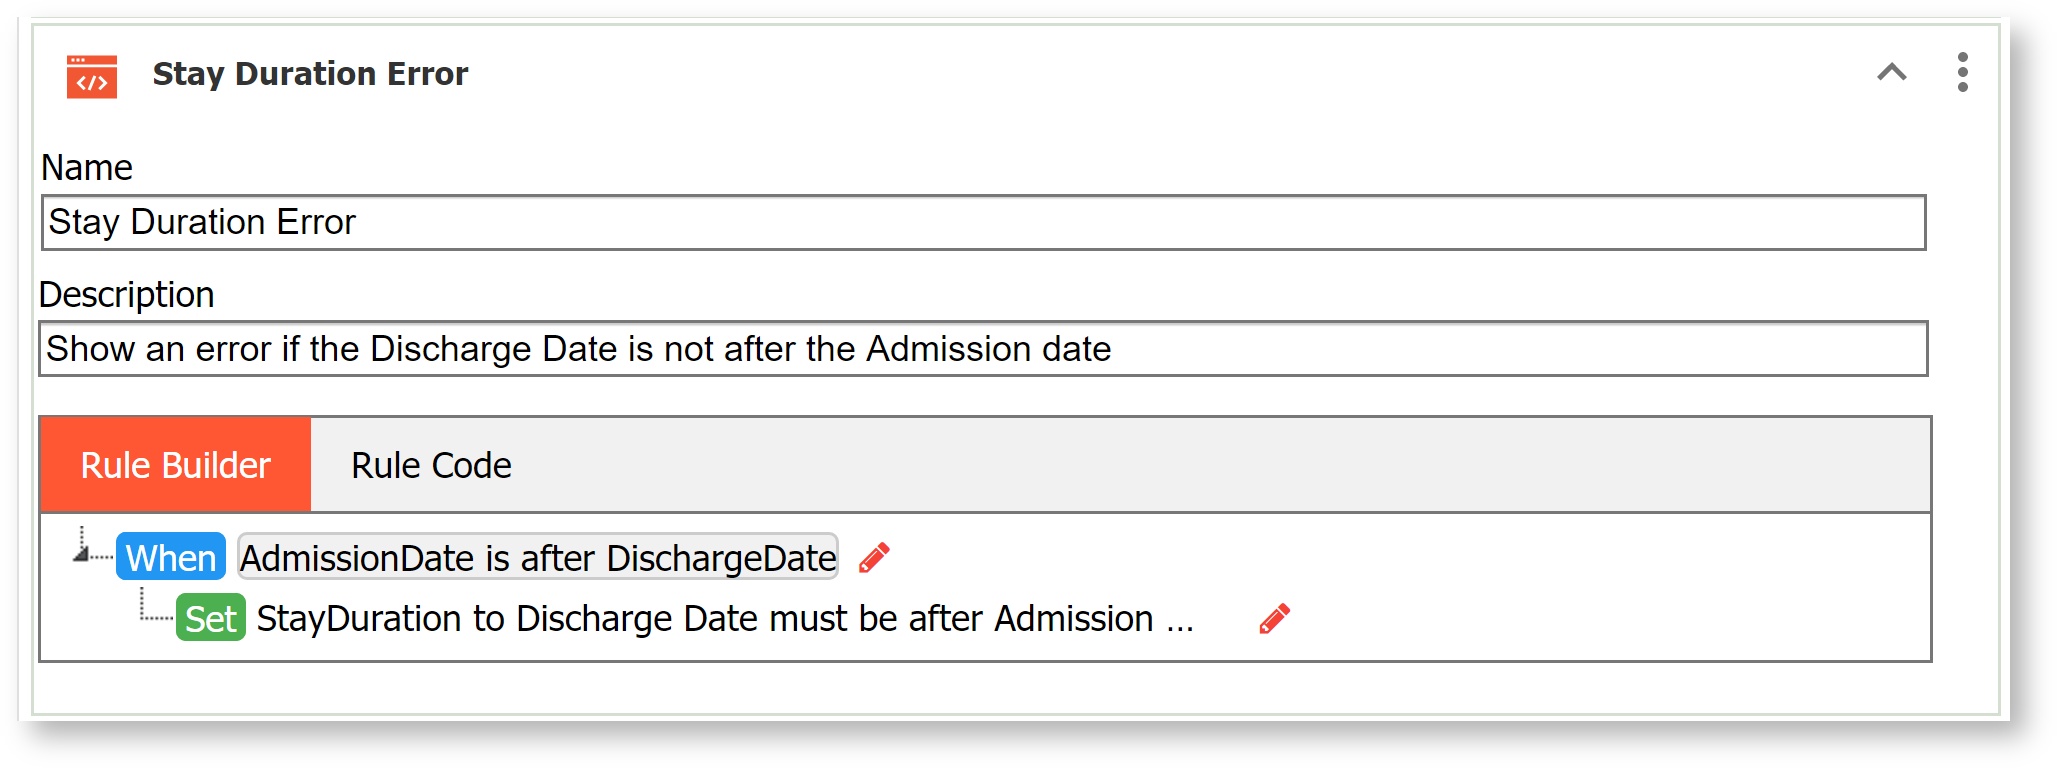
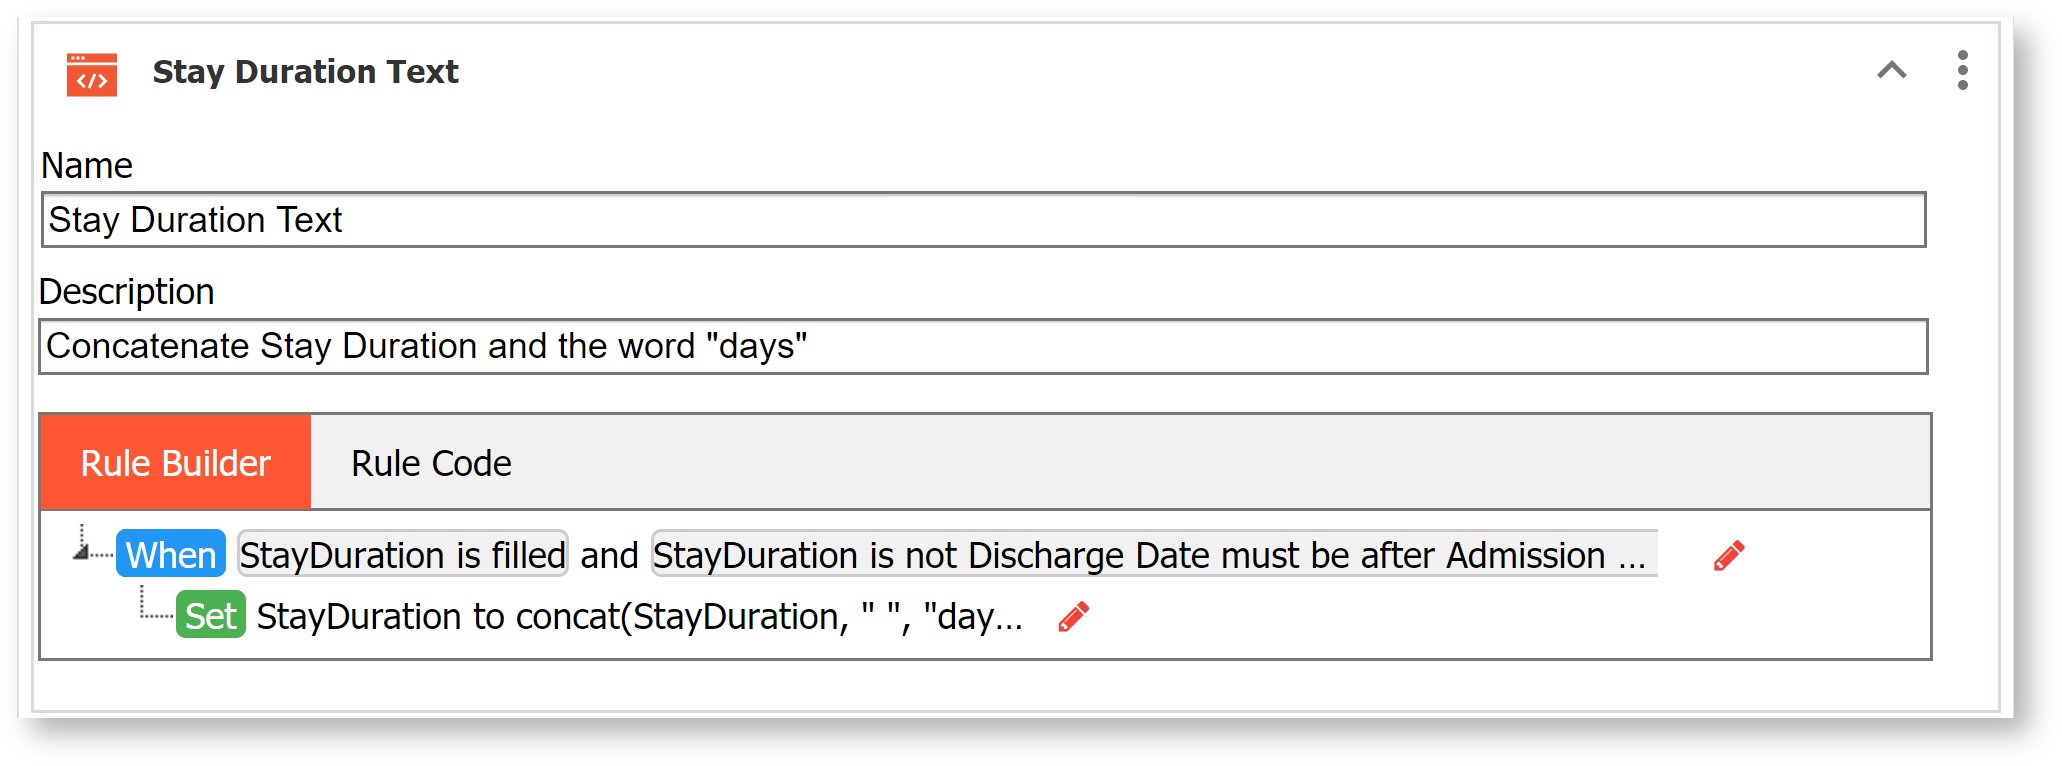
This form initializes the hospital discharge date using a rule, and when the user enters the admission date a 2nd rule calculates the number of days the patient stayed in the hospital.
...
- Use the daysBetween function in the Rule Builder to calculate the number of days between the Admission Date and the Discharge Date.
- Populate the Hospital Stay Duration field with the result.
- Concatenate the number of days between the dates with the word "days" in the Hospital Stay Duration field.

- Display an error message in the Hospital Stay Duration field if the Admission Date is later than the Discharge Date.

| Expand | ||
|---|---|---|
| ||
Rule List
|
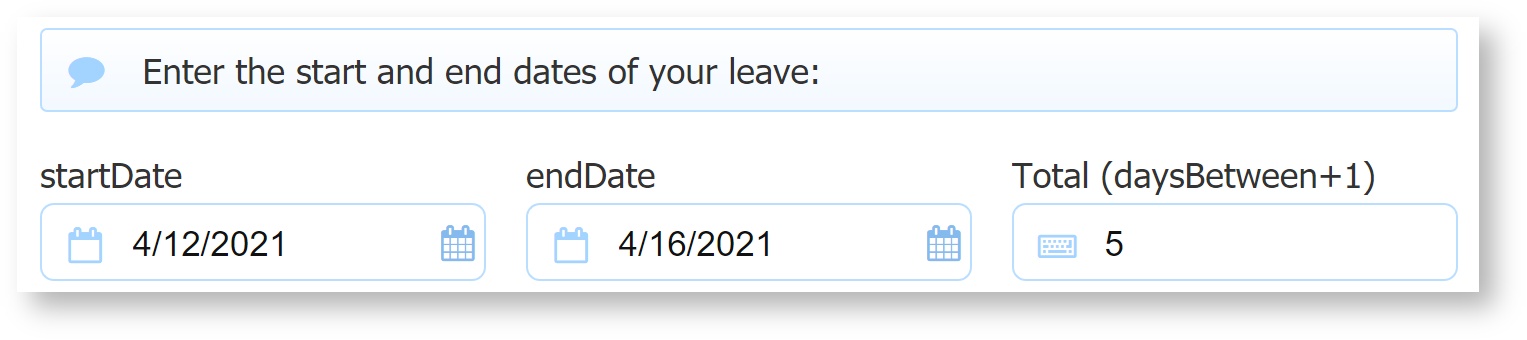
One common use for this function is in a Time Off Request. In this case, you may wish to include both the start and end date in the calculation. Since the daysBetween function counts the start date up to (but not including) the end date simply add +1 in the Visual Rule Builder Expression.
| Expand | ||
|---|---|---|
| ||
 |

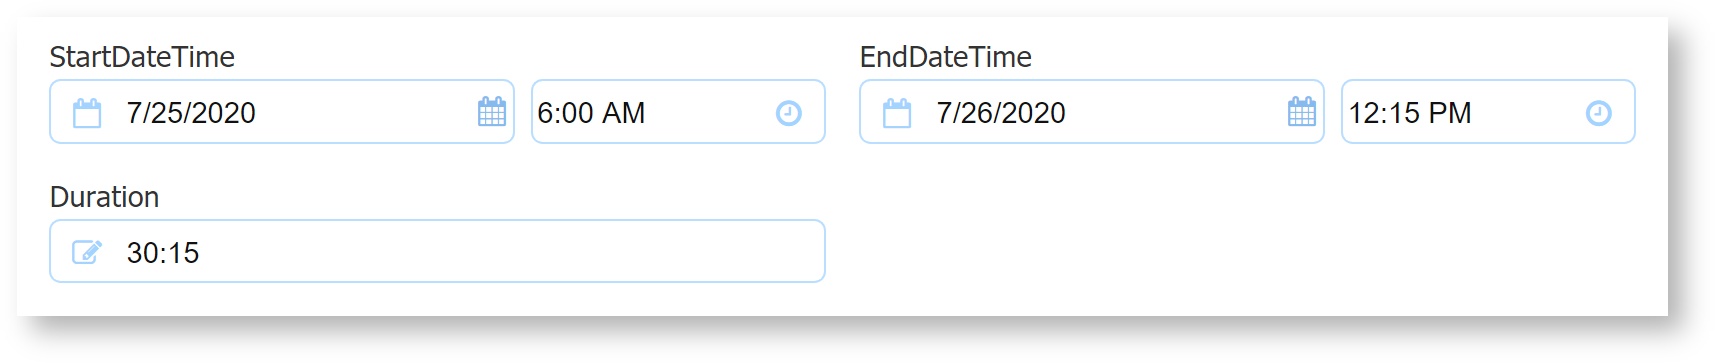
Duration (between Date/Time)
This rule is not yet supported in the Visual Rules Builder and thus still requires some JavaScript. Here is a rule example to calculate the time difference between two Date/Time values in hours:minutes format.
| Code Block |
|---|
var event = form.load;
var endDate = null;
var startDate = null;
var millisDiff = 0;
if (StartDateTime.value && EndDateTime.value) {
  startDate = new Date(StartDateTime.value);
  endDate = new Date(EndDateTime.value);
  millisDiff = endDate.getTime() - startDate.getTime();
}
var hours = Math.floor(millisDiff / 1000 / 60 / 60);
    millisDiff -= hours * 1000 * 60 * 60;
    var minutes = Math.floor(millisDiff / 1000 / 60);

Duration.value = (hours < 9 ? "0" : "") + hours + ":" + (minutes < 9 ? "0" : "") + minutes; |
...
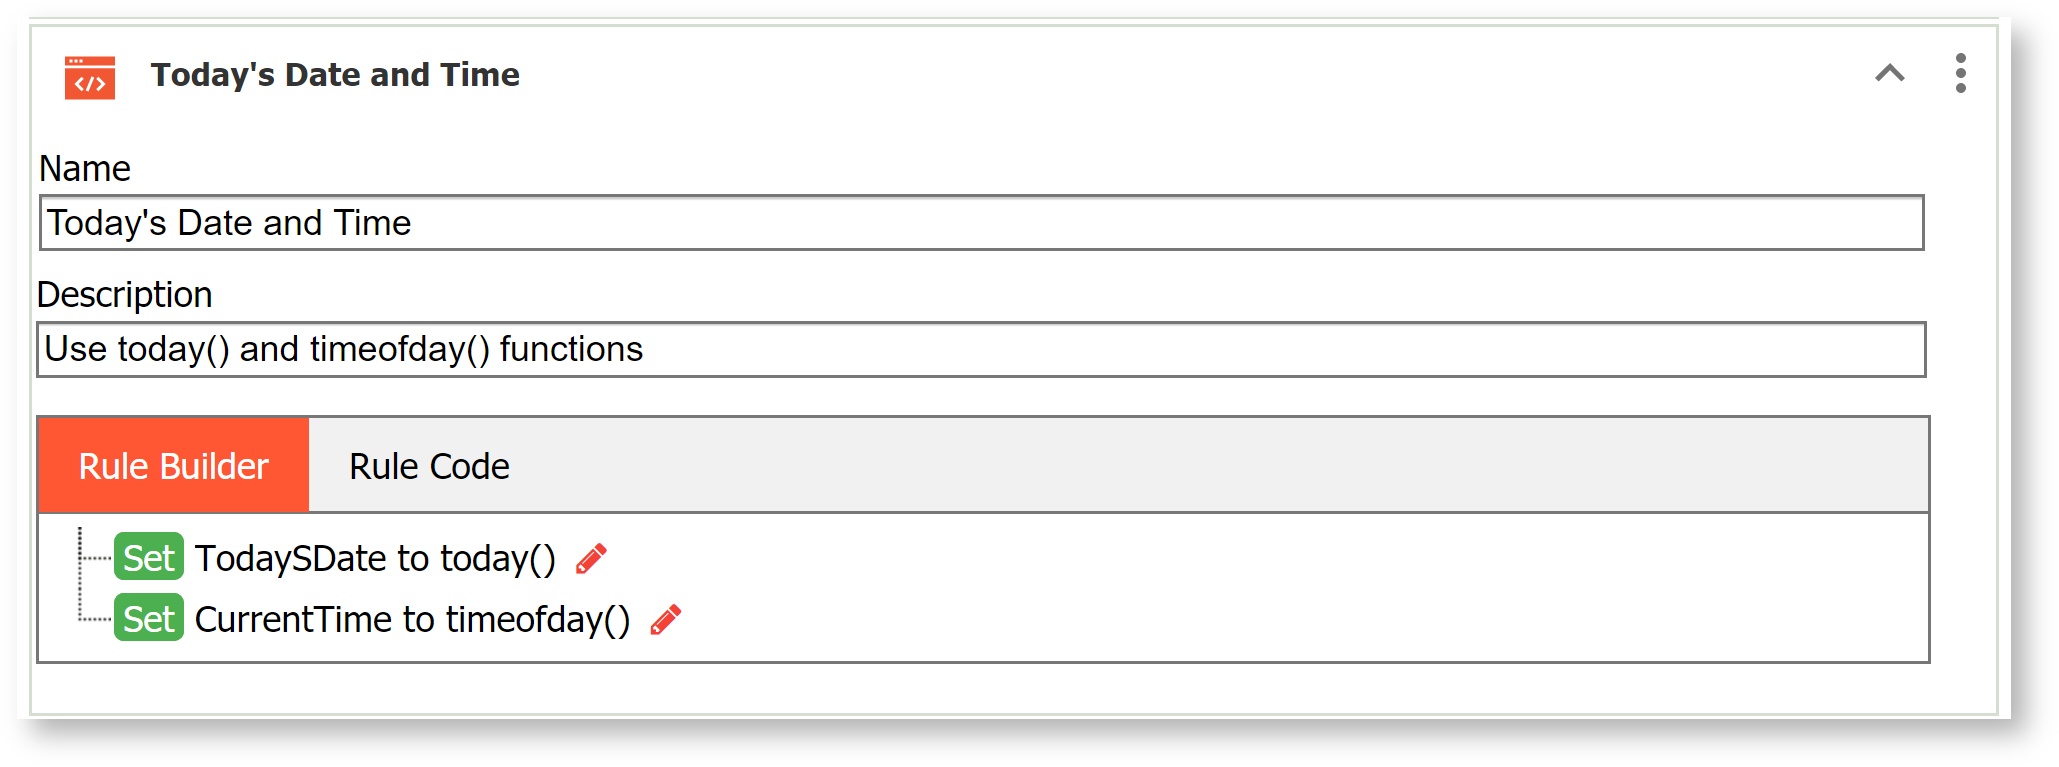
Today's Date and Time
Use the today and timeofday functions in the Rule Builder to populate a Date field with the current date and a Time field with the current time on form load. Remember to select Date or Time from the Date Control Type dropdown.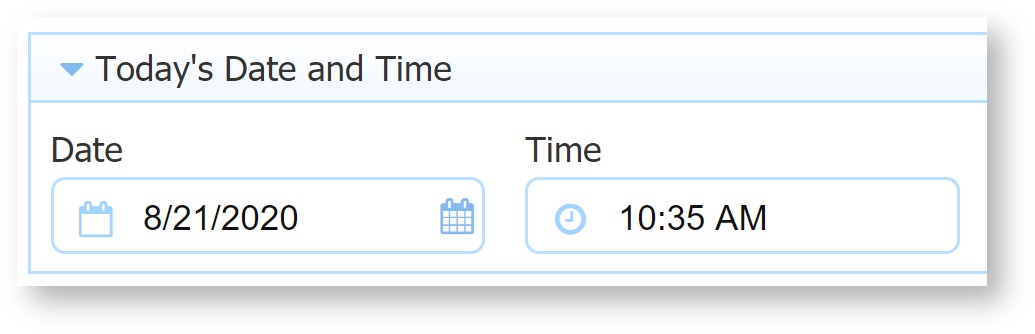
Here is what the rule looks like in the Rule List.
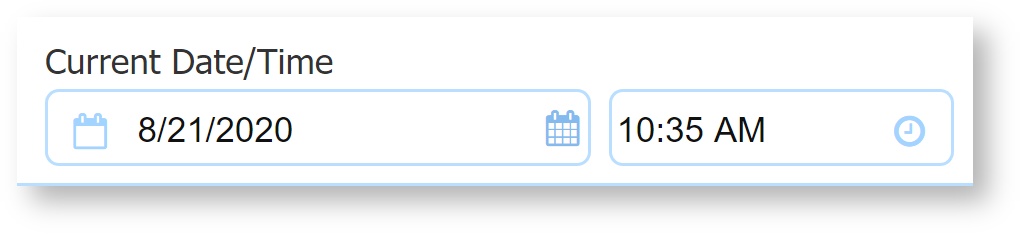
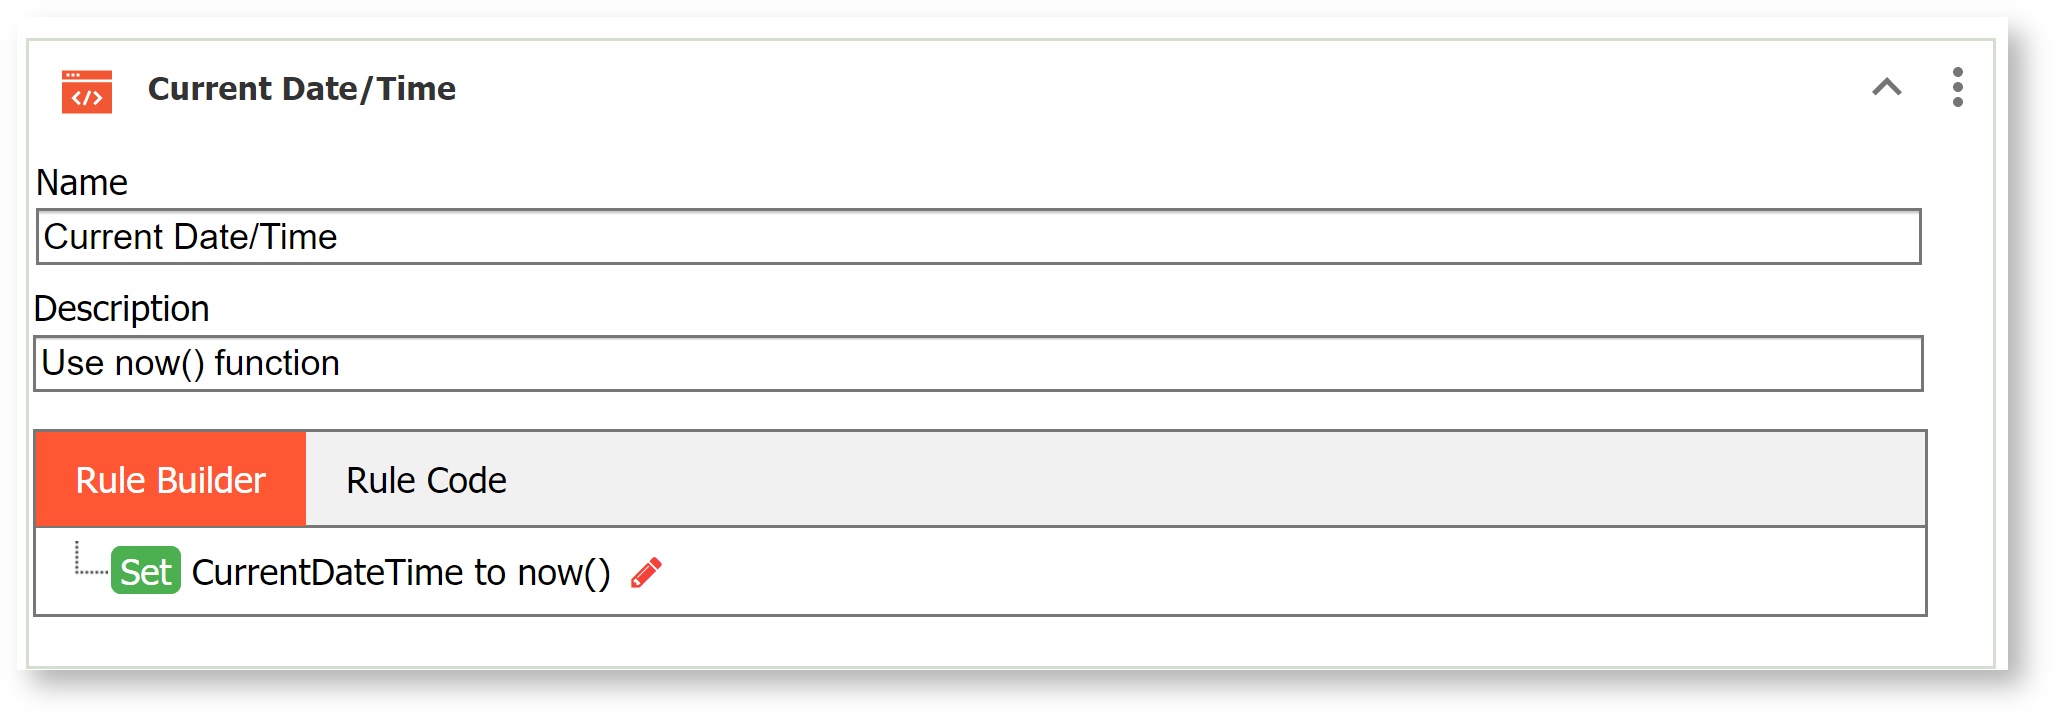
Use the now function to set your date/time controls to the current date and time in the user's local timezone on formload.
| Note |
|---|
The currentTime(), currentDate() and currentDateTime() will not work in a form.load rule unless you specify a timezone on the form's Url via the _formTz Url parameter. This is because the form server needs to know the timezone in which to return the date and time. If you do not specify a formTz the methods will return null and the control values will remain blank. For example &formTz=America/New_York will set the control values to the current date and time in the eastern timezone. |
Create a Date, Time or DateTime value
Use the date, time and date/time functions to construct dates and times in your form/fields.
Here is what the rule looks like in the Rule List.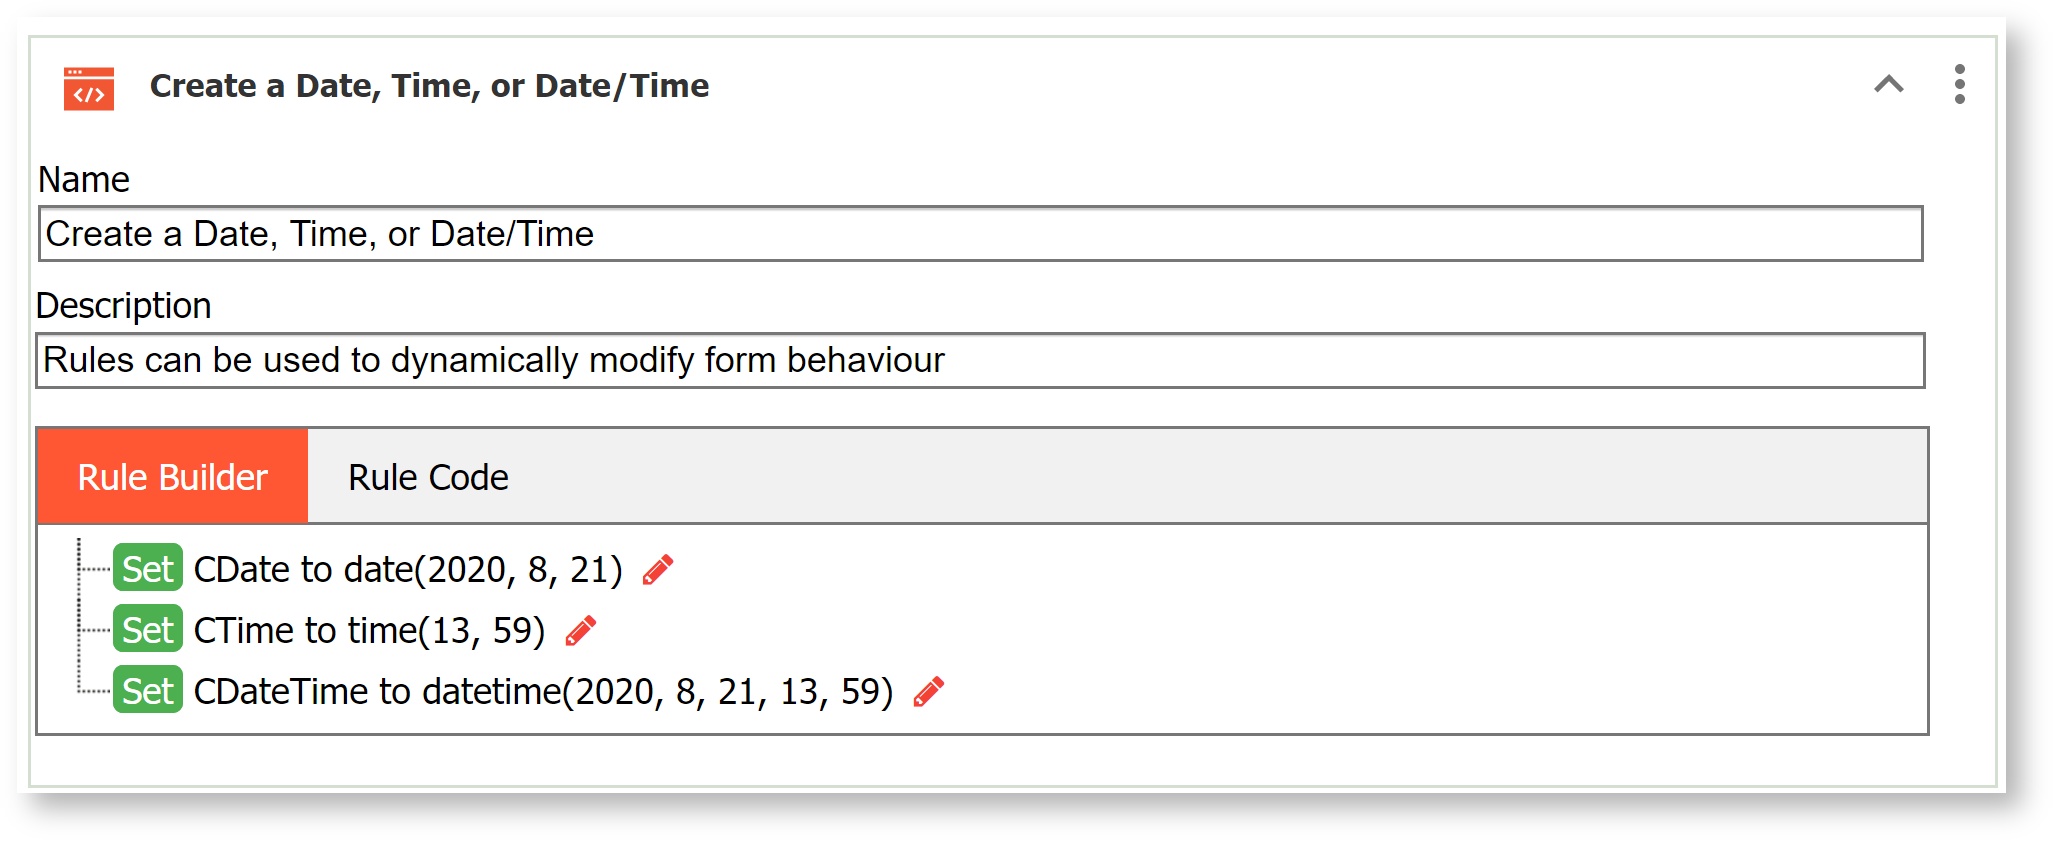
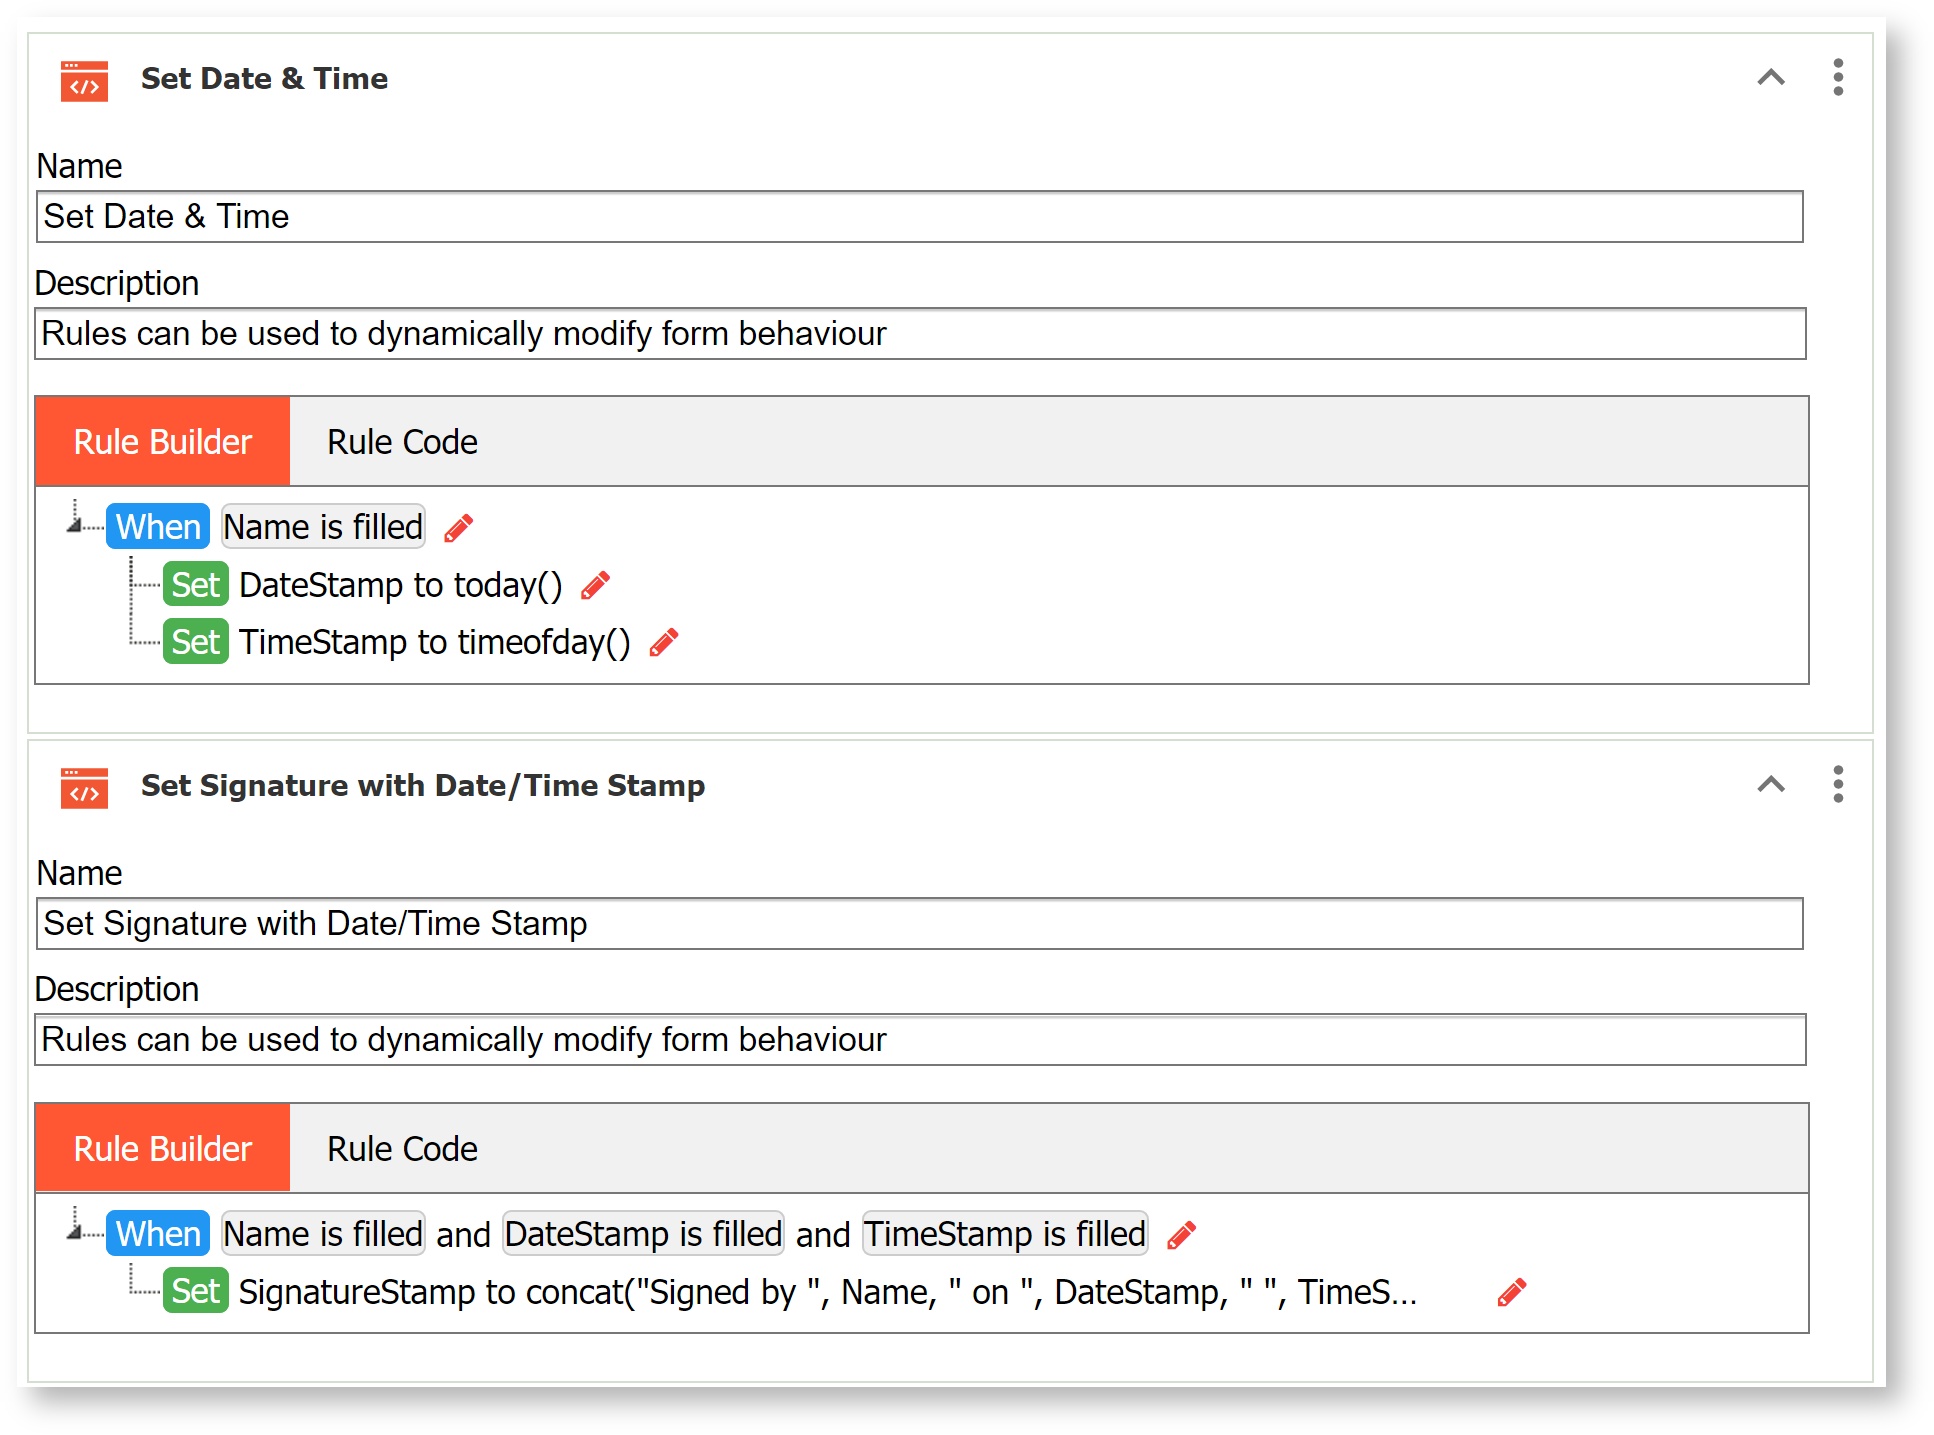
Date/Time Stamp
This rule sets a control named Signature to the value of a control named Name plus a date/time stamp. The form has a hidden Date and Time field.
Build two rules with the Rule Builder:
- One rule to populate the hidden Date and Time fields with the current Date and Time
A second rule to concatenate the text and Date and Time field values as shown:
Code Block concat("Signed by ", Name," on ", Date, " ", Time)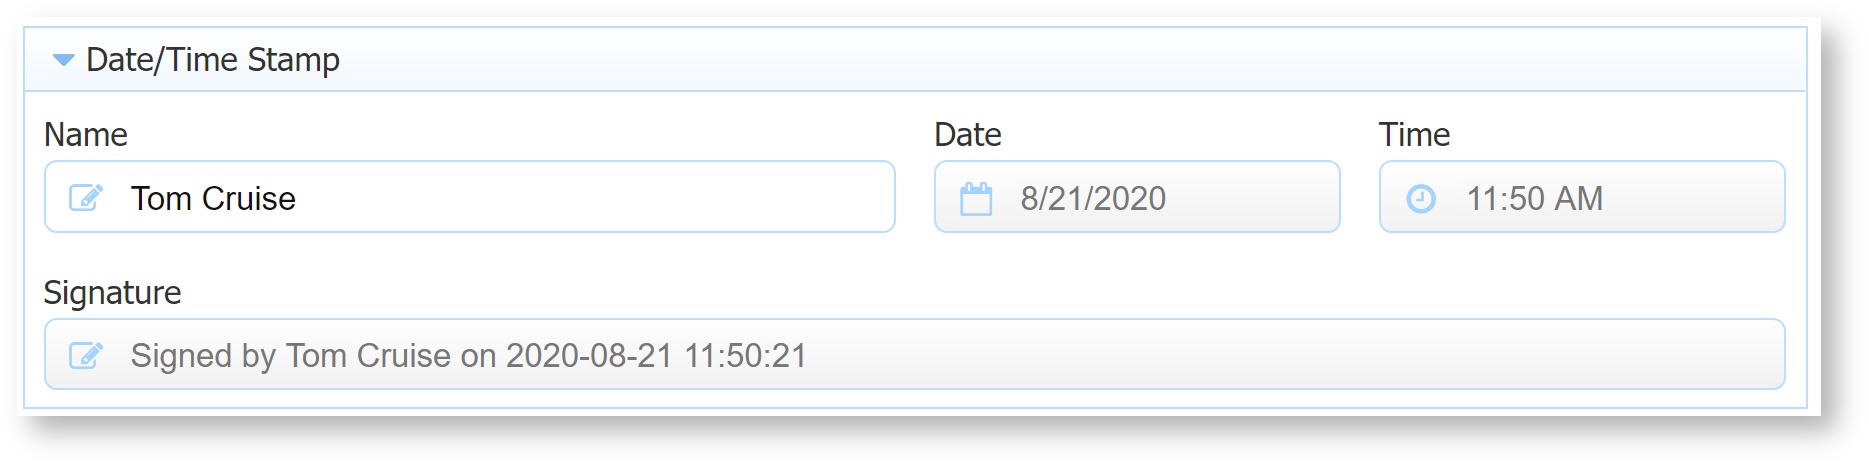
| Expand | ||
|---|---|---|
| ||
|
Invalid if Not Before Today
This rule makes the date control invalid if the date entered isn't before today's date.
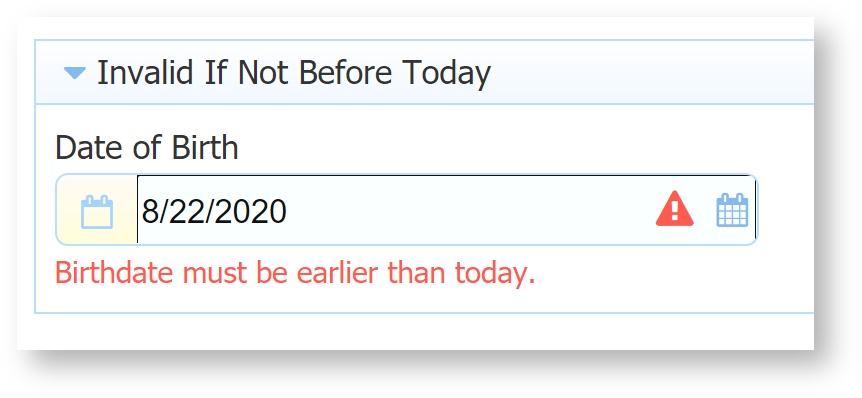
Use the Rule Builder to create a rule that:
- Uses the is after condition for the Date of Birth control
- Sets the Date of Birth status to invalid if the entered date is after the current date
- Sets the error text for the Date of Birth field to "Birth Date must be earlier than today"

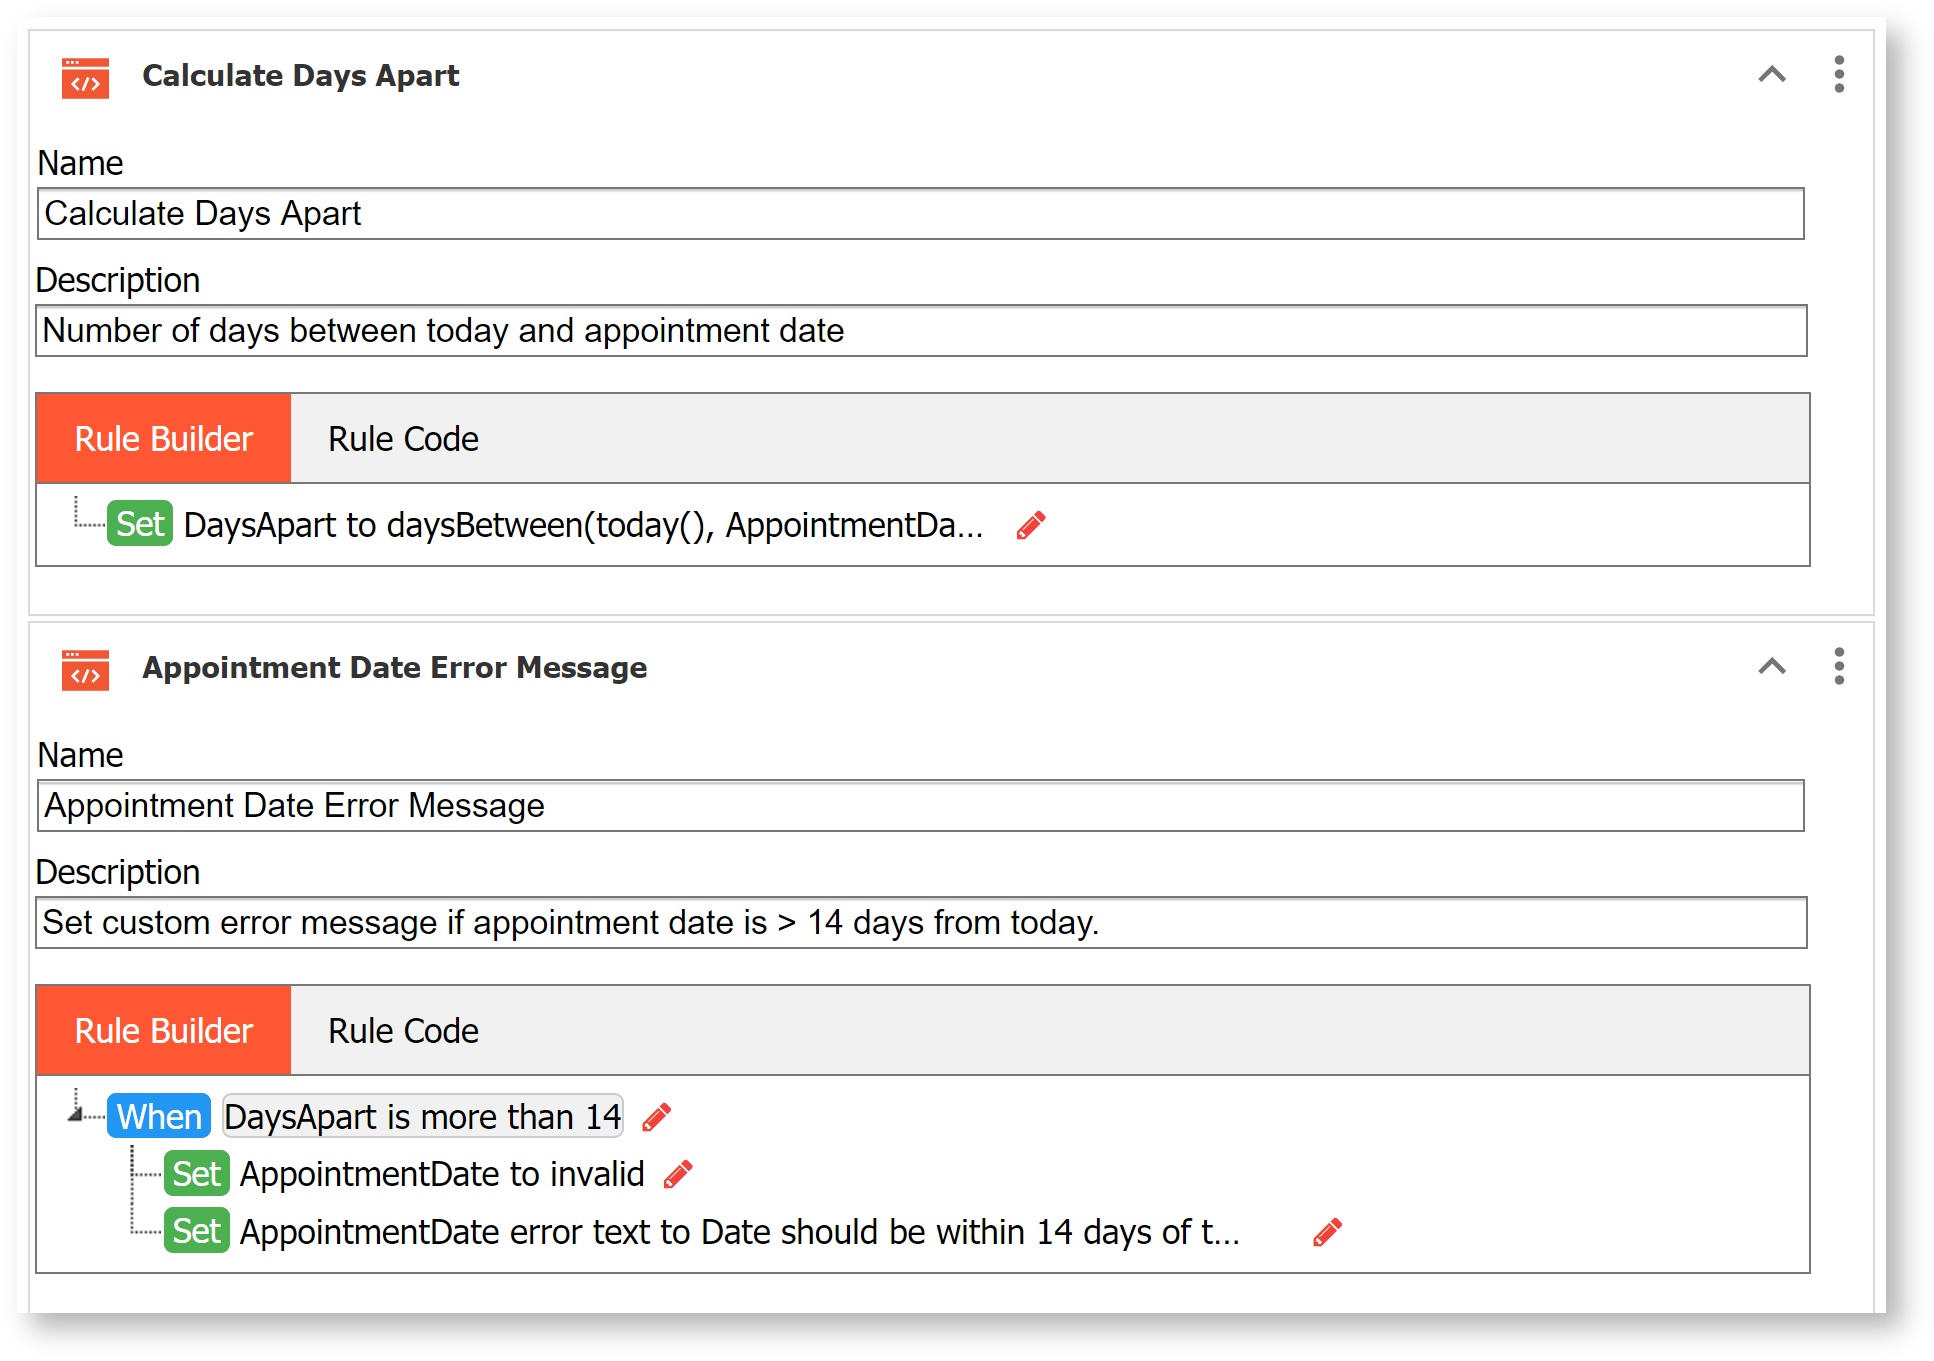
Date no more than 14 days from Today
In this example, we want to check that the date entered into a control named AppointmentDate is no more than 14 days greater than today's date. If the Appointment Date is more than 14 days from the current date, we want to display an error message to the user. The form contains a hidden field named DaysApart (visible below for the purpose of demo.) 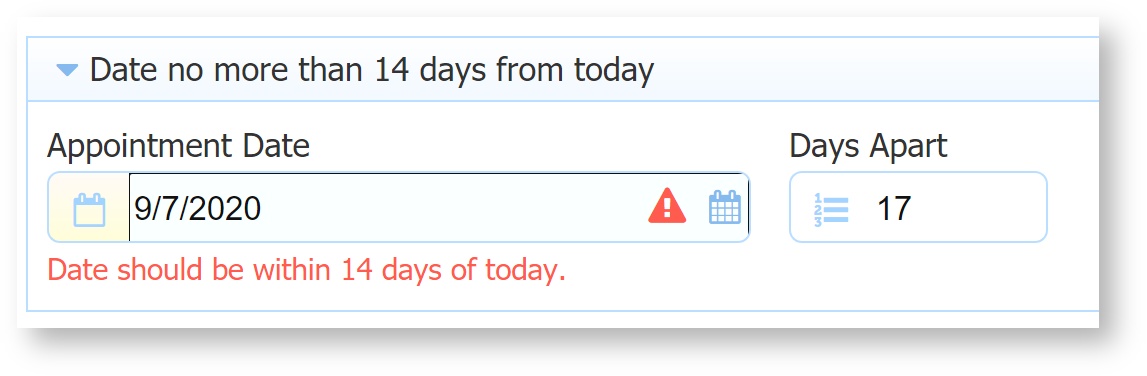
You will need two rules created in the Rule Builder:
...
| Expand | ||
|---|---|---|
| ||
 Condition and Action wizards |
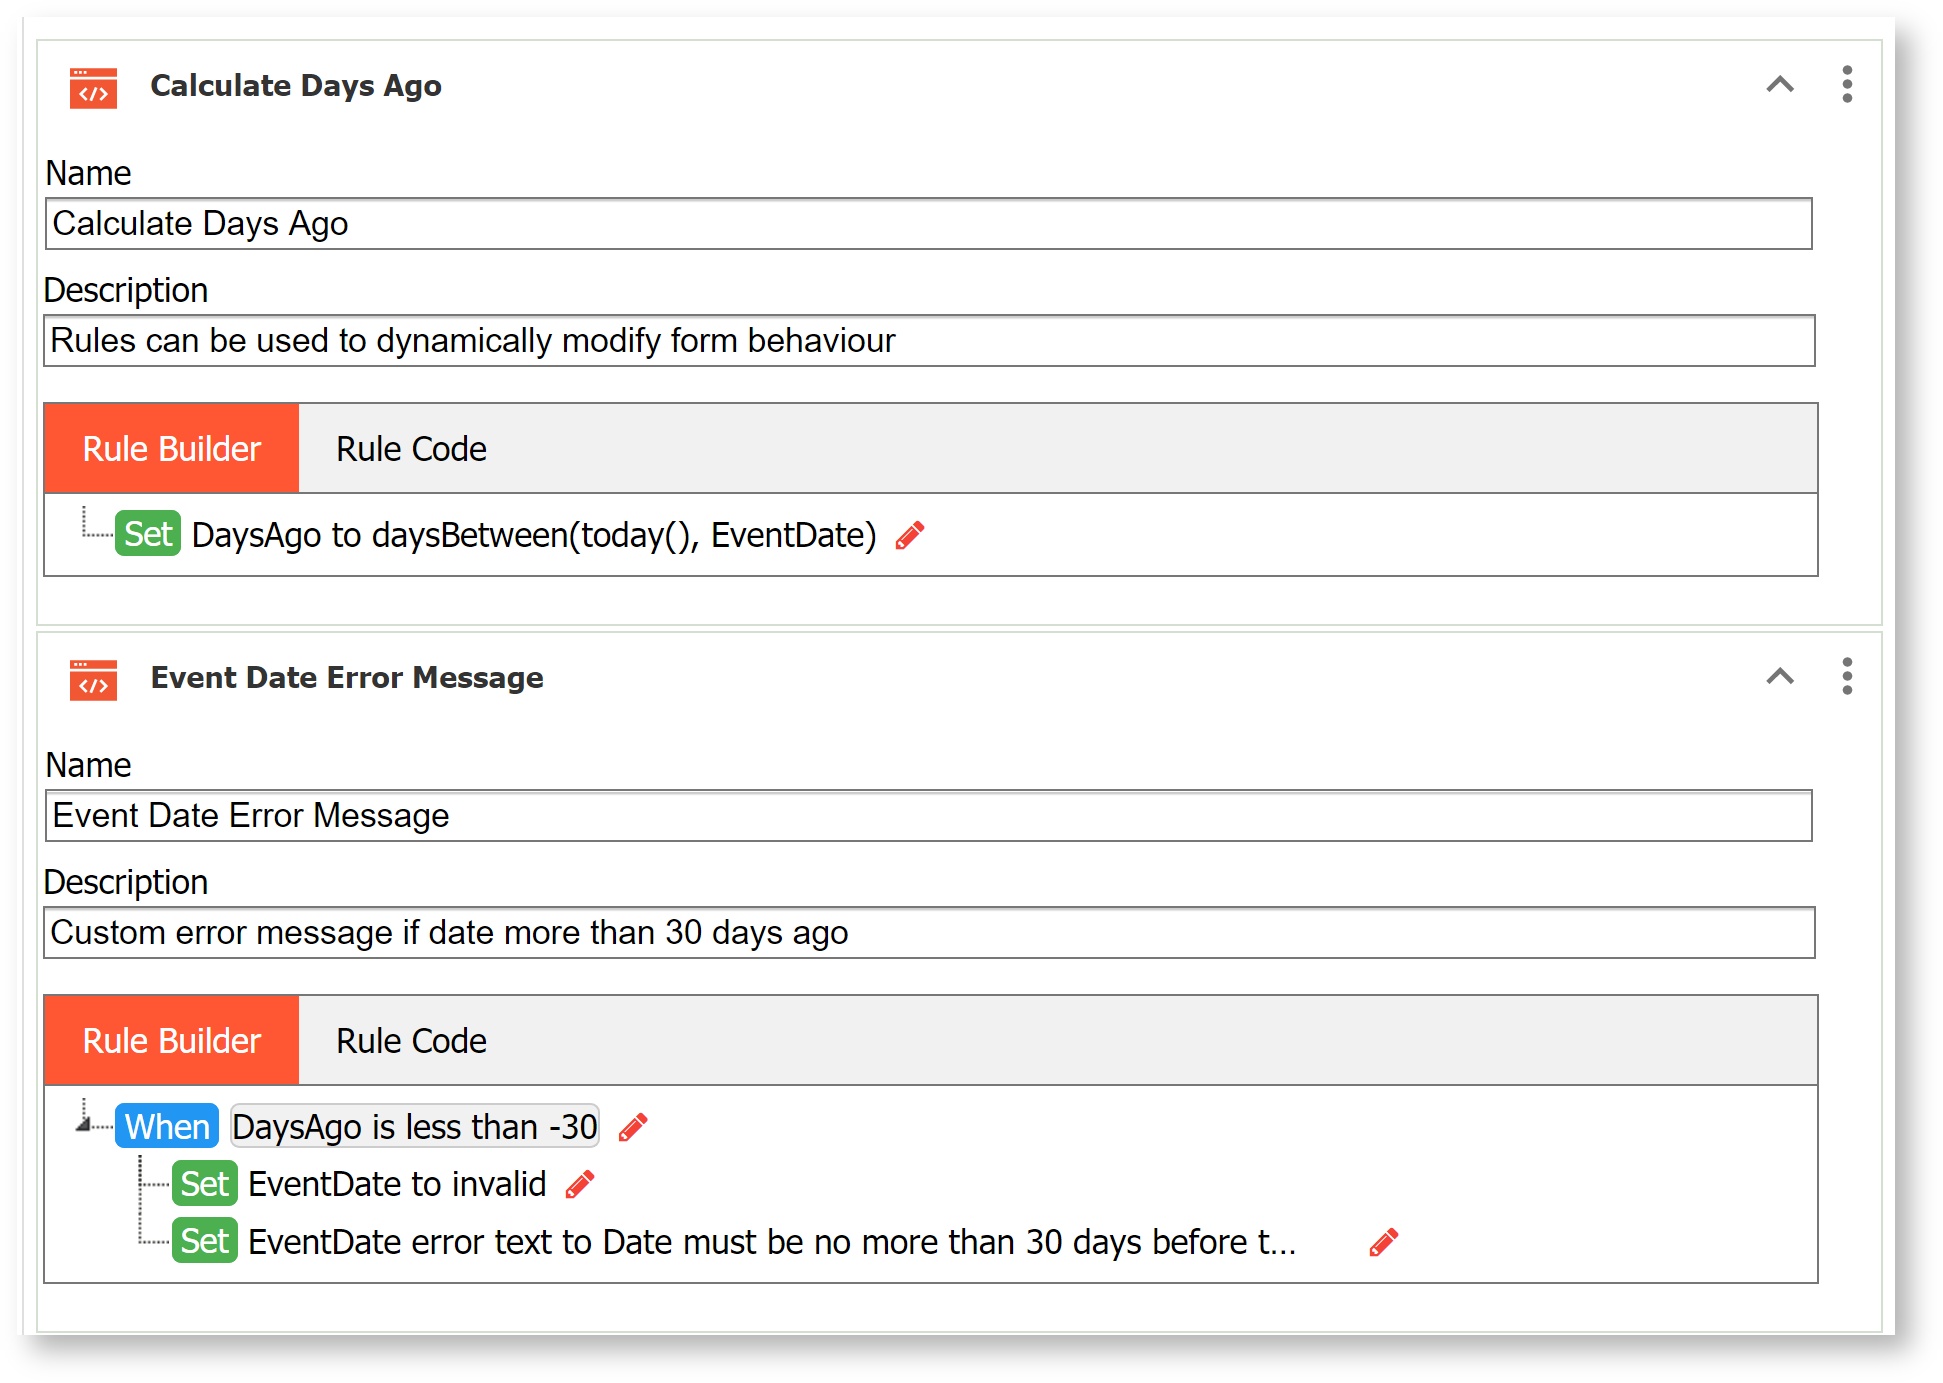
Date no more than 30 days ago
In this example, we want to check that the date entered into a control named EventStartDate is not more then 30 days ago. If the Event Start date is more than 30 days from the current date, we want to display an error message to the user.
The form contains a hidden field named DaysAgo (visible here for demo purposes). 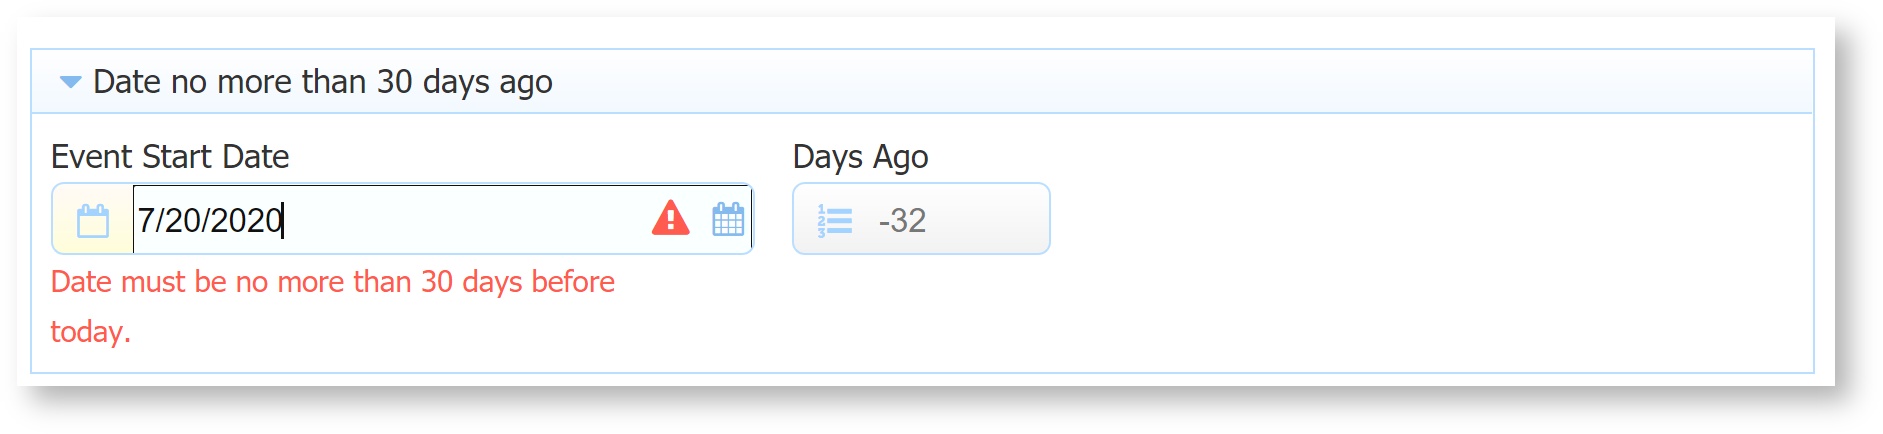
You will need two rules created in the Rule Builder:
...
| Expand | ||
|---|---|---|
| ||
Rule List |
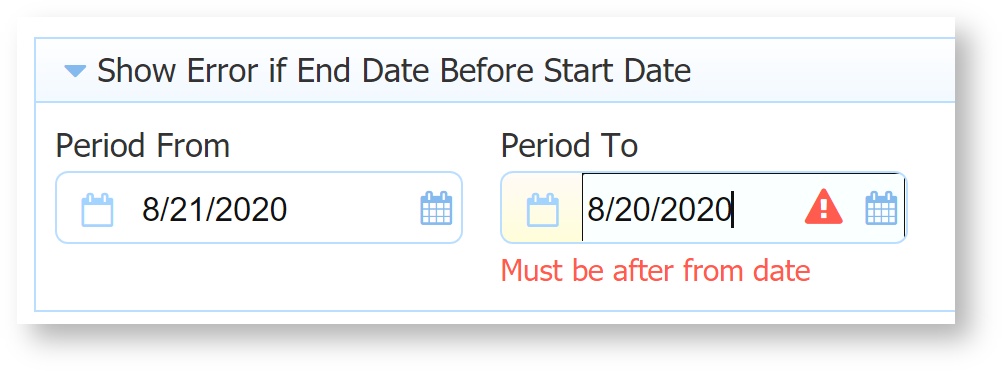
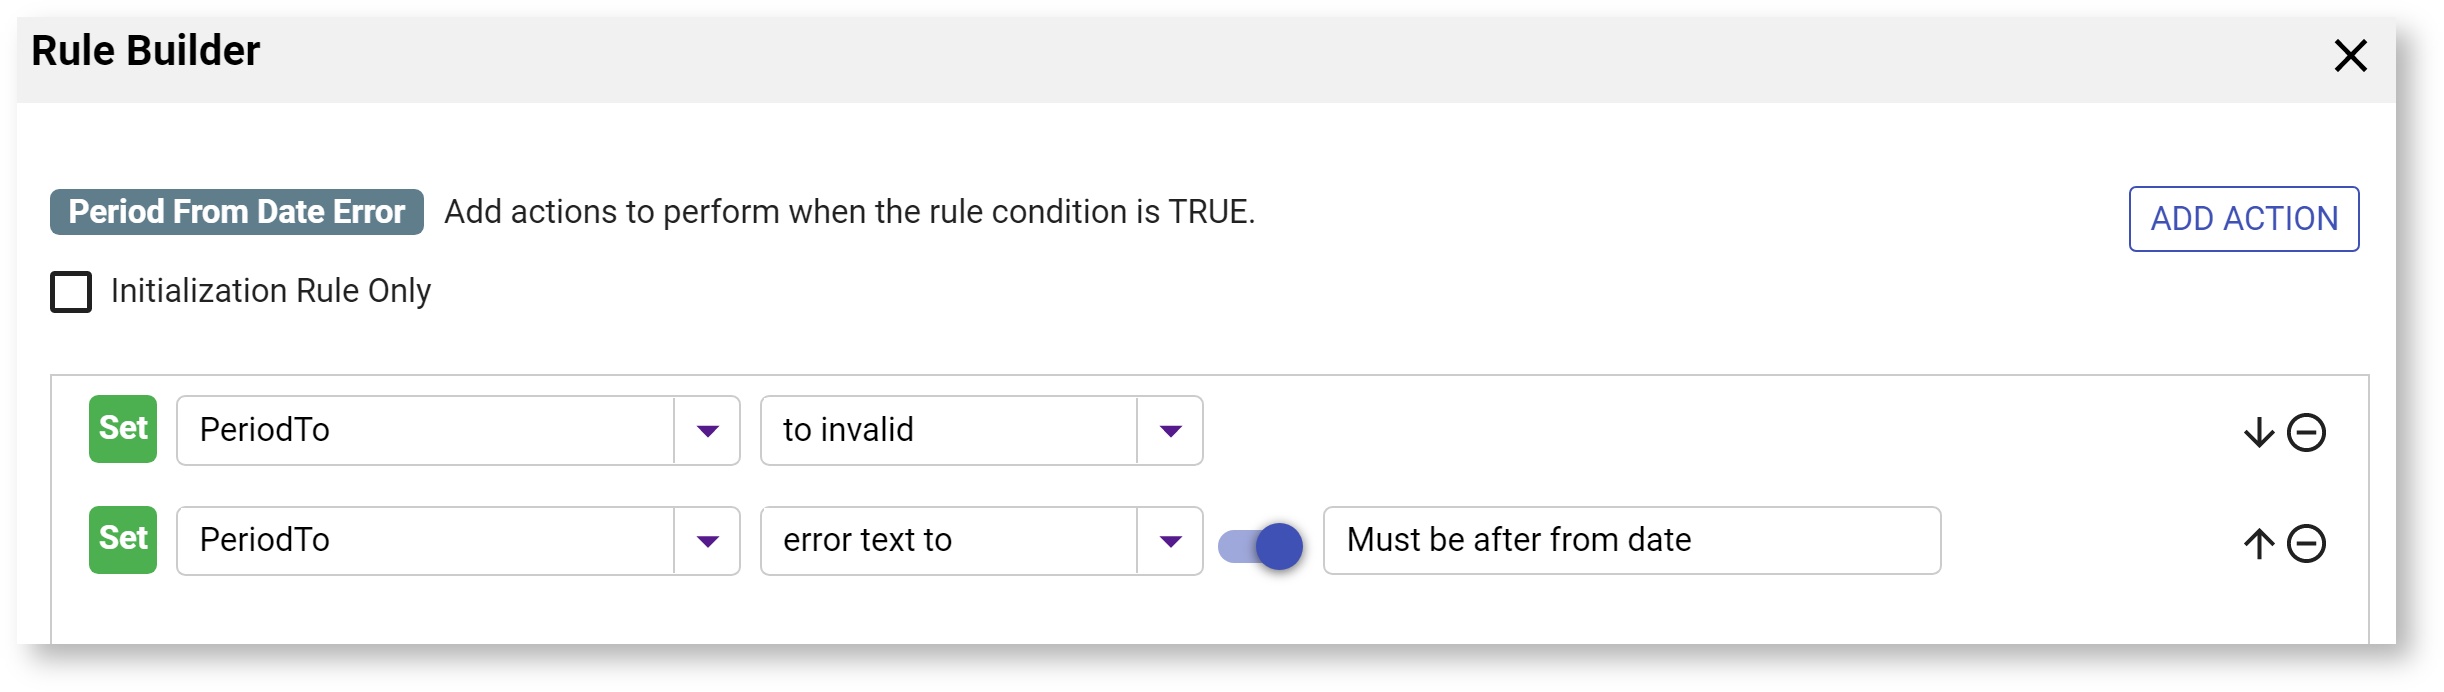
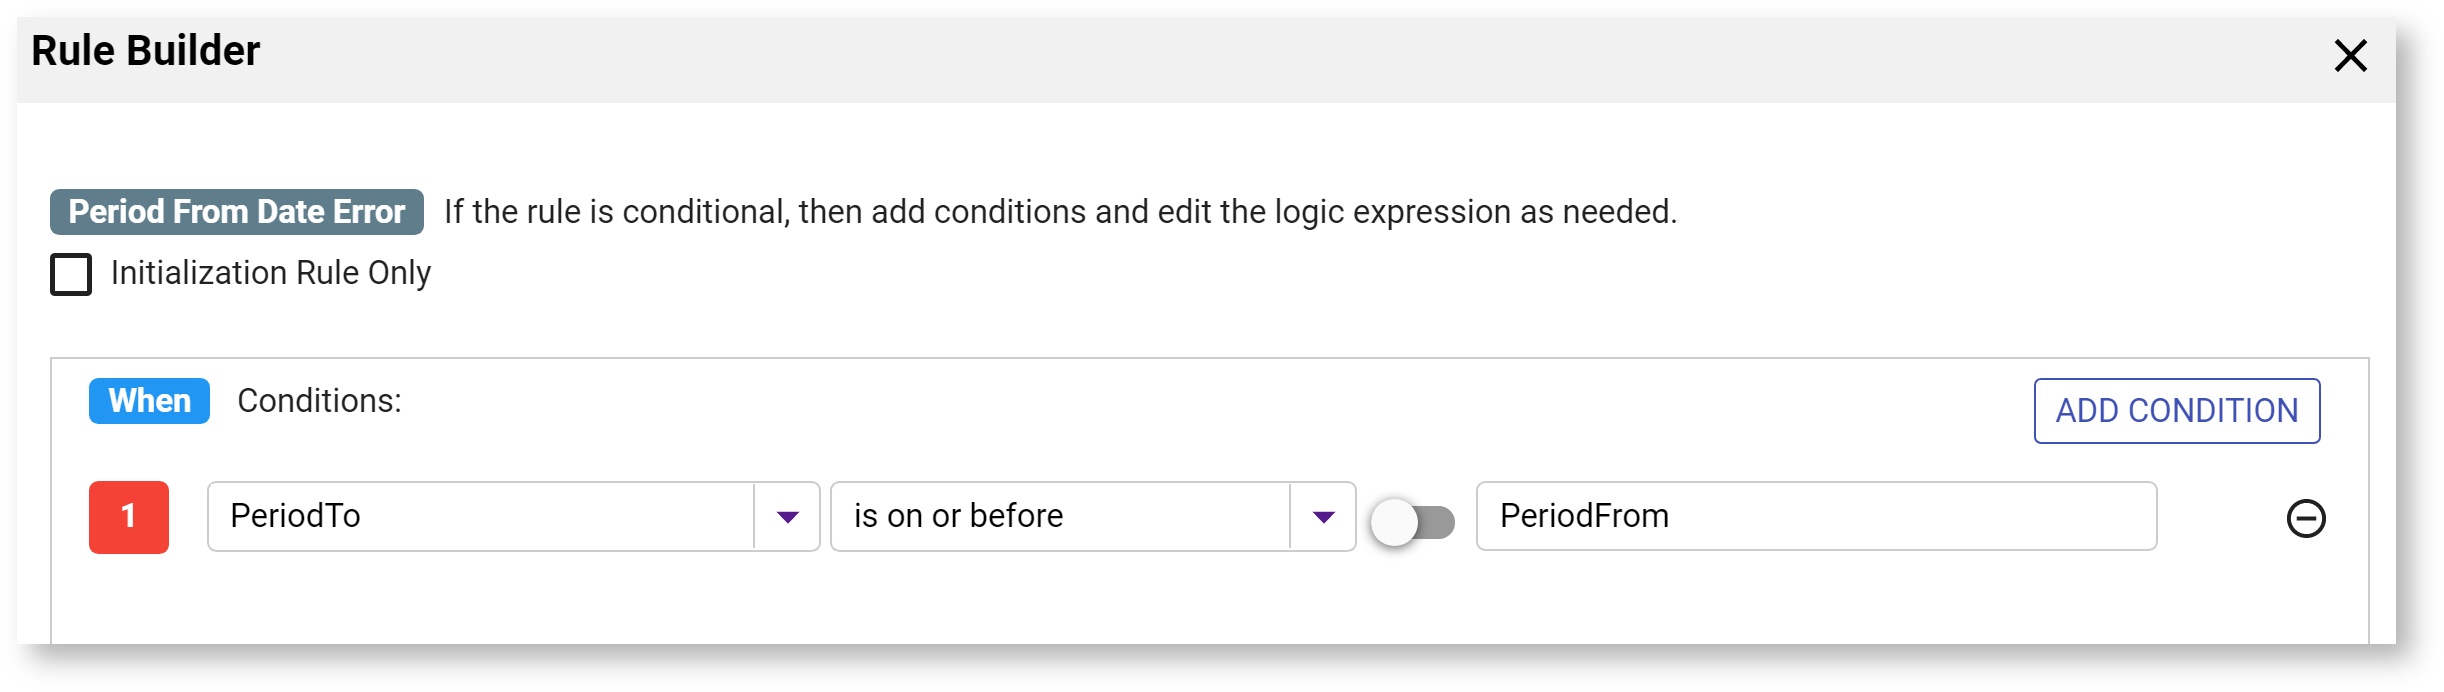
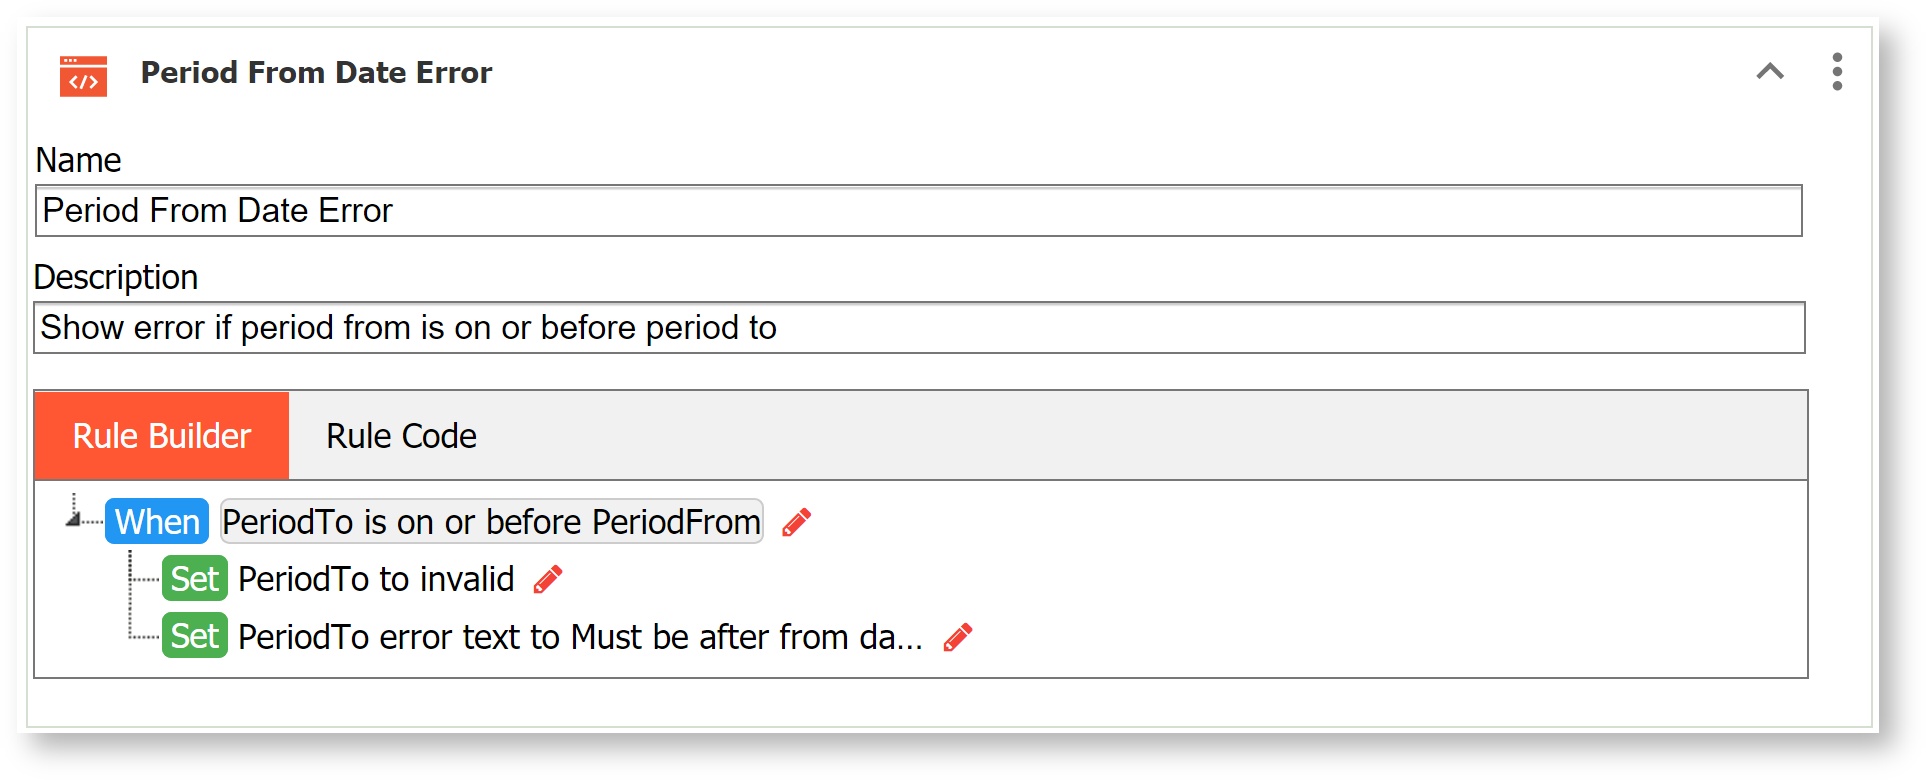
Show Error Message if Date1 is equal to or earlier than Date2
You are designing a weekly Time Sheet that has fields where the user must enter the From and To dates for the reporting period.
...
In this example, the error message displays if the user enters 3/7/2017 or a date before 3/7/2017 in the Period To field:
| Expand | ||||||
|---|---|---|---|---|---|---|
| ||||||
|
Add Years, Months or Days to a Date
This rule is not yet supported in the Visual Rules Builder and thus still requires some JavaScript. Here is a rule that will add 3 years to a given date. For example, to calculate the expiration date of a three year contract by adding three years to the starting date, your form could have two date controls, one used to enter the starting date and the other to show the contract expiration date. This rule will take the date from the StartingDate field, add 3 years to it and populate the result in a field named ExpirationDate.
...
These functions can be used with Date and Date/Time controls.
Setting a Future Date
This rule is not yet supported in the Visual Rules Builder and thus still requires some JavaScript. You can write a rule using the addToDate method to calculate a future date. The example code executes when the form loads. It uses the DateUtil.today() method to populate the control named D1 with the current date. This method returns today's date in the format 'yyyy-mm-dd' instead of 'mm-dd-yyyy', making it compatible with utility methods such as addToDate(). The rule then
- adds one day to the current date to populate the control named D2.
- adds one month to the current date to populate the control named D3.
- adds one year to the current date to populate the control named D4.

| Code Block | ||
|---|---|---|
| ||
if (form.load) {
  var dt = DateUtil.todayISO();
  D1.value = dt;
  D2.value = frevvo.addToDate(dt,'d','1');//add day
  D3.value = frevvo.addToDate(dt,'m','1');//add month
  D4.value = frevvo.addToDate(dt,'y','1');//add year
} |
Calculate a Date based on a five day work week
This rule is not yet supported in the Visual Rules Builder and thus still requires some JavaScript.
Calculating a date based on a five day work week is a common business scenario used in time sheets and displaying deadlines. You can calculate 'x' number of working days from the current date, and set that date in a Date control on your form. Here is the business function/rule that will add 3 working days to the current date to give you the deadline date. Copy/paste the entire rule including the function in the Rule Editor. Substitute the name of your date control for <your date control>:
| Code Block | ||
|---|---|---|
| ||
 function calcWorkingDays(fromDate, days) {
    var count = 0;
    while (count < days) {
        fromDate.setDate(fromDate.getDate() + 1);
      if (fromDate.getDay() !== 0 && fromDate.getDay() !== 6) {  // Skip weekends
            count++;
      }
    }
    return fromDate;
}

if (form.load && <your date control>.value.length === 0){
  var numWorkingDays = 3;
  var today = frevvo.currentDate().split('-');
  var escDate = calcWorkingDays(new Date(today[0], today[1]-1, today[2]), numWorkingDays);
  var m = escDate.getMonth() + 1;
  var d = escDate.getDate();
  var y = escDate.getFullYear();
  <your date control>.value = m + '-' + d + '-' + y;
} |
Central Timezone adjusted for Daylight Savings
This rule is not yet supported in the Visual Rules Builder and thus still requires some JavaScript. This rule adjust today's date in UTC timezone to Central timezone and adjust for daylight savings time. This additional conversion is most commonly needed for online users as the javascript Date() and ' DateUtil.today() both return today's date in UTC timezone.
| Code Block |
|---|
// Converts UTC to either CST or CDT
if (form.load)
{
    var today = new Date();
    var DST = 1; // If today falls outside DST period, 1 extra hr offset
    var Central = 5; // Minimum 5 hr offset from UTC
    // Is it Daylight Savings Time?
    //
    var yr = today.getFullYear();
    // 2nd Sunday in March can't occur after the 14th
    var dst_start = new Date("March 14, "+yr+" 02:00:00");
    // 1st Sunday in November can't occur after the 7th
    var dst_end = new Date("November 07, "+yr+" 02:00:00");
    var day = dst_start.getDay(); // day of week of 14th
    // Calculate 2nd Sunday in March of this year
    dst_start.setDate(14-day); day = dst_end.getDay(); // day of the week of 7th
    // Calculate first Sunday in November of this year dst_end.setDate(7-day);
    // Does today fall inside of DST period?
    if (today >= dst_start && today < dst_end) { DST = 0;
}

    // Adjust Date for Central Timezone
    today.setHours(today.getHours() - Central - DST);

    var m = today.getMonth() + 1;
    var d = today.getDate();
    var da = today.getDay();
    var y = today.getFullYear();
    var h = today.getHours();
    var min = today.getMinutes();
    if (min < 10) { min = '0' + min;}
    var timezone = ['CDT', 'CST'];
    var dom = ['Sunday', 'Monday', 'Tuesday', 'Wednesday',
               'Thursday', 'Friday', 'Saturday'];
    var todayStr = dom[da] + ' ' + m + '-' + d + '-' + y + ' ' + h + ':' + min + ' ' + timezone[DST];

    DateTime.value = todayStr;
} |
Hours >= 4 and <= 6 Apart
This rule is not yet supported in the Visual Rules Builder and thus still requires some JavaScript. This rule makes sure the end time is at least 4 hours greater then the start time but no more then 6 hours later then the start time.
| Code Block |
|---|
var event = form.load;
var sTime = null;
var eTime = null;
var millisDiff = 0;
if (TS.value && TE.value) {
   sTime = new Date('1970-01-01T'+TS.value);
   eTime = new Date('1970-01-01T'+TE.value);
   millisDiff = eTime.getTime() - sTime.getTime();
  if (millisDiff < 4*3600*1000 || millisDiff > 6*3600*1000) {
     TE.valid = false;
  } else {
     TE.valid = true;
  }
} |

Calculate a Return Time
...
| Note |
|---|
Use this example only when you want to add whole number hours. Adding a decimal value for the time interval (such as 7.5) will not work. |
Displaying Dates in Message Controls
This rule is not yet supported in the Visual Rules Builder and thus still requires some JavaScript. Irrespective of your date control's Date Format, the server stores that value in a canonical yyyy-dd-mm format. Thus the Date Format affects only the format the user sees while using the form and not the actual stored value. The canonical format is also what you will see in your form's submission XML. When you want to use a date control's value in a message control you will need to convert the canonical date format to your desired display format. This rule writes the date control named datefield into a message control named Msg using the format dd/mm/yyyy.
...
| Code Block |
|---|
var date = datefield.value.split('-');
var dateStr = date[1] + '/' + date[2] + '/' + date[0] ;
Msg.value = "I selected the date: " + dateStr; |
Checking a Date for Extra Digits
This rule is not yet supported in the Visual Rules Builder and thus still requires some JavaScript. This rule uses the valid property to verify that the entered date does not contain extra digits. For example, if a user enters a date with a 6 digit year (1/2/201717) into a control named StartDate, the customized error message displays.
| Code Block | ||
|---|---|---|
| ||
if (StartDate.value.length > 10) {
  StartDate.valid = false;
  StartDate.status = 'Invalid. Please check that the date is entered in the mm-dd-yyyy format';
} else {
  StartDate.valid = true;
} |
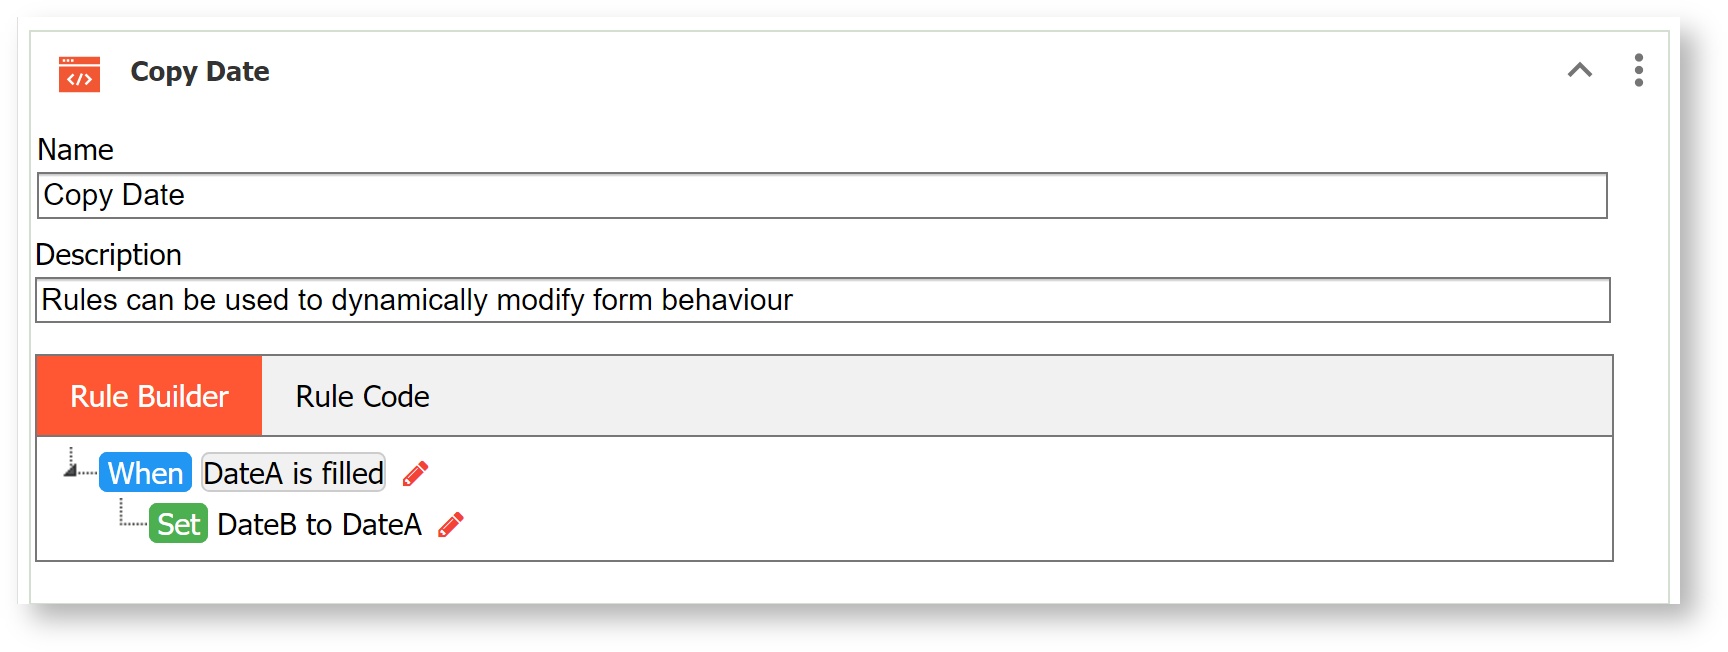
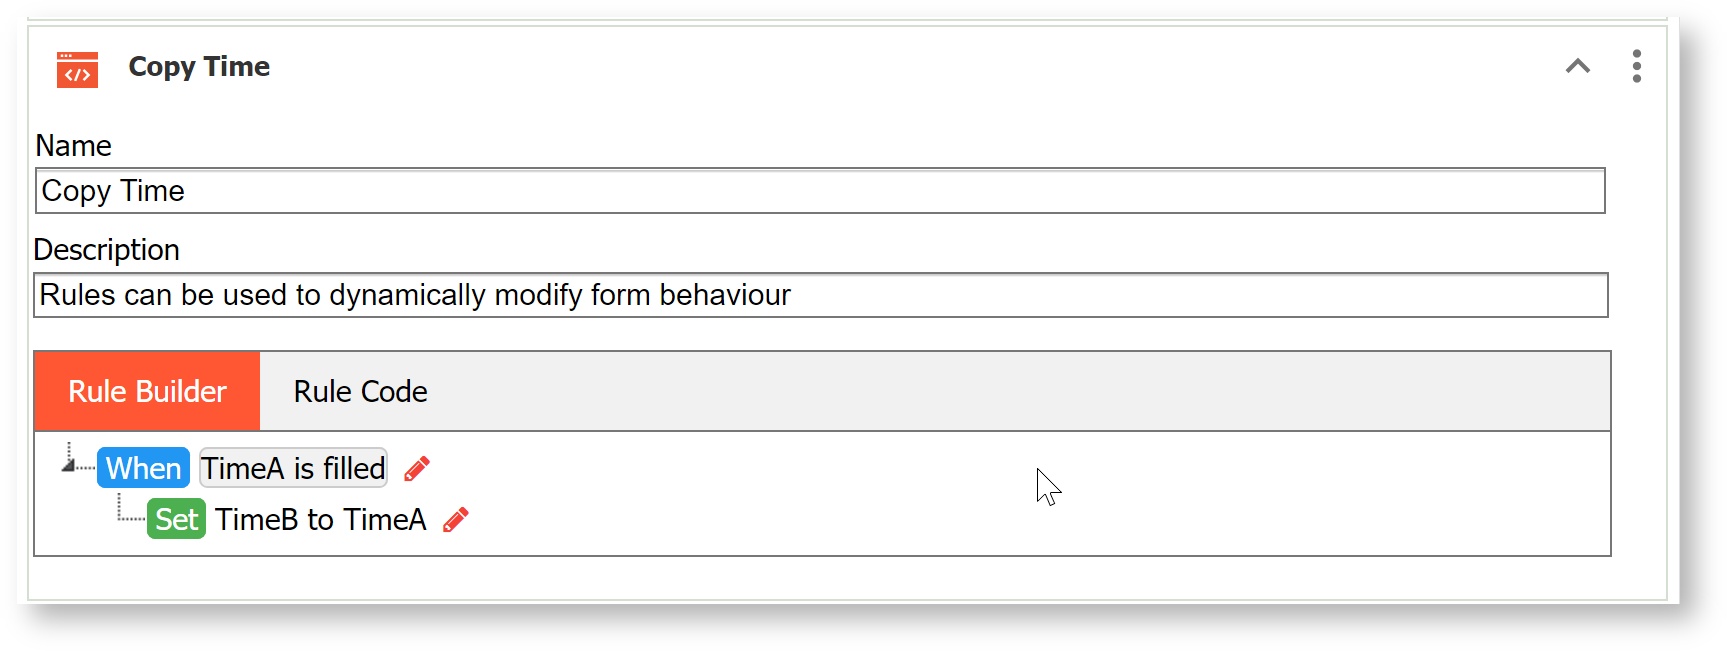
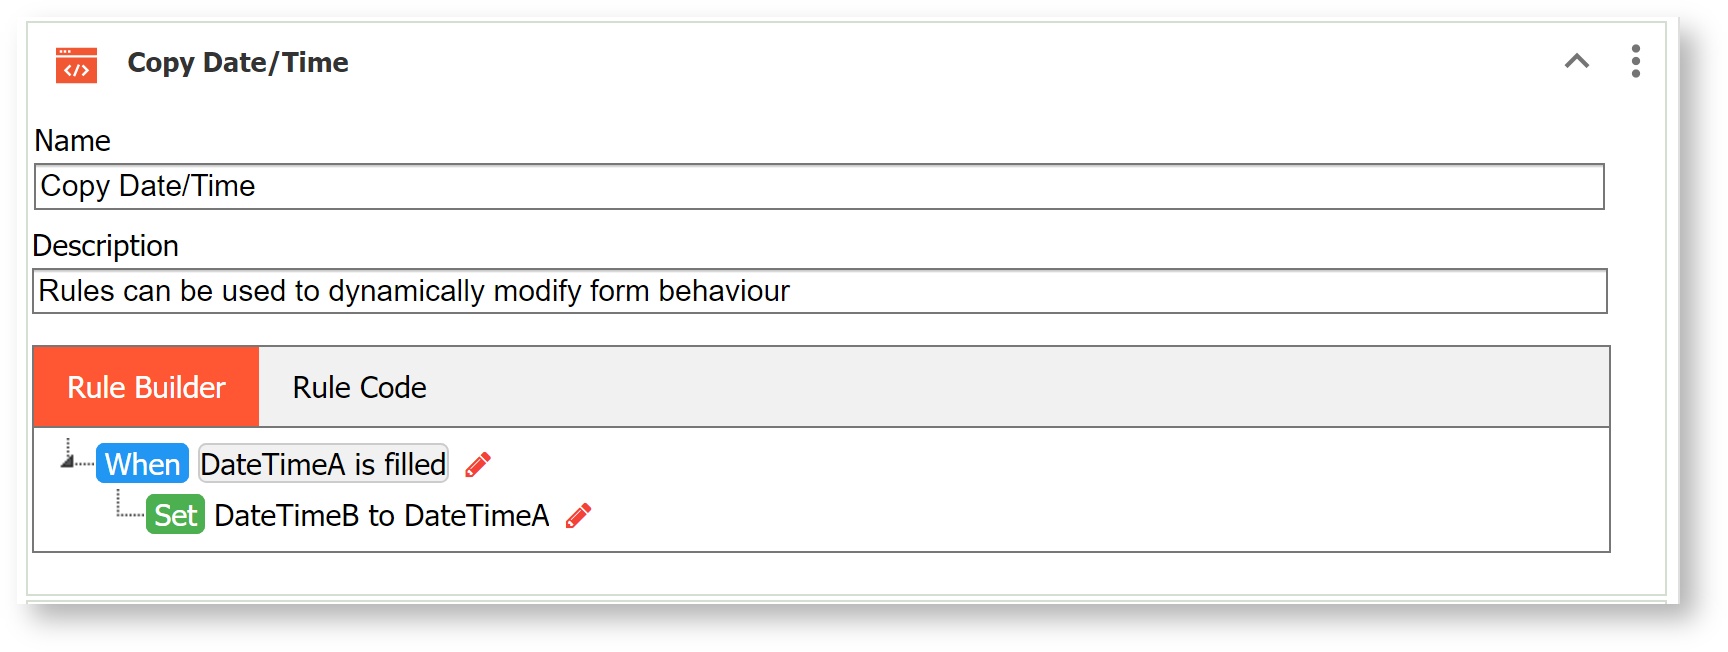
Copy Date, Time and DateTime Values
The date control can be set to either just a date, just a time, or a combined date/time. Using the Rule Builder you can copy values from these fields to other controls in your forms/workflows.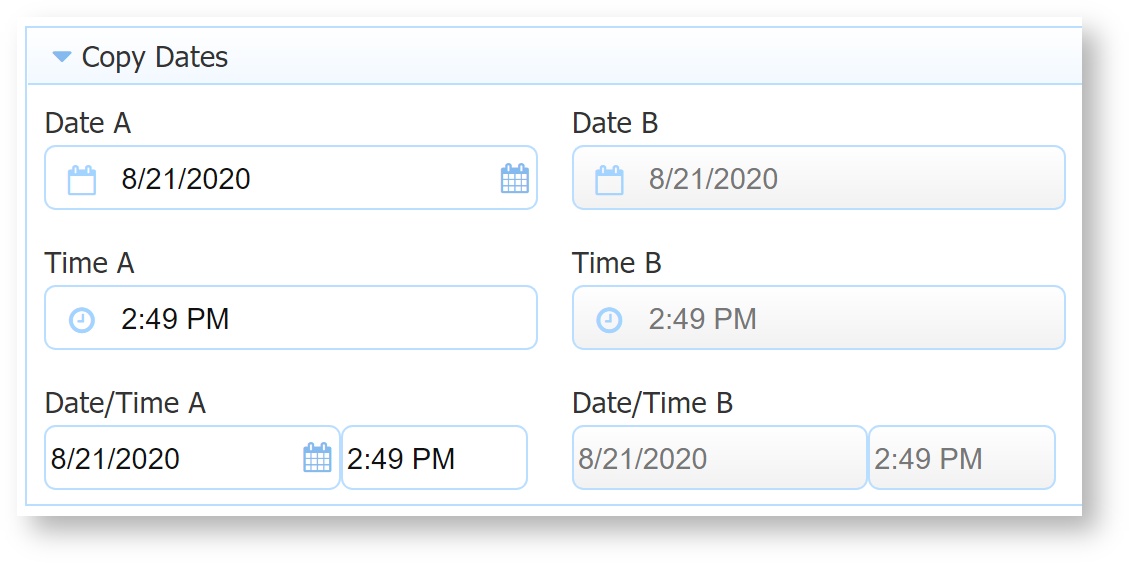
| Expand | ||
|---|---|---|
| ||
|
Tenants, Roles, Users
have several built-in methods that enable you to access information about your current tenant. Some common examples are:
...
Displaying lists of roles for selected users and populating Dropdowns with lists of users/roles still require Javacript - use the built-in methods. Some of these methods return a boolean true/false value. Others return a JSON string that is automatically converted to a JavaScript object.
Here are some samples:
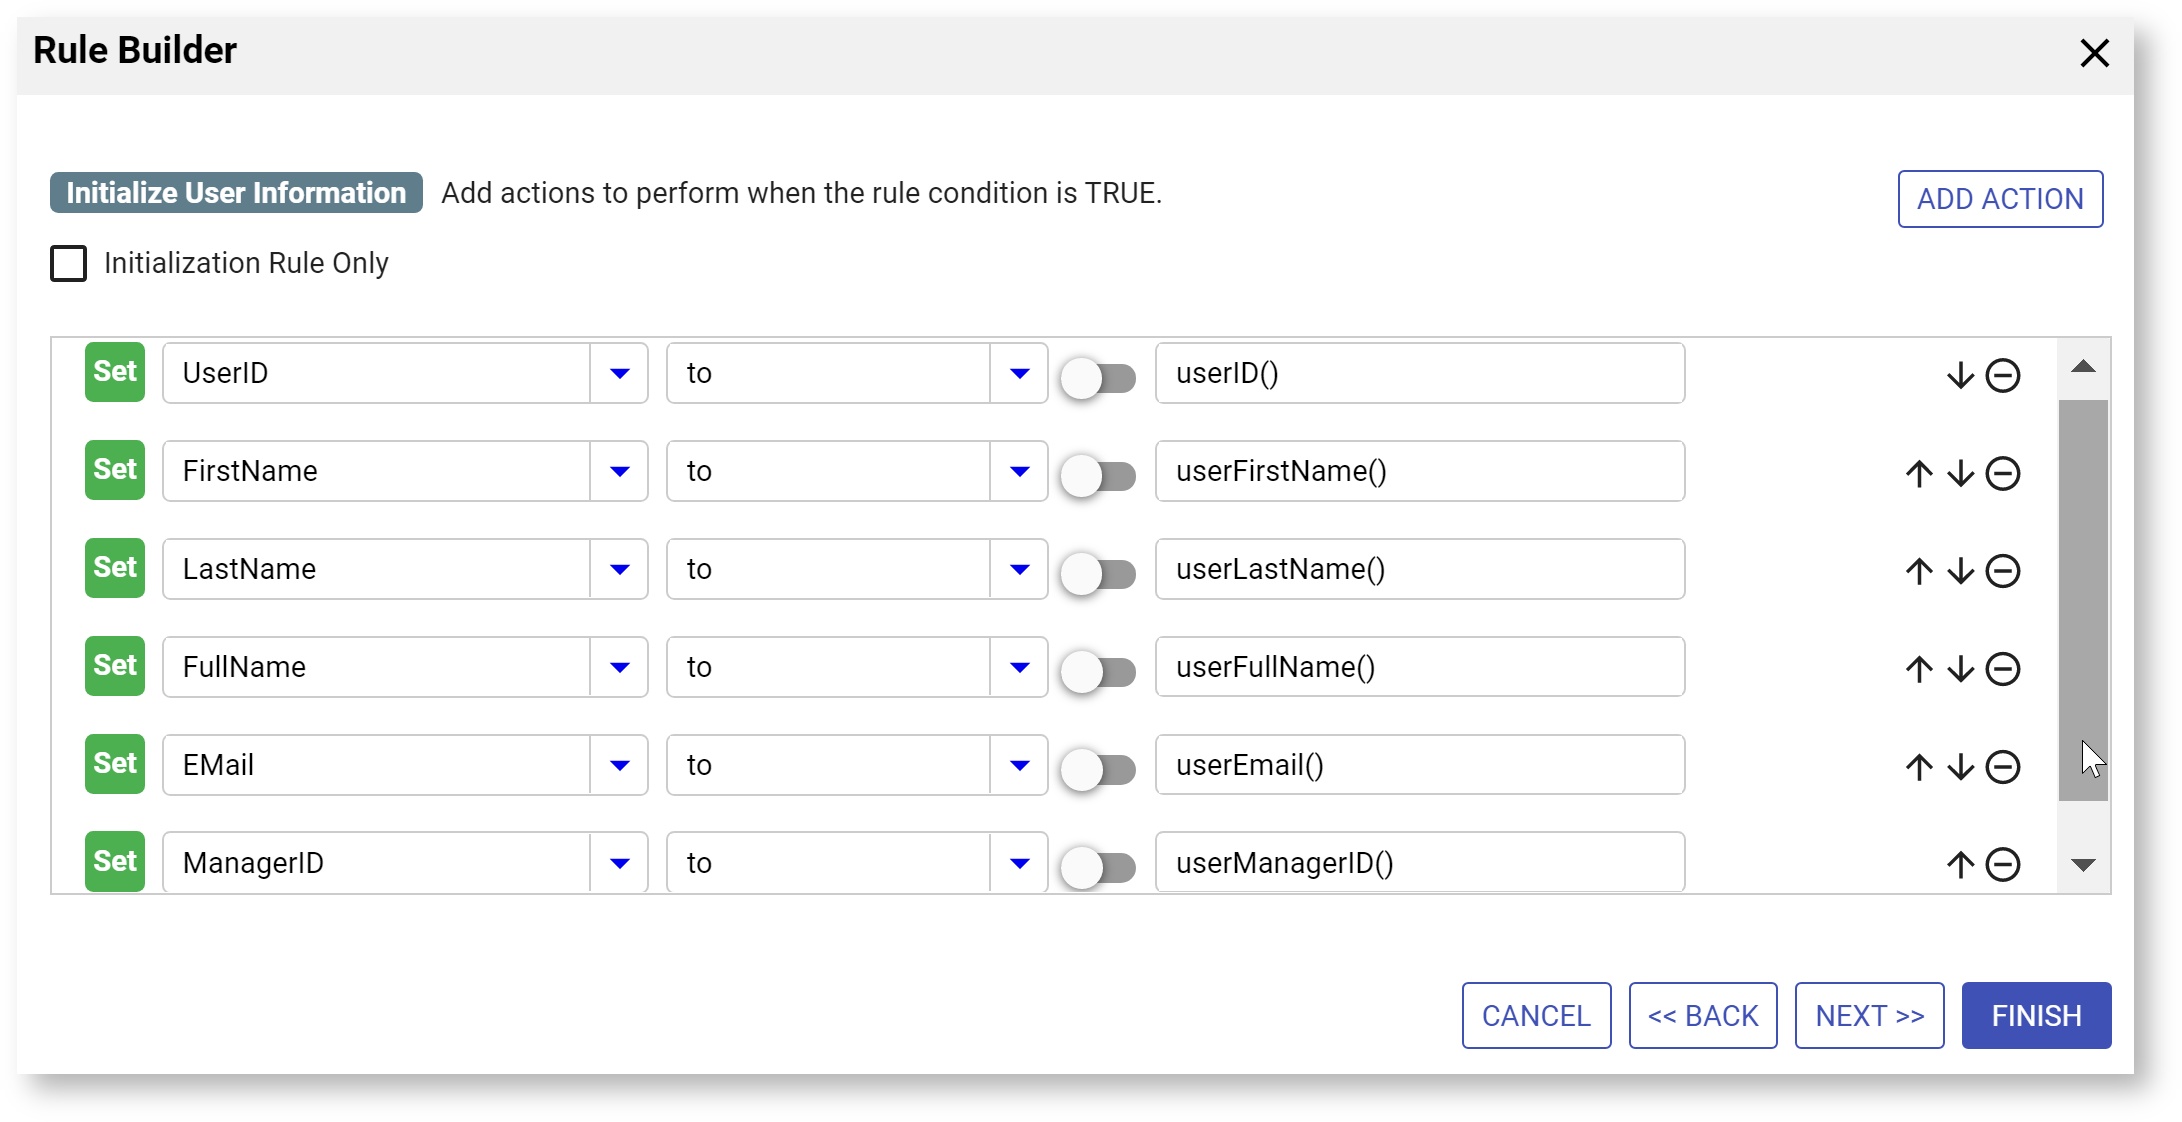
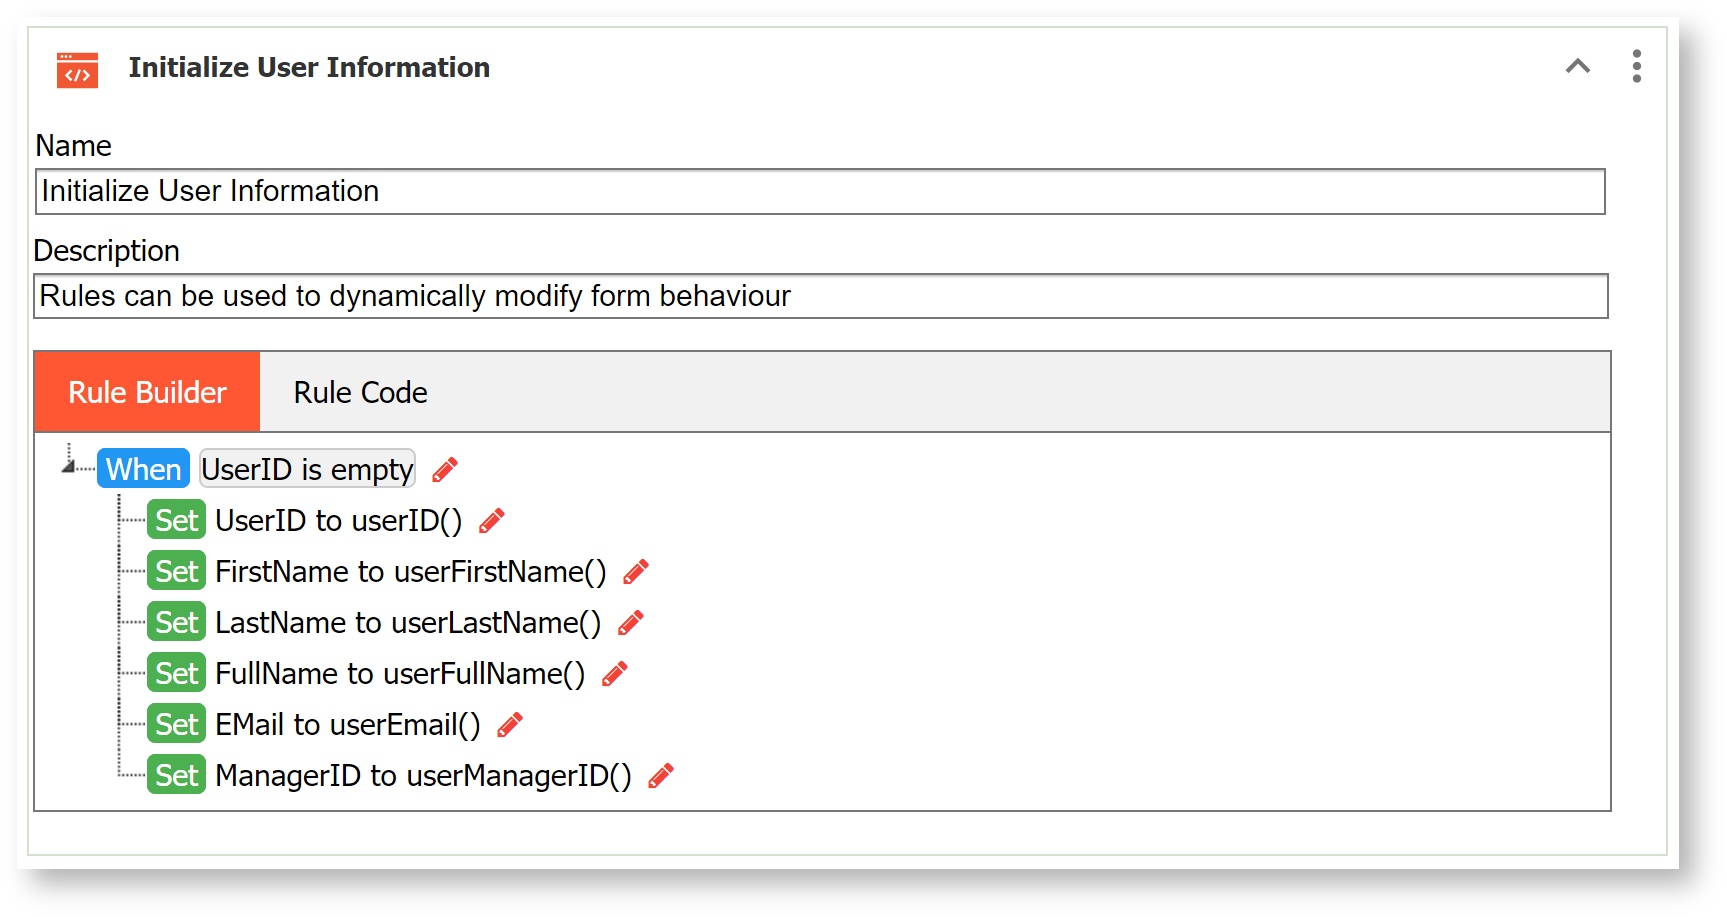
Initialize fields with logged in user information
Prefilling form controls with the user's info can save your user time and prevent data entry errors. Use the Rule Builder functions to create this rule - userID(), user FirstName(), userLastname(), userFullName(), userEmail(), and userManagerID(). When the form loads, fields are populated with the logged in user information.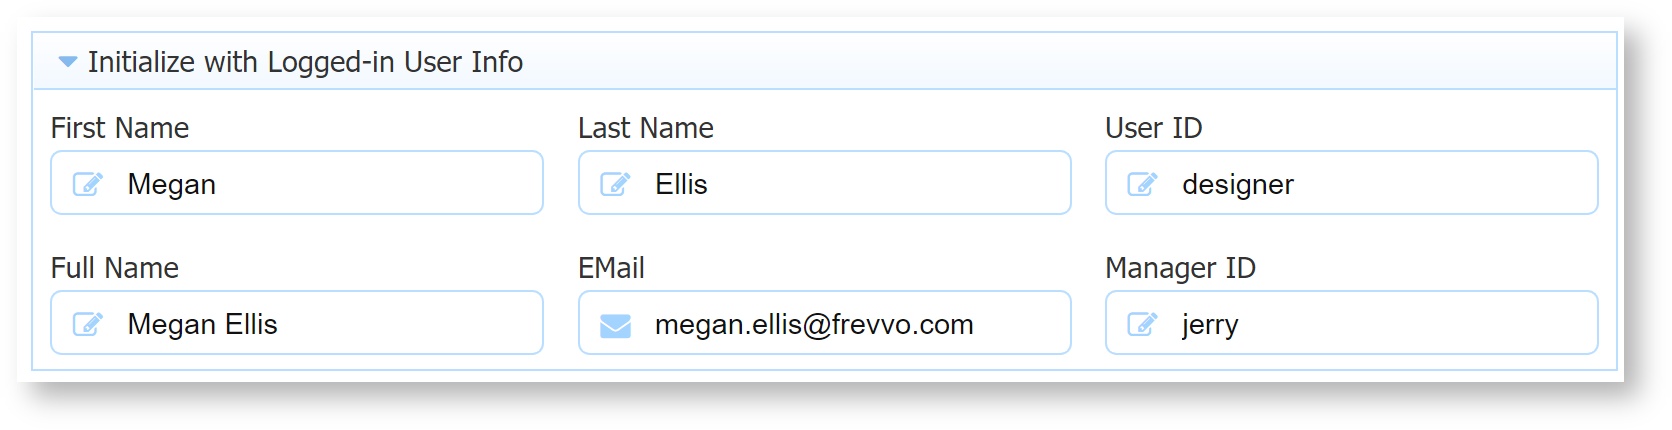
| Expand | ||||||
|---|---|---|---|---|---|---|
| ||||||
|
| Info |
|---|
Please see this documentation if initializing user data in a workflow with linked steps. |
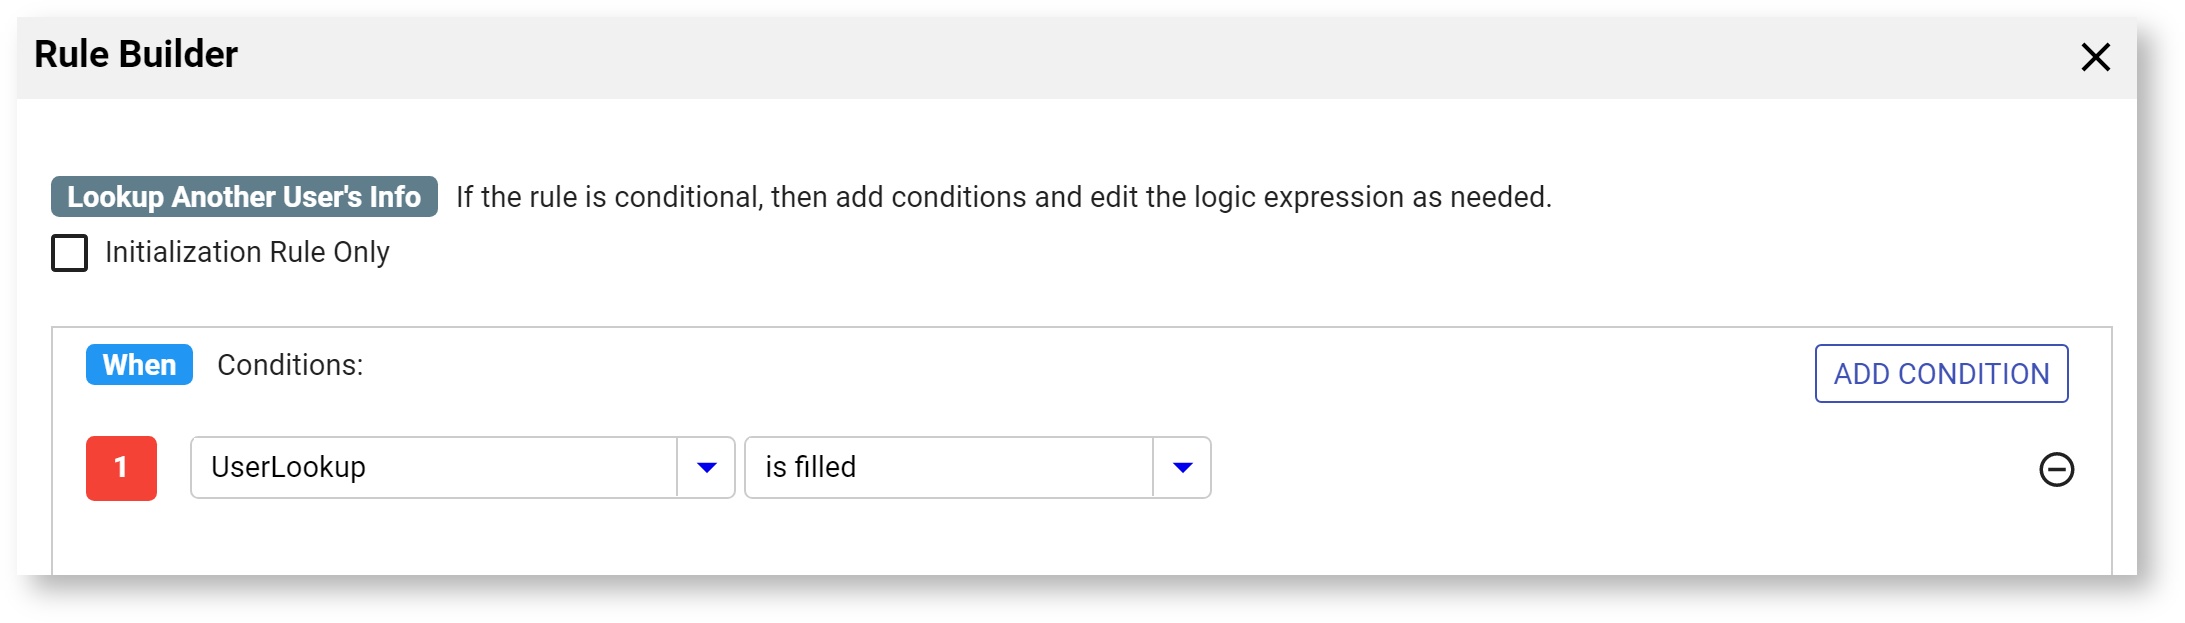
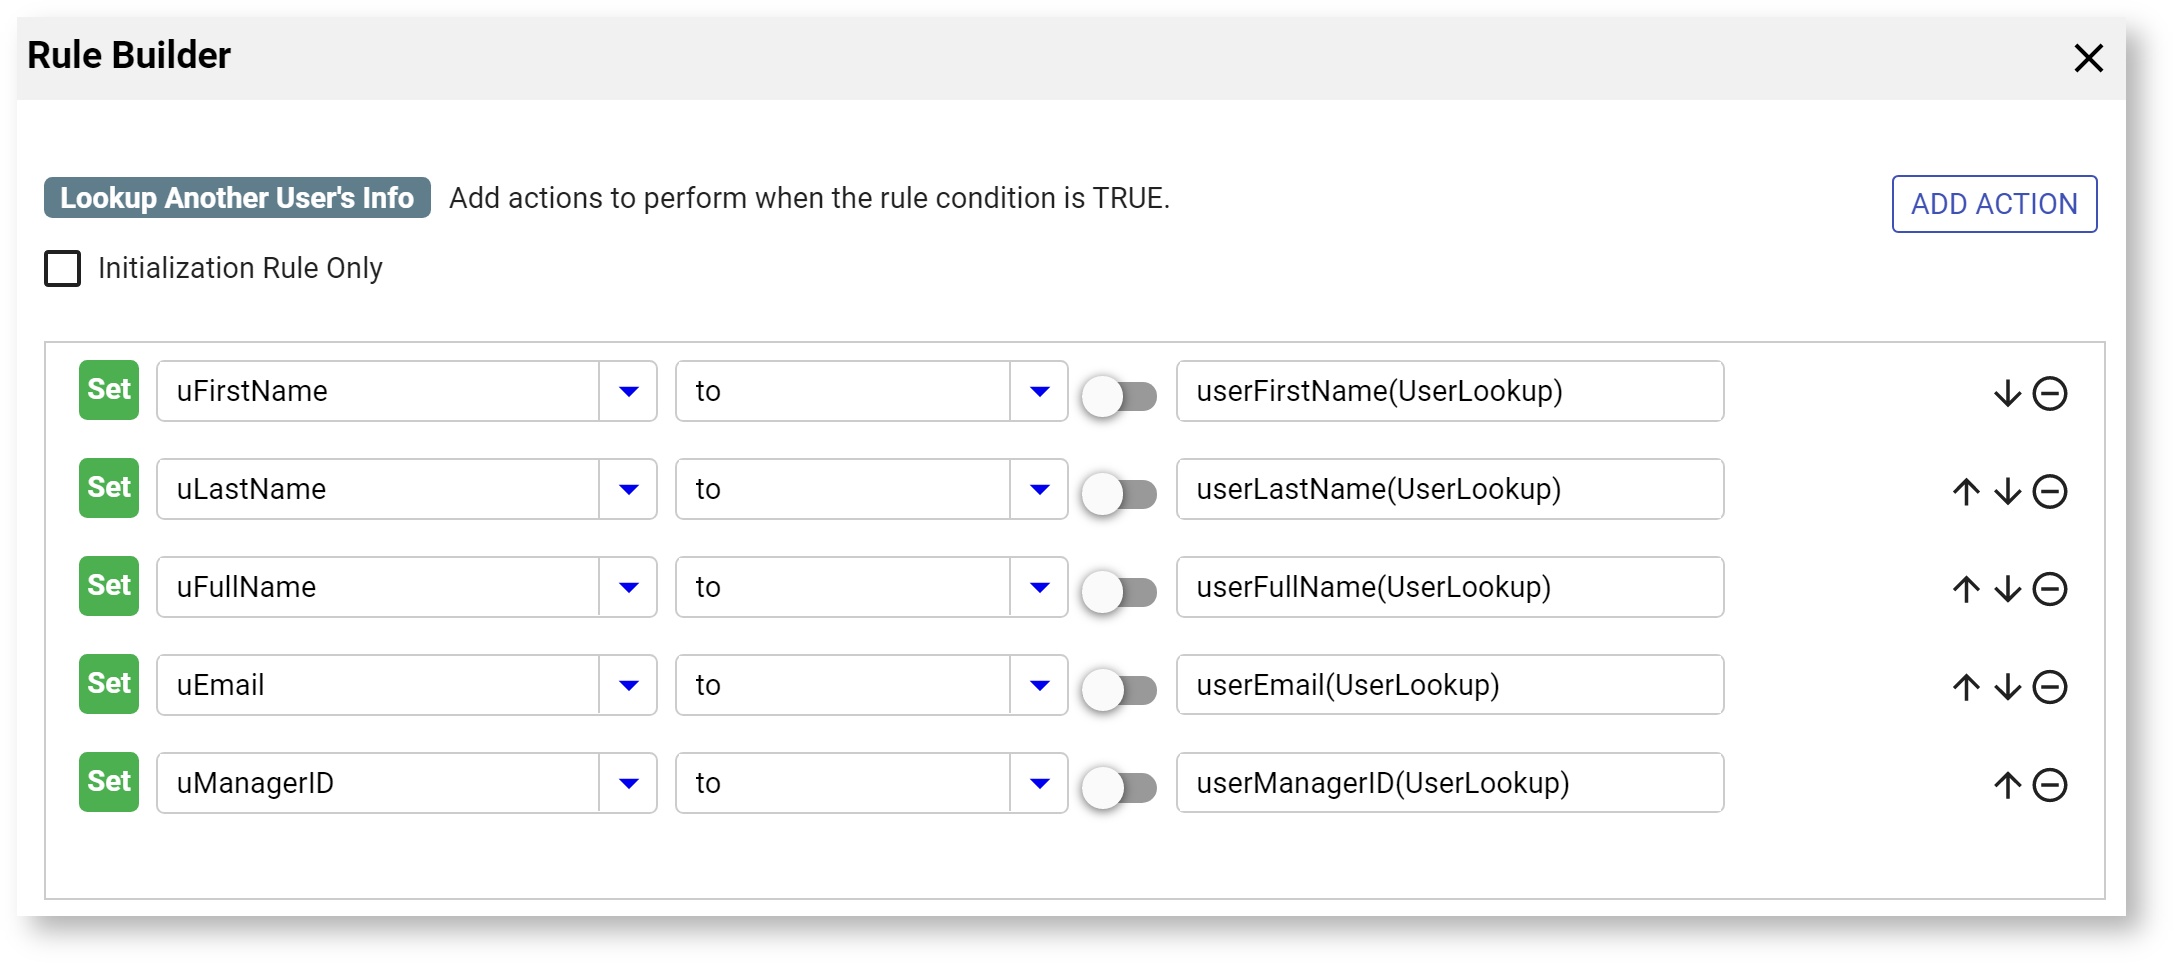
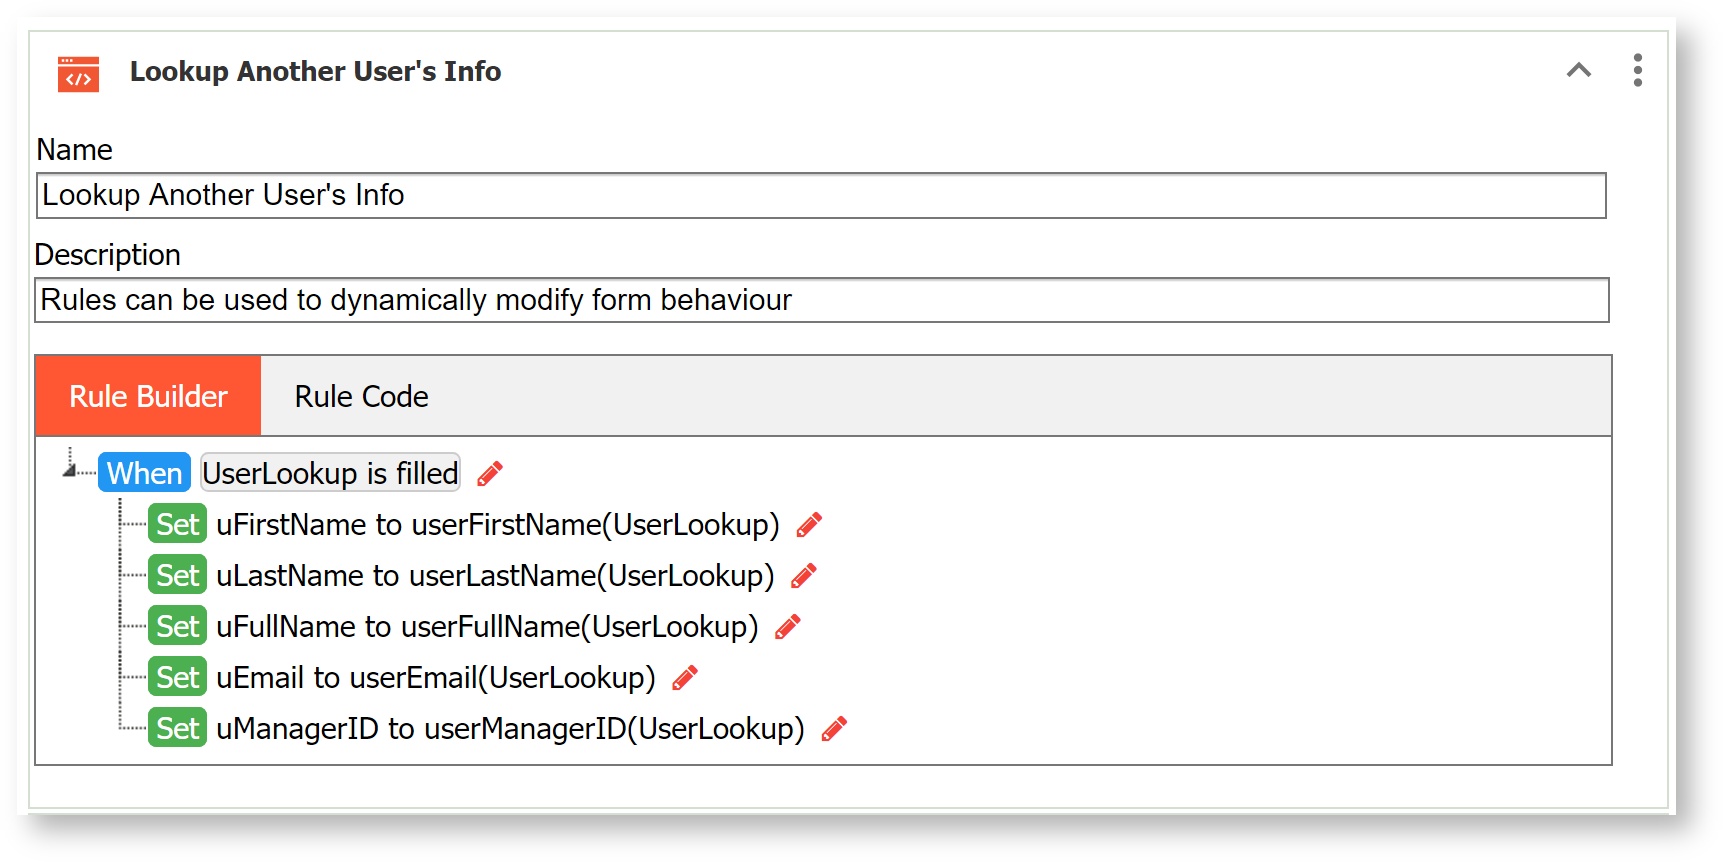
Populate Form Fields with User Details for Another user
In this example, a user id is entered into the User Id field. This field is a text control in the form named UserLookup. When the user enters a user id into the UserLookup field, the uFirstName, uLastName, uFullName, uEmail and uManagerID are populated with the information about that user.
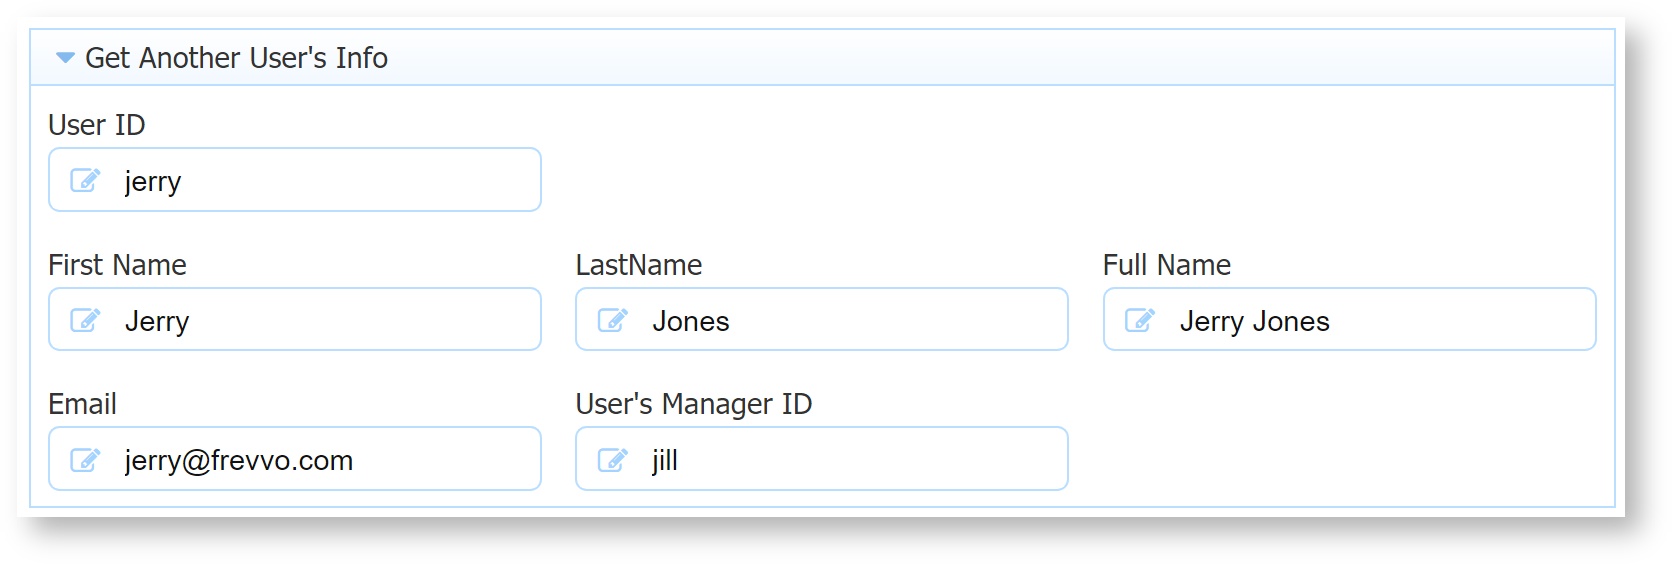
Reference the User Id input field in the user functions in the Rule Builder.
| Expand | ||||||||||||
|---|---|---|---|---|---|---|---|---|---|---|---|---|
| ||||||||||||
|
| Info |
|---|
The UserDetail function can also be used to retrieve individual information fields for the currently logged in user. These fields can either be one of the standard fields or a custom attribute configured using the LDAP Security Manager. The standard properties are 'id', 'first.name', 'last.name', 'email' and 'reports.to'. 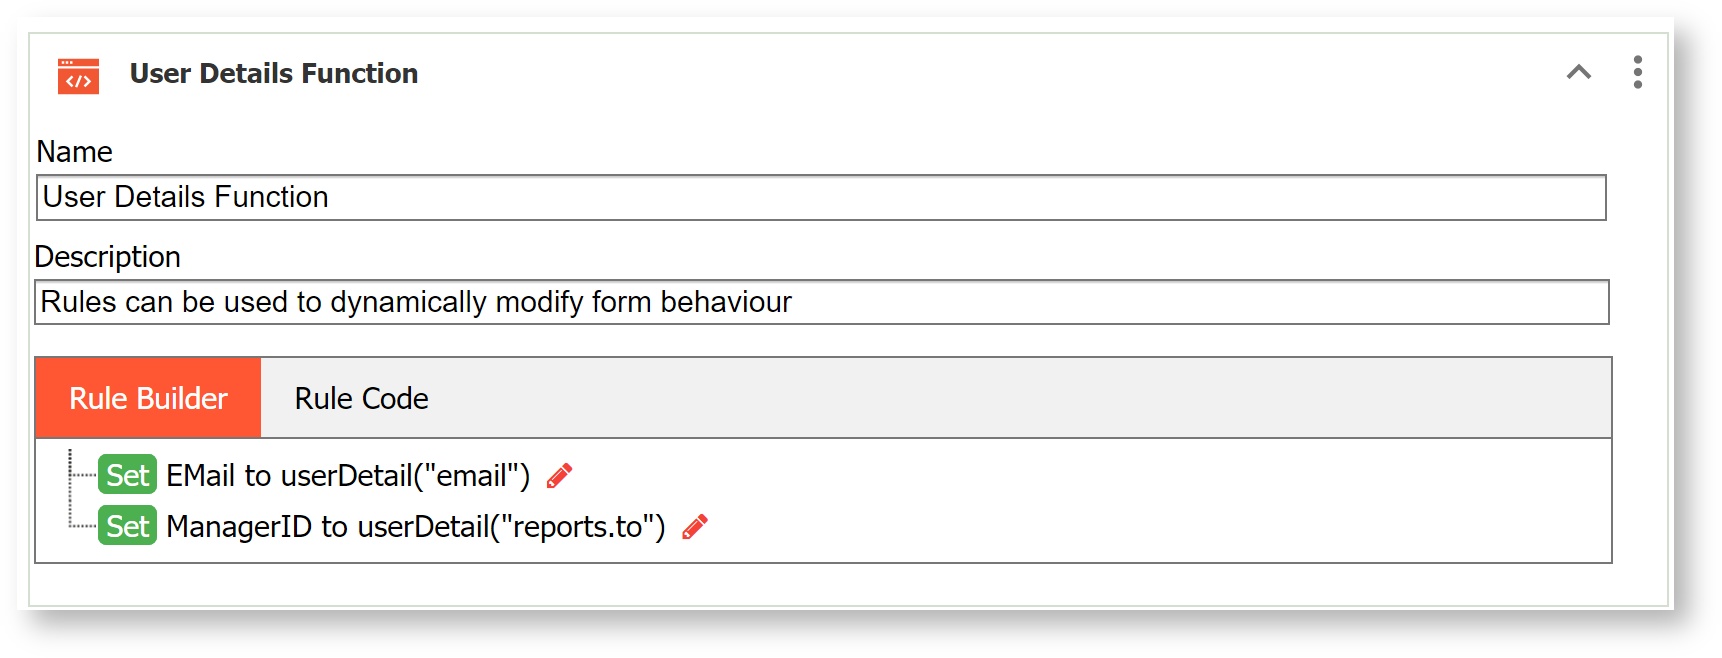 |
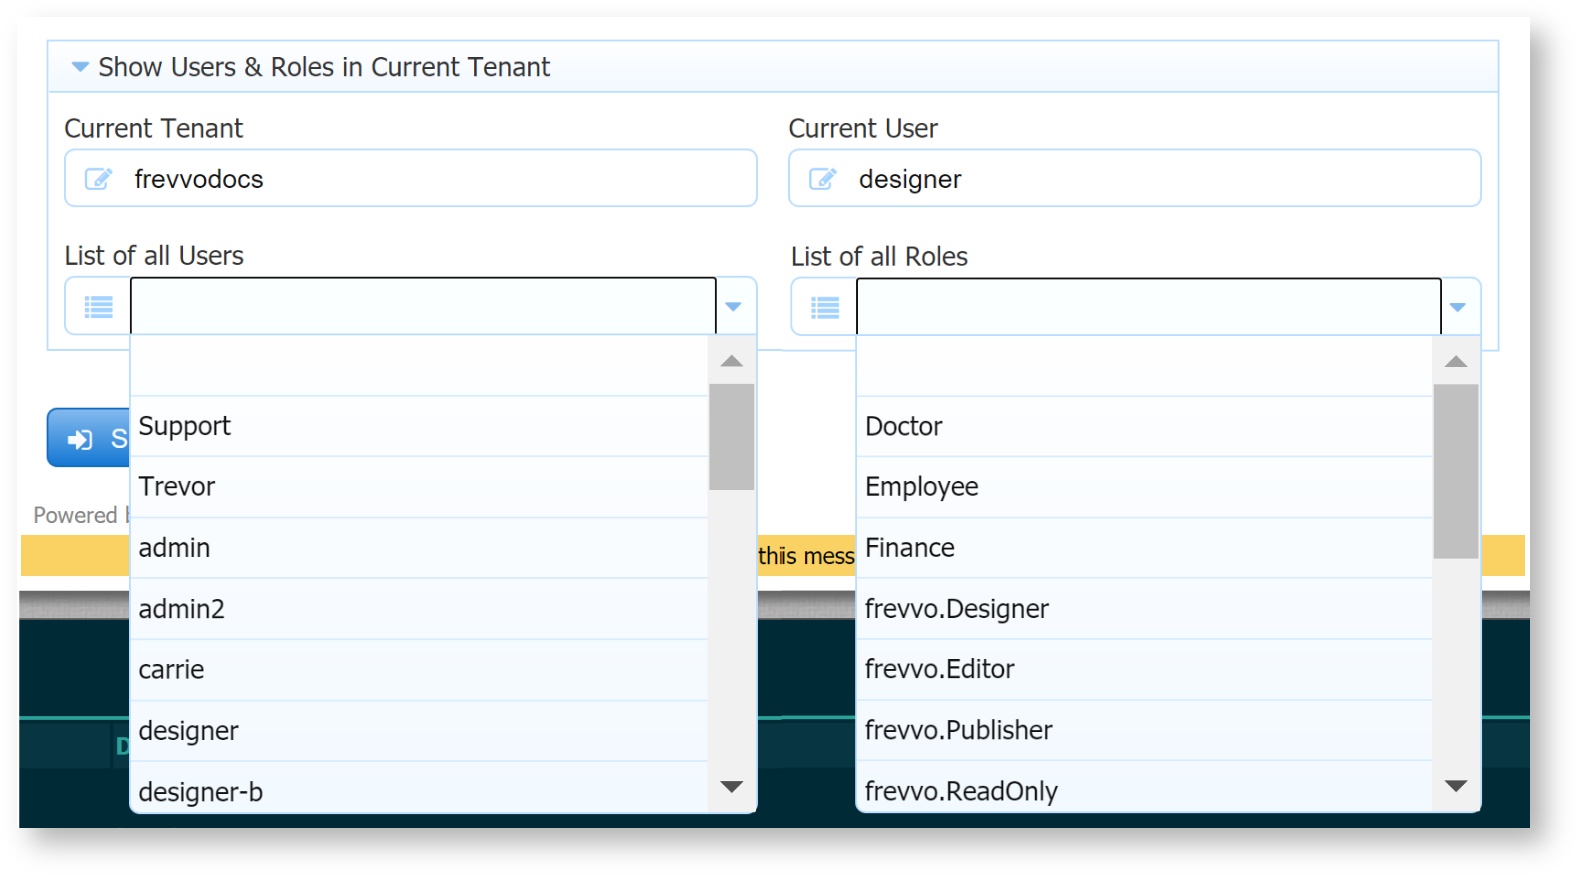
Populate Dropdowns with all Users/Roles in the Current Tenant
This rule is not yet supported in the Visual Rules Builder and thus still requires some JavaScript. This rule populates the following controls when the form loads:
...
Leave the default options for the dropdown controls in the designer.
| Section | |||||||||||||||
|---|---|---|---|---|---|---|---|---|---|---|---|---|---|---|---|
|
| Tip |
|---|
Populating the options of a ComboBox control with lists of users/roles can be done without writing JavaScript rules. See Dynamic Options feature to populate a ComboBox for details. |
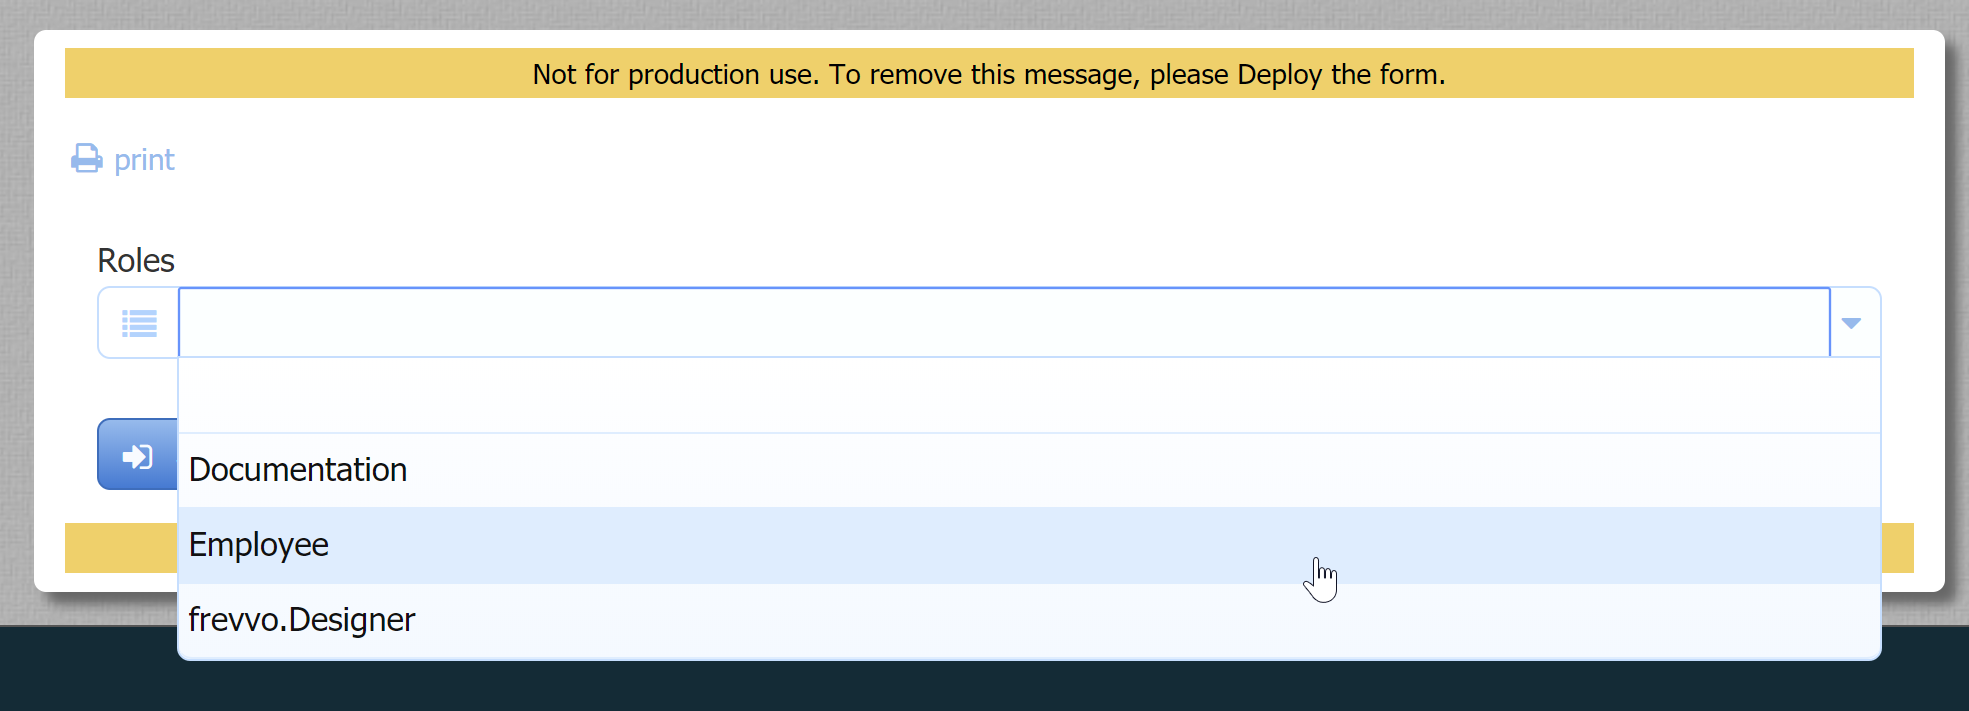
Populate Dropdown with All Roles Assigned to Specific User
This rule is not yet supported in the Visual Rules Builder and thus still requires some JavaScript. It can be used to populate a dropdown with the roles assigned to a specific user.
| Code Block |
|---|
var event = form.load;
var options=[];
var ud = frevvo.userDetails("designer");
var roles = ud.roles;
for (var i=0; i < roles.length; i++) {
  options[i] = roles[i] + '=' + roles[i];
}
Roles.options = options; |
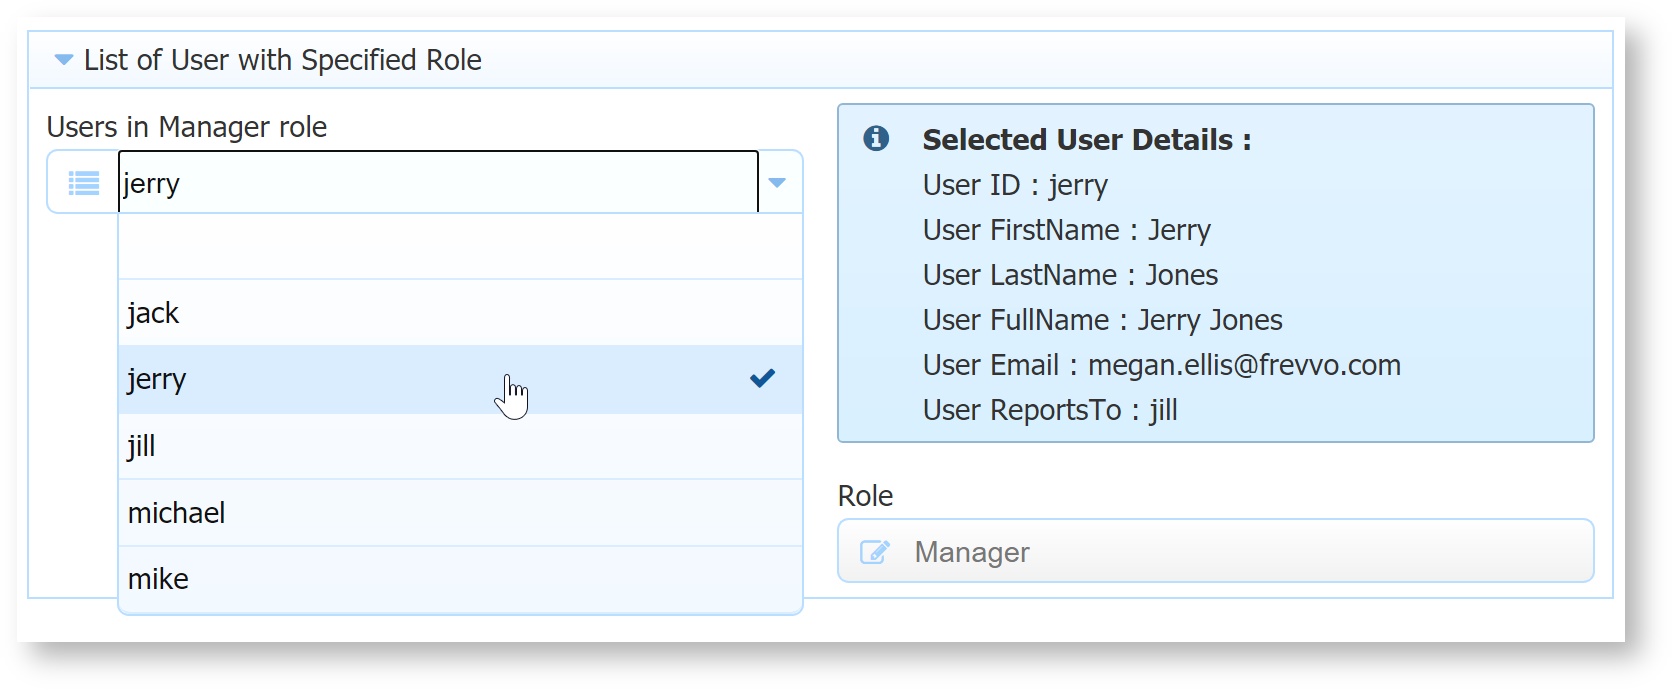
List All Users with a Specified Role
This rule is not yet supported in the Visual Rules Builder and thus still requires some JavaScript.
...
Here is an example of a rule that filters the list of users to only those that are assigned the Manager role and populates the options of a dropdown control with the results. The frevvo.userDetails(String userId) function is used to retrieve the details about the selected user (Jim). The results are displayed in a formatted Message Control named m. The form has a text field named Role with an initial value of "Manager". This field is referenced in the rule to supply the role name.
| Section | |||||||||||||||
|---|---|---|---|---|---|---|---|---|---|---|---|---|---|---|---|
|
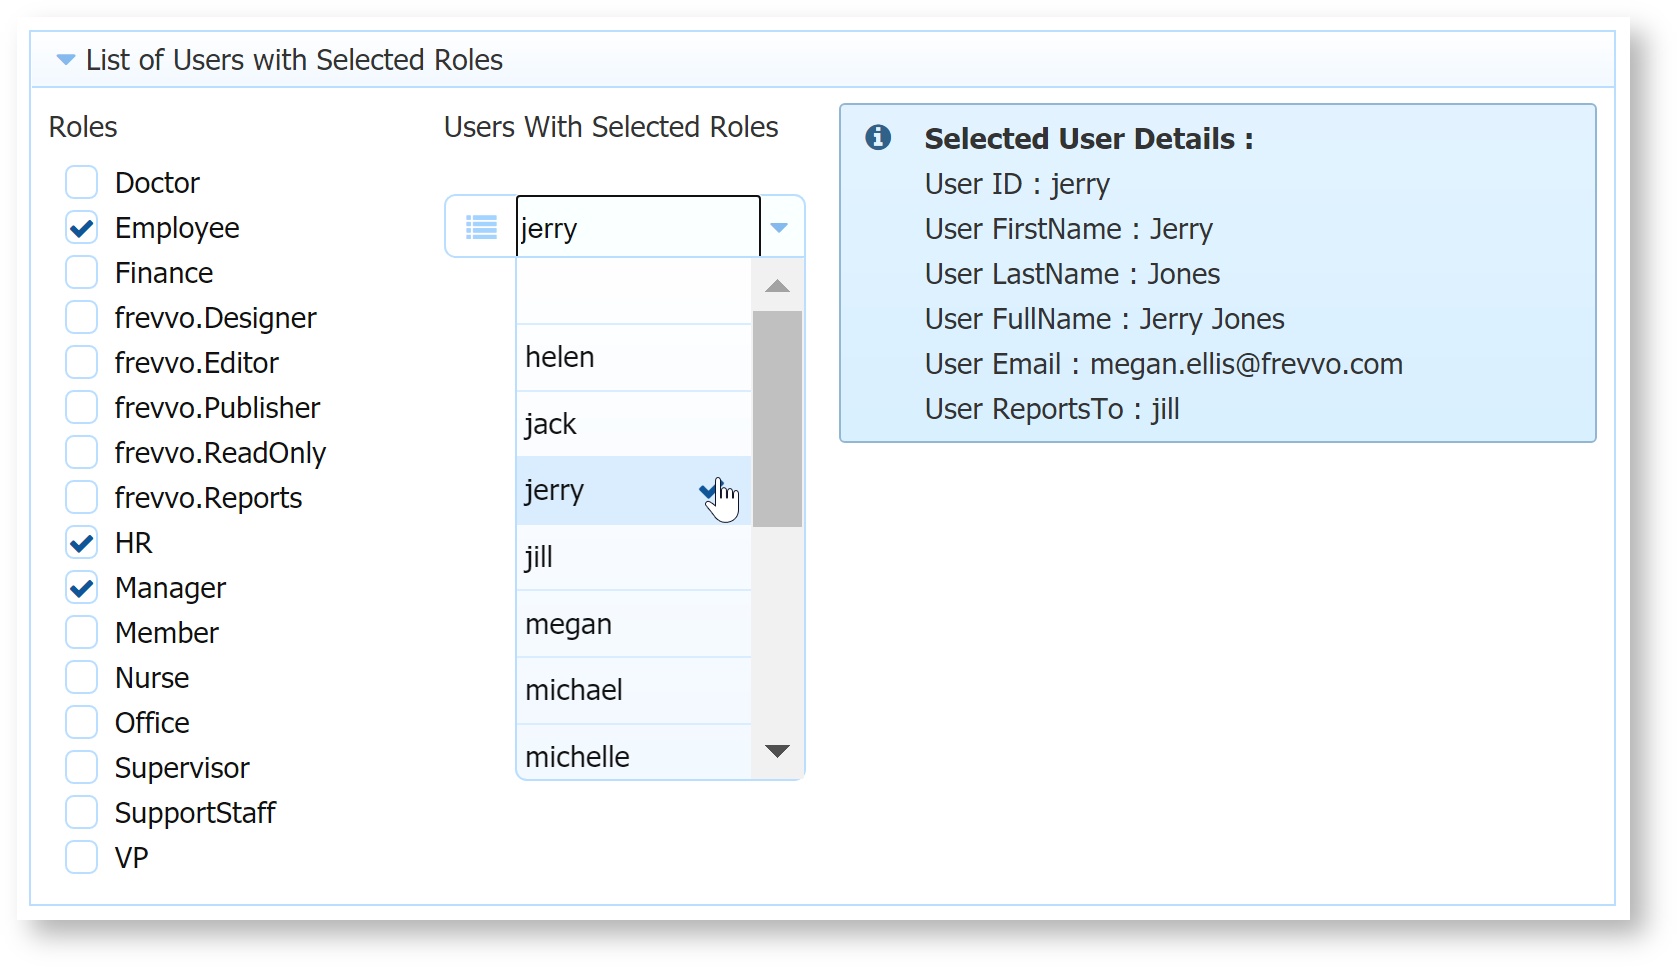
List All Users with Specified Roles
This rule is not yet supported in the Visual Rules Builder and thus still requires some JavaScript.
You can also select more than one role from your tenant list and use a business rule to display a filtered list of users who are assigned any of the selected roles. This business rule populates the options for a checkbox named Roles with the list of all users in the tenant. Selecting more than one role from the list populates a dropdown named UserswithSelectedRoles with the filtered list of users assigned those roles. Details for the selected user are displayed in a formatted Message Control named m.
| Section | |||||||||||||||
|---|---|---|---|---|---|---|---|---|---|---|---|---|---|---|---|
|
Security Subject Information
This form.load rule JavaScript combines the code to pre-populate fields in your form with information about the currently logged in user and populate a dropdown named Roles with a list of the roles in your tenant. For example, if you have controls in your form named Id, FirstName, LastName, Email, Roles and Manager the following rule will prefill those fields as indicated below. The bottom part of the rule populates the Roles dropdown.
...
| Code Block | ||
|---|---|---|
| ||
var x;
if (form.load) {
    // User Information
    Id.value = _data.getParameter('subject.id'); // Username
    FirstName.value = _data.getParameter('subject.first.name');
    LastName.value = _data.getParameter('subject.last.name');
    Email.value = _data.getParameter('subject.email');
    Manager.value = _data.getParameter("subject.reports.to");

    var roles = _data.getParameter ("subject.roles");
    if (roles) {
        eval ('x=' + roles);
        Roles.options = x;
    }
} |
Verify User
This rule is not yet supported in the Visual Rules Builder and thus still requires some JavaScript. This rule executes when the user enters a value into the Username text field. It uses the built-in isUniqueUserId() method that returns false if the user already exists. If the user already exists this rule then sets the value of a message control, makes that message control visible on the form and sets the Username valid property to false so that Username field displays as invalid to guide the user to make a correction. See the section on dynamic content for more details.
| Code Block | ||
|---|---|---|
| ||
if (U.value.length > 0) {
    if (frevvo.isUniqueUserId(user.value, tenant.value) === false) {
        M.value = 'User: ' + U.value + ' already exists';
        M.visible = true;
        U.valid = false;
    } else {
        M.visible = false;
    }
} |
Verify Role
This rule is not yet supported in the Visual Rules Builder and thus still requires some JavaScript. This rule executes if there is a value in a field named role. It uses the built-in isUniqueRoleId() method that returns false if the role already exists. If the role already exists, this rule displays the message "The role (rolename) already exists in the tenant (tenant name)." to notify the user.
| Code Block |
|---|
// Verify that a role already exists in the tenant
if(role.value.length > 0)
{
  t.value = frevvo.isUniqueRoleId(role.value, tenant.value);
  if (frevvo.isUniqueRoleId(role.value, tenant.value) === false) {
    ErrMsg.value = 'The role ' + role.value + ' already exists in tenant ' + tenant.value;
  }
} |
Repeats
It is possible to create business rules to show/hide Repeat controls with the Visual Rule builder. The Visual Rule Builder will generate code to handle when the user clicks on the Plus icon to add a repeating section (item added event). You should see this code for rules with/without conditions.
...
The remaining rules listed in this section are not yet supported in the Visual Rules Builder and thus still requires some JavaScript.
Repeat Item Added
This rule executes when a new item is added to a repeat. Imagine your form contains a repeating section named Employee with name Erepeat. NOTE: that the name Erepeat is set on the Repeat control and not on the Section control. The Employee section control contains many controls such as Name, Phone, etc.. and a dropdown control labeled Manager and named M. It also contains a radio control labeled Employee Shift named ES whose options have been set to 'Day' and 'Evening'.
...
| Info |
|---|
Tables are repeats. So the same rule can be written for a table control. The name of a table's repeat is always <TableName>Repeat. For example if you name your table Children. Then the repeat is named ChildrenRepeat. |
Repeat Item Added - Collapse Other Items
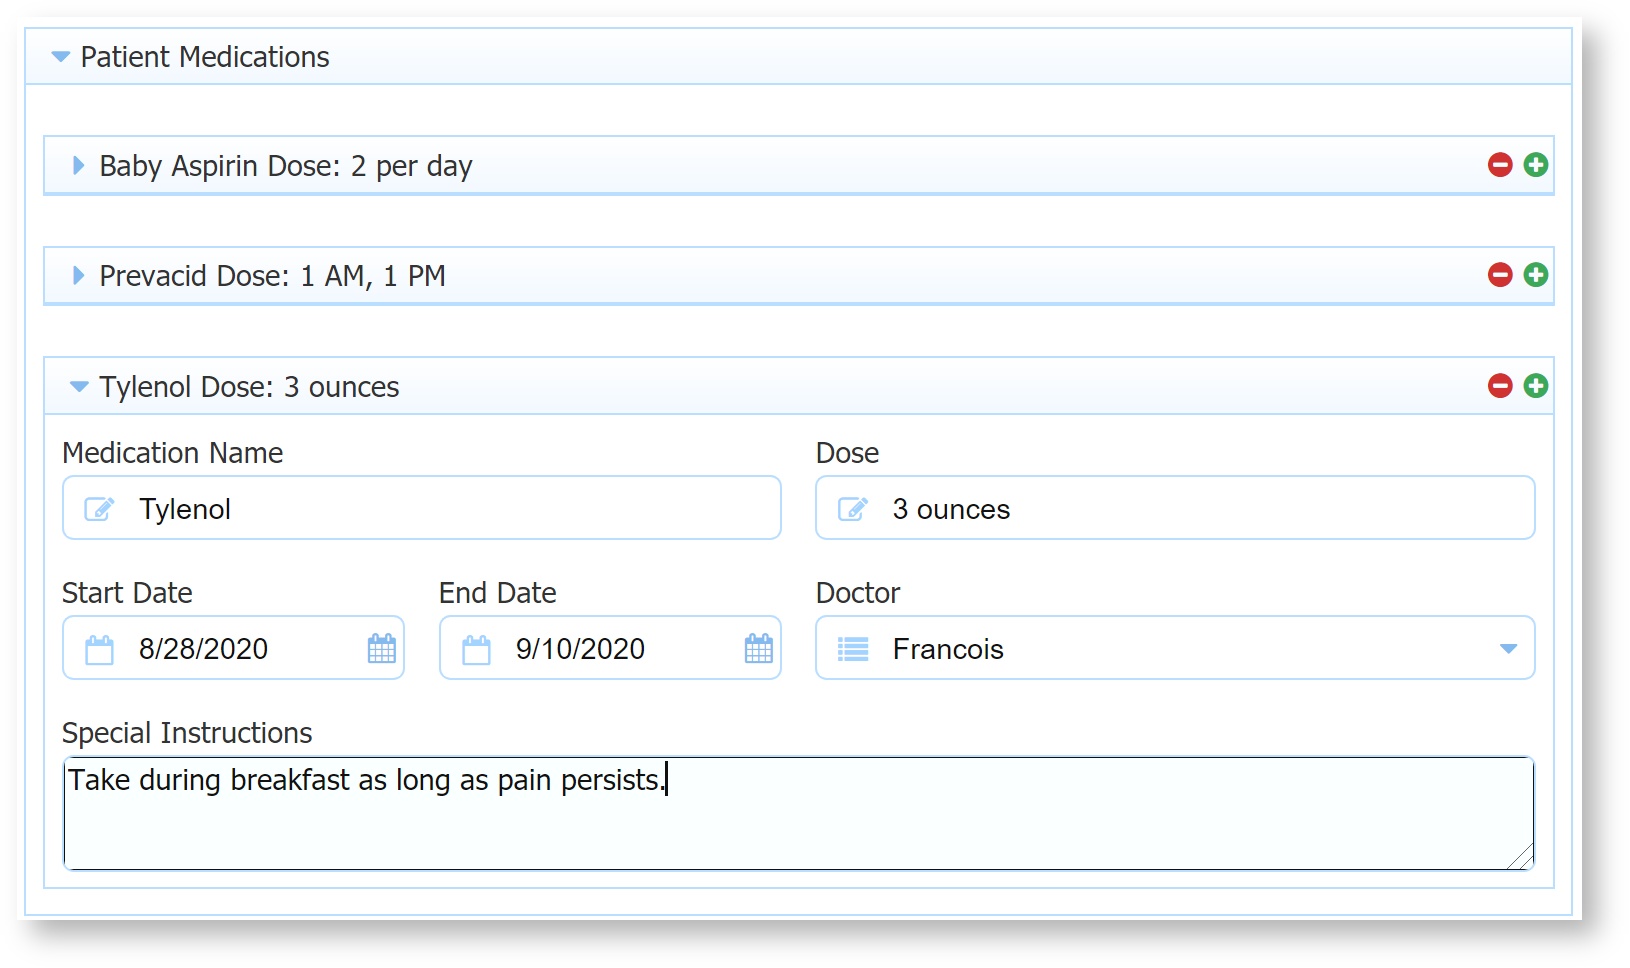
This rule executes when a new item is added to a repeat. This form contains a repeating section with a templatized label. It is nice to collapse the other items when adding a new item to keep the repeat list small and grid-like. Medrepeat is the name of the repeat control. Medication is the name of the section control inside the repeat.
| Code Block |
|---|
if (Medrepeat.itemAdded)
{
    var index = Medrepeat.itemIndex;
    for (var i = 0; i < Medication.value.length; i++) {
        if (i !== index) {
            Medication[i].expanded = false;
        }
        else {
            Medication[i].expanded = true;
        }
    }
} |
Dynamically Setting Min and Max in a Repeat
Imagine an airline reservation form where the number of traveler information sections displayed or the number of rows in a table is based on the number of airline tickets purchased. There is a field in the form for the number of tickets named count and a repeat with a section including controls to collect information about each traveler. You can leave the default values for the Min/Max properties of the Section in the Forms designer or set them to any values provided the min value < max value and the max value > min value.
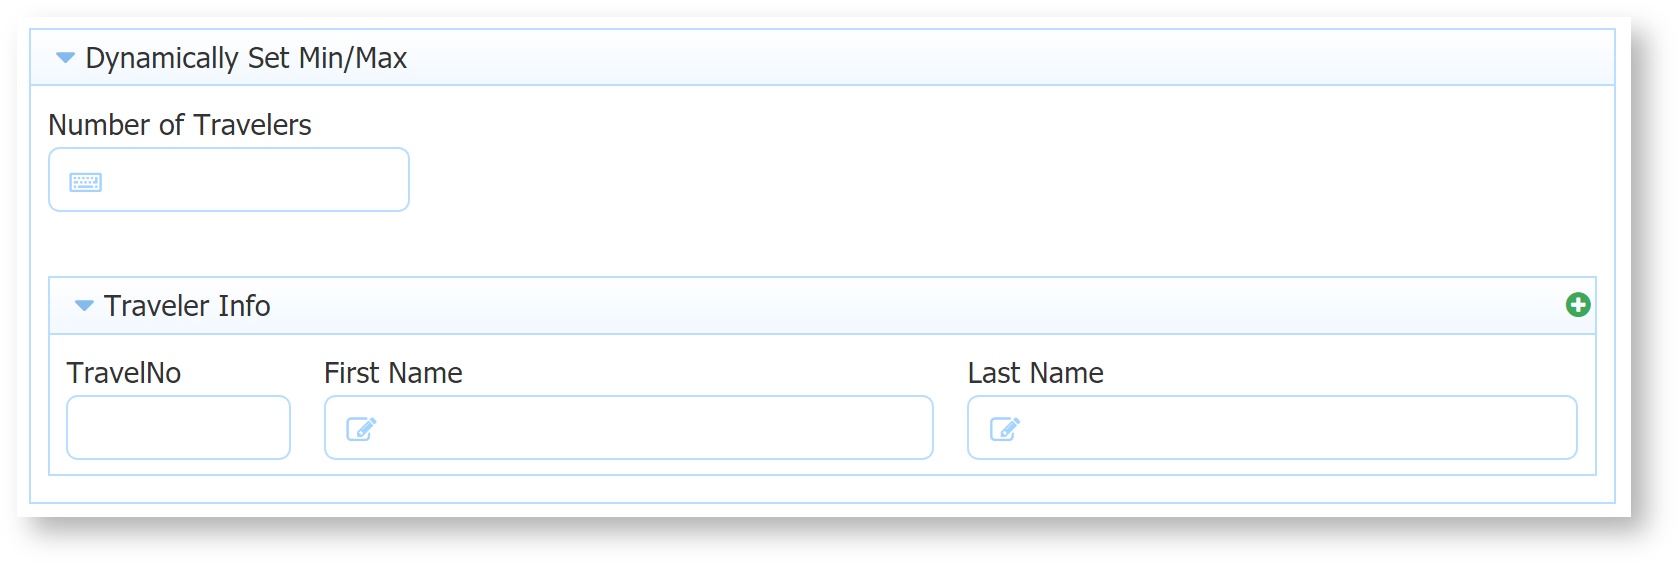
This is an example of a business rule that displays the number of sections based on the number of purchased airline tickets. Min/Max for the section are set to 1 and 20 in the forms designer.
| Code Block | ||
|---|---|---|
| ||
var i;
if (TravelRepeat.itemAdded) {
    i = TravelRepeat.itemIndex;
    TravelNo[i].value = 1 + i;
} else {
    if (count.value > TravelNo.value.length){
        TravelRepeat.maxOccurs = count.value;
        TravelRepeat.minOccurs = count.value;
    } else {
        TravelRepeat.minOccurs = count.value;
        TravelRepeat.maxOccurs = count.value;
    }
    for (i=0; i<TravelNo.value.length;i++) {
        TravelNo[i].value = 1 + i;
    }
} |
...
- The first part of your rule should retrieve the results set (this part of the rule is not shown here). In this example, the user enters a number in the Number of Travelers (the control name is 'count') field in the form.
- The itemAdded statement is needed to determine if you are adding more sections. The first time the rule runs, this statement will evaluate as false and run the else statement
- Evaluate if the number of sections needed ('count.value') is greater than the number or existing sections. If true, set the maxoccurs first because the table needs to increase.
- If the number of sections needed is less than the number of existing sections then set the minoccurs first.
- The rule will loop through the existing sections and set the values in the TravelNo field. If there are still additional sections to be added after the rule has looped through the existing sections, the itemAdded lines will run.
- This rule sets the Min/Max properties to he same values so the
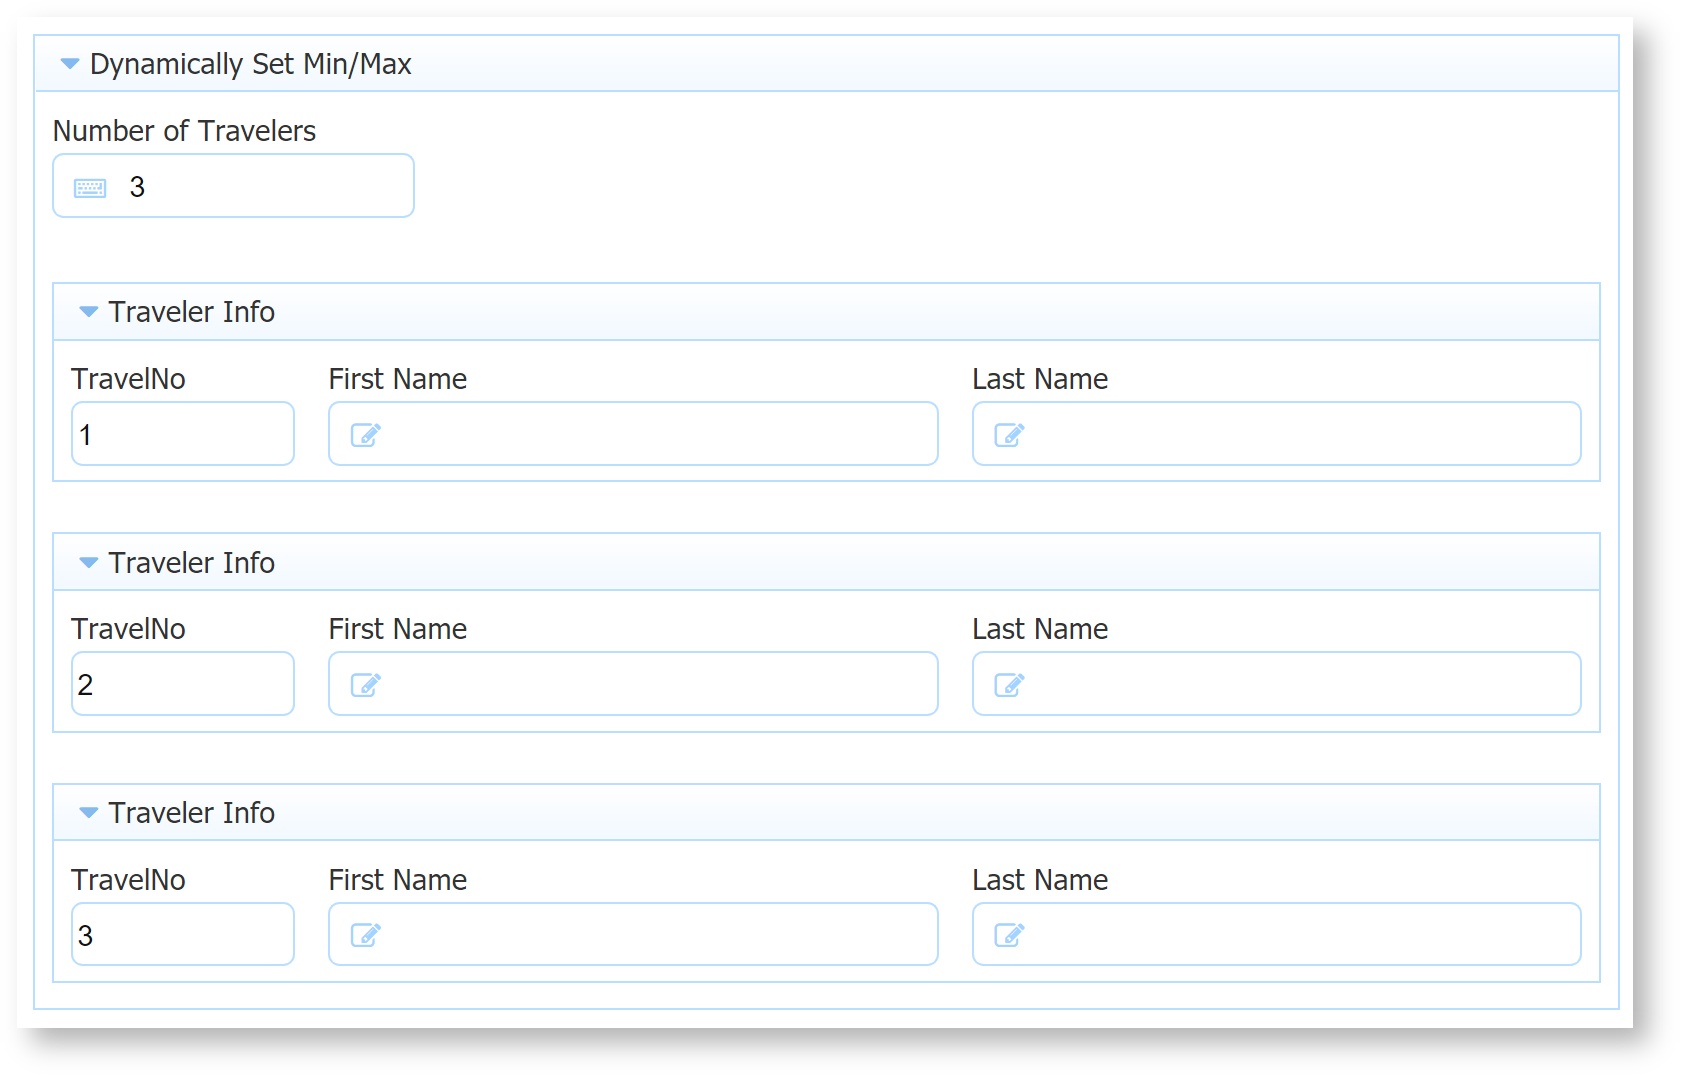
Entering "3" as the number of travelers, sets the minOccurs and maxOccurs to 5 and shows 5 information sections.
Repeat Item Initialization
The rule above was one example of initializing a newly added repeating control with a default list of options. This same concept is useful if you want to initialize a repeating control's value. When you add a repeat to your form in the Form Designer you can set a default value in any of those repeating controls visible in the designer. However when the user clicks "+" while using the form to add an additional item the default entered in the Form Designer is not automatically used in this new item. In order to accomplish this you can add a simple rule as follows:
...
This rule takes into account a repeat where min > 1. If min is 0 or 1, you can simplify this further by removing the for loop and simply have albumOnly[0].value = 0 inside the if (form.load).
Repeat ItemAdded by Init Doc
ItemAdded also executes when adds items found in an init doc. You may want to only initialize items added when the user clicks "+" on the form. And not those added from an initial document. This form contains a Mailing Label that repeats. Each label needs a unique ID assigned. However once the form is submitted the assigned IDs are saved in the database via the form's Doc URI. When the form loads it adds items automatically from rows in the database. They already have assigned Ids. We only need to assign new Ids in the sequence when the user manually adds a new Mailing Label by clicking the "+" button on the form. MLrepeat is the name of the Mailing Label repeat. MLmid is the name of the ID field in the repeat.
| Code Block |
|---|
if (MLrepeat.itemAdded)
{
  var index = MLrepeat.itemIndex;


   // This rule is fired both when the user clicks "+"
   // and when frevvo adds items found in the init doc.
   // Need to assign new mid only when user clicks "+"

  // New items added via "+" will have a zero length value.
  if (MLmid[index].value.length === 0) {
    // Assign unique ID to label so it can be referenced
    // in RI Mailing Labels field

    // Count the number of existing mailing labels on the form
    var maxId = 0;
    for (var i=0; i < MLmid.value.length; i++)
    {
     if (MLmid[i].value > maxId) {
       maxId = MLmid[i].value;
     }
   }
   var next = parseInt(maxId, 10) + 1;
   MLmid[index].value = next.toFixed(0);
 }
} |
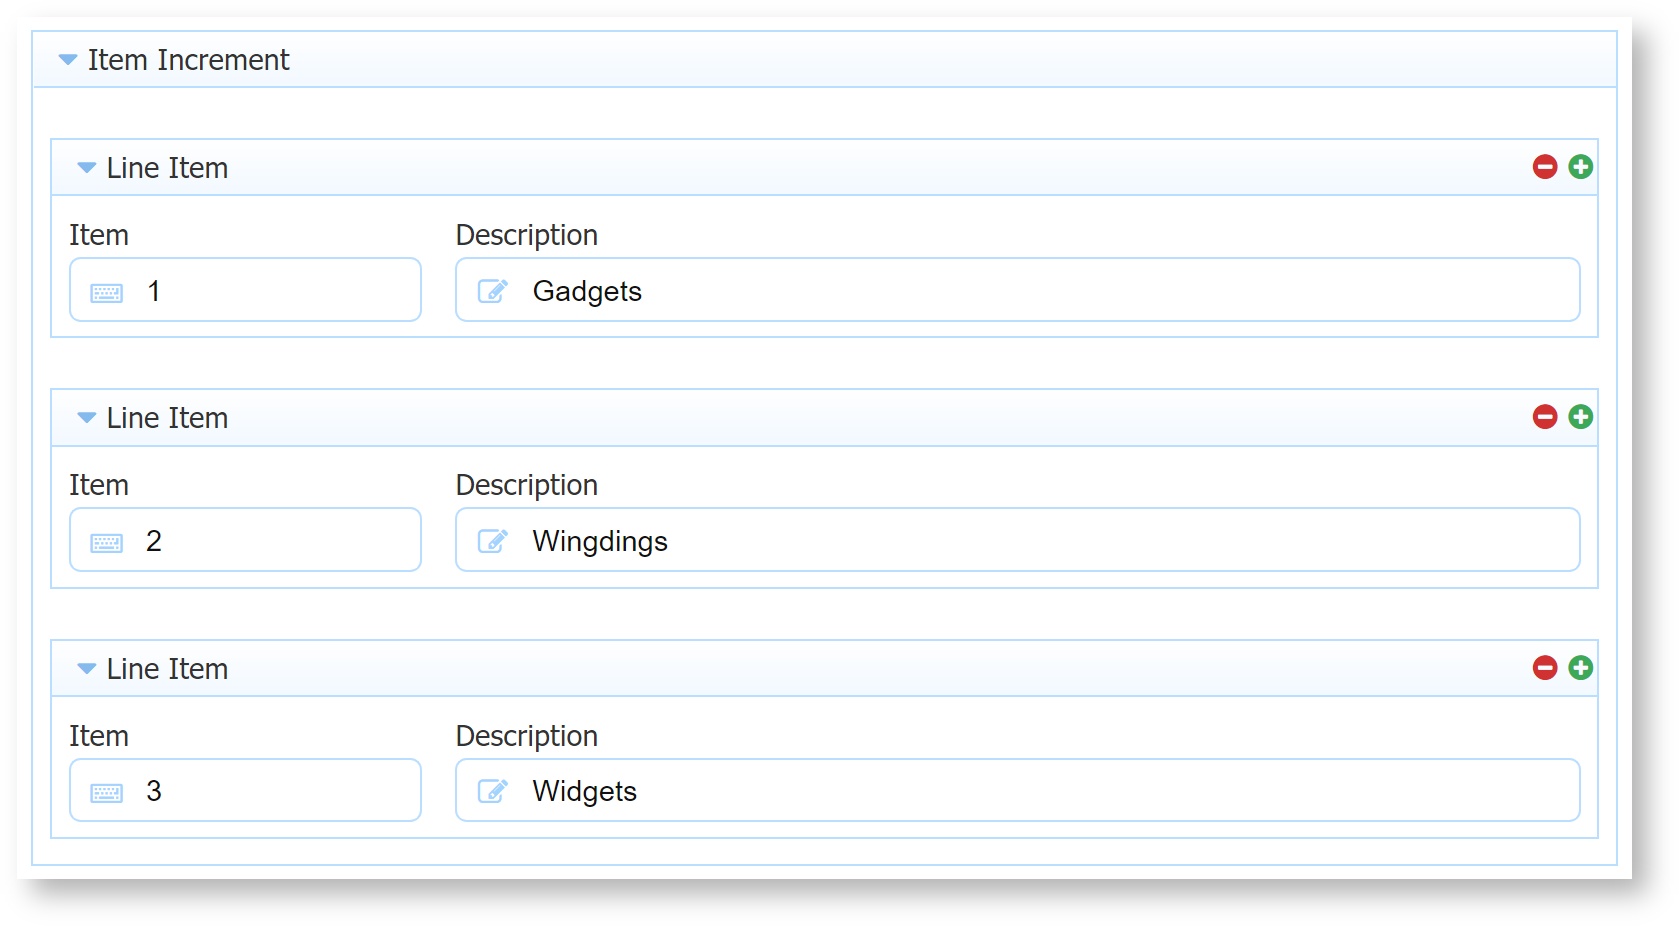
Repeat Item Increment
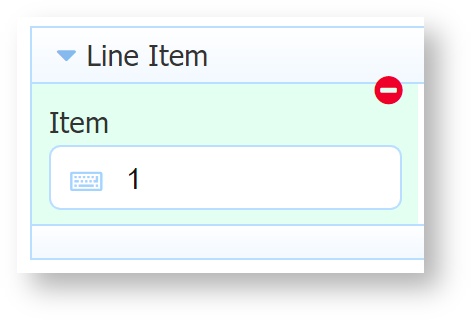
You can easily auto populate incremental items numbers in repeats using a business rule. In this example Erepeat is the name of the repeat control and Item is the name of the item control inside the repeat. You also need to set 1 as the default value of first repeating Item control directly into your form field via the form designer as shown here.
| Code Block |
|---|
if (Erepeat.itemAdded || Erepeat.itemRemoved){
  for(var i = 0; i < Item.value.length; i++) {
    Item[i].value = i+1;
  }
} |
Tables
Table controls are often used in forms/workflows. Tables are used in many situations. Here are just a few:
...
| Code Block | ||
|---|---|---|
| ||
var Subtotal_start_index = Table290Repeat.itemAdded ? Table290Repeat.itemIndex : 0;
var Subtotal_end_index = Table290Repeat.itemAdded ? Subtotal_start_index + 1 : Subtotal.value.length;
var event = form.load;
for (let i = Subtotal_start_index; i < Subtotal_end_index; i++) {
  Subtotal[i].value = (Price[i].value * Quantity[i].value);
} |
Table Column and Cell Properties
The setting of properties on table cells and columns from rules is really at the "cell" level in that you are operating on a javascript array. For some properties, setting the property on any of the indices affects the whole column, while for others it only affects the individual cell.
...
Each column in a table has a label, help and hint property. These properties work at the column level and can be set dynamically with a rule created with the Visual Rule Builder. Here is an example: 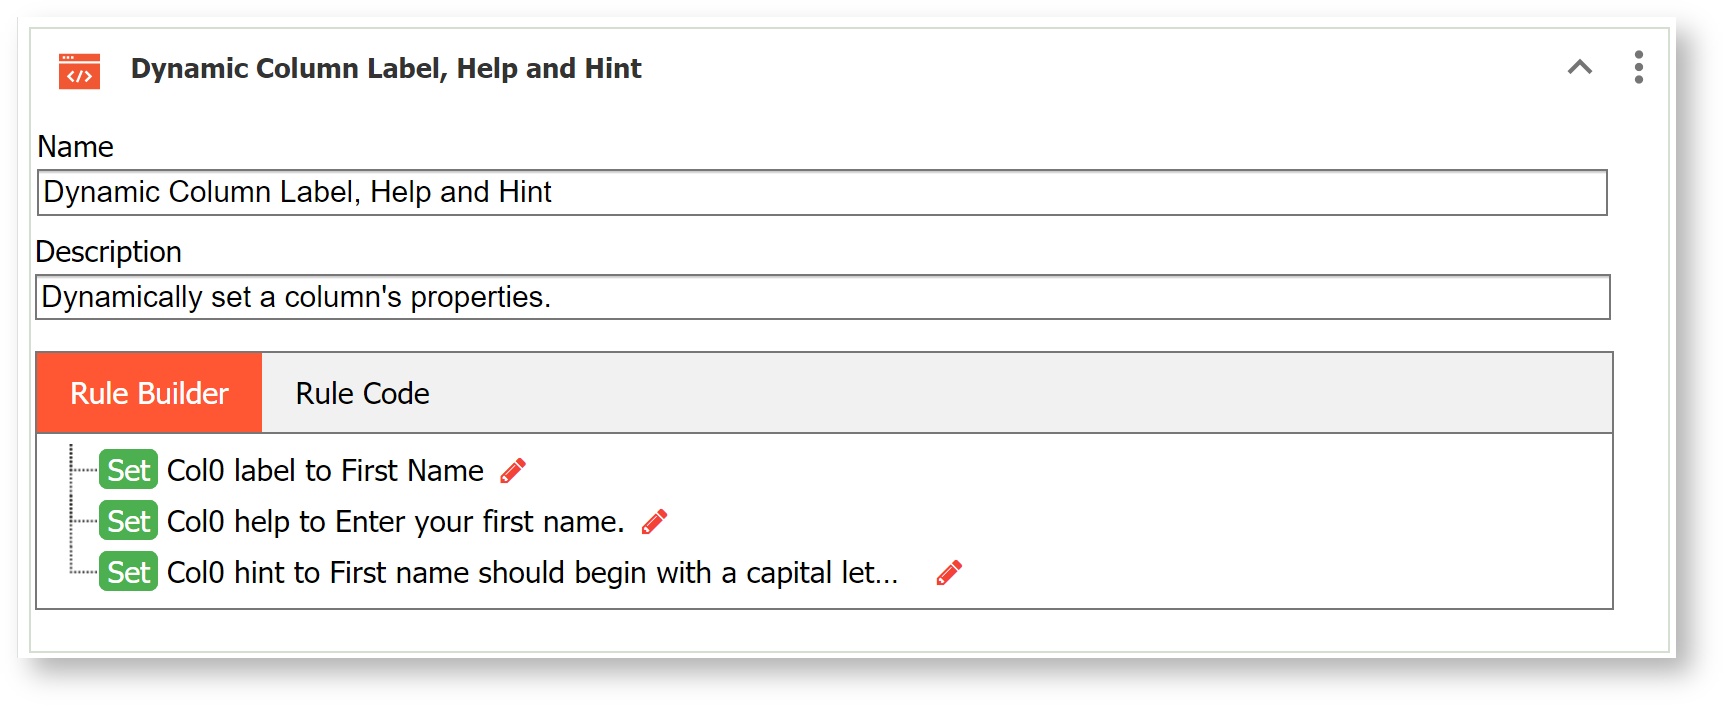
Here is an example of setting the table column printable property using rule code. Line 1 will set the entire column's printable property to false; lines 2-4 show an example of how to make individual cells not printable. Keep in mind that the column setting will override the setting of individual cells.
...
| Note |
|---|
Setting a column to printable is a feature introduce in the v7.4.19 patch for in-house customers and v9.1 for Cloud customers. If you were using a rule to set a column to printable in a prior version, edit the rule and re-save it to ensure that the column setting takes effect. |
Show/Hide a Column in a Table
The Visible property is available on the column level and can be used in a rule to make the whole column visible/invisible. For example, let's say you have a table with 3 columns in a two step workflow. You want all three columns to display for Step 1 of the workflow. When the workflow navigates to Step 2, you do not want the ID column to display.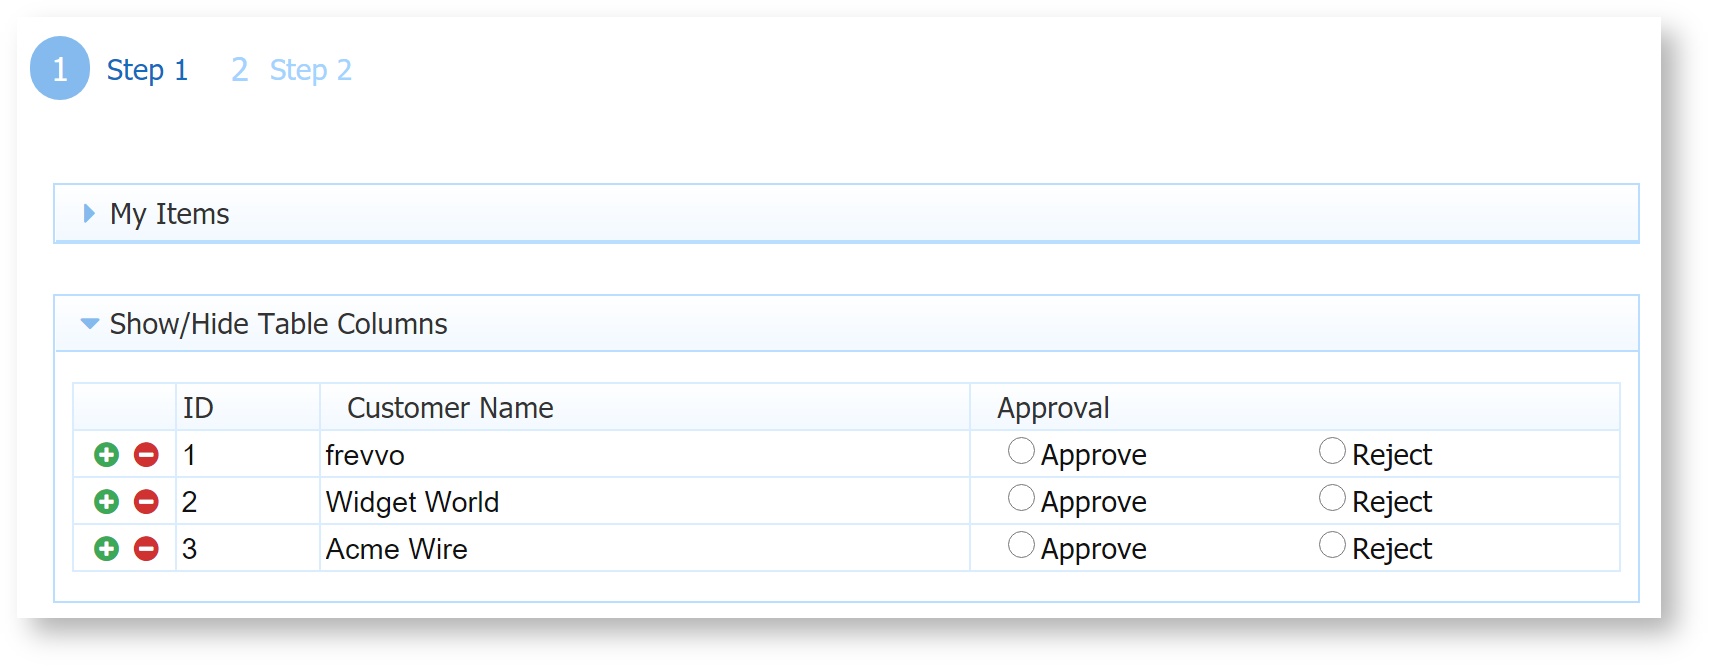
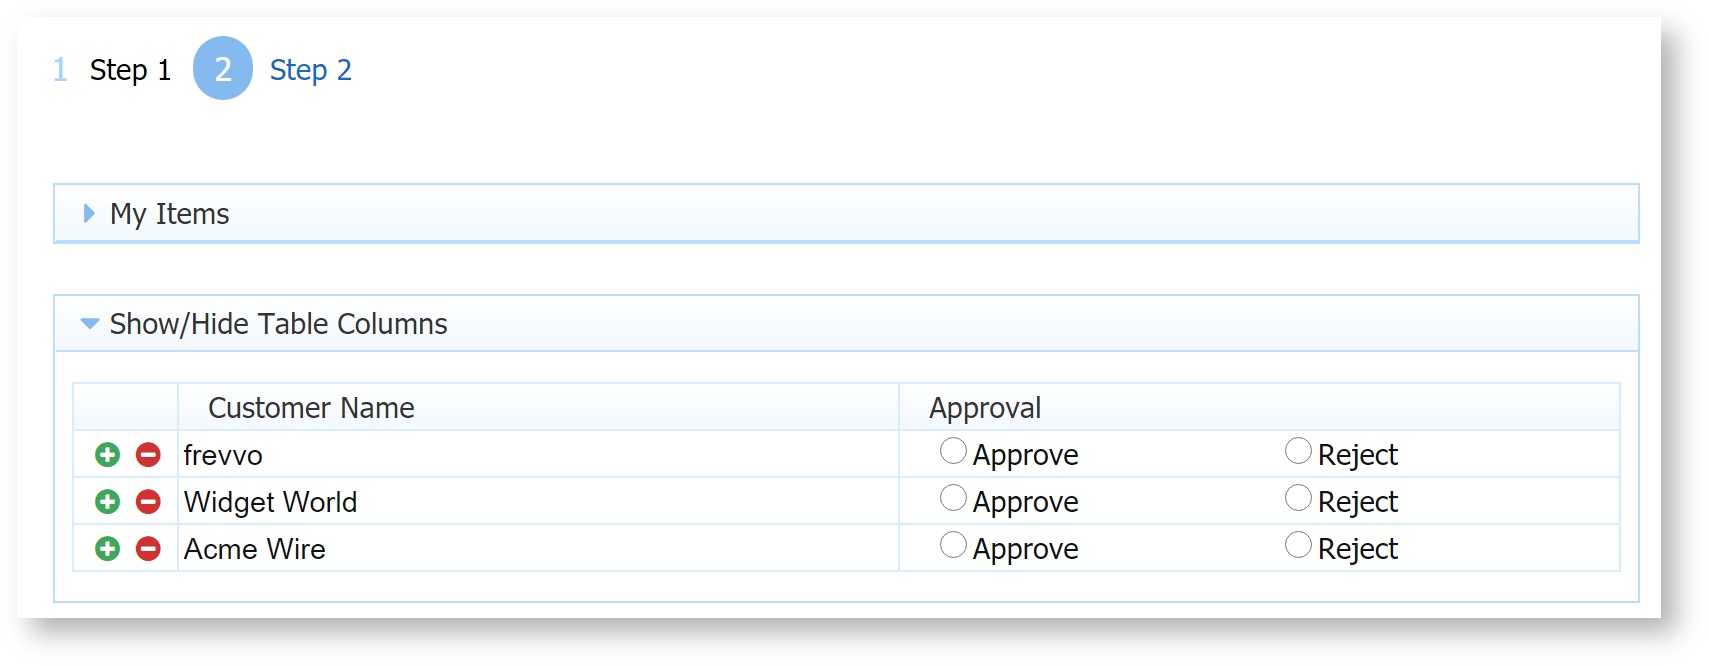
In the designer, the visible property is checked on the ID column property panel.
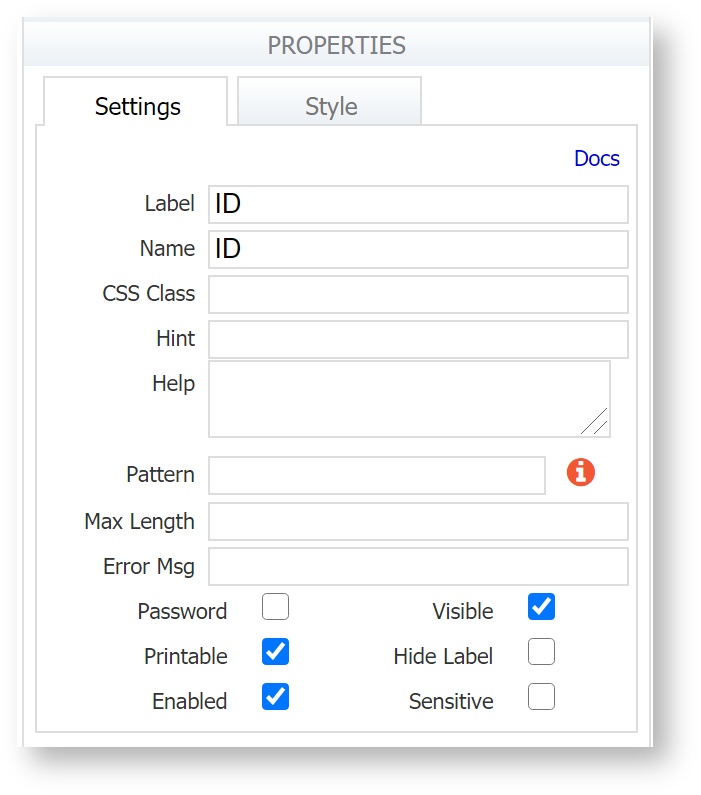
Here is the rule created with the Rule Builder that hides the ID column on Step 2. 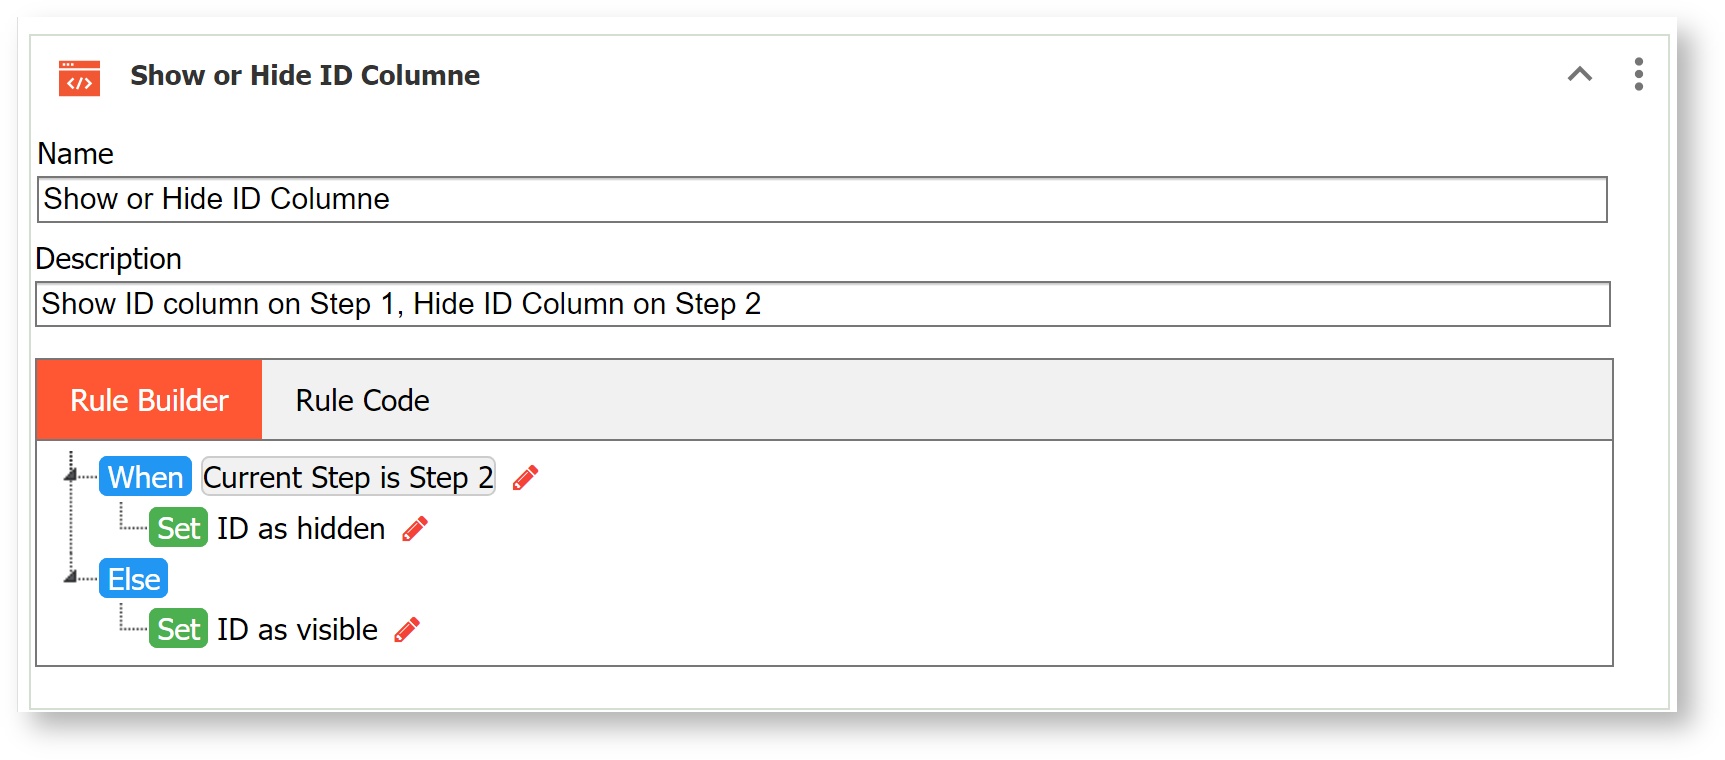
The Visible property is available on each table cell as well and can be used to make the cell content visible/invisible. Here is a rule that will hide the cell contents of the first cell in column a:
| Code Block |
|---|
if(form.load)
{
 a[0].visible = false;
} |
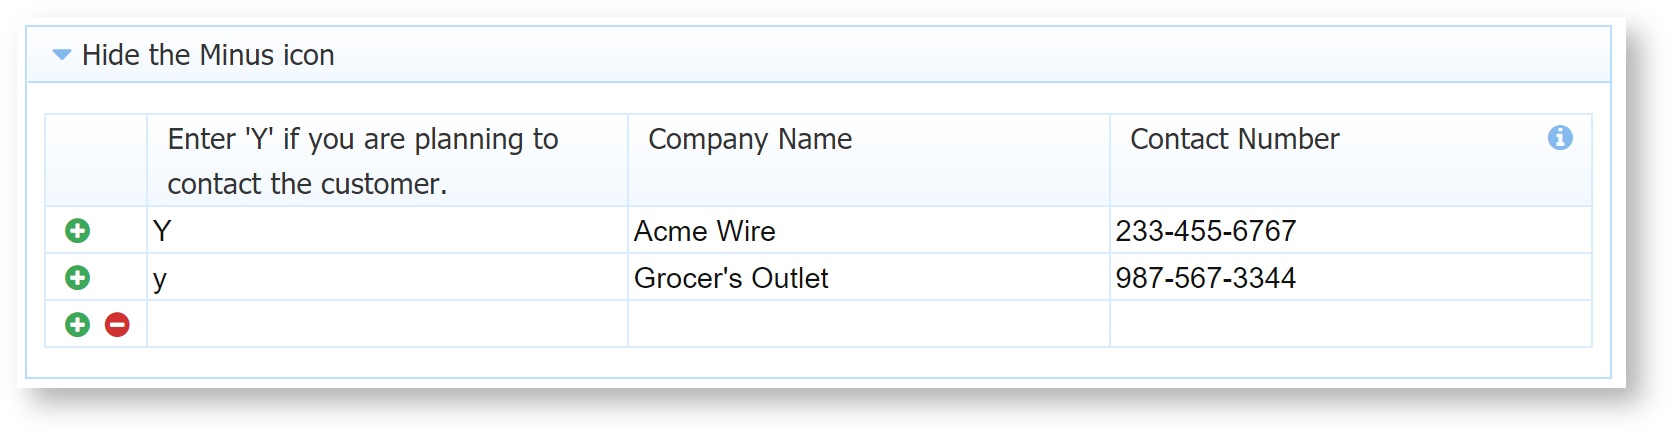
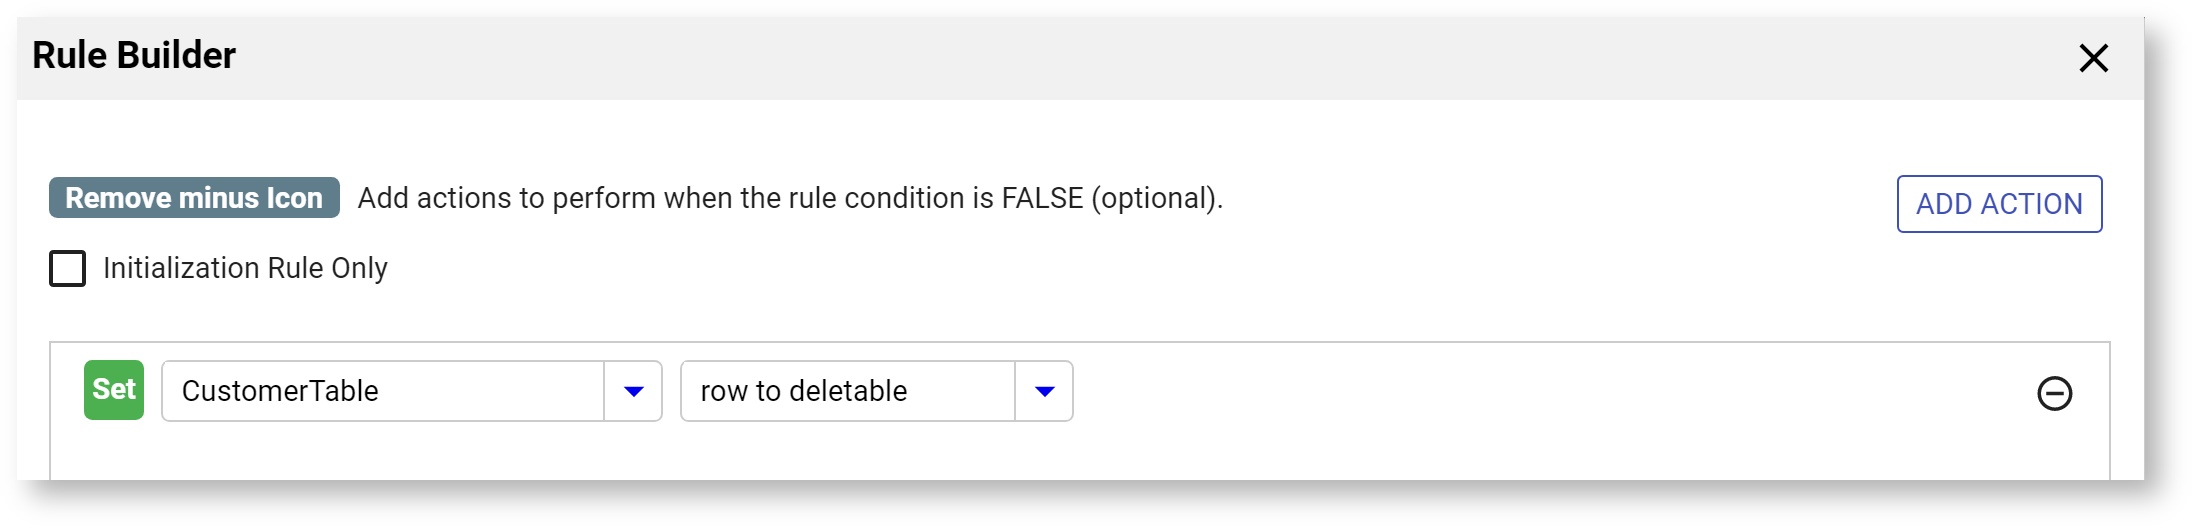
Hiding the Minus Icon on a Table Row
You can hide the minus icon of a table row using a business rule. For example, the designer may not want to allow users to delete rows in a table that is populated from a back end system. Hiding the delete icon on these rows eliminates accidental deletion. The rule must set the table rows deletable attribute. You will not see this property listed on the Table control property pane but it will be listed in the Form Outline tool and is available in the Rule Builder.
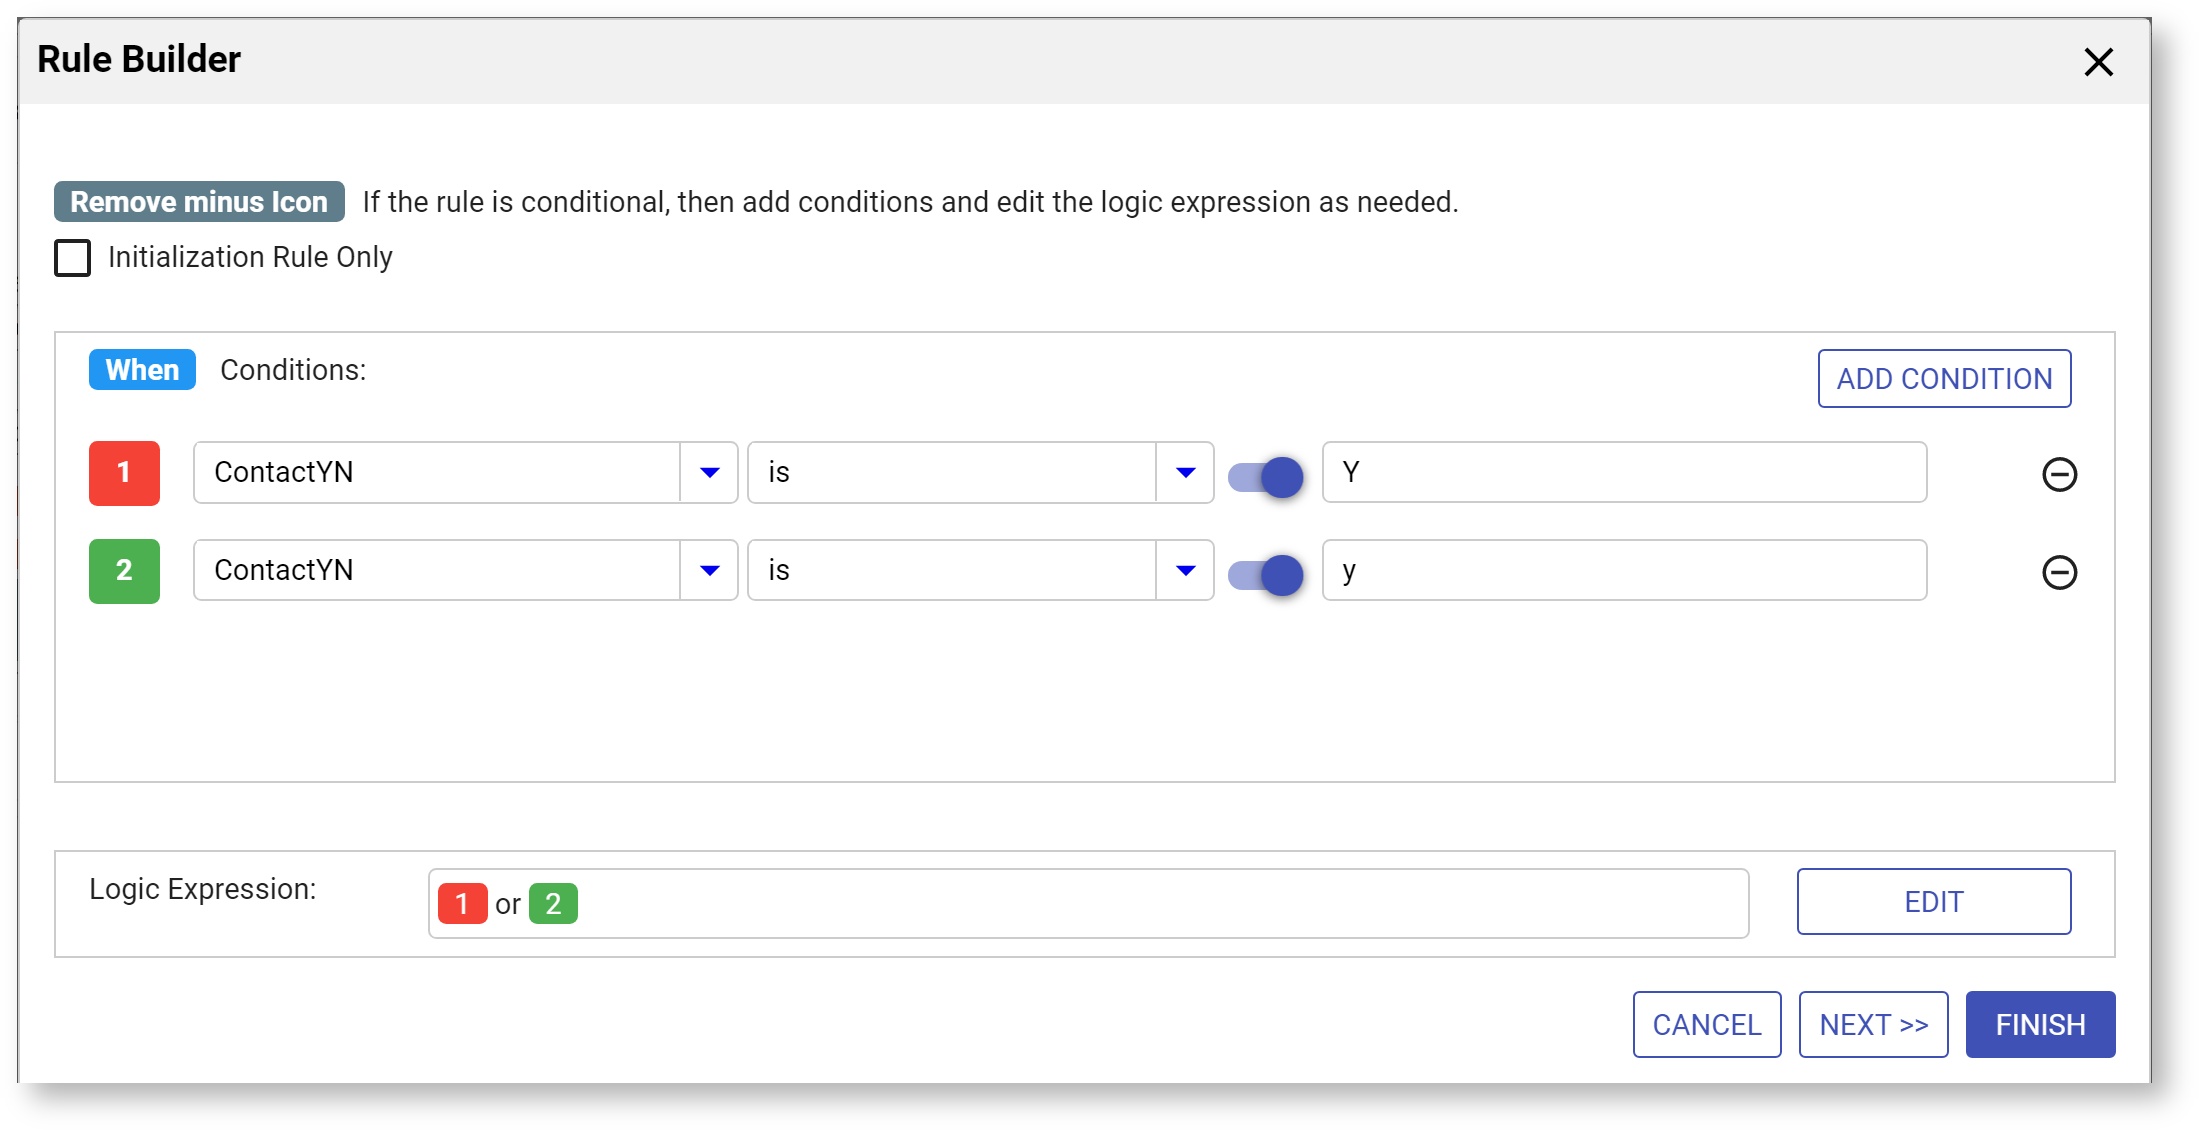
...
- Change the Logic Expression from "and" to "or"
- Use the deletable/non-deletable properties in the Action and Else Action wizards.
| Expand | ||||||
|---|---|---|---|---|---|---|
| ||||||
|
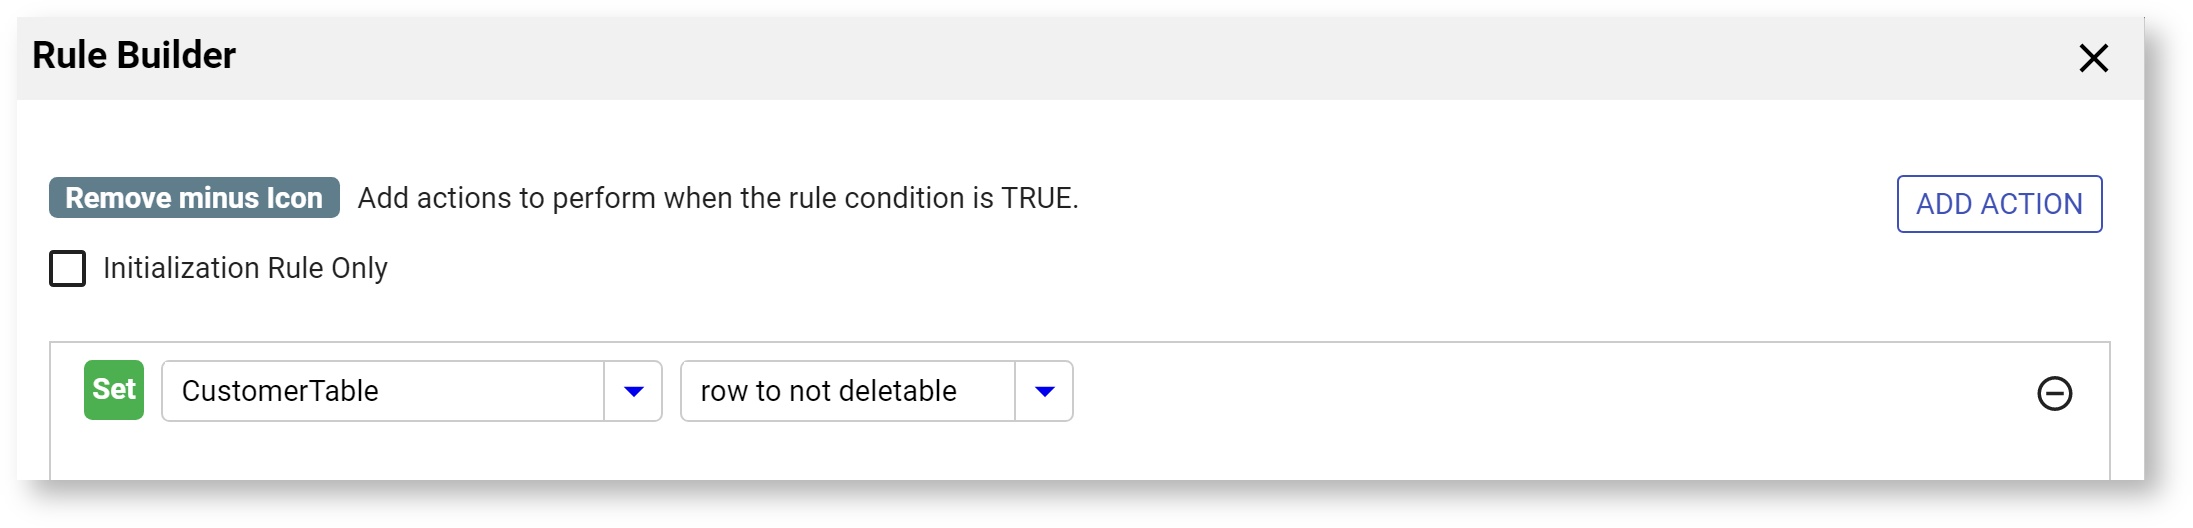
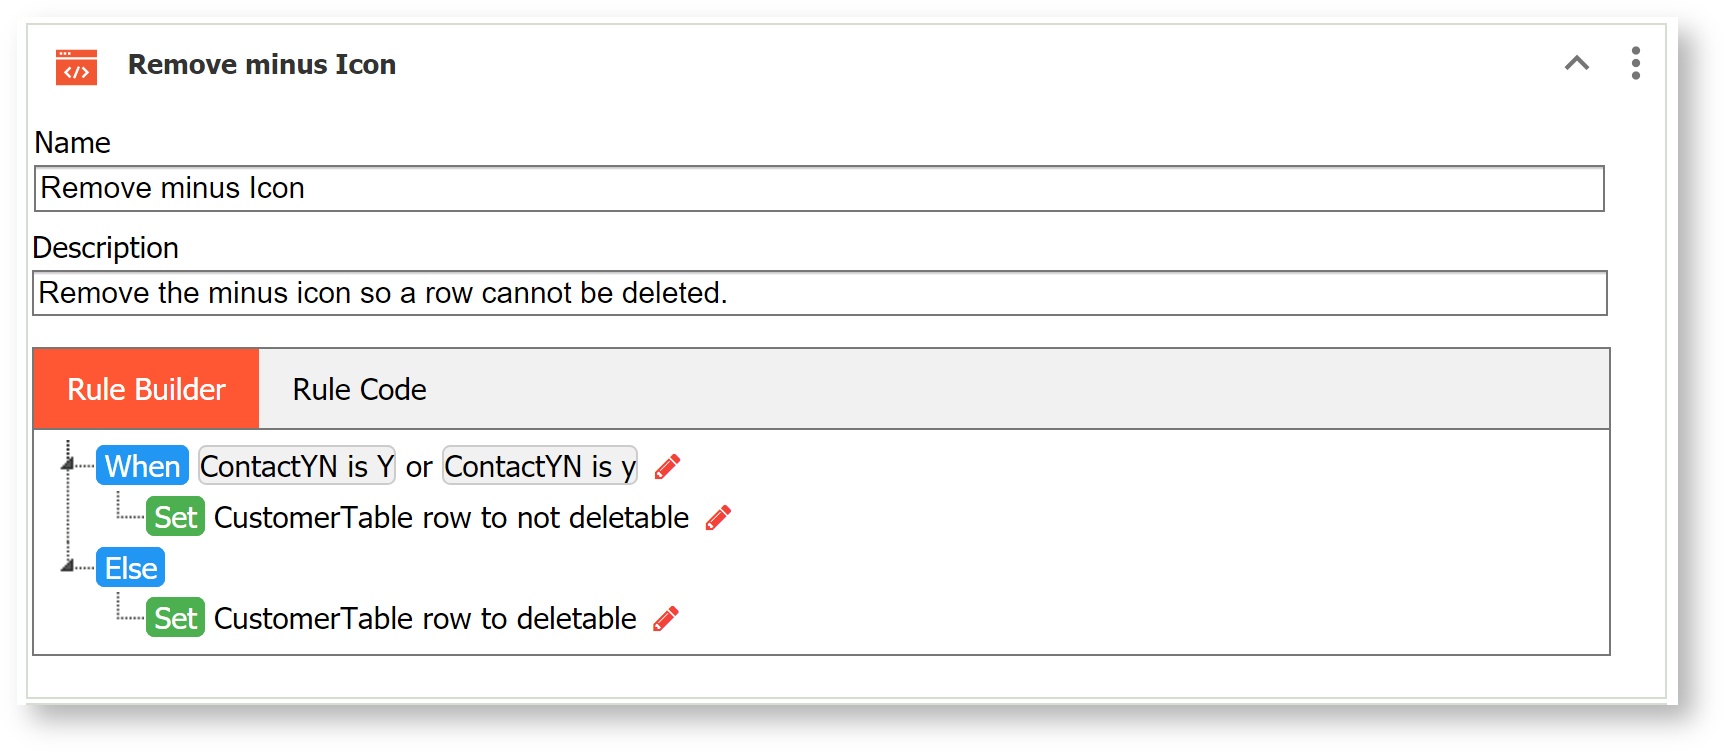
If you click on the Rule Code to see the JavaScript generated by the Rule Builder, you will notice:
- The individual rows inside the CustomerTable are referred to in the rule as CustomerTableItem.
- Notice the TableItem deletable property is set to false when a lowercase or capital Y is entered in the first column. This will remove the minus icon for that row of the table. The for loop cycles through the table rows until the Max# property is reached.
| Code Block |
|---|
  var event = form.load;
for (let i = 0; i < ContactCustomer.value.length; i++) {
  if ((ContactCustomer[i].value === 'Y') || (ContactCustomer[i].value === 'y')) {
    CustomerTableItem[i].deletable = false;
  } else {
    CustomerTableItem[i].deletable = true;
  }
} |
Dynamically Setting Min/Max in a Table
Min/Max properties of a table can be dynamically set using a business rule. Some scenarios where you might want to do this are:
...
You can leave the default values for the Min/Max properties of the Table in the Forms designer or set them to any values provided the min value < max value and the max value > min value.
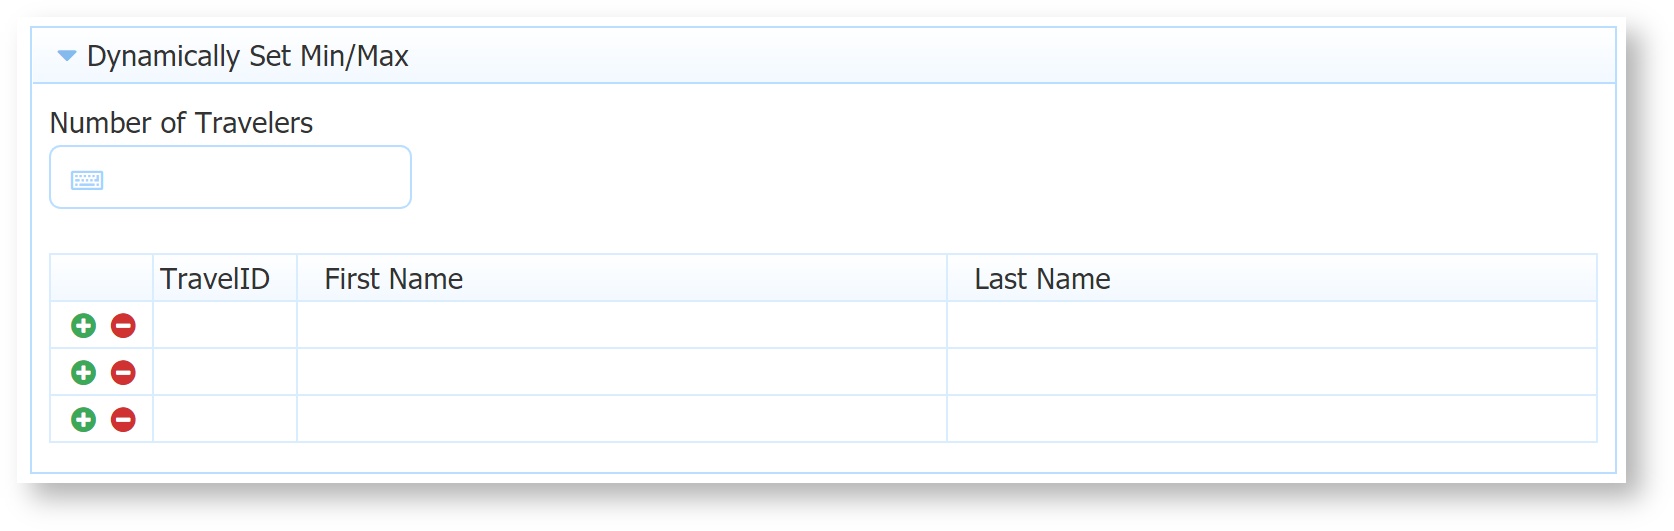
For this example, the rule should have the following components:
...
| Code Block | ||
|---|---|---|
| ||
var i;
if (TableRepeat.itemAdded) {
    i = TableRepeat.itemIndex;
    TravelID[i].value = 1 + i;
} else {
    if (count.value > TravelID.value.length){
        Table.maxOccurs = count.value;
        Table.minOccurs = count.value;
    } else {
        Table.minOccurs = count.value;
        Table.maxOccurs = count.value;
    }
    for (i=0; i<TravelID.value.length;i++) {
        TravelID[i].value = 1 + i;
    }
} |
The images show the table when the user enters 5 as the number of travelers and then changes the value to 3.
| Section | ||||||||||||||
|---|---|---|---|---|---|---|---|---|---|---|---|---|---|---|
|
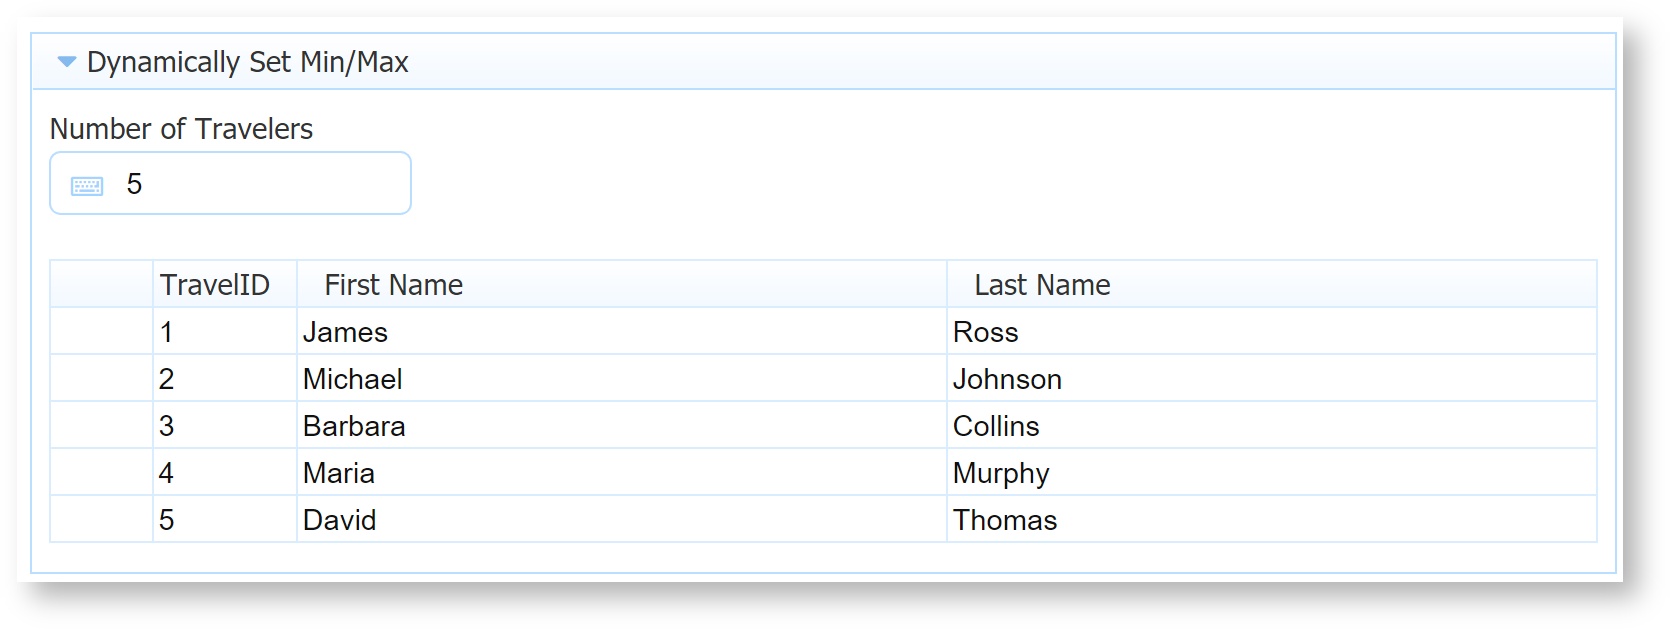
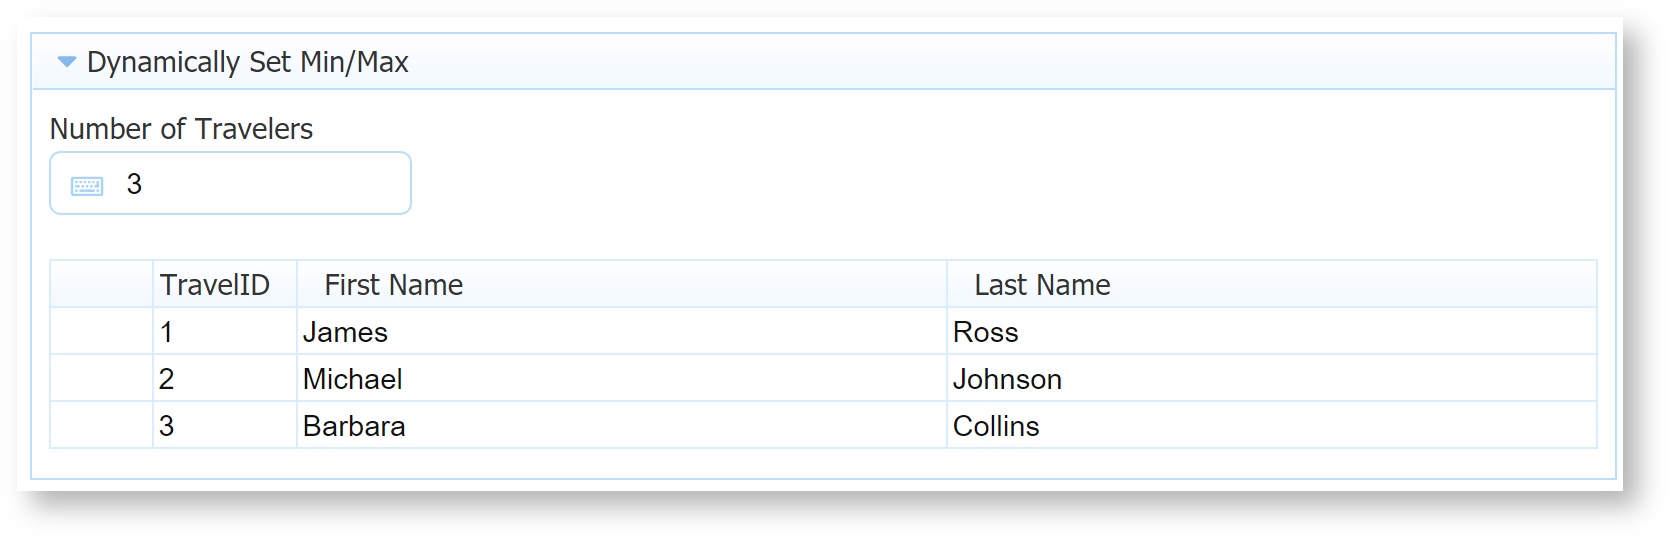
...
| Code Block |
|---|
//set the maxOccurs to more than the current length & minOccurs to 1 again
	if (TravelID.value.length === count.value){
		Table.maxOccurs = count.value + 1; //or any number larger than the count.value
		Table.minOccurs = 1;
} |
Populate Table Rows based on Query Results
| Tip |
|---|
The recommended approach to using a table control to perform Create, Read, Update, and Delete (CRUD) operations on your database is the Doc URI method, which is efficient and requires no code. You can also find examples of the Doc URI approach in the Database Connector Tutorial. |
...
At runtime, the form looks like this:
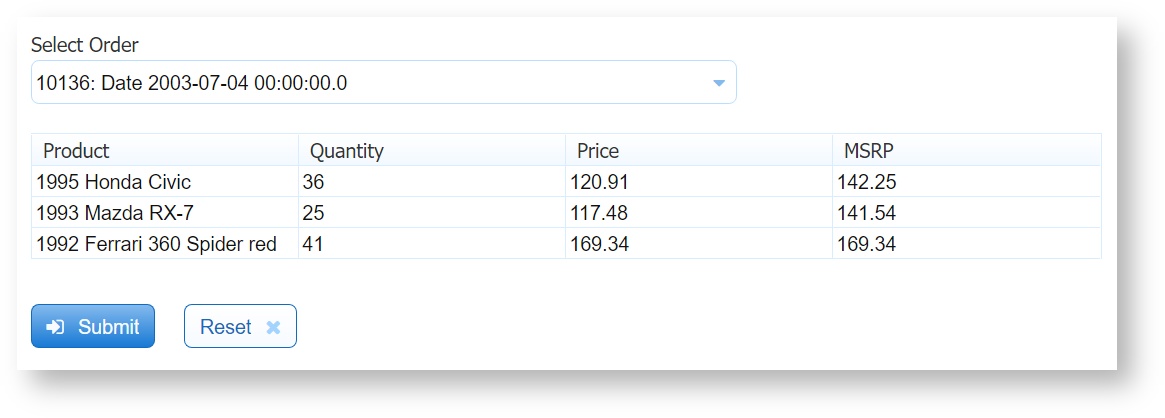
Clearing Values in a Table
Use the Rule Builder to create this rule which clears the values from all rows in a table. Simply set the name of your table control to empty. In the rule shown, the Table control named MyTable is cleared when a trigger (ClearTable) is clicked.![]()
If you click on the Rule Code to see the JavaScript generated by the Rule Builder, you will notice a for loop that iterates over all the rows. Inside the loop a null value is assigned to all the columns in the table row.
![]()
Clickable Links in a Table
In most cases, the Link control can be used to add a clickable link to your form that can also be clicked from the submission PDF snapshot. However, Link controls cannot be added to tables. Instead, use a message control with a rule like this to seamlessly show the clickable link on the PDF printout. For example, on an office supply order form you want the user to add the link to the requested product. The PDF snapshot will go to the buyer, who only needs to click the link. In this example, the message column is hidden in use mode and only appears on the PDF snapshot.


| Code Block |
|---|
for(var i=0; i<Link.value.length; i++){
  if(EnterLink.value){
    Link[i].value = "<a href='" + EnterLink[i].value.split('?')[0] + '?' + encodeURIComponent(EnterLink[i].value.split('?')[1]) + "' target='_blank'>Open</a>";
  } else{
    Link[i].value = null;
  }
} |
Set a Value Based on Table Rows
You can set a value in another control based on the value(s) in your table. For example, consider a table that asks for Appropriation Number. If there is only one row filled, we want to set a separate text control (AppNumber) to the Appropriation Number entered in the table. However, if more than one row is filled, we want to set that text control to the word 'various'. Write a business rule like this:
...
The result is that the text box is populated with either the Appropriation Number from the table, or the word various. It will update automatically if a second table row is filled in, or if table rows are deleted leaving only one filled.
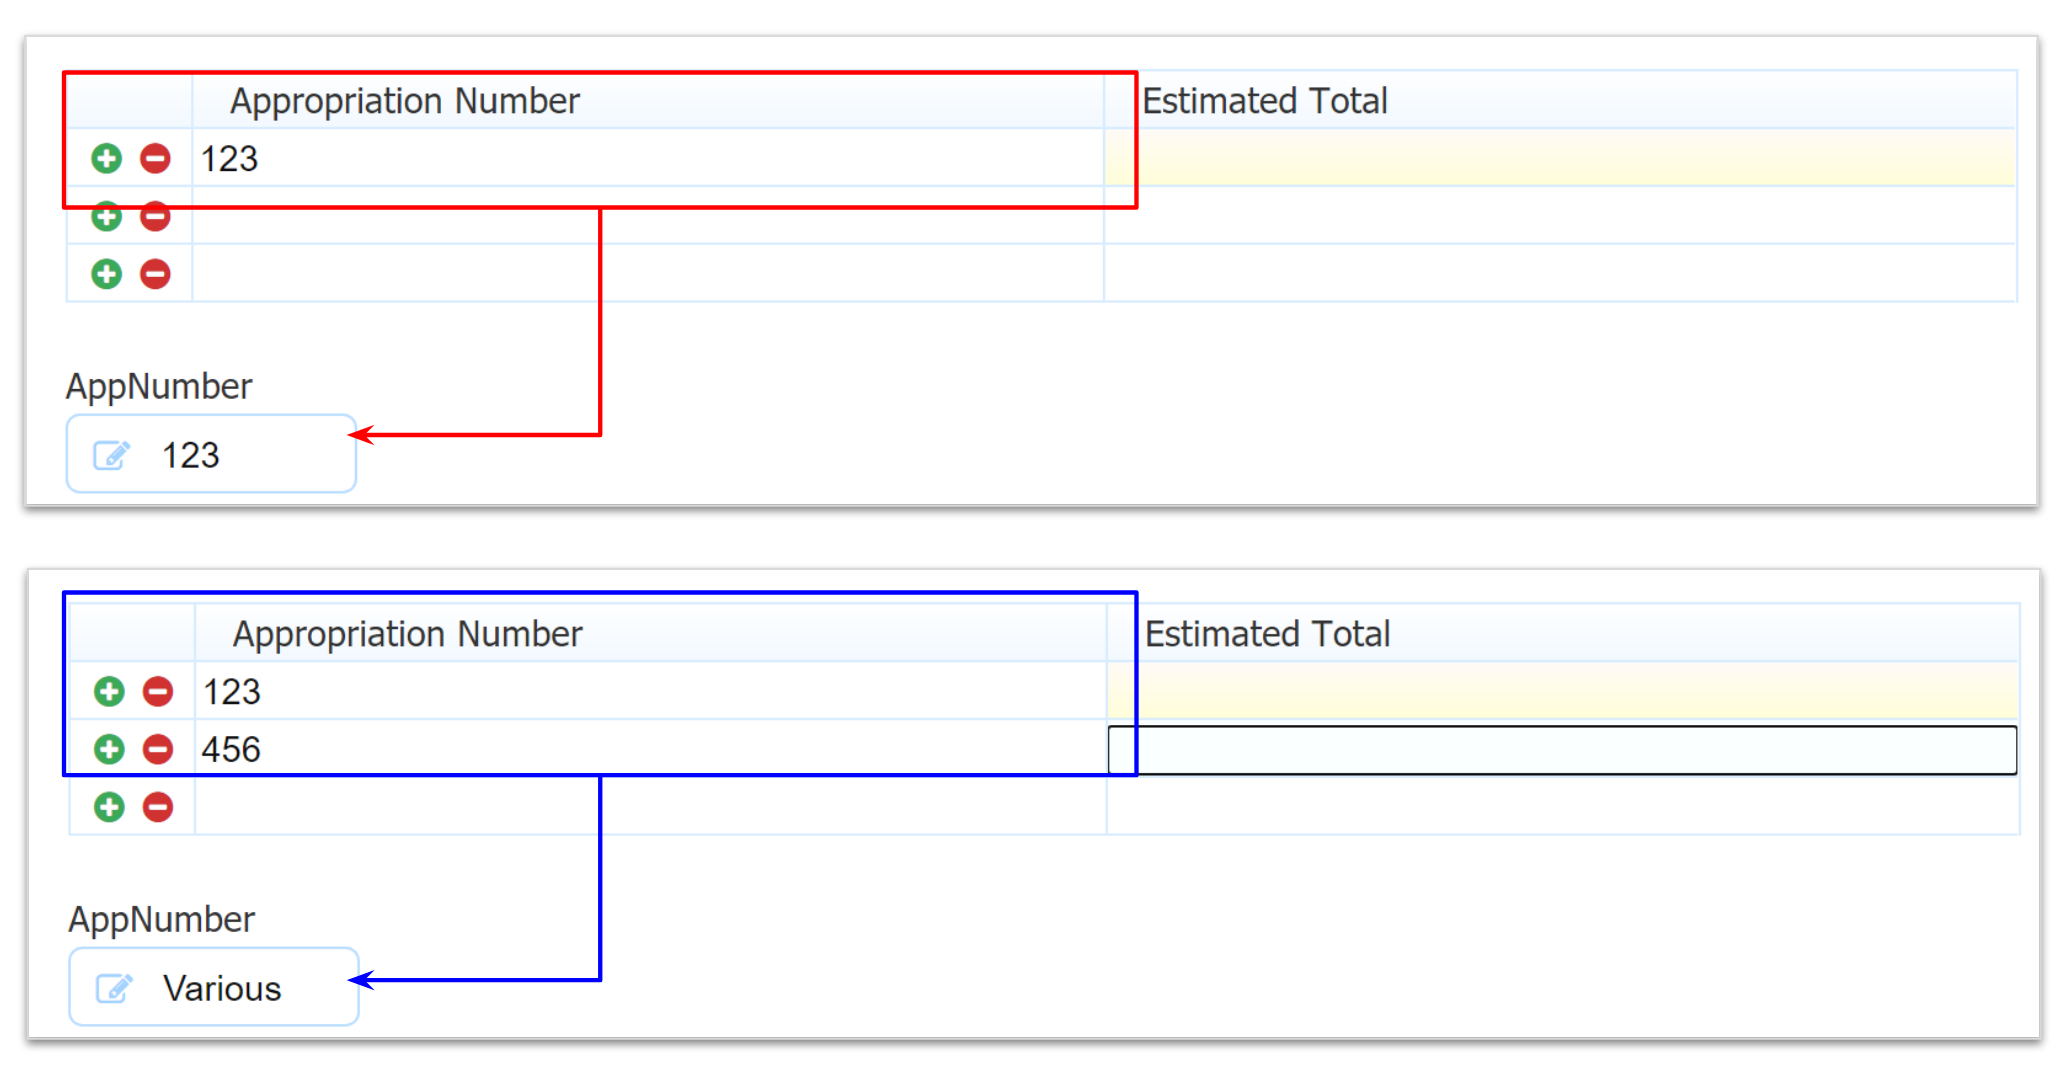
Count the Number of Items in a Table
Perhaps you need a simple rule to calculate the number of rows (in this case, Items) in a table. This table has a column named Item and a separate quantity control named NumberOfItems. We can use the Visual Rule Builders countIf function to count how many rows have a value in the Item column. The countIf function takes two arguments - first, the control to be counted, and second the condition on which to count it. In this case, we are using the isFilled function inside the second argument.
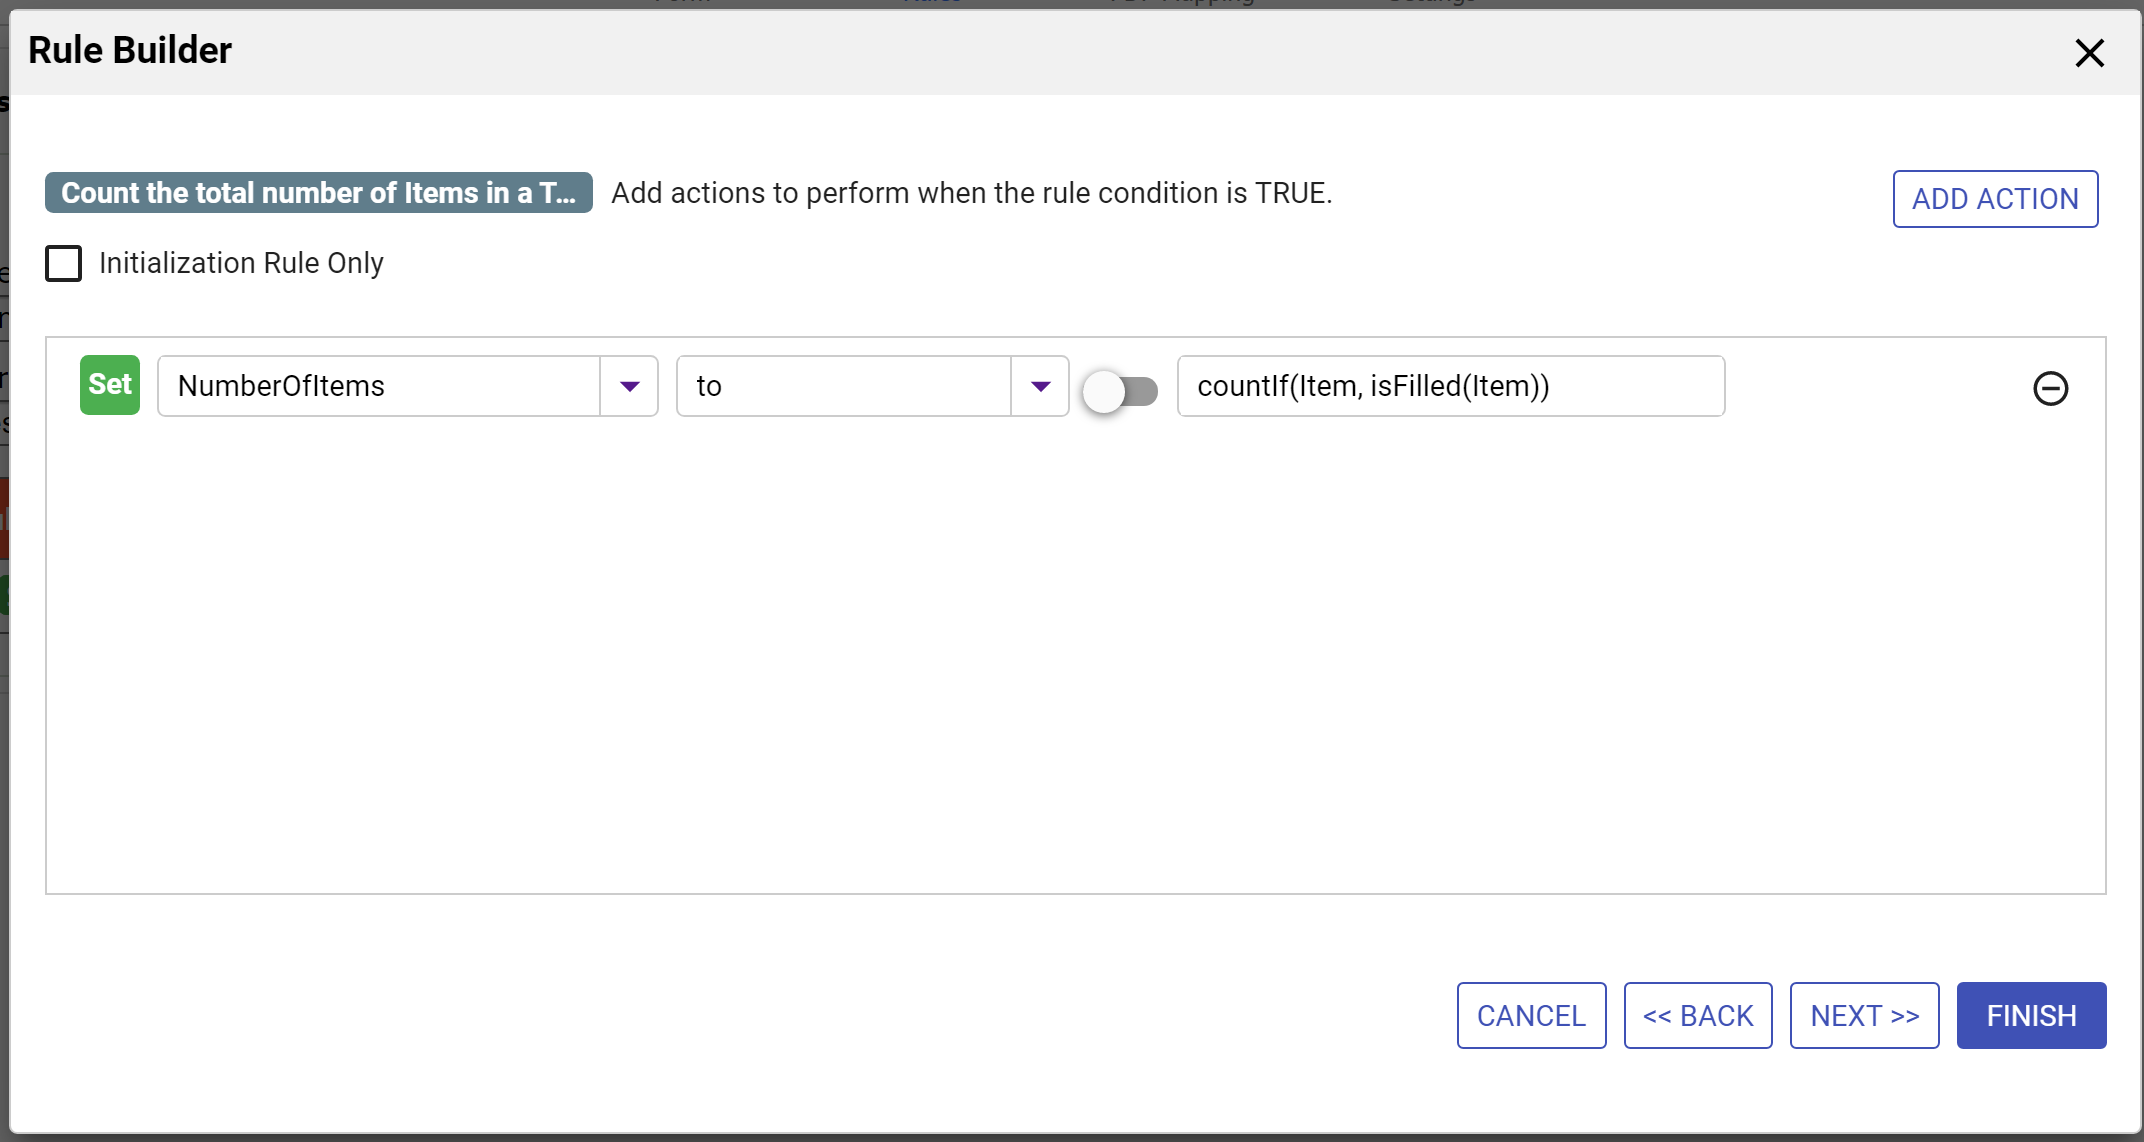
The result is that the quantity field Number of Items automatically displays the number of rows in which the Item column is filled.
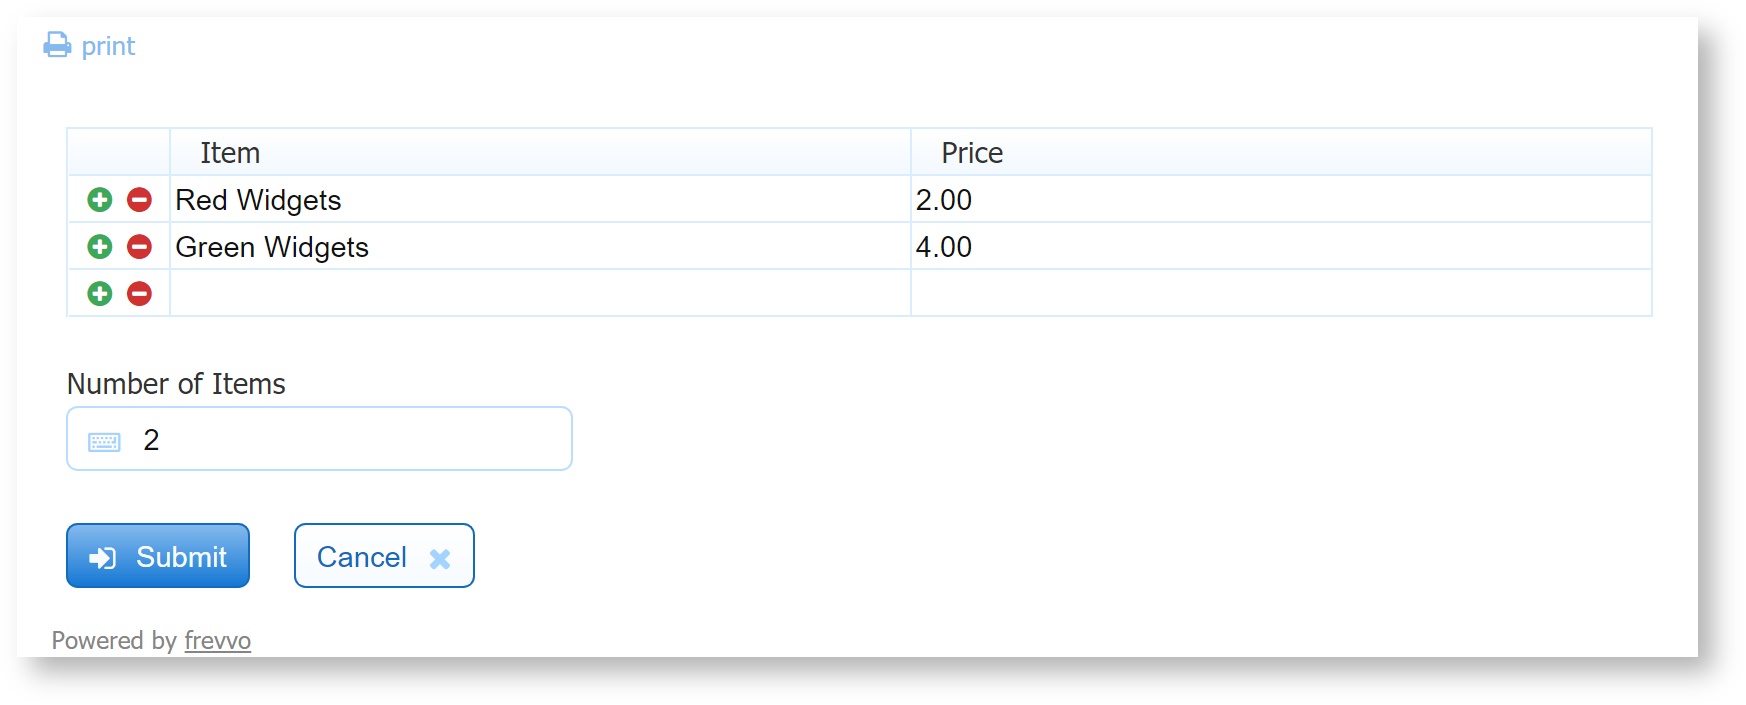
form.load
Rules can be used to initialize field values. This is a very useful feature and is often used to dynamically populate dropdown options from a database. Rules using form.load are triggered when a form first loads and when a workflow is loaded from a task list.
...
Refer to the When Do Rules Execute for more information.
form.unload
Rules including the form.unload event are not yet supported in the Visual Rules Builder and thus still requires some JavaScript. Rules can be used to finalize field values after the users clicks the form's submit button but prior to the Form and Doc Action execution. Rules using form.unload are triggered when the form user clicks the submit button and for workflows when the user clicks continue to go to the next activity or finish to complete the workflow.
...
| Tip |
|---|
The form.deactivate event is identical to the form.unload event. Whenever a step gets deactivated in a screenflow or multi-user workflow, it is unloaded as well. form.deactivate was added for completeness. The rule in this example will also work if it was written using form.deactivate instead of form.activate. |
form.activate
In a desktop browser, users can navigate back and forth between the steps of a Live Forms screenflow or multi-user workflow using the Navigation toolbar. Previous and Next buttons are available on mobile devices for this functionality.
...
Let's take a look at a two step screenflow designed using Linked forms to illustrate these points. Step 1 has 2 text fields, Text 1 is visible and not required. Text 2 is initially not visible and not required. We added a rule in the Visual Rule Builder that sets Text2 to visible and required on Step 2. Notice that by default the VRB creates the ruel on the form.load event.
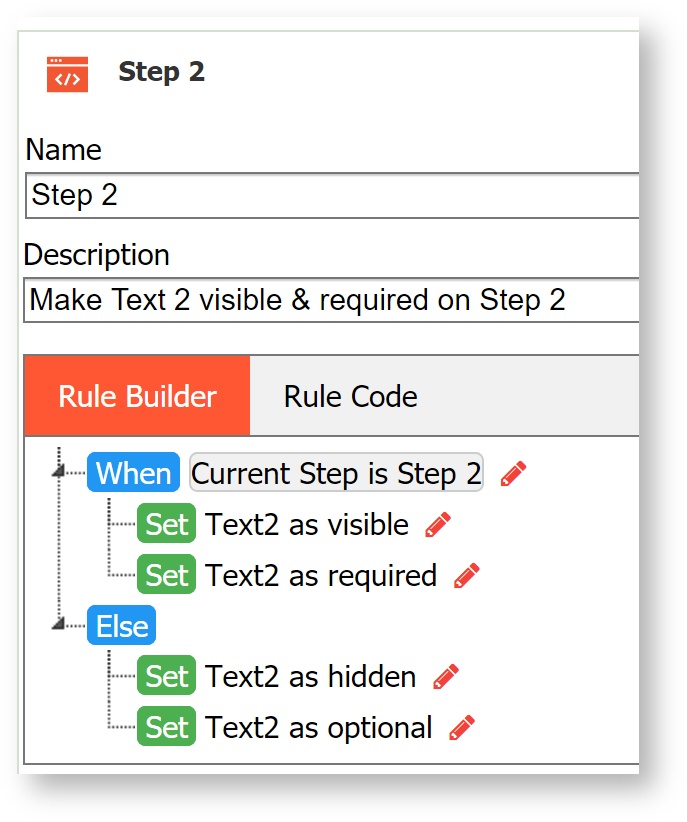
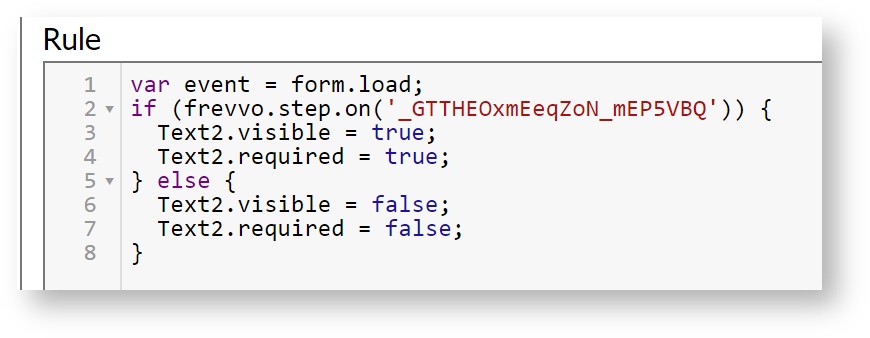
Let's see what events occur when Step 1 is loaded.
- LOAD Step 1 – the form.load is triggered since step 1 is being run for the first time. Text 1 is visible and required and Text 2 is not visbile and not required
- ACTIVATE Step 1 – activate triggers because the step is loaded for the first time.

The user clicks continue and the workflow navigates to Step 2. Note Step 1 is deactivated and unloaded and Step 2 is loaded and activated:
- DEACTIVATE Step 1
- UNLOAD Step 1
- LOAD Step 2 – the workflow is on step 2 – the form.load triggers because step 2 is being loaded for the first time. Text 2 is now visible and required.
- ACTIVATE Step 2 – this runs because step 2 is displayed.
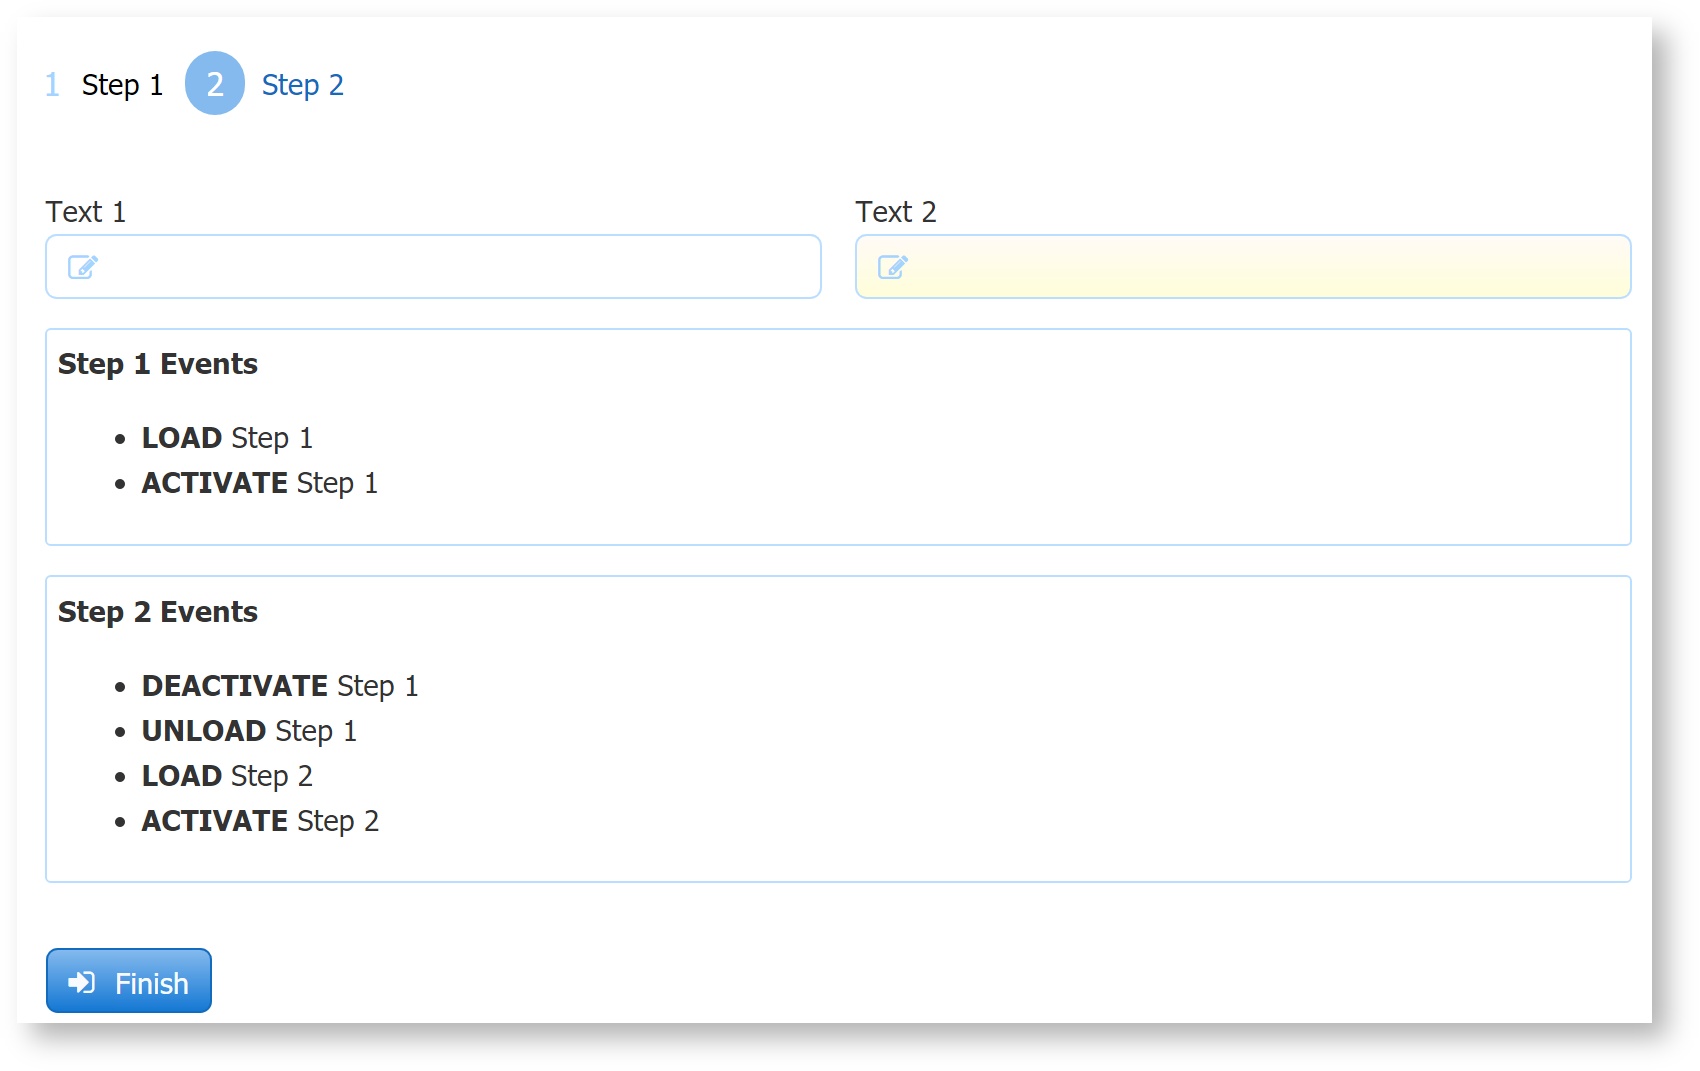
The user navigates back to Step 1 without filling in Text 2. Note Step 2 is deactivated and unloaded and step 1 is activated.
...
form.load is not triggered, so Text 2 is not visible (due to initial property value) but it is still required because Step 1 did not LOAD again. When the user clicks Continue to move to Step 2 the screenflow does not move forward.
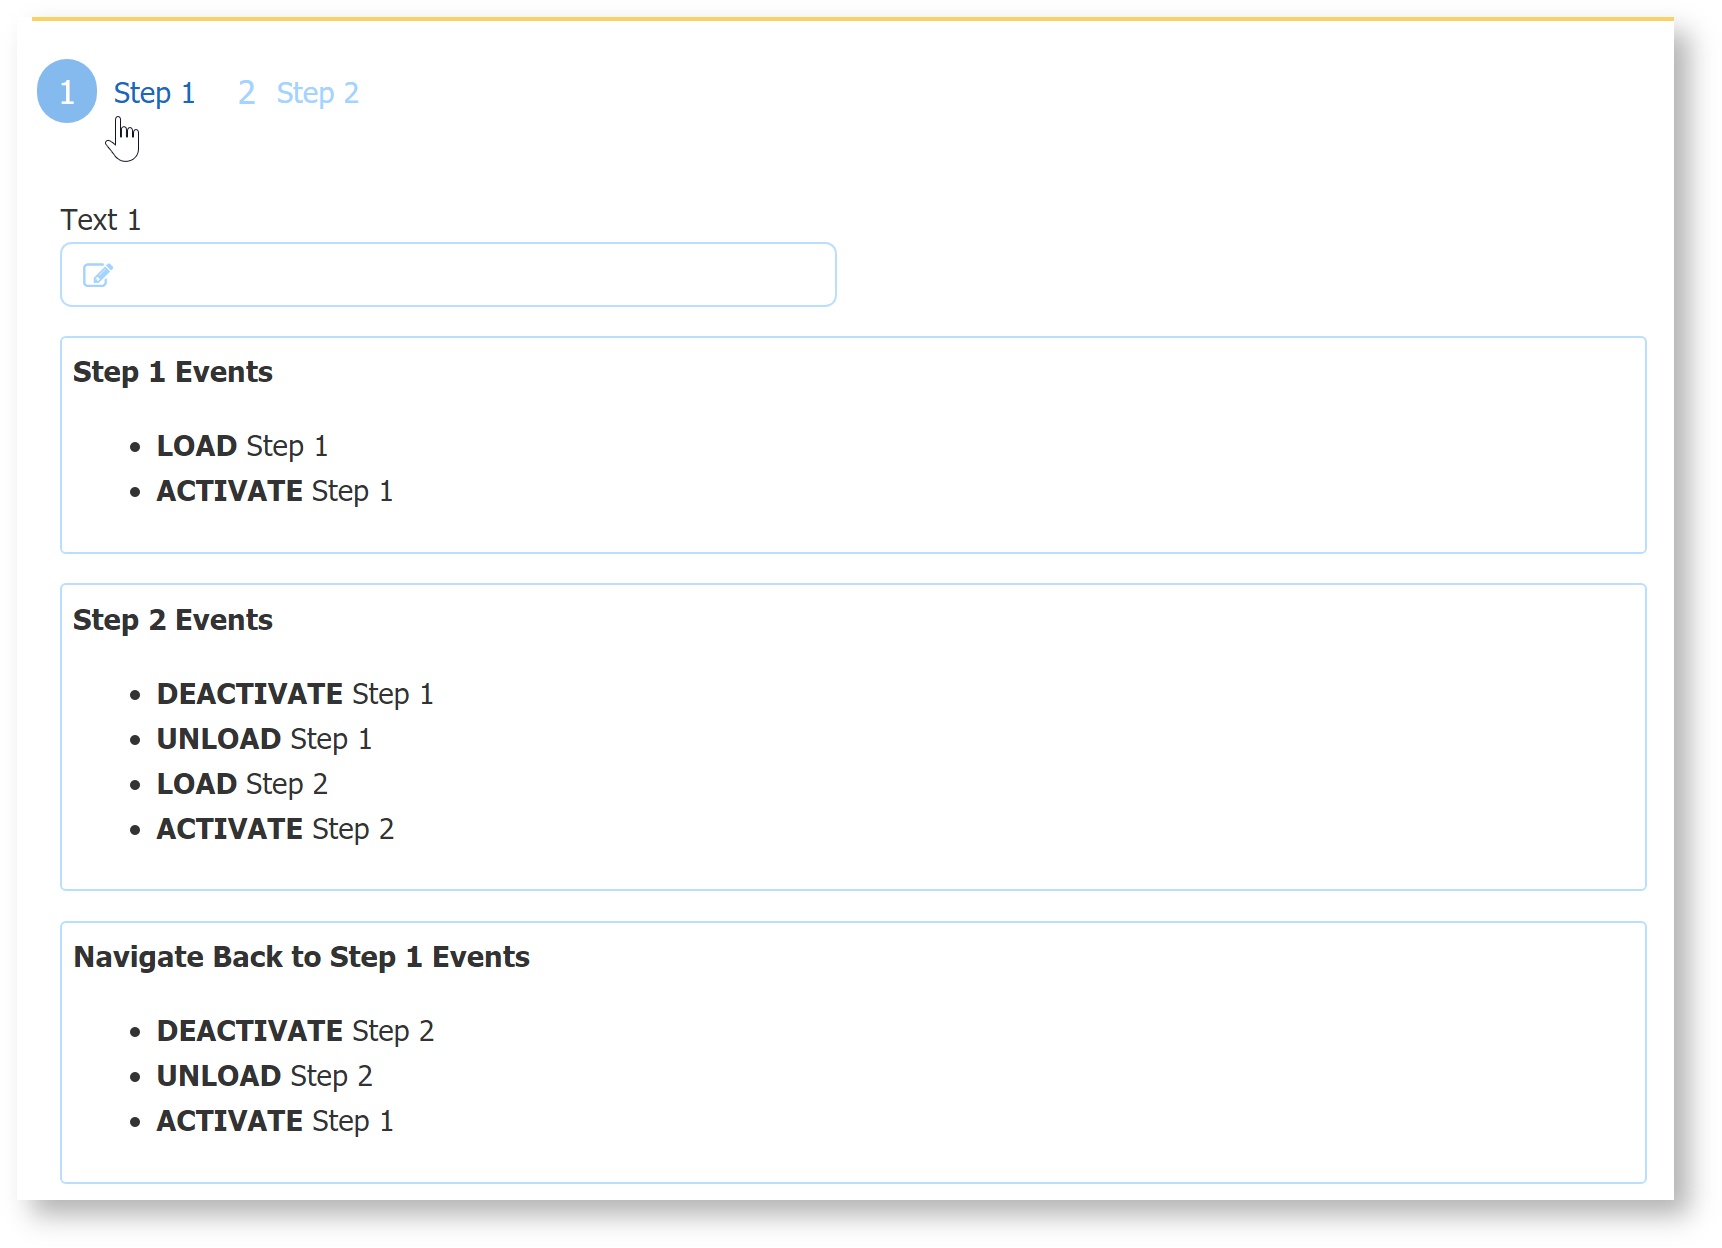
If the rule is written based on the form.activate event instead, here’s what happens. (In this case, we edited the rule code and changed form.load to form.activate.)
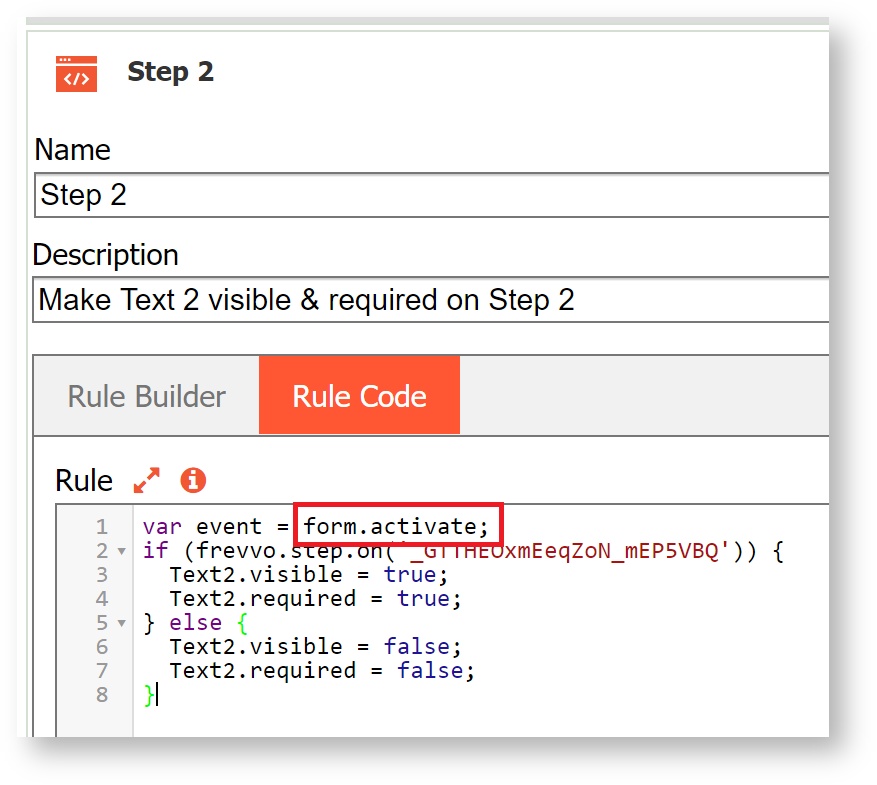
- The user initiates the screenflow.
- LOAD Step 1 – the form.load is triggered since step 1 is being run for the first time. Text 1 is visible and optional and Text 2 is not visbile and not required
- ACTIVATE Step 1 – activate triggers because the step is loaded for the first time
- The user clicks continue and the workflow navigates to Step 2. Note Step 1 is deactivated and unloaded and Step 2 is loaded and activated.
- DEACTIVATE Step 1
- UNLOAD Step 1
- LOAD Step 2 – the workflow is on Step 2 – the form.load triggers because Step 2 is being loaded for the first time. Text 2 is now visible and required.
- ACTIVATE Step 2 – this runs because step 2 is displayed.
- The user navigates back to Step 1 without filling in Text 2. Note Step 1 is only activated.
- DEACTIVATE Step 2
- UNLOAD Step 2
- ACTIVATE Step 1
- The form.activate event is triggered, so the rule runs. The visible and required properties for Text 2 evaluate to false.
- When the user clicks Continue to move to step 2 the screenflow moves forward. The user fills in Step 2, clicks Finish and completes the screenflow.
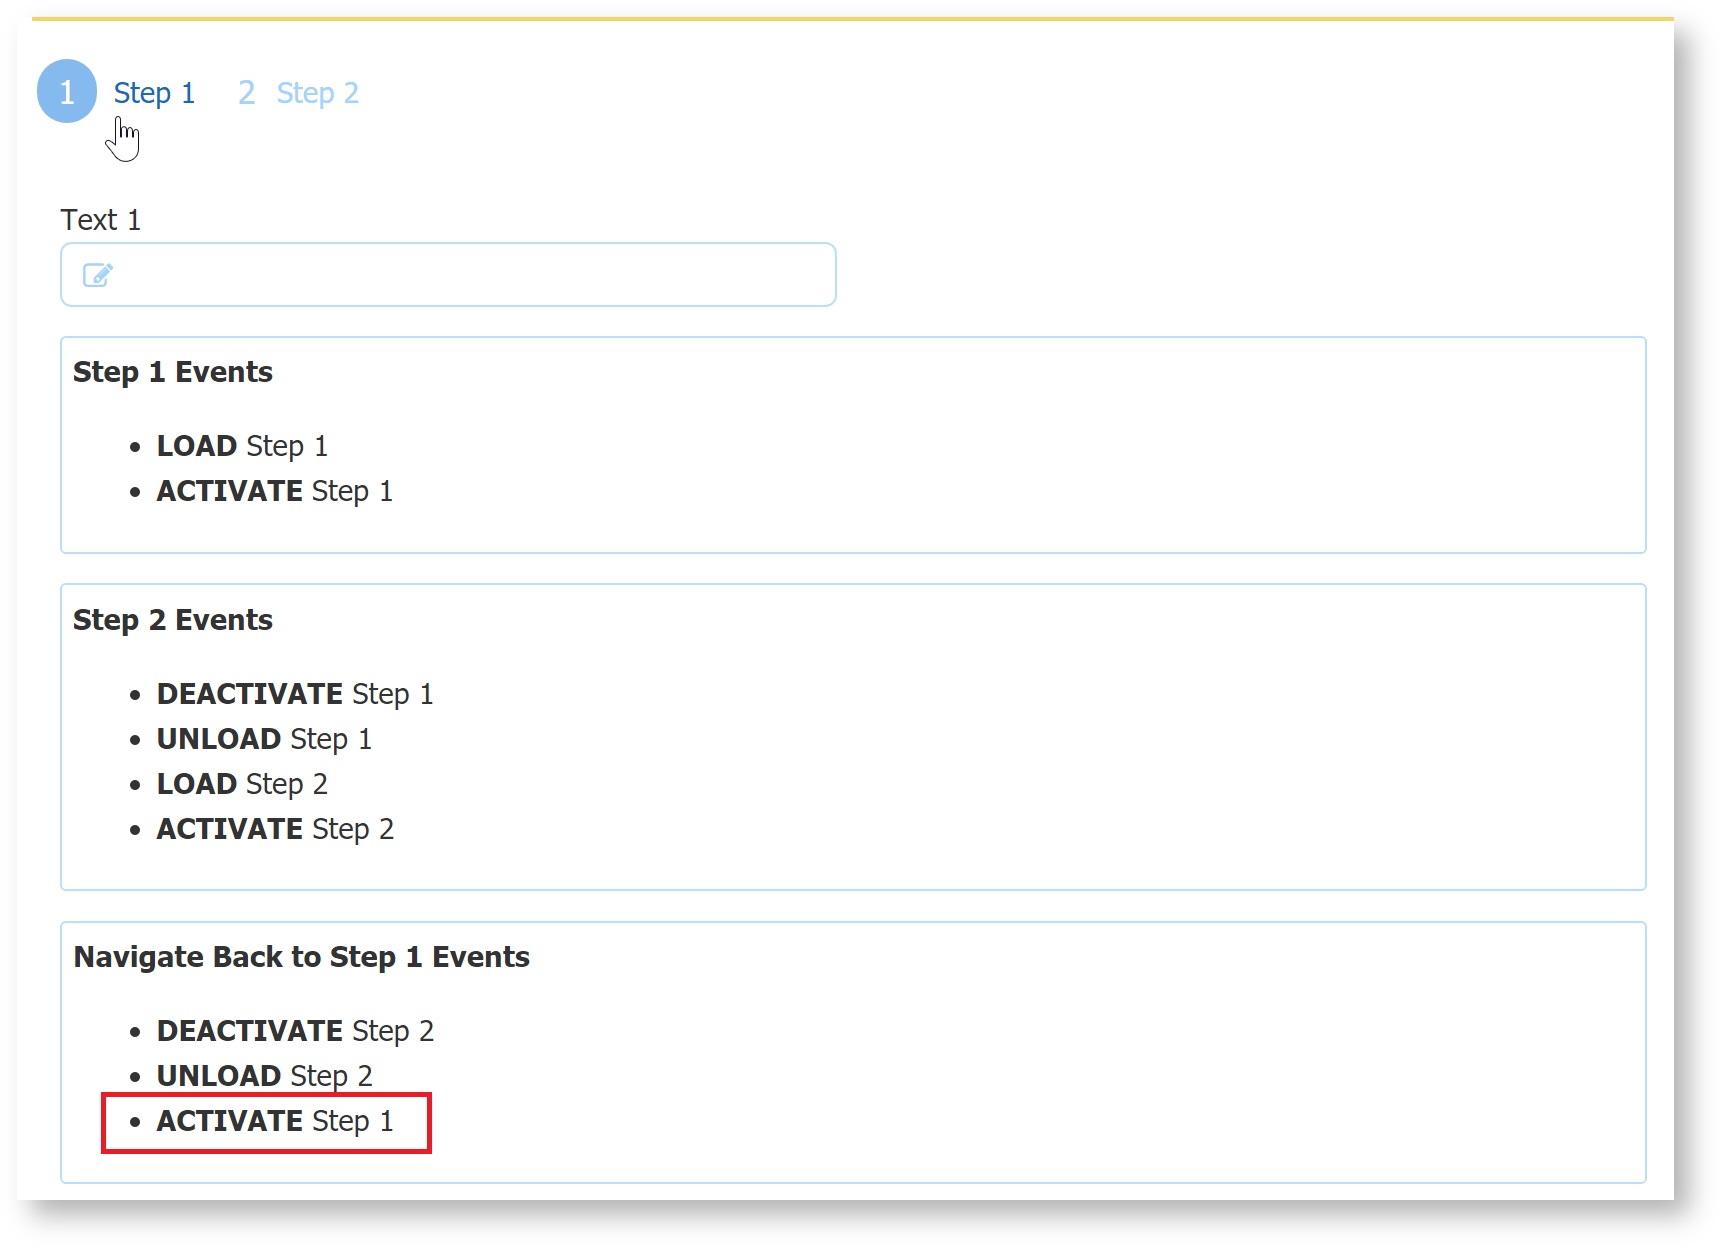
For multiuser workflows, form.load and form.activate are triggered when the step is displayed for the first time. form.activate is not triggred when navigating backwards via the Task List as these steps are Read Only. The Activity assigned to the current user will load only once but will activate every time they are loaded in a particular session.
Geo Location
This rule is not yet supported in the Visual Rules Builder and thus still requires some JavaScript. Rules can be used to save a snapshot of location information of any form. For example, an insurance company may want to capture the GPS location of their representatives filling out a form used for audit purposes. The designer can use the Geo Location feature in conjunction with rules like the ones shown in the examples below to accomplish this. When the form loads in the browser, the user will be prompted by to allow/disallow the use of location services. If permission is granted, the position will be calculated and server will be updated via an Ajax which causes the rule to fire. If the user denies permission or there is a timeout, the server will get an Ajax with an error.
...
Here is an example of a location tab on a Police Report form.
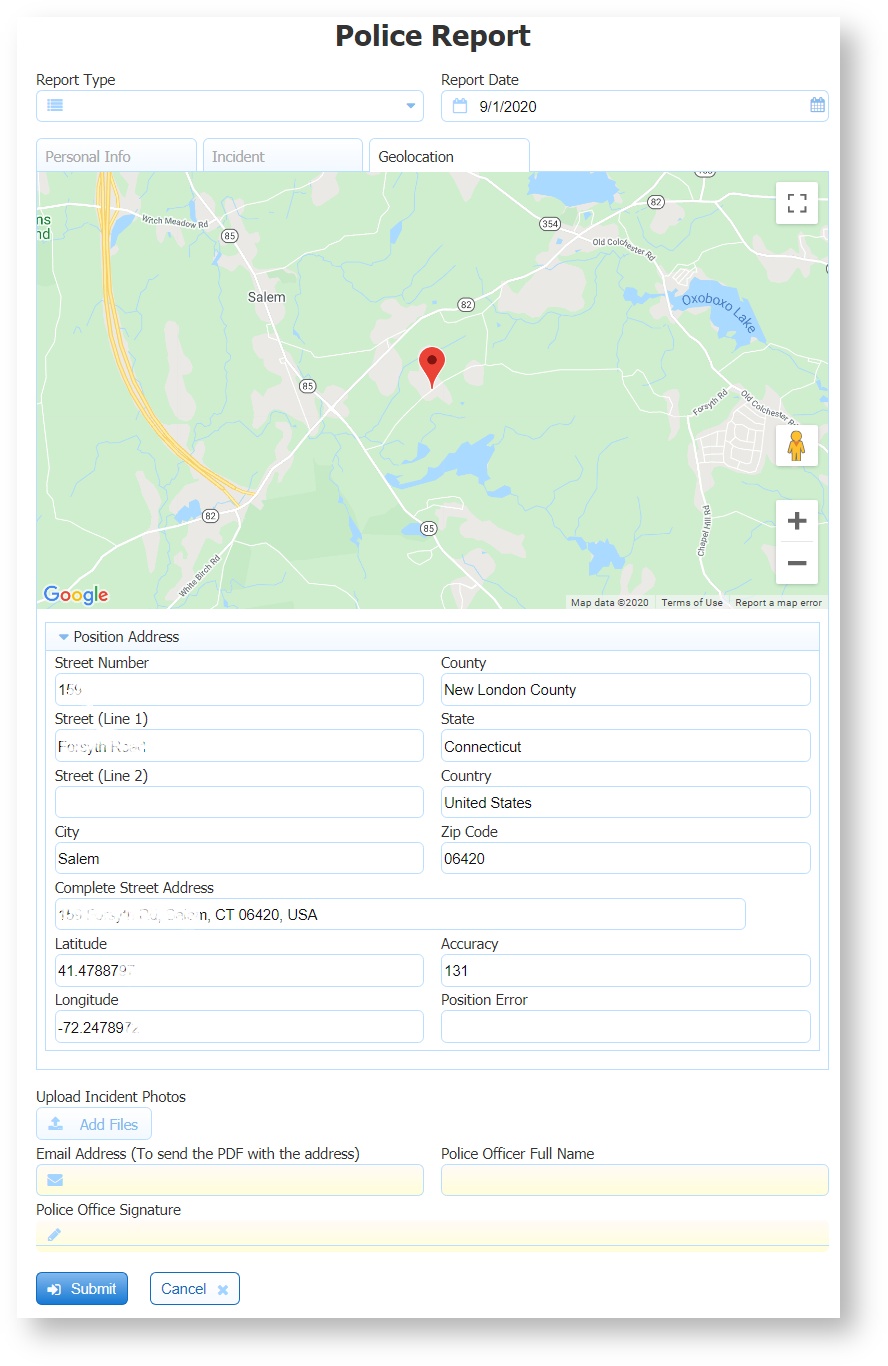
Checking the Detailed Loc checkbox in the Form Property pane and implementing a rule like the one shown will go to Google Maps to get additional information and a map associated with the location.
...
When you run the form (unless you get a timeout or error) the address will automatically get filled in and the Google map will display.
Use Google Maps API to Calculate Mileage
Mileage can be automatically calculated in a frevvo form using Google Maps API and a business rule with Javascript.
- Get a Google Maps API Key.
Create a form with "From" and "To" Dropdown controls as well as controls to calculate mileage as in this example.
Expand title Click here to see example form... 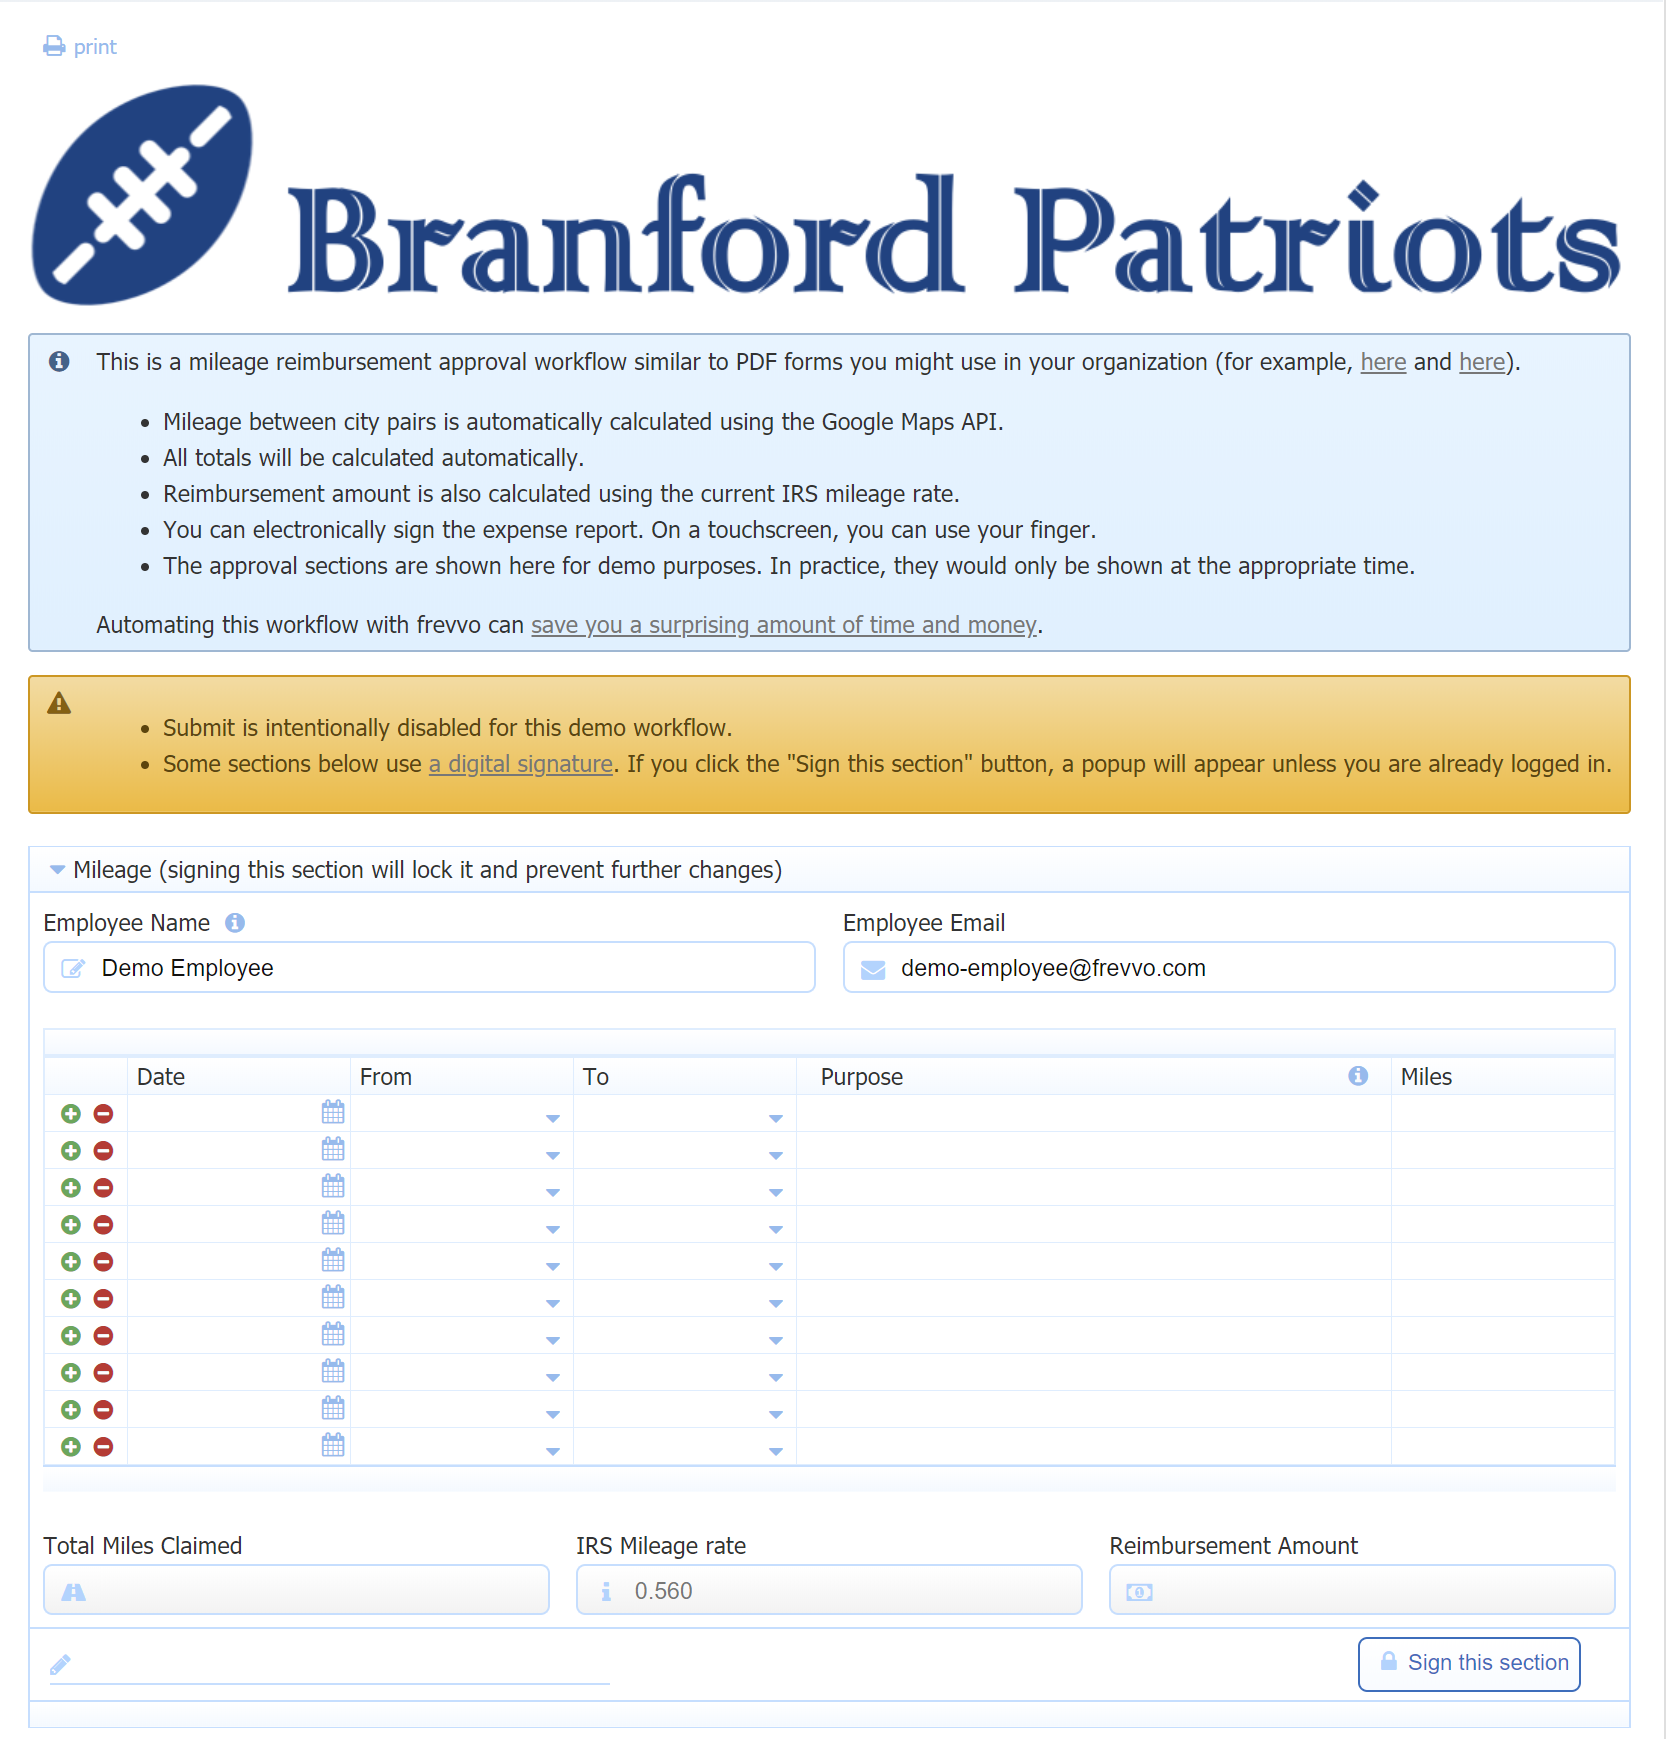
The dropdown option addresses must have a "+" between each word and no special characters, and should include a city and state abbreviation at a minimum. Zip code is not needed. Format the left-side values as follows:
Code Block //Format StreetNumber+StreetName+City+StateInit=Label //Examples 123+Peach+Ln+Anytown+CT=Anytown, CT Chicago+IL=Chicago New+York+NY=New York, NY
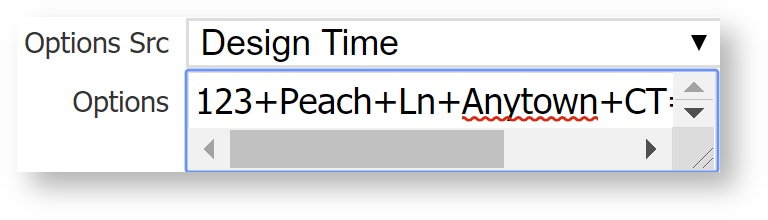
Note the the label (right-side value) can be any value you want your users to see in the dropdown list.Create a business rule to calculate the mileage.
Code Block /*member distance, rows*/ var x; var origins = ""; var destinations = ""; var total = 0.0; for (var i = 0 ; i < From.value.length; i++) { if (From[i].value.length > 0 && To[i].value.length > 0) { origins+=From[i].value + "|"; destinations+=To[i].value + "|"; } } if (origins.length > 0) { eval('x=' + http.get('https://maps.googleapis.com/maps/api/distancematrix/json?origins=' + origins + '&destinations=' + destinations + '&units=imperial&key=<Your Key>')); var miles; for (var i = 0 ; i < x.rows.length; i++) { miles = Math.round(x.rows[i].elements[i].distance['value']*0.00062137); total += miles; Miles[i].value = miles; } TotalMilesClaimed.value = total; Amount.value = total * IRSMileageRate.value; } if (MileageTableRepeat.itemRemoved) {var x1;}The form will automatically calculate the mileage between locations, multiply it by the IRS Mileage Rate, and calculate the total reimbursement.
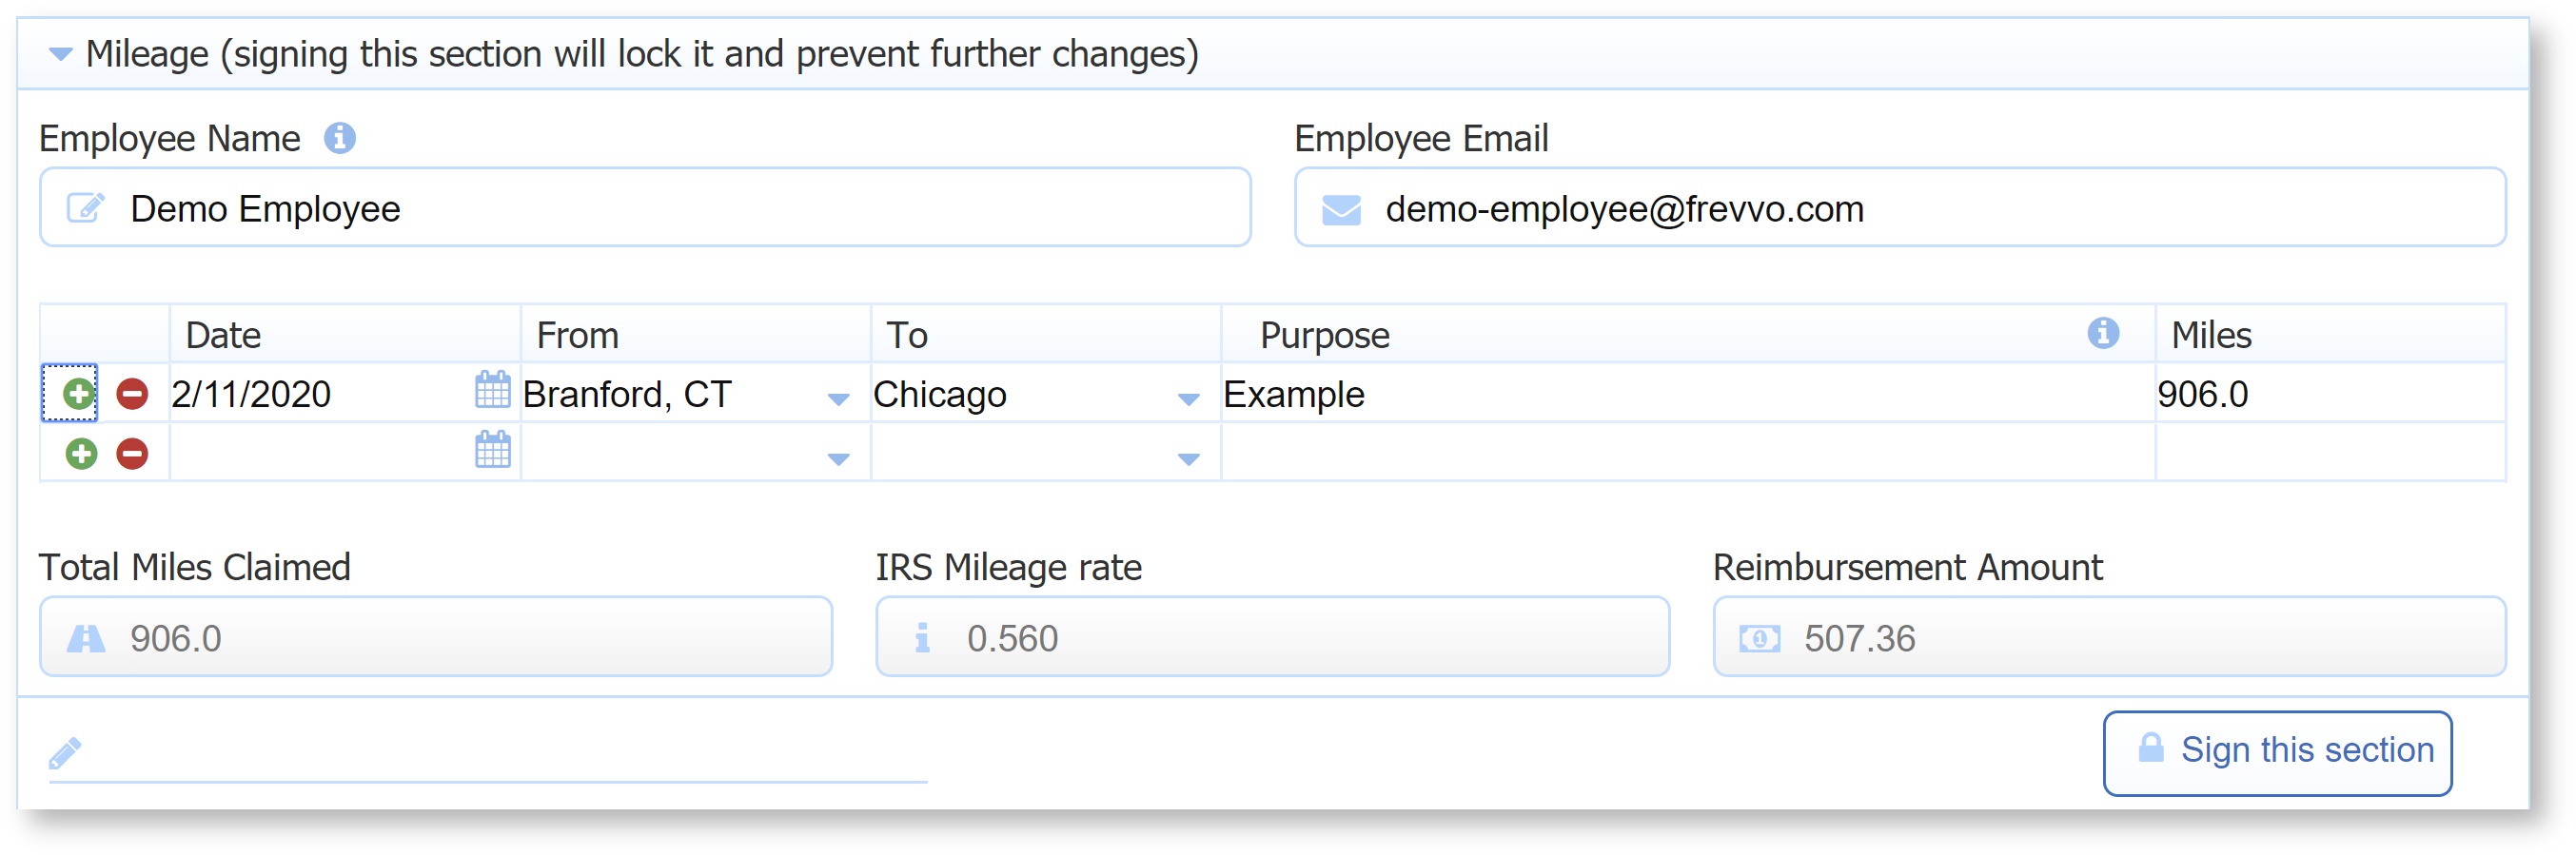
Sequential Numbers
A Google Sheet can be used to generate sequential numbers to populate form/workflow fields. See the example business rule in the Google Connector documentation for the details.
Unique ID
This rule is not yet supported in the Visual Rules Builder and thus still requires some JavaScript. Forms such as invoices, bills of lading, etc often need to be stamped with a unique ID. The Sequential Number example is one approach, however it has some limitations. One is that you must guarantee that only one person at a time is filling out your form. This is because there is no mutex around the read and update of the Google spreadsheet cell.
...
| Code Block |
|---|
// some VERY likely unique number var n = new Date().valueOf().toString(); PONumber.value = n; |
Upload Control
The rules for he Upload Contorl are not yet supported in the Visual Rules Builder and thus still requires some JavaScript.
| Note |
|---|
If you set the upload control's value property to null (i.e. uploadcontrol.value = null;) via a business rule, the uploaded files will be removed in the UI but not in the submission. If you have "Attachments" checked on Activity Doc Action or Doc Action Emails, the uploaded files will still be sent. A feature to delete uploaded files may be available in a future release. |
Display Uploaded Image
A rule can dynamically display an image uploaded to your form via the upload control. In this example the upload control is named 'u'. The form also must contain a message control as a place holder for displaying the uploaded image. The rule dynamically creates a URL to the uploaded image in the temporary attachment repository. The upload control's value 'u.value' is a GUID that uniquely identifies the attachment. The uploaded image will be included in the submission PDF.
| Code Block | ||
|---|---|---|
| ||
if (u.value.length > 0) {
  var baseUrl = "/frevvo/web/tn/" +
      _data.getParameter('tn.id') +
      "/user/"+_data.getParameter('user.id') +
      "/app/"+_data.getParameter('app.id') +
      "/form/"+_data.getParameter('form.id');

  im.value = '<img src="' +
         baseUrl + '/attachment/' + u.value+'/does_not_matter"/>';
} |
Here is the example form before and after the user has upload the frevvo.logo.orange.png image:
| Section | ||||
|---|---|---|---|---|
|
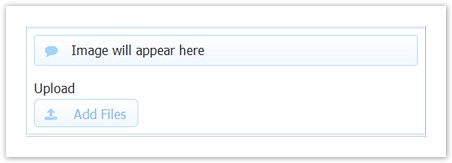
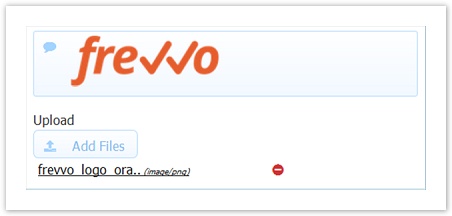
This rule is a bit more complex to handle the case where the user uploaded multiple images via the upload control.
...
| Info | ||
|---|---|---|
| ||
If you are displaying an uploaded document, such as a PDF, instead of an image, replace the <img src=.../> tags with the <iframe src=.../> tag in the rule examples above. |
Dynamically Set Min/Max Properties
There are two properties, minFiles and maxFiles, associated with the Upload control that can be read or changed at runtime using a business rule. This is a way to dynamically control the number of attachments uploaded to your form/workflow.
...
- If the user selects none for the Files to Upload control, then we do not want to allow any files to be uploaded - disable the Upload control
- If the user selects one then we want to restrict the file uploads to 1 - set minFiles to 0 and maxFiles to 1.
- If the user selects many then we want to allow no more than 10 attachments - set minFiles to and MaxFiles to 10.
| Section | ||||||||||||
|---|---|---|---|---|---|---|---|---|---|---|---|---|
|
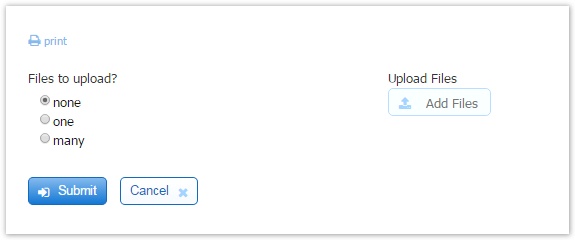
Making the Upload Control Required
You can set the minfile and maxfile properties using a business rule without supplying values for the Min/Max properties in the Form/Workflow designers. In this simple form, there is a Radio control with 2 options and an Upload control with no values specified for the Min and Max properties.
Selecting the "Yes" option for the Radio control named TrainingCourse triggers the rule that sets the minFiles and maxFiles of the Upload control named Certificate, making it required. Selecting "No" sets these properties to 0, removing the requirement.
| Section | |||||||||||||||
|---|---|---|---|---|---|---|---|---|---|---|---|---|---|---|---|
|
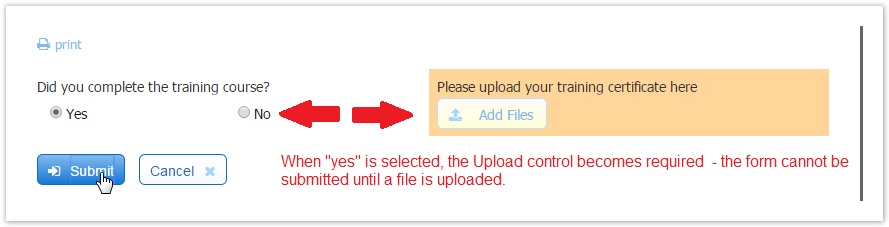
Construct Form URL
This rule is not yet supported in the Visual Rules Builder and thus still requires some JavaScript. A rule can dynamically construct the URL to itself. This can be handy when you want to add a link to your form's URL to an email message or to the form action display message. In this example FormURL is the name of a text control in your form.
...
| Code Block |
|---|
Thank You!<br/><br/>
Your account will be created within 24 hours.<br/>
Click <a href="{FormURL}">here</a> to request another demo account. |
Display a PDF in a Message Control
Message controls are a great way to display a PDF right in your form. You can host the PDF on your website where it is accessible by URL, or you can use frevvo's PDF Mapping feature to contain the PDF right in your form designer.
Method 1: Host the PDF on your website.
- Upload your PDF to a location on your website, and copy the link for it.
- Add a Message Control to your form. Give it a name (in this example we use the name PDFStatic and set the Message Type to "None."
Add a Business Rule like this:
Code Block if (form.load) { var baseUrl = "https://s3.amazonaws.com/static.frevvo.com/docs/Sample+PDF.pdf"; PDFStatic.value = '<iframe width="100%" height="750" src="' + baseUrl + '" frameborder="0" ></iframe>'; }- Set the variable baseUrl to the link for your PDF.
- Then, set your Message Control to a string including the iframe tags and the base url.
- Save and Test the form. The PDF controls at the top may vary based on the user's browser, but in most cases allow the user to download or print the PDF, and to scroll up and down the PDF if it is multiple page.
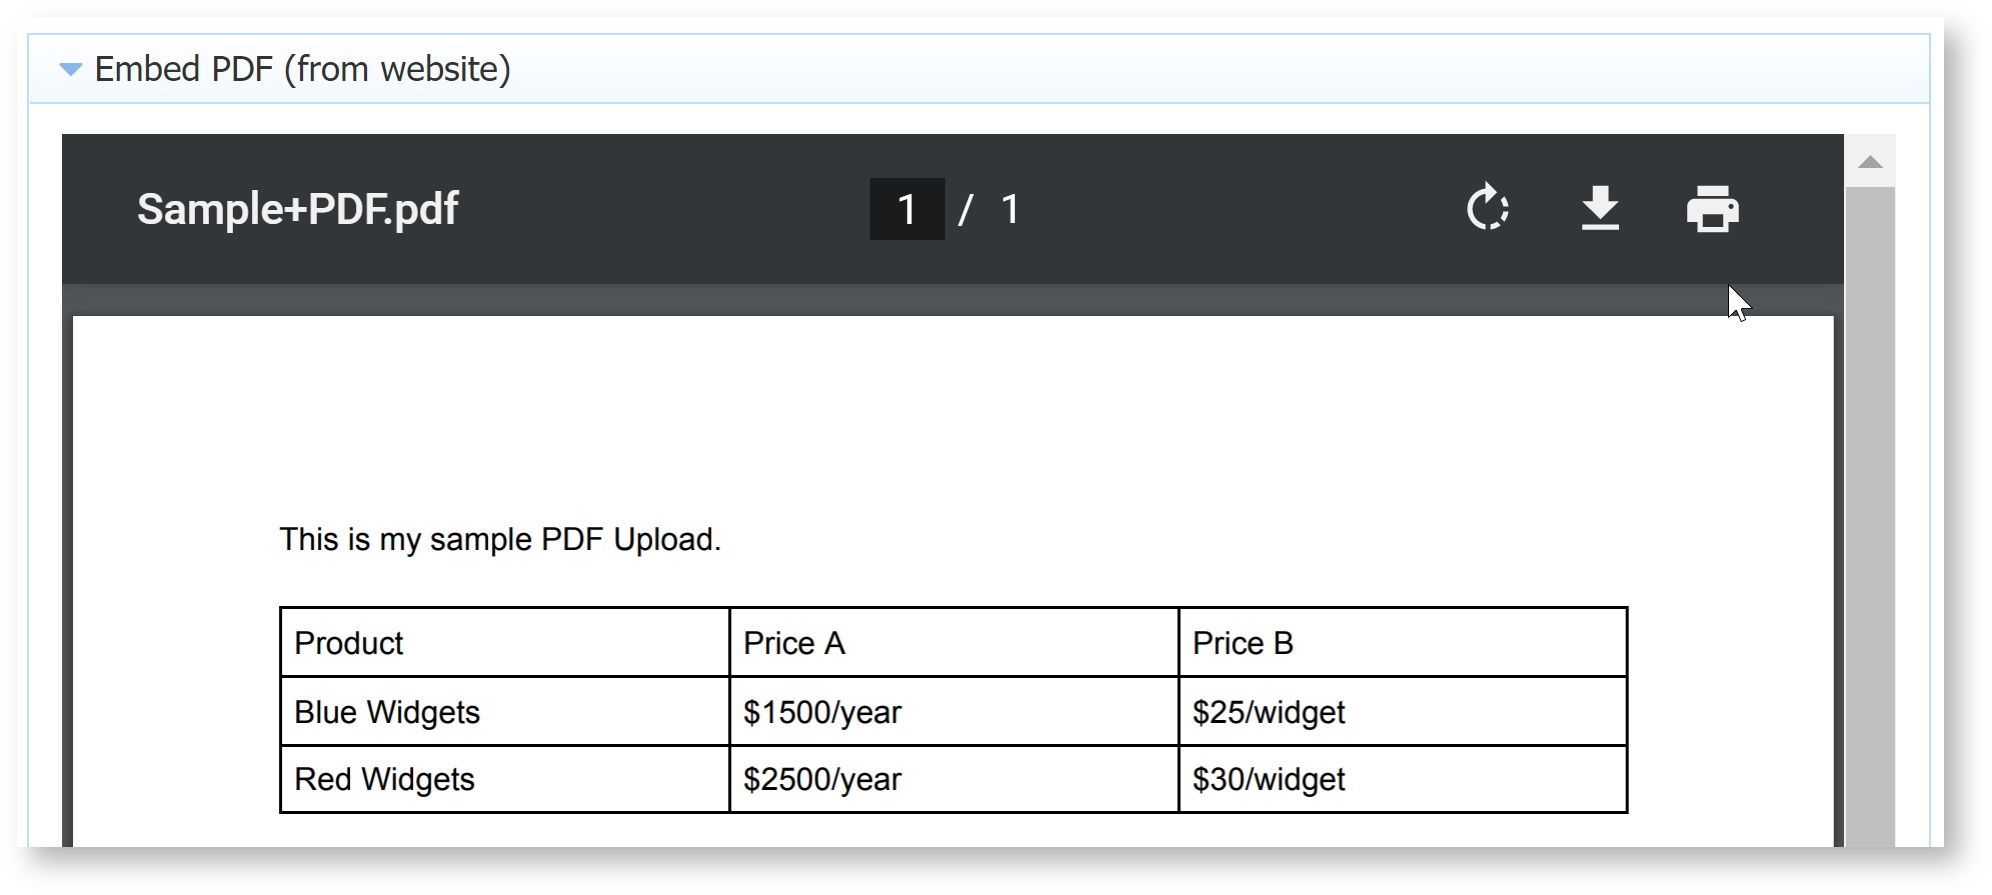
Method 2: Upload the PDF in frevvo's PDF Mapping tool.
Usually the PDF Mapping feature is used to map form data to a PDF. However, it also allows you to host the PDF right within your form and use the generated link to display it similar to Method 1 above. While this method requires a few additonal steps, it eliminates the need to host your PDF elsewhere, and allows you to map form data to the PDF as well.
- In order to upload a PDF into frevvo's PDF Mapper, it must be an acroform. Start by uploading it to a tool like PDF Escape. If you plan to map fields, you can set the fillable fields in that tool. If you only need to display it, simply upload the PDF to that tool, add a Form Field anywhere on the document (it will not be visible to the user), then immediately download it again as a fillable acroform.
- Open your form and select
- Click the
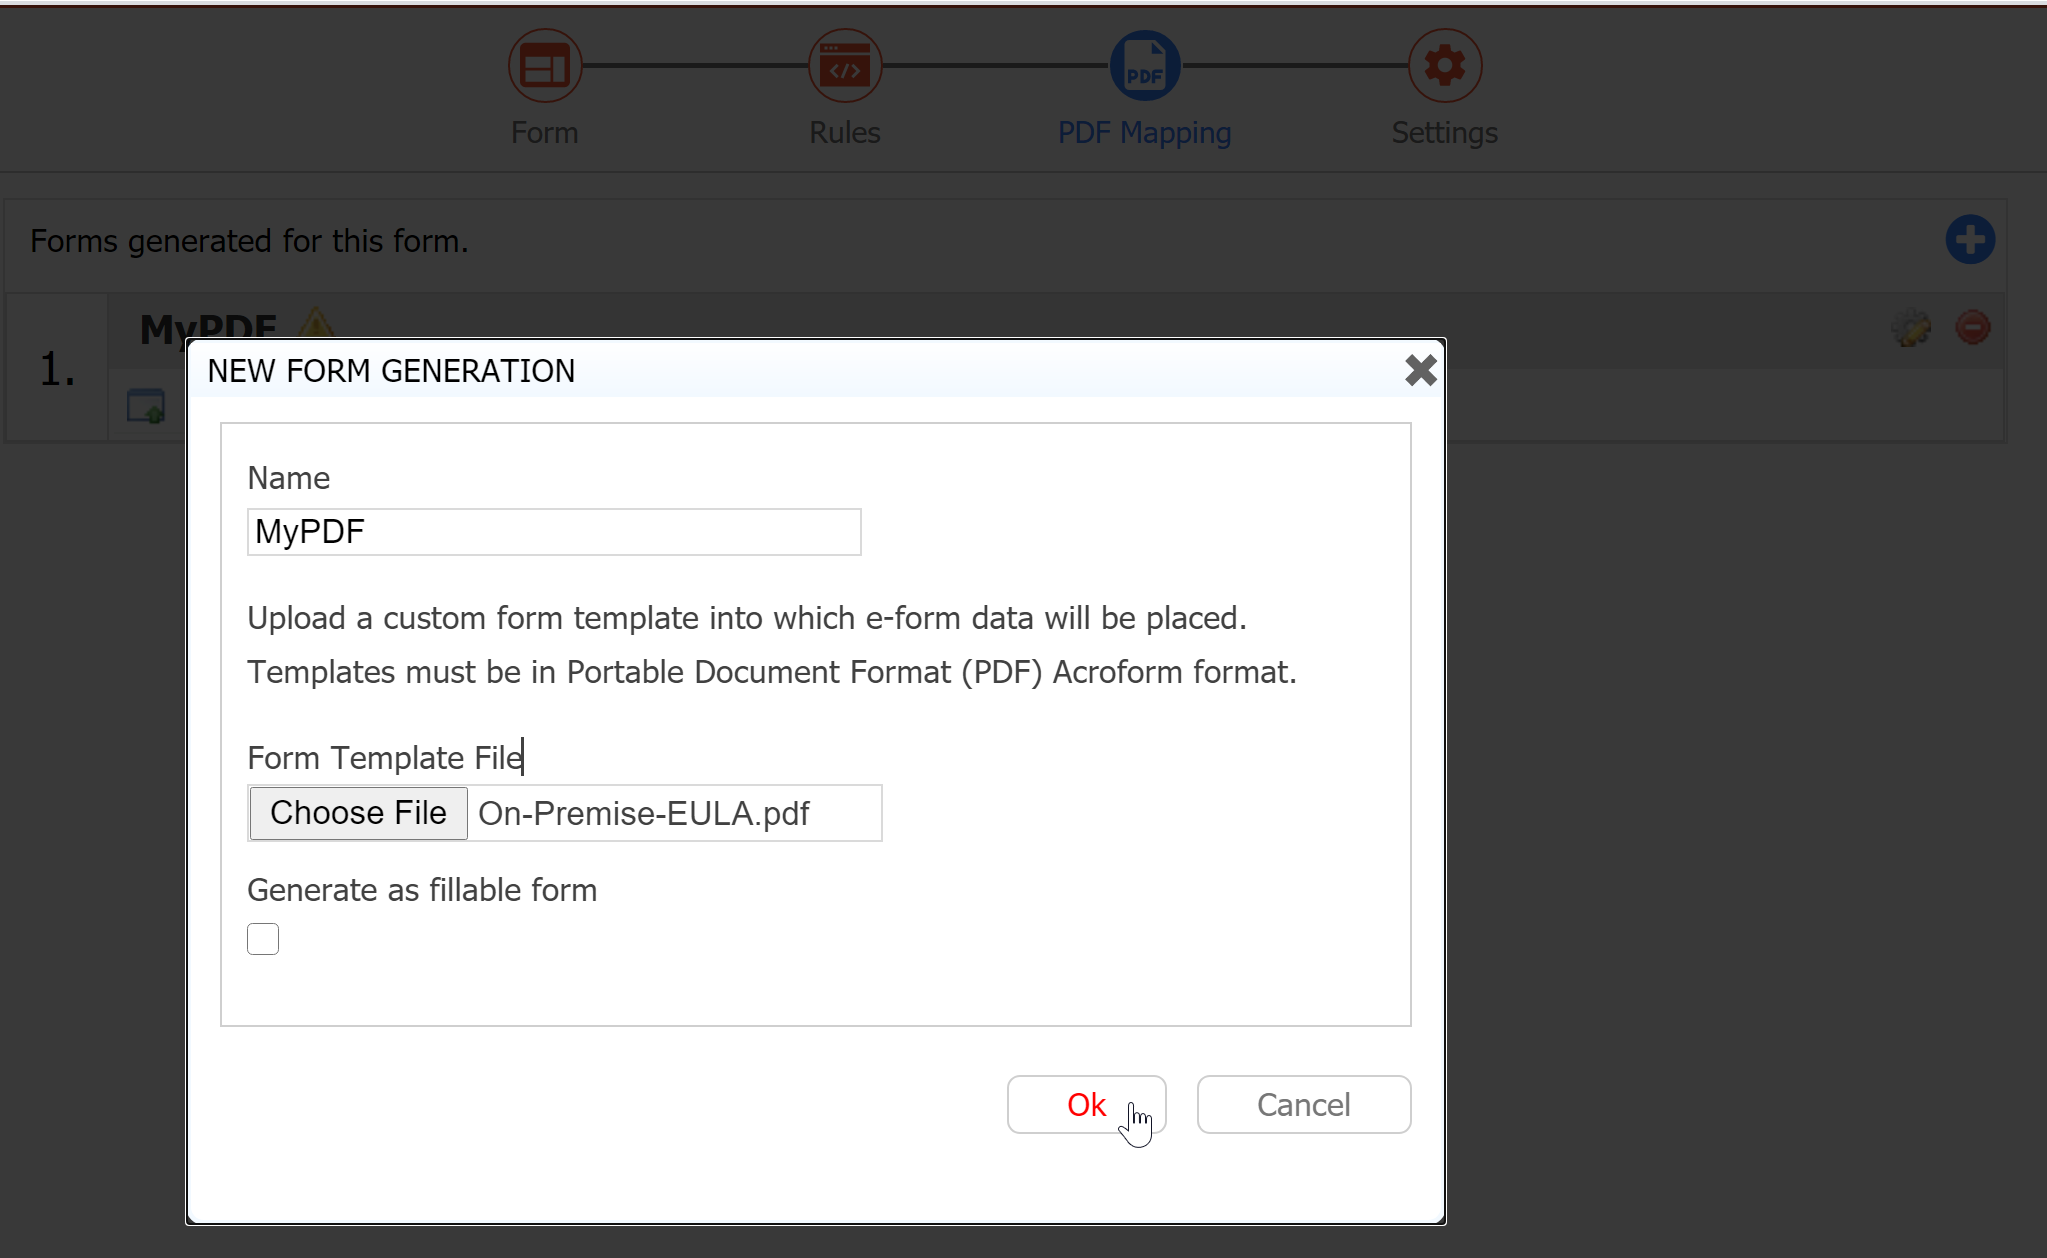
- Return to Forms editing mode by clicking Form(s) in the Guided Designer navigation bar.
- Add a Message Control to your form. Give it a name (in this example we use the name PDFfrevvo) and set the Message Type to "None."
- Add a Form Viewer control to your form. In the From property, choose the form you just uploaded.

- Save and test the form, and click the Form View control. The PDF will open in a new tab. Click on the URL and copy from /genform/... to the end of the url. Paste to a text pad - we'll use this in our business rule.

- Optionally, set the Form Viewer control to hidden. Once you have the URL, you do not necessarily need this control visible to users.
Add a business rule like this:
Code Block if (form.load) { var baseUrl = "/frevvo/web/tn/" + _data.getParameter('tn.id') + "/user/"+_data.getParameter('user.id') + "/app/"+_data.getParameter('app.id') + "/form/"+_data.getParameter('form.id'); PDFfrevvo.value = '<iframe width="100%" height="750" src="' + baseUrl + '/genform/_dMOPwEFOEeurl6p3Z49rvQ?action=gen-form' + '" frameborder="0" ></iframe>'; }- Set the variable baseUrl to construct your form's URL. This is dynamic, so if you later move a form from a development tenant into a production tenant, the url will contineu to work. If you are setting this rule in a workflow, be sure to use /flow/ and 'flow.id' in place of /form/ and 'form.id'.
- Set the message control to a string that includes the iframe tags, the baseUrl, and the /genform/... url parameter you copied in Step 7.
- Save and Test the form. The PDF controls at the top may vary based on the user's browser, but in most cases allow the user to download or print the PDF, and to scroll up and down the PDF if it is multiple page.
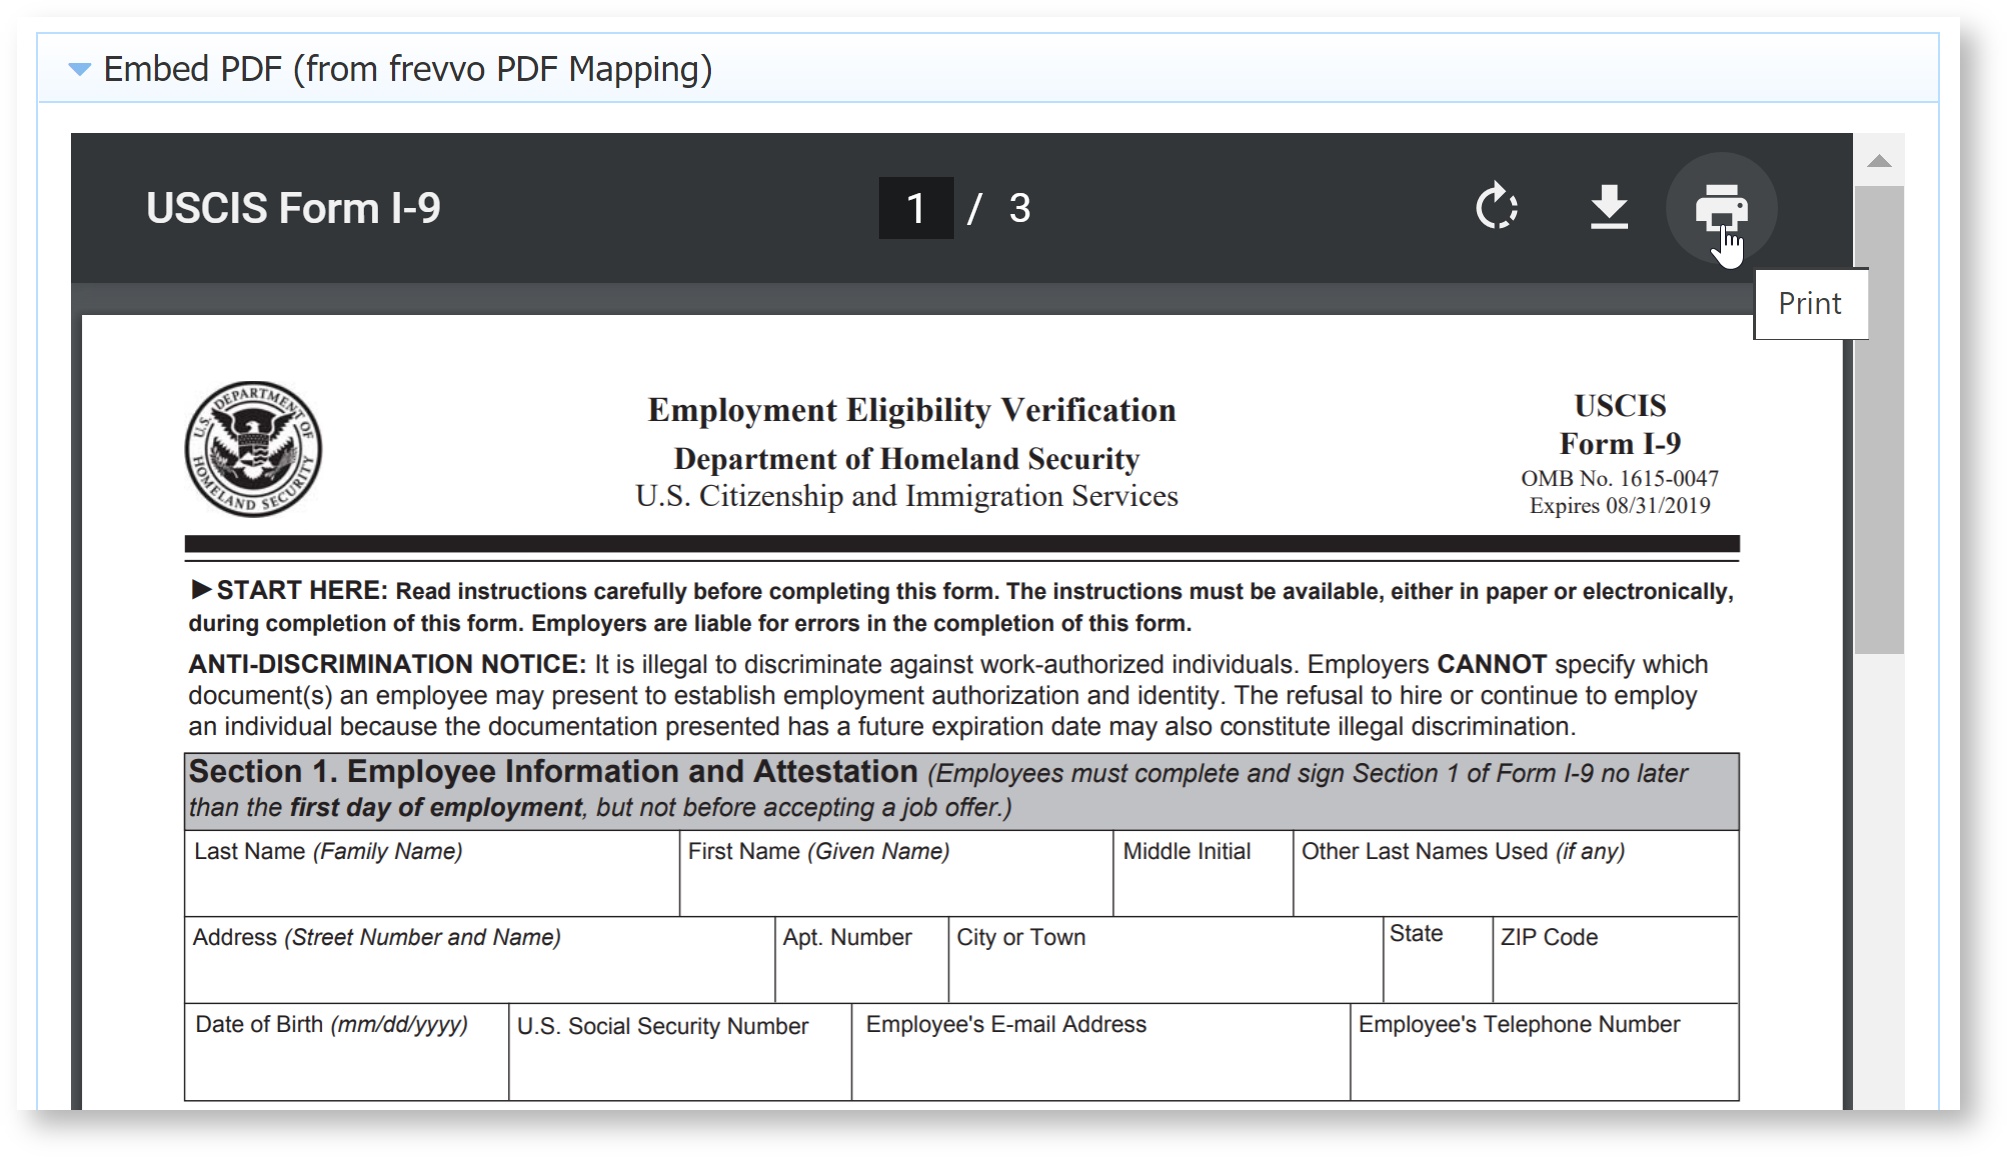
Display PDF with mapped fields
If you are mapping fields to the PDF, the Method 2 rule will not automatically show the PDF with fields mapped. However, you can add a trigger control to your form, and change the rule's condition to if (<triggerName>.clicked) which will refresh the PDF displayed in the Message control with mapped fields each time it is clicked. This can be an alternative to the built-in Form Viewer control which opens the mapped PDF in a new browser tab.
Embed a Video in a Message Control
You can also use a message control to embed a video in your form.
- Get the URL for your video, such as a YouTube link.
- Add a Message Control to your form. Give it a name (in this example we use the name VideoMsg) and set the Message Type to "None."
Add a Business Rule like this:
Code Block if (form.load) { VideoMsg.value = '<iframe width="100%" height="450" src="https://youtube.com/embed/AOtLYy6I9Vg" + " frameborder="0" ></iframe>'; }This rule sets the Message Control to a string that includes the iframe tags and your video link.
- Save and Test the form. Your users can play the video right in your form.
Search Popup
This rule is not yet supported in the Visual Rules Builder and thus still requires some JavaScript. forms can initialize dynamically from backend systems. A common form design pattern is the master/detail. An example of master/detail is a form that contains an order number or employee Id. When the user enters an existing Id into the form field you want all other form fields to populate dynamically from values in a database. This is done using a form created from XSD data source generated by the database connector. This part of the master/detail form design pattern needs no business rule. It happens automatically using the Doc Action manually set document URIs. See the DB Connector Tutorial for complete detail on how to initialize your form using a Doc Action document URI to your database.
...
Here is an example form that allows user to view existing employee records and to update their information.
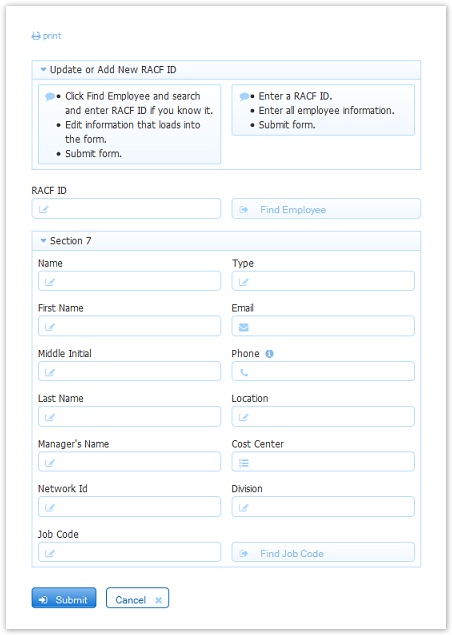
If you know the RACF ID for an employee you can simply type it into that field. If the RACF ID is found in the database the form will automatically populate all other fields from the database (because of the doc action document uri setting). However if you do not know the employee's RACF ID you can click the Find Employee trigger.
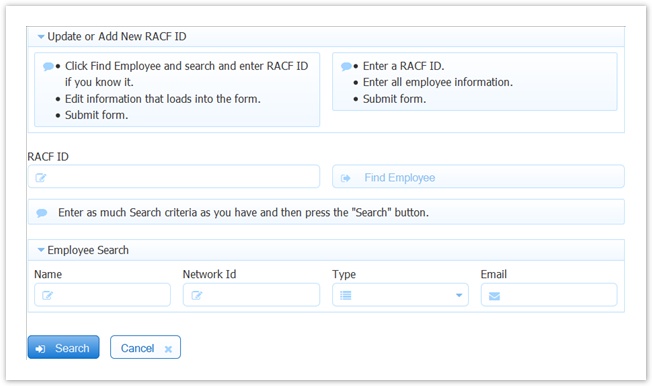
This trigger control is named FindEmployee and fires the following rule that makes the search condition section control visible.
...
| Code Block |
|---|
/*member clicked racfid resultSet type */
var x;

if (Search.clicked) {

 eval('x=' +
http.get('database/myqset/findEmployee?name={name_s1}&type={type_s1}&racfid={id_s1}&email={email_s1}'));

    var opts= [];
    for (var i=0; i < x.resultSet.length; i++) {
        if (x.resultSet[i]) {
            opts[i] = x.resultSet[i].racfid + "=" +
                      x.resultSet[i].name + ", " +
                      x.resultSet[i].type;
        }
}
    SearchMsg.value = x.resultSet.length +
    ' Matches Found. Change your criteria and click "search" to try again.';
    SearchMsg.visible = true;
    SearchResults.options = opts;
    SearchResults.visible = true;
} |
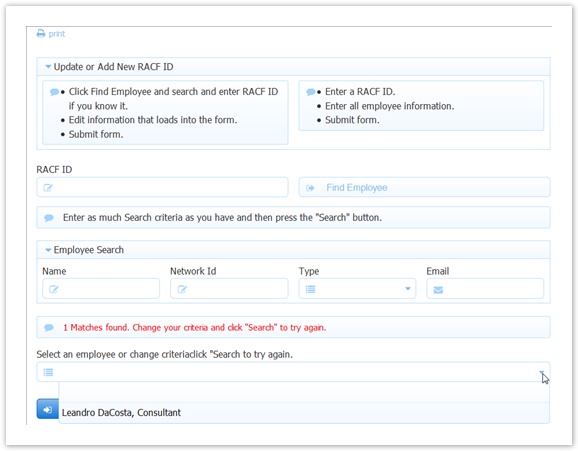
The Search returns one or more matches and dynamically populates a dropdown control named SearchResults. You can change the search criteria to narrow or expand you search. When you select one of the matches from the SearchResults dropdown this 3rd rule executes to copy the selection into the RACF ID control.
...
Once the value is copied into RACF ID the form automatically loads all other values in the form from the database. This is due to the form action document Uri setting.
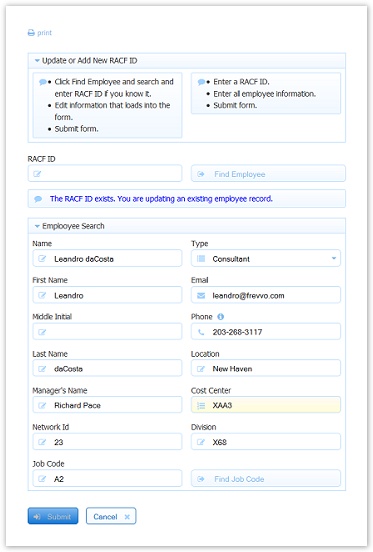
The values in the employee loaded into the form can now be edited. When the users clicks the form's submit button the values will automatically be updated in the database record. This is due to the form action document Uri setting.
LDAP Custom Attributes
You can use a business rule to pull custom attributes from your LDAP server into your form. You will have to modify your LDAP configuration and write a rule using _data.getParameter. See the docs section Working with Rules: LDAP Security Subject Information for an example of this type of rule. This rule is not yet supported in the Visual Rules Builder and thus still requires some JavaScript.
REST Web Services
REST web services can be invoked via a rule. The frevvo database connector is a practical example of a REST web service. Refer to the Database Connector Tutorial for examples of rules using http methods. REST web services very commonly return JSON strings. For an overview of how to parse JSON in a business rule, for example to populate dropdown controls, see our rule example for Dropdown Options and also our documentation on Reusing Dynamic Content.
...