Live Forms v7.4 is no longer supported. Please visit Live Forms Latest for our current Cloud Release. Earlier documentation is available too.
Palette Controls
- Former user (Deleted)
- Megan Ellis
- Former user (Deleted)
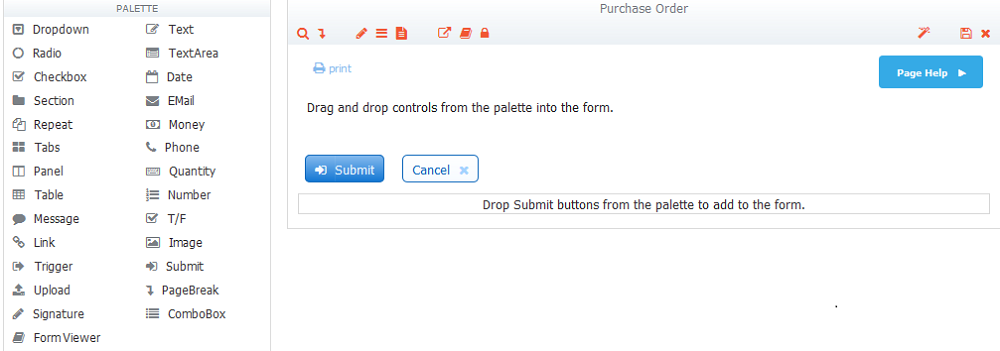
palette offers a rich variety of controls that let you create virtually any form. All controls provide functionality as soon as you
drop them into your form but need to be customized (edited) to suit the form you are designing.
The purpose of each control is described below.
On this page:
Input Controls
Input controls allow users to enter data (text, dates, numbers, etc.) into your form and automatically prevent them from entering the wrong data types. For example, if users enter letters into a number control, your form will display an error message and form submission is prevented until valid data is supplied. This validation happens automatically; you do not have to do anything special. The purpose of each input control is described below.
To validate the content in each input control, assigns a default XML schema data type to each control. The table below shows the default data types for each input control.
| Input Control | XML Schema Type |
|---|---|
| Text | xsd:string |
| Date | xsd:date |
types:emailType, an xsd:string restriction pattern defined in types.xsd. | |
| Money | types:number, an xsd:double restriction defined in types.xsd. |
| Phone | types:phoneType, an xsd:string restriction pattern defined in types.xsd. |
| Quantity | xsd:integer |
| Number | types:number, an xsd:double restriction defined in types.xsd. |
| T/F | xsd:boolean |
The explanations below describe the controls generically—before you edit them to impose additional restrictions or define behavior specific to the form you’re creating.
Input controls have a two new properties: Decorator and Placeholder. Refer to Setting Properties for the information.
Text
Allows users to type any text and is intended for short, one-line entries. Placeholder and decorator properties have been added to the text properties pane in . See Setting Properties for the details.
TextArea
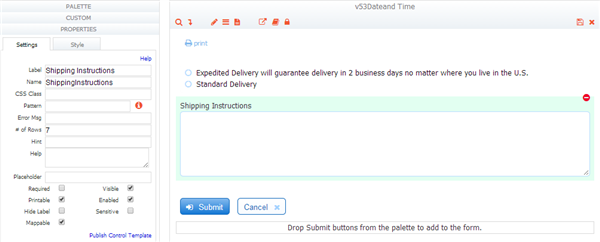
Lets users type any text and is intended for longer, multi-line submissions. When users enter data, scroll bars appear as needed to accommodate the text. This control has a # of Rows property that controls the default number of lines visible in the input area.
In HTML there is no way to set a maxLength on a textarea control which is why the textarea control does not have the maxlength property like the text control. If you need a maxlength, it's best to either choose the text control, or this can be accomplished via a business rule. See the Business Rule for Textarea Max Length.
Since users typically enter multi-line text into textarea controls this can pose a challenge if you want to display that text in an html page. For example you may want to display the entered text in your form's Doc Action display message, in an html formatted email or in on a web page such as your Confluence wiki. The challenge is caused by the fact that line breaks entered into a web form text area are represented by a single newline character \n while line breaks in an html context are represented by the html break characters:
<\br>
In order to display the text in a html context you need to replace the \n with the html break characters. See the business rules chapter textarea newline vs break for a working example.
A new Placeholder property has been added to the textarea properties pane. The Textarea control is the only input control that does not have a decorator.
Do not select a Textarea field as a Searchable Field if the amount of text stored in the field is greater than 32k.
Date, Time, Date/Time
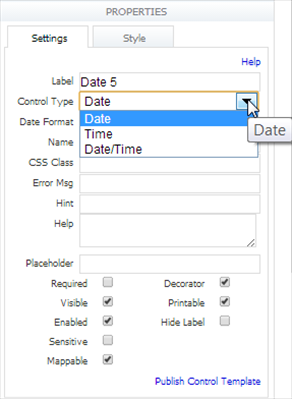
The date control can be used in a form as a date, time or date plus time control. The Control Type property lets you select from a dropdown of choices: date, time or date/time. The designer can choose from a variety of formats for each type. Rules can be applied to the Date/Time control in all variations. See the Rules Examples chapter containing numerous examples and code samples.
You can specify whether or not you want to display the date picker via a checkbox on the Style Properties tab. If checked, you will see the date picker inside the the date control and the date portion of the date/time input control. The date picker brings up a calendar that can be used to enter a date.

The Time control is used to denote the time of the day. This means it has no dependencies on time zones or offsets. It will not shift based on whether or not Daylight Savings Time is observed in a time zone.
The Date/Time control relies on the timezone of the browser. The time portion will be calculated based on the date and whether or not Daylight Savings Time is observed in that time zone.
The Date control is used to denote a day and has no dependencies on time zone.
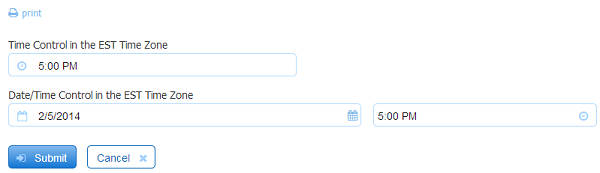
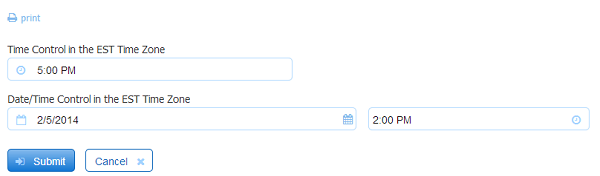
For example, A time of 5:00 PM is entered into a Time control and a date of 2/5/2014 plus 5:00 PM into a Date/Time control by a user located in the America/New_York (Eastern Standard Time). When the submission is viewed in the EST time zone, the Time Control displays 5:00 PM. This value will not change. The time portion of the Date/Time control also displays 5:00 PM, because it takes on the timezone of the browser (EST) and it is not further adjusted because Daylight Savings Time is not observed in EST on February 5th.
If the submission is viewed in the Tijuana (Pacific Standard Time), the Time Control will display 5:00 PM as it did in EST but the Time portion of the Date/Time control will show 2:00 PM as it will be adjusted by the browser timezone, PST.
Time Zones
In general, form data is displayed in the browser’s time zone and saved in Coordinated Universal Time (UTC) in the submission document. The form’s time zone is inferred automatically from the browser’s time zone. The time zone, once set, cannot be changed for that form instance. An example can be seen when you click on the  Test icon in the
 designer. The form URL will have the &_formTz=<tz> parameter with the value of the browser's timezone appended to it. The URL for a form being tested in the Eastern DayLight Time (EDT) timezone would be:
http://localhost:8082/frevvo/web/tn/rap.com/user/rap/app/_w-eeENIYEeGYrP3vLLbERA/formtype/_CXKywNIaEeGYrP3vLLbERA/popupform?embed=true&_extId=0.04202334303408861&_formTz=America/New_York
The browser’s time zone can be overridden by appending the &_formTz=<tz> parameter to the form URL. Modern Time Zone Strings must be used with the &_formTz parameter. Other time zone formats are not supported. The time zone strings can be found here.
Here is an example: A Product Order form running in the PST timezone displays all the time and date/time control data in the America/Tijuana timezone if the &_formTz=<tz> is appended to the URL as shown below.
http://localhost:8082/frevvo/web/tn/qa.com/user/rap1/app/_cm8JIGR7EeG4D7_jeDNSHQ/formtype/_XyC2wGbsEeG2-p_Sm3q9pA/popupform?locale=&_formTz=America/Tijuana
Some timezones may not return the expected results. This is a known issue with the JVM. Contact Customer Support for assistance.
When users enter data into a form, the &_formTz=<tz> parameter is not required. You may notice that URLs for the following functions will contain the _formTz parameter appended to them:
- Edit form/flow
- Test form/flow
- Initialize submission
- Access form/flow/tasklist (outside space)
- Access form/flow/tasklist (from space)
You must specify the _formTz=<tz> parameter appended to the share URL when initializing a form with time or date/time controls from an XML init document, the _data parameter or a business rule that uses the rule identifier,form.load. The form server needs to know the timezone in which to return the date and time. Successful initialization cannot be guaranteed if the &_formTz parameter is not supplied. Refer to Initializing Forms with Data for the details. This URL parameter is not needed if your form/flow only contains Date controls.
Time data is no longer converted from the browser's timezone to a valid UTC format when posted in the form XML document in the submissions database. Refer to Viewing XML Documents for more information. Business Rules execute in the form time zone.
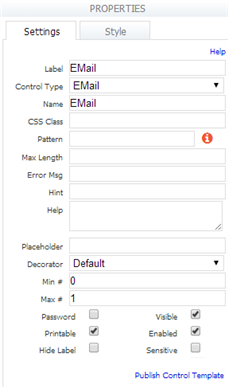
Requires users to enter a valid EMail address. The address must conform to the following syntax: <name>@<name>.<string>
Money
Allows users to enter U.S. currency. Users may type commas and a decimal point but will not add them to the data automatically. The form also will round all entries to two decimal places. For example, if the user enters 4000, it will display as 4000.00 when the user exits the field.
Phone
Used for entering a phone number and allows any of the following formats: ##########,###-###-####, ###.###.####, ###-####, ###.####. If you want to enforce one of the 10-digit formats (to require an area code), you can edit the control’s Pattern.
Quantity
Used for entering quantities or any whole numbers (integers). The form displays an error message if users enter decimal points, commas, or anything other than an integer.
Number
Used for entering decimal numbers. Users may enter any number of digits after the decimal place.
You may notice that the Max Length property for the numeric controls: Number, Quantity and Money is no longer present in the Forms designer. Uploading forms that were designed in v4.1.7+, with the Max Length set to a value, will not show this property in the designer. However, the max length value will be honored when the form is executed in use mode.
Selection Controls
supports 5 types of Selection controls. Selection controls let users choose from a list of options instead of having to enter text.
- Dropdown
- Radio
- Checkbox
- ComboBox
- T/F
Dynamic Options
Options for the Dropdown, Radio and Checkbox controls can be populated using 2 methods:
- Method 1 - Designers enter the options at design time by typing them in the Options property for the chosen selection control. Options entered in this way are static - they will not change at runtime. The controls are discussed below:
- Method 2 - Designers can dynamically populate options at runtime from an external RESTful web service source. This can be accomplished with a business rule or if your preference is not to write JavaScript you can use the
Dynamic Option feature. This method eliminates the need for a business rules.
Refer to the Dynamic Options topic for the details.
Dropdown
This adds a dropdown list to your form. By default the first choice in the dropdown list will be blank; you define the other choices by editing the control’s Options properties. Keyboard selection of an option is not currently supported but is planned for a future release. Users can type-ahead. For example, select a dropdown control and type "S" and it jumps you to options that start with "S". This is extremely useful for dropdown controls that have a long list of options. This control is a standard HTML dropdown so it does not allow using backspace to clear selected options. The Comment property can be used to provide a text box for additional information when the last option in the selection control is chosen.
ComboBox
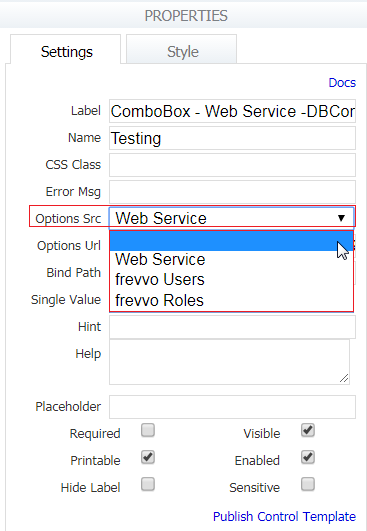
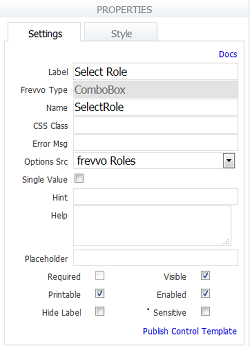
The ComboBox control supports three types of data retrieval: frevvoUsers, frevvoRoles and Web Service. The source for the options is selected from the Options Src property. Information about how to set up Options for the ComboBox control is discussed under the Dynamic Options feature topic.
You can use the Combobox to retrieve values from a database and enable a list of possible partial matches.
LDAP customers often use the ComboBox control if they have many users/roles configured on their LDAP server. What if the designer wants to pull a list of users or roles from their LDAP server into a form or flow for user selection? Using a traditional dropdown control is not ideal especially when you have thousands of users to pick from. The ComboBox control allows users to type characters in the ComboBox control that filter the choices to the entered characters and display those that match. You can also type a value that is not in the list.
Drag/drop the ComboBox from the Palette or import it from schema. When you dnd the ComboBox from the Palette, it does not have a Control Type property. You cannot change the ComboBox to a different control by changing the value in the Control Type dropdown. You must delete the ComboBox and then add the control that you want.
Existing forms/flows that contain the ComboBox control will have the value of the Options URL property in the Options Src field after upgrading.
- The Combobox control will not work for public forms as the call to find users and roles is secured.
- The ComboBox control will not work in Edit mode. Click the
 save and test icon to verify your changes.
 - The maximum number of items returned from a query is 1000 when using the ComboBox control in a form/flow if your tenant is using the LDAP Security Manager. This is an LDAP limitation.
- The maximum number of items returned from a query is 1000 when using the ComboBox control in a form/flow if your tenant is using the Azure SAML Security Manager.
ComboBox from Schema
You can change the Options Src for Combobox controls that are added to your form/flow when you upload a schema. Notice this control does not have a display as property so you cannot change the appearance of the control using this property.
Information about how to set up Options for the ComboBox control is discussed under the Dynamic Options feature topic.
Radio
This adds mutually exclusive radio buttons. You define the number of radio buttons and the specific choices by editing the control’s Options properties. Note: If you select a radio option as the default and later decide you do not want an option selected by default, you must remove that option from the control and tab out of the options property so that it is removed from the control. Then add the option back to the control's option list. Now that option is no longer a selected default.
- Do not use the '>' character in a radio control option label if the radio is used inside a repeat control. This causes a known issue where the selected option in one radio repeat deselects when the value in the next radio item is selected.
- Radio controls that do not display in a yellow background even if the Required property is set, can be reset to the proper state by changing the control type to different type and then back again.
A Comment property can be used to provide a text box for additional information when the last option in the selection control is chosen.
Checkbox
This adds a set of checkboxes so users can check one or more. As with the other selection controls, you edit the control’s Options properties to define the number of checkboxes and the specific choices. A Comment property can be used to provide a text box for additional information when the last option in the selection control is chosen.
T/F
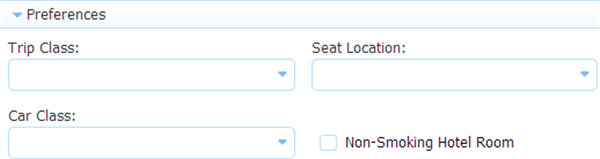
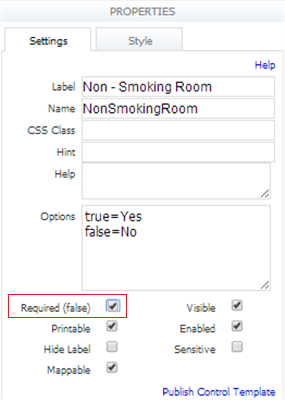
Use a T/F (Boolean) control in your form for situations where the values will only be Yes or No. For Example: The image shows a T/F control in the Preferences section of a company Travel Request. The label for this field has been changed to Non-Smoking Hotel Room. The employee filling out the request checks the box if they prefer a Non Smoking room.
The control options default to "true=Yes" and "false=No". When you drag the control from the palette, only the "Yes" option will be visible. You can change the option labels from Yes and No to whatever you want. It is important to note changes to the label for false are irrelevant as it will never be visible on the form. The option values cannot be changed and will always stay as true and false. Blank labels for options are not allowed. Checking the “Yes” checkbox of the Boolean control results in a true value in the XML document.

Leaving it unchecked will translate to a false value( no value will show in the XML document).

Notice the Required (false) property on the T/F Properties pane. This property is unchecked by default. If checked, the XML entry shows a false value even when the T/F value is not selected.
notselected.png?version=1&modificationDate=1509722960000&cacheVersion=1&api=v2&width=500&height=81)
A T/F control, added to a table, will hide the "Yes" option label. A Boolean checkbox should be used only if there are two states: Y/N. The column header label in the table can help make the choice obvious. For Example, you could create a column header - Non-Smoking Room in the table and if the user checks the box the value will be true and if the box remains unchecked, the value will be false.

Use another selection control if the choices are not restricted to Y/N. An example would be a gender control where the possibilities are male or female.
Value Property of T/F in Business Rules
The value property behaves differently for a T/F control depending on whether it is from schema or not.
- From schema, when checked: control.value === true
- From scratch, when checked: control.value[0] === true
If you use the Visual Rule Builder to build a rule with the T/F control , the resulting rule covers both value states so the designer will not have to make further changes.
Upload Control
Use this to allow the user to upload and submit attachments with your forms. You can attach photos from your device photos library or take a new photo with the device camera. The Upload control is decorated with an image that cannot be changed. When you click on the Upload control in use mode, the button text is underlined.

The upload control contains special properties to control the max attachment size allowed (in bytes), the min and max number of attachments to accept per form submission and to allow the form designer to specify restrictions on the types of files allowed to be uploaded to the control/form. When a user uploads content to an upload control with a content filter applied, will check the upload against the filter and if there is no match, reject the upload with an error message.
Attachments are viewable in the Submissions Repository. You can configure your form's Doc Action property to send attachments to a URL endpoint (ex: servlet) that can save the attachments locally within your company. For more details see handling attachments.
The File Name property allows designers to specify a naming convention for the attachment in the form/flow submission.
Min/Max Number of Attachments
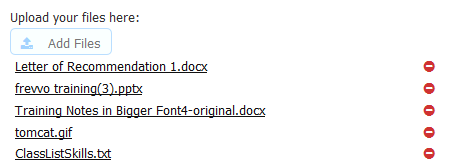
You can specify the minimum and maximum number of attachments that can be uploaded to your form using the Min # and the Max # properties. Setting the min and max values to 0 or if the maximum # field is left empty means an unlimited number of files can be uploaded. Setting the min # to a value greater than zero makes the field required. Set the min # to 1 to ensure that the user uploads at least one attachment to your form. Use the max # for the maximum attachments allowed. Clicking on Add Files will not display the upload lightbox when the maximum # of attachments have been uploaded. No further uploads will be allowed. Setting the Max # to 1 disables the multi-select feature. See below for more information.
You will not see the Required property on the Properties panel for the Upload control. This is because "Required" is not a valid property of an upload control so trying to set that property using a rule will not work. However, you can make the control required by setting the min # property greater than 1. If you need to make the Upload control required from a rule, you can put the upload control into a section, uncheck required on the section and then create a rule to make the section required.
Setting Min/Max Properties with a Business Rule
The min and max properties can be changed with a business rule using the properties, minFiles and maxFiles. The values for minFiles and maxFiles can be read and changed at runtime if required. Check out this very simple example.
Restricted Content Types and Other Mime/Ext
Use the Restricted Content Types field on the Upload Control Property pane to restrict the content type of the files uploaded to your form. This property lets the designer specify one or more types which restricts the content to those types. Uploads can be restricted by using MIME Types (limited set supported) or File Extensions or both.
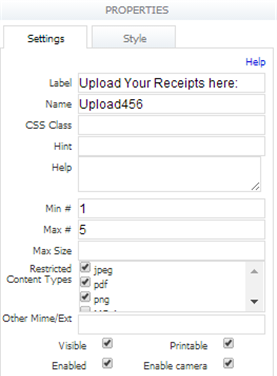
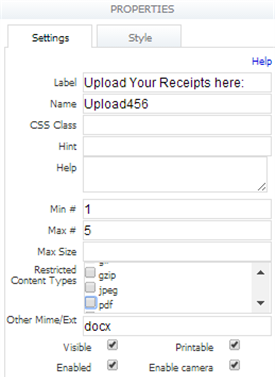
Select the content types you want to allow by checking the associated check box in the Restricted Content Types field. The choices are: pdf, MS Word, MS Excel, MS PowerPoint, MS Access, gif, jpeg, png, tiff, rtf, tar, zip, gzip, xml and bmp. will map the content types that you choose to one or more mime types. Content type filtering will be enabled for the extensions selected. For example, the image shows an upload control in a form that will only allow files with .jpeg, .pdf and .png extensions. This list can be expanded for customers using
in-house by modifying the context parameter: frevvo.upload.file.types in the web.xml file. See Installation Tasks for the details.
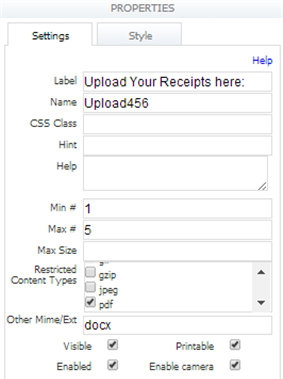
An easier way to add extensions or other mime types for filtering can be accomplished via the Other Mime/Ext field. You can use this field to restrict uploads to a mime type or file extension that is not included in the subset of the most common file content types provided by . Enter one or more extensions (of any length) or mime types, separated by a space, to enable extension and additional mime type filtering. An upload matches on an extension if it's name ends in a period followed by one of the extensions. The comparison is case insensitive. Likewise, an upload matches on mime type if it's mime type matches one of the additional mime types entered. For example, the extensions, txt and htm, shown in the Other Mime/Ext field in the image above, restricts uploaded files to ones that have .jpeg, .png, .pdf, .txt and .htm extensions.
The mime utility now uses the Apache Tika toolkit for improved mime detection. Files with .xls, .xlsx, ppt and .docx extensions are now correctly described when uploaded in use mode.
If you select "xml" for the restricted content types of an upload control, it will only accept xml files with an xml declaration. To upload xml files that do not have the xml declaration, the designer can enter xml into the Other Mime/ext field on the Property panel of the upload control. The Upload control will then accept any file with an .xml extension.
Selecting zip as the Restricted/Mime type, uploading a zipfile and submitting the form may exhibit some unexpected behavior when downloading the zipfile from the submission if you are using IE9+ as your browser. Clicking on the attachment in the submission repository does not save the uploaded zipfile as a zipfile. Instead, it will save it as a file named Upload91. As a workaround, you can open the file using winrar.exe and then save it or simply use right click and and select the 'save as' option.
Error Messages
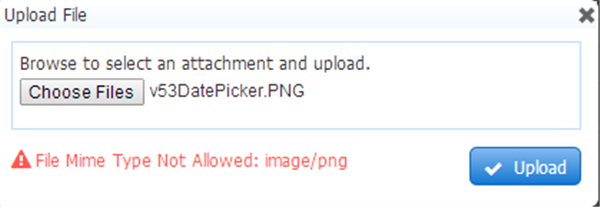
The user will see error messages if upload filtering is applied and the uploaded content types do not match. The error message, shown below, will be displayed if content type only filtering or both content type and extension/mime filtering has been applied and the uploaded content does not match either restriction. For instance, uploading a file with a .jpeg extension will not match the selected content type choices or the .docx file extension listed in the Other Mime/Ext field as shown in the Upload Control Property Pane image:
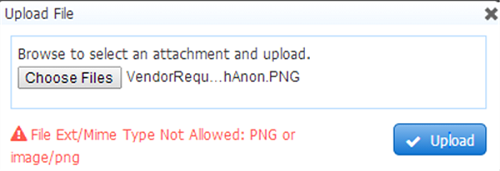
When extension and additional mime type filtering only has been specified and the uploaded content does not match, the error message below will display:
Multi-select
The user can select more than a one file (during a single file browse) to be uploaded by holding down the control/command key then click on each file you want to select. The multi-select feature support has been added in HTML 5 with a multiple attribute. Multi-select of files for the Upload control is supported in newer versions of browsers. For example, multi-selection of files works in Safari, Chrome and Firefox.
The multi-select feature is not supported in Internet Explorer (IE 9) or IOS for mobile devices. Furthermore, the name of the uploaded file will be image.jpg. This is not a issue. It is a limitation of IOS.
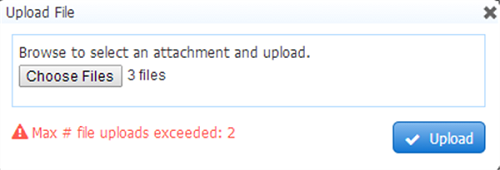
The multi-select of files in the browser is dependent upon the max files property of the upload control. Multi-select is disabled by setting the max # files to 1. It is possible to select too many files . For example, turn on multi-select by setting the max # to 2. Multi-select 3 files. This will show an error and none of the 3 will be uploaded.
Max Size
Max size is the upper limit for each attachment uploaded to Upload controls in your forms/flow. The internal upper limit is controlled by a configuration parameter - frevvo.attachment.maxsize. In the cloud. It is set to 10 Mb. If you enter a value into the control's max attachment size property greater than
internal upper limit, you will see an error message displayed on the upload control.
In-house, customers can control the internal upper limit via the frevvo.attachment.maxsize property in the <frevvo-home>\tomcat\conf\frevvo-config.properties file. Initially, this value is set to 10485760 bytes. You can also set the max attachment size per user by editing the user's profile as the admin user and editing the Configuration field shown below:
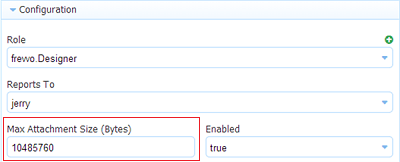
The value in the user profile takes precedence over the configuration parameter. The value in the Max Size property for an Upload control takes precedence over the value in the Max Attachment Size field. All values must be entered in bytes and cannot exceed the max size configured on the server level. Refer to the Maximum Size for Attachments topic for more information.
Changing the file name of an uploaded attachment in the form/flow submission
The File Name property allows designers to set up an attachment name that applies to all files uploaded with an upload control. Attachments with configured file names will be seen when viewing the attachment section of a submission.
This property only affects the name of the file, not the extension which will be automatically appended. The file name can be a:
- Fixed name - The attachment name of the file is entered and is used without change.
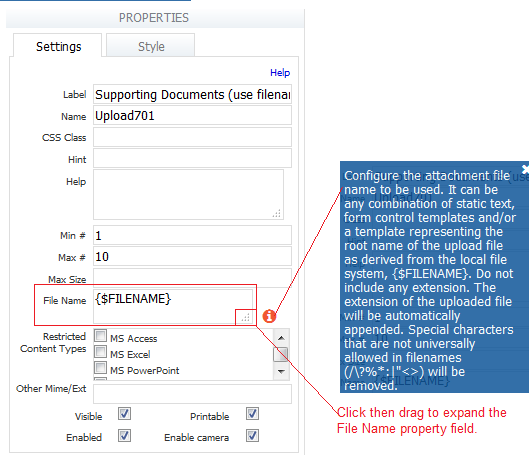
- Dynamic - The attachment name can be configured to be dynamic. It can be any combination of static text, form control templates and/or a template representing the name of the upload file as derived from the local file system - {$FILENAME}
The default setting of the File Name property is: "{$FILENAME}". This special template names the attachment using the file name as derived from the local file system. Leaving the File Name property empty is synonymous to setting it to "{$FILENAME}".
- File names for uploaded attachments should not exceed 255 characters
- Special characters that are not universally allowed in filenames ( / \ ? % * : | " < > ) are removed.
Curly braces {} used in file name property of the upload control are treated as a control template value.
- Specifying a Repeat or multiple rows in a Table in a template requires the special syntax that includes the pipe (|) - ex:{|Control Name}. Configuring a template using the pipe (|) to specify repeats will not work for the Upload control File Name property. The pipe character will be removed and only the 0th index value of the repeating control or table will be used as the filename.
Expand the File Name field by clicking/dragging the three diagonal lines in the bottom right corner.
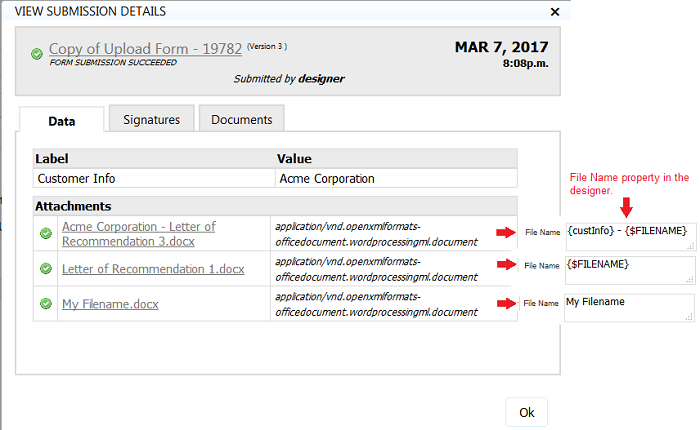
The image displays the file names for attachments visible in the form/flow submission detail when:
- the File Name property uses a control template from the form/flow (the custInfo field) and the default template {$FILENAME}
- the File Name property is empty or uses the default template {$FILENAME}
- the File Name property uses a fixed name (My Filename)

File Name Property Behavior in Use Mode
When a user uploads an attachment to the Upload control, the file name will be the name of the file from the local file system.
- Hovering over the file link in your form/flow shows a tooltip that displays: "<filename> uploaded as <attachment_name>". The attachment will be stored in the form/flow submission with the attachment name mentioned in the hover message.

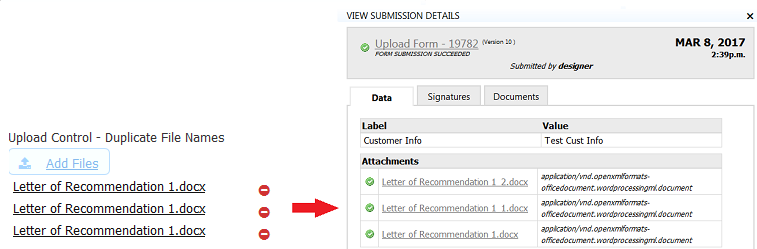
If the same attachment is uploaded more than once in a form/flow, "_#" is appended to the subsequent attachment file names where "#" is a number starting at 1.
- filename.pdf
- filename_1.pdf
- filename_2.pdf
View Attachments in Submissions
Once the designer has configured the File Name property and submissions have been created, attachments named with the specified criteria are viewed in the attachment section of a submission. Follow these steps to view them:
- Click on the
 Submissions icon.
 - Double click on a submission for the Submission Details.
- Submission attachments are listed in the Attachment section of the Data tab.
File Names for Downloaded Attachments
The following is true when downloading attachments:
- If the filename contains a space it will be replaced with a '+' in the downloaded filename. For example, if the filename is "My File.pdf" the downloaded file is named "My+File.pdf"
- If the filename contains special characters than the encoded value of the special character is included in the downloaded filename. For example, if the filename is "My Name@@" then it changes to "My+Name%40%40.txt "
- When downloading an attachment from the View Submission Details lightbox, the link to edit a submission or from Test Mode:
The filename of the downloaded attachment will be the original filename if the File Name property is empty or set to {$FILENAME}.
The filename of the downloaded attachment will use the configured filename if the File Name property is set to a fixed name i.e. MyFile.The original filename will be used as the download name when downloading attachments from upgraded submissions.
Enable Camera
The"Enable Camera" property for the upload control refers to the camera in your mobile device .It is enabled by default. Here is how it works:
- Checking this property has no effect in a desktop browser
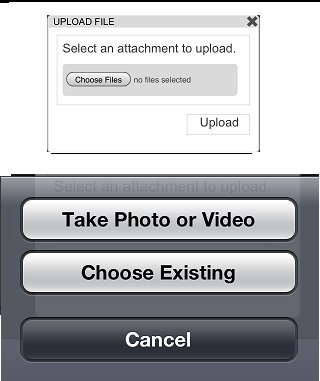
- If maxFiles=1, you will be able to take a picture with the camera and upload it. You will see a prompt similar to the image below when you tap "Choose Files".
- If maxFiles=0 or if maxFiles > 1, on mobile iOS, you can enable or disable the camera. If enabled, you can take a picture with the camera and upload it but cannot upload multiple files at a time. If disabled, you can upload multiple files at a time but the user will not be presented with the option to take a picture from the camera for uploading.
- IOS Safari decides access to the camera on the iPhone or iPad. Unchecking the "Enable Camera" checkbox does not disable the camera because it is not possible. If you check it, it will disable the multi-select (multiple attribute) of files to upload, even when max # is > 1.
The Enable Camera property does not apply to Android devices. Android always makes the camera available.
Mapping an Upload Control
You can take a picture with your iPad or iPhone and map the photo into a generated pdf. Image types supported are: gif, png, jpg/jpeg and bmp. Tiff is not supported. Non image file types uploaded are ignored. The designer should be aware of the following when mapping the Upload control:
- The Upload control can be only be mapped to text fields in the pdf acroform.
Only a single file will be mapped per control. Mapping takes the first found image file in the case of an upload control with multiple files.
The image will resize to the dimensions of the acrofield.
The image shows an upload control in a form where jpg files for a koala bear and a jellyfish have been uploaded. Drag the Upload control from the Mapping Form Outline and drop it on the text field in your acroform. Viewing the pdf via the Form Viewer control, shows the koala bear image in the pdf.

Message Control
Message controls are most often used to add static text to your form or flow. Form titles and helpful instructions for your users are just a few ways to use the Message control, It can also be used in the following not so obvious situations:
- Adding custom client-side JavaScript to your form/flow.
- You can use the Message control to center images uploaded to your form. Click here for the details.
- Message controls can also be used to display a message to the user if a form/flow contains invalid controls and cannot be submitted. Refer to the Invalid Form Notification for Users to see how to implement this feature.
Type the text of your message into the textarea in the Message control properties pane. You can add HTML to format your message in this property as well or invoke the Rich Text Editor which will create the HTML for you. 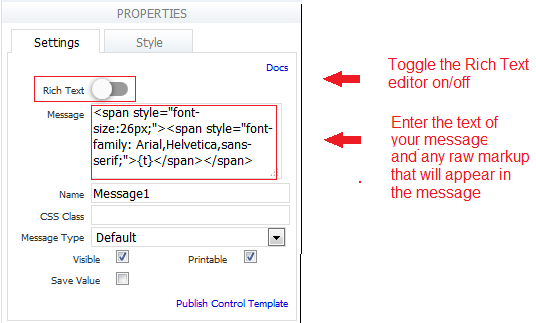
Rich Text Editor
The message control supports rich text input in design mode via the Rich Text Editor. The editor simplifies the creation of your message content eliminating the need for the designer to provide HTML code . It is a simple way to format message content such as different font sizes, test and background colors, bolding, bullet and numbered lists along with many other features. You provide the text and then choose from the many menu options to customize your message. You can even include a Google Map or an image if desired.
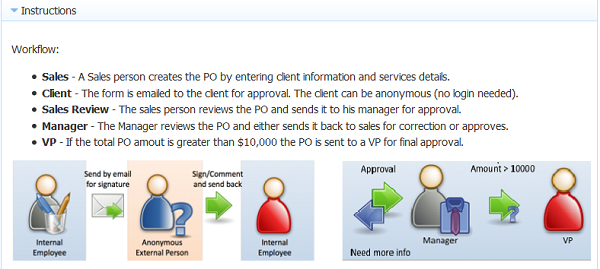
For example, an Instruction section for users that has a bullet list, bolded text and an image can be quickly and easily created by adding the Message control to the section and applying the text stying and image features available in the Rich Text Editor.
Using the Rich Text Editor
Drag a Message control from the palette and drop it into your form/flow then click on it, Notice the property panel to the right. The ![]() toggle switch just above the textarea message property turns the Rich Text Editor on/off. When you slide it to the on position, the message control transforms to an in-place rich text editor. The mode of the Rich Text Editor will be remembered - so if it was turned on when your saved your form/flow, it will be turned on the next time the form/flow is opened for editing.
toggle switch just above the textarea message property turns the Rich Text Editor on/off. When you slide it to the on position, the message control transforms to an in-place rich text editor. The mode of the Rich Text Editor will be remembered - so if it was turned on when your saved your form/flow, it will be turned on the next time the form/flow is opened for editing.
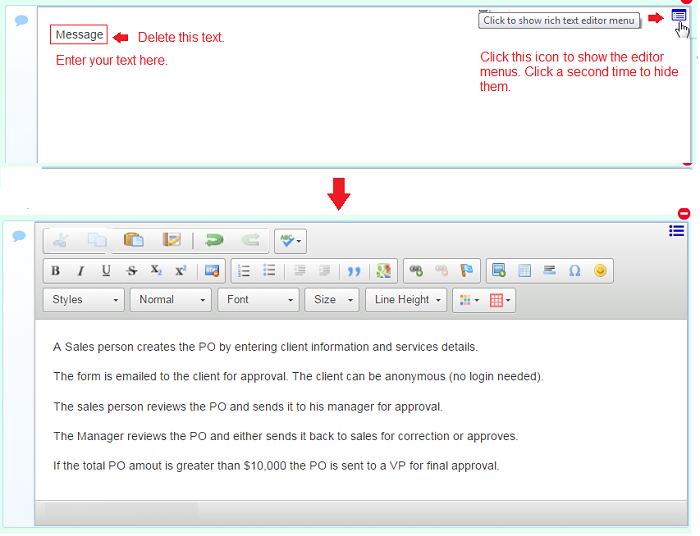
The editor consists of an editing area for entering text and an icon in the top left that shows/hides the editor toolbar and menus.
Click the  icon to display the editor menus. When the menus are displayed, click the
  icon to hide them.
- The state of the Show/Hide menu items is remembered so if you exit the Message control with the menus showing you will see them the next time you enter the Rich Text editor.
- If a Message control cannot be edited in the forms/flow designers, delete it from the form/flow then re-add it. The control will become editable again due to changes in the handling of certain html tags.
Rich Text Editor Toolbar
The rich text editor has a variety of menus/buttons for enhancing entered text. Most of these are self explanatory. If you are unsure of a particular function, hover the cursor over the button for a helpful tooltip. Many of the menus have dropdowns to select other text stying/formatting options
Entering Text
There are two ways to apply text styling features;
- Select the feature from the toolbar first, then type your text. For example, to write in bold, click the
 button on the toolbar then type your text. Bolded characters display as you type.
 - Select a portion or all of the text in the Editing area with your mouse then select the feature from the toolbar.
- If you are using the Chrome browser, you must type the text, select it and then click the menu option.
- You can include (copy/paste) special characters that get encoded as special entity references in the text of the Message control, Examples of these special characters are left and right quotes etc...
Adding Custom Fonts to the Rich Text Editor
Custom fonts can be added to the list of fonts displayed in the Font dropdown of the Rich Text Editor. Refer to Using Custom Fonts in the Message Control for implementation details.
Exiting the Rich Text Editor
To exit the Rich Text editor in the designer, click the icon. Turn it off by sliding the ![]() toggle switch to the off position.
toggle switch to the off position. remembers the Rich Text Editor mode when your form/flow was saved and it display it in that mode the next time the form/flow is opened for editing.
Using Templates in a Message Control
Controls in your forms/flows that are dynamically populated can be included in the message text by using templates. The templates in the Message control are replaced with the values in these controls at runtime. For example, let's say you have a Product Order form with controls for the customer to select the product, color, size and select the option to include a gift card. When the order is complete, you want to display a message to the customer recapping the order. The image shows the control templates in the message text in the designer and the form at runtime. A business rule hides the Message control until the order is complete.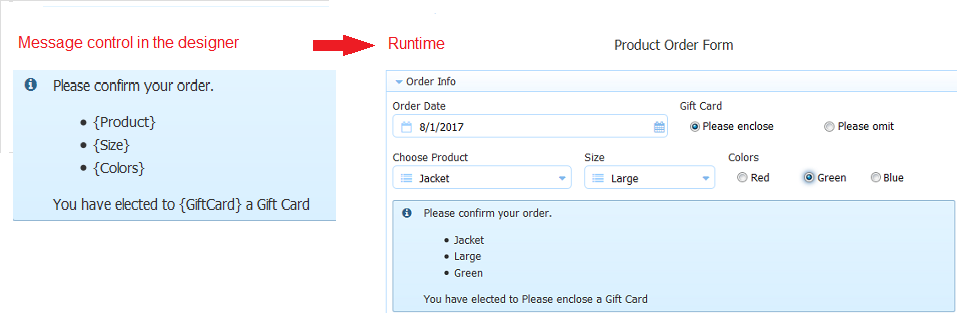
Using Custom Fonts in the Message Control
If your organization has special font requirements, custom fonts can be used to style Message Control text. Typically custom fonts can be added dynamically with JavaScript. The exact JavaScript will vary based on the font.
There are two methods for enabling custom fonts:
- HTML markup OR
- In-house customers can add custom fonts to the font dropdown in the Rich Text Editor. This is optional.
Both methods described below require custom JavaScript to dynamically load custom fonts to Live Forms. The JavaScript varies based on the font. Contact the font vendor to obtain the exact JavaScript for your custom font(s). Use the Custom JavaScript feature to upload the JavaScript to each application or to your tenant. frevvo recommends uploading the JavaScript to the tenant so that it will be available to all designers and all applications.
- If you choose to include custom fonts in the HTML markup added to the Message Control property, contact the vendor to obtain the exact HTML needed.
- If you choose to add custom font(s) to the Message Control Rich Text Editor, contact the font vendor for the correct value to use for the font name in the frevvo.message.rte.extra.fonts configuration property.
HTML Markup
Follow these steps to use HTML markup:
Upload custom JavaScript to dynamically load custom fonts to each application or to your tenant.
- Drag and drop a Message Control into your form/flow.
Add the markup and text to the Message property.
<h1 style="font-family: 'Century Schoolbook Roman';">h1 style - Century Schoolbook Roman</h1>
<h2 style="font-family:'Roboto', sans-serif">h2 style - Roboto</h2>
- Save and test your form/flow.

Adding Custom Fonts to the Rich Text Editor
If you want custom fonts to be available in the Message Control's Rich Text Editor, in-house customers can add the frevvo.message.rte.extra.fonts property to the <frevvo-home>\tomcat\conf frevvo-config.properties file .
Follow these steps:
Upload custom JavaScript to dynamically load custom fonts to each application or on the tenant level.
- Stop
- Navigate to <frevvo-home>\tomcat\conf.
- Edit the frevvo-config.properties file
- Add the frevvo.message.rte.extra.fonts property with a value listing the extra fonts in this format:
- Each font in the list is delimited by a semi-colon.
The font itself must be identified by its name in single quotes. Prefix the font name with an optional display name, if desired. Separate the display name from the font name by a forward slash. The display name is used in the font drop down of the Rich Text Editor. If the display name is not provided, the actual font name will be used.
Example of the Configuration property for Custom Fontsfrevvo.message.rte.extra.fonts=Century Schoolbook Roman/'Century Schoolbook Roman';Roboto/'Roboto', sans-serif
The font names and font type (sans-serif) on the right side of the equal sign in the example above came from the vendor. Contact the font vendor for the correct information for the custom font(s) that you are using.
- Each font in the list is delimited by a semi-colon.
- Save the file.
- Restart
- Login as a designer user.
- Create/Edit an Application
- Create/Edit a Form
- Drag and Drop a Message control into your form.
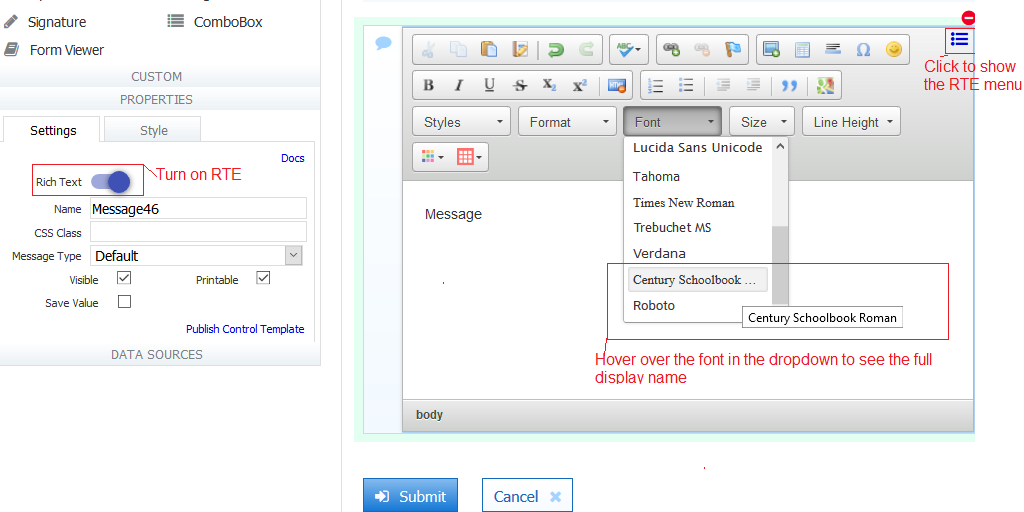
- Enable the Rich Text Editor of the Message control by sliding the Rich Text toggle to the right.
- Click to show the Rich Text Editor menu
- Click on the Font dropdown in the toolbar.
Custom fonts are appended to the standard supported fonts.
Message Control and Business Rules
The Message control supports the value property. The Save Value property must be checked for there to be a value and have it accessible in a business rule.
Message Control Style and Settings Tabs
You can chose a message type to display different background colors, decorators or a border from the Message Type dropdown on the Setting tab of the property panel. You can still select style properties on the Style Tab.
Message Control in a Table
When you drop a Message Control in a Table, the rich text editor is rendered much smaller when you click on it. This is illustrated below. Notice that none of the rich text editor's menus are displayed.

Clicking the icon to toggle the menus on expands the height of the in-place editor.
The Rich Text editor will be vertically expanded when you show the menus in Message Controls or any group control that you drop a Message control into that is less than 4 columns wide.
Message Control in a Repeat
You can drag and drop a Message control from the palette into a repeat or into a section that then gets dropped into a repeat. You can write Rules affecting the Message controls in repeats. Message controls in Repeats can contain templates. Repeat controls containing Message controls can be converted to Tables. Refer to the Control Type property for the details.
Horizontal Layout using the Message Control
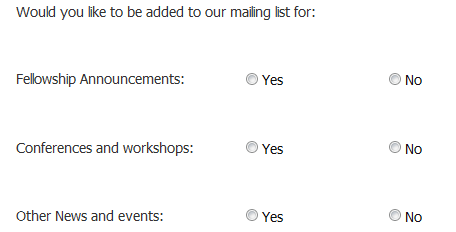
Let's say you wanted to modify a section of your form to reflect a horizontal layout as shown in the image. c
One approach would be to use the Table and Radio Controls. Another alternative is to use three Message controls and three Radio controls. Follow these steps:
- Drag and drop a Panel onto the designer canvas.
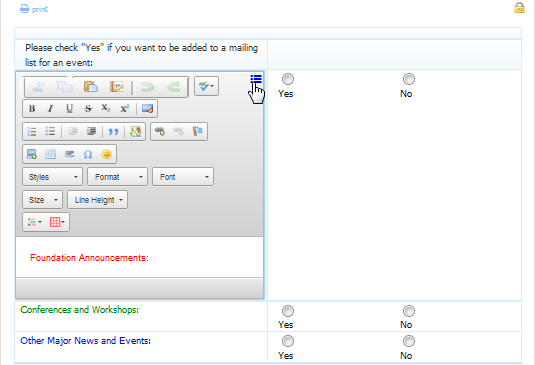
- Drop Message controls into the panel for the user instruction and the labels Fellowship announcements, Conferences and workshops and Other major news and events. Select None in the Message Control Type field.
- Click on the Style tab. Set the width of the Message Controls to half the size of the panel.
- Place 3 Radio controls with Yes/No options to the right of the Message Controls for the 3 choices. Check the Hide Label property for each.
- Click the Style tab and enter 50% in the Item Width property
- You may have to insert a single line break HTML tag in the Message property to align the Message Control text with the Yes/No options of the Radio Control.
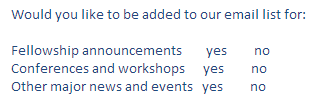
Here is what the form looks like in Use mode:
.
Link Control (for URLs)
Use the Link Control when you want to include a URL in your form. When users click the link, the button text is underlined and the target URL will open in a separate browser window. The Link control has a default button color and is automatically decorated. You cannot remove the decorator or change the button color. Unlike most controls, the default width of the control, when dragged from the palette and dropped into your form is 3 columns. Click here for more information. The New Line property is checked by default.
Templates are allowed in the Link controls href/url property.
Save Value Property
Check the Save Value property to include the value of the Link control in the form/flow submission document. This property is unchecked (default) when you add new Link controls to your form/flow. Refer to the Save value property topic for more information and to see how this property can help with Link controls in Optional Sections.
Link Control and Business Rules
The Link control supports the value property. The Save Value property must be checked for there to be a value and have it accessible in a business rule.
Image Control
This control lets you include an image (picture, logo, etc.) in your form. The control allows you to use .JPG, .GIF, and .PNG files or any other image type that your browser supports.
When you drag in the control, you’ll see a Browse button and an Upload Image button. Click Browse, navigate to the image you want, and click Upload Image. After you upload the image, the Browse and Upload Image buttons disappear, so if you aren’t satisfied with the image, delete the image control and drag in a new one.
Choose images that fit sensibly in your form before you upload it. The “regular” form size is 600px. You can resize an uploaded image by selecting the image control in the designer, clicking on the style tab in the properties panel and setting the width.
Save Value Property
Check the Save Value property to include the value of the Image control in the form/flow submission document. This property is unchecked (default) when you add new Images controls to your form/flow. Check the Save Value property if you are using the Image control in a template i.e.Print Headers/Footers in the form/flow PDF.
Refer to the Save value property topic for more information and to see how this property can help with Image controls in Optional Sections.
Image File Size
The maximum size of the image that can be uploaded is configured with the frevvo.asset.maxsize context parameter. The default value is 2097152 bytes. If the size of the image exceeds the specified value, the following message displays: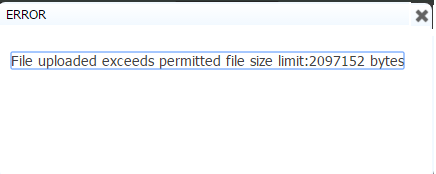
The message informs the designer what the configured limits are so they can take corrective action.
Centering Images using the Message Control
You can add a Message control on the left side of an image uploaded to your form to center the image. Replace the default text in the message control with a single line break HTML tag - <br/>.. Change its Message Type to None. This will add a blank area on the left of that image and move it into the center. Click the Style tab if you need to modify the width of the message control.
Trigger Control
The trigger control adds a button to your form and is used in conjunction with rules. If your form does not have rules you will not need the trigger control. If your form does have rules, see Triggers & DynamicOptions for details on how to use trigger controls and examples of when you might want to use them.
Triggers do not work in repeating items.
You can change the color of the Trigger button on the Setting tab of the properties panel. When you drag a trigger control from the palette and drop it into your form the default width is 3 columns. You can change this on the Style Properties tab. You cannot center the text on a Trigger or remove the decorator.
The New Line property is checked by default. Refer to this documentation for migration information.
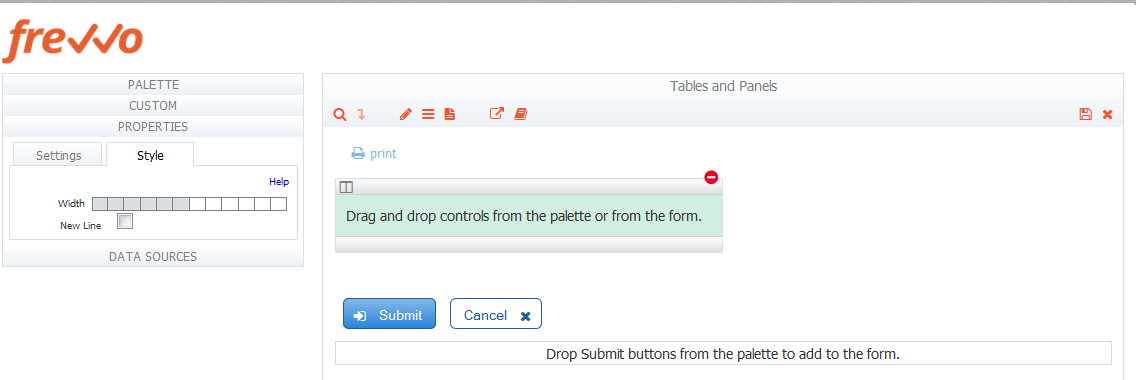
Submit Control
The submit control adds a new button to your form that, when clicked, will submit the form. By default, new forms already contain a single submit button labeled "Submit." Submit buttons can only be added to the bottom of the form in a special drag/drop area.
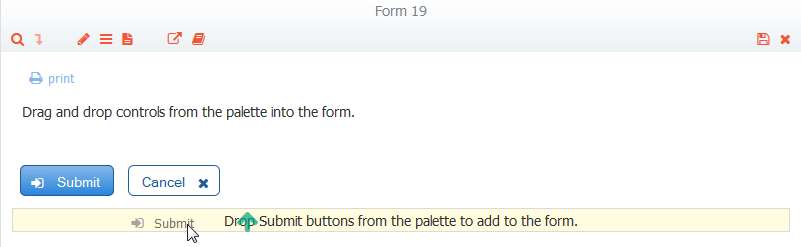
The background color of the Submit control is controlled by the color scheme and is not customizable. Submit and Cancel buttons are automatically decorated. The Submit button has a darker gradient background color to highlight it compared to the Cancel button.
Group Controls
Group controls help you organize your forms and give them a professional appearance free of visual clutter. Each group control is described below.
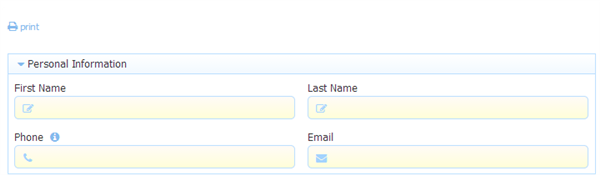
Sections
Use sections to create groups of controls that users can expand and collapse. Sections are always 12 columns wide when you drag/drop it from the palette and each is itself divided into 12 columns. Click here for more information.
![]()
Click the ![]() arrow to expand a collapsed section
arrow to expand a collapsed section ![]() or to collapse an expanded section. When users access your form the section can be expanded or collapsed—it’s up to you. If you want the section collapsed initially, make sure it is collapsed when you save (finish) your form. You can show/hide the section expand/collapse icon via a checkbox on the control style tab.
or to collapse an expanded section. When users access your form the section can be expanded or collapsed—it’s up to you. If you want the section collapsed initially, make sure it is collapsed when you save (finish) your form. You can show/hide the section expand/collapse icon via a checkbox on the control style tab.
After you drag a section control into your form, you can drag any other controls inside it — or even another section control.
If you have a required control inside a collapsed section, the section label turns red to cue users that they must expand the section and supply the required information before they submit the form.
If you delete a section control while designing your form, will automatically delete all controls you dragged inside the section.
See Optional Sections for details on using the required property with sections and how that affects the validation.
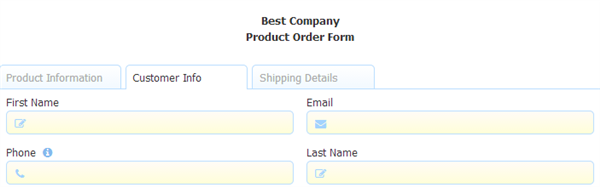
Tabs
This group control lets you create a tabbed view as in the example below.
Tabs are always 12 columns wide when you drag/drop it from the palette and each is itself divided into 12 columns.
When you drag the tab control into your form you’ll start with three individual tabs. To add or remove a tab, click any tab and then click the  or
or  icon. Added tabs appear to the right of the tab from which you clicked the add icon.
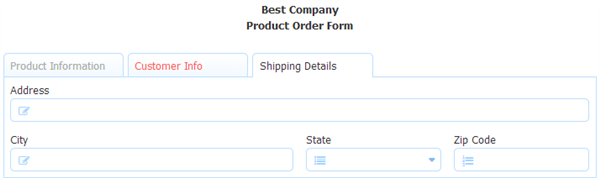
To rearrange the tab order, drag one tab on top of another tab; look for the ![]() green right arrow then release the mouse when the green arrow is in the destination position. The tab you dragged will move to the right of the tab upon which it was dropped. (Since you can’t move tabs left, if you wanted the Shipping Details tab before the Customer Info tab in the example above, you’d drag the Shipping Details tab and drop it on the Product Info tab.)
green right arrow then release the mouse when the green arrow is in the destination position. The tab you dragged will move to the right of the tab upon which it was dropped. (Since you can’t move tabs left, if you wanted the Shipping Details tab before the Customer Info tab in the example above, you’d drag the Shipping Details tab and drop it on the Product Info tab.)
You can drag in other controls (including other group controls) into any individual tabs. As you’d expect, users will see only those controls in the currently selected tab—in the example above we dragged the First Name, Last Name, Phone and Email controls into the Customer Info tab, so these will not be visible when users select the Product Info or Shipping Details tabs. When users click the Shipping tab, they see different controls as shown below.
To move your entire group of tabs to another spot in your form, click the area to the right of your last tab and drag the entire group to the desired location.
Tab controls have some limitations:
- Individual tabs in a tab group must be the same size and fit on one row
- Individual tab labels must fit on one line
- Centering of a column header cannot be done
Tab Widths
Multiple rows of tabs are not fully supported, so if your tabs spill over to the second row, adjust the width of your tabs and also possibly the Form Width. To edit the tab widths, click the unlabeled area to the right of your last tab; this will display the tab group properties on the left side of the Forms Designer.
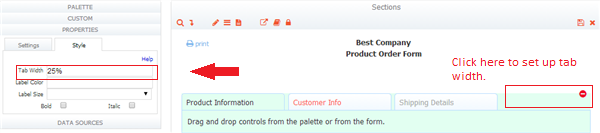
Type a percentage in the tab group’s Width property field. With five tabs, for example, typing 19% will cause each individual tab to take up 19% of your form’s width. As with panels you must account for space consumed by tab borders—so if you try to set the width to 20% the five tabs won’t fit on one row.
Panels
Columns can be created with or without the use of the panel control. Click Multi-column Form Layout for an in-depth discussion about this topic.
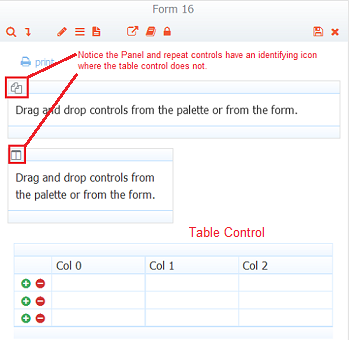
When you drag/drop a panel control on the canvas, it will have a default width of 6 columns. Notice panels do not have a label. You can identify a panel in the designer by the panel icon seen on top-left header.
Let's make a three-column layout using panels, where the first column is twice the width of the other two. Drag/drop a section onto the canvas. Simply drag/drop the first panel into the section. It will have a width of 6 columns. Drag a second panel to the right of the first and drop it when you see the ![]() green right arrow. Change the width of the second panel to 3 columns.
green right arrow. Change the width of the second panel to 3 columns.
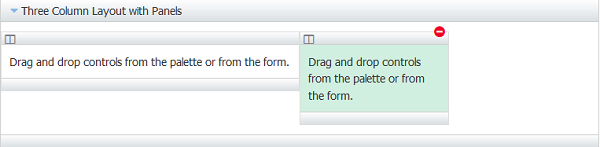
Drag the third panel from the palette over the second panel and drop it when you see the ![]() green right arrow. This panel will automatically adjust to a 3 column width to fill the remaining space in the section. Since panels are group controls, you drag other controls inside them. Below are three panels that have been dragged in to the palette for use in a three-column layout. Inside the first panel is a text control (city), a dropdown control (state) and another text control (zip)
green right arrow. This panel will automatically adjust to a 3 column width to fill the remaining space in the section. Since panels are group controls, you drag other controls inside them. Below are three panels that have been dragged in to the palette for use in a three-column layout. Inside the first panel is a text control (city), a dropdown control (state) and another text control (zip)
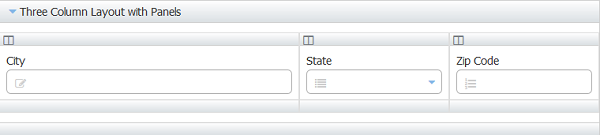
If you want to rearrange the order of your panels,drag the panel you want to move across the other panels in the direction you want to go and drop it when you see the green arrow. For example, the image below shows the panel for State being moved to the left of the panel for Zip Code.

Once the panel for State is dropped, it will look like this:

You can no longer label panels in the form designer. Panels themselves are not visible to users or to you when you test or preview your form. Only the controls inside your panels are visible; these controls will be organized visually according to the width of the panels.
The width of panels can be 1-12 columns, as desired. Each panel is itself divided into 12 columns irrespective of its width. Panels do not take up visible use mode space i.e. have a 6 column control outside a panel and a 12-column control inside a 6-column panel take up exactly the same width.
Panels can be dropped to the left or right of other panels. You can't drop other controls in a similar manner to the left/right of panels. The same width rule from above applies: a newly dropped panel dropped to the left/right of another panel will take the width of whatever you dropped on. This makes it very easy to create multi-column layouts.
You can drop another control in between two panels. In the image below, two panels 4 columns wide were dragged/dropped on the canvas. A Money control is dragged/dropped on the canvas and the width is changed to 4 columns. Moving the first panel to the left of the the Money control and dropping it when the ![]() up green arrow appears will put the Money control in between the two panels.
up green arrow appears will put the Money control in between the two panels.

If you delete a panel automatically deletes any controls you’ve dragged inside it.
Table
A table/grid layout in a form is a useful space saving technique. The use of panels to create columns can be replaced by using the table control. This control makes table/grid form layout easy by allowing you to create a table with user designated columns and rows. You can edit the table name, column names, drag and drop new controls from the palette, and set the widths of the columns. You can control the number of rows in the table by clicking on Add/Remove icons that appear to the left of the first column in the table. You can hide the delete icon to eliminate deletion of a row in a table rows using the deletable property or allow only a certain number of items based on user input using a business rule. You can also use business rules for computed values, enabling/disabling fields, showing/hiding fields etc.
When tabbing through a form, use Shift-Right arrow or click on a table cell to begin tabbing into a table.
Tables are always 12 columns wide when you drag/drop it from the palette. Table controls do not have an identifying icon like Panels and Repeats do.
When you drag the table control into your form, the control will have three rows and three columns. The Table is assigned a default name i.e.Table95. The columns will display the default names of col 0, col 1 and col 2 respectively. The and icons will display for each row in the table, allowing addition and deletion of rows. Deleting all the rows will result in a table with one row. Notice the name of each tables column is unique.

It is strongly recommended that column names in a table be unique.
Rearrange table columns by clicking on the ![]() green bidirectional arrow that appears when you click in the column heading of the column that you wish to move. For Example, to move the “Years Acquainted" column to the left of the “Business” column in the table, click the green arrow in the "Years Acquainted" column until it reaches the desired position. Columns will move to the to the left or right until the last column position in each direction in the table is reached.
green bidirectional arrow that appears when you click in the column heading of the column that you wish to move. For Example, to move the “Years Acquainted" column to the left of the “Business” column in the table, click the green arrow in the "Years Acquainted" column until it reaches the desired position. Columns will move to the to the left or right until the last column position in each direction in the table is reached.

There is a property panel for the table and a separate panel for each column and cell in the table. Labels for the table control will not display in Use mode.
Users can add/delete rows in a table control in a form depending on the requirements of the task. The forms designer can control the number of rows in a table by setting the Min/Max properties on the table properties panel. Min # defaults to zero and Max # to10. The Min # value will dictate the minimum number of rows in the table and the Max # value specifies the maximum number of table rows allowed. Setting the Min# and Max# to zero will default the Max# to 1 resulting in a table with one row. All the cells in this one row table will be displayed in the designer and use mode with a pink color indicating the entire row must be filled in to submit the form. See Min/Max and Required properties for more information.
Designers creating accessible forms/flows can use the Summary property to specify extra help text that will be announced by Assistive Technology tools.
.png?version=1&modificationDate=1509722950000&cacheVersion=1&api=v2&width=303&height=296)
The table control has some limitations:
- The Table control cannot be published by dragging to the custom palette. Currently, this can be done by clicking on Publish Control Template link in the properties panel.
- Drag and drop of a Table control into a Repeat control is not supported.
- Schema controls cannot be added to a table that is dragged from the palette and dropped into a form.
Centering of a column header in a table cannot be done at this time but might be possible in a future release.
Margins given in percent for the table and table cells will not work in IE8. Use px values.
- The f-page-break css class should not be used in table cells.
Adding a Column to the Table Control
Other controls can be dragged into the table (Dropdown, Radio, Checkbox, Message, Text, Text area, Date, Email, Money, Phone, Quantity, Number, T/F). Drag the control from the palette. The new control will appear as a column positioned to the right of the column where it is dropped. For Example, a date control can be dragged from the palette and dropped over the Description of Expense column. Adjust the column widths in the table if necessary. Notice that the cells in the added control column do not have the Required property checked. The form designer must set the Required property as appropriate for newly dragged columns.

Help icons for a column with a label that has multiple lines may not align properly. Adjust the column widths if possible.
Adding columns to a table generated from schema is not allowed.
Table Min and Max Properties
Add/Remove icons will automatically appear to the left of each row in the table. Click on the icon to append a row to the bottom of the table until the number of rows reaches the Max # value specified in the property panel.
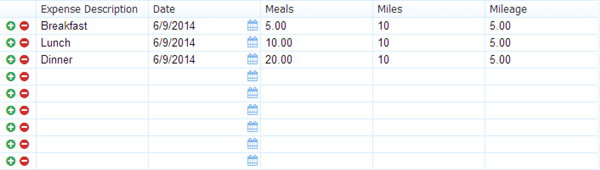
The image below shows an Expense Report created using the Table control. The Min # property is set to zero and the Max # is set to 10. Nine expense items can be specified in the table as shown. One more row can be added by clicking the icon.
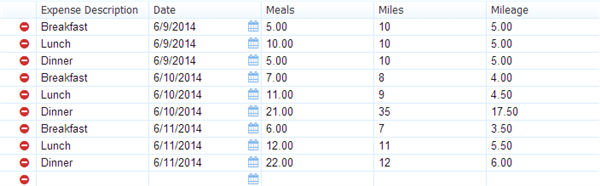
When the table consists of 10 rows, the will icon will disappear and the icon will remain. Clicking on the icon will delete one row from the bottom of the table. The minus icon will become a when the Min # value is reached or there is only one row in the table.
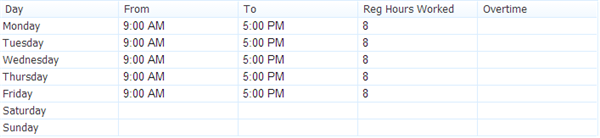
The Table control can also be used for static grids where the number of rows is fixed. Set the Min # equal to the Max # and the Add/ Remove icons will not display. The image below shows a table control in a Time Sheet form. Users enter the work data into the grid and are not able to add /delete rows.
The Min/max fields for table created from schema are not editable. See Setting Properties for more Information.
Prompt and Prompt Message Properties for Tables
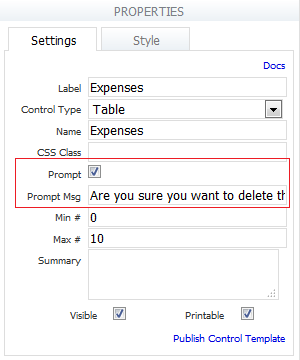
Check the Prompt property checkbox on the Table control Properties panel to display a confirmation message if users attempt to delete a table row. The text of the message can be customized in the Prompt Msg property.The Prompt Msg property is only visible when the Prompt property is checked.
At runtime, displays the prompt when the user attempts to delete a repeat item if the Prompt property is checked. This applies to Table rows and Repeat items. If the user selects Ok the item is deleted. Selecting Cancel aborts the delete.
The Prompt Msg and the labels of controls included in a Repeat are available in the form level downloadable text strings file for localization.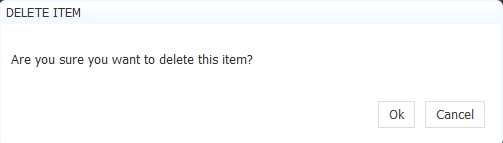
Table Column Properties
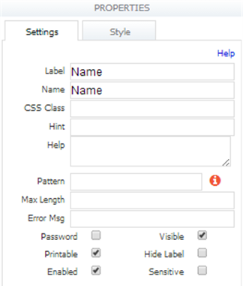
Columns in a table may require different properties depending on your specifications. There is a properties panel for each column where the properties shown in the image below can be selected. Checking a property on the column property panel will apply the selection to all the rows in that column in the table.The Visible property is available at the column level and can be used to Show/Hide a column at runtime using a business rule.
If you have a dropdown, radio or checkbox control in your table the required and comment properties are selectable on the cell property panel.
Labeling column headers, must be done from the properties pane – in place edit of column headers is not possible.
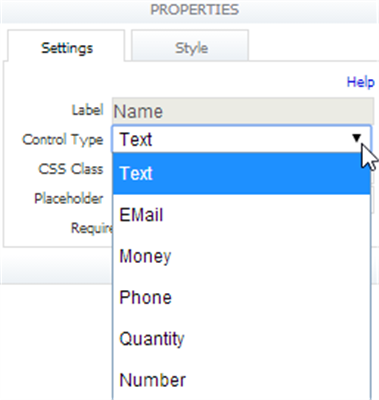
Modifications made to one cell in a table on the cell property panel will be replicated in all the rows of the column in the table. The Control Type drop down, provides choices to change the type of control from a text control to one of the following types: Email, Money, Phone, Quantity, Number. Changing the Control Type of one cell will change the control type for all of the cells in the column of the table. For example, all of the cells in a column in a table that will be used to collect mileage information can easily be changed to number controls by selecting that choice in the Control Type dropdown on one of the cell property panels.
Required cells in a table will display in the edit and test modes with a yellowish background color as shown. When you drag the table control from the palette into your form, all cells are marked required. Individual cells can be designated as required/optional by checking/unchecking the required checkbox on each cell property panel. Changes made to the required property in one cell in a column will add/remove the requirement from all the cells in the column. Refer to Setting Properties for more information.

Error messages for invalid data in a table will display one at a time.
Column Widths
Column widths can be adjusted using the Column Width property found on the table Style Properties tab. To edit the column widths, enter a value in percentages (Ex: 50%), or px values, separated by a space, for each column in the table. For Example, the Name and Business columns have a width of 25% of the Form Width while the Address and Phone column is set to 30%. The Years Acquainted column is set to 10%.
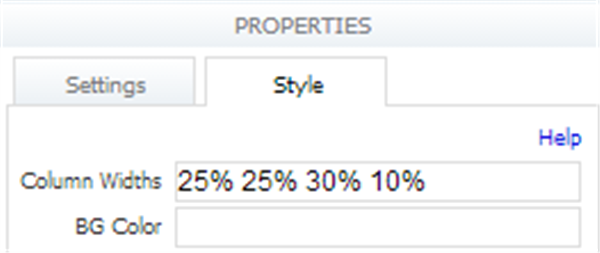
Here is how the Table control looks with these column widths.

Set the column widths explicitly at the table level for consistency in html and print view.
Labeling the Rows of a Table
Dragging a message control from the palette and dropping it into a table will provide a column in the table that can be used to label the table rows. Move the message column to the desired position. The text of the message control of each cell in that column can then be set as desired. The days of the week in the Day column of the Timesheet form shown below is an example of using the message control with modified text for row labels. Remember the Rich Text Editor is available for easy creation of your Message control content.
A Message Control dropped into a table will not have hint, help, or enabled properties. Be sure to check the "hide label" property if you have a message control as a column in your table and you do not want a column label on it. The column label will be hidden in use and edit modes if "hide label' is selected.
Deleting a Table Control
Select the entire table control by clicking in the table label. A red  will display. Click on the x to delete the entire table.
To delete a column in the table, click on the red in the top right corner of the column.
Changing a Table Control to a Repeat
You can change a table control to a repeat control via the Control Type or Display As properties, depending on whether the table was dragged and dropped from the palette or added from schema. Refer to this documentation for the details.
When you change a table to a repeat or vice versa and there are referencing rules, it is recommended that you check the rules for the correct syntax and section names. See Rules Examples for more information.
Horizontal Layout using the Table Control
Let's say you wanted to modify a section of your form to reflect a horizontal layout as shown in the image.
You can use a Table control with Message and Radio controls to accomplish this. Follow these steps:
- Drag a Table control from the palette and drop it on the designer canvas.
- Drag a Message control from the palette and drop it into the table to create a column. Click on the column header and check the Hide Label property on the Settings tab. Delete unwanted columns.
- Modify the rows of the Message control column for the labels. The Rich Text Editor is available for easy creation of your Message control content.
- Drag a Radio control from the palette to the canvas.
- Set up the Yes/No options for the Radio Control.
- Specify the item width on the Style tab so that the options display horizontally.
- Drop the Radio Control into the table to make a second column.
- Click on the column header and check the Hide Label property.
- This is what the table will look like in Use mode.

Repeats
Say you want users to be able to enter one or more addresses, phone numbers, or other data. With repeating controls, your form can dynamically display as many controls as a user needs rather than always showing extra input controls that may not be needed. You can write a business rule to allow only certain number of items based on user input.
Repeat controls do not have a label. You can identify a repeat control in the designer by the palette icon for a repeat seen on top-left header. Repeats are assigned a name by default i.e.Repeat96

Repeats are always 12 columns wide when you drag/drop it from the palette and each is itself divided into 12 columns. Click here for more information.
Drag the repeat control into your form and then drag another control into the repeat control just like you would for sections, tabs or panels. When the control is inside your repeat control, click the control to see its properties (on the left hand side of the Forms Designer). Notice that two Settings properties have been added to the properties you normally see for the control: Min# and Max#. These properties default to 0, 1. You must change them as described below to make the control repeat.
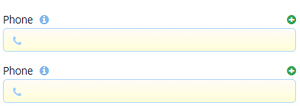
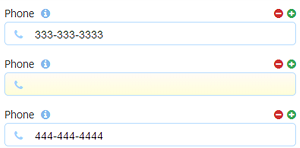
These minimum and maximum properties control the behavior users will see on the form. In the example below we’ve set the phone control min # to 2 and the max # to 5, so when they access the form users will see two phone controls and both will be required. Also, both will have an icon; clicking this automatically displays another phone control. If you click during design, the min # property will be incremented automatically. The ![]() icon above each control is optional and appears because we set the phone control's Help property.
icon above each control is optional and appears because we set the phone control's Help property.
It is often helpful to tell the user how to add additional repeat items. You can easily do this by dragging a message control into the form with the following text:
<center>Click on the <img src="/frevvo/images/icons/add.gif"/> icon to add more phone numbers to the list.<br/></center>
The first items in order up to the min# must be filled in when the form is used in order for the submit button to be enabled. Thus if the user enters a value into the 1st repeat item and then the 2nd repeat item, and then clicks plus on the first repeat item, a new item will be added to the form between what was the 1st and the 2nd moving what was the 2nd item to the 3rd position in the list. The new 2nd item will become required because it has no value. Until the new 2nd item is filled with a value the form will not be submittable.
Thus it is not enough that 2 items contain values when min# is 2. The 1st two items must contain values.
If users elect to supply the maximum number of values, after all controls are displayed, the icons will disappear from the form and only the icons will remain.
When you edit the label or any properties of a control inside a repeat control, your changes will be applied to every instance of the control inside the repeat control. The same is true if you decide to delete a control inside the repeat control—all instances of the control will be deleted.
As with panels, repeat controls are hidden when testing or using forms and only the controls inside your repeat controls are visible. (The input controls will have icons as a visual cue to users.)
There are some key differences between repeat controls and the other grouping controls:
- You may drag in only one control, and you may not drag in tab controls, panels or other repeat controls.
- You may not drag in trigger, image, link, upload, tab, table or signature controls.
You can have multiple controls inside a repeat. To do this, first add your controls to a section control, and then drag the section into the repeat control. Only one section is allowed inside a Repeat control.

If you need to add more controls to the section, you must first drag the section back out of the repeat. Add the additional controls, and then drag the section back into the repeat. Panels are the exception: you can drop a panel into a section without first dragging the section out of the repeat
If you add a control from a repeating element that was uploaded as part of a schema (maxOccurs > 1), automatically will generate a repeat control and nest the repeating item in that control. The repeat control will automatically enforce the minimum and maximum occurrence constraints.
When referring to repeat controls in various places such as Form Action display message, you must use a special template syntax. See templates for repeat controls for the details.
Prompt and Prompt Message Properties for Repeating items
Check the Prompt property checkbox on the control inside a Repeat control Properties panel to display a confirmation message if users attempt to delete a repeating item. The text of the message can be customized in the Prompt Msg property.The Prompt Msg property is only visible when the Prompt property is checked.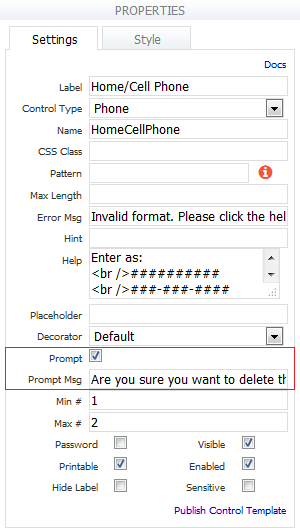
At runtime, displays the prompt when the user attempts to delete a repeating item if the Prompt property is checked. If the user selects Ok the item is deleted. Selecting Cancel aborts the delete.
The Prompt Msg and the labels of controls included in a Repeat are available in the form level downloadable text strings file for localization.
If you have more than one control inside a Section that is dropped into a Repeat control, these properties will show on the Section Properties panel.
The Prompt and Prompt Message properties appear on the Properties panel for all levels of controls that are included in nested Repeats.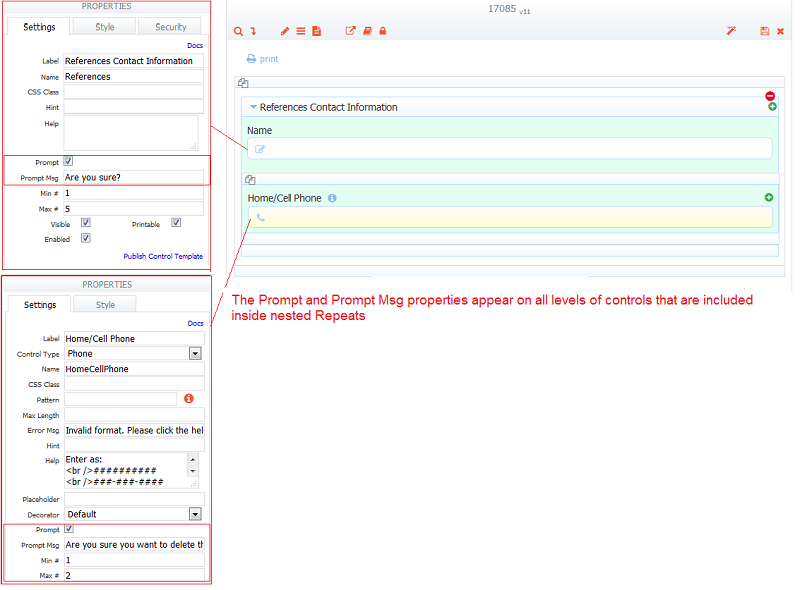
Changing a Repeat Control to a Table
You can change a repeat control to a table control via the Control Type or Display As properties, depending on whether the repeat was dragged and dropped from the palette or added from schema. Refer to this documentation for the details.
When you change a repeat to a table or vice versa and there are referencing rules, it is recommended that you check the rules for the correct syntax and section names. See Rules Examples for more information.
PageBreak
Mobile forms work best when they are broken up into small, logical pieces. The PageBreak control lets the designer create a mobile layout consisting of multiple pages where each page contains a small number of controls (logical groupings). The user navigates between the pages via Back/Next buttons, or on a device that supports it, by swiping left/right.
Tablet and Smartphone
Forms are generated using HTML5 controls so features like Custom Keyboards, Date pickers etc. can be used. For example:
- Money, Number and Quantity controls will display a numeric keyboard.
- An Email control will display a keyboard with an @ sign.
- A Phone control will display a phone-specific keyboard.
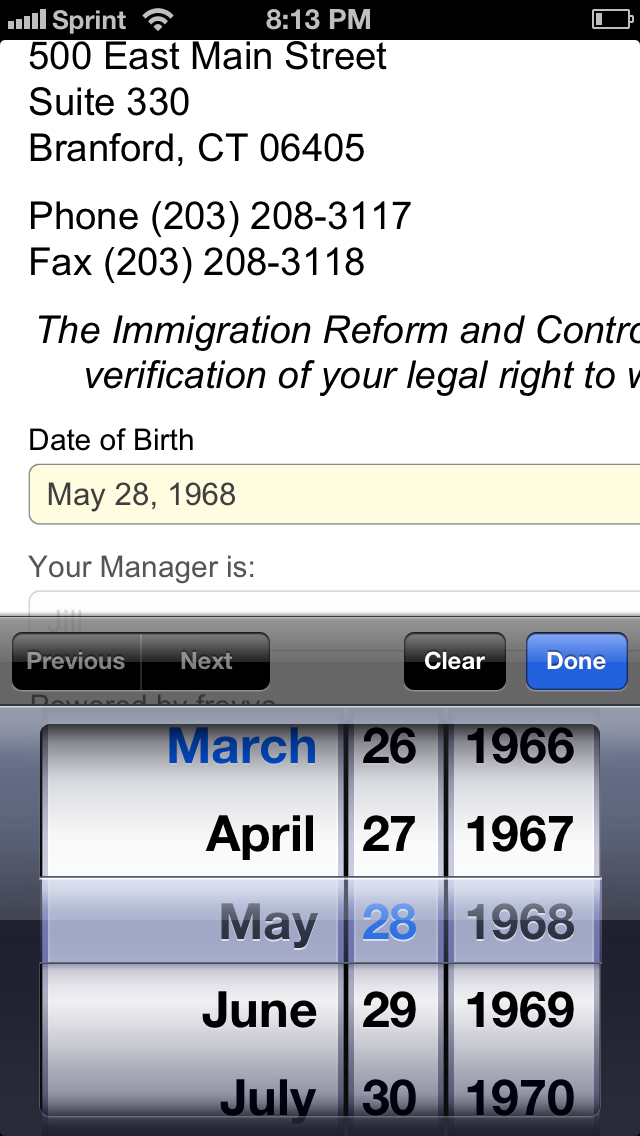
- Date, Time and Date-Time controls will display the appropriate pickers.
- Drop-downs will use the device specific pickers.
Panels will be ignored on a smart phone, rendering all controls one below the other. Panels on a tablet will be rendered as usual. The +/- icons are rendered larger so that it's easier to touch them with a finger. Your mobile form takes up the entire width of the device
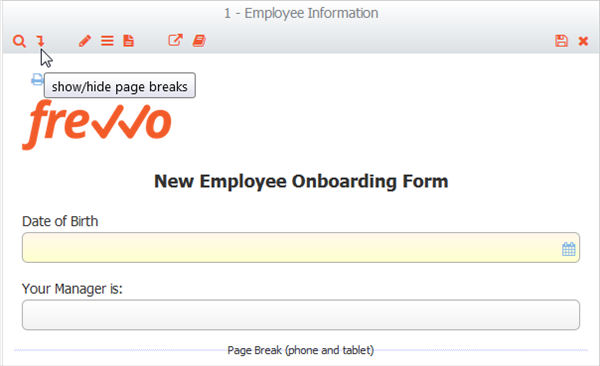
If your form has PageBreak controls in it, they will be visible by default when you edit your form in the form designer. You can hide them by clicking the  icon in the toolbar.
When you drag/drop a PageBreak control from the palette into your form, the visibility will automatically be toggled so the controls are visible.
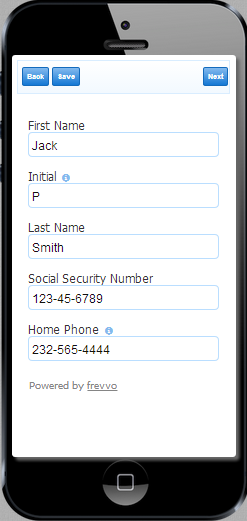
Drag and drop a Page Break control from the palette into your form to specify pages on your mobile devices. You can set a page break for Phone, Tablet or both by checking the Tablet and Phone checkboxes on the Properties panel of the control. If neither is selected, it has no effect. When the designer clicks Finish, will generate a Smartphone layout and a Tablet layout with the page-breaks specified. If page-breaks are not specified, there will be just one page. The Employee on Boarding form shown below, when rendered on the iPad and iPhone, displays the company information, the new employee's date of birth and manager's name on the first page and the new employee's name, social security number and home phone on the next page because the first PageBreak control has both phone and tablet checked. If tablet is unchecked on the second PageBreak control, the name and address panels will display on the same page on the tablet.
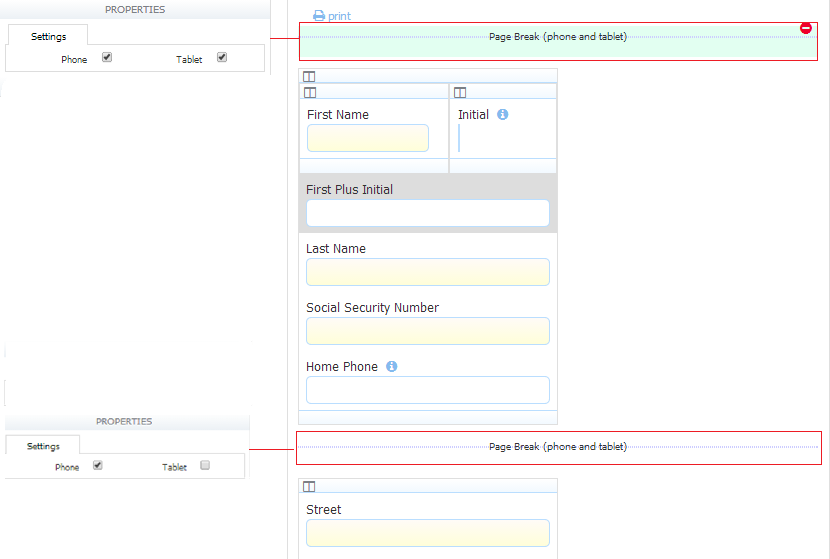
PageBreak Controls in the designer
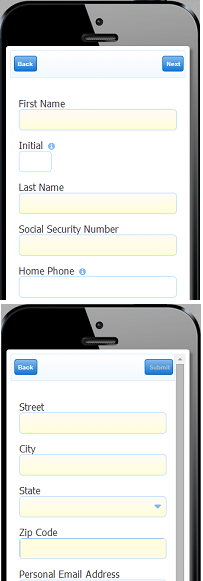
iPhone Layout and iPad Layout if Phone and Tablet are checked
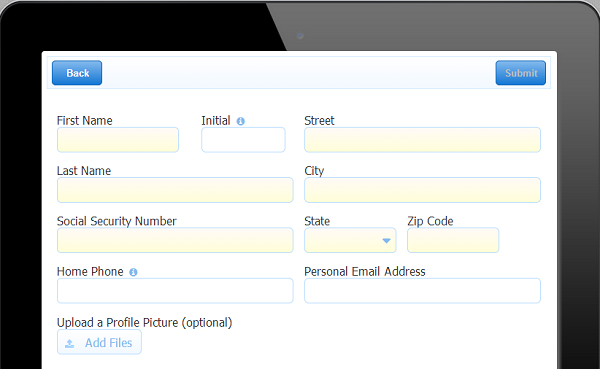
iPad Layout if Tablet is unchecked.
The PageBreak control cannot be dropped BELOW any control. It can be dropped BETWEEN 2 controls or ABOVE any control. For example, say you had a form with two panels side by side and you wanted to drop a PageBreak control in between them. Drag the PageBreak control from the palette to the left of the second panel in the form until you see the ![]() up arrow as shown in the image below:
up arrow as shown in the image below:

Drop the control when you see the ![]() green up arrow and the PageBreak control will drop between the two panels.
green up arrow and the PageBreak control will drop between the two panels.
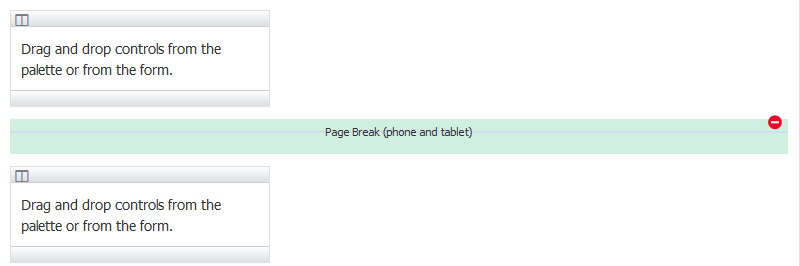
Let's try another example. You are designing a form for mobile devices. You drag and drop one control on the form. Now you want to add the PageBreak control and then add other controls below it. You cannot drop the PageBreak below any control so you will have to add the other controls first and then drop the PageBreak control where you want it. Once you add more than one control to the form, you can drop controls from the palette or the form above or below the page break. You can drag and drop the PageBreak itself anywhere at the root of the form. The PageBreak control should not be dropped inside sections, panels, tables or repeat group controls. The only exception is the Tab control. See below for the details.
PageBreaks in a Tab Control
Dropping a page break control in one tab of the tab control adds the page break to all tabs. You must drag and drop the Tab control into the form first and then drop the PageBreak into one of the tabs in the tab control. If you drag and drop the PageBreak control onto the canvas first and then try to move it into a tab control, it will not work. When you drag and drop a page break control into a tab, it will always be at the top. You cannot drag it but if you drop another control from the palette or the form it will always drop below the page break control even if you drop it on the tab header. Setting/unsetting a property (e.g. uncheck Phone) in one Tab will duplicate the action in all tabs. If you try to add more than one PageBreak control to a tab, you will see the following message:

You cannot move the PageBreak out of a tab. The only way to remove it from one of the tabs is to click on the delete icon which will remove it from all the tabs.
Here is how a PageBreak control dropped into a Tab control looks in the designer.
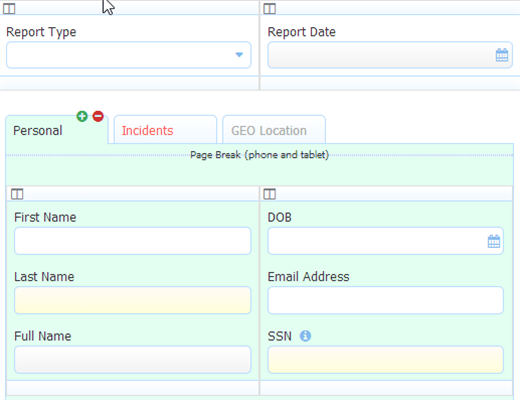
Tabs containing a Page Break will be rendered as separate pages on the appropriate device e.g. if phone is checked and tablet is unchecked, the Tabs will turn into pages on the phone and stay as Tabs on the tablet.
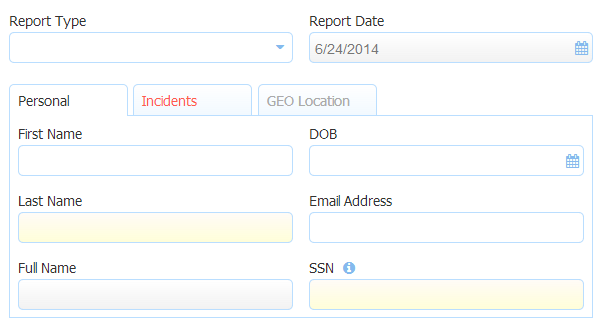
Tabs Display on a Tablet
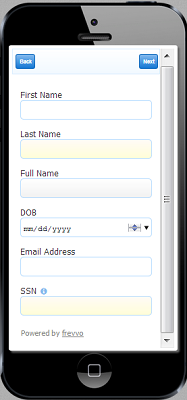
Tabs become Pages on a Smart Phone
Signature
Drag a signature control from the palette to add an electronic wet signature to your form.The Signature control is decorated with an image that cannot be changed.

You cannot enter a signature into the control in edit mode. In use mode, clicking or touching a signature control presents the signature entry dialog that is illustrated in the image below. Use your mouse, track pad, touchscreen, stylus or a configured Topaz Electronic Signature Pad to sign. You can clear the signature in order to sign again by clicking the Clear button.The Cancel button negates any changes. All signature controls are empty of any signature (shows the X and a line) when the user first displays the form. Entered signatures are only applied to the use mode form when the user selects Done.
Notice the signature is displayed in the form scaled down into the signature control.
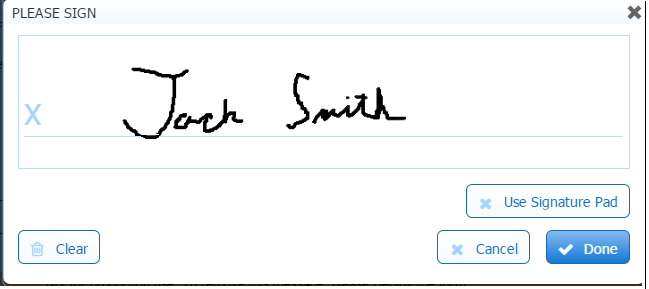
Forms and flows can be made accessible to help individuals with visual and motor impairment. Refer to this topic for the behavior of the Wet Signature control when this property is checked.
will display the error message "Signature support not available. Please use a later browser version with HTML5 support for canvas." if your browser does not support HTML5 canvases.
Signature controls on mobile devices will not have the text entry field.
Refer to Electronic Signatures for more information.
Limitations
- The signature control in thin forms is not supported.
Form Viewer Control
The Form Viewer Control is used to allow a generated PDF to be viewed as part of a form/flow. This control is visible in the Forms designer palette to be used when generating "Pixel Perfect" PDFs in the Forms designer. Refer to this documentation for the details..
Save Value Property
Check the Save Value property to include the value of the Form Viewer control in the form/flow submission document. This property is unchecked (default) when you add new Form Viewer controls to your form/flow. Refer to the Save value property topic for more information and to see how this property can help with Form Viewer controls in Optional Sections.
Since all fonts are different, you may need to contact the vendor for instructions to include the font in your HTML
Testing Your Mobile Form
Currently, the best way to test mobile forms/flows is to click the Test icon on the Forms Home Page in the designer. You can click on tablet and phone icons at the top to see an approximate rendering of your form on the selected device. . Sometimes, the mobile form/flow does not look the same in these test form views as it does on the mobile device. It is recommended that you design/debug your form/flow completely on the desktop first. Then you can add your form/flow to a space and look at it on the mobile device.