Live Forms v8.0 is no longer supported. Please visit Live Forms Latest for our current Cloud Release. Earlier documentation is available too.
Manage Users
- Former user (Deleted)
- Former user (Deleted)
A tenant admin uses the Manage Users page to add new users, delete users, edit the properties of existing users and download/upload a csv file containing user data. Click the Manage Users link to display the user list. To the right of each user name are icons described below.
If you are logged in as the superuser admin you must first click the Manage Tenants link to display the list of tenants. Then click the  button to manage users/roles for the desired tenant. Then click the Manage Users link.
On this page:
Add New User
Create new tenant users on the Manage Users page.

Click  add new user icon at the top of the user list.
- Complete the new user form.
User names can contain characters, numbers, dot (.), hyphen (-) and the underscore (_) and cannot start with a number. Max length is 50 characters.
- Assign roles to the user. NOTE: Assign the special role frevvo.Designer to any user who needs permission to create forms and workflows.
- You can assign multiple roles to any user by clicking the "+" icon
- Assign a reports to for any user who needs to route a form they fill in to their manager. For example a PTO request.
- Submit the form

The Reports To field is a ComboBox. Begin typing the userid of the person this user reports to and a list of matching users displays. Select the Role and Enabled field values from the Dropdown choices.
Add Tenant Admin
You can add additional tenant admins by click the  icon. This creates a new user with the special permission required to login and manage the tenant. You cannot add this special tenant admin to an existing user. This is the only way to to grant this special tenant admin permission.

If you want to disable a tenant admin, edit that user by clicking the  button and add the frevvo.ReadOnly role. You can also delete all tenant admin except the initial tenant admin created while creating the tenant. One common case is that you need to remove admin access to a person who initially had that permission via the initial tenant admin. To do this:
- Create a new tenant admin
- Edit the original tenant admin and add the role frevvo.ReadOnly
Edit Admin Users
There is also a short-cut to edit the initial tenant admin – click the button above the alphabet list to go directly to the initial tenant admin's edit page. You can also distinguish the initial tenant admin from non-admins because the initial tenant admin cannot be deleted so it does not have the  button. If you added additional tenant admins, the user list does not make it readily apparent that a user has that special admin access permission. Currently the way to distinguish an admin is click on each user's
  button and see if the user has the Manage Tenant functions.
CSV Upload of Users and Roles
customers that have a large number of users with assigned roles, may need to import these (userids/roles) into
.
provides the ability to perform a bulk import of user data.
Only tenant admins may import user data and associated roles. The upload/download users links are available for tenants using all security managers. This feature is useful when creating/migrating a tenant that uses the LDAP or SAML Security managers.

Download Users and Roles
- Make sure you are logged in as the tenant admin. Click the Manage Users link.
- Click the
 download users csv file icon.
 - This downloads a complete comma separated file that includes the list of the users and their assigned roles in the current tenant. Roles that exist in the tenant but are not assigned to any users will not be included in the file.The fields are comma separated. The following is an example:

The first row contains the column names. Descriptions of the field/column names in the file are listed in the table:
| Field/Column Name | Description |
|---|---|
| userId | The unique user id used for login. Required |
| tenant | The tenant identifier is optional. If not supplied, it defaults to the current tenant. Attempts to upload users for another tenant shows a validation error. |
| password | For newly inserted users, the plain text password. Always blank on download. Default passwords should be provided especially if you are using a tenant configured with the SAML Security Manager. If you are using the Default Security Manager, users can then be instructed to change the password on first login using the Manage Personal Information option. |
| firstName | User's first name. |
| lastName | User's last name. |
| User's email address. Required | |
| enabled | Set to 'true' to enable the user |
| reportsTo | The userId of the user that the user reports to, if any. |
| roles | A list of the user's roles, separated by the '|' character. Roles are inserted as necessary. Spaces are not allowed in role names. Role names cannot contain more than 100 characters. |
| transaction | Either blank or 'DELETE'. If DELETE then the user will be removed. Otherwise, the user is updated if it exists or inserted as necessary. |
- To include a ',' (comma) in a field, escape it with a leading '\' character. To include a '|' (bar) in a role name, escape it with a leading '\' char.
- To delete a user, enter DELETE into the transaction column of the file for that user. The user id and tenant fields are required for successful deletion. The message "Attempting to delete non-existing userId. It will be ignored." displays if the user id does not exist.
- To delete all roles for a user, leave the roles column blank. See Updating Users and Roles using a CSV file for more information.
- Although csv files can be opened in other programs, they are best viewed through some kind of spreadsheet program. Here is the file when it is opened with Excel:
Notice the password column is blank.

Upload Users csv file
Downloading the user csv file will provide you with the format needed to import users and their associated roles into . Once you have your csv file ready, follow these steps to upload it:
Make sure you are logged in as the tenant admin. Click the Manage Users link.
- Click the
 upload csv users icon.
 - Browse to your users csv file and then click Validate. User data is validated prior to successful import. You will see "Validating..." until the validation process is completed. It is useful to report the status especially if you are loading a large csv file. Once validation has succeeded without error, the Load button is enabled to allow the upload. When you click on the Load button, you will see "Loading...".

- The image shows the the result of a validation that resulted in errors. Users data cannot be uploaded until the errors are corrected. The table showing the validation data is scrollable vertically when loading a large csv file.

If the users.csv file will not pass validation because passwords are required, it is recommended that you provide a default password. This is mandatory if you are using a tenant with the SAML Security Manager. If you are using the Default Security Manager, users can then be instructed to change the password on first login using the Manage Personal Information option.
- A default password was added to the users.csv file that loaded with errors in the image above. The file was uploaded again. This time the validation resulted only in warnings.
- Click the Load button, the system uploads the same data again from the file. Another validation is performed and if still no error, the users are loaded individually or deleted if specified in the transaction column of the file. Roles are also inserted as necessary.

You will see this message with the number of roles and users that were created: "Users Loaded successfully. 3 Added, 1 Updated, 0 Deleted, 4 Roles Added." Uploading an empty users file displays the message "Users file is empty".
Updating Users and Roles using a CSV file
Once your csv file has been uploaded, it is very easy to update User and Role information. It is not necessary to reload your entire csv file every time you need to make changes. Simply create a csv file, with the proper format, that contains only the information that you want to change.
Existing users will be updated with the new information if you upload modified versions of your csv file.
For example, let's say you have 19 users in your tenant. You want to change the last name of an existing user, and add a new user (Pat) who will have the new role of (Coordinator).
- Create a csv file with the changes - change the last name of a user and add a new line for a new user (Pat) with the role of Coordinator.
- When you upload the modified file, you will see this message: "Users Loaded successfully. 1 Added, 1 Updated, 0 Deleted, 1 Roles Added". The existing user will be updated with the new last name, the role of Coordinator will be created and new user Pat will be added with that role.

- If you leave the roles column blank in the csv file you are using for updates, the existing roles for that user will be deleted. Be sure to add the roles relevant to the users you are updating so the existing roles are not cleared.
- The warning messages "Update of user failed" or "Users Loaded successfully with some issues. See detailed results for details." is no longer displayed if users in the csv file you are uploading do not have any roles assigned to them.
Troubleshooting
Current Tenant Validation Error
If the csv file contains a name that is different from the current tenant, a validation error message displays. Upload the file again with the tenant field empty.

Spaces in Role Names
If there are spaces in the role names in your csv file, the message "role [the name of the role that contains the space for example: V P] - format not permitted (must start with a letter or _, max 16 chars from the set: a-zA-Z0-9_- ). Remove the spaces then upload the file again.
View User List
Click on a capital letter (A to Z) to display a list of users whose name begins with that letter. Click All to display all current users.

- Click at the top of the user list to add a new user.
- Click at the top of the user list to add a new tenant admin user.
- Click to display that user's home page.
- Click to edit that user's management functions.
Click
 to upload a signature image file that will be applied to all forms/flows this user signs in place of his or her first and last name. Refer to Signature Images and Electronic Signatures for more information.
- Click
 to log into
 as that user.
- Click to edit a user's profile including password, e-mail address, max upload attachment size, disable the user.
- Click to remove a user from the server.
If you use LDAP or a delegating or custom security manager to define your users and their roles or groups, you do not see the New User icon on the Manage Users page.
You should not assign any roles (such as Manager, Supervisor, etc.) to a tenant admin user, as this can adversely affect the execution of tasks and activities in work flows. A tenant admin with roles may be accidentally assigned a task actually intended for other non-admin users who have the same role, and the tenant admin could perform the task and thereby disrupt or compromise the work flow or its data.
Adding Superusers
The superuser admin, whose username is "admin" can add new superusers to the special d (default tenant). Note to login as the superuser enter the username admin@d (admin is the username and @d specifies the special default tenant). New Users added to the default tenant automatically become new superusers. This allows you to name additional superusers and then if you want you can disable the built-in superuser. To disable the build-it superuser named "admin" click the button above the alphabet list. This brings you directly to the build-in superuser admin's edit page, or you can click the icon to the right of the admin name in the user list. Set the Enabled dropdown to false. This will prevent further logins by the built-in superuser named "admin". Note you cannot delete the built-in superuser named "admin". You can however delete any additional admin user you have created.
Signature Images
The tenant admin can add/manage signature images for users that is applied to all forms/flows this user signs in place of his or her first and last name.
To upload a signature image for a user:
- Click the add signature icon. The Manage Signature for ,userid> screen displays.

- Browse to the location of the signature image file and select it.
- Click the Upload/Delete button. A successful upload displays for the userid

- To delete an existing signature file, check the Delete Signature checkbox then the Upload/Delete button.
If uploaded signatures do not display properly, try to open the image with the browser (Open With for Windows) off the filesystem. The signature image may have errors.
Edit Users
Click the button next to any user in the users list to edit that user. You can perform functions such as adding/removing roles, resetting paswords, configuring the Max Attachment size per user etc...The default size for attachments is 10485760 bytes.
The Reports To field is a ComboBox. Begin typing the userid of the person this user reports to and a list of matching users displays. Select the Role and Enabled field values from the Dropdown choices.
Maximum Size for Attachments
There are three places to set the maximum size of attachments in .
- The

- The tenant admin can set the maximum file size per user by editing their profile. Add the value in bytes to the Max Attachment Size field on the Edit User screen.
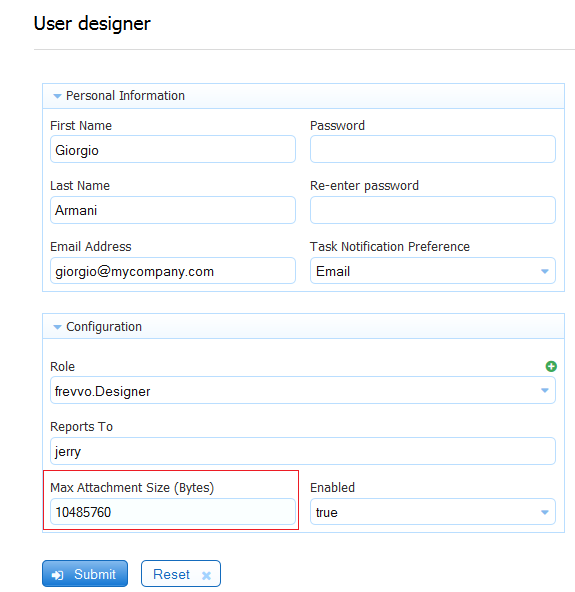
The value in this field overrides the max size value configured on the server level, as long as it does not exceed that value. For example, if the Server was set for 10 MB and the user profile was configured for 8 MB, the user sees this error message when trying to upload a 30 MB attachment:
- Designers can specify the max file size per the Max Size property of individual Upload Controls. The image shows a 5 MB Max Size property specified for an Upload Control.
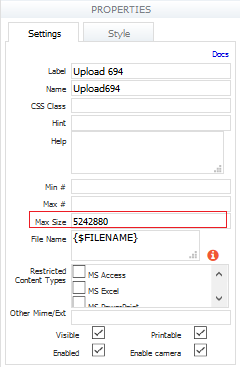
If a user uploads a file larger than 5 MB to this control, they will see this error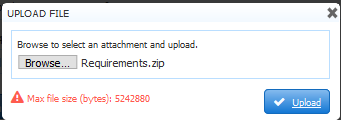
The value of the Max size property of individual Upload controls overrides the value per user which overrides the max size property on the server level. All values must be specified in bytes. If a maximum file size is specified at the server level, the values in the user profile Max Attachment Size field and the Upload Control Max Size property cannot exceed the server max size.
Disable Users
The superuser or tenant admin can disable a user. Disabling a user prevents that user from logging into the form server. If the user has the role frevvo.Designer (aka. was a designer user) the users' forms will become inaccessible to other users. Even if the forms were public users will get the error "This resource belongs to a disabled user". To disable a designer user but keep the form accessible, change the user's role from frevvo.designer to frevvo.readonly and set the Enabled dropdown back to true. In this case when the user tries to login they will get the error "Login is currently disabled".
To disable a user click the icon to the right of the user's name in the user list. Set the Enabled dropdown to false. If this user is already logged into the form server they will be able to continue using the form server until they logout. At that point future logins will be blocked with the error "Your account is disabled".
