frevvo v9 is no longer supported. Please visit Live Forms Latest for our current Cloud Release. Earlier documentation is available too.
Defining SQL Queries
- Former user (Deleted)
- Megan Ellis
- Former user (Deleted)
Your SQL queries are defined in configuration.xml. The database connector looks for this file in
- Standalone bundle - <db-home>\database\database-connector-(DBC version number)\config.
- frevvo-tomcat bundle - The location you specified in <frevvo-home>\tomcat\conf\frevvo-config.properties via the frevvo.connectors.database.configuration property.
The database connector logging output is very helpful for troubleshooting database SQL issues. This example shows the log entry generated when browsing with an incorrect query name.
2017-10-26 10:31:35.359 ERROR   12048 --- [http-nio-8082-exec-5] c.f.connectors.database.QueryResource    : Query BIRT/allcustomers not found
2017-10-26 10:31:35.372  INFO   12048 --- [http-nio-8082-exec-5] org.restlet.Component (1199403432)       : 2017-10-26    10:31:35    0:0:0:0:0:0:0:1    -    0:0:0:0:0:0:0:1    8082    GET    /database/BIRT/allcustomers    -
The database connector logs version information for each datasource definition as it makes initial contact with your database(s).
2017-09-15 15:50:01.554  INFO   28614 --- [ost-startStop-1] c.f.c.d.service.ConfigurationService     : DriverName: Microsoft JDBC Driver 6.3 for SQL Server
2017-09-15 15:50:01.554  INFO   28614 --- [ost-startStop-1] c.f.c.d.service.ConfigurationService     : DriverVersion: 6.3.1.0
2017-09-15 15:50:01.554  INFO   28614 --- [ost-startStop-1] c.f.c.d.service.ConfigurationService     : DriverMajorVersion: 6
2017-09-15 15:50:01.554  INFO   28614 --- [ost-startStop-1] c.f.c.d.service.ConfigurationService     : DriverMinorVersion: 3
2017-09-15 15:50:01.554  INFO   28614 --- [ost-startStop-1] c.f.c.d.service.ConfigurationService     : DatabaseProductName: Microsoft SQL Server
2017-09-15 15:50:01.554  INFO   28614 --- [ost-startStop-1] c.f.c.d.service.ConfigurationService     : DatabaseProductVersion: 14.00.900
2017-09-15 15:50:01.554  INFO   28614 --- [ost-startStop-1] c.f.c.d.service.ConfigurationService     : DatabaseMajorVersion: 14
2017-09-15 15:50:01.554  INFO   28614 --- [ost-startStop-1] c.f.c.d.service.ConfigurationService     : DatabaseMinorVersion: 0
The Database Connector logfile is located in <frevvo-home>\tomcat\logs for the tomcat bundle and in <db-home>\database-connector-X.X.X\logs directory for the Standalone bundle. X.X.X is the version of the Database Connector. It is named database-connector.YYYY-MM-DD.log
In standalone mode, you will see three additional logfiles.
- DbConnector.err.log - currently empty.
- DbConnector.out.log - logs the database connector version.
DbConnector.wrapper.log - empty unless the database connector is running as a servers. Logs starts/stops date/time.
Turning on DEBUG level logging
- Stop
if you are using the tomcat bundle or the Database Connector service if you are using the Standalone bundle.
- Edit the:
- Standalone bundle - <db-home>\database-connector-DBC version number\config\dbconnector.properties file
- Tomcat bundle - <frevvo-home>/tomcat/conf/dbconnector.properties file.
Add the following line.
logging.level.com.frevvo.connectors.database=DEBUG
- Save the file
- Restart the Standalone Database Connector service or
On this page
Configuration.xml Content
Here is a sample configuration.xml file for a queryset named BIRT.
<dbconnector>
    <queryset name="BIRT">
        <query name="allProducts" autocreate="true">
            <retrieve>
                <!--maps to HTTP GET -->
                <statement> SELECT productCode, productName from Products order by productName </statement>
            </retrieve>
        </query>
        <query name="orderDetailsByOrder" autocreate="true">
            <retrieve>
                <!--maps to HTTP GET -->
                <statement> SELECT p.productName as product, o.quantityOrdered as quantity, o.priceEach as price,
                    p.productDescription as description, p.MSRP FROM OrderDetails o, Products p WHERE
                    o.productCode=p.productCode and o.orderNumber={onum} ORDER by o.orderLineNumber </statement>
            </retrieve>
        </query>
        <query name="productDetails" autocreate="true">
            <retrieve>
                <!--maps to HTTP GET -->
                <statement> SELECT * from Products order by productName </statement>
            </retrieve>
            <create>
                <statement>INSERT into Products (productCode,productName,productLine,productScale,productVendor,productDescription,quantityInStock,buyPrice,MSRP)
                   VALUES ('{productCode}','{productName}','{productLine}','{productScale}','{productVendor}','{productDescription}',{quantityInStock},{buyPrice},{MSRP})</statement>
            </create>
        </query>
</dbconnector>
The configuration.xml contains all the SQL statements (create, retrieve, update, delete) you need to integrate with your forms. This file uses XML syntax. The key elements are:
- <query> - contains a SQL statement (create, retrieve, update, delete). See the Database Connector Tutorial for working examples.
- <queryset> - contains a set of <query> elements. Define one <queryset> element per database datasource. See <<Datasource Definitions>>. The database connector can simultaneously connect to multiple databases; each must have its own queryset.
The database connector automatically picks up configuration.xml changes without restart.
This example uses this simple database table.
CREATE TABLE customers (
customerId INT,
firstName  VARCHAR(50),
lastName   VARCHAR(50)
)
Here is a retrieve operation for the customers query. The SQL statement returns all records from the customers table that match a given customer id:
<query name="customers">
   <retrieve>
   <!-- maps to the http GET method -->
      <statement>
        SELECT * FROM customers WHERE customerId='{customerId}'
      </statement>
   </retrieve>
   <!-- Omitted other statements -->
</query>
The SQL statements are nested inside a <query> element and one query can include up to four SQL statements. This is part of the SQL-to-Browser translation—four is the “magical” number because under the covers the connector is translating the four basic SQL functions: create, retrieve, update and delete (CRUD) to the four basic browser functions of POST, GET, PUT and DELETE. That is reflected in the children elements of the <query> element: <create>, <retrieve>, <update> and <delete>. You can use any valid SQL statement..
One query cannot have two SQL statements of the same type. If you need two different <retrieve> statements (for example, Select * from customers and Select * from Product), you’ll need two different <query> elements. A query may have fewer than four SQL statements—if users can’t delete data from your database via your forms, your query does not need a <delete> operation.
Note the string {customerId}. This is an example of how to pass data from your form fields into your SQL statements. For example, if your form field named customerId contains the value 1234 than the select statement would return the record for customer 1234.
Using > or < characters in the configuration.xml SQL statements is not supported. These characters need to be escaped, so < should be replaced by < and > should be replaced by > in the query. Alternatively, you can use <![CDATA[put your long SQL here]]> to bypass encoding issues in XML, or use the BETWEEN operator instead of using >= and <= in your SQL statement.
Retrieving NULL or Blank Database columns
By default, the database connector will not return any xml value or json value for any database column that is blank or null. If you want the database connector to return a empty string or null for such columns then set the emitNullColumns attribute to true. The emitNullColumns attribute can be set in these configuration.xml elements from highest to lowest precedence : <dbconnector>, <queryset>, or <query>. The outer elements take precedence over the inner elements.
Here are several configuration.xml examples.
<dbconnector version="2.5" emitNullColumns="true">
queryset name="BIRT" emitNullColumns="true">
<query name="lkadgroupmembers2" emitNullColumns="true">
Here is a dbconnector-properties or frevvo-config.properties example
dbconnector.emitNullColumns=true
If you are running with emitNullColumns=false (the default) you can still handle null and blank columns via well written business rules.Check the returned resultset as follows:
if(x.resultSet[0].contactemailaddr)
     vendorEmail.value = x.resultSet[0].contactemailaddr;
else
     vendorEmail.value = null;
Conditional NULL in MySQL Insert Statement
If you are using the MySQL database, there is a special syntax to insert a conditional null in an insert statement. For Example, let's say your form/flow has an optional date field in a form that is designed to insert a row into the database. The insert will fail because the database connector inserts an empty string where MySQL expects NULL.
Use this Insert statement to resolve the issue:
INSERT into log (VisitorName,optional_date) VALUES ('{VisitorName}', (CASE {optional_date} WHEN '' THEN NULL ELSE {optional_date} END))
In this example, {optional_date} refers to a column of type date and is optional. When its empty in your form, NULL is inserted fulfilling the MySQL requirement otherwise the value in the field will be inserted.
Empty ResultSets
The XML Schema generated by the dbconnector requires at least 1 row (minOccurs=1). When the resultset has no rows, the connector sends an empty string, i.e. invalid XML instance. This is because the attribute emptyStringForEmptyResultSet="true" is configured by default.
logs a warning to that effect. You may notice an error message that reads "Premature end of file", similar to the image below, in the debug console when testing your forms.
![]()
This behavior can be controlled by adding the queryset attribute emptyStringForEmptyResultSet with a value of false to the queryset in the configuration.xml file or by adding the property dbconnector.queryset.emptyStringForEmptyResultSet=false to the dbconnector.properties file.![]()
Post/Put to the Database Connector from a Business Rule
The Database Connector supports URL parameters and JSON payload in POST/PUT requests. You can use http.post() and http.put() statements in a frevvo business rule to send data to the frevvo Database Connector to insert/update records into your external database.
Use the http.post method to insert records into your database and use the http.put method to update existing records.
Let’s take a look at an example to explain this.
Create a form from the Database Connector schema (productDetails) to insert a record into the products table in an external database named classicmodels. We have added a Trigger control to make testing the rules easier. The MySQL classicmodels database has a table named products. When we execute the rule in our frevvo form, we want to insert a record into this database table.
Here is an image of the form: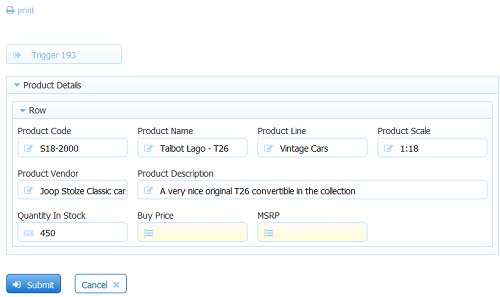
This query is included in the configuration.xml.
</query>
        <query name="productDetails" autocreate="true">
            <retrieve>
                <!--maps to HTTP GET -->
                <statement> SELECT * from Products order by productName </statement>
            </retrieve>
            <create>
                <statement>INSERT into Products (productCode,productName,productLine,productScale,productVendor,productDescription,quantityInStock,buyPrice,MSRP)
                   VALUES ('{productCode}','{productName}','{productLine}','{productScale}','{productVendor}','{productDescription}',{quantityInStock},{buyPrice},{MSRP})</statement>
            </create>
        </query>
There are 3 ways to insert/update a record in your external database by passing data to the Database Connector.
A Doc URI - this is the simplest way but the Doc URI is only executed when a form is submitted or a flow has completed it’s final step. When the user submits the form or completes the flow, the URI will be executed with the POST method selected from the dropdown. The database connector will execute the Insert operation identified by the URI.
http://localhost:8082/database/BIRT/productDetails
A
if (trigger.clicked) {
  var PostURL = 'http://localhost:8082/database/BIRT/productDetails?productCode=' + productCode.value + '&productName=' + productName.value + '&productLine=' + productLine.value + '&productScale=' + productScale.value + '&productVendor=' + productVendor.value + '&productDescription=' + productDescription.value + '&quantityInStock=' + quantityInStock.value + '&buyPrice=' + buyPrice.value + '&MSRP=' + MSRP.value;
  http.post(PostURL);
}
A
/*member MSRP, buyPrice, productCode, productDescription, productLine, productName, productScale, productVendor, quantityInStock*/

if (trigger.clicked) {
  var jp = {
    productCode: productCode.value,
    productName: productName.value,
    productLine: productLine.value,
    productScale: productScale.value,
    productVendor: productVendor.value,
    productDescription: productDescription.value,
    quantityInStock: quantityInStock.value,
    buyPrice: buyPrice.value,
    MSRP: MSRP.value,
  };
  http.post('http://localhost:8082/database/BIRT/productDetails', jp);
}
Let’s analyze this rule:
- The first line of the rule is the member directive required by the frevvo rule validator
- Line 2 is a conditional statement to specify that the rule runs when the Trigger control is clicked
- var jp – defines the JSON payload variable
- The next 9 lines define the JSON payload – specify the form field values that will be written to the columns in the products table.
- The last line specifies the http.post operation to the database connector using the JSON payload. When the user clicks on the Trigger control, the database connector will execute the Insert operation identified by the URL in the productDetails query in the configuration.xml file..
You can also use a combination of data passed by URL parameters and JSON payload. Note that if a form field is specified both via a URL parameter and in the JSON payload, the URL parameter will take precedence. For example you can write a rule like this:
/*member MSRP, buyPrice, productCode, productDescription, productLine, productName, productScale, productVendor, quantityInStock*/

if (trigger.clicked) {
  var jp = {
    productCode: productCode.value,
    productName: productName.value,
    productLine: productLine.value,
    productScale: productScale.value,
    productVendor: productVendor.value,
    productDescription: productDescription.value,
    quantityInStock: quantityInStock.value,
    buyPrice: buyPrice.value,
    MSRP: MSRP.value
  };
  http.post('http://localhost:8082/database/BIRT/productDetails?productCode='3', jp);
}
In this rule the value of “3” specified by the ?productCode=3 URL parameter overrides the value of the JSON object.
Writing rules with http.post and http.put requests eliminates the need to use a stored procedure to update/insert records into your database tables and then call that Stored Procedure from a business rule.
Stored Procedures
The Database Connector supports the use of Stored Procedures to update/insert data into a database table. Existing stored procedures can still be used. However, using the Post/Put to the Database Connector from a Business Rule accomplishes the same thing and is a more straight forward approach than using a stored procedure.
To use a stored procedure, you must:
- Create a stored procedure to update/insert the values into the database table
- Call this stored procedure in the <retrieve> tag of your configuration.xml query
- Use an http.get statement in your business rule to call this query. The stored procedure will execute and update/insert data into your table.
Here is an example of a mySql stored procedure.
DELIMITER //
CREATE PROCEDURE GetNewOrderNum()
    BEGIN
    SELECT max(orderNumber) + 1 as onum FROM Orders;
    END //
DELIMITER ;
To call this from the mySql command line you would use the command: call GetNewOrderNum(); To call this from the database connector you would add the following to configuration.xml:
<query name="getOrderNumber">
    <retrieve>
        <statement>
            call GetNewOrderNum()
        </statement>
   </retrieve>
</query>
To retrieve the next order number from your database and populate that value into a control in your form named 'onum', add the following business rule to your form:
eval ('x=' + http.get('http://localhost:8082/database/BIRT/getOrderNumber'));
onum.value = x.resultSet[0].onum;
SQL Server
Here is an example with the syntax required for a SQL server stored procedure:
<query name="getOrderNumber">
    <retrieve>
        <statement>
            exec GetNewOrderNum
        </statement>
    </retrieve>
</query>
To pass form field values to your SQL server stored procedure, append the variables to the end of the exec line. For example if your form contains a field named customerId and department, and your sproc takes two arguments @cust and @dept:
<query name="getOrderNumber">
    <retrieve>
        <statement>
            exec GetNewOrderNum @cust = {cid}, @dept = {did}
        </statement>
    </retrieve>
</query>
If you need to call this stored procedure from a business rule you can pass the form data to the database connector as shown below. Note that customerId and department are the name of two controls in your form and that cid and did are the two url parameters in the http URL below.
eval ('x=' + http.get('http://localhost:8082/database/BIRT/getOrderNumber?cid=' +
	customerId.value + '&did=' + department.value));
Stored Procedure to Insert Rows
Here is an example of using a Stored Procedure with an insert statement that can be called in a business rule using http.get. For this example we created a table 'interns' in the Classic Models sample database.
use classicmodels;
CREATE TABLE interns (
  `AutoID` int(11) NOT NULL AUTO_INCREMENT,
  `StartDate` varchar(255) DEFAULT NULL,
  `JobType` varchar(255) DEFAULT NULL,
  `JobTitle` varchar(255) DEFAULT NULL,
  `NameOfIntern` varchar(255) DEFAULT NULL,
  PRIMARY KEY (`AutoID`)
) ENGINE=InnoDB AUTO_INCREMENT=35 DEFAULT CHARSET=latin1;
Create the Stored Procedure.
DELIMITER $$
CREATE PROCEDURE `SP_Interns`(IN StartDate varchar(255),IN JobType varchar(255),IN JobTitle varchar(255),IN NameOfIntern varchar(255))
BEGIN
INSERT INTO interns (StartDate,JobType,JobTitle,NameOfIntern) VALUES (StartDate,JobType,JobTitle,NameOfIntern);
SELECT
    MAX(AutoID) AS autoid
FROM
    interns;
END$$
DELIMITER ;
Add this query to the configuration.xml file.
<queryset name='interns'>
   	<query name="interns_forschema">
	            <retrieve>
	                <statement>SELECT StartDate,JobType,JobTitle,NameOfIntern FROM interns</statement>
	            </retrieve>
	        </query>
	        <query name="addInterns" autocreate="true">
	            <retrieve>
	                <statement>call SP_Interns ({StartDate}, {JobType}, {JobTitle}, {NameOfIntern})</statement>
	            </retrieve>
        </query>
   </queryset>
Create a form from the schema query above. Write a business rule to call the Stored Procedure. In this case we used a trigger control, but you may want to call it when a particular workflow step is completed on form.unload or another condition.
var x;
if (SendToDatabse.clicked){
eval ('x=' + http.get('http://localhost:8082/database/interns/addInterns?StartDate=' +
	StartDate.value + '&JobType=' + JobType.value + '&JobTitle=' + JobTitle.value + '&NameOfIntern=' + NameOfIntern.value));
}
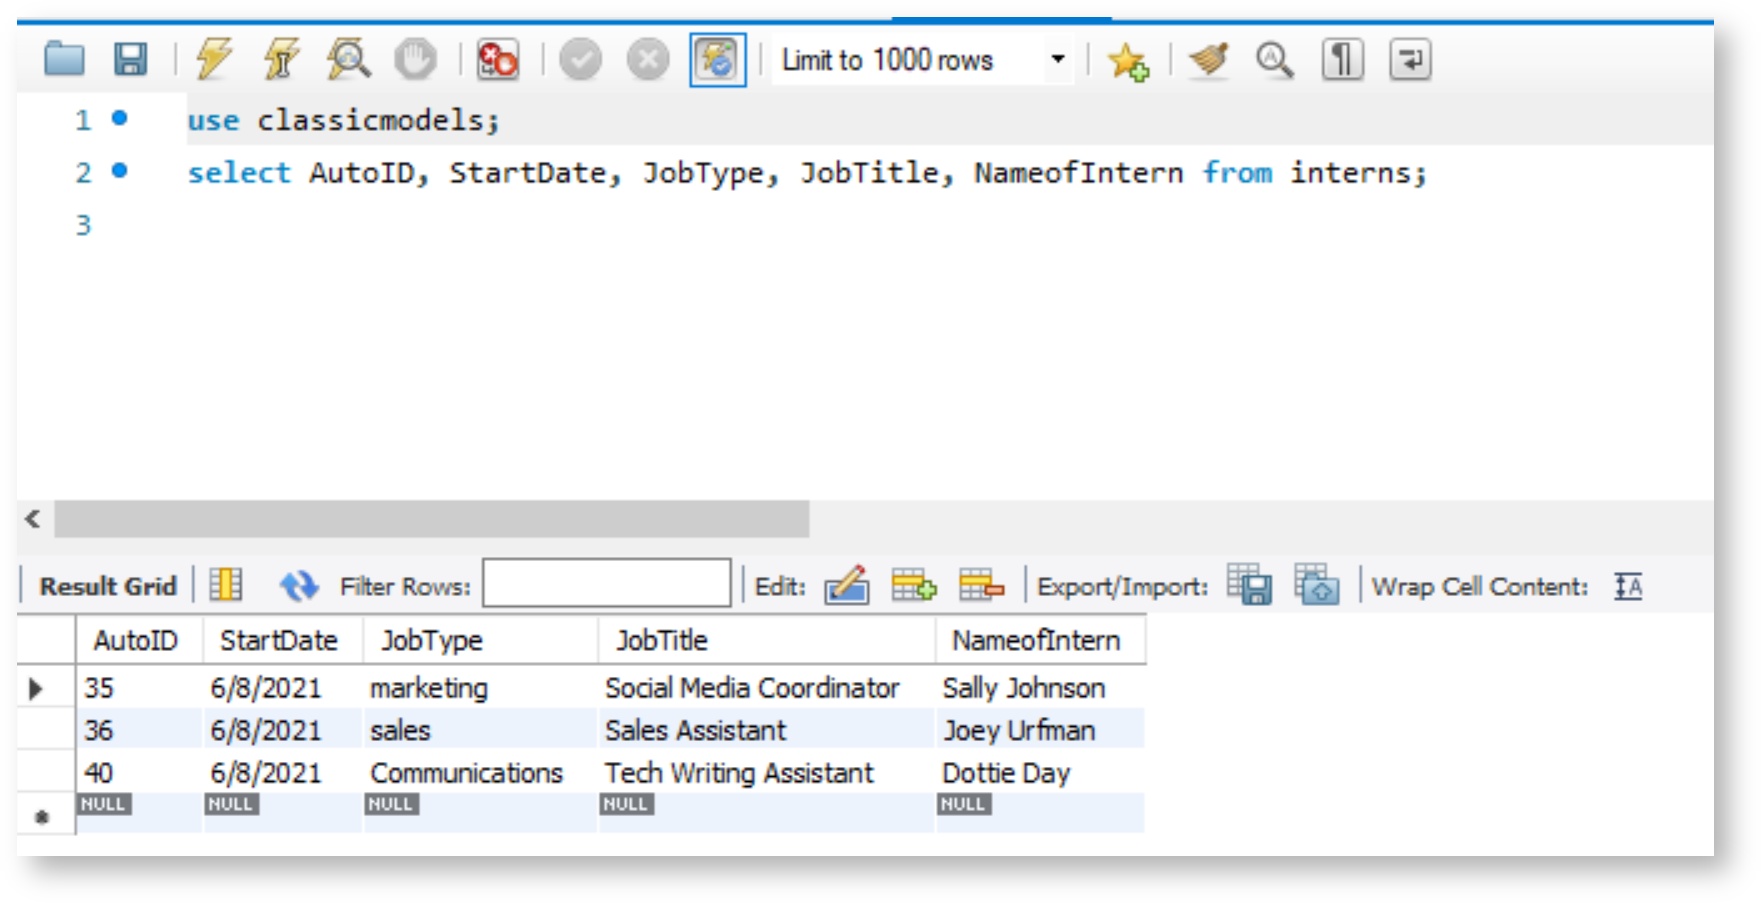
When the user fills in the details and clicks Send to Database, the values are inserted in the 'interns' table:
Auto Create Rows
You can set the attribute autocreate in a query element.
<query name="customers" autocreate="true">
This property applies only when users submit an HTTP PUT request to the database connector. The property tells the database connector to create a new row in the database if one doesn't exist already meaning that the connector will run the create statement automatically if the update statement fails. In summary:
- If the user is updating an existing record, the Update statement will work as it normally does and the autocreate function won’t kick in.
- If the user is adding a new record, the update statement will fail (by design, because the record cannot exist if the user hasn’t added it yet) and the Connector will then run the create statement.
The autocreate feature is particularly useful when working with 's repeat control.
repeat control gives you the ability to work with dynamic collections, for instance: customers, cars, addresses, dependents and others. When the user loads the form, the form may be initialized with some items (we will see how to do that with
later). If the user adds new items to the collection and submits the form, those items will be automatically added to the database if autocreate=true
This behavior is actually enabled by default so if you want to turn it off you can set autocreate to false.
Auto Delete Rows
The autodelete feature is useful when working with repeat controls. Imagine you have a collection of elements in the form that were initialized from a database. If you eliminate an item in the collection and submit the form, the connector will automatically remove the item from the database. For that to happen, set the attribute autodelete to true in the query element. The autodelete function only works when the Write method is set to PUT.
<query name="customers" autocreate="true" autodelete="true" deleteKey="customerId">
Behind the scenes, the connector actually compares the items in the database with what is submitted in the form. That comparison criteria is based on a key that you define with the attribute deleteKey (required). The deleteKey value is normally the name of the primary key in the table that contains the repeat items.
The Doc URI Approach: Performing CRUD Operations using a Table Control
The Doc URI or "data first" approach is an easy method to perform CRUD (CREATE, RETRIEVE, UPDATE, DELETE) operations on your database from a table or repeat control in your form. The best part is – using our powerful database connector, you don't need programming.
This Doc URI approach with a Repeat or Table control is generally much easier and more efficient than using a business rule to connect your form to your database. This chart explains why you might choose this approach.
| Doc URI | Business Rules |
|---|---|
| No code needed | Javascript code required |
| Automatically pass all controls from schema | Pass each individual control |
| Call the DB Connector once for all operations (using the autocreate feature) | Call the DB Connector query for every add/update operation |
You can use a form created from schema to perform all of the CRUD operations on your database table as long as all your SQL statements (SELECT, CREATE, UPDATE, and DELETE) are declared in the same DB Connector query. For example consider this query:
<query name="products" autocreate="true" autodelete="true" deleteKey="id">
	<retrieve>
	    <statement>
		<!-- Maps to the HTTP GET method -->
		SELECT * FROM products WHERE orderId='{orderId}'
	    </statement>
	</retrieve>
	<create>
	    <statement>
		INSERT INTO products
		(orderId, productName, quantity,price)
		VALUES ({orderId}, '{productName}', '{quantity}', {price})
	    </statement>
	</create>
	<update>
	    <statement>
		UPDATE products SET  productName = '{productName}', quantity = {quantity}, price = {price}
		WHERE id = {id}
	    </statement>
	</update>
	<delete>
	    <statement>
	     DELETE from products where id={id}
	     </statement>
	</delete>
</query>
- Note that the id column of this products table is a Primary Key/Unique column and an automatically incrementing number is assigned as value to this column (on the database side) when inserting a new record in Products table.
- Notice the autocreate and autodelete attributes of this query. Please see Auto Create Rows above.
- This query has all the CREATE, RETRIEVE, UPDATE, and DELETE statements declared in it.
- To create the schema, browse the DB connector query URL with /schema appended to it. For example: http://localhost:8082/database/BIRT/products/schema?orderId=10000
After creating the form fields using this schema, configure the Doc Action -> Doc URI to:
- Read URL: http://localhost:8082/database/BIRT/products?orderId=\{orderId} with method: GET
Write URL: http://localhost:8082/database/BIRT/products with method: PUT
See this section for an explanation of how HTML statements (GET, PUT, etc.) translate to SQL statements (RETRIEVE, UPDATE, etc.)
- Test the form. Enter a valid orderId, and notice that the form table will automatically expand and display all the order items retrieved by the SELECT statement.
- Add a row and enter some data.
- Edit another row.
- Delete a different row.
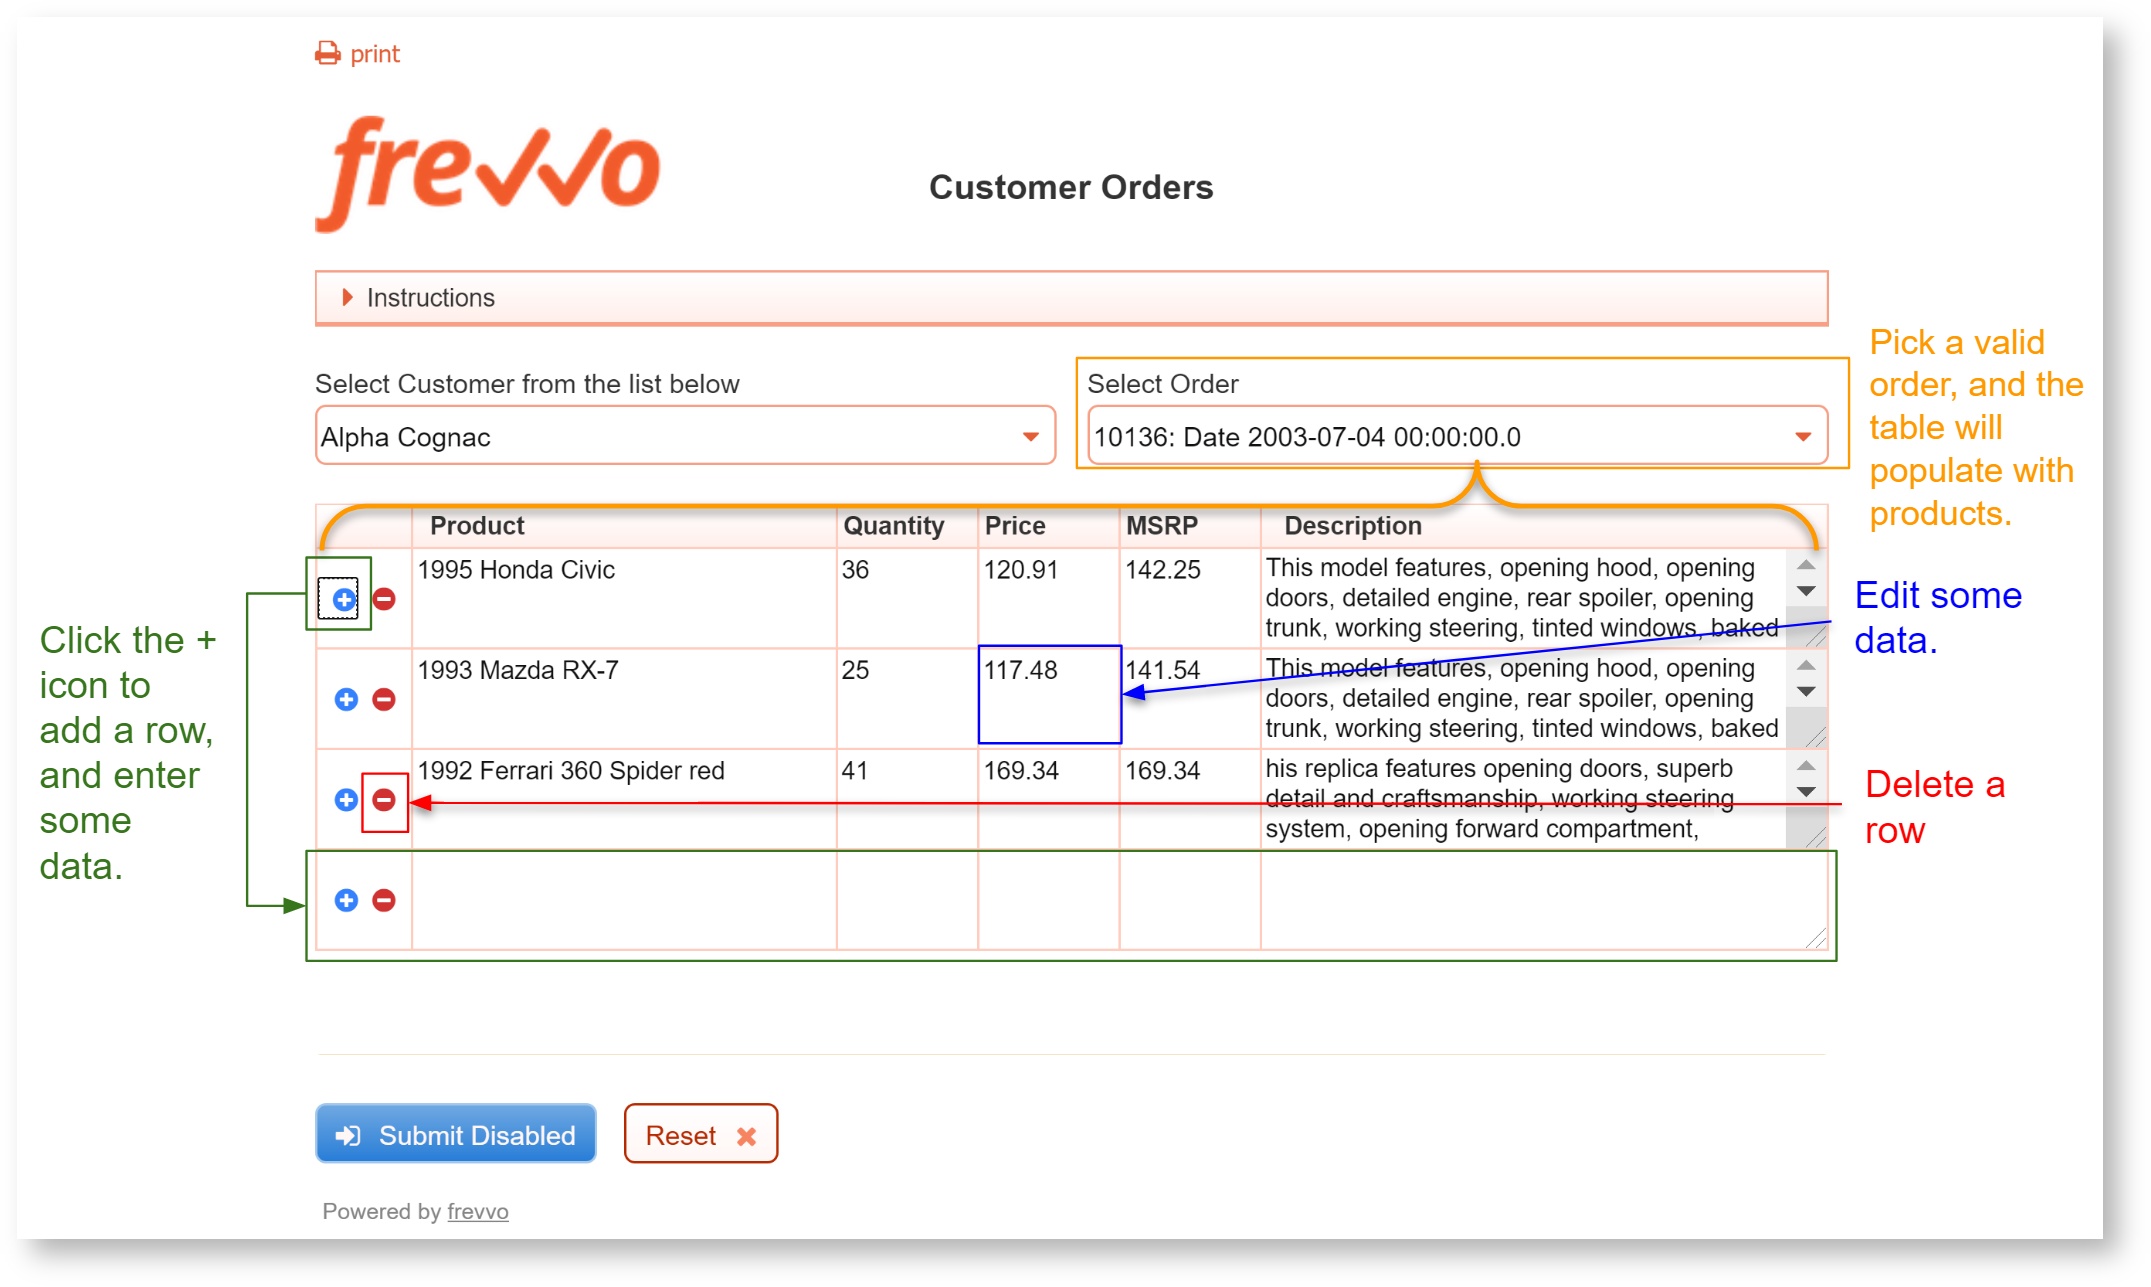
- Submit the form. The database connector will
- Execute the INSERT statement for any form table row that was added.
- Execute the UPDATE statement for any form table row that was changed.
- Execute the DELETE statement for any form table row that was deleted.
What is happening "behind the scenes"? When you use the Doc URI approach to read/add/update/delete rows, the controls in your form are bound to the schema (data source) from which they were created. When the form is submitted, frevvo creates an XML document which conforms to that schema. This XML document has all the values entered in those schema controls. When the form is submitted, this XML document is sent to the DB connector. The DB connector can get the control values directly from this document and use them while executing the SQL query.
Dates and Timestamps
<queryset name="myStore" timeStampFormat="yyyy-MM-dd HH:mm:ss" dateFormat="yyyy-MM-dd" xmlDateFormat="yyyy-MM-dd">
When the xml document is created, the date format will follow the definition of the attribute xmlDateFormat.
Enable the Database Connector Cache
Normally the database connector retrieves a resultset from the database every time a query executes. Enabling caching will improve performance. A good time to use caching is when you are retrieving a resultset where the data does not change often. For example to retrieve a list of managers or product codes.
Add a cache element to each <retrieve> element you want to cache. The first time the <retrieve> runs the resultset gets cached. The resultset is retrieved from the database connector cache (not from your database) until the <timeToIdle> expires. Here is an example:
<query name="getRoleInMsg" autocreate="true">
	<retrieve>
		<statement> SELECT role FROM roles WHERE tenant="tn14" </statement>
		<cache>
			<timeToIdle>300</timeToIdle>
		</cache>
	</retrieve>
</query>
The timeToIdle parameter specifies the number of seconds before retrieving a fresh resultset database to be cached again.. This example will refresh the cache every 300 seconds. If you set this value to 0, caching will never expire.
Disabling QuerySets/Queries
When you are developing your integration, you might want to disable a particular queryset/query so you can focus on the one you are troubleshooting. QuerySets/queries can be disabled in one of two ways:
Add the enabled= attribute with a value of false to the <querySet/> or individual <query> elements in the configuration.xml file to completely disable it. The first example disables the queryset named BIRT and the second example disables the allCustomer query.
This example disables the querySet named BIRT<dbconnector> <queryset name="BIRT" enabled="false" ...>
This example disables the querynamed allCustomers<queryset name="BIRT"> <query name="allCustomers" autocreate="true" enabled="false" > <retrieve> <!-- maps to HTTP GET --> <statement> SELECT customerNumber,customerName from Customers order by customerName </statement> </retrieve> </query>The same can be done by adding the enabled property with a value of false as shown below to the dbconnector.properties in the standalone or tomcat bundles.
dbconnector.queryset@<queryset name>.enabled=false
This property disables all querysets. Add it to the dbconnector.properties(standalone bundle) or frevvo-config.properties (tomcat bundle).
dbconnector.queryset.enabled=false
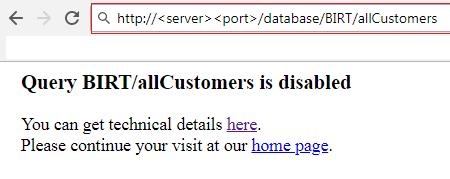
You will see the disabled status when you browse the status URL for the Database connector - http://<server:host>/database/status. Browsing a disabled query displays the message shown below:
SQL Query Examples
A solid understand of SQL syntax is helpful when creating forms that interact with your database. Below are common and useful example queries.
Like Query
Sometimes it is useful to match a row where the matching string is not exact. To do this use the SQL Like and % wild card. In this example we want to retrieve all customers that have an email address with a specific email domain 'frevvo.com'. The % wild card must be coded into the configuration.xml query. It cannot be passed down to the query as part of the URI template.
<query name="customers">
    <retrieve>
        <statement>
          SELECT * FROM customers WHERE emailAddr='%{domain}%'
        </statement>
    </retrieve>
</query>
Generate Unique Sequential Id
This example uses a stored procedure, a table in your database, a database connector query and a business rule to generate a unique sequential number when a form loads. This number can populate a ticket or invoice number field in your form.
Step 1 - Create a table in your database (SQL Server):
CREATE TABLE dbo.TBLUniqueID
(
UniqueID int IDENTITY(10000,1) PRIMARY KEY,
formuid varchar (255) NOT NULL
)
Step 2 - Create a Stored Procedure (SQL Server):
CREATE PROCEDURE dbo.getid
@formid varchar (255)

AS
SET NOCOUNT ON;
INSERT INTO [dbo].[TBLUniqueID] ([formuid]) VALUES (@formid);

SELECT * from [dbo].[TBLUniqueID] WHERE formuid = '@formid';
Step 3 - Add queries to your configuration.xml file
<query name="insertformid" autocreate="true">
	<retrieve>
		<statement>EXEC dbo.getid @formid = '{formuid}'</statement>
	</retrieve>
</query>
<query name="getformid">
	<retrieve>
		<statement>SELECT [UniqueID] FROM [dbo].[TBLUniqueID] WHERE [formuid]={formuid}</statement>
	</retrieve>
</query>
Step 4 - Add this rule to your form
/*member, UniqueID, resultSet*/
var x;
var formid = _data.getParameter('form.id');

if (form.load && !ID.value) {
  if (formid.length > 0) {
    http.get('http://<your server>:<port>/database/<queryset name>/insertformid?formuid=' + formid);
    eval ("x=" + http.get('http://<your server>:<port>/database/<queryset name>/getformid?formuid=' + formid + '&_mediaType=json'));
    ID.value = x.resultSet[0].UniqueID;
  }
}
Add a Text control named "ID" in your form where the unique sequential number will be saved.
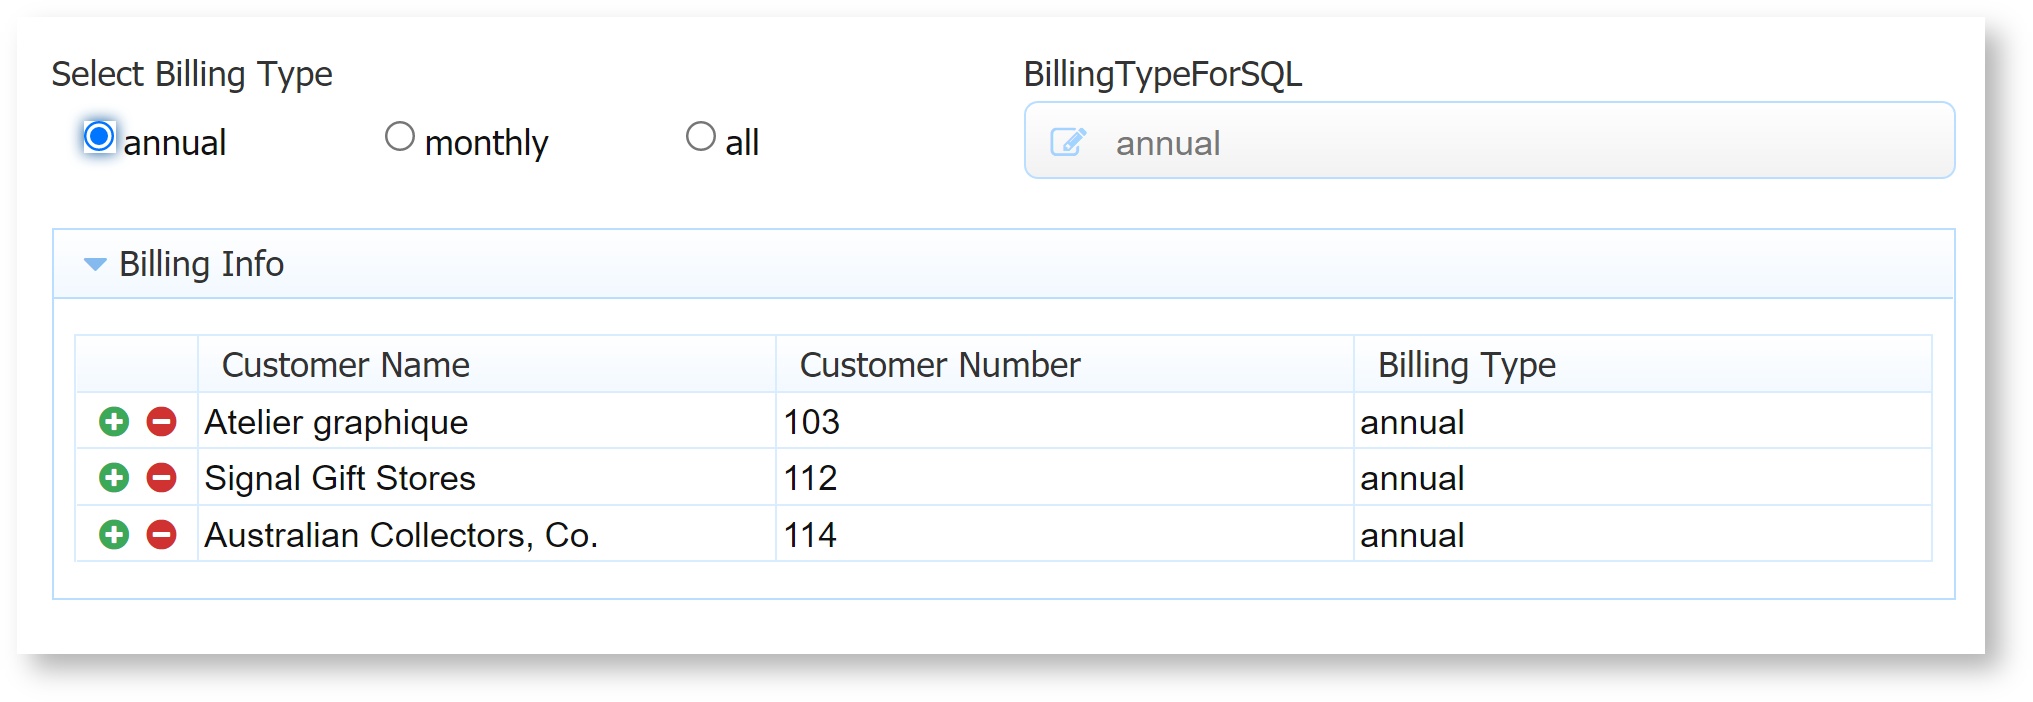
SQL IN Statements
Consider a case where you want to display customers from your database table based on the billing type you select in your form. The billing type options are all, annual, and monthly. Your query passes the billing type selected and returns results. If the user selects annual or monthly, your SQL SELECT statement works well since those are actual values in the database. However, 'all' is not a valid option, and will not returns results. One option is to create a second query that does not pass a value for billing type. The simpler option to add an IN condition to your SELECT statement, and then use a simple business rule in your form to create a string with all possible options. First, create your query. For this example, we've added a column "billingType" to the Classic Models sample database 'customers' table. Note the FIND_IN_SET() function in this statement, which takes two parameters (columnname, {value template}). We will pass a value to the template using a control template from our form that represents the user's billing type selection. The function searches for the column's value in the string returned by the /{billingType} template.
  <queryset name="customers">
   	<query name="billingInfo">
   		<retrieve>
   			<statement>
   				SELECT customerName, customerNumber, billingType FROM customers WHERE FIND_IN_SET(billingType, {billingType})
   			</statement>
   		</retrieve>
   	</query>
   </queryset>
Next, create a form form that has a radio control to select the billing type and a table from schema to show the results. Add a hidden text field named "BillingTypeForSQL". You will use this capture the billingType value and send it in the query URL.
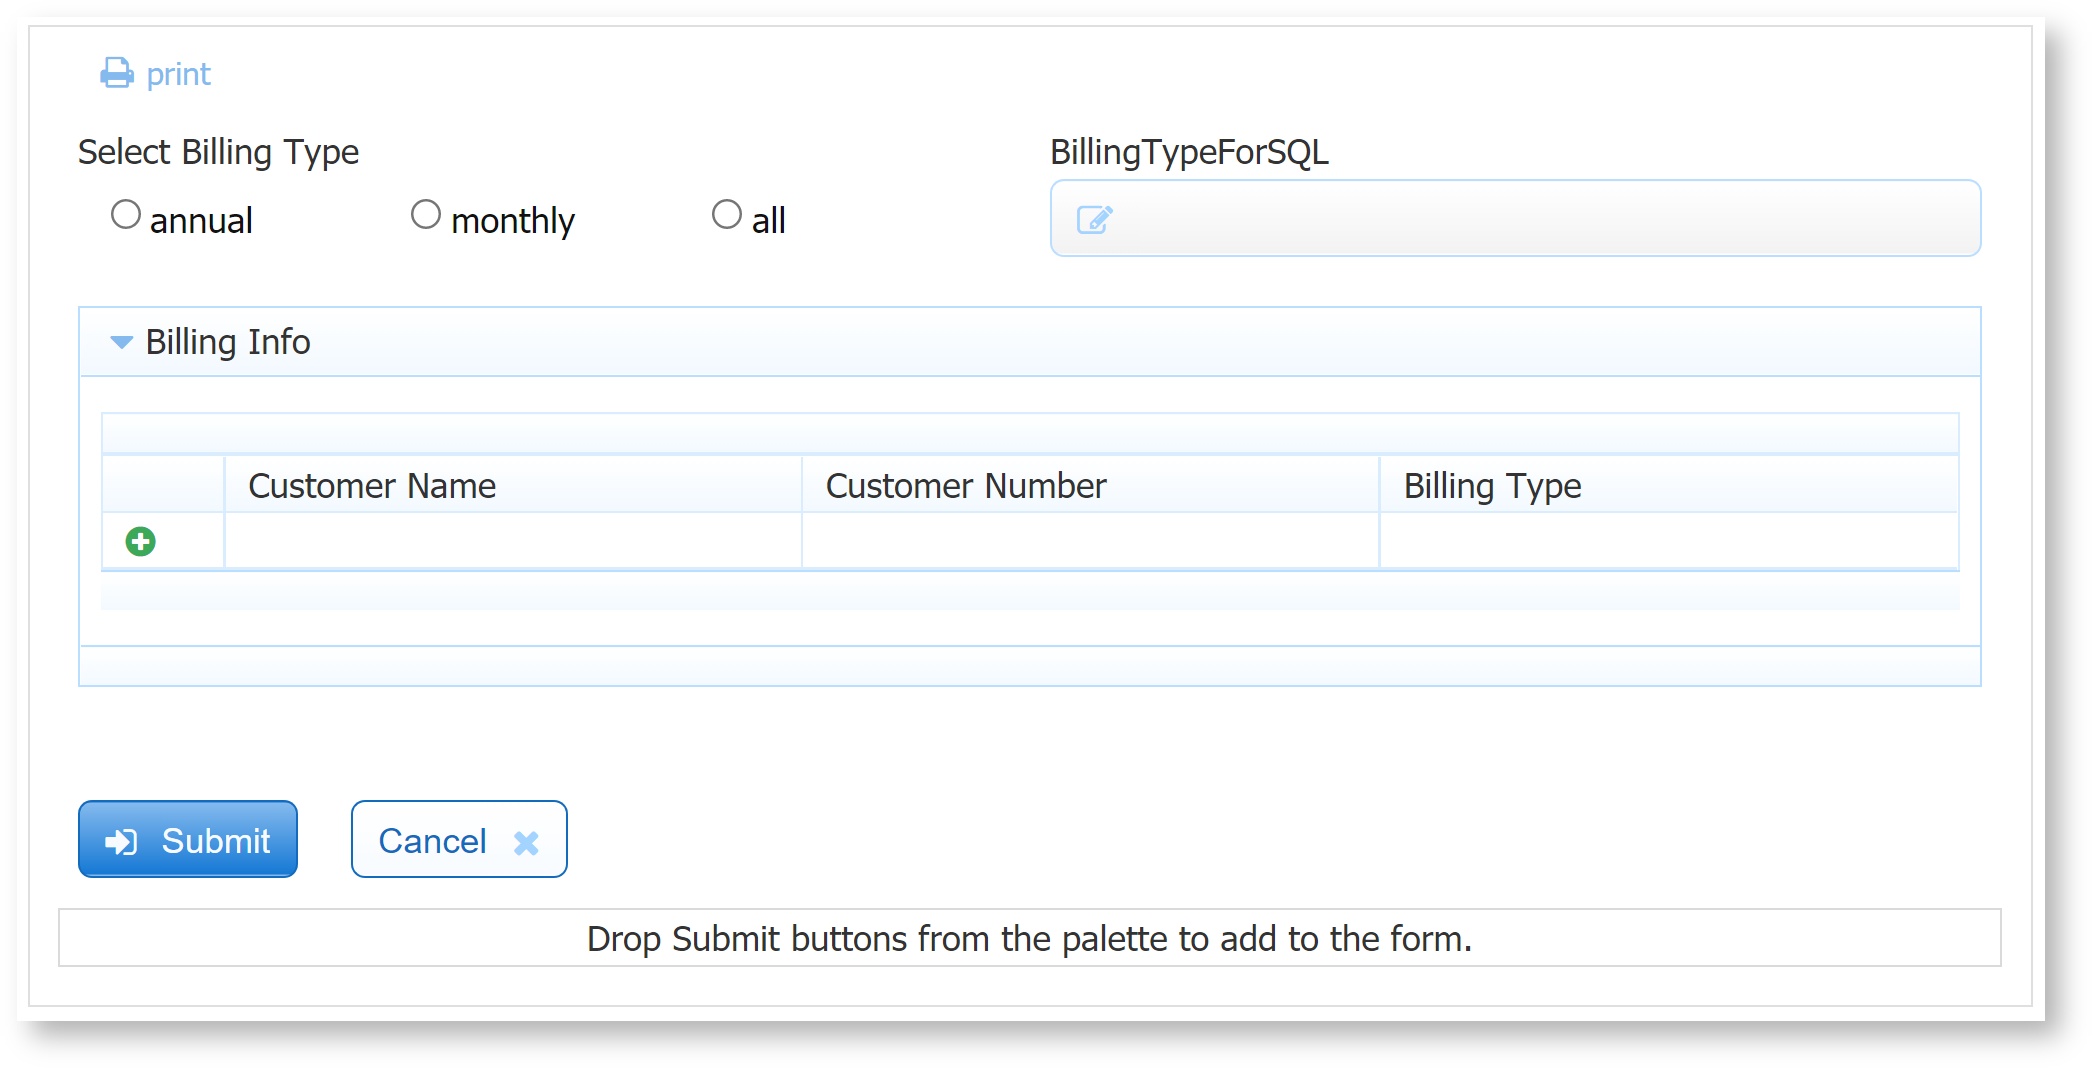
Add a business rule that will set a value in your hidden BillingTypeForSQL text control. If the use selects 'all', set the text control all possible values in a comma separated string. The characters '%2C' encode the commas so they can be passed in the URL. Otherwise, set the text control to the value specified in the radio control.
if (form.load || SelectBillingType.value) {
  if (SelectBillingType.value === 'all') {
    BillingTypeForSQL.value = "annual%2Cmonthly%2Cquarterly";
  } else {
    BillingTypeForSQL.value = SelectBillingType.value;
  }
}
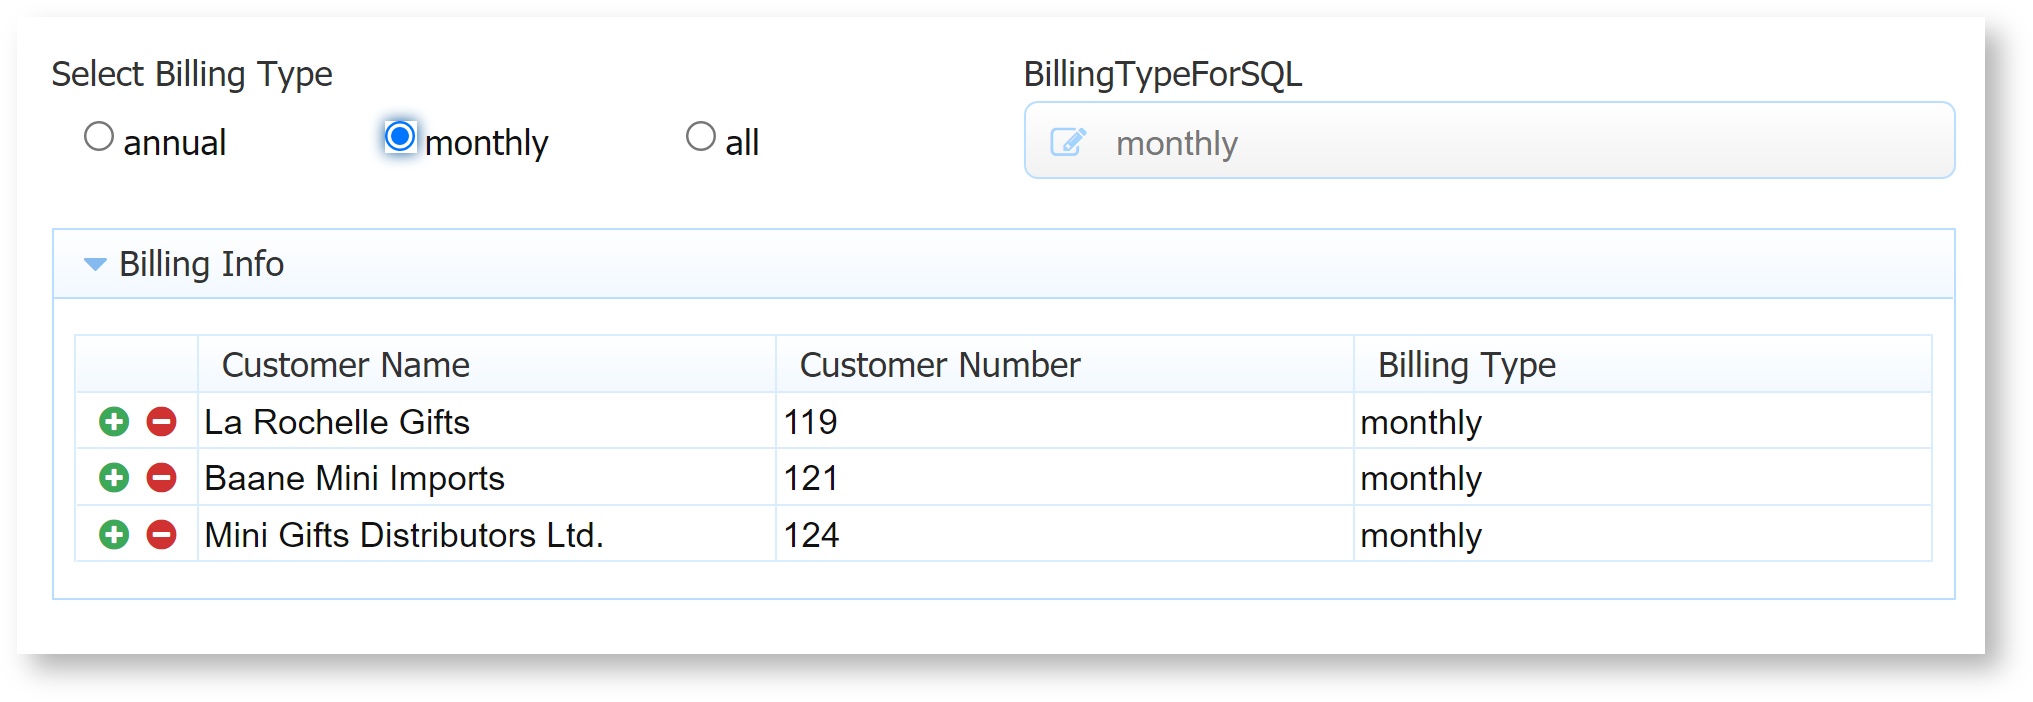
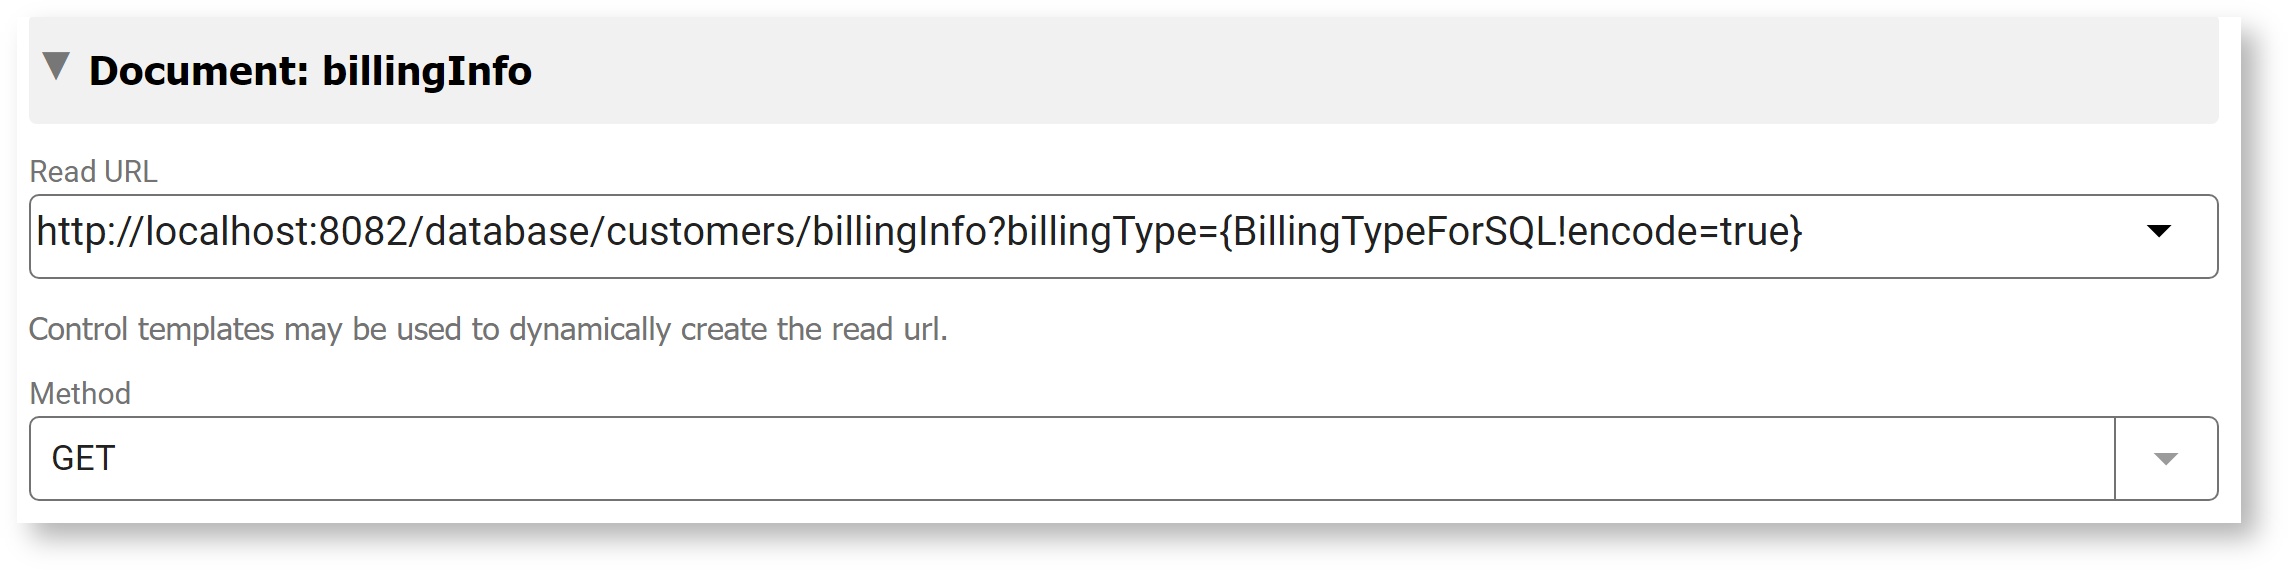
Finally, set your Doc URI Read URL to the query URL with the parameter ?billingType={BillingTypeForSQL}. This sends the control template's value to the query template, and returns the results. This simple example works with or without the control template parameter !encode=true. You can encode the URL if the template value might have spaces or special characters.
Save and test your form. The result is that selecting 'annual' or 'monthly' returns just customers with that billing type, but selecting 'all' returns customers with any billing type.