frevvo v9 is no longer supported. Please visit Live Forms Latest for our current Cloud Release. Earlier documentation is available too.
Planning for v9.0
- Former user (Deleted)
- Megan Ellis
- Former user (Deleted)
The initial release of Version 9.0 will be deployed to the frevvo Cloud on 8/24/2019. The v9.0 download is available for in-house customers from our Software Downloads Directory.
Before you start...
View our What's New in v9.0 Webinars for Design Features and Admin Features.
New Features:
- Redesigned User Interfaces:
Redesigned Form and Document Action Wizard UI
More intuitive names for file type options in all frevvo wizards
- Control names now referenced in all frevvo Wizards instead of labels
- Ability to edit the Flow Step name in the Edit Step Properties wizard
- New Form steps added to a flow are automatically named "Step #' and the form name is set to "Form #" while pulling an existing form into a flow names the step "Step#" but retains the original name.
- Visual Rule Builder
- Rule enable checkbox moved to Rule Editor Canvas
- Rule Editor is now automatically expanded when you create a new rule. It is no longer necessary to click the pencil icon to define the rule.
- Non Default Security Managers
- Redirect to tenant's SAML URL if logging into a SAML tenant with frevvo normal login URL
- Warning message on the Manage Users page to remind the tenant admin that user changes made on this page will be overwritten when the user logs in. The tenant admin will see this message for SAML Security Manager tenants configured for Discovery mode (Authentication Only not checked)
- New built-in admin URL for all non-default Security Managers including LDAP
- Configured built-in admin id now shows on the SAML & Azure Edit tenant page
- Form Styling Improvements:
Changes to
passwords and the CSV upload
- Tenant admin can select password expiration for users by checking the "Change Password on next login" option
- Last used password is not allowed when changing password.
- CSV Upload now has an option to send an email to create a password if a user does not have one
- New user now receives an email with their frevvo id and password when added to tenant via the CSV Upload. Users added manually do not receive this email.
- Passwords are no longer supported in CSV upload and will be ignored. Translation File:
- Reorganized translation file entries into functional groups
- Rule related strings grouped together in the translation file
- Default Spaces:
Ability to select a default space. Task perform links will render in the default space if selected
Default Space displays on the View Configuration screen
- Renaming a flow in production retains the original flow name for the submission in Reports and on the Task List. New submissions will show the updated flow name.
- Progress indicator for form loading when clicking the Perform icon, the Task List Search Magnifying icon or the Submit button on a Task List search
- Warning message if the user did not check the Replace checkbox when replacing a form/flow with an id that matches an existing form/flow
- Operational Reports are now available to non admin users
- Forms/Flows using the f-submit-error css class and Message controls to warn users about invalid controls are automatically hidden when the form/flow becomes valid
- Tenant/flow admin email notifications now contain the application form/flow name and error to easily identify the submission that did not reach it's destination
- Tenant/flow admins no longer receive an email if submissions are created while the Refresh Searchable Fields process is running.
- There is a 60-second batch delay when running Refresh Searchable Fields.
- New ComboBox property to allow only valid values that match available options
"Cc" field added to task notifications, escalation reminders and escalation notifications to specify a list of email addresses
Changes to workflow behavior for steps that are routed to a role, user or an email address (Task Boundaries). Tasks are created on the user's Task List if the user is eligible to perform the next step.
Task assignment to role sends a single Task Notification email to all users belonging to that role.
Unlimited mappable fields in Filesystem Connector wizard
Improved template validation. A warning message displays in the designers if a template control was renamed/deleted
Click anywhere in the signature panel for a Signed Section to sign.
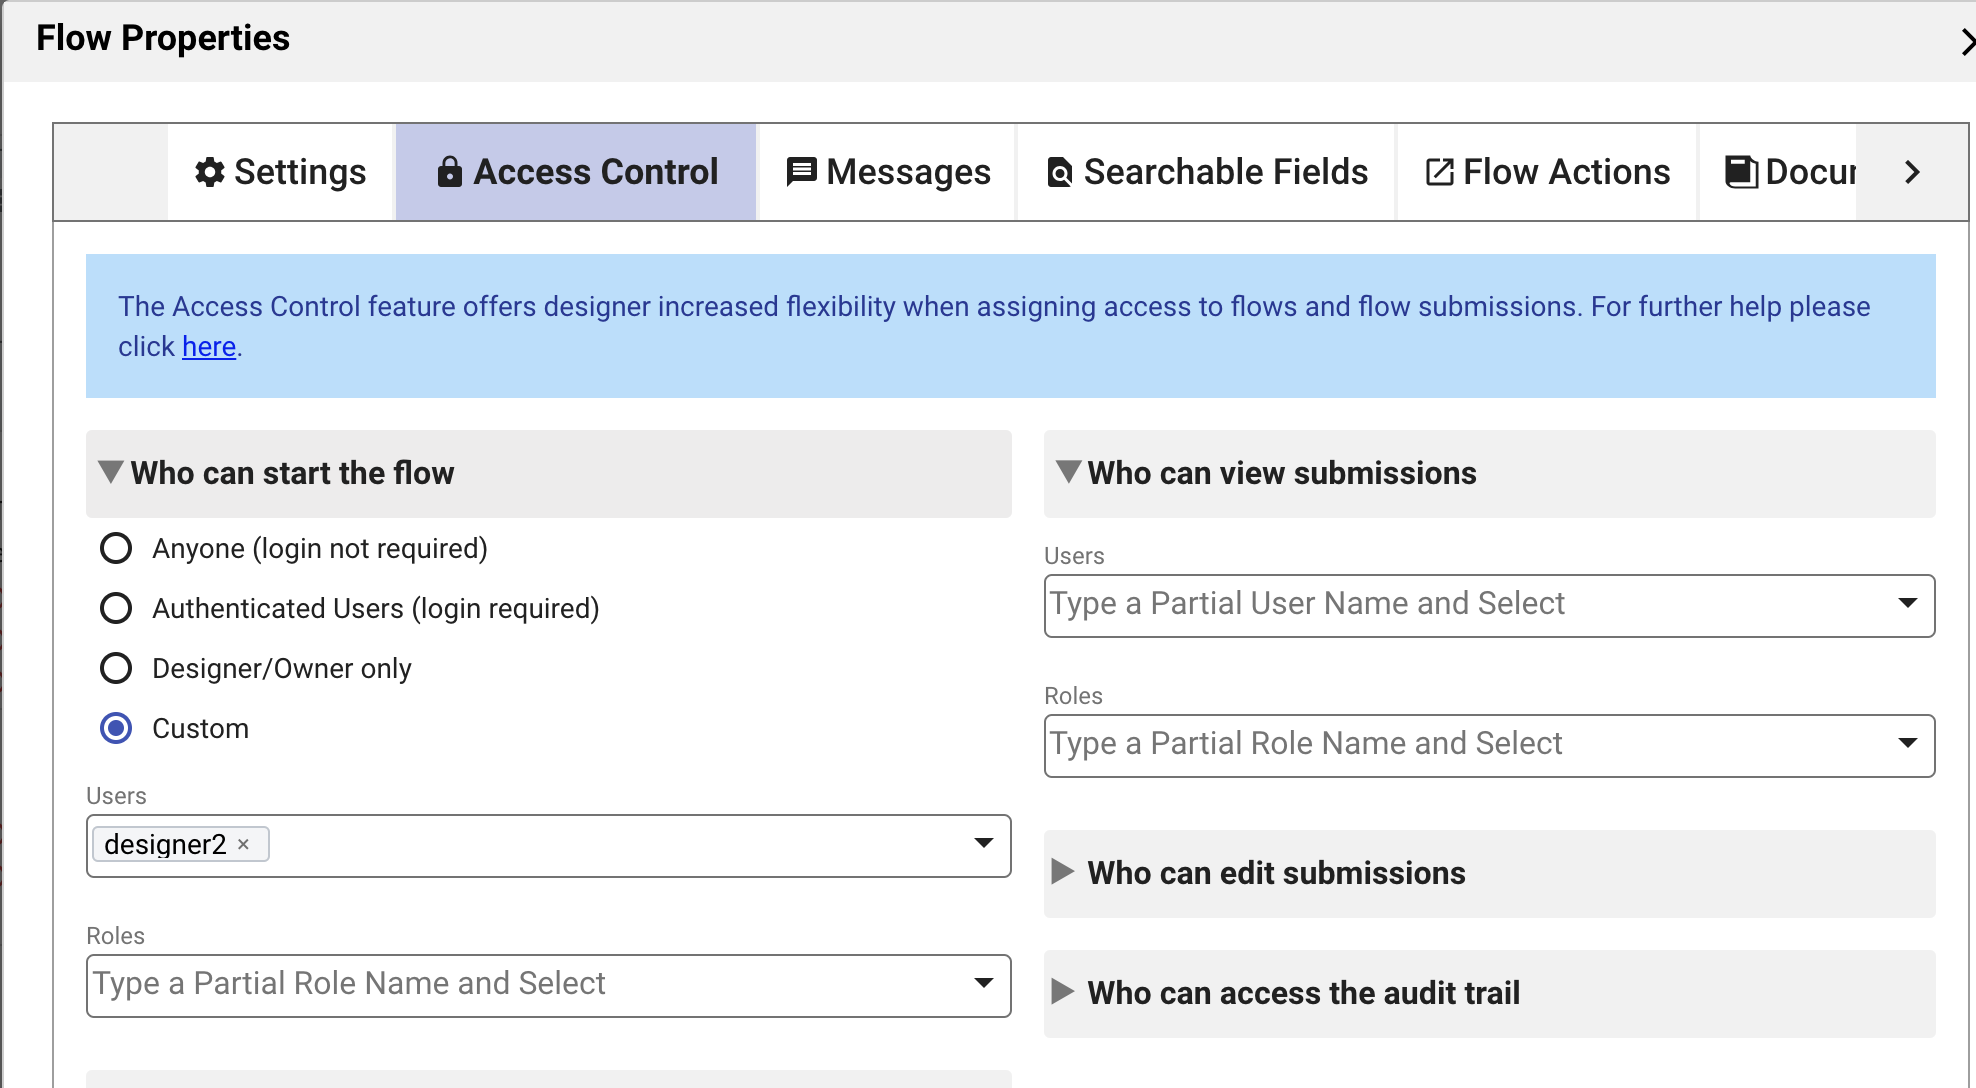
Custom option to add role and user support for the "Who can start the flow" permission on the Access Control List
Label name in the PDF Mapping UI are no longer truncated in the tooltip
- Updated Error Message on Upload Forms/Flows to reinforce best practices
Detect/log warning message when single formtype has more than one _types.xsd
Features Removed:
The "Close Window" Form Action wizard has been removed from frevvo
The box connector is no longer supported by frevvo
frevvo is committed to making more intuitive and easier to use. More features/improvements are coming in future releases.
Features Introduced in Prior Releases (In-House Customers)
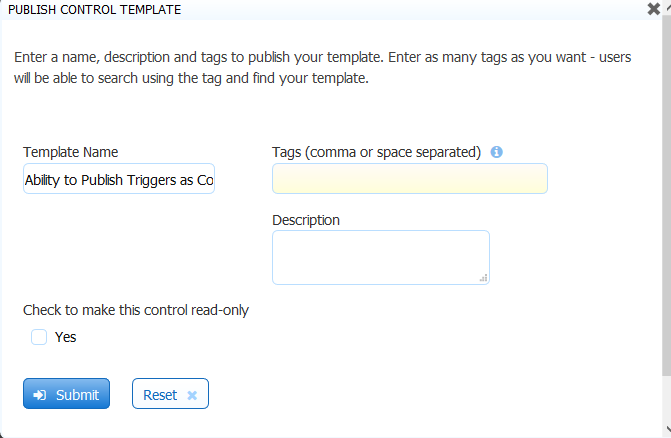
Publish Flows as Templates
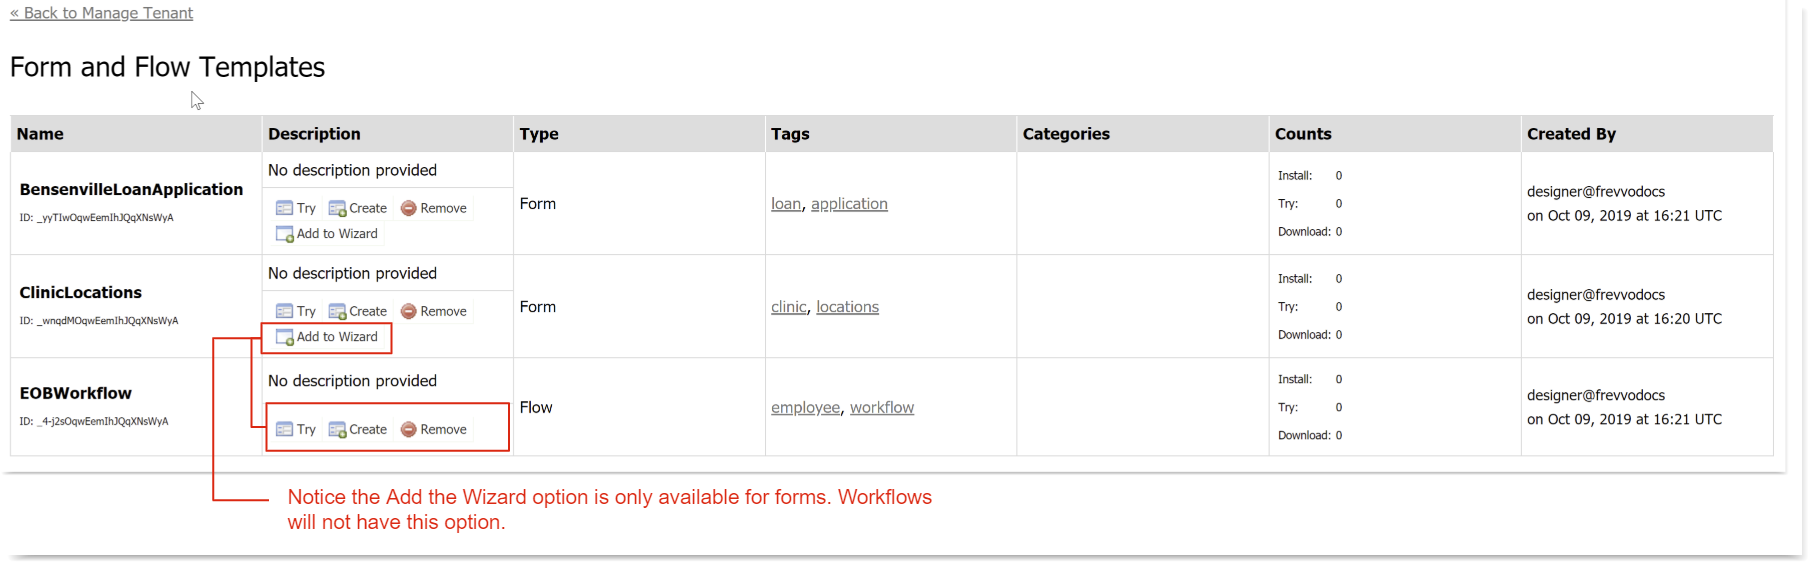
Designers can now publish form AND workflows they have created as templates. The ability to publish workflows as templates was only available for forms in previous releases. Form/Flow Templates make it easy to reuse existing work you have done in previously created forms/flows and to share that work with other designers.
Follow these steps to publish a workflow:
- Click the
 Publish icon on the Flows Home Page for the workflow that you want to publish.
- Fill in the fields on the workflow Publish Template wizard.
- Template Name – This defaults to the name of your form. You can keep this name or overlay it with a different one.
- Tags – Type at least one tag that will help you quickly find your template. Type as many tags as you like; if you type more than one, separate them with a comma or a space.
- Categories - Check the category you want to assign the form to. If no categories appear in the wizard contact your tenant admin to create Categories. It is the responsibility of the tenant admin to create Categories and Manage Templates. You can assign the template to more than one category.
- Make Public - Check this box to add your form/flow to a queue of Installable templates that can be made available to designers in all tenants. The frevvo global template administrator must share your Installable template across all tenants in the frevvo Cloud for your template to be available to everyone.
- Description – Enter a description of your form that will display when Forms By Category or Forms By Tag is selected.
- When you or other designers in your tenant are ready to use the published workflow template to create a different flow, click the Templates tab, select Forms/Flows by Category or Form/Flows by Tag then click the category/tag that you specified when you published it.
- The Form and Flow Templates table displays
- Click the
 Try icon for a preview of the workflow.
 - Click the
 Create icon to to add it to an existing application. If you do not select an application,
 - Click Finish. The Workflow template is imported onto the Flow Designer canvas.
- Now you are ready to modify the workflow template to create a different workflow.
Refer to Templates for more information about publishing forms/flows.
Form and Flow Categories
It is the responsibility of the tenant admin to create Categories and Manage Templates. Category names now support spaces.
Internet Explorer 11 no longer supported in Design Mode
Designing forms/flows in Internet Explorer 11 is no longer supported. You will see these error messages if you attempt to do so.
You can still run in this browser. Refer to Supported Platforms.
Additional Locale options for Internationalization
Creole, Hatian (Creole) and Somali locale options have been added to the locale dropdown when internationalizing forms/flows.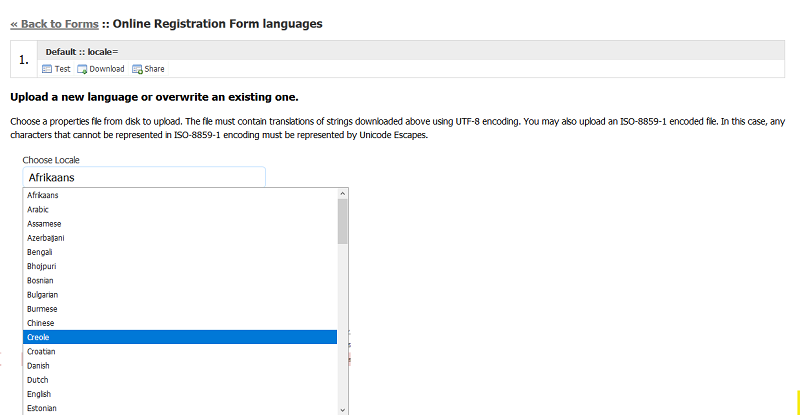
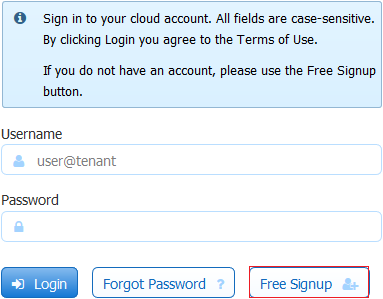
Sign Up for a free 30 day trial
A Free Signup button has been added to the login screen. Click this button to sign up for a free
30 day trial tenant. Install form/flow templates from our website to get started. Workflow templates automatically launch a Guided Tour to show you how to run the workflow, explain application screens and guide you through some small modifications.
Error Description Column in the Submissions Table
The Error and Error Description columns in the Submission table provide troubleshooting information if a submission logs an error. The Error column displays the error icon  and the Error Description column shows a description of the error . The Error Description column has been moved to the last position in the table. Click the
  Plus icon to see this column if it is not automatically displayed.
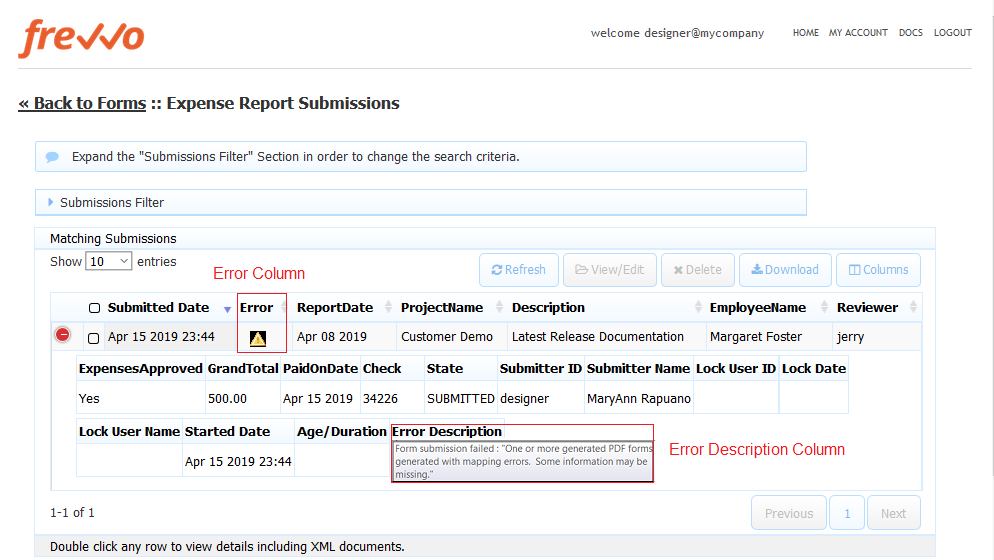
Manage Logged in User Sessions through the frevvo UI.
Users are reporting a Max user limit has been reached error message when they try to login to ? What does the Superuser/tenant admin(s) do? In v8.1, you no longer have to restart
or wait for the configured session timeout to terminate sessions.
The Manage User Sessions UI makes it easy for the Superuser/initial tenant admin or additional admins to see who is logged in and take action to terminate user sessions. Once the max user limit is reached, only the Superuser admin or the tenant admin that was set up when the tenant was created (initial) are allowed to login. Additional admin users will be prevented from logging in.
Admins access the Manage Sessions page by clicking the link on the Manage Tenant screen.
The Manage Sessions page displays the following:
- The current number of sessions in the tenant and the maximum session count based on your license.
A table of the currently logged in user sessions with columns providing the User Id, Login Time , Last Access Time , Is the user a designer?, User's device (phone/tablet/desktop) and the Session Timeout value configured for the tenant.
Option to send a customizable email to a user requesting they logout or kill a user session. The user is notified via email that their session has been terminated by an administrator.
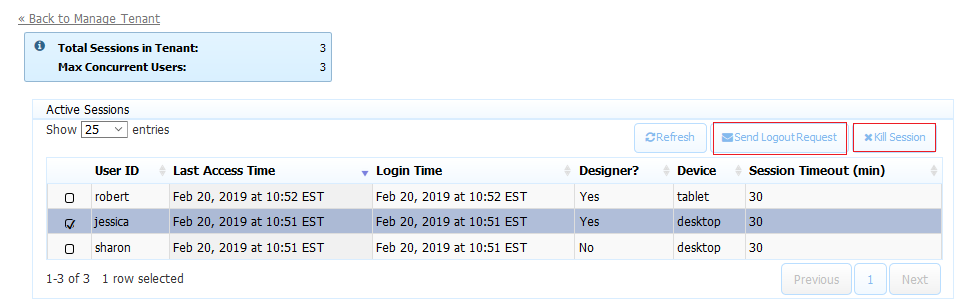
Refer to Manage Logged in User Sessions for the details.
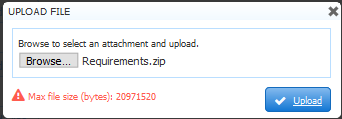
Increased Maximum Size for Attachments
The maximum size for attachments uploaded to Upload controls in forms/flows in the frevvo Cloud has been increased to 20 MB (20971520 bytes). As a reminder, there are three places to set the maximum size of attachments in .
- The
- The tenant admin can set the maximum file size per user by editing their profile. Add the value in bytes to the Max Attachment Size field on the Edit User screen.
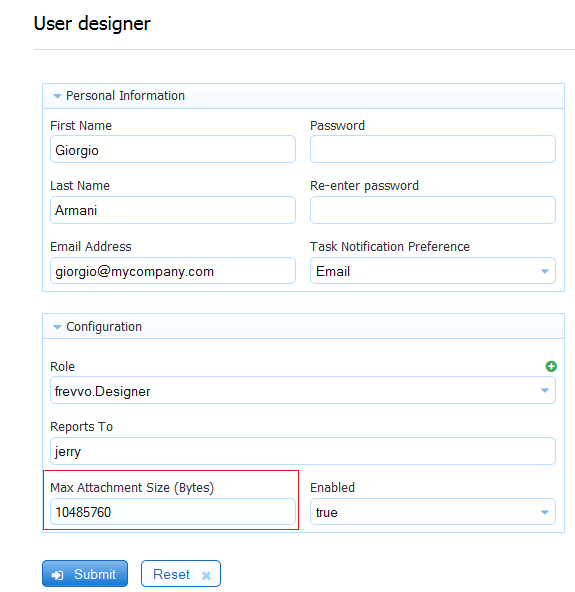
The value in this field overrides the max size value configured on the server level, as long as it does not exceed that value. For example, if the Server was set for 20 MB and the user profile was configured for 15 MB, the user sees this error message when trying to upload a 30 MB attachment: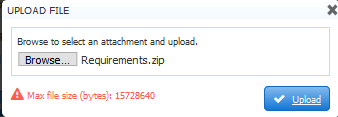
- Designers can specify the max file size per the Max Size property of individual Upload Controls. The image shows a 5 MB Max Size property specified for an Upload Control.
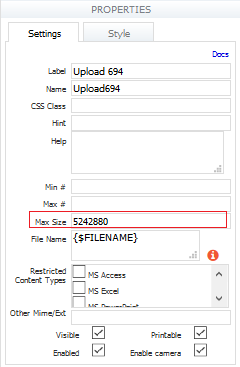
If a user uploads a file larger than 5 MB to this control, they will see this error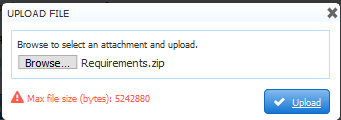
The value of the Max size property of individual Upload controls overrides the value per user which overrides the max size property on the server level. All values must be specified in bytes. If a maximum file size is specified at the server level, the values in the user profile Max Attachment Size field and the Upload Control Max Size property cannot exceed the server max size.
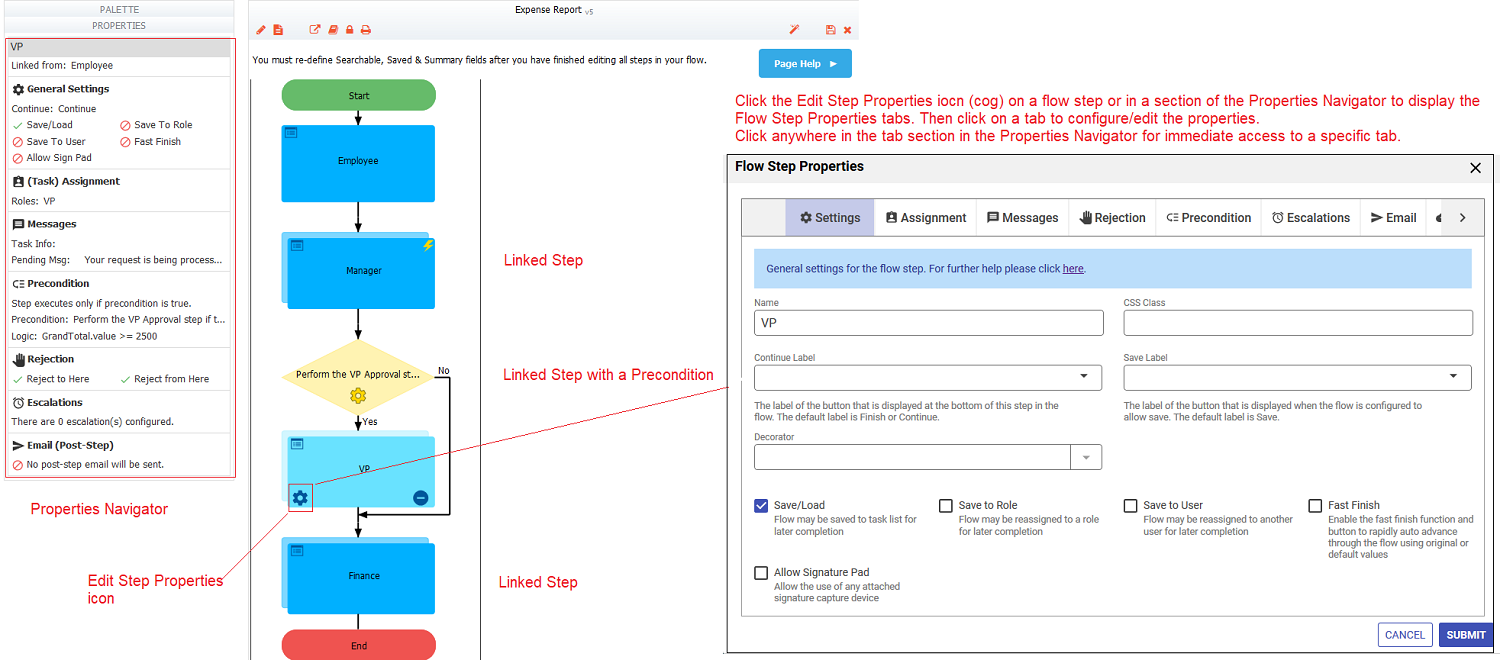
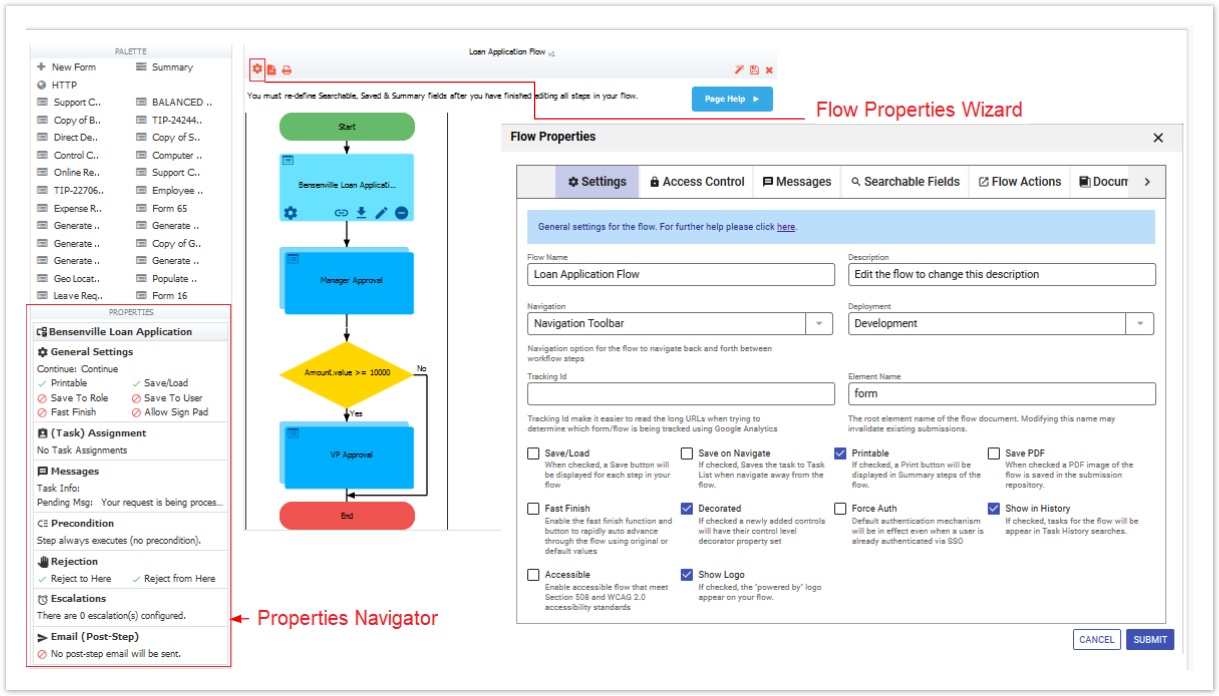
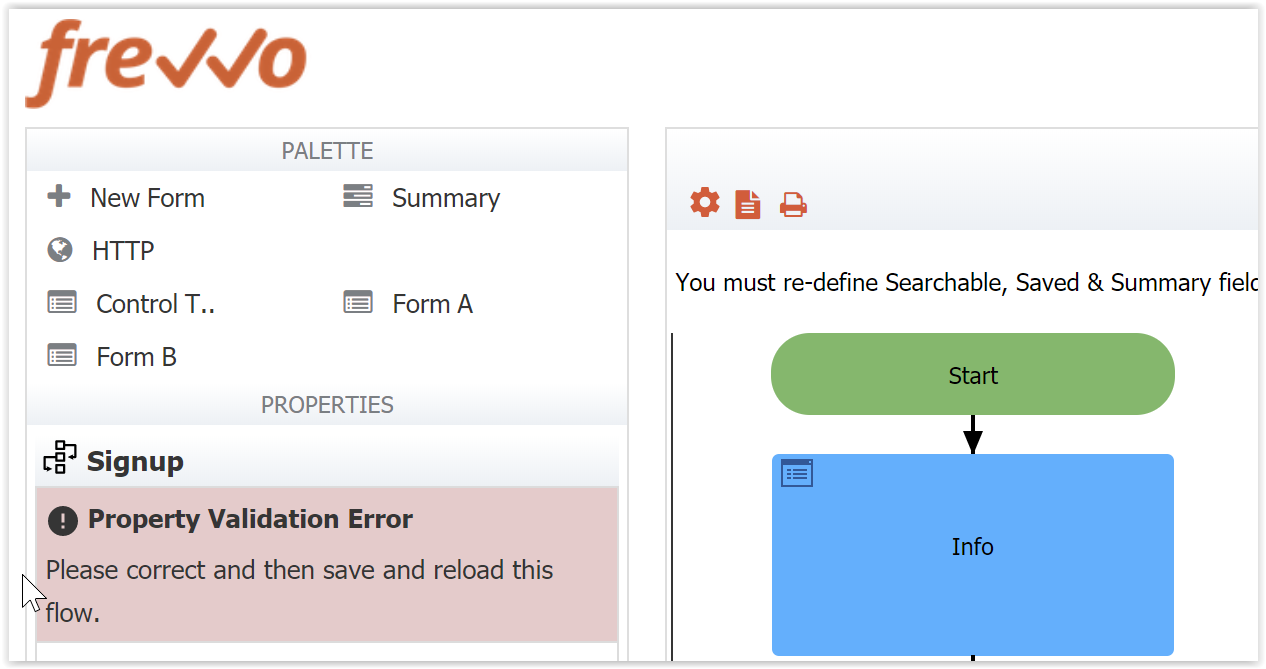
Redesigned Flow Designer Canvas
When you launch the Flow Designer, you will see a more intuitive canvas to create/edit workflows. Designer can quickly see how the flow is routed and have easy access to the properties for each workflow step.
The new canvas:
- Displays workflows in a flow chart format.
- Adds Lines and arrows are automatically as you build/edit your flow.
- Flashing green “bulls eye” to indicate the exact place where a step is to be placed.
- Flow Step Properties are located on tabs that are easy to get to from the flow step or the Properties Navigator. Help text is provided to make configuration quicker and easier. Each tab contains a link to the documentation if more information is required.
- Designers are notified if tabs contain invalid information and in some cases, you cannot continue until it is fixed.
- Selecting a flow step shows important properties and their values via a new Properties Navigator and action icons relevant to the step e.g. create a linked step, edit the form associated with a form step etc.
- Preconditions represented as a decision box (yellow diamond)
- Simplified routing to a user, role or email address
- Linked steps display a double box indicating that the step is a copy of a prior step in the flow.
- On hover feature for Linked steps shows the name of the parent form that the linked step was copied from.
Existing workflows will automatically be converted to the new format when the Cloud is upgraded. No worries - at runtime your existing flows will work as before but they will look different when you edit them in the Flow Designer.
Easily Add an Anonymous Step to your Workflow
Anonymous steps in a workflow are steps that are performed by an non-authenticated user. This means the user does not have to login to to perform their step in the workflow.
This a common workflow scenario. Some examples are:
- a Membership workflow that requires reference letters from an external person.
- a Purchase Order Approval requiring the customers review and signature.
- a workflow that is sent to an External Vendor for a Quote.
Anonymous steps are simply form steps that route to an email address in version 8.0. That's it.
Create an anonymous step in your workflow by following these simple steps:
- Create the step you want the recipient to see or link to an existing one.
- Click on the step then click the
 Edit Step Properties icon
 - Navigate to the Assignment tab.
- Enter a valid email address in the Assign to Email field. Leave the Assign to User and Assign to Role fields blank. Only one email is allowed.
- You can use Control Templates in the email field so that it’s dynamic. Enter the left curly brace - { - then start typing the control name and a pick list will appear with matching controls. Selecting the control form the list enters it into the field with the closing curly brace - }
- Customize the email that the anonymous user receives. Control Templates can be used in the email Subject and Message for dynamic behavior as well.
- Click Submit.
At runtime, the value in the Assign to Email field is evaluated and an email that contains a link to the anonymous step is sent. The recipient clicks the link to perform the anonymous step. Logging into is not require
- It is no longer a requirement to set the Who can start the form/flow permission to Anyone (No login required) - called Public in previous releases. The anonymous step will work with any of the Form/flow Visibility choices.
- Designers can now design a workflow that rejects to an Anonymous step.
- The Modify a Task feature now allows Tenant/flow administrators to reassign an anonymous step to a different email address.
Existing workflows, created with Email/Anonymous steps, will continue to work after the upgrade to v8.0. However, the ability to reassign an anonymous step to a different email address or rejection to an anonymous step are not available for workflows created with these types of steps. Please review Migrating Flows with EMAIL/Anonymous Task Steps for information to manually migrate these flows to take advantage of the new features.
Migrating Flows with Email or Anonymous Task Steps
Designing a workflow step performed by a non-authenticated (anonymous) user in previous versions required dragging/dropping an Anonymous Task Step from the Flow Designer Palette and configuring it with an email address. The step that followed the Anonymous Task Step was the actual step that the recipient would perform. This design approach was confusing and error prone.
To convert your flow from pre v8.0 to v8.0, we suggest you follow the same procedure that you use to update any other form/flow in Production. Review Administrator Best Practices if you need a refresher.
To convert your Anonymous Task Step to the v8.0 Simple Anonymous step(s) follow these instructions:
- Login to your Production tenant or the user account where your Production forms/flows are located.
- Ensure there are no flows in flight for the workflow you want to update.
Download the workflow from your Production tenant or Production designer account.
Upload it into a different application in your test tenant or designer test account
Edit the existing Email/Anonymous Task step.
- Click the Edit Step Properties icon. Click on the Assignment tab.
- Copy the information in the Assign to Email, Task Notification Subject and Message fields. Paste this information to a text pad and save to your desktop. Click Cancel.
- Click on the step following the Email/Anonymous Step. (the step performed by the anonymous user)
- Click the Edit Step Properties icon. Click on the Assignment tab.
- Paste the information you copied in step 7 into the Assign to Email, Task Notification Subject and Message fields.
- If the Message field contains the {task.notify.url} template, change it to {task.perform.url} or {task.list.url}.
- Click Submit.
- Delete the Email/Anonymous Task step from the workflow.
- Save and Test the workflow.
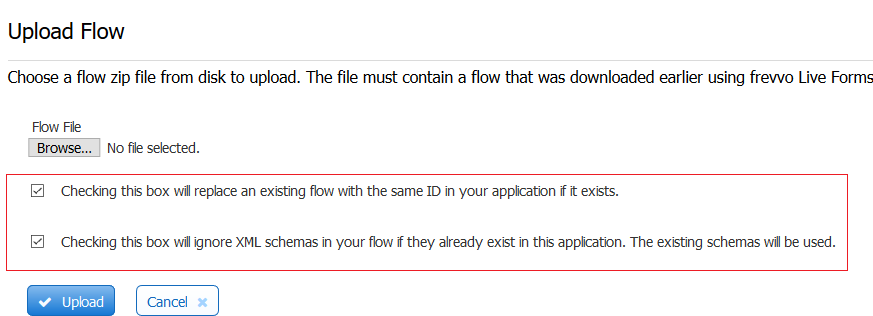
- To replace the production workflow with the updated flow, download the updated flow from your test tenant or designer test account.
Upload the updated workflow to your Production tenant. Be sure to check the checkbox to REPLACE an existing flow with the same ID. The checkbox to use existing schemas is checked automatically.
Workflows with steps performed by anonymous users no longer require the Who can start the form/flow (called Who can use the form/flow in previous releases) permission to be set to Anyone (No login Required) (called Public in previous releases). In version v8.0, you can change the Flow Visibility to one of the other choices and the workflow with the Anonymous step will still work.
Anonymous Steps and the Audit Trail
If your workflow was created in a version of previous to v8.0, then the step performed by the customer (anonymous user) was designed by dragging an EMail or Anonymous Task step from the Palette and dropping it on the Flow Designer canvas. Workflows designed in this manner will still work but the Audit Trail will show the task in a WAITING state.
In version 8.0, the same flow can be designed by simply assigning the step to an Email Address. The Audit Trail, shows the step performed by the customer (anonymous user) in a Pending state and displays the Email address it was sent to.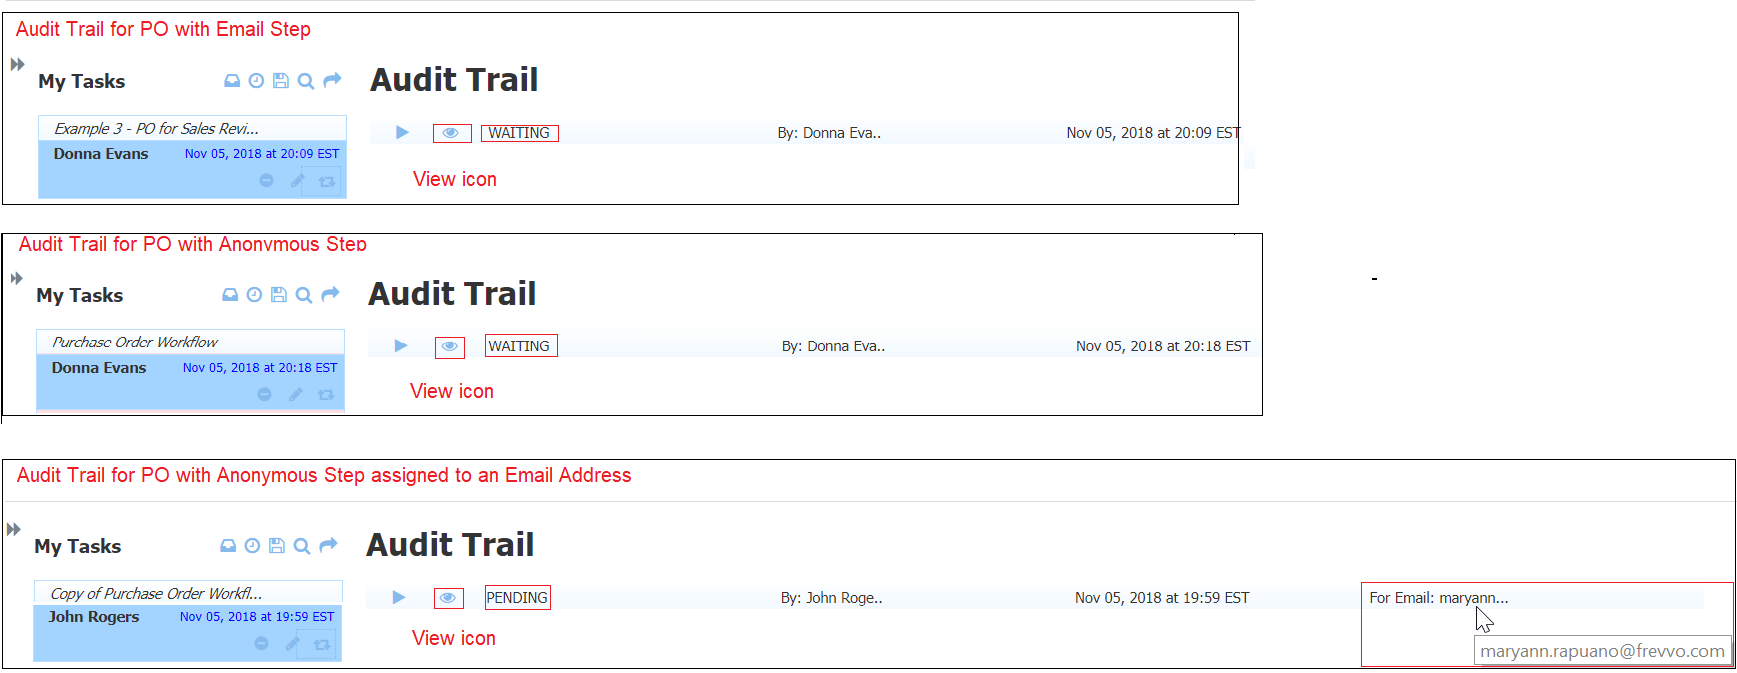
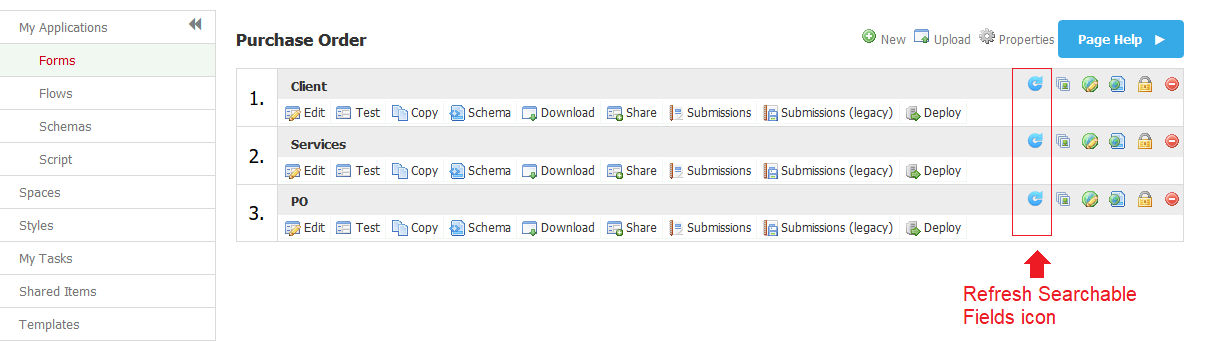
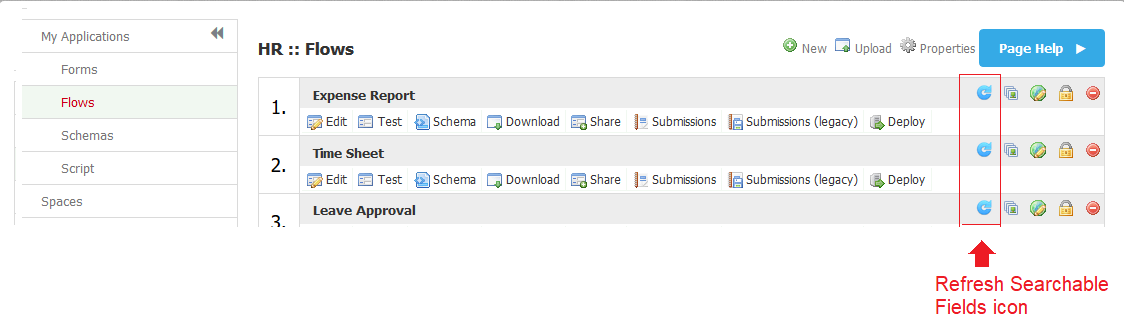
Refresh Searchable Fields per Form/Flow
Designers now have the ability to run a Refresh Searchable Fields for an individual form or flow. You may want to run this process to update existing submissions to reflect changes to Searchable Fields. In previous releases, this process could only be performed by the tenant or superuser administrators and could only be done for the entire instance or the entire tenant.
Administrators can still run the process, of course but version 8.0 provides a way for form/flow owners ( the designer user that created the form/flow) or any designer user given the Who can edit the form/flow permission to run it for a single form/flow. The designer can start/stop/abandon the process and view a list of processes run.
It's easy. Simply login to your tenant as a designer user and click on the  Refresh Searchable Fields icon that you see on the Forms Home Page or the Flows Home Page. Follow the onscreen directions or check the docs for more details.
Forms Home Page
Flows Home Page
View My Task
Let's say you submitted an Expense Report or a Vacation Request to your manager. A few days later, you want to check the status of your request and view the information you submitted. users now have the ability to view completed tasks in a workflow that they performed. You search for your task and view the Audit Trail to see the progress of the workflow. You will see a new
 View icon for the steps that you performed. Click it and a read-only view of the workflow step with the submitted data displays. Screenflows and tasks with multiple submissions i.e. Save on Navigate is turned on, display a Next button to move forward. Only the last step will be viewable for multiple submissions but the first step displays when you click the View icon.
A watermark displays to to remind you that you can view data but you cannot change it.
In previous releases, designers had to send an email with a PDF to the user at the completion of a step to provide them with a record of the submitted task. This is no longer necessary with the View My Task feature.
Workflow Step Properties Wizard
The configuration/editing of workflow step properties is easier and more intuitive. The wizard consists of a series of easy to get to tabs designed to collect the necessary information for each property.
A Properties Navigator provides a quick view of important flow-step properties. This view changes based on the type of workflow step i.e. form, HTTP or Linked step.
There are three ways to open a properties tab:
- Click on the workflow step then click the Edit Step Properties icon. Navigate to the relevant tab when the wizard appears.
- Click anywhere in a section of the Properties Navigator for quick navigation to the relevant tab for immediate editing.
- Click the Edit Step Properties icon in a section of the Properties Navigator.
Once the tab is displayed, the following features make the properties setup/editing easier to understand help with property
- On hover feature providing explanatory help text
- Links to the
- Many fields have pick lists that can be filtered by typing ahead. Controls from your form/flow and built-in
- Type a left curly brace - {followed by a control name then select the field from the pick list that displays and the selection will be added to the field as a Control Template automatically adding the right curly brace - } -.
- Changes are saved when you click the Submit button. If there are invalid property settings on any of the tabs, tabs with validation errors are displayed in red with a red asterisk.
Refer to Editing Flow Properties for detailed information about properties and feature setup.
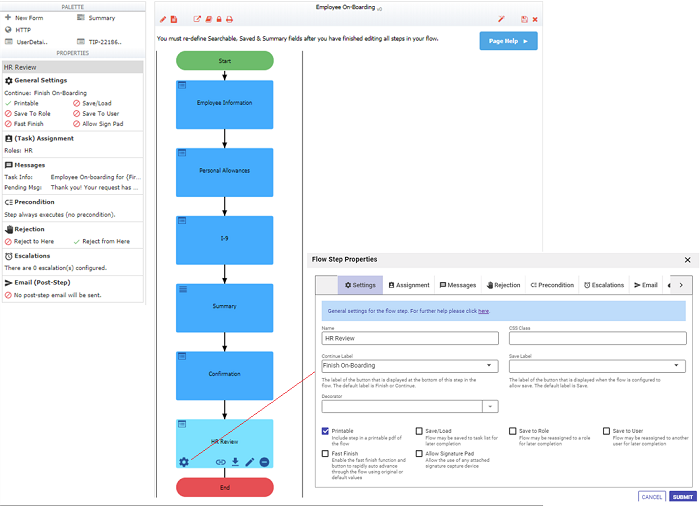
Flow Step Properties Wizard
Properties Navigator
Dynamic Option Improvement
Options for Selection Controls (Dropdowns, Checkbox, Radio) are set up using the syntax: value=label. When these controls are used in a template, uses the option label when resolving the template at runtime. This is desirable when you want your users to see the labels as options. If you are using the Dynamic Options feature and you have a template in the Options URL for a Selection Control, the template resolves to the label at runtime. This may cause the query to fail. Template syntax has been expanded to force the use of the true value as opposed to the option label if the template control is a Selection Control. Use {controlName.value} in place of {controlName} in the options URL to substitute the value instead of the label at runtime.
Refer to Populating a Selection Control based on the Value of Another Dynamically Populated Selection Control for an example.
Message controls as a spacer
Message controls re commonly used as a spacer to center other controls in forms/flows. In previous releases, the Message property had to be set to a single space. The Message control can now be set to an empty string eliminating the need to add the space. Refer to Centering Images using the Message Control for an example.![]()
IE11 Browser no longer supported for Design mode
The new Flow Designer UI is no longer supported in the Internet Explorer 11 browser. A warning message "The flow designer functionality is not supported in this browser" displays if IE11 is detected. Internet Explorer 11 is still supported when using forms/flows on a desktop.
Flow Visibility option description changed.
The explanatory text for the Who can use the form/flow permission in the Access Control list has been changed to Who can start the form/flow. The functionality remains the same.
Email/Anonymous Task Step removed from the Palette
The Email/Anonymous Task has been removed from the Flow Designer Palette. Workflow steps performed by an anonymous user are form steps that route to an email address in version 8.0.
Publish Trigger Control as a Control Template
The ability to publish a Trigger control as a Control Template has been restored. This feature will be supported in v7.2.8+, v7.4.6+ and v8.0.0+ going forward.
Document Action Post Failures include the server name
When A Document Action post fails to reach it's destination, tenant/flow admins receive an email notifying the admins doesn't include any info about the server hosting the form which makes it impossible to know which environment the failure originated (e.g. app.frevvo.com vs staging-app.frevvo.com). The server name is now included in the message of the email.
Visual Rule Builder and Rules with Repeat or Table Controls
The Visual Rule Builder now adds the itemAdded code to a rule that references Repeat or Table controls. The itemAdded code is needed to guarantee that the rule runs when the user clicks the  Plus icon to add a Repeating Section or a row. This code will be added to rules with/without conditions. It will not be added if the Initialization Only box is checked. Here is an example of a rule created using the Visual Rule Builder, that makes a Repeat Control visible when a text field starts with a.
var Text_start_index = Repeat1794.itemAdded ? Repeat1794.itemIndex : 0;
var Text_end_index = Repeat1794.itemAdded ? Text_start_index + 1 : Text.value.length;
var event = form.load;
for (let i = Text_start_index; i < Text_end_index; i++) {
 if (Text[i].value && Text[i].value.startsWith('a')) {
 Repeat1794.visible = true;
 }
}
Since Tables are grid layouts of Repeating items, the itemadded event will be generated for rules with Tables as well.
Form Styling Improvements
Additional Form Styling Improvements related to corners, colors and fonts are now possible. Changes for custom fonts include:
- Adding Custom Fonts to the Message Control:
We recommend that you read the information below before you begin.
Automatic Upgrade for frevvo Online (Cloud Hosted) Customers
frevvo Online cloud hosted customers will be automatically upgraded on 8/10/2019. The automatic cloud upgrade will be seamless. Cloud customers should review these topics to prepare for the new version of .
If you have any questions, please email support@frevvo.com.
Migration Considerations
Java/OpenJDK
v9.0 was certified with JDK 11 (11.0.2) - OpenJDK. The cloud server will be upgraded to OpenJDK 11 with this release. In-house customers must upgrade to JDK 11 before upgrading to
v9.0.
- Java OpenJDK does not come with a JRE for download, unlike past Java versions.
Set up Form/Flow Properties with Helpful Wizards
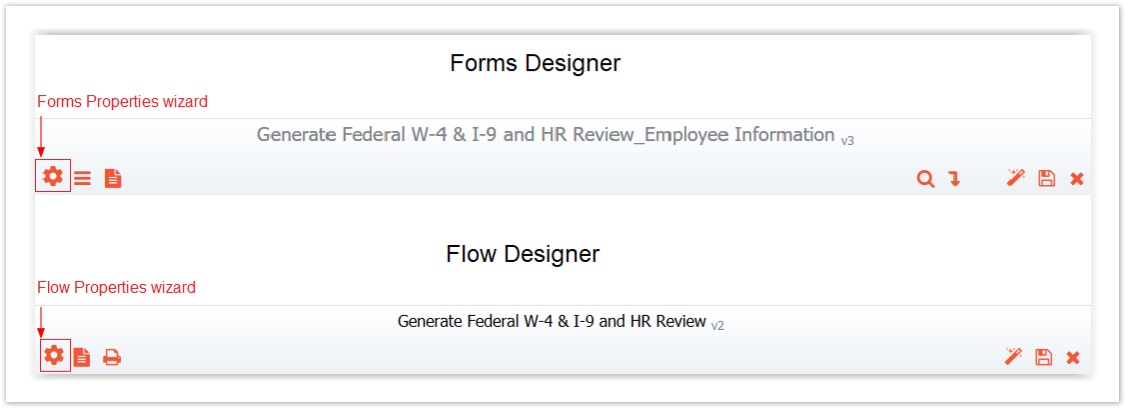
The new Form/Flow Properties User Interface (UI) is intuitive and organizes logical groupings of related properties on individual tabs. Click the![]() Edit Form/Flow Properties icon in the toolbar at the top of the Form/Flow work area to access the Properties Wizard. The Properties Navigator on the left side of the work area provides a quick view of the important settings for a form or flow. Clicking in a section of the Properties Navigator takes you directly to the tab within the Properties Wizard. Hover over any field on any tab for a helpful hint about the property. Links to the
Edit Form/Flow Properties icon in the toolbar at the top of the Form/Flow work area to access the Properties Wizard. The Properties Navigator on the left side of the work area provides a quick view of the important settings for a form or flow. Clicking in a section of the Properties Navigator takes you directly to the tab within the Properties Wizard. Hover over any field on any tab for a helpful hint about the property. Links to the documentation are also provided.
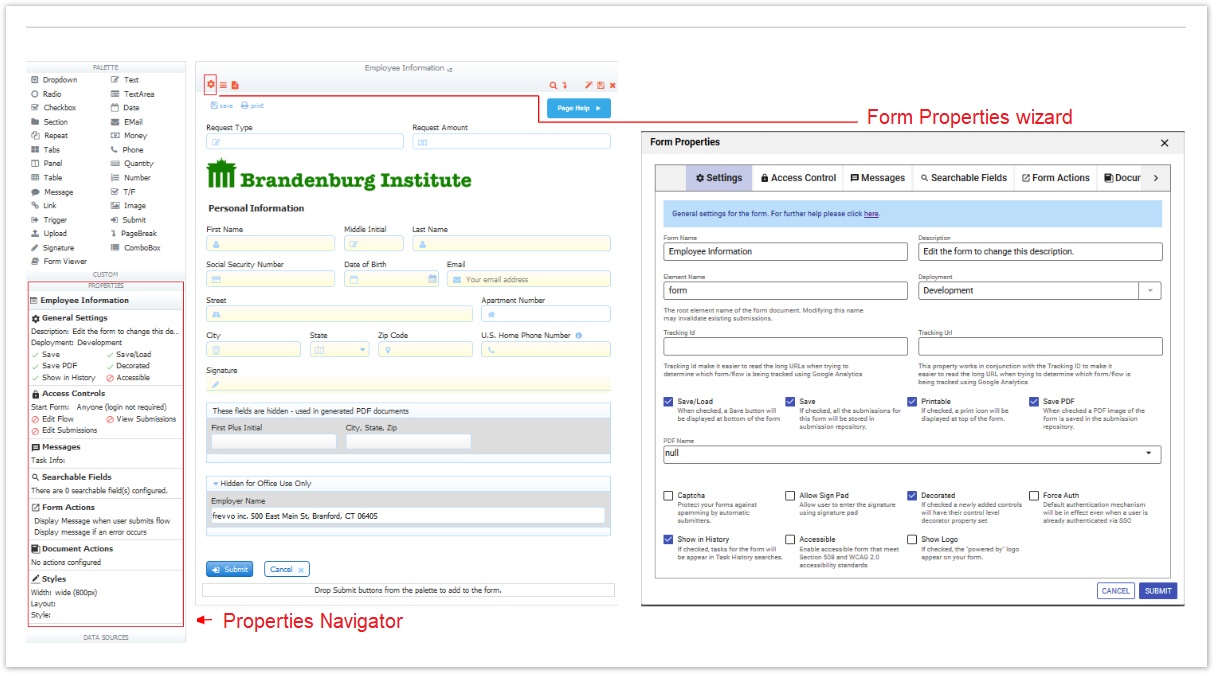
Form Properties wizard - Refer to Form Setting Properties to see how it works.
Flow Properties wizard - Refer to Flow Setting Properties to see how it works.
Form Actions and Document Actions included in Form/Flow Properties wizards
Form/Flow Actions and Document actions are now set up on tabs in the Edit Form/Flow Properties Wizard. Simply access the wizards by clicking on the ![]() Edit Form/Flow Properties icon in the toolbar of the
Edit Form/Flow Properties icon in the toolbar of the designers.
Click the Form/Flow Actions tab to set up what the user sees when the form/flow is submitted. Click the Document Actions tab to specify what happens to the data when the form/flow is completed.
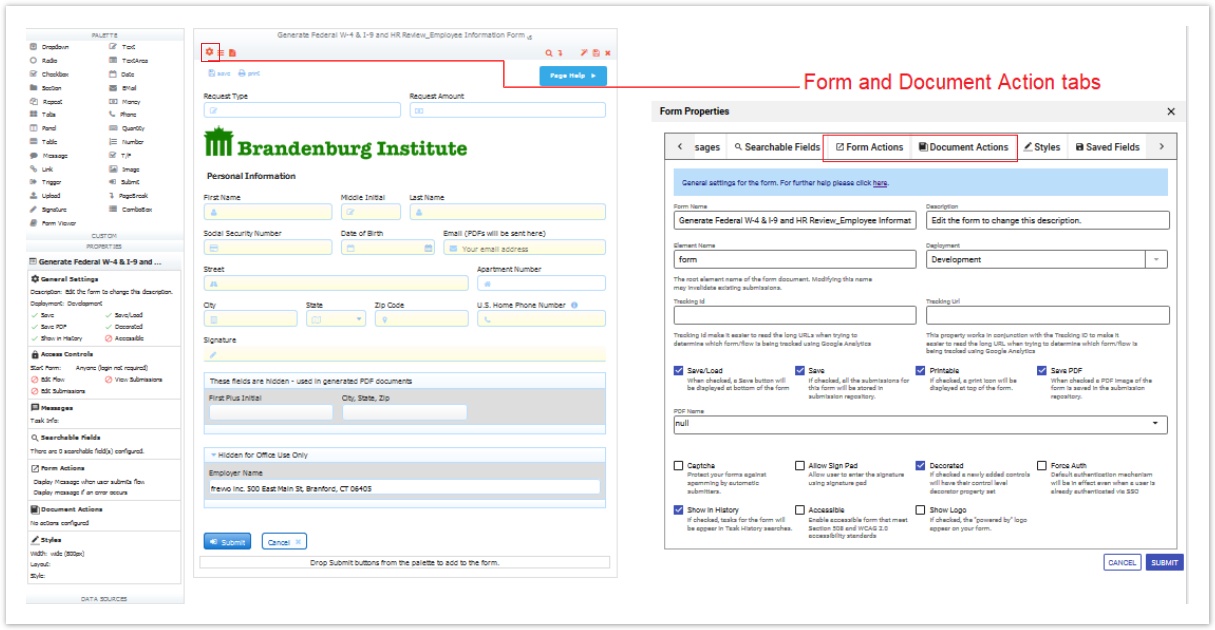
Form and Document Action tabs
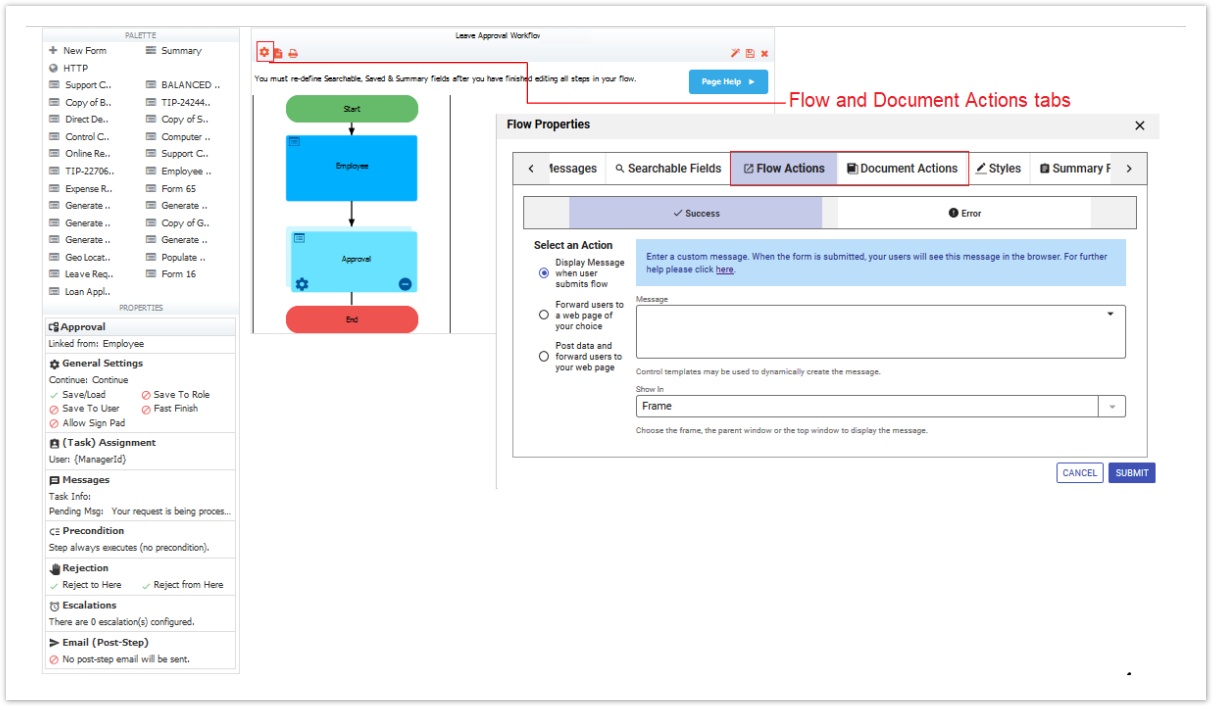
Flow and Document Action tabs
Helpful Tours on the Flow Step Properties Wizard
Click the ![]() Help icon at the top of any Flow Step Properties tab for a quick tour of the features in that section. Currently, tours are only available for Cloud customers.
Help icon at the top of any Flow Step Properties tab for a quick tour of the features in that section. Currently, tours are only available for Cloud customers.
Workflow Task Design Considerations
In prior versions, some workflow behavior was determined at run-time (rather than design-time) based on the user performing a step and the step assignment. It was hard for the designer to predict workflow behavior because of the possibility of different combination of users/assignments that may result in a screenflow vs. a standard workflow.
In v8.0 and prior, these errors in flow design would be apparent in certain use cases such as:
- The second step (i.e. Manager Approval) on a Vacation Request workflow was set to the template reports.to() which resolved to a manager's name. If the manager user was not configured correctly so that this template resolved to null, the user who performed the first step would automatically get a screenflow for the next step and could approve their own vacation request.
- A company used a launcher form to launch another flow, such as a budget request, by sending the first step of a flow to a specified user's task list. If the first step was a template that resolved to the same userId of the person running the launcher form, it would become a screenflow rather than putting that step on their task list.
- A Sales Order Form used the Anonymous Step feature to send an order form to a client. The salesperson wanted to access the task and reject it back to the first step to make a correction, but if the salesperson performed the anonymous step, that step would become a screenflow and the the reject button was not enabled.
In v9.0, the designer now defines workflow behavior at design time using task boundaries. Task boundaries are created by setting assignments (user, role or email address), so each flow step with an assignment is considered a new task. Any subsequent flow steps without assignment are considered part of screen flow of the same task. This diagram illustrates how designers can manage task boundaries and workflow behavior:
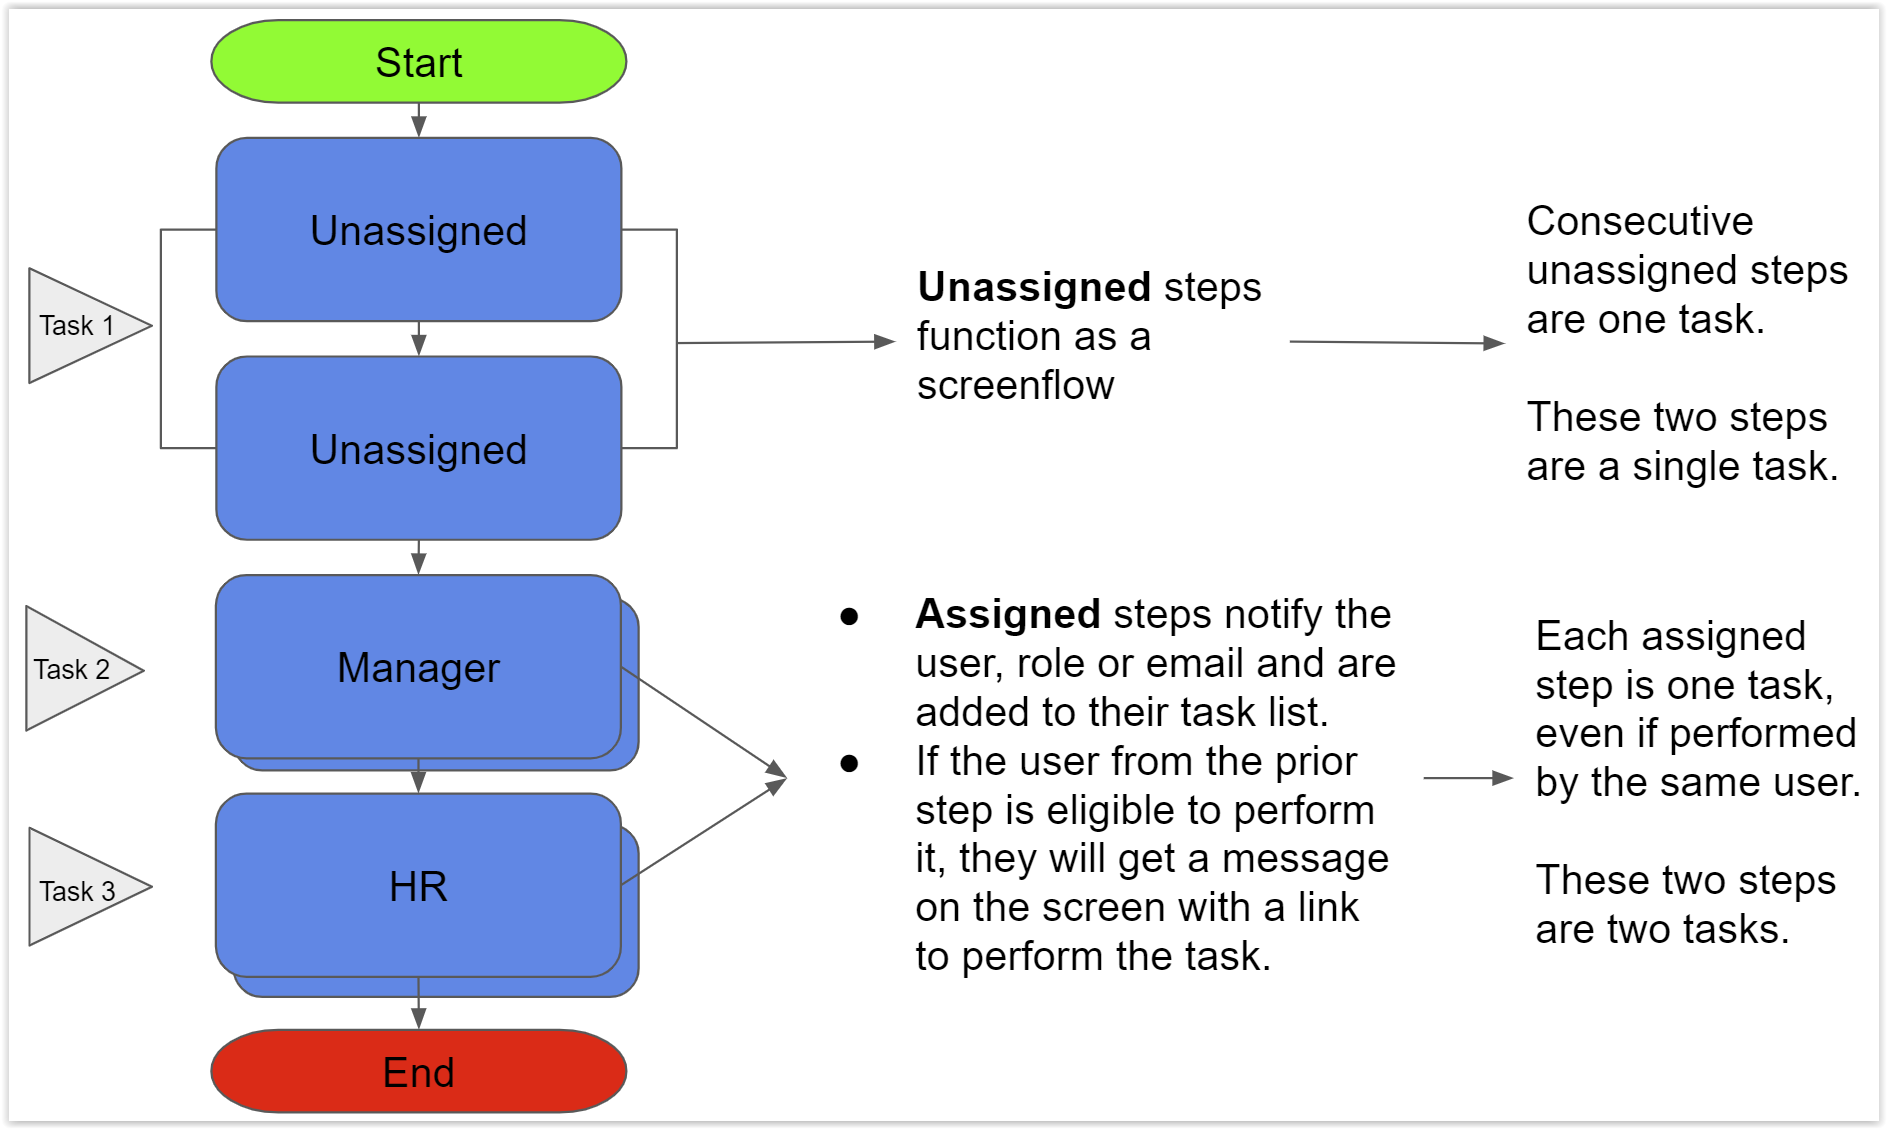
Screenflows
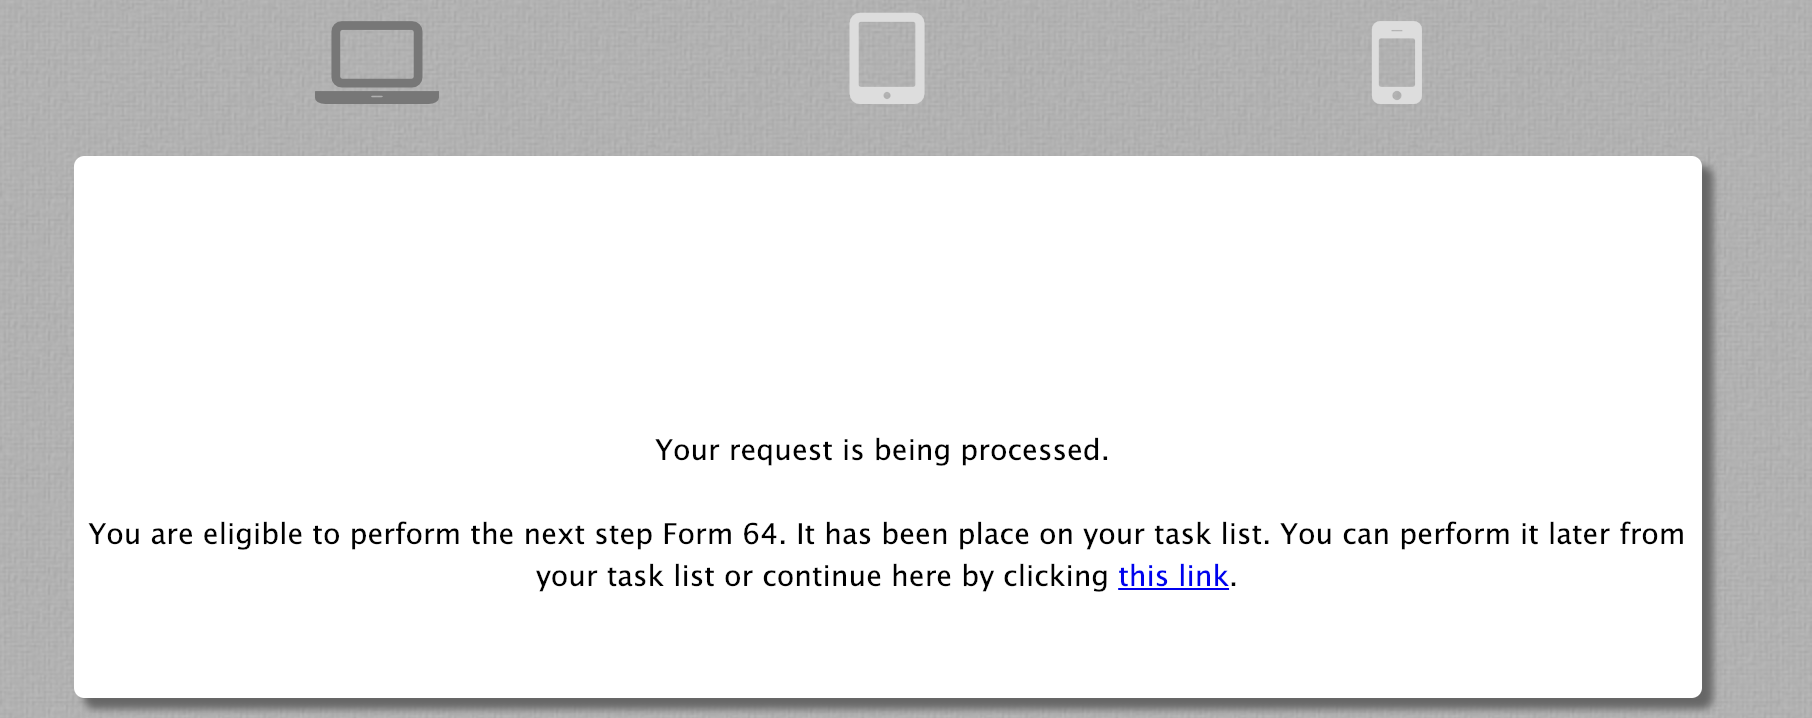
To preserve the convenience of a screenflow, if the next step is a new task and the current user is eligible to perform it, a message will appear with a link to continue the flow in the same screen. When the user clicks the link provided, the flow will continue like a screen flow but a new task will be created behind the scenes.
When navigating back using the navigation bar, consecutive unassigned tasks in a screenflow will be available to edit. Once a user has moved on to a subsequent assigned step, all prior steps will be read only.
When a task that is routed to templatized user, role, or email resolves to null or empty string, instead of becoming a screenflow, the task will now be assigned to the "invalid-task-assignment" userId and a notification with be sent to flow admin users (or tenant admin user if no flow admin is configured.) This will enable flow admin users to easily search mis-routed tasks assigned to the "invalid-task-assignment" userId and re-assign to valid user.
Considerations for "Task for First Step" Flows
The Task for First Step property was removed from the General Settings tab of flow properties.
- Having an assignment to a flow step strictly enforces the task boundary and it is applicable for the first step of flow as well. This means to create a task for the first step there is no need to explicitly configure the Task for First Step property. Instead, configure the first step with an assignment.
Designers can now define flow level Access Control by selecting Custom in the Who can start the flow property and entering user(s) or role(s).
Invalid Task Assignment
For workflows created in v9.0.x and later, when a task that is routed to a templatized user, role, or email resolves to null or empty string, the task will be assigned to the "invalid-task-assignment" userId and a notification with be sent to flow admin users (or the tenant admin user if no flow admin is configured.) This will enable flow admin users to easily search mis-routed tasks assigned to the "invalid-task-assignment" userId and re-assign to valid user.
Migrating Existing Flows
Existing flows with an assignment at the first step to control Who can start the flow will be automatically migrated to Access Control during the upgrade process to v9.0.
If Task for First Step was set to false (unchecked) and there was a user or role(s) assigned to the first step of the flow, then the assignment would come off the first step and move to the Who can start the flow custom permission.
If Task for First Step was set to true (checked) and there was a user or role(s) assigned to the first step of the flow, then this would be considered as a valid assignment and there will be no change.
If Task for First Step was set to true (checked) and there was not a user or role(s) assigned to the first step of the flow, then this will no longer be a task for first step flow. It will be a normal flow.
If Task for First Step was set to false (unchecked) and there was not a user or role(s) assigned to the first step of the flow, then this would be considered as normal flow and there will be no change.
Workflows created in v8.x and prior will not inherit the new "invalid-task-assignment" behavior if a templatized user, role or email resolves to null. Instead, they will retain the previous behavior of morphing into a screenflow. To upgrade a workflow to use the v9 Invalid Task Assignment behavior, you will need to manually edit the flowtype property supportNullAssignee="false".
- Download the .zip file of your workflow
- Extract the files to a location of your choice. Open the unzipped folder.
- Edit the flowtype file with a text editor.
- In the code section that begins with '<flt: FlowType' add the attribute 'supportNullAssignee="false"'

- Re-zip the workflow file.
- Upload the edited workflow .zip into a different application and test it.
- Upload/Replace the original workflow when you are ready. Follow these best practices for updating a workflow in production.
Changes to passwords and the CSV upload
Tenant Admins can expire passwords by checking Change Password on Next Login on the Edit User page. Tenant Admins can also update current users or add new users by uploading a CSV file. For security, the CSV file does not include a password column.
Setting notifyIfNewUser to TRUE causes to send an email notification to the user prompting them to create a password. The defaults setting for notifyIfNewUser is FALSE, which allows Admins to set up users without passwords initially, and notify them to create passwords later.
- Set notifyIfNewUser to TRUE to send new users and current users without a password an email to create a password. Current users who already have a password will not receive a notification, even if notifyIfNewUser is set to TRUE.
- Set notifyIfNewUser to FALSE to not send an email notifications.
.PNG?version=1&modificationDate=1563475496000&cacheVersion=1&api=v2&width=900&height=95)
Password Reset email links will expire in 6 hours.
Users added manually will not get an automatic email prompt, but can be required to update their password on next login. This is by design to allow Admin users to add users prior to production, and then notify them to update their password later.

Changing your password to the last known password is not allowed. This message will display on the Edit User and Change password screens.
Uploading Users via the API
The password column in a csv file that is uploaded to will be ignored. Customers uploading users via the API will not experience a disruption in service. The password column can be removed from the csv file.
Box Connector
The box connector is no longer supported for .
Microsoft Edge Browser
The Form Properties and Flow Properties windows are slightly slower to load on the Microsoft Edge browser than other browsers. This will be the case until Microsoft releases a version that supports custom elements and shadow DOM natively (date TBD).
Drag and Drop Enhancements
Enhancements to the drag and drop feature include increased padding around controls making the available drop space more intuitive, and allowing controls to be dropped into a section in the available space on any side of existing controls. When dragging a control to the design canvas, will recognize the nearest control and prioritize placement to the right or below that control. The left side and top are also available by dragging the control in those directions.
On-premise Database and Filesystem Connectors for Cloud Tenants
Cloud customers running the Filesystem and Database connectors behind their firewall do not have to upgrade immediately. The existing JDK/connector(s) will continue to work with v9.0 for a limited time.
- Plan to upgrade your in-house JDK and connector(s) at your earliest convenience.
- Remember to:
- Upgrade the server running the connector(s) to the supported version of Java OpenJDK
- Use the recommended version of the connector(s) listed in the Release Notes.
Tomcat and Insight Server version Upgrades
The version of tomcat has been upgraded to 9.0.19 in the frevvo Cloud.
The version of the Insight Server has been upgraded to Solr 7.5.0 in the frevvo Cloud. Server functionality remains the same.
Internationalization Improvements
With the new UI, several significant improvements were made regarding text externalization localization.
Previously, all externalized text was found in the "default" file located in WEB-INF/data/locales. The "default" file remains. However, there are now several new file for specific areas of the application. The names of these files is intended to indicate the area for which the file contains externalized text strings:
form-designer-properties
flow-designer-properties
flow-designer-step-properties
rule-builder
frevvo-ui (currently covers the template install dialog)
The scheme for placing locale-specific (language-specific) files into the WEB-INF/data/locales folder is similar to before. The "default" file is still copied and named "some-locale". The scheme for the other files is similar except that the locale is pre-pended onto the file. For example for french, "form-designer-properties" becomes "fr-form-designer-properties". Note that all 6 files are required for each locale in order for this to work properly. For example for french (fr), you must place the following files into WEB-INF/data/locales, even if not all of them are translated:
fr
fr-form-designer-properties
fr-flow-designer-properties
fr-flow-designer-step-properties
fr-rule-builder
fr-frevvo-ui
The way that locale/language is determined at run-time is unchanged from before. It may be set in the browser properties (preferred language) or using the locale=parameter on the form/flow type share URL (either edit or use mode)
Refer to Creating Runtime and Design-TimeTranslations for more information.
Control Options/Dropdowns in Wizards
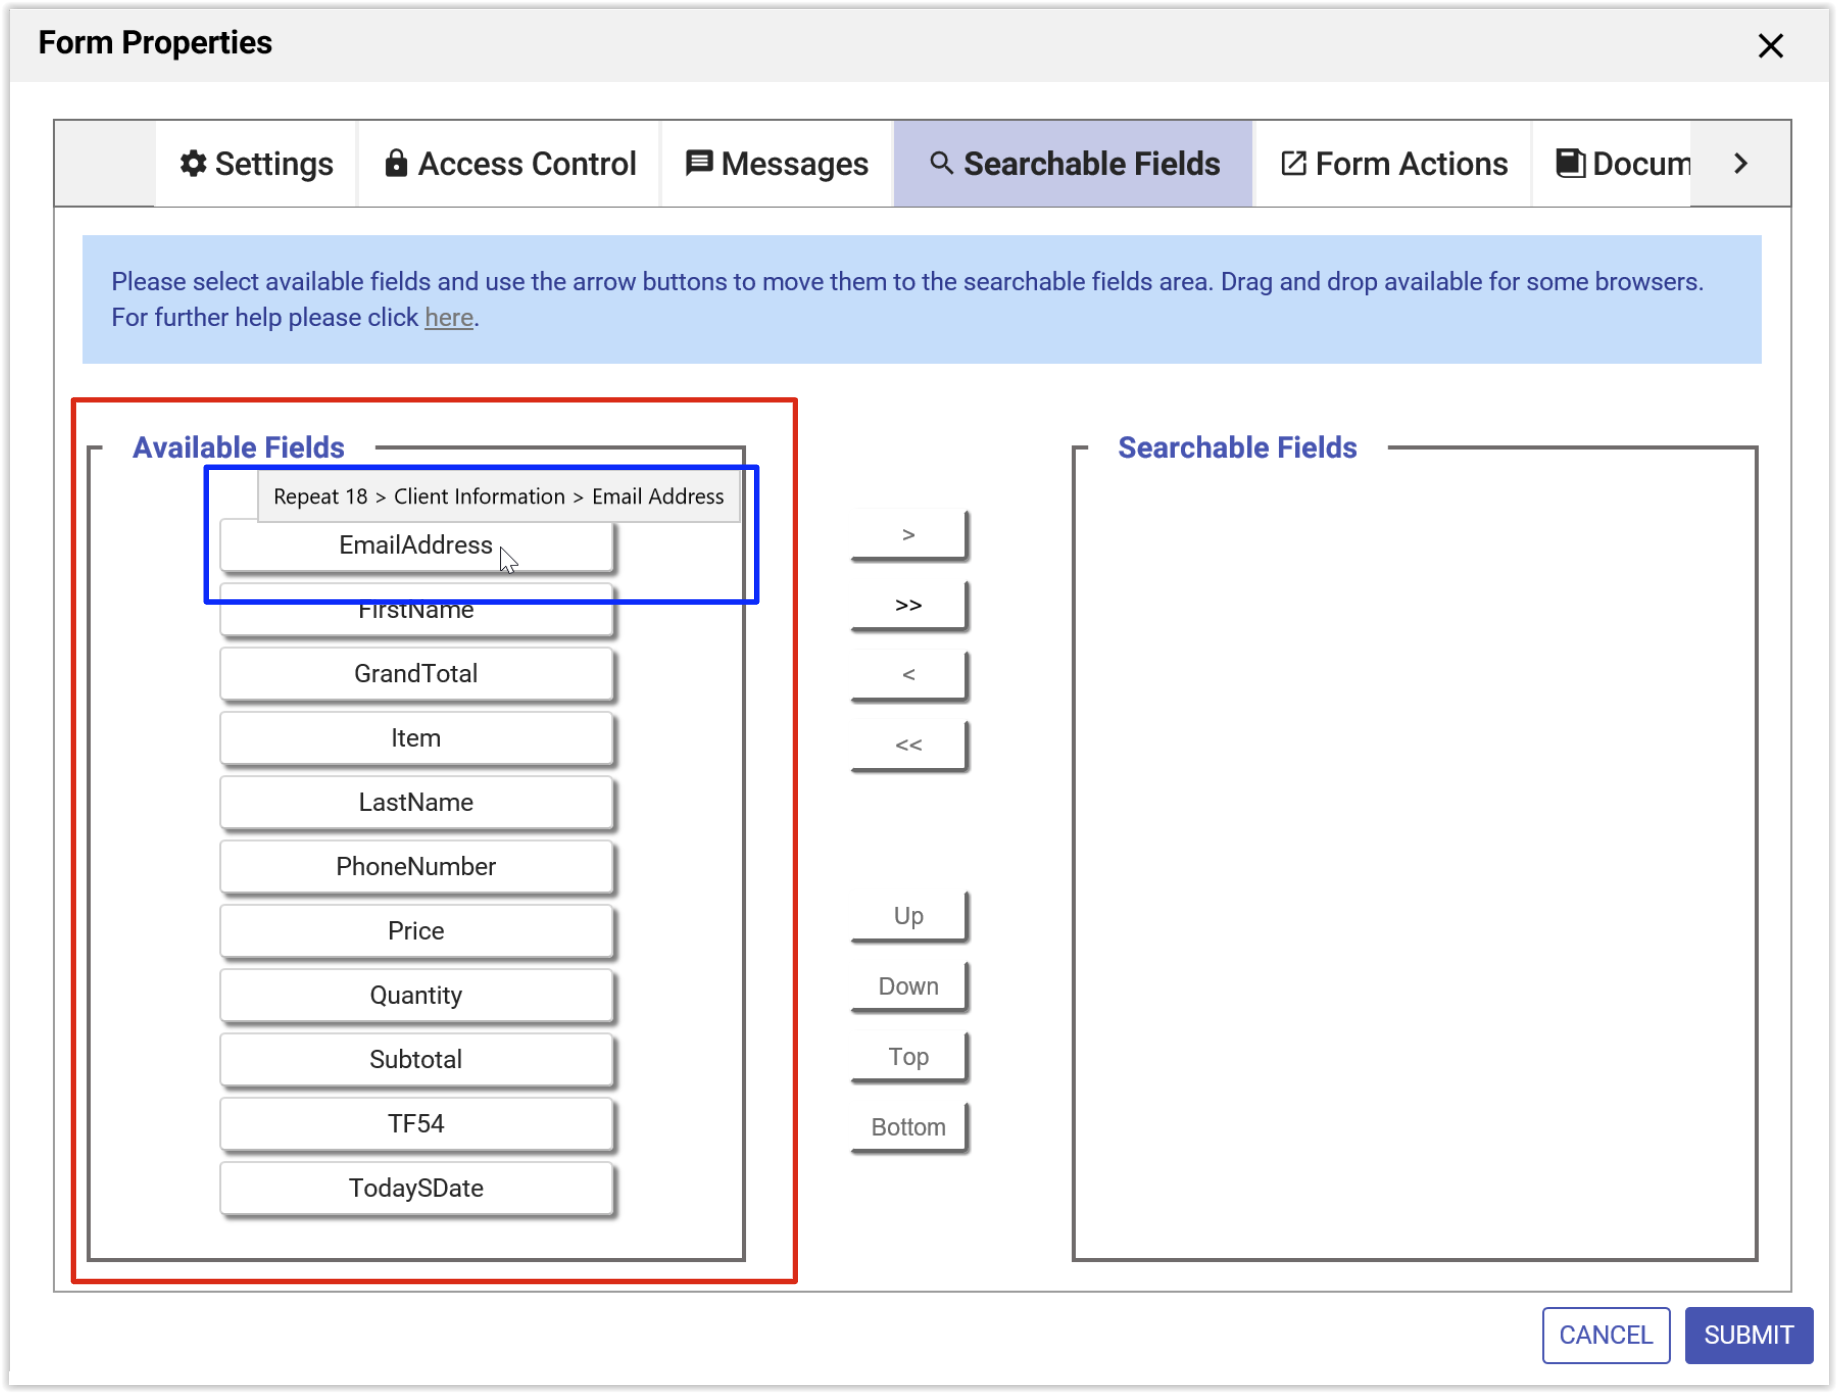
The control dropdowns in the Sharepoint and Filesystem Connector Wizards now display control names (not labels.) The Searchable Fields and Saved Fields properties also display control names (not labels) in the Available Fields column. Hovering the cursor over a field name will display a tooltip that includes the control's section as well for clarity when multiple controls have the same name. This enhancement is consistent with other wizards throughout and will increase accuracy and clarity when selecting controls.
Admin Warning for SAML Discovery Tenants
Tenants using a SAML Security Manager in discovery mode (with "Auth Only" unchecked) should not edit users or roles from the Manage Tenant page because changes made this way are temporary. The next time the user logs in the user will be re-synced via discovery -- deleted roles will be added back (if the user has them) and the user will be updated (roles added by admin will be deleted and roles deleted will be added back). In v9.0, a warning message will appear on the User List to alert the admin that they are in discovery mode and should make permanent changes in their IDP instead.

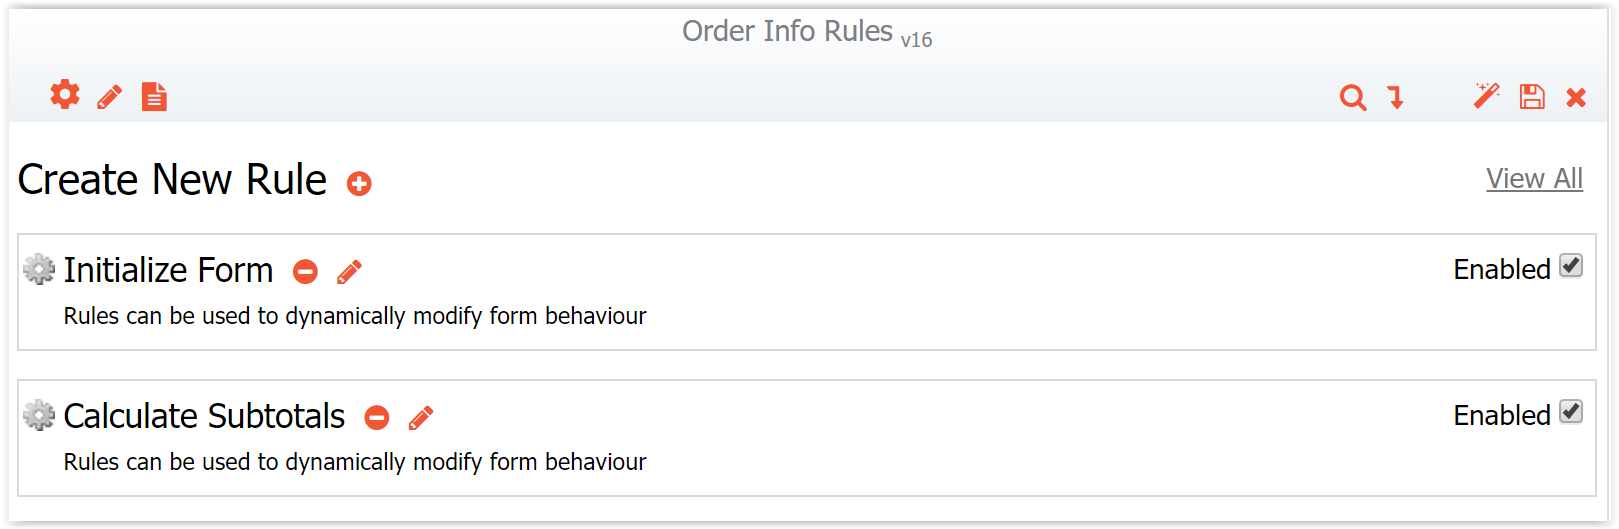
Adding a Rule
In prior versions, when adding a new rule the designer had to click the pencil icon to expand the rule properties. Now, when adding a new rule, the rule properties will automatically expand giving the designer quick access to the rule name, description and Visual Rule Builder.
Rule Enabled Checkbox in Collapsed View
The Enabled checkbox is now visible and accessible when rules are in collapsed view. This allows the designer to quickly enable/disable rules without editing/expanding each one.
Failure Notification for Doc Actions
E-mail notifications to form/flow admins upon Document Action failure will now include additional information to help the user identify the form/flow that is has a failure in order to correct it. Doc Action failure notifications will now include form/flow name, tenant, designer, and application.
Workflow Step Automatic Naming
New and Existing Forms added as workflow steps are automatically named "Step #." Dragging a New Form into the flow designer sets the step name to "Step #" and the form name to "Form #". Dragging a form that was previously created in the form designer sets the step name to "Step #" and leaves the form name unchanged. Use the pencil icon on the step to access the step Properties Panel and rename the step(s).
Email Option Enhancements
'CC' Functionality
In prior releases, the doc action Email allowed email submissions to multiple addresses, CC and BCC. In v9.0, the 'CC' functionality extends to workflow Task Assignment, Escalation Notification, and Escalation Reminders. This feature enables the designer to specify a 'CC' email which is useful in the following scenarios:
- A task is assigned to an anonymous user, but the user does not get the task (due to a bounced email, or the user never opened the task.) In this scenario, the cc'd user/role can "grab" the Pending task and reassign or resend it.
- Notifying a manager that a task has been sent to a new sales rep in training, so the manager will be able to monitor the trainee's tasks and follow up.
- Notifying a second party for escalations to ensure follow up at this stage of the flow.
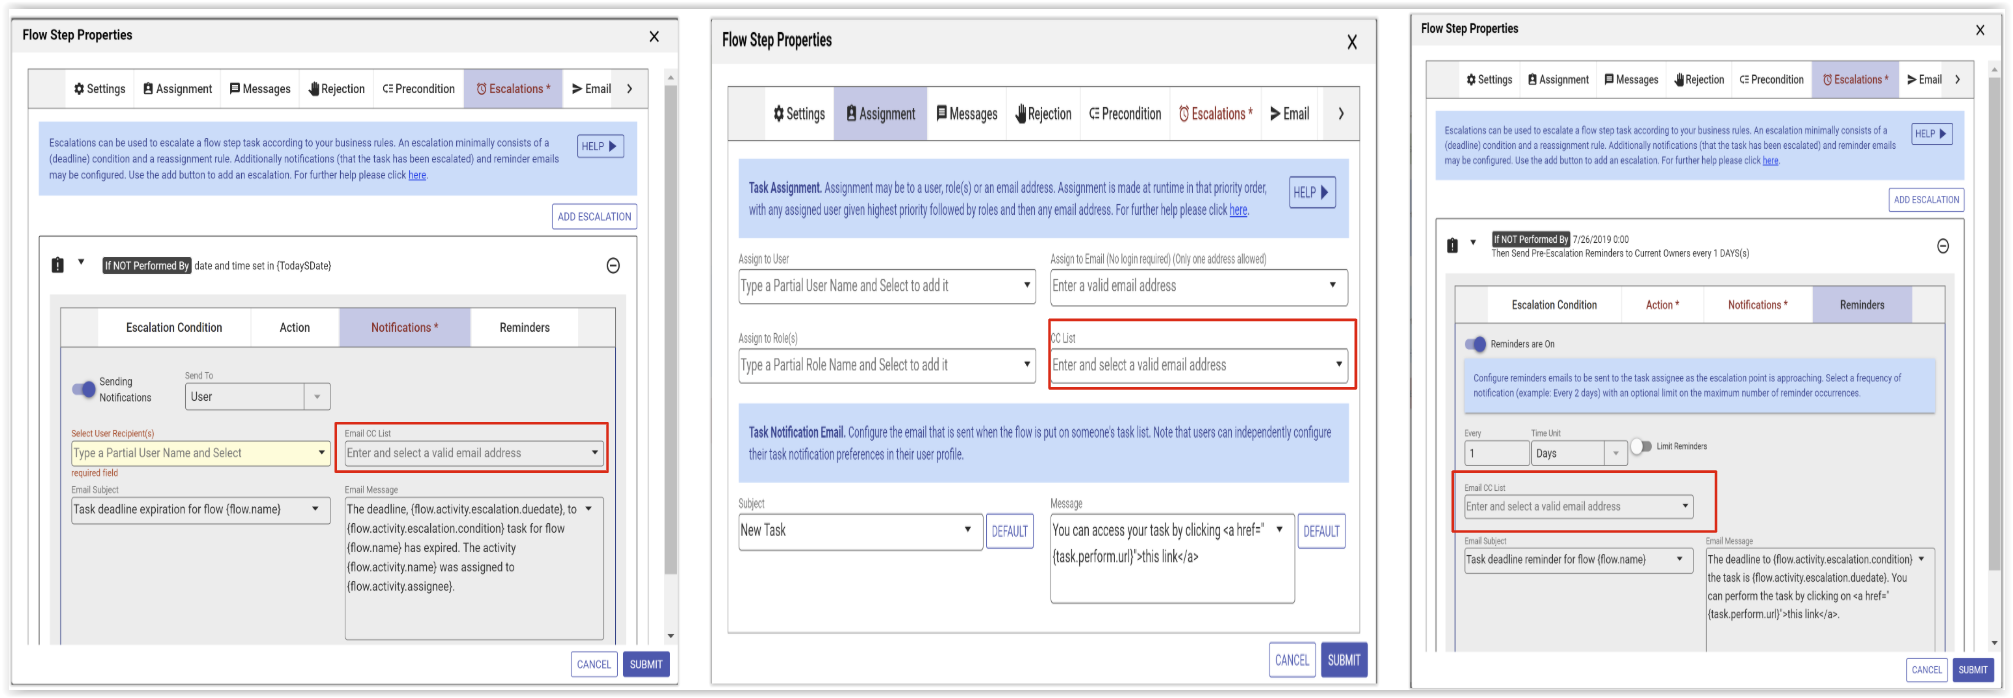
Note on Anonymous Tasks
The 'CC' function is intended to allow oversight of task assignment and the ability to access a task sent to an anonymous user. The first user who follows the task link will lock the task, so designers should be cautious when emailing an anonymous step to multiple recipients. One way to ensure the task is completed by the intended recipient is to include in the Email Message a statement that clarifies who should complete the task. i.e. "A copy of this message has been sent to your manager. Managers should not click the URL above."
Flows created in v7.x and earlier with the old anon step feature will not be enhanced to include this new CC feature. In order to access these features, please redesign 7.4 and earlier anon step flows to replace the old Anonymous Step with the new Assign to Email property.
Flows created in v8.x and later with the new simple anon step will now include CC: and upon upgrade those fields will be empty.
Single Email vs. Multiple Emails
In prior releases, scenarios that required emailing multiple users (such as assigning a task to a Role that multiple Users have) would send separate emails to each user in the list. In v9.0, these scenarios and the 'cc' functions described above will trigger a single email to be sent to all intended recipients. This will provide more efficient use of system resources and speedier processing.
Template Validation
Template references used in will be automatically validated when the form/flow is first migrated from an earlier version into the v9.0 version, upon upload of a form/flow and upon saving a form/flow. If there is a previously existing typo in the control name, or if the control doesn't exist, then that template will have a validation error to alert the designer to the errors and guide the designer to correct them. Forms and flows with validation errors appear in the list of forms/flow with a pink/salmon background. This warning is non-fatal and will still allow the form/flow to run.

- Any control that has a templatized property error will show an error message below it (red text on gold background).
- Within a flow, any flow step containing a control that has a validation error (for a templatized property) will be shown in pink when not selected.
- All properties on all tabs are immediately validated when the designer opens the Properties Wizard. Any tab containing an error will be displayed in red text.

- Template validation will also apply to any templatized property that references a value to be supplied by _data. Note that any _data used on the URL at runtime is not supported (and will not validate) with this functionality because it is not known at design time, only runtime. Also be aware that if a global _data property was used in a template and then the form/flow downloaded and uploaded into another frevvo instance that does not have that _data property, a validation error will happen (most likely on save). In this situation, the designer can either ignore the error, update the default _data properties or, if the validation is for a flow/form or flow step property that prevents saving the properties, add a hidden control of the same name so that validation passes.
PDF Mapping Dialogue Improvement
Long control names and labels in the PDF Mapping Dialogue box display in truncated form, making it difficult to distinguish between similarly named controls when mapping PDFs using this method. In v9.0, hovering the cursor over the name or label in the PDF Mapping Dialogue box will display a tooltip with the full name or label visible. This feature will make it easier to distinguish between controls for mapping purposes.
Default Space
The tenant admin can set a default space by selecting from the drop down menu of spaces that have been created in Edit Tenant. Selecting a default space will cause task notification links to direct the user to the task and/or Task List rendered in the default space. If no default space is selected, Task Notifications direct user to the task/Task List in the tenant.
Expanded access to Operational Reports
By default, operational reports in a space only display if the space is accessed by the tenant administrator. Non-admin users that log into a space on a desktop will not see the links to the Operational Reports. The designer user that created the space (space owner) will see the report links but will receive an "Access Denied. Authentication required. Are you trying to access a private form or flow?" error message when they click on them.
However, tenant admins can assign other users the frevvo.Reports role which will allow them to view operational reports.
Assign frevvo.reports Role to a User:
1. Log-in to frevvo as a tenant admin (username admin@mycompany.com)
2. Click Manage Users in the menu on the left side.
3. Select a user (browse alphabetically or click All for a full list.)
4. Next to the user’s name, click Edit User
5. In the Role section, click the + to add a new role.
6. From the drop-down list, select the role frevvo.reports. Click Submit to save.
Now when the user logs in, they should see the Reports tab available on their home screen with the same report features that tenant admin users can view.
If a user with the frevvo.Reports role also has frevvo.Publisher or frevvo.ReadOnly roles assigned, the latter will take precedence and they will not see the reports tab.
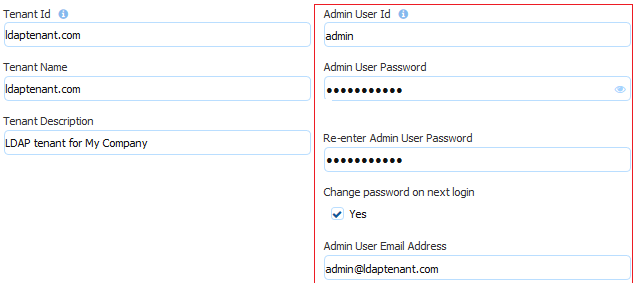
Built-in Admin for LDAP Security Manager tenants
In previous releases, the Tenant admin could login directly to frevvo or login with a user id who has been given tenant admin permissions in your Active Directory. Tenants using the LDAP(s) Security Manager now have the ability to configure a built-in Admin account. This was not possible for this Security Manager in previous releases.
When you create a new tenant, you are prompted to set up a tenant admin user id, password and email address. This tenant admin does not authenticate via your LDAP IDP. It only exists in frevvo. If you experience an issue with your LDAP configuration such that you can't login as an Active Directory authenticated user, use this built-in account to login to your tenant as a tenant admin in order to fix your configuration issue. The built-in admin is able to access the tenant admin functions if your LDAP Server should become inaccessible. Only one built-in tenant admin account is supported.
Browse this URL to login as the built-in admin: <base_URL>/frevvo/web/admin/login. The <base_URL> is typically http(s)://<your servername>:<port>. For cloud customers the <base> is always https://app.frevvo.com.
You must use the admin specific URL - <base-url>/frevvo/web/admin/login - to login as the built-in admin.
Non admin users can also login using the admin specific URL.
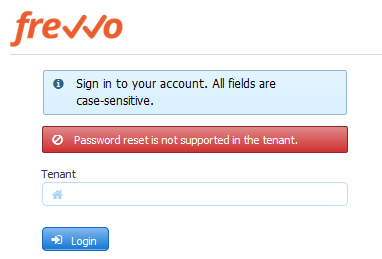
If your tenant originally used the Default Security Manager and then you changed to the LDAP Security Manager, this tenant admin account has already been setup. If you have forgotten the password, you can change it by :
Logging as your authenticated LDAP tenant admin. Click the Edit Tenant link. The Admin User information is displayed.
If logging in as the authenticated LDAP tenant admin is not possible, browse this admin specific URL - <base-url>/frevvo/web/admin/login. Enter the built-in admin userId. Click Forgot Password? Once you have changed the password, browse the admin specific URL again and login with the tenant admin user id and the new password. If you need to change the password again, or make changes to your tenant, click the Edit Tenant link. The built-in admin password can be changed on this screen.

This error message displays if any other user clicks on the Forgot Password? link after browsing the admin specific URL:
Refer to the Configuring the LDAP Security Manager for In-house and Configuring LDAP Security Manager LDAP(s) for Cloud Tenants topics for more configuration information.
Changes to the Built-in Admin for the Azure Security Manager
The built-in admin for a tenant configured with the Azure Security Manager has changed.
- You must use the admin specific URL - <base-url>/frevvo/web/admin/login - to login as the built-in admin. The <base_url> is typically http(s)://<your servername>:<port>. For cloud customers the <base_url> is always https://app.frevvo.com.
Changes to the Built-in Admin for the SAML Security Manager
The built-in admin for a tenant configured with the SAML Security Manager has changed.
- You must use the admin specific URL - <base-url>/frevvo/web/admin/login - to login as the built-in admin. The <base_URL> is typically http(s)://<your servername>:<port>. For cloud customers the <base> is always https://app.frevvo.com.
Automatic Redirect to IDP login screen for SAML tenants
Logging into a SAML or Azure tenant directly (user@saml tenant name) displayed an application error message. On-premise customers using the tomcat bundle saw this entry in the log: "Application error processing /frevvo/web/login?null java.lang.UnsupportedOperationException: null"
This behavior has changed in v9.0. Cloud customers browsing app.frevvo.com or in-house customers browsing http://<servername>:<port>/frevvo/web/login attempting to log into a SAML or Azure tenant directly (user@saml or azure tenant name) will automatically be redirected to the SAML/Azure IDP login page.
Log Message Property Names
Log Message property names that include a . (period) make it difficult to filter these messages using cloud watch filters. Properties have been renamed to include the _ (underscore) instead of the . (period) i.e. tenant.id = tenant_id. frevvo Cloud log messages now include session information such as tenant_id, subject_id, correlation_d, session_id, owner_d, application._d, and type._d (formtype or flowtype). This additional information can be extremely helpful when troubleshooting errors particularly in the frevvo cloud environment.
Uploading Form/Flow Error Messages
Error messages have been updated on the Upload Form and Upload Flow features to reinforce best practices. When uploading a form/flow with the same ID as an existing form/flow, without checking Replace, a copy will be created and the designer will see an error message: "The form/flow that was uploaded matches the id of one that already existed so a copy was made. If you intended to replace the existing form/flow, delete the form/flow you just uploaded and upload it again but check off the ‘Replace’ option."
When uploading a form/flow with Replace checked that is currently being edited by another user, the designer will see this error message: "This form/flow is currently being edited by <user@tenant>. Please try again later."
Detect/log warning message when a single .formtype file has multiple _types.xsd files
will detect a single .formtype file that references more than one _types.xsd. A Warn log entry will be added to the <frevvo-home>/tomcat/logs/frevvo.YYYY-MM-DD.log.
2019-08-12 21:50:52.028 WARN d79bcd4b-158f-4473-814e-3bc0326d9d1e mycompany 15420 --- [http-nio-8082-exec-4] c.f.f.s.a.LazyFormTypeWrapperAdapter [mycompany max] [d79bcd4b-158f-4473-814e-3bc0326d9d1e 33B5A4A956C8A2CD46FB5D3CE467D5F4] [max ] : Found multiple _types.xsd files for formtype db:/users/mycompany/max/_TPT9oSNDEeCBs_7GkFfjVg/_wjxhIJ5SEeK4jeecnc1rZQ.formtype#_wjxhIJ5SEeK4jeecnc1rZQ: [/users/mycompany/max/_TPT9oSNDEeCBs_7GkFfjVg/_nAP8ECNEEeCBs_7GkFfjVg_types.xsd, /users/mycompany/max/_TPT9oSNDEeCBs_7GkFfjVg/_wjxhIJ5SEeK4jeecnc1rZQ_types.xsd]
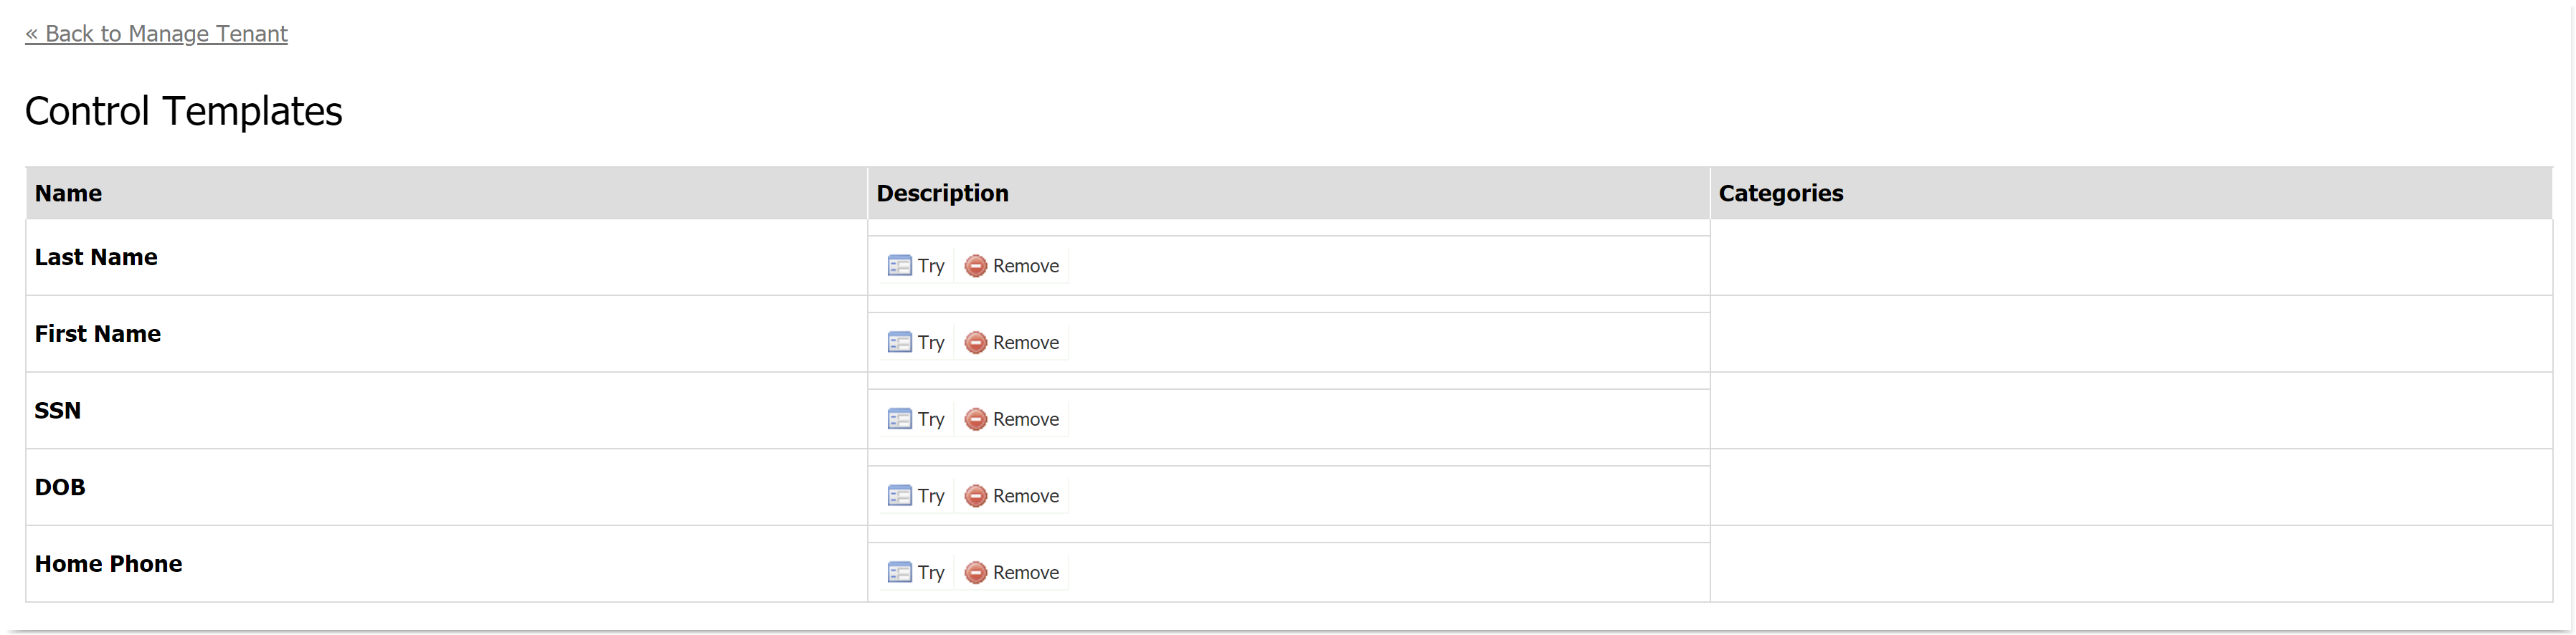
Manage Form/Flow and Control Templates Simplified
In v9.0.x you will see that the Admin Home Page Manage Form/Flow Templates and Manage Control Templates navigation menus have changed. Instead of requiring the admin to first filter by categories or tags, all templates are now displayed in a single table for convenient management.
Manage Control Templates
Manage Form/Flow Templates
Tenant/Flow admins no longer receive emails if submissions are created while the Refresh Searchable Fields process is running
The "Could not send submission for <flow name> Flow to insight server. HttpSolrClient.RemoteSolrException: Error from server at http://insight-server:8983/solr/<tenantid> missing required field: instanceid Exception is no longer logged when a submission is delayed because the batch is running at the same time. The tenant/flow admin will no longer receive emails to inform them that there was an issue with a submission. However, if an original submission could not be sent to the Insight server for some reason ( Insight server is not available or there are insufficient connections in the http connection pool), the exception will be logged and the administrators will be notified.
You May Notice...
- The Close Window Form Action wizard has been removed.
- The entire signature panel is now clickable in a Signed Section to enable the user to sign.
- Forms/Flows using the f-submit-error css class and Message controls to warn users about invalid controls are automatically hidden when the form/flow becomes valid. Refer to Invalid Form Notification for Users for an example.
Additional Information for In-House Customers
The initial release of version 9.0 will be deployed to the frevvo Cloud on August 10, 2019. Version 9.0 will be released for in-house customers on 10/16/2019. In-house customers should review the topics below, the instructions in the Upgrade Guide and Supported Platforms before migrating. It is recommended that you perform a full installation of
v9.0.0 when upgrading. Please remember that In-house customers must upgrade to JDK 11 before upgrading to
v9.0.
v9.0 License
v9 License Key Required
A v9 license key is required for this version of . Request a v9 license by completeing this form BEFORE you begin the upgrade. v7 licenses will not work.
v9.0 license required for this release. v7.0 licenses will not work (TIP-22386)
JDBC Driver Upgrade
- MySQL Connector/J 8.0 is highly recommended for use with MySQL Server 8.0, 5.7, 5.6, and 5.5. Note the difference in the driver classname:
Connector/J 5.1: driverClassName="com.mysql.jdbc.Driver"
Connector/J 8.0: driverClassName="com.mysql.cj.jdbc.Driver"
- The SQL Server JDBC Driver (mssql-jdbc-7.2.2.jre11.jar ) is included in the frevvo tomcat bundle in the <frevvo-home>\frevvo\tomcat\lib directory.
Tomcat and Insight Server version Upgrades
The version of tomcat has been upgraded to 9.0.19 in the frevvo Cloud. and in the frevvo tomcat bundle for the v9.0 release.
The version of the Insight Server has been upgraded to Solr 7.5.0 in the frevvo Cloud and in the frevvo tomcat bundle. Server functionality remains the same with the exception of the name of the directory in the tomcat bundle where Solr resides. In-house customers should review the Start the Insight server before frevvo topic for the changes.
Hardware and Memory Requirements for your frevvo Server
The minimum recommended hardware configuration for your frevvo server is:
- 2 gigahertz (GHz) 64-bit (x64) processor with 4 cores
- 5 gigabyte (GB) of system memory
- 100 GB hard drive
However you must size your hardware platform to your specific form usage characteristics. As the number of concurrent users and forms/flows increases so must the system memory. Refer to the memory configuration topic for the details.
Insight Server Memory Requirements
It may be necessary to increase heap size for the Insight server, when reporting on/indexing a large number of submissions. Refer to the memory configuration topic for the details.
Windows:
Open a command prompt. Navigate to <frevvo-home>\solr-7.5.0. Type bin\solr.cmd start to run the Insight server in the background, listening on the default port 8983.
Use the bin\solr.cmd -all command to stop all instances of the Insight Server. The -p option allows you to specify the port number for the instance you want to stop
You will see this message: "Started Solr server on port 8983. Happy searching!"
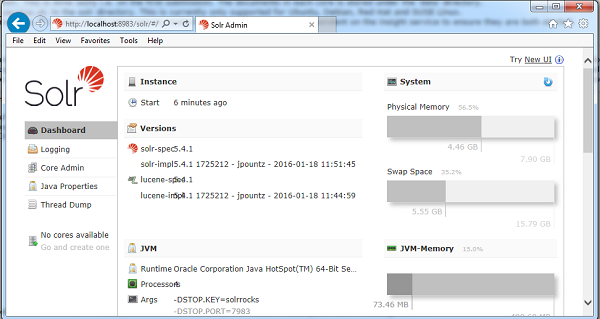
- Browse http:<your server:your port>/solr to verify the Insight server is running. The <server:port> default values are localhost:8983. Change <your server> to the server name and <your port> to the port the Insight server is running on if they are different than the defaults. Do not include the angle brackets <>. You will see the Insight server (Solr) dashboard with the current status:
If you close the Insight server (Solr) startup window, the server will stop running. Leave the window open or set up frevvo and the Insight Server to run as Windows services.
You do not have to restart the Insight server every time you restart .
Linux:
- Ensure that the scripts are executable: chmod 755 <frevvo-home>/tomcat/bin/*.sh
- Navigate to <frevvo-home>/solr-6.6.2/bin. Run this command to make the solr startup file executable: chmod +x solr
- Navigate back to the solr-6.6.2 directory.
- Start the Insight server by typing: bin/solr start - this starts the Insight server in the background, listening on the default port 8983.
- Browse http:<your server:your port>/solr to verify the Insight server is running. The <server:port> default values are localhost:8983. Change <your server> to the server name and <your port> to the port the Insight server is running on if they are different than the defaults. Do not include the angle brackets <>. You will see the Insight server (Solr) dashboard with the current status:
You do not have to restart the Insight server every time you restart .
Batch User Uploads
Uploading a CSV file to add or edit users normally runs quickly. However, if uploading a file in which the notifyIfNewUser property is TRUE for a large number of rows, this process may slow down on some email servers. Tenant Admins can configure frevvo to run CSV-file user uploads in batches to improve upload time if needed. To adjust batch load size, configure the following property in <frevvo-home>\tomcat\conf\frevvo-config.properties.
frevvo.userloader.batchSize=25
frevvo.war file
As of the v9.0.11 patch upgrade, the frevvo.war file is now shipped unpacked in the <frevvo home>\tomcat\webapps\frevvo directory. If you are working with a pre-v9.0.11 version and need to perform customization in these files, you will need to unzip your frevvo.war file to make changes, and rezip/replace it to run frevvo with your customization.
- Stop frevvo if it is running.
- Navigate to <frevvo-home>\tomcat\webapps directory.
- Copy the frevvo.war file to a temporary location of your choice: e.g. c:\tmp\frevvo-war. Change the file extension from .war to .zip if necessary. Unzip it.
- Edit the desired file.
- Save the changes to the default file.
Rezip all the files in the c:\tmp\frevvo-war directory, even the ones you did not edit — if you change directories or zip them differently, frevvo may not load correctly:
This is the correct structure for the frevvo.war zipfile.
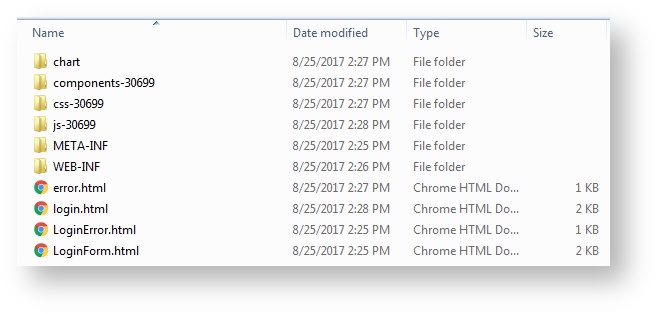
Make sure you create the zipfile with the directory structure as shown in the image above (select all files, then send to compressed folder.) It is an easy mistake to include the containing directory in the zipfile. If you do this, frevvo may not load correctly. Zip will often give your zipfile a .zip extension. Make sure you change this to a .war extension.
- Copy the updated frevvo.war file to <frevvo-home>tomcat\webapps.
Restart your frevvo server.
sameSiteCookies attribute
Recent browser versions (especially Chrome v80+), by default, allow cookies to be sent only with top-level navigation and GET request initiated by third party websites. When you need to expose cookies to a third party site, such as using the SAML security manager or embedding in an iframe, you need to use https (Chrome only) and explicitly set the samesite attribute of the cookie to "none". frevvo v9.0.10+ includes a tomcat upgrade that allows configuring the cookie processor with this attribute.
For third party access, you must use https and update the provided tomcat/conf/context.xml CookieProcessor element to add the sameSiteCookies attribute.
<CookieProcessor className="org.apache.tomcat.util.http.LegacyCookieProcessor" allowEqualsInValue="true" sameSiteCookies="none"/>
On premise customers who do not want to make these updates need to turn on the legacy behavior in the chrome browser. Please see this Chrome documentation for details.