frevvo Latest - This documentation is for frevvo v10.3. v10.3 is a Cloud Only release. Not for you? Earlier documentation is available too.
Form and Doc Actions
Wizards make it easier to configure what happens to the data when a user submits your form and what the users see after submitting the form. Configure Form Actions (what the user sees) and Document Actions (what happens to my data) on the associated tabs in the Settings wizard.

- Form and Document Actions functions for workflows are very similar to those for forms. The term "Form Actions" used on this page also refers to "Workflow Actions".
- Forward to PayPal is not available in workflows, but can be configured following this documentation.
- Document Actions that happen in between steps are known as Activity Doc Actions. See the Email & Webhook documentation for details.
Form/Workflow Actions
The Form/Workflow Action wizards help set up what the user sees when the form/workflow is submitted. You can access the Form/Workflow Action tab in the Guided Designer Settings mode.
The wizards help guide you through the configuration process. Many of the wizards allow you to use form controls as templates to dynamically personalize what the user sees. See the section on Using Templates for full details. Hover over any field in the wizards for a helpful hint.
You can only configure one Form action for a form/workflow. This is as designed.
Success
The Form Actions available on the Success tab are:
Display Message when User Submits Form
Forward users to a web page of your choice
Post data and forward users to your web page
Forward to Paypal to complete payment

Display Message when User Submits Form
After the user submits the form/workflow, the browser will display a standard frevvo page with a text message. For example, the message might say, “Thank you for completing our form.” You supply the specific text in the Message field. This option works best for relatively brief messages. It can be tricky to enter or edit large amounts of text in the wizard's Message field, so for verbose messages consider creating a simple HTML page for your message and choosing the Forward User to your Web Page wizard.

The message can be customized, using the wizard's control dropdown, with values the user enters into the form. For example, if your form contains fields named firstName and lastName, you can set your message to "Thank you {firstName} {lastName}". Now when a user submits the form the controls templates {firstName} and {lastName} will automatically be replaced with field values "Thank you Joe Smith". See Using Templates for full details.
Another useful message is to display a link back to the form. For example the display message:
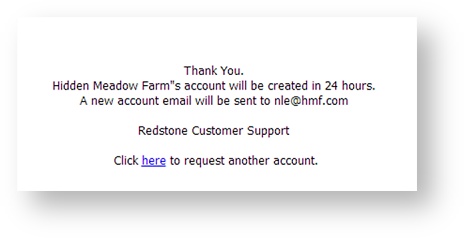
The display message would be written as follows. The URL back to the form is the share dialog Raw Form link.
Thank You!<br/><br/>
{Company}'s account will be created within 24 hours.<br/>
A "A New Account" email will be sent to {Email}.<br/><br/>
<i>RedStone Customer Support</i><br/><br/>
Click <a href="http://test.frevvo.com/frevvo/web/tn/redstone/user/designer/app/_OLlAYUouEd-0jOS-XMShUg/formtype/_YRsQYEyBEd-OltN4g8wchQ?_method=post &embed=true&locale=">here</a> to request another demo account
The form/workflow URL in the above HTML example can be constructed dynamically in a business rule. See this rule example.
Javascript is not allowed in the display message. Plain text, HTML, and control templates are allowed. Anything else will break the message and nothing will be displayed.
Show In
Both the display message wizard and the forward to web page wizard allow you to select where the message is displayed on the page using the "Show In" dropdown. There are three choices: Frame, Parent and Top. This tells the browser where to show the text (if you chose Display Message) or the new Web page (if you chose the Forward to Web Page).
- Frame means inside the form's iframe
- Parent means inside the form iframe’s immediate parent
- Top means at the top of the page, regardless of how many parents are outside the iframe.
Forward Users to a web page of your choice
After the user submits the form/workflow, the browser will be redirected to another URL, which you supply in the URL field. You must include the http:// prefix (e.g., http://myhost.com/thankyou.html). The project can have a Form Action Base URL which you set in the project properties. For example, you can have http://myhost.com/ in the project baseURL and simply “thankyou.html” in the Form Action URL field.
You can use a form/workflow field template in the URL field. Ex: http://localhost:8082/{URL!encode=false}. The encode=false template parameter is important to avoid mangling the URL. See Templatized String Parameters for details.

Show In
These are the same options as described under the display message wizard above. Unless you have created a special page that you know will fit correctly within the form’s iframe you should not choose iframe. Choose the Parent or Top option instead.
Forwarding users to a web page that is located in a different domain will not work.
Forward to another Form
You can forward the user from one frevvo form to another by specifying the raw URL of the second form in one of the Form Action wizards in the first form. When the user clicks Submit on the first form, you can choose to:
- Display the second form with data passed from the first form - use the Post data and forward users to your web page wizard.
- Display the next form without the data - use the Forward users to a web page of your choice wizard.
Suppose you have two forms in your project. One named ''formA'' and the other named ''formB''. When the user clicks the submit button on formA you want them to see formB next.
- Edit formA
- Select the Settings mode.
- Select the Form Actions tab.
- Select the Forward users to a web page of your choice
- Enter the raw form URL for formB in the URL property field.
- Click Submit then save the form.
- Browse the URL for formA, click Submit. formB displays.
The raw form link URL can be found by clicking  Share for formB on the Forms and Workflows Home Page.
Here is an example of a formB's raw form URL:
https://<your server>:<your port>/frevvo/web/tn/<your tenant name>/u/60b97620-6e5b-4d97-a93e-6b81e803a671/app/_mzwYwGMrEeeemceeobqUCg/formtype/_6NZG8GMrEeeemceeobqUCg?_method=post&embed=true
For portability, we recommend you use relative URLs such as:
//frevvo/web/tn/<your tenant name>/user/app/_uJKtwbesEduG2Me8fheS4Q/formtype/_18go4Lx7EduG2Me8fheS4Q?_method=POST&embed=true
Post Data and forward users to your web page
After the user submits the form, the browser will POST the user’s data to the URL you specify in the wizard’s URL field and display whatever is returned—the next page to display.
Fill in the Post Submission to your Application wizard with the following information:
- Enter the URL to the application where you want to post data:
- Your URL field must include the http:// prefix (e.g., http://myhost.com/services/processPayment). The project can have a Form Action Base URL which you set in the project properties. For example, you can have http://myhost.com/services/ in the project baseURL and simply “processPayment” in the Form Action URL field.
- The URL can also include control templates. This can be useful when you wish to specify a production versus a test server. For example: http://{serverURL}/services/processPayment/{customerId}. Using this form URL, you can specify serverURL using &_data=(serverURL:'testhost'). This makes switching from a test server to a production server a matter of setting the form URL parameter "serverURL" rather than editing the form itself. See Initializing Forms with Data for more details on _data usage.
- You can use a form field template in the URL field. The encode=false template parameter is important to avoid mangling the URL. See Templatized String Parameters for details.
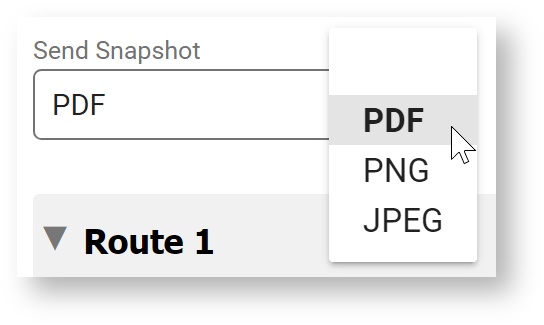
- Send the data as a PDF attachment or other image type using the Send Snapshot dropdown. The image type options are PDF, PNG or JPG. Select the blank option from the dropdown to exclude this attachment in the submission.
- Attach an XML data document using the Data checkbox. This checkbox is checked by default. Uncheck it to exclude the XML data document in the submission.
- Attachments uploaded to your form/workflow are included if the Attachments checkbox is checked. This checkbox is checked by default. Uncheck it to exclude attachments in the submission.
If you have Pixel Perfect mapped PDFs (ex: W-4, I-9 etc…) associated with your forms/workflows, choose the action you want to take from the Send Generated PDF Forms control:
• Check All to send all the mapped PDFs. This is the default value.
• Check None to send none of the mapped PDFs
• Check Select to display a list of all the mapped PDFs associated with your form/workflow. Click the ones you want to be part of the submission. Click again to deselect.- POST responses must be displayed in the frevvo form frame.

Forwarding users to a web page that is located in a different domain will not work.
Passing Data from One Form to Another
If formA and formB both contain the same data source, and the Form Action in form A is set to '''Post''' to the raw form Url of form B, then form B's fields from schema will be initialized with the values entered into form 1. Follow these steps:
- Create formA and formB from the same schema.
- Edit formA
- Select the Settings mode.
- Select the Form Actions tab.
- Select the Post data and forward users to your web page wizard.
Enter the raw form link for formB in the URL property of the wizard. Here is an example of the raw link share URL
http://<your server>:<your port>/frevvo/web/tn/<your tenant name>/user/max/app/_mzwYwGMrEeeemceeobqUCg/formtype/_6NZG8GMrEeeemceeobqUCg?_method=post&embed=true
Remember, you can use a relative URL if you are concerned with portability.
//frevvo/web/tn/<your tenant name>/user/max/app/_mzwYwGMrEeeemceeobqUCg/formtype/_6NZG8GMrEeeemceeobqUCg?_method=post&embed=true
- Test formA by filling in the fields and clicking Submit. formB displays with the fields populated with the data in formA.

Using Templates
Fields in form B can also be initialized with data from form A using Url Parameters. Imagine form A contains a from palette text control labeled 'Customer Name' with Name property set to 'custName'. And form B has a palette text control labeled 'Full Name' with Name property set to 'fname'. Using either Form Action Forward to Webpage or Post with the URL set to that of Form B, append &_data=(fname:'{custName}') and when form B loads it's 'Full Name' field will be set to the value entered into form A's 'Customer Name' field.
See initializing via _data Url Parameters in the Initializing Forms with Data section for more details on using _data.
Forward to Paypal to complete payment
When the form is submitted, users will be forwarded to Paypal to complete payment. This multi-step wizard guides you through configuration:
- Paypal account login
- Paypal invoice description based on form values
- Paypal payment amount from form values
and more...

Paypal for Workflows
Workflows do not have a corresponding "Forward to PayPal to complete Payment" action. However, you can configure either the Workflow Action: Forward users to a webpage of your choice or a link control in an individual step to connect to PayPal from a workflow.
Replace the values in the <> brackets in the examples with your values. (These parameters are explained below.) You can also substitute the value of a form control in the below URLs using templates, for example: to use a control named "amount" in the URL, configure it as:
&amount={amount}
PayPal Sandbox: https://www.sandbox.paypal.com/cgi-bin/webscr?cmd=_xclick&business=<Paypal business name>&amount=<Payment amount>&item_name=<Payment Description>¤cy_code=<Currency Code>&return=<Return URL>&cancel_return=<Cancel URL>&custom=<Custom Value>&invoice=<Invoice Value>¬ify_url=<Notification Url>
Production: https://www.paypal.com/webscr/webscr?cmd=_xclick&business=<Paypal business name>&amount=<Payment amount>&item_name=<Payment Description>¤cy_code=<Currency Code>&return=<Return URL>&cancel_return=<Cancel URL>&custom=<Custom Value>&invoice=<Invoice Value>¬ify_url=<Notification URL>
URL Parameters
Paypal business name: Paypal business name. Typically, this is the email address you use to sign in to Paypal.
Payment amount: The payment amount.
Payment Description: The payment description is what your users will see when paying.
Currency Code: The currency code used in payment. Example: USD, CAD, INR
Return URL: A user will be redirected to this page after payment is complete. If you leave this blank, users will be redirected to a standard platform URL.
Cancel URL: A user will be redirected to this page if payment is cancelled. If you leave this blank, users will be redirected to a standard platform URL.
Custom Value: PayPal will return this custom value in the IPN as well as the acknowledgement email.
Invoice Value: PayPal will return this invoice value (such as an Invoice Number) in the IPN as well as the acknowledgement email.
Notification URL: A notification URL. If you enter a URL here, PayPal will notify you using Instant Payment Notification. Please see the PayPal documentation for details.
Workflow Action: Forward Users to a Webpage of Your Choice
Open the workflow properties, and select the Workflow Actions tab. Click the Forward Users to a webpage of your choice radio button. Add the URL (configured like this example) to the URL field. After the last step is submitted, the user will be redirected to PayPal for payment processing.
This example uses the raw share link for the workflow in the &return= and &cancel_return= URLs. These will redirect the user to a new instance of the workflow.
Individual Step
If you need PayPal integration in specific step of a workflow, add a link control in that step with above URL and set return URL pointing back to current step of the workflow using built-in data. They can then submit the step and the workflow will continue as designed.
Error
These wizards optionally allow you to customize what the user sees if an error occurs. You can either display a message or forward users to a web page of your choice. The wizards behave exactly like the corresponding Form Action wizards above. The Display message can be customized to display the actual error that occurred by adding the special {_frevvo_root_cause_msg} template to your message text. This is helpful for debugging, especially if your are using frevvo Online.
Display Message if an error occurs

Forward users to an error page of your choice

Document Actions
The document action wizards configure what happens to the entered data when a user submits your form/workflow. You can access the Document Actions tab in the Guided Designer Settings mode.

The wizards help guide you through the configuration process. Many of the wizards allow you to use form controls as templates for dynamic behavior. See the section on UsingTemplatesinForm/Doc/ErrorActions for full details. Hover over any field in the wizards for a helpful hint.
See DocURIWizards below for details on using the wizards to configure doc URI settings. Please also refer to the processing submissions tutorial.
This wizard has three tabs as shown in the screen image below:
- Send Documents
- Send Data
- Additional Email

Send Documents
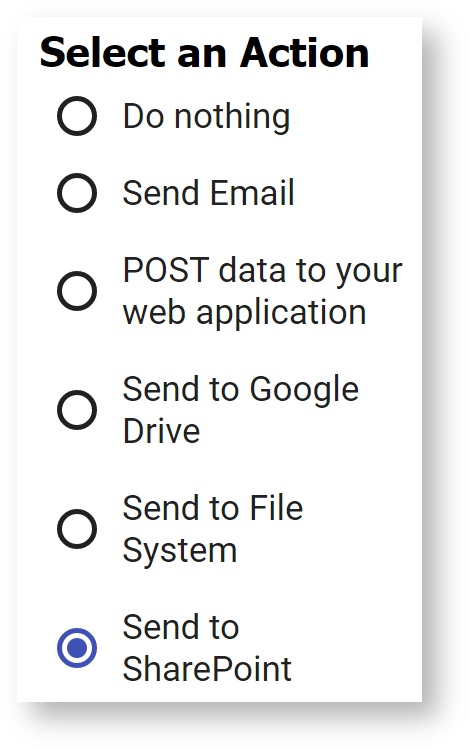
Using this wizard you can:
- Do nothing with the data
- Email the data to an email address
- Post the form data to your web application
- Save the data to a Google Document
- Save the frevvo submissions to a local or remote filesystem using the Filesystem connector.
- Save submissions to a SharePoint site
- Save submissions to an External System such as Docuware
The wizards help guide you through connecting your forms/workflows to various destinations. Many of the wizards allow you to use form controls as templates to dynamically configure wizard parameters. For example, you can dynamically set the email address to send the data to instead of hard coding an email address. See the section on Using Templates for full details.
Doc action wizards are single select. If you set up one of the wizards then configure an action using a second wizard, the information configured on the first wizard will no longer display. This is as designed.
Let's say you want to send an email after your form/workflow is submitted but you are also using the Filesystem connector to save your submissions to a directory on a local server. You configure the Filesystem connector wizard to do this. Then your configure the Email data to a specified address wizard to send the email. If you return to the Filesystem connector wizard, after configuring the email wizard, the information that you entered on the Filesystem connector screens will no longer display. In this situation, you can use the email wizard on the AdditionalEmailWizard tab to configure your email
Do Nothing
This is the default option, which simply stores the data in frevvo's submissions repository. (The other options also store the data in the repository but provide additional functionality.)
Do nothing is typically selected when you plan to do one or more of the following:
- View the submissions using the submission repository.
- SaveSubmissiontoGoogleSpreadsheet.
- Save submissions to your own database or other backend system using ManuallysetDocumentURIs
- Use the form action wizard to PostDatathenForwardtoWebPage
Send Email
When the form/workflow is submitted, frevvo will send an email message with the following selectable options attached. These include submission data, an XML document, an image of the filled form/workflow, attachments uploaded to the form/workflow, and any, all, or none of the Generated Forms (mapped PDFs) associated with your form/workflow.

Fill in the Send Email wizard with the following information:
Enter destination email addresses in the To: Reply to: Cc;, Bcc: fields. The email can be sent to multiple addresses separated by a comma or a semicolon. The "To:" email address is required. All other email fields are optional.
The tenant admin can configure the from email address on the tenant admin's Edit Tenant page. If you want an email to show a different From:address than what is configured on the Edit Tenant page, enter that address in the From: field. You can enter a static address or use templates to make the address dynamic. The From address replaces the default no-reply@… , an address configured on the Edit Tenant screen or any settings in web.xml or frevvo.xml config files for In-house customers.
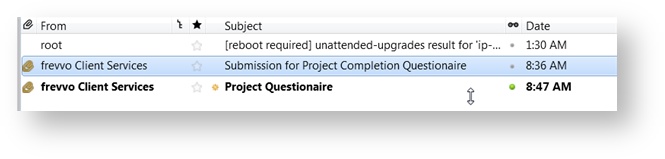
You can even use the standard internet address convention, for example: From: frevvo Client Services <services@frevvo.com>, so that your emails appear in people's inboxes looking like this:
- Customize the email body and Subject text in the Message field. You can use HTML and templates.
- Send the form/workflow data as a PDF attachment or other image type using the Send Snapshot dropdown. The image type options are PDF, PNG or JPG. Select the blank option from the dropdown to exclude this attachment in the submission.
- Attach an XML data document using the Data checkbox. This checkbox is checked by default. Uncheck it to exclude the XML data document in the email.
- Files uploaded to your form/workflow are included if the Attachments checkbox is checked. This checkbox is checked by default. Uncheck it to exclude attachments in the submission.
If you have Pixel Perfect mapped PDFs (ex: W-4, I-9 etc…) associated with your forms/workflows, choose the action you want to take from the Send Generated PDF Forms control,
Check All to send all the mapped PDFs. This is the default value.
Check None to send none of the mapped PDFs
Check Select to display a list of all the mapped PDFs associated with your form/workflow. Click the ones you want to be part of the submission. Click again to deselect.
Email attachment size
The frevvo Cloud server limits email attachment size to 25MB and the total email size to 30 MB. If your uploads or mapped PDFs are larger than this, the email will fail to send. To prevent this, limit the Upload control max size and/or min # properties in your form
The built-in PDF Snapshot will automatically be optimized to a smaller size if it contains images or other large data.
See Email Integration for further details.
POST data to your web application
When the form is submitted, frevvo POSTs the document set to the specified URI and ignores any returned XHTML or redirect. This option may be used for the additional processing of data. Use PostDatathenForwardtoWebPage if you want to both submit data to your URI and forward to a web page or display returned XHTML.

Fill in the Post Data to your web application wizard with the following information:
- Enter the URL to the application where you want to post data:
- Your URL field must include the http:// prefix (e.g., http://myhost.com/services/processPayment). The project can have a Form Action Base URL which you set in the project properties. For example, you can have http://myhost.com/services/ in the project baseURL and simply “processPayment” in the Form Action URL field.
- The URL can also include control templates. This can be useful when you wish to specify a production versus a test server. For example: http://{serverURL}/services/processPayment/{customerId}. Using this form URL, you can specify serverURL using &_data=(serverURL:'testhost'). This makes switching from a test server to a production server a matter of setting the form URL parameter "serverURL" rather than editing the form itself. See Initializing Forms with Data for more details on _data usage.
- You can use a form field template in the URL field. The encode=false template parameter is important to avoid mangling the URL. See Templatized String Parameters for details.
- Send the data as a PDF attachment or other image type using the Send Snapshot dropdown. The image choices are PDF, PNG and JPG. Select the blank option from the dropdown to exclude this attachment in the submission.
- Attach an XML data document using the Data checkbox. This checkbox is checked by default. Uncheck it to exclude the XML data document in the submission.
- Attachments uploaded to your form/workflow are included if the Attachment checkbox is checked. This checkbox is checked by default. Uncheck it to exclude attachments in the submission.
If you have Pixel Perfect mapped PDFs (ex: W-4, I-9 etc…) associated with your forms/workflows, choose the action you want to take from the Send Generated PDF Forms control :
•Check All to send all the mapped PDFs. This is the default value.
•Check None to send none of the mapped PDFs
•Check Select to display a list of all the mapped PDFs associated with your form/workflow. Click the ones you want to be part of the submission. Click again to deselect.
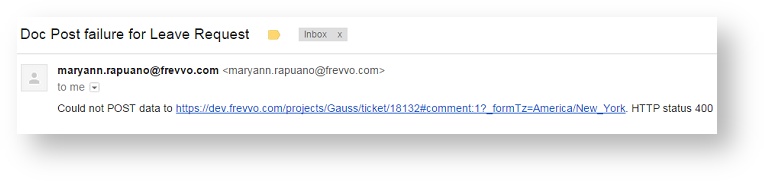
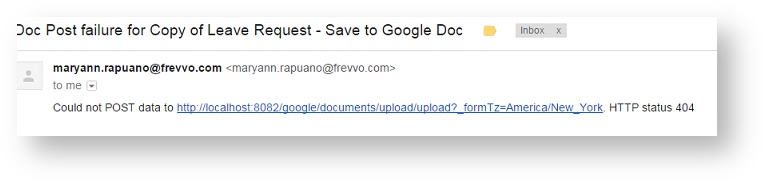
If a form is configured to Post Data to a web application and it does not reach it's intended destination successfully, frevvo notifies the tenant admin of the failure via an email. If there are users given the workflow admin permission for the workflow, they will receive the email instead of the tenant admin.
Send to Google Drive
The Send to Google Drive wizard steps you through the process of saving your documents to Google Drive.
- In Google Drive, create a parent folder that will hold all the submissions for this form/workflow.
- Log into your frevvo tenant as a designer user.
- Edit your form/workflow and go to the Settings editing mode.
- Click the Document Actions tab. Select Send to Google Drive on the Send Documents tab.
- In the wizard that appears, enter your credentials (see above for how to get an access token). Note that the email field is optional and intended only to describe which account is associated with the access token. This email does not validate against the token provided.

- Select the parent folder you created earlier in Step 1.
For the Submission folder, you may enter a fixed value (not recommended) or use a template. In this case, we have chosen the StudentsName control. For example, if you enter John Adams in the Student Name control, the submission documents will be stored in a subfolder called JohnAdams.
Do not use apostrophes in your Submissions Folder name or template, as this can cause a submission failure. To ensure templates are valid, you can set a pattern on the control(s) you are using as template(s), or write a business rule to remove apostrophes in those control(s).
- Do not use spaces or special characters when creating submission folder names.
- If you want to save a pdf of your form/workflow to the Google folder, make sure you have Save PDF checked. An optional field that is used to name the pdfs displays. You can use templates in this field. For example, if you have a control called EmployeeName in your form, you can type {EmployeeName} into the PDF Name field and the pdf's in the Google folder will be named {EmployeeName}.pdf
- If a form/workflow does not reach the specified folder in your Google drive successfully, frevvo notifies the tenant admin of the failure via an email. If workflow administrator(s) are configured, the workflow admin(s) receive the email instead of the tenant admin.
See Google Connector for full details.
Send to File System
The Save to Filesystem wizard is used to connect forms/workflows to the frevvo Filesystem Connector. The connector saves submissions in a specified location and can be configured to create metadata files for importing your submissions into a document Management system.
Saving files to a local or remote location is easily done with the Save to File System wizard if generating metadata is not required. Let's begin with a very simple example. Here are the requirements: You have created a small form that has a Name, Address, City, State and Zip Code fields. A mapped W - 4 PDF is included in the form. The Save PDF property is selected and the PDF Name property is configured with the template {Name}. Follow these steps to fulfill the requirements by using the doc action Send to Filesystem wizard To fulfill the requirements listed above, we only need to fill in the URL, Submission Directory and File sections of the wizard. Here is an explanation of the fields: The URL: this is the URL to the location where you installed the Filesystem Connector. Be sure to include the /filesystem/submission in the URL after you change the server and port. In-house: The location of the Filesystem connector is set for the installation using the frevvo.filesystem.connector.url parameter in the <frevvo-home>\tomcat\conf\frevvo-config.properties file. It defaults to http://localhost:8082/filesystem in the tomcat build. The <localhost:8082> in the default URL can be changed to the <server:port> where you installed the Filesystem connector in your environment. This is a required field. The value entered here overrides the value in the frevvo-config.properties file.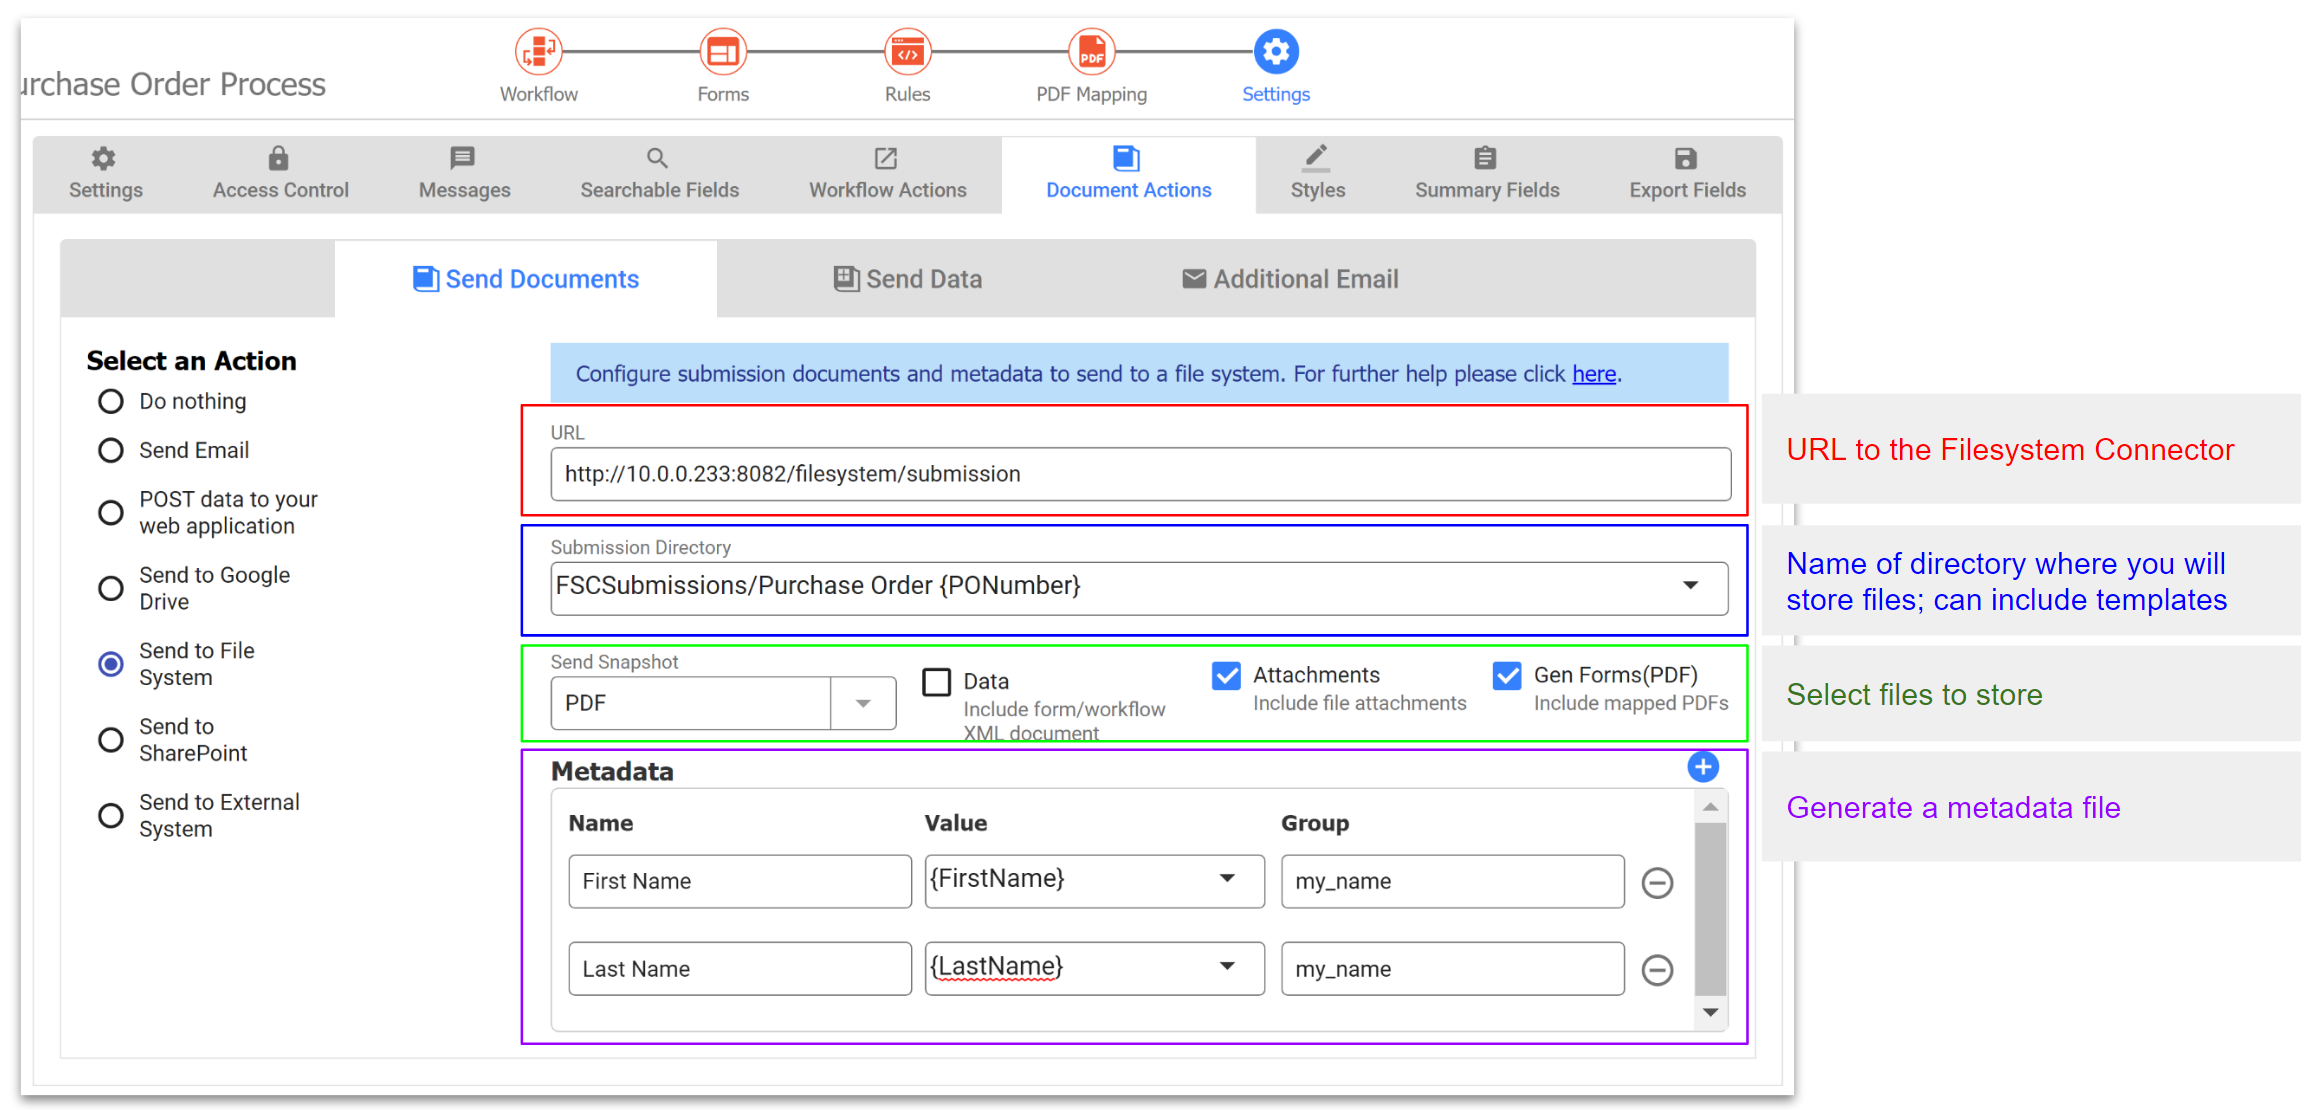
 Save the form.
 Save and Test), filling in the form and clicking submit.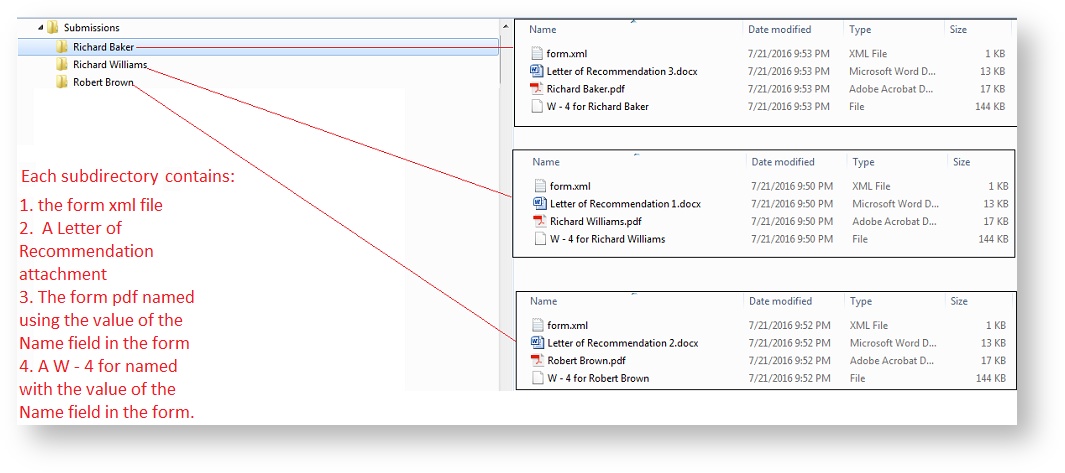
Refer to the Filesystem Connector chapter for the installation and configuration details plus information about using the Save to File System wizard and generating metadata.
Send to SharePoint
Connecting your forms/workflows to your SharePoint site is easy with the Save to SharePoint wizard. Your tenant must be configured for SharePoint in order for this wizard to display.
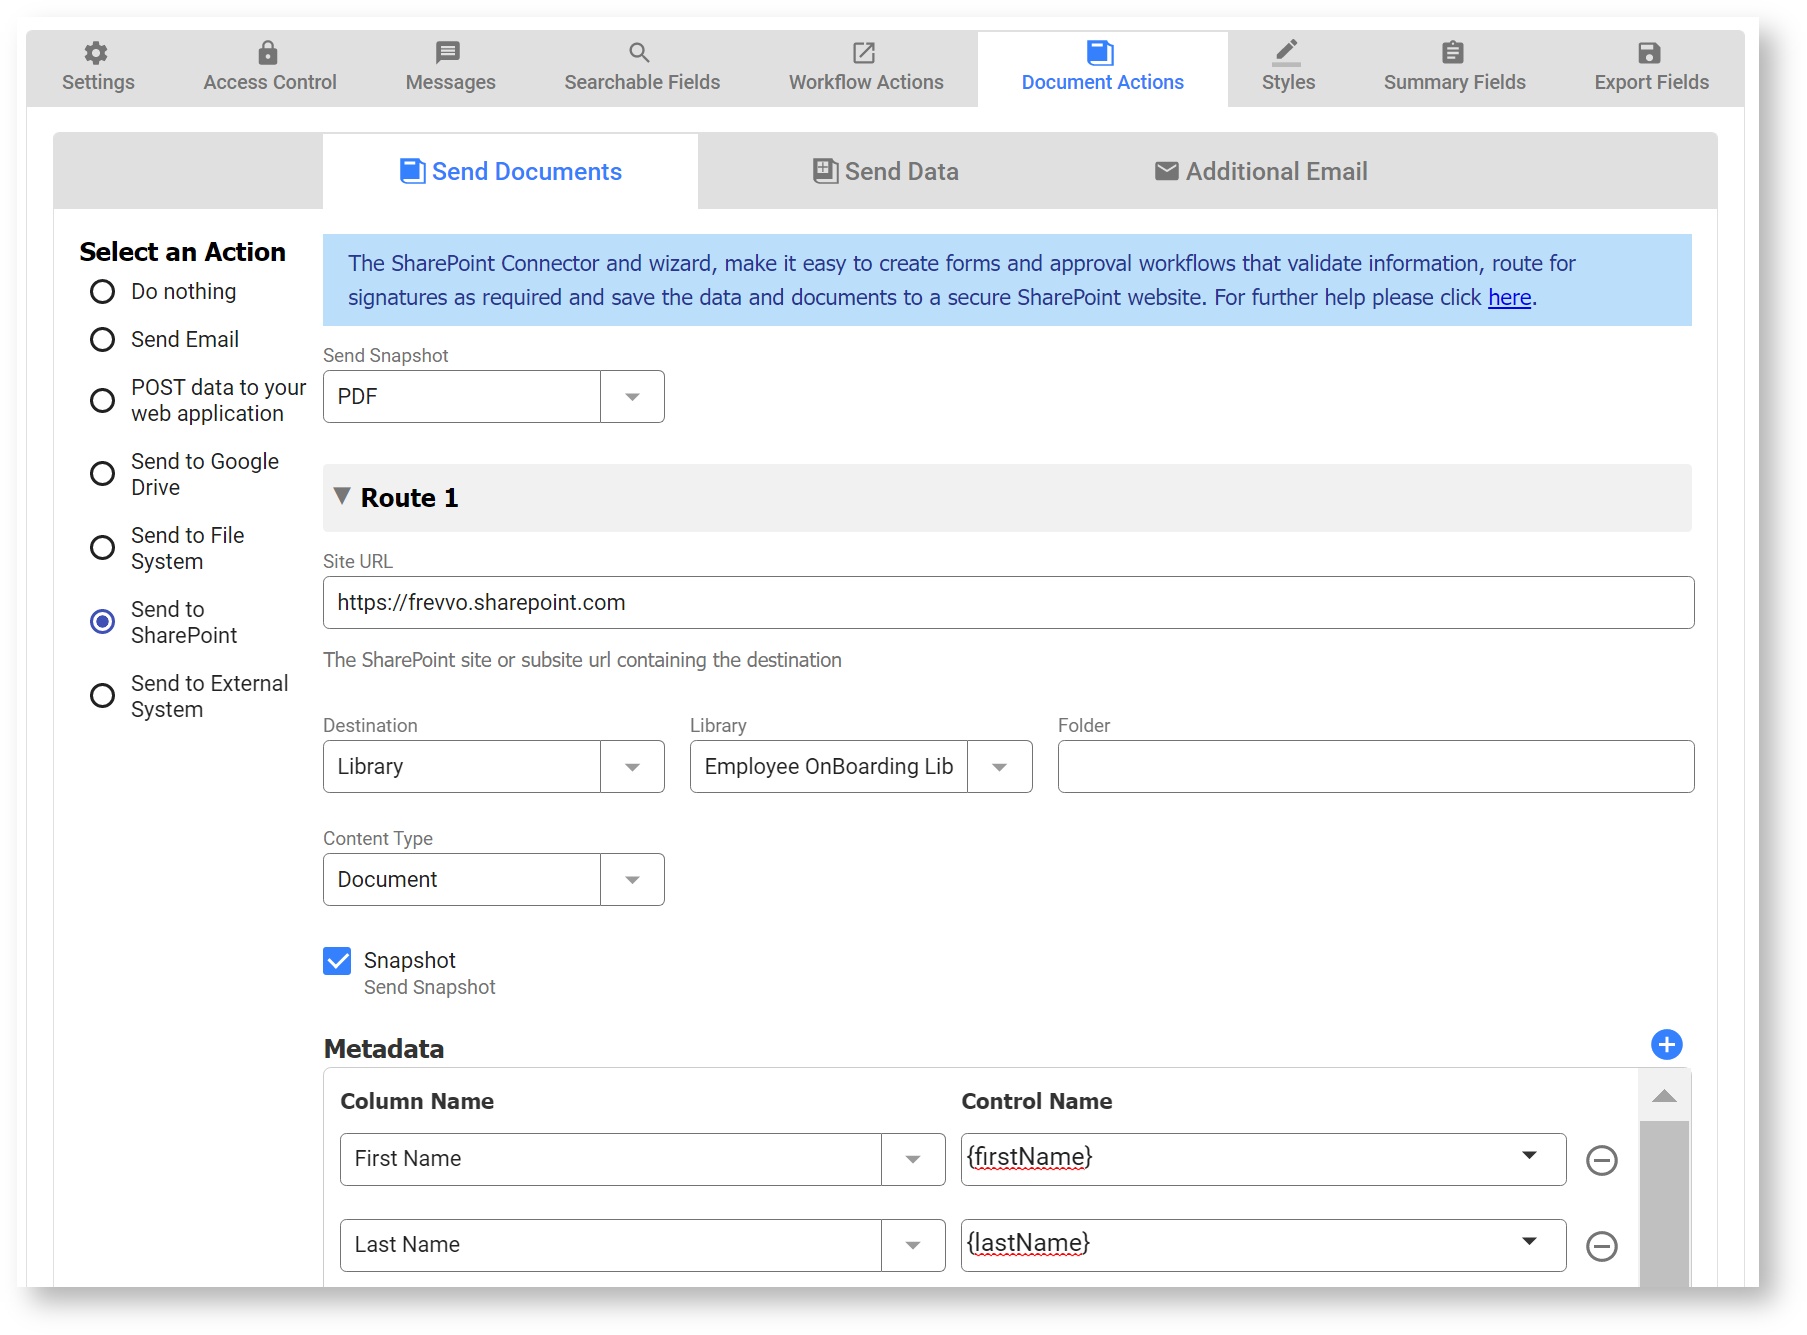
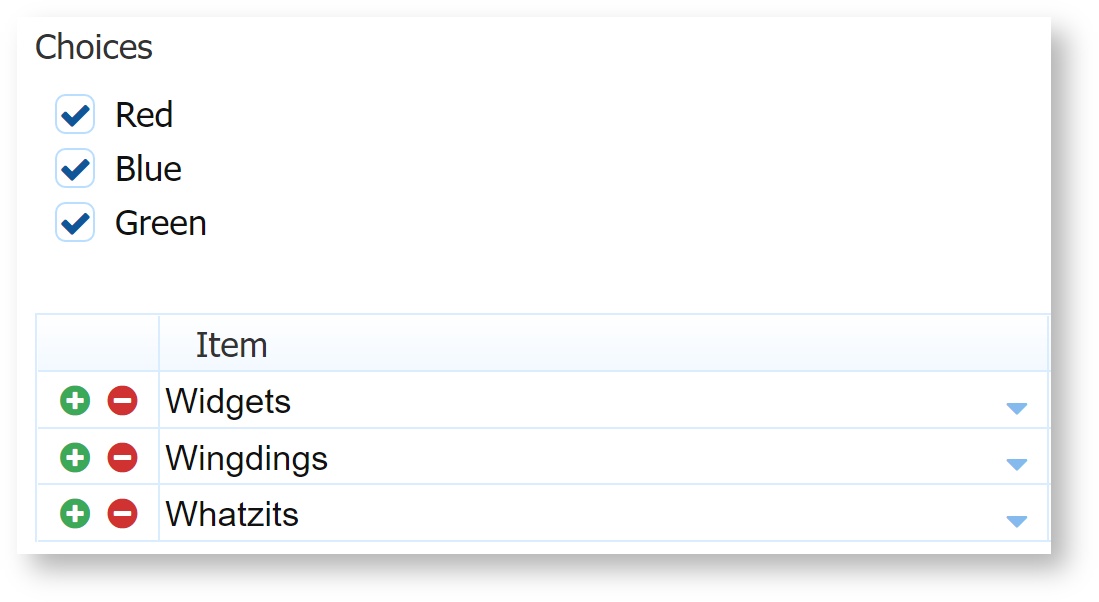
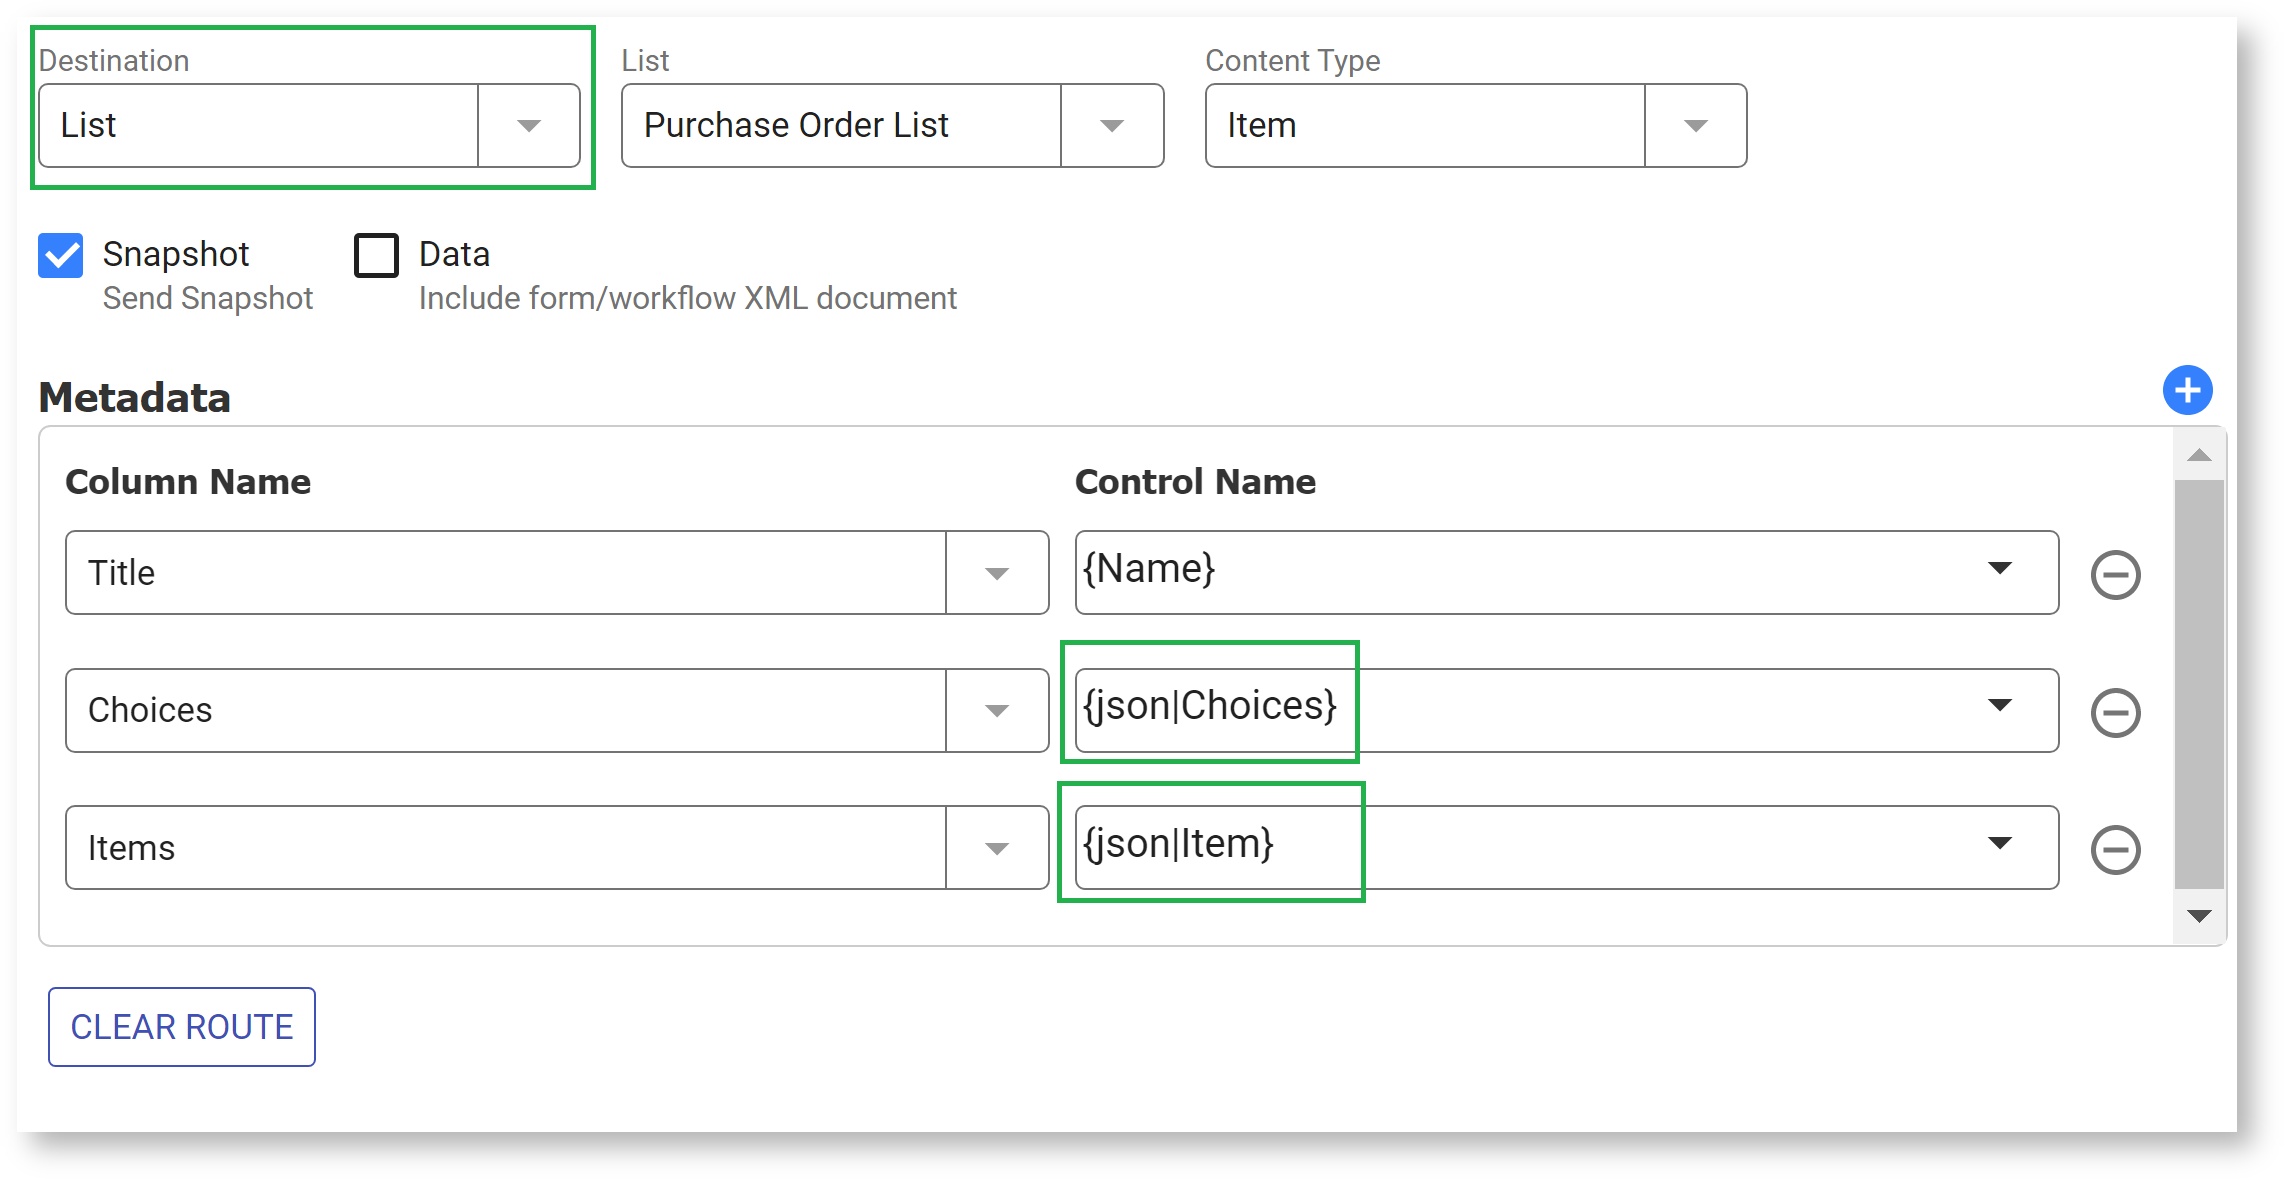
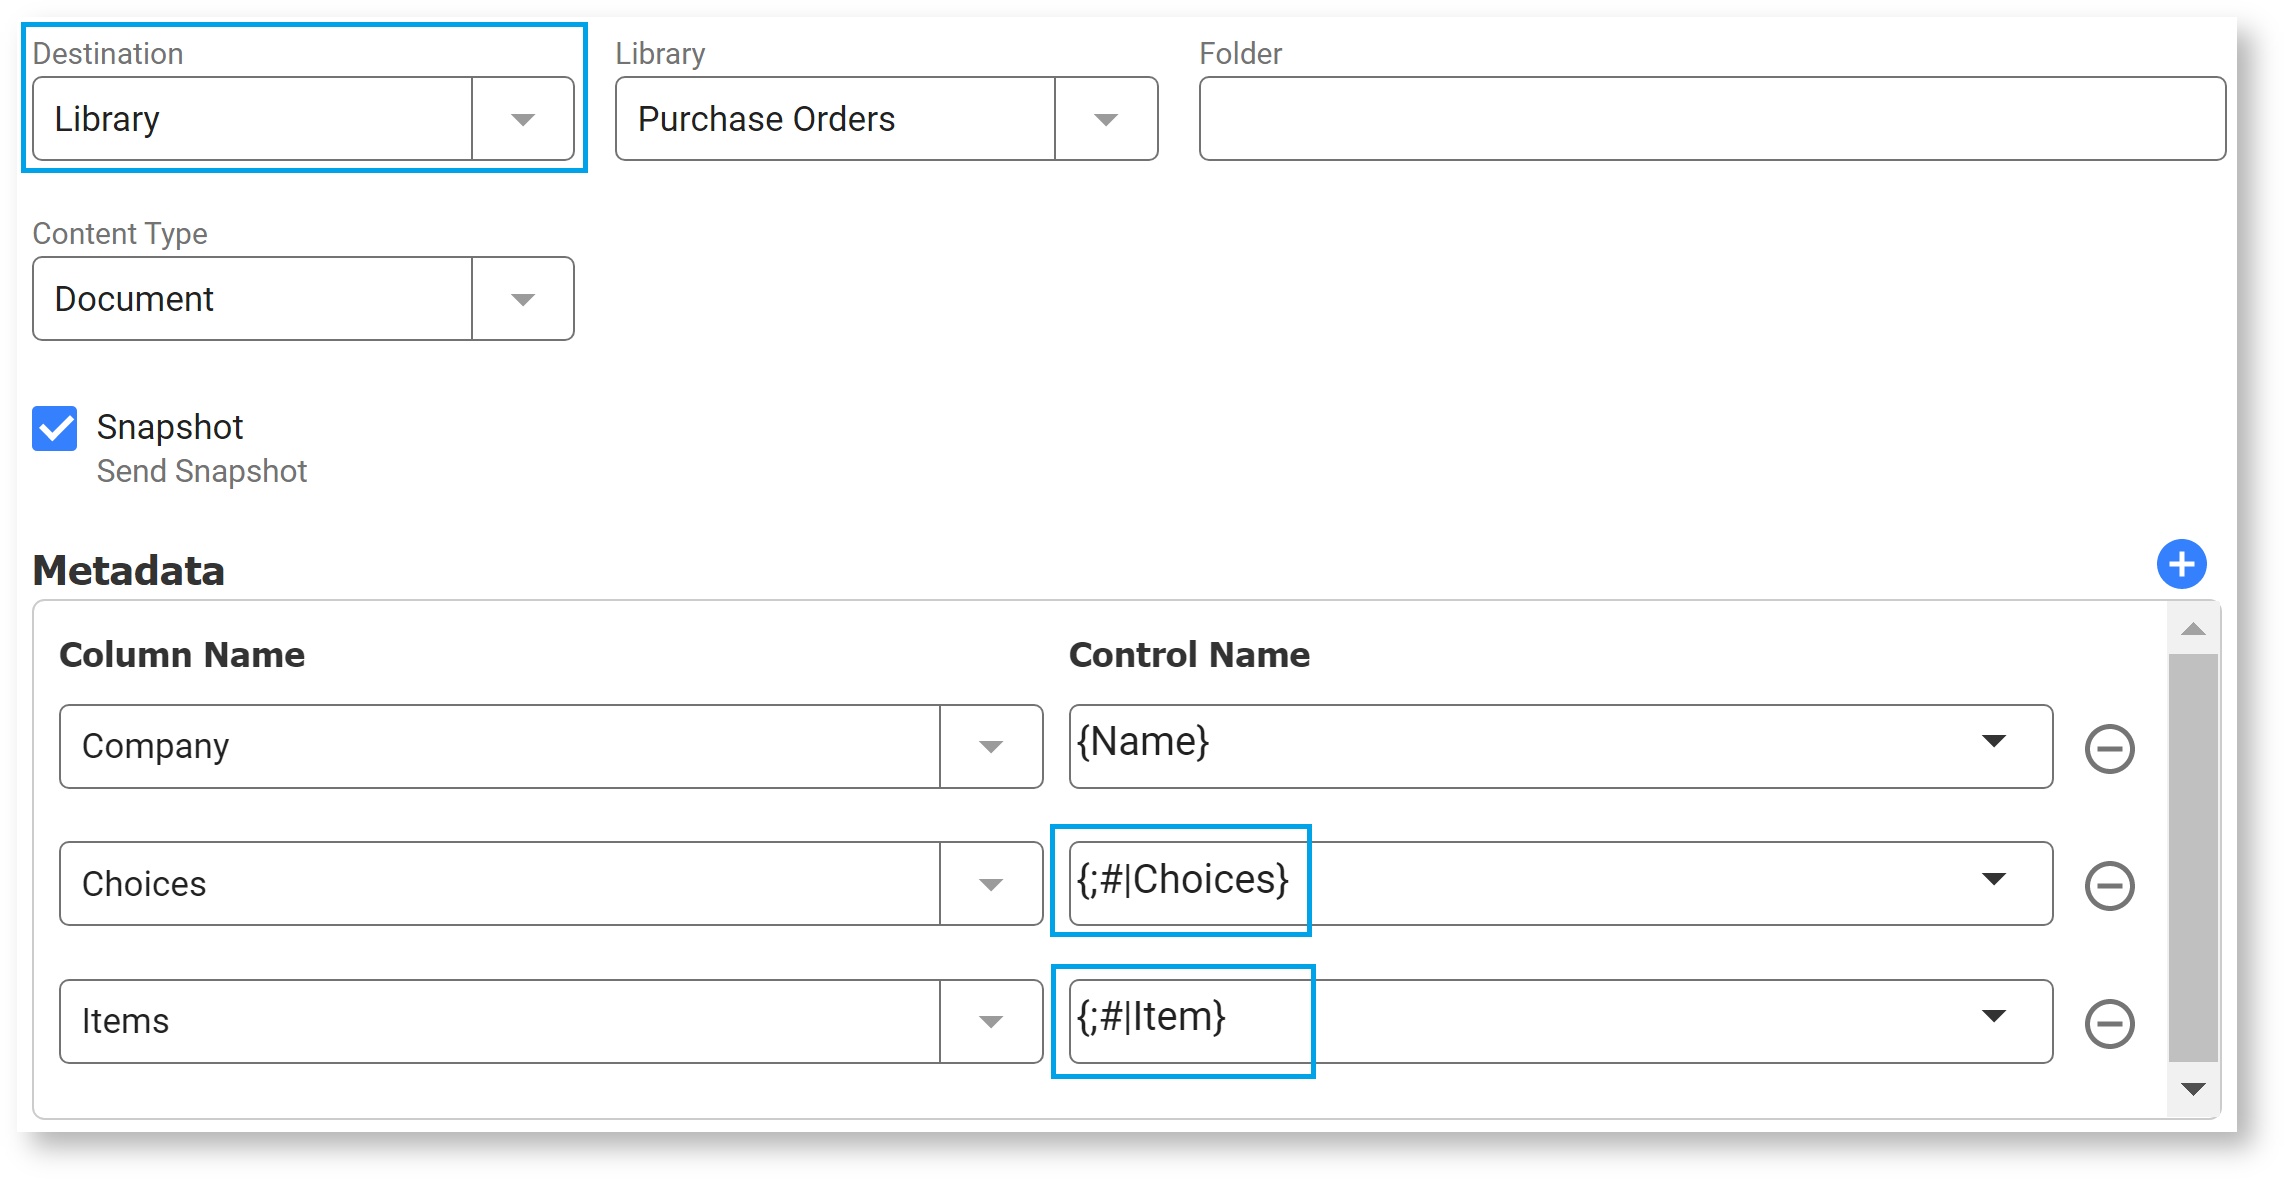
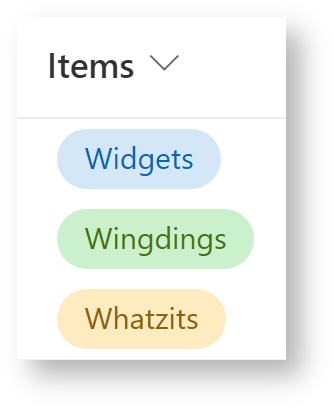
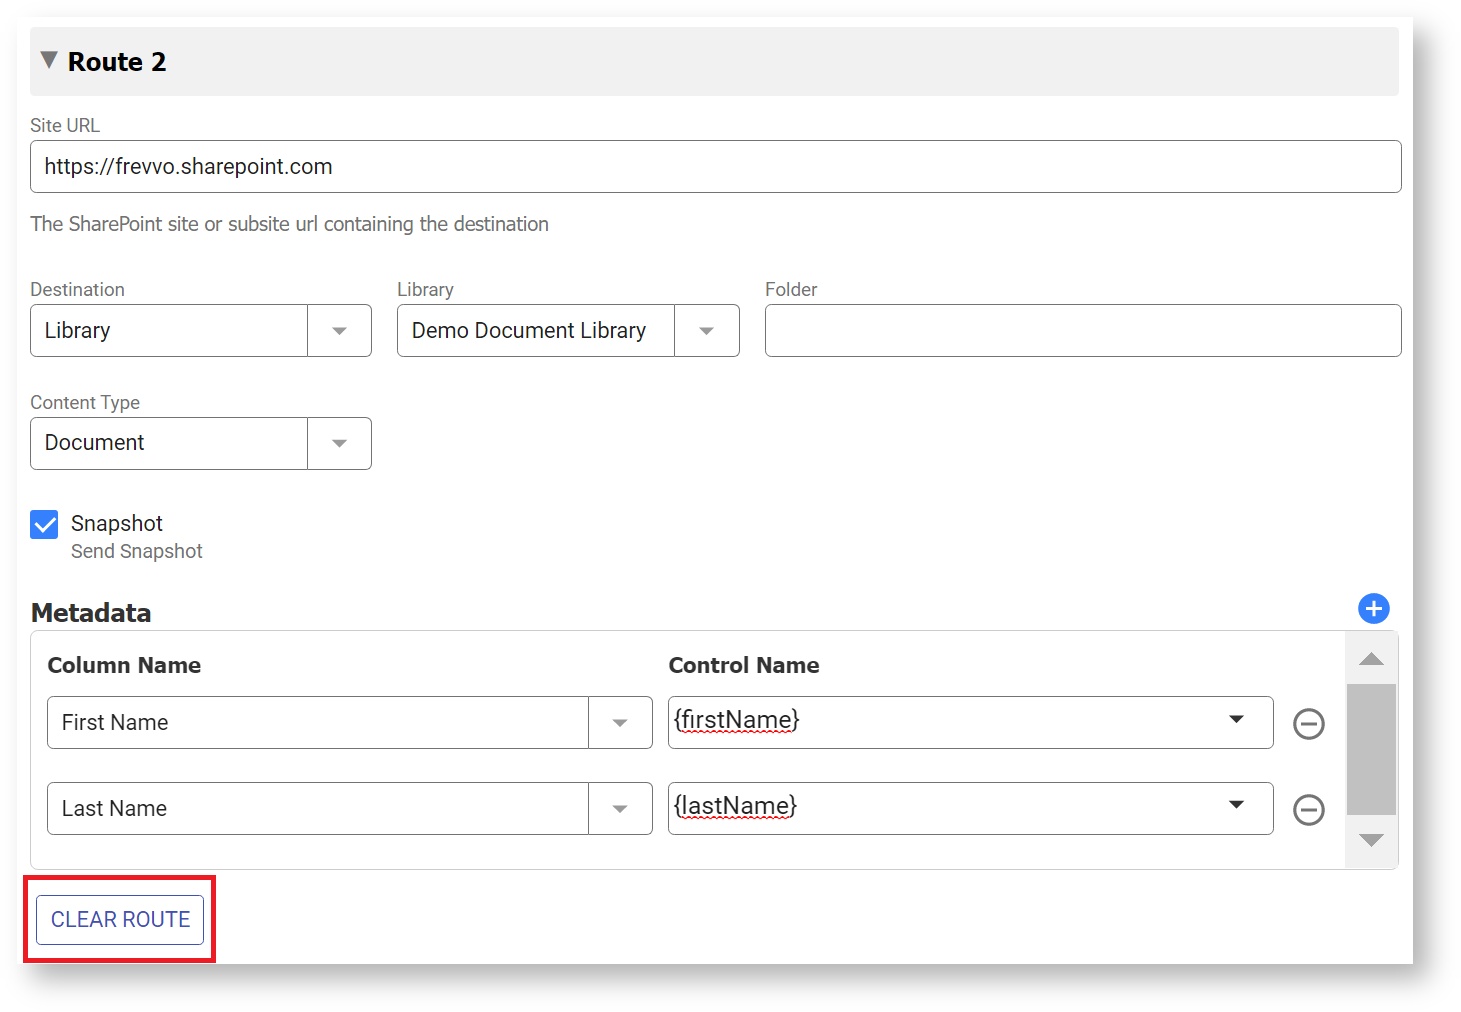
Log in as a frevvo designer user. If you are On Premise frevvoconnecting to Sharepoint in the cloud, use the URL https://<server>:<SSL port>/frevvo/web/login. Example: https://localhost:8443/frevvo/web/login. Port 8443 is the default. Create your form or workflow with controls that capture the data that you want to store in the columns configured in the Lists and Libraries on your SharePoint site. Go to Settings mode in the Guided Designer navigation bar. You can set up a single Document Action to write to two places (i.e. SharePoint Library and List). Route 1 will be automatically expanded. Expand Route 2 to add a second destination if desired. The Site URL is automatically prefilled from the SharePoint tenant configuration. This is the SharePoint site or subsite containing the destination e.g. https://frevvo.sharepoint.com. If you use a site and/or subsite, simply add it to the URL, e.g. https://frevvo.sharepoint.com/sites/Docs/docsub1. This URL must use the https protocol. Pick a Destination. SharePoint destinations can be a Library (and optionally a Folder), or List. Select Library or List from the Destination Type dropdown. If you select a Library, you will also see the Folder field. If you want to send to a subfolder, enter the server relative path of the folder within the library. For example, for folder 'test' in library 'mylib', enter /mylib/test. The folder path may not always match exactly the visible name in the Sharepoint UI. For example, for my Library named 'Documents', the path is actually 'Shared Documents'. You can find the path in the folder's properties. 1. Go to your Sharepoint site or subsite, and click on the folder where you plan to save your frevvo documents. 5. Log in to frevvo, edit your form and go to Document actions. Select a Content Type from the dropdown. The wizard automatically pulls the content type choices from your SharePoint site. The Content Type determines the available metadata column names for mapping. For example, if the destination is a List you would see Item as a choice for the Content Type. This means your submission is saved as a new item on your SharePoint list. Document Libraries show Document as the Content Type. Data - include the frevvo XML document (only available when sending to a List) Attachments - include attachments uploaded to your forms/workflows. In Workflows, when Attachments is selected you will see a list of available upload controls and can choose which to include in your Sharepoint submission. Add Metadata. Map the Control Names in your form/workflow to the column names in your SharePoint destination. Click the The wizard will populate the Column Name dropdown with all the columns in the destination In the Control Name field, you can type static text (not recommended), select one or more control from your form, or a combination of control(s) and static text. To use a control from your form, type an open curly brace and the first few letters of your control name, i.e. {Fir. A list of controls in your form appears. Select the correct one. When mapping Message controls with templates to the SharePoint Connector, the Save Value property should be checked. You can map multi-value controls such as controls inside repeats, table columns, and checkboxes to Sharepoint columns. To map to a single value Sharepoint column, you can use any regular separator, such as a comma, in your repeat template syntax. This results in a single, comma-separated string value in the Sharepoint target column. For example, you can map the Items column in a table to a text column named with the syntax {,|Items}. This results in a single value sent to the target Sharepoint column as a comma-separated string, e.g "Widgets, Wingdings, Whatzits". You can also map a repeat control to a multi-value (checkbox) Choice column. In this case, you must use a special syntax to send separate values that populate the Sharepoint checkboxes. For a Sharepoint list, use the repeat separator 'json'. List: {json|Items} For a Sharepoint library, use the repeat separator ';#'. Library: {;#|Items} These separators send the control values in an array, which populates the checkboxes in the target Choice column. If you configure a second Route, clicking the Clear Route button removes the information for Route 2 only. Click theLogin and Create Form/Workflow
Configure Send to SharePoint Document Action


First-time SharePoint Login
You will be redirected to log in to SharePoint or Office 365 if you are logging into your account for the first time. On successful login, you will be asked to grant or deny access for your frevvo SharePoint add-in.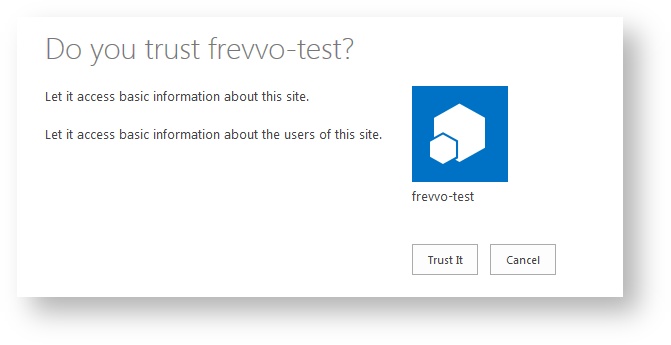
Click Trust It to authenticate and grant permission to frevvo. You will not see the trust screen on subsequent logins. The wizard will display.Set up Route(s)


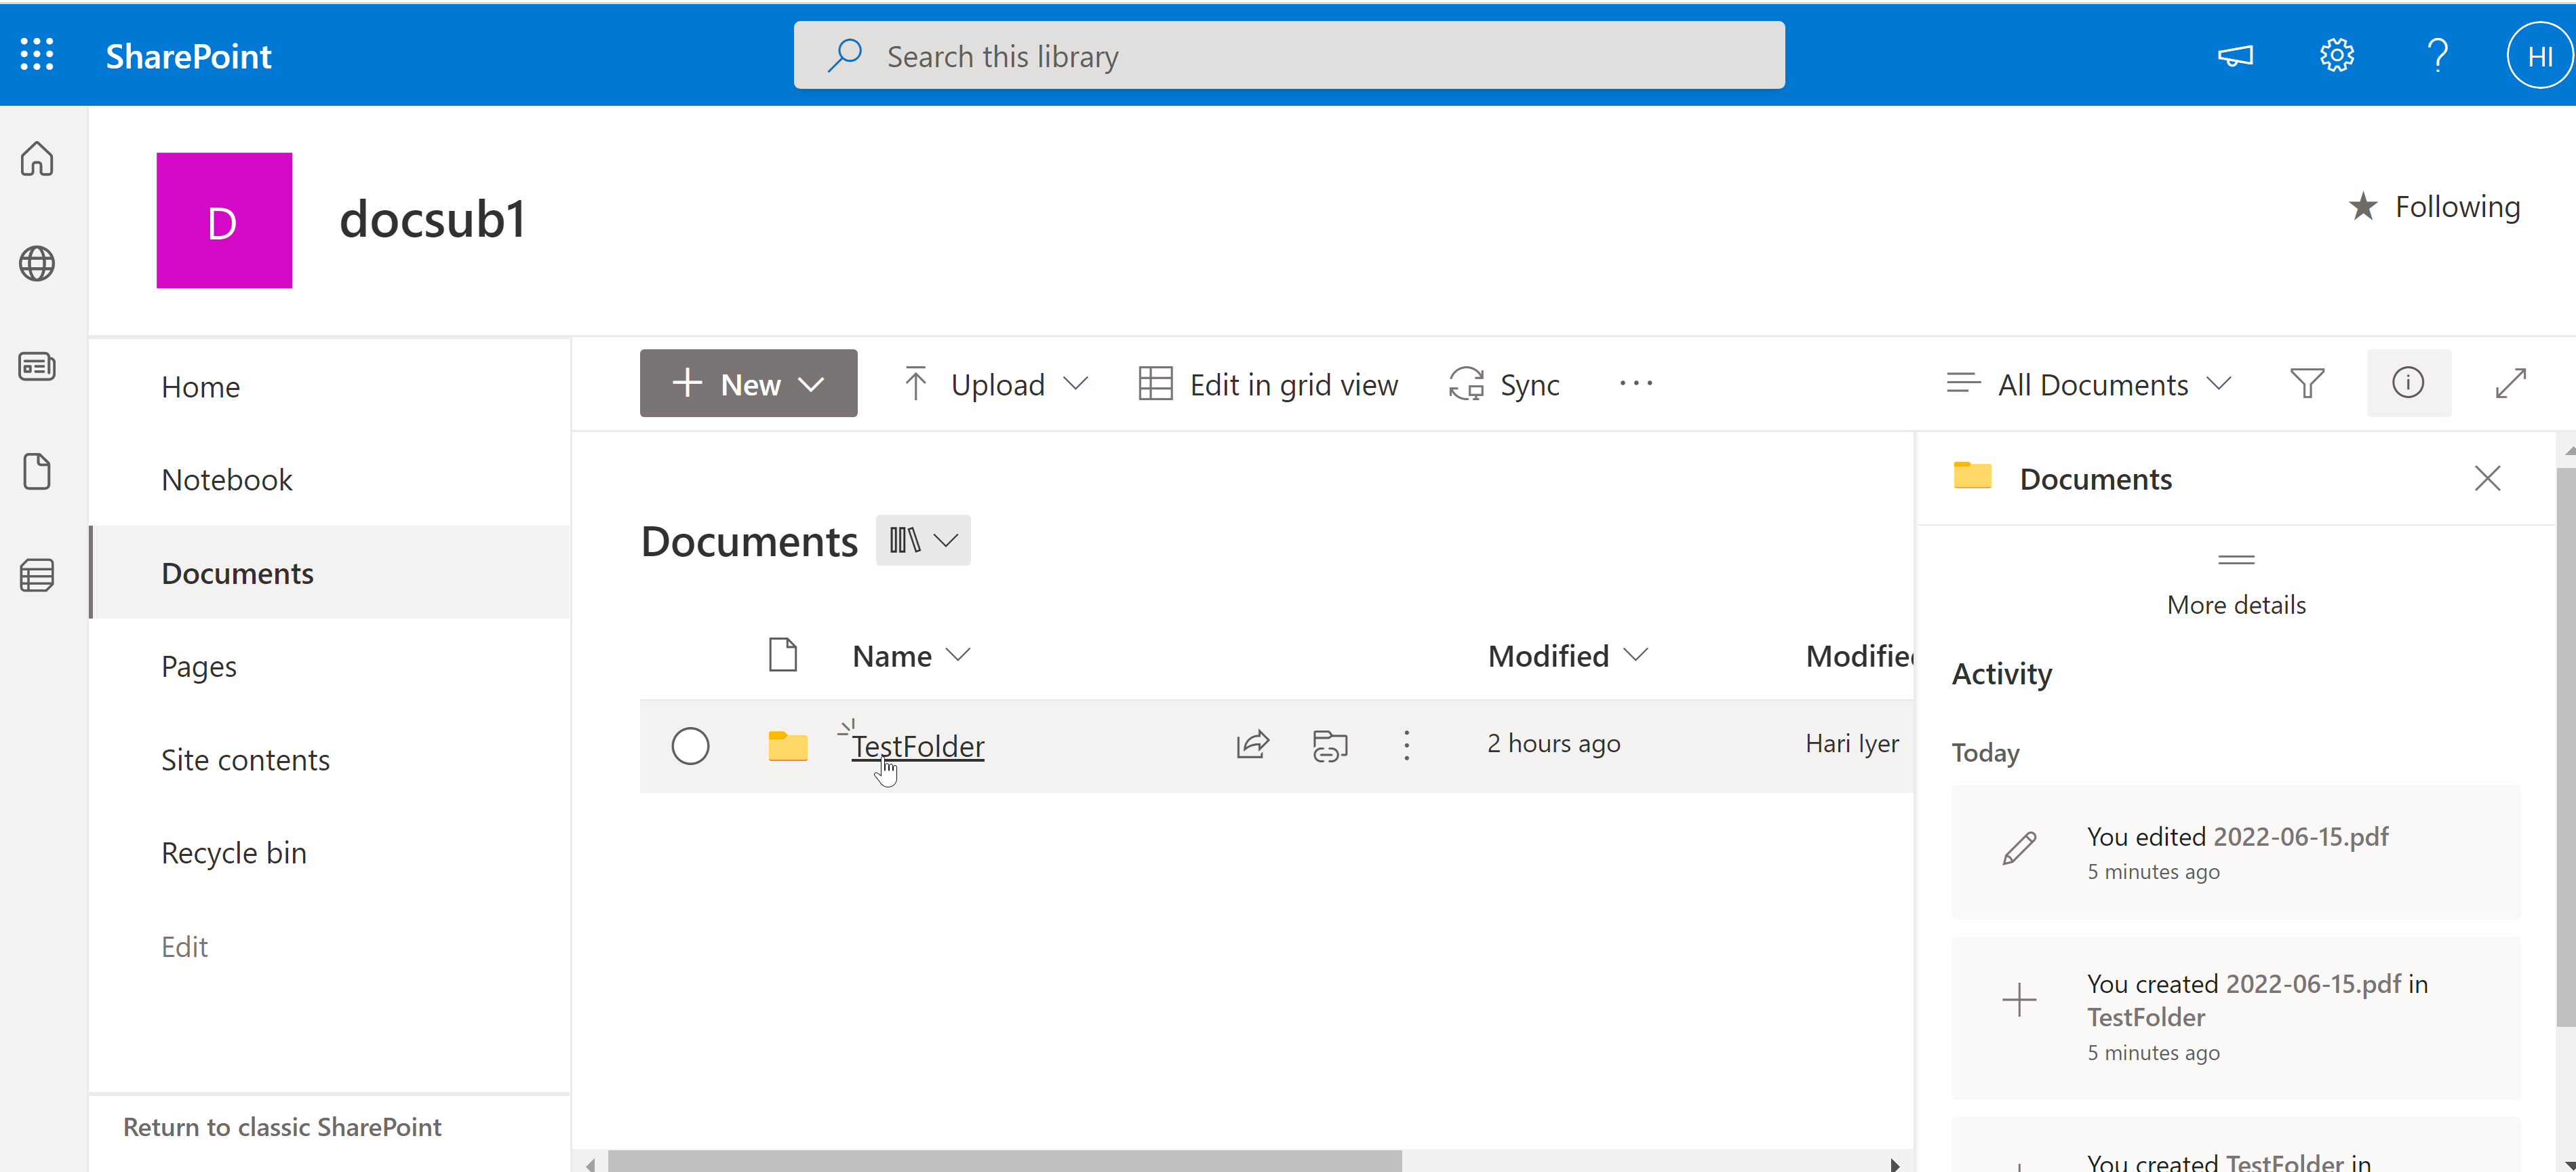
2. Click the Info icon (i) in the upper right side to open a properties panel.
3. Scroll down towards the bottom to the "Path" property. Click the copy icon.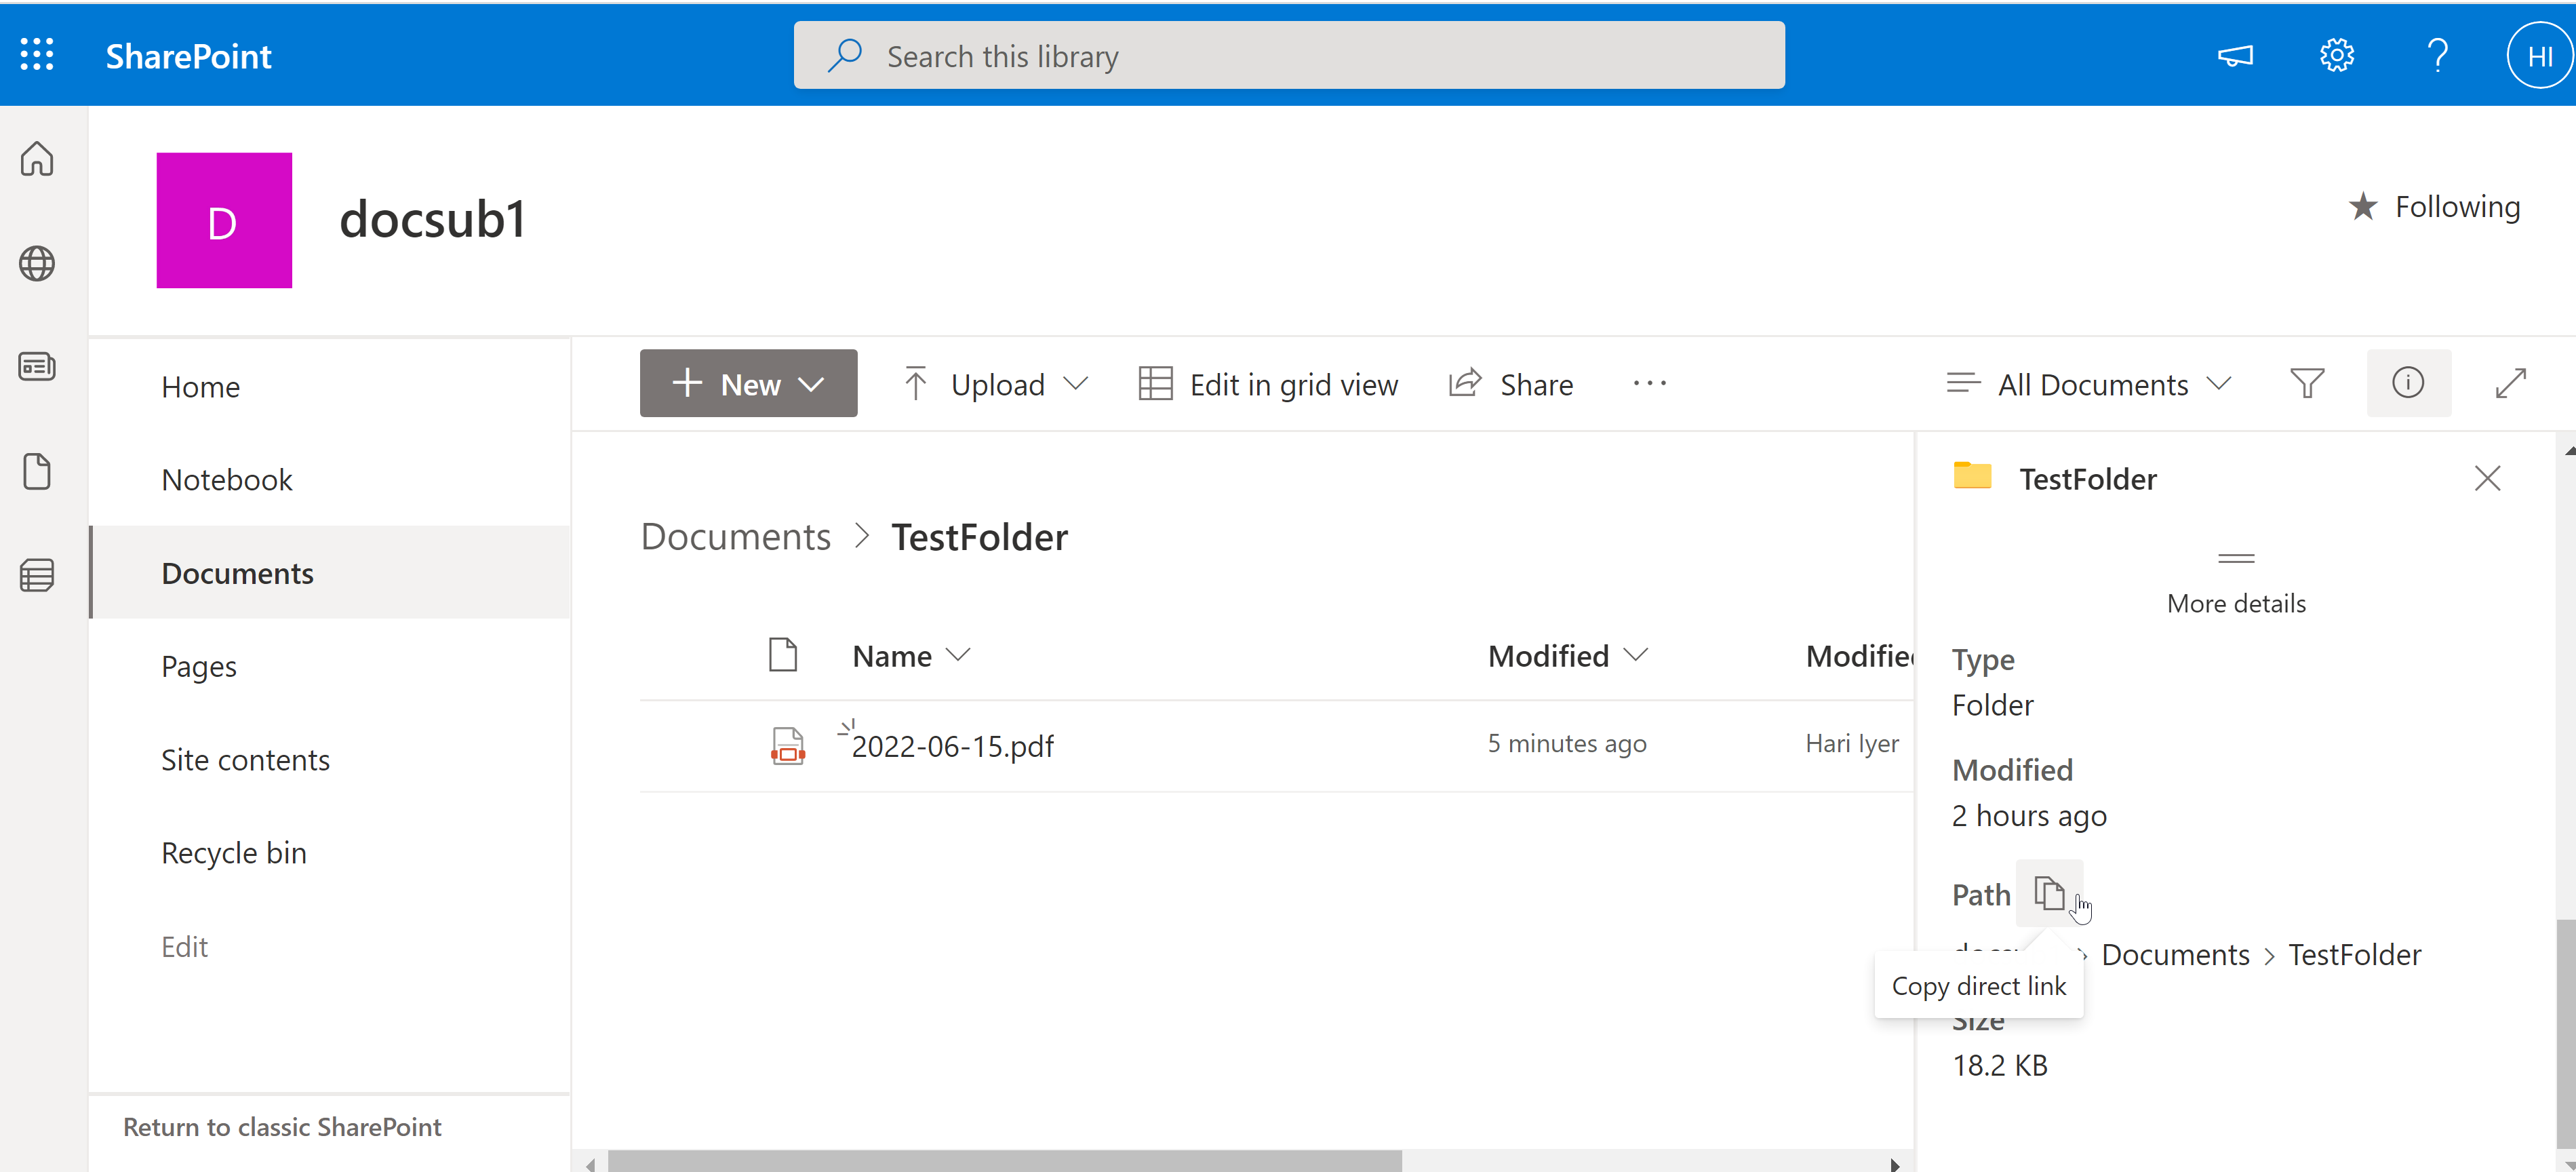
4. Paste the copied path into a text pad. Copy everything after the domain name (in my case, /sites/Docs/docsub1/Shared%20Documents/TestFolder) and replace the encrypted character(s) as needed e.g. /sites/Docs/docsub1/Shared Documents/TestFolder
6. If using a subsite, make sure the Site URL includes your subsite, e.g. https://frevvo.sharepoint.com/sites/Docs/docsub1
7. Choose Library, then pick the correct Library from the dropdown. (If you don't automatically see them, try changing "Library" to "List" and back again; this reconnects the SP connector).
8. In the Folder field, enter the path you copied from Step 4.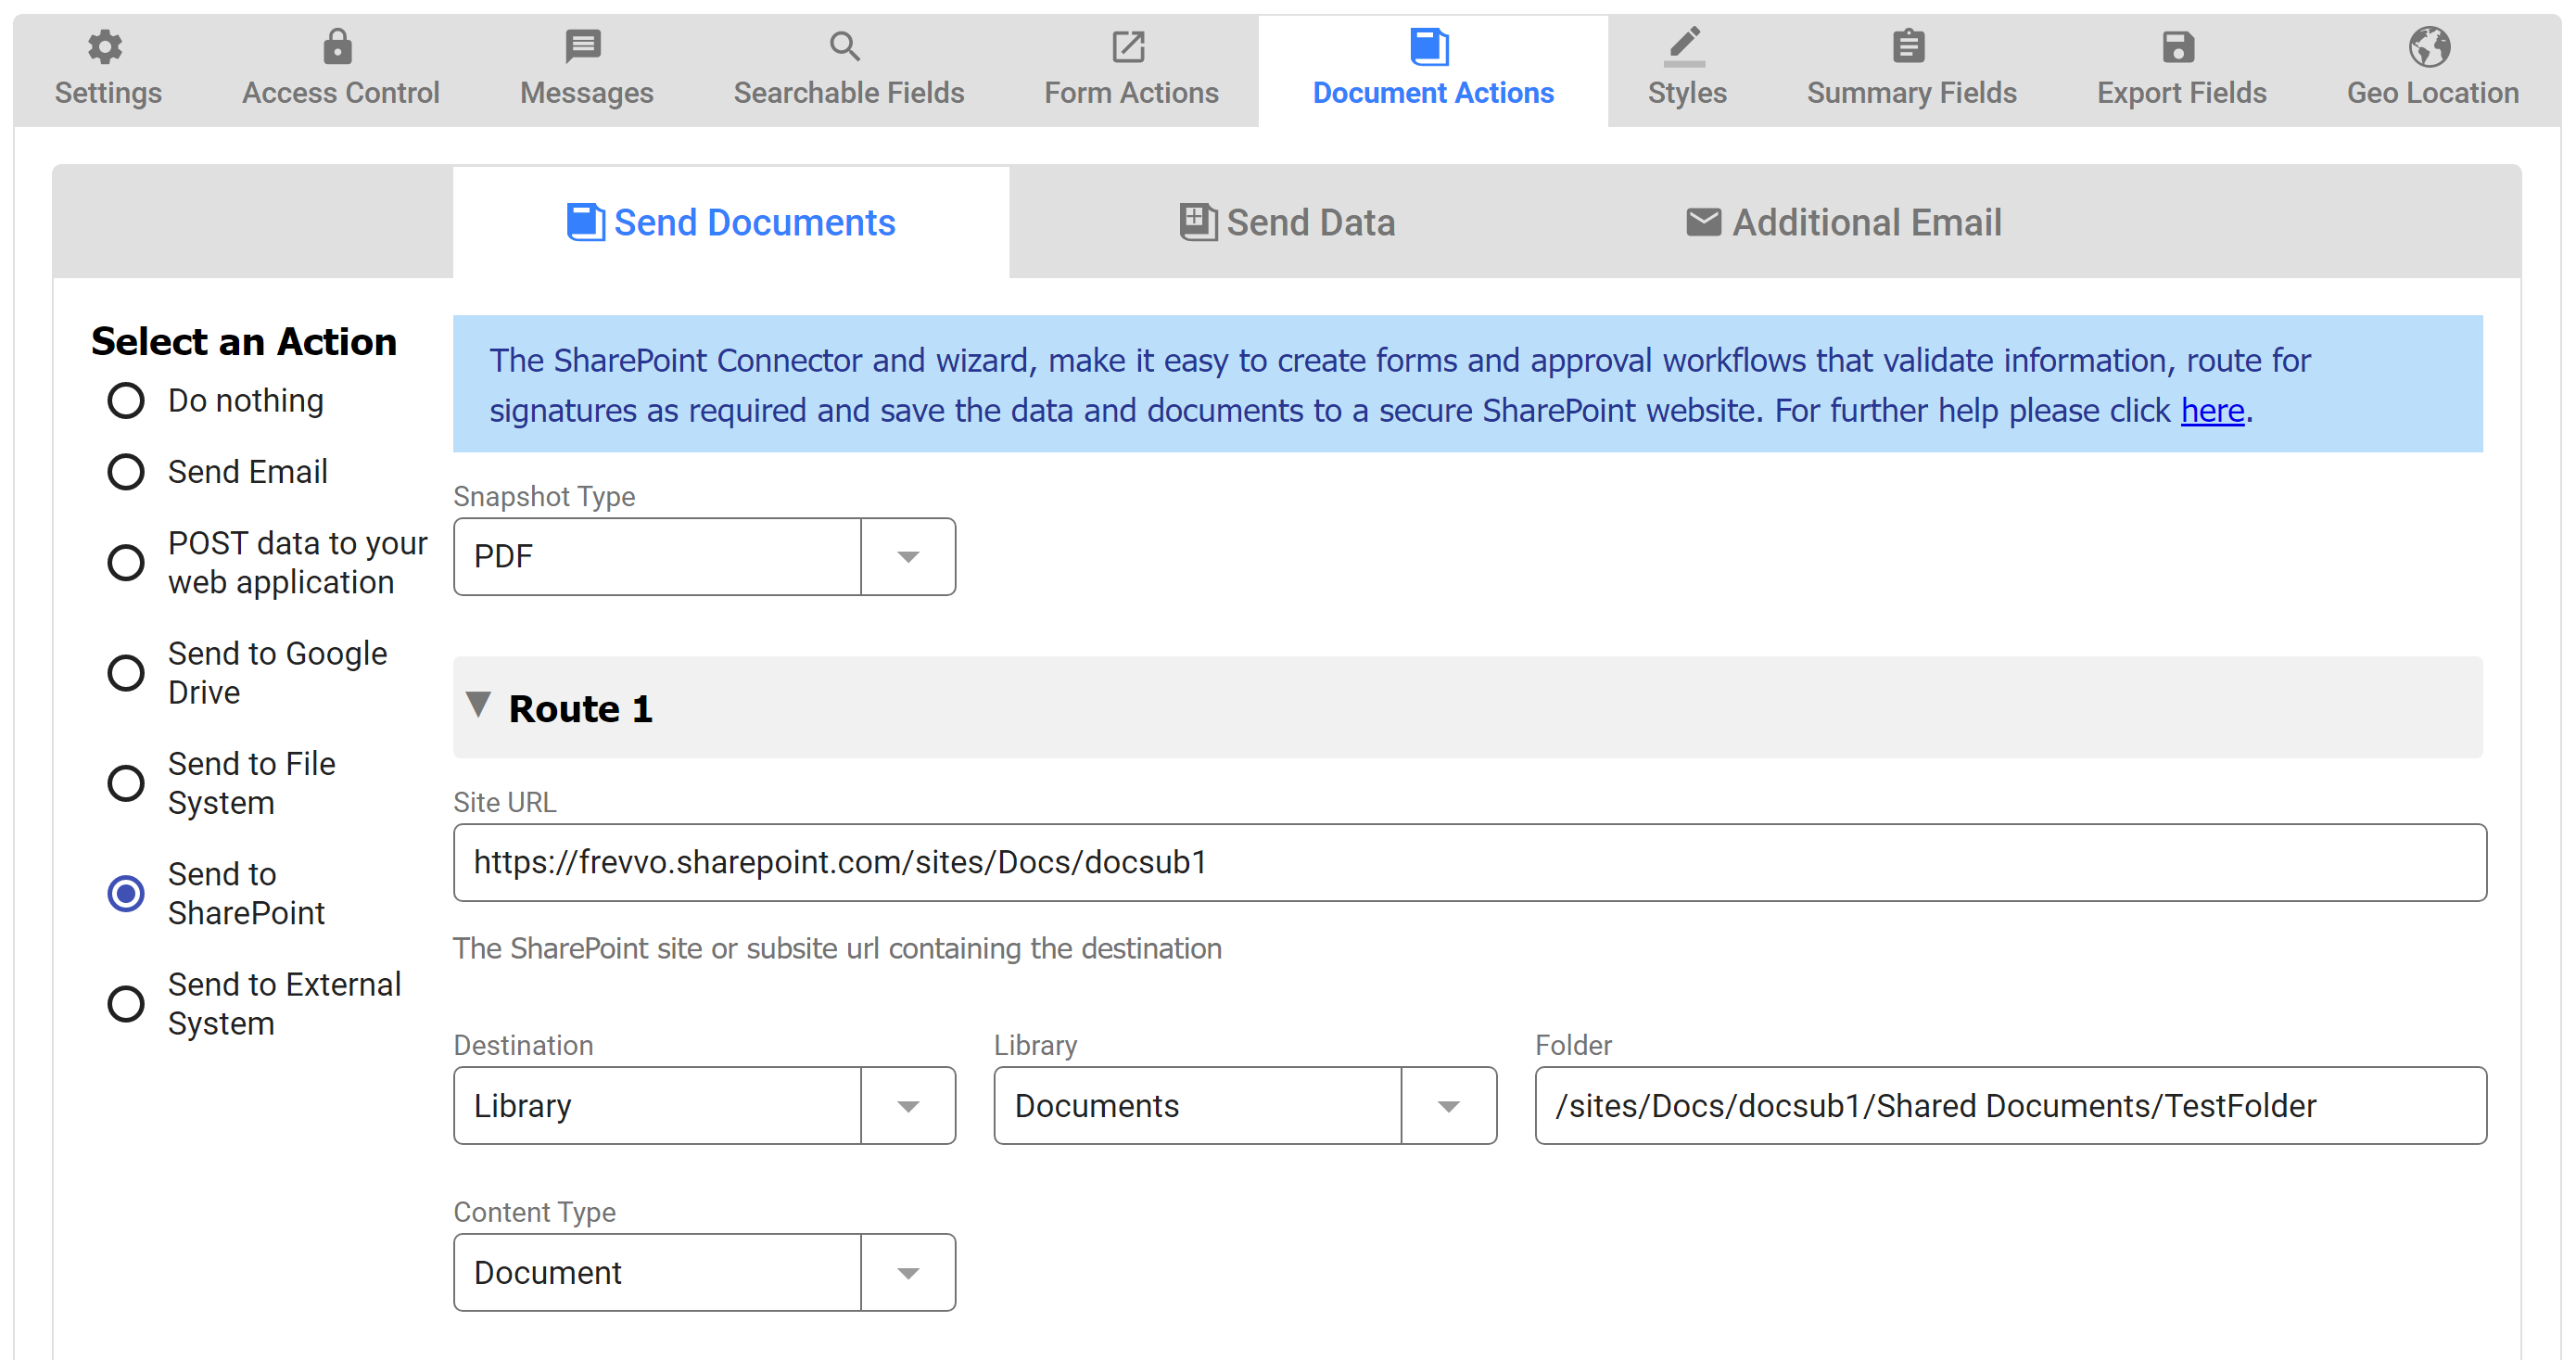
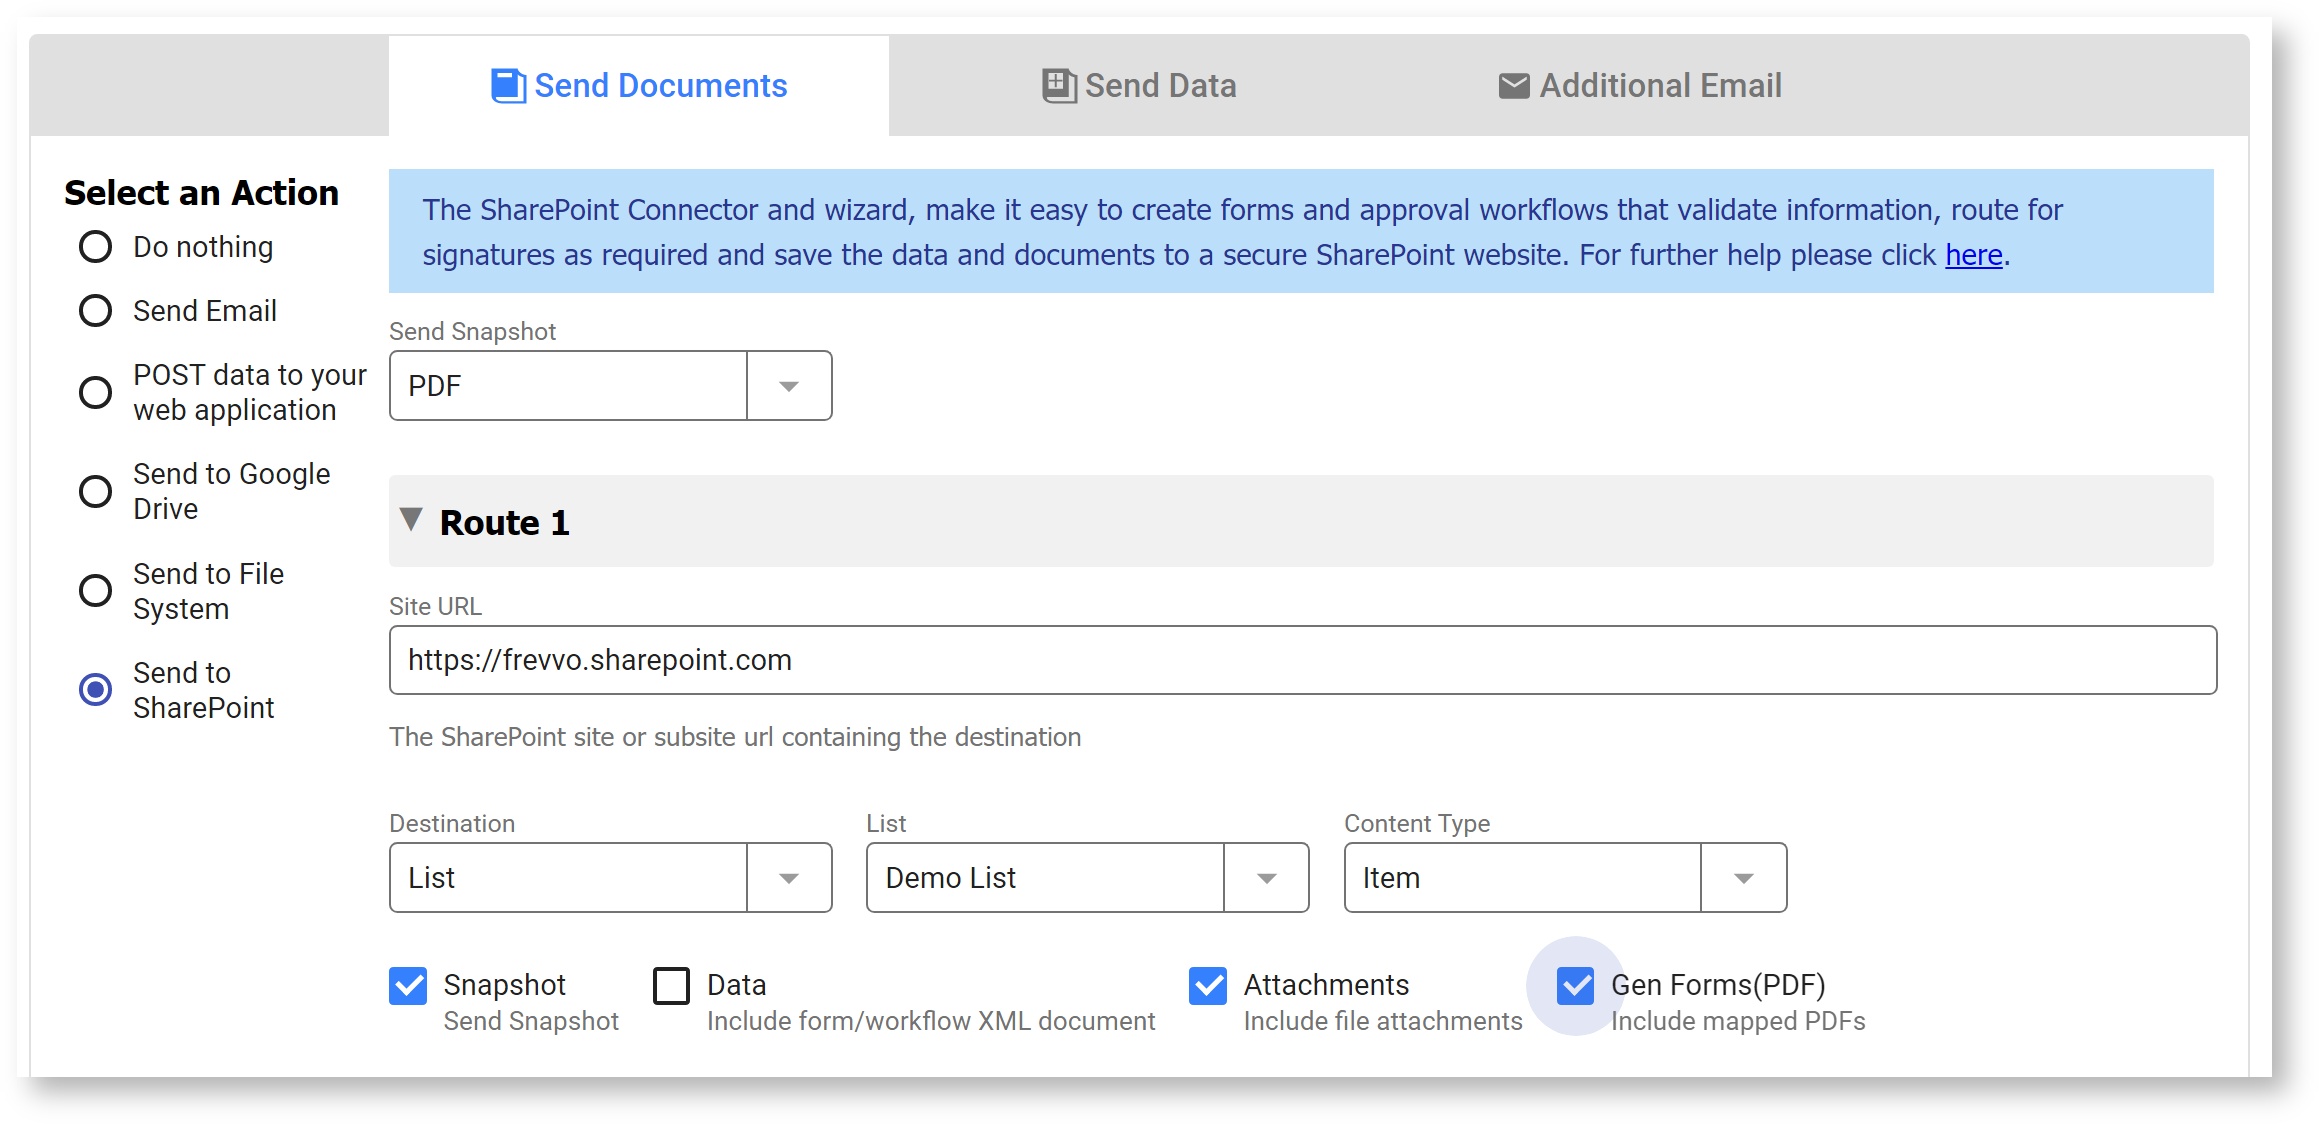

Workflows only:
 blue add icon to add a row.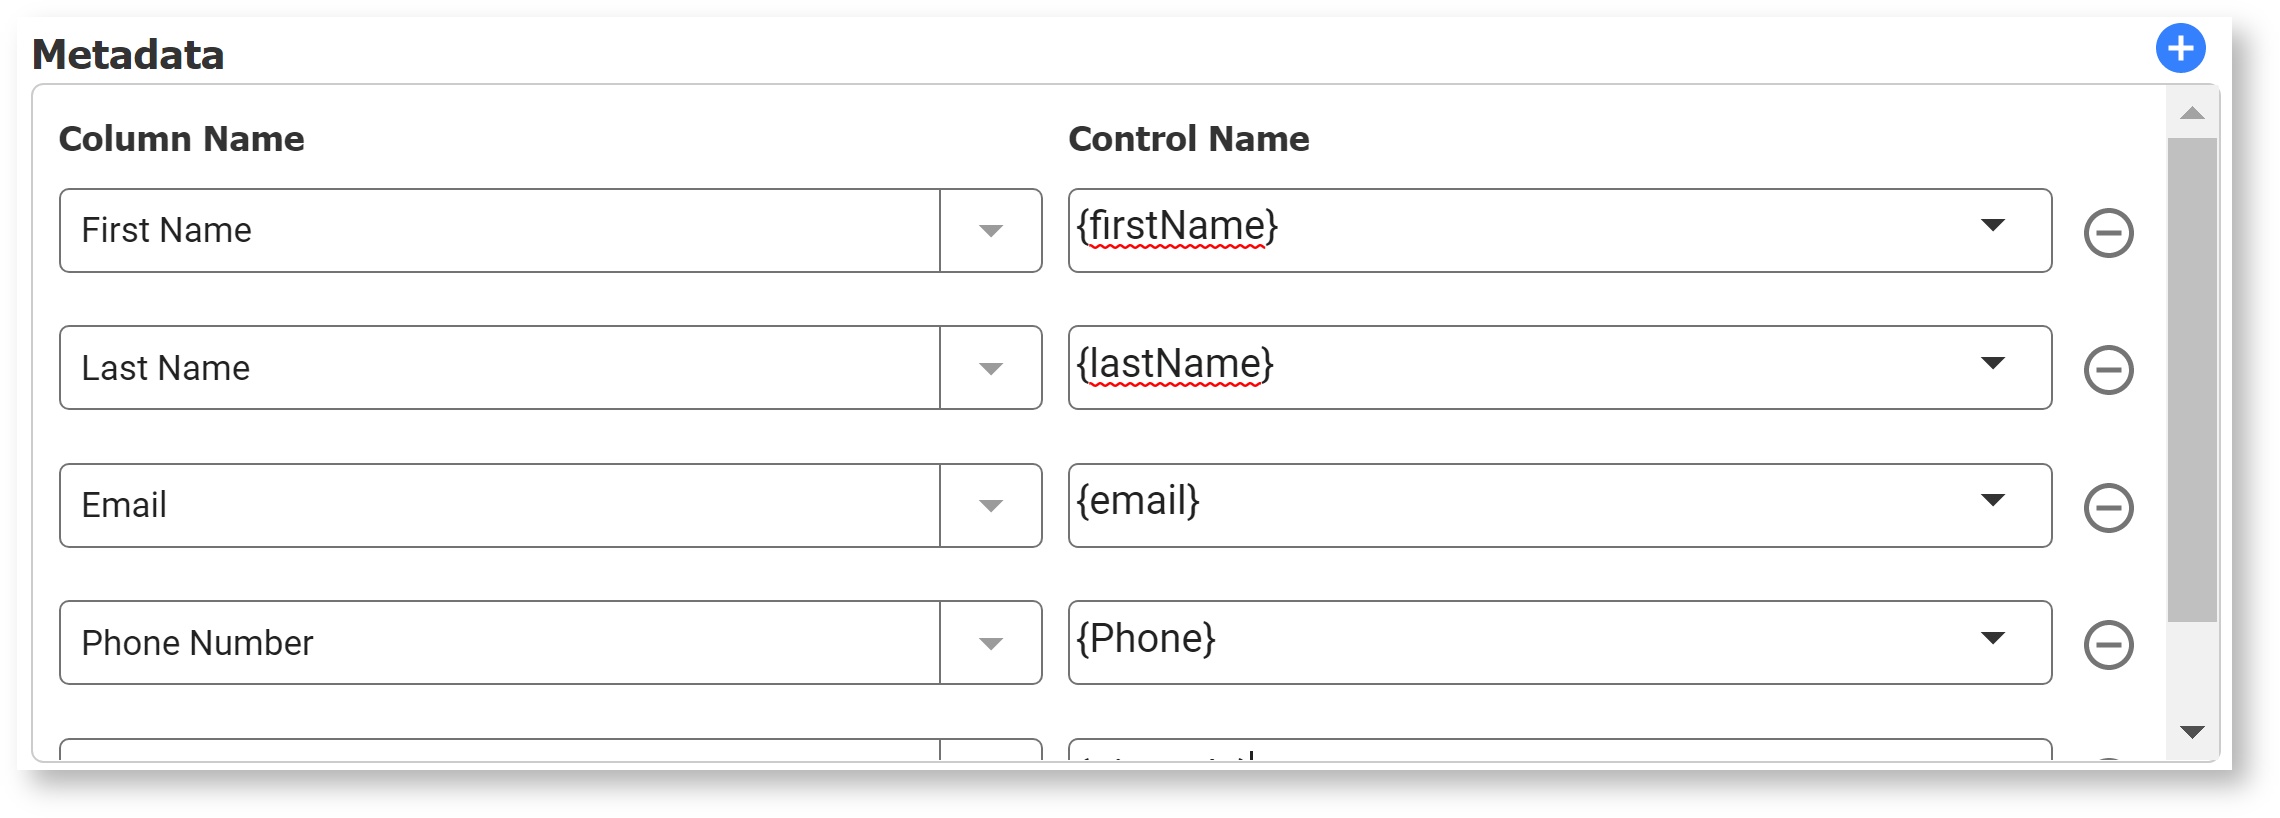
Mapping Multi-Value Controls
Clear Route
Save and Test
 save and test icon to save the form/workflow and bring up Test mode popup.
Refer to the SharePoint Connector chapter for configuration details and more information on the Send to SharePoint wizard.
Send to External System
You can connect forms/workflows to a frevvo-provided connector that your admin has configured in the Manage Connectors page using the Send to External System doc action. The connectors currently available are the Docuware Connector and the DocuShare® Flex Connector.
In the third column, add the value you want to send. To use a field from your form, type an open curly brace '{' following by the first few letters of the control name. Then, select the control name from the dropdown. Repeat Controls To map values from repeating controls to the Keywords field type, the value should be a template string that resolves to multiple values. The recommended approach is to create a template that results in a JSON array using the built-in separator 'json' i.e. {json|controlname}. This special separator resolves to JSON format. The same result can be accomplished by specifying the JSON format i.e. ["{","|controlname}"]. Select any attachments you would like to send, such as the PDF Snapshot (set by default), the submission xml document, any attachments uploaded by the form user, and any mapped PDFs.Connect a Form/Workflow to Docuware


 Add to add rows.


 Save.
Save.
Enter the name of a DS Folder (this can be a path). If the folder(s) already exist they are used, otherwise they are created. Select the Document Type from the dropdown. In the third column, add the value you want to send. To use a field from your form, type an open curly brace '{' following by the first few letters of the control name. Then, select the control name from the dropdown. Repeat Controls To map values from repeating controls to the Keywords field type, the value should be a template string that resolves to multiple values. The recommended approach is to create a template that results in a JSON array using the built-in separator 'json' i.e. {json|controlname}. This special separator resolves to JSON format. The same result can be accomplished by specifying the JSON format i.e. ["{","|controlname}"]. Select any attachments you would like to send, such as the PDF Snapshot (set by default), the submission xml document, any attachments uploaded by the form user, and any mapped PDFs. The filename needs to be unique within the destination folder.Connect a Form/Workflow to DocuShare® Flex

 Save.
Save.
Send Data
Using these wizards you can:
- Do Nothing
- Post submissions to a Google Spreadsheet
- Manually set document URIs - to connect to database and other back-end systems
The Send Data wizards enable you to manually set a URI to which the data will be sent when your form is submitted.

Do nothing
This is the default option. Selecting Do nothing will also clear the other options if they are set.
Post Submissions to a Google Sheet
frevvo supports direct connectivity with Google Spreadsheets. This wizard allows you to save submissions directly into Google Spreadsheets. It also provides additional assistance in setting up the login to your Google account and in selecting the spreadsheet.
After the user submits the form, the data will be written into a new row in the Google spreadsheet. This wizards steps you through the process of logging into your google account and locating the spreadsheet you where you want to save the submissions.
- Edit your form/workflow
- Go to the Settings mode in the Guided Designer navigation bar.
- Click on the Document Actions tab, then click the Send Data tab.
- Check Post Submissions to a Google Spreadsheet.

- This launches the Google Sheet Wizard.
- Enter your Oauth token (from Step 1). Note that the email field is optional and intended only to describe which account is associated with the access token. This email does not validate against the token provided.
- A Spreadsheet dropdown appears listing all the spreadsheets in your Google account
- Select the Google Sheet from the list.
- Select the worksheet of your Google Sheet from the dropdown.
Click Submit.
- That’s it. When the form is submitted, the data will be saved to the selected Google Sheet.
See the frevvo Save your Submissions to a Google Sheet for details.
Manually set document URIs
After you have generated controls from the elements in your database schema, set your form’s Document URI to the database connector query URL. Follow these steps: The first section in the wizard is for the form's default document. This is indicated by the Document Name of "default" displayed in the wizard. The default document maps to all of the controls you added to this form by dragging and dropping from the palette. This is typically not the document you want to configure. The next screen has two sections: Read URI and Write URI. Typically, when the form loads, frevvo customers read form data from their database to initialize the form and send the updated XML document to the same database upon form submission. Enter the same URI in the Read URI and the Write URI fields, as shown in the image, with the appropriate SQL statement to run if you are reading from and writing to the same database using the database connector. It is possible to read the form initialization data from one database and then update a different database. Enter different URIs in the Read URI and the Write URI fields if this is your situation. You also must specify which of the four SQL statements to run—you do this by choosing the appropriate values in the Document URI Read Method and Document URI Write Method dropdowns according to the table below. (You may notice in the Forms Designer that the Document URI Read Method drop down box includes a POST option, but it is not shown below because it is not used by the database connector.) You’ll see one set of Document URI properties for each schema in your form. Type the Document URI next to the schema name—make sure not to type it next to the Default schema. To specify which of the four SQL statements to run, choose the appropriate values in the Read Method and Write Method dropdowns, based on the information below. Note that you may choose only one Write Method in the Forms Designer.

SQL Statement Type Document URI Read Method Document URI Write Method Create Leave blank POST Retrieve GET (or leave blank if you are not retrieving data) Leave blank if your form is read-only Update Leave Blank PUT Delete Leave Blank DELETE
If a form is configured to post data using a manually set document URI and it does not reach it's intended destination successfully, frevvo notifies the tenant admin of the failure via an email. If a workflow does not reach the web application successfully, the workflow administrator(s) - if configured - receive the email instead of the tenant admin.
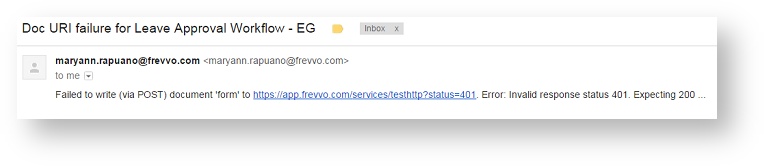
See the chapter on connecting to your database for all the details.
Additional Email Wizard
When the form is submitted, frevvo can send an additional email message with optional XML document(s) , an image of the filled form, attachments and Pixel Perfect PDFs (referred to as Generated Forms),
Slide the  toggle to the right to turn on the Additional Email wizard.
The email can be sent to multiple comma separated email addresses. The "To:" email address is required. All other properties are optional.
Enter destination email addresses in the To: Reply to: Cc;, Bcc: fields. The email can be sent to multiple addresses separated by a comma or a semicolon. The "To:" email address is required. All other email fields are optional.
- Customize the email body and Subject text in the Message field. You can use HTML and templates.
- Send the data as a PDF attachment or other image type using the Send Snapshot dropdown. The image type options are PDF, PNG or JPG. Select the blank option from the dropdown to exclude this attachment in the submission.
- Attach an XML data document using the Data checkbox. This checkbox is checked by default. Uncheck it to exclude the XML data document in the email.
- Files uploaded to your form/workflow are included if the Attachments checkbox is checked. This checkbox is checked by default. Uncheck it to exclude attachments in the submission.
If you have Pixel Perfect mapped PDFs (ex: W-4, I-9 etc…) associated with your forms/workflows, choose the action you want to take from the Send Gen PDF Forms control:
Check All to send all the Pixel Perfect PDFs. This is the default value.
Check None to send none of the PDFs.
Check Select to display a list of all the PDFs associated with your form/workflow. Click the ones you want to be part of the submission.

For example, consider a Vacation Request Approval workflow. When the workflow is complete, we want to send a PDF to the internal HR system (using the document action) but in addition, we want to notify the employee requesting the vacation by email. Use the Additional Email wizard for this scenario. The email to the employee will contain whatever documents are selected on the Additional Email wizard screen.
To use the wizard, click the Doc Actions section in the left toolbar and select the Additional Email Tab. See Email Integration for further details on configuring the content of the email.
How to set up Multiple Document Actions
It is important to remember that doc action wizards are single select by design. The Additional Email wizard can be used to send an email if you are configuring more than one doc action on a form/workflow.
Let's say you have a workflow where you want to
- Save a copy of the form to Google Drive
- Email a copy of workflow pdf to the IT department
Set up the Save to Google wizard. Then use the AdditionalEmail tab to configure the email to the IT department.
Using Templates in Form and Doc Actions
The values/entries in all doc action/doc URI wizards can be customized with data entered in the form/workflow using templates. The values set in the following Form Action wizards can be customized with data from the form:
- Display a message
- Forward users to a web page
- Post data and forward users to a web page
For instance, in the display message, you may wish to display a customized message with the user's name. You can use templates in the display message to do this.
- Make sure you have two controls in the form called FirstName and LastName.
- Click on Form Action
- Click on Display a Message.
- In the Message area of the wizard, type: Thank You {FirstName} {LastName} for submitting my form.
- As a shortcut, you can also select the appropriate control from the drop down by clicking the
 down arrow on the right side of the field.
 - Click Finish.
Use the form by clicking on the Test button. Enter something into the First Name and Last Name controls. When you click submit, will display the above message with {FirstName} and {LastName} replaced by the values entered by you.
Templates work the same way when used in URLs for forwarding to a web page or Post data. When referring to repeat controls you must use a special template syntax. See templates for repeat control for details.
There are built-in templates you can use:
- {_frevvo_root_cause_msg} - Add this to the Error Action Display Message to display the actual error that occurred.
Templates work the same way as documented above when used in Doc and Error Action Wizards.
Form & Doc Action Failure Notifications
An email notification is sent to all tenant administrators or the workflow administrator(s) (if configured) when a Form Action post, DOC URI or DOC Action fails and the submission does not reach it's intended destination. When the form/workflow is submitted, the user sees the message "Thank You! Your submission has been received." and then the appropriate admin is notified via email. The email is sent when the following Form/Doc actions are configured in a form/workflow:
- Form Action
- Doc Action
This is not applicable to the email doc action since it is asynchronous and the notification would fail if the service were unavailable. Refer to each topic for more information.
Doc action wizards are single select. If you set up one of the wizards then configure an action using a second wizard, the information configured on the first wizard will no longer display. This is as designed.
Let's say you want to send an email after your form/workflow is submitted but you are also using the Filesystem connector to save your submissions to a directory on a local server. You configure the Filesystem connector wizard to do this. Then configure the Email data to a specified address wizard to send the email. If you return to the Filesystem connector wizard, after configuring the email wizard, the information that you entered on the Filesystem connector screens will no longer display. In this situation, you can use the email wizard on the AdditionalEmailWizard tab to configure your email. Refer to HowtosetupMultipleDocumentActions for an example.