Administrator Best Practices
- Megan Ellis
There are many paths to Rome.... frevvo suggests the following best practices for managing your tenants, projects, forms and workflows.

frevvo On Premise Test/Staging Server Installations
Multiple frevvo server installations are the most flexible and best practice for maintaining a production environment. In this scenario, you may have a development server, a test/staging server and a production server. Or you may have only a development server also used for testing and a production server for deployed forms/workflows.
Create roles and users in your development environment. If you are using the default security manager, simply create the users and roles in the tenant, otherwise refer to customers using the LDAP/SAML/Azure Security Manager.
The role names in your development environment should be the same as the role names in your production environment. If they are different, modifications to your workflows will have to be made to users and workflows to reflect the production roles when they are moved to the production.
- Multiple designer users can create and test forms/workflows in each of their user accounts.
- These designer users will download a finished and tested project and check it in to a source code repository (a repository outside of a frevvo server) as the new version of the project. Ex: SVN, CVS, Google drive.
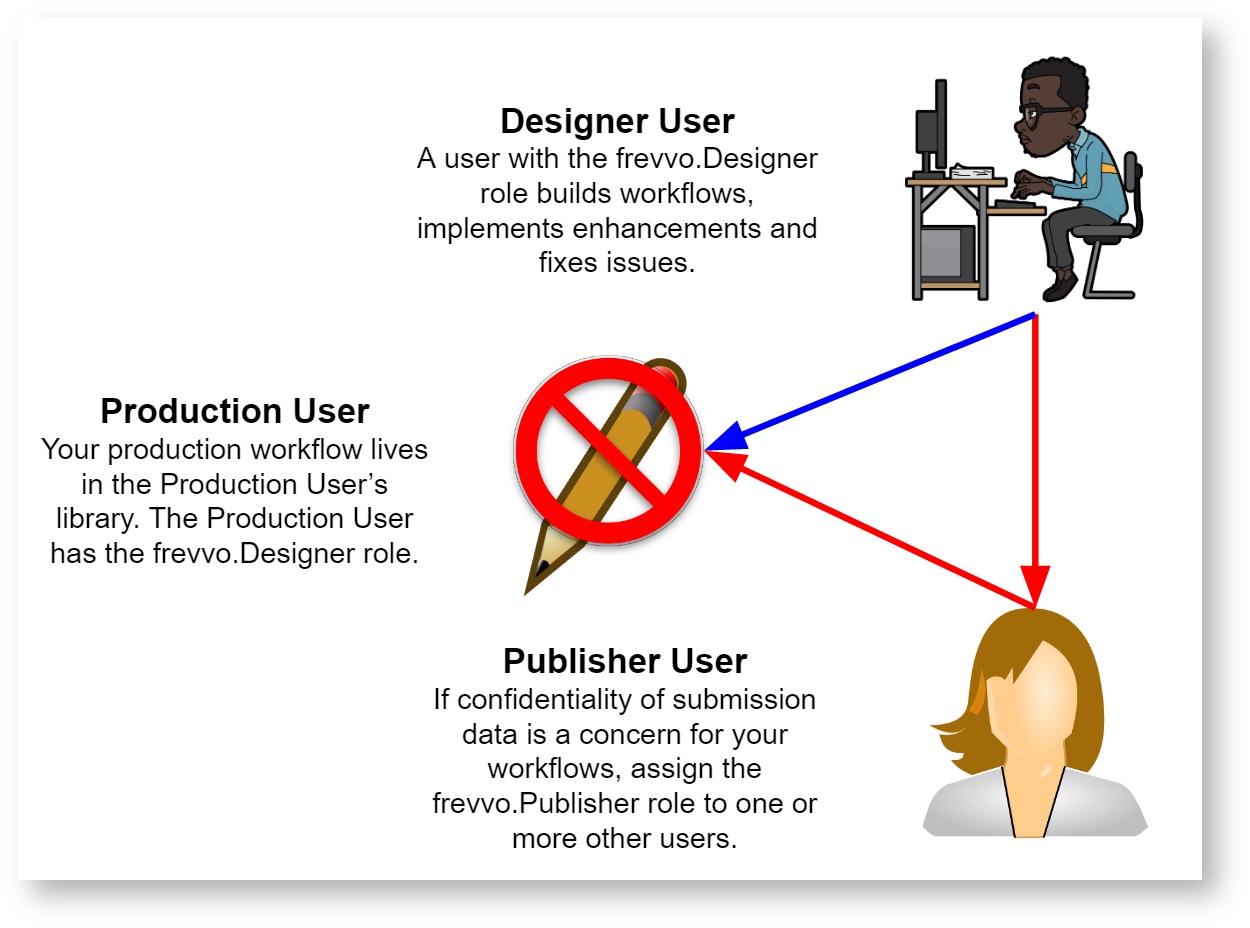
Create a generic production user account (ex: “production@<your tenant>”) in your production environment and give this user the frevvo.Designer role. All your production forms/workflows will be in this user account.
If you are using a non-default security manager, this step and the next step would be done via your IDP software.
- Assign the frevvo.Publisher role to one or more other users in your production environment.
When a designer is ready to deploy a form/workflow to production or update one already in production, a frevvo.Publisher will check-out the new project from source code (a repository outside of a frevvo server) and upload/replace the project into the generic production user account in your production environment.
- Step 6 can be performed by the tenant admin or your generic production user if you prefer not to create users with the frevvo.Publisher role.
The tenants in your development and production environments may have the same name although this is not required.
frevvo On Premise Single Server Installations
We recommend that all On Premise customers with a single server have two tenants: a development/test tenant and a production tenant. A separate development/test tenants is recommended for the following reasons:
- The roles in your development tenant will contains test users with test email addresses so that workflow notification emails will not impact/spam real company employees.
- Test submissions will not be mingled with production submissions.
- Test tasks will not appear on your real users' task list.
- Test tasks will not appear in production Task History Search
- Test submissions will not appear in production Shared Items / Submissions
Follow the setup steps above for On Premise Test/Staging Server Installations. The only difference is that in your case your "test environment" is simply a dev/test tenant on the same server as your "production environment" and not a separate frevvo server.
Cloud Tenants
Cloud customers have a single tenant. In this scenario, best practices are to create a set of test roles and test users. Your form/workflow designers will use test roles/users during the dev/test phase.
- Test roles & users allow your designers to test workflow email notifications and workflow task navigation without spamming real users' email inboxes and task lists.
- When a form/workflow is in development you may consider:
- Temporarily switch the form/workflow configuration to use your test roles and users.
- Temporarily turn off Show in History to prevent test forms/workflows from cluttering production Task History Search.
- Temporarily turn off Who can view and/or edit submissions ACL to prevent test forms/workflows from cluttering production Shared Items / Submissions, or switch the ACL to your test roles and users.
- When your form/workflow is ready to deploy to production switch the roles/users from your test roles/users back to your production roles/users, and if desired re-enable task history search and view/edit submissions ACL.
- Follow the detailed steps below for Publishing Forms/Workflows from Development to Production and Updating a Form or Workflow in Production noting that your generic production users account (ex: "production@<your tenant>") will be in the same tenant as your designer's user accounts.
Cloud customers may optionally purchase a 2nd tenant for development and testing.
Details
Publishing Forms/Workflows from Development to Production
We recommend that the forms/workflows be created & tested by one/multiple designers in their own accounts. After the forms are designed/tested, they can be downloaded from the individual designer user accounts and uploaded to a generic production user account (ex: “production@<your tenant>" where the forms can be published and used by your end users.
We recommend using a generic production user account to publish projects/forms/workflows into production for the following reasons:
- If designers publish production forms/workflows from their individual designer accounts and edit a production form/workflow, they will be editing a live form. This does not give any source code / QA control.
- If there are multiple designer publishing production forms/workflows from their own accounts, then your production forms/workflows will be scattered around between different user accounts and it will be more challenging to maintain them.
- The username of the user account where the form/workflow is published is used in the form/workflow URL and you might not want the username to be known to all other form users.
- Designer users have permission to view submissions. Publishing in a generic production account prevents the designer from viewing production submissions.
Follow these best practices:
Create a generic production user (ex: “production@<your tenant>”) and give this user the frevvo.Designer role. All your production forms/workflows will be in this user account.
If you are using a non-default security manager, this step and the next step would be done via your IDP software.
- Assign the frevvo.Publisher role to one or more other users.
- When a designer is ready to deploy a form/workflow/project for production or update one already in production, the designer will download the form/workflow/project zipfile and check it into a source code repository (outside of a frevvo server).
- A user with the frevvo.Publisher role will check-out the new form/workflow/project from the source code repository (outside of a frevvo server) and upload/replace the form/workflow/project into the generic production user account.
To deploy a form/workflow for the first time, you must then log in as the Production User, select the form/workflow, and click Deploy.
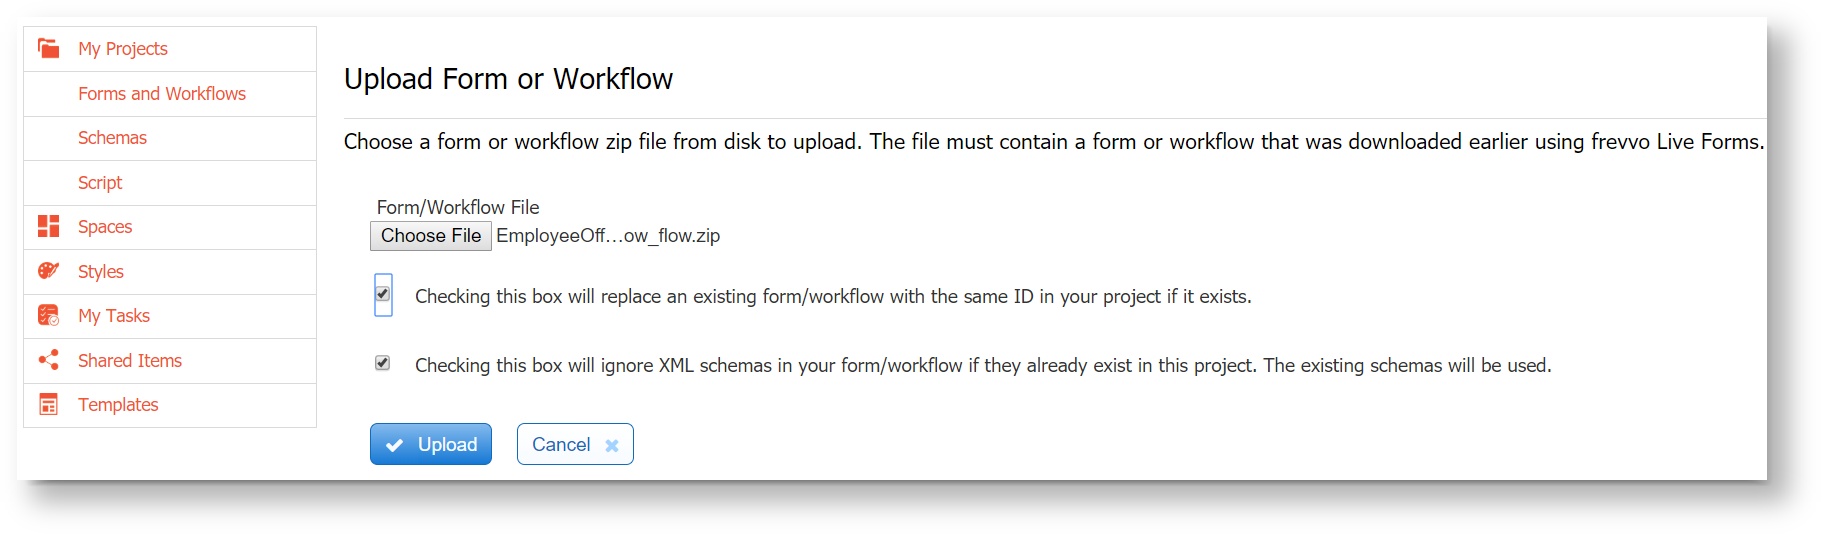
To update a form/workflow that is already in production, check "replace" on the upload screen. The deployment state of the form/workflow being replaced will be maintained for the updated version.
Updating a Form or Workflow in Production
If you need to update a form/workflow that has been deployed to production, there are specific steps to follow to avoid issues with submissions. Submissions are tied to a specific form/workflow. It is very important that you make your changes to the form/workflow that has the same typeId as the production version. This ensures that the production version of your form/workflow will be replaced by the updated version when you upload it to your production account and check the Replace checkbox on the Upload screen.
Let's say you have a form/workflow in production that requires some changes. Follow these steps:
Download the form from your production account.
frevvo recommends that customers maintain backup .zip files of production forms and workflows their own version repository. Each time you download a workflow from production, provide it with a unique filename (i.e. MyWorkflow_flow prod YYMMDD.zip) and maintain it in your directory as a backup. In case a later development version has incompatible changes, you will be able to revert to your latest backup version.
- Upload the form to a new or existing project in your development environment.
- Make the changes.
- Download the updated form/workflow from your development account.
- Upload it to your production account. Be sure to check the Replace checkbox on the Upload screen. The XML schema checkbox will automatically be checked.
- The existing version in your production environment will be replaced with the modified version from the development environment. You will see it at the end of the form/workflow list.
The typeId of a form/workflow can be seen in the URL when you edit it in the form/workflow designer.
When a production workflow that has pending tasks associated with it is edited and replaced with an updated version, pending tasks will contain the changes the next time they are "performed" from the task list. For example, let's say you
- Add or delete controls in a signed section and there are workflows pending in flight that have already been signed.
- Add/remove a field that was used in a business rule; ex: Add/remove a column from a table that was used in a calculation.
- Change a spreadsheet that you are reading from or writing to using the Google connector.
When you edit a workflow and change business rule or add/remove fields, all the pending tasks pick up the latest version of the workflow. Pending tasks for a form/workflow that integrates with a Google sheet reflects any changes made to the Google sheet while the tasks are in-flight.
When uploading a form/workflow with the same ID as an existing form/workflow, without checking Replace, a copy will be created and the designer will see an error message: "The form/workflow that was uploaded matches the id of one that already existed so a copy was made. If you intended to replace the existing form/workflow, delete the form/workflow you just uploaded and upload it again but check off the ‘Replace’ option."
When uploading a form/workflow with Replace checked that is currently being edited by another user, the designer will see this error message: "This form/workflow is currently being edited by <user@tenant>. Please try again later."
How do changes to a production form/workflow impact in-flight tasks?
Some changes have little to no impact on your in-flight forms and tasks, but other changes can significantly affect, or even break, workflows that are in progress.
"Safe" Changes
Usually it is safe to:
- Move controls (except for moving controls into/out of sections, tables and repeats)
- Change control, form or workflow style properties.
- Change control Labels and selection control option Labels
- Edit Messages, email subjects and email messages (such as for task notifications and doc actions.)
Impactful Changes
These changes can impact the forms schema and routing, and thereby may impact forms and workflows that are in-progress.
- Changing a control Name or a selection control Option Value when that control is referenced in business rules, preconditions, and/or task assignments.
- For example, let's say you change a control name and then perform a pending task for that workflow from your task list. The data entered into the workflow on the prior form version will not display in the task with the renamed control.
- Move a control inside a section, repeat or table.
- Similar to the above example, data from tasks performed before the change may not appear on tasks performed after the change.
- Adding, removing or changing controls inside a signed section - this will invalidate signatures on sections that have already been signed, including completed forms/workflows that are edited from the Submission repository.
- Making a control required that was previously optional.
- Adding steps with required fields.
- Deleting or moving workflow steps.
Update the database (or google sheet, or 3rd party system) supplying data for dynamic select control options on form.[load,activate]. Any task performed from the task list that had an option set that was deleted or changed (for example, to fix a typo) from the database displays the control as blank again and required if that was the default. If you're on a workflow step where these fields are now disabled, such as an approval step, you need to reject back to the user of that prior task to re-enter the data.
This same behavior occurs if you change selection control option values.
- Adding or changing a precondition; if there is a pending task and the designer adds a precondition that resolves to false for that step (so it should be skipped), when the users attempts to perform it they will immediately see the pending message for the following step.
- Changing a single field to a repeat, or vice versa.
- PDF Mapping - if you update the template, field mapping may be impacted.
Updating a Workflow with In-flight Tasks
Modify Tasks
Let's say you have a Purchase Order workflow in production that is used frequently by your sales team. You have been working on some major updates to the workflow in a development project, and you are ready to update the production workflow. However, you know there are some "breaking" changes that will cause in flight tasks to render in error. For example, you've changed a control in a required signed section, and there is a Client Approval task assigned to a client's email (anonymous user) waiting to be signed. If you update the production workflow, that user may click on their task notification email and see an error message.
Follow these steps to identify and modify tasks that may be impacted before you update the production workflow.
- Optional: Set the Who can start the workflow? permission to "Designer/Owner Only" to prevent new submissions while you take the following steps.
- Search the Task List (as Workflow or Tenant Admin) for Pending tasks in this workflow. You can also filter by date, user, etc.
- You may also want to search the Submissions Repository for tasks that are pending. Tasks that are pending, but the "Locked By" column is empty, are pending for an email/anonymous user.
- Review the audit trail of each task to see how far along it is in the workflow.
- Tasks that are near the end may be able to be pushed through to completion (by communicating with, or logging in as, their assigned user.)
- For tasks that are pending for an email or earlier in the workflow, you may choose to modify the task and reset it back to Step 1. Tasks on Step 1 can be edited by the Step 1 user to ensure they meet the updated workflow's validation (required controls, etc.), and that user can click Continue to send it forward as usual.
- Once all pending tasks have either been completed or returned to Step 1, you can upload/replace your development workflow into the production project.
- If you changed the workflow permissions, change them back to their original state.
- Follow up with the users of modified tasks and/or login as those users to resubmit the existing tasks. You may also need to communicate with email users and ask them to perform their most recent task notification and ignore the prior one.
Update in Stages
The Modify Tasks option may sound daunting if you have hundreds or even dozens of pending tasks. Another option some customers choose is to update the form in stages. Let's say you're updating a Leave Request workflow, and you will be removing some controls, removing a dropdown option, and adding some required controls.
Stage 1
Make these interim changes on a development Version 2 of your Leave Request workflow, then upload/replace the existing production versions (Version 1) with Version 2.
- For the controls you intend to remove, make them disabled instead. They will still be visible on existing submissions, and will not cause in-flight flows to break.
- For the dropdown option you intend to remove, change the label to something like "not available" and add a business rule that sets the control to invalid and provide a helpful error message if that option is selected on the first step. Again, this will allow existing submissions with that option selected to function, but will prevent users from selecting it on a new workflow interview.
- For the controls you intend to make required, use a business rule to set them as required only on step 1. Existing tasks and submissions will be past step 1, so they will see this control as required. You can extend this logic to apply to your specific use case.
Stage 2
After enough time has passed that all of your existing tasks from Version 1 of the Leave Request have been completed, you can upload/replace it with a development version (Version 3) that has the controls deleted, the dropdown option removed, and the required controls always required. Since in Version 2, the deleted control was disabled, the deleted option not allowed, and the required control required, workflow interviews started on Version 2, but still pending, will be compatible with Version 3.
Make a Copy of the Form/Workflow
In some cases when you need to make major, or potentially breaking, changes to a form/workflow, you might choose to simply duplicate the form/workflow, start using the copy with the changes implemented and stop using the original/old form. When you do this, the old and new forms/workflows are completely separate - they will have separate submissions repositories, and you will need to update embedding, share links and/or portals where users access the form/workflow. However, you will not have to use either of the above methods so the development-to-production process is far simpler. This is a good option if you already save all submissions to a google sheet, google drive, database or filesystem instead of using the frevvo submissions repository, or if you don't mind looking in different submissions repositories before/after your new production date (perhaps for a form that changes year-to-year).
One example is a customer who had a production workflow but wanted to update it to use the frevvo Database Connector. Instead of updating the production workflow, they duplicated it and made the changes on the copy. Then, on the original workflow they restricted the Who Can Start the Workflow to designer/owner only, and updated their portal links with the new workflow. Those users who were still in progress on the old flow were still able to perform their tasks and never knew there was a difference, while any new users started on the new workflow.
Migrating a v7.4 or earlier Email Step to v8+ Email Assignment
Workflows built in v7.4 or earlier that have a step performed by an external/anonymous user were configured with an anonymous email step. Starting in v8, the email step is deprecated and you may now assign a step directly to an email address, similar to how you assign it to a User or Role. The anonymous email step has backward compatibility and continues to work, but will be retired in a future release. Additionally, there are many benefits to the Email Assignment such as the ability to reject back to the step assigned to email. Please follow these steps and review the cautions below to migrate your v7.4 and earlier email steps to v8+ email assignments.
- Download production workflow
- Upload to designer user
- Copy any details from the anonymous email step, such as subject, message, etc. to a text editor.
- Edit the step below the anonymous email step. Assign the step to the same email address or template, and paste details copied from the anonymous email step such as subject, message, etc.
- Delete the anonymous email step.
- Download the workflow from the designer user.
IMPORTANT: IN PRODUCTION Move any tasks that are currently on the email step by either resetting them to a prior, non-email step or sending them forward. Do this BEFORE step 8!
Workflow instances that have a pending task on the anonymous email step when the workflow is updated to use email assignment will be hung in the WAITING state and cannot be reset to another step.
If a user has clicked the link to perform the step but has not yet submitted it at the time the workflow is updated, they may still submit the step. Prior steps already performed by anonymous users are not affected by the workflow update.
- Upload/Replace workflow in production user.
You may edit submissions that were submitted with the old anonymous email step after updating the workflow to use the new email assignment step.
Form/Workflow designer edit ACL
The Access Control feature in frevvo allows the designer to assign other users permission to make changes to forms and workflows.
The ability to edit a form/workflow should not be given to other users if the form/workflow is in production. Giving this permission would enable those users to edit your production forms directly thereby subverting the best practices described in this guide.
Multi-Tenant Scenario
Development Tenant
It is best to have the roles in your test tenant match the roles in your production tenant. This enables testing of forms/workflow in development for ACL and navigation without having to edit your form/workflow before deploying the updated form/workflow to production.
Create test users in your development tenant. If you are using the default security manager, simply create the test users in the tenant. Refer to Customers using the LDAP/SAML/Azure Security Manager if you are not using the default security manager.
The role names in your development tenant should be the same as the role names in your production tenant. If they are different, modifications to your workflows will have to be made to users and workflows to reflect the production roles.
- Multiple designer users can create and test forms/workflows in each of their user accounts using the test users and roles.
- The designer users will download a finished and tested project and check it in to a source code repository (versioning) as the new version of the project. Ex: SVN, CVS, Google drive.
When further updates/modifications are required, the forms/workflows should again be edited in the designer user accounts and then upload/replaced in the generic production user account.
Production Tenant
- Create a generic production user account that has the frevvo.designer role (ex: “production@<your tenant>") on your production tenant to which you publish all forms/workflows.
- Assign the frevvo.publisher role to one or more users. These users have permission to upload new versions of your projects to your production user account.
- One of the users with the frevvo.Publisher role will check-out the new project from source code (a repository outside of a frevvo server) and upload/replace the project into the generic production user account
Customers using the LDAP/SAML/Azure Security Manager
If you are testing in a multiple tenant scenario, we recommend that both your dev/test and production tenants are configured with the same security manger. This is recommended for the following reasons:
- The only way to guarantee the same behavior for both tenants is to configure both with the same security manager.
- Each tenant should point to its own instance of your security manager.
- For example if you are using LDAP, a development LDAP domain with a set of LDAP groups that are EXACTLY the same as your production LDAP domain is suggested. This way workflows can be moved from your development tenant to your production tenant and workflow navigation w/roles is guaranteed to work correctly.
- The generic production user account (ex: "production") must be created in your IDP (LDAP, Azure, SAML).