frevvo v11.1 is no longer supported. Please visit the Documentation Directory for our current Cloud Release and other versions.
Submissions Stored Inside of frevvo
- Megan Ellis
frevvo comes with a built-in submissions repository. The repository can run on top of most SQL databases. By default, your form data is stored in the repository and can be viewed from the Submissions page. Fields in your form/workflow, set up as Searchable fields by the designer, can be used as criteria when searching submissions. You can also filter by default fields such as error, error description, submitter id, lock user id, started date, etc. The Insight Server and the Insight service must be running for the Submission view to work.

Accessing Submissions
To access submissions for a particular form/workflow, the designer who created the form (owner) navigates to the Forms and Workflows Home Page and clicks the ![]() Submissions icon for that form or workflow. The designer can grant permission to view/edit submissions to other designers and non-designer users/roles via the Access Control feature. Non-designers granted view/edit permissions, access submissions from the Shared Items tab.
Submissions icon for that form or workflow. The designer can grant permission to view/edit submissions to other designers and non-designer users/roles via the Access Control feature. Non-designers granted view/edit permissions, access submissions from the Shared Items tab.
A Shared Items link is added to newly created Portals automatically and can be added to existing portals.
Searchable, Summary, and Export Fields
Searchable, Summary, and Export Fields are available for configuration in the form/workflow Settings editing mode. They define which controls in your form can be used in search/filter, the submissions detail display, and the CSV download. It's important to understand the difference between each of these three settings.

Searchable Fields
Searchable Fields can be used as search criteria for submissions and tasks. They also define the columns that will be available in the Submissions Table. Once defined, frevvo can also go back and re-index existing submissions so you can search them using the same fields. Searchable fields and Export fields will be included in the Submission CSV download.
Cloud customers can configure up to 20 Searchable Fields.
In-house customers can change the default value by adding the frevvo.max.searchable.fields configuration parameter to the <frevvo-home>\tomcat\conf\Catalina\localhost\frevvo.xml file.
Summary Fields
Summary Fields can be used to configure the fields shown in the Submissions Detail: Data tab, as a quick view of data in the form/workflow. They will be shown in the order configured with the exception of Repeat controls and table columns, which will be grouped together by repeating control.
Export Fields
Export Fields define which controls will be exported, and in which order, in the CSV Download in addition to the metadata and Searchable Fields. The CSV can also be opened as an Excel Document, where the Export Fields selected are displayed as columns. Adding or changing Export fields will take immediate affect; there is no need re-index as with Searchable Fields.
Submissions View
From the form's three-dot action menu, select View Submissions to open the Submissions view, which consists of two sections displays:
- Submissions filter section
- Matching submissions results table.
Initially, the Submissions Filter section is collapsed. 
Click on the ![]() blue arrow to expand it. Click Reset to revert to the default filters.
blue arrow to expand it. Click Reset to revert to the default filters.

Submissions Filter
The Submissions filter section contains:
- Section A - From Date and To Date fields to specify a date/time range.
- Section B - Check the status of the submissions you are searching for
- Other Filter Items section - setup your search criteria, including the capability to edit the logical expression used as the search criteria.
- Logic Expression - As you add/remove filters, the logic expression changes automatically, defaulting the logic to AND. Click Edit to change the order of operations or the expressions.
- Reset button - To start over with a new set of filter criteria, click the Reset button. This will clear all criteria, including the from/to dates, state and all rows of the other filter items.
When the expression or any of the sub-expressions change in any way, the submissions query is automatically re-run and the results are updated in the Submissions Table.

Submission From Date and To Date
The two date/time controls specify the time period for the submissions you see. The dates default to the current date and one month earlier, so you see one month of submission results when the Submissions page first displays. Adjust the dates if you want a shorter or longer time period. The query will run in the current user's browser time zone.
Submission Status
The Submissions table will show submissions in the following states: SAVED, PENDING, SUBMITTED, ABORTED, WAITING. Simply check the appropriate check box in the State section. For example, It would be easy for a manager to check the current status of Expense Report approvals by checking one or all the submission types in the State box. The Submission Table dynamically changes as the submission state choices are checked/unchecked.
Here is an explanation of the available states:
- SAVED: This will return only those tasks which were created when users clicked the Save button on the form/workflow to save their partially filled forms
- PENDING: This will return all tasks which are pending, meaning someone else put these tasks in the users task list
- SUBMITTED: This will return all tasks which are completed, i.e. the form/workflow for which this task was created has been submitted
- ABORTED: This will return all the tasks that were deleted/aborted so the form/workflow never got submitted
- WAITING: The WAITING status can be used to find workflow tasks that have an Email or HTTP activity. A submission will show a state of WAITING when a workflow is routed to an anonymous user and the workflow is suspended until the this step is completed.
Choose Search Criteria from Form/Workflow Data
The Other Filter Items section describes the conditions that submissions must match in order to be included in the Submission Table. Here is how the grid works:
- Click the
 plus /
 minus icon to add/remove rows. Rows are labeled numerically beginning at 1 and are color coded. You can specify up to 100 rows of filter criteria.
 - Specify the field, condition and value for the search criteria you are adding. For most conditions, all three columns are required but there are some that may not require a value.
- As you add fields and conditions, they are automatically added to the logic expression field by appending an "AND" and the character of the sub-expression (A for the Date section, B for the State section or the number of the row in the filter table as appropriate). Each sub-expression is color coded for quick reference. The characters for the sub-expressions are also color coded to match the row in the grid where the expression is defined.
- Click the Edit button to modify the logic expression.
- Click the Reset button to clear all of the search criteria.
Let's take a closer look at the columns in the Other Filter Items grid.
Field Column
The Field column includes a dropdown where you can select any fields that were specified in the Searchable fields wizard in your form/workflow or you can choose from default columns that are available across all form and workflow types.

Condition Column
The Condition column choices depend on the data type of the selected field. Click below to see a list of the data types and their corresponding options.
For example, the choices in the Condition dropdown, will be different if you select the Submitted Date or the ProjectName, which is a searchable field in the form/workflow from the Fields list.

Condition Choices when a Date field is selected from the Fields list.

Condition Choices when ProjectName, a text field in the Expense Report workflow, is selected from the Fields list.
Value Column
The values entered into the Value Column depend on the field type and also sometimes upon the condition chosen. Click below to see a table of the allowed values for Field Type(s) and conditions. The Values column is not case-sensitive, so entering "apple," "Apple," or "APPLE" will return the same list of results that contain those letters either upper- or lower-case.
For Example, if you select a Date field, the Date Picker is provided to help enter the value. If you select a Text field from your form/workflow, you will be prompted to "Enter text" for the value. If you select the Error metadata field, the value choices will be True or False in a dropdown in the Value column.
A Date/Time field with the "is within last" condition selected, requires a special time duration entry. The duration must be entered in this format: Years:Months:Days:Hours:Minutes. Fields to the left may be omitted. For example, if you were searching for submissions that were submitted within the last 2 hours you can enter 02:00 or as 2:0. To search for submissions created within the last 2 months and 12 days, enter 02:12:00:00.
If you enter an invalid value, an error will display with instructions, e.g. "Bad time duration value, must be Yr:Mn:Dy:hh:mm".

Editing the Logical Expression
If you want to modify the logical expression, click the Edit button. The logic expression becomes editable.
The Logic Expression allows you to customize and combine the filter conditions using ANDs and ORs as well as parenthesis () to group terms of the expression.
- Each filter item (expression) is represented by a letter (A for the Date range or B for the State or a number that corresponds to the row of the sub-expression in the Other Filter Items grid).
- Combine the letters and numbers using parenthesis to group items as needed.
- Build the logic of the overall predicate expression using AND and OR as appropriate.
- Click save when done to save the expression. Please correct any indicated parse errors in order to save.
For example, let's say you have a Job Application that has 3 submissions:
You want to display the submissions that were submitted on January 11, 2022 or any of the applicants that live in Connecticut (Mobile Phone Area Code is 203):
- Expand the Submissions Filter.
- Select the SUBMITTED state.
- Select the Acknowledgement Date field from the Fields dropdown
- Select "is equal to" from the Condition dropdown.
- Use the Date Picker to select "01/11/2022" as the value.
- Add a row to the Other Filter Items grid.
- Select the Mobile field from the Fields dropdown.
- Select "begins with" from the Condition dropdown.
- Enter "203" as the value.
At this point, the expression displays only one submission that has an Acknowledgement Date of 01/11/2022 AND has a Phone number that begins with an area code of 203. 
This is not the expected results. To display the submissions that were submitted on January 11, 2022 OR have a Phone number that starts with an area code of 203, the logical expression has to be modified.
- Click the Edit button.
- Change the expression to A AND B AND (1 OR 2)
- Click the Save button.

The submissions that match the Date range and State conditions and either were submitted on January 11, 2022 OR contain a phone number that starts with an area code of 203:

Upon selecting the Save button, the logic expression is parsed for correctness. If there is any parsing failure, an error message describing the failure is displayed and the screen remains in edit mode. If there is no error, then the screen returns to read-only mode.
Recap
In summary, let's say Jerry, a manager wants to create a submission query to check the status of all Expense Reports for Sales Demonstrations performed by the Sales department within the last month:
- Make sure you have a field in your Expense Report to specify the Project Name - for example, a dropdown with Infrastructure, Sales Demonstration and Customer Meeting options.
- Make sure Jerry has been granted permission to view submissions in the Access Control List for the Expense Report workflow.
- Create a portal and distribute the link to the portal to Jerry
- Jerry access the portal and logs into frevvo.
- Jerry clicks on the Important Items tab in the portal.
- Jerry clicks on the Shared Items tab.
- Jerry clicks the View Submissions option in the Expense Report workflow's Action Menu

- On the Submission Filter screen, Jerry selects:
- The Project Name field from the Fields dropdown
- The contains condition from the Condition dropdown.
- Types "Sales Demo" in the Value column.
- In the Submission Table, Jerry can quickly see that Maria Meyers has an Expense Report for a Sales Demonstration pending approval, Richard Walker has saved an Expense Report for a Sales Demo to his Task List, and an Expense Report for a Sales Demonstration was completed for Deborah Morris.

Submissions Table
Submissions matching the submission filter are displayed in the Submissions table. The table has the following features and behaviors:
- The results display a page at a time. The Previous, Next page buttons and individual page links, located in the lower right corner, can be used to "page" through the submissions.
- Select the number of submissions to display on a page from the choices in the Show 10 entries dropdown in the upper left corner. The default is 10, with 25, 50, and 100 being the other available sizes.
- The Record/Page summary appears on the lower left of the table. This details the records being shown on the current page and the total records matching the criteria.
- To select an Individual submission, check the checkbox next to that submission in the Select column (second) in the table. Checking the checkbox in the Select column header selects all submission records in the table. This action toggles the selection state of all rows in the table.
- The table is responsive and only displays columns it can fit on the display. Additional columns can be viewed by clicking the plus icon. The overflow columns are displayed in this secondary row. The overflow columns will wrap if necessary.
- Most columns in the table can be sorted. Clicking on a single column determines the sorting direction (ascending/descending) for all the sortable columns. An example of a column that cannot be sorted is Age/Duration. See below for the details.

Some of the Action buttons on the upper right of the Submissions Table require the selection of one or more submissions while others do not. Click below for a list of the buttons and their functions.
Submission Table Columns
The Submission Table displays all of the default columns plus columns for Searchable fields configured by the form/workflow designer. Click below for a list and description of the default columns.
Default Columns
The table list the describes the default columns that appear in the Submission Table. You cannot change the order of the default columns but you can Show or Hide them in the Submission Table.
| Column Name | Formatted | Default Column | Description |
|---|---|---|---|
| Submitted | Date/time | Yes | Time/date of the submission |
| Error | Yes | A  yellow icon in the Err column indicates the data was captured but there was an issue with the request. For example, if you set the form action property to go to a URL after the user clicks Submit but the URL is invalid, you would see a yellow icon. Or if the form action was set to send an email but the email address was missing, this will also cause a yellow icon to appear on the submission. yellow icon in the Err column indicates the data was captured but there was an issue with the request. For example, if you set the form action property to go to a URL after the user clicks Submit but the URL is invalid, you would see a yellow icon. Or if the form action was set to send an email but the email address was missing, this will also cause a yellow icon to appear on the submission. | |
| State | Text | Yes | Submission status: SUBMITTED, PENDING, ABORTED, SAVED, ERROR WAITING. This column displays the submission types selected in the State section of the Submissions Filter. |
| Submitter ID | Text | Yes | frevvo user ID of the logged in tenant user submitting the form or blank if the form was submitted by an anonymous user. |
| Submitter Name | Text | Yes | First and Last Name of the logged in tenant user submitting the form or blank if the form was submitted by an anonymous user. |
| Lock User ID | Text | Yes | If the submission is currently locked (and not SUBMITTED), this is the user id who has it locked. |
| Lock Date | Date/Time | Yes | If the submission is currently locked (and not SUBMITTED), this is the time/date when it was locked. |
| Lock User Name | Displays the First and Last name of the user who has a task locked, when viewing Pending tasks. | ||
| Started Date | Date | Yes | Date when the submission was created. |
| Age/Duration | Days, Hours, Minutes | Yes | For completed submissions (State=Submitted) this is the time interval for how long it was in process - from the first incomplete submission (Pending, saved, etc.) until it reached SUBMITTED status. If the submission is currently incomplete (i.e. SAVED, PENDING or WAITING), then the time interval shows how long has it been in process so far (Age). |
| Error Description | Text | Yes | Description of the error if the error column is true. |
This image shows a PENDING submission for a Purchase Order workflow. The first step of the workflow was submitted by a designer user (Submitter ID), Giorgio Armani (Submitter Name). It is currently pending approval by his manager, Jerry Mouse (Lock User Name). Jerry's frevvo user id is jerry (Lock User ID).
Searchable Field Columns
In addition to the default columns, the Submission Table contains columns for each searchable field setup for the form/workflow. Notice the Report Date, Project Name, Employee Name, Reviewer, Expenses Approved, Paid On Date and Check in the Expense Report workflow submission shown in the image. These columns are generated by fields in the workflow configured as Searchable fields. 
You can change the order of the Searchable Field columns by moving field positions in the Searchable Fields wizard. The changes will not reflect in the Submission Table until a new submission is created or existing submissions are resubmitted.
Show/Hide Columns
Clicking the Columns button in the Submission Table, allows the user to toggle the visibility of each table column. Initially, all columns are visible indicated by displaying their respective button in yellow. You will see the default columns and columns for each of the Searchable fields defined in the form/workflow.
Clicking a column toggles it to grey to indicate that it is not visible. Clicking it again toggles to visible/yellow. As you check/uncheck columns, the columns in the table change as appropriate.
Once you select your columns, the modified column view displays until you go back to the Forms and Workflows Homepage. If you redisplay the submissions, the original column view displays. If you use your computer function key to refresh the screen, the original column view displays. Use the Refresh button on the Submissions Table if you require a refresh.
Submission Details
When you open the Submissions view, you will see submissions for the previous month for that form/workflow. Notice the View/Edit and Delete submission buttons are greyed out. Checking the checkbox preceding the submission in the table enables these buttons.

To view a particular submission results document, double click the submission row of interest in the table to open the Submission Details popup. You can also check the box beside the submission and click View/Edit to open the popup.
You will see a Submission Info section (header), along with three tabs: Data, Signature and Documents. Clicking the X closes the popup.
- The Submission Info Section contains summary info about the submission, including the Form/Workflow Name, version, status and if applicable, error details, Submitted by <user> and the submission date and time.

The Form/Workflow name is a clickable link that opens the form/workflow in either read-only or edit mode.- PENDING workflows will only open in read-only mode.
- SUBMITTED forms/workflows will open in read-only mode for users with View Submission permission, and edit mode for user with Edit Submissions permission. In read-only mode, you will see a blue banner at the top of the form/workflow "This form is read only." See Editing Submissions for more details on edit mode.

- In read-only mode, workflows will open at the current step. You can use the navigation toolbar to navigate back to prior steps if needed.

The Data Tab displays controls selected as Summary Fields in the form/workflow settings, and attachments such as the PDF Snapshot, mapped PDF's and attachments uploaded by the user. This tab shows the user’s view of the data. This means for money controls you’ll see dollar signs, decimals and commas, for example. The Label column corresponds to the labels on your form, and the Value column shows you what the user entered in each control. This tab is view-only; you cannot edit any data shown here. If you do not see a specific form field then go back and edit this form to add the field to the Summary Fields tab.
The Summary Fields are shown in the order they were configured in the form/workflow Settings. However, controls that are grouped in a repeating section or a table will be grouped in this view regardless of the order set. This data is available for forms/workflows in SAVED or PENDING state (i.e. not only SUBMITTED) as long as the field contains data.
Attachment links are clickable and will open the attachment in a new browser tab.
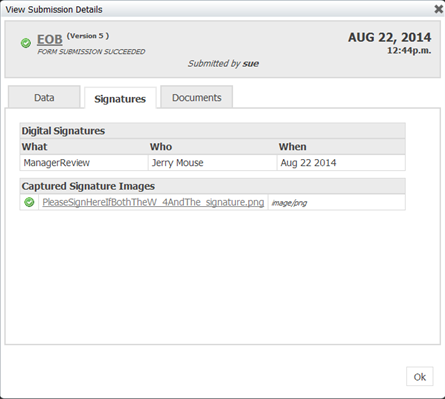
- The Signatures Tab shows you all the users that signed the form using frevvo's wet and digital signature features.

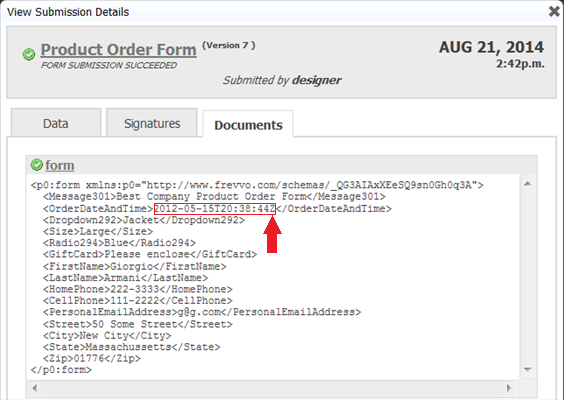
- The Documents Tab shows you the exact XML document that was generated when the form was submitted.

Viewing Attachments & PDF Images
Scroll to the bottom of the Data Tab to see all attachments uploaded to the form submission. If you selected Save PDF for this form in the form designer, you will also see an attachment named <form name>.pdf. This is an image of your form exactly how the user saw it when they filled it in and submitted it to you. Remember, decorators and placeholders do not appear in PDF's. The image below also shows W4-pdf and I-9.pdf attachments. These are additional Pixel Perfect PDFs generated for the Employee's Withholding Allowance Certificate and the Employment Eligibility Verification federal forms. Click the links on the Data Tab to view the PDFs or attachments.
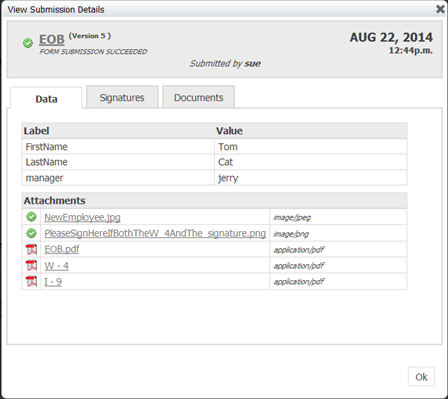
One of the attachments is a Wet Signature image. Clicking on the Submissions Stored Inside of frevvo#SubmissionsDetailtab lists the manager, Jerry's digital signture and the and wet signature image of the new employee. The signature image can be downloaded from the Data or Signature tabs of the form submission. There you will find information about any digital signatures that were stored with the form. See Electronic Signatures for more information.
Selecting zip as the Restricted/Mime type, uploading a zip file and submitting the form may exhibit some unexpected behavior when downloading the zip file from the submission. Clicking on the attachment in the frevvo submission repository does not save the uploaded zipfile as a zipfile. Instead, it will save it as a file with an unrelated name e.g. Upload91 or ProfilePicture. As a workaround, you can open the file using winrar.exe and then save it or simply use right-click and select the 'save as' option if it is available.
Currently the layout/style for submission pdfs depends on where the last activity is submitted. For Example, If the first activity in a workflow is submitted from a portal and the second activity is performed directly from a Task List outside the portal, the submission PDF renders in the layout/style the Task List uses. If the last activity in a workflow is submitted from a portal, the submission pdf renders in the portal's layout/style.
You can specify the name for the pdf and margins, header/footer content. Click the links for the details.
The File Name property allows the designer to rename attachments uploaded using the Upload Control.
Viewing XML Documents
frevvo always stores your form data as XML documents. To view the XML data, click the Documents tab in the Submission Details panel.

Dates will be stored in the YYYY-MM-DD format. There is no conversion to UTC timezones for the time control in the XML document. Date/Time values will be converted to the XML standard YYYY-MM-DDTHH:MM:SSZ.
Most business users can safely ignore the xml, but it can be helpful when debugging a form and when integrating with another entity such as a database.
Submission Errors
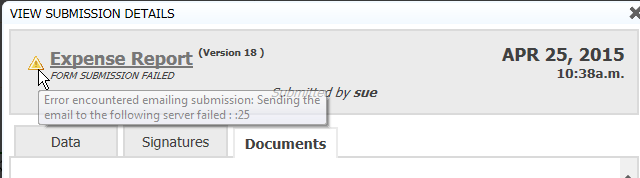
If your submission has an error, you'll see an icon in the Error column in the submissions list. You can get more information about the error in two ways:
- Hover over the icon
- Display the Error Description column. The Error Description column is the last default column in the Submission table.

Another way to get information about the error is to double-click on the submission to view its details, and again hover over the icon.
If a mapped pdf has a severe mapping error such as (Invalid E-form field), the workflow will submit and the pdf is generated. The submission is marked in error with a icon in the Submissions table. You will see the error: "One or more generated PDF forms generated with mapping errors. Some information may be missing." on the submission.
The Error Description column is the last default column in the Submission table.

If the Insight Server is down, submissions for ALL of your forms/workflow will no longer display. You will not see the error icon or any error description in the Error or Error Description columns. 
The tenant admin receives an email to alert them that the submission never reached the Insight Server.

The following error is logged in the In the <frevvo-home>\tomcat\logs\frevvo_YYYY-MM-DD.log,
18:07:09.654 |-ERROR [http-nio-8082-exec-3] [.s.s.FormSubmissionService] [mycompany designer] [5750c49b-be25-4715-81f1-2d3a94c30e1b 76DF75577B56B8BBEE392ACB16CEE3CE] [ ] - Could not send submission to insight server. org.springframework.data.solr.UncategorizedSolrException: Server refused connection at: http://localhost:8983/solr/mycompany; nested exception is org.apache.solr.client.solrj.SolrServerException: Server refused connection at: http://localhost:8983/solr/mycompany
Reports will show the message "No data available in table". Once the Insight server is restarted, the submissions will show in the Recent Submissions report and submissions will redisplay reporting the error. Remember, the Error Description column is the last default column in the Submission table.
Email Size Exceeded Error
This section applies only to frevvo Cloud Customers.
The frevvo mail server limits email size to 30MB. If emails sent in Activity Doc Action or Document Actions exceed this limit, your tenant admin may receive an email bounceback from "Mail Delivery System <"MAILER-DAEMON@sysops+stage"@frevvo.com>" that contains an error like this "message size 34559092 exceeds size limit 31457280 of server smtp.sendgrid.net[107.20.8.136]".
The only workaround for this issue at this time is to limit the Upload control max size and/or min # properties in your form. If you have a submission that has hit this error, you must edit the submission, delete some of the attachments and then resubmit.
Editing Submissions
Only submissions in the SUBMITTED state can be edited. If you have the correct permissions, submissions can be edited easily by clicking the form name rendered as a clickable URL on the submission. In this image below click on "Product Order Form" to edit the submission.

This will reload the current version of the form with the data from this old submission. If the form is linked to any back-end systems (via Doc URIs) these links will not execute as it would possibly change the submissions data. You can then edit the data in the form. All date/time controls will have the values automatically loaded in your machine's local timezone. The submission date/time in the image below shows Aug 21, 2014, 2:42 pm. This date/time is the timezone where the form server was running when this form was originally submitted. The <OrderDate>2012-05-15T20:38:44Z</OrderDate> is the date/time value in the OrderDate form field converted to UTC timezone. When this form loads, if the browser's timezone is America/New_York, the OrderDate control will display the value 16:38:44 as America/New_York is -4 hrs from UTC on a date where Daylight Savings Time is in effect.
Forms configured with a Doc URI will not execute the Doc URI when you edit the submission. The data displayed when you edit a form/workflow submission is from the submission data at the point in time when the form was originally submitted. Any Doc URIs will not execute and thus will not refresh data from your backend system.
When you click submit on the form/workflow, the frevvo submission repository will be updated with the new data. If the form properties are set to save a PDF then the PDF will also be replaced. You must perform a refresh to see the updated information for Searchable fields for forms/workflow on the Data tab after editing a submission.
If the current version of the form is different than when the data you're editing was originally submitted then some of the data may not be visible. For example, if your form contained a field for "detailed description", and the current version of your form no longer has that field as the designer removed it, then the detailed description data will exist but will not be visible/editable.
The designer can grant permission to view/edit submissions to non-designer users via the Access Control feature. Once permission is granted, submissions are accessible as Shared Items. It is also possible to build your own project that enables editable access to non-designers using the Data API.
frevvo Cloud users can edit submissions by default. In-house customers can turn off the edit link for all users by modifying the frevvo.submission.edit.link configuration property in the <frevvo-home>/WEB-INF/web.xml or the <frevvo-home>/tomcat/conf/catalina/localhost/frevvo.xml files.
Restarting a Workflow
To restart a workflow that has already been submitted:
Logged into frevvo as the flow/form designer user and edit the submission.
Once you have the submission open, click the "Save" button. This will save it to your (workflow designer's) task list.
Go to your task list and click "Modify this Task."
Select the first step of the workflow.
Sorting Submission Results
Columns in the Submission Table that are sortable display the ![]() up and down arrow icon in the column header. Clicking on the up section of the arrow icon in one column sorts all the columns in the table in the ascending direction. Clicking on the down section of the arrow icon in the column header in one column sorts all the columns in the table in the descending direction. This icon can also be used to toggle the sort direction. Submitter Name, Lock User Name and Age/Duration columns are not sortable.
up and down arrow icon in the column header. Clicking on the up section of the arrow icon in one column sorts all the columns in the table in the ascending direction. Clicking on the down section of the arrow icon in the column header in one column sorts all the columns in the table in the descending direction. This icon can also be used to toggle the sort direction. Submitter Name, Lock User Name and Age/Duration columns are not sortable.
At any time as a shortcut, you also can click anywhere inside the column header to toggle the sort of the results in ascending or descending order.
Changing the sort of a column from a submission table page > 1, goes back to the first page when displaying the results. This is as designed.
Deleting Submissions
The ability to delete submissions from the Submissions Table depends on your frevvo role, assigned Access Control permissions and the type of submission.
Who Can Delete submissions
The form/workflow owner (the designer who created the form/workflow) and any user given the Edit Submission permission by the designer can delete submissions in the SUBMITTED, ABORTED, and ERROR states.
The tenant admin, workflow admin, or the workflow’s designer/owner can delete submissions in the PENDING, SAVED, or WAITING states in addition to submissions in the SUBMITTED, ABORTED, and ERROR states.
Deletions of PENDING, SAVED, or WAITING submissions are first aborted then soft deleted. Users with the Edit Submission permission that are not the tenant admin, a workflow admin or the designer/owner of a form/workflow will see this error when attempting to delete submissions in these states.

How do you Delete Submissions
The Delete button is only enabled when one or more submissions are selected. The user is prompted with an ok/cancel dialog to confirm the deletion of the selected submissions. If ok/yes, the submissions are deleted, the filter re-runs, and the Submission Table is refreshed.
When you click the  Submissions icon, the submissions from the last month display. You may see submissions in various states. Notice the View/Edit and Delete buttons are greyed out.
To delete all the submissions on the page, check the checkbox in the select column header then click the Delete button.
You will be asked to confirm.
To delete a single submission, check the checkbox preceding the submission in the table. Notice the View/Edit and the Delete buttons become enabled. You will be asked to confirm.

Users that are not granted permissions to delete submissions see this error:
A successful deletion displays the following:![]()
Download Submissions to CSV file
The Export of submissions to Excel feature has been replaced by Download to CSV.
Submission data can be exported to a CSV (comma-separated value) file that can be easily opened in Microsoft Excel. The CSV will contain the submissions currently shown in your submissions table, and the control values configured in the Export Fields tab of your form/workflow. The default columns and any form fields designated as Export Fields appear as columns from left to right in the CSV file.
Verify that your Export Fields are properly set up in the form/workflow and that you see the expected submissions in the Submissions Table before Downloading to CSV.
Click the  Download button icon at the top of the submissions table to download the CSV file. The message below displays:
If you open the CSV file using a text editor the file will look like this:

If you open the CSV file with Microsoft Excel, the file will look like this. The columns Date of Invoice, Last Name, First Name, Phone, Product, and Email are set up in the form as Export Fields and reflect the data in these fields. The order of the columns is determined by the order set in the Export Fields tab.

For example, let's say your requirement is to upload submission data from frevvo to a different website.
- Perform the submission query so the data that you want to download displays in the table. The default columns in the submission table appear in the spreadsheet even if you are not displaying them in the table. Hide the columns in Excel if you do not want to display them in your spreadsheet.
- Click the Download button to save the CSV file.
- Open the file in Microsoft Excel.
- Show/Hide columns in the spreadsheet if desired.
Changing the Column Order in the CSV file.
The CSV column order will be a) the Submissions table fields, including Searchable Fields in the order they are set, then b) Export fields in the order they are set, then c) additional metadata fields from the Submissions Table. To change the order of the columns in the Submissions CSV file, change the order on the Searchable Fields and Export Fields tabs. The CSV file will reflect the new column order. When editing the file in a spreadsheet application (e.g. Excel) you can easily rearrange the columns if needed.
Repeating Data
If repeating controls are set as Searchable Fields, the Submission Table shows their values as a comma-separated list.

Repeat controls or table columns designated as Export Fields generate multiple rows in the exported CSV/Excel worksheet for each form submission - one row for the submissions itself plus one row for each repeat item added and filled on the form.
Here is how the Excel workbook looks when you initially open it after downloading.

The CSV file viewed in a text pad will also reflect this pattern.
Date and Time Controls exported to the CSV file
Date controls are stored in the XML document in the MM/DD/YYYY format. Date controls and time controls are NOT converted to UTC in the CSV download. Date/Time control values are converted to the XML standard YYYY-MM-DDTHH:MM:SSZ.
For example, this Product Order submissions table shows two submissions: one customer order entered on January 3rd, 2022 at 2:30 PM and another on February 9, 2022 at 10:30 AM in the Eastern Standard Time Zone.
Viewing the Documents tab in the submission details for the February order, notice the Order Date and Time is expressed in UTC while the separate Date and time fields are stored as expected for those datatypes. 
In the CSV Download file (viewed here in Excel) the DateTime control displays the value in UTC and in ISO format. The Date displays in MM/DD/YYYY format and the Time in HH:MM:SS format.

Numbers or Text Controls with Leading Zeros
When you open a CSV file in Excel, number or text control submissions that contain leading 0's will have the leading zero removed. For example a zip code entered "06405",

will appear in Excel as "6405".

This happens because Excel makes assumptions about the way imported data should be formatted; usually leading zeros are mathematically insignificant, so they are removed. You can keep the leading zeros in CSV files by using Excel's Text Import Wizard. (These instructions may vary based on your Excel version.)
- Launch Excel Spreadsheet. Click the Data tab.
Click the From Text/CSV icon. Use the file manager to locate the CSV file you want to import.
Click Import.
- Select Comma from the Delimiter dropdown.
Click Transform Data.
Select the column(s) that contains the data with leading zeros. Change the Data Type to "Text". The preview will refresh to show your data with leading zeros.

Click Close & Load.
Submissions View on Mobile Devices
The Submission view screen is designed to be responsive to different screen sizes. You will notice a different layout for small screens (< 640px) such as the iPhone. The "Other Filter Items" grid renders with a vertical layout of field, condition, and value. 
- Values are selected from a wheel scroller user control that displays when the user touches the field.
- The matching submissions grid/table only displays columns it can fit. Click the plus icon to view additional columns.
- The Action buttons (Refresh, View Submission Details, Delete and Show/Hide columns) do not have text labels on phone screens (<640px). Also,
- The page size selector and individual page selection buttons do not show on smaller screen sizes (<640 px).

Viewing submissions from the Shared Items tab (inside or outside of a portal) on an IOS device (iPad,iPhone), may require an application to edit and save Excel.xls files. This requirement is browser specific.
Processing submission data using the frevvo API
frevvo provides a complete API for interacting with the system. Using the API, you can query submissions, download submission PDF/XML, etc. Using the API is documented in its own Tutorial.