Live Forms Latest - This documentation is for Live Forms v9.2. v9.2 is a Cloud Only Release. Not for you? Earlier documentation is available too.
COVID-19 Response Info: At frevvo, our top priorities have always been employees and customers. We have taken several steps to promote the well-being of our people, to minimize services disruptions, and to help where we can. Visit our website for updates.
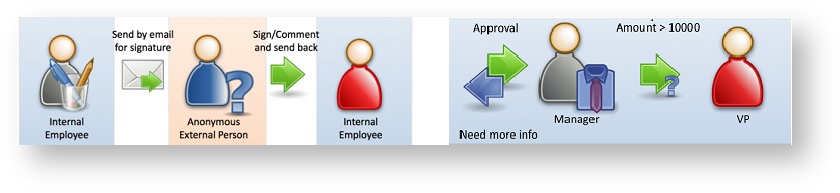
Workflow Tutorial
Approval workflows are everyday actions that businesses perform on a routine basis. This tutorial will show how easy it is to create an Approval Workflow using . We will use an example of a services Purchase Order workflow to demonstrate design patterns and
features. If you need basic help using the
Workflow Designer, please refer to the Getting Started with Workflows guide, and then return here.
What are we going to build?
Many companies offer software services to their new and existing clients. This tutorial will produce a Purchase Order workflow for services that follows this business scenario:
- A sales person accesses the company's Purchase Order form, fills in the customer's email address and other required information, signs it and clicks Continue.
sends a customized email to the customer that contains a link to the PO.
- The customer clicks on the link, reviews the Purchase Order, approves and signs it or sends it back to the company for corrections
- The workflow is routed back to the sales person.
- The sales person reviews the PO, and sends it to his manager for approval. The manager receives an email.
- The manager clicks on the link in the notification email, logs onto
- If approved by the manager and the total amount of the PO is greater than $10,000.00, the workflow is routed to the VP for final approval.
What You Will Need
You need either a Live Forms Online account -- signup for a 30 day trial if you don't already have an account. Or use a working Live Forms In-house software installation. If you are using In-house software you will also need to create a tenant, add a designer user to that tenant and configure email.
Example Project
Download this example project (WorkflowTutorial_project.zip) that contains completed workflow examples as well as the forms you need to build the workflow yourself using the steps below.
Upload the project to your user account. Follow these steps:
- Browse the appropriate URL below and log into your tenant as the designer user:
- Cloud: https://app.frevvo.com/frevvo/web/login
- In-house: http://<server>:<port>/frevvo/web/login
- Click the
 Add icon at the top of the Projects Home Page and select
  Upload Project.
 - Browse for the downloaded project zipfile (WorkflowTutorial_project.zip).
- Do not check the Replace or Copy checkboxes.
- Click the Upload button.
The project is uploaded and immediately appears in your list of projects.
Set Up Roles and Users
We need to create several roles and users assigned to those roles in order to complete all of the steps in this tutorial. Users and Roles can only be created by the tenant admin.
Create the VP Role
Login to
Click the Manage Roles link.
Click the
 plus icon.
Type "VP" into the role name and click Submit.
Create Users
We'll create a few users and assign some of them roles and supervisors.
Add "jerry"
Log on to
Click Manage Users on the Manage tenant page
Click the
 add new user icon which will bring up the Add New User form
Enter "jerry" as the User Name then enter all the required information - leave the Reports To and Roles fields empty. Click Submit.
Edit "designer"
- You should be back on the user list - click the
 edit user icon for the designer user.
 Select jerry from the Reports To dropdown. Click Submit.
Add "ed"
Click the
add new user icon which will bring up the Add New User formEnter "ed" as the User Name then enter all the required information.
Leave the Reports To field empty
Select the VP role from the role dropdown. Click Submit.
Add "sue"
Click the
add new user icon which will bring up the Add New User formEnter "sue" as the User Name then enter all the required information.
Leave the Reports To and Role fields empty. Click Submit.
Add "jim"
Click the
add new user icon which will bring up the Add New User formEnter "jim" as the User Name then enter all the required information.
Leave the Reports To field empty.
Select VP from the Role dropdown. Click Submit.
You should be back on the user list. Logout.
1 - Create the Workflow
First, build the workflow using the Workflow Design Wizard, which provides an easy way to quickly create all of your approval steps and business rules to route them at once.
Let's begin by using the built-in Workflow Design Wizard to create the steps of our workflow and automatically add routing and business rules.
- Click the name of the Workflow Tutorial project (or click the
 Action Menu and select
  Open.) to go to the Forms and Workflows homepage.
 - Click the
 Add icon and select
  Create a New Workflow. The Workflow Design Wizard will open.
- Enter a Name and Description for your workflow, i.e. Name: "My Purchase Order Workflow," Description: "Example PO workflow for tutorial." Click Next.

- Notice that the first step is already created for us. Rename it to "PO." Then, instead of the default "Create New Form," select the existing form "PO" form from the Step Type dropdown.

- Click the Add icon to add Step 2.
- Rename the new step "Client Approval"
- Leave the default Step Type set to "Approval Step"
- Leave the default Assignment Type "To an Email Address." You will see that the email field defaults to your email - leave that as is for now. We will change it to a template later.
- Click the Add icon to add Step 4.
- Rename the new step "Sales Review"
- Leave the default Step Type set to "Approval Step"
- Change the Assignment Type to "To a User." Add yourself as the user. We will change it to a template later.
- Click the Add icon to add Step 4.
- Rename the new step "Manager Approval"
- Leave the default Step Type set to "Approval Step"
- Change the Assignment Type to "To a User." Add yourself as the user. We will change it to a template later.
- Click the Add icon to add Step 5.
- Rename the new step "VP Approval"
- Leave the default Step Type set to "Approval Step"
- Change the Assignment Type to "To a Role." Add the role VP (you will have to create this role in your tenant first.)

Click Finish. Your initial workflow should look like this:

The Workflow Design Wizard added some controls and business rules for you, which saves a lot of time! These can also help you to understand the actions of business rules so that you can change them or add your own. Open the PO step by clicking the pencil icon. Scroll down and notice that the wizard added approval sections for Client Approval, Sales Review, Manager Approval, and VP Approval. The Client Approval has a Wet Signature control and a Date control. All the other approval sections are Text/Signature Image Signed sections because they will be performed by authenticated users.
Now look at the business rules by clicking the Rules Icon. Some of these came over with the PO Step, but the rules to show/hide the approval sections on each approval step were added by the Workflow Design Wizard.
Visit the Workflow Design Wizard documentation for more details about how it streamlines workflow creation!
2 - Customize the PO & Client Approval Steps
This workflow sends the Purchase Order electronically to the customer for their review and signature.
- The customer's email address is entered by the sales person on the first step.
- An email is sent to the customer with a link to the PO.
- The customer clicks the link to review the PO, approves and signs it or sends it back to the sales person for corrections.
Note, the customer does not have to be logged into a tenant (anonymous) to perform the Approval step.
We need to customize:
- The Approval Section on the PO form.
The Task Assignment that sends the step that the customer signs.
Task notification emails to the customer and sales person.
A document action to send an email to the sales person and the client. A signed PO is attached to the email when the workflow is completed.
You will need at least one valid email address to test this workflow.
Add Rules
First, let's add a rule to make the client signature required when the client approves the PO.
- Click on the PO Step, and then click Edit.
- Drag the Agreement Section inside the Client Approval Section.

Click the Rules icon to open the Rules Editor. Notice that several rules already exist; some were present on the PO form that we used. Others were added by the Workflow Design Wizard. The descriptions tell you each rule's purpose.
- Add a Rule. Name the rule "Set Client Signature to Required." Add a description "Set Client Signature to Required when approved."
- Set the Condition to "ClientApprovalCheck" "is filled."
- Set the Action to "signature_ClientApproval" "to required."
- Set the Else Action to "signature_ClientApproval" "to optional."

Next we'll update the rule "On Approval Step (Client Approval)" to hide the Instruction section on the Client Approval step. The Instructions should only show on the steps performed by company employees logged into . This rule was built by the Workflow Design Wizard, so it already makes the Client Approval section required on the Client Approval and optional on all other steps. Since the Instructions section can work under the same condition, we'll just add it to this existing rule.
Find the rule named On Approval Step (Client Approval)
Click any pencil icon on the actions.
Click Add Action - this is the Action wizard where you set up actions that will happen if the condition is true.
Set the Instructions section to hidden.
Click Next then click Add Action - this is the else action wizard where you set up actions that will happen if the condition is false.
Set the Instructions section to visible.
The Rule should look like this on the Rule Editor page:
- Click save to save your rules and go back to the workflow designer.
Messages
Click on the Client Approval step, and then click the
 Step Properties icon. On the Step Properties wizard that pops up, pick the Messages tab.
Copy the message below into the Pending Message box.
The Purchase Order for {ClientName} at {ClientCompany} has been sent to the client for approval.{ClientName} and {ClientCompany} are examples of templates. Templates are specified by surrounding the name of a control in your form with curly braces.

- Keep the popup window open - we'll use it for the next step.
Task Assignment & Continue Button
- Click the Setting tab (on the Client Approval Step Properties popup)
Type 'Send to frevvo, Inc' into the Continue label property to change the text to something more meaningful.
- Click the Rejection tab, uncheck the Reject to here and Reject from here checkboxes. The Reject button feature will be discussed in a later example.
Click on the Assignment tab of the Properties window. Remove your email and enter the template {ClientEmail} into the Assign to Email property. ClientEmail is the field in Step 1 where the sales person enters the email address of the customer.
{ClientName},
<br/><br/>
Please review and sign this Purchase Order from frevvo Inc. by clicking on <a href="{task.perform.url}">this link</a>.
<br/><br/>
Thank You.
- Click Submit.
Document Action, Workflow Action and Access Control
- In this example, the workflow will end after the client approves. The sales person receives an email with a copy of the workflow PDF attached. Follow these steps to configure this email.
- Click the header in the Workflow Designer, then click the
 section in the properties panel. The Workflow Properties window will appear on the Document Actions tab.
 - Click the Send Email radio button.
Enter {SalesEmail} and {ClientEmail} in the To: field. Separate them with a comma. Ex: {SalesEmail},{ClientEmail}
- Enter "Purchase Order for {ClientName} at {ClientCompany}" in the subject field.
Copy the text below into the message field to replace the existing message.
The Purchase Order from {ClientName} at {ClientCompany} is attached. Please review. <br/> Thank You.- Select PDF from the Send Snapshot dropdown. This adds a PDF to the email after the customer approves it or requests corrections.
Do not check the Send Data checkbox. Check the Attachments checkbox. These selections ensure the workflow xml will not be attached to the email but any attachments that are uploaded will.
- Click the header in the Workflow Designer, then click the
- Customize the message the client will see when they click the Send to frevvo, Inc button.
Click on the
 tab.
tab.Click the Display Message when user submits workflow radio button. Enter "The Purchase Order for {ClientName} at {ClientCompany} was sent to frevvo, Inc.".
- Change the visibility of the workflow to public so the customer (anonymous user) can access it. To do this:
Click the
 tab.
tab.Under Who can start the workflow check the radio button for 'Anyone (login not required)'.
Click Submit.
- If you want to see the details of the forms, click on a step in the workflow then click the
 Edit icon on that step. The form will display in the forms designer. You can view the business rules by clicking on the
  Rules icon.
 - The Workflow Visibility does not have to be set to Anyone (login not required) when you have a step in your workflow that is assigned to an email address and is performed by an anonymous user. Any of the Workflow Visibility options will work.
- If you want to see the details of the forms, click on a step in the workflow then click the
Test the Workflow
- Click the
 save/exit icon then the
  Test icon. Click the
  blue right arrow to expand the Instructions section. This section is only visible to internal employees of the company.
 - Fill in the first step of the PO and sign.
Click the Send to client button. You will see your customized pending message.
Log out of
Open the customer's email with a "Purchase Order from frevvo" subject. Click on the link provided.
The customer will see the completed PO and a section where they can sign to approve the PO or send it back if corrections are needed. In this example, the Reject button does not show as it is not configured for this workflow step.
Approve the PO for now. We will cover rejecting the PO in a later section. Sign as the customer. Verify the Date Signed field is populated with the current date after signing.
Click the Send to frevvo, Inc button. (In order to see the finished products of these customizations, you will need to complete the next steps as well. For steps assigned to you, you will be prompted on the screen that you are eligible to perform the next step. Accept it, click "Sign this Section on the required approval section. For the VP step, log in as a user with the VP role (or give yourself this role) and sign the approval section.) Once you submit the final step, you will see your custom message.
The sales person and the client receive an email "Purchase Order for {ClientName} at {ClientCompany}" as the subject.
Open one of the emails and click on the PDF. Verify the Sales Information, Client Information, Client Services details and the Agreement section with the customer's signature are included.
3 - Customize the Sales Review Step
The PO form has a hidden field that is populated with the user id of the sales person by a business rule. We will set an assignment on the Sales Review step that uses the information in this field to route the workflow back to the sales person. We can also customize the Task List notification email that the sales person receives.
Also, in order to be able to use data from the PO workflow to search submissions and tasks, we will define the fields that we want to use as search criteria using the Setup Searchable/Summary fields wizard.
Set up Searchable Fields
- Login to your
- Edit the Workflow Tutorial project.
Click the Purchase Order Workflow to open the Workflow Designer.
- Set up the fields from the workflow to use as task and submission search criteria. For example, if we define the control named ClientCompany as a searchable field then we can search for Purchase Orders that were submitted by a particular company.
- Click the Searchable fields link on the Workflow Properties panel.
- Minimally, move the Client Company, Client Name and Total Amount fields from the Available Fields column to the Searchable Fields column. Add/remove any other fields that you want to define as Searchable Fields.
- Click Submit.

Assign the Sales Review Step
- Click on the Sales Review step, and then click the Step Properties icon.
- Click on the Assignment Tab. Type {SalesID} in the Assign to User property on the panel.
To customize the task notification email the sales person receives:
Type "Review PO from {ClientName}" in the subject field.
Leave the default message.
- Click on the Messages tab. Type "Thank you! Your PO has been sent back to frevvo Inc." in the Pending Message property. This is the message the client will see when they click the Send to frevvo, Inc button on the previous step.
Type "Client: {ClientCompany}" in the Task Information property. The Task Information helps the sales person identify the task on the Task List.
- Click Submit
Edit Workflow Actions
Click the workflow header, then click the
 tab on the properties panel. Click on the Display Message wizard. Change the message back to
The Purchase Order for {ClientName} at {ClientCompany} is complete.Click Submit.
- Click the
 save/exit icon to save your changes.
Test the Changes
- Click the
 Test icon or the
  Save and Test icon from the Workflow designer.
 - Fill in the PO and sign as the sales person. Click the Send to client button.
- Log out of
- Check the email account for the customer. Access the notification email, click on the link provided.
- Approve the PO. Sign as the customer.
- Click the Send to frevvo, Inc button. You will see your customized pending message.
- Check the sales person's email account. Click the link in the notification email.
- Log into
The Sales person (designer) is taken directly to the task. The link in the email is built with will the {task.perform.url} that bypasses the Task List.
- Review the PO and click the Continue button. (In order to see the finished products of these customizations, you will need to complete the next steps as well. For steps assigned to you, you will be prompted on the screen that you are eligible to perform the next step. Accept it, click "Sign this Section on the required approval section. For the VP step, log in as a user with the VP role (or give yourself this role) and sign the approval section.)
Check the email account for the sales person. Verify that the PDF shows the Client and Sales information, the Client Service Order details and the Signed Agreement section.
Logout
4 - Create a Live Forms Space
A space is a built-in portal that's very simple to create and makes it easy to test your forms and workflow(s). We will create a space to test the remaining examples. The Task Notification emails for the remaining Purchase Order examples will send the user to their Task List in your space.
Default Space
The Tenant Admin can set a Default Space on the Manage Tenant page. Task Notifications will then link the user directly to their task or task list in your Default Space without the need to configure the URLs in the workflow properties.
- Login to your tenant as the designer user.
- Open the Workflow Tutorial project.
- Find the Purchase Order Workflow in the list.
- Click the
 Action Menu and select
  Deploy to remove the development watermark and deploy your workflow to production.
 - Click the Spaces link at left. Click the Add icon.
- Enter a Space Id i.e. workflowtutorial and a Space Name i.e. Workflow Tutorial Space and click Create. You will be directed to the Space Editor. Click Save.
- Click the Action Menu and select
 Share. Copy the share URL for your space. Bookmark it in a different tab of your browser. Save the URL. You will need it for the Task Notification email messages in Example 4.
 - Logout.
5 - Customize the Manager Approval Step
Modify the Manage Approval Step
- Click on the Manager Approval step, then click the Step Properties icon.
Click on the Assignment Tab. Type "{subject.reports.to}" in the Assign to User property.
To customize the task notification email the manager receives,
Type "Approval needed for PO from {ClientCompany}" in the Subject field.
If a Default Space has been set, {task.perform.url} will send the user to the task in your space and you do not need to customize the url.
Optional (if no Default Space set): Replace the {task.perform.url} template with the URL to the Space we created above. Make sure the space URL is included between the double quotes. Append /tasklist to the end of the URL. The message shown below will send the user to their Task List in a space with an id of workflowtutorial.
You can access your task by clicking <a href="https://app.frevvo.com:443/frevvo/web/tn/mycompany/u/85a7dee1-e4cc-4c31-bcc6-d6929fb4d2b2/space/workflowtutorial/tasklist">this link</a>
Click on the Messages tab. Type "PO sent for your Manager's Approval" in the Pending Message property.
Type "Client: {ClientCompany}" in the Task Information property.
Click Submit
Modify the Sales Review step
Click to select the Sales Review step. Click the
 Edit Step Properties icon then click on the General Settings tab.
Type "Send to Manager" in the Continue Label property.
If a Default Space has been set, {task.perform.url} will send the user to the task in your space and you do not need to customize the URL.
Optional (if no Default Space Set): Click on the Assignment Tab. Do not make any changes to the Subject under Task Notification Email instruction. In the Message field, replace the {task.perform.url} template with the URL to the Space we created above. Make sure the space URL is included between the double quotes. Append /tasklist to the end of the URL. The message shown below will send the user to their Task List in a space with an id of workflowtutorial.
You can access your task by clicking <a href="https://app.frevvo.com:443/frevvo/web/tn/mycompany/u/85a7dee1-e4cc-4c31-bcc6-d6929fb4d2b2/space/workflowtutorial/tasklist">this link</a>
Click Submit
Click the ![]() save/exit icon to save your changes. Log out of the designer.
save/exit icon to save your changes. Log out of the designer.
Test the Changes
Click the link to your space that you bookmarked earlier. Login as the designer user.
Select the Purchase Order Workflow from the Workflow Tutorial tab. Fill in the PO and sign as the sales person. Click the Send to client button.
- Logout of the space
- Check the email account for the customer. Access the email with the subject "Purchase Order from frevvo", click the link provided.
- Approve and sign the PO as the customer.
- Click the Send to frevvo, Inc button.
- Check the sales person's email account. Find the notification email with the subject "Review PO from {ClientName}" and click the link.
- Login to your
- Review the PO then click Send to Manager.
- Check the manager's email account for the notification email with a subject "Approval needed for PO from {ClientCompany}". Click the link in the email.
- Login to your
 Perform icon. Note the Manager Approval section displays as specified by the Show/Hide rule.
 - Add a comment and sign as the manager. Click Continue. (In order to see the finished products of these customizations, you will need to complete the next steps as well. For steps assigned to you, you will be prompted on the screen that you are eligible to perform the next step. Accept it, click "Sign this Section on the required approval section. For the VP step, log in as a user with the VP role (or give yourself this role) and sign the approval section.)
- Logout of the space.
The sales person and the client receive emails with the signed/approved PDF. Verify that the PDF shows the Client/Sales information, the Client Service Order details, the Signed Agreement and Manager Approval sections.
6 - Customize the VP Approval Step
Modify the VP Approval Step
- Click on the VP Approval step then click the Edit Step Properties icon.
Click on the Assignment tab. To customize the task notification email the VP receives, Type "VP Approval needed for PO from {ClientCompany}" in the Subject field.
Optional (if no Default Space Set): In the Message field, replace the {task.perform.url} template with the URL to the Space we created above. Make sure the space URL is included between the double quotes. Append /tasklist to the end of the URL. The message shown below will send the user to their Task List in a space with an id of workflowtutorial. Click Finish.
You can access your task by clicking <a href="https://app.frevvo.com:443/frevvo/web/tn/mycompany/u/85a7dee1-e4cc-4c31-bcc6-d6929fb4d2b2/space/workflowtutorial/tasklist">this link</a>
- Click on the Messages section in the Properties panel. Click on the Message Tab. Set the Pending Message property to "PO sent for VP Approval".
- Type "Client: {ClientCompany}" in the Task Information property.
- Click Submit.
Modify the Manager Approval Step
- Click to select the Manager Approval step.
- Set the Continue Label property to "Send to VP". Click Submit.
- Click the save/exit icon to save your changes.
- Logout of the designer.
Test the Changes:
Click the link to your space that you bookmarked earlier. Login as the designer user.
Select the Purchase Order from the Workflow Tutorial tab.
- Fill in the PO and sign as the sales person. Click the Send to client button.
- Log out of your
- Check the email account for the customer. Access the email with the subject "Purchase Order from frevvo", click the link provided.
- Approve and sign the PO as the customer.
- Click the Send to frevvo, Inc button.
- Check the sales person's email account. Find the notification email with the subject "Review PO from {ClientName}" and click the link.
- Login to your
 Perform icon. The red Perform icon indicates that the task has been assigned to a specific user. In this case, the sales person (designer user). Review the PO then click Send to Manager. Logout of your
 - Check the manager's email for the notification email with a subject "Approval needed for PO from {ClientCompany}". Click the link in the email.
- Login to your Perform icon. Note the Manager Approval section displays as specified by the Show/Hide rule.
- Add a comment and sign as the manager. Click Send to VP. Logout of your
- Check the VP emails with the title "VP Approval needed for PO from {ClientCompany}". Click the link in the email.
- Login to your
 Perform icon. The blue perform icon indicates that the task has been assigned to a role. The task will be locked when the first user assigned the VP role clicks the Perform icon.
 - Note the Manager Approval and VP Approval sections display as specified by the Show/Hide rules.
- Enter a comment for the VP, sign and click Finish. Logout of the
The sales person and customer receive emails with the signed/approved PDF. Verify that the PDF shows the Client/Sales information, the Client Service Order details, the Signed Agreement,Manager Approval and VP sections.
Since we have seen working examples of how the Task Notification emails work, we will bypass them for the Manager and VP steps when testing workflows going forward.
7 - PO Conditional Routing
In , preconditions are used to add logic to your workflow to skip or perform a step when the condition is true. We will add a precondition on the VP Approval step to route the workflow to the VP only if the Total Amount of the PO is greater than or equal to $10000.00. When the VP approves, the workflow will be completed and the sales person and client receive emails with the signed PDF.
If the amount of the PO is less than $10,000.00 then the VP step will be skipped and the workflow will end with the Manager Approval step. The sales person and the client will get the email with the signed PDF.
You can type the JavaScript for the precondition or let create it for you using the Precondition Rule Builder.
Modify the Workflow
- Login to your
- Open the Workflow Tutorial project, then edit the Purchase Order Workflow.
- Click on the Manager Approval step then click on the General Settings section of the Properties panel. Change the text of the Continue button to say Finish or Send to VP. Click Submit.
Click on the "VP Approval" step
- Click on the Precondition Tab in the Properties panel.
- Make sure the Slider is set to Precondition Builder On (this is the default).
- Click on the Edit below the slider. It will open a popup to set the precondition. Click "Add Condition".
- Select the TotalAmount control from the first dropdown.
- Select is equal or more than from the operator dropdown.
- Slide the toggle to the right and enter 10000 into the literal field.
Click OK.

Click Submit.
- Click the save/exit icon to save your changes.
- Logout of the designer.
Test the Changes
Click the link to your space that you bookmarked earlier. Login as the designer.
Select the Purchase Order from the Workflow Tutorial tab.
- Fill in the PO with a Total Amount value that is equal to or greater than $10,000.00. Sign as the sales person. Click the Send to client button.
- Log out of your
- Check the email account for the customer. Access the email with the subject "Purchase Order from frevvo", click the link provided.
- Approve and sign the PO as the customer.
- Click the Send to frevvo, Inc button.
- Log into your
- Click the Perform icon. Review the PO then click Send to Manager. Logout of your
- Login to your
Click the
Perform icon. Add a comment and sign as the manager. Click Finish or Send to VP. Logout of your - Login to your
- Click the Perform icon. Add a comment and sign as the VP. Click Finish. Logout of your
- The sales person (designer) and the customer will receive an email with the signed PO. Check the PDF to make sure the VP approval is included.
- Run the workflow again with a Total Amount that is less than $10000.00. The workflow is finished after the Manager Approval step.The sales person and client receive an email with the signed PDF.
8 - PO Reject
What happens if the manager or VP need more information or corrections made to the PO before approving? They can send the PO back to an earlier step by clicking the reject button. When a task is rejected, the user who it is being sent back to receives an email informing them of the reason for the rejection.
The designer configures which steps display a Reject button via the Setup Approval/Rejection wizard. Simply check/uncheck the Reject to here or Reject from here checkboxes for each step in the workflow. The reject button label can also be modified on any step.
You can reject from or to a step performed by an anonymous user (our Client Approval step). For example, clicking the Reject button on this step allows the customer to send the PO back to the sales person (designer) for corrections. Once the corrections are made, the workflow is sent back to the customer for another review and the workflow continues to completion if the customer approves.
Modify the Workflow
Log into your tenant as the designer user. Edit the Workflow Tutorial project, then edit the Purchase Order Workflow. You can change the button label on any step where Reject from here is checked.
- Click the PO step then click on the Rejection section in the left Properties panel.
- Check "Reject to here" and uncheck "Reject form here". Since this is the first step in the workflow, there are no steps before it to reject to. If you leave it checked, it will be ignored.
- Click Submit.
- Click the Client Approval step. Click on the Rejection section in the left Properties panel.
- Check Reject to here and Reject from here.
- Change the Reject Button Label to "Send PO back for revision".
- Click Submit.
- Click the Sales Review step then click on the Rejection section in the left Properties panel.
- Check Reject from here and Reject to here.
- Click Submit.
- Click the Manager Approval step then click on the Rejection section in the left Properties Panel.
- Verify that Reject from here and Reject to here are checked. The manager can reject the workflow back to the sales person and the VP can reject the workflow back to the manager step.
- Change the Reject Button Label to "Reject PO".
Optional (if no Default Space is set.): Replace the {task.perform.url} template in the Rejection email body to the URL of your
Reject Email Message<p>This workflow was rejected back to you for further action.</p><p>The workflow was rejected by {subject.first.name} {subject.last.name} at step: {flow.activity.name}. The reason was: {flow.activity.reject.reason}.</p><p> You can access your task by clicking <a href="https://app.frevvo.com:443/frevvo/web/tn/mycompany/u/85a7dee1-e4cc-4c31-bcc6-d6929fb4d2b2/space/workflowtutorial/tasklist">this link</a></p>If a Default Space has been set, {task.perform.url} will send the user to the task in your space and you do not need to customize the URL. This also applies to the instructions below.
- Click Submit
- Click the VP Approval step then click on the Rejection section in the left Properties Panel.
- Check Reject from here and uncheck Reject to here. Since this is the last step in the workflow, there are no steps after it that can reject back to it. If you leave it checked, it will be ignored.
- Change the Reject Button Label to "Reject PO".
Optional (if no Default Space is set.): Replace the {task.perform.url} template in the Rejection email body to the URL of your
Reject Email Message<p>This workflow was rejected back to you for further action.</p><p>The workflow was rejected by {subject.first.name} {subject.last.name} at step: {flow.activity.name}. The reason was: {flow.activity.reject.reason}.</p><p> You can access your task by clicking <a href="https://app.frevvo.com:443/frevvo/web/tn/mycompany/u/85a7dee1-e4cc-4c31-bcc6-d6929fb4d2b2/space/workflowtutorial/tasklist">this link</a></p>- Click Submit.
- Click the save/exit icon to save your changes to the workflow.
- Logout of your
Test the Changes
Click the link to your space that you bookmarked earlier. Login as the designer user.
Select the Purchase Order from the Workflow Tutorial tab.
- Fill in the PO with a Total Amount value that is equal to or greater than $10,000.00. There is no Reject button on this step. Sign as the sales person. Click the Send to client button.
Log out of your
Check the email account for the customer. Access the email with the subject "Purchase Order from frevvo", click the link provided.
Notice the reject button with the label Send PO back for revision. Click on this button.
- Click the down arrow for the To dropdown on the Rejection screen. Select the step in the workflow to send the workflow back to - in our case - PO - (designer) who is the sales person.
- Provide an explanation for rejecting the PO in the Reason box. Click Submit.
- The message "Task successfully rejected" displays.
- Check the email for the sales person (designer user). Notice the email with the title "You have a new task for Purchase Order Workflow". This is the Rejection email.
- Open this email. The step of the workflow where the rejection was performed and the reason for the rejection is shown in the body of the email. Click the link to the workflow embedded in the rejection email. The rejection email subject and body can be customized to reflect whatever you want to say.
Log into your
Perform icon, review the PO, make a change, sign then click Send to client. Logout.- Check the email account for the customer. Access the email with the subject "Purchase Order from frevvo", click the link provided.
- Approve the corrected PO, sign and click the Send to frevvo, Inc button.
Login to your
Perform icon. Review the PO. Click Send to Manager. Logout.Login to your
Perform icon. Notice the Reject PO button on this step.Approve the PO as the manager, sign then click Finish or Send to VP. Logout.
Login to your
Perform icon. Notice the Reject PO button on this step.Click Reject PO. A list of steps that you can send the task back to displays when you click the down arrow in the To dropdown. In this example, the VP can reject the task back to the manager Jerry or the sales person (desiger user).
Select Manager Approval (jerry) from the dropdown then fill in a reason for the rejection - "Does this project conflict with the Sales Conference in LA". Click Submit. The message "Task successfully rejected" displays.
Click the
 Inbox icon. The task is removed from the VP's Task List. Logout.
The manager receives an email with the subject "You have a new task for {your workflow name}". Note the reason for the rejection is included in the email body. Click the link in the Rejection email.
Login to your
Perform icon. Change the comment to inform the VP that the project does not conflict with the conference. sign and click Finish or Send to VP. Logout.Login to your
Perform icon.Approve, sign then click Finish. Logout. The sales person (designer) and the customer will receive an email with the signed PO.
9 - Save/Load
The Save/Load property adds a Save button to a workflow step. If the sales person cannot complete the PO in one session, they can partially fill the purchase order form, save it, then return to complete it at a later date. We will add the Save button to the PO step in this example. Also, we will take this opportunity to view the audit trail - a feature that is available for any task in the Task List. The audit trail is very useful when you want to view the task's history.
Modify the Workflow
- Login to your
- Edit the Workflow Tutorial project, then edit the Purchase Order Workflow.
- Click on the Workflow Designer toolbar to display the Workflow Properties panel. Check the Save/Load property.

- Click the PO step to display the property panel for this step. Click on General Settings Section. Check the Save/Load property.
- Change the label of the Save button by typing "Save for Later" in the Save Label field.

- Click Submit
- Repeat steps 4, 5 and 6 for the Sales Review, Manager and VP Approval steps.
- Click on the Client Approval step. Verify that the Save/Load property is unchecked.
- Click the save/exit icon to save your changes.
- Logout of the workflow designer.
Test the Changes
- Click the link to your space that you bookmarked earlier. Login as the designer user.
- Select the Purchase Order Workflow from the Workflow Tutorial tab. Fill in a few fields on the PO. Note the Save button is added.
- Click Save for Later. The "Save successful" message displays.
- Click Task List on the Important Items tab.
- Since the sales person only has one task in the Task List, the saved task will display. However, if you have many tasks in the list and you only want to see the partially completed ones, click the
 Saved Task icon at the top.
- Click the Perform icon. Fill in some more fields. Click Save for Later.
- You can click the Save button as many times as you want. Clicking the
 view task history icon will show the audit trail for the task. You will see an entry for each time the task was saved. The task shown in the image was saved 3 times and is currently locked by the sales person (max).
- When all the fields in the PO are filled in, click Send.
- Run the rest of the workflow as described in the previous examples. You will see the Save button on any of the steps that require the user to log into
10 - Save to User
Manager Jerry is going to the Sales Conference in LA. As he is preparing to leave the office, a PO requiring his approval comes in. Example 9 will show you how Jerry can quickly reassign the PO to another manager, Sue, so he can leave for the conference.
Modify the PO Step
- Login to your
- Edit the Workflow Tutorial Project, then edit the Purchase Order Workflow.
- Click the PO step and the to edit it.
Add a text control named "ManagerID" with a label "Manager ID" to the Sales Information Section. Uncheck the Visible property.
- Drop a Dropdown control under the Manager Approval Section. Change the Decorator property to the blank option in the Decorator dropdown on the Properties panel.
- Set the label and name of the control to "Managers".
- Uncheck the visible property
Add two managers to the dropdown control's Option's property. The option syntax is value=label. Value must be the manager's
jerry=Jerry Mouse
sue=Sue Blue
- Click the Properties Style tab and set the control width to half the width of the form.
- Drop a Message control to the right of the Managers dropdown.
Add this text to the message control's Message property.
To reassign your approval task to another manager, select that manager from the Managers dropdown and click the Save button.
- Set the Name property to ReassignMsg. Uncheck the visible property
Modify/Add Rules
We will create a rule that show the Manager Dropdown and the reassign Message controls only when the workflow is on the Manager Approval step.Click the
rules icon on the toolbar.The Visual Rule Builder consists of 3 wizards:
- Condition wizard - describe the conditions under which a set of actions should be executed
- Action wizard - declare the actions that should be taken when the condition is true
- Else Action wizard - declare the actions that should be taken when the condition is false
- Find the rule named "On Approval Step (Manager Approval)" and edit it.
- Click on any action to open the Visual Rule Builder.
- Click Add Action - this is the Action wizard where you set up actions that will happen if the condition is true
- Set the Managers control to visible
- Add another action to set the Reassign Message control to visible
- Click Next then click Add Action - this is the else action wizard where you set up actions that will happen if the condition is false
- Set the Managers control to hidden
- Add another action to set the Reassign Message control to hidden
- Click Finish

Edit the rule "Populate Sales Person" and add this action line under the SalesID to userID() line:
- Click the
 on the Set SalesID to userID().
 - Click Add Action
- Select ManagerID from the first dropdown
- Select to from the second dropdown
- Type user in the Expression box - a list of Rule Builder functions for User details will display
- Scroll down and select the userManagerID function.
- Add the closing parenthesis and tab out of the Expressions box.

- Click Finish

- Click the
Add a new rule to copy the selection from the Managers dropdown into the ManagerID control. Remember we have set up the ManagerID template to route this step of the workflow to the user name specified in the ManagerID control.
The Visual Rule Builder consists of 3 wizards:
- Condition wizard - describe the conditions under which a set of actions should be executed.
- Action wizard - declare the actions that should be taken when the condition is true.
- Else Action wizard - declare the actions that should be taken when the condition is false.
- Click the
 to add the rule.
 - Name it Reassign to User
- Click the Rule Builder button then click Add Condition - this is the Condition wizard
- Select Managers from the first dropdown.
- Select is filled from the second dropdown
- Click Next then click Add Action - this is the Action wizard where you set up actions that will happen if the condition is true
- To set the value of the ManagerID control to the value of the Managers control:
- Select ManagerID from the first dropdown.
- Select to from the second dropdown
- Begin typing "man" in the Expression field. A list of the fields in the workflow that begin with the letters "man" display. Select the Managers field from this list.
- This rule does not require an else action. Click Finish

Click the
save/exit icon to save the changes to the PO form.
Modify the Workflow
- Click the Manager Approval step.
- Click the
 Edit Step Properties icon. Click on the General Setting tab. Check the Save to User property and verify that the Save/Load property is checked.
 - Change the User property from {subject.reports.to} to {ManagerID} - this must now be set to a dynamically populated control in the PO form.
- Change the label of the Save button to Save.
- Click Submit.
- Click the
- Click the save/exit icon to save the changes to the workflow.
Test the Changes
- Test the workflow to the step for Manger Approval
- When performing the task from Jerry's Task List, select the other manager (sue) from the Manager's dropdown. You do not have to sign it.
- Click the Save button. The task will be removed from Jerry's Task List.
- Login as the other manager (Sue). The PO Manager Approval task is now on her task list.
- Perform that task. The workflow will be routed to the VP if the amount of the PO is greater than or equal to > $10,000.00. If the amount is under $10,000.00, the workflow will complete.
11 - Save to Role
In some cases, you may want multiple actions taken during a step in the workflow. Let's say you want to collect comments about the PO from more than one VP in the company. The PO can be routed to the first VP (Ed) who will comment, click Save and the approval task will be assigned to the Task List of all users with the VP role. A second VP can then perform the task from their Task List add their comment, click Save. The last VP to comment signs to complete the workflow.
In this example, we will drop the comment control in the VP section of the PO into a repeat control so more than one manager can comment and add some message controls to clarify the instructions. Our workflow must use the Save to Role feature so the saved task is assigned to all users with the VP role that we specified for the VP step.
Modify the PO Step
- Login to your
- Edit the Workflow Tutorial Project, then edit the Purchase Order Workflow.
Click the PO step and the
to edit it.Drop a Message control inside the VP Approval section above the VP Comments text area.
Put the following text into the message control's Message property
If you want another VP to comment:
        <ol>
        <li>Add your comment below</li>
        <li>Click the save button to return this PO onto the task list of all employees with the VP role</li>
       </ol>
       Other VPs can add comments by clicking the + icon.
Drop a Message control inside the VP Approval section, below the VP Comments text area
Select "Warning" from the Message Type dropdown.
Put the following text into the message control's Message property.
The last VP to comment must sign the approval.
Click the Comments control inside the VP Approval section
- Type "Enter both your name and comments" into the Placeholder property
Drop a Repeat control inside the VP Approval section immediately above the VP Comments text area.
- Drag the VP Comments text area into the repeat control
- Click to select the VP Comments text area control
- Set the Min property to 0
- Set the Max property to 4
- Click on the VP Approval section
- Type f-page-break in the CSS Class property for the VP Approval section. This css class will put the VP Approval on a new page in the workflow PDF.
Click the
save/exit icon to save the changes to the PO form.
Modify the VP Approval Step
- Click the VP Approval step
- Click the Edit Step Properties icon. Click on the General Settings tab. Check the Save to Role property.
- Verify that the Save/Load property is checked.
- Change the label of the Save button to Save.
- Click the
- Click the save/exit icon to save the changes to the workflow.
- Logout as the designer.
Test the Changes
- Test the workflow to the step for VP Approval. Be sure to make the amount of the PO greater than or equal to $10,000.00 so the workflow navigates to the VP step.
- You should be logged in as the user, ed for the VP step.
- Add a VP Comment. Do not sign it.
- Click the Save button. Logout. Notice the task remains on Ed's Task List. All users with the VP role will receive a task notification letting them know the PO is available on their tasks lists again. For this example, users ed and jim receive a Task Notification email.
- Login as the other VP user (jim) and view Jim's Task List
- Perform the task.
- Click the
 icon to add another comment and sign the section.
 - Click Finish.
- Logout of your
- Check the workflow PDF attached to the final email. Verify that the VP Approval section is on a new page in the PDF.
12 - Workflow Escalation
If workflow tasks are not completed within a certain specified time, you can remind the user via an email(s) that there is a deadline for task completion and you can reassign the task to another user when the deadline expires. In this example, we will use the Escalation feature to set a five minute deadline for manager Jerry to approve the PO. He will receive two emails in that time frame reminding him that he has a task that requires his attention. When the five minute deadline expires, Jerry will receive an email informing him that the task has been reassigned to manager Sue.
Modify the Workflow
- Login to your Live Forms tenant as the designer user.
Open the Workflow Tutorial project, then edit the Purchase Order Workflow.
- Click the Manager Approval step. Click on the Escalations Section in the Properties Panel.
- Set up the Deadline:
- Click on the Add Escalation button
Select Complete Within from the dropdown in the Condition field. Enter "5" on the minutes box that displays.
- Setup the Reassignment:
- Click on the Action tab. Select the Reassign Task option.
- Select "User" from the Reassign To dropdown. Type "sue" in the Select User Assignee's text box. Note the list of users that begin with the letter s displays as you type.
- Setup the email that will inform Jerry that the deadline has expired for the PO task.
- Click on the Notifications Tab. Change the No Notification slider to on.
- Select "Current Owners" from the Send To dropdown. Current Owners will notify users who currently have the task on their Task List via email.
Replace the template {flow.activity.assignee} with {flow.activity.escalation.reassignee} in the Email message. This change will put the name of the manager the task was reassigned to (Sue) in the message to Jerry.
Setup the Reminder emails to be sent. For Example, we want a total of two reminder emails to be sent - one every two minutes during the 5 minute time period.
Click on the Reminders Tab. Change the Reminders are Off slider to on.
Enter "2" in the Every text box. Select "Minutes" from the Time Unit dropdown.
- Slide the "Limit Reminder" to on. Enter "2" in the Occurrences(s) text box.
Leave the text of the Reminder message at the default.
Click Submit.
Click the
save/exit icon to save the changes to the workflow.- Logout as the designer.
Test the Changes
- Test the workflow to the step Manager Approval step.
- Logon as Jerry to verify the PO task is on his Task List..
- Wait 2 minutes then check Jerry's email for the first reminder email.
- Wait another 2 minutes then check Jerry's email for the second reminder email.
- Check Jerry's email for the Task Deadline notification email after the 5 minutes has passed. The email should mention that the task has been reassigned to Sue.
- Check Jerry's Task List. The PO Approval task should be removed. Logout.
Login as Sue. The PO Approval task should now be on Sue's Task List. Note the task was initiated by "System User".
- Perform the task and complete the workflow.
- Logout.
- Check the PDF in the final email to verify that the approval was signed by the user, sue.
13 - Quick Approve/Reject
Quick Approve provides the ability for a user to see a simple view of a task in order to Approve or Reject it. A comment and/or signature can be added to the task without viewing the entire form. Quick View makes the process of task review/approval/rejection easy, especially on mobile devices. When the sales person uses a tablet or smartphone to access their task list, they can perform a quick approval/reject without having to view the PO details by clicking the  Quick Approval icon..
In this example, we will add Quick Approval to the Sales Review step.
Modify the Workflow
- Click on Sales Review step
- Click the Edit Step Properties icon then click on the General Settings tab.
- Scroll the tabs to the right.
- Click on the Quick Approval tab.
- In the Quick Approve section, Change the Quick Approval Enabled slider to on.
Copy the text below into the Summary:
{ClientName} from {ClientCompany} has approved the PO for {TotalAmount}!!!- Select Sales Review from the Approval Controls dropdown.
- Click Submit.
- Click the
Click the
save/exit icon to save the changes to the workflow.- Logout as the designer.
Test the Changes:
- Test the workflow to the Client Approval step. Approve the PO.
- Logon as the sales person (designer).
- Click the Important Items tab then click the Task List.
Click the
 quick view icon. The Quick Approval screen will display.
- If the client did not approve the PO and sent it back to frevvo with comments, the Sales Person can click the Details button to view those remarks.
- Notice the text we added as the Quick Approval summary appears at the top.
- Add a comment and click Approve. You will see the message "Task Successfully Approved".
- Notice the Sales Approval section displays on the Sales Review, Manager and VP Approval steps.
- Complete the workflow.
14 - Page Break for Mobile
What do you have to do to run the PO workflow on a tablet or smartphone? Nothing! automatically breaks up the form into steps and adds Back and Next buttons.
uses the device’s features, such as specialized keyboards, to create a user-friendly mobile experience.
You can use the PageBreak control to customize the mobile page breaks on the PO step into small logical pieces. For example, our PO has Instructions, Sales Information, Client Information and Client Services Order sections. In this example, we will use the PageBreak control to display the Instructions, Sales and Client Information sections on the same screen on a tablet and and on two separate screens on a smartphone. We will add another PageBreak control to display the Client Services Order section on a separate screen on both devices.
Modify the PO Step
- Login to your Live Forms tenant as the designer user.
Open the Workflow Tutorial project, then edit the Purchase Order Workflow.
- Click the PO step then click the Edit icon.
- PageBreak controls in your workflow display by default. If you want to hide them while you are developing your workflow, click the
 show/hide page breaks icon in the toolbar once.
 - Drag a PageBreak control from the palette and drop it below the Sales Information section. Click on it and uncheck Tablet. This PageBreak control will only be recognized on a smartphone.
- Drop a PageBreak control from the palette and drop it between the Client Information and Client Services Order sections.
Leave the Phone and Tablet checkboxes checked.
Click the
save and test icon. The Save and Test feature saves the changes to your workflow and allows designers to test forms/workflows without leaving the Workflow designer.
Test the Changes
- When you click the save and test icon, you will see the desktop view. The Instructions, Sales Information, Client Information and the Client Services Order sections display on the same screen.
Click the Tablet icon at the top. The Instruction, Sales Information and Client Information display on the same screen, as expected, since the first PageBreak was setup to be recognized on the phone and not the tablet. The second PageBreak was setup to be recognized by the phone and the tablet so you will have to click Next, to see the Client Services section.
- Click the Phone icon at the top. You will see the Instructions and Sales Information sections only. The first PageBreak was setup to be recognized on the phone so you will have to click Next, to see the Client Information section. The second PageBreak was setup to be recognized by the phone and the tablet so you will have to click Next, to see the Client Services Order section.
- Close the Test window. Click the Save/Exit icon twice to exit the Step and Workflow Designer.
Feature - Screenflow & Fast Finish (Employee Onboarding Workflow)
In this example, we will switch to an Employee On-boarding workflow to demonstrate the Fast Finish feature that allows the user to fast forward through a screenflow. A screenflow is a type of workflow where all the steps are filled in by the same user. Fast Finish is very useful if your screenflow contains a lot of steps. Let's consider this scenario:
A new employee starts their first day at your company and needs to provide their information. The employee is handed an iPad with a link to an Employee Onboarding workflow that is used to collect basic information, W-4 allowances and Education information. When completed, the new employee clicks the Continue button and the workflow is routed to their manager for approval. If approved by the manager, the workflow is routed to HR for final processing.
Imagine the employee completes the workflow through the Confirmation step and then decides to navigate back to make a change to the Employee Information step. Without a fast finish button the screenflow will make the user review each step (Employee Info, W-4, Education Info and Confirmation) in order to submit the forms to the manager for approval. Adding Fast Finish allows the new employee to click on the Finish button and (if all required fields are complete and valid in all other workflow steps) immediately submit the forms to the manager for approval.
We will use the Navigation toolbar at the top to navigate back and forth between the steps of the workflow. We will configure Fast Finish on the first three steps. We will also need to add another role, HR and another user, Pam who has the HR role, to test it.
Add a Role and User
Login as your tenant admin.
Create a new role - HR.
Add a new user pam and give her the role HR. Logout.
Review the Workflow
- Login as the designer. Open the Workflow Tutorial project.
- Edit the Employee OnBoarding workflow.
- Click on the Employee step.
- Notice the Fast Finish property is checked in General settings on the Property panel.
- Click on the Allowances step.
- Notice the Fast Finish property is checked in General settings on the Property panel.
- Notice the Task Assignment is empty. Since this step is unassigned, it will function as a screenflow and be performed by the user who completed the previous step.
- Click on the Education step.
- Notice the Fast Finish property is checked in General settings on the Property panel.
- Notice the Task Assignment is empty. Since this step is unassigned, it will also function as a screenflow.
Click
 cancel changes icon to exit back to the Form and Workflows Home Page in the workflow designer.
Test this Feature
Click the
Test icon for the Employee OnBoarding Workflow.The Employee Information step prefills the user name and uses the Geo-location feature to capture the user's location. All browsers will show a pop up asking the user's permission to use their location. Click to give permission.
Fill in the other required fields. Click Continue.
- Fill in the W-4 Allowances. Notice the Total Allowances field is updating as you enter values for the other allowances. this calculation is done using a business rule. Sign then click Continue.
- Fill in the Education Information step. Notice if you check "yes" for the "Permission to access college transcript" question a table requesting additional information displays. This is controlled by a show/hide business rule. Click Continue.
- On the Confirmation step, click Review Your W-4 form. The W - 4 will open in a separate browser tab merged with the data you entered. This is an example of the
- While reviewing the PDF, you realize you made a mistake when entering your social security number. Close the PDF.
- Click the Employee Information step in the Navigation toolbar at the top.
- Make a change to the SSN. Click the Finish button.
- The workflow will skip the Allowances and Education information steps and return you immediately to the Confirmation step.
- Review the PDF to verify the updated SSN is now displaying. Close the PDF.
- Sign then click Send to Manager.
- Logout as the designer.
- Login as Jerry. Perform the task. Add a comment and sign. Click Send to HR.
- Logout as jerry.
- Login as Pam and complete the workflow.
- Logout of
Feature - Summary Step
In this example, we will look at the Summary step on the Employee On-boarding workflow. This will simply display a Summary view of all the data that has been entered into the various steps of the workflow prior to the Summary step. Previously completed steps in a workflow can be viewed by all users but editing data is only allowed for the currently logged in user. Clicking on the Details button navigates to the selected step for viewing/editing.
We will change the Navigation property to a different format and use the Summary step to navigate back to a previous step.
Review the Workflow
- Login as the designer. Open the Workflow Tutorial project.
- Edit the Employee OnBoarding Workflow.
- Click on the toolbar to display the workflow properties.
- Click the Summary Fields tab on the Properties panel. Designers select the workflow fields to display in the Summary step using this wizard. Note most of the fields in the workflow have been selected to display in the Summary Step.

- Clicking on the Searchable fields tab shows the First and Last Name fields in Step 1 have been setup as Searchable Fields. They can now be used as search criteria when searching submissions.
- Notice the Summary step between the Education and Confirmation Step. The Summary step displays the fields selected with the Setup Searchable and Summary Fields wizard and all the data that has been entered into these fields prior to the Summary step. Clicking on the Details button navigates the user to the selected step for viewing/editing.
Click
cancel changes icon to exit back to the Form and Workflows Home Page in the workflow designer.
Test this Feature
- Click the Test icon for the Employee OnBoarding Workflow.
- On the Summary step, click the Details button on a previous step to view the entered data.
- Change a value in one of the fields.
- Click the Continue or Finish button on the rest of the steps.
- Complete the workflow.
Feature - Save on Navigate
Imagine a large workflow with many steps - let's say 30. You are filling in the screens and when you get to screen 25 you accidentally close your browser! None of the entered information is saved and you will have to begin all over again. The Save on Navigate feature will prevent this situation by automatically save the workflow to your Task List. When you click the Perform icon to open up the task returns you to the last step where data was being entered. If you navigate to previous steps, all entered data displays.
Review the Workflow
- Login as the designer. Open the Workflow Tutorial project.
- Edit the Employee OnBoarding workflow.
- Click on the toolbar to display the workflow property panel. Notice the Navigation property is set to Navigation Toolbar and the Save on Navigate checkbox is checked to turn the feature on.
Click
cancel changes icon to exit back to the Workflows Home Page in the Workflow Designer.
Test this Feature
- Click the Test icon for the Employee OnBoarding Workflow.
- Fill in the Employee Information and Personal Allowances steps in the workflow.
- Fill in the first column of the first row of table on the Education step.
- Close the browser.
- Open the browser again and login as the designer.
- Click My Tasks. The unfinished task will be on your Task List.
- Click the Perform icon.
- Continue entering data from this point to complete the workflow.