Live Forms v7.4 is no longer supported. Please visit Live Forms Latest for our current Cloud Release. Earlier documentation is available too.
Quick Start Guide
- Former user (Deleted)
- Former user (Deleted)
provides a downloadable version for local installations that runs
without further configuration on a Windows systems. This bundle includes an HSQL embedded database. Once you have downloaded
and obtained your trial license key, follow these steps to install
in your environment.
On This Page:
Hardware Requirements and Memory Configuration for your  Server
Click here to review the recommended hardware requirements and memory configuration for your in-house server.
Live Forms™ in-house Quick Start Installation Guide:
The steps below describe the Tomcat bundle installation on a Windows system.
Prerequisites
The following prerequisites must be satisfied in order to run in-house.
- Review the Supported Platforms list.
- You must have the Java Development Kit (JDK) 1.8 or Java Runtime Environment (JRE) version 8 installed on your system.
- Click here to go to the Java SE Downloads site if necessary.
- Return to this page and continue with Set Up the Environment when the Java download and the installation are completed.
Set Up the Environment
Set the JAVA_HOME environment variable to the installation directory of your JDK or JRE installation - for example, C:\Program Files\Java\jdk1.7.0_09. Refer to JDK or JRE Prerequisite for the details.
Unpack the download zip
requires the Insight server for the Reporting feature. The Insight server is included in the tomcat bundle. It is recommended that you start the Insight server first before starting
. Further configuration is not necessary for the trial period. Follow these steps:
- Download the most recent v7.4 tomcat bundle from the DocuPhase Forms Software Downloads Directory
- .Unzip the frevvo zip file into a location of your choice: e.g. c:\frevvo. We'll refer to this directory below as <frevvo-home>.
- Ensure that you do not have another server running on ports 8082 or 8983
- Open a command prompt. Navigate to <frevvo-home>\solr-6.6.2
- Type bin\solr.cmd start to start the Insight server. This starts the Insight server in the background, listening on port 8983.

You will see this message:
Browse http://<your server:port>/solr to verify the Insight server is running. The <server:port> default values are localhost:8983. Change <your server> to the server name and <your port> to the port the Insight server is running on if they are different than the defaults. Do not include the angle brackets <>. You will see the Insight server (Solr) dashboard with the current status:

If you close the Insight server (Solr) startup window, the server will stop running. Leave the window open or set up Live Forms and the Insight Server to run as Windows services.
- Navigate to <frevvo-home>\frevvo and double-click Start frevvo. This starts tomcat on port 8082 with
- Open the
- Enter the license key from the confirmation email in the License Key box. Click Submit. The

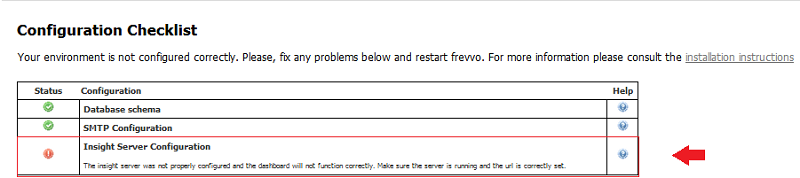
If you start before the Insight server, you will see this message when you browse the
login URL. Follow these steps to start the servers in the correct order:
- Naviagate to your <frevvo-home> directory.
- Run the stop-frevvo batch file.
- Open a command prompt. Navigate to <frevvo-home>\solr-5.4.1.
- Type bin\solr.cmd start to start the Insight server.
- Browse http://<your server:port>/solr to verify the Insight server is running. The <server:port> default values are localhost:8983. Change <your server> to the server name and <your port> to the port the Insight server is running on if they are different than the defaults. Do not include the angle brackets <>.
- Naviagate to your <frevvo-home> directory.
- Run the start-frevvo batch file.
Create a New Tenant
Your server installation is complete. Next you must create your first tenant.
- Browse this URL - http://localhost:8082/frevvo/web/login - Change the <localhost:8082> to the server:port where you installed
- Login to
- Click the "Manage Tenants" link on the page that displays.
- There is a single tenant named d. This is the default tenant.
- Click the
 icon to create a tenant, fill in the form and submit it. The new tenant will be created.
We recommend that you do not use the admin user to create your own forms. Add a new user for that purpose.
Add a New User
- Click the
 icon, to administer the newly created tenant.
 - On the page that is displayed, click the "Manage Users" link.
- There is a single user (the administrative user you defined when you created the tenant).
- Click the
 icon, fill in the form and submit it. Assign Roles to the user as desired. Note that you must assign the frevvo.Designer role to any users who wish to design forms.
 - The new user will be created. Create as many users and assign them roles as needed.
- Logout of the admin account.
- Login as one of the newly created users with the frevvo.Designer role by filling in the user@<your tenant> ex: designer@mycompany and the password that you assigned to this user on the Login screen. The page that displays is called the Application Home Page.
- If you are new to
You can find examples on creating your own workflows on the Tutorials page. Refer to Getting Started for the next steps to follow to create forms/flows.
Trial tenants are configured to use the frevvo Default Security Manager by default. Once you have purchased a license for your tenant, you can switch the Security Manager of your tenant and retain forms/flows, users, roles and submissions.
Tenants using the Default Security Manager can be migrated to:
- Default Security Manager → LDAP
- Default Security Manager → SAML
- Default Security Manager → Azure SAML
Tenants using the LDAP Security Manager can migrate to:
- LDAP → SAML
- LDAP → Azure SAML
If you are planning to switch the Security Manager of your tenant to LDAP or SAML Security Managers in the future, make sure the users created in the default security manager tenant have the same user names as the users in your LDAP server or identity provider.
Detailed Installation Instructions
When you have completed the trial period and you are ready to customize your server software, please see the detailed In-house Installation Guide.
The bundle includes an HSQL embedded database. If you use the HSQL database during your trial period, you cannot migrate the data (user, roles, applications) automatically from HSQL to your production database. Once your production database is in place, you must manually:
- Create your tenant.
- Use csv upload feature to move your users/roles to the tenant.
- Download and upload the applications from designer user accounts in the trial database to the designer users in the new database.