| Table of Contents |
|---|
| Tip |
|---|
Looking for a section on this page? Hover your cursor over the Table of Contents icon |
This chapter contains numerous real-world samples of the custom dynamic behaviors you can add to your forms and workflows. Many of the business rules described below are easily created with the Visual frevvo Visual Rule Builder. This eliminates the need for the designer to write JavaScript. The Visual Rule Builder provides the functionality to add business logic by simply selecting appropriate functions or controls from your forms/workflows using a visual wizard.
...
The easiest way to create a Show/Hide rule is to use the Visual frevvo Visual Rule Builder. Here are common reasons for using Show/Hide:
...
| Expand | ||||||||||||
|---|---|---|---|---|---|---|---|---|---|---|---|---|
| ||||||||||||
Your form contains a Billing Address section, a hidden Shipping Address section a Radio control named DiffShip that asks the question, "Is the Shipping Address different from the Billing Address?" If the Billing and Shipping addresses are the same there is no need to clutter the form with the unnecessary Shipping Address input fields. You can use rules to hide the Shipping Address and show it only when the form user says they are different. This rule will automatically fire whenever the user changes the response to DiffShip and will show/hide the shipping address section. In this example, an Else Action is helpful so that when the form loads, and if the user changes a Yes response back to No, the section will be hidden. 
|


Show a Message based on Selections in Other controls
| Expand | ||
|---|---|---|
| ||
This form has a radio control named Facility and a second radio control named CompanyFacility. This rule makes a message control named FacilityMessage visible depending on the selected options. If Boston is selected for the Facility control OR New York is selected for the the CompanyFacility control, the hidden message control will display. Use the Rule Builder to create this rule - remember to change the "and" to "or" in the Logic expression so the rule will execute if either condition is met.
|


Show a Message if a control contains data
| Expand | ||
|---|---|---|
| ||
This rule makes the message control NicknameMsg visible when the user enters a value into the Nickname input text control. And then hides the message control if the user deletes the value in Nickname.
|


Show Tabs on specified workflow steps
| Expand | ||
|---|---|---|
| ||
In this workflow, Step 1 has a Tab control with a tab named Employee and a second tab named Review. This rule makes the Review tab visible only when the workflow is on the linked Review step(Step 2).
|


Show/Hide Submit & Cancel
...
This form has a radio control named DescribeInDetail and a section control named Details. Details is hidden by default and made visible if the user selects 'Yes'.


When the form is submitted we've configured to configured frevvo to send an email with the form PDF. We only want the Details section to appear on the PDF when the user selects 'Yes'. So we uncheck the printable property on the section control. This property will apply to the section and all controls inside the section. So we do not have to uncheck printable on the inner controls. Then we create this business rule with the Visual Rule Builder. When the section is visible we also set it to be printable. When the section is hidden we also set it to be not printable.
...
| Expand | ||
|---|---|---|
| ||
To dynamically send an email, add a hidden email control (SendtoCSEmail) to your form.
In the Email Doc Action (or Activity Doc Action Email for a workflow step), enter the control name as a template in the "To" field.
Use the Visual Rule Builder to fill the hidden email control with the valid email if the condition is true, and a no-reply email if the condition is false. The Else Action is important here - if you set it to Empty or to an invalid string (any string not using the syntax <name>@<name>.<string>), you will get a submission error.
You can also set the hidden email to a template so that it is evaluated at run time.
When the user clicks Submit or Continue, the email will send to either the valid email (condition=true) or the noreply email (condition=false.) |


...
Submit/Continue Button Disabled
A great feature of is frevvo is the fact that a form cannot be submitted or a workflow cannot be continued to the next step until all required fields are filled and all filled fields have valid data (eg. a date field must contain a valid date). Sometimes it might not be as obvious to the form/workflow user why the form/workflow will not submit or continue to the next step. provides frevvo provides a built-in feature to show validation errors at the time of submission. Refer to the Invalid Form Notification for Users topic to see how it works.
...
| Expand | ||||
|---|---|---|---|---|
| ||||
|


...
Here is the form in use mode:


| Info |
|---|
This rule is similar to the format money rule above, in that it adds a decimal with two zeroes behind the number entered, so 12345 displays as 12.345,00. If you'd rather convert the number to a decimal as entered, simply remove the '* 100' from the Math.round() method parameters. This change will display 12345 as 123,45. |
...
The result places the split values in two separate controls at run time. These controls would typically be hidden in use mode and mapped to the PDF.


Textarea Max Length
...
Rule 1: Set Employee-Only to Optional & Empty if Family is selected. If the user selects family, this rule sets the employee-only radio control to optional and empty. The else action sets the employee-only radio control to required.
Condition Wizard


Action Wizard


Else Action Wizard
...
Rule 2, "Set Family to Optional & Empty if Employee is selected", is similar and is shown in the Rules List below. If the use selects employee-only, this rule sets the family radio control to optional and empty. The else action sets the family radio control to required.


At runtime, both controls are required at first. As soon as one control is filled the other control is set to optional and vice versa. Notice that if you change your selection, the opposite control value is cleared.


Required Field Status in Accessible Forms
...
You can build forms/workflows In that frevvo that meet Section 508 and WCAG 2.0 accessibility standards. Accessible forms/workflows can assist users with visual and motor impairments. When the Accessible property is enabled for a form/workflow, the error, "You can't leave this empty <control name>" displays, if users move ahead from a required field without filling it. The status property for the empty control becomes invalid and sets the error message. Normally, the status property can be used in a business rule. For example, let's say a form has a text control named 't', and a message control named "m". If you write a rule to update the message field (control named m) with the STATUS of the required/invalid control (control named t), as shown below, it will not work because the "You can't leave this empty" message for a required control is not treated as it's status.
| Code Block | ||
|---|---|---|
| ||
if(!t.valid)
  {
    m.value = t.status;
} |
...
You may want to populate selection control options by pulling from a web service or database. You can do this without writing an JavaScript code with the the frevvo Dynamic Options feature.
Some of the rules discussed below require a business rule written in JavaScript and other are quickly and easily created with the Visual frevvo Visual Rule Builder.
Dropdown Options
...
This method is useful when you have multiple ComboBoxes and making multiple calls to the same webservice impacts performance. This simple example gets product data from the frevvo Database Connector and stores it in a hidden textArea in the form. Then a second rule parses the data and sets the ComboBox options. Please see the chapter on Reusing Dynamic Content for more details.
...
This sample resets a dropdown option to the automatically added blank option. For dropdowns added from palette controls and from schema, automatically frevvo automatically adds a blank option so the dropdown initially shows no choice by default. To reset the dropdown, set the dropdown control's value to null not the empty string. The empty string will not work since the empty string is not a valid option. This form resets the dropdown named size whenever the value of the product option changes.![]()
![]()
Filter Dynamic Options
...
You can use this business rule to display the Dropdown's option label in a hidden field, and then set that hidden field as the Searchable Field for users to search task list or submissions by. Here's an example of a dropdown where the options value and label are different. Notice that we have a hidden control beside it to collect the selected option's label:


This rule is not yet available in the Visual Rule Builder, and will require some javascript. Create a new rule, click Rule Code, and then Edit Rule Code. Add this code (replacing the control names with your control names.)
...
The result is that when an option is selected from the dropdown, we pass the option value in the dropdown control, and the option label in the hidden control. The Selected Option Label control is visible here in use mode for demo purposes:


In the Workflow Settings Searchable Fields tab, select the hidden field (in this example, "Selected Option Label") instead of the dropdown control itself. This allows your users to search by the option label, set in the hidden field, rather than the Dropdown value, which they do not know.


| Info |
|---|
For Checkbox controls, see this rule example to display all selected option labels. |
...
The run time result will look like this:


Randomize Options
...
Each time you load the form, you will see the options in a different, random order.


Checkbox Options
Checkbox controls are different from all other palette other frevvo palette controls in that they are multi-select. Therefore the way to write rules with checkbox controls are in many ways similar to rules with repeat controls.
...
| Expand | ||
|---|---|---|
| ||
Rule List |


Checkbox Options - Making a Control Visible/Invisible
...
It is important to note that when a checkbox is added to the form from the palette and its options are multiple words containing spaces, the option array has converted each space character to the '_' character. We must make the comparison as shown below. Checkbox controls from schema do not have space replaced with '_'.

| Expand | ||||||
|---|---|---|---|---|---|---|
| ||||||
|


Note that when we hide Details we also clear its value. This is because the user may have selected one of the Structures checkboxes that made Details visible AND entered a value into Details. And then they may have changed their minds and uncheck the option that caused Details to become visible. If you don't want the value entered into Details to be in your form submission, clear the value when hiding it.
...
This rule makes an associated comment input control visible and required when a checkbox is checked. The for loop determines which checkboxes are checked and sets an appropriately named variable to true. Depending on the value of the checkbox the associated input control will be made visible and required via the if/else and will be hidden and not-required when it is unchecked again. This is a very common rule design pattern.
This form uses the Compact frevvo Compact layout to align the comment input controls with the checkbox options. Download a working sample that uses JavaScript rules here.
...
| Expand | ||
|---|---|---|
| ||
  Many Comments screen
|


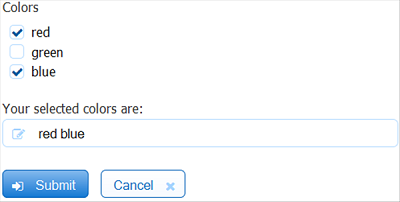
Checkbox Initialization
...
| Code Block |
|---|
var x;
var selectedcolors = '';

for (var i = 0; i < RGB.value.length; i++)
{
    var v = RGB[i].value;
    for (x in RGB.options) {

        var opt = RGB.options[x];
        var val= opt.split('=')[0];
        var lab= opt.split('=')[1];
        if (v === val) {
            selectedcolors = selectedcolors + ' ' + lab;
        }
    }
}
SelectedColors.value = selectedcolors; |

Set Options for a Checkbox based on Values Selected in another Checkbox
This rule is not yet supported in the Visual Rules Builder and thus still requires some JavaScript. This rule will take values selected in one checkbox control and populates those as options in a second checkbox control. For example, a checkbox control (Services) displays all available services. The second checkbox (Selected Services) will display as options the values selected in Services. One scenario you might use this is to customize an employee scheduling form. In Step 1 of the workflow the Coordinator picks the offered services from the full Program Service list. In Step 2 the Employee sees only the smaller list to select from.
| Code Block |
|---|
var opts = [''];

for (var i = 0; i < ProgramService.value.length; i++ ){
  var v = ProgramService.value[i].replace(/_/g,"  ");
  opts[i] = ProgramService[i].value + "=" + v;
}
SelectedPS.options = opts;
var event = form.load; |


Count the Number of Options Selected
...
| Code Block |
|---|
Quantity.value = Accessories.value.length + Shoes.value.length + Jewelry.value.length; |
.PNG?version=1&modificationDate=1594676067000&cacheVersion=1&api=v2&effects=drop-shadow&height=400)
.PNG?version=1&modificationDate=1594676067000&cacheVersion=1&api=v2&height=400)
Retrieving or Setting the Comment Property for Selection Controls
...
The Visual Rule Builder can be used to set the comment field to a value or expression.


Business rules can be written to retrieve the value of the Comment field using the commentValue property. Note that the initial value of the commentValue is null. Your rules may have to be coded to check for that. This rule is not yet supported in the Visual Rules Builder and thus still requires some JavaScript.
...
| Code Block |
|---|
if(Supervisor.commentValue != null){
  OtherSupervisor.value =Supervisor.commentValue;
} else {
  OtherSupervisor.value = "";
} |


Review this special syntax to reference comment fields in templates.
...
| Expand | ||||||
|---|---|---|---|---|---|---|
| ||||||
|


| Expand | ||||||
|---|---|---|---|---|---|---|
| ||||||
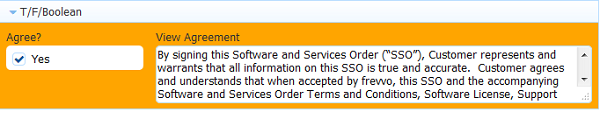
To set the checkmark on a T/F control - Remember to slide the
|


| Expand | ||||||
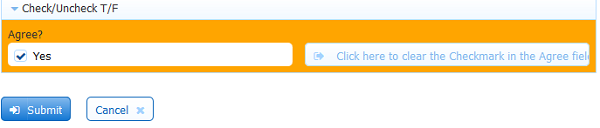
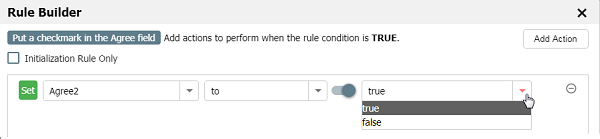
|---|---|---|---|---|---|---|
| ||||||
To clear a checkmark from a T/F control you must set the value to null and ensure that the control is not required. This rule clears the checkmark from a field named Agree1 when the Trigger control is clicked:
|


| Tip | ||||
|---|---|---|---|---|
The value property for a Boolean checkbox behaves differently depending on whether it is from schema or not. If the T/F control is from schema, you will see If you use the Rule Builder, this difference will be seamless to the designer. For example, the rule for a Boolean control from schema generated by the Rule Builder looks like this
And the code for a Boolean control from the palette, looks like this. .
|
...
Message controls can be used in business rules to create Summary information on your form from values entered into earlier form fields. Using templates in the Message control in combination with a business rule created in the Rule Builder make creating the Summary easy.


This form has fields to collect First Name, Last Name, Telephone Number, a Personal Email Address, a hidden field named fullname and a Message control named BasicSummaryMsg. The Summary Message control will show the entered Full Name, Telephone Number and Personal Email Address. We would like to show
- Click on the Message control.
- Slide the
toggle switch on the Message control Property panel to turn on the Rich Text Editor. Then click Edit with rich text editor.
- Type the desired text into the Editor - for this example, type Name, Phone and Email labels followed by the {Fullname}, {Phone} and {Fullname} templates
- Select formatting options from the Rich Text Editor menu.


- Create a rule with the Visual Rule Builder to concatenate the First Name and Last Name and display the results in the Fullname field.
| Expand | ||
|---|---|---|
| ||
Condition Wizard:
Action Wizard:
Else Action Wizard:   Rule Summary:
Result in Form:
|


Dynamic Labels, Help or Hints
You can set the value of control labels, help and hint dynamically in a rule. For example imagine you do not know the label, help or hint at design time but would rather set it dynamically at run time. Create this rule using the Rule Builder.

In the above example the label, help and hint is still hard-coded. It's just being set from the rule rather than in the form designer control properties. To make this more useful you can initialize these properties from _data parameters:
...
| Expand | ||
|---|---|---|
| ||
|


Multiple Choice
...
| Expand | ||
|---|---|---|
| ||
Rule List |


Dynamic Options
...
This rule searches a JSON string (populated from a database, google sheet, or other webservice) and populates a radio control with matching options. The form has a hidden textarea control, used to save and reuse the JSON string. It also has a text control, trigger, radio control and error message.


- Write a rule to fetch the data from your system and store it in the textarea, as described here.
Write the following rule to search the stored JSON string and populate the radio control. This rule uses the conditions of a value change in the custName text control OR a trigger click; you only need to choose one of those conditions.
Code Block /*member customers, id*/ var string; var customerlist = JSON.parse(CustomerListJson.value.trim()); if (custName.value.length > 0 || onClick.clicked){ var matchingcustomers = []; var matchtext = custName.value.toLowerCase(); for (var i=0; i<customerlist.customers.length; i++){ if (customerlist.customers[i].name.toLowerCase().indexOf(matchtext) >= 0){ matchingcustomers.push(customerlist.customers[i].id + '=' + customerlist.customers[i].name); } } if (matchingcustomers.length > 0){ SelectCustomer.visible = true; SelectCustomer.printable = true; SelectCustomer.options = matchingcustomers; noMatches.visible = false; } else { noMatches.visible = true; SelectCustomer.visible = false; SelectCustomer.printable = false; } } else { noMatches.visible = false; SelectCustomer.visible = false; SelectCustomer.printable = false; }
The result is a handy search form:


Value Change & Dynamic Options
...
This form uses a rule to pass a username and password to a LDAP Active Directory authentication service. If authentication fails the form makes an error message control visible. If authentication succeeds the form disables the username form field and replaces the password field with a date field set to the current date. The form contains a trigger control named sign, username and password fields named u and p respectively, a date field named d and a message field named m.


| Code Block | ||
|---|---|---|
| ||
/*member auth */
var x;

if (sign.clicked) {
    // passwords may contain characters that need url encoding
    var p_encode = encodeURIComponent(p.value);

    eval('x=' + http.get('http://(your webhost)/authServices/signForm?username=' +
                          u.value + '&password=' + p_encode));

    if (x.auth) {
        var dt = new Date();
        var day = dt.getDate();
        var month = dt.getMonth() + 1;
        var year = dt.getFullYear();
        d.value = month + '-' + day + '-' + year;

        d.visible = true;
        u.enabled = false;
        p.visible = false;
        sign.visible = false;
        m.visible = false;
    } else {
    m.visible = true;
    }
} |
...
Here's another example form that requires a doctor's signature. This shows how the form works in use mode. The first image contains a dropdown to select one of the doctor's authorized to sign the form and a text control where they enter their PIN code.


This image shows the case where the doctor entered an invalid PIN and the error message becomes visible.


This image shows the case of a valid PIN. Today's date is entered into the date control via the rule and made visible and disabled from edit. The username dropdown is disabled and the PIN and Sign controls are hidden.


Wet Signature
This example sets a date control to today's date as soon as the user signs the form. The wet signature control is named EmployeeSignature and the date control is named EmployeeSignDate.


Use the today() function in the Rule Builder to create this rule.
| Expand | ||||||
|---|---|---|---|---|---|---|
| ||||||
|


Enable Click to Sign for Anonymous User
...
Finally, use the Visual Rule Builder to concatenate the First Name and Last Name the user entered at run-time:


At run time the result looks like this:
...
| Expand | ||
|---|---|---|
| ||
Net Worth screen
Rule List |


Dates and Times
...
The samples below show you how to create the most common business logic with dates and times.
| Info |
|---|
|
...
The Date/Time control will display an "Invalid Value" error if single digits for the month and/or day are used .


Change the Date_Time.value = "2020-7-10T20:20:20"; to Date_Time.value = "2020-07-10T20:20:20"; in the rule or the xml document for successful initialization.
...
The Visual Rule Builder generates two lines of code to calculate age. This example form automatically determines today's date and then calculates the person's age in the control named 'Age' when they enter their Date of Birth.


| Expand | ||
|---|---|---|
| ||
Action Wizard
Rule List |


Duration
...
- Use the daysBetween function in the Rule Builder to calculate the number of days between the Admission Date and the Discharge Date.
- Populate the Hospital Stay Duration field with the result.
- Concatenate the number of days between the dates with the word "days" in the Hospital Stay Duration field.


- Display an error message in the Hospital Stay Duration field if the Admission Date is later than the Discharge Date.


| Expand | ||
|---|---|---|
| ||
Rule List
|


One common use for this function is in a Time Off Request. In this case, you may wish to include both the start and end date in the calculation. Since the daysBetween function counts the start date up to (but not including) the end date simply add +1 in the Visual Rule Builder Expression.
| Expand | ||
|---|---|---|
| ||
  |


Duration (between Date/Time)
...
| Code Block |
|---|
var event = form.load;
var endDate = null;
var startDate = null;
var millisDiff = 0;
if (StartDateTime.value && EndDateTime.value) {
  startDate = new Date(StartDateTime.value);
  endDate = new Date(EndDateTime.value);
  millisDiff = endDate.getTime() - startDate.getTime();
}
var hours = Math.floor(millisDiff / 1000 / 60 / 60);
    millisDiff -= hours * 1000 * 60 * 60;
    var minutes = Math.floor(millisDiff / 1000 / 60);

Duration.value = (hours < 9 ? "0" : "") + hours + ":" + (minutes < 9 ? "0" : "") + minutes; |


Today's Date and Time
Use the today and timeofday functions in the Rule frevvo Rule Builder to populate a Date field with the current date and a Time field with the current time on form load. Remember to select Date or Time from the Date Control Type dropdown.

Here is what the rule looks like in the Rule List.


Use the now function to set your date/time controls to the current date and time in the user's local timezone on formload.


| Note |
|---|
The currentTime(), currentDate() and currentDateTime() will not work in a form.load rule unless you specify a timezone on the form's Url via the _formTz Url parameter. This is because the form server needs to know the timezone in which to return the date and time. If you do not specify a formTz the methods will return null and the control values will remain blank. For example &formTz=America/New_York will set the control values to the current date and time in the eastern timezone. |
...
Use the date, time and date/time functions to construct dates and times in your form/fields.

Here is what the rule looks like in the Rule List.

Get Day of Week from Date
It can be helpful to display the day of the week (Monday, Tuesday, etc.) on your form based on a specified date. You can do this in a business rule using the getDay() JavaScript method. Here is an example.


| Code Block |
|---|
var d = new Date(SelectDate.value);

var weekday = new Array(7);
weekday[0] = "Sunday";
weekday[1] = "Monday";
weekday[2] = "Tuesday";
weekday[3] = "Wednesday";
weekday[4] = "Thursday";
weekday[5] = "Friday";
weekday[6] = "Saturday";

var n = weekday[d.getDay()];

if (SelectDate.value){
DayOfTheWeekOutput.value = n;
} |
...
- One rule to populate the hidden Date and Time fields with the current Date and Time
A second rule to concatenate the text and Date and Time field values as shown:
Code Block concat("Signed by ", Name," on ", Date, " ", Time)

| Expand | ||
|---|---|---|
| ||
|


Invalid if Not Before Today
This rule makes the date control invalid if the date entered isn't before today's date.


Use the Rule Builder to create a rule that:
- Uses the is after condition for the Date of Birth control
- Sets the Date of Birth status to invalid if the entered date is after the current date
- Sets the error text for the Date of Birth field to "Birth Date must be earlier than today"


Date no more than 14 days from Today
In this example, we want to check that the date entered into a control named AppointmentDate is no more than 14 days greater than today's date. If the Appointment Date is more than 14 days from the current date, we want to display an error message to the user. The form contains a hidden field named DaysApart (visible below for the purpose of demo.) 

You will need two rules created in the Rule Builder:
...
| Expand | ||
|---|---|---|
| ||
  Condition and Action wizards |
...
The form contains a hidden field named DaysAgo (visible here for demo purposes). 

You will need two rules created in the Rule Builder:
...
| Expand | ||
|---|---|---|
| ||
Rule List |


Show Error Message if Date1 is equal to or earlier than Date2
...
In this example, the error message displays if the user enters 3/7/2017 or a date before 3/7/2017 in the Period To field:


| Expand | ||||||
|---|---|---|---|---|---|---|
| ||||||
|


Add Years, Months or Days to a Date
...
This rule is not yet supported in the Visual Rules Builder and thus still requires some JavaScript. You can write a rule using the addToDate method to calculate a future date. The example code executes when the form loads. It uses the DateUtil.today() method to populate the control named D1 with the current date. This method returns today's date in the format 'yyyy-mm-dd' instead of 'mm-dd-yyyy', making it compatible with utility with frevvo utility methods such as addToDate(). The rule then
- adds one day to the current date to populate the control named D2.
- adds one month to the current date to populate the control named D3.
- adds one year to the current date to populate the control named D4.


| Code Block | ||
|---|---|---|
| ||
if (form.load) {
  var dt = DateUtil.todayISO();
  D1.value = dt;
  D2.value = frevvo.addToDate(dt,'d','1');//add day
  D3.value = frevvo.addToDate(dt,'m','1');//add month
  D4.value = frevvo.addToDate(dt,'y','1');//add year
} |
...
Calculating a date based on a five day work week is a common business scenario used in time sheets and displaying deadlines. You can calculate 'x' number of working days from the current date, and set that date in a Date control on your form. Here is the business function/rule that will add 3 working days to the current date to give you the deadline date. Copy/paste the entire rule including the function in the Rule Editor. Substitute the name of your date control for <your date control>:
| Code Block | ||
|---|---|---|
| ||
 function calcWorkingDays(fromDate, days) {
    var count = 0;
    while (count < days) {
        fromDate.setDate(fromDate.getDate() + 1);
      if (fromDate.getDay() !== 0 && fromDate.getDay() !== 6) {  // Skip weekends
            count++;
      }
    }
    return fromDate;
}

if (form.load && <your date control>.value.length === 0){
  var numWorkingDays = 3;
  var today = frevvo.currentDate().split('-');
  var escDate = calcWorkingDays(new Date(today[0], today[1]-1, today[2]), numWorkingDays);
  var m = escDate.getMonth() + 1;
  var d = escDate.getDate();
  var y = escDate.getFullYear();
  <your date control>.value = m + '-' + d + '-' + y;
} |
...
This rule is not yet supported in the Visual Rules Builder and thus still requires some JavaScript. This rule adjust today's date in UTC timezone to Central timezone and adjust for daylight savings time. This additional conversion is most commonly needed for online users as the javascript Date() and ' DateUtilthe frevvo DateUtil.today() both return today's date in UTC timezone.
...
| Code Block |
|---|
var event = form.load;
var sTime = null;
var eTime = null;
var millisDiff = 0;
if (TS.value && TE.value) {
   sTime = new Date('1970-01-01T'+TS.value);
   eTime = new Date('1970-01-01T'+TE.value);
   millisDiff = eTime.getTime() - sTime.getTime();
  if (millisDiff < 4*3600*1000 || millisDiff > 6*3600*1000) {
     TE.valid = false;
  } else {
     TE.valid = true;
  }
} |


Calculate a Return Time
...
Simple Time Between - this rule finds the difference between two time controls in the form, and displays the difference in hh:mm format.


Code Block language js title Rule Code - Simple Time Between var event = form.load; var endDate = null; var startDate = null; var millisDiff = 0; var sd = Date.value + 'T'+ FromTime_c.value + 'Z'; var ed = Date.value + 'T'+ EndTime_c.value + 'Z'; if (FromTime_c.value && EndTime_c.value) { startDate = new Date(sd); endDate = new Date(ed); millisDiff = endDate.getTime() - startDate.getTime(); var hours = Math.floor(millisDiff / 1000 / 60 / 60); millisDiff -= hours * 1000 * 60 * 60; var minutes = Math.floor(millisDiff / 1000 / 60); TimeBetween_c.value = (hours < 9 ? "0" : "") + hours + ":" + (minutes < 9 ? "0" : "") + minutes; } else { TimeBetween_c.value = null; }Time Sheet Table - this example has a table where a user can enter multiple From and To times. The rule finds the hours and minutes between, stores them in hidden table columns and displays the result for each row in the format "# hours # minutes".


Code Block language js title Rule Code - Time Sheet Table var event = form.load; var endDate = null; var startDate = null; var millisDiff = 0; for (var i = 0; i < FromTime.value.length; i ++){ if (FromTime[i].value.length > 0 && EndTime[i].value.length > 0) { var sd = DateEnter[i].value + 'T'+ FromTime[i].value + 'Z'; var ed = DateEnter[i].value + 'T'+ EndTime[i].value + 'Z'; startDate = new Date(sd); endDate = new Date(ed); millisDiff = endDate.getTime() - startDate.getTime(); var hours = Math.floor(millisDiff / 1000 / 60 / 60); millisDiff -= hours * 1000 * 60 * 60; var minutes = Math.floor(millisDiff / 1000 / 60); timeBetween[i].value = (hours < 9 ? "0" : "") + hours + " hours " + (minutes < 9 ? "0" : "") + minutes + ' minutes'; Minutes[i].value = Number(hours) * 60 + Number(minutes); } else { timeBetween[i].value = null; } }We can also display the total time for the entire table in a "total time" control. This can be displayed as a number by using the Visual Rule Builder to sum the Minutes column, divide by 60 to get a decimal representation of the total hours, and then rounding to two decimal places.

Commonly in a Time Sheet use case, you will want to round the time to the nearest quarter-hour. Here is a JavaScript rule that does just that.Code Block language js title Rule Code: Total Time to Nearest Quarter Hour var sum_result; var event = Table6Repeat.itemRemoved || Table6Repeat.itemAdded || form.load; sum_result = 0; for (let i = 0; i < Minutes.value.length; i++) { sum_result += Minutes[i].value; } var number = (sum_result / 60); totalTime.value = number = (Math.round(number * 4) / 4).toFixed(2);
...
The date control can be set to either just a date, just a time, or a combined date/time. Using the Rule Builder you can copy values from these fields to other controls in your forms/workflows.

| Expand | ||
|---|---|---|
| ||
|


Tenants, Roles, Users
have frevvo have several built-in methods that enable you to access information about your current tenant. Some common examples are:
...
Displaying lists of roles for selected users and populating Dropdowns with lists of users/roles still require Javacript - use the frevvo built-in methods. Some of these methods return a boolean true/false value. Others return a JSON string that is automatically converted to a JavaScript object.
...
Prefilling form controls with the user's info can save your user time and prevent data entry errors. Use the Rule Builder functions to create this rule - userID(), user FirstName(), userLastname(), userFullName(), userEmail(), and userManagerID(). When the form loads, fields are populated with the logged in user information.

| Expand | ||||||
|---|---|---|---|---|---|---|
| ||||||
|


| Info |
|---|
Please see this documentation if initializing user data in a workflow with linked steps. |
...
In this example, a user id is entered into the User Id field. This field is a text control in the form named UserLookup. When the user enters a user frevvo user id into the UserLookup field, the uFirstName, uLastName, uFullName, uEmail and uManagerID are populated with the information about that user.


Reference the User Id input field in the user functions in the Rule Builder.
| Expand | ||||||||||||
|---|---|---|---|---|---|---|---|---|---|---|---|---|
| ||||||||||||
|


| Info |
|---|
The UserDetail function can also be used to retrieve individual information fields for the currently logged in user. These fields can either be one of the standard fields or a custom attribute configured using the LDAP Security Manager. The standard properties are 'id', 'first.name', 'last.name', 'email' and 'reports.to'.   |
Populate Dropdowns with all Users/Roles in the Current Tenant
...
Leave the default options for the dropdown controls in the designer.
| Section | |||||||||||||||
|---|---|---|---|---|---|---|---|---|---|---|---|---|---|---|---|
|


...
One approach is to populate a radio control with all the roles in your tenant, allow the user to choose a role and then display the results in a dropdown. Another approach is to use an invisible text field where you hardcode the rolename. Remember that role that frevvo role names are case sensitive.
...
Here is an example of a rule that filters the list of users to only those that are assigned the Manager role and populates the options of a dropdown control with the results. The frevvo.userDetails(String userId) function is used to retrieve the details about the selected user (Jim). The results are displayed in a formatted Message Control named m. The form has a text field named Role with an initial value of "Manager". This field is referenced in the rule to supply the role name.
| Section | |||||||||||||||
|---|---|---|---|---|---|---|---|---|---|---|---|---|---|---|---|
|


...
You can also select more than one role from your tenant list and use a business rule to display a filtered list of users who are assigned any of the selected roles. This business rule populates the options for a checkbox named Roles with the list of all users in the tenant. Selecting more than one role from the list populates a dropdown named UserswithSelectedRoles with the filtered list of users assigned those roles. Details for the selected user are displayed in a formatted Message Control named m.
| Section | |||||||||||||||
|---|---|---|---|---|---|---|---|---|---|---|---|---|---|---|---|
|


...
This rule executes when a new item is added to a repeat. Imagine your form contains a repeating section named Employee with name Erepeat. NOTE: that the name Erepeat is set on the Repeat control and not on the Section control. The Employee section control contains many controls such as Name, Phone, etc.. and a dropdown control labeled Manager and named M. It also contains a radio control labeled Employee Shift named ES whose options have been set to 'Day' and 'Evening'.
will frevvo will execute this rule each time a user clicks "+" on the repeat to add a new item. Here we want to default the Employee Shift ES to the value 'Day', and populate the Manager dropdown dynamically with values from the Database the frevvo Database Connector.
Usually your form will have a form.load rule to initialize dropdown options for the 1st repeat item visible on your form by default.
...
This rule executes when a new item is added to a repeat. This form contains a repeating section with a templatized label. It is nice to collapse the other items when adding a new item to keep the repeat list small and grid-like. Medrepeat is the name of the repeat control. Medication is the name of the section control inside the repeat.


| Code Block |
|---|
if (Medrepeat.itemAdded)
{
    var index = Medrepeat.itemIndex;
    for (var i = 0; i < Medication.value.length; i++) {
        if (i !== index) {
            Medication[i].expanded = false;
        }
        else {
            Medication[i].expanded = true;
        }
    }
} |
...
Imagine an airline reservation form where the number of traveler information sections displayed or the number of rows in a table is based on the number of airline tickets purchased. There is a field in the form for the number of tickets named count and a repeat with a section including controls to collect information about each traveler. You can leave the default values for the Min/Max properties of the Section in the Forms designer or set them to any values provided the min value < max value and the max value > min value.


This is an example of a business rule that displays the number of sections based on the number of purchased airline tickets. Min/Max for the section are set to 1 and 20 in the forms designer.
| Code Block | ||
|---|---|---|
| ||
var i;
if (TravelRepeat.itemAdded) {
    i = TravelRepeat.itemIndex;
    TravelNo[i].value = 1 + i;
} else {
    if (count.value > TravelNo.value.length){
        TravelRepeat.maxOccurs = count.value;
        TravelRepeat.minOccurs = count.value;
    } else {
        TravelRepeat.minOccurs = count.value;
        TravelRepeat.maxOccurs = count.value;
    }
    for (i=0; i<TravelNo.value.length;i++) {
        TravelNo[i].value = 1 + i;
    }
} |
...
- The first part of your rule should retrieve the results set (this part of the rule is not shown here). In this example, the user enters a number in the Number of Travelers (the control name is 'count') field in the form.
- The itemAdded statement is needed to determine if you are adding more sections. The first time the rule runs, this statement will evaluate as false and run the else statement
- Evaluate if the number of sections needed ('count.value') is greater than the number or existing sections. If true, set the maxoccurs first because the table needs to increase.
- If the number of sections needed is less than the number of existing sections then set the minoccurs first.
- The rule will loop through the existing sections and set the values in the TravelNo field. If there are still additional sections to be added after the rule has looped through the existing sections, the itemAdded lines will run.
- This rule sets the Min/Max properties to he same values so the
Entering "3" as the number of travelers, sets the minOccurs and maxOccurs to 5 and shows 5 information sections.


Repeat Item Initialization
...
Repeat ItemAdded by Init Doc
ItemAdded also executes when adds when frevvo adds items found in an init doc. You may want to only initialize items added when the user clicks "+" on the form. And not those added from an initial document. This form contains a Mailing Label that repeats. Each label needs a unique ID assigned. However once the form is submitted the assigned IDs are saved in the database via the form's Doc URI. When the form loads it adds items automatically from rows in the database. They already have assigned Ids. We only need to assign new Ids in the sequence when the user manually adds a new Mailing Label by clicking the "+" button on the form. MLrepeat is the name of the Mailing Label repeat. MLmid is the name of the ID field in the repeat.
...
You can easily auto populate incremental items numbers in repeats using a business rule. In this example Erepeat is the name of the repeat control and Item is the name of the item control inside the repeat. You also need to set 1 as the default value of first repeating Item control directly into your form field via the form designer as shown here.


| Code Block |
|---|
if (Erepeat.itemAdded || Erepeat.itemRemoved){
  for(var i = 0; i < Item.value.length; i++) {
    Item[i].value = i+1;
  }
} |


Tables
Table controls are often used in formsfrevvo forms/workflows. Tables are used in many situations. Here are just a few:
...
The Visual Rule Builder supports the calculation of SubTotals CalculateaSubtotal and Grand Totals CalculateaGrandTotal in a Table. You can also write rules to Show/Hide a Table column based on a condition and Hide theMinus icon. The rest of the business rules in this section are not yet supported in the Visual Rules Builder and thus still requires some JavaScript
...
Each column in a table has a label, help and hint property. These properties work at the column level and can be set dynamically with a rule created with the Visual Rule Builder. Here is an example: 

Here is an example of setting the table column printable property using rule code. Line 1 will set the entire column's printable property to false; lines 2-4 show an example of how to make individual cells not printable. Keep in mind that the column setting will override the setting of individual cells.
...
The Visible property is available on the column level and can be used in a rule to make the whole column visible/invisible. For example, let's say you have a table with 3 columns in a two step workflow. You want all three columns to display for Step 1 of the workflow. When the workflow navigates to Step 2, you do not want the ID column to display.


In the designer, the visible property is checked on the ID column property panel.


Here is the rule created with the Rule Builder that hides the ID column on Step 2. 

The Visible property is available on each table cell as well and can be used to make the cell content visible/invisible. Here is a rule that will hide the cell contents of the first cell in column a:
...
- Change the Logic Expression from "and" to "or"
- Use the deletable/non-deletable properties in the Action and Else Action wizards.


| Expand | ||||||
|---|---|---|---|---|---|---|
| ||||||
|


If you click on the Rule Code to see the JavaScript generated by the Rule Builder, you will notice:
- The individual rows inside the CustomerTable are referred to in the rule as CustomerTableItem.
- Notice the TableItem deletable property is set to false when a lowercase or capital Y is entered in the first column. This will remove the minus icon for that row of the table. The for loop cycles through the table rows until the Max# property is reached.
| Code Block |
|---|
  var event = form.load;
for (let i = 0; i < ContactCustomer.value.length; i++) {
  if ((ContactCustomer[i].value === 'Y') || (ContactCustomer[i].value === 'y')) {
    CustomerTableItem[i].deletable = false;
  } else {
    CustomerTableItem[i].deletable = true;
  }
} |
...
You can leave the default values for the Min/Max properties of the Table in the Forms designer or set them to any values provided the min value < max value and the max value > min value.


For this example, the rule should have the following components:
...
| Code Block | ||
|---|---|---|
| ||
var i;
if (TableRepeat.itemAdded) {
    i = TableRepeat.itemIndex;
    TravelID[i].value = 1 + i;
} else {
    if (count.value > TravelID.value.length){
        Table.maxOccurs = count.value;
        Table.minOccurs = count.value;
    } else {
        Table.minOccurs = count.value;
        Table.maxOccurs = count.value;
    }
    for (i=0; i<TravelID.value.length;i++) {
        TravelID[i].value = 1 + i;
    }
} |
The images show the table when the user enters 5 as the number of travelers and then changes the value to 3.
| Section | ||||||||||||||
|---|---|---|---|---|---|---|---|---|---|---|---|---|---|---|
|


...
At runtime, the form looks like this:


Clearing Values in a Table
Use the Rule Builder to create this rule which clears the values from all rows in a table. Simply set the name of your table control to empty. In the rule shown, the Table control named MyTable is cleared when a trigger (ClearTable) is clicked.![]()
![]()
If you click on the Rule Code to see the JavaScript generated by the Rule Builder, you will notice a for loop that iterates over all the rows. Inside the loop a null value is assigned to all the columns in the table row.
![]()
![]()
Clickable Links in a Table
In most cases, the Link control can be used to add a clickable link to your form that can also be clicked from the submission PDF snapshot. However, Link controls cannot be added to tables. Instead, use a message control with a rule like this to seamlessly show the clickable link on the PDF printout. For example, on an office supply order form you want the user to add the link to the requested product. The PDF snapshot will go to the buyer, who only needs to click the link. In this example, the message column is hidden in use mode and only appears on the PDF snapshot.


| Code Block |
|---|
for(var i=0; i<Link.value.length; i++){
  if(EnterLink.value){
    Link[i].value = "<a href='" + EnterLink[i].value.split('?')[0] + '?' + encodeURIComponent(EnterLink[i].value.split('?')[1]) + "' target='_blank'>Open</a>";
  } else{
    Link[i].value = null;
  }
} |
...
The result is that the quantity field Number of Items automatically displays the number of rows in which the Item column is filled.


Sort a Table by a Column Value
...
| Code Block |
|---|
/*member num */
var x;

if (form.unload)
{
    eval('x=' + http.get('http://(your webhost)/json/getNextOrdernum'));
    OrderNum.value = x.num;
} |
If you have a rule in your form that changes any control(s) after clicking Submit, thereby making the form invalid, the form will no longer be submitted and the invalid form will redisplay. This change avoids creating an invalid xml for a successful submission.
- Form and Document actions will not execute when the form becomes invalid.
- PDFs are not generated.
- Invalid controls become highlighted as expected.
- form.unload output displays in the debug console.
...
In a desktop browser, users can navigate back and forth between the steps of a screenflow frevvo screenflow or multi-user workflow using the Navigation toolbar. Previous and Next buttons are available on mobile devices for this functionality.
...
Let's take a look at a two step screenflow designed using Linked forms to illustrate these points. Step 1 has 2 text fields, Text 1 is visible and not required. Text 2 is initially not visible and not required. We added a rule in the Visual Rule Builder that sets Text2 to visible and required on Step 2. Notice that by default the VRB creates the ruel on the form.load event.


Let's see what events occur when Step 1 is loaded.
- LOAD Step 1 – the form.load is triggered since step 1 is being run for the first time. Text 1 is visible and required and Text 2 is not visbile and not required
- ACTIVATE Step 1 – activate triggers because the step is loaded for the first time.


The user clicks continue and the workflow navigates to Step 2. Note Step 1 is deactivated and unloaded and Step 2 is loaded and activated:
- DEACTIVATE Step 1
- UNLOAD Step 1
- LOAD Step 2 – the workflow is on step 2 – the form.load triggers because step 2 is being loaded for the first time. Text 2 is now visible and required.
- ACTIVATE Step 2 – this runs because step 2 is displayed.


The user navigates back to Step 1 without filling in Text 2. Note Step 2 is deactivated and unloaded and step 1 is activated.
...
If the rule is written based on the form.activate event instead, here’s what happens. (In this case, we edited the rule code and changed form.load to form.activate.)


- The user initiates the screenflow.
- LOAD Step 1 – the form.load is triggered since step 1 is being run for the first time. Text 1 is visible and optional and Text 2 is not visbile and not required
- ACTIVATE Step 1 – activate triggers because the step is loaded for the first time
- The user clicks continue and the workflow navigates to Step 2. Note Step 1 is deactivated and unloaded and Step 2 is loaded and activated.
- DEACTIVATE Step 1
- UNLOAD Step 1
- LOAD Step 2 – the workflow is on Step 2 – the form.load triggers because Step 2 is being loaded for the first time. Text 2 is now visible and required.
- ACTIVATE Step 2 – this runs because step 2 is displayed.
- The user navigates back to Step 1 without filling in Text 2. Note Step 1 is only activated.
- DEACTIVATE Step 2
- UNLOAD Step 2
- ACTIVATE Step 1
- The form.activate event is triggered, so the rule runs. The visible and required properties for Text 2 evaluate to false.
- When the user clicks Continue to move to step 2 the screenflow moves forward. The user fills in Step 2, clicks Finish and completes the screenflow.


For multiuser workflows, form.load and form.activate are triggered when the step is displayed for the first time. form.activate is not triggred when navigating backwards via the Task List as these steps are Read Only. The Activity assigned to the current user will load only once but will activate every time they are loaded in a particular session.
...
This rule is not yet supported in the Visual Rules Builder and thus still requires some JavaScript. Rules can be used to save a snapshot of location information of any form. For example, an insurance company may want to capture the GPS location of their representatives filling out a form used for audit purposes. The designer can use the frevvo Geo Location feature in conjunction with rules like the ones shown in the examples below to accomplish this. When the form loads in the browser, the user will be prompted by to allow/disallow the use of location services. If permission is granted, the position will be calculated and server will be updated via an Ajax which causes the rule to fire. If the user denies permission or there is a timeout, the server will get an Ajax with an error.
...
Here is an example of a location tab on a Police Report form.


Checking the Detailed Loc checkbox in the Form Property pane and implementing a rule like the one shown will go to Google Maps to get additional information and a map associated with the location.
...
- Get a Google Maps API Key.
Create a form with "From" and "To" Dropdown controls as well as controls to calculate mileage as in this example.
Expand title Click here to see example form... 
The dropdown option addresses must have a "+" between each word and no special characters, and should include a city and state abbreviation at a minimum. Zip code is not needed. Format the left-side values as follows:
Code Block //Format StreetNumber+StreetName+City+StateInit=Label //Examples 123+Peach+Ln+Anytown+CT=Anytown, CT Chicago+IL=Chicago New+York+NY=New York, NY


Note the the label (right-side value) can be any value you want your users to see in the dropdown list.Create a business rule to calculate the mileage.
Code Block /*member distance, rows*/ var x; var origins = ""; var destinations = ""; var total = 0.0; for (var i = 0 ; i < From.value.length; i++) { if (From[i].value.length > 0 && To[i].value.length > 0) { origins+=From[i].value + "|"; destinations+=To[i].value + "|"; } } if (origins.length > 0) { eval('x=' + http.get('https://maps.googleapis.com/maps/api/distancematrix/json?origins=' + origins + '&destinations=' + destinations + '&units=imperial&key=<Your Key>')); var miles; for (var i = 0 ; i < x.rows.length; i++) { miles = Math.round(x.rows[i].elements[i].distance['value']*0.00062137); total += miles; Miles[i].value = miles; } TotalMilesClaimed.value = total; Amount.value = total * IRSMileageRate.value; } if (MileageTableRepeat.itemRemoved) {var x1;}The form will automatically calculate the mileage between locations, multiply it by the IRS Mileage Rate, and calculate the total reimbursement.


Sequential Numbers
...
This rule is not yet supported in the Visual Rules Builder and thus still requires some JavaScript. Forms such as invoices, bills of lading, etc often need to be stamped with a unique ID. The Sequential Number example SequentialNumbers is one approach, however it has some limitations. One is that you must guarantee that only one person at a time is filling out your form. This is because there is no mutex around the read and update of the Google spreadsheet cell.
...
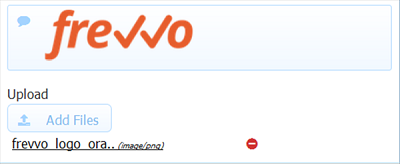
A rule can dynamically display an image uploaded to your form via the upload control. In this example the upload control is named 'u'. The form also must contain a message control as a place holder for displaying the uploaded image. The rule dynamically creates a URL to the uploaded image in the temporary frevvo temporary attachment repository. The upload control's value 'u.value' is a GUID that uniquely identifies the attachment. The uploaded image will be included in the submission PDF.
| Code Block | ||
|---|---|---|
| ||
if (u.value.length > 0) {
  var baseUrl = "/frevvo/web/tn/" +
      _data.getParameter('tn.id') +
      "/user/"+_data.getParameter('user.id') +
      "/app/"+_data.getParameter('app.id') +
      "/form/"+_data.getParameter('form.id');

  im.value = '<img src="' +
         baseUrl + '/attachment/' + u.value+'/does_not_matter"/>';
} |
Here is the example form before and after the user has upload the frevvo.logo.orange.png image:
| Section | ||||
|---|---|---|---|---|
|


This rule is a bit more complex to handle the case where the user uploaded multiple images via the upload control.
...
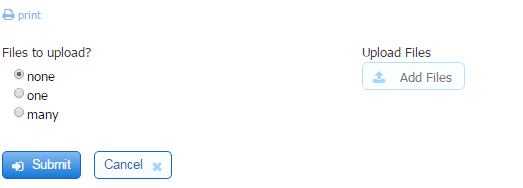
- If the user selects none for the Files to Upload control, then we do not want to allow any files to be uploaded - disable the Upload control
- If the user selects one then we want to restrict the file uploads to 1 - set minFiles to 0 and maxFiles to 1.
- If the user selects many then we want to allow no more than 10 attachments - set minFiles to and MaxFiles to 10.
| Section | ||||||||||||
|---|---|---|---|---|---|---|---|---|---|---|---|---|
|

...
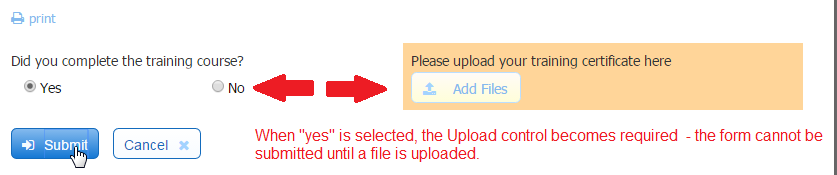
Selecting the "Yes" option for the Radio control named TrainingCourse triggers the rule that sets the minFiles and maxFiles of the Upload control named Certificate, making it required. Selecting "No" sets these properties to 0, removing the requirement.
| Section | |||||||||||||||
|---|---|---|---|---|---|---|---|---|---|---|---|---|---|---|---|
|

...
You can use a business rule to capture the total number of uploaded files at run time.


| Code Block | ||||
|---|---|---|---|---|
| ||||
if(Upload.value[0] === "_"){ //Looks at the first index to see if only a single file is uploaded
 FileCount.value = 1;
} else {
 FileCount.value = Upload.value.length;
} |
...
- Upload your PDF to a location on your website, and copy the link for it.
- Add a Message Control to your form. Give it a name (in this example we use the name PDFStatic and set the Message Type to "None."
Add a Business Rule like this:
Code Block if (form.load) { var baseUrl = "https://s3.amazonaws.com/static.frevvo.com/docs/Sample+PDF.pdf"; PDFStatic.value = '<iframe width="100%" height="750" src="' + baseUrl + '" frameborder="0" ></iframe>'; }- Set the variable baseUrl to the link for your PDF.
- Then, set your Message Control to a string including the iframe tags and the base url.
- Save and Test the form. The PDF controls at the top may vary based on the user's browser, but in most cases allow the user to download or print the PDF, and to scroll up and down the PDF if it is multiple page.


Method 2: Upload the PDF in frevvo's PDF Mapping tool.
...
- In order to upload a PDF into frevvo's PDF Mapper, it must be an acroform. Start by uploading it to a tool like PDF Escape. If you plan to map fields, you can set the fillable fields in that tool. If you only need to display it, simply upload the PDF to that tool, add a Form Field anywhere on the document (it will not be visible to the user), then immediately download it again as a fillable acroform.
- Open your form and select
- Click the

- Return to Forms editing mode by clicking Form(s) in the Guided Designer navigation bar.
- Add a Message Control to your form. Give it a name (in this example we use the name PDFfrevvo) and set the Message Type to "None."
- Add a Form Viewer control to your form. In the From property, choose the form you just uploaded.

- Save and test the form, and click the Form View control. The PDF will open in a new tab. Click on the URL and copy from /genform/... to the end of the url. Paste to a text pad - we'll use this in our business rule.

- Optionally, set the Form Viewer control to hidden. Once you have the URL, you do not necessarily need this control visible to users.
Add a business rule like this:
Code Block if (form.load) { var baseUrl = "/frevvo/web/tn/" + _data.getParameter('tn.id') + "/user/"+_data.getParameter('user.id') + "/app/"+_data.getParameter('app.id') + "/form/"+_data.getParameter('form.id'); PDFfrevvo.value = '<iframe width="100%" height="750" src="' + baseUrl + '/genform/_dMOPwEFOEeurl6p3Z49rvQ?action=gen-form' + '" frameborder="0" ></iframe>'; }- Set the variable baseUrl to construct your form's URL. This is dynamic, so if you later move a form from a development tenant into a production tenant, the url will contineu to work. If you are setting this rule in a workflow, be sure to use /flow/ and 'flow.id' in place of /form/ and 'form.id'.
- Set the message control to a string that includes the iframe tags, the baseUrl, and the /genform/... url parameter you copied in Step 7.
- Save and Test the form. The PDF controls at the top may vary based on the user's browser, but in most cases allow the user to download or print the PDF, and to scroll up and down the PDF if it is multiple page.


Display PDF with mapped fields
...
This rule is not yet supported in the Visual Rules Builder and thus still requires some JavaScript. frevvo forms can initialize dynamically from backend systems. A common form design pattern is the master/detail. An example of master/detail is a form that contains an order number or employee Id. When the user enters an existing Id into the form field you want all other form fields to populate dynamically from values in a database. This is done using a form created from XSD data source generated by the database connector. This part of the master/detail form design pattern needs no business rule. It happens automatically using the Doc Action manually set document URIs. See the DB Connector Tutorial for complete detail on how to initialize your form using a Doc Action document URI to your database.
This form was created from employee.xsd generated by the database frevvo database connector. The master Id is a control from that XSD named racfid. The key to this design pattern is in using the master Id in the form's doc action document URI. In this example the form's doc action document URI for the employee document is set to:http://localhost:8082/database/myqset/employee?racfid={racfid}.
...
Here is an example form that allows user to view existing employee records and to update their information.


If you know the RACF ID for an employee you can simply type it into that field. If the RACF ID is found in the database the form will automatically populate all other fields from the database (because of the doc action document uri setting). However if you do not know the employee's RACF ID you can click the Find Employee trigger.


This trigger control is named FindEmployee and fires the following rule that makes the search condition section control visible.
...
Once the value is copied into RACF ID the form automatically loads all other values in the form from the database. This is due to the form action document Uri setting.


The values in the employee loaded into the form can now be edited. When the users clicks the form's submit button the values will automatically be updated in the database record. This is due to the form action document Uri setting.
...