This documentation is for frevvo v10.0. Not for you? Earlier documentation is available too.
DB Connector Tutorial
- Former user (Deleted)
- Megan Ellis
Looking for a section on this page? Hover your cursor over the Table of Contents icon ![]() to the right to quickly navigate this page.
to the right to quickly navigate this page.
Introduction
The database connector maps between HTTP requests issued from frevvo forms to SQL queries executed against your database. The connector enables you to use the database of your choice to save and load your form data. You can create a new database or you can automatically generate forms that connect to your existing database tables to save and load data. The database connector contains working sample databases with some test data. The BIRT (ClassicModels) and myStore querySets are preloaded with in-memory Derby databases. We will use the in-memory databases to successfully complete this tutorial.
Check out these quick videos to get started:
What are we going to build?
We will first implement a simple master-detail application to view orders for a customer and line item details for any order in a single form. This demonstrates how to populate a web form with data from the database.
- When the form loads, we will initialize a drop down with the list of customers from the database.
- Select a customer and the drop down below it populates with the orders for that customer.
- Select an order and order details will appear below.
Later, we will also write data back to the database creating new records and updating existing ones. This tutorial does not cover advanced areas such as autocreate, autodelete, date/timestamp considerations. See the documentation for more detailed coverage of these topics.
Example Forms
Download the Database Connector Tutorial project. This project contains all of the example forms used in this tutorial. This download is a frevvo project zip file that you can upload into your user account. See Project Home Page documentation for more information on uploading this project zip file.
Database Connector Configuration
Since we are using the in-memory databases, no further configuration is required. This tutorial assumes that frevvo-tomcat bundle or the Database Connector Standalone bundle is installed and that the Database Connector is up and running.
Cloud customers should verify that the Database Connector is accessible from the frevvo servers. Cloud customers should replace <localhost:8082> with <app.frevvo.com> in the Business Rule and Document Action URL examples below.
Define a Queryset
The first step is to define a queryset and give it a name - BIRT in the configuration.xml file. Since we are using the built-in configuration.xml file, you do not have to do this. Here is an example of the BIRT queryset and the allCustomers query that is described below.
 <dbconnector>
    <queryset name="BIRT">
         <query name="allCustomers" autocreate="true">
            <retrieve>
                <statement>
                    SELECT customerNumber,customerName from Customers order by customerName
                </statement>
            </retrieve>
        </query>
    </queryset>
</dbconnector>
The database connector can simultaneously connect to multiple databases; each must be defined in its own queryset. The queryset consists of a resource definition and any number of named queries. The resource definition is shown above for MySQL. It is configured in the dbconnector.properties file. You will need to modify it as required: change localhost to the name of the machine running MySQL, specify the MySQL driver, change the database user name and password.
Next we define a simple query named 'allCustomers' in the configuration.xml file. Queries can contain four SQL statements (create, retrieve, update, delete). In this example, our query contains just one SQL statement to get the list of customers.
Mapping HTTP requests to SQL queries
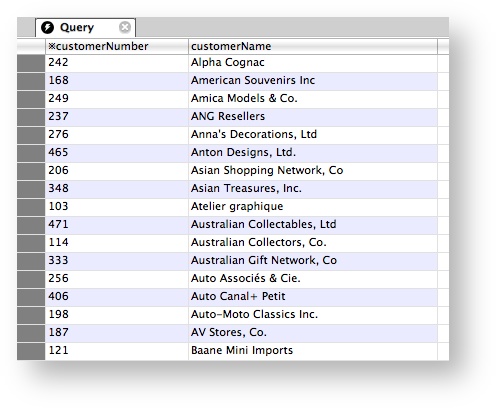
The database connector maps between HTTP requests issued from frevvo and SQL queries. It is important to understand how HTTP URLs map to SQL queries in the database connector. The above query returns a resultset that contains data as shown below:
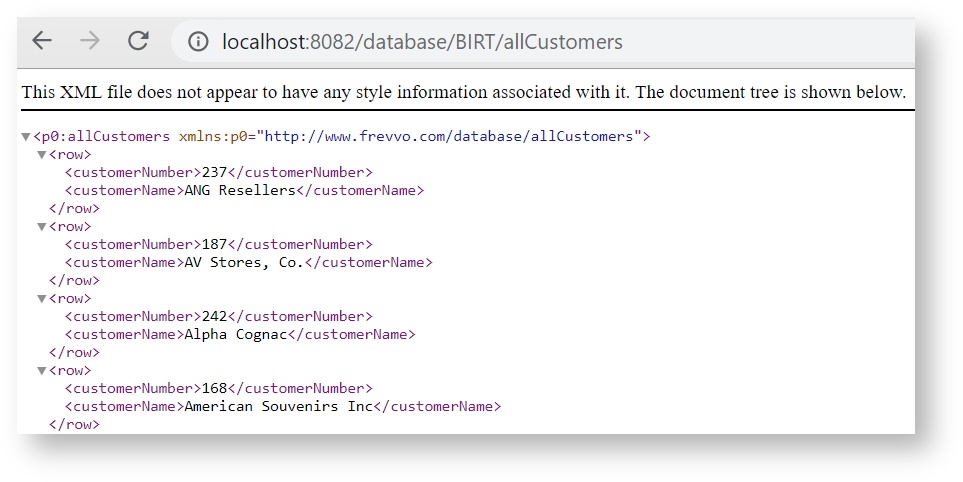
frevvo forms work with XML or JSON data. You can test the above query using the URL: http://localhost:8082/database/BIRT/allCustomers. This should return an XML document with customerNumber and customerName for each customer as shown below. The DB connector has converted the SQL data into a format that is usable by frevvo forms.
Let's take a closer look at this URL.
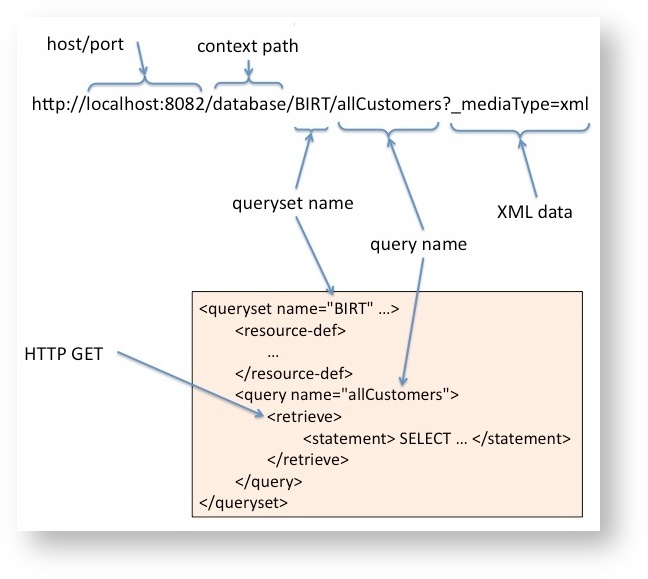
- The 'localhost:8082' points to the database connector inside the tomcat servlet container on localhost and listening on port 8082.
- 'database' refers to the context path for the database connector web application running inside Tomcat.
- 'BIRT' refers to the name of the queryset defined above.
- 'allCustomers' is the name of the query.
- Since we are issuing an HTTP GET from the browser, this maps to the <retrieve> SQL.
- _mediaType=xml tells the connector to return an XML document. This is the default; if you leave out a _mediaType, the connector will return XML. When the HTTP GET is issued, the connector executes the <retrieve> SQL for the 'allCustomers' query in the 'BIRT' queryset using the resource definition to connect to the appropriate database. The data in the resultset is converted to XML and returned.
The connector is also capable of returning JSON data. Try the URL: http://localhost:8082/database/BIRT/allCustomers?_mediaType=json the connector will return the same data as JSON. frevvo forms can use JSON data in business rules for dynamic behavior.

We will use these features in the examples below.
It is very helpful to test your queries as shown above by entering the query URL directly into your web browser and verify that the data returned to your browser as a web page is as you expect. Note however that browsers often cache web pages. If you edit your configuration.xml SQL query and reload/refresh the URL in your browser you may NOT get the updated results due to your browser's caching. Avoid this caching issue by always opening a new browser tab to retest an updated query.
Generating xml schema
If you prefer, you can generate the schema for the entire BIRT queryset before you begin. This eliminates the need to create a schema one by one for each query as specified in the instructions. The queryset schema can be uploaded to your project one time and then you can add the relevant schema elements to your forms/workflows as you need them. Browse this URL to get the schema, save the schema as an .xsd file in your file system then upload the schema to frevvo.
http://<server>:<port>/database/BIRT/schema
Example 1: View customer list
The following example shows how you can use a business rule to set your dropdown options dynamically. However, another (often simpler) method is to use your query URL as the Options Source directly in the control's OptionsSrc property. Please see our documentation on Setting Up Dynamic Options - No Coding Needed for details.
Our first example is to create a form with a dropdown control that is dynamically populated with the above list of customers from the database. When the user selects a customer by name, the value of the dropdown control should be set to the customer number.
The steps are as follows:
Define a query
We will use the query 'allCustomers' in the configuration.xml file.
<query name="allCustomers" autocreate="true">
	<retrieve>
		<statement>
			SELECT customerNumber,customerName from Customers order by customerName
		</statement>
	</retrieve>
</query>
Create a form
- Create a new form. Accept the defaults by clicking the Finish button. The Form Designer will appear.
- Drag a Dropdown control from the Palette and drop it into the form.
- In the properties pane on the left, change the Label as desired.
- In the properties pane, change the Name to sc.
Create a business rule
We will use a business rule to retrieve the list of customers from the database as JSON and dynamically populate this drop down control.
- Click the Rules mode in the Guided Designer navigation bar.
- Click
 to create a new rule.
 - Set the Name to 'Show customers'.
- Select Rule Code then click Edit Code to open the rule editor.
- In the Rule text area: copy and paste the following:
/*member customerName, customerNumber, resultSet */
var x;

if (form.load)
{
    eval ('x=' + http.get('http://localhost:8082/database/BIRT/allCustomers'));
    var opts= [];
    for (var i=0; i < x.resultSet.length; i++) {
        if (x.resultSet[i]) {
            opts[i] = x.resultSet[i].customerNumber + '=' + x.resultSet[i].customerName;
        }
    }
    sc.options = opts;
}
Let's analyze this rule.
- if (form.load) - this implies that the rule will execute when the form first loads.
eval ('x=' + http.get('http://localhost:8082/database/BIRT/allCustomers')) - this causes an HTTP GET to be issued to the indicated URL. When invoked in the context of a rule, the media type is automatically set to JSON. As we saw above, the database connector will return the list of customers as a JSON object.
For the Standalone bundle with frevvo Cloud, replace localhost:8082 with "app.frevvo.com" in the UR
- The rest of the rule is just JavaScript. We create an array of options in the format value=label (e.g. 242=Alpha Cognac) from the data returned in the JSON.
- Finally, we set the options of the dropdown to the array of options using the name we chose earlier (sc).
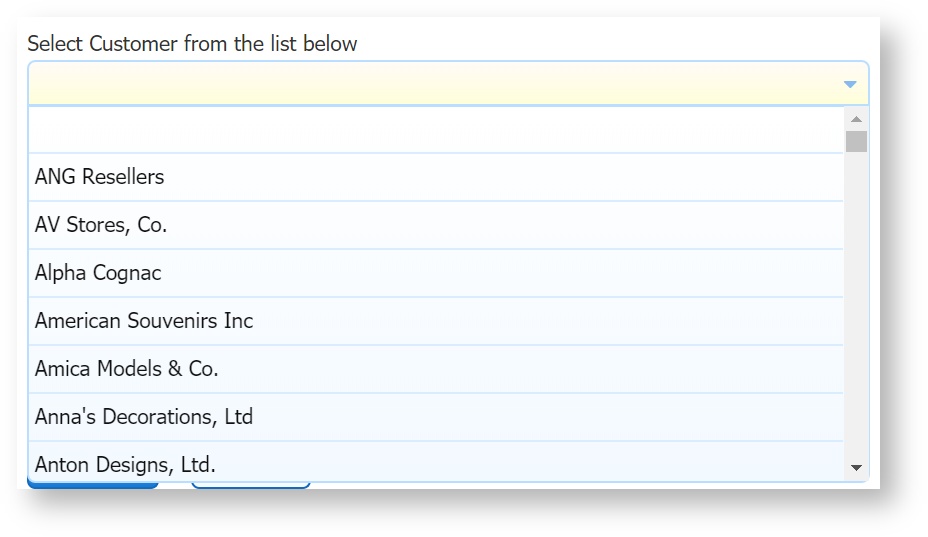
When the form is loaded, the drop down will be populated with the list of customers as shown in the image above.
Example 1B: Prefill Customer's Manager for Dynamic Workflow Routing
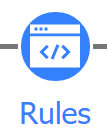
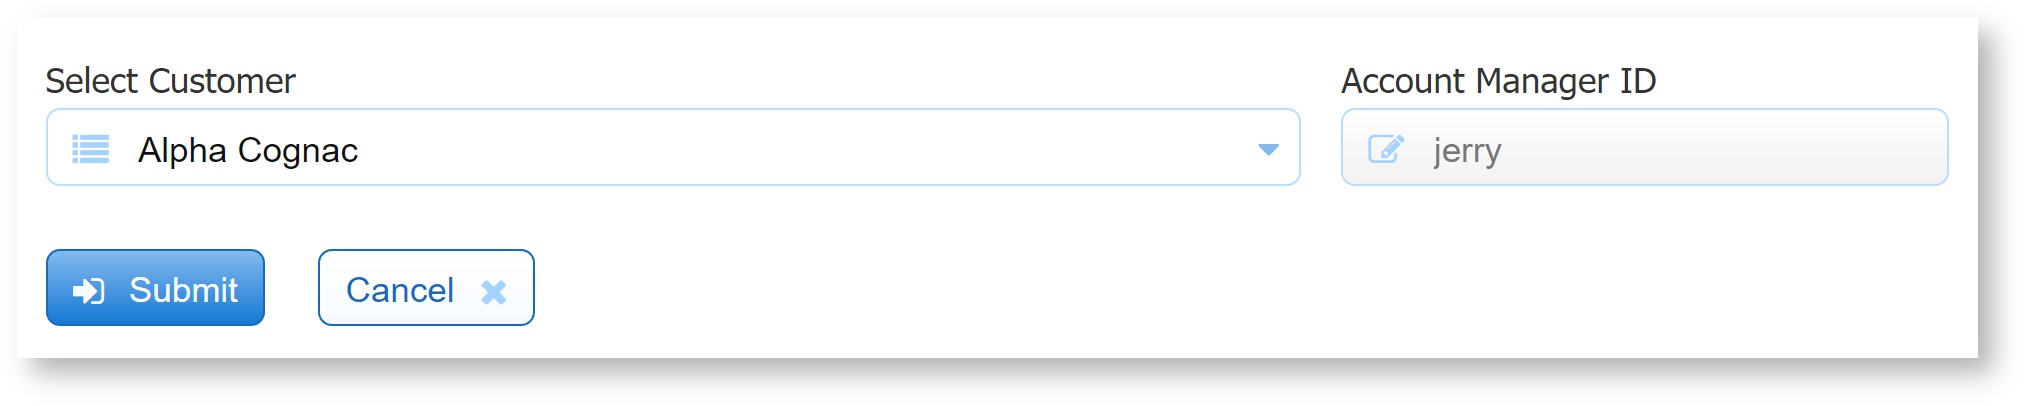
A common use case is to set values (not just selection control options) in your form based on a DBC query. In this example, we want to query the database to get the customer's Account Manager ID from the column in our database named accountMgrId. This is one way to route a workflow dynamically - we can then set an approval step assignment to a template of the Account Manager ID field to send it to the correct Account Manager for this customer.
For this example, we added the column "accountMgrId" to the Classic Models sample database table 'customers'. You cannot run this example on the built-in sample database exactly as is. However, you can replace 'accountMgrId' with any other available column info in the 'customers' table, such as 'contactFirstName', 'contactLastName', 'phone', etc. to see how it works.
Define a Query
We will define a query in the configuration.xml file with the select statement to get the accountMgrId from the customers table where the customerNumber is {cnum}. The template {cnum} will get it's value once we select a customer from the dropdown in Example 1 above in our form.
<query name="getAccountMgrId">
	   		<retrieve>
	   			<statement>
	   				SELECT accountMgrId FROM customers WHERE customerNumber={cnum}
	   			</statement>
	   		</retrieve>
   	</query>
Create a business rule
We will use a business rule to retrieve the list of customers from the database as JSON and dynamically populate this drop down control.
- Click the Rules mode in the Guided Designer navigation bar.

- Click
 to create a new rule.
 - Set the Name to 'Show customers'.
- Select Rule Code then click Edit Code to open the rule editor.
In the Rule text area: copy and paste the following:
/*member accountMgrId, resultSet*/
var x;
eval ('x=' + http.get('http://localhost:8082/database/customers/getAccountMgrId?cnum=' + sc.value));
for (var i=0; i < x.resultSet.length; i++) {
if (x.resultSet) {
AccountManagerID.value =  x.resultSet[i].accountMgrId;
}
}
This rule runs the http.get and sets the query template 'cnum' to the value of our Select Customer ('sc') control from Example 1. This will resolve the customerNumber. The query runs the SELECT statement, which gets that customer's Account Manager ID, and sets that value in the text control 'AccountManagerID'. If you were to use this form in a workflow, you might have an Account Manager Review step assigned to the templatized string {AccountManagerID}, dynamically routing the correct Account Manager for this customer.
Example 2: View Orders for a customer
Next, we will add a drop down that displays the list of orders for a particular customer. When the user selects a customer name from the first drop down, we will display the list of orders for that customer from the database. This is essentially repeating the steps above except that the database query is triggered by a user action (selecting a customer from the drop down) and depends on the selected customer.
Define a query
Here is the query used in the built-in configuration file. Note that, this query requires a parameter indicated by the {cnum}.
<query name="ordersByCustomer" autocreate="true">
            <retrieve>
                <statement>
                    SELECT "orderNumber", "orderDate", "status", "customerNumber" FROM "Orders" WHERE "customerNumber"={cnum} ORDER BY "orderDate"
                </statement>
            </retrieve>
</query>
Modify the form
- Make a copy of the form from Example 1 and open it for editing by clicking the Edit button
- Drag a Dropdown control from the Palette and drop it into the form.
- Set the Label as desired.
- Set the Name to 'so'.
Create a business rule
- Click the Rules mode in the Guided Designer navigation bar.
- Click to create a new rule.
- Set the Name to 'Show orders'.
- Select Rule Code then click Edit Code to open the rule editor.
- In the Rule text area: copy and paste the following:
/*member orderDate, orderNumber, resultSet */
var x;

if (sc.value.length > 0) {
  eval ('x=' + http.get('http://localhost:8082/database/BIRT/ordersByCustomer?cnum=' + sc.value));
  var opts= [];
  for (var i=0; i < x.resultSet.length; i++) {
    if (x.resultSet[i]) {
      opts[i] = x.resultSet[i].orderNumber + '=' + x.resultSet[i].orderNumber + ': Date ' + x.resultSet[i].orderDate;
    }
  }
  so.options = opts;
}
Let's analyze this rule.
- if (sc.value.length > 0) - this implies that the rule will execute when the select customer drop down has a value and the value changes.
- eval ('x=' + http.get('http://localhost:8082/database/BIRT/ordersByCustomer?cnum=' + sc.value)) - this causes an HTTP GET. We pass the selected customer number as the value of cnum to the query.
- The rest of the rule is essentially identical to the previous rule. For the label we concatenate order number and order date.
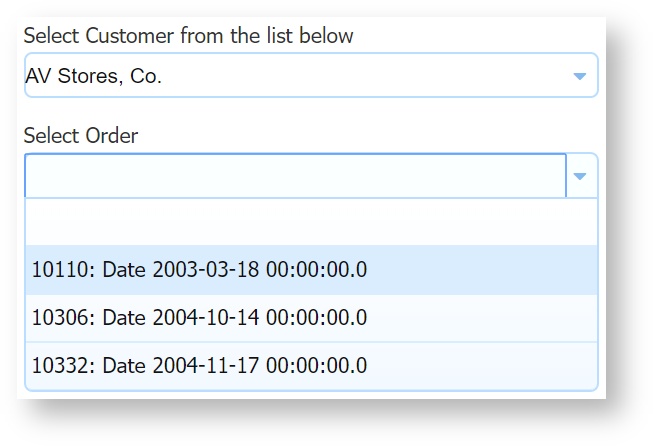
When a customer is selected from the first drop down, the orders drop down will populate with orders for that customer. Select a different customer and the orders will update dynamically.
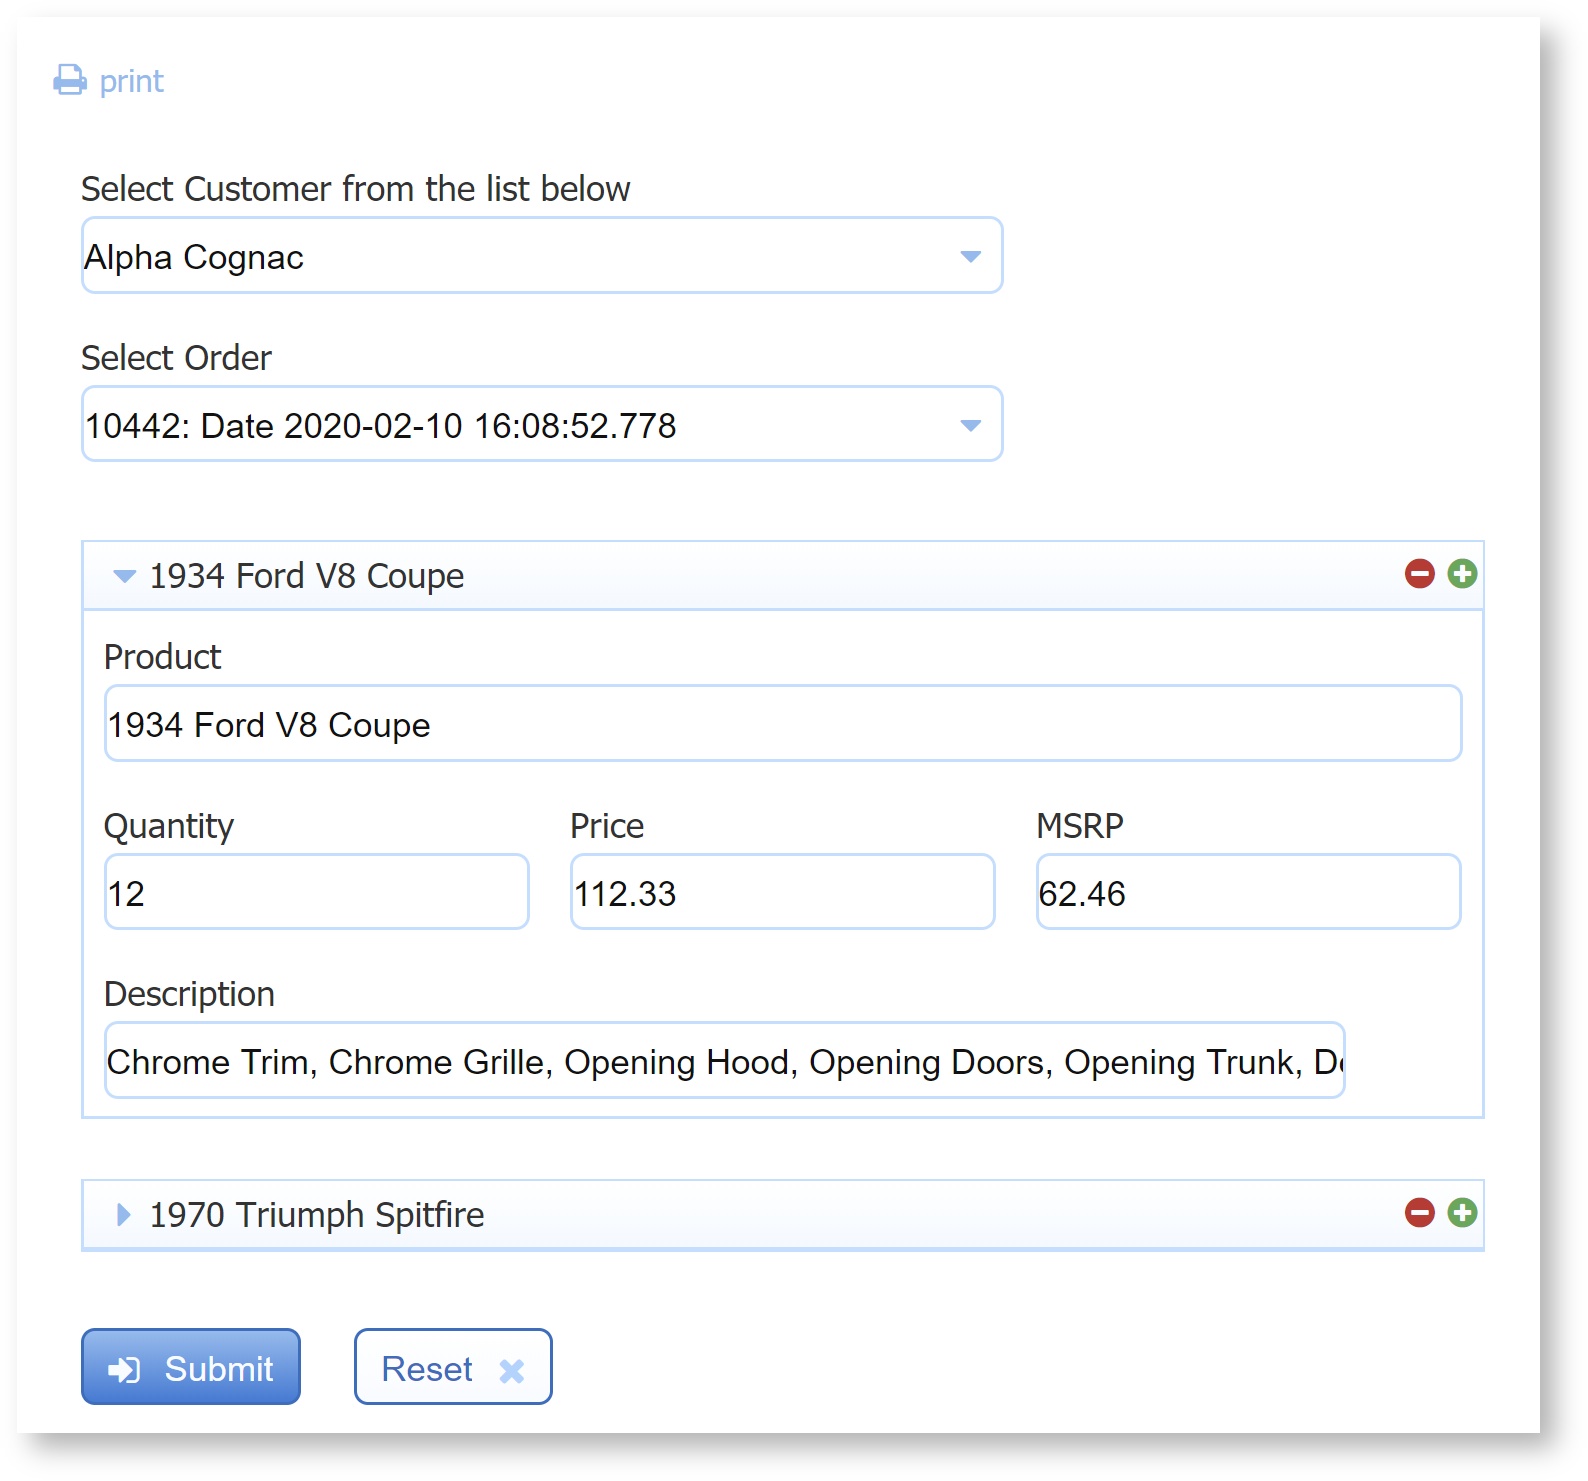
Example 3: View Details for an Order
Now, we will display order details for any given order. For example, for order number 10397 above, the order details resultset is shown below.

Since order details is a complex structure (product name, quantity, price etc.) we will use frevvo's built-in XML features to generate controls and populate them from the database. When an order is selected, the order line items will be displayed as shown below:
Define a query
Here is the query defined in the built-in configuration file. The query requires a parameter indicated by {onum}.
<query name="orderDetailsByOrder" autocreate="true">
            <retrieve>
                <statement>
                    SELECT p."productName" as "product", o."quantityOrdered" as "quantity", o."priceEach" as "price", p."productDescription" as "description", p."MSRP"
                    FROM "OrderDetails" o, "Products" p
                    WHERE o."productCode"=p."productCode" and o."orderNumber"={onum}
                    ORDER by o."orderLineNumber"
                </statement>
            </retrieve>
</query>
Generate XML schema
The database connector can generate an XML schema from any query's <retrieve> operation. This schema can then be used to generate a frevvo form.
- In a browser go to the URL: http://localhost:8082/database/BIRT/orderDetailsByOrder/schema?onum=10100 Save the resulting XML schema file to disk. Note that we need to pass in a known order number so that the query can successfully execute.
- Upload the schema to frevvo. See Data Sources for instructions.
Modify the form
See Data Sources for help on the steps below.
- Make a copy of the form from Example 2 above and open it for editing.
- In the properties panel on the left, open the Data Sources pane by clicking on it.
- Click 'New from XSD'.
- You should see your schema in the resulting dialog box. Expand it and add the 'orderDetailsByOrder' element to the form by clicking the + icon next to it.
- Close the dialog box by clicking X in the top right corner.
- In the Data Sources pane, click the + icon next to the orderDetailsByOrder data source. frevvo will generate controls in the form.
- You can drag and drop to re-arrange as you wish.
- Change the label of the Section named 'row' to the string '{product}'. We'll explain this in more detail below.
- Collapse this Section.
This step generates controls that are bound to the orderDetailsByOrder data source by frevvo. You can render the controls as you wish but frevvo will always generate an XML document conforming to the XML schema above.
Link to the database
Now, we connect the generated controls to the database query defined above. See Doc URl Wizards for help on the steps below.
- Go to the Settings mode in the Guided Designer navigation bar.
- Select the Document Actions tab and the Send Data sub-tab.

- Select Manually set document URIs.
- You should see the Document name change to 'orderDetailsByOrder', which is the data source we are interested in.
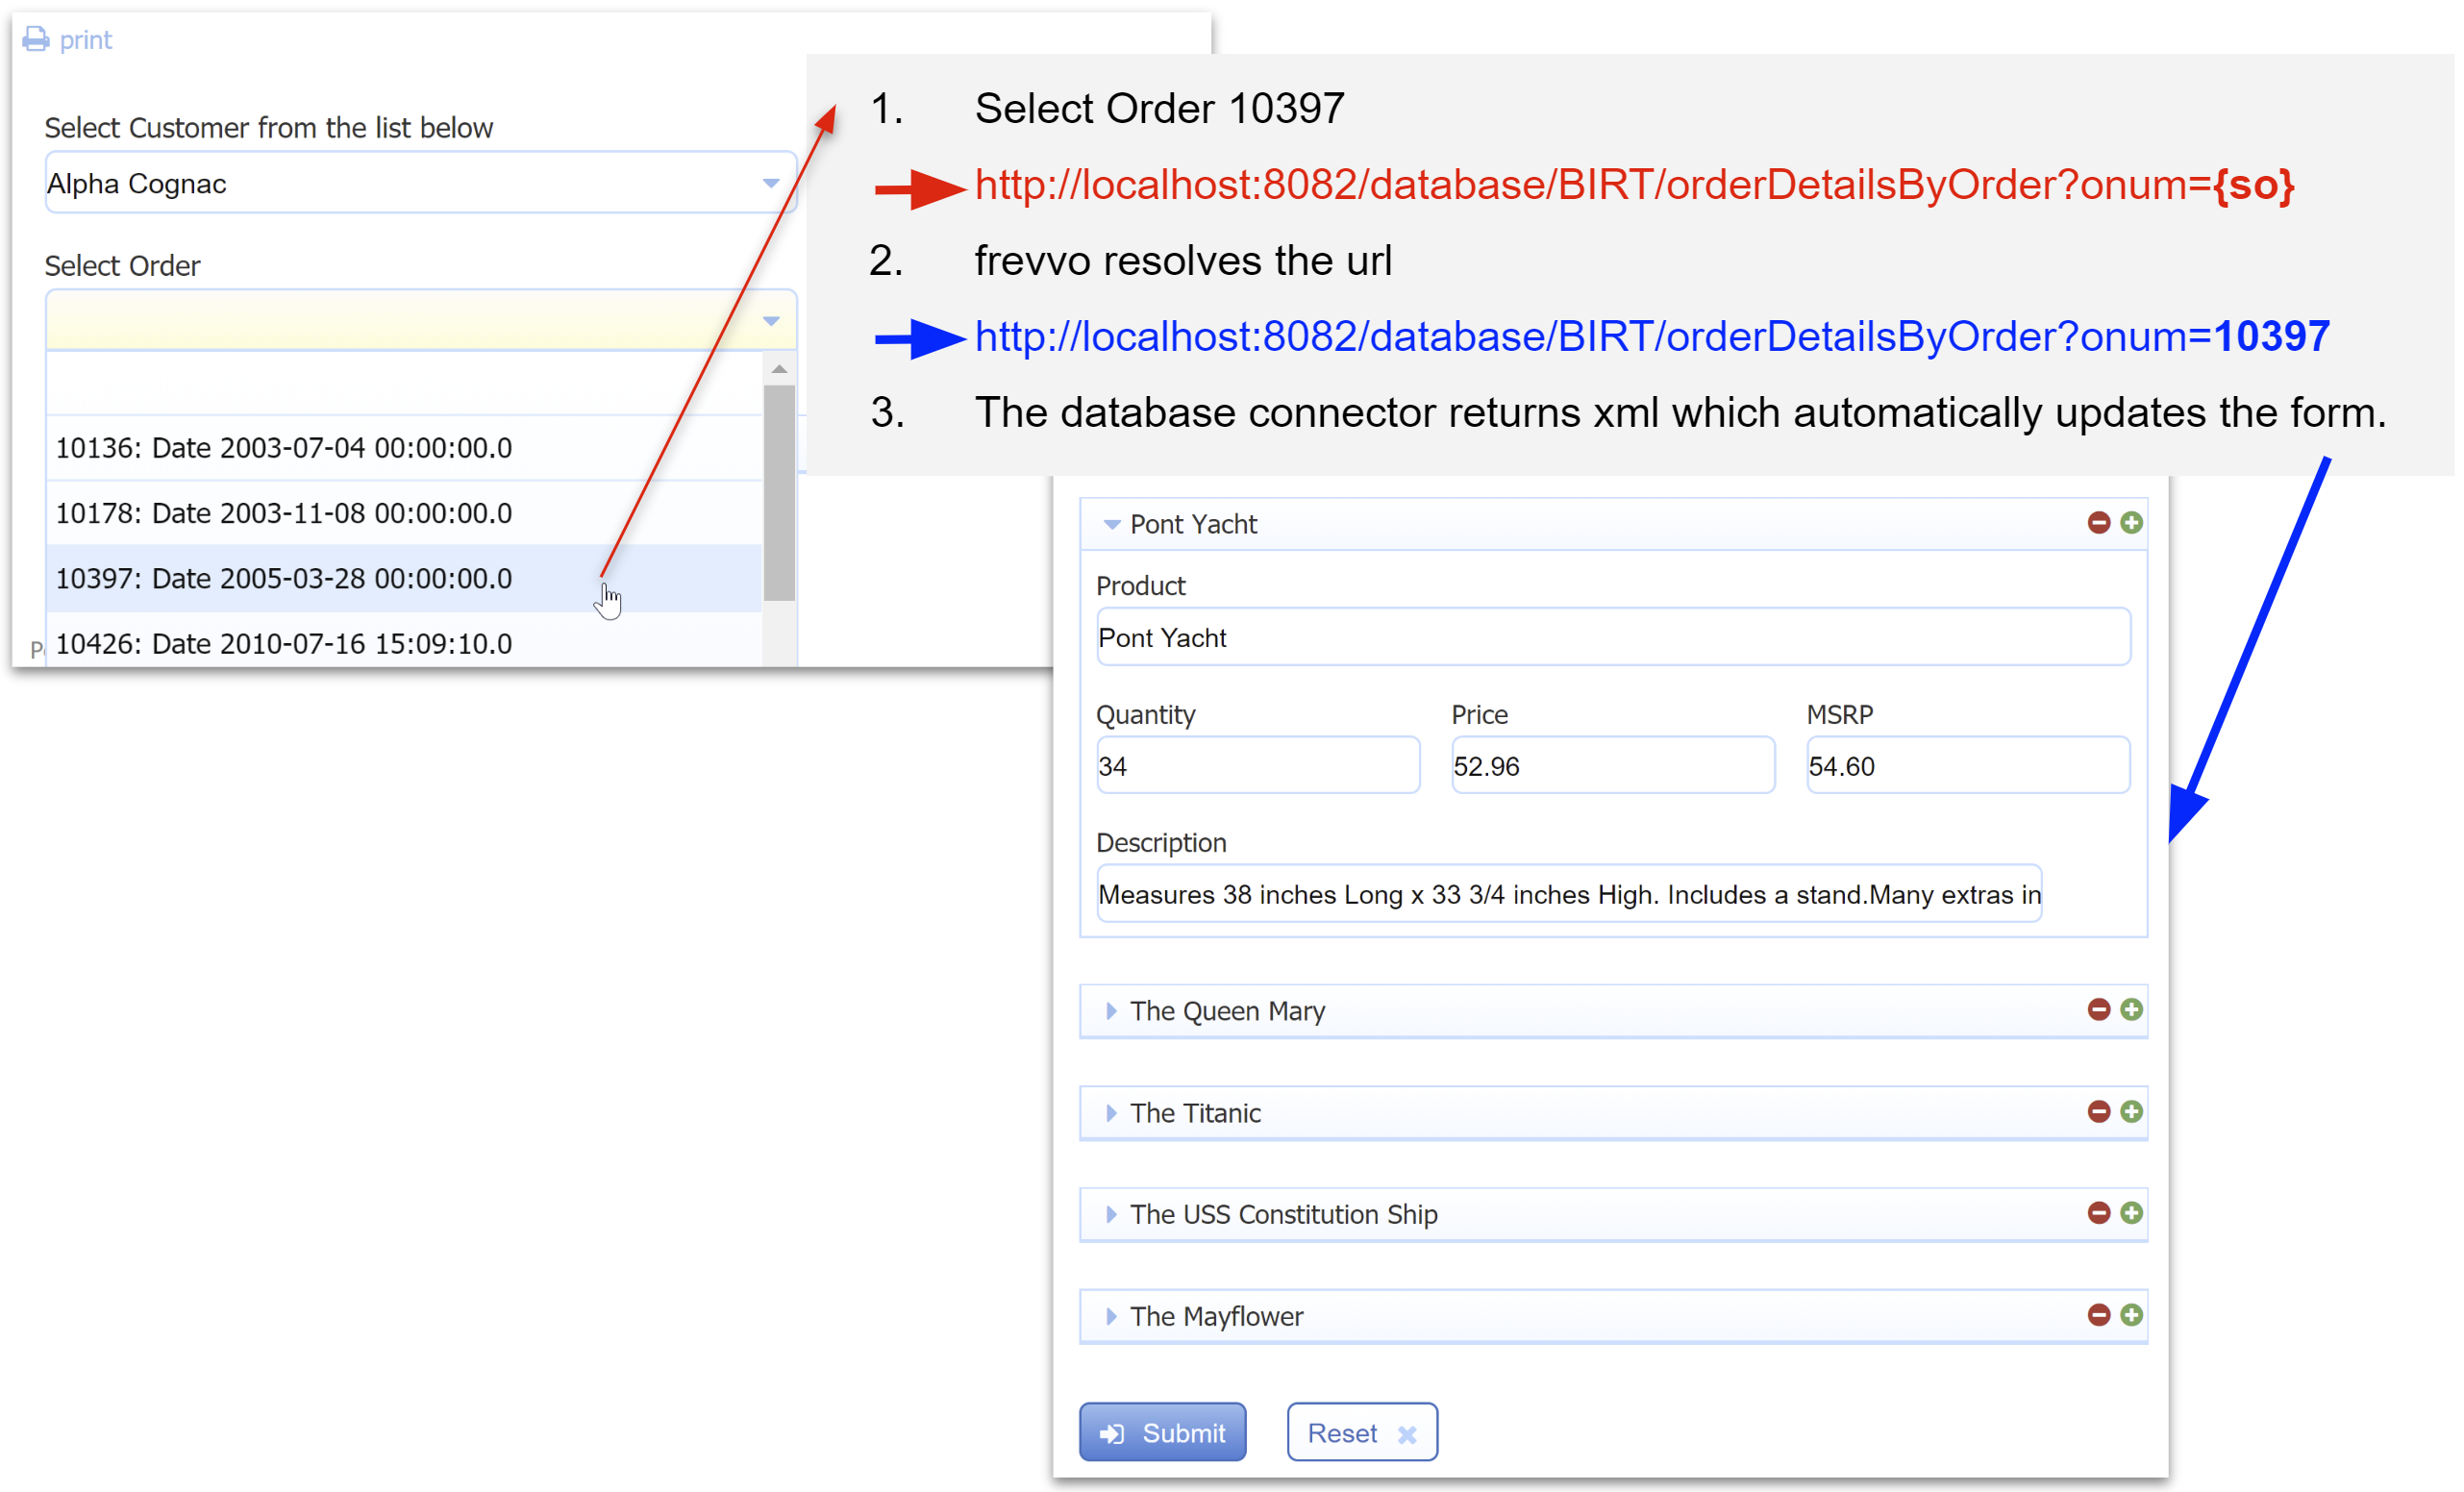
- Set the URL to: http://localhost:8082/database/BIRT/orderDetailsByOrder?onum={so} (for standalone bundle with frevvo Cloud, replace <server:port> with app.frevvo.com.)
- Set the Read method to GET.
 Save the form.
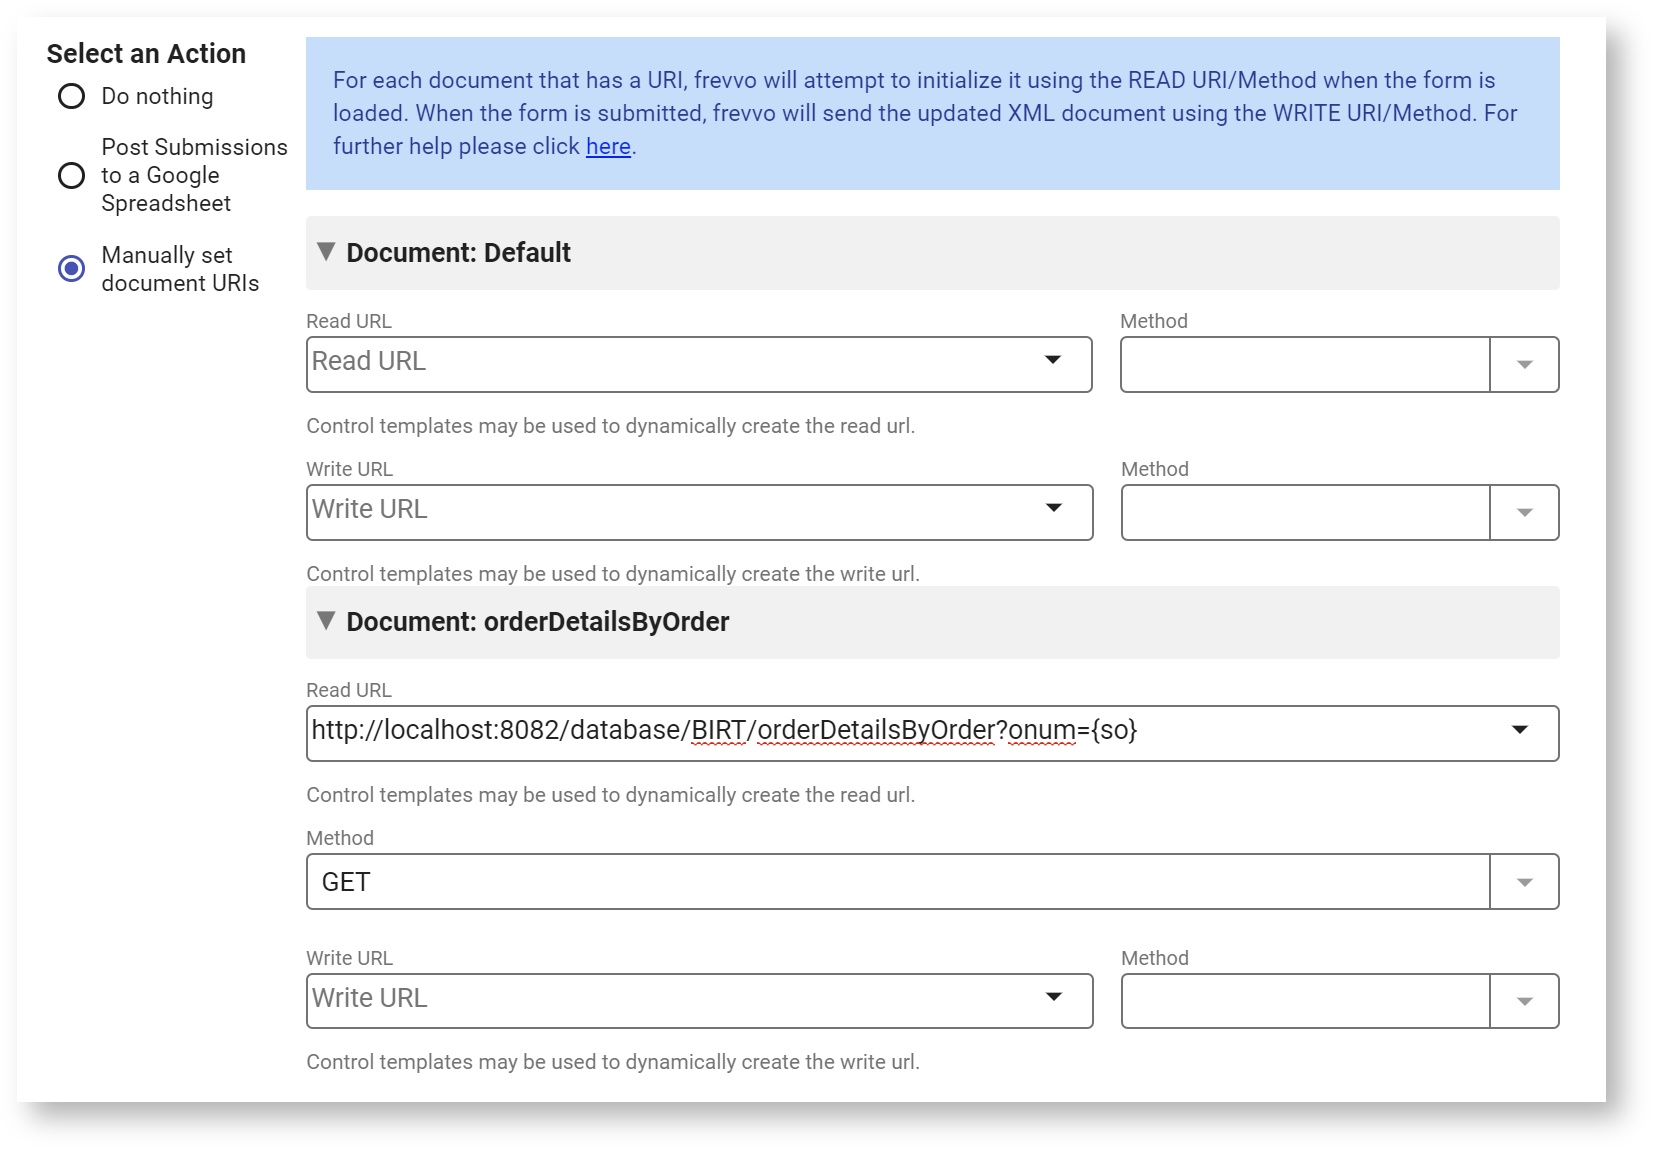
This step indicates to frevvo that the 'orderDetailsByOrder' document is linked to the above URL via the READ method GET. frevvo will issue an HTTP GET request to the above URL and if an XML document conforming to the schema above is returned, frevvo will automatically initialize controls in the form using that document.
The URL itself is a dynamic URL and has a parameter indicated by {so}. Remember that we have a control in the form named 'so' (defined in Modifytheform. When the value of the control named 'so' changes (which will happen when the user selects a particular order), frevvo will automatically issue an HTTP GET to the above URL using the new order number and will dynamically update the order details including creating new line items, removing old ones etc. without refreshing the form as shown in the picture below.
Example 4: Create a new order
Now, let's look at submitting form data to the database. We will create a form using which a customer can place a new order. The order is then saved to the database. Note that we have simplified the form for demonstration purposes.
Define queries
There are two queries defined in the built-in configuration file. The first one creates an order. In addition to the usual <retrieve> operation, this query also has a <create> operation.
<query name="createOrder">
            <retrieve>
                <statement>
                    SELECT "orderNumber" as "onum", "customerNumber" as "cnum" from "Orders" WHERE "orderNumber"=10100
                </statement>
            </retrieve>
            <create>
                <statement>
                    INSERT INTO "Orders"
                        ("orderNumber","orderDate","requiredDate","status","customerNumber")
                    VALUES
                        ({onum}, CURRENT_TIMESTAMP, CURRENT_TIMESTAMP, 'In Process',{cnum})
                </statement>
            </create>
</query>
Let's understand this query. We specify a <retrieve> operation (SELECT statement) in order to generate an XML schema/form controls. When the form is submitted, frevvo generates an XML document for those controls. The XML document is used to execute the <create> operation, which INSERTS the data. We have simply hard-coded a known order number for the example but you can use any query that generates a result set with the desired columns.
Note that we'll just insert the current date as the order date and required date for this example. You can easily customize the query to add a date of your choice. If you want the date to come from the form, you must add it to the SELECT statement so that a control is generated in the form. Dates/Times tend to be database-specific and we'll look at an example later.
The second query is simply used to generate an order number.
<query name="getOrderNumber">
            <retrieve>
                <statement>
                    SELECT max("orderNumber") + 1 as "onum" FROM "Orders"
                </statement>
            </retrieve>
</query>
Once again, this is an oversimplification for tutorial purposes. In practice, order numbers might be generated by the outer application rather than the database.
Generate XML schema
- In your browser go to the URL: http://localhost:8082/database/BIRT/createOrder/schema Save the resulting XML schema file to disk.
- Edit the file. Due to a current limitation in the database connector, the generated schema needs to be edited. Remove the maxOccurs="unbounded" attribute from the row element declaration. Replace:
<xsd:element maxOccurs="unbounded" name="row">
with
<xsd:element name="row">
- Upload the schema to frevvo. See Data Sources for instructions.
Create the form
See Data Sources for help on the steps below.
- Make a copy of the form from Example 1 and open it for editing.
- In the properties panel on the left, open the Data Sources pane by clicking on it.
- Click 'New from XSD'.
- You should see your schema in the resulting dialog box. Expand it and add the 'createOrder' element to the form by clicking the + icon next to it.
- Close the dialog box by clicking X in the top right corner.
- In the Data Sources pane, expand the createOrder data source by clicking on the + icon to the left.
- Click the + icon next to the row element. frevvo will generate controls in the form.
- You can drag and drop to re-arrange as you wish.
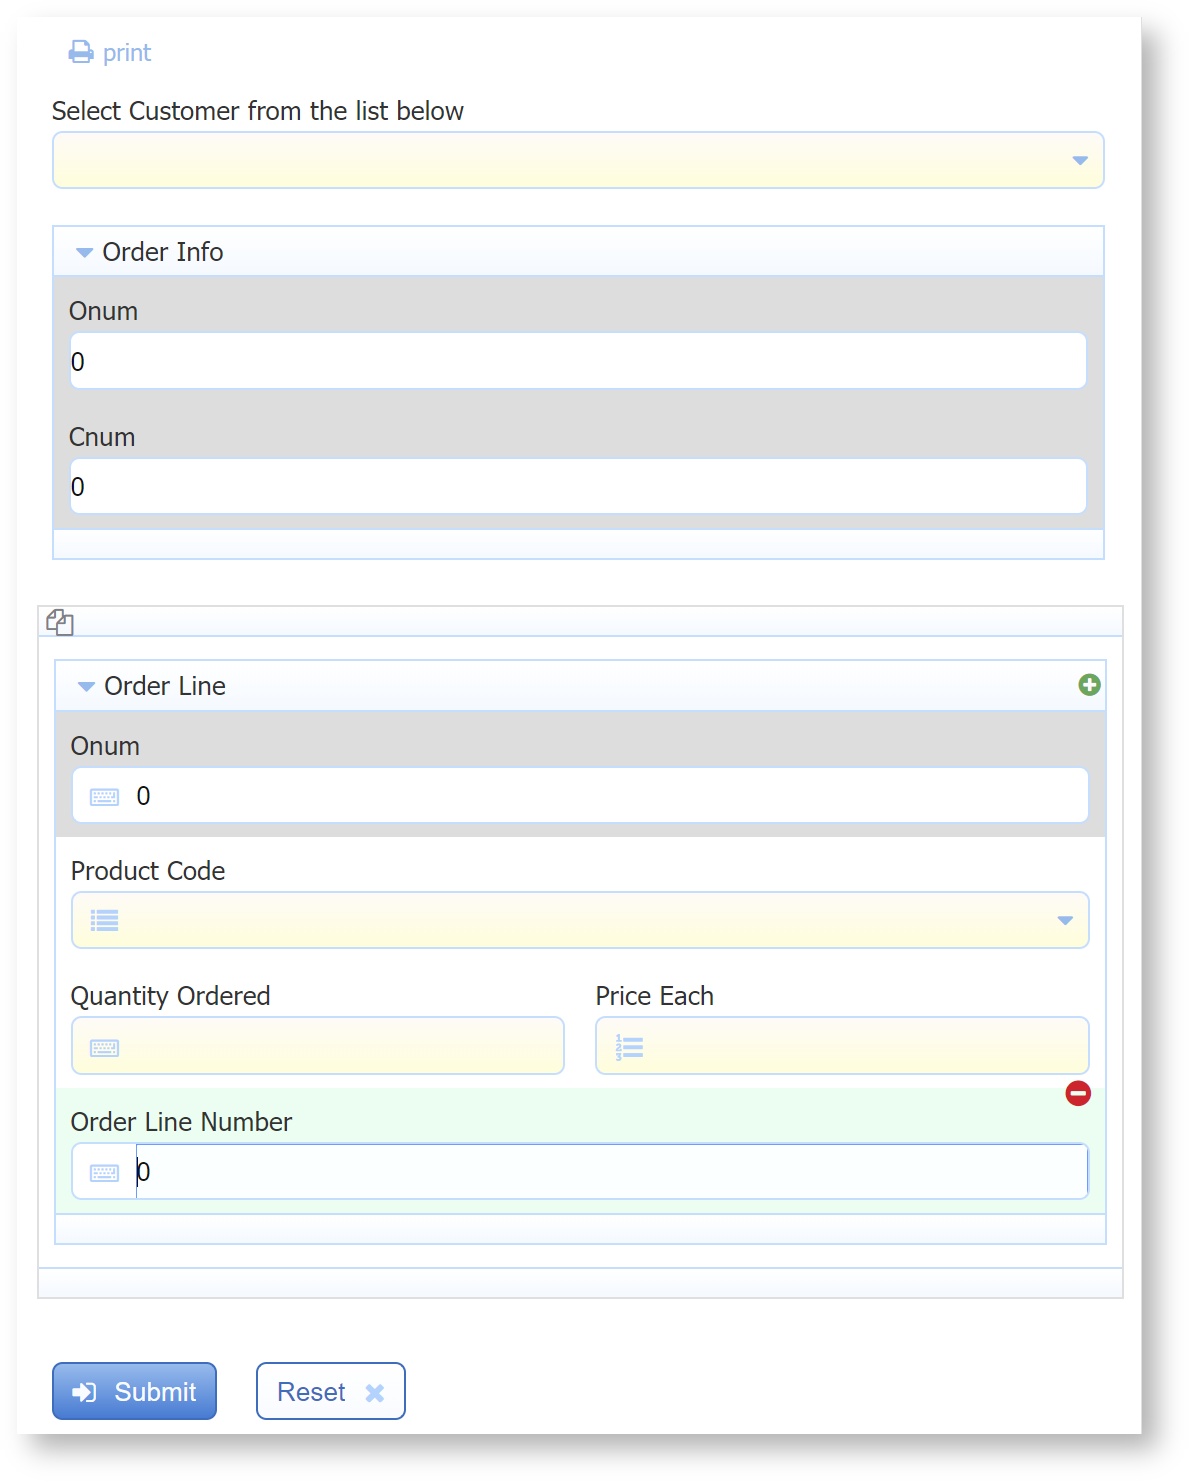
- Rename the Section named Row to Order Info.
This step generates controls that are bound to the createOrder data source by frevvo. You can render the controls as you wish but frevvo will always generate an XML document conforming to the XML schema above.
Create a business rule
- Click the Rules mode in the Guided Designer navigation bar.
- Click to create a new rule.
- Set the Name to 'Copy customer number and generate an order number.
- Click Rule Code then click Edit Code to open the rule editor.
- In the Rule text area: copy and paste the following:
/*member onum, resultSet */
 var x;
 if (sc.value.length > 0) {
  cnum.value = sc.value;
  eval ('x=' + http.get('http://localhost:8082/database/BIRT/getOrderNumber'));
  onum.value = x.resultSet[0].onum;
}
Let's analyze this rule.
- if (sc.value.length > 0) - this implies that the rule will execute when the select customer drop down has a value and the value changes.
- cnum.value = sc.value; simply copies the customer number into the cnum control.
- eval ('x=' + http.get('http://localhost:8082/database/BIRT/getOrderNumber')) - this gets an order number HTTP GET.
- onum.value = x.resultSet[0].onum; copies the order number from the result set into the onum control.
Link to the database
Now, we connect the generated controls to the database query defined above. See Doc URI Wizards for help on the steps below.
- Go to the Settings mode in the Guided Designer navigation bar.
- Select the Document Actions tab and the Send Data sub-tab.
- Select Manually set document URIs.
- You should see the Document name 'createOrder', which is the data source we are interested in.
- Set the URL to: http://localhost:8082/database/BIRT/createOrder (for standalone bundle with frevvo Cloud, replace <server:port> with app.frevvo.com.)
- Leave the Read method empty.
- Set the Write method to POST.
- Save the form.
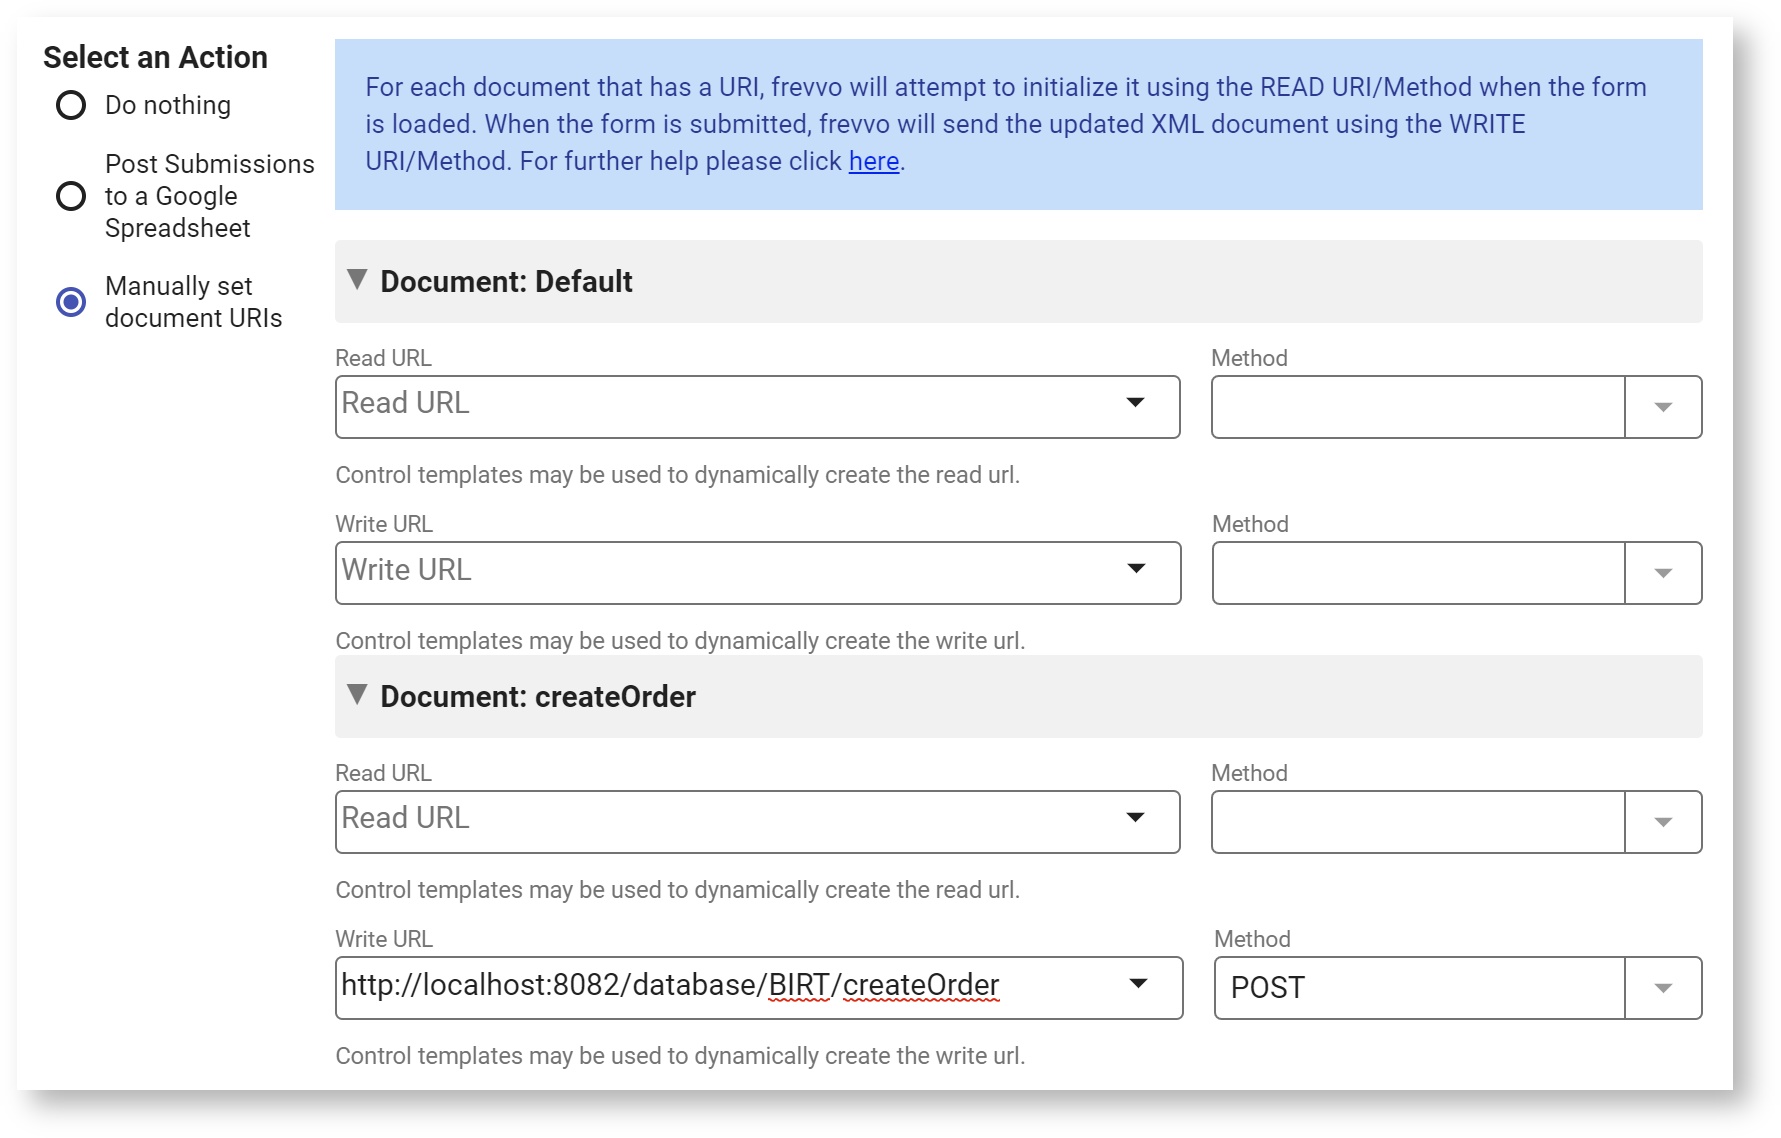
This step indicates to frevvo that the 'createOrder' document is linked to the above URL via the WRITE method POST. When the form is submitted, frevvo will issue an HTTP POST request to the above URL sending the createOrder XML document in the payload. The database connector will map this to the <create> operation of the createOrder query that we defined above, will use the data in the XML document to resolve the query (replace {cnum} and {onum} with values from the XML) and perform the INSERT.
Example 5: Add Order Details
Now, we'll add line items to the order.
Define queries
There are two queries defined in the built-in configuration.xml file. The first one fetches product codes and descriptions from the database so that the user can select a product for purchase.
<query name="allProducts" autocreate="true">
            <retrieve>
                <statement>
                    SELECT "productCode", "productName" from "Products" order by "productName"
                </statement>
            </retrieve>
</query>
The second query creates the order detail line item records in the database.
 <query name="createOrderDetail">
            <retrieve>
                <statement>
                    SELECT
                        "orderNumber" as "onum","productCode","quantityOrdered","priceEach","orderLineNumber"
                    FROM
                        "OrderDetails"
                    WHERE
                        "orderNumber"=10100
                </statement>
            </retrieve>
            <create>
                <statement>
                    INSERT INTO "OrderDetails"
                        ("orderNumber","productCode","quantityOrdered","priceEach","orderLineNumber")
                    VALUES
                        ({onum},'{productCode}',{quantityOrdered},{priceEach},{orderLineNumber})
                </statement>
            </create>
</query>
The steps are very similar to the earlier examples.
Generate XML schema
- In your browser go to the URL: http://localhost:8082/database/BIRT/createOrderDetail/schema Save the resulting XML schema file to disk.
- Upload the schema to frevvo. See Data Sources for instructions.
Modify the form
See Data Sources for help on the steps below.
- Make a copy of the form from Example 4 above and open it for editing.
- We can hide the Order Info section since it does not contain information entered by the user. Select the section by clicking on its header and uncheck the Visible checkbox in the properties pane. The entire section should gray out.
- In the properties panel on the left, open the Data Sources pane by clicking on it.
- Click 'New from XSD'.
- You should see your schema in the resulting dialog box. Expand it and add the 'createOrderDetail' element to the form by clicking the + icon next to it.
- Close the dialog box by clicking X in the top right corner.
- In the Data Sources pane, expand the Create Order Detail data source by clicking on the + icon to the left.
- Click the + icon next to the row element. frevvo will generate controls in the form. Note that frevvo automatically generates a repeating element since a single Order can contain any number of line items.
- You can drag and drop to re-arrange as you wish.
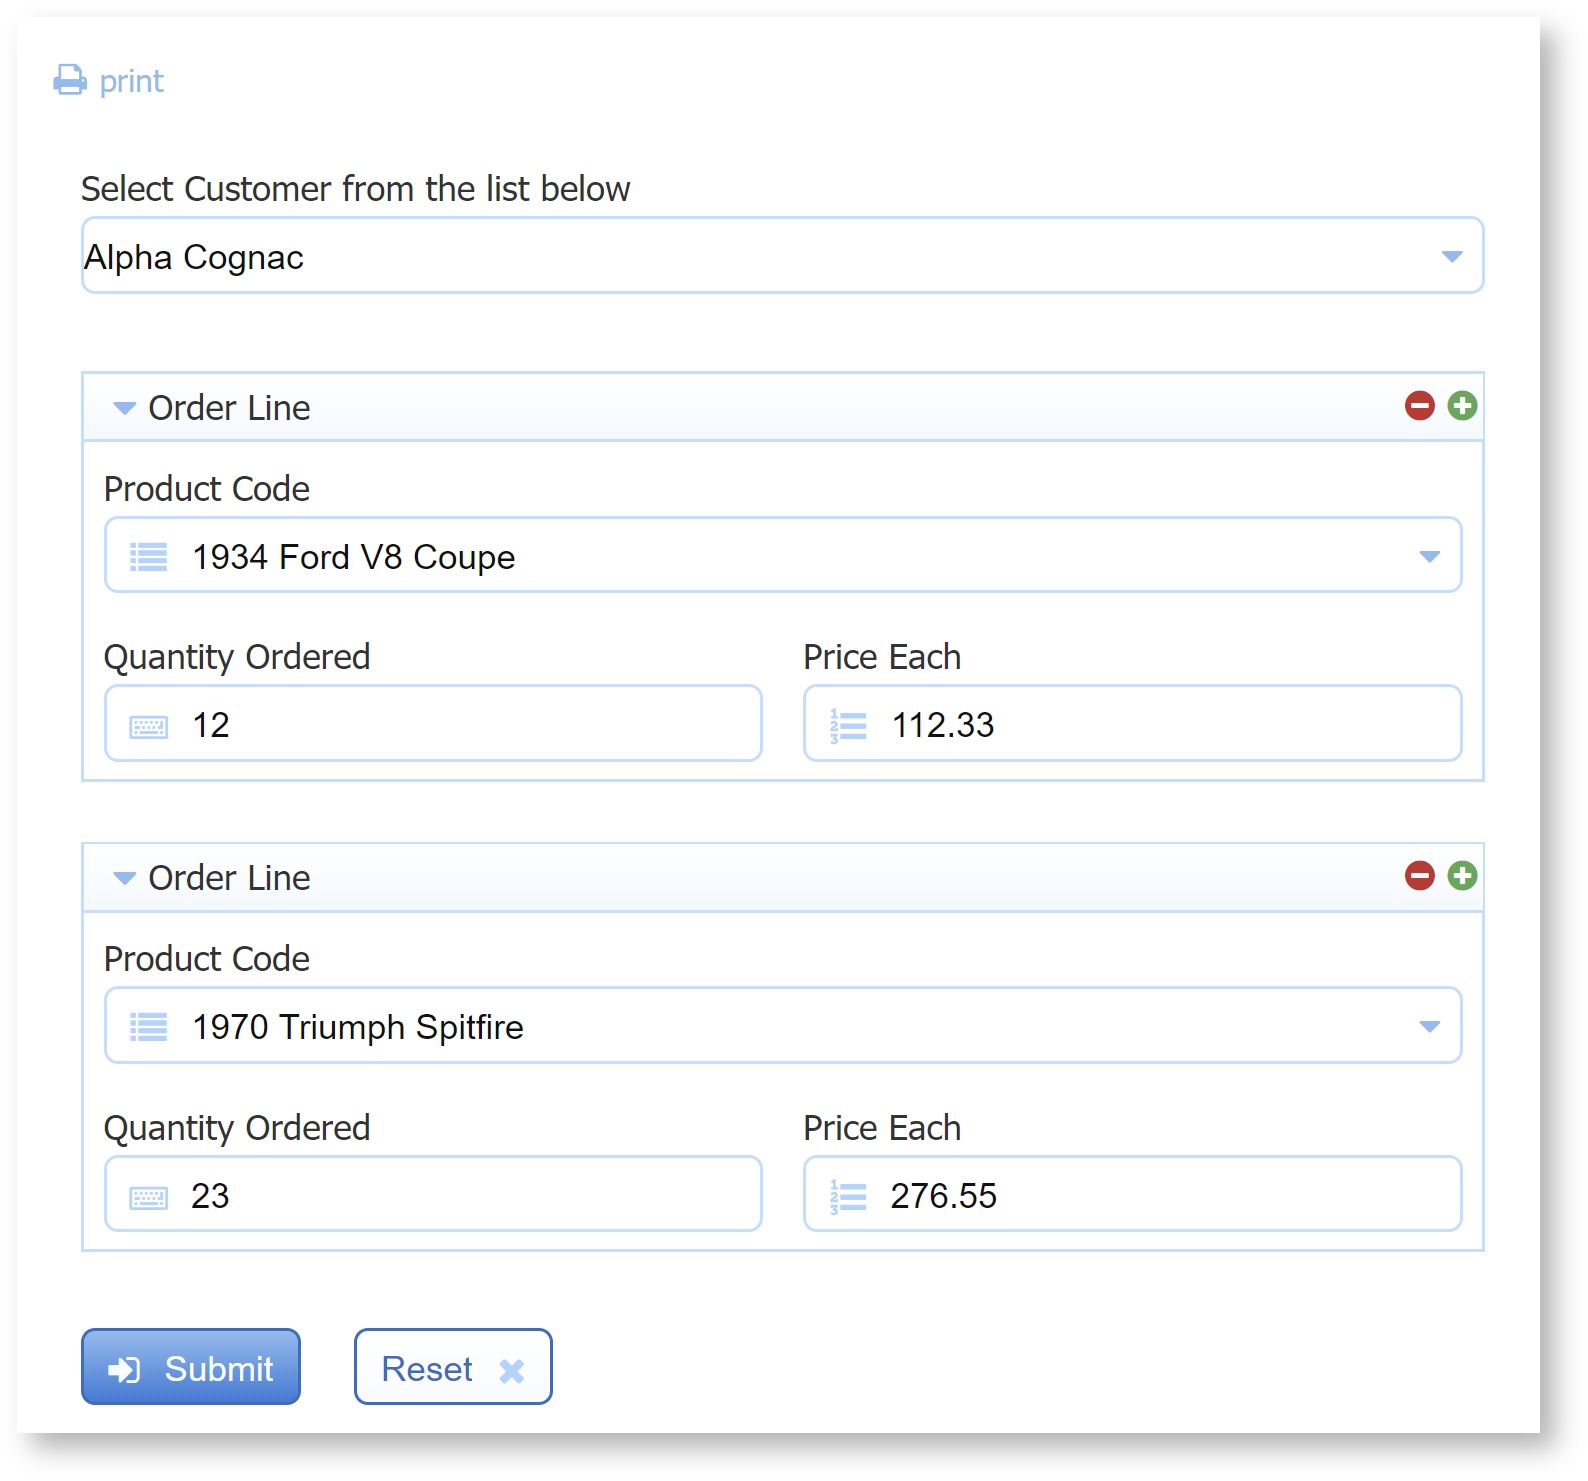
- Rename the Section named Row to Order Line.
- Name the repeat control OrderLines. Take note of the "s" in the name.
- Select the Product Code input control. In the properties panel:
- Set the name to pc.
- Select Dropdown from the Display As property list.
- Select the Onum control inside the Order Line section and in the properties pane set the name to olonum. Uncheck the Visible property.
- Select the Order Line Number control inside the Order Line section and in the properties pane set the name to oln. Uncheck the Visible property.
- Set default values in the Onum and Cnum controls inside the Order Info section and in the Onum and Order Line Number controls inside the Order Line section. You can set any values since we will be overriding them in a rule. We need to set a default value otherwise frevvo will gray out the Submit button and the form cannot be submitted.
This step generates controls that are bound to the createOrderDetail data source by frevvo. You can render the controls as you wish but frevvo will always generate an XML document conforming to the XML schema above. Here's what our form looks like:
Create/Update business rules
- Click the Rules mode in the Guided Designer navigation bar.
- Click the Show Customers rule we created in Example 4. Change the name to Show Customers/Products.
- In the Rule text area: copy and paste the following:
/*member customerName, customerNumber, productCode, productName, resultSet */
var x;
if (form.load)
{
  eval ('x=' + http.get('http://localhost:8082/database/BIRT/allCustomers'));
  var opts= [];
  for (var i=0; i < x.resultSet.length; i++) {
    if (x.resultSet[i]) {
      opts[i] = x.resultSet[i].customerNumber + '=' + x.resultSet[i].customerName;
    }
  }
  sc.options = opts;
  // Products.
  eval ('x=' + http.get('http://localhost:8082/database/BIRT/allProducts'));
  opts= [];
  for (var i=0; i < x.resultSet.length; i++) {
    if (x.resultSet[i]) {
      opts[i] = x.resultSet[i].productCode + '=' + x.resultSet[i].productName;
    }
  }
  pc[0].options = opts;
}
This rule will fire on form load and initialize the customer drop down as before. In addition, we initialize the products drop down in each order line (there could be multiple) with the list of products from the database.
- Edit the 'Copy customer number and generate an order number' rule we created in Example 4.
- In the Rule text area: copy and paste the following:
/*member onum, resultSet */
var x;
if (form.unload) {
  cnum.value = sc.value;
  eval ('x=' + http.get('http://localhost:8082/database/BIRT/getOrderNumber'));
  onum.value = x.resultSet[0].onum;
  for (var i = 0; i < olonum.value.length; i++) {
    olonum[i].value = x.resultSet[0].onum;
    oln[i].value = i+1;
  }
}
This rule will fire when the form unloads (just after the user clicks Submit) and set the values of the hidden fields. We make sure that the Order has a valid customer number and order number, the order number is copied into each order detail element and the order line number is correctly set.
- Click + to create a new rule and the Edit button to open the rule.
- Set the Name to 'Order Line Item Added'.
- In the Rule text area: copy and paste the following:
if (OrderLines.itemAdded) {
  var ix = OrderLines.itemIndex;
  pc[ix].options = pc[0].options;
  oln[ix].value = 0;
  olonum[ix].value = 0;
}
This rule will fire when the user adds a new Order Line repeat item. We copy the product list into the newly added Order Line and set default values in the hidden fields.
Link to the database
Finally, we connect the createOrderDetails document to the database query defined above. See Doc URl Wizards for help on the steps below.
- Go to the Settings mode in the Guided Designer navigation bar.
- Select the Document Actions tab and the Send Data sub-tab.
- Select Manually set document URIs.
- You should see the Document name 'createOrder', which is the data source we are interested in.
- Set the Write URL to: http://localhost:8082/database/BIRT/createOrderDetail
- Leave the Read method empty.
- Set the Write method to POST.
- Click Submit.
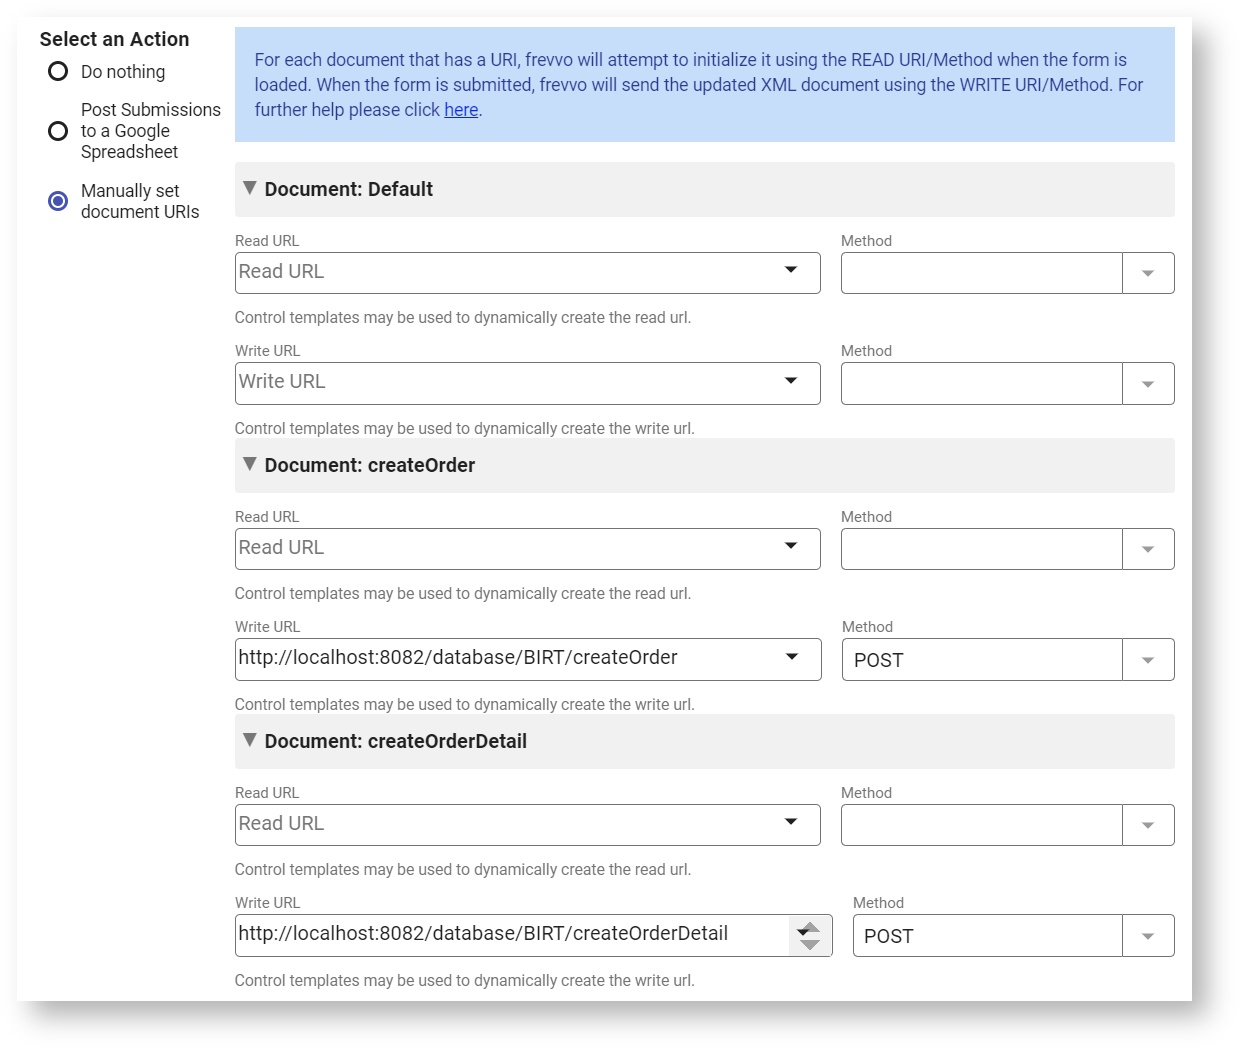
When the form is submitted, frevvo will issue an HTTP POST request to the above URL sending the createOrderDetail XML document in the payload. The database connector will map this to the <create> operation of the createOrderDetail query that we defined above, will use the data in the XML document to resolve the query. Since there are multiple line items, the query will be executed once for each Order line item thereby inserting the multiple line items for an Order.
Test the example
- Click the Test button.
- Select a customer from the drop down.
- Enter at least one line item.
- Submit the form.
- Verify that the order was successfully inserted.
- Use the form from Example 3 by clicking the Test button.
- Select the customer.
- You should see your order. Select the order.
- You should see Line Item details appear below.
Example 6: Update existing records
In this example, we will update the credit limit for an existing customer.
Define query
The query defined in the built-in configuration file is shown below. This query has an <update> operation in addition to the usual <retrieve> operation. We retrieve the customerName in the retrieve operation purely for display purposes.
<query name="customerCreditLimit">
            <retrieve>
                <statement>
                    SELECT
                        "customerNumber" as "cnum","customerName","creditLimit"
                    FROM
                        "Customers"
                    WHERE
                        "customerNumber"={cnum}
                </statement>
            </retrieve>
            <update>
                <statement>
                    UPDATE "Customers" SET
                        "creditLimit" = {creditLimit}
                    WHERE
                        "customerNumber"={cnum}
                </statement>
            </update>
</query>
Generate XML schema
- In your browser go to the URL: http://localhost:8082/database/BIRT/customerCreditLimit/schema?cnum=242 Save the resulting XML schema file to disk.
- Edit the file. Due to a current limitation in the database connector, the generated schema needs to be edited. Remove the maxOccurs="unbounded" attribute from the row element declaration. Replace:
<xsd:element maxOccurs="unbounded" name="row">
with
<xsd:element name="row">
- Upload the schema to frevvo. See Data Sources for instructions.
Create the form
See Data Sources for help on the steps below.
- Make a copy of the form from Example 1 and open it for editing.
- In the properties panel on the left, open the Data Sources pane by clicking on it.
- Click 'New from XSD'.
- You should see your schema in the resulting dialog box. Expand it and add the 'customerCreditLimit' element to the form by clicking the + icon next to it.
- Close the dialog box by clicking X in the top right corner.
- In the Data Sources pane, expand the customerCreditLimit data source by clicking on the + icon to the left and expand the row element.
- Click the + icon next to the cnum and creditLimit elements. frevvo will generate controls in the form.
- You can drag and drop to re-arrange as you wish.
- Hide the cnum element by unchecking the Visible checkbox in the properties pane.
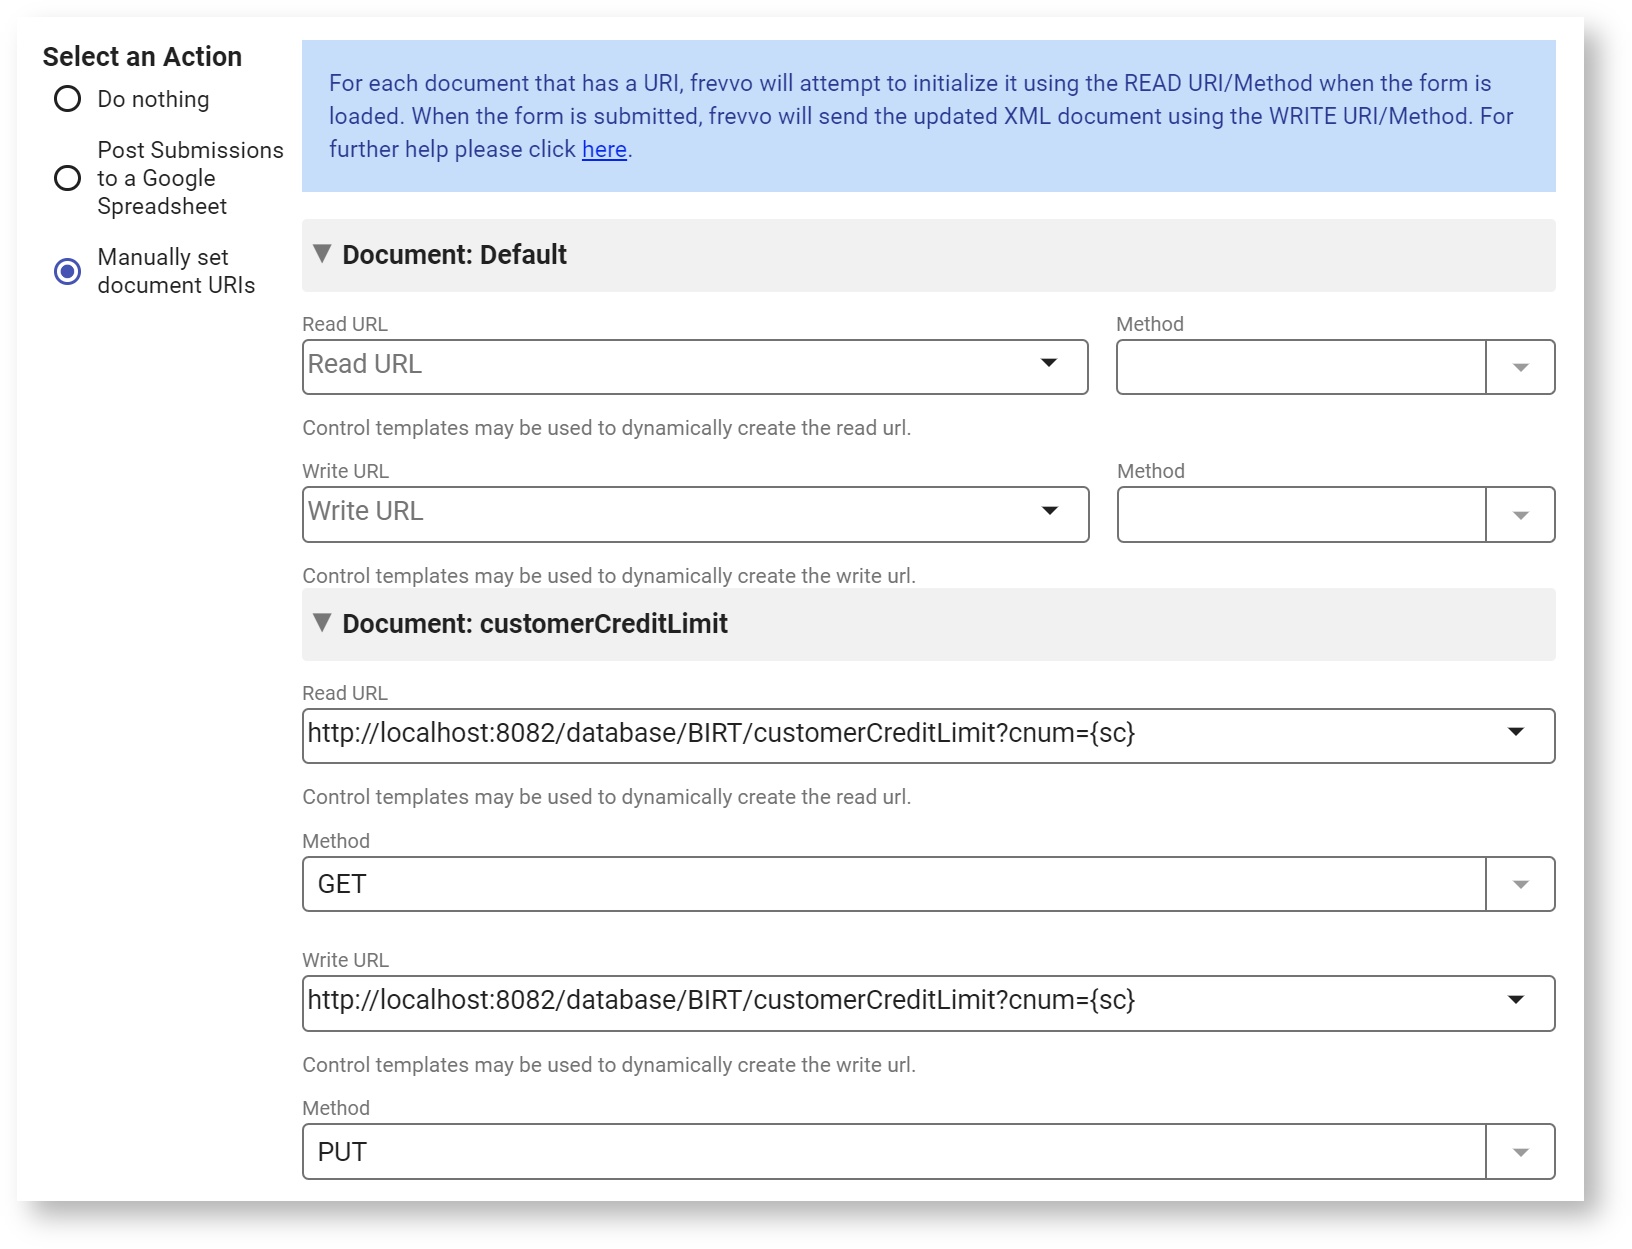
Link to the database
Connect the customerCreditLimit document to the database query defined above. See Doc URl Wizards for help on the steps below.
- Go to the Settings mode in the Guided Designer navigation bar.
- Select the Document Actions tab and the Send Data sub-tab.
- Select Manually set document URIs.
- You should see the Document name 'customerCreditLimit', which is the data source we are interested in.
- Set the Read and Write URLs to: http://localhost:8082/database/BIRT/customerCreditLimit?cnum={sc}
- Set the Read method to GET.
- Set the Write method to PUT.
- Click Submit.
This step indicates to frevvo that the 'customerCreditLimit' document is linked to the above URL via the READ method GET and the WRITE METHOD PUT. frevvo will issue an HTTP GET request to the above URL and if an XML document conforming to the schema above is returned, frevvo will automatically initialize controls in the form using that document. The URL itself is a dynamic URL and has a parameter indicated by {sc}. When the value of the control named 'sc' changes (which will happen when the user selects a customer), frevvo will automatically issue an HTTP GET to the above URL using the new customer number and will dynamically update the values of the credit Limit and cnum controls without refreshing the form.
When the form is submitted, frevvo will issue an HTTP PUT request to the above URL sending the customerCreditLimit XML document in the payload. The database connector will map this to the <update> operation of the customerCreditLimit query that we defined above, will use the data in the XML document to resolve the query (replace {creditLimit} and {cnum} in the query with the actual values from the XML document) and perform the UPDATE.
More Info on Updating Existing Records
The database connector is a powerful tool that allows you to perform all CRUD (CREATE, READ, UPDATE, DELETE) operations on your database without the need for programming. Please see this documentation for additional details.