| Section | |||||||||||||||||||||
|---|---|---|---|---|---|---|---|---|---|---|---|---|---|---|---|---|---|---|---|---|---|
|


...
- You can enter any text you want for in the Subject and Message fields. Clicking on the DEFAULT button, shows "New Task" as the default subject and "You can access your task by clicking <a href="{task.perform.url}">this link</a>" for the default message.
- Clicking on the
down arrow, show a list of templatized fields from your flow, flow/special templates provided by and Task Templates that you can use in the body of your email.
- Type the opening curly brace - {- followed by the control name to enter a field from your flow as a template. Selecting an option enters the control name into the field with the closing curly brace
Built-in flow templates
- {flow.id} - The unique flow instance id. This id is unique for each flow submission.
- {flow.type.id} - The unique id associated with a given flow. See Sharing Forms
- {flow.extid} - Client defined extId passed in the formtype Url parameter.
- {flow.name} - The name of the flow.
- {flow.description} - Description of the flow.
- {flow.activity.id} - The Id of the current workflow step.
- {flow.activity.name} - The name of the current workflow step
- {flow.activity.reject.reason} - The reason a workflow step is rejected
- {flow.id} - The unique flow instance id. This id is unique for each flow submission.
Built-in special templates
- {subject.id} - logged in user's username.
- {subject.roles} - A list of all the roles for the logged in user
- subject.email - logged in users's email address
- {subject.first.name} - logged in users's First Name
{subject.last.name} - logged in users's Last Name
{subject.reports.to} - the user id of the person the logged in user Reports To - configured in the user profile by the Tenant Admin. Typically used to designate a manager/supervisor.
{tn.id} - the Tenant ID where a form/flow is located
{tn.name} - the Tenant Name where a form/flow is located
{user.id} - Owner of form/flow and user folder name in the filesystem
- {app.id} - The unique id associated with a given application. See Sharing Forms
- {app.name} - The unique name associated with a given application.
- Type the opening curly brace - {- followed by the control name to enter a field from your flow as a template. Selecting an option enters the control name into the field with the closing curly brace
...
| Expand | ||
|---|---|---|
| ||
Let's say you have a 3 step Expense Report workflow. Step 1 (the Expense Report) is filled in by the employee, Step 2 is performed by the employee's manager who approves or rejects the report and Step 3 is performed by an employee in the payroll department who processes the Expense Report for payment. << Employee submits Expense Report (Step 1) ==> the flow is routed to the employee's manager for approval (Step2) ==> once approved, the flow is routed to the payroll department for payment>>. Step 2 in our example workflow is assigned to the employee's manager which is collected by a field in the form named ManagerName. When the employee submits the Expense Report, the designer wants the employee to see the message "Your request has been sent to {Manager name}". {ManagerName} is an example of a template that is replaced at runtime by the name that is entered in the ManagerName field in Step 1. Step 3 in our example is assigned to any user that is assigned the role of Payroll. When the manager approves the report and clicks submit, the designer would like to display the message "The Expense Report has been sent to Payroll for processing" to the manager. To understand where you type in the text for your messages to get them to display when you want them to, think of the Pending Message property as the message that is displayed when users try to access workflow steps. In our example, when the employee submits step 1, the flow moves to step 2, the manager approval step. The message typed into the Pending Msg field for Step 2 - "Your request has been sent to {Manager name}" is shown to the employee instead of the Step 2 form. When the manager approves the Expense Report and submits Step 2, the message typed into the Pending Msg field on Step 3 - "The Expense Report has been sent to Payroll for processing" is displayed to the manager when the flow moves to the Payroll department employees instead of the Step 3 form. To set up the Pending messages discussed in our example, follow these steps:
|


...
Steps performed by the same user in a flow are referred to as a screenflow. The steps of the screenflow are considered one task. The reject functionality will allow users to reject only to the beginning of that screenflow. You cannot reject back to steps after step 1 in the screenflow.
| Tip |
|---|
Steps performed by the same user that are separated by Anonymous Task steps are considered to be a separate workflow tasks. For example, consider a Purchase Order flow with the following navigation: Step 1 is performed by Sales employee > Step 2 is sent to the customer's Email Address (Anonymous user) > Step 3 is performed by the same Sales employee that performed Step 1. You can configure a Reject button on the Sales step that will show both steps as rejection targets even though Step 1 and 4 were performed by the same user. Refer to the Flow Tutorial for an example. |
Customize the Rejection Email
It is possible to customize the subject and email message body that is sent when a workflow task is rejected. You will configure this email on the step you are rejecting from. The customized rejection email will be sent when the Reject button is clicked on that workflow step or Quick Approval screen.
You can choose controls from your form which will be added to the Message as templates or you can use built-in templates as described below. Click on thedown arrow shows the list.
- {flow.name} - Name of the workflow
{subject.first.name} - First name of the user who rejected the task.
{subject.last.name} - First name of the user who rejected the task.
{flow.activity.name} - The step of the workflow that was being performed when the task was rejected.
{flow.activity.reject.reason} - The reason for the rejection.
{task.perform.url} - The URL to the rejected task.
...
Troubleshooting the Reject Button
Here are some reasons why you might not see the Reject option on a step where "Reject From Here" is selected:
- If the Reject To Here option is not selected in the previous steps, then user won't be able to see the Reject button on current step.
- When consecutive steps are executed by the same user, treats it as a screenflow. Think of those steps in the screenflow as one task. The reject functionality allows users to reject only to the beginning of that screenflow/task i.e. where the previous user started his work. It won’t allow a reject to the in-between steps.
- If the immediate steps prior to the current step were performed by the same user, then he/she cannot reject to those steps (the user is rejecting the flow to himself). Users can reject only to those steps performed by other users, or to steps performed by himself that do not come immediately before the current step.
- If a previous step was skipped because its precondition failed, then the user won't be able to reject to such a step.
- If a precondition on previous step passed when that step was being performed, but the control values change causing the precondition to now fail, the user might not be able to reject to that step.
- The Reject button will not be displayed at all if the conditions are such that users cannot reject to any prior steps.
...
| Tip |
|---|
In general, a condition is selected that acts as a trigger for the escalations. If the condition is NOT met, then the designer can specify what actions to take. You can elect to reassign, notify, send reminders or skip the task but you do not have to choose all three. However, once a condition is selected one of the actions must be reassign,notify or skip.
For example. if you wanted to send reminder emails to the user(s) who currently have the task on their Task List that the deadline is approaching and then send an email notification to them when the deadline is reached, you would configure the Notifications and Reminders tabs and check None (Notify Only) on the Action tab. Continue reading for more details. |
...
Selecting Perform By or Complete By displays two options.
Using Date/Time Control: The Due Date control dropdown displays all date controls in your form.
Info 
- The control used in the template must have a value before the task is created. For example, a date entered by the user on Step 1 can be used in an escalation condition on any later step. However, that date control template will not work in an escalation on Step 1, because the escalation is created at the moment the Step 1 task is created (when the form loads), and at that moment the control does not yet have a value. The date or date/time control used as a template in an escalation can get it's value a) in use mode or by business rule in a prior step, b) by setting a default value in the designer, or c) using _data when the workflow is initialized.
- An invalid due date template value will resolve to the current time to prevent any use-mode errors. The following message will appear in the frevvo logfile: "Escalation Due Date {DueDate} resolves to an invalid value".
- Date controls will automatically use the end of the day set in your business calendar in UTC, or 11:59 PM if no end of day is set, as the time component.
- Use Using Fixed Date: Enter a date/time as the deadline.
...

Selecting Perform Within or Complete Within displays Days, Hours and Minutes and a Business Calendar checkbox.
- Specify the amount of time the user has to perform or complete the task in Days, Hours or Minutes.
- Check the Business Calendar checkbox if you want to use the business days, times and timezone specified for your tenant to calculate a task deadline. The business calendar is set up at the tenant level by the tenant admin.

Escalation Actions
Once the condition is selected, click the Action tab to continue. Select from the following choices:
- None (Notify only) - Check this option if you want to send reminder emails to the user(s) who currently have the task on their Task List that the deadline is approaching and then send an email notification to them when the deadline is reached. The Notification tab becomes required. The task will not be reassigned or skipped.
- Reassign Task - Reassignment sends the task to the user/role selected if the deadline is passed. Select whether the task will be reassigned to a Role, User or Unlock to Role:

- If you select Role or User, then you must select the user or role in Select Role or User Assignee(s) field. Type ahead to display the Roles/Users in your tenant that begin with the letter you are typing and select from the list or enter comma separated templates. Remember that userids and roles are case sensitive. If reassigning to a specific user, only one user id can be selected but you can reassign to more than one role.
- Unlock to Role - This option unlocks the task. Use this option for a step in your workflow that has a role assigned to it and you want to handle the situation where one user with that role has the task locked and the deadline for the task has passed. Selecting Unlock to Role unlocks the task and keeps it on the Task list of all users with the role after the deadline expires. Now it can be performed by any user with the specified role again.
For example, let's say you have a step in your workflow that is assigned the manager role. Users Jerry and Jim are managers so the task shows up on both their task lists. Jerry clicks the Perform icon but he does not complete the step. The task remains on his task list and it is locked by him. If Jim tries to access the task or checks the Audit Trail he will see that the task is locked by Jerry. The deadline to complete the task passes. If Unlock to Role is selected as the reassignment option, the task remains on the task list of users with the manager role, in this case, Jerry and Jim, but it is unlocked and the audit trail shows a status of pending. Now it can be performed by any user with the manager role again.
- Reassigned users receive the Task Information email specified by the designer. So be sure to Setup Task Notification Email for the step in your workflow where you assigned escalations and you want to reassign the task after the deadline.
Skip Task - check this option if you want the workflow to escalate automatically to the next step when the timer expires. When checked, no further configuration is required.
Info Skipping a task is only supported if the next step in the workflow is a form/summary step. Configuring the Skip a task feature on the last step of your workflow will not work.
- Reassign Task - Reassignment sends the task to the user/role selected if the deadline is passed. Select whether the task will be reassigned to a Role, User or Unlock to Role:
Escalation Notifications

You can set up notifications for any of the three actions.
- Click on the Notifications tab.
- Slide the
 toggle icon to the right to turn on Notifications
 - Select Role, User or the Current Owners from the Send To dropdown to specify who will receive email notification reminders when the deadline is reached.
- If you select Role or User, then you must list them in the Select User(s) or Role Recipient(s) field. Type ahead to display the Roles/Users in your tenant that begin with the letter you are typing and select from the list or enter comma separated templates. Remember that userids and roles are case sensitive. You can specify more than one user or role.
Current Owners refers to user(s) who currently have the task on their task list. Partial templates with prefixes and suffixes can be used to create a complex role such as floor-manager when setting up Escalations.
Expand title Click here for an example Insert excerpt Templatized Strings Templatized Strings nopanel true
- Specify an email(s), user(s), or role(s) to receive a CC: of the notification (optional).
- The subject and body of the notification email are shown once the Recipient(s) are selected. You can customize the email message by adding controls from your form as templates, workflow templates, common templates, escalation or task templates. Simply click the
 to show the templates or type ahead to filter the list. For example, when a task is reassigned, you may want to specify the user/role that the task is being reassigned to (reassignee) in the email to avoid confusion. Simply add some text with this template in the Notification message section: {flow.step.escalation.reassignee}.
- If you select Role or User, then you must list them in the Select User(s) or Role Recipient(s) field. Type ahead to display the Roles/Users in your tenant that begin with the letter you are typing and select from the list or enter comma separated templates. Remember that userids and roles are case sensitive. You can specify more than one user or role.
- Slide the
Escalation Reminders

Configure email reminders on the Reminders tab. Reminder emails notify the roles/user(s) originally assigned to this step.
- Specify the interval between reminders by entering the number of reminders in the Every field and select Days, Hours or Minutes from the Unit dropdown.
- You can limit the number of reminders by sliding the toggle icon to the right and entering the number of reminders closer to the deadline in the Occurrence(s) field. If you enter a negative number in this field by mistake, will change it to a 1 when you exit the field.
- Specify an email(s), user(s), or role(s) to receive a CC: of the notification (optional.)
- You can customize the email message by adding controls from your form as templates, workflow templates, common templates, escalation or task templates. Simply click the to show the templates or type ahead to filter the list. Select them from the Control dropdown.
- You can limit the number of reminders by sliding the
| Info |
|---|
Reminders calculate back from the deadline. For example, let's say you set the condition to Perform within 1 day (24 hours), and then set the Reminders for every 2 hours, with no limit. So, 12 reminders will be sent (24 hours / 2 hours = 12 reminders), including one immediately after the Task Notification. To prevent this, be sure to toggle Limit reminders and set the occurrences to at least one fewer, in this case 11. |
...
Escalations and Screenflows
Escalation should always be defined on the first step of a task - this is relevant when setting up Escalations for a Screenflow.
Screenflows are steps in a workflow that are performed by the same user. Consider a New Employee On-boarding workflow where steps 1 - 5 are designed to collect the Personal Information, W - 4 Allowances, State Allowances, Health Insurances preferences and Banking Information. Step 6 in the flow is routed to the new employee's manager and step 7 is routed to HR for final processing. Steps 6 and 7 are not part of the screenflow as they are performed by users other than the new employee.
Think of the 5 steps of the screenflow as one task. Escalation for the screenflow task will work as long as you define the escalation on the first step of the screenflow task. The escalation configured on the first step of the screenflow applies to all steps of the screenflow. For example, if a Complete Within 2 days escalation is configured on Step 1 of screenflow, then the escalation is triggered if the whole screenflow is not completed within 2 days.
| Tip |
|---|
If the first steps of a workflow consist of a screen flow, you must configure the flow to use the Save on Navigate and/or Task for First Step properties for escalation triggers to get created |
Escalation Examples
| Expand | ||
|---|---|---|
| ||
Escalation Example 1Let's consider a Time Sheet workflow consisting of 3 steps:
In this example, the designer has configured a 10 minute interval for the Manager to approve/reject the task. The Escalation tabs are shown  Employee William submits his Time Sheet at 12:55 PM. The deadline to complete this task is 1:05 PM. William's Manager Jerry receives a Task Notification email notifying him there is a task that requires his attention. The email includes a link he can use to access it.  In this example, the deadline to complete the task is 1:05 PM. Based on the setup of the Reminder(s) section shown above, Jerry will receive 3 reminders every 3 minutes as the deadline approaches. The emails contain a link that Jerry can click to get to the task. The first one arrives as 12:56 PM, the second at 12:59 PM and the final reminder before the deadline arrives at 1:02 PM.  At 1: 05 PM, the task is removed from Jerry's task list since it was not completed in the allotted time and is routed to the task list of any users with the role of Supervisor. Jerry receives an email informing him that the deadline for the task has expired and the task is now assigned to any user with the role of Supervisor.  Reassigned users receive the Task Information email specified by the designer. So be sure to Setup the Task Notification Emails. When Jack, a user with the role of Supervisor, access his task list he will see a task sent to him by the system and the Audit Trail shown in the image:  Escalation Example 2Let's consider a situation where you might want to skip the task after the deadline has been reached. Imagine a workflow with a requirement that it must be approved by specific users in sequence. To prevent the chain of approvals from being delayed if one user does not perform their approval before the deadline, the designer can check the Skip the Task checkbox on the flow steps and will automatically complete the current step and create a pending task on the Task List of the next user. The Project Approval workflow shown in the image must be approved by Approver 1 and Approver 2 in that order. The escalation set up on the Approver 2 step automatically skips this step and advances the flow to the next next step . Notice that notification and reminder emails are also configured. In this example,
Here's what happens:
|

Activity Document Actions
...
- Click on the step of the workflow, then click the
- Click anywhere in the Email section in the Properties Navigator. This takes you directly to the Email tab.
- Click the
- Slide the
- Enter email addresses or click the
- Customize the Subject and Message of the email.
- Select the type of attachments to include in the email.
- Remember to click Submit to save your changes.
Configuring Email
You can configure the Email tab on as many steps of your workflow. Remember the Document Actions that are set up will execute when the flow is completed, so you may not need to configure an action for the last step.
...
- You have the option of sending a filled form image using the Send Snapshot dropdown. Select the image type from the dropdown. Leave the option blank if you do not want to send a snapshot.
- The Data checkbox adds an XML document of your flow.
- Check Attachments to include files uploaded to your form/flow. Uncheck it to exclude attachments in the submission.
If you have Pixel Perfect mapped PDFs (ex: W-4, I-9 etc…) associated with your forms/flows, choose the action you want to take by checking an option in the Send Generated PDF Forms field:
- Check All to send all the Pixel Perfect PDFs in the submission. This is the default value.
- Check None to send none of the PDFs.
- Check Select to display a list of all the PDFs associated with your form/flow. Click the ones you want to be part of the submission from the popup.
| Info |
|---|
Snapshots are generated for the entire flow when step Document Actions are configured on individual steps. For example, imagine a flow with 2 steps. An email step Document Action is configured on step 1. When Step1 is submitted, a pdf containing all printable controls in both steps will be attached to the email. This is as designed. |
...
| Expand | ||
|---|---|---|
| ||
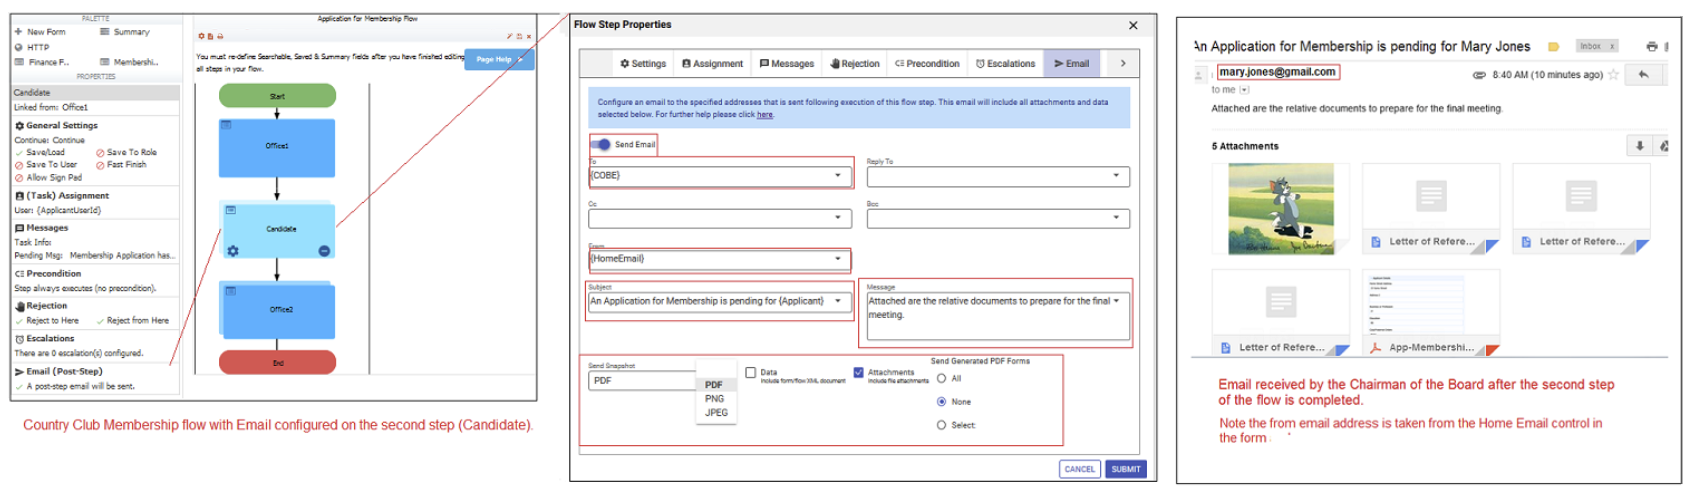
Consider the following Country Club Membership application flow:
In this scenario, the Chairman of the Board is not informed about the applicant until all of the office tasks have been completed. This could delay the process for some time. The Country Club wanted to improve the process by sending the Chairman of the board an email with the relevant documents (application, letters of recommendation, photo) attached after the step in the flow where the applicant completes the application. The Email tab can be configured to send an email to the Chairman of the Board when the applicant submits the Candidate step (Step2) of the workflow. The application, required letters of recommendation and photo are attached to the email. Now the Chairman of the Board can review the application and relevant documents ( letters of recommendation, photo) without having to wait for the office to complete the final processing step.
|
...
- Clicking on the step of the workflow, then click the
- You will not see a section for this tab in the Properties Navigator.
- Slide the
- Click the
- Select the type of attachments, if any.
- Remember to click Submit to save your changes.
Configuring the Web Hook
- Type the URL to your web application in the URL field. Templates can be used. Click the
- You have the option of also sending a filled form image using the Send Snapshot dropdown. Select the image type from the dropdown. Leave the option blank if you do not want to send a snapshot of the flow
- The Data checkbox sends the flow XML document.
- Attachments uploaded to your form/flow are sent if the Attachments checkbox is checked.
If you have Pixel Perfect mapped PDFs (ex: W-4, I-9 etc…) associated with your forms/flows, choose the action you want to take from the Send Generated PDF Forms control:
- Check All to send all the Pixel Perfect PDFs in the submission. This is the default value.
- Check None to send none of the PDFs.
- Check Select to display a list of all the PDFs associated with your form/flow. Click the ones you want to be part of the submission from the popup.
Activity Document Action Failure Notification
...
| Expand | ||||
|---|---|---|---|---|
| ||||
Activity Document Action Behavior for Failed PostIf the HTTP POST returns a status code 422 and an error message, interprets this code to mean that the activity in question should be re-run. For flow steps, this means that the form for the flow step is re-rendered. If you want to display a message to the user when the post fails,
For example, Let's say you have a fields on the last step of a flow step to collect a credit card number and the expiration date. The user fills in the information then clicks Finish. There is a Post Submission to a web app configured on this step.
If the web app returns a status code of 422 and some type of error message, the flow step will be re-rendered. The message informing the user to check the information and resubmit displays.
The flow step will continue to be re-displayed until the post returns an Ok status (HTTP 200).
|


...
- Clicking on the step of the workflow, then click the
- You will not see a section for this tab in the Properties Navigator.
Approval Control
Your workflow step MUST have an Approval Control to successfully configure the Quick Approval feature.
...
- Drag/drop a Section control into the step of the workflow where you want to configure the Quick Approval feature. Name the section whatever you want.
- Drop a Textarea control inside the section. Do NOT add any other controls to the section.
The Approval control can be optionally set up to be digitally signed. Regular text digital signatures and Wet Signatures are supported. See Electronic Signatures for more information. The image below shows a section named Manager Review with a textarea control for comments. Text/Signature image is selected on the Signature dropdown on the section security tab. This section meets the requirements for an Approval control that can also be digitally signed.
...
- Slide the
- Set up Task Information for the Quick Approval view in the Summary field. Click the
- Select the Quick Approval control from the dropdown.
- Remember to click Submit to save your changes.
- Repeat for all steps where you want to configure Quick Approval.
- Set up Task Information for the Quick Approval view in the Summary field. Click the
There is a visual cue, a lightning icon, , that displays on a workflow step if quick approval is enabled.
...
| Expand | ||
|---|---|---|
| ||
Let’s use an Employee On Boarding flow as an example. The Employee On Boarding flow consists of 6 forms: Employee Information, Allowances, Additional Information, Confirmation, Approval and Office Use Only. The requirements are as follows:
The Approval step consists of one section named Manager Review. This section has one control in it – a text area where the manager can comment. The section is set up for a digital signature - the Text/Signature image choice is selected in the Signature dropdown on the Security Tab. This section meets the criteria for an Approval Control and can be used to setup the Quick Approval feature.
A Lightning icon appears on the step in the flow once the Quick Approval has been enabled. This icon will appear and disappear as required when you enable/disable Quick Approval using the wizard.
The Quick Approval screen shown above displays in a manager's Task List when it is accessed from a mobile device. The manager clicks the Quick View icon
Refer to the Using the Task List for more information about how to use the Quick Approval feature. |


| Tip |
|---|
|

| Expand | ||
|---|---|---|
| ||
Quick Approval Behavior when Activity Document Action post failsIf the HTTP POST returns a status code 422 and an error message, interprets this code to mean that the flow step in question should be re-run. For flow steps, this means that the form for the flow step is re-rendered. If there are any message controls in the form with CSS class f-action-error, they will now become visible. These message controls are not visible by default when the form is first rendered. For example, Let's say you have a two step workflow where step 2 has fields to collect a credit card number and the expiration date and has to be approved by a manager. .An Activity Document Action Post to a web app for data verification and Quick Approval have also been configured on this step. The user fills in the fields in step 1, then clicks Continue to send the workflow to a manager for approval. The manager accesses his Task List, clicks the Quick Approval icon then the Approve button. The information is posted to a web application for verification. If the web app returns a status code of 422,(fail status) and some error text, the manager sees this message: When the manager clicks on the
The flow step will continue to be re-displayed until the post returns an Ok status (HTTP 200).
|


...
- Capture location information for a step in your workflow.
- Embed a Google map in your flow step.

You can display the Geo Location tab by:
- Clicking on the step of the workflow, then click the
- You will not see a section for this tab in the Properties Navigator.
- Enable the Geo Location feature for the step.
- Enable the ability to capture additional location information or embed a Google map in the flow step
- Do this for each step in your flow where you want to use the Geo Location feature.
- Remember to click Submit to save your changes.
You can capture the location where your form/flow was filled in by turning on ' Geo location feature. A form/flow knows it's current location and will submit that information when the form is completed. uses the HTML5 GeoLocation api. The geo api is well supported on tablet, phone and recent laptop/desktop browser versions. This feature works on a desktop or any GPS capable mobile device.
...
- Select one of three options from the Geo Location dropdown to turn this feature on:
- None - (no location) - this is the default
- On Load - turn the feature on when the flow step loads (at start time)
- Custom - allows the designer to specify a periodic refresh. The default value is 30 seconds. Choosing this method will fire a rule in the specified time. For example, if the field to the right of the Geo Location dropdown was set to 10, rules to capture additional location information would fire every 10 seconds.
- Enter the Location Refresh Timeout - thisis the amount of time in seconds the location finder in the browser will search to find the location before it times out. The default value is 5 seconds.
Check the Detailed Location checkbox to capture additional information based on the location via a Business Rule or to embed a Google map in your form. You will need a connection to google.com for this to work.
Info - A connection to google.com is required for this to work. This connection is automatically available in the frevvo Cloud.
- New in-house installations must obtain an API key in order to use this feature. Follow the steps listed here to obtain the key.
- A connection to google.com is required for this to work. This connection is automatically available in the frevvo Cloud.
- None - (no location) - this is the default
Displaying a Google Map in your Workflow Step
...