frevvo v9 is no longer supported. Please visit Live Forms Latest for our current Cloud Release. Earlier documentation is available too.
Editing Step Properties
- Former user (Deleted)
- Megan Ellis
- Former user (Deleted)
When you click on any step in the flow, a series of action icons displays depending on the step type. Creating a flow step by dragging/dropping an existing form or a New Form from the Palette shows these icons:
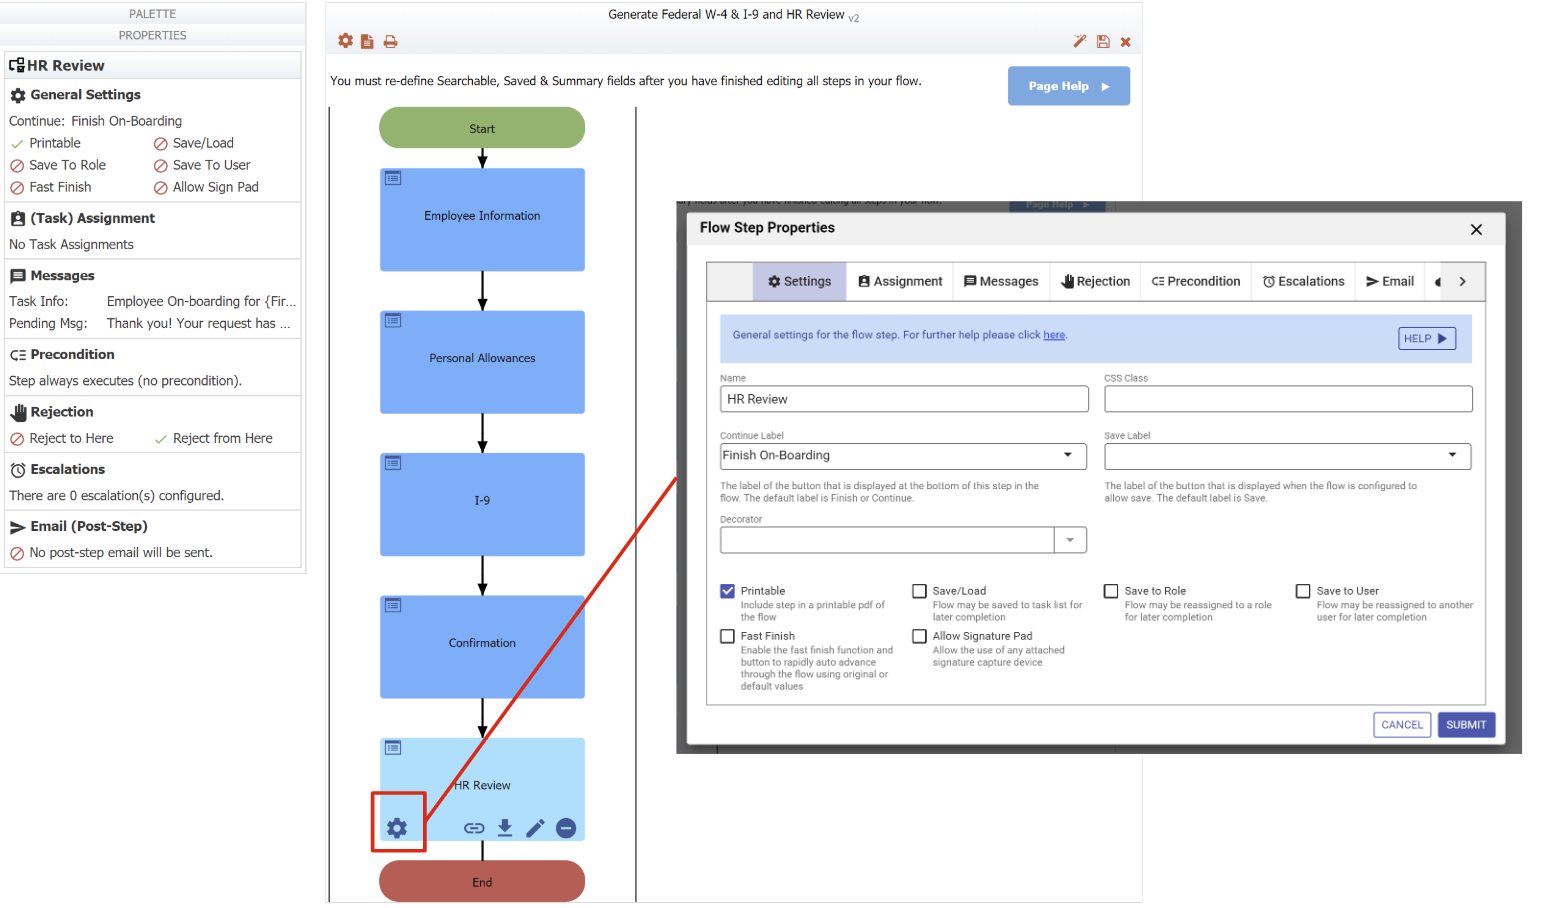
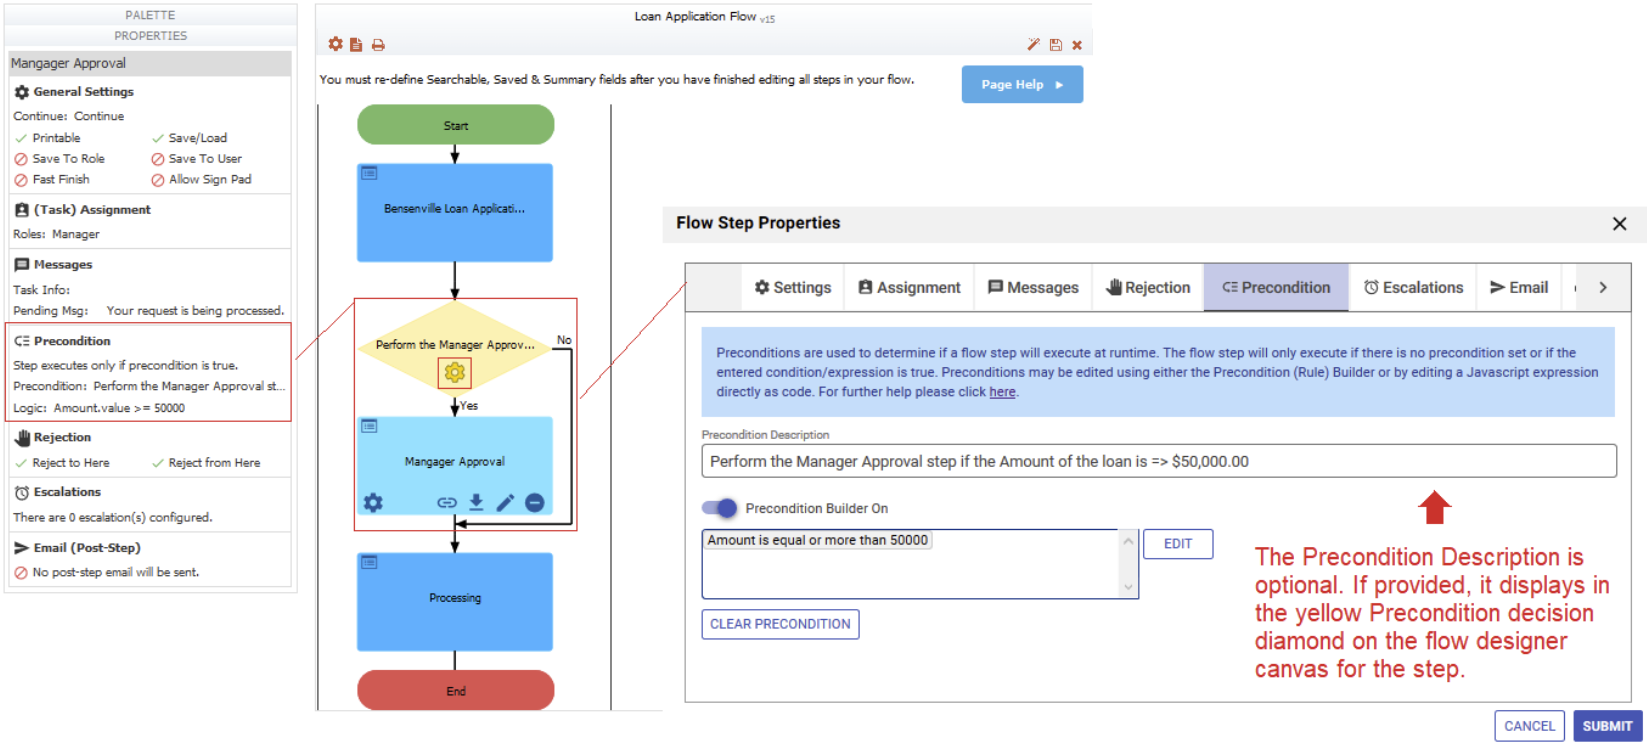
 - Cog icon - Click this icon to edit Step Properties. This icon is displayed when you select the flow step and in the Properties Navigator on the left side of the designer.
 - Clicking the Edit Step Properties icon on a flow step displays tabs to set up Settings, Assignment, Messages, Rejection, Precondition, Escalations, Emails, Web Hook, Quick Approval and Geo Location as shown in the image above.
- Clicking the Edit Step Properties from the Properties Navigator or simply clicking on a section of the Properties Navigator brings you directly to the tab for immediate editing.
- Clicking the
 - Chain link icon - Click this icon to create Linked Steps. Refer to Linked Steps in a Flow for a discussion of this Flow Design pattern and when you should use it.
 - Download Arrow over bar - Use this icon to download the step of the workflow as a standalone form. You may want to do this if you update the step in the flow designer and you want to keep your Forms and Flow libraries in sync.
 - Pencil icon - Click this icon to make changes to a flow step. The form will open in the Forms Designer inside of the Flow Designer. Remember, the form in the Flow Designer is a copy and any form changes will not automatically sync up with the original form in your Forms library.
 - Minus icon - Use this icon to delete a step in a workflow. You will NOT be asked to confirm the deletion. Once clicked, the deletion is permanent.
If your step is a Summary, HTTP or Linked step, you will only see the ![]() Edit Step Properties and
Edit Step Properties and  Delete icons.
Properties Navigator
When you click on a flow step, a Properties Navigator panel displays in the lower-left portion of the Flow Designer. This panel shows information about important properties setup for this flow step. Not all of the configured properties are shown in this view. Clicking inside a section or clicking on the ![]() Edit Step Properties icon in a section of the Properties Navigator immediately displays the property tab for editing.
Edit Step Properties icon in a section of the Properties Navigator immediately displays the property tab for editing.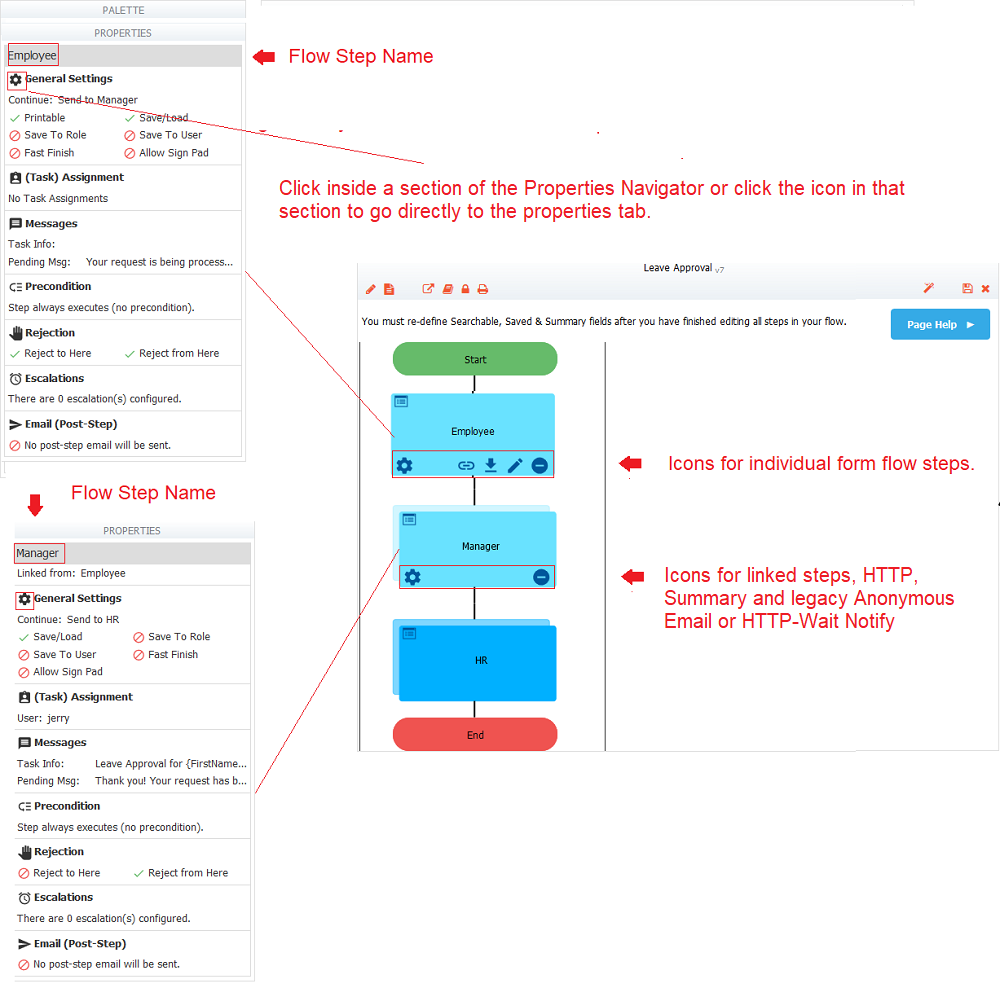
The Properties Tabs work the same way whether you open them from the Navigator or from the flow step. Here is what you need to know:
- If you are working on several tabs at one time, you can navigate to other tabs and make changes there. Use the left and right arrows at the top of the screen to display additional tabs. You must click the Submit button when you are finished configuring Step Properties to save your changes. Remember to save the workflow.
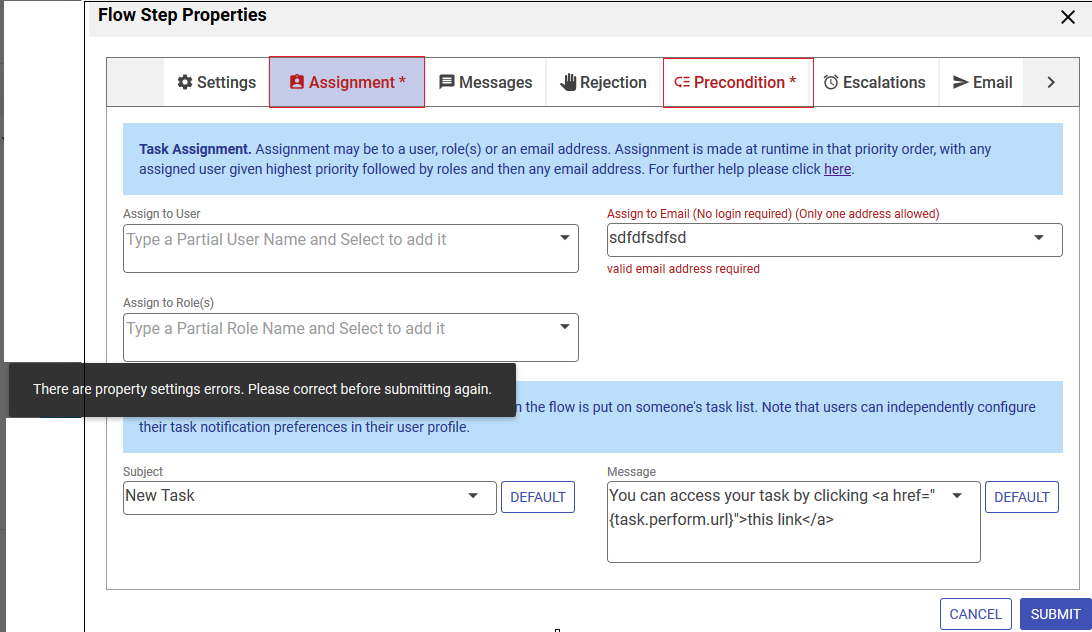
will validate the Property Settings when you click Submit. If a property value is invalid, the tab(s) will not close and a message will display telling the designer that there are corrections to be made before saving. The screen will stay on the current tab if there is a validation error. Otherwise, another invalid tab will be auto selected (starting from left to right) if another tab needs attention. Tab labels with invalid entries display in red.
- Clicking on the Cancel button closes the tab(s). You will be asked to confirm if any changes were made.
- Hover over any field on the Properties tabs to see a helpful hint providing information about the property. Some fields contain instructions to guide you.
- Clicking on the
 down arrow for a property shows an unfiltered list of choices applicable to that property. For some properties, you may see templatized controls from your flow and flow/special templates provided in
 - In some cases, you can type ahead to narrow down the list. Use the up/down arrows, the Enter key or click an option with your mouse to select an option. Use the Backspace, Delete or click the x on a selected property to delete it.
- Typing a opening curly brace into some fields, followed by the name of a control, show a list of the fields in your flow that match the entered text and will be added to the field as a control template.
- On some tabs, you may have to slide the
 toggle to the right to turn on a feature.
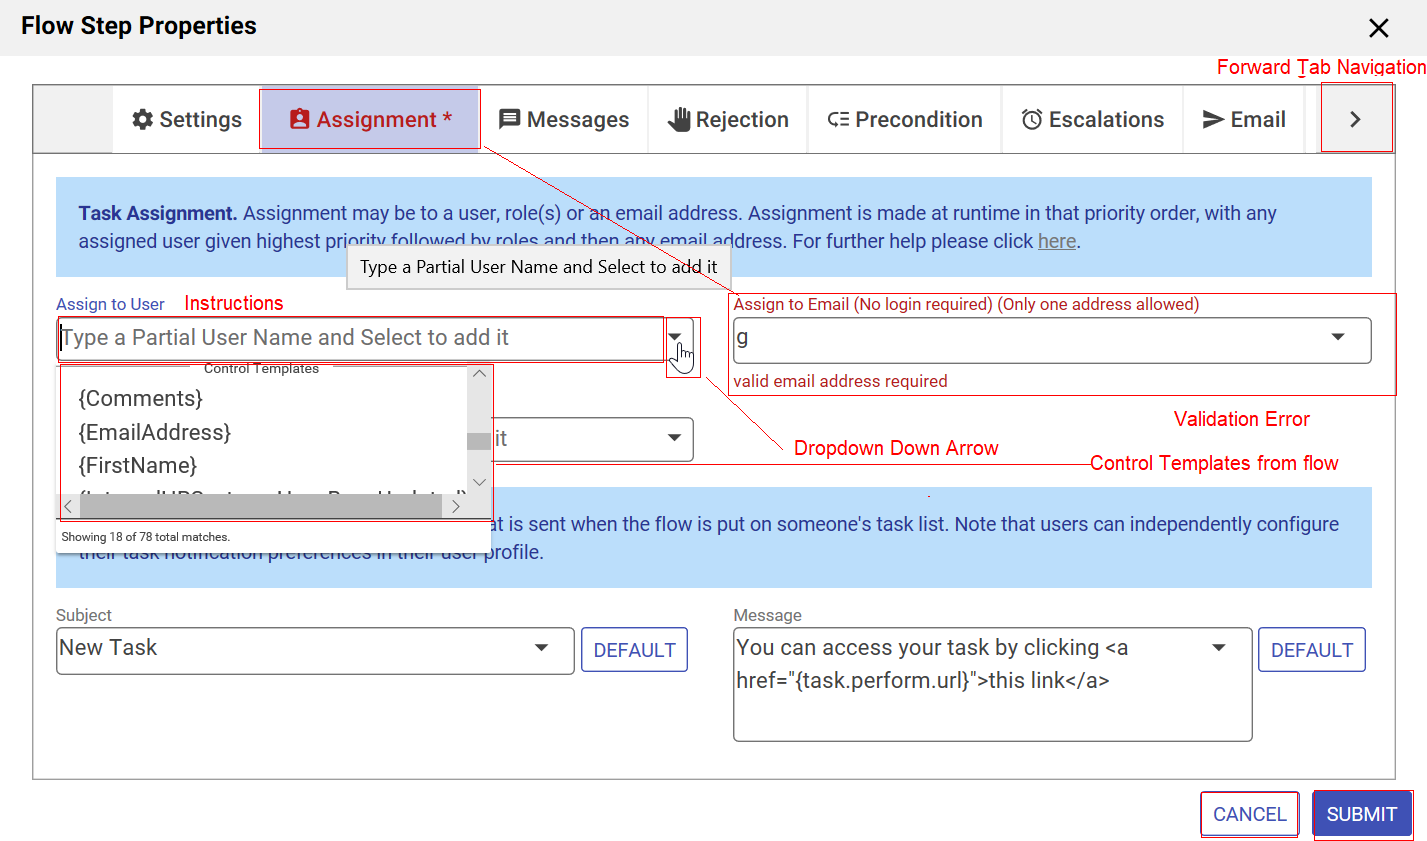
Each step property setting is described below.
Click the ![]() Help icon at the top of any tab for a quick tour of the features in that section. Currently tours are only available for Cloud customers.
Help icon at the top of any tab for a quick tour of the features in that section. Currently tours are only available for Cloud customers.
Settings
Specify General Settings for a step in your flow on the Settings screen.
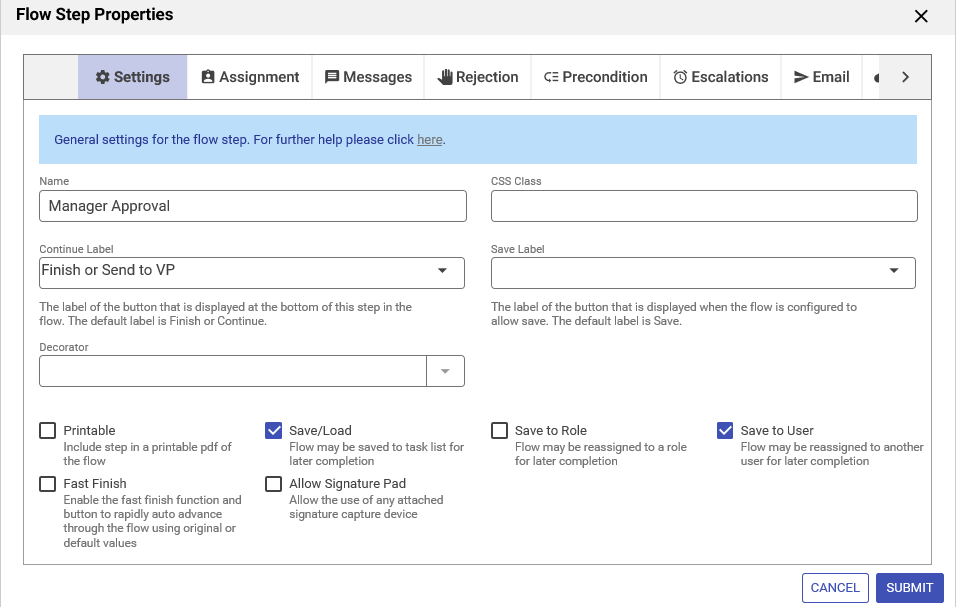
Name
This is the name of the form that you dragged from the flow designer palette and dropped into your flow. If you drag and drop a New Form from the palette, you can change this name to something meaningful. Form names longer than 60 characters will be truncated. The Flow Step name can also be edited from the Flow designer canvas by clicking the flow step then clicking the  pencil icon above the Properties Navigator. Edit the name then click the
 ![]() checkmark to save or the
checkmark to save or the ![]() cancel icon to discard your changes.
cancel icon to discard your changes.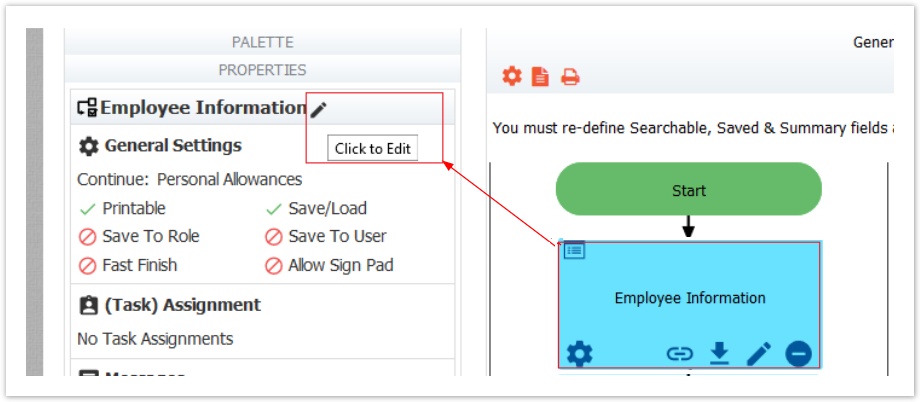
CSS Class
This CSS class name will be added to the XHTML markup generated for this step in the flow. Refer to the CSS class topic for details.
Continue Label
This is the label of the button that is displayed at the bottom of every step in the flow. The default label is Continue for all flow steps except the last step where it defaults to Finish. You can use templates to customize the label on different steps of the workflow.
Save Label
The Save button label can be customized for each step in your workflow. For example, you can change the button text to Save for Later. This will help users understand what to do if they want to save a partially completed flow. To show the Save button on a flow step, the Editing Step Properties#Save/Load property must be checked on the entire flow and on the flow step.
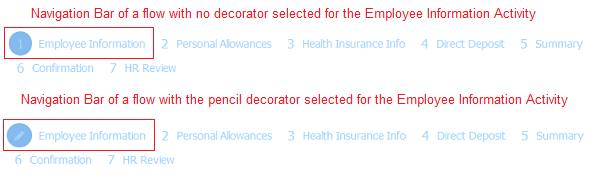
Decorator
The designer can select a decorator for the steps in a flow by choosing an icon from the Decorator dropdown. The selected decorator will replace the default number for the step of the flow on the Navigation toolbar. The image shows the navigation bar for a flow that does not have a decorator selected on the Employee Information step and then shows how the navigation bar looks when the pencil icon is selected for this step.
Printable
If this is unchecked, then this step will not appear in the printable PDF for the flow. This is commonly used when you add the same form to the flow multiple times or use the linked step feature to duplicate the same form for multiple steps. This is a common design pattern when the same form is passed among multiple people for approval (Approval Workflows). You will only be able to set printable on non-linked steps. The linked steps will not have the Printable property available in the designer. The setting for the non-linked step covers that step and all steps linked to it. The form for these step(s) will only be printed once in the pdf. It is no longer necessary to uncheck the printable property for all but one of the steps in this type of workflow . The designer can have fine grained control over which controls appear in the PDF by editing the step and setting the control's printable property.
Save/Load
If you check this checkbox on the flow level and on the step level, a Save button will be displayed for each step in your flow. If you don’t want users to be able to save partially completed flows and continue them later, uncheck the checkbox so users will not see this button.This feature is useful for flows containing lengthy forms where your users may not have all the information required to complete the form in a single session. By clicking on the Save button, a copy of the flow with all the current values is saved by frevvo. frevvo will also generate an entry in the user's task list. Users access the saved flow task from the to continue working on it at a later time.
If you are not authenticated, clicking the Save button will display an authentication dialog that requires you to login. Users can save the flow as many times as they wish.
Saved flows can be monitored in the Submissions Repository. Saved flows can contain invalid data and can also contain required fields with no values yet entered. When such a flow is re-loaded the missing and invalid values are again flagged as such by frevvo. And the flow cannot be continued/finished until corrections are made to those fields.
This setting overrides the default Save/Load for the flow for this step only. If Save/Load is enabled for the flow as a whole, you can uncheck this property to disable it for specific steps. Click here for an explanation of how the Save/Load feature works.
Save to Role
When you click Save to save a partially completed flow, the saved flow will only appear on your own task list. If you check this box, then the saved flow is assigned to all users in the Role that is specified for the current step. For example, you may have an Issue Tracking workflow where an employee submits an Issue and the Issue can be acted upon by multiple users in the "Admin" role before it is resolved. The first step is filled in by any employee. When the employee clicks Continue, a task is generated for an "Admin" user. Any user with the "Admin" role can perform the task. The user can enter some data and click Save. The flow goes back into a pending state and is placed on the task list for any "Admin" user. A different "Admin" user can pick it up and continue working on the issue. In this manner, you can create a step in a flow that loops several times before continuing. Refer to the Looping between multiple users in a role topic for an example of a flow design pattern that uses Save to Role.
Save to User
When you click Save to save a partially completed flow, the saved flow will only appear on your own task list. If you check this box, then the saved flow is assigned to the user that is specified in the Users property. When you use this feature the User property should contain a template. For example, you may have form that needs to be reviewed and approved in an ad-hoc manner. In this manner, you can create a step in a flow that loops several times and that dynamically routes to different people before continuing. See the flow example Ad-hoc workflow: pass steps between arbitrary users for a deeper understanding of this feature.
Fast Finish
The Fast Finish feature is useful for workflows with many steps. If a user navigates to a previous step to change data, Fast Finish eliminates the need for the user to click the Continue button on the remaining steps of the flow to resubmit it with the changed data. Fast Finish can be selected at the flow level or at the step level. Refer to this feature announcement for more information.
Allow Signature Pad
Check this checkbox if the step in a flow will be using an external signature pad. Leave the property unchecked (default) on the steps that will not be using a signature pad. See Topaz Electronic Signature Pads topic for the models supported and configuration information.
On This Page:
Assignment
Use the Assignment tab to:
Assign a workflow step to a to a user, role(s) or an email address.
- CC a notification to any additional user(s) who should also know the flow is on this step.
- Customize the Task Notification email message that is sent when the generated task for that step is put on the user's Task List. This email informs the recipients that there is a task that requires their attention.
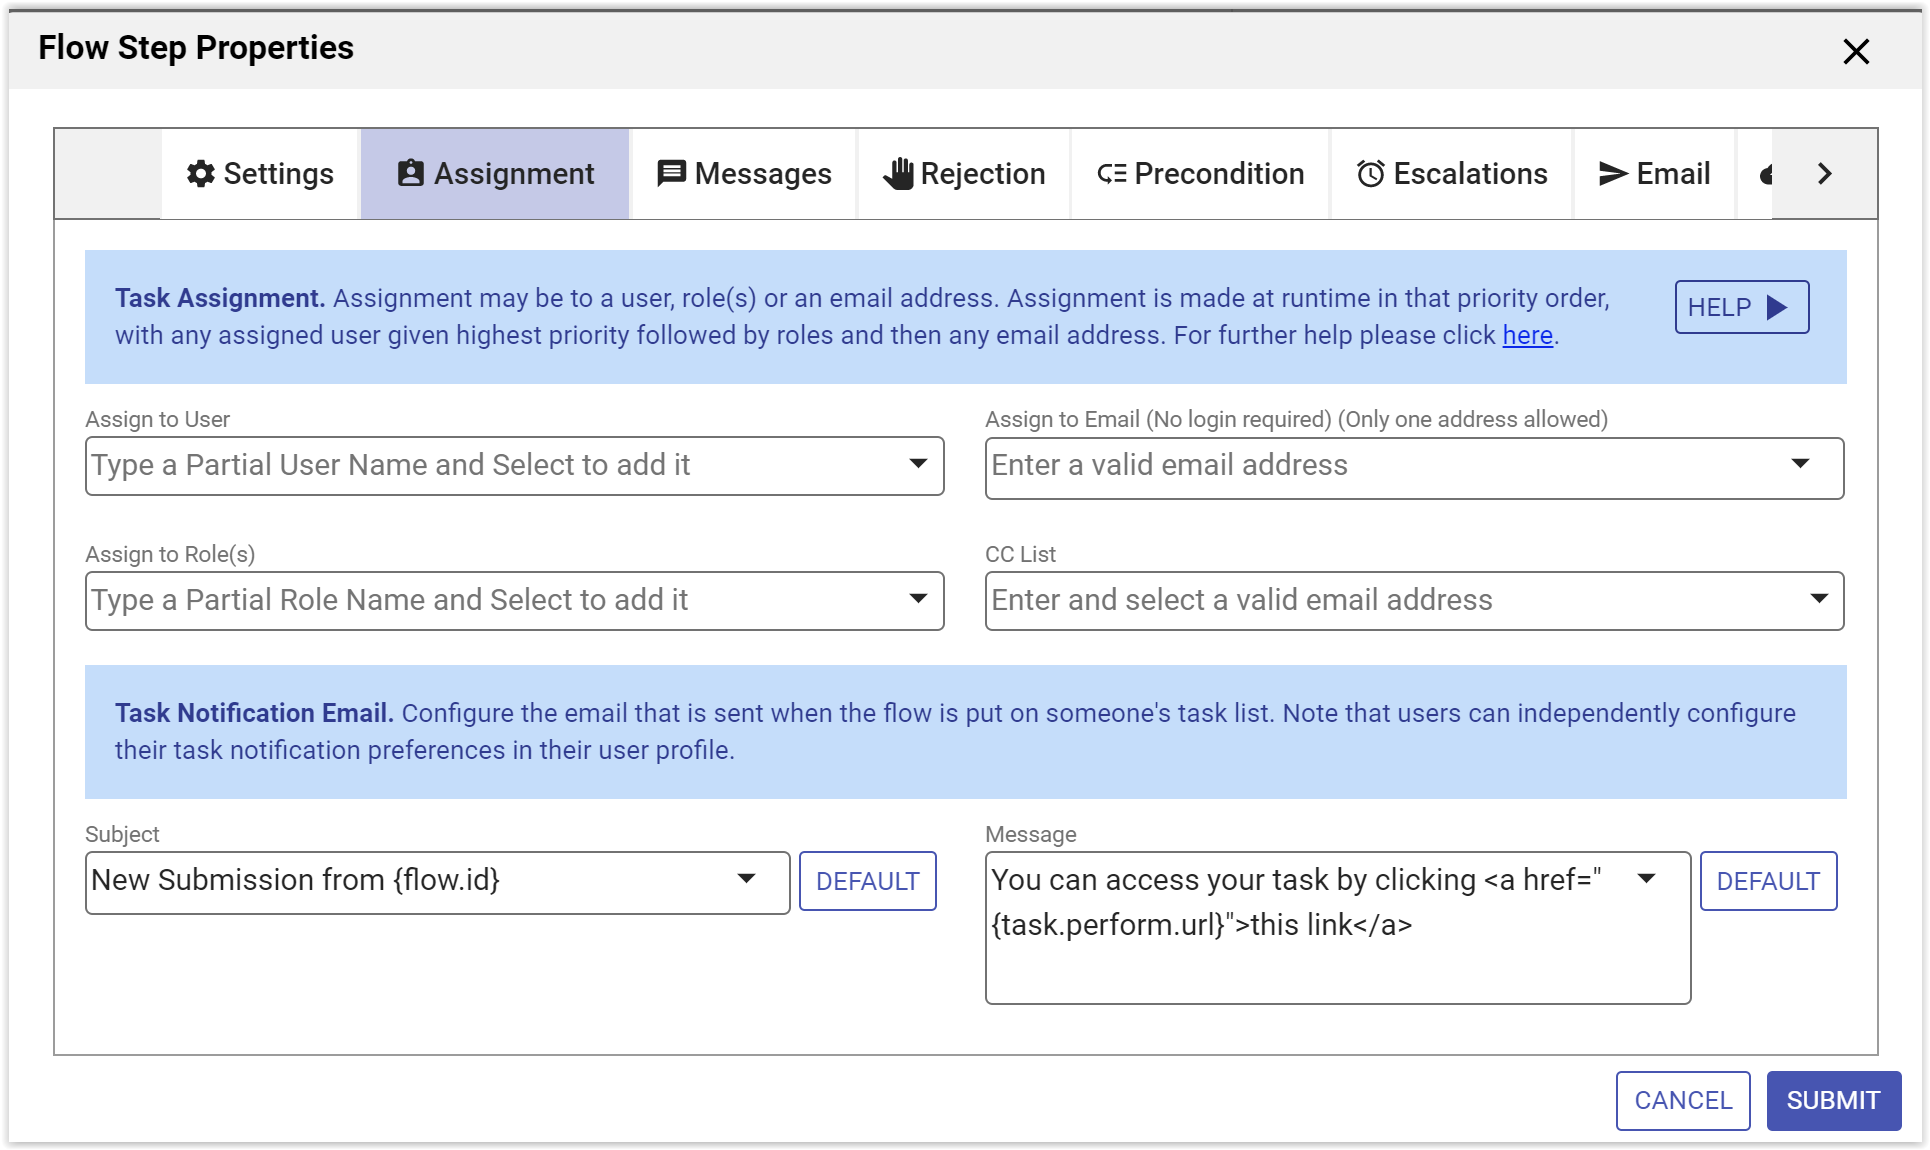
Assign a Workflow Step to a User, Role(s) or Email Address
Users are given the highest priority at runtime followed by roles and then any email address.
- When you add a user to the Assign to User field, the Assign to Role and Assign to Email(No login required) fields become disabled. You cannot add Role(s) or an Email Address.
- When you add a role to the Assign to Role(s) field, the Assign to Email(No login required) field becomes disabled but the Assign to User field remains enabled.
- If you add a specific User then the Assign to Role(s) field becomes disabled, and will be ignored at runtime.
- If you add a dynamic User (using a template), the step will reroute to the Role(s) only if the template resolves to null at run time.
- If you only add an Email Address, the Assign to User and Roles(s) fields remain enabled. If you add a User or a Role(s), the Email Address field becomes disabled and will be ignored at runtime.
User
This field allows the designer to assign a workflow step to a specific user. Clicking the shows the first 10 users in your tenant in alphabetical order, followed by the first 10 fields in your flow in curly braces, making it a Control Template.
- You can enter a
- You can only enter a single username in this field. Ex: nancy. Setting the user property to a comma separated list of usernames, Ex: nancy, prajakta, will not work. This will be treated as a single username.
- This field can use templatized strings for dynamic content. For example, in a Vacation Request workflow, the first step is to be completed by an employee but the second (approval) step must be performed by the employee's manager. i.e. it can contain "{ManagerId}" where ManagerId is the name of a field in a form from a prior step.
- To enter a Control Template, type the opening curly brace - {followed by the control name into the Assign to User field. A list of fields from your flow displays surrounded by curly brackets). Selecting an option enters the control name into the field with the closing curly brace.
Do NOT use accented characters in the User property field.
Refer to the workflow topic sending a workflow step to a specific user for an example.
You may want to route a step in a workflow to the user's manager. provides a built-in template that is available for every transaction. Simply type the template {subject.reports.to} in the User property for that step in your flow. The workflow will then be routed to the user who is specified in the Reports To field on the User's configuration screen
Role
Roles are created by your tenant administrator or automatically imported from your LDAP or Active Directory server. When a role is selected, the step in question can only be performed by users belonging to that role. For example, if you have a Purchase Request workflow where the first step is to be completed by any employee but the second (approval) step must be performed by someone with the "Manager" role, you can select the Manager role for the second step. When an employee uses the workflow, completes the first step and clicks Continue, will generate a task and place it on the task list for users with the Manager role and display the Pending Msg to the employee.
- You can enter one or more
- Repeat these actions to select additional roles i.e.Manager, HR
This field can use templatized strings to dynamically determine a role at runtime. For example, you may have a workflow where the first step is a Purchase Order or a Loan Request and the second step is an approval; however the approval must be performed by a Manager if the amount is less than $1000 and a Supervisor otherwise. You will need a control in your form that is populated with the role that you want the flow to navigate to - in this case, Manager or Supervisor. To enter a Control Template, type the opening curly brace - {followed by the name of the control into the Assign to Role(s) field. A list of fields from your flow displays surrounded by curly braces. Selecting an option enters the control name into the field with the closing curly brace. Repeat these actions for the steps in your flow that are going to use the role entered for routing e.g. {ApproveRole}. At runtime.
Partial templates with prefixes and suffixes can be used to create a complex role such as floor-manager for workflow routing.
When you are setting up step Assignments or Escalations for workflows, you can assign a user/role template where only part of the text is inside the curly brackets - {}. This is best explained with a simple example using roles for workflow routing.
Let's say the roles in your organization are floor-manager, sales-manager and store-manager. Of course, these role names and users assigned these roles must exist in your tenant. Your form has a dropdown control named roles with these options: floor, sales, store. Users select the first part of the role from the dropdown. The suffix -manager is typed in after the role template in the Assignment tab to create the complex template - (floor-manager, sales-manager, store-manager). The workflow step with the complex template assigned will navigate to the appropriate role.
A partial match template lookup is available on the Assignment and Escalations tabs to select the complex template from dropdown options.
We will assign the {role}-manager on the Assignment tab of a workflow as an example:
Type the control name of the template surrounded by curly brackets - in our example - {role}
Type the dash - followed by manager. The {role}-manager appears in the dropdown
Click on it to select. Click Finish to save the changes to the Assignment tab then click the
 save and exit to save the changes to the flow.
- Test the flow. Select floor in the role dropdown. The assigned workflow step will navigate to all the users in your tenant with the role of floor-manager.

The partial lookup works with users/roles and prefixes/suffixes in the users/role names.
Email Address(No login required)
Use this field to assign a step in your workflow that is going to be performed by an anonymous user. This is a user who will not need to log into your tenant to perform their step. Let's say you have a Purchase Order workflow, where the Order Details are completed by someone in your company and one of the steps is routed to the customer for approval and signature.
- Edit the Purchase Order workflow in the Flows Designer.
- Click on the step(s) anonymous users will perform. Click the Edit Step Properties icon on the step then click on the Assignment tab or click the Edit Step Properties from the Assignment section in the Properties Navigator. This takes you directly to the Assignment tab.
- Enter a valid email address into the Assign to Email Address(No login required) field.
- Only one email address is allowed.
- This field can use templatized strings to dynamically determine an email address at runtime. To enter a Control Template, type the opening curly brace - {followed by the name of the control that will contain the email address into the field. A list of fields from your flow displays surrounded by curly braces). Selecting an option enters the control name into the field with the closing curly brace. Repeat these actions for additional steps in your flow that are going to be performed by anonymous users.
- The flow can be rejected to a task performed by anonymous user.
- Tenant/flow admins can reassign the anonymous step to a different email address.
- The Task Assignment can be CC'd to another user so that in case the link is lost, there is another way to access the task, reassign or resend it. Be aware that first user to click the link will lock the task, so to ensure the intended user performs the task, consider including in the email message a warning such as "A copy of this message has been sent to your manager. Managers should not click the task link."
- Configure a History Message on the step before the Anonymous Task step if you want to see relevant information in the audit trail. The History Message can be templatized so you can see the email address of the recipient.
- The Who can start the flow permission does not need to be set to Public. The Anonymous step will work with any of the Flow Visibility choices.
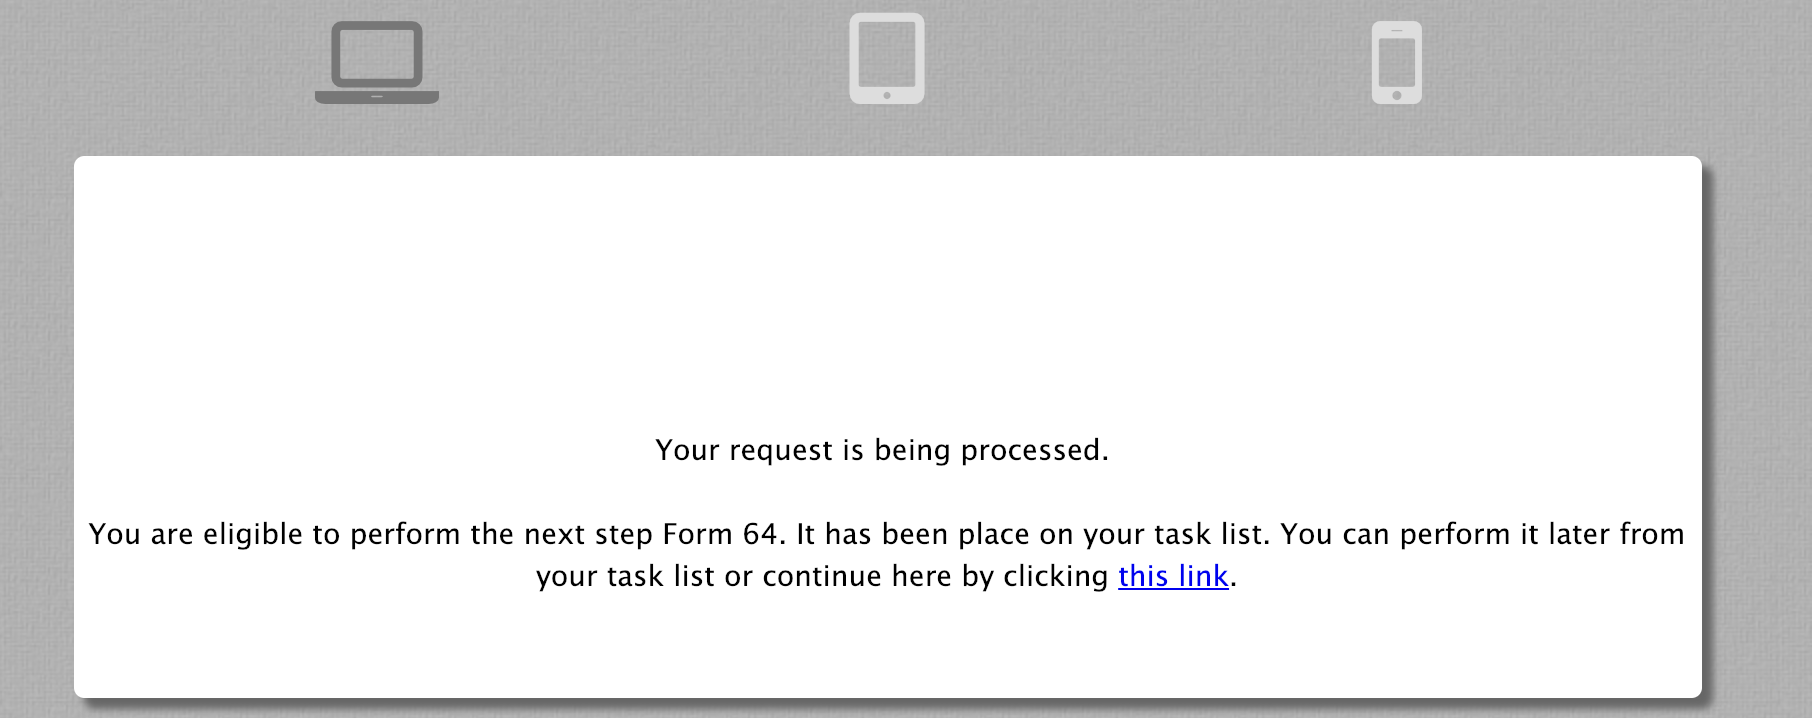
The Anonymous step uses the {task.perform.url} template in the Task Notification email Message by default. If the anonymous user submits their step of the flow then goes back into the email and re-clicks on the link, the following message displays:

Refer to the Anonymous Participant topic or the Flow Tutorial for an example.
Please review the Planning for v9.0 for important information about converting workflows with an Email/Anonymous step to take advantage of this feature.
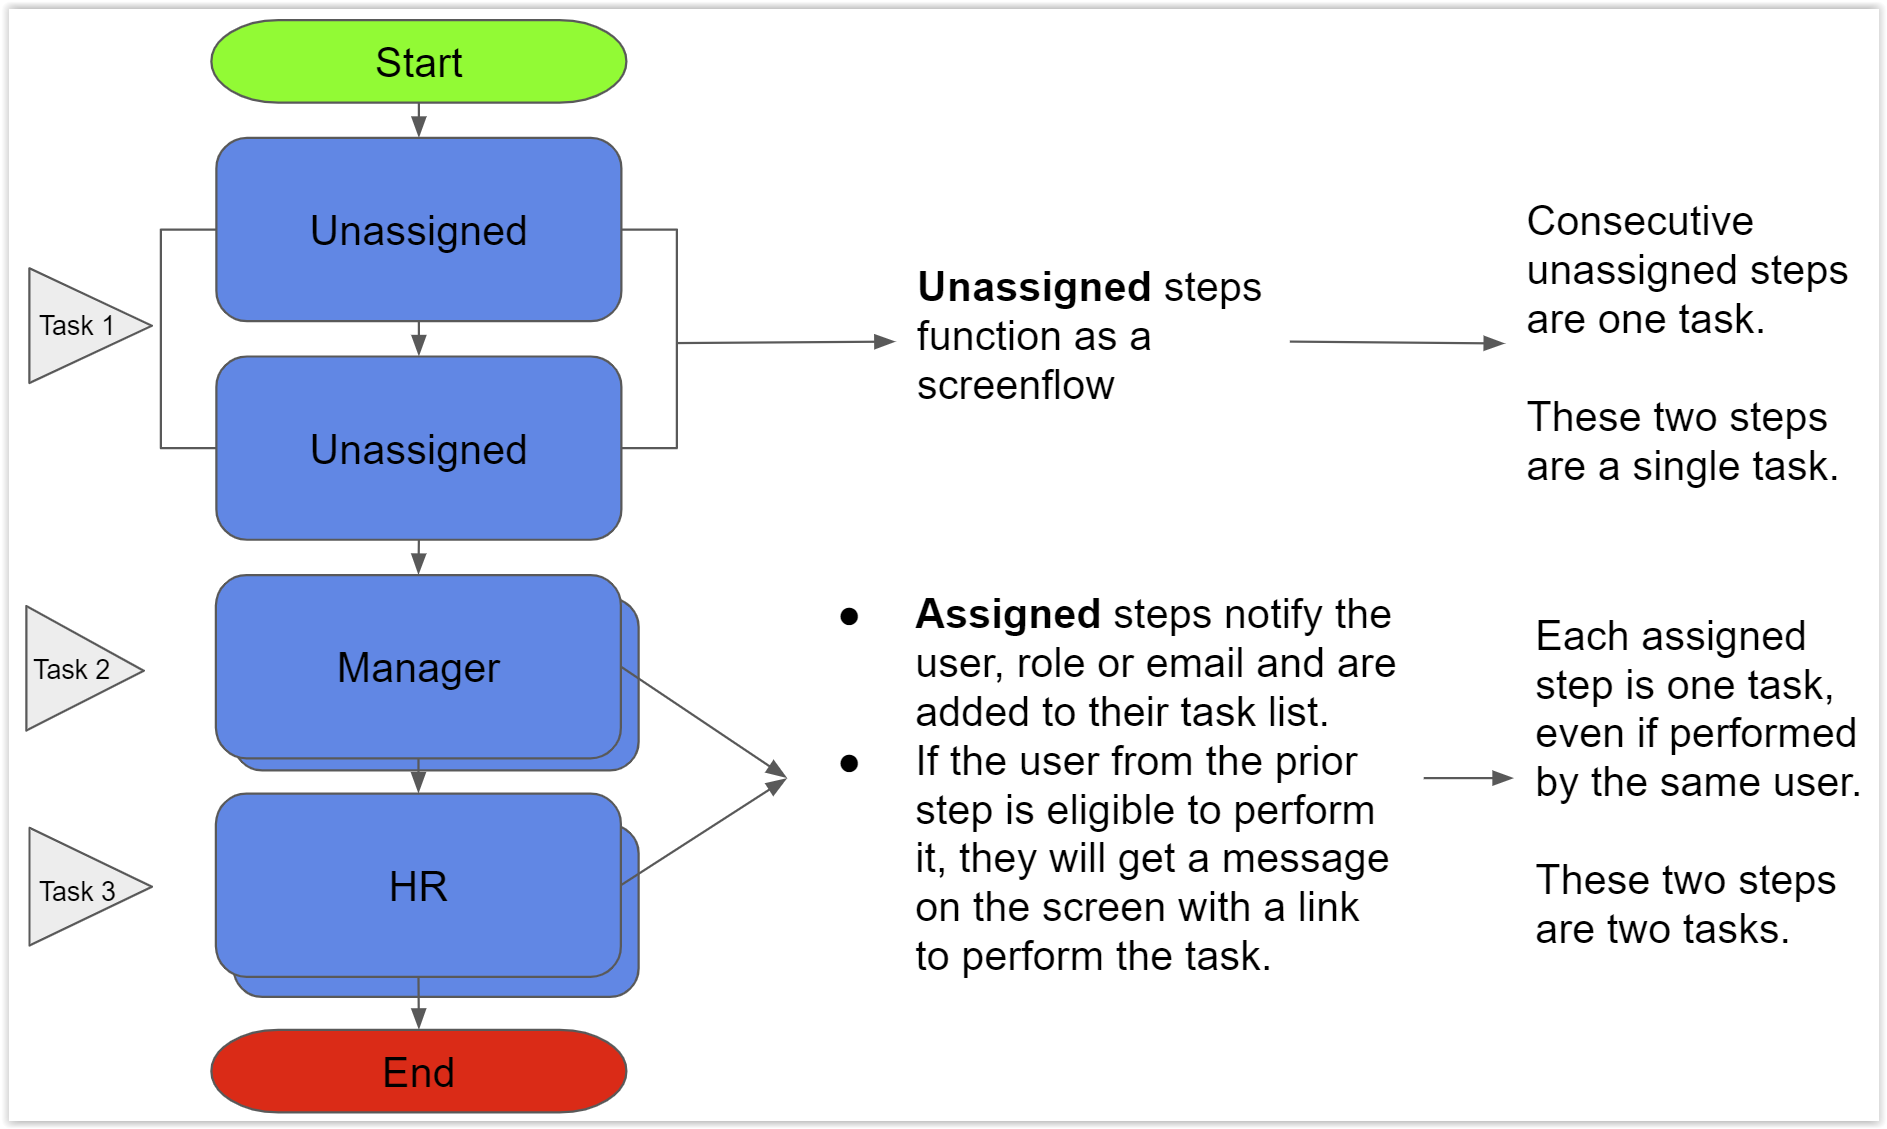
Workflow Task Design Considerations
The designer defines task boundaries by setting assignments (user, role or email address), so each flow step with an assignment is considered a new task. Any subsequent flow steps without assignment are considered part of screen flow of the same task. If the next step is a new task and the current user is eligible to perform it, the user will be provided with a link to continue the flow in the same screen. When the user clicks the link to continue the flow execution, the flow will continue like a screenflow but a new task will be created behind the scenes.
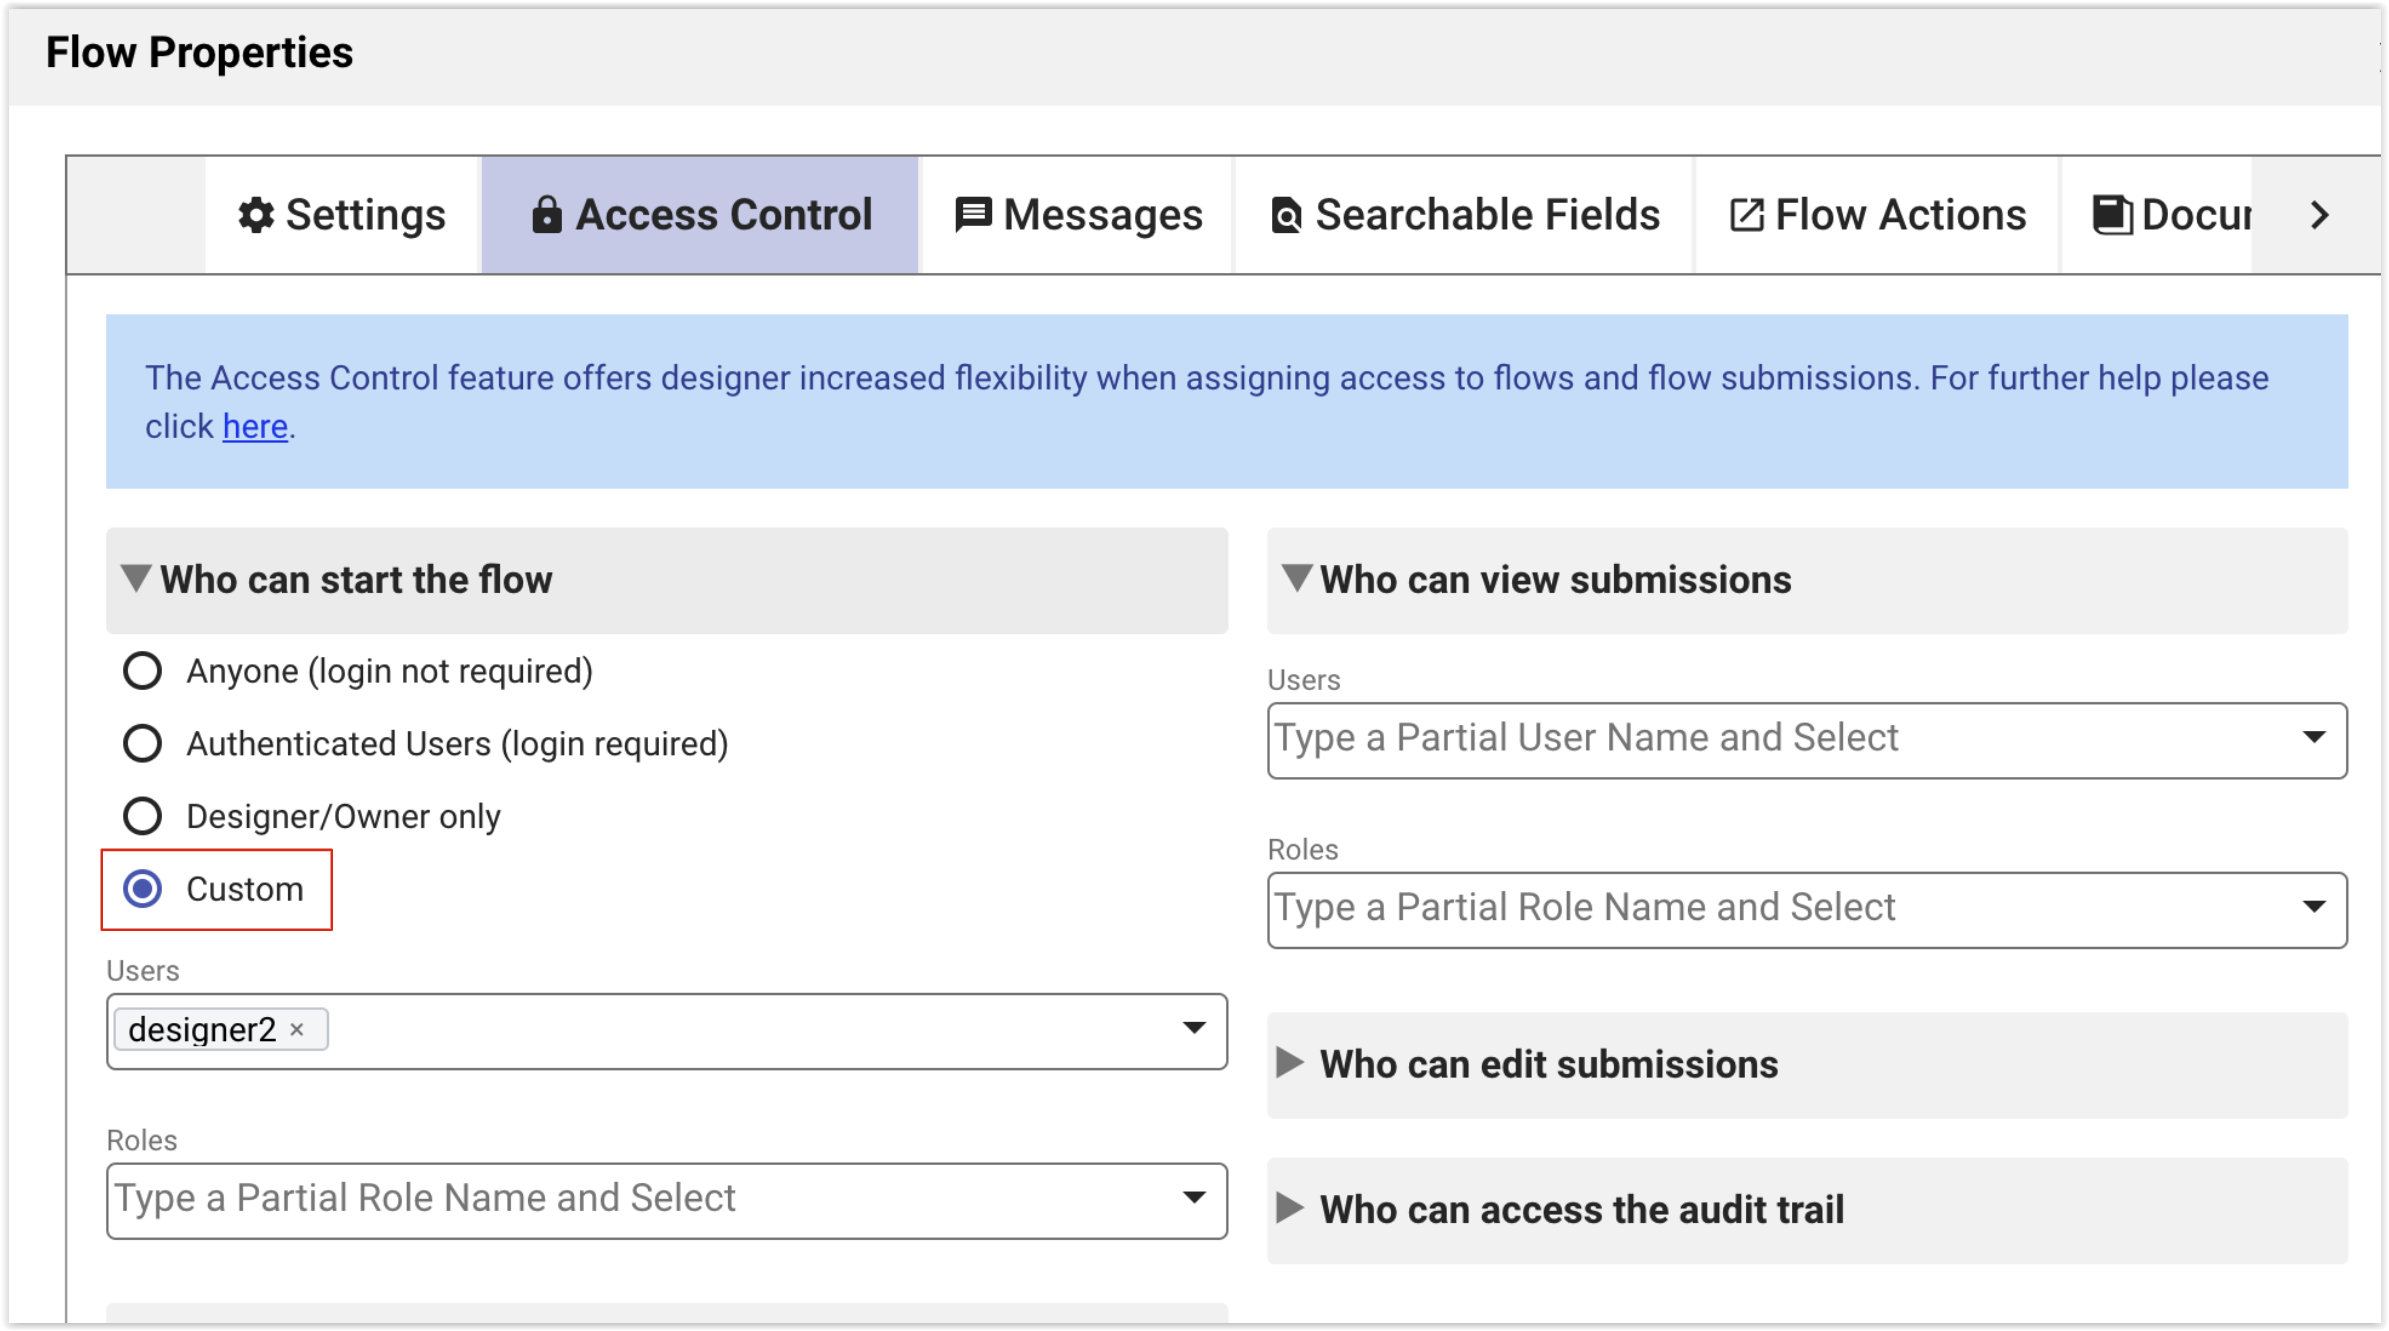
Designers can also define flow level Access Control by selecting Custom in the Who can start the flow property and entering user(s) or role(s).
Invalid Task Assignment
For workflows created in v9.0.x and later, when a task that is routed to templatized user, role, or email resolves to null or empty string, the task will be assigned to the "invalid-task-assignment" userId and a notification with be sent to flow admin users (or tenant admin user if no flow admin is configured.) This will enable flow admin users to easily search mis-routed tasks assigned to the "invalid-task-assignment" userId and re-assign to valid user.
One exception to this is when you have both a templatized user and a role assigned, the step will reroute to the Role(s) if the template resolves to null at run time. If the templatized user is valid, Role will be ignored.
Workflows created in v8.x and prior will not inherit the new "invalid-task-assignment" behavior if a templatized user, role or email resolves to null. Instead, they will retain the previous behavior of morphing into a screenflow.
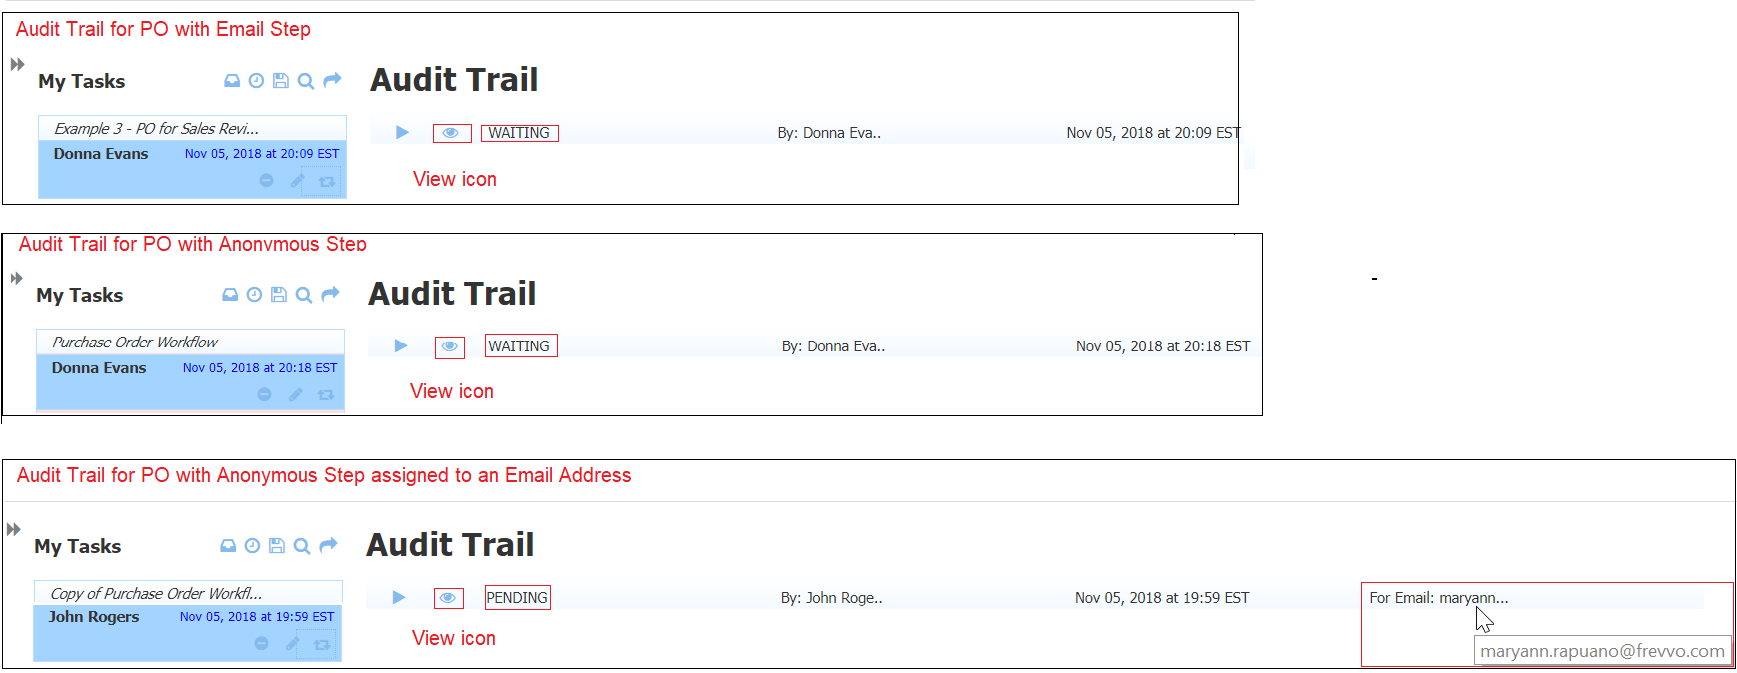
Anonymous Steps and the Audit Trail
If your workflow was created in a version of previous to v8.0, then the step performed by the customer (anonymous user) was designed by dragging an EMail or Anonymous Task step from the Palette and dropping it on the Flow Designer canvas. Workflows designed in this manner will still work in v8.0 but the Audit Trail will show the task in a WAITING state.
In version 8.0, the same flow can be designed by simply assigning the step to an Email Address. The Audit Trail, shows the step performed by the customer (anonymous user) in a Pending state and displays the Email address it was sent to.
Setup Task Notification Email
When generates a task and places it on a user's task list, a notification email is generated. The email informs the user that there is something on their Task List that requires their attention. A clickable link to the task or the Task List depending on the template that you choose, is included in the email.
You can specify your own email subject and message. The message body can contain HTML and CSS, giving you the ability to generate nicely formatted emails. Form data values can be added to the message subject and body using control template names or flow/special templates provided by .
The designer can also specify email address(es), user(s), and role(s) to receive a CC: of the task notification message. For tasks assigned to an Email Address (No login required), the task will be locked by the first user who clicks the {task.perform.url} link. Designers can help ensure only the intended recipient picks up the task by configuring a warning into the email message such as "A copy of this notification has been sent to your manager. Managers should not click the link above."
Access the Assignment tab for that step to customize the subject and message of the email the user receives.
Email notification is optional. Each user can configure their own email notification preference in their User Profile using the My Account link on their applications page. If the Email option is turned off, they will not receive Task Notification emails.
- You can enter any text you want for in the Subject and Message fields. Clicking on the DEFAULT button, shows "New Task" as the default subject and "You can access your task by clicking <a href="{task.perform.url}">this link</a>" for the default message.
- Clicking on the down arrow, show a list of templatized fields from your flow, flow/special templates provided by
- Type the opening curly brace - {- followed by the control name to enter a field from your flow as a template. Selecting an option enters the control name into the field with the closing curly brace
Built-in flow templates
- {flow.id} - The unique flow instance id. This id is unique for each flow submission.
- {flow.type.id} - The unique id associated with a given flow. See Sharing Forms
- {flow.extid} - Client defined extId passed in the formtype Url parameter.
- {flow.name} - The name of the flow.
- {flow.description} - Description of the flow.
- {flow.activity.id} - The Id of the current workflow step.
- {flow.activity.name} - The name of the current workflow step
- {flow.activity.reject.reason} - The reason a workflow step is rejected
- {flow.id} - The unique flow instance id. This id is unique for each flow submission.
Built-in special templates
- {subject.id} - logged in user's username.
- {subject.roles} - A list of all the roles for the logged in user
- subject.email - logged in users's email address
- {subject.first.name} - logged in users's First Name
{subject.last.name} - logged in users's Last Name
{subject.reports.to} - the user id of the person the logged in user Reports To - configured in the user profile by the Tenant Admin. Typically used to designate a manager/supervisor.
{tn.id} - the Tenant ID where a form/flow is located
{tn.name} - the Tenant Name where a form/flow is located
{user.id} - Owner of form/flow and user folder name in the filesystem
- {app.id} - The unique id associated with a given application. See Sharing Forms
- {app.name} - The unique name associated with a given application.
- Type the opening curly brace - {- followed by the control name to enter a field from your flow as a template. Selecting an option enters the control name into the field with the closing curly brace
Built-in data templates for forms (form.id, form.name, etc.) may be used in Workflow Step Properties Settings, Messages, and Quick Approval tabs.
Task Notification Email Links
There are two built-in frevvo templates that can be used to generate a link in the task notification email: {task.list.url} and {task.perform.url}. To make any of these clickable links in your task notification emails, wrap them in an HTML <a> tag like this:
You can access your task by clicking <a href="{task.perform.url}">this link</a>
{task.list.url} - The special template {task.list.url} can be used in the email body to generate a clickable link to the user's server task list. Users will be taken to their Task List in your tenant after logging into
. Users will be directed to the Task List in your space if a default space is set for the tenant. Use the directions for 1063730798 to direct these links to any space other than the default.
Here is an example of the hyperlink generated in the email:
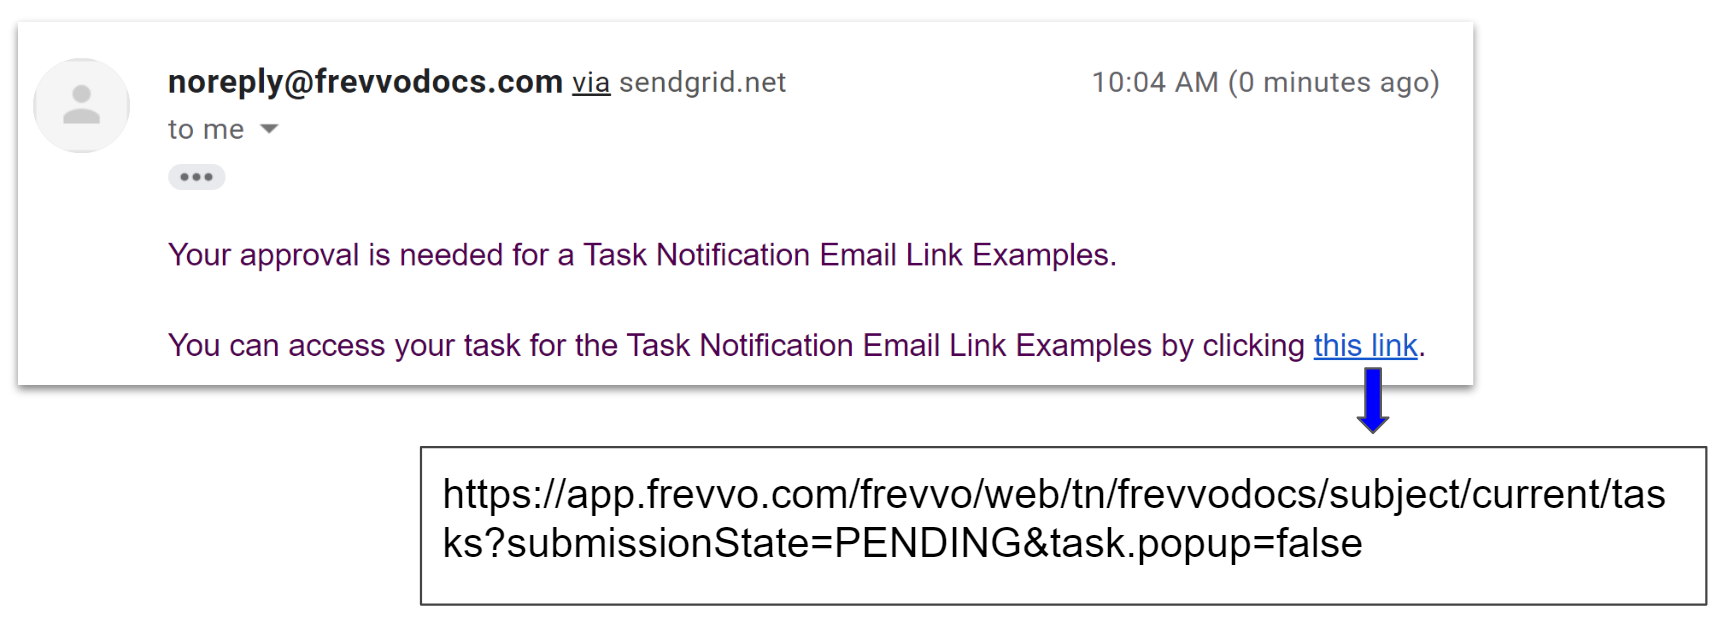
{task.perform.url} - This is a URL template to the specific task in question (popupform URL). This is the default.
Clicking this link from the email on a desktop, shows the form/workflow rendered in an iframe (similar to clicking Test). Clicking this link on a mobile device shows the mobile rendering (no iframe). Users will be directed to the form/workflow rendered in your space if a default space is set for the tenant. Use the directions for 1063730798 to direct these links to any space other than the default.
Clicking a link in an email created with this template satisfies the Perform By or Perform Within requirement when setting up 1063730799.
Here is an example of the hyperlink generated in the email: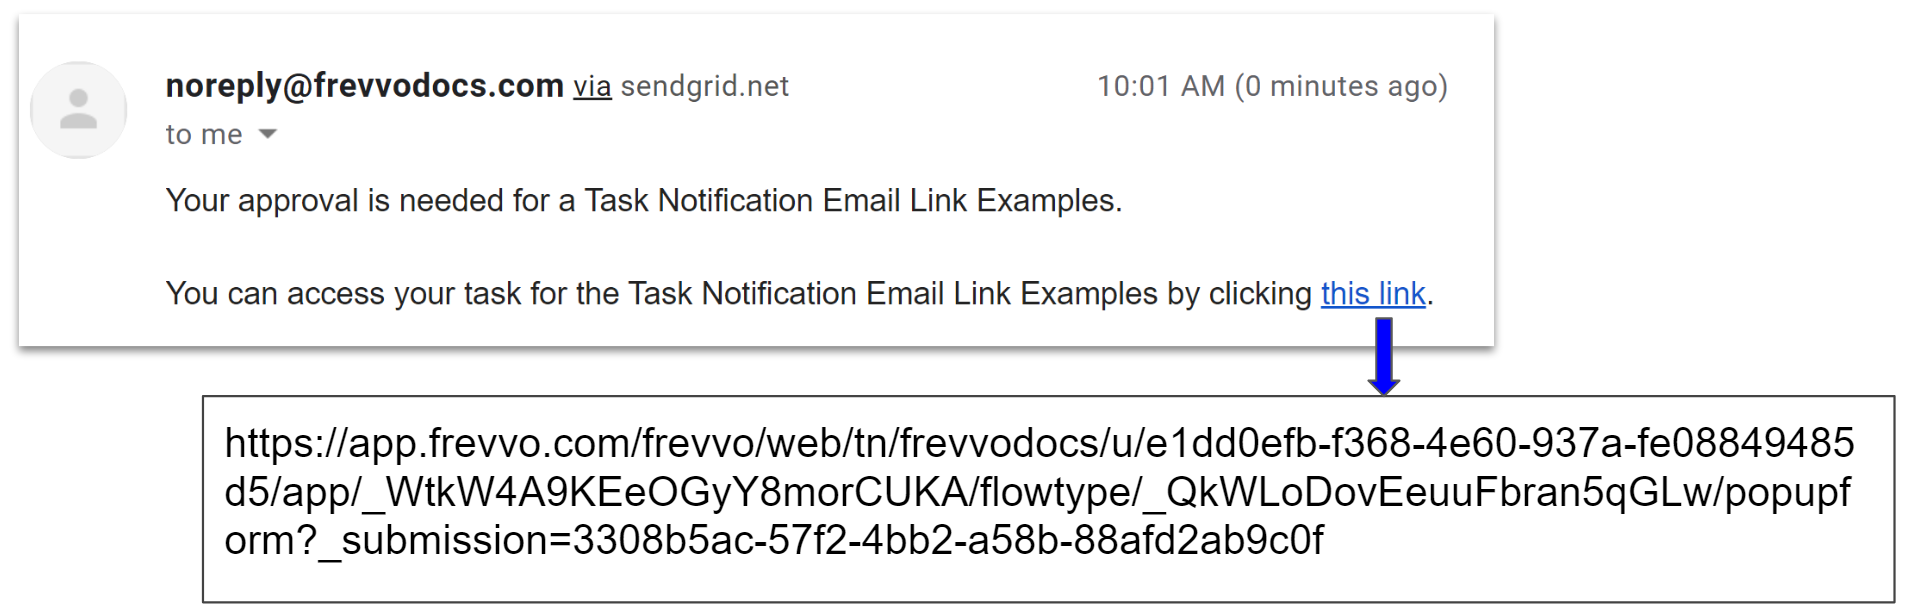
Consider an Employee On Boarding flow where the manager receives a task notification email to approve or reject the screen flow submitted by the new employee. If this built in template is used, the manager step in the flow displays when the link is clicked without having to access it from the Task List.
Space Specific URL
If you are using the space feature it is more likely you might want to return to the user's task list in the space. To do this - modify the task notification email to use a space specific URL. Change the default Task List special template to a space specific URL which will return you to the user's Task List embedded in your chosen space. Create a space specific URL by supplying a URL to the Task List with the space/spaceID/tasklist appended to it.
You have a new task for New Hire. To access your task list,
please click on:
http://10.0.0.14:8082/frevvo/web/tn/mycompany.com/user/designer/space/mycompany/tasklist
In this example, the url is the space URL with /tasklist appended to it. Users must be logged in for this URL to take them directly to their Task List in your space. On mobile, you will see a Back button rendered to take you back to the space. In both cases, the top browser URL is redirected to the appropriate menu item for your task list so the user will not have to click on the Task List menu tab to display it. If you do not have a task list menu item in your space, you'll end up at the space home page.
See the Email Integration topic for information on setting up email notifications for form and flow submissions. This function uses a similar notification wizard.
The tenant admin can configure the from email address for task notification emails on the admin's Edit Tenant page.
If you are using tomcat, emails sent are tracked in the <frevvo-home>\tomcat\logs\frevvo.log file when the INFO log level is enabled. In-house customers can search for an entry like "Sending email to <email address> with subject <the subject of your email>. If an error occurs when sending, the message "Could not send email to <email address> with subject <the subject of your email> including the actual exception that caused the problem.
Messages
Setup Task Information, Pending Messages and History Messages on the Messages tab. 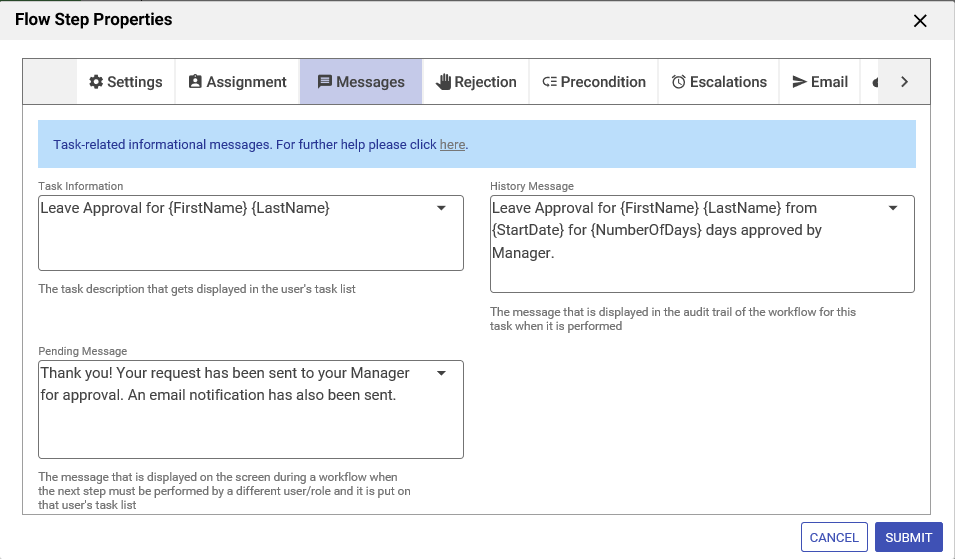
- You can display the Messages tab in three ways:
- Click on the step of the workflow, then click the Edit Step Properties icon then click on the Messages tab.
- Click anywhere in the Messages section in the Properties Navigator. This takes you directly to the Messages tab.
- Click the inside the Messages section in the Properties Navigator. This takes you directly to the Messages tab.
- Click on the step of the workflow, then click the
- Enter your customized text for each message in the appropriate field.
- Clicking on the down arrow shows a list of templatized fields from your flow, flow/special templates provided by
- Type the opening curly brace - {- followed by the control name to enter a field from your flow as a template. Selecting an option enters the control name into the field with the closing curly brace
- Click the Submit button to save the changes or navigate to another tab.
Remember, if you navigate to another tab without clicking the Submit button, changes will NOT be saved.
Task Info
When you save a partially filled flow to continue it later or when puts a task on your task list as part of a workflow, the task is accessed via your task list. This field controls the text that gets displayed in the user's task list. For more details, see the Using the Task List. This information gives the user(s) more details about the task that is waiting on their Task List. It also helps you to quickly find a particular task if you have a lot of tasks on your Task List.
This field can use templatized strings for dynamic content, e.g. the Task Info can contain "Vacation Request for {FirstName} {LastName}" where FirstName and LastName are the names of fields in a form from a prior step in the flow. Before putting the task on a user's task list, will resolve the Task Info string using the actual values of the FirstName and LastName fields e.g. "Vacation Request for Tom Smith".
will truncate the Task Info data to 250 characters.
You access your Task List from your applications home page or from a Space. You use the Task list to perform tasks assigned to you, to view a task's history, or search for tasks you've participated in — a tenant admin can also search for other users' tasks.
If the Task Information is the same for all the steps of your workflow, you can set it up on the flow level. If you want the Task Info to show something different on a flow step, select the step, select the Messages tab and set up your customized Task Information there. The Task Information on individual flow steps overrides the default Task Info for the flow for this step only. 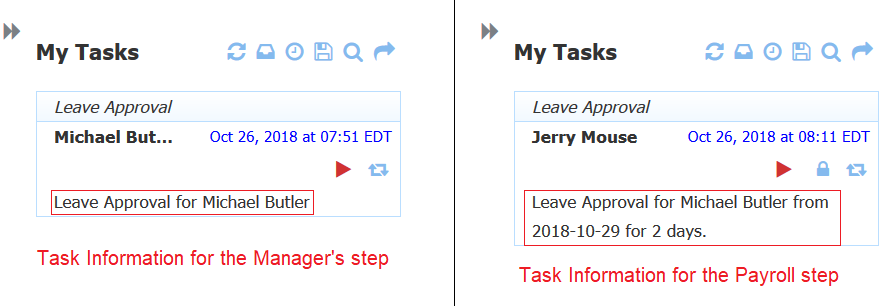
Pending Msg
Use this property to display different customized messages for each step of your workflow. Pending messages can be setup at the flow or flow step level. Setting this property at the flow step level, overrides any default Pending Msg that is set up on the flow level for all the flow steps.
Designers may want to display different messages to the users submitting each step of the flow. Templates can be used in the messages to provide dynamic content. The Pending Message is best explained with an example.
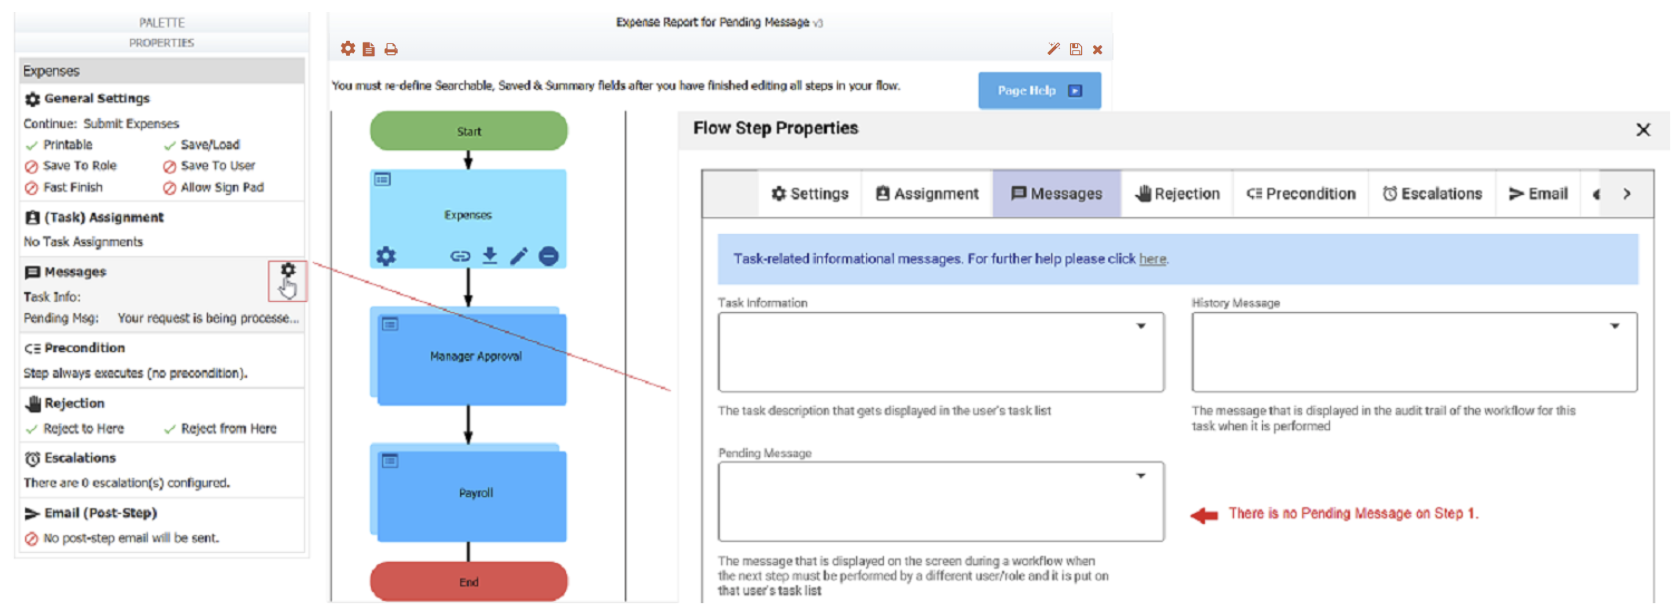
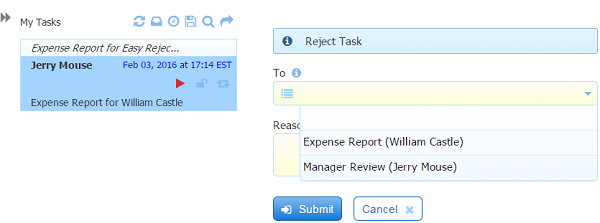
Let's say you have a 3 step Expense Report workflow. Step 1 (the Expense Report) is filled in by the employee, Step 2 is performed by the employee's manager who approves or rejects the report and Step 3 is performed by an employee in the payroll department who processes the Expense Report for payment.
<< Employee submits Expense Report (Step 1) ==> the flow is routed to the employee's manager for approval (Step2) ==> once approved, the flow is routed to the payroll department for payment>>.
Step 2 in our example workflow is assigned to the employee's manager which is collected by a field in the form named ManagerName. When the employee submits the Expense Report, the designer wants the employee to see the message "Your request has been sent to {Manager name}". {ManagerName} is an example of a template that is replaced at runtime by the name that is entered in the ManagerName field in Step 1.
Step 3 in our example is assigned to any user that is assigned the role of Payroll. When the manager approves the report and clicks submit, the designer would like to display the message "The Expense Report has been sent to Payroll for processing" to the manager.
To understand where you type in the text for your messages to get them to display when you want them to, think of the Pending Message property as the message that is displayed when users try to access workflow steps. In our example, when the employee submits step 1, the flow moves to step 2, the manager approval step. The message typed into the Pending Msg field for Step 2 - "Your request has been sent to {Manager name}" is shown to the employee instead of the Step 2 form. When the manager approves the Expense Report and submits Step 2, the message typed into the Pending Msg field on Step 3 - "The Expense Report has been sent to Payroll for processing" is displayed to the manager when the flow moves to the Payroll department employees instead of the Step 3 form.
To set up the Pending messages discussed in our example, follow these steps:
- Click the
 Edit icon for your flow on the Flows Home Page.
 - Click on the first workflow step to display the Properties Navigator panel.
- The Pending Message for Step 1 displays the default - "Your request is being processed"
A Pending message set up on the first step of a flow is only displayed if there is an assignment on the first step of your workflow. This feature is useful for auto-starting flows programmatically. Do not assign a Pending Message for the first step if you are not using this feature.
Click on Step 2 of your flow - in our example this is the Manager Approval step.
- Click the Edit step Properties icon in the Messages section of the Properties Navigator.
Type "Your request has been sent to {Manager name}", without the quotes into the Pending Msg field. The employee will see this message when he/she submits Step 1 and the task is placed on the Manager's Task List
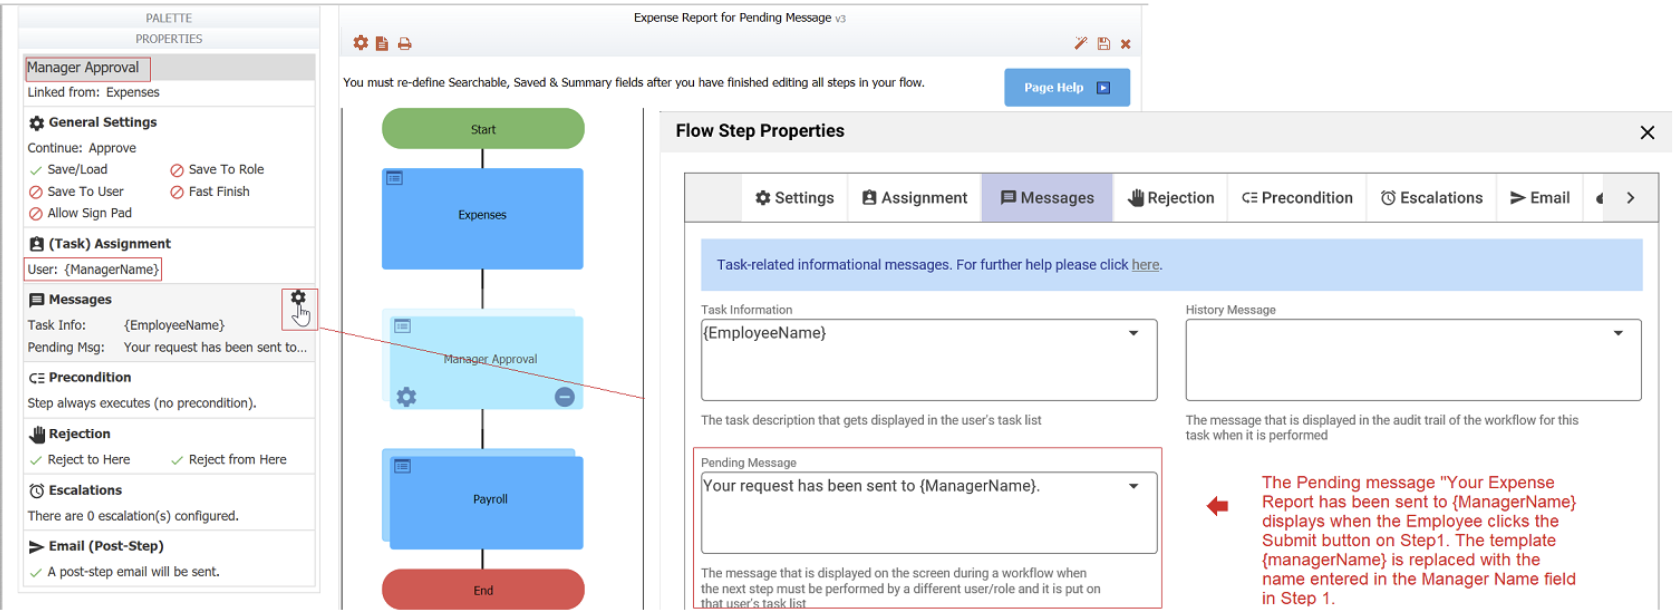
- Click the
- Click on Step 3 of your flow - in our example this is the Payroll step.
- Click the Edit step Properties icon in the Messages section of the Properties Navigator.
- Type "The Expense Report has been sent to Payroll for processing." without the quotes into the Pending Msg field. The manager will see this message after clicking Submit on Step 2 and the workflow is routed to the Payroll department. Click Submit.
- Click the
- If you want to display a custom message such as "Expense Report Processing is complete." after the Payroll user clicks the Finish button, click the
 what does the user see icon? on the flow designer toolbar to display the Form Action wizards. Click on Display Message when users submit your form wizard. Type your message in the Message box. Click Finish.
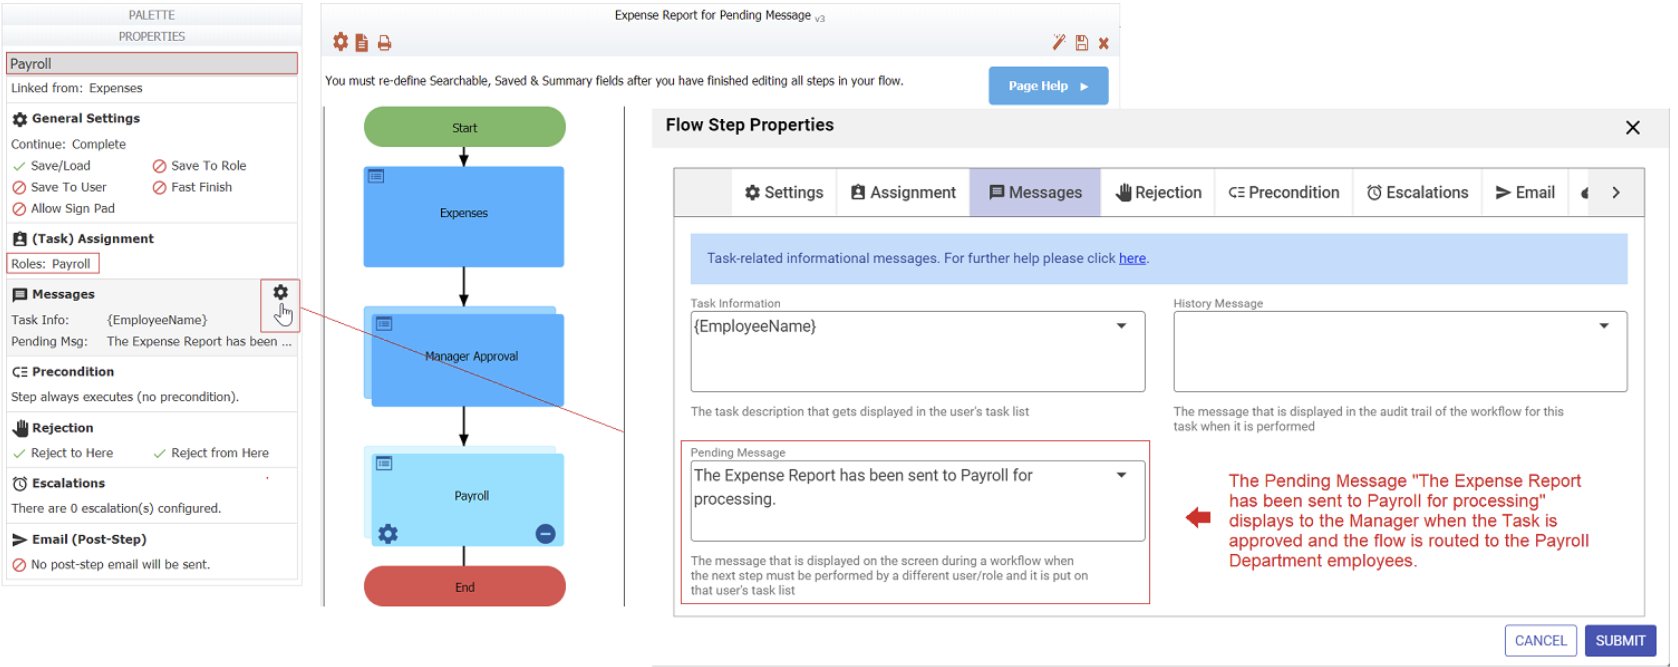
Save the flow.
History Msg
You can use the History Msg property to type a message e.g. {EFullName} requested leave starting {StartDate} for {NumberOfDays} days. At runtime, will resolve this message using the data from the form and save it in the audit trail. The names in the {} must exactly match the names of the respective controls.
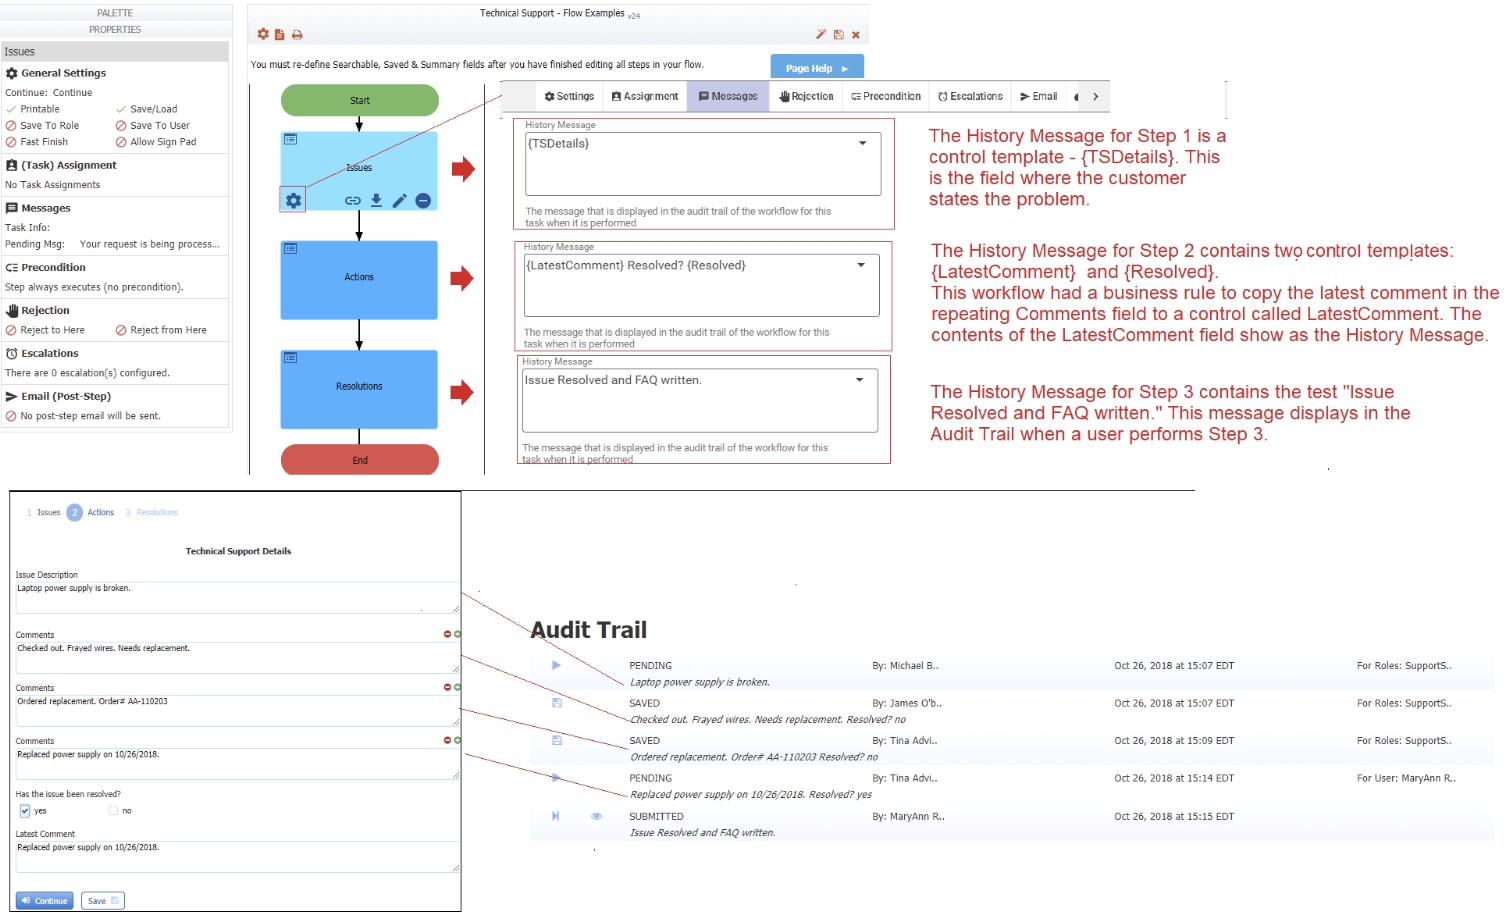
Let's say you had a workflow for Technical Support Problem reporting that has 3 steps: Issue, Action and Resolution. Step 1 is filled in by the user reporting the problem. Step 2 can be handled by anyone of a number of employees with the role SupportStaff. Once the issue is resolved the flow navigates to the Documentation department to write an FAQ about the problem resolution.
Adding history messages to all the flow steps puts an entry in the Audit Trail that will indicate the actions taken by the reporting user, individual support team and documentaiton team members.
This workflow uses the feature Save to Role and records information in the Audit Trail for each step using the History Message property.
- Step 1 of the workflow has a control where the user fills in the details of the issue. The name of the field is TSDetails. This field is entered as a control template so the text entered here shows as the History Message for this step.
- Step 2 of the workflow has a Repeat control that includes a Textarea control named Comments. Step 2 becomes a task for all the users with the role of SupportStaff. The first Support person to perform the task enters their comment in the Comments field then clicks Save. The task is then returned to all the Support Staff users Task List. The second Support person to perform the task clicks the
 Plus icon and enters their comments in the second Comments box then clicks Save. The task returns to the Support Staff Task Lists and the comments are added as described for each Support person that works on the task. This step has a business rule that copies the latest comment in the Comments field to a control named LatestComment. This field is entered as a control template so the text entered here shows as the History Message for this step.
 - When the issue is resolved, the flow advances to all the users on the Documentation team so they can write an FAQ about the solution. The History Message for the Resolution step will always be "Issue Resolved and FAQ written".
Use the Save on Navigation feature and the history message to log a new submission entry in the Audit Trail every time the workflow navigates to a new step, even if the current user has permissions (the correct role) required to immediately execute that step.
Configure a History Message on the step before the task to be performed by the anonymous user, if you want to see relevant information in the audit trail. The History Message can be templatized so you can see the email address of the recipient.
Rejection
Use the Rejection tab to:
- Specify if a user can reject a step in a workflow or if the step can be rejected to by other users or both.
- Customize the Reject button label on workflow steps that are configured to show one.
- Customize the Subject and Message for the email users receive when a task is rejected.
- You can display the Rejection tab in three ways:
- Click on the step of the workflow, then click the Edit Step Properties icon then click on the Rejection tab.
- Click anywhere in the Rejection section in the Properties Navigator. This takes you directly to the Rejection tab.
- Click the inside the Rejection section in the Properties Navigator. This takes you directly to the Rejection tab.
- Click on the step of the workflow, then click the
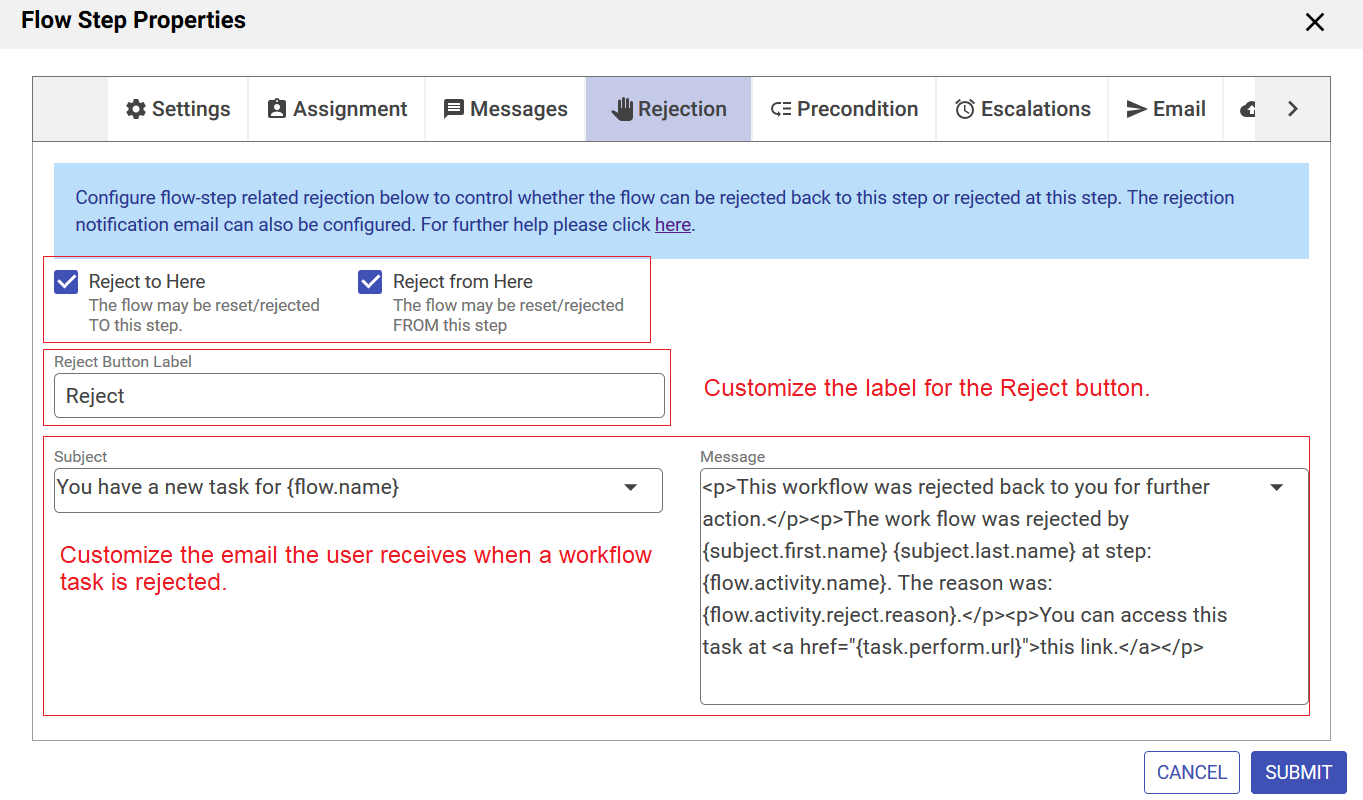
- Check Reject to Here if the flow may be rejected/reset TO this step.
- Check Reject from Here if the flow may be rejected/reset FROM this step.
- If Reject from here is checked, When selected, sections to customize the rejection email will appear.
- Clicking the Submit button to save your changes.
Rejecting a Workflow
There are three types of rejection scenarios for workflows:
- Reject to Revise - The form is sent back to a prior flow step for correction/more information. This is the Reject to Revise (Easy Reject) feature described below and is built into
- Submit as Disapproved - When a user disapproves the request from an Approval control, the workflow skips all subsequent steps and completes. A submission is saved into the Submission Repository. You may want to implement some custom business rules that run when the "disapprove" option is selected, such as display a message to communicate the status to the user.
- Abort a Task - crumple the form up and toss it into the trash can. Only the Tenant Admin, users who have been granted the Flow Admin privilege for the workflow and the designer who created the workflow have the capability to abort a workflow task. When a task is aborted, all subsequent flow steps are skipped and the form is not saved in the Submission Repository. The Abort feature is built into
Reject to Revise (Easy Reject)
Steps in a workflow that are routed to different non-admin users other than the person originally performing the step can be rejected (sent back) to a previous step by clicking on the Reject button. The designer can specify which steps display a Reject button and the steps the reject button can reset to. To take full advantage of this feature, make sure email is selected as the notification method for participating users. In-house customers should also make sure email is correctly configured. When a task is rejected, the user who it is being sent back to receives an email informing them of the reason for the rejection. The notification subject of this email is defaulted. The notification message and task history message are set to the specified reason provided by the person rejecting the task. The email shows task information specified by the designer.
Users designated as flow admins can reject a task using the Reject button if configured or the Modify Task icon.
Rejecting to a step that has a signed section will clear the signature on that section, requiring the user to re-sign before submitting that step again.
Configure the Reject button
To configure the Reject button on an step of a workflow, follow these steps:
- Click on the step in your flow where you want to configure the Rejection feature.
- The Reject to Here checkbox is checked by default. Leave it checked if the flow can be rejected/reset to this step. Check Reject to Here if the flow may be rejected/reset TO this step. This
- The Reject From Here checkbox is checked by default. Leave it checked if the flow can be rejected/reset from this step.
- If Reject from Here is checked, you can customize the label of the Reject button and the Rejection email. This is the label used for the Reject button displayed in the form at this step. You can use a template to dynamically set the label.
- Clicking on the down arrow shows a list of templatized fields from your flow, flow/special templates provided by
- Type the opening curly brace - {- followed by the control name to enter a field from your flow as a template. Selecting an option enters the control name into the field with the closing curly brace
- Click the Submit button to save the changes or navigate to another tab. Remember, if you navigate to another tab without clicking the Submit button, changes will NOT be saved.
- Repeat these steps for each step of your workflow.
Configuring a Reject button on the first step of a workflow or for the steps in a multipage form/screen flow (steps fill out by the same user) serves no purpose. It is possible to reject to a step with a precondition, provided that step was executed and the precondition still holds.
When a user clicks the reject button, an embedded rejection page replaces the task form on the right side of the task list. This will happen on a desktop or mobile devices. To reject a task, the user selects the user/step that they want to send the flow back to from the To:dropdown. and provides a reason for the rejection. Note the list contains prior flow steps and the first and last names of the users who performed them.
If a task is accessed from an email that uses the task.perform.url, the user will be taken directly to the task. If the task is then rejected on the desktop, the display rejection popup displays instead of the embedded rejection page.
Imagine a Time Sheet workflow with three steps:
- Step 1 - Time Sheet - this is filled in by the employee
- Step 2 - Manager Approval - the Time Sheet is approved by the employee's manager or rejected back to the employee for correction.
- Step3 - Finance step - this step is performed by any member of the Finance department. The user must have the role of Finance. The flow can be rejected back back to the manager or employee for corrections from this step.
Configure the Rejection feature as shown in the image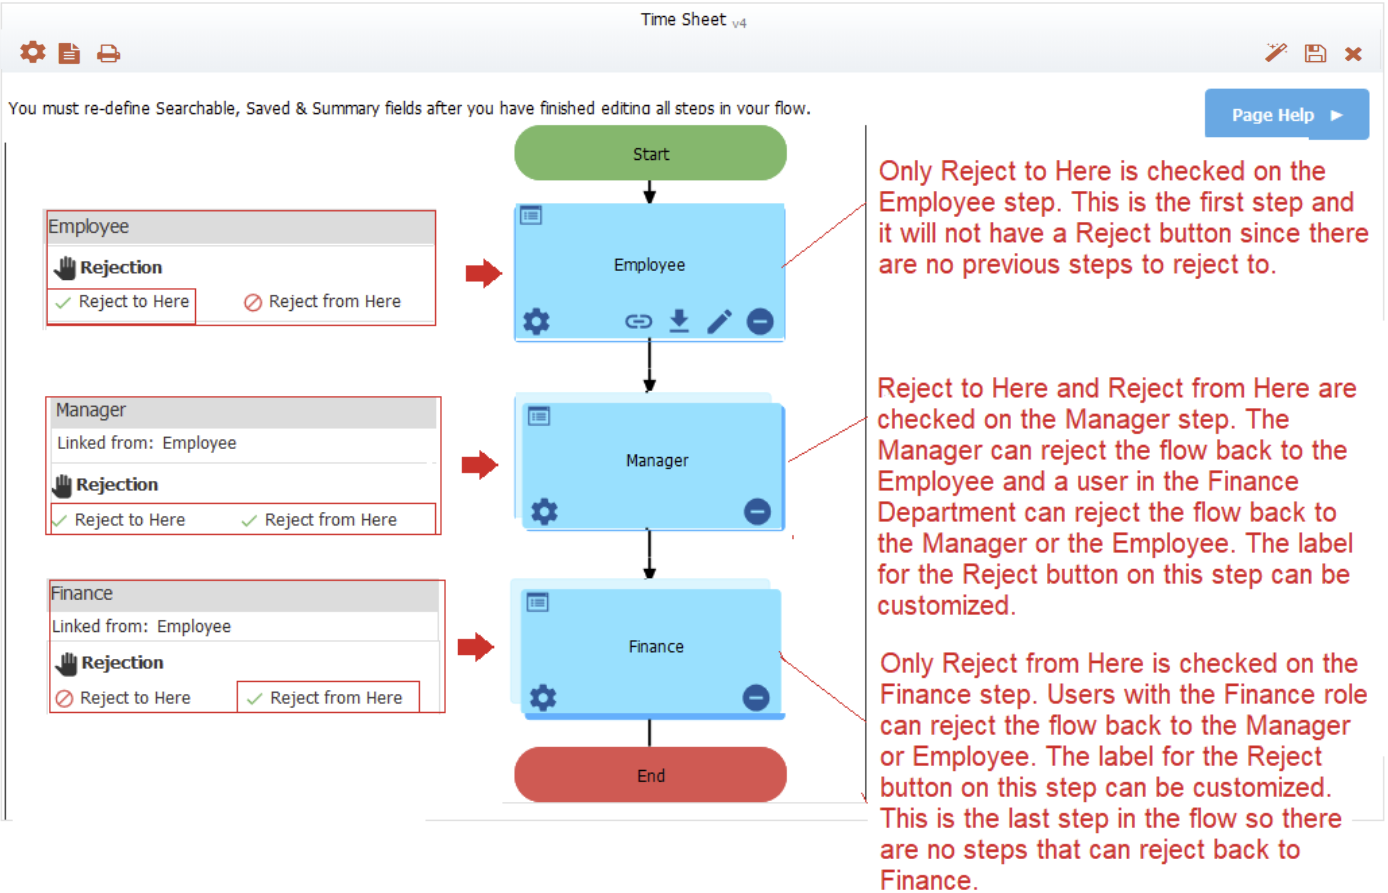
Configuring Reject for Steps performed by Anonymous Users
Tasks assigned to an Email Address can be rejected from and rejected to, just like any step is the flow performed by a logged in user.
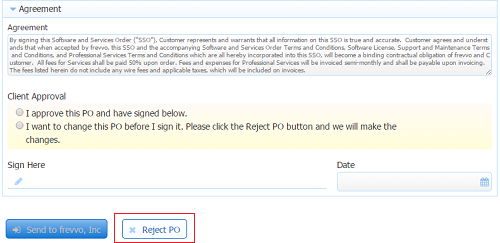
Let's say you have a Purchase Order workflow where the PO is sent to the customer for signature. The designer can configure a Reject button on this step (anonymous) so that the customer can send the PO back to the sender for corrections before signing.
Subsequent workflow steps can be configured to Reject the task back to the customer, if necessary.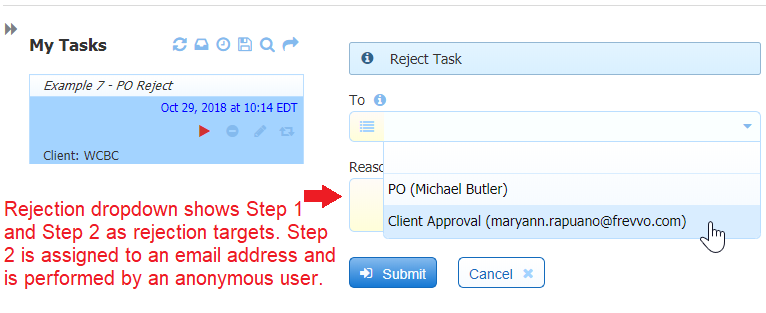
Configuring Reject for Screenflows
Steps performed by the same user in a flow are referred to as a screenflow. The steps of the screenflow are considered one task. The reject functionality will allow users to reject only to the beginning of that screenflow. You cannot reject back to steps after step 1 in the screenflow.
Customize the Rejection Email
It is possible to customize the subject and email message body that is sent when a workflow task is rejected. You will configure this email on the step you are rejecting from. The customized rejection email will be sent when the Reject button is clicked on that workflow step or Quick Approval screen.
You can choose controls from your form which will be added to the Message as templates or you can use built-in templates as described below. Click on the![]() down arrow shows the list.
down arrow shows the list.
- {flow.name} - Name of the workflow
{subject.first.name} - First name of the user who rejected the task.
{subject.last.name} - First name of the user who rejected the task.
{flow.activity.name} - The step of the workflow that was being performed when the task was rejected.
{flow.activity.reject.reason} - The reason for the rejection.
{task.perform.url} - The URL to the rejected task.
Here is the default rejection subject and message. Notice the use of built-in templates to pull the following information into the email:
Subject: You have a new task for {flow.name}
Message: <p>This workflow was rejected back to you for further action.</p><p>The work flow was rejected by {subject.first.name} {subject.last.name} at step: {flow.activity.name}. The reason was: {flow.activity.reject.reason}.</p><p>You can access this task at <a href="{task.perform.url}">this link.</a></p>
In-house customers can modify the default subject and message values by changing the text in the web.xml file. Click here for the details.
Click here for an example showing how the Easy Reject feature works.
The "from" email for a rejection is the tenant "from" email. If no tenant "from" email is set, this will default to the admin user's email address.
Submit as Disapproved (Reject to Discard)
Most often, steps in an Approval workflow can have one of three possible outcomes. They can be:
- Approved
- Sent back to a previous step for corrections/more information (Reject to Revise)
- Disapproved and terminated (Submit as Disapproved)
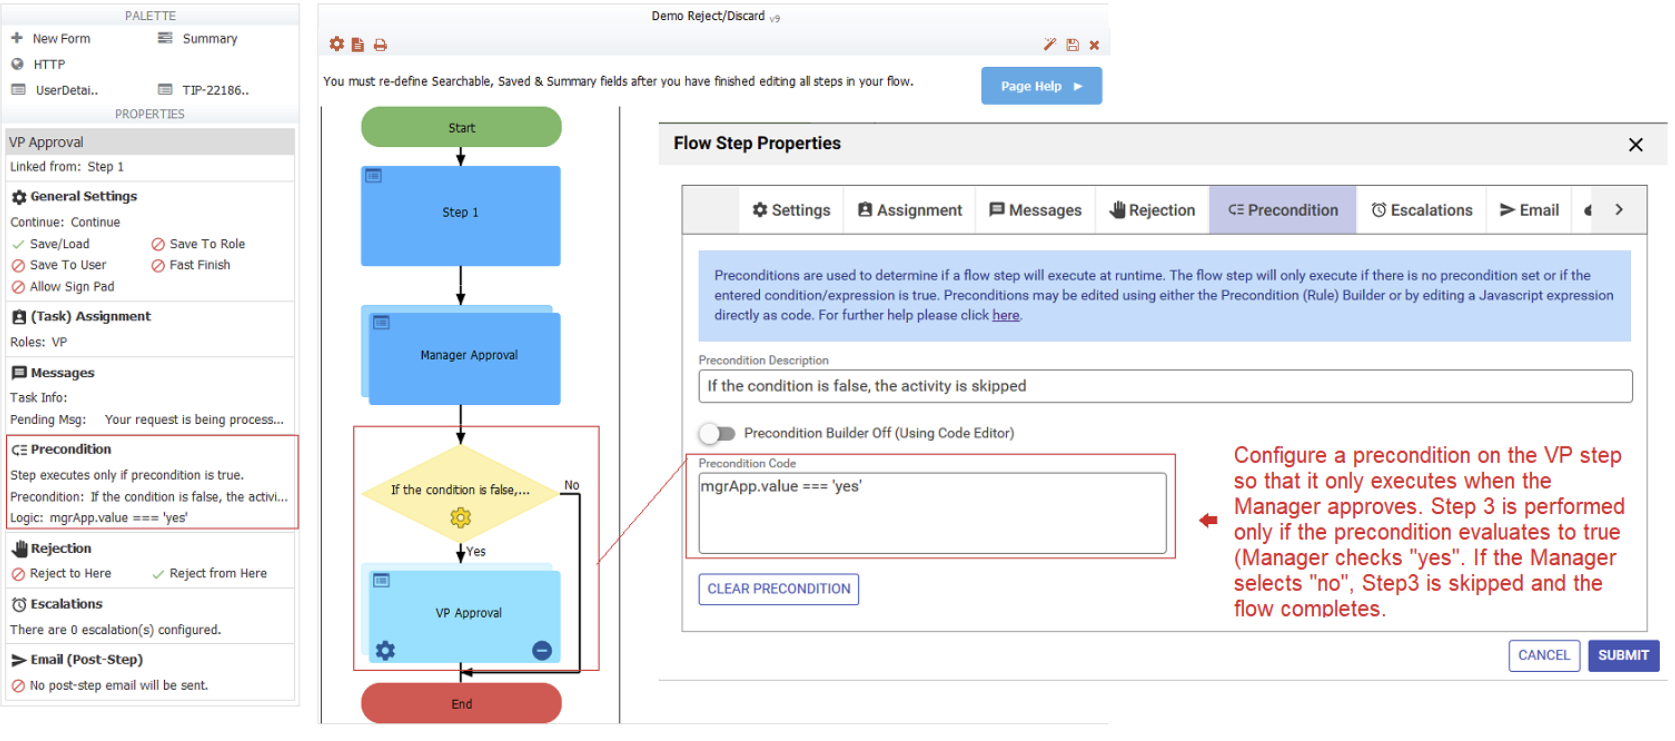
In the third case, where any approval step that is disapproved should terminate the workflow, we recommend the Submit as Disapproved workflow pattern. This is also know as "Reject to Discard" but it is important to note that this scenario does not use the Rejection feature. Rather, it uses Preconditions to skip the remaining steps in the workflow and submit it. Let's say you have a three-step workflow:
- User fills out a form
- Manager approves or disapproves
- VP approves or disapproves
If the Manager disapproves, you don't want the VP to even see the workflow; you simply want to discard it. To do this, you will set a Precondition on the VP step to only perform that step if the Manager has approved (click the link below for step-by-step instructions). Often you will use a Radio control to indicate Approved/Disapproved. The workflow will now route as follows:
- User fills out form
- Manager can
- Approve and send to VP
- Reject and return to User for more info
- Disapprove and skip VP step, submitting the workflow at this point.
- (if Manager approved) VP approves/disapproves and submits the workflow.
When you use the Submit as Disapproved scenario, you will still have a submission for the workflow, and Workflow Document Actions will run. Activity Doc Actions on skipped steps will not run. Many customers choose to configure Document Actions, such as email, with templatized strings in the To address, subject and message, in conjunction with business rules that set those control values, so that the message sent will be different depending on whether the steps were approved or disapproved. Here is an example of conditionally sending a Workflow Doc Action email. You may also choose to set the control that indicates approval/disapproval as a Searchable Field, so that you can easily view it in the Submission table and filter submissions by that field.
Follow these steps to implement Submit as Disapproved:
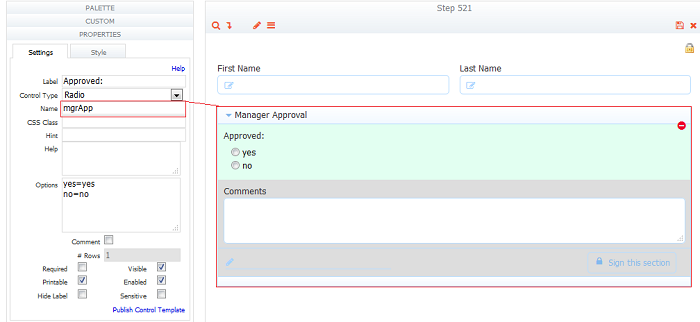
- Create an approval section with a Radio button in Step 2 of the workflow. Note the name of the Manager Approval control. In this example, the control where the Manager selects "yes or no" to approve/reject is named mgrApp.
Set a Editing Step Properties#Precondition on Step 3 (VP step in our example) so that it only executes when the Manager selects "yes" in the Approval control in Step 2. You can invoke the Precondition Rule Builder by clicking on the
 icon or click the
  icon too enter the code manually.
In our example, the precondition would be:mgrApp.value==="yes"
Step 3 is only performed if the precondition evaluates to true (Manager selects "yes"). When the Manager selects "no" Step 3 will be skipped and the flow completes.
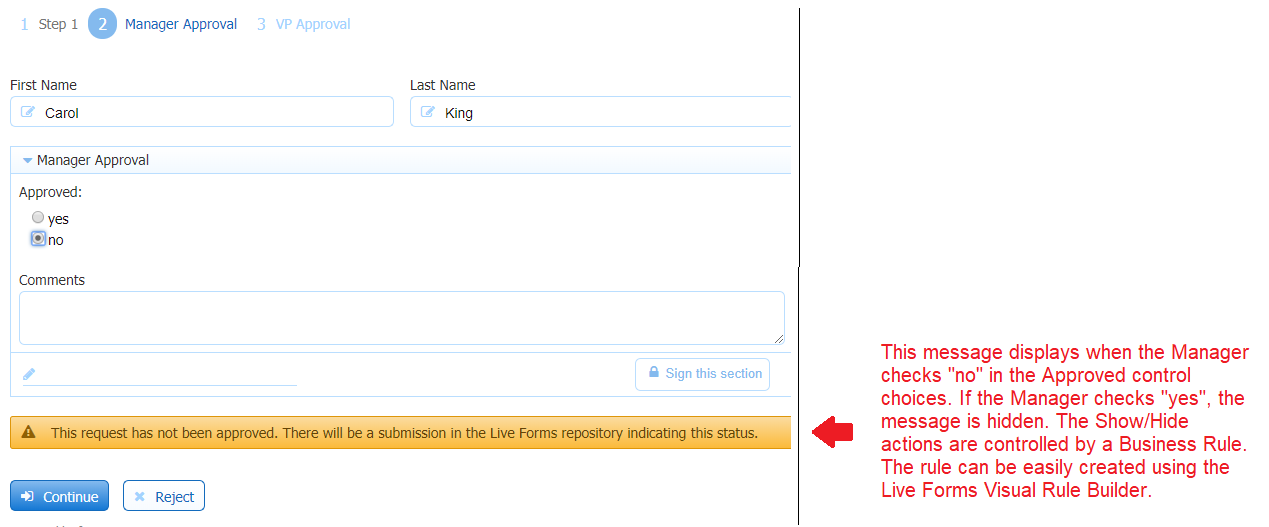
- Use the Visual Rule Builder to write any Business Rules needed for behaviors after the Reject to Discard selection is made. For example, a business rule to show a message to the Manager explaining the flow status, when "no" is selected and to hide the message if the Manager selects "yes" to approve the request.
- Configure the Reject button to give the Manager/VP the opportunity to reject the workflow back to a previous step for revision.
- Check Submissions Stored Inside of frevvo for the procedure to check the completed submission.
Troubleshooting the Reject Button
Here are some reasons why you might not see the Reject option on a step where "Reject From Here" is selected:
- If the Reject To Here option is not selected in the previous steps, then user won't be able to see the Reject button on current step.
- When consecutive steps are executed by the same user,
- If the immediate steps prior to the current step were performed by the same user, then he/she cannot reject to those steps (the user is rejecting the flow to himself). Users can reject only to those steps performed by other users, or to steps performed by himself that do not come immediately before the current step.
- If a previous step was skipped because its precondition failed, then the user won't be able to reject to such a step.
- If a precondition on previous step passed when that step was being performed, but the control values change causing the precondition to now fail, the user might not be able to reject to that step.
- The Reject button will not be displayed at all if the conditions are such that users cannot reject to any prior steps.
Precondition
Use the Precondition Builder on the Precondition tab to:
- Write the JavaScript for a precondition on a workflow step.
- Provide a short business-level description of the precondition to help make the flow design easier to read.
- You can display the Precondition tab in three ways:
- Click on the step of the workflow, then click the Edit Step Properties icon then click on the Precondition tab.
- Click anywhere in the Precondition section in the Properties Navigator. This takes you directly to the Precondition tab.
- Click the inside the Precondition section in the Properties Navigator. This takes you directly to the Precondition tab.
- When you add a precondition to a flow step, a yellow Precondition decision diamond is displayed on the Flow Designer canvas. Clicking the
 icon in the Precondition decision diamond takes you directly to the Precondition tab. If the step has a precondition validation error, the error icon shows instead and the diamond displays with a red color.
- Click on the step of the workflow, then click the
Preconditions are used to add logic to your flow to skip or perform a step based on the data entered into prior flow steps. They are also used to generate/not generate mapped PDFs. Preconditions are entered into the Precondition property field for a workflow step and are performed if the precondition statement evaluates to true or the field is left empty. The precondition logic is the same used when writing business rules.
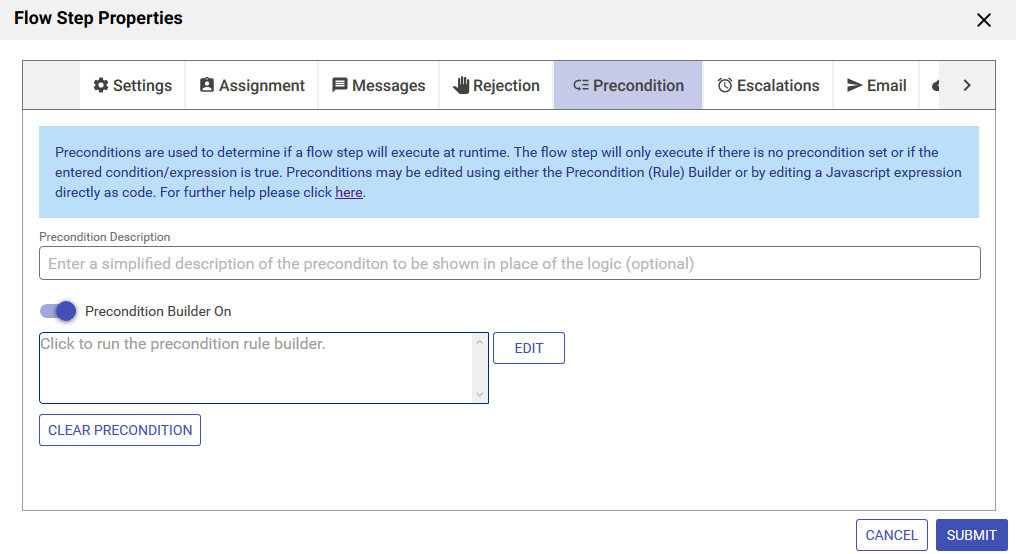
There are two entry modes: Precondition Builder mode and code entry mode. Precondition builder mode is turned on by default. The designer can switch back and forth between the two modes.
The Precondition Builder makes it very easy to eliminate incorrect or invalid JavaScript in your precondition statements during the design phase.
- Open the Precondition tab.
- Provide a Precondition Description. This field is optional. If this field is empty, the Precondition logic is described i.e. "LoanAmount is equal to or more than 50000"
- The Precondition Builder is turned on by default. Launch the Builder by clicking in the Precondition logic box or clicking the Edit button. Click the CLEAR PRECONDITION button to remove any existing Precondition logic.
- This editor uses a modified version of the
- Create the Precondition by selecting fields from your flow, an operation and a value. To enter a literal value, slide the toggle to the right. Yo can add more than one condition by clicking on the Add Condition button and modify the logic expression, if necessary.
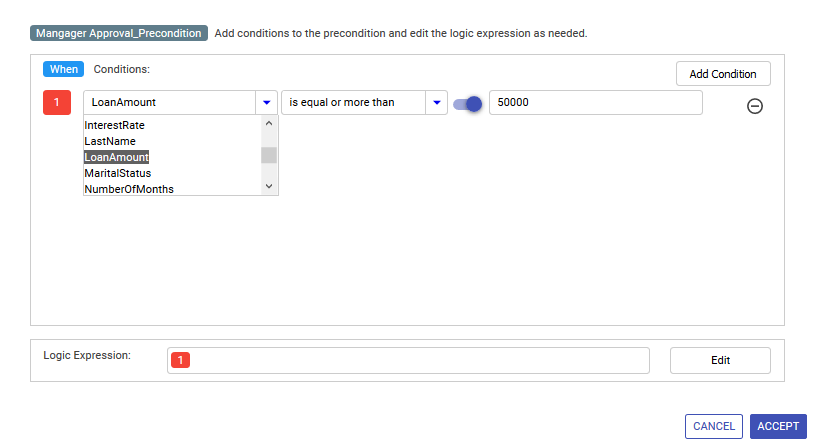
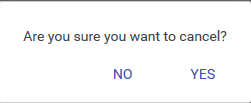
Click Accept then Submit to save the precondition or click Cancel to discard. You will be prompted to confirm the cancellation.
Save the workflow.
When the user completes entry of a precondition via the rule builder, the precondition expression is displayed in the precondition property panel. Click in the precondition area in the properties panel again or click the  icon on the diamond shaped decision box to re-run the Precondition Rule Builder.
To manually enter the Precondition JavaScript or edit a precondition created using the Precondition Rule Builder by editing the JavaScript code :
- Slide the Precondition Builder toggle to the left to turn off the Builder. Be aware that taking this action will remove your ability to edit using the Precondition Builder. A warning message will display:

- Click the CLEAR PRECONDITION button to remove any existing Precondition logic or edit existing code that is displayed.
- Type the JavaScript into the field.
Click Submit to save the precondition. If you click Cancel, you will be asked to confirm.
Changes to the precondition trigger code validation. Appropriate messages are displayed if errors are encountered. Errors with information display if the JavaScript is invalid.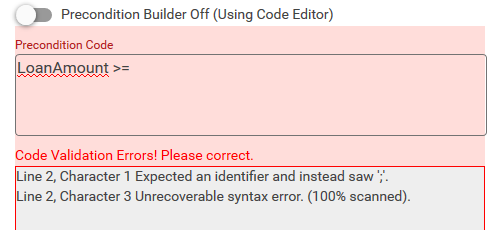
If you have an existing precondition that was manually entered into the Precondition Code field when the Builder was turned off (code mode), slide the ![]() to the right to turn the Builder back on.The existing code will be removed but the Precondition Builder will be available again.
to the right to turn the Builder back on.The existing code will be removed but the Precondition Builder will be available again.
You will see this message:
It is important that designers test the preconditions in your workflow. The Precondition Builder displays an error if it encounters invalid JavaScript, however, runtime errors such as leaving off the .value are not flagged by the Precondition Builder because the JavaScript is valid. For example, the precondition in the image is missing the .value for the Loan Amount field. This precondition will pass the Precondition Rule Builder validation but it will not work. will catch this error when the flow navigates to Step 2. To correct the runtime behavior, change the precondition to LoanAmount.value >=500000

- You cannot use form template syntax in preconditions.
- Preconditions are re-validated on saving forms/flows and if there is an error, the user is notified and given an option to re-edit
- The precondition logic is the same used when writing Business Rules. However, the User Info, Numeric, Boolean and Date/Time functions, added to the Visual Rule Builder, are not available in the Precondition Builder. If you hand type one of these functions, it will validate and but you will receive an error message at runtime.
- The following operators are supported in precondition expressions:
- + (add and concat)
- -
- * (multiply)
- /
Precondition Examples
Example 1:
For example imagine a mortgage application in which a Supervisor had to perform a step for all mortgages over 500,000.00. The flow has a 1st step where the applicant enters the loan amount into a field named LoanAmount. Step 2 is performed by a bank Employee and Step 3 is performed by the Supervisor only for mortgages over 500k.
To do this, use the Precondition Builder or drop in the code to add the precondition - LoanAmount.value >= 500000 - to Step 3.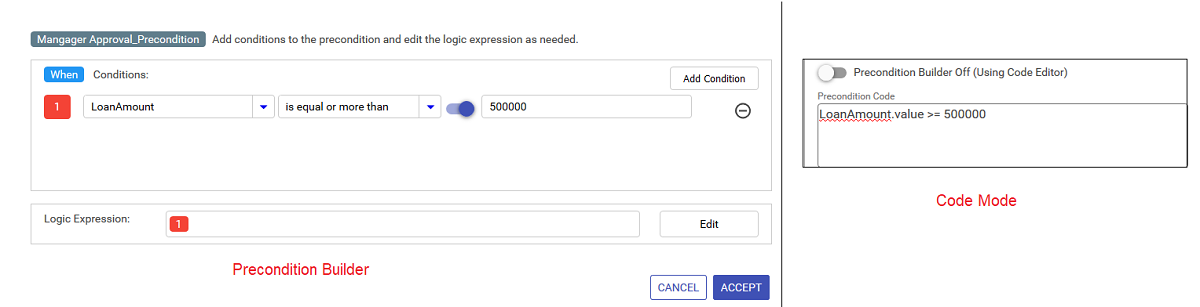
Example 2:
You can also set preconditions based on values in dropdowns and radios. For example, imagine the 2nd Step contained a dropdown control named SendToSupervisor with the values Yes/No. The Employee could override the logic in the flow to send for Supervisor approval even for loan amounts under 500,000.00. Add the following precondition - (LoanAmount.value >= 500000) || (SendToSupervisor.value === 'Yes') - to the Supervisor step.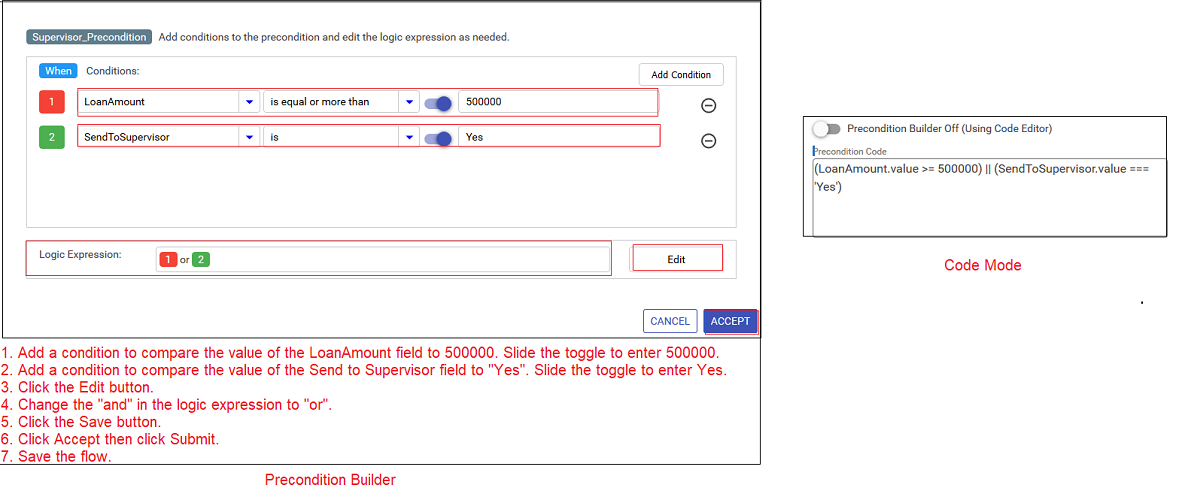
LoanAmount.value >= 500000 || SendToSupervisor.value == 'yes'
Either way the Supervisor step would be skipped for loans less then 500,000.00 or if the Employee set Send To Supervisor to 'no'.
Make sure the controls used in preconditions are required controls. Controls without values used in preconditions will cause an error in the flow. Test for this when you are creating flows with preconditions to ensure that when the flow designer shares the flow with others that it will not display an error.
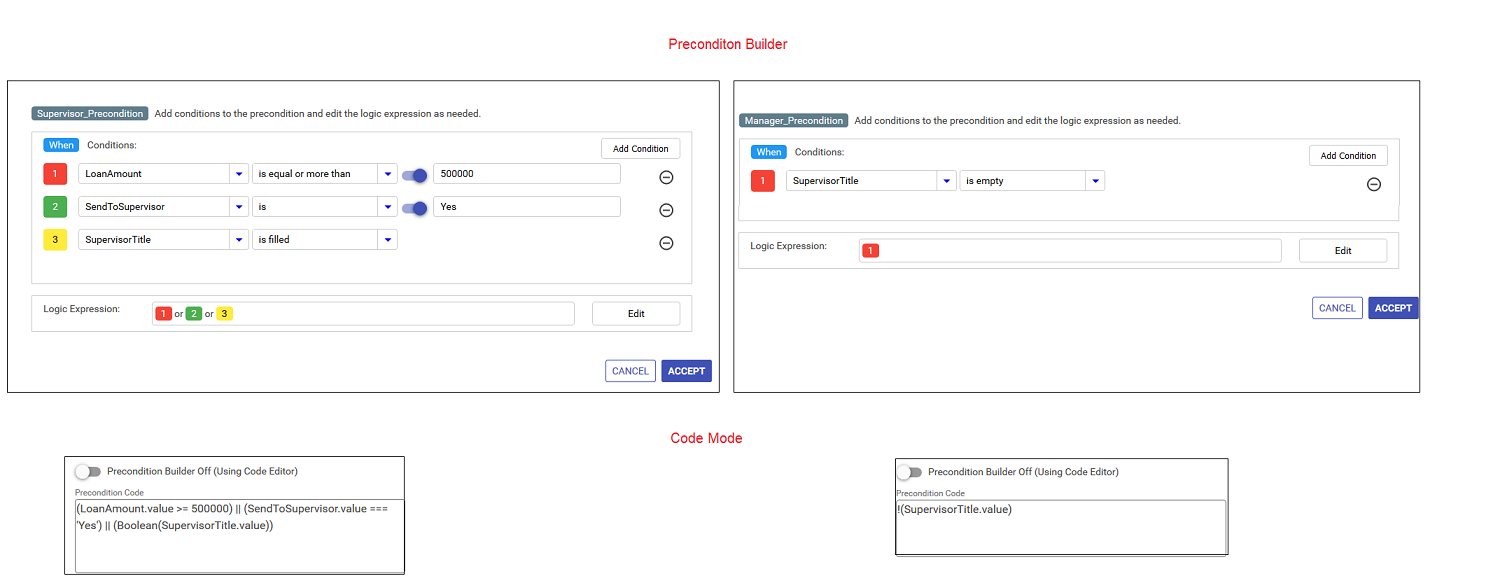
Example 3:
In this example if the Supervisor was the one to fill the first step of the flow then they were required to enter their Supervisor Title, and that field is thus guaranteed to have a value. In this case, to skip the next step and go directly to the Supervision step, add this code - SupervisorTitle.value != '' " to the second step's precondition or use the builder to create a precondition where the second step only executes if the Supervisor Title filed is empty. Then add another OR statement to the precondition on the Supervisor step to execute that step if the Supervisor Title is filled.
!
Preconditions and Rejecting Tasks to Discard
Preconditions can be used to implement a Reject to Discard scenario as an option for rejecting workflow tasks. Let's say you want to note that a workflow task is rejected (not approved) but still have the form stored as a completed submission in the repository. Adding pre-conditions that evaluate to true to later flow steps will cause those subsequent steps to be skipped and the flow will complete. The flow will be saved in the
submission repository with some customized indication that the flow step was rejected. See the Reject to Discard topic for the details and an example.
Escalations
Use the Escalations tab to set up the following on a workflow step:
- The workflow condition that needs to be met for escalations to take effect
- The time interval/due date for a task to be performed or completed
- Specify an action when the deadline is missed - Reassignment to a different user or role, Notification that the task has been escalated or the ability to skip the step and navigate the flow to the next step.
- The ability to skip a step in a workflow if the task deadline is not met.
- The number of email reminders and the interval to send them before the task deadline.
You can display the Precondition tab in three ways:
- Click on the step of the workflow, then click the Edit Step Properties icon then click on the Escalation tab.
- Click anywhere in the Escalation section in the Properties Navigator. This takes you directly to the Escalation tab.
- Click the inside the Precondition section in the Properties Navigator. This takes you directly to the Escalation tab.
- When you click on the Escalation tab, a short explanation of existing Escalations displays. Click the
 arrow to edit or review. Click the ADD ESCALATION button to add one.
 - Click the
 Delete icon to remove an escalation.
 - Remember to click Submit to save your changes.
Setup Escalations
In general, a condition is selected that acts as a trigger for the escalations. If the condition is NOT met, then the designer can specify what actions to take. You can elect to reassign, notify, send reminders or skip the task but you do not have to choose all three. However, once a condition is selected one of the actions must be reassign,notify or skip.
- You can skip a task when the deadline expires and the workflow automatically navigates to the next step. This is set up on the Action tab.
- You can reassign the task to another user/role. This is set up on the Action tab.
- You can send notifications to the user(s) that currently have the task that the deadline has been reached and the task has been reassigned. This is set up on the Notifications tab.
- You can use templatized values of controls in any of the Assignee(s) fields in the Escalation setup screen. The username that is filled in as that control's value will be picked up during escalation.
- You can send reminder emails to the user(s) who have the task on their task list at specified intervals reminding them that the deadline for the task is approaching. This is set up on the Reminders tab.
For example. if you wanted to send reminder emails to the user(s) who currently have the task on their Task List that the deadline is approaching and then send an email notification to them when the deadline is reached, you would configure the Notifications and Reminders tabs and check None (Notify Only) on the Action tab. Continue reading for more details.
To take full advantage of this feature, make sure email is selected as the notification method for participating users. In-house customers should also make sure email is correctly configured.
Configuring Escalations
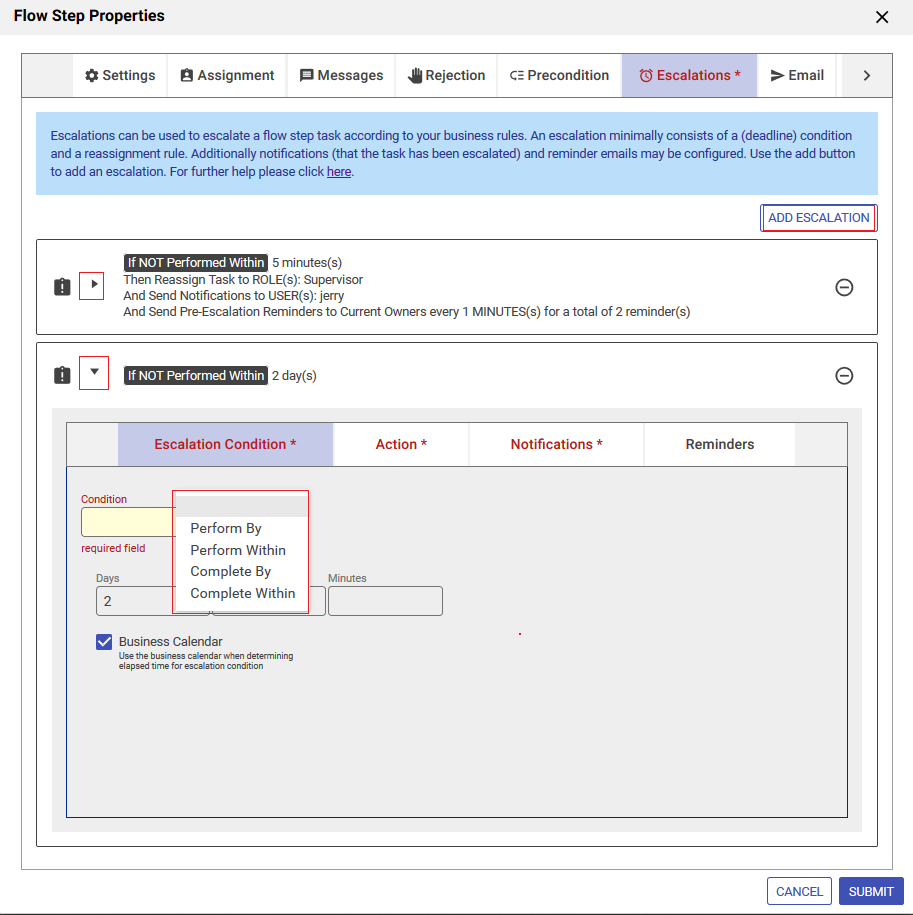
To start, click on the step in your workflow where you want to configure the Escalation feature and select the Escalations tab. Then click ADD ESCALATION to display the Escalation Condition tab.
Escalation Conditions
Select a condition from the dropdown. There are 4 choices:
Perform By - This condition is met when the user clicks the
 (if the task is assigned to a particular user) or
  ( if the task is assigned to a role) Perform icon on the task in the users Task List or Saves/Locks the task before the configured due date. If the Task Notification email includes the {task.perform.url} then the deadline is met when the user clicks the link in the email to display the task.
 - Perform Within - This condition is met when the user clicks the (if the task is assigned to a particular user) or ( if the task is assigned to a role) Perform icon on the task in the users Task List or Saves/Locks the task before the configured the configured duration). If the Task Notification email includes the {task.perform.url} then the deadline is met when the user clicks the link in the email to display the task.
- Complete By - This condition is met when the user clicks the Continue/Finish button on a step in a workflow before the configured due date.
Complete Within - This condition is met when the user clicks the Continue/Finish button on a step in a workflow before the configured duration.
Selecting Perform By or Complete By displays two options.
Using Date/Time Control: The Due Date control dropdown displays all date controls in your form.
- The control used in the template must have a value before the task is created. For example, a date entered by the user on Step 1 can be used in an escalation condition on any later step. However, that date control template will not work in an escalation on Step 1, because the escalation is created at the moment the Step 1 task is created (when the form loads), and at that moment the control does not yet have a value. The date or date/time control used as a template in an escalation can get it's value a) in use mode or by business rule in a prior step, b) by setting a default value in the designer, or c) using _data when the workflow is initialized.
- An invalid due date template value will resolve to the current time to prevent any use-mode errors. The following message will appear in the frevvo logfile: "Escalation Due Date {DueDate} resolves to an invalid value".
- Date controls will automatically use the end of the day set in your business calendar in UTC, or 11:59 PM if no end of day is set, as the time component.
- Using Fixed Date: Enter a date/time as the deadline.

Selecting Perform Within or Complete Within displays Days, Hours and Minutes and a Business Calendar checkbox.
- Specify the amount of time the user has to perform or complete the task in Days, Hours or Minutes.
- Check the Business Calendar checkbox if you want
- Check the Business Calendar checkbox if you want
Escalation Actions
Once the condition is selected, click the Action tab to continue. Select from the following choices:
- None (Notify only) - Check this option if you want to send reminder emails to the user(s) who currently have the task on their Task List that the deadline is approaching and then send an email notification to them when the deadline is reached. The Notification tab becomes required. The task will not be reassigned or skipped.
- Reassign Task - Reassignment sends the task to the user/role selected if the deadline is passed. Select whether the task will be reassigned to a Role, User or Unlock to Role:
- If you select Role or User, then you must select the user or role in Select Role or User Assignee(s) field. Type ahead to display the Roles/Users in your tenant that begin with the letter you are typing and select from the list or enter comma separated templates. Remember that
- Unlock to Role - This option unlocks the task. Use this option for a step in your workflow that has a role assigned to it and you want to handle the situation where one user with that role has the task locked and the deadline for the task has passed. Selecting Unlock to Role unlocks the task and keeps it on the Task list of all users with the role after the deadline expires. Now it can be performed by any user with the specified role again.
For example, let's say you have a step in your workflow that is assigned the manager role. Users Jerry and Jim are managers so the task shows up on both their task lists. Jerry clicks the Perform icon but he does not complete the step. The task remains on his task list and it is locked by him. If Jim tries to access the task or checks the Audit Trail he will see that the task is locked by Jerry. The deadline to complete the task passes. If Unlock to Role is selected as the reassignment option, the task remains on the task list of users with the manager role, in this case, Jerry and Jim, but it is unlocked and the audit trail shows a status of pending. Now it can be performed by any user with the manager role again.
- Reassigned users receive the Task Information email specified by the designer. So be sure to 1063730798 for the step in your workflow where you assigned escalations and you want to reassign the task after the deadline.
- If you select Role or User, then you must select the user or role in Select Role or User Assignee(s) field. Type ahead to display the Roles/Users in your tenant that begin with the letter you are typing and select from the list or enter comma separated templates. Remember that
Skip Task - check this option if you want the workflow to escalate automatically to the next step when the timer expires. When checked, no further configuration is required.
Skipping a task is only supported if the next step in the workflow is a form/summary step. Configuring the Skip a task feature on the last step of your workflow will not work.
- Reassign Task - Reassignment sends the task to the user/role selected if the deadline is passed. Select whether the task will be reassigned to a Role, User or Unlock to Role:
Escalation Notifications
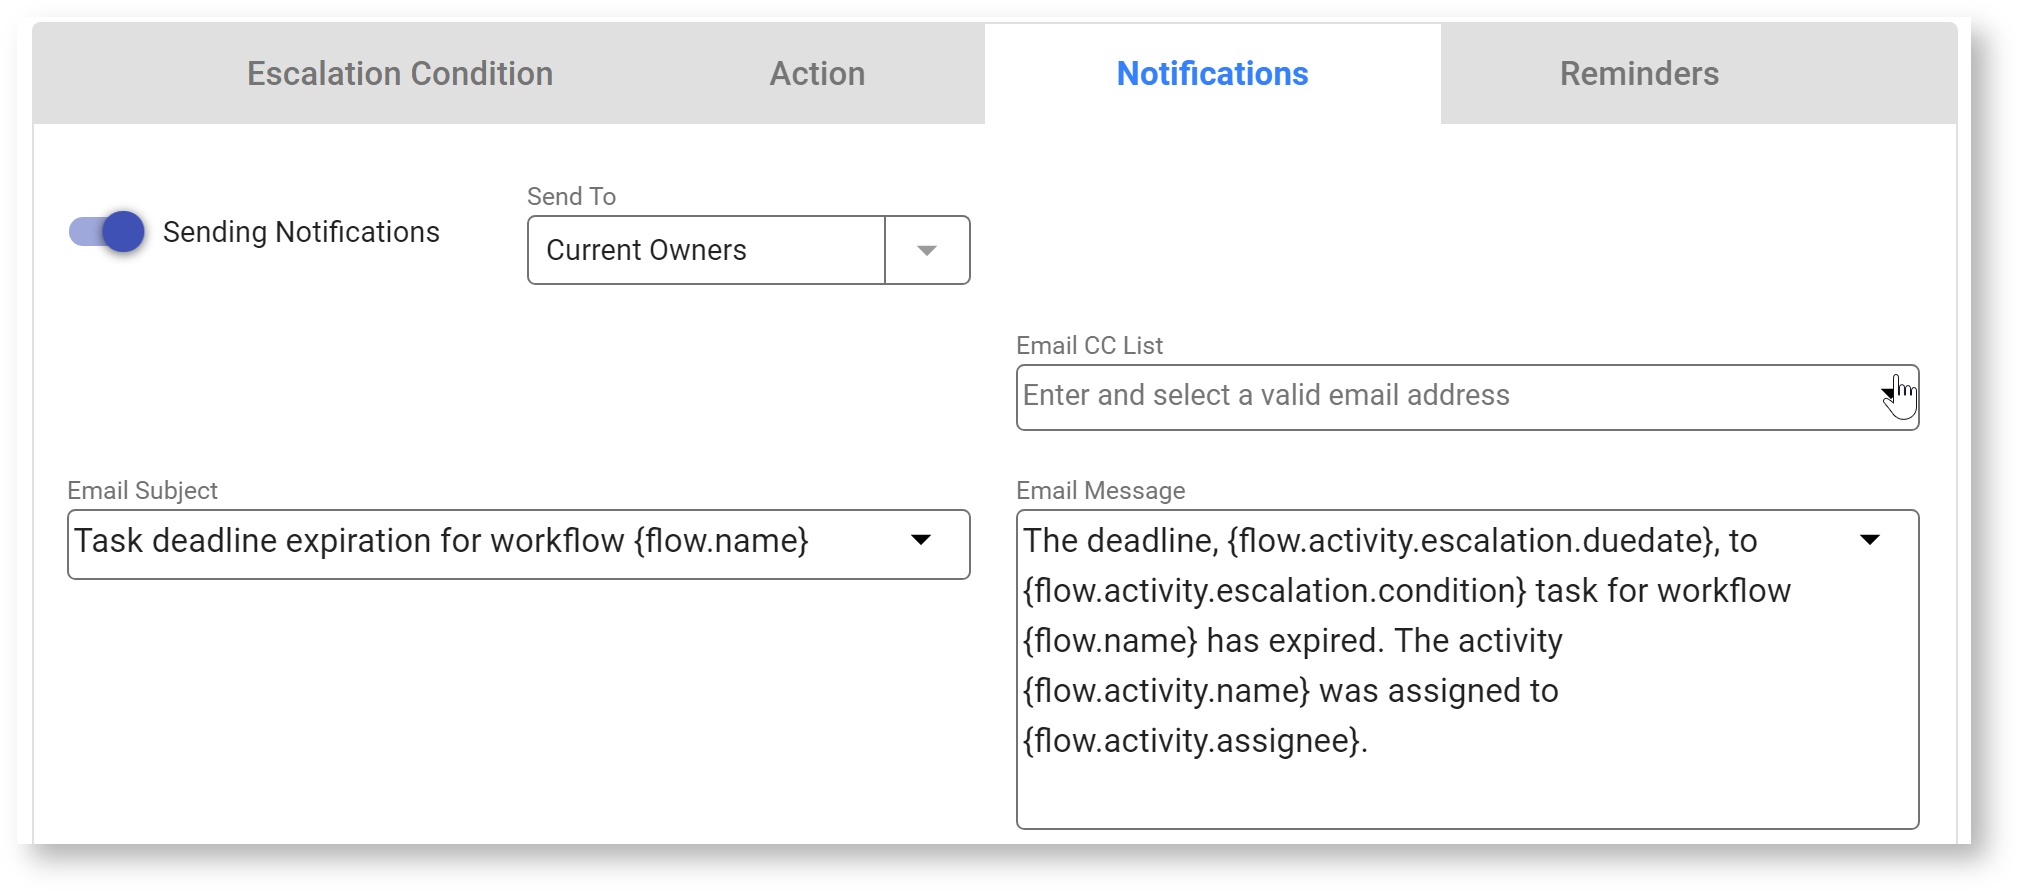
You can set up notifications for any of the three actions.
- Click on the Notifications tab.
- Slide the
 toggle icon to the right to turn on Notifications
 - Select Role, User or the Current Owners from the Send To dropdown to specify who will receive email notification reminders when the deadline is reached.
- If you select Role or User, then you must list them in the Select User(s) or Role Recipient(s) field. Type ahead to display the Roles/Users in your tenant that begin with the letter you are typing and select from the list or enter comma separated templates. Remember that
Current Owners refers to user(s) who currently have the task on their task list. Partial templates with prefixes and suffixes can be used to create a complex role such as floor-manager when setting up Escalations.
When you are setting up step Assignments or Escalations for workflows, you can assign a user/role template where only part of the text is inside the curly brackets - {}. This is best explained with a simple example using roles for workflow routing.Let's say the roles in your organization are floor-manager, sales-manager and store-manager. Of course, these role names and users assigned these roles must exist in your tenant. Your form has a dropdown control named roles with these options: floor, sales, store. Users select the first part of the role from the dropdown. The suffix -manager is typed in after the role template in the Assignment tab to create the complex template - (floor-manager, sales-manager, store-manager). The workflow step with the complex template assigned will navigate to the appropriate role.
A partial match template lookup is available on the Assignment and Escalations tabs to select the complex template from dropdown options.
We will assign the {role}-manager on the Assignment tab of a workflow as an example:
Type the control name of the template surrounded by curly brackets - in our example - {role}
Type the dash - followed by manager. The {role}-manager appears in the dropdown
Click on it to select. Click Finish to save the changes to the Assignment tab then click the
save and exit to save the changes to the flow.- Test the flow. Select floor in the role dropdown. The assigned workflow step will navigate to all the users in your tenant with the role of floor-manager.
The partial lookup works with users/roles and prefixes/suffixes in the users/role names.
- Specify an email(s), user(s), or role(s) to receive a CC: of the notification (optional).
- The subject and body of the notification email are shown once the Recipient(s) are selected. You can customize the email message by adding controls from your form as templates, workflow templates, common templates, escalation or task templates. Simply click the
 to show the templates or type ahead to filter the list. For example, when a task is reassigned, you may want to specify the user/role that the task is being reassigned to (reassignee) in the email to avoid confusion. Simply add some text with this template in the Notification message section: {flow.step.escalation.reassignee}.
- If you select Role or User, then you must list them in the Select User(s) or Role Recipient(s) field. Type ahead to display the Roles/Users in your tenant that begin with the letter you are typing and select from the list or enter comma separated templates. Remember that
- Slide the
Escalation Reminders
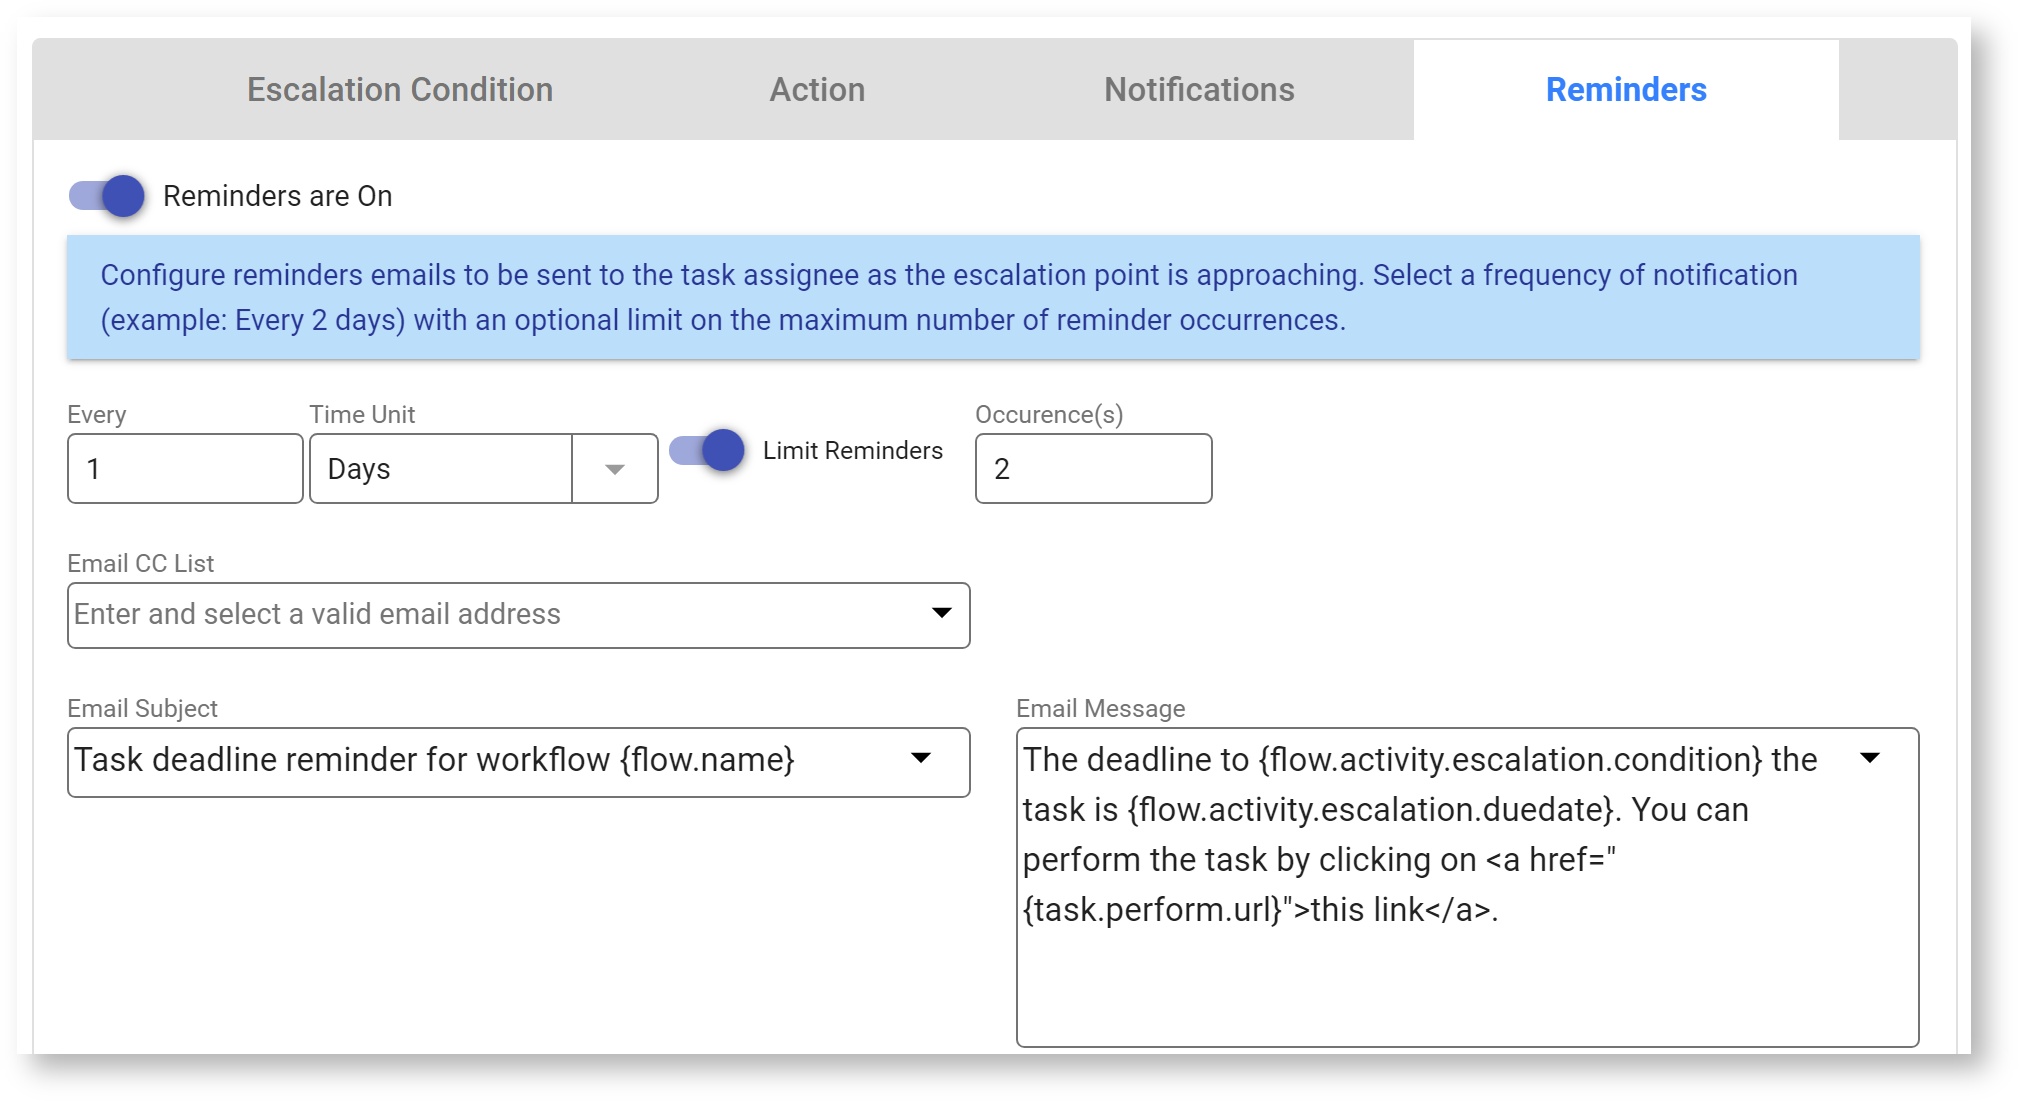
Configure email reminders on the Reminders tab. Reminder emails notify the roles/user(s) originally assigned to this step.
- Specify the interval between reminders by entering the number of reminders in the Every field and select Days, Hours or Minutes from the Unit dropdown.
- You can limit the number of reminders by sliding the toggle icon to the right and entering the number of reminders closer to the deadline in the Occurrence(s) field. If you enter a negative number in this field by mistake,
- Specify an email(s), user(s), or role(s) to receive a CC: of the notification (optional.)
- You can customize the email message by adding controls from your form as templates, workflow templates, common templates, escalation or task templates. Simply click the to show the templates or type ahead to filter the list. Select them from the Control dropdown.
- You can limit the number of reminders by sliding the
Reminders calculate back from the deadline. For example, let's say you set the condition to Perform within 1 day (24 hours), and then set the Reminders for every 2 hours, with no limit. So, 12 reminders will be sent (24 hours / 2 hours = 12 reminders), including one immediately after the Task Notification. To prevent this, be sure to toggle Limit reminders and set the occurrences to at least one fewer, in this case 11.
Escalations and Screenflows
Escalation should always be defined on the first step of a task - this is relevant when setting up Escalations for a Screenflow.
Screenflows are steps in a workflow that are performed by the same user. Consider a New Employee On-boarding workflow where steps 1 - 5 are designed to collect the Personal Information, W - 4 Allowances, State Allowances, Health Insurances preferences and Banking Information. Step 6 in the flow is routed to the new employee's manager and step 7 is routed to HR for final processing. Steps 6 and 7 are not part of the screenflow as they are performed by users other than the new employee.
Think of the 5 steps of the screenflow as one task. Escalation for the screenflow task will work as long as you define the escalation on the first step of the screenflow task. The escalation configured on the first step of the screenflow applies to all steps of the screenflow. For example, if a Complete Within 2 days escalation is configured on Step 1 of screenflow, then the escalation is triggered if the whole screenflow is not completed within 2 days.
If the first steps of a workflow consist of a screen flow, you must configure the flow to use the Save on Navigate and/or Task for First Step properties for escalation triggers to get created
Escalation Examples
Escalation Example 1
- The employee accesses the Time Sheet workflow, fills in the form, signs it and clicks Continue. frevvo sends that employee's manager a notification via email
- The manager clicks on the notification [on any device], views the Time Sheet approval request and approves it or sends it back for corrections.
- If approved by the manager, the workflow is routed to employees in the payroll department for final processing.
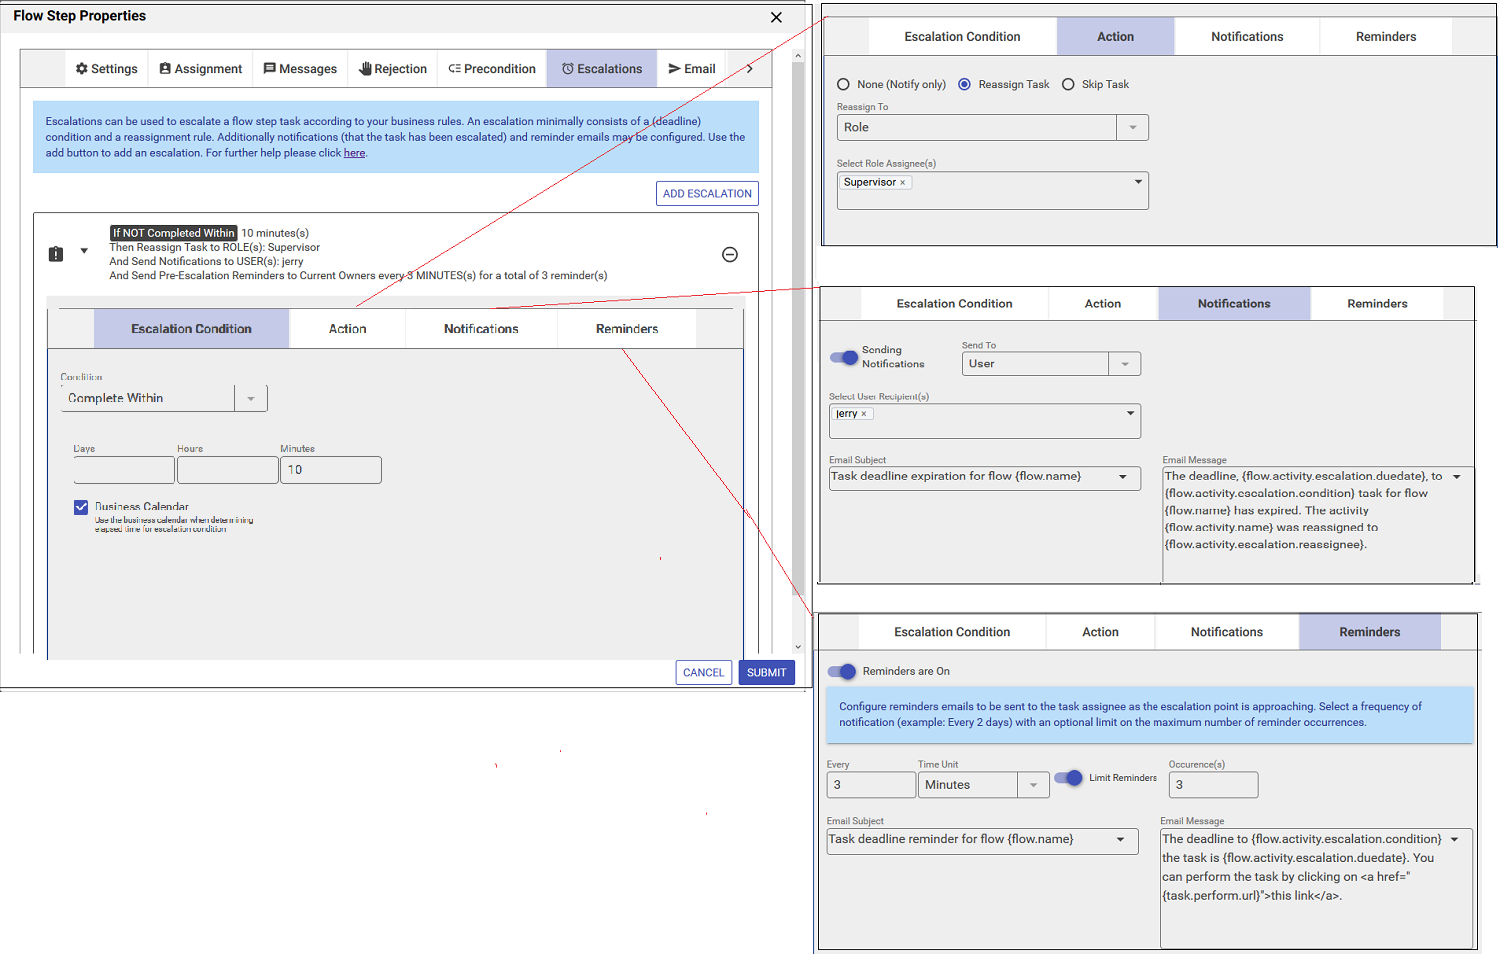
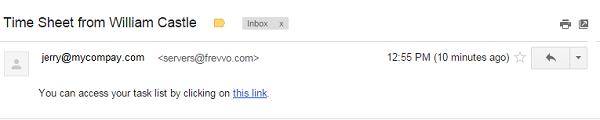
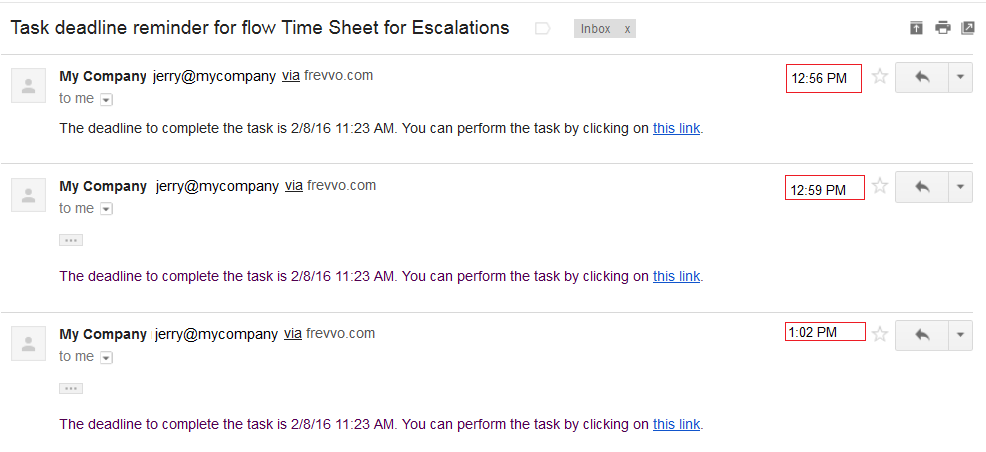


Escalation Example 2
The Project Approval workflow shown in the image must be approved by Approver 1 and Approver 2 in that order. The escalation set up on the Approver 2 step automatically skips this step and advances the flow to the next next step . Notice that notification and reminder emails are also configured.
In this example,
- The Approver 1 and Supervisor steps do not have Escalation configured.
- The Approver 2 step has an escalation that specifies the step must be completed within 3 minutes.
- If Approver 2 does not complete the task within 3 minutes, the Approver 2 step is skipped and the flow advances to the Supervisor step.
- Approver 2 receives an Notification email stating that the flow is now assigned to a Supervisor.
- Approver 2 receives 1 Reminder email during the 3 minutes interval.
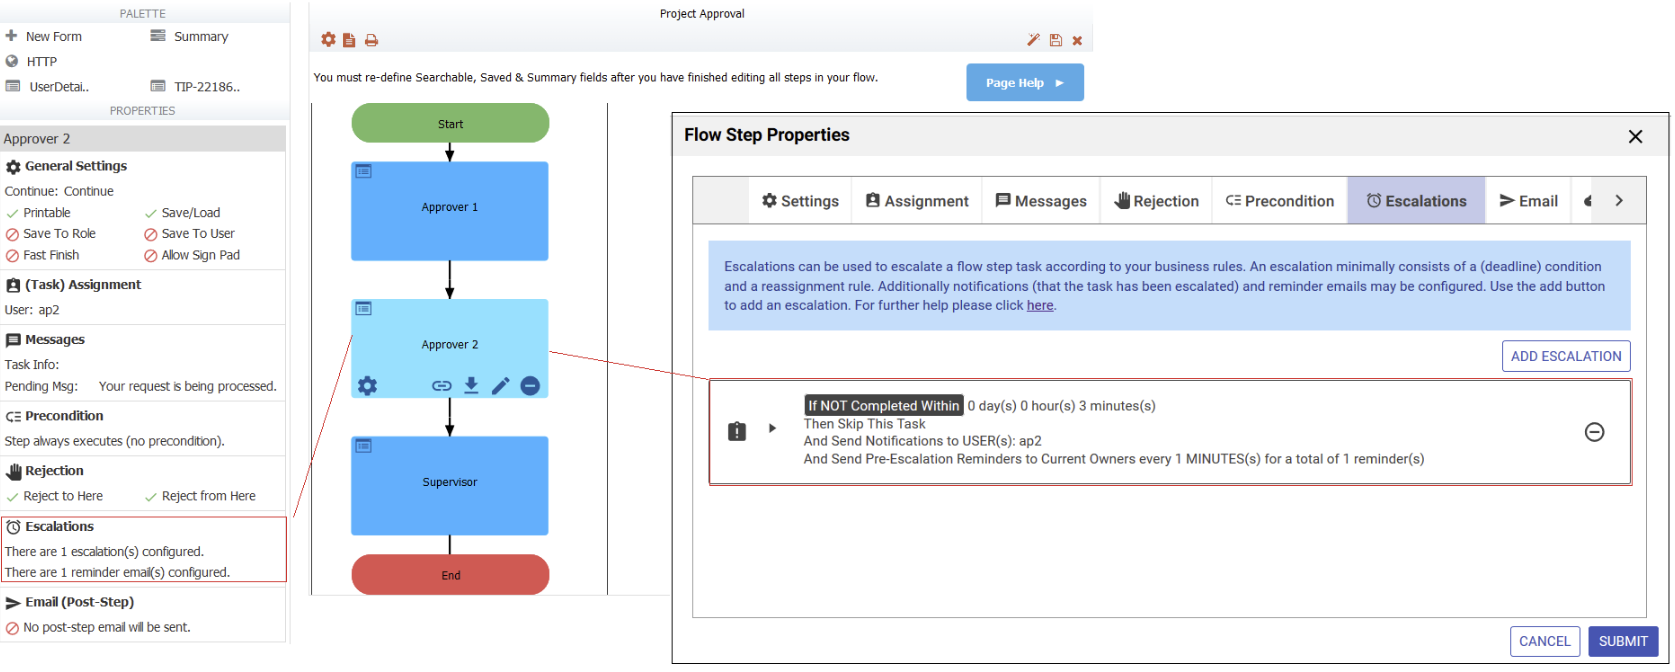
- The Approver 2 step has an escalation that specifies the step must be completed within 3 minutes.
- Project Details are submitted for approval.
- Approver 1 receives a Task Notification email, clicks the link in it and performs step 1 of the workflow. The task is placed on Approver 2's task list.
- Approver 2 receives a Task Notification email which includes a link to the task. Approver 2 does not click the link in the email to perform the task.
- Approver 2 receives 1 reminder email. Approver 2 does not perform their approval within the 3 minutes.
- When the 3 minutes expires, the task is removed from Approver 2's Task List. Approver 2 receives a customized email stating that the flow has moved to a Supervisor for approval.
- All users with the role of Supervisor receives a Task Notification email which includes a link to the task.
- Someone in the Supervisor group approves/rejects the task.
Activity Document Actions
What do you do with the data you collect from your workflow? offers the ability to configure a Document Actions to send a final email, post data to a web service/back end system, update a Google Spreadsheet or save submissions to ImageSilo/Papervision, Google Drive, your Filesystem, Box or SharePoint using one of the frevvo Connectors . The Document Actions execute when the workflow is completed.
What if you want to perform some action after a workflow step is completed, instead of having to wait for the flow to finish? You can configure an email to a specified address or to post to a web application or both for any step in the flow. For example. Each step of your flow could post to a web application that will audit flow steps or you might want to send a customized email to a specified address after one of the steps instead of waiting for the entire flow to be completed. The designer can configure an Email or a post to a web application for the steps in your flow, as well as, Document Actions that will execute when the flow is completed.
Actions configured on the Email and Web Hook tabs execute when the user clicks the Continue button for each step. It does not matter if the next step is performed by the same user or if the step is put on the task list of a new role/user.
If you are saving back to your own task list, by clicking Save on the flow step instead of Continue, saving to role or saving to a different user, in a flow, these actions do not execute.
Use the Email tab to send a custom email with attachments (if required) to a specified address. The email will be sent when the workflow step completes.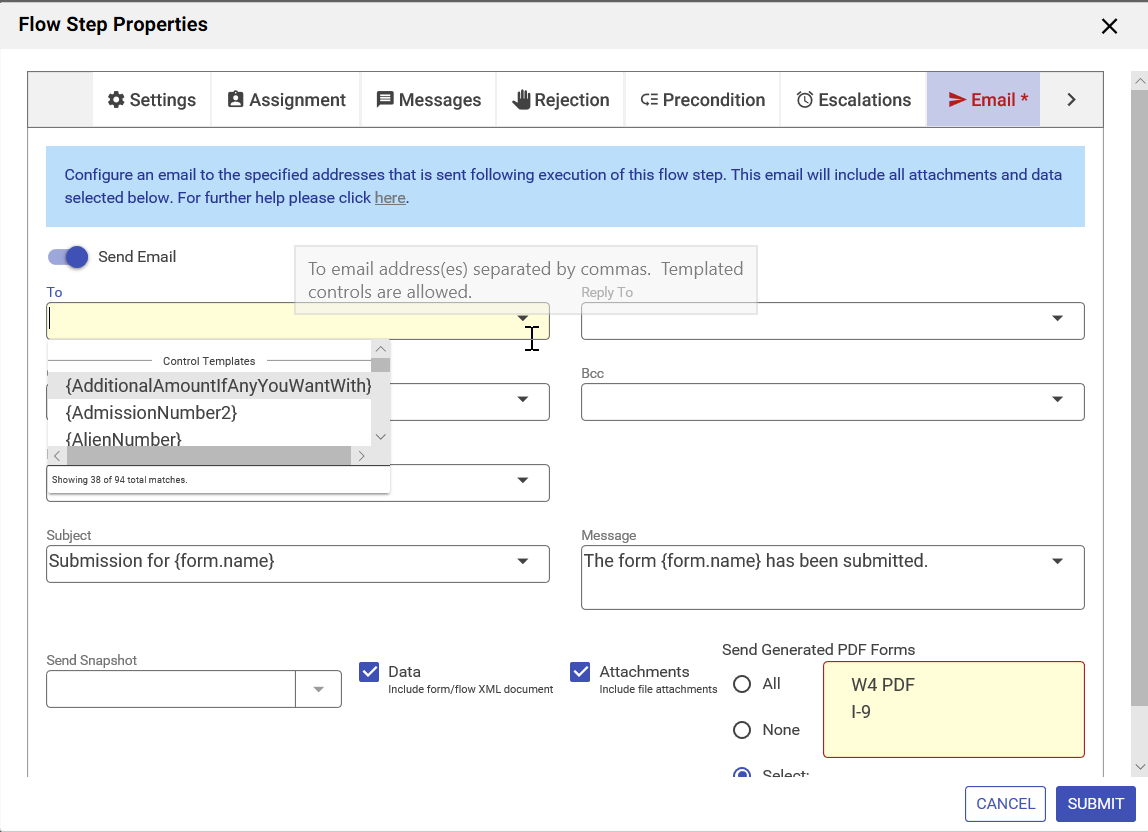
You can display the Email tab in three ways:
- Click on the step of the workflow, then click the Edit Step Properties icon then click on the Email tab.
- Click anywhere in the Email section in the Properties Navigator. This takes you directly to the Email tab.
- Click the inside the Email section in the Properties Navigator. This takes you directly to the Email tab.
- Slide the toggle to the right to turn on the Email feature.
- Enter email addresses or click the down arrow to select control and built-in form/flow templates to dynamically determine it at runtime.
- Customize the Subject and Message of the email.
- Select the type of attachments to include in the email.
- Remember to click Submit to save your changes.
Configuring Email
You can configure the Email tab on as many steps of your workflow. Remember the Document Actions that are set up will execute when the flow is completed, so you may not need to configure an action for the last step.
Specify the To: email address and the optional Cc: and Bcc addresses. You can enter multiple addresses separated by commas or semicolons in the To, Cc, Bcc fields and a single Reply To address.Templates can be used to provide the email addresses if desired. The "To:" email address is required. All other properties are optional. The tenant admin can configure the from email address on the tenant admin's Edit Tenant page. If you want an email to show a different From:address than what is configured on the Edit Tenant page, enter that address in the From: field. You can enter a static address or use templates to make the the address dynamic. The From address replaces the default no-reply@…, an address configured on the Edit Tenant screen .
Select which documents are included in the email.
- You have the option of sending a filled form image using the Send Snapshot dropdown. Select the image type from the dropdown. Leave the option blank if you do not want to send a snapshot.
- The Data checkbox adds an XML document of your flow.
- Check Attachments to include files uploaded to your form/flow. Uncheck it to exclude attachments in the submission.
If you have Pixel Perfect mapped PDFs (ex: W-4, I-9 etc…) associated with your forms/flows, choose the action you want to take by checking an option in the Send Generated PDF Forms field:
- Check All to send all the Pixel Perfect PDFs in the submission. This is the default value.
- Check None to send none of the PDFs.
- Check Select to display a list of all the PDFs associated with your form/flow. Click the ones you want to be part of the submission from the popup.
Snapshots are generated for the entire flow when step Document Actions are configured on individual steps. For example, imagine a flow with 2 steps. An email step Document Action is configured on step 1. When Step1 is submitted, a pdf containing all printable controls in both steps will be attached to the email. This is as designed.
Customize the subject and message of the email in the Subject and Message fields on the tab.
Email Example
Consider the following Country Club Membership application flow:
- To join the Country Club, an applicant has to be sponsored by 2 members of the club. Mary Jones calls the Club office and requests a membership application. The office worker creates a
- Mary Jones gets a task notification email with link back to the club space and the information she needs to login. She logs into the Country Club
- Office workers get a task notification email informing them that a membership application task is pending for final processing.
- When the office completes the final processing, an email goes to the Chairman of the Board with all documents attached – (Application, Letters of Recommendation, photo) so he can prepare for the final meeting with the applicant.
- Mary Jones gets a task notification email with link back to the club space and the information she needs to login. She logs into the Country Club
In this scenario, the Chairman of the Board is not informed about the applicant until all of the office tasks have been completed. This could delay the process for some time. The Country Club wanted to improve the process by sending the Chairman of the board an email with the relevant documents (application, letters of recommendation, photo) attached after the step in the flow where the applicant completes the application.
The Email tab can be configured to send an email to the Chairman of the Board when the applicant submits the Candidate step (Step2) of the workflow. The application, required letters of recommendation and photo are attached to the email. Now the Chairman of the Board can review the application and relevant documents ( letters of recommendation, photo) without having to wait for the office to complete the final processing step.
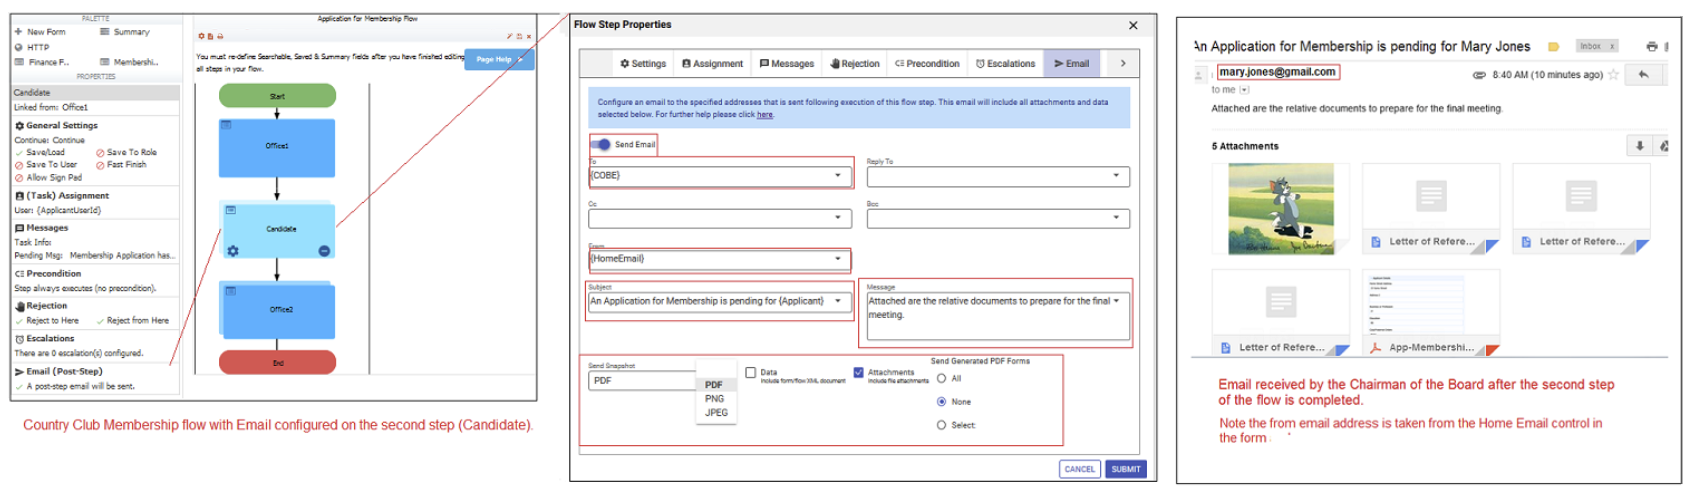
Web Hook
Use the Web Hook tab to post the data from your flow to a web application. Your data will post to the web application specified by the URL when the user clicks the Continue button on the workflow step.
For example. Each step of your flow could post to a web application that you created to audit flow steps. At this time, Web Hook cannot be used to kick off another workflow (please see this documentation for another option.)
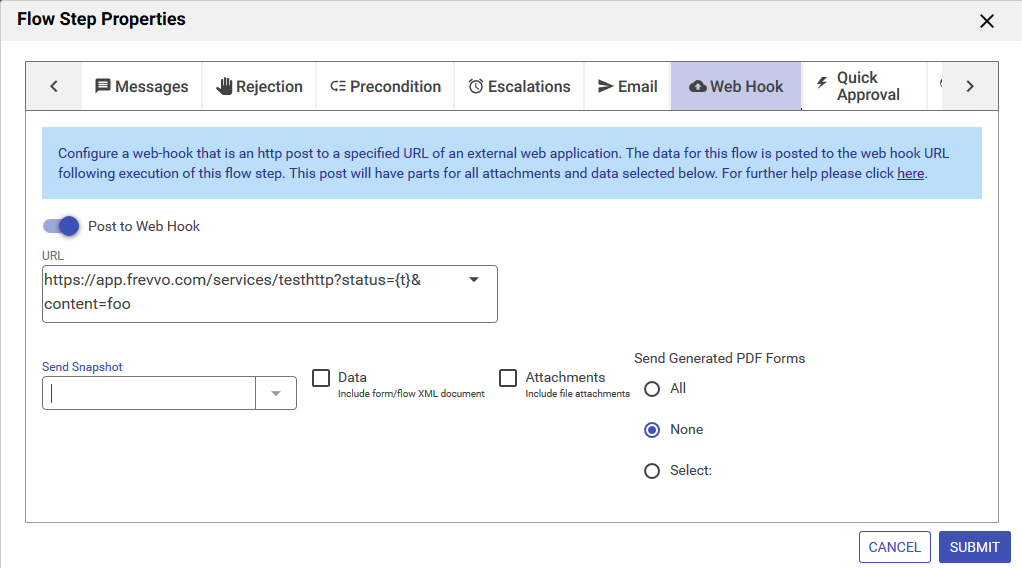
You can display the Web Hook tab by:
- Clicking on the step of the workflow, then click the Edit Step Properties icon then click on the Web Hook tab.
- You will not see a section for this tab in the Properties Navigator.
- Slide the toggle to the right to turn on the Post to Web Hook feature.
- Click the down arrow to select control and built-in form/flow templates in the URL.
- Select the type of attachments, if any.
- Remember to click Submit to save your changes.
Configuring the Web Hook
- Type the URL to your web application in the URL field. Templates can be used. Click the down arrow in the URL field to select control and built-in form/flow templates in the URL to your Web Application. When the form is submitted,
- You have the option of also sending a filled form image using the Send Snapshot dropdown. Select the image type from the dropdown. Leave the option blank if you do not want to send a snapshot of the flow
- The Data checkbox sends the flow XML document.
- Attachments uploaded to your form/flow are sent if the Attachments checkbox is checked.
If you have Pixel Perfect mapped PDFs (ex: W-4, I-9 etc…) associated with your forms/flows, choose the action you want to take from the Send Generated PDF Forms control:
- Check All to send all the Pixel Perfect PDFs in the submission. This is the default value.
- Check None to send none of the PDFs.
- Check Select to display a list of all the PDFs associated with your form/flow. Click the ones you want to be part of the submission from the popup.
Activity Document Action Failure Notification
If the data from your flow steps do not successfully reach the web application configured on the Web Hook tab, notifies all users in your tenant with the role of tenant admin of the failure via an email. If flow administrator(s) are configured, the flow administrator(s) receive the email instead of the tenant admin(s). HR is the name of the step in the flow in the image.

Activity Document Action Behavior for Failed Post
If the HTTP POST returns a status code 422 and an error message, interprets this code to mean that the activity in question should be re-run. For flow steps, this means that the form for the flow step is re-rendered.
If you want to display a message to the user when the post fails,
- Add a Message control with the text you want to display to the flow step
- Add the class f-action-error to the CSS class property of the Message control. Controls with this class are not visible when the flow step loads, even if the Visible property is checked.
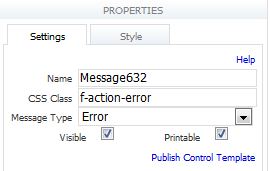
- If the post returns a status code of 422 and some error text, the flow step will be re-rendered and the Message control will display.
- Add the class f-action-error to the CSS class property of the Message control. Controls with this class are not visible when the flow step loads, even if the Visible property is checked.
For example, Let's say you have a fields on the last step of a flow step to collect a credit card number and the expiration date. The user fills in the information then clicks Finish. There is a Post Submission to a web app configured on this step.
https://<your server>/services/testhttp?status={t}&content=errortext
If the web app returns a status code of 422 and some type of error message, the flow step will be re-rendered. The message informing the user to check the information and resubmit displays.
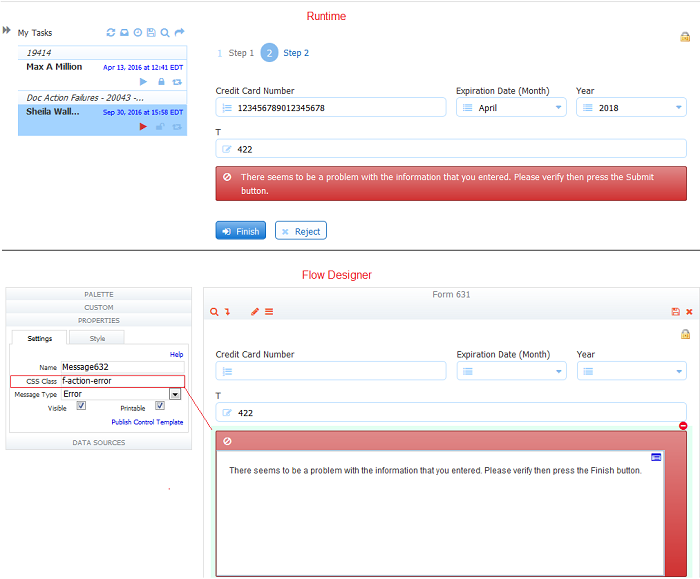
The flow step will continue to be re-displayed until the post returns an Ok status (HTTP 200).
This behavior ONLY applies to POSTs to a web app in workflows. The behavior changes slightly if a Quick Approval is configured on the step. Refer to the Quick Approval Behavior when Activity Document Action post fails topic provides the details.
Quick Approval
Use the Quick Approval tab to configure the Quick Approval feature on workflow steps. Quick Approval provides the ability for a user to see a simple view of a task in order to Approve or Reject it. A comment and/or signature can be added to the task without viewing the entire form. Quick View makes the process of task review/approval/rejection easy especially on mobile devices.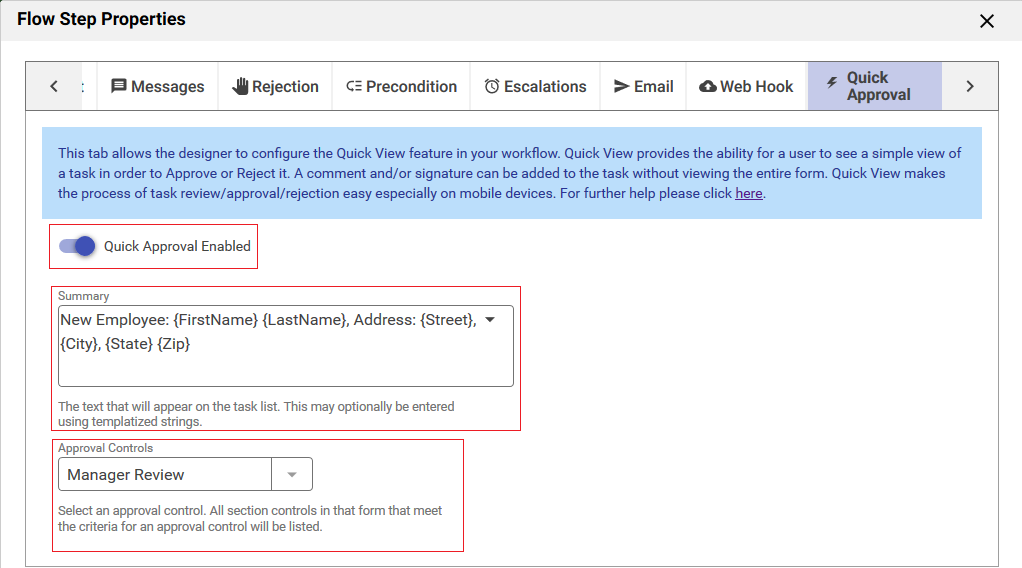
You can display the Quick Approval tab by:
- Clicking on the step of the workflow, then click the Edit Step Properties icon then click on the Quick Approval tab.
- You will not see a section for this tab in the Properties Navigator.
Approval Control
Your workflow step MUST have an Approval Control to successfully configure the Quick Approval feature.
Approval controls are sections in your form that contain a textarea control. The Approval control section can NOT contain any other controls in addition to the text area. The section can be named anything. It cannot be nested in a repeat or a signed section.
Follow these steps to create an Approval control:
- Drag/drop a Section control into the step of the workflow where you want to configure the Quick Approval feature. Name the section whatever you want.
- Drop a Textarea control inside the section. Do NOT add any other controls to the section.
The Approval control can be optionally set up to be digitally signed. Regular text digital signatures and Wet Signatures are supported. See Electronic Signatures for more information. The image below shows a section named Manager Review with a textarea control for comments. Text/Signature image is selected on the Signature dropdown on the section security tab. This section meets the requirements for an Approval control that can also be digitally signed.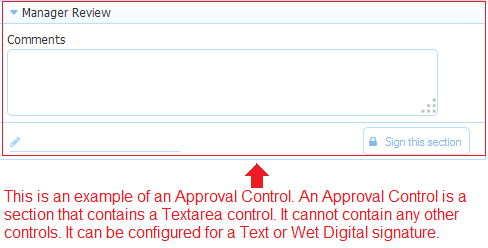
Quick Approval will be disabled if the approval control is removed from the workflow step or additional controls are added to the Approval Control section.
Approval Controls cannot be nested in a Signed Section. Form/Flow designers should not drop a section that qualifies as an Approval Control into a section that is set up for a digital signature. This can result in an invalid scenario when editing submissions in a workflow. You cannot nest an approval control inside a section that is already signed by a previous step. For Example; Let's say the employee fills in the form and signs the Signed Section in the first step in a flow. The Quick Approval feature is configured in this flow so the manager approves the request by entering comments in the Approval Control. Editing the submissions of this flow will result in the following error "Invalid signature detected. Data may have been tampered with" message as the signature data has changed and it is now considered "tampered with" upon submission initialization.
If the flow step does not contain an Approval Control, you will see this warning message when you display the Quick Approval tab.

Setup Quick Approval
Once you have added Approval Controls to the workflow steps where you want to configure Quick Approval, select the Quick Approval tab.
- Slide the toggle to the right to turn on the Quick Approval feature.
- Set up Task Information for the Quick Approval view in the Summary field. Click the
 down arrow to include control and built-in form/flow templates in the Task List Summary. The Quick View icon
  will appear on the Quick Approval view on the Task List if the step in your flow has been setup for it. This feature is helpful if your users will be approving/rejecting steps of a workflow from a mobile device.
 - Select the Quick Approval control from the dropdown.
- Remember to click Submit to save your changes.
- Repeat for all steps where you want to configure Quick Approval.
- Set up Task Information for the Quick Approval view in the Summary field. Click the
There is a visual cue, a lightning icon,  , that displays on a workflow step if quick approval is enabled.
Quick Approval Example
An example of an Employee On Boarding workflow with Quick Approval configured on the Manager Approval step is provided.
Let’s use an Employee On Boarding flow as an example.
The Employee On Boarding flow consists of 6 forms: Employee Information, Allowances, Additional Information, Confirmation, Approval and Office Use Only. The requirements are as follows:
- The new employee fills out 4 forms: Employee Information, Allowances, Education History and Confirmation.
- The Confirmation form allows the new employee the opportunity to confirm the information and view the generated W-4 form.
- Upon submission, the flow is routed to the new employee’s manager for approval.
- Managers can approve/reject the forms from an iPad or iPhone, using the Quick Approval feature which is configured on the Approval step of the flow
- If approved, the task is sent to the Human Resources department so that the Office Use Only form can be completed.
- If rejected, the task is sent back to the new employee for correction.
The Approval step consists of one section named Manager Review. This section has one control in it – a text area where the manager can comment. The section is set up for a digital signature - the Text/Signature image choice is selected in the Signature dropdown on the Security Tab. This section meets the criteria for an Approval Control and can be used to setup the Quick Approval feature.
- Click on the step in your flow where you want to set up Quick Approval.
- Click the step of the workflow, then click the Edit Step Properties icon then click on the Quick Approval tab.
- If the form does not include an Approval Control, the wizard will indicate that the Quick Approval feature cannot be configured.
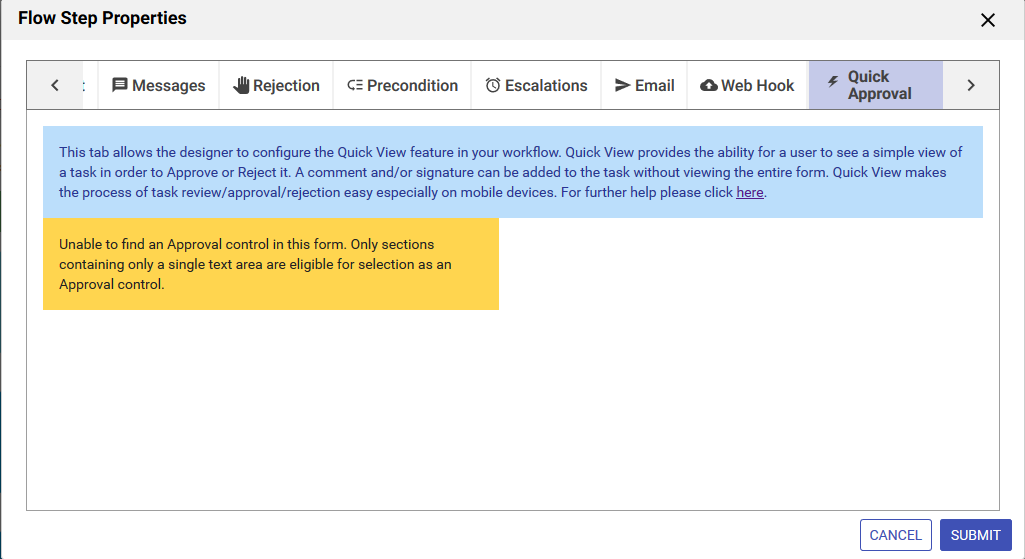
- Slide the toggle to the right to turn on the Quick Approval feature.
- Set up Task Information for the Quick Approval view in the Summary field. You can type the Summary statement or click the down arrow to include control and built-in form/flow templates in the Task List Summary. The Summary gives the mobile device user a short description of the task.
- Select the Approval Control from the Approval Control dropdown. In this example, the Manager Review section is the Approval set up on the second step of the flow - the Manager Approval step
- Click Submit to save the changes.
- Click the step of the workflow, then click the
A Lightning icon appears on the step in the flow once the Quick Approval has been enabled. This icon will appear and disappear as required when you enable/disable Quick Approval using the wizard.
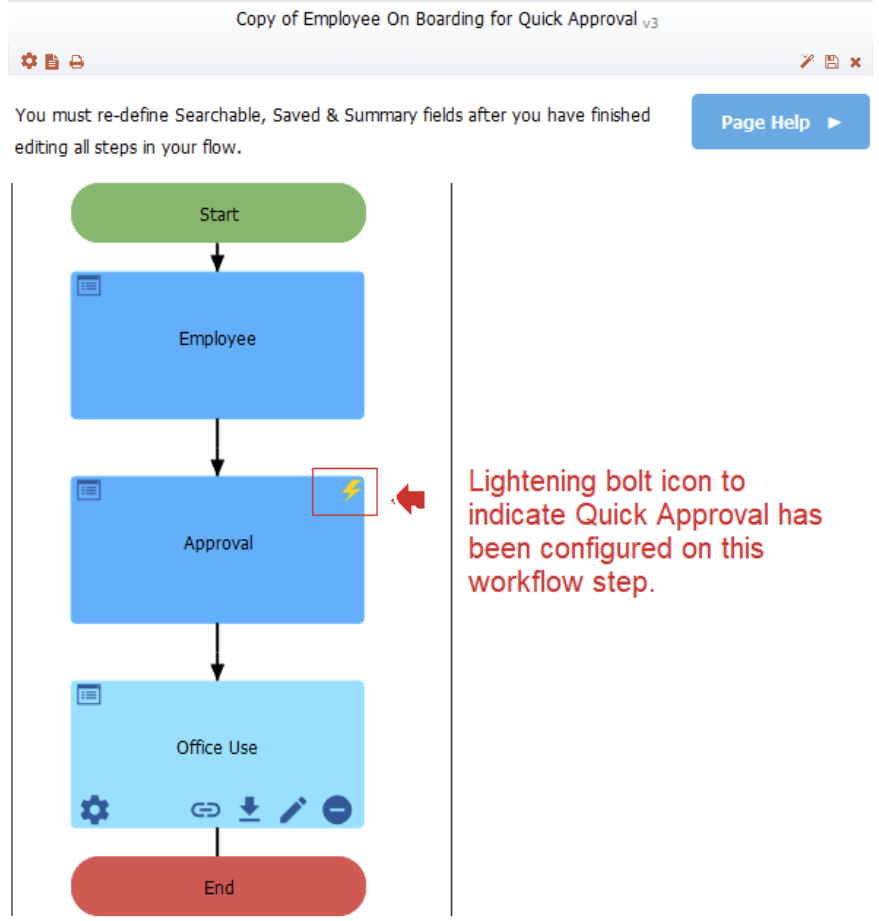
The Quick Approval screen shown above displays in a manager's Task List when it is accessed from a mobile device. The manager clicks the Quick View icon on the Task List to approve/reject the task without having to view all the details.
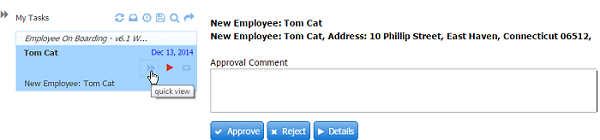
Refer to the Using the Task List for more information about how to use the Quick Approval feature.
- If a step in a flow is setup for the Quick Approval/Rejection feature and it is followed by a Summary step or another step accessible by the same role , the task will go right back onto the user's Task List. It will be locked by that user who must click on the
 perform icon so the task can proceed to the next step in the flow. A flow where the next step after a Quick View approval is intended for the same user is not typical of good flow design.
- You cannot configure Quick Approval on a workflow step that has the Save to User or Save to Role property selected. A warning message will display:
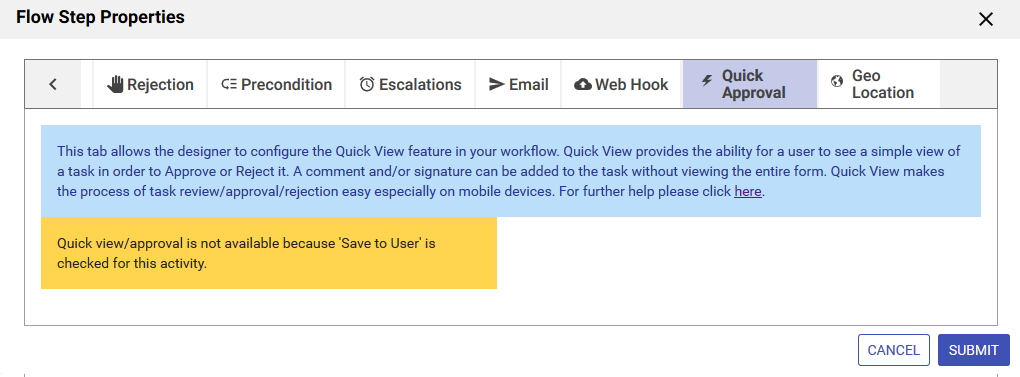
- You cannot configure Quick Approval on a workflow step that has the Save to User or Save to Role property selected. A warning message will display:
Quick Approval Behavior when Activity Document Action post fails
If the HTTP POST returns a status code 422 and an error message, interprets this code to mean that the flow step in question should be re-run. For flow steps, this means that the form for the flow step is re-rendered. If there are any message controls in the form with CSS class f-action-error, they will now become visible. These message controls are not visible by default when the form is first rendered.
For example, Let's say you have a two step workflow where step 2 has fields to collect a credit card number and the expiration date and has to be approved by a manager. .An Activity Document Action Post to a web app for data verification and Quick Approval have also been configured on this step.
The user fills in the fields in step 1, then clicks Continue to send the workflow to a manager for approval. The manager accesses his Task List, clicks the Quick Approval icon then the Approve button. The information is posted to a web application for verification. If the web app returns a status code of 422,(fail status) and some error text, the manager sees this message: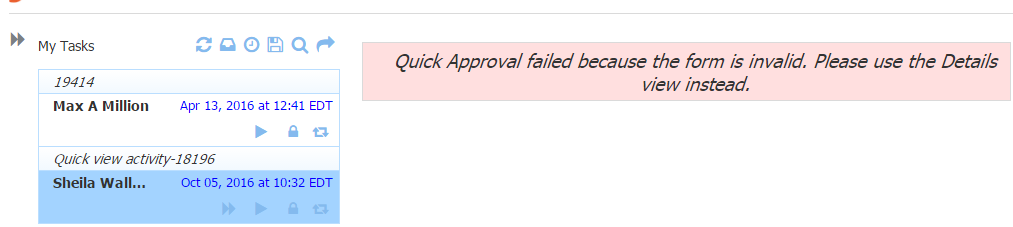
When the manager clicks on the Perform icon the flow step will be re-rendered. Any message controls, where the f--action-error class has been added to the CSS property, will display.
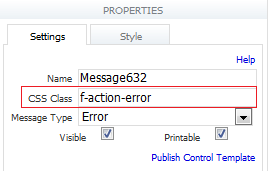
The Message control informs the manager that the post failed and provides instructions. 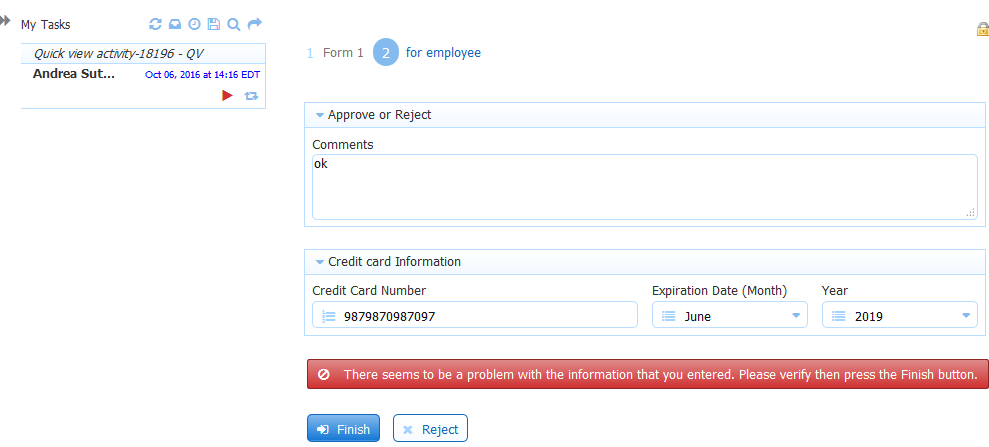
The flow step will continue to be re-displayed until the post returns an Ok status (HTTP 200).
This behavior ONLY applies to workflow steps with Quick View configured and a POST to a web application that fails.
Geo Location
Use the Geo Location tab to:
- Capture location information for a step in your workflow.
- Embed a Google map in your flow step.
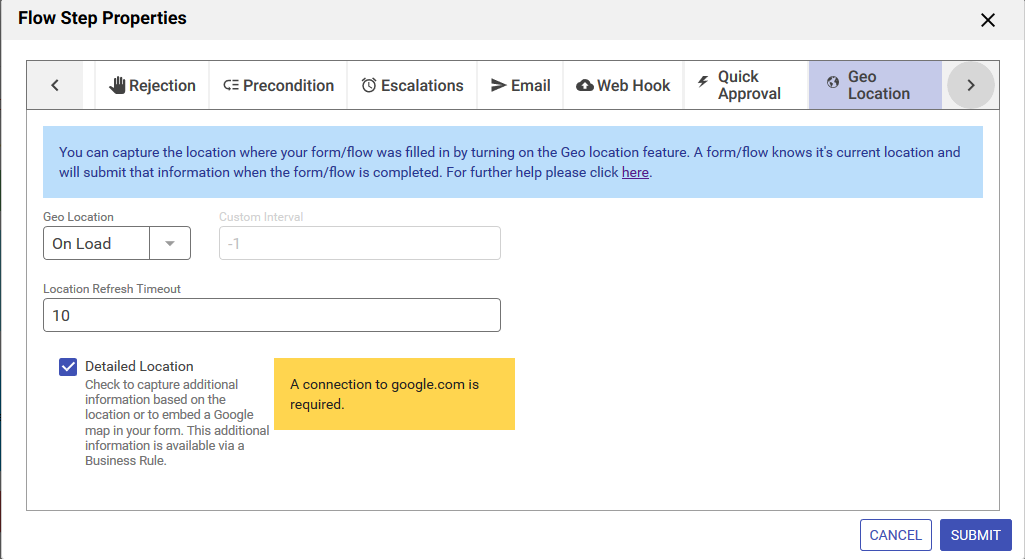
You can display the Geo Location tab by:
- Clicking on the step of the workflow, then click the Edit Step Properties icon then click on the Geo Location tab.
- You will not see a section for this tab in the Properties Navigator.
- Enable the Geo Location feature for the step.
- Enable the ability to capture additional location information or embed a Google map in the flow step
- Do this for each step in your flow where you want to use the Geo Location feature.
- Remember to click Submit to save your changes.
You can capture the location where your form/flow was filled in by turning on ' Geo location feature. A form/flow knows it's current location and will submit that information when the form is completed.
uses the HTML5 GeoLocation api. The geo api is well supported on tablet, phone and recent laptop/desktop browser versions. This feature works on a desktop or any GPS capable mobile device.
When the form/flow loads in the browser, it will ask for the location. All browsers will show a pop up asking the user's permission to use their location, unless permission was Always granted or refused in a previous session. The user must give permission for Geo Location to proceed. Here is an example of the request in the Firefox browser:
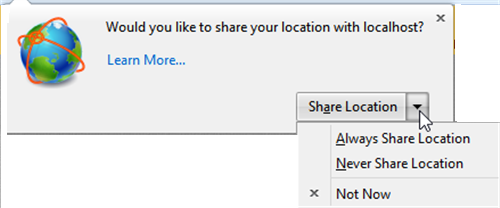
The Geo Location feature works in conjunction with rules that use the form.positionUpdated identifier. You can set up the rule to execute every time the position is updated. See Business Rules for examples of rules that will do this. Also see Rules Position Data for the complete list of available build-in data.
You can also collect additional information associated with your location. For example, a section of a Police Incident Report, shown in the image, captures the location where the form/flow was filled in plus the address information associated with it. The last position update will be in the submission metadata of your form or flow but it is NOT automatically added to the XML document . You must create controls (perhaps hidden) and rules to add the location information to the form XML document. The Position Address section of the Police Incident Report has controls and rules to show longitude, latitude, accuracy and/or errors plus the address information.

Latitude and Longitude display the coordinates of the user location. The accuracy of the location in meters is represented by the value in the Accuracy field - a low Accuracy value means the position is more precise. You can display a position error code and the text description of an error message in your form/flow if desired. Error message codes can be 1, 2 or 3:
1 - Permission Denied - You will get this error code if the user says no to the access question.
2 - Position Unavailable - This error code means the device running the browser cannot get the GPS satellite signal (tunnel, underground).
3 - Timeout - The device running the browser times out trying to get the location information.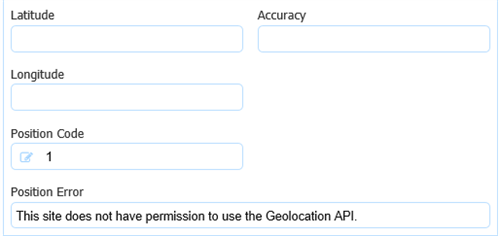
You will never see coordinates and error codes in the same form. You get one or the other.
Configuring Geo Location
- Select one of three options from the Geo Location dropdown to turn this feature on:
- None - (no location) - this is the default
- On Load - turn the feature on when the flow step loads (at start time)
- Custom - allows the designer to specify a periodic refresh. The default value is 30 seconds. Choosing this method will fire a rule in the specified time. For example, if the field to the right of the Geo Location dropdown was set to 10, rules to capture additional location information would fire every 10 seconds.
- Enter the Location Refresh Timeout - this is the amount of time in seconds the location finder in the browser will search to find the location before it times out. The default value is 5 seconds.
Check the Detailed Location checkbox to capture additional information based on the location via a Business Rule or to embed a Google map in your form. You will need a connection to google.com for this to work.
- A connection to google.com is required for this to work. This connection is automatically available in the frevvo Cloud.
- New
- New
- A connection to google.com is required for this to work. This connection is automatically available in the frevvo Cloud.
- None - (no location) - this is the default
Displaying a Google Map in your Workflow Step
- Add a Message Control where you want the map to display in your flow step. Type f-map-div in the css class field on the Message Control Properties panel. This is a built in java script that cannot be edited to display the map.

The map will only display at runtime. You will not see it in the Flow Designer.