frevvo v9 is no longer supported. Please visit Live Forms Latest for our current Cloud Release. Earlier documentation is available too.
Palette Controls for Flows
- Former user (Deleted)
- Megan Ellis
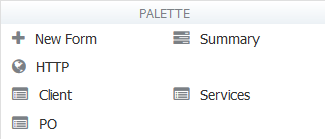
’ flow palette contains all of the forms you have already created in the Forms tab of the application you are currently editing. These forms are available for you to add as steps of the flow. The palette also contains a new form which lets you create a new form step directly within the flow designer. Additional step types for flow steps are Summary, http and Anonymous Task. The purpose of each is described below.
On This Page:
Keeping your Forms and Flows in Sync
Forms that are used as steps in a workflow can be created in the Form or Flow designers. There are two approaches a designer can choose from when creating a flow:
- Create forms in the Forms designer and then drag the form(s) into the flow as the steps (Existing Forms).
- Create the flow by dragging a New Form from the palette and drop it onto the flow canvas. Then click the
 edit icon and create the form in the forms designer that opens up in the flow designer.
There are pros and cons to each approach when you need to make small updates to one of the steps of your flow:.
- The designer can go back and edit the forms in the forms designer then drag the updated forms into the flow. If you choose to do this, then you have to redo any properties for that step. (assign users/roles, task information, Pending messages, customized Save and Continue buttons etc).
- Or you can update the form directly in the flow by clicking the edit icon. This approach is quicker but the changes that you make to the form from within the flow designer DO NOT update the form in the Forms designer.
Let's say you create the perfect form step in a workflow and now you want to use it in another flow. How do you extract the form step from the flow so that it is available in the Forms designer?
If you click on a form step in a workflow, you can download that step from the flow as a standalone form and upload it into the Forms designer. Simply click on the step in the flow then click the ![]() form icon. If you have designed your workflow using Linked Steps in a Flow the icon to download the form step will only appear on the parent step.
form icon. If you have designed your workflow using Linked Steps in a Flow the icon to download the form step will only appear on the parent step.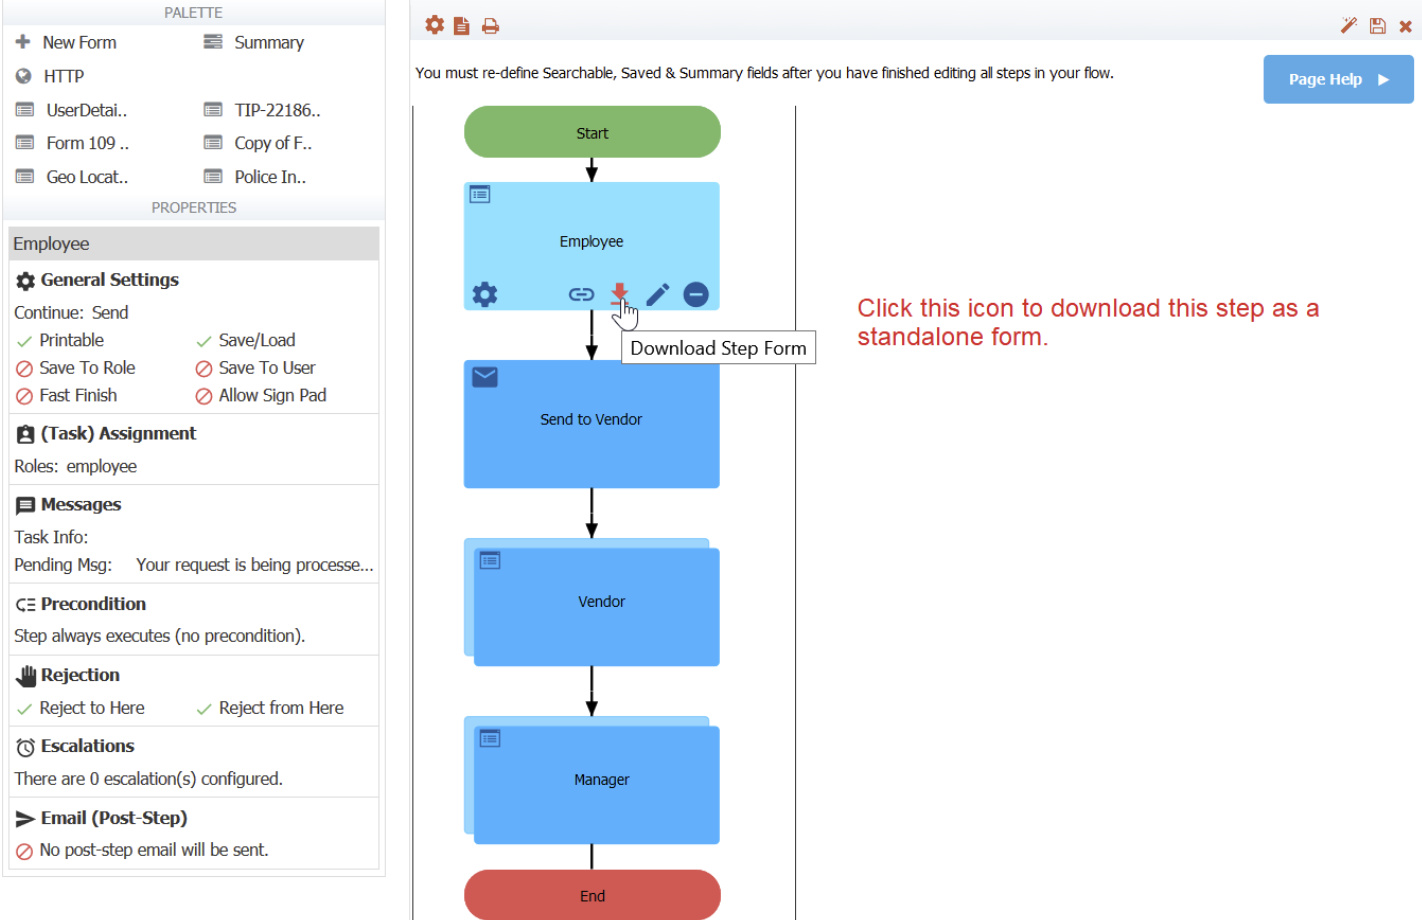
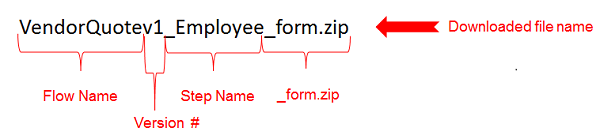
The downloaded file is a _form.zip file and is named according to the convention shown below:
- the flow name
- the version number of the form step plus 1
- _flow step name
- _form.zip
Here is an example of the downloaded file for step 1 named Employee in a workflow named Vendor Quote.
This is an easy way to keep your forms and flows in sync and reuse forms created/updated in the flow designer in other workflows or as standalone forms.
Form actions and Doc actions, excluding Doc URIs, are copied to the extracted form if that step in the flow was an existing form that was dragged into the flow and that form had configured actions.
Activity doc actions are retained. Email Activity doc actions are copied to the Additional Email tab in the extracted form.
Doc Uris are cleared when applied to a form that is created in the forms designer then dragged into the flow designer as a step. Designers will have to manually add them to the extracted form.
- PDF mappings from the flow will NOT be included in the download of the extracted step.
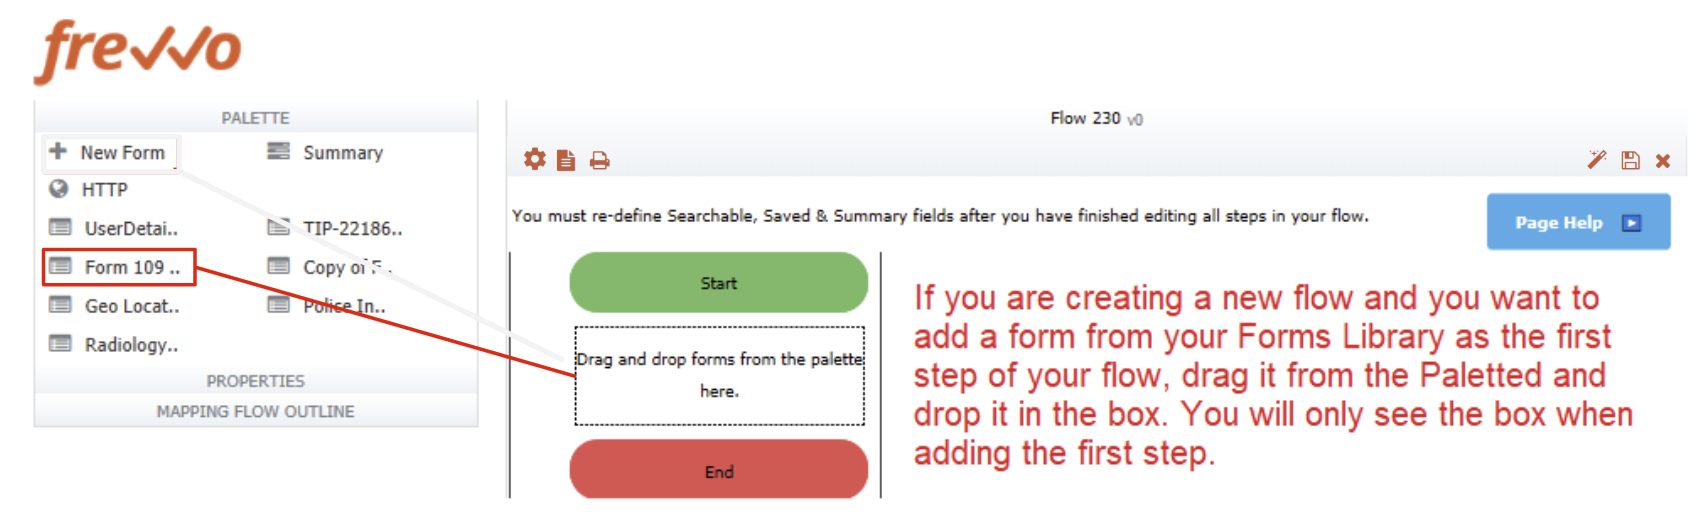
New Form
The New Form palette control allows you to create a new form step in your workflow directly inside the flow designer. If you do not have an existing form for the step you require, drag & drop the New Form into your flow and create the step in place. This will launch the form designer where you can add controls to the form just as you would if you designed the form from the Forms Home page.
Drag the New Form from the palette and drop it into the guide box. You will only see the guide box when adding the first step.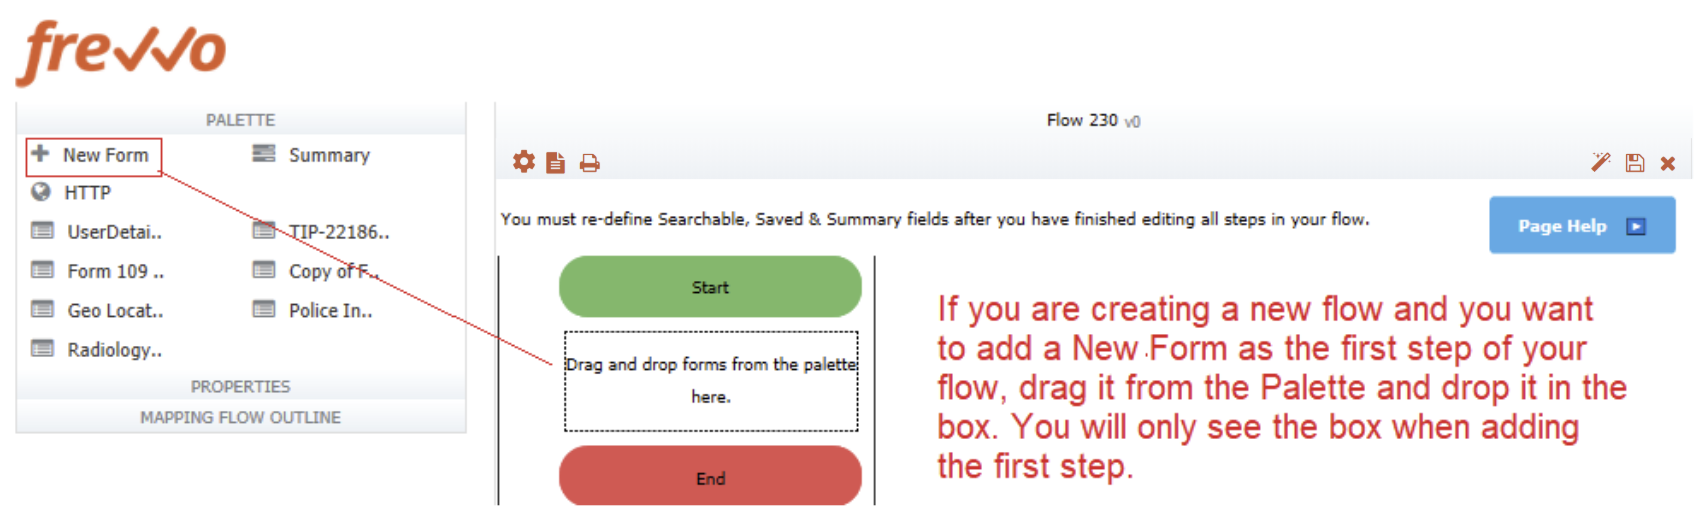
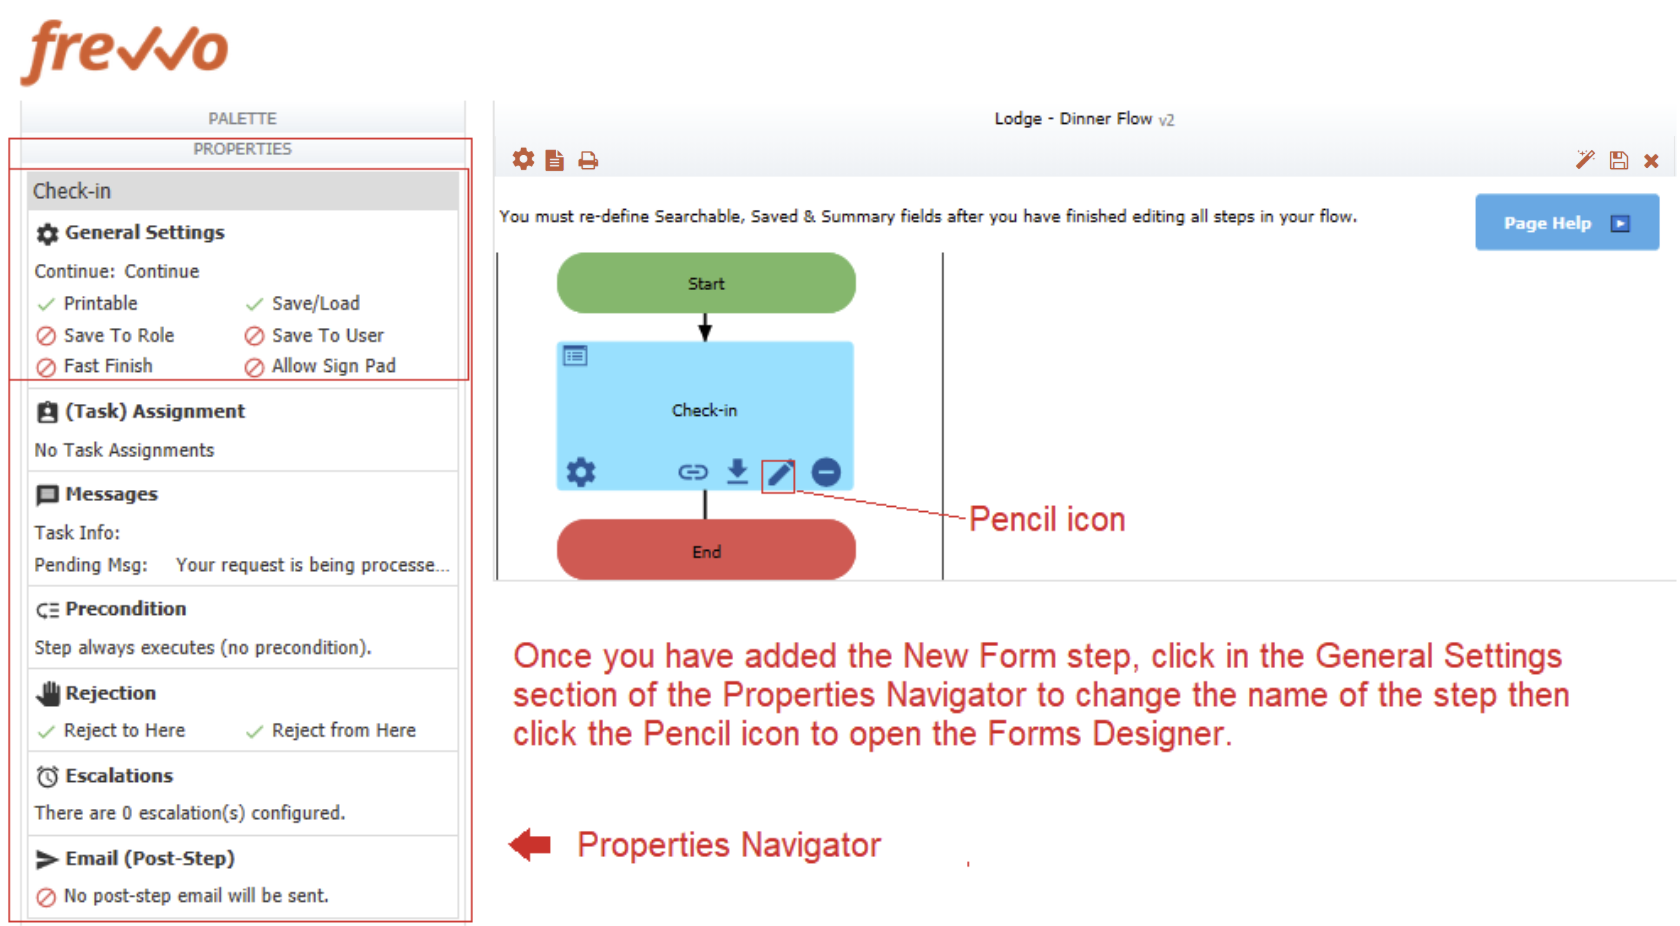
Click to select it. A unique and arbitrary name will be generated automatically for the step--Step 29 for example. To change the name of the flow step:
Click anywhere in the General Setting section in the Properties Navigator on the left. This opens the Settings tab. Change the name of the step from the default to something meaningful in the Name field.
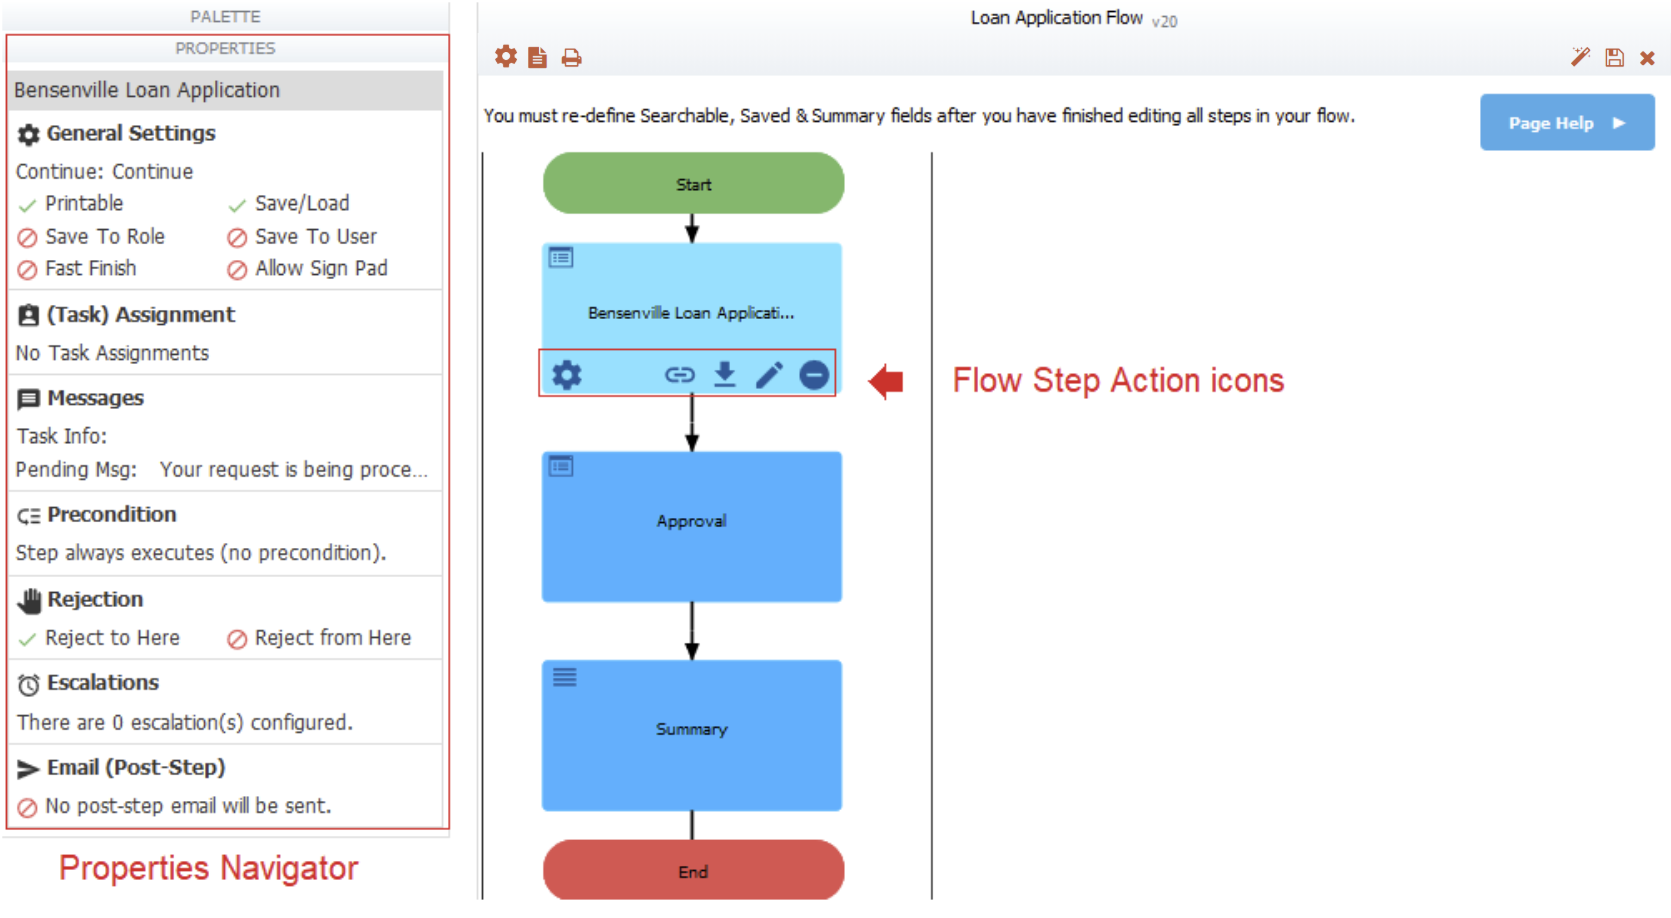
When you click on any step in the flow, a series of action icons displays depending on the step type. Creating a flow step by dragging/dropping an existing form or a New Form from the Palette shows these icons: - Cog icon - Click this icon to edit Step Properties. This icon is displayed when you select the flow step and in the Properties Navigator on the left side of the designer.
 - Clicking the Edit Step Properties icon on a flow step displays tabs to set up Settings, Assignment, Messages, Rejection, Precondition, Escalations, Emails, Web Hook, Quick Approval and Geo Location.
- Clicking the Edit Step Properties from the Properties Navigator or simply clicking on a section of the Properties Navigator brings you directly to the tab for immediate editing.
- Clicking the
 - Chain link icon - Click this icon to create Linked Steps. Refer to Linked Steps in a Flow for a discussion of this Flow Design pattern and when you should use it.
 - Download Arrow over bar - Use this icon to download the step of the workflow as a standalone form. You may want to do this if you update the step in the flow designer and you want to keep your Forms and Flow libraries in sync.
 - Pencil icon - Click this icon to make changes to a flow step. The form will open in the Forms Designer inside of the Flow Designer. Remember, the form in the Flow Designer is a copy and any form changes will not automatically sync up with the original form in your Forms library.
 - Minus icon - Use this icon to delete a step in a workflow. You will NOT be asked to confirm the deletion. Once clicked, the deletion is permanent.
Existing Forms
The palette contains all of the forms that you have already created and which are listed in your current application's forms home page. You can use any form as a step in the flow. Adding an existing form to the flow creates a copy of that form. If you later edit the form from the forms home page, those changes will not affect the step in the flow. It remains as it was at the time you copied it into the flow. If you want to update the flow to have a new copy of the form, delete the form from the flow and drag it in again. You can also edit the form directly in the flow. Conversely these changes to the form inside the flow do not affect the original form in the form home page.
Drag the existing Form from the palette and drop it into the guide box. You will only see the guide box when adding the first step.
Click to select it.
When you click on any step in the flow, a series of action icons displays depending on the step type. Creating a flow step by dragging/dropping an existing form or a New Form from the Palette shows these icons:- - Cog icon - Click this icon to edit Step Properties. This icon is displayed when you select the flow step and in the Properties Navigator on the left side of the designer.
- Clicking the Edit Step Properties icon on a flow step displays property tabs to set up Settings, Assignment, Messages, Rejection, Precondition, Escalations, Emails, Web Hook, Quick Approval and Geo Location.
- Clicking the Edit Step Properties from the Properties Navigator or simply clicking on a section of the Properties Navigator brings you directly to the tab for immediate editing.
- Clicking the
- - Chain link icon - Click this icon to create Linked Steps. Refer to Linked Steps in a Flow for a discussion of this Flow Design pattern and when you should use it.
- - Download Arrow over bar - Use this icon to download the step of the workflow as a standalone form. You may want to do this if you update the step in the flow designer and you want to keep your Forms and Flow libraries in sync.
- - Pencil icon - Click this icon to make changes to a flow step. The form will open in the Forms Designer inside of the Flow Designer. Remember, the form in the Flow Designer is a copy and any form changes will not automatically sync up with the original form in your Forms library.
- - Minus icon - Use this icon to delete a step in a workflow. You will NOT be asked to confirm the deletion. Once clicked, the deletion is permanent.
When you add an existing form as a step in your flow:
- PDF mappings associated with the form will be copied to the flow
- If the form has a configured Email data to a specified location doc action it will be copied to the Email tab for that step.
- If the Email data to a specified address wizard is empty but an Additional Email doc action is configured, it will be copied to the Email tab for that step.
If the following properties are selected in your form, they will be unchanged when you drag and drop this form into a flow as one of the steps:
Settings:
- Save/Load
- Task Info
- Allow Sign Pad
- Printable
Style:
- Orientation
Summary
Drag a Summary step anywhere in your flow. This will simply display a Summary view of all the data that has been entered into the various steps of the flow prior to the Summary step at runtime. Clicking on the Details button navigates to the selected step for viewing/editing.
Previously completed steps in a workflow can be viewed by all users but editing data is only allowed for the user that initiated the flow. For example, if the Summary step is part of a screenflow performed by the same user, editing is allowed when this user clicks on the Details button. Once the flow navigates to a different user, previous steps are rendered read-only and cannot be edited. Refer to Flow Processing Modes for more information.
The Print button is available on Summary steps by default. Refer to Printing Flows for the details.
When you click on the Summary step, you will see
- - Cog icon - Click this icon to edit Step Properties. This icon is displayed when you select the flow step and in the Properties Navigator on the left side of the designer. Click the icon on the Properties Navigator or anywhere in the General Settings section takes you directly to the Settings tab.
- - Minus icon - Use this icon to delete a step in a workflow. You will NOT be asked to confirm the deletion. Once clicked, the deletion is permanent.
The designer can specify a CSS class, a Button label and a Decorator for the Summary step on the Settings property tab.

The fields that display on the Summary Step are selected by the designer in the Summary wizard.
HTTP
Drag an HTTP step from the Palette and drop it anywhere in your flow. If you are adding it as the first step, drop it into the guide box. You will only see the guide box when adding the first step.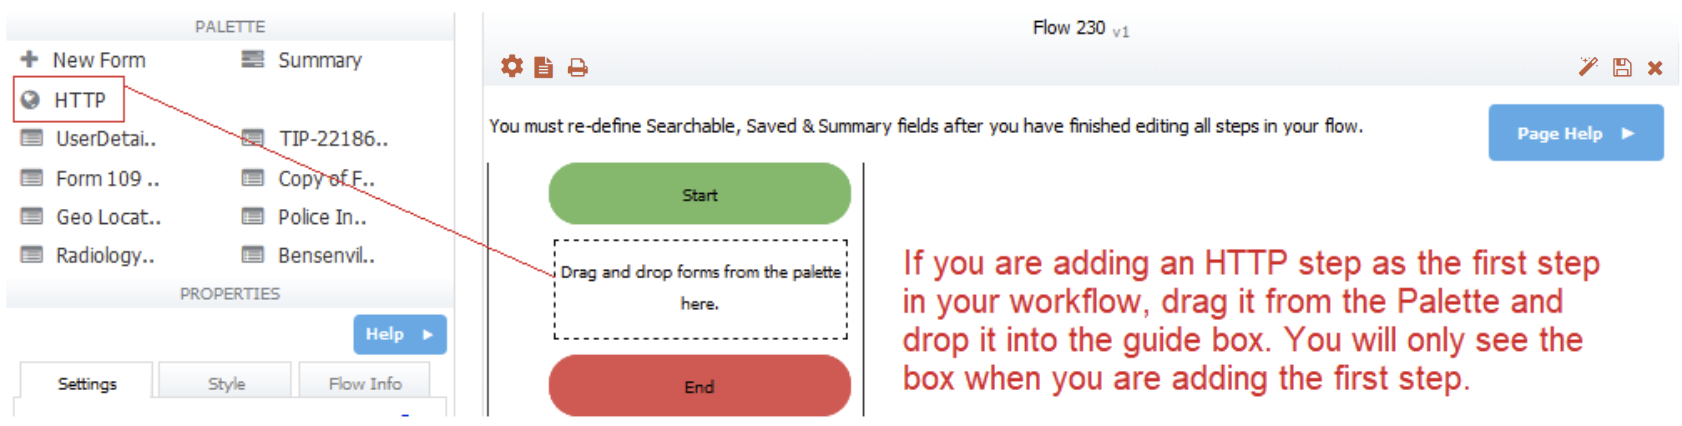
Click to select it.
When you click on any step in the flow, a series of action icons displays depending on the step type. Creating a flow step by dragging/dropping an HTTP shows these icons:
- - Cog icon - Click this icon to edit Step Properties. This icon is displayed when you select the flow step and in the Properties Navigator on the left side of the designer.
- Clicking the Edit Step Properties icon on a flow step displays tabs to set up Settings, Email and Web Hook properties.
- Clicking the Edit Step Properties from the Properties Navigator or simply clicking on a section of the Properties Navigator brings you directly to the tab for immediate editing.
- Clicking the
- - Minus icon - Use this icon to delete a step in a workflow. You will NOT be asked to confirm the deletion. Once clicked, the deletion is permanent.
HTTP Wait - Notify
HTTP Wait-Notify is a step, configured with a post url, that can be added to a flow. The flow data is posted to this url when the task is executed. A call back url is included in the post. The flow and task are suspended until the receiver posts back.
The timezone must be added programmatically by the service you are using. HTTP steps can be performed by an anonymous user.
Consider this scenario. Your company has a purchase process workflow. One of the steps in the workflow requires approval from several other approvers before the flow can continue to the next step. These approvals should happen in parallel and not one after the other. A web component that would manage those approvals is in place. An HTTP step can be added to the frevvo flow with a URL to the web component to collect the signatures. The callback URL will be included in that post. The flow will be suspended until all the signatures are collected. The remote web component will notify the frevvo flow using the callback URL when the signature task is completed. If the HTTP step in the flow has doc actions configured, they will be performed and the flow will proceed to the next step.
Now let’s take a look at a simple flow that will accomplish the scenario described above. This flow contains the Purchase Request form submitted by the company purchasing manager as the first step. The second step is an HTTP step which provides the url to the web component that handles collecting the signatures from all the required approvers. The third step is a Summary step. Remember the flow will be suspended until all the approval signatures have been collected by the web component. The web program will then use the callback url to proceed to the Summary step of the flow.
- Click on the HTTP step and open the Settings tab. Enter the URL for your post. In the image below, we are entering the URL to a remote test server running a service that can be used to test this feature: http://<server:port>/services/testwaitnotify.
- Configure Email or a post to a web application if required. These actions will be performed when the HTTP step is completed. Remember to slide the
 toggle icon to turn on the Email and Web Hook features.
When the first step in the flow is submitted, an outbound message similar to the one shown below is captured in the frevvo.log:
Notice the latter portion of the entry contains the call back URL:
This URL is generated by the frevvo server and will point to whatever host/port the frevvo server is accessed on. If the frevvo.forms.server.external.url property is set in the frevvo-config.properties, it will always use the value of that property.
This URL is used by the remote service to “wake” up the frevvo flow. Any document actions configured will be performed and the frevvo flow will resume. Flow visibility can be set to any of the choices.
You cannot reset a flow to an HTTP step. Look for a status of WAITING in the Audit Trail to find HTTP steps in a flow that are in a suspended state.
If navigation is used to go to previous step, the HTTP step will be skipped. In this case if a user who has navigated back, makes some changes in a form and proceeds forward through the flow, the backend system will not have updated data. If you use the HTTP step, it is important to realize that it will not get called again if the user navigates around. The designer may not want to have the navigation bar visible or prior steps' data should be read-only. The HTTP step will get recalled if you reset to a prior step and the flow continues through it's normal steps.
Configure a History Message on the step before the http step if you want to see relevant information in the audit trail.