This documentation is for frevvo v10.0. Not for you? Earlier documentation is available too.
DB Connector Installation
- Former user (Deleted)
- Megan Ellis
The Database Connector is a web application that allows you to easily integrate your frevvo forms and workflows with your external database. The connector can be added to your frevvo tomcat bundle. A Standalone Bundle is also available.
frevvo only supports/certifies the Database Connector running in the tomcat container. Refer to our Supported Platforms for the list of Application Servers and databases supported/certified by frevvo.
Cloud customers who are integrating with their database in their on-premise installation and in-house customers, can choose to:
- install the Database Connector in your frevvo tomcat bundle on their in-house server OR
- install the Standalone Bundle on their in-house server
We recommend the frevvo-tomcat bundle for in-house customers. Follow the frevvo-tomcatBundleInstructions.
We recommend the Standalone bundle for cloud customers as no additional servlet container is needed. Standalone is also useful for in-house customers who want to run the connector on a different server than the frevvo server installation. Follow the StandaloneBundleInstructions
The Database Connector requires a JDBC driver for your database. Some pre-installed drivers are included with the connector. See InstallaJDBCdriver to see if the driver for your database is provided.
The Database Connector contains a working sample Derby database with BIRT and MyStore query sets and some test data. This makes it very easy to test if the DB Connector is up and running when your installation is complete.
When you complete the Installation instructions then follow the Connector Configuration Instructions - detailed steps to integrate the connector with your database.
Cloud customers must also verify connector connectivity to the frevvo Cloud Server.
On this page:
Installation Steps
We recommend:
- In-house Customers - Follow the frevvo-tomcat Bundle Instructions.
- Cloud Customers - Follow the Standalone Bundle Instructions.
frevvo-tomcat Bundle Instructions
These instructions assume that your frevvo-tomcat bundle is already installed and running successfully.
- Stop your frevvo server.
- Download Database Connector war file that is compatible with the version of frevvo that you are running to <frevvo-home>\tomcat\webapps.
- Rename the downloaded file to database.war
- InstallaJDBCDriver
Start your frevvo server
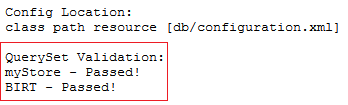
- Browse http://<host>:<port>/database/status
If the status returns failures or disabled:
Review the previous installation steps.
See starting and testing the connector installation for troubleshooting.
- When the status returns Passed for each queryset, your installation is complete
- Follow the Connector Configuration Instructions with the detailed steps to integrate the connector with your database.
Upgrading from a previous version (for frevvo-tomcat Bundle)
To upgrade a previous version of the Database Connector to the latest version in your existing Tomcat bundle installation:
Ensure you have downloaded the supported version of OpenJDK. Check Supported Platforms before beginning.
Stop frevvo
Download the latest version of the Database Connector
Extract the database.war to your <frevvo-home>\tomcat\webapps directory.
Verify that the Database Connector configuration is correct for the new version.
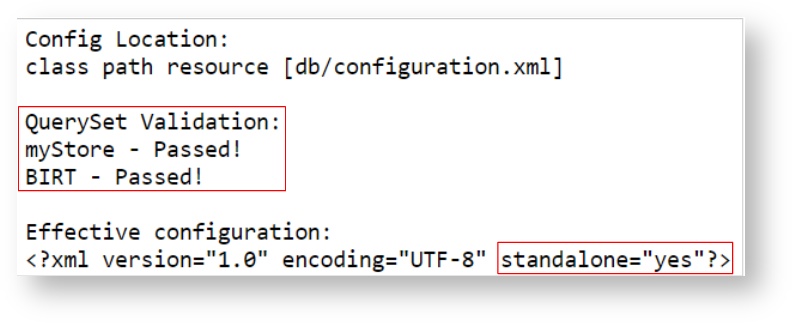
- Browse the status URL http(s)://<host>:<port>/database/status. Your database configuration is successful when the status returns Passed! for each queryset.
Standalone Bundle Instructions
- Download the Database Connector Standalone bundle.
- Unzip the database.zip file to a location of your choice. We will refer to this directory as <db-home>
- InstallaJDBCDriver
- Choose one of these methods to start the connector:
- Method 1: Using java in a command window
- Navigate to <db-home>\database-connector-2.5.x .Type java -jar database.war
- Method 2: for Windows OS
Double click the <db-home>\database-connector-2.5.x\Install-Service.bat file to install the connector as a Windows service. Click the Start-DBConnector-Service.bat to start it
The Standalone Database Connector bundle includes the files shown in the image:
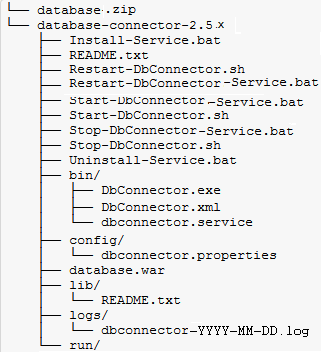
Note the files in the database-connector-2.5.x directory that are used to manage the Database Connector as services on *nix and Windows operating systems: These files should be run as an administrator.
Install-Service.bat - installs the Database Connector on a Windows system as a service named frevvo Database Connector.
Uninstall-service.bat - uninstalls the frevvo Database Connector on a Windows operating system
Start-DB Connector-Service.bat - starts the frevvo Database Connector on a Windows operating system
Start-DBConnector.sh - starts the frevvo Database Connector as a *nix console instance.
Restart-DBConnector-Service.bat - restarts the frevvo Database Connector on a Windows operating system
Restart-DBConnector.sh - restarts the frevvo Database Connector as a *nix console instance.
Stop-DBConnector-Service.bat - stops the frevvo Database Connector on a Windows operating system.
Stop-DbConnector.sh - stops the frevvo Database Connector *nix console instance.
- Method 3: for *nix OS
- Execute the DB Connector.sh shell script for Unix/Linux operating systems.
- Method 4: for Linux
- The Database Connector can also run as a service under Linux systemd
- The Database Connector can also run as a service under Linux systemd
- Method 1: Using java in a command window
- Browse http://<host>:<port>/database/status - Note the standalone connector defaults to port 8081.
- If the status returns failures or disabled Connector Test failed then:
- Review the previous installation steps
- See starting and testing the connector installation for more detailed instructions and common problems.
- When the status returns Passed for each queryset, your installation is complete.
- Cloud customers must also verify connector connectivity to the frevvo Cloud Server.
- Follow the Connector Configuration Instructions with the detailed steps to integrate the connector with your database.
Upgrading from a previous version (for standalone)
To upgrade a previous version of the Database Connector to the latest version using the standalone connector:
Ensure you have downloaded the supported version of OpenJDK. Check Supported Platforms before beginning.
Stop frevvo
Download the latest version of the Standalone Database Connector bundle
Install the bundle.
Verify that the Database Connector configuration is correct for the new version.
Browse http(s)://localhost:8081/database/status. Your database configuration is successful when the status returns Passed! for each queryset.
Install a JDBC Driver
The connector relies on the JDBC API. You must have a JDBC driver for your database. Refer to Supported Platforms for the list of databases certified by frevvo.
You MUST use a JDBC4 type driver, version 5.1.26 or later.
- Install the Driver
- If your database uses a preinstalled drive, you can skip this step. The preinstalled drivers are:
- MS SQL driver - This is embedded in the database.war file with standalone bundle, however it is not embedded in the frevvo-tomcat bundle.
- DERBY driver
- If your database driver is not preinstalled, you will have to locate a compatible driver from the internet. Try these locations.
- If your database uses a preinstalled drive, you can skip this step. The preinstalled drivers are:
- Locate the driver (i.e. mysql-connector-java-<version>-bin.jar or ojdbc6.jar) among the files that were installed. For example, on the location may be: Windows C:\Program Files (x86)\MySQL\MySQL Connector J\mysql-connector-java-8.0.19-bin.jar.
- Copy your driver to
- Tomcat Bundle <frevvo-home>/tomcat/lib, or
- Standalone Bundle <db-home>\database-connector-2.5.x\lib
- You MUST copy the MS SQL (sqljdbc.jar) to the <frevvo-home>/tomcat/lib directory when running the connector in the frevvo-tomcat bundle AND using MS SQL as your external database
- The jTDS driver requires an adidtional property, Refer to Datasource Definition Examples for information
- You can copy the driver into any location that is in the CLASSPATH of the tomcat installation. Another location would be <CATALINA_HOME>/lib
DB Connector Quick Demo
The BIRT (ClassicModels) and myStore querySets are preloaded with in-memory Derby databases and test data. This make it very easy to try out the connector. No configuration is necessary.
Follow the steps below to deploy the connector in the the frevvo-tomcat bundle and you can get started very quickly
Download the latest frevvo-tomcat bundle from the frevvo website.
Download the Database Connector war file. Rename it to database.war.
Extract the tomcat bundle zipfile to a location of your choice. We will refer to this directory as <frevvo-home>.
Copy database.war to <frevvo-home>\tomcat\webapps.
Start the Insight server, then start frevvo.
- Test the connector installation by copying this URL directly into your browser:
http://localhost:8082/database/status
After performing these steps you will have: successfully installed the frevvo database connector and retrieved data from the built-in test database - Log into frevvo as the superuser (admin@d, admin). Create a tenant.
- Create a designer user in the tenant
- Download the Database Connector Project, then upload it to your designer user. This project includes some example forms that demonstrate the power of the Database Connector using built-in databases.