Integrating with IIS
While it is possible to integrate with IIS for LDAP SSO, frevvo recommends SAML or Azure Security Managers when the Single Sign On feature is required.
This page describes how to configure Microsoft's IIS web server and frevvo such that IIS forwards requests on to frevvo, and responds back to the user.
frevvo is written in Java, and needs a Java Application Server (servlet container) to run. As IIS does not provide services of a Java Application Server, it is not possible to deploy frevvo directly into IIS. It is possible, however, to configure IIS to proxy requests for frevvo to an application server where frevvo is deployed. If you are not using the standalone frevvo distribution with Tomcat, please consult your application server's documentation to determine whether it is possible to integrate with IIS and how to achieve it. Also, note that this is a guideline on how to enable the interaction between frevvo and IIS.
On this page:
Single Sign On with IIS
In this scenario, a user authenticates to his windows account and tries to use frevvo. Since the user is already authenticated to the network, frevvo will recognize his credentials and automatically forward the user to his frevvo account, if he is a designer, or allow the user to use a form/flow if those resources are available to the tenant.
The basic deployment is IIS fronting frevvo and the authentication is done against LDAP. For that to work you need to:
- Install frevvo
- Configure frevvo to work with IIS
- Configure Windows Authentication
- In IIS, Make sure that Anonymous Authentication or Basic Authentication is NOT configured in the Web Application (Default Web) that will be used to proxy requests to frevvo.
Please also refer to the force auth property for forms and workflows. Force auth lets you override SSO for an individual form or flow.
If you are using LDAP and SSO, and you want to embed the frevvo in your website, refer to Embedding the Task List for important information.
Once all is configured and running it is possible to test these scenarios:
Signing in from within the network
In this case, the frevvo server and the Active Directory server are running on the same network. The user is already authenticated to the windows network and points the browser to:
http://[server]/frevvo/web/tn/[LDAP tenant]/login
Substitute LDAP tenant above with the tenant name you configured with the LDAP Security Manager. The server variable should be the ip address of the machine where IIS is installed.
The user will automatically authenticate to frevvo. It is crucial that the LDAP user is known to frevvo, in other words, the user should be one of the entries retrieved by the LDAP expression configured in the All Users Filter on the LDAP configuration screen.
Signing in from outside the network
In this case, the frevvo server and the Active Directory server are running on different networks. The user is trying to hit the URL below from outside the network.
http://[server]/frevvo/web/tn/[LDAP tenant]/login
Substitute LDAP tenant above with the tenant name you configured with the LDAP Security Manager and the server variable with the ip address of the machine where IIS is installed.
Since the user is not authenticated in the windows Network, he will be prompted by the browser for credentials. IIS will authenticate the user in the network and forward the request to frevvo. The user will be automatically redirected to his initial page without having to re-enter his credentials.
Single sign-on Browser Configuration
If you are still being prompted for Windows authentication after SSO is configured, the security settings for your browser may be too high. Configure your browser to authenticate using the "system logon credentials" (Kerberos authentication mechanism) by adding the frevvo server to the browser's trusted sites.
Follow these steps for the specified browsers:
Configuring Firefox
If you are using either the IisLoginModule or NtlmLoginModule option, your Firefox users may want to modify their browser settings. By default, Firefox will prevent automatic login. Browsing the frevvo SSO URL will cause a windows dialog box to popup requesting login information. This popup can be avoided by having your users modify their Firefox settings as described below.
- In the Firefox address bar type about:config. This will display all settings for Firefox.
- In the filter box type ntlm and hit the enter key. This will narrow the display items to those pertaining to NTLM authentication.
- Double click on the key entry network.automatic-ntlm-auth.trusted.uris. This is a comma-separated list of trusted servers for which automatic NTLM authentication is enabled.
- In the edit box displayed, enter the name of the server you are accessing. For example, http://frevvoserver.com/.
- If you are using SSL, replace http with https.
- If you are using SSL, replace http with https.
- Click the OK button. Firefox should now enable automatic NTLM authentication with the frevvo server.
Configuring Chrome
To configure chrome you need to start the application with following parameter: auth-server-whitelist - <Allowed fully qualified domain name>.
For example: In Windows,
- Click the Start button, All Programs, Accessories, and then click Run.
- In the Open box, type following and click Ok:
- chrome --auth-server-whitelist="*frevvoserver.com"
Configuring Safari
No additional configuration is needed.
Configure Proxy for LDAP SSO
If a proxy is configured (see this documentation) all share dialogs for forms and workflows will use this as the external URL. This may be needed when using a proxy if that external url is not also accessible from the form server machine.
Upload Control Behavior
If your system is configured for LDAP SSO, the upload control may display the "uploading..." image continuously when uploading an image to an upload control in a form, accessed from a space, on a mobile device. To workaround this issue, configure IIS so that it does not require re-authentication for every single request.
Install and Configure the Form Server
IIS configuration is a complex task. The integration steps below relating to your IIS web server should be performed by your IIS Web System Administrator.
It is very important that you first follow the basic frevvo Quick Start Guide and verify that frevvo works by itself by pointing a browser to http://localhost:8082/frevvo/web/login.
Configure Tomcat
It is necessary to configure Tomcat to receive proxied requests from IIS.
- Stop Tomcat.
- In a text editor open FREVVO_HOME/tomcat/conf/server.xml
- Ensure that the AJP Connector is enabled by uncommenting out the section.
- Specify a value for the secret attribute (recommended) or if you are using the connector on a trusted network you can set secretRequired="false" instead.
- If you are using the recommended boncode connector, when you set the secret attribute you also need to set the RequestSecret attribute in the boncode connector file, BonCodeAJP13.settings, to the same value. (Refer to this article for additional details and troubleshooting.)
<Connector port="8009" protocol="AJP/1.3" redirectPort="8443"
               useBodyEncodingForURI="true" tomcatAuthentication="false"
               address="YOUR_TOMCAT_IP_ADDRESS" secret="YOUR_TOMCAT_AJP_SECRET"/>
- Start Tomcat
- Check that the configured AJP port is enabled and listening for requests. On a windows command prompt:
netstat -na | findstr 8009
When the tomcat server configuration is completed, install the IIS to Tomcat Connector.
Install the IIS to Tomcat Connector
- Download the connector project from: BonCode Connector website. Click on the link to download the latest version.
- To avoid multiple issues with using the zip file content, unblock the package before unzipping. Simply right-click on the zip file and click “Unblock” on the “General” tab:
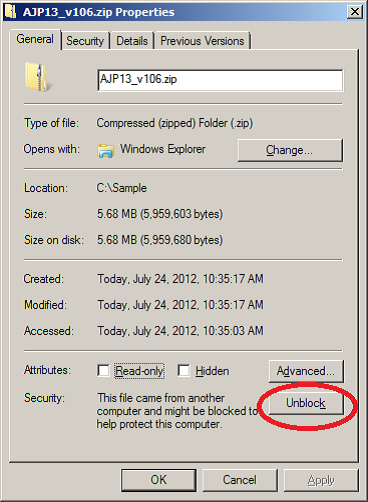
- Extract the project zip file.
- Execute the Connector_Setup.exe file.
- Accept the License Agreement and click Next.
- Follow the prompts and in the Apache Tomcat location details enter correct AJP port as configured in the tomcat server.xml file above:

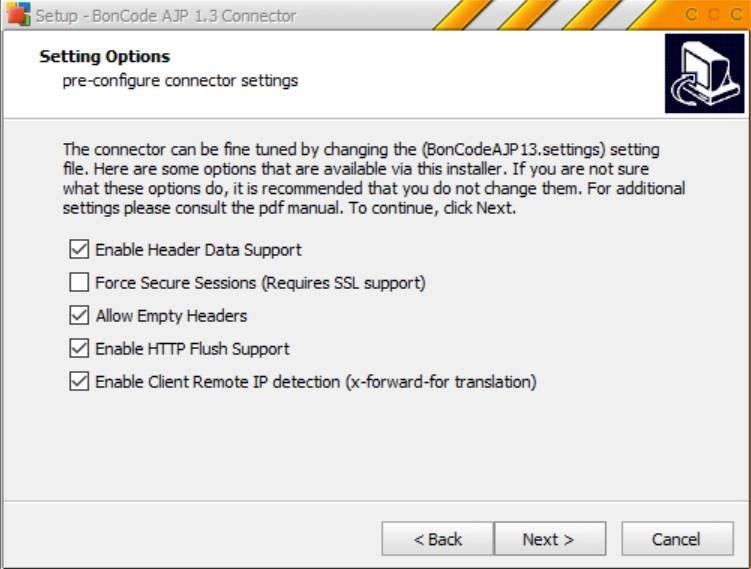
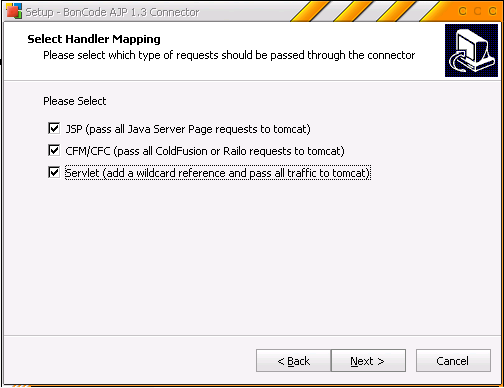
- Click Next and use default values in all the prompts until you reach the Select Handler Mapping prompt.
- In the Select Handler Mapping prompt select the option Servlet (add wildcard reference and pass all traffic to tomcat)
- Continue to the final prompt and click Install to finish the connector installation.
- Test the configuration by browsing http://localhost:port/frevvo/web/login
Troubleshooting
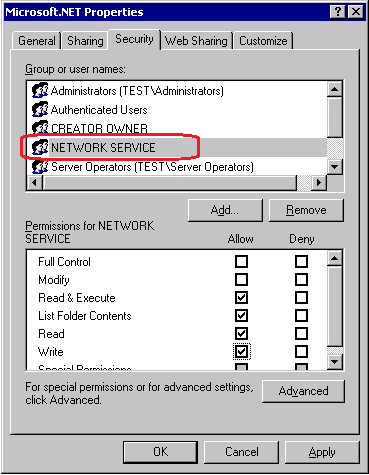
- If you see an access error like the one below, make sure that the Application Pool Identity (the security account set for the Application Pool) also has write permissions to C:\WINDOWS\Microsoft.NET directory.

- To check the currently set identity, open IIS and right click on your Application Pool, then click on the Identity tab:
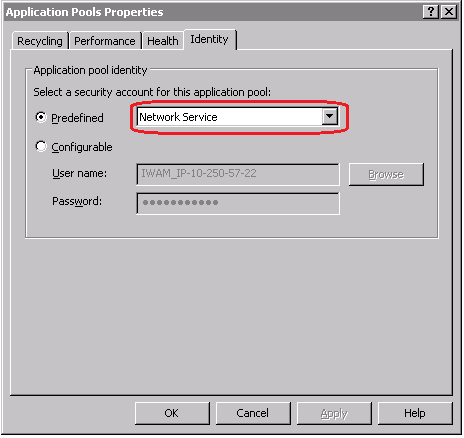
- Then in your Windows explorer, right click on C:\WINDOWS\Microsoft.NET directory and click on Properties. Check if the identity user set of your Application Pool has the ‘write’ permissions for this directory. If not, then add the user permissions.
- Test the configuration again by browsing http://localhost:port/frevvo/web/login
- To check the currently set identity, open IIS and right click on your Application Pool, then click on the Identity tab:
2. Customers using LDAP SSO that see a "Value update failed" or “Update control failed" error intermittently occur on forms should reconfigure the AJP (IIS to Tomcat) connector with these settings to resolve the error: