SAML Security Manager
- Megan Ellis
frevvo supports the creation of a tenant using the SAML (Security Assertion Markup Language) Security Manager. Users in this tenant can log into frevvo via SAML version 2.0. SAML enables internet single sign-on by allowing users to authenticate at an identity provider and then access service providers without additional authentication.
The SAML Security manager is for customers who expose their user identities over the internet via the SAML single sign-on (SSO) standard.
SAML requires the configuration and installation of an identity provider that supports SAML 2.0. Some examples are Google, Okta, Shibboleth, OpenSSO, ADFS, and PingFederate, OneLogin.
In a SAML environment, integration with an LDAP server for authentication is common. In general, here's how it works:
- User A attempts to access frevvo by typing the URL into the browser
- frevvo sends a SAML request for authentication to the Identity Provider
- The Identity Provider requires more information. The Identify Provider login screen is displayed.
- User A logs into the Identity Provider.
- The Identity Provider may communicate with your LDAP server for authentication.
- The Identity Provider builds and sends a SAML token to frevvo containing the security information for User A.
- frevvo processes the information. If User A has been authenticated, frevvo establishes a session and redirects User A to the correct frevvo screen depending on User A's authorization level.
On this page:
.PNG?version=1&modificationDate=1661277988802&cacheVersion=1&api=v2&effects=drop-shadow&width=704&height=400)
frevvo only supports/certifies the SAML Security Manager when frevvo is running in the tomcat container. Refer to our Supported Platforms for the list of Application Servers supported/certified by frevvo.
Prerequisites
Authentication Only mode
When you create your SAML tenant, you can select Authentication Only mode. This is done by checking a checkbox when you configure your SAML tenant.
If Authentication Only is selected, SAML is used only for authentication. Authorization depends on the roles defined in frevvo. SAML will authenticate the user but not retrieve any of the attributes.
You may choose to use this mode if you:
you prefer to maintain groups/roles in frevvo rather than in your IDP or LDAP server.
you find the SAML mapping for the other required attributes complex. For example, retrieving the manager user id and role names may require writing custom rules.
In this mode, manual creation of users & roles in the frevvo tenant is required. The frevvo CSV upload feature makes this easy.
If Authentication Only is not selected, users will be added (discovery) at runtime when they log in for the first time. It is important to consider the following points before making your decision.
User discovery:
There is no guarantee that the first login will occur before a task is created for a specific user /role. If you have workflows, that are routed to users who have not logged in yet, your workflow may not do what you expect. If the user’s role changes after 1st login but before the next task is routed to their new role, the task will not appear on their Task List. For example, a user with the role of employee logs into frevvo. The user then gets promoted to manager. The user will not receive a task routed to the user's new role of manager if the workflow is initiated before the user logs out and logs in again and the user account is updated.
Manually creating/uploading users and roles ahead of time avoids this situation.
- Your IDP or LDAP Server:
- Customers must ensure that the frevvo.User, frevvo.TenantAdmin and frevvo.Designer roles are specified in their IDP or LDAP server.
- All users requiring access to frevvo must be assigned to the frevvo.User group.
- Tenant admin users must be assigned to the frevvo.User and frevvo.TenantAdmin groups,
- Designer users must be assigned to the frevvo.User and frevvo.Designer groups.
- Customers must ensure that the frevvo.User, frevvo.TenantAdmin and frevvo.Designer roles are specified in their IDP or LDAP server.
- Contact the frevvo Customer Success team to schedule your Security Manager configuration.
- The group names for these three special roles must be frevvo.User, frevvo.TenantAdmin, and frevvo.Designer. Upper/lower case may be a factor for Open LDAP systems.
- frevvo Best Practice recommends that you create a user account that will house all of your deployed Production forms/workflows. This user can be named anything (e.g., frevvoProduction) but it must be a member of the frevvo.Designer group.
- Review the documentation on Preserving Projects/Forms/Workflows developed in your trial/starter tenant BEFORE changing security managers.
- frevvo only supports the SAML Security Manager when frevvo is running in the tomcat container. Refer to our Supported Platforms for the list of Application Servers supported/certified by frevvo.
Configuring the SAML Security Manager
In the directions given below, the Service Provider refers to frevvo frevvo. The metadata for your frevvo SAML tenant must be obtained first. Customers will need to configure the frevvo metadata when creating the SAML tenant.
- On Premise Customers Only
- Create the frevvo Metadata file
- Configure your Identity Provider
- Create or edit the SAML tenant
- Users and Roles in a SAML tenant
- Logging into a frevvo SAML Tenant
Section 1 - On Premise Customers Only
Cloud customers can skip the Generate Your Certificate and Install the Java Cryptography steps. These instructions are provided for On Premise customers only.
Generate Your Certificate
If you are using the frevvo tomcat bundle, the supplied keystore, frevvoKeystore.jks is located in the <frevvo-home>/tomcat/lib folder, The keystore contains a default certificate. Replace this with a certificate for your installation.
This certificate is used to sign/encrypt the SAML request. The use of a long-lived self-signed certificate for SAML is recommended because a CA certificate is usually only valid for 1 to 2 years and you have to keep replacing it. Since the keystore is located outside the frevvo war, you can use the Java keytool to generate and store your certificates
The alias, password, and path to the keystore are configured in the <frevvo-home>\tomcat\bin\setenv.bat and the service.bat files for the Windows OS or setenv.sh for UNIX/Linux OS. The properties listed below are used in the setenv and service.bat files to set the default values:
- com.frevvo.security.saml.key - use this property to change the alias
- com.frevvo.security.saml.password - use this property to change the password
- com.frevvo.security.saml.keystore - use this property to change the location of the keystore
rem SAML keystore configuration
set CATALINA_OPTS=%CATALINA_OPTS% -Dcom.frevvo.security.saml.keystore=file:${catalina.home}/lib/frevvoKeystore.jks -Dcom.frevvo.security.saml.key=frevvo -Dcom.frevvo.security.saml.password=p@ssw0rd
# SAML keystore configuration
export CATALINA_OPTS="${CATALINA_OPTS} -Dcom.frevvo.security.saml.keystore='file://${CATALINA_BASE}/lib/frevvoKeystore.jks' -Dcom.frevvo.security.saml.key=frevvo -Dcom.frevvo.security.saml.password=p@ssw0rd"
set SAML_ARGS=-Dcom.frevvo.security.saml.keystore=file:${catalina.home}/lib/frevvoKeystore.jks;-Dcom.frevvo.security.saml.key=frevvo;-Dcom.frevvo.security.saml.password=p@ssw0rd
Follow these steps to generate and import the certificate for your installation:
- Stop frevvo if it is running.
- Copy the default <frevvo-home>\tomcat\lib\ frevvoKeystore.jks to another location as a backup
- Log in as administrator.
- Make sure the path to the keytool application is configured in your system path. keytool is part of the standard Java distribution (JDK or JRE)). For example, keytool is located in the C:\Program Files\Java\jdkx.x.x\bin directory in the JDK.
- Navigate to <frevvo-home>\ tomcat\lib or to the new location of the keystore if you changed the com.frevvo.security.saml.keystore property in the setenv or service.bat files
Delete the existing certificate:
keytool -delete -alias frevvo -keypass p@ssw0rd -keystore frevvoKeystore.jks -storepass p@ssw0rd
If you changed the password from the default, execute this keytool command to change the password in the keystore
keytool -storepasswd -keystore frevvoKeystore.jks
You will be prompted for the old password. Enter p@ssw0rd. Then when prompted, enter the new one. The keystore password must match whatever is in the line that you added to the setenv or service.bat files.
Generate a new certificate: Here is the command: Change the -dname value to the DNS name of your IDP.
If you changed the values of the com.frevvo.security.saml.key or com.frevvo.security.saml.password properties in the setenv or service.bat files then change the alias in the command and the keypass and storepass password parameters to match those values. The key and store passwords need to be the same as there is only one password property.
The dname in this keytool command specifies the X.500 Distinguished Name to be associated with the alias and is used as the issuer and subject fields in the self-signed certificate. While we provide a sample in the documentation, it is up to the customer (your security policy) to decide what the value should be when the certificate for your installation is generated. Since this is a self-signed certificate, the dname could be anything. Here is a link to the Oracle documentation to give you some ideas.
Execute this command to create a new certificate and store it in the keystore.keytool -genkey -dname "cn=app.frevvo.com" -alias frevvo -keypass p@ssw0rd -keystore frevvoKeystore.jks -storepass p@ssw0rd -keyalg rsa -keysize 2048 -validity 3650
The certificate can be viewed by exporting it to a file. If you changed the password, substitute the new password in the command:
keytool -exportcert -alias frevvo -file frevvo.rfc -rfc -keystore frevvoKeystore.jks -storepass p@ssw0rd
For added security, you may also store the keystone password as an OS Environment Variable instead. Please see Secure Passwords in Tomcat for details.
If you update the SAML certificate after you have installed frevvo as a service, you must remove and re-install the service. Run the remove-service.bat and then re-run the install-service.bat.
Section 2 - Create the frevvo Metadata file
Follow these steps to generate the frevvo metadata for your SAML tenant. You can do this even if the tenant has not been created yet.
Paste this URL into your browser:
Cloud Customers: https://app.frevvo.com:443/frevvo/web/saml/metadata/alias/{t} - replace {t} with the tenant id of your SAML tenant.
On-premise customers: http://<server>:<port>/frevvo/web/saml/metadata/alias/{t} - replace <server> with the ip of your server, <port> with the port number (if applicable) and t with your tenant id).
When the metadata displays, right-click and select the browser option to View the Page source.
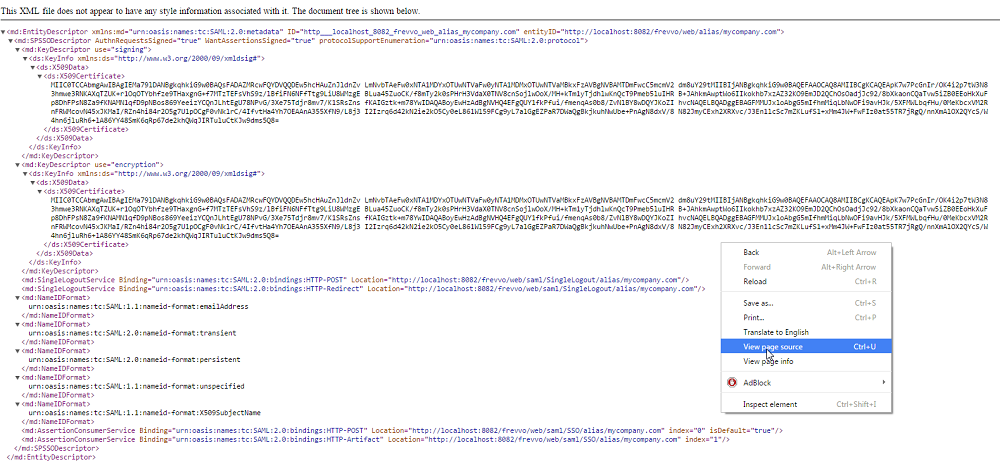
- Save the page as an xml file.
- Metadata must be generated for each SAML tenant. Each tenant will have a unique URL.
Section 3 - Configure Your Identity Provider
- Configure the Service Provider metadata for your Identity Provider. For example, the Shiboleth Identity provider requires modification of a file to provide the path to the frevvo tenant metadata xml file created above.
- Your Identity Provider must be configured to expose the attributes that frevvo requires. Attribute mapping is done when you create the SAML tenant. These are:
- User Id
- First Name
- Last Name
- Manager Id (optional)
- Groups
- Custom Attributes (optional)
We know that your IDP software of choice is outside of the frevvo server software and that you have the expertise in-house to install, configure and maintain your IDP software. But here are some tips we have found that may assist you.
The information below applies to ADFS v2.0. If you are using a different version, your ADFS expert must locate the equivalent functions for that version.
Save the frevvo tenant metadata as an xml file. Add Relying Party Metadata Trust. Use the 'Import data about the relying party from a file' option to upload the saved xml file.
In Edit Claim Rules, create a rule to map AD attributes to the outgoing claim type as shown below. Information about creating rules to send LDAP attributes as Claims can be found on this Microsoft support website
- samAccountName to NameID - If you rather generate an opaque identifier, you would need to create custom rules as described here.
- samAccountName to Windows Account Name
- givenName to Given Name
- Surname to Surname
- emailAddresses to Email Address
Group membership is added using the wizard. Select Token-Groups Unqualified Names and map it to the Group claim.
Extract the Manager's samAccountName. This can be done using the following 3 custom claim rules. This rule assumes that the CN of the manager DN contains the samAccountName:
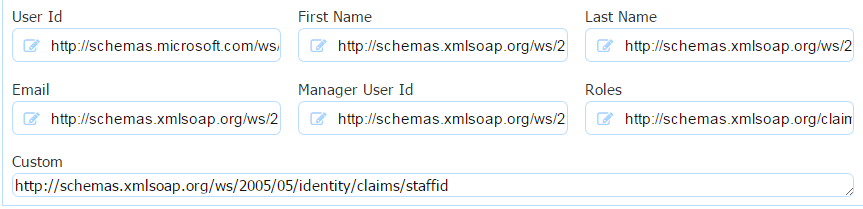
c:[Type == "http://schemas.microsoft.com/ws/2008/06/identity/claims/windowsaccountname", Issuer == "AD AUTHORITY"]
=> add(store = "Active Directory", types = ("http://schemas.xmlsoap.org/ws/2005/05/identity/claims/ManagerDN"), query = ";Manager;{0}", param = c.Value);

Manager SAM1
c:[Type == "http://schemas.xmlsoap.org/ws/2005/05/identity/claims/ManagerDN"]
=> add(Type = "http://schemas.xmlsoap.org/ws/2005/05/identity/claims/ManagerSam", Value = RegExReplace(c.Value, ",[^\n]*", ""));

ManagerAccountName
c:[Type == "http://schemas.xmlsoap.org/ws/2005/05/identity/claims/ManagerSam"]
=> issue(Type = "http://schemas.xmlsoap.org/ws/2005/05/identity/claims/manageraccountname", Value = RegExReplace(c.Value, "^CN=", ""));
In the frevvo tenant, map the attributes as shown: Refer to this website for more information about Claims.
Attribute Value User Id http://schemas.microsoft.com/ws/2008/06/identity/claims/windowsaccountname First Name
http://schemas.xmlsoap.org/ws/2005/05/identity/claims/givenname Last Name http://schemas.xmlsoap.org/ws/2005/05/identity/claims/surname Email http://schemas.xmlsoap.org/ws/2005/05/identity/claims/emailaddress Manager User Id http://schemas.xmlsoap.org/ws/2005/05/identity/claims/manageraccountname Roles http://schemas.xmlsoap.org/claims/Group - It is recommended that you turn on tracing in ADFS so that the SAML response is visible. Compare the names of the attributes contained in the response to the names of the attributes configured on the tenant screen. If turning on ADFS tracing is not an option, the frevvo log can be searched for the name attribute values.
Configure Custom Attributes
Active Directory attributes other than the standard First Name, Last Name, or Email are considered custom attributes. You can retrieve custom attributes in addition to the standard ones from your IDP and pull the data into your form/workflow using frevvo business rules. For example, let's say you want to extract the custom attribute, StaffId, from LDAP and populate fields in your form/workflow using a business rule.
Perform these general steps:
- Make sure the custom attribute, in our example StaffID, is configured in Active Directory and assigned to the correct users.
- Expose StaffID as a SAML attribute by writing an ADFS claim rule.
- During this process, you assign the attribute a name, e.g. http://schemas.xmlsoap.org/ws/2005/05/identity/claims/staffid
- Map the attribute with this name in the Custom section of the tenant setup screen. Save the tenant configuration.
Here is an example of a business rule that references the custom attribute, Staff Id, and populates a field in a form named StaffID.
if (form.load) {
  StaffID.value =  _data.getParameter('subject.http://schemas.xmlsoap.org/ws/2005/05/identity/claims/staffid');
}
Refer to Retrieving Custom Attributes from LDAP in a SAML Tenant for another example.
Follow these steps to setup Google as the Identity Provider and frevvo as the Service Provider to configure Single Sign-On. These instructions are for Cloud. On-Premise customers follow the same steps with one additional step to generate a certificate:
On Premise customers ONLY: Generate a Certificate.
Configure Google as the Identity Provider
- Login to your Google domain as an admin, go to the admin portal and click through to Apps > SAML Apps. If you have any existing SAML apps, you’ll see them here. Click the big PLUS (+) sign at the bottom right to add a new one. A wizard will appear.
- Click the “Setup My Own Custom App” link at the bottom of the screen.
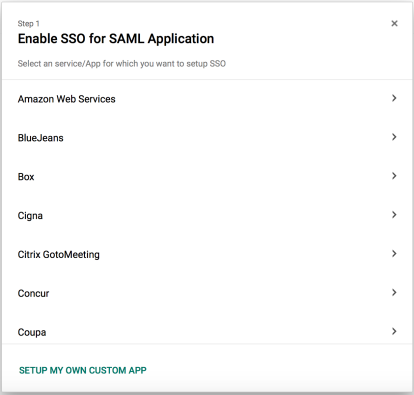
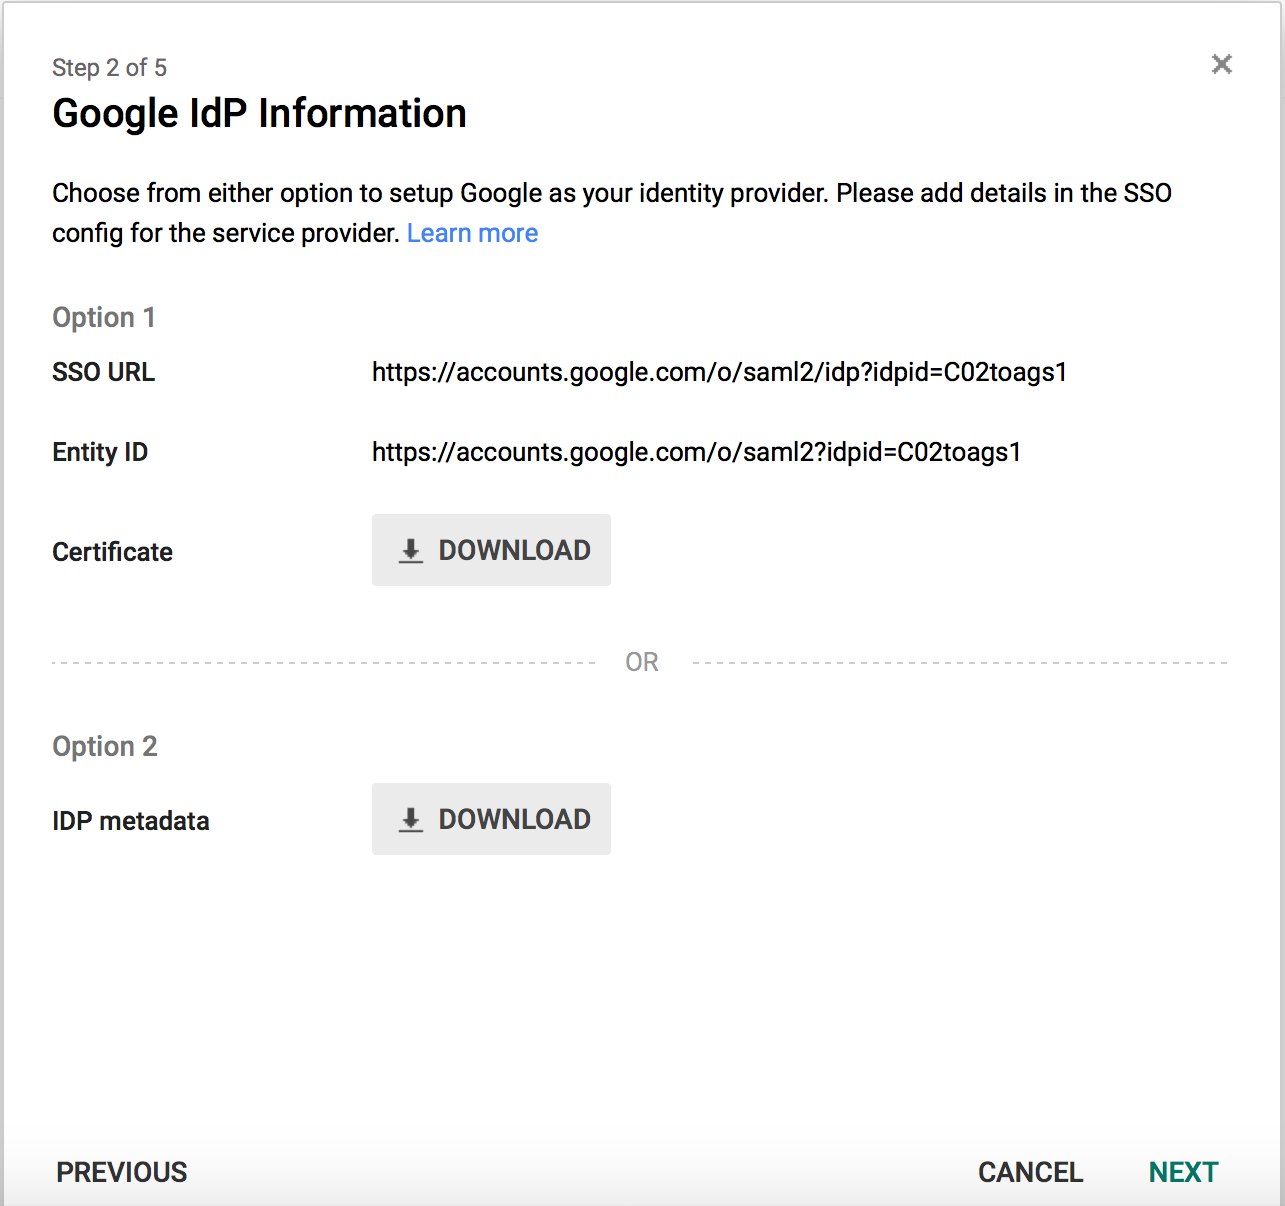
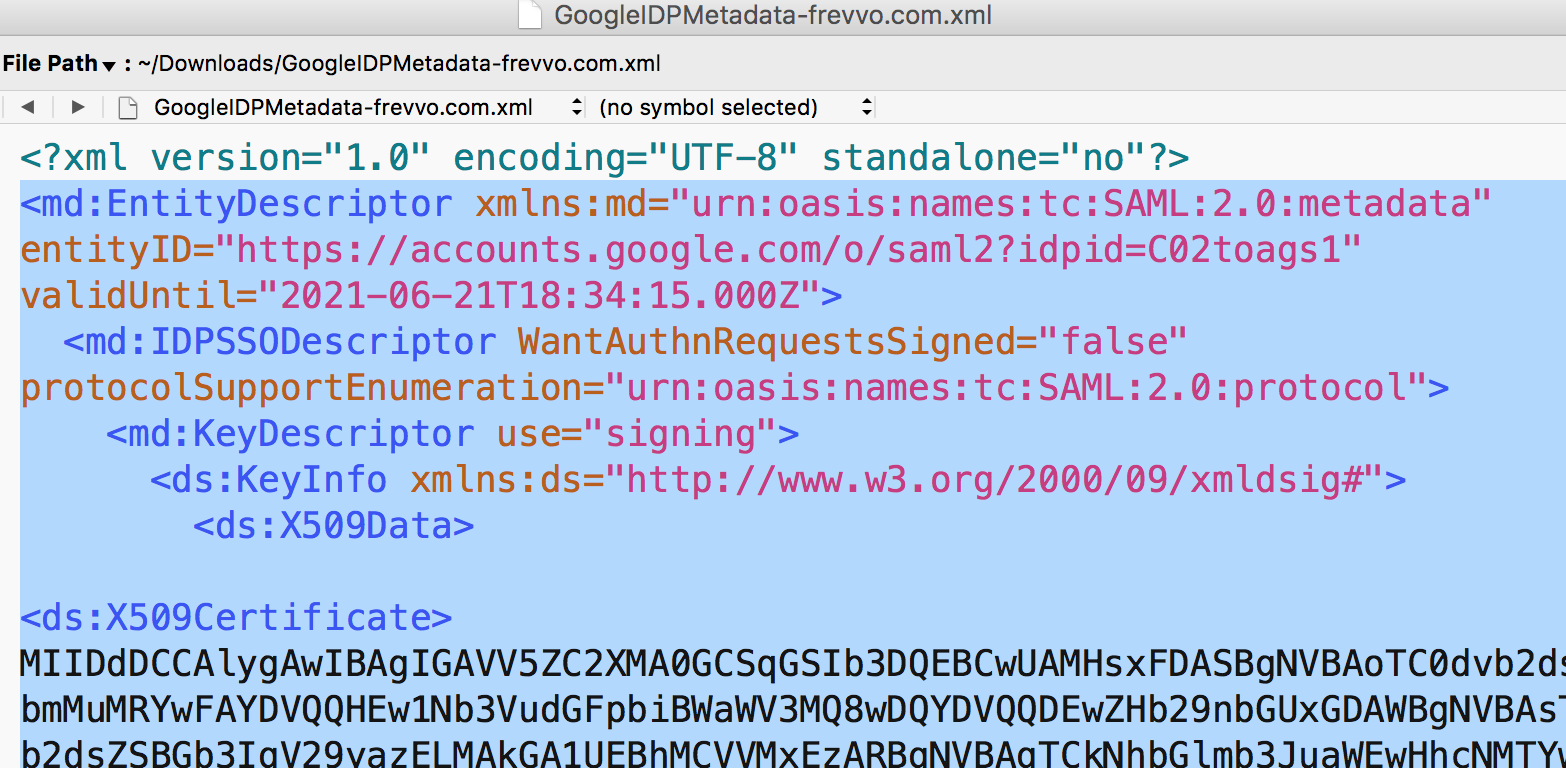
- Choose Option 2 and Download the IDP metadata file.
- Provide a name for your application, a description, and a logo.
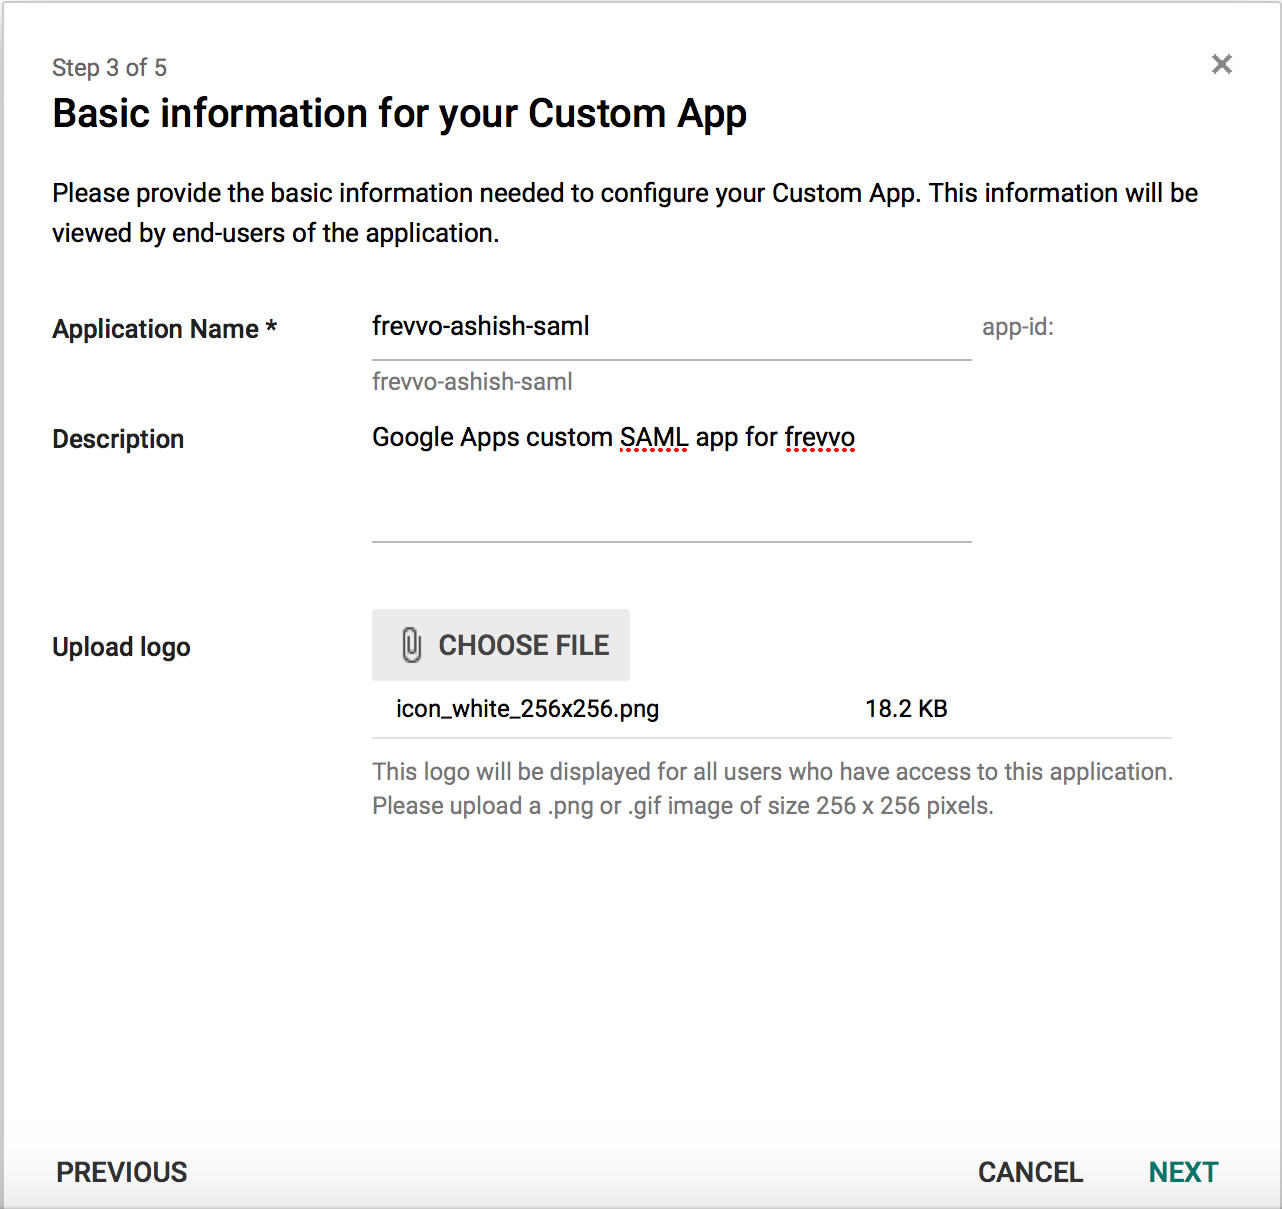
- Enter the Service Provider (frevvo) details.
- For ACS URL, type https://app.frevvo.com:443/frevvo/web/saml/SSO/alias/{tenant} - replace {tenant} with your cloud tenant.
- For Entity Id, type https://app.frevvo.com:443/frevvo/web/alias/{tenant} - replace {tenant} with your cloud tenant.
- Leave the built-in Name Id attribute configuration alone.
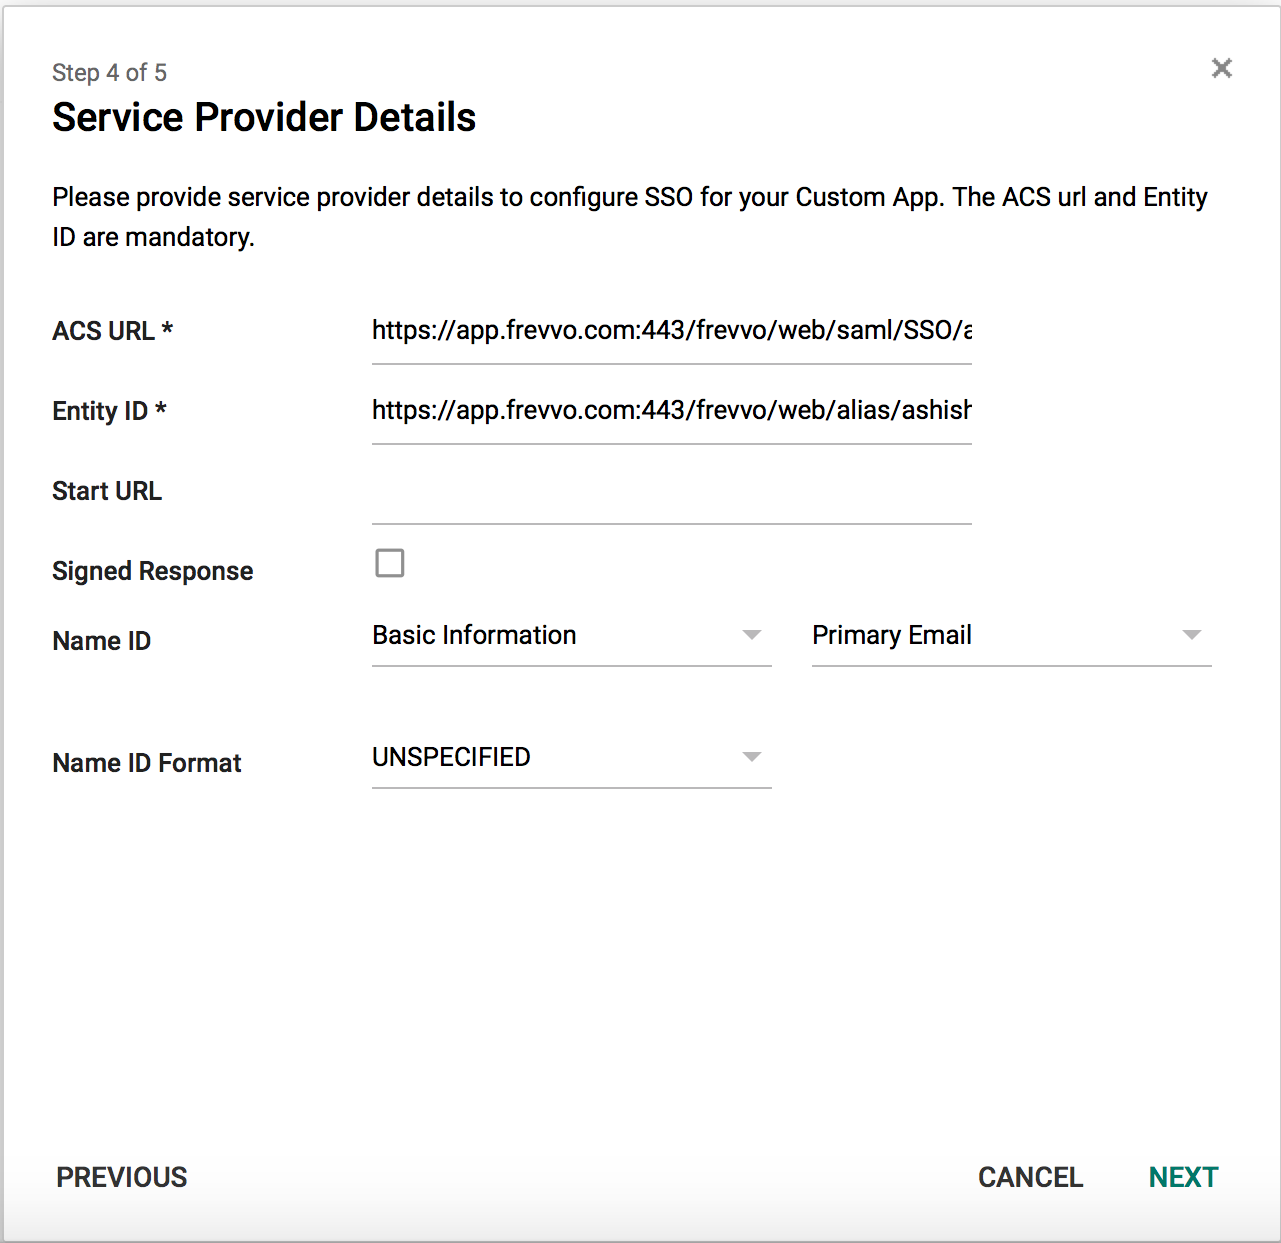
- Add a new Attribute Mapping: User Id | Basic Information | Primary Email
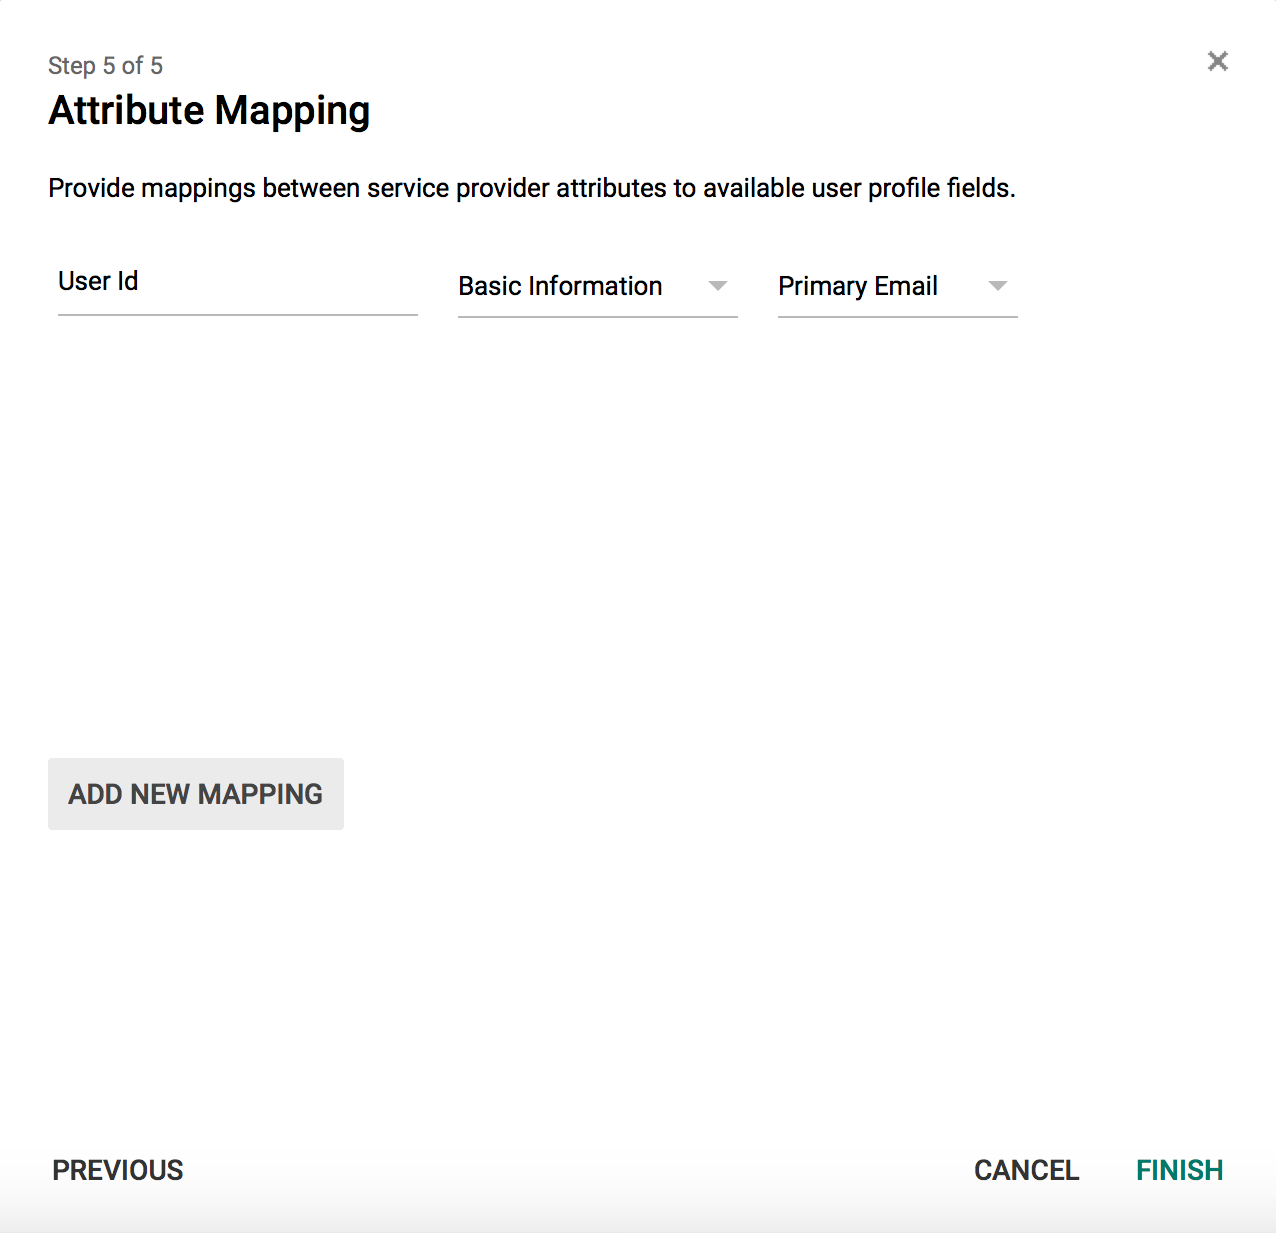
- Click Finish. The Setup Complete screen displays.
- Click OK.
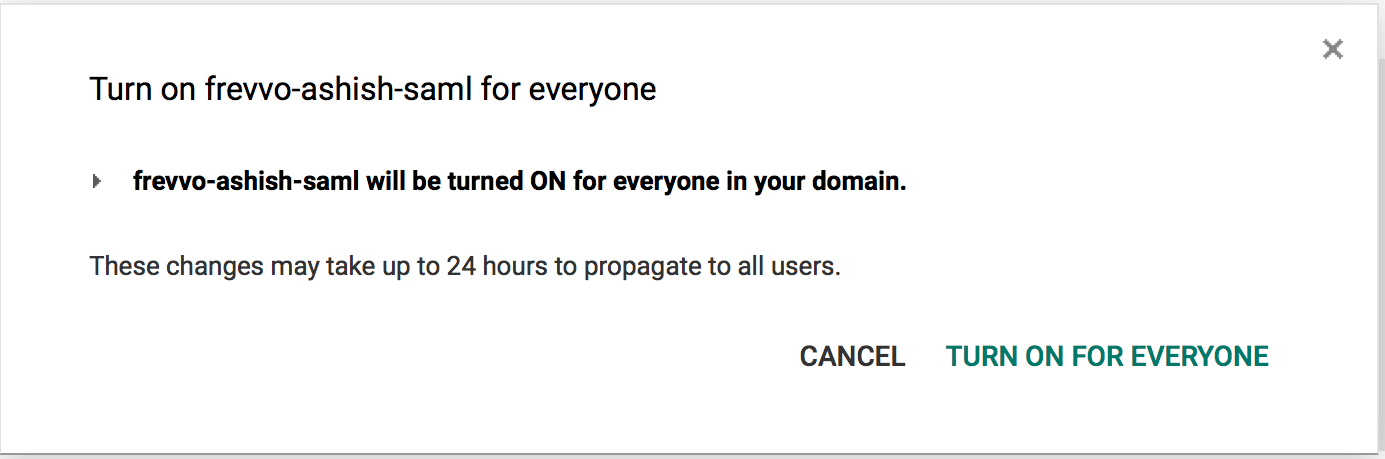
- Your new SAML App will be displayed. Click the three dots at the right and turn ON SSO. You can choose to turn it ON for everyone in your domain or for specific sub-domains.
Create users in Google:
- Create your users in Google or move existing users into the appropriate sub-organization if you are limiting access to your SAML app in Google. You won’t have to create new users or move existing users if you enabled the SAML app for everyone in your Google domain.
- You’ll need a user in your Google domain to serve as the tenant administrator. Either, create a new one or choose an existing one (there’s nothing to do as long as you choose someone).
Create users in frevvo:
You need to ensure that the user you chose/created as the tenant admin exists in frevvo. Once we switch over to SAML, all authentication will use Google Apps credentials and you won’t be able to login using your current tenant admin or other users. We’ll use CSV upload. The file syntax looks like this:
userId,tenant,firstName,lastName,email,enabled,reportsTo,roles,transaction
 {user}@{domain},{tenant},123,{first},{last},{email},true,,frevvo.Designer|frevvo.TenantAdmin,
The fields are your Google login (e.g. prajakta.deshmukh@frevvo.com), your frevvo tenant id (e.g. ashish-saml.com), the first name, last name, and email address. In the roles field, use the roles indicated above.
- Login as the current tenant admin user.
- Click on Manage Users.
- Click on Download CSV users file.
- Edit the file to set up at least one Google User (the one you chose/created as the tenant admin).
- Click the CSV Upload icon and upload the file to create this user.
Configure frevvo as the Service Provider: Files
- Generate the SP metadata file from frevvo. Visit the URL: https://app.frevvo.com:443/frevvo/web/saml/metadata/alias/{tenant} in your browser. Replace {tenant} with your cloud tenant. Right-click to View Page Source and save as an XML file.
- Login to your Cloud account as tenant admin and click the Edit Tenant button.
- In the Security Manager section, click the Change button, choose SAML in the dropdown that appears, and click Ok. NOTE: Free Trial accounts do not show the Change button. If the Change button is not visible in your tenant, please contact customer support.
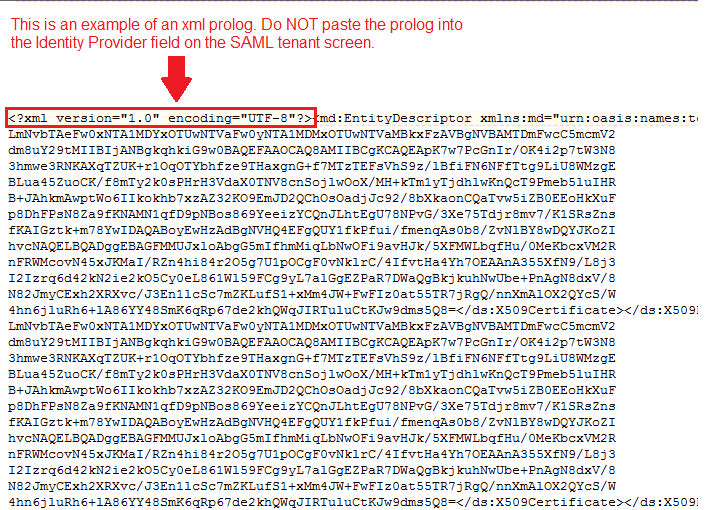
- The SAML configuration section will appear. In the Service Provider section, we must paste the SP metadata file we generated in Step 1 above. Unfortunately, the file contains an XML prolog (highlighted in the image below) which must be removed. Paste the contents of this SP metadata file without the prolog into the Service Provider text area of the configuration form.
- In the Identity Provider section, paste the IDP metadata file we generated and saved in the Google setup above. Once again, the file contains an XML prolog. Paste the contents of this IDP metadata file without the prolog into the Identity Provider text area of the configuration form.
- Check Authentication Only. This means SAML will authenticate the user but not retrieve any of the attributes. Users are not automatically discovered upon first login. Therefore, you must create users & roles using CSV upload.
- If you do not wish to select the Authentication Only option, you’ll need to map other attributes in Google first before you can assign them in Frevvo. First Name, Last Name, and Email should be pretty straightforward since these attributes are surfaced by the Google SAML IdP app. The other attributes may be more difficult.
- With the Authentication Only option, attribute mapping only includes one attribute, the User Id. Since we mapped the email address to the User Id attribute in Google while setting up the SAML app, we can simply map the frevvo attribute to User Id in the configuration form.
Submit the form and we’re done.

Edit tenant.
Setup SAML

SP Metadata (paste without XML Prolog)
IDP Metadata (paste without XML prolog)
How to use your new SAML tenant
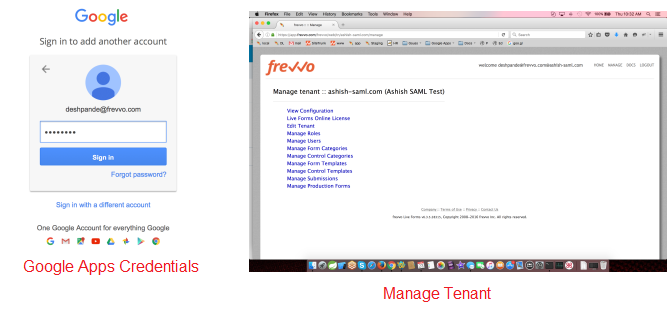
- Log out of all your Google accounts to test.
- Go to the tenant URL: https://app.frevvo.com:443/frevvo/web/tn/{tenant}/login. Replace {tenant} with your tenant id.
- You will be redirected to the Google login page.
- Login to Google as the Google user you chose/created as the tenant admin.
- You will be redirected to frevvo to the Manage Tenant screen.
The user id displayed in frevvo at the top will look like {user}@{domain}@{tenant} which is a bit confusing but is purely cosmetic.
Load other users in frevvo
Before your other Google users can login to frevvo using their Google Apps credentials, they must first be created in frevvo. You can download users from Google Apps as a CSV file (uncheck the create a Google Sheet option), modify it to follow frevvo’s syntax as shown above, and upload it. You can also login as the tenant admin Google user and create users and roles using the UI.
Once the user exists in frevvo, he/she can login using Google credentials and the system will behave as expected according to the roles assigned to the user.
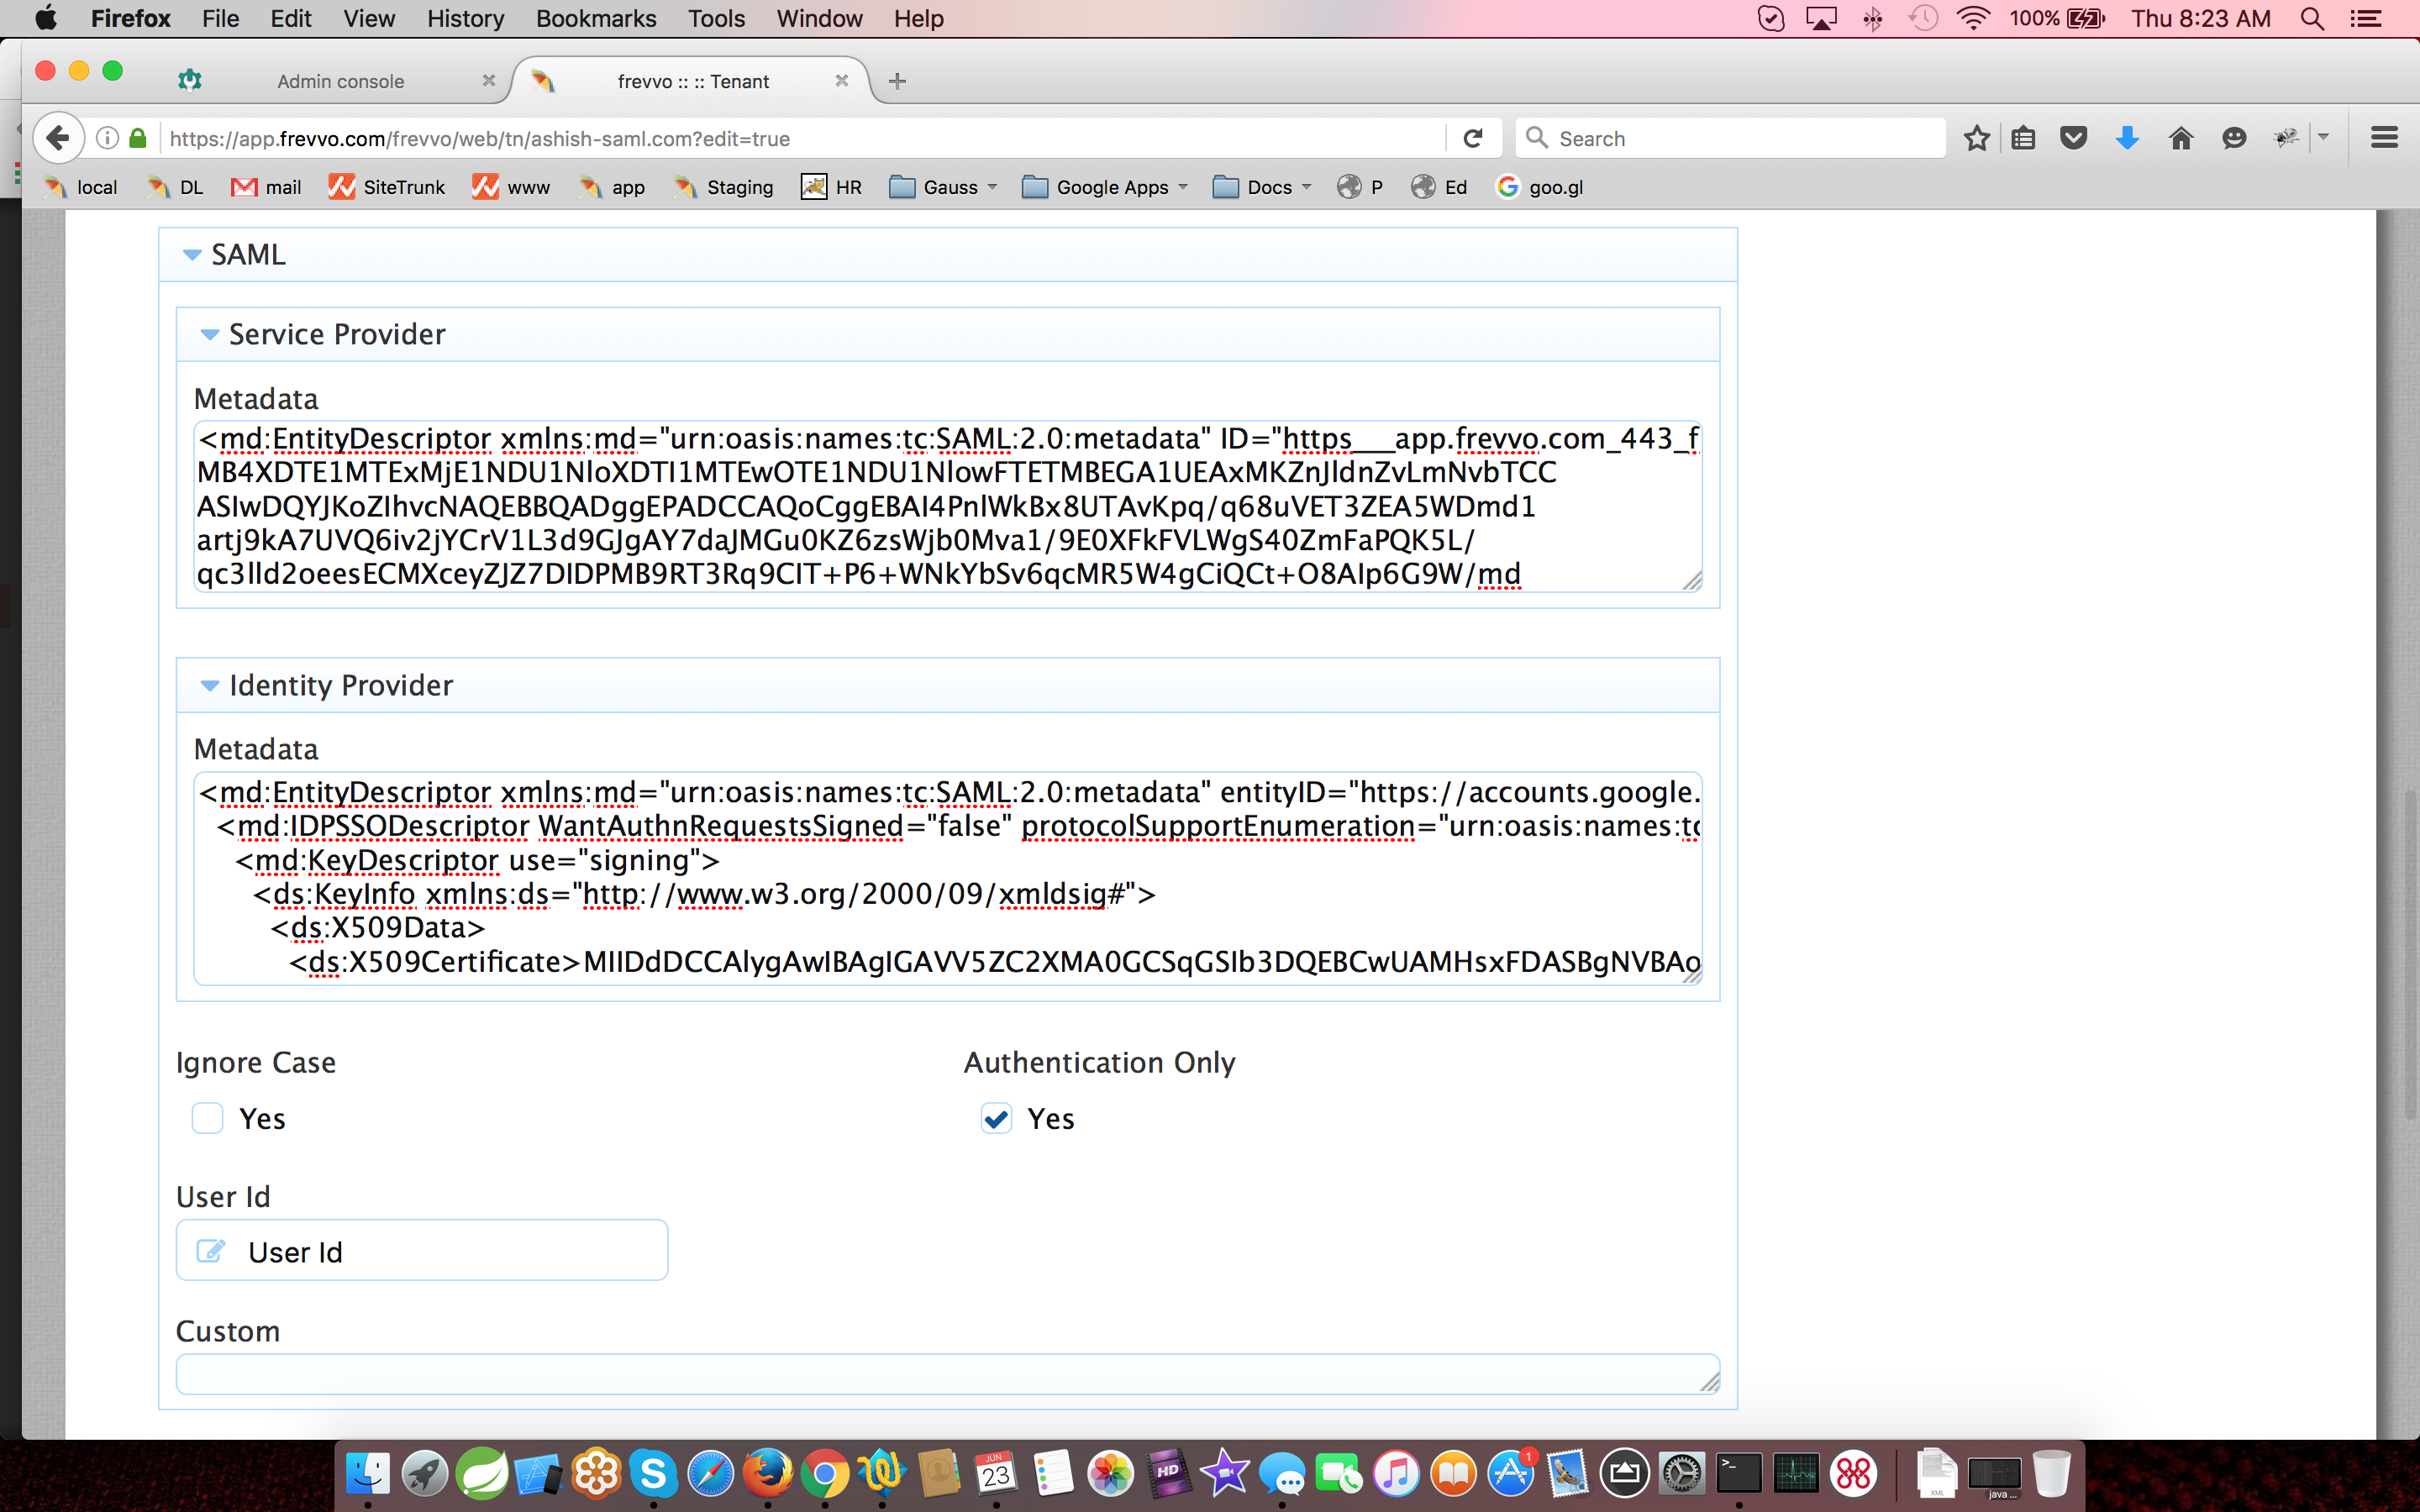
Section 4 - Create or edit the SAML tenant
To successfully create a frevvo tenant using the SAML Security manager, you will need the following:
frevvo SAML Security Manager#Step2-CreatetheMetadatafile
- The metadata for your Identity Provider
- Attribute mapping information
frevvo cloud customers, migrating your tenant to the SAML Security Manager, will make the changes via the Edit Tenant screen. Once accessed, follow these steps beginning with step 2.
Log onto frevvo as the superuser (on-premise) or the tenant admin (cloud).
- Access the Add Tenant (on-premise) or Edit Tenant (cloud) screen.
- Select SAML Security Manager from the Security Manager Class dropdown.
- Copy the Service Provider (frevvo) metadata into the Service Provider field. The xml should be pasted without the prolog. For example, the image shows an example of the frevvo metadata file before pasting:
- Retrieve the metadata for your Identity Provider. For example, for the Shibboleth product, the metadata is located in the idp-metadata file.
- Paste the metadata into the Identity Provider field. This metadata should also be pasted without the prolog.
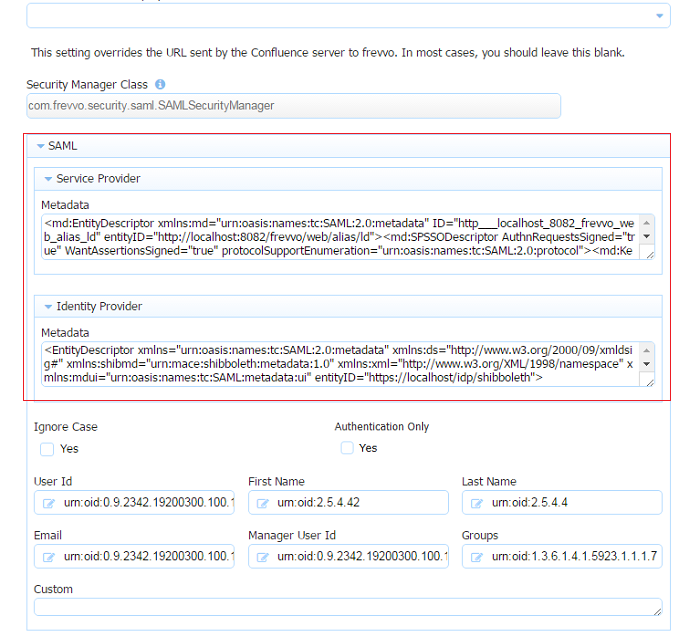
- Check the Ignore Case checkbox if you are using LDAP for authentication and you want frevvo to ignore the case stored in LDAP systems for users/roles. It is checked by default. Refer to the Mixed or Upper case User Names topic for more information.
Check the Authentication Only checkbox if you want SAML to handle authentication and provide user identification but all other user attributes come from the frevvo database.
When checked, the screen display changes as attribute mapping, other than the mapping for the user id and custom attributes, is no longer necessary.
SAML Security Manager#Prerequisites:
- If Authentication Only is checked:
- SAML will authenticate the user but not retrieve any of the attributes. Authorization depends on the roles defined in frevvo. Changes made in the frevvo UI will not be overridden if the user logs out and then logs in again.
- Manual creation of users & roles in the frevvo SAML tenant is required. This can be done with a csv upload.
- SAML will authenticate the user but not retrieve any of the attributes. Authorization depends on the roles defined in frevvo. Changes made in the frevvo UI will not be overridden if the user logs out and then logs in again.
- If Authentication Only is unchecked:
All users requiring access to frevvo must be assigned to the frevvo.User group in your IDP. Tenant Admins must be assigned to the frevvo.User and frevvo.TenantAdmin groups. Designer users must be assigned to the frevvo.User and frevvo.Designer groups.
- Users are added (discovered) when they log in.
- It is important to know that a SAML tenant in this mode (SAML/LDAP handles authentication and authorization) that users and tenant admins can modify user information in the frevvo UI. If user information/role assignment is changed in the frevvo UI, the changes will be overwritten by the information in SAML the next time the user logs out and then logs back in again. In this case, make the changes in your IDP to make them permanent.
- If Authentication Only is checked:
Map the attributes configured in your Identity Provider by entering the name for each attribute in the corresponding field on the frevvo screen. Be sure to provide the attribute name - not the friendly name. For example, if you are using Shibboleth for your Identity Provider the attribute information is located in the attribute-resolver.xml file. The image shows the section of the file where the attributes are defined.
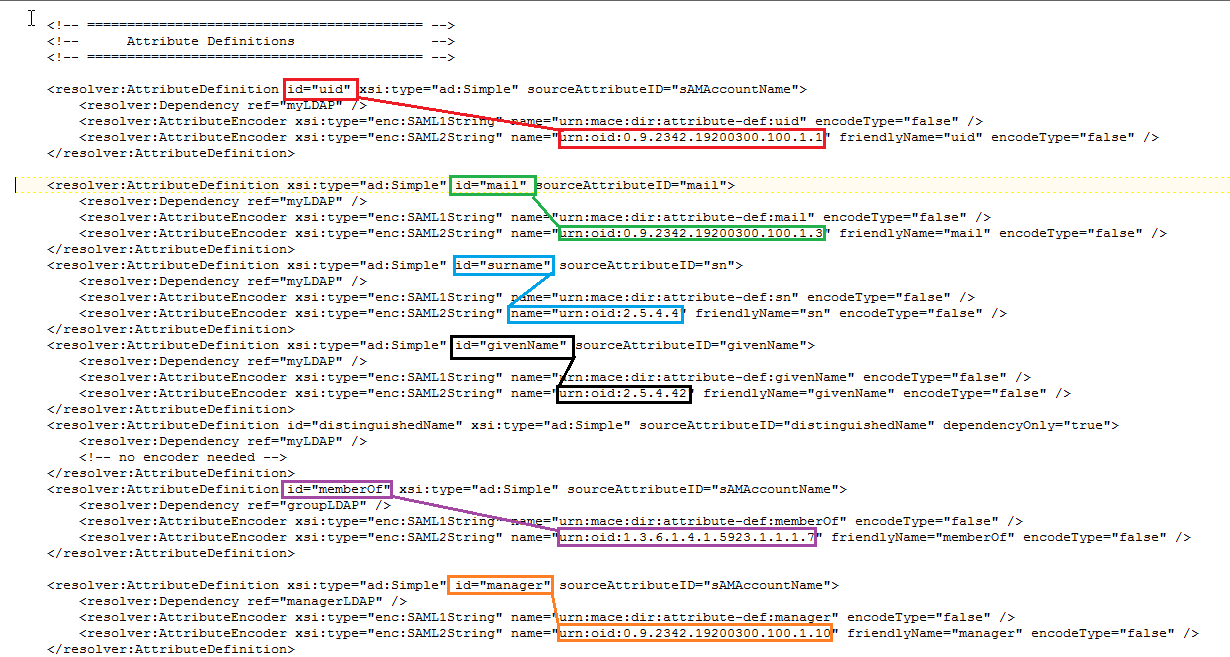
The image below shows the attribute mapping on the frevvo screen with the attribute names from the Shibboleth file: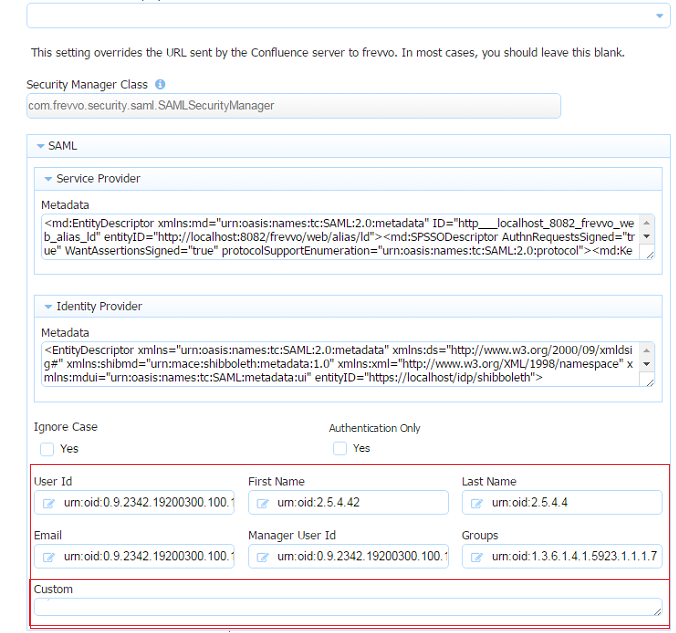
If Authentication Only mode is enabled for your tenant, mapping is only required for the User Id. Refer to step 8 for the details
- Custom attributes can be mapped by typing the attribute names in the Custom field separated by a comma.
- Configure a tenant admin account. This account does not require SAML authentication. This tenant admin can log directly into frevvo.
- The tenant admin id, password and email fields are required. The Change password on next login field is optional. It is checked by default.
- When this tenant admin performs a form-based login i.e. /frevvo/web/login, the password entered on this screen is used for authentication. This is also the URL used by the API. For cloud customers, the <base> is always https://app.frevvo.com.
- If the tenant based login url is used i.e. /frevvo/web/tn/{t}/login then SAML login is used.
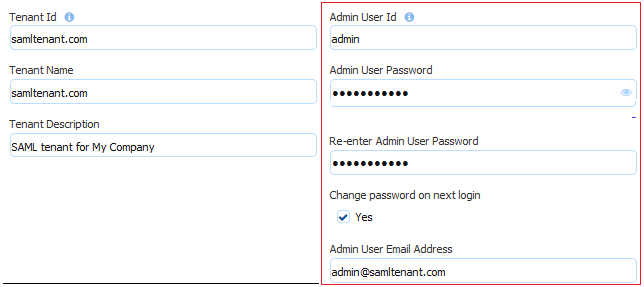
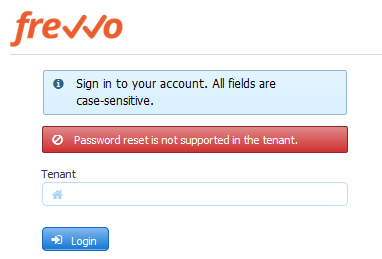
The forgot password function works for a SAML tenant admin user. For all others, it will display the error message, "Password reset is not supported in the tenant."
- Configure the Business Calendar for your tenant and HTTP Authorization Credentials if required.
- Click Submit.
Section 5 - Users and Roles in a SAML tenant
Choosing the Authentication only option in your SAML tenant implies that the user and roles will be managed from frevvo. You may choose this mode if:
- you prefer to maintain groups/roles in frevvo rather than in your IDP or LDAP server.
- you find the SAML mapping for the other required attributes complex. For some IDPs, retrieving the manager user id and role names may require writing custom rules.
When Authentication Only is selected (checked) there is no discovery of Users & Roles. They must be created in your tenant manually. The CSV upload is a good way to do this.
When Authentication Only is not selected (unchecked) frevvo will discover new users at run-time. However, users are only discovered when the person tries to log in. They are not discovered nor is their user data (email, name, report-to) kept in sync automatically. It requires the user to log in. So, this does not necessarily remove the need for manually creating/uploading users and roles ahead of time nor does it remove the need to continuously update the users when changes are made in LDAP.
If you have workflows that are routed to users/roles there is no guarantee that the required users will log in before a task is created for that user (specifically or via a role). For example, if a workflow is routed to a specific user and it is performed before the first login of that user, frevvo will send an email to the tenant admin indicating that the user is unknown. Routing based on the user's manager will fail. Routing based on a role will succeed but the user will receive no notification.
Manually creating/uploading users/roles in frevvo ahead of time avoids this situation. Be sure to review CSV Upload Considerations first.
A SAML tenant with Authentication Only unchecked means that authentication and authorization are handled by SAML IDP. Users are added/updated through discovery. If a tenant admin modifies user information in the frevvo UI, for example, changes an email address or adds a role for a user, the changes will stay in effect until the user logs out of the tenant and then logs back in. When the user logs back in, the changes made in the frevvo UI will be overwritten by the information in SAML IDP. In this case, make the changes in your IDP to make them permanent. A warning message will appear on the User List to alert the admin that they are in discovery mode and should make permanent changes in their IDP instead.

Discovery updates only occur when the user logs into the tenant. The admin "login as" feature will not execute a discovery update.
Section 6 - Logging into a frevvo SAML Tenant
Browse the URL below to initiate the SAML authentication process by redirecting to the Identity Provider login page.
Cloud Customers: https://app.frevvo.com:443/frevvo/web/tn/{t}/login. Replace {t} with the name of your SAML tenant.
- On-premise Customers: http://<server>:<port>/frevvo/web/tn/{t}/login. Replace <server> and <port> with your server information and t with the name of your SAML tenant.
- Clicking the logout link in frevvo, logs the user out from frevvo only.
- Accessing a Space in a SAML tenant on a mobile device will not display a logout button.
- When a user logs in to frevvo (non-space mode), the logout link will be visible
- Cloud customers browsing app.frevvo.com or On Premise customers browsing http://<servername>:<port>/frevvo/web/login attempting to log into a SAML tenant directly (user@saml tenant name) will automatically be redirected to the SAML IDP login page. For best performance, frevvo recommends using the login URL described above.
sameSiteCookies attribute
Please see this documentation on the use of the sameSiteCookies attribute to ensure compatibility with your SAML configuration.
SAML Tenant Built-in Admin User
Just a reminder that the tenant admin account can log in directly into frevvo or use the SAML login.
When you create/edit a new tenant you are prompted to set up/modify a tenant admin user id, password, and email address. This tenant admin does not authenticate via your SAML IDP. It only exists in frevvo. If you experience an issue with your SAML configuration such that you can't log in as a SAML authenticated user, use the built-in admin to log in to your tenant as a tenant admin in order to fix your SAML configuration issue. Only one built-in tenant admin account is supported.
Browse this URL to login as the built-in: <base_URL>/frevvo/web/admin/login. When specified, frevvo will prepend the base URL to the URLs in your Form/Document Actions. The <base_URL> is typically http(s)://<your servername>:<port>.
- You must use the admin specific URL - <base-url>/frevvo/web/admin/login - to login as the built-in.
- Non-admin users can also log in using the admin-specific URL.
If your tenant originally used the Default Security Manager and then you changed to the SAML Security Manager, this tenant admin account has already been set up. If you have forgotten the password, you can change it by:
- Browsing the admin specific URL - <base-url>/frevvo/web/admin/login. Enter the built-in userid. Click Forgot Password?. The error message "Password reset is not supported in the tenant." displays if any other user clicks on the Forgot Password link after browsing the admin specific URL:
- Logging in as a SAML authenticated tenant admin and changing the password via Manage Users.
The frevvo superuser admin (Cloud customers) and the On Premise superuser can change the password for the built-in userid from the Edit Tenant page.
What if you do not remember the userid of your original tenant admin? Follow these steps:
- Log in as your authenticated Azure SAML tenant admin
- Click Manage Users and click the
 edit admin icon
The frevvo (Cloud customers) and On Premise superuser can see the built-in tenant userid from the Edit Tenant page.
Logged in User Display in Azure SAML frevvo tenant
If your SAML userIds are in the format <username>@<domain name>, when you log in to frevvo the frevvo tenant name is appended to the userId. This is as designed. You will see <username@domain name@frevvo tenant name> as the logged-in user at the top of the screen. If your domain name is the same as your frevvo tenant name, it will appear as if the domain name is listed twice, for example, tom@frevvo.com@frevvo.com.
Session Timeout
Session timeouts are configured in frevvo and in your IDP. If a user's session ends before the IDP timeout is reached, they will automatically be logged back into frevvo if they try to access it again. It is recommended that the frevvo session timeout and the IDP session timeout be configured for the same value.
Embedding Forms/Workflows in your website
Embedding forms and workflows into your website when using the SAML Security Manager, will work in the following scenarios :
- The visibility of the form is set to Public.
- The visibility of the form is set to Public in Tenant and the user is already authenticated to SAML
Embedding forms and workflows into your website (and other use of the Link (Email/Webpage) share URL) is NOT supported if the visibility of the form is set to Public in Tenant and the user is NOT already authenticated to SAML. This is because frevvo must direct the user to the IDP login screen and the browser will not allow loading the IDP login page in frevvo's form iframe. Users will see an error like this one if you open your browser's console:
Refused to display 'https://....' in a frame because it set 'X-Frame-Options' to 'deny'.
If the tenant is using a SAML security manager, always use the Raw form link (see this documentation) to access your forms. This link will not load the form in a frame and login will work as expected.
If you are embedding your forms inside another website, then make certain that user has to login to IDP before they can see that web page. If the user is already logged in, the form will load correctly (even inside a frame).
Automating the Daily CSV Upload
Customers using the SAML Security Manager, often want to schedule a daily upload batch job to automatically handle the synchronization of users between their IDP and frevvo. The Java Client API is one way to do this. Refer to the How do I batch upload users from the api? topic for the details.
Retrieving Custom Attributes from LDAP in a SAML Tenant
Custom properties in LDAP server for the logged-in user can be made available so you can pull them into your form/workflow using a frevvo business rule. Attributes have to be configured and released in your IDP configuration for them to be available on login. There are several steps that have to happen to accomplish this:
- Make sure Authentication Only is unchecked in your SAML tenant.
- Make sure the custom attribute(s) are configured in your LDAP server and assigned to the correct users.
Configure and release the custom attributes as SAML attributes in your IDP.
The procedure to expose custom attributes will differ depending on the IDP you have selected. Refer to your IDP documentation or your on-staff IDP expert to complete this step.
- Map the attribute with this name in the Custom section of the tenant setup screen.
- You can do this when you are creating your SAML tenant or by accessing the Edit Tenant link, after signing on as the tenant admin of your existing SAML tenant.
- Save the tenant configuration.
- Write a frevvo business rule to populate controls in your form/workflow with the information.
Example:
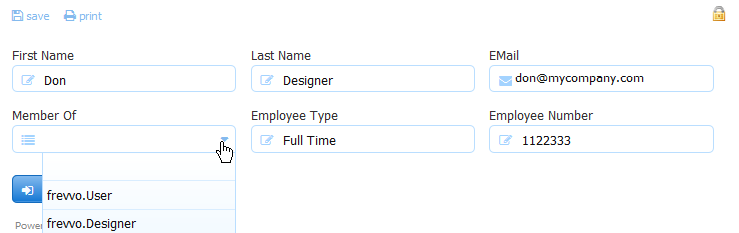
Let's take a look at a frevvo installation using a SAML tenant, Shibboleth as the IDP and Active Directory for authentication. When the user logs into the SAML tenant, you want to populate these fields in your form with the information from the LDAP server:
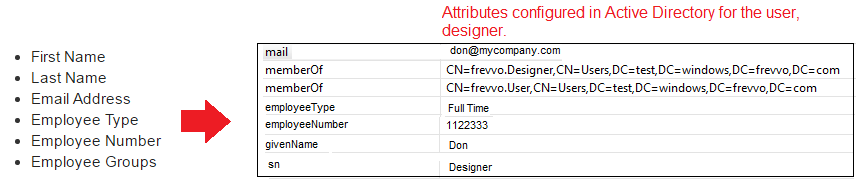
These attributes must be configured and released in your IDP. The process to expose the attributes varies for each Identity Provider. In our example, which uses the Shibboleth IDP, configuration and release of the attributes is done in two files, attribute-resolver.xml and attribute-filter.xml. You may need to confer with your on-staff IDP expert to complete this step.
Here is an example of the section of the attribute-resolver.xml file that was added for the employeeType and employeeNumber custom attributes: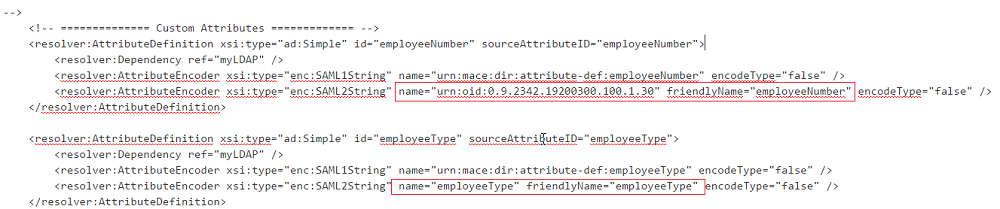
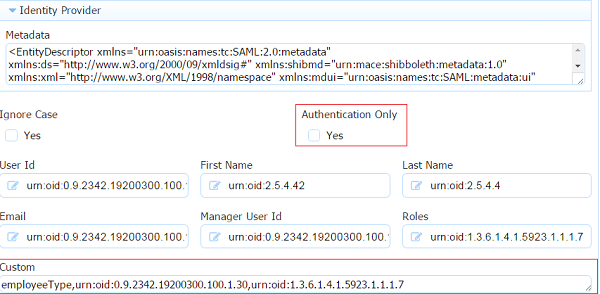
When the attributes are configured in the IDP, add them to the Custom section for attribute mapping by editing/creating your SAML tenant :
Note the friendly name for the employeeType is listed here while the name of the employeeNumber attribute is used. This was done to match the configuration of the attributes in the IDP.
Next, create your form with fields to collect the attribute information. Include a Dropdown control that will be populated with the groups (roles) that are assigned to the designer user in Active Directory. Add a rule to pull the information into your form:
if(form.load) {
    FirstName.value = _data.getParameter('subject.first.name');
    LastName.value = _data.getParameter('subject.last.name');
    EMail.value = _data.getParameter('subject.email');
    EmployeeType.value = _data.getParameter('subject.employeeType');
    EmployeeNumber.value = _data.getParameter('subject.urn:oid:0.9.2342.19200300.100.1.30');
  MemberOf.options =JSON.parse(_data.getParameter('subject.urn:oid:1.3.6.1.4.1.5923.1.1.1.7'));
}
Troubleshooting Tips
Login fails with illegal Key Size Error
After a failed login, if this error message appears in the <frevvo-home>\tomcat\logs\frevvo.log file:
org.apache.xml.security.encryption.XMLEncryptionException: Illegal key size
at org.apache.xml.security.encryption.XMLCipher.decryptToByteArray(XMLCipher.java:1822) ~[xmlsec-1.5.7.jar:1.5.7]
…
org.opensaml.xml.encryption.DecryptionException?: Failed to decrypt EncryptedData?
at org.opensaml.xml.encryption.Decrypter.decryptDataToDOM(Decrypter.java:546) ~[xmltooling-1.4.4.jar:na]
…
Solution
This error indicates the Java Cryptography Extension (JCE) Unlimited Strength Jurisdiction Policy Files are missing in the Java Development Kit (JDK) software of your on-premise installation. Ensure you have the supported version of JDK installed which includes the JCE.
The IDP login page does not display in the Microsoft Edge Browser
On Premise customers may see a blank page when browsing the URL to access your SAML tenant in the Microsoft Edge browser. There is a known issue with the Edge browser and untrusted self-signed certificates, especially where redirect is concerned. Registering the certificates in Windows will not work. The workaround is to:
- Refresh the page. It shows the untrusted site warning.
- Click on the Run anyway option to display the stale SAML request message.
- Enter the login url again and the IDP login page displays
Chrome browser: - You may see "Connection is not private" messages -skip these warnings and the login page displays
Access Denied Authentication Required error
This error typically occurs if the login is invalid, but may also occur if the max concurrent user limit has been reached. The max concurrent user limit can be configured by the server admin for On Premise installations.
SAML Errors
The table below lists errors you may encounter when configuring your tenant with the SAML Security Manager. Verify the recommended values to resolve.
| Parameters | Value to Verify | Error on Edit Tenant Page | Error While Accessing Tenant |
|---|---|---|---|
| SP Metadata | random | org.opensaml.xml.parse.XMLParserException: Invalid XML | NA |
| <md:EntityDescriptor xmlns:md="urn:oasis:names:tc:SAML:2.0:metadata" ID="http___example.com_8082_frevvo_web_alias_saml" entityID="http://example.com:8082/frevvo/web/alias/saml"> </md:EntityDescriptor> | No error while adding/editing tenant | Application Error when accessing the login URL javax.servlet.ServletException: org.opensaml.saml2.metadata.provider.MetadataProviderException: No local entity found for alias saml, verify your configuration. Logs: Same exception with stack | |
| Change domain name to something else e.g. example.com to localhost in the original metadata generated | No error while adding/editing tenant | UI: Web Login Service - Unsupported Request The application you have accessed is not registered for use with this service. Logs: No Error | |
| In case the certificates in metadata are invalid and we need to regenerate the metadata. | No error while adding/editing tenant | Web Login Service - Message Security Error | |
| IdP metadata | Some syntax error in xml | org.opensaml.xml.parse.XMLParserException: Invalid XML | NA |
| Removed certificates(tag : <ds:X509Certificate>) from IdP metadata xml | No error while adding/editing tenant | UI: Access Denied. Authentication required. Logs : 2017-11-02 16:54:25.904 WARN saml 9c539fc6-1afb-4bb7-987f-6fd38b8e260f 7584 --- [http-nio-8082-exec-1] com.frevvo.forms.web.LoginResource : Login failure org.springframework.security.authentication.AuthenticationServiceException: Incoming SAML message is invalid | |
| User Id | Wrong value | No error while adding/editing tenant | The IdP login page appears. After login following error on UI: Application Error Could not save user null; SQL []; Cannot insert the value NULL into column 'userId', table 'frevvo74.dbo.users'; column does not allow nulls. INSERT fails.; nested exception is com.microsoft.sqlserver.jdbc.SQLServerException: Cannot insert the value NULL into column 'userId', table 'frevvo74.dbo.users'; column does not allow nulls. INSERT fails. Logs: Same exception with stack trace |
| First Name | Wrong value | No error while adding/editing tenant | No Error in accessing and using tenant. The firstname remains blank in the edit user page. NULL in firstname colum in users table |
| Last Name | Wrong value | No error while adding/editing tenant | No Error in accessing and using tenant. The firstname remains blank in the edit user page. NULL in firstname column in users table |
| Wrong value | No error while adding/editing tenant | Application Error Could not update user (not password): dl in tenant: saml (id=1020); SQL []; Cannot insert the value NULL into column 'email', table 'frevvo74.dbo.users'; column does not allow nulls. UPDATE fails.; nested exception is com.microsoft.sqlserver.jdbc.SQLServerException: Cannot insert the value NULL into column 'email', table 'frevvo74.dbo.users'; column does not allow nulls. UPDATE fails. Logs: Same Error with stack | |
| Manager User Id | Wrong value | No error while adding/editing tenant | reportsTo column in DB set to NULL. No error anywhere. |
| Groups | Wrong value | No error while adding/editing tenant | IdP login appears. After entering credentials, the following error is seen and the user can not log in: Access Denied. Either you are not authenticated or you do not have the proper permissions/role. Logs: 2017-11-02 15:48:38.836 WARN saml 15805e17-2a04-43dc-9d91-298da764a915 7584 --- [http-nio-8082-exec-9] com.frevvo.forms.web.LoginResource: Could not login dl: Access Denied. Either you are not authenticated or you do not have the proper permissions/role. |