...
supports the creation of a tenant using the SAML (Security Assertion Markup Language) Security Manager. Users in this tenant can log into via (SAML) version 2.0. SAML enables internet single sign-on by allowing users to authenticate at an identity provider and then access service providers without additional authentication.
...
...
| Section | |||||||||||
|---|---|---|---|---|---|---|---|---|---|---|---|
|
...
If Authentication Only is selected, SAML is used only for authentication. Authorization depends on the roles defined in . SAML will authenticate the user but not retrieve any of the attributes.
You may choose to use this mode if you:
...
- Active Directory:
- Customers using LDAP must ensure that the frevvo.User, frevvo.TenantAdmin and frevvo.Designer roles are specified on their LDAP/AD server.
- All users requiring access to must be assigned to the frevvo.User group.
- Tenant admin users must be assigned to the frevvo.User and frevvo.TenantAdmin groups,
- Designer users must be assigned to the frevvo.User and frevvo.Designer groups.
- Customers using LDAP must ensure that the frevvo.User, frevvo.TenantAdmin and frevvo.Designer roles are specified on their LDAP/AD server.
| Warning |
|---|
|
...
In the directions given below, the Service Provider refers to frevvo . The metadata for your SAML tenant must be obtained first. Customers will need to configure the metadata when creating the SAML tenant.
- In-house Customers Only
- Create the frevvo Metadata file.
- Configure your Identity Provider
- Create/edit the SAML tenant
- Manage Users/Roles for your SAML tenant
- Logging into Live Forms in a SAML Tenant
Section 1 - In-house Customers Only
Cloud customers can skip the Generate Your Certificate and Install the Java Cryptography steps. These instructions are provided for On-premise customers only.
Generate Your Certificate
If you re using the frevvo tomcat bundle, the supplied keystore, frevvoKeystore.jks is located in the <frevvo-home>/tomcat/lib folder, The keystore contains a default certificate. Replace this with a certificate for your installation.
...
- Stop if it is running.
- Copy the default <frevvo-home>\tomcat\lib\ frevvoKeystore.jks to another location as a backup
- Login as administrator.
- Make sure the path to the keytool application is configured in your system path. keytool is part of the standard Java distribution (JDK or JRE)). For example, keytool is located in the C:\Program Files\Java\jdkx.x.x\bin directory in the JDK.
- Navigate to <frevvo-home>\ tomcat\lib or to the new location of the keystore if you changed the com.frevvo.security.saml.keystore property in the setenv or service.bat files
Delete the existing certificate:
Code Block keytool -delete -alias frevvo -keypass p@ssw0rd -keystore frevvoKeystore.jks -storepass p@ssw0rd
If you changed the password from the default, execute this keytool command to change the password in the keystore
Code Block keytool -storepasswd -keystore frevvoKeystore.jks - it will ask for the old password - p@ssw0rd and then prompt for the new one - The keystore password must match whatever is in the line that we added to the setenv pr service.bat files.
Generate a new certificate: Here is the command: Change the -dname value to the DNS name of your IDP.
If you changed the values of the com.frevvo.security.saml.key or com.frevvo.security.saml.password properties in the setenv or service.bat files then change the alias in the command and the keypass and storepass password parameters to match those values. The key and store passwords need to be the same as there is only one password property.
The dname in this keytool command specifies the X.500 Distinguished Name to be associated with the alias and is used as the issuer and subject fields in the self-signed certificate. While we provide a sample in the documentation, it is up to the customer (your security policy) to decide what the value should be when the certificate.for your installation is generated. Since this is a self-signed certificate - the dname really could be anything - but here is a link to the Oracle documentation to give you some idea of what you might want to set that too.
Execute this command to create a new certificate and stores it in the keystore.Code Block keytool -genkey -dname "cn=app.frevvo.com" -alias frevvo -keypass p@ssw0rd -keystore frevvoKeystore.jks -storepass p@ssw0rd -keyalg rsa -keysize 2048 -validity 3650
The certificate can be viewed by exporting it to a file. If you changed the password, substitute the new password in the command:
Code Block keytool -exportcert -alias frevvo -file frevvo.rfc -rfc -keystore frevvoKeystore.jks -storepass p@ssw0rd
...
Paste this URL into your browser:
Cloud Customers: https://app.frevvo.com:443/frevvo/web/saml/metadata/alias/{t} - replace {t} with the tenant id of your SAML tenant.
On-premise customers: http://<server>:<port>/frevvo/web/saml/metadata/alias/{t} - replace <server> with the ip of your server, <port> with the port number (if applicable) and t with your tenant id).
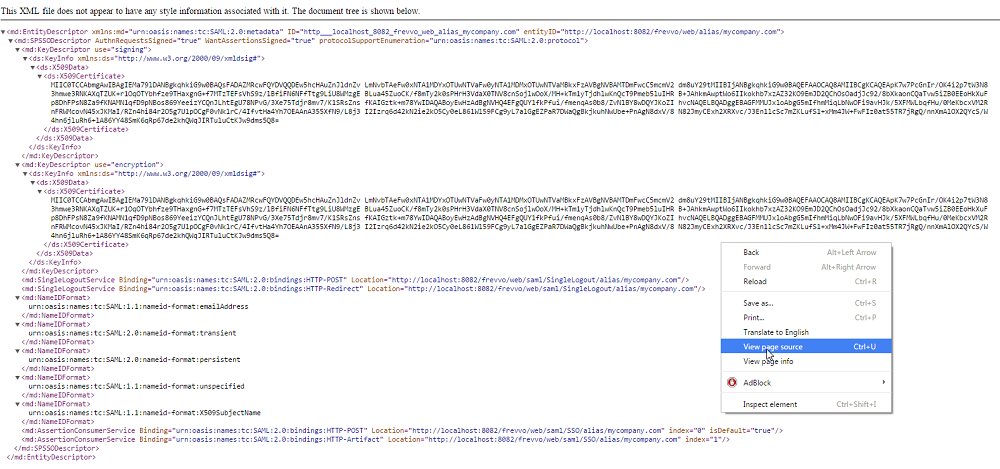
When the metadata displays, right click and select the browser option to View the Page source.
- Save the page as an xml file.
- Metadata must be generated for each SAML tenant. Each tenant will have a unique URL.
Section 3 - Configure Your Identity Provider
- Configure the Service Provider metadata for your Identity Provider. For example, the Shiboleth Identity provider requires modification of a file to provide the path to the tenant metadata xml file created above.
- Your Identity Provider must be configured to expose the attributes that requires. Attribute mapping is done when you create the SAML tenant. These are:
- User Id
- First Name
- Last Name
- Manager Id (optional)
- Groups
- Custom Attributes (optional)
We know that your IDP software of choice is outside of the frevvo server software and that you have the expertise in house to install, configure and maintain your IDP software. But here are some tips we have found that may assist you.
| Expand | ||||||||||||||||||||
|---|---|---|---|---|---|---|---|---|---|---|---|---|---|---|---|---|---|---|---|---|
| ||||||||||||||||||||
Configure Custom AttributesActive directory attributes other than the standard First Name, Last Name or Email are considered custom attributes. You can retrieve custom attributes in addition to the standard ones from Active Directory and pull the data into your form/workflow using Live Forms business rules. Perform these general steps:
|
| Expand | ||||||||||||||||||||||||
|---|---|---|---|---|---|---|---|---|---|---|---|---|---|---|---|---|---|---|---|---|---|---|---|---|
| ||||||||||||||||||||||||
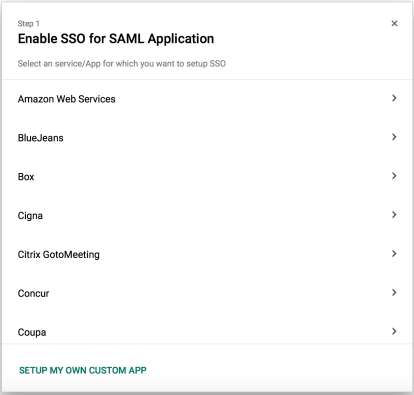
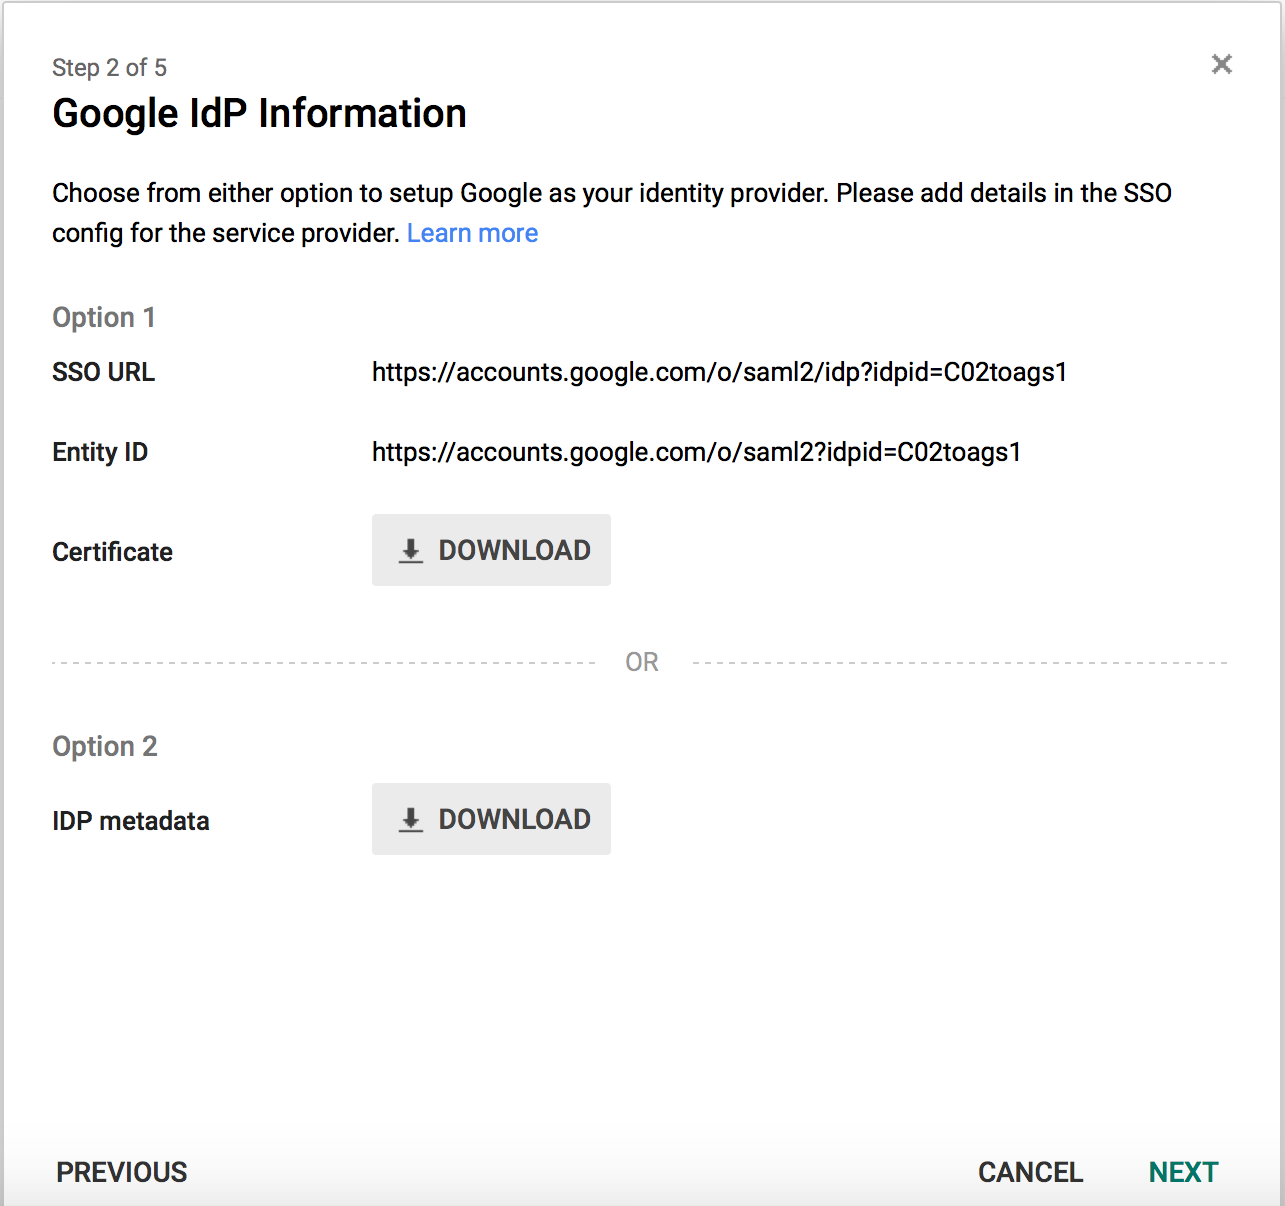
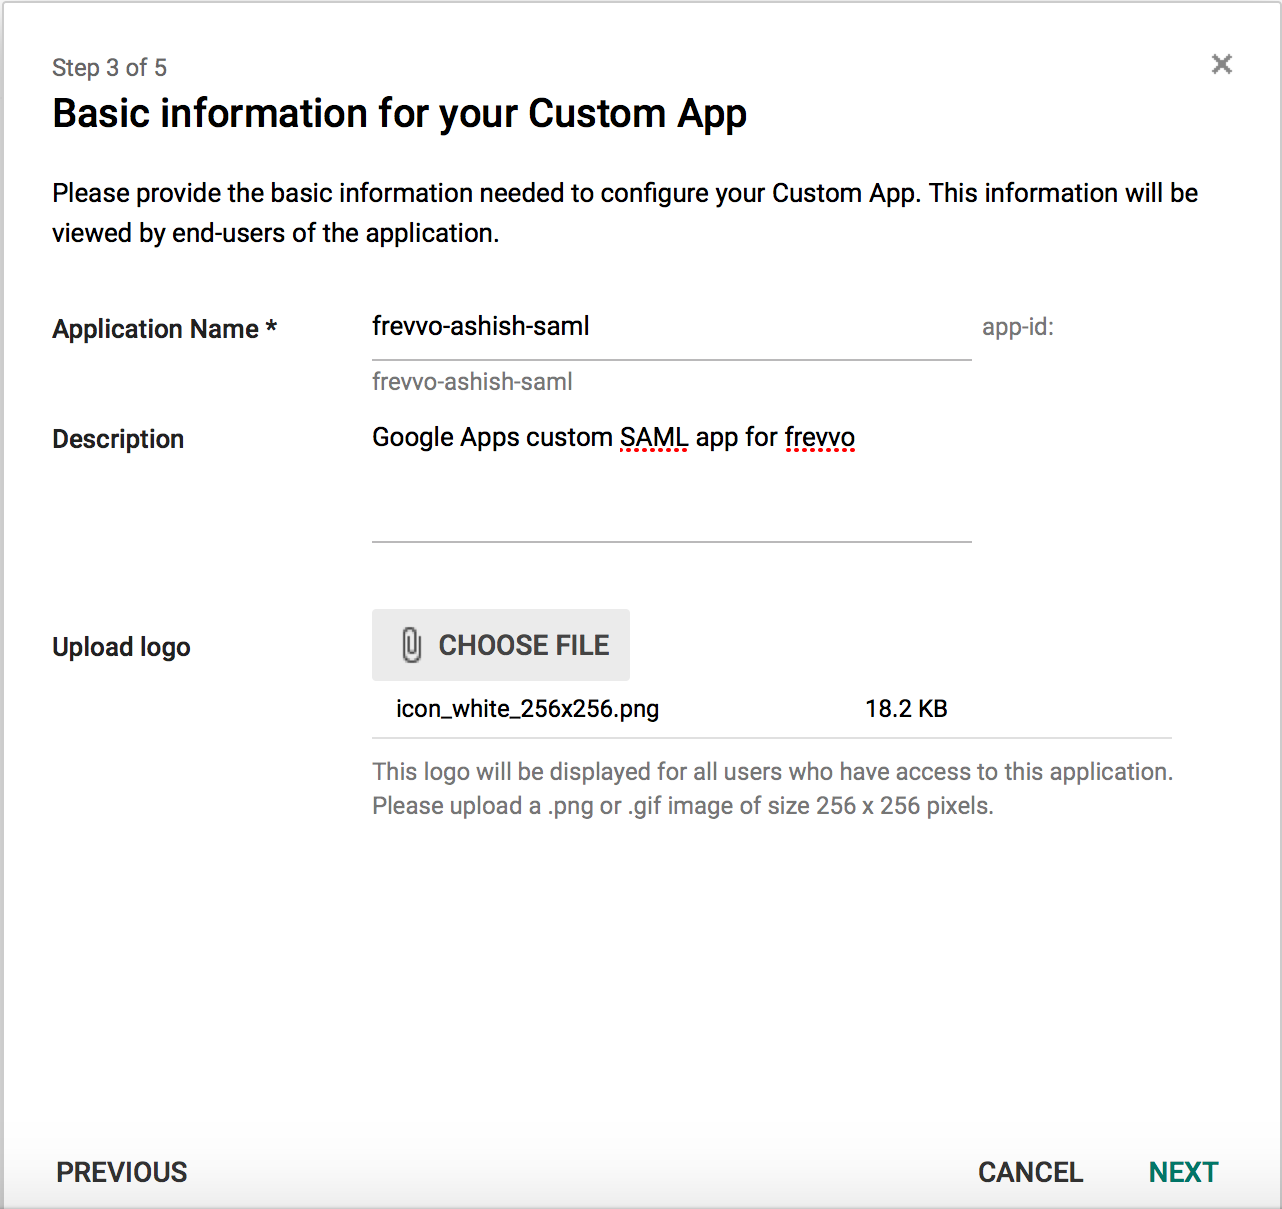
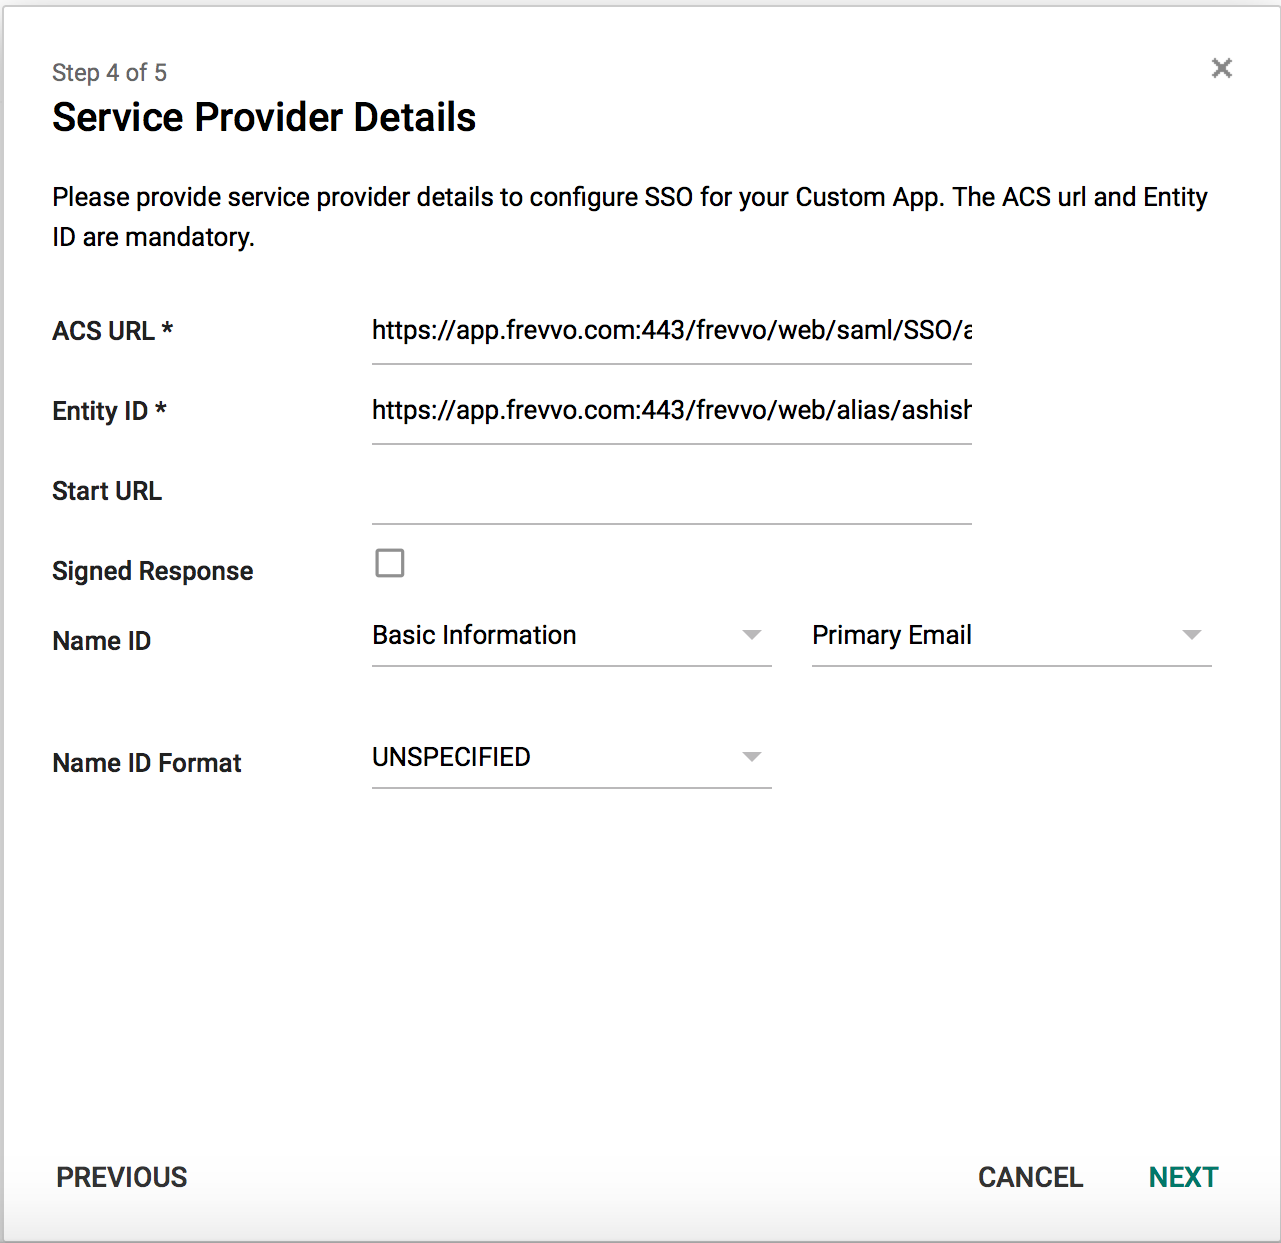
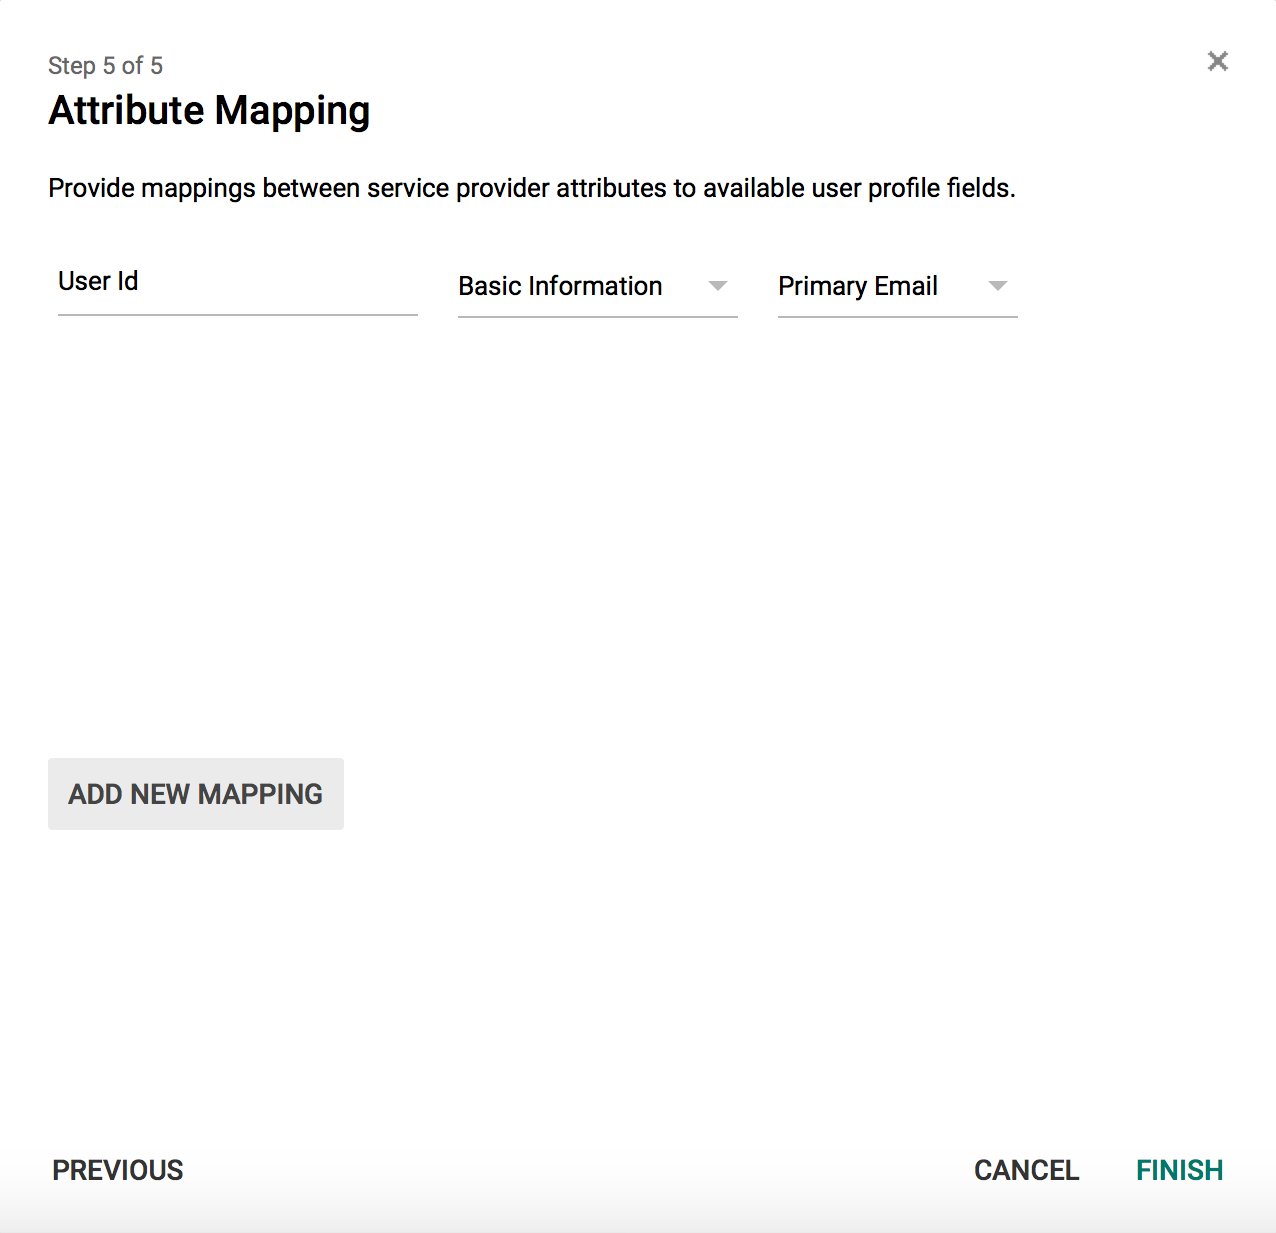
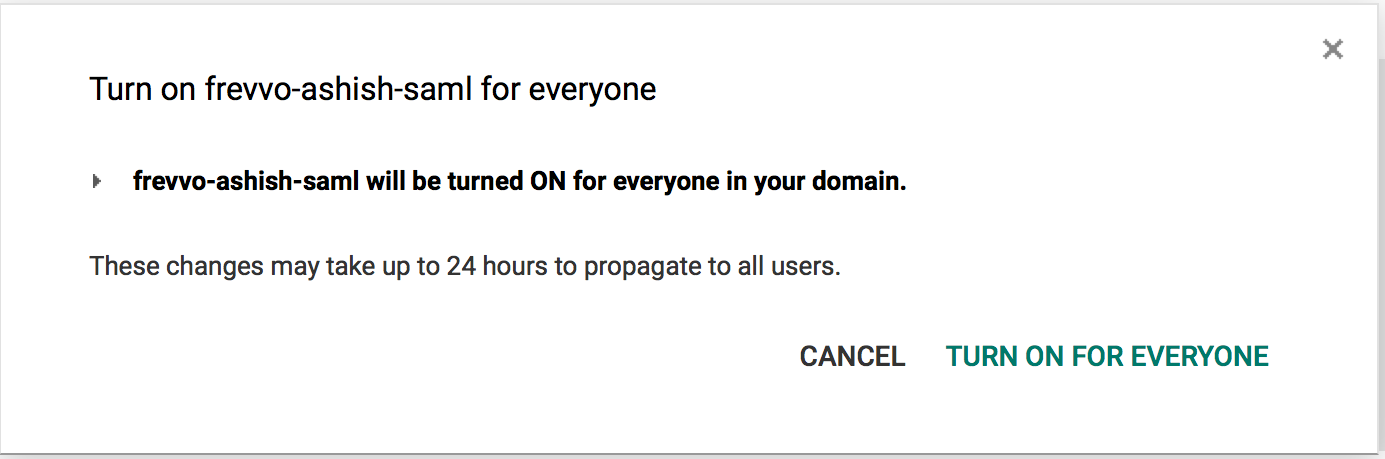
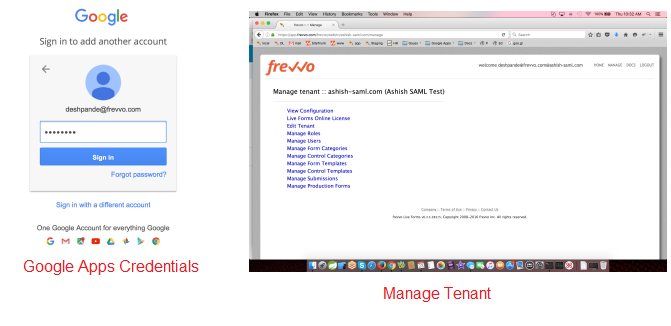
Follow these steps to setup Google as the Identity Provider and Live Forms as the Service Provider to configure Single Sign On. These instructions are for Cloud. On-Premise customers follow the same steps with one additional step to generate a certificate:
|
Section 4 - Create or edit the SAML tenant
To successfully create a tenant using the SAML Security manager, you will need the following:
- The metadata for your Identity Provider
- Attribute mapping information
cloud customers, migrating your tenant to the SAML Security Manager, will make the changes via the Edit Tenant screen. Once accessed, follow these steps beginning with step 2.
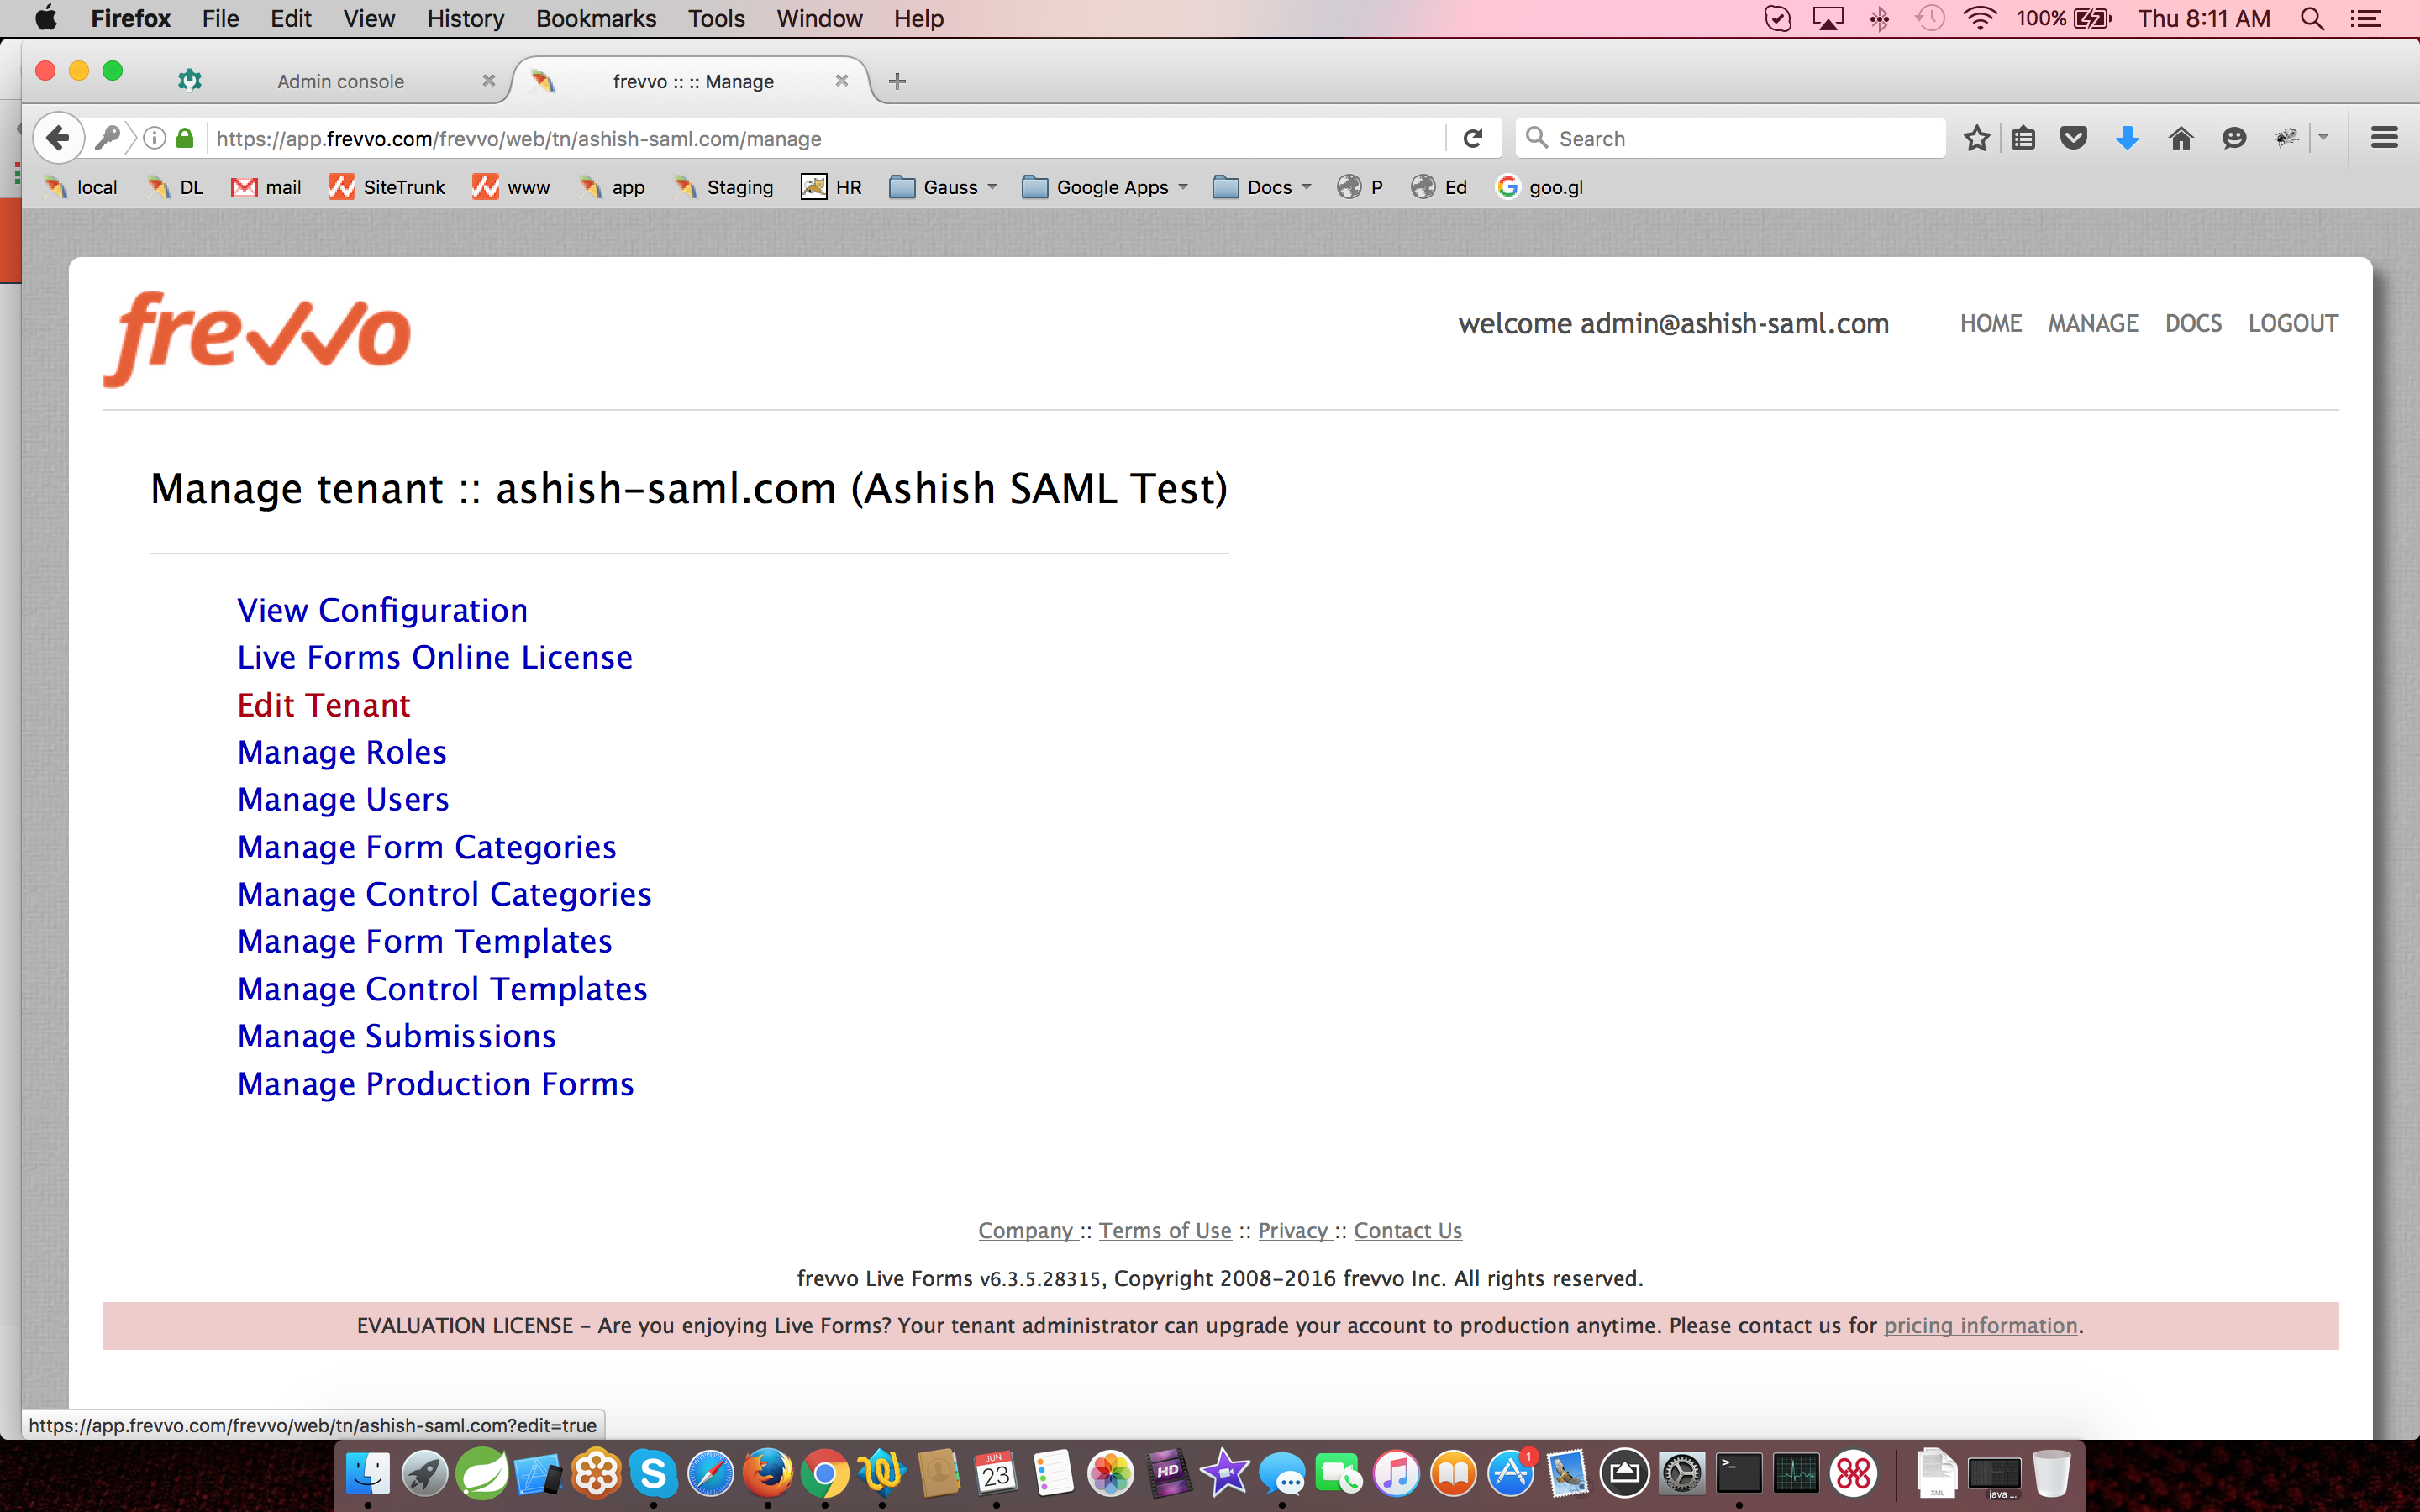
Log onto as the superuser (on-premise) or the tenant admin (cloud).
- Access the Add Tenant (on-premise) or Edit Tenant (cloud) screen.
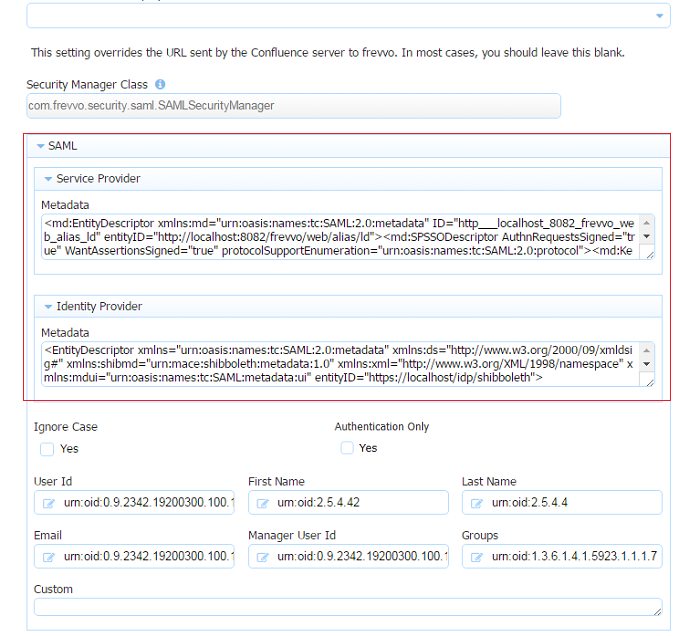
- Select SAML Security Manager from the Security Manager Class dropdown.
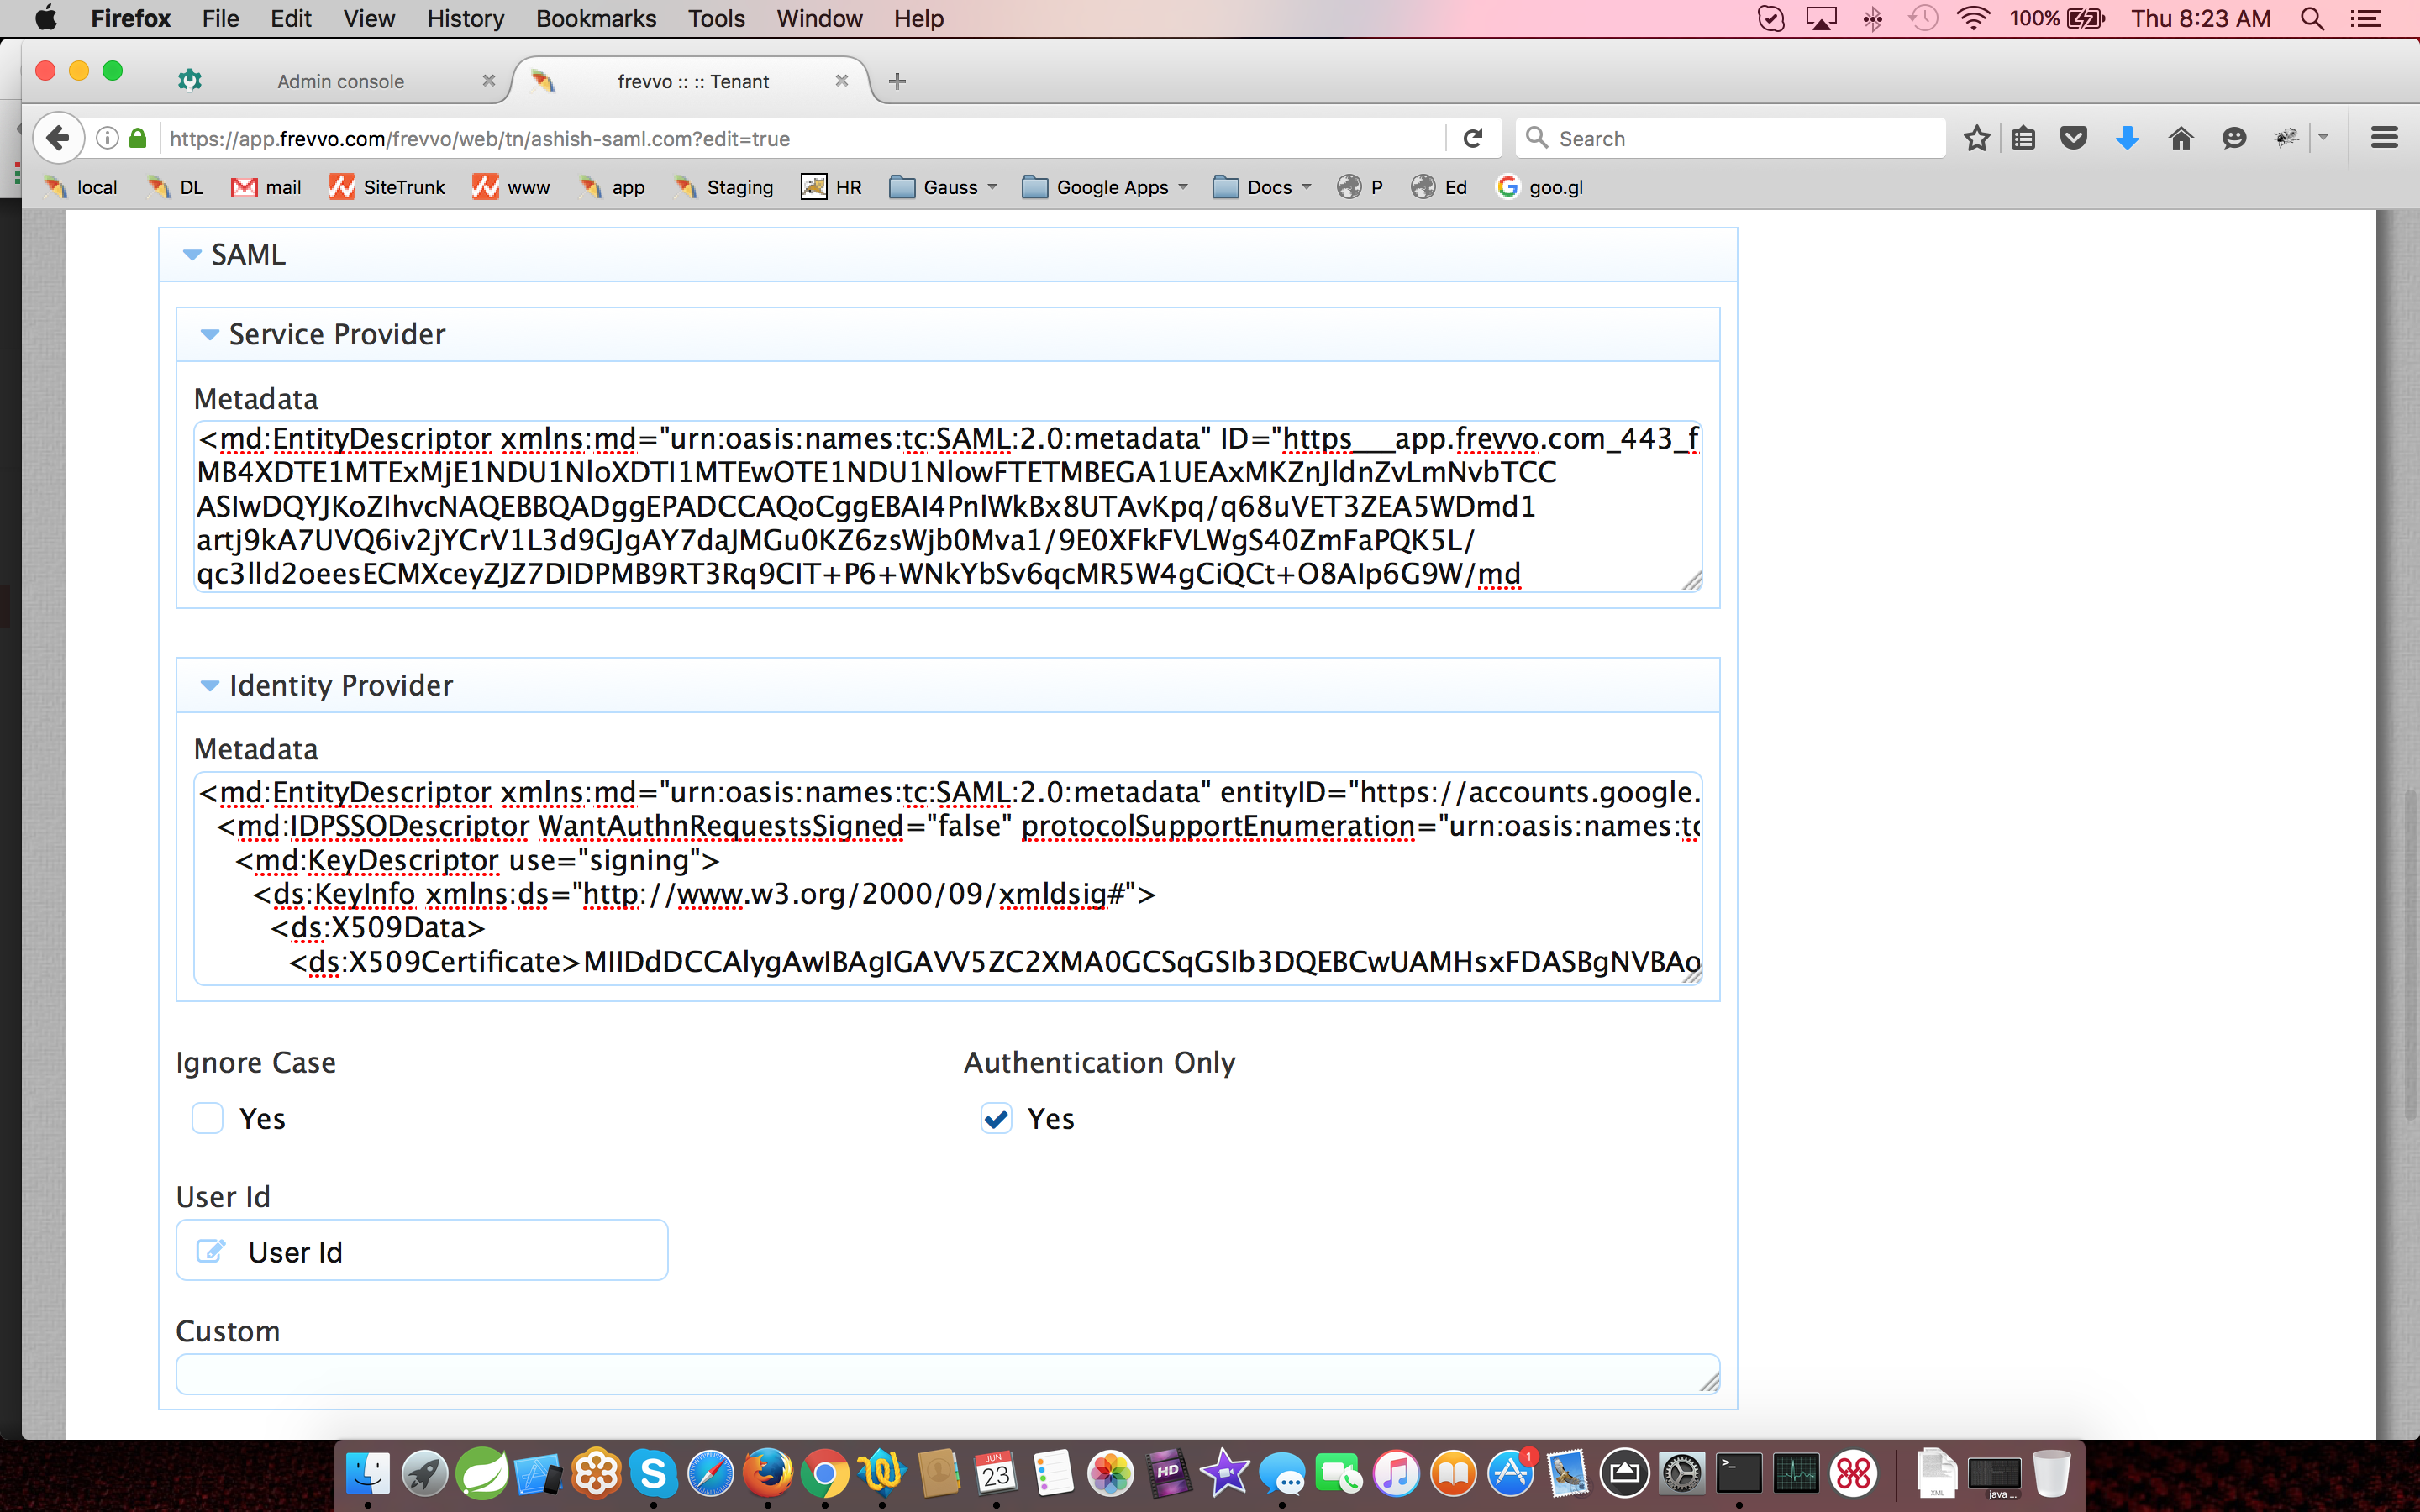
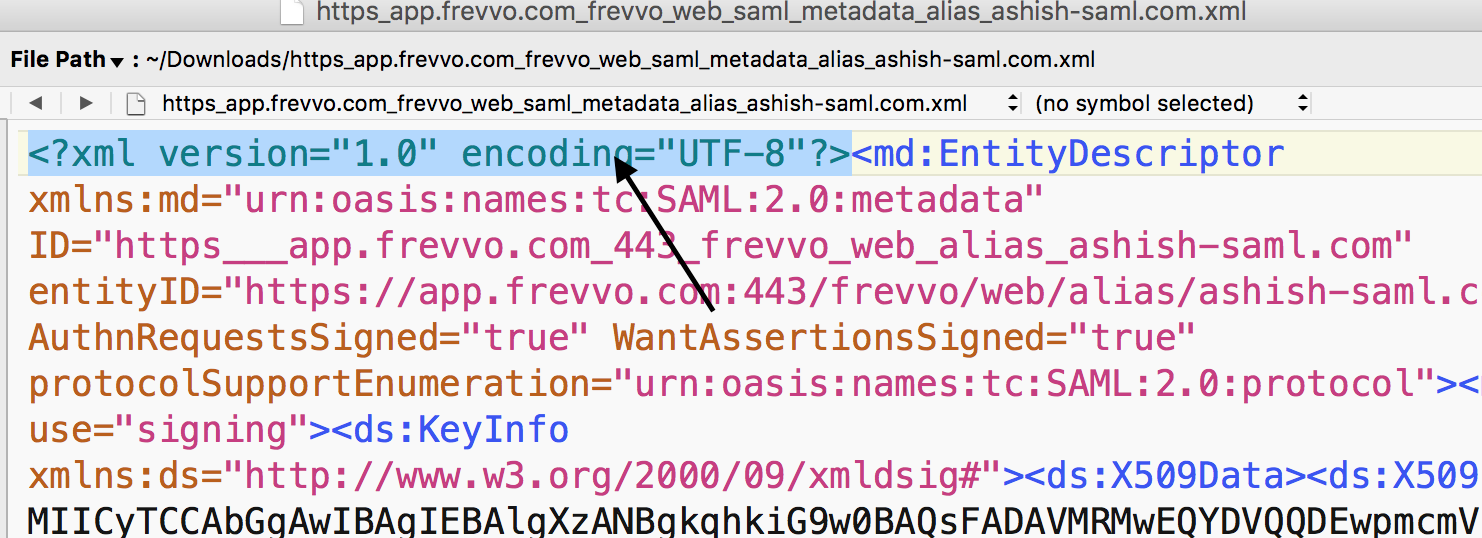
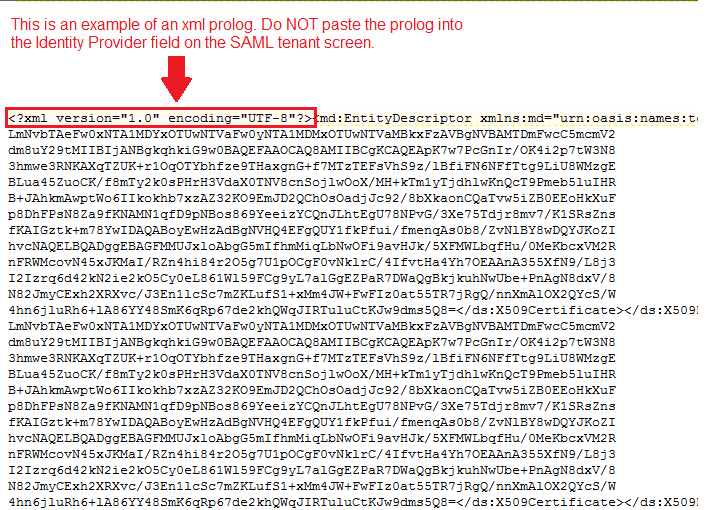
- Copy the Service Provider (frevvo) metadata into the Service Provider field. The xml should be pasted without the prolog. For example, the image shows an example of the frevvo metadata file before pasting:
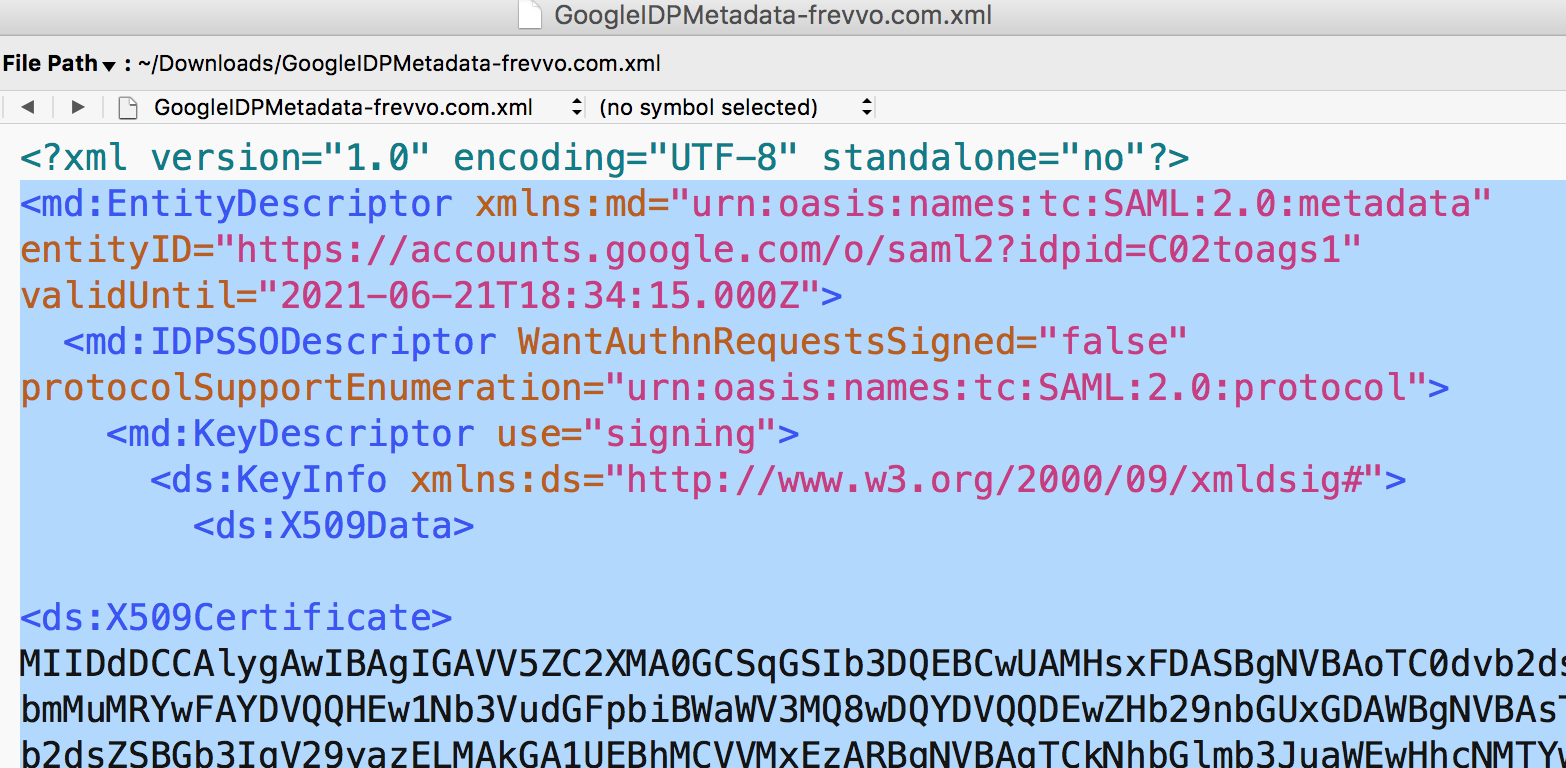
- Retrieve the metadata for your Identity Provider. For example, for the Shiboleth product the metadata is located in the idp-metadata file.
- Paste the metadata into the Identity Provider field. This metadata should also be pasted without the prolog.
- Check the Ignore Case checkbox if you are using LDAP for authentication and you want to ignore the case stored in LDAP systems for users/roles. It is checked by default. Refer to the /wiki/spaces/frevvo91/pages/901492728 topic for more information.
Check the Authentication Only checkbox if you want SAML to handle authentication and provide user identification but all other user attributes come from the database.
When checked, the screen display changes as attribute mapping, other than the mapping for the user id and custom attributes, is no longer necessary.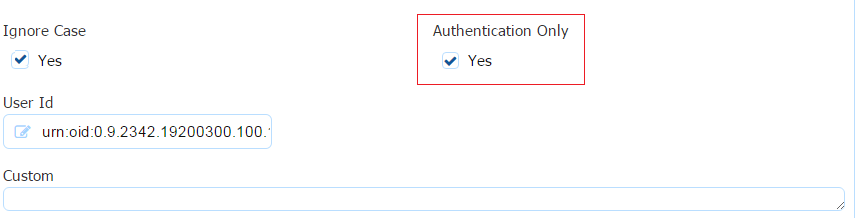
Note - If Authentication Only is checked:
- SAML will authenticate the user but not retrieve any of the attributes. Authorization depends on the roles defined in . Changes made in the UI will not be overridden if the user logs out and then logs in again.
- Manual creation of users & roles in the SAML tenant is required. This can be done with a csv upload.
- SAML will authenticate the user but not retrieve any of the attributes. Authorization depends on the roles defined in . Changes made in the UI will not be overridden if the user logs out and then logs in again.
- If Authentication Only is unchecked:
All users requiring access to must be assigned to the frevvo.User group in Active Directory. Tenant Admins must be assigned to the frevvo.User and frevvo.TenantAdmin groups. Designer users must be assigned to the frevvo.User and frevvo.Designer groups.
- Users are added (discovered) when they log in.
- It is important to know that a SAML tenant in this mode (SAML/LDAP handles authentication and authorization) that users and tenant admins can modify user information in the UI. If user information/role assignment is changed in the UI, the changes will be overwritten by the information in SAML the next time the user logs out and then logs back in again. In this case, make the changes in your Active Directory to make them permanent.
- If Authentication Only is checked:
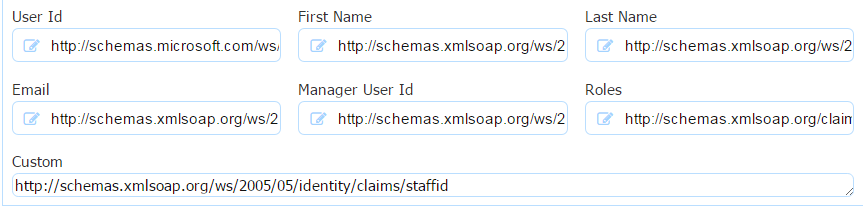
Map the attributes configured in your Identity Provider by entering the name for each attribute in the corresponding field on the screen. Be sure to provide the attribute name - not the friendly name. For example, if you are using Shibboleth for your Identity Provider the attribute information is located in the attribute-resolver.xml file. The image shows the section of the file where the attributes are defined.
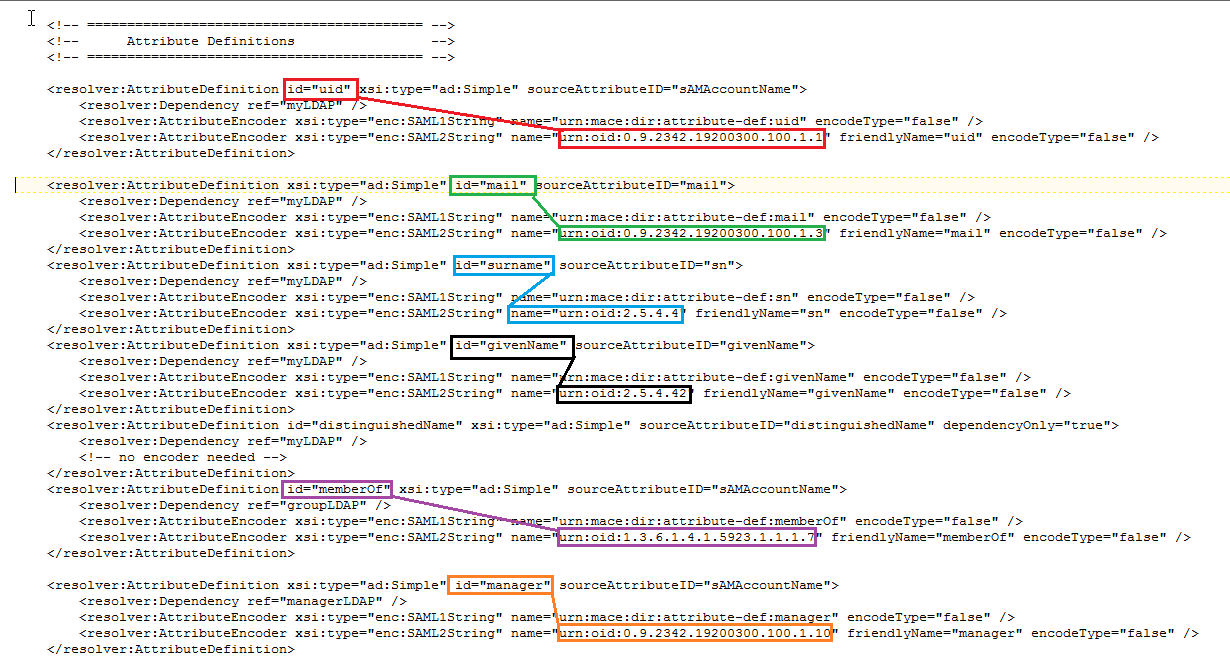
The image below shows the attribute mapping on the screen with the attribute names from the Shibboleth file: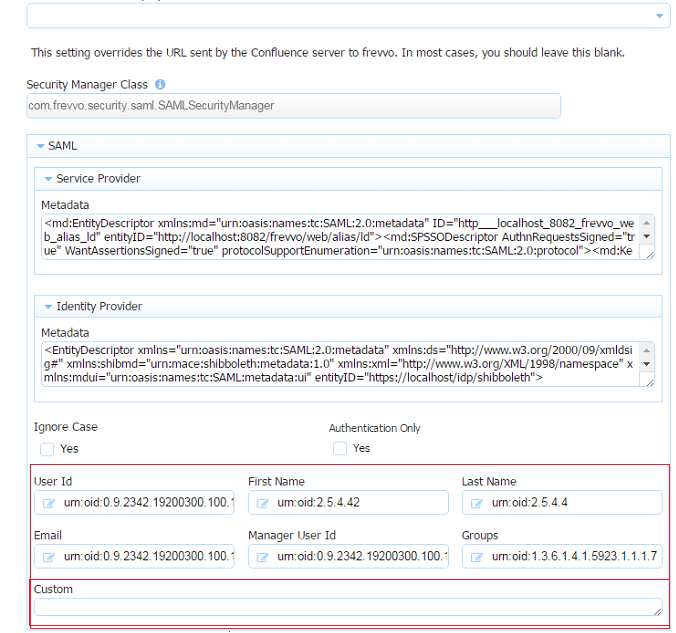
Note If Authentication Only mode is enabled for your tenant, mapping is only required for the User Id. Refer to step 8 for the details
- Custom attributes can be mapped by typing the attribute names in the Custom field separated by a comma.
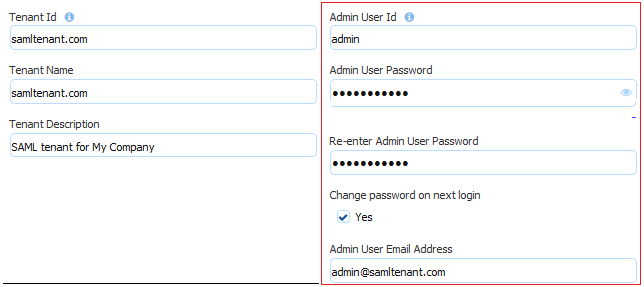
- Configure a tenant admin account. This account does not require SAML authentication. This tenant admin can log directly into .
- The tenant admin id, password and email fields are required. The Change password on next login field is optional. It is checked by default.
- When this tenant admin performs a form based login i.e. /frevvo/web/login, the password entered on this screen is used for authentication. This is also the URL used by the API. For cloud customers the <base> is always https://app.frevvo.com.
- If the tenant based login url is used i.e. /frevvo/web/tn/{t}/login then SAML login is used.
The forgot password function works for a SAML tenant admin user. For all others, it will display the error message about not being supported for the tenant.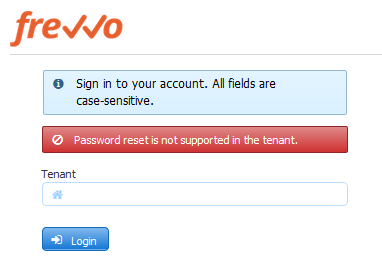
- Configure the Business Calendar for your tenant and HTTP Authorization Credentials if required.
- Click Submit.
...
Browse the URL below to initiate the SAML authentication process by redirecting to the Identity Provider login page.
Cloud Customers: https://app.frevvo.com:443/frevvo/web/tn/{t}/login. Replace {t} with the name of your SAML tenant.
- On-premise Customers: http://<server>:<port>/frevvo/web/tn/{t}/login. Replace <server> and <port> with your server information and t with the name of your SAML tenant.
| Note |
|---|
|
SAML Tenant Built-in Admin User
Just a reminder that the tenant admin account can login directly into Live Forms or use the SAML login.
When you create/edit a new tenant you are prompted to set up/modify a tenant admin user id, password and email address. This tenant admin does not authenticate via your SAML IDP. It only exists in Live Forms. If you experience an issue with your SAML configuration such that you can't login as an SAML authenticated user, use the built-in admin to login to your tenant as a tenant admin in order to fix your SAML configuration issue. Only one built-in tenant admin account is supported.
Browse this URL to login as the built-in: <base_URL>/frevvo/web/admin/login. When specified, will prepend the base URL to the URLs in your Form/Document Actions. The <base_URL> is typically http(s)://<your servername>:<port>.
...
typically http(s)://<your servername>:<port>.
- You must use the admin specific URL - <base-url>/frevvo/web/admin/login - to login as the built-in.
- Non admin users can also login using the admin specific URL.
If your tenant originally used the Default Security Manager and then you changed to the SAML Security Manager, this tenant admin account has already been setup. If you have forgotten the password, you can change it by:
- Browsing the admin specific URL - <base-url>/frevvo/web/admin/login - to login as . Enter the built-in userid. Click Forgot Password? This error message displays if any other user clicks on the Forgot Password? link after browsing the admin specific URL:
- Logging in as a SAML authenticated tenant admin and changing the password via Manage Users.
| Tip |
|---|
The frevvo superuser admin (Cloud customers) and the in-house superuser can change the password for the built-in |
...
If your tenant originally used the Default Security Manager and then you changed to the SAML Security Manager, this tenant admin account has already been setup. If you have forgotten the password, you can change it by:
...
| Tip |
|---|
The frevvo superuser admin (Cloud customers) and the in-house superuser can change the password for the built-in userid from the Edit Tenant page. |
What if you do not remember the userid of your original tenant admin? Follow these steps:
- Login as your authenticated Azure SAML tenant admin
- Click Manage Users and click the
edit admin icon
| Tip |
|---|
The frevvo (Cloud customers) and in-house superuser can see the built-in tenant userid from the Edit Tenant page. |
Logged in User Display in Azure SAML Live Forms tenant
...
Session Timeout
Session timeouts are configured in and in your IDP. If a user's session ends before the IDP timeout is reached, they will automatically be logged back into if they try to access it again. It is recommended that the session timeout and the IDP session timeout be configured for the same value.
Embedding Forms/Workflows in your website
Embedding forms and workflows into your website when using the SAML Security Manager, will work in the following scenarios :
- The visibility of the form is set to Public.
- The visibility of the form is set to Public in Tenant and the user is already authenticated to SAML
| Info |
|---|
Embedding forms and workflows into your website is NOT supported if the the visibility of the form is set to Public in Tenant and the user is NOT already authenticated to SAML. This is because frevvo must direct the user to the IDP login screen and the browser will not allow loading the IDP login page in frevvo's form iframeuserid from the Edit Tenant page. |
What if you do not remember the userid of your original tenant admin? Follow these steps:
- Login as your authenticated Azure SAML tenant admin
- Click Manage Users and click the
| Tip |
|---|
The frevvo (Cloud customers) and in-house superuser can see the built-in tenant userid from the Edit Tenant page. |
Logged in User Display in Azure SAML Live Forms tenant
If your SAML userIds are in the format <username>@<domain name>, when you login to the tenant name is appended to the userId . This is as designed. You will see <username@domain name@frevvo tenant name> as the logged in user at the top of the screen. If your domain name is the same as your tenant name, it will appear as if the domain name is listed twice.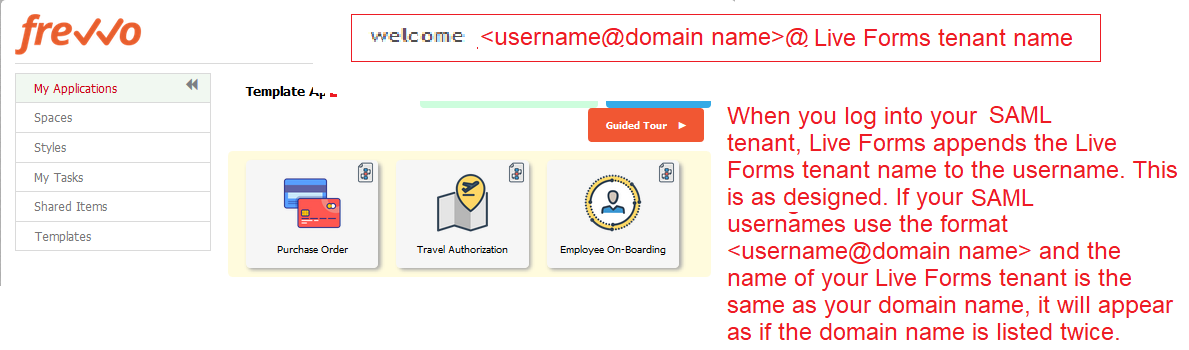
Session Timeout
Session timeouts are configured in and in your IDP. If a user's session ends before the IDP timeout is reached, they will automatically be logged back into if they try to access it again. It is recommended that the session timeout and the IDP session timeout be configured for the same value.
Embedding Forms/Workflows in your website
Embedding forms and workflows into your website when using the SAML Security Manager, will work in the following scenarios :
- The visibility of the form is set to Public.
- The visibility of the form is set to Public in Tenant and the user is already authenticated to SAML
| Info |
|---|
Embedding forms and workflows into your website (and other use of the Link (Email/Webpage) share URL) is NOT supported if the the visibility of the form is set to Public in Tenant and the user is NOT already authenticated to SAML. This is because frevvo must direct the user to the IDP login screen and the browser will not allow loading the IDP login page in frevvo's form iframe. Users will see an error like this one if you open your browser's console: Refused to display 'https://....' in a frame because it set 'X-Frame-Options' to 'deny'. |
| Tip |
|---|
If the tenant is using a SAML security manager, always use the Raw form link (see this documentation) to access your forms. This link will not load the form in a frame and login will work as expected. If you are embedding your forms inside another website, then make certain that user has to login to IDP before they can see that web page. If the user is already logged in, the form will load correctly (even inside a frame). |
Automating the Daily CSV Upload
...
- Make sure Authentication Only is unchecked in your SAML tenant.
- Make sure the custom attribute(s) are configured in Active Directory and assigned to the correct users.
Configure and release the custom attributes as SAML attributes in your IDP.
Tip The procedure to expose custom attributes will differ depending on the IDP you have selected. Refer to your IDP documentation or your on-staff IDP expert to complete this step.
- Map the attribute with this name in the Custom section of the tenant setup screen.
- You can do this when you are creating your SAML tenant or by accessing the Edit Tenant link, after signing on as the tenant admin of your existing SAML tenant.
- Save the tenant configuration.
- Write a business rule to populate controls in your form/workflow with the information.
Example:
Let's take a look at a installation using a SAML tenant, Shibboleth as the IDP and Active Directory for authentication. When the user logs into the SAML tenant, you want to populate these fields in your form with the information from the LDAP server:
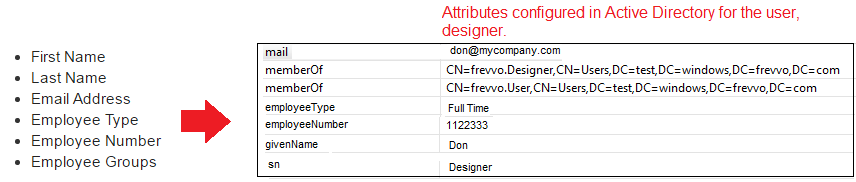
These attributes must be configured and released in your IDP. The process to expose the attributes varies for each Identity Provider. In our example, which uses the Shibboleth IDP, configuration and release of the attributes is done in two files, attribute-resolver.xml and attribute-filter.xml. You may need to confer with your on-staff IDP expert to complete this step.
...