Tomcat Bundle on Unix
On This Page:
Unix Installation
frevvo provides a bundle that includes the supported Tomcat version, the frevvo web application, the database connector web application, and the Google connector web application pre-deployed and pre-configured. The bundle works on Windows, Linux and Mac systems without any further configuration. If you are evaluating frevvo, we strongly recommend the bundle.
- You must register for a frevvo account, generate a trial license and download the tomcat bundle from the frevvo web site.
- Download the tomcat bundle to your local machine
- Generate a trial license. You will receive an email with a link to activate your account. Click the link in the email and follow the prompts.
- Ensure that you do not have another server running on ports 8443 or 8983.
- Unpack the frevvo.zip file to the location of your choice: e.g. /Users/me/frevvo. We'll refer to this directory below as <frevvo-home>.
- Ensure that the scripts are executable: chmod 755 <frevvo-home>/tomcat/bin/*.sh
- Navigate to <frevvo-home>/solr/bin. Run this command to make the solr startup file executable:
chmod +x solr - Navigate back to the solr directory
cd .. - Start the Insight server by typing:
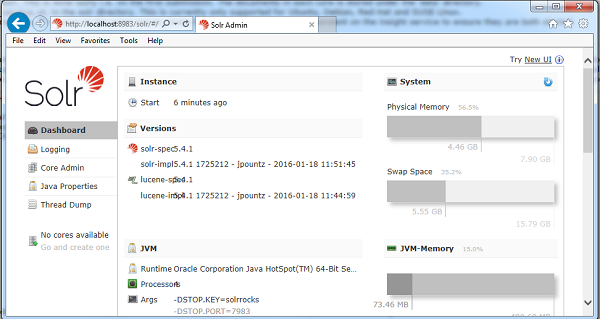
bin/solr start - this starts the Insight server in the background. - Browse http:<your server:port>/solr to verify the Insight server is running. The default values for the server and port are localhost:8983. Change them to point to the server and port where the Insight server is running if it is different from the default values. You will see the Insight server (Solr) dashboard with the current status:
- Start frevvo: <frevvo-home>/tomcat/bin/catalina.sh run. This starts tomcat on port 8443 with frevvo pre-configured.
- In your browser, go to https://<server-name>:8443/frevvo/web.
- A current license is required. If frevvo does not accept your license after multiple attempts, please try restarting your frevvo server after the license install. <frevvo-home>/tomcat/bin/catalina.sh stop. When tomcat has stopped, restart using <frevvo-home>/tomcat/bin/catalina.sh run.
If you start frevvo before the Insight server, you will see this message when you browse the frevvo login URL. Follow these steps to start the servers in the correct order: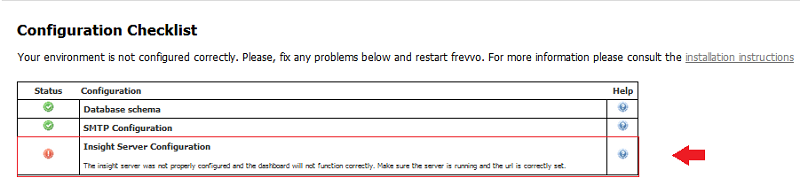
- Naviagate to your <frevvo-home> directory.
- Run the stop-frevvo.sh script.
- Navigate to <frevvo-home>\solr.
- Type bin\solr start to start the Insight server.
- Browse http://<your server:port>/solr to verify the Insight server is running. The default values for the server and port are localhost:8983. Change them to point to the server and port where the Insight server is running if it is different from the default values.
- Navigate to your <frevvo-home> directory.
- Run the start-frevvo.sh startup script.
Installing as a Linux Service
frevvo and solr can be installed and started/stopped as a Service. Follow these steps.
Make sure that the name of the directory where you installed frevvo does not have any spaces in it.
- Create two service files:
/etc/systemd/system/frevvo-tomcat.service
[Unit]
Wants=frevvo-solr.service

[Service]
User=frevvo
Group=frevvo
Environment=JAVA_HOME= /usr/lib/jvm/java-11-openjdk
Environment=CATALINA_PID=/opt/frevvo/tomcat/temp/tomcat.pid
Environment=CATALINA_HOME=/opt/frevvo/tomcat
Environment=CATALINE_BASE=/opt/frevvo/tomcat
WorkingDirectory=/opt/frevvo/tomcat
ExecStart=/opt/frevvo/tomcat/bin/catalina.sh run
ExecStop=/opt/frevvo/tomcat/bin/shutdown.sh
PIDFile=/opt/frevvo/tomcat/temp/tomcat.pid
SyslogIdentifier=frevvo-tomcat
Restart=on-failure

[Install]
WantedBy=multi-user.target
/etc/systemd/system/frevvo-solr.service
[Unit]
PartOf=frevvo-tomcat.service

[Service]
Type=forking
User=frevvo
Group=frevvo
Environment=JAVA_HOME= /usr/lib/jvm/java-11-openjdk
WorkingDirectory=/opt/frevvo/solr
PIDFile=/opt/frevvo/solr/bin/solr-8983.pid
ExecStart=/opt/frevvo/solr/bin/solr start
ExecStop=/opt/frevvo/solr/bin/solr stop
SyslogIdentifier=frevvo-solr
Restart=on-failure
LimitNOFILE=65000
LimitNPROC=65000

[Install]
WantedBy=multi-user.target
- Copy frevvo-tomcat.service and frevvo-solr.service to /etc/systemd/system/ folder
- Adjust the following in both frevvo-tomcat.service and frevvo-solr.service files:
- frevvo installation path
- Java installation path
- User and Group
Reload systemd
sudo systemctl daemon-reload
Start frevvo
sudo systemctl start frevvo-tomcat.service
Check frevvo status
sudo systemctl status frevvo-tomcat.service
Check solr status
sudo systemctl status frevvo-solr.service
Stop frevvo
sudo systemctl stop frevvo-tomcat.service
Next Steps
Your frevvo server installation is complete. You are now ready to create your first tenant, users, forms, and workflows. See the documentation for creating a tenant and users.
You can find examples of creating your own workflows on the Quick Start Video Guide page.