frevvo v11.1 is no longer supported. Please visit the Documentation Directory for our current Cloud Release and other versions.
Workflow Design Patterns
- Megan Ellis
This page is for new to experienced workflow designers who are building a new workflow and looking for a pattern to meet their business requirements. These examples may help you to choose the best design pattern for your situation before you begin building it. Here is chart to help you compare some common patterns; many workflows combine multiple patterns.
| Workflow Pattern | Best For | Example |
|---|---|---|
| Screenflow |
| An Employee On Boarding workflow in which the new employee fills out multiple forms such as Employee Info, IRS W-4, State Withholding, and Health Insurance Enrollment. |
| Multi Form Approval |
| A Professional Development Request Workflow that includes both Professional Development opportunity approval and a Check Request form, each of which need to be approved individually. |
| Role-Based |
| A Patient Referral that can be processed by any nurse and and reviewed by any doctor. |
| User-Based |
| An Expense Report that is always sent to the user Jerry for approval. |
| Dynamic Role/User |
| A Time Off Request that should route to the user's manager, and then the department chair, for approval. |
| Task Collaboration |
| See the next three examples below for task collaboration (previously known as 'ad hoc') patterns. |
| Save to Role (User Loop) |
| A Support Request that may require input from different support team members to complete. |
| Save to User |
| A Proposal Review where each reviewer can select the next reviewer from a dropdown. |
| Save to User or Role |
| A Contact Request that gives the user a choice at run time to save the task to return to later, reassign it to another specific user, or save the task back to the entire role. |
| Anonymous Participant |
| A Purchase Order that must be sent to the client for approval; the client accesses their step through an emailed link. |
| Anonymous Screenflow |
| A Job Application that has steps for Personal Info, Education, and Work History. |
| Anonymous User Starts Workflow |
| A Scholarship Application that is public, so anyone can start it using a form embedded on your website. The user verifies their email, then begins the workflow. |
| Automated Step |
| A Membership Application where the user completes Step 1, and Step 2 is an HTTP Wait-Notify step performed by a payment processing system. Completion by the service triggers Step 3, which is assigned to a user to complete the workflow. |
| Kick Off Form |
| A finance department uses a kick-off form to assign Budget Proposal Workflows for each department chair. |
| Rejection |
| A Student Add-Drop Request that the advisor may need to send back to the student for more information, or may be submitted as disapproved, skipping remaining steps, if not approved. |
| Parallel Workflow |
| A Purchase Order that requires multiple invoice approvals for completion. |
Screenflow (no users or roles)
A screenflow consists of consecutive workflow steps that are performed by the same user. To create a screenflow with a navigation toolbar, use the Workflow Design Wizard to add new or existing forms to each step, and select assignment type "None." For an existing workflow, use the Add Step Wizard to add a new or existing form with the Assignment Type "None." You can click on each of your workflow steps and look at the Assignment tab verify that the steps are not assigned to a user/role as shown below. You can set Form and Document actions as usual.

A navigation toolbar is displayed and the user will be able to navigate back and forth between the various steps in the screenflow. Note that you cannot go forward to the next step until the current step is valid. frevvo will automatically enforce this constraint similar to the way forms cannot be submitted unless they are valid.
All unassigned steps performed by a single user in a screenflow are considered one 'task.' In the example above, there are five steps that combine to a single task. This workflow task design consideration is helpful to know when designing approve/reject steps, applying business rules and viewing audit trails.
Multi-Form Approval Workflow
A multi-form approval workflow is a combination of a screenflow, where one user completes multiple separate forms, and an approval workflow. It allows User A to fill out multiple separate forms, and the User B (the approver) to approve each of those separate forms in their own screenflow. Let's say you have a Professional Development Request Workflow. The user needs to submit a form to request professional development approval, and a separate check request form to issue the funds. The manager also needs to approve each of these forms individually.
- Start by creating a workflow with four steps. In the Workflow Design Wizard, you will set them up as follows:
Step 1: Professional Development Request - Create New Form - Assignment is None.
Step 2: Manager Approval (Professional Development) - Approval Step* - Assign to a User: jerry (or your Manager's UserId). *This links to the parent step Professional Development Request.
Step 3: Check Request - Create New Form - Assignment is None.
Step 4: Manager Approval (Check Request) - Approval Step^ - Assignment is None. ^This links to the parent step Check Request.
Notice that this initial design is not the final step order that we will use. This is because when you create an Approval Step, it links to the nearest Parent Step above it. So, by designing steps in this order initially we allow frevvo to automatically create approval steps with their corresponding Business Rules and Assignments. In the next stage, we will move these steps around so they are performed in the correct order. - Click the second step, Manager Approval (Professional Development) and drag it down to the + icon between the third and fourth steps. This places the steps in the correct order in which they will be performed.

Since Steps 1 and 2 have no assignment, they will be performed by the initial user as a screenflow. The new Step 3 (Manager Approval (Professional Development)) is assigned to the Manager. Step 4 (Manager Approval (Check Request)) has no assignment, so it will also be performed by the Manager as a screenflow. - Edit the form(s) as desired. In this case, we added some fields to the Professional Development form regarding event name, type and cost. We added fields to the Check Request form regarding Payee and Mailing address. The My Items (relabeled My Info in this example) section appears on both forms - it prefills on the first form with the logged in user's details. In the second form, since the controls all have the same name and nesting level, the data entered in Step 1 will be passed into those fields in Step 2. So, on Step 2 (Check Request) we have disabled those fields. We also deleted the Initialization Rule on Step 2, as it is not needed. Both forms have Manager Approval sections and respective rules to show/hide those sections on the appropriate steps.


- Save and Test the Workflow. Notice that the initial user fills out the Professional Development Request, clicks Continue, and fills out the Check Request in a screenflow. Then, the Manager picks up the task for Manager Approval (Professional Development) and sees the Professional Development form with their approval section. They sign and click continue, and see the Check Request with another approval section in a screenflow. After approving the Check Request they can submit the workflow.
Role-based workflow
In a role-based workflow, you will assign one or more roles to one or more steps in the workflow. A step with roles can only be performed by an authenticated user who belongs to one of the assigned roles. Your administrator will have to create the required roles in advance. Create the step assignments in the Workflow Design Wizard, or in an existing workflow add the role name(s) to the Assign to Roles field on the Assignment tab. Begin typing the role name then select the role from the dropdown options. Repeat to add more roles.
In this example Step 2 can be performed by any user with the "Nurse" role, and Step 3 can be performed by any user with the "Doctor" role.


Sending a workflow step to a specific user
Sometimes, for example, when approving vacation requests or expense reports, you want the workflow to go to a specific person (the employee's manager rather than any manager). In this situation, roles are not appropriate since any user with the role Manager will be able to pick up and perform the pending request.
Create the step assignments in the Workflow Design Wizard, or for an existing workflow add the user name to the Assign to User field on the Assignment tab. Begin typing the user id then select the user from the dropdown options. Only one user id is allowed.
You can enter a template e.g. {ManagerId} as shown in the image below. Simply type the left curly brace and begin typing the Manager Id control name (Managerid) and the template will appear in the dropdown. Select it and it will add the template - {ManagerId} to the field.
Leave the Assign to Role field empty. Click Submit.
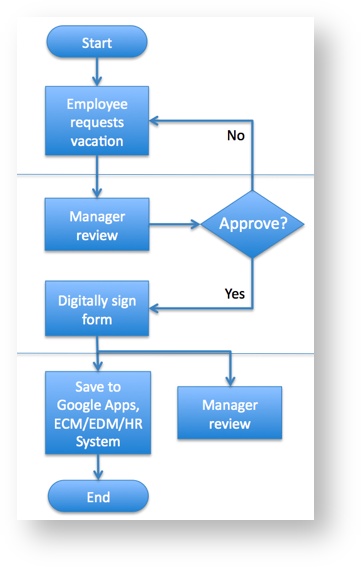

Dynamic User Assignment
You must have a control in any previous step with the specified name, i.e. in the example shown, you must have a control in the Leave Approval form from the first step with name ManagerId. This control must be populated with the frevvo user id of the specific person that you want to route to. At run-time, frevvo will resolve the target user id using the data in the ManagerId control and will route the workflow to that specific user.
You can populate this control manually (via a dropdown or by typing the user id) or preferably via a business rule that automatically pulls the information from a back end system or simply populates fields in your form/workflow step with the logged-in user's information.
You may want to route a step in a workflow to the user's manager. frevvo provides a built-in template that is available for every transaction. Select the template {subject.reports.to} from the Assign to User dropdown. The workflow will then be routed to the user who is specified in the Reports To field on the User's configuration screen
Using dynamic roles - determining the role at run-time
In some cases, the role is not known in advance. For example, you may have a workflow where the first step is a Purchase Order or a Loan Request and the second step is an approval; however the approval must be performed by a Manager if the amount is less than $1000 and a Supervisor otherwise.
- Add a control with name ApproveRole.
- Add a business rule that populates ApproveRole with Supervisor if Amount is <1000, and Manager if Amount is >1000.

- Click the approval step to open the Workflow Step Properties, and select the Assignment tab.
- Enter the template e.g. {ApproveRole} in the Assign to Role field.

Workflow steps that are assigned to a user, role, anonymous or dynamically are each considered their own 'task.' In the example above for Using Dynamic Workflows, there are two steps which are also two tasks. This workflow task design consideration is helpful to know when designing approve/reject steps, applying business rules and viewing audit trails.
Task Collaboration Workflow Patterns
Task Collaboration workflow patterns capitalize on the Save to User and Save to Role features to pass a workflow step between multiple users in a role, between users determined at run-time, or a combination of both of these methods in an ad hoc manner.
If you plan to use Save to User or Save to Role on the first step of a workflow, please review this documentation.
Save to Role - Looping between multiple users in a role
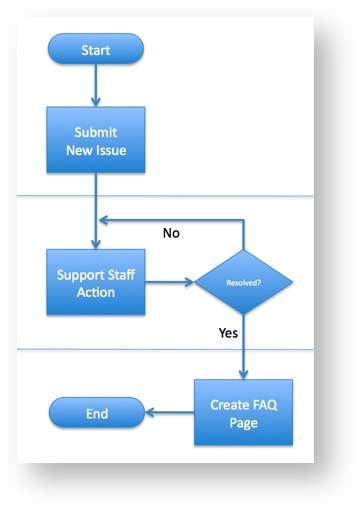
In some cases, you may want multiple actions taken during a step in the workflow. For example, consider an Issue Tracking workflow where the first step is an Issue entered by an employee or a customer and the second step is Actions taken by support staff. There could be multiple actions before the issue is resolved; however all actions are performed by a member of the support staff.
- Click on the Actions workflow step. Click the Settings tab. Check Saved to the task list and Save to Role.
- Navigate to the Assignment tab. Add the appropriate role or dynamic role as described above to the Assign to Role field. In our example, the assigned role is SupportStaff.
- Click on the Guided Designer: Settings editing mode
 and check Save/Load. This enables Save/Load for the workflow as a whole.
![]()
At run-time, a member of the support staff performs this step, takes an action and logs it in the workflow. While this user is performing the steps, other users in the Support-Staff role are locked out. When the user is done, he/she can click the Save button in the workflow rather than the Continue or Finish button as shown below. This will place the step back into the Task List of all members in the Support-Staff role.

If you want to avoid users accidentally clicking the Continue/Finish button, place a required control in the form such as a checkbox that must be checked before continuing to the next step. In this case, the Continue/Finish button will not be enabled until the checkbox is checked thereby preventing accidental clicks.
Viewing the status of an issue
Users can view the status of an issue using the Task List and its built-in search capabilities. You can search for any workflow tasks that you have performed. The audit trail also shows the progress of the workflow through various approval stages so you can always see where the workflow is currently sitting and the history as it was routed from person to person. Clicking on the  View icon also shows the data.
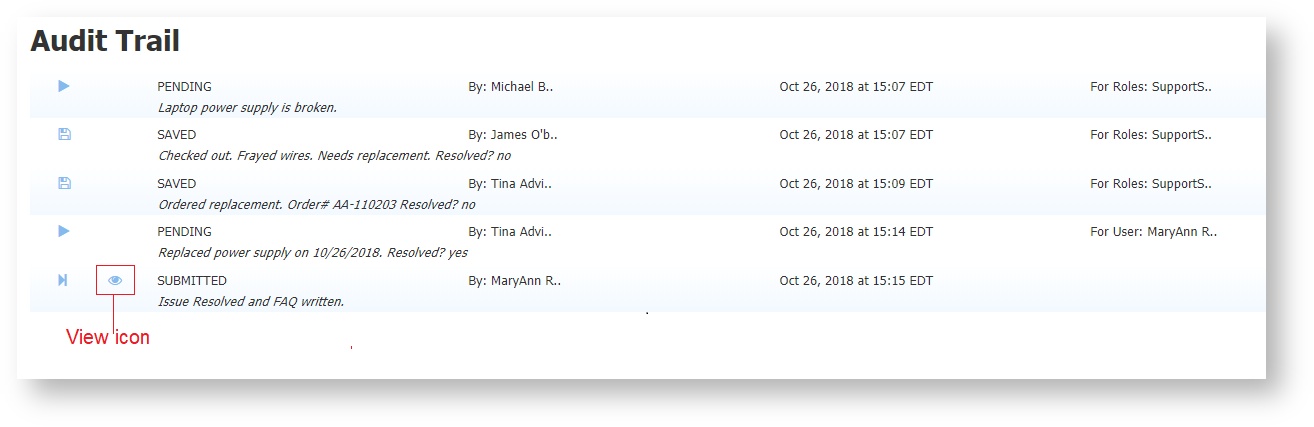
Save to User - pass steps between arbitrary users
Watch this 3-minute video to see how we at frevvo are using the Save to User feature to allow multiple users to collaborate on a workflow step in a flexible, ad hoc manner.
In some cases, you may want multiple actions taken during a step in the workflow but in an ad-hoc manner. For example, consider a workflow to review a proposal. The first step is the Proposal entry and the second step sends the Proposal for review. However, a number of users may review the proposal in any ad-hoc order.
Reviewer 1 selects another reviewer from a dropdown control and a task to review the Proposal is sent to Reviewer 2's Task List.
Leave the Assign to Role(s) field blank and use a dynamic User as described above.
- Click on the Reviews workflow step. Click the Settings tab. Check Save to the task list and Save to User.
- Navigate to the Assignment tab. Add the {Reviewer} template to the Assign to User field.
- Click on the Guided Designer: Settings editing mode and check Save/Load. This enables Save/Load for the workflow as a whole.
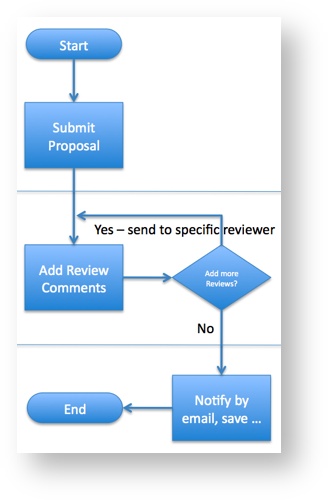

At run-time, frevvo will resolve the dynamic user id using a control in the form and the proposal will first be routed to that user. The user can make comments and decide to pass it on to a different reviewer. To do so, he/she selects the next reviewer from a control in the form e.g. a drop down and clicks the Save button in the workflow rather than the Continue or Finish button as shown below. This will place the step into the Task List of the selected Reviewer.
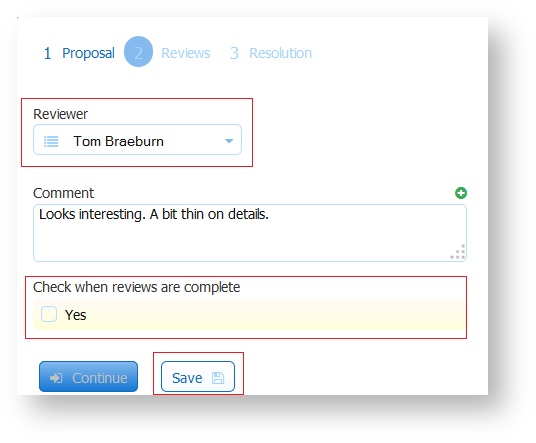
If you want to avoid users accidentally clicking the Continue/Finish button, place a required control in the form such as a checkbox that must be checked before continuing to the next step. In this case, the Continue/Finish button will not be enabled until the checkbox is checked thereby preventing accidental clicks.
Save to User or Role Dynamically
Let's consider a scenario where you want a step initially assigned to a Role, but also want the user to be able to enter some information and then save a task to their own task list to work on later. For example, here is a Contact Request form. Any user can perform step 1. Then the workflow routes to step 2 "Account Management", which is initially assigned to the role "Manager", so all managers are notified and any one of them can perform the task. Perhaps Jerry performs the task. He wants to make a note, and save it to his own task list so he can return to it later.

If the step is assigned to the role Manager and Save to Role is checked, when Jerry clicks Save, the task notifies everyone in the Manager role again, and is also on everyone's task list. To give Jerry the ability to save the task to his own task list, follow this pattern.
- Set the Step 2 Role assignment to a template.

- Then use a business rule to set that control to "Manager" on Step 1 (so that Step 2 initially goes to the all of the Managers' task lists), and null on Step 2. We're using the step as a condition here, but you could use any other condition that make sense for your use case.

- If the Role assignment resolves to null, the Save button will automatically save the task to the user's own task list. This audit trail shows the task initially assigned to the Manager role, then Saved to Jerry's task list.

You can take this one step further, giving Jerry the choice of saving to his own task list, another user's task list, or back to the role. Use templates for both User and Role Assignment, and check both Save to User and Save to Role properties on that step. We'll use a business rule to dynamically set either the User or Role to a valid value and the other to null.
- If Jerry indicates he wants to save the task to his own task list, set the User control to "jerry" and the Role control to null, activating the Save to User feature.
- If Jerry indicates he wants to save the task to another user's task list, set the User control to that user's id, and the Role control to null, activating the Save to User feature.
- If he indicates he wants to save the task back to the role, set the Role to 'Manager' and the User to null, activating the Save to Role feature.
We'll walk through this example step by step.
Create the Workflow
- Create a workflow with two steps: Contact Request and Account Management.

- Set up the form as desired, but be sure to add the following fields in the Account Management Section:
- Radio: What would you like to do with this request? with three options: Take, Assign, and Return. Set the option labels as desired.
- ComboBox: Assign To User (set to frevvo Users). If the user chooses to save the task to a different user, they will enter the userId here. You could use a dropdown or even a text control, but be sure it will resolve to a valid userId.
- Text: UserID. This can be hidden as it will be set by a business rules.
- Text: Role. This can be hidden as it will be set by a business rule.
- Text: Save Label. This is optional but can help personalize the form and give the user more context for what Save action they are performing. It is also hidden. We'll use it as a template to dynamically change the text on the Save Button based on the option the user selects.
- In our example form, we've also provided a Comments TextArea in a Repeat, so users can provide additional comments if the task is saved multiple times.

Add the Business Rule
Add a Business Rule like the following. This rule sets the UserID, Role, and Save Label fields based on the selection made in the radio What would you like to do with this request?. It also shows the Assign to User control if the user selects "Assign" so that they can enter a specific user to assign the task to.
var event = form.load;
// If the user wants to save the task to their own task list, set the userID to their id and other fields to null.
if (WhatWouldYouLikeToDo.value === 'Take') {
  UserID.value = _data.getParameter('subject.id');
  Role.value = null;
  AssignToUser.value = null;
  AssignToUser.visible = false;
  AssignToUser.required = false;
  SaveLabel.value = 'Save to your task list.';

// If the user wants to reassign the task to a specific user, allow them to select that user.
} else if (WhatWouldYouLikeToDo.value === 'Assign') {
  AssignToUser.visible = true;
  AssignToUser.required = true;
  UserID.value = AssignToUser.value;
  Role.value = null;
  SaveLabel.value = 'Save to ' + UserID.value + "'s task list.";

// If the user wants to save the task back to Manager task list, set the Role Manager and clear the user values.
} else if (WhatWouldYouLikeToDo.value === 'Return') {
  AssignToUser.visible = false;
  AssignToUser.required = false;
  AssignToUser.value = null;
  UserID.value = null;
  Role.value = 'Manager';
  SaveLabel.value = 'Return task to the Manager Role';

// Set Role to Manager by default if nothing is selected to avoid invalid task assignment
} else {
  AssignToUser.visible = false;
  AssignToUser.required = false;
  AssignToUser.value = null;
  UserID.value = null;
  Role.value = 'Manager';
  SaveLabel.value = 'Please select an option above if you would like to save this task.';
}
Edit Workflow Settings
In Settings editing mode, check Save/Load, which will show a Save button on the form.
Workflow Step Settings and Assignment
Return to Workflow editing mode.
- On the Account Management Step, check Save to the Task List, Save to Role, and Save to User.
- In the Save Label property, enter the template {SaveLabel}. This will show the Save Label that you set in your business rule on the form's Save Button.

- In the Assignment Tab, set Assign to User to the template {UserID}, then set Assign to Role(s) to the template {Role}. You must use templates here; if you enter a specific user or role(s) this workflow will not work as expected.

Test the Workflow
- Click
 Save and Test. Enter any info in the first step, Contact Request, and click Continue. The business rule sets the control Role to Manager by default, and the control UserID to null, so Step 2 Account Management will be assigned to the role Manager. Every user in that role will get a Task Notification email, and will have the option to perform the step.
 - Login as a user with the role Manager and go to the Task List. Click on the task for this workflow, and view the Audit Trail. Notice that the step is assigned to the role Manager.

- Perform the step. Choose the Option "Take it", and click the customized Save to your task list button at the bottom. Then, view the audit trail again and notice that the task has been saved to this user's (in this case, Jerry's) task list. This happened because the business rule has set the UserID control to "jerry" and the Role control to null, and the Save to User option is checked.


- Perform the task again. This time, select Assign to a Specific User. Notice that the Assign to User field becomes visible and required. Enter or select a valid user, and notice that the Save button's label updates to Save to <user>'s task list. Click that Save button. The task disappears from your task list, and Sue (or the user you selected) gets a Task Notification email.

- Login as the user you just assigned this task to, and find the task on their Task List. Check the Audit Trail, and see that the business rule set the UserID field to the user you entered in AssignToUser, and the Role field to null, which triggered Save to User to assign the task to this user.

- Perform the task, and this time select Return it to the Manager Role. Notice your custom Save button label updates, and click it. The business rule will set the Role control to Manager and the UserID field to null, which allows the Save to Role feature to run. This returns the task to the task list of all users in the Manager role, and also notifies them.

- Login as any user in the Manager role. Locate the task and check the audit trail, noticing the most recent Save operation which assigned this task to the role Manager. When you perform the task, you see all comments previously added by the other users. You can add more comments, and Finish the Workflow.

Anonymous Participant
Sending a workflow step to an Email address allows the step to be performed by an anonymous user. An anonymous user is a person who does not have an account in your frevvo tenant.
This a common workflow scenario. Some examples are:
- a Membership workflow that requires reference letters from an external person.
- a Purchase Order Approval requiring the customer's review and signature.
- a workflow that is sent to an External Vendor for a Quote.
Imagine a Purchase Order workflow consisting of three steps:
- Step 1 is filled out by the company salesperson. The sales person is logged into frevvo for this step.
- An email is sent to the customer with a link to Step 2 for the customer's review and signature. The customer is an anonymous user as they are not required to log into frevvo to perform this step. The workflow is suspended until the customer performs step 2.
- Step 3 routes the workflow back to the salesperson for continued processing. The salesperson is logged into frevvo for this step.
In the Workflow Designer:
Step 1 contains an Email control, named ClientEmail, where the salesperson enters the customer's email address.
Step 2 is the step that the Anonymous user sees. In this example, it is assigned to the {ClientEmail} form field template. To route the workflow to an email address in your workflow
Click the three-dot action menu on the anonymous step. Select Edit Properties.
Select the Assignment tab.
Add the email address or the control template to the Assign to Email (No login required) field.
This step sends a task notification email to the customer's email address provided by the template. The email contains a link to Step 2. When the customer clicks on the link, the workflow is suspended until step 2 is completed.
Step 3 in our example is assigned the role of Sales. When the customer approves/rejects the Purchase Order, a task is sent to the Salesperson - an authenticated user with a Sales role. The Salesperson must log into frevvo to complete the workflow.

The anonymous user can click the link more than once.
Refer to the Workflow Tutorial for step-by-step instructions to create the Purchase Order workflow described above and for more information about other features available in frevvo.
Anonymous Screenflow
A screenflow is a series of consecutive workflow steps performed by the same user. Consider the situation where you want to collect a large amount of information from an anonymous user Some examples are:
- Real Estate Listing
- Job Application
- Membership Renewal
You could design a long form with many fields to fill in on a single page. The user might have to scroll down to complete it. An Anonymous Task step followed by a screenflow sends an email with a link to access a series of screens to collect the information. If the Save on Navigate feature is configured, the anonymous user can complete the workflow in multiple sessions. Clicking the email link in the Task Notification email takes the user back to the last submitted step.
Anonymous users can navigate to previous steps in the workflow if the Navigation toolbar is configured.
Let's consider a Job Application workflow with the following requirements:
- The workflow is going to be performed by anonymous users. Anonymous users do not sign in to frevvo.
- The anonymous user receives an email that includes a link to the workflow.
- The workflow must collect a lot of information from the applicant: Contact Information, Education and Employment history, References and more. You can create one long form or design a screenflow with an Anonymous Task step and subsequent steps as separate screens to collect the information.
- The user must have the option to compete the screenflow in multiple sessions. Clicking on the email link takes the user back to the last step in the screenflow where the Continue button was clicked.
- The user must be able to navigate back to previous steps to review or update information that was previously entered.
Workflow Designer
- Step 1 of the screenflow has a field named EmailAddress that collects the applicant's email address.
- Step 2 is assigned to an email address. This is the first step that is performed by the anonymous user.
- All remaining steps in the screenflow are designed to collect the applicant's information: Contact Info, Education and Employment history, references etc. Remember, the anonymous user does not login to perform these steps so they cannot have a role, dynamic role or user property assigned to them.
- The Save on Navigate checkbox is checked and the Navigation Toolbar is configured.

The image shows an example of a possible screenflow design:

Use Mode
Anonymous screenflow users return to a previous step by clicking on the Navigation Toolbar..

Anonymous User Starts Workflow
There are times when you want an anonymous user to start a workflow, but you would like to use Save on Navigate, Reject, or Escalation features for the step(s) they will perform. To do this, your first step should collect the user's email address. The second step will contain the main content of the form. Assign the second step to the template that contains the email value from Step 1, i.e. {email} in the Assign to Email field. Here's an example:
Workflow Outline

Step 1: Collect Email Address

Step 2: Enter Data. This step is dynamically assigned to the email entered in Step 1.

Here is what it might look like in use mode:

Optionally, you could add screenflow (unassigned steps) after Step 2. Then, check Save on Navigate for the workflow. This will automatically save the user's data as they move forward thru the flow. Whenever they open the link in the Step 2 email, they will be automatically taken to the last step they were filling.

Step 3: Approval Step (notice that Reject is available here, so this workflow could be sent back to the anonymous user for corrections.)

Automated Step
Workflow data can be sent to an external processing system by adding an HTTP step to a workflow. When the workflow executes this step, it will be suspended until the external system replies.
For example, consider a Membership Renewal workflow consisting of three steps:
- The first step is the Membership Renewal form filled out by the member.
- The second step uses HTTP Wait-Notify to send the data to an external payment processing system. The workflow suspends until that system replies.
- The third step sends the workflow back to an unauthenticated user in a frevvo tenant to process the membership.
Parallel Workflow Patterns
A common design requirement is a workflow that branches out to multiple simultaneous tasks and then returns to the main workflow for finalization.

Though frevvo does not currently have a built-in parallel step feature, there are several ways a designer can approach this business requirement.
- Some of the simplest methods involve the creative use of Save to User or Save to Role design patterns, which can collect multiple approvals on the same step. By using dynamic assignment and business rules to add or remove approval sections, you can create a flexible workflow where the number of approvers and specific approvers are determined at run-time.
- Use an Activity Doc Action email to send a task to a user that occurs outside of the frevvo workflow. For example, an Employee OnBoarding Workflow needs the marketing team to create business cards. The workflow can simply send an email to this person to prompt them to perform that task, without needing to perform a step in the workflow. Using a screenflow you can send a second parallel email to HR asking them to add the employee information to the company contact list.
- Start a new workflow from another form or workflow. This allows you to create separate, parallel workflows that can happen simultaneously. If branching data back to the original workflow is not necessary, this design may be enough.
- If you wish to join data back to the original workflow, you can integrate our Google Connector or Database Connector with #3 above. Each separate workflow will write data to a Google Sheet or database. A rule will help determine with each submission if the data is complete. When it is complete, the next step of the original workflow reads the data from the Google Sheet or Database, effectively continuing the original workflow with data from the branched workflows.

Documentation on Parallel Workflow Patterns and examples will continue to be improved. However, since these patterns tend to be complex, we strongly recommend seeking help from our Client Services team who can recommend the best approach, assist with workflow design, and coordinate integration if needed. Please reach out to your frevvo Account Manager or use this form to request Client Services help.
Start a new workflow from another form or workflow
It is possible to "kick-off" workflow tasks for more than one user from a form. The HR or Finance person fills in the form and selects a user(s) to send the task to. A task for the workflow will appear on the Task List of the selected users.
Let's take a look at a simple example first. You want to create a form that launches an Employee Review workflow task and adds it to the employee manager's Task List. The form is executed by an HR employee when Employee Review time comes around. We will build an Employee Review Workflow and Employee Review Launch Form to see how this works.
- Build the Employee Review Workflow first. This is the workflow that is launched by the Employee Review Launch Form. Follow these steps:
- Create a new workflow and name it Employee Review workflow. If you want to know more about creating workflows refer to Workflow Tutorial.
- Drag and drop 4 text fields from the palette.
- Name them EmployeeID, ManagerID, FirstName, LastName respectively in the properties panel of each text control.
- You can add any additional fields you want but that is optional.
- Click Workflow to return to the Workflow Diagram. Click the first step to display it's properties.
In the Assignment tab enter {ManagerID} in the Assign to User field.
If assigning the first step to an email address template, you must set encode=false to prevent the "@" symbol from being encoded in your rule. The designer should use the template {EmailAddress!encode=false}.
- Select Save & Exit from the menu at the top right.
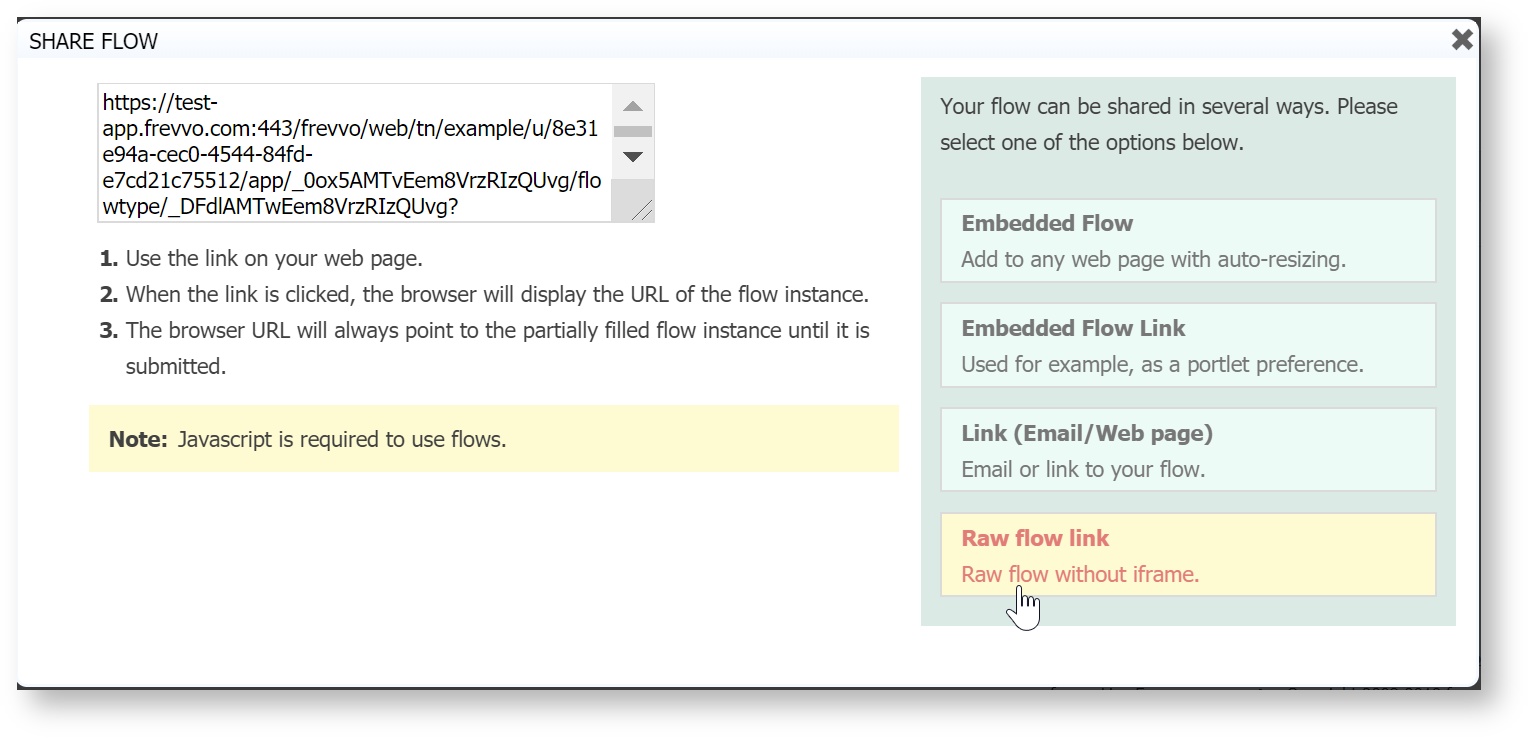
- Copy the Share Dialog Raw Link URL for the Employee Review workflow (the workflow you want to launch for each employee) into that field. To do this:
- Go to the Forms and Workflows homepage.
- Click the
 Action Menu for the Employee Review Workflow and select
  Share.
 - This will open a Share workflow wizard . Click on the Raw workflow link. Copy the URL in the left textarea. NOTE: any other share URL type will not work.
- Follow these steps to build the Employee Review Launch Form. This form will start multiple new Employee Review workflows.
- You cannot launch a workflow sent to the currently logged in user’s task list. You can only send it to another user’s task list. Make sure you are not logged into the other user’s frevvo account when running the Employee Review Launch form. This is being improved in a future release.
- Create a form named Employee Review Launch Form. To know more about creating form refer to Forms Tutorial.
- In the form drag and drop a text control from the palette.
- In the control’s properties on the left, name the control WorkflowToLaunchURL. You can enter any label you like.
- Uncheck the visible checkbox in the control’s properties to make the control hidden.
- Paste the copied URL in the Employee Review Launch Form WorkflowToLaunchURL field
- Make the following changes to the URL pasted in the field,
- Cloud customers must change http://app.frevvo.com//443/ to frevvo:// in the URL to the workflow.
- In-house customers must change the http:<domain>:<port> to frevvo:// in the URL to the workflow.
- Save the form.
Add an EmployeeID dropdown field. The HR manager will select the employees to be reviewed from this dropdown. You can either add the userId in the Options field in the properties panel of the dropdown control or fetch all the users from the tenant through business rule as below:
var event = form.load;
var Users = [];
Users = frevvo.userIds();
EmployeeID.options = Users;
Add a ManagerID dropdown field. The HR manager selects the manager responsible for reviewing this employee. This is the task list you want the Employee Review form to be sent to. The ManagerIDs can be added through the Options property of the dropdown or fetched from the tenant through Business rules as below:
var event = form.load;
var Managers = [];
Managers = frevvo.userIds(“<Your Manager Role>");
Manager.options = Managers;
Add text controls named FirstName & LastName. The HR manager can enter the employee’s name or they can be fetched through Visual rule builder:
- Click Rules in the Guided Designer navigation bar at the top.
Click on the + icon for Create New Rule
Click Run Builder Button to open the wizard
On the first step enter condition EmployeeID in the first dropdown and select Is filled in the second dropdown
Click Next, Select FirstName in first Dropdown, ‘to’ in the second dropdown and userFirstName() function in the third.
Click Add Action in the right hand top corner.
In new added line Select LastName in first Dropdown, ‘to’ in the second dropdown and userLastName() function in the third.
Click Next. Add 2 Actions and set the FirstName and LastName to ‘to empty’ in the second dropdown.
Click Finish. This rule will automatically populate the FirstName and LastName for the selected EmployeeID.
Add a trigger control named Launch to the form. When the trigger is clicked the form will launch a new Employee Review workflow and put the first step task on the selected Manager’s Task List.
Add a Business Rule to call your Employee Review Workflow via the http.get method. The rule shown below runs when the user clicks a Launch trigger button. The rule appends frevvo _data URL parameters to initialize each Employee Review workflow. The rule allows you to trigger the workflow for a different user or role when you browse the workflow URL.
if (Launch.clicked){
   var myurl = WorkflowToLaunchURL.value;
   http.get(myurl + "&_data=(EmployeeID:{EmployeeID},ManagerID:{ManagerUserId},FirstName:{FirstName},LastName:{LastName})");
}
To test:
- Open the Employee Review Launch Form. Select a user from the Employee ID dropdown. The First and Last Name fields are populated with the selected user's information. Select a Manager from the Manager ID dropdown. Click the trigger to run the rule.
- Log out. Log back in with the Manager ID you selected. Verify that an Employee Review workflow task is on the Manager's Task List.
In a real case scenario, it is recommended that you:
Create a separate form with all the basic information fields in it. Then add a field where the user filling in that form can add the list of users for whom he wants to start the workflow.
Create a Business Rule which uses http.get method to call your workflow URL. You will have to call this URL multiple times depending on how many users you want to create the task for. You can pass the usernames of those users and basic information data to the workflow in this URL by using _data URL parameter.
If assigning the first step to an email address template, you must set encode=false to prevent the "@" symbol from being encoded in your launch rule. The designer should use the template {EmailAddress!encode=false}.
Rejecting a step - sending it back to the original user
In some cases, a workflow needs to go backward. Nonadmin users can accomplish this by clicking a configurable Reject button on the form/workflow where the user can select the step in the workflow to go back to. Tenant and workflow administrators use the frevvo task list and its built-in modify task feature to reject, reassign or abort tasks. Refer to Using the Task List for information about how these features work.
Submit as Disapproved
In some cases, when any approver disapproves their step, you want the workflow to immediately be discarded. While the only way to truly discard a workflow is the abort the task, we recommend a Submit as Disapproved scenario. See the Submit as Disapproved chapter for an example of this scenario.