Live Forms v7.4 is no longer supported. Please visit Live Forms Latest for our current Cloud Release. Earlier documentation is available too.
SharePoint Connector
- Former user (Deleted)
- Megan Ellis
- Former user (Deleted)
All customers need a valid Office 365 SharePoint account.
Submissions can contain multiple files of different types - Invoice, Receipt, PO etc. You may want to save these files in different locations on your SharePoint site.
The SharePoint Connector wizard, allows you to:
- Save the form/flow data and metadata to a SharePoint destination. The destination could be a folder in a document library and/or a list item.
- Designers select the SharePoint destination from a dropdown
- Map form/flow control values to the SharePoint columns.
- Configure two destinations for your data.
The SharePoint wizard guides you through connecting your forms/flows to SharePoint.
On This Page:
Live Forms - SharePoint Configuration Scenarios
- Cloud Customers Connecting to SharePoint Online - This configuration had been certified by frevvo. Follow these steps:
In-house Customers connecting to SharePoint Online - This configuration has been certified by frevvo. Follow these steps:
frevvo only supports/certifies the SharePoint Connector running in the Apache Tomcat container.
- Configure Live Forms as a SharePoint Add-in
- Configure SharePoint for your Live Forms tenant
- Install the SharePoint Connector.
Connect your Forms/Flows using the SharePoint wizard.
Prerequisites for this configuration:
When configuring a test tenant for the SharePoint Connector, use the frevvo.certificate.signature property to bypass SSL Security. Do not do this for a Production tenant.
- In-house customers using SharePoint On-premise - this configuration is supported but not certified.
Customers using SharePoint On-premise also need an Office 365 SharePoint Online account. This is necessary to obtain an authorization token. There is no data transfer from the SharePoint On-premise to SharePoint Online.
Customers are responsible for configuring the On-premise installation and the integration with SharePoint Online.
- The On-premise version of SharePoint must be version 2013+.
Refer to this Microsoft website for information about how to use Office 365 to allow
to authenticate.
- Live Forms Cloud customers connecting to SharePoint On-premise - This configuration is supported but considered unlikely as SharePoint On-premise requires your On-premise SharePoint to be exposed to the Cloud.
- Customers are responsible for configuring the On-premise installation and it's exposure to the Cloud.
- Customers are responsible for configuring the On-premise installation and it's exposure to the Cloud.
Configuring the SharePoint Connector
These instructions assume you are a frevvo Cloud customer or have an in-house installation of up and running using the frevvo Tomcat bundle.
In-house Only
If your environment includes an in-house server, you must install the SharePoint Connector in the tomcat bundle on this machine. Cloud customers can skip this step.
- Stop
- Download the SharePoint Connector.
- Unzip the SharePoint Connector zipfile to a temporary location.
- Extract the sharepoint.war file to <frevvo-home>//tomcat/webapps directory on your
- Start
- SSL must be installed on your frevvo server
- Your frevvo server must be able to access your SharePoint site to post data
- When configuring a test tenant for the SharePoint Connector, use the frevvo.certificate.signature property to bypass SSL Security. Do not do this for a Production tenant.
- frevvo only supports/certifies the SharePoint Connector running in the Apache Tomcat container.
Step 1 - Configure Live Forms as a SharePoint App/Add-in
must be added as a SharePoint provider hosted add-in by your global Office 365 tenant SharePoint Administrator. The process is described in Steps 1 and 2 on this Microsoft SharePoint website. Copy the Client Id and client Secret and save them somewhere on your desktop. You will need to add these values when configuring your tenant for SharePoint.
Here are some tips
- The Title can be anything that can differentiate your frevvo SharePoint application from other applications.
- The app domain field should be the
- app.frevvo.com:443 for Cloud customers
- <server>:8443 for an in-house installation.
- The Redirect URL for
- For a cloud customer, that would be app.frevvo.com:443.
- For an on-premise customer, a typical example would be <server>:8443.
https://<server>:<port>/frevvo/web/sharepoint/token
- The Permission Request XML should be: You can copy/paste this xml into the Permission Request XML box.
<AppPermissionRequests AllowAppOnlyPolicy="true">
<AppPermissionRequest Scope="http://sharepoint/content/tenant" Right="Manage" />
</AppPermissionRequests>
Remember SharePoint only allows https.
Step 2 - Configure the Live Forms Tenant for SharePoint
Cloud and in-house customers must configure their tenant to connect to SharePoint as a client. frevvo expects that customers will only be integrating with one SharePoint instance for their organization. You will need the SharePoint Client Id and the Client Secret from Step 1.
Follow these steps:
Login to
Click the Edit Tenant link.
- Click the
 blue arrow to expand the SharePoint section.
 Enter the Connector URL. - This URL is needed if you are using
The URL in the Connector URL field will override the connector URL that is specified in the configuration property in the <frevvo-home>\tomcat\conf\frevvo-config.properties file. In some cases you can leave this field blank.
The default value is shown below:
frevvo.sharepoint.connector.url=http://localhost:8082/sharepointEnter the Client Id and the Client Secret that you saved in Step 1 into the respective fields.
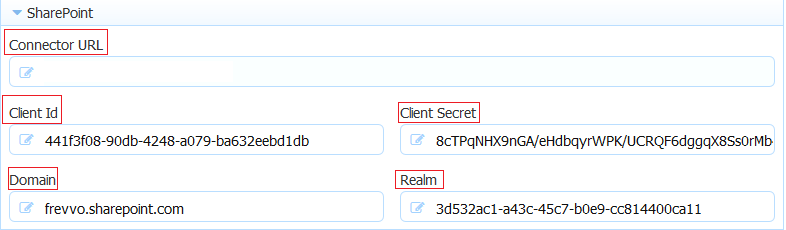
- Enter the SharePoint Domain Name e.g. <Your SharePoint tenant name>.sharepoint.com - there is a dot between the SharePoint tenant name and sharepoint.com
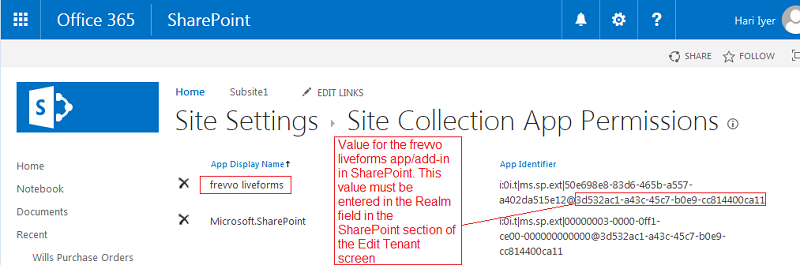
- To determine the realm for your SharePoint site :
Navigate to https://<tenant>.sharepoint.com/_layouts/appprincipals.aspx - change the <tenant> to the name of your SharePoint tenant - e.g. https://frevvo.sharepoint.com/_layouts/appprincipals.aspx
Find your registered application in the list and and look at the App Identifier column. The unique identifier after the @-sign in the App Identifier is the app realm and must be entered in the Realm field.
- Click Submit
- Browse http://<your server:port>/sharepoint/health (replace <your server:port> with your frevvo server:port) to check the status of the connector. If the connector is up and running, you will see { "status" : "UP" }.
- Proceed to Connect Forms/Flows with the Save to SharePoint wizard
Step 3 - Connect Forms and Flows with the SharePoint wizard
Login as a
- Create your form or flow with controls that capture the data that you want to store in the columns configured in the Lists and Libraries on your SharePoint website
Click on the
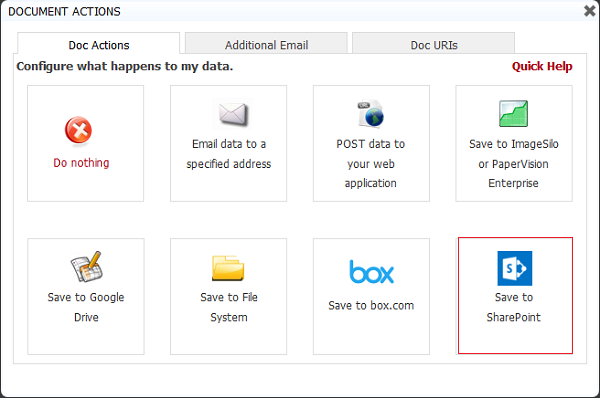
 what happens to my data? icon on the designer toolbar.
- Select the Sharepoint Connector option. If the tenant is not configured for SharePoint, the Save to SharePoint wizard will not display.
- You’ll be redirected to login to SharePoint or Office 365 if you are logging into your account for the first time.
- On successful login, you will be asked to grant or deny access for your
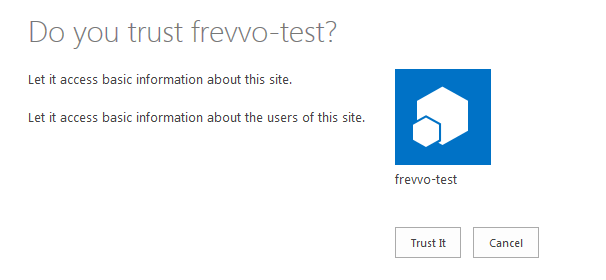
- On successful login, you will be asked to grant or deny access for your
Click Trust It to authenticate and grant permission to . You will not see the trust screen on subsequent logins. The wizard will display.
- We recommend that you create a separate user in SharePoint for frevvo forms connection, and use that user while configuring the Save to SharePoint wizard in frevvo forms. This frevvo specific SharePoint user always remains active and eliminates issues if the designer user configured your forms to submit to SharePoint using their own SharePoint login and then leaves the company.
- At least one designer user must also be a SharePoint user with the correct privileges to provide consent when invoking the Save to SharePoint wizard if your tenant is configured with the Azure SAML Security Manager .
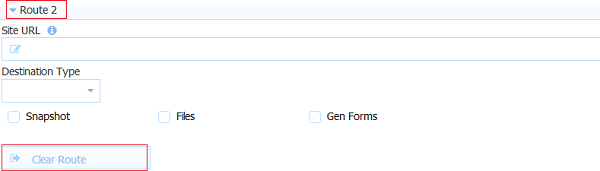
- You can set up a single Document Action to write to multiple places (SharePoint Library and List). Add a route for the second destination by clicking the Route 2 icon.
Select a format for the Snapshot to be saved in SharePoint. The choices are: PDF, PNG or JPEG. If you do not check the Snapshot checkbox under the Destination Type section, you can leave this field empty.
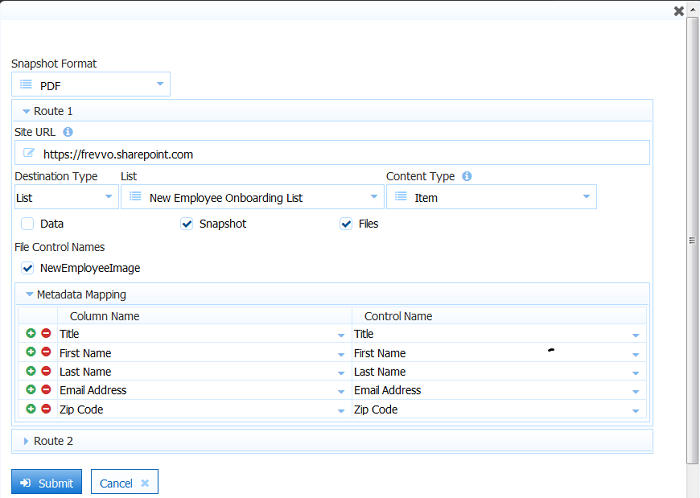
Enter the site URL - this is the SharePoint site or subsite containing the destination e.g. https://frevvo.sharepoint.com - Remember this URL must specify the https protocol. This value is read in from the SharePoint tenant configuration screen for Route 1.
Set up the first location (route) where you want to save your files in SharePoint. SharePoint destinations can be a Library (and optionally a Folder), or List. Select Library or List from the Destination Type dropdown.
The wizard pulls the list of Libraries and Lists configured on your SharePoint site to populate the Library/List dropdown. Select Library or List. Only destinations that the user has access to are displayed.
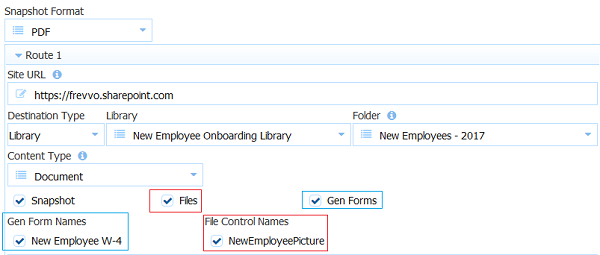
- If your Library has folders configured, the wizard will display a dropdown listing them. Select the destination folder from the list.
Select a Content Type from the dropdown. The wizard automatically pulls the content type choices from your SharePoint site. The Content Type determines the available metadata column names for mapping. For example, if the destination is a Document list you would see Item as a choice for the Content Type. This means your submission is saved as a new item on your SharePoint list. Document Libraries show Document.as the Content Type.
Check the types of files to be saved to the selected destination. The choices are:
Data - checking this includes the
Snapshot - checking this includes a snapshot of your form/flow in the format selected in the Snapshot Format field to be saved
Files - checking this includes attachments uploaded to your forms/flows to be saved. The wizard automatically lists the Upload Controls in your form/flow by name when Files is checked. The attachments for the selected Upload Controls will be saved in the configured destination.
- Gen Forms - this checkbox appears if you have mapped PDFs associated with your form/flow e.g. W-4 and I-9 filled out by a new employee. Select the mapped PDFs that you want to store in SharePoint.
Map the Control Names in your form/flow to the column names in your SharePoint destination. The wizard will populate the Column Name dropdown with all the columns in the destination but a maximum of 15 controls can be mapped.
When mapping Message controls with templates to the SharePoint Connector, the Save Value property should be checked.
Click Submit.
Click the
 save and test icon to save the form/flow and bring up Test mode popup.
- If you configure a second Route, clicking the Clear Route button removes the information for Route 2 only.
Special Characters in Filenames
If you want to customize the name of the PDF of your form/flow to Sharepoint, make sure you have Save PDF checked. An optional field that is used to name the PDFs displays. You can use templates in this field. For example, if you have a control called EmployeeName in your form, you can type {EmployeeName} into the PDF Name field and the pdf's in the on your SharePoint site will be named {EmployeeName}.pdf.
- If you leave the PDF Name property blank, Live Forms uses the flow/form name as the pdf file name. The PDF will not post to SharePoint generating an HTTP 500 status error if the Form Name contains special characters. To avoid any issues, name your form/flows using characters that are suitable for filenames and explicitly set the pdf name in the form/flow using the same standard. Following the POSIX filename standard (A–Z a–z 0–9 . _ - ) will ensure it works.
- Special characters in filenames will cause the submission to be flagged with an error in the
Check Submissions on SharePoint
When the form is submitted or the flow is completed, submission data, metadata and attachments are uploaded to the specified destination in your SharePoint account
Verify your stored submissions on your SharePoint website:
- Test your form/flow by filling in data, adding attachments, and submiting/completing it.
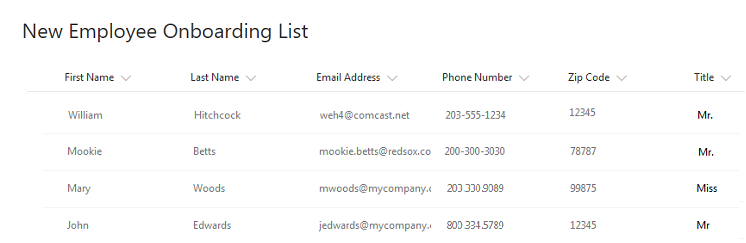
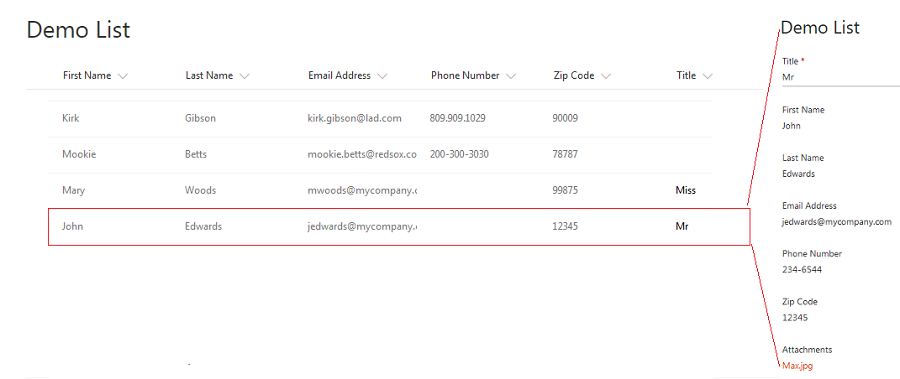
- Login to your SharePoint account and navigate to the specified destination. The image shows submissions saved to a SharePoint list named Demo List and the John Edwards submission data and attachments.
Using the SharePoint Connector in an Azure SAML Security Manager tenant
At least one designer user that is going to be connecting forms/flows to SharePoint with the Save to SharePoint wizard must also be a SharePoint user with the correct privileges to provide consent if your tenant is configured with the Azure SAML Security Manager.
Troubleshooting
Some common issues with solutions are listed below.
Doc Post Failure
If the submission doesn't reach your SharePoint website - if does not receive a response back from SharePoint with a status code of 200, you can find information about the error from the
submission table.

All tenant admin(s) in your tenant or flow admin(s) configured for specific workflows will receive a Doc Post Failure notification email to alert them that an issue has occurred.
Max file size
The maximum size for all fevvo connectors is set to unlimited. Any size file can be uploaded to and posted to SharePoint.
Determine the version of the SharePoint Connector you are using:
To determine the version of the SharePoint connector you are using:
- Browse http://<your server:port>/sharepoint/info - the version information is returned as shown in the image.
