This documentation is for Live Forms 9.1. v9.1 is a Cloud Only release. Not for you? Earlier documentation is available too.
COVID-19 Response Info: At frevvo, our top priorities have always been employees and customers. We have taken several steps to promote the well-being of our people, to minimize services disruptions, and to help where we can. Visit our website for updates.
Filesystem Connector
- Former user (Deleted)
- Megan Ellis
The Filesystem Connector saves submissions to local or remote file systems (Windows, Linux). You can:
- Save each submission to it’s own folder
- Save all submissions to the same folder
- Choose to keep file names or generate a file name
- Generate metadata for import into your Enterprise Content Management system.
Submission form/workflow XML document(s), attachments that are added by the user and the PDF snapshot of your form/workflow can be saved in the configured submissions directory.
Using the Filesystem Connector to save submissions to a shared directory might be an alternative if your forms/workflows contain sensitive/secure information that you would rather not send via email or if you want to import the submissions into your Enterprise Content Management system.

Submissions from are posted to the Filesystem Connector using the Doc Action Save to File System wizard.
The Filesystem Connector is available for cloud and in-house customers.
frevvo only supports/certifies the Filesystem Connector running in the Apache Tomcat container.
Generation of a metadata file for each submission can imported into a document management system. This is possible with the Save to Filesystem wizard and a descriptor file that provides the instructions in freemarker language. Once the metadata file is generated, it is the customer's responsibility to import it into the document management system.
On This Page:
Installing the Filesystem Connector
Cloud Customers
The Filesystem connector can be installed behind your firewall where it can connect to your back end system in order to read/write data.
- If you use the Live Forms Cloud hosted server, you must ensure that the connector is accessible from the frevvo servers. This is done by opening up one of the following ports in your firewall:
- HTTP Ports: 80 or 19080
HTTPs Ports: 443 or 19443
We recommend that you use https and not http. Https is a secure channel.
- Customers that use firewall white-listing, should make sure the frevvo cloud outgoing server IP 54.86.85.105 (host outgoing.frevvo.com) is added to the list.
- If you want to install the Filesystem Connector in the frevvo In-House tomcat bundle, follow these easy steps: (You don't have to use the
application from this bundle).
- Review the Supported Platforms list.
- Download and install the certified version of the Java Development Kit (JDK) and set the JAVA_HOME environment variable as described here.
- Download the frevvo tomcat bundle
- Unzip the frevvo zip file into a location of your choice: e.g. c:\frevvo. We'll refer to this directory below as <frevvo-home>.
- Install the Filesystem connector inside that same tomcat.
- Download the filesystem zipflile
- Extract the filesystem.war to <frevvo-home>\tomcat\webapps directory.
- Delete <frevvo-home>\tomcat\webapps\frevvo.war
- Configure the Filesystem Connector
Start
In-house Customers with an existing tomcat bundle installation
The Filesystem connector can be installed in behind your firewall where it can connect to your back end system in order to read/write data. These instructions assume you have an in-house installation of up and running and you are running
and the Filesystem Connector in the same tomcat.
To install the Filesystem connector in the same tomcat as :
- Stop
- Download the filesystem connector zipfile
- Extract filesystem.war to your <frevvo-home>\tomcat\webapps directory.
- Configure the Filesystem Connector
- Start
Upgrading from a previous version
To upgrade a previous version of the Filesystem Connector to the latest version in your existing Tomcat bundle installation:
Ensure you have downloaded the supported version of OpenJDK. Check Supported Platforms before beginning.
Stop
Download the latest version of the Filesystem Connector
Extract the filesystem.war to your <frevvo-home>\tomcat\webapps directory.
Verify that the Filesystem Connector configuration is correct for the new version.
- Proceed to Connect Forms/Workflows with the Save to FileSystem wizard to continue.
Configuring the Filesystem Connector
The Filesystem Connector is configured using properties in the <frevvo-home>\tomcat\conf\frevvo-config.properties file.
Follow these steps to configure the Filesystem connector:
Modify the File Connector settings section of the frevvo-config.properties file.
the frevvo.filesystem.connector.url - The location of the Filesystem connector is set for the installation with this property. It defaults to http://localhost:8082/filesystem. Change the <localhost:8082> in the default URL to the <server:port> where you installed the Filesystem connector in your environment.
Uncomment the property by deleting the # that precedes it.
# File Connector settings
frevvo.filesystem.connector.url=http://localhost:8082/filesystem
Add these properties to the <frevvo-home>\tomcat\conf\frevvo-config.properties file. You can add them to the existing File Connector settings section or make a new section with a comment as shown in the example below. Refer to the table for a description of the configurable properties:
Configuration Parameter Description connector.file.root.dir This is the location in your file system where the submission docs will be saved. Set the submissions directory field in the Save to Filesystem wizard as a relative path from the root directory specified by the connector.file.root.dir in the connector deployment configuration. It's value can contain one or more control template strings. For example, if the configuration file contains C:\ for the connector.file.root.dir parameter, enter the name of the directory where you want to save the submissions in the Submissions field in the Save to Filesystem wizard. This will save the submissions in C:\<DIRECTORY NAME>. If not explicitly configured, it defaults to the user home directory. Change the value to reflect the location for your file system. connector.file.name.keep This parameter determines whether the original files names will be retained. If this is set to true, then you either have to make sure that all your files have unique names or else save the documents of each submission under a separate uniquely named folder. If this parameter is not included, or is set to false, submission files will be named with a generated identifier as the prefix suffixed by '_' and a sequence number to make the file name unique. The original filename extension is retained. This is the default behavior. Ex: e454fa08-9a6e-4c54-9743-18f4ba0ad0b4_1.xml instead of form.xml. connector.file.dir.submission This parameter allows you to create a unique new sub-folder for documents of every submission if true. connector.file.ignore.attachments This parameter determines whether attachments will be saved or not. If the value is false, attachments will be saved. Change the value to true and attachments will not be saved.
The submission XML does not store the names of uploaded attachments, instead it points to unique ID that is assigned to each attachment when that submission in created inconnector.file.descriptor.suffix The metadata descriptor filename is a generic GUID filename, followed by a configurable suffix. The default suffix is '.xml'. Use this parameter to change the suffix.The suffix can make identifying the metadata file easier, particularly if you save the files from all submissions into the same folder.
Ex: 432e0d1f-d084-4cd4-8bbe-50f6e9bd5ee6_desc.txtHere is an example of the Filesystem Connector properties added to the File Connector settings section of the frevvo-config.properties file. When executed,
- Saved on the local drive in a directory specified in the wizard that is located under the root directory configured here. Ex: C:\Submissions.
- Individual file names will be retained.
- Attachments in the submission will be saved.
Add the suffix "_desc.txt" to the metadata file for each submission.
In a properties file, a backslash is considered as a continuation character when splitting across lines. Escape it with another backslash i.e. C:\\ or use the forward slash i.e. C:/ when specifying the connector.file.root.dir property.
# File Connector settings
frevvo.filesystem.connector.url=http://localhost:8082/filesystem
connector.file.root.dir=C:/
connector.file.name.keep=true
connector.file.ignore.attachments=false
connector.file.descriptor.suffix=_desc.txt
- Start the Insight server first, then start
Make sure the directory where you plan to save the submissions is created and and has the appropriate access for the OS you are using. For example:
If you are using Windows, you can map a drive to a server directory (not recommended because Windows mapped drives cannot be reliably accessed from java), or you could use the UNC path i.e. //host-name
If you are using a Unix operating system you could mount a remote filesystem as a directory and use it as your destination directory
To ensure interoperability across file systems, it is recommended that you follow a good naming standard such as POSIX when creating files and folders. For example, folder names can't contain slashes so a folder named '1/2/15' would not be valid.
Browse http://<your server:port>/filesystem/health (replace <your server:port> with your frevvo server:port) to check the status of the connector. If the connector is up and running, you will see { "status" : "UP" }
Connect Forms/Workflows with the Save to File System wizard
Saving files to a local or remote location is easily done with the Save to File System wizard if generating metadata is not required.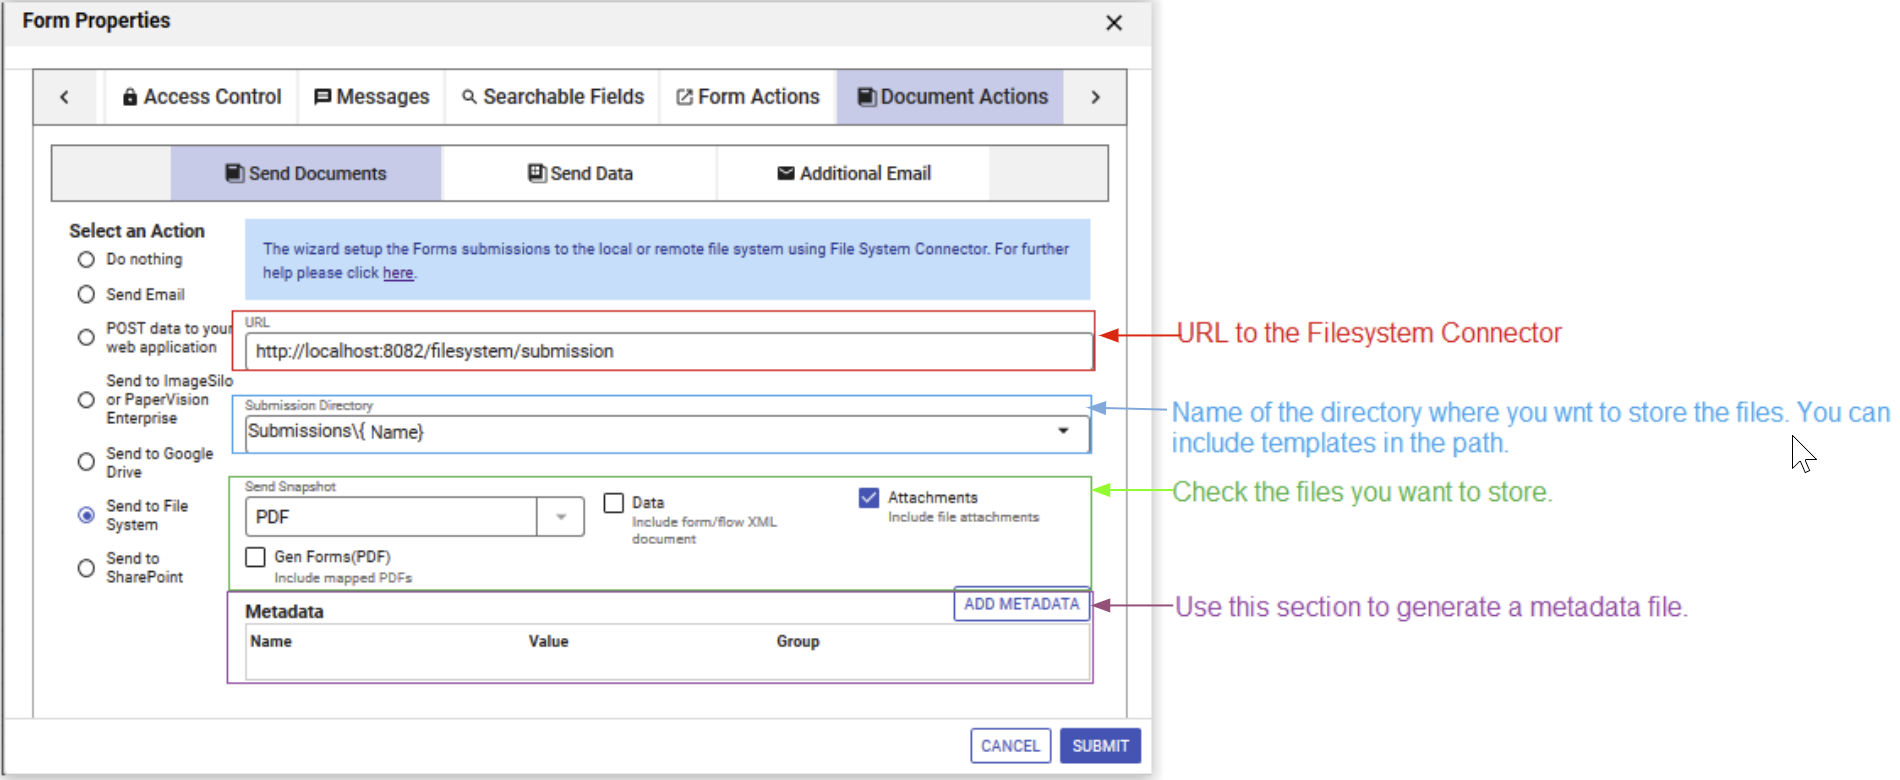
Let's begin with a very simple example. Here are the requirements:
You have created a small form that has a Name, Address, City, State and Zip Code fields. A mapped W - 4 PDF is included in the form. The Save PDF property is selected and the PDF Name property is configured with the template {Name}.
- You want to store the submission files for this form in a directory on your local machine named Submissions.
- You want to create a sub directory for each submission under the Submissions directory. The name of the sub directory is created from the value entered into the Name field on the form
- You want to save the form/workflow PDF, any mapped PDFs associated with the form, an xml file and any attachments uploaded to the form in the subdirectory.
Follow these steps to fulfill the requirements by using the doc action Send to Filesystem wizard
- Log into your
- Open your form/workflow in the appropriate designer.
- Click the
 Edit Form/Workflow Properties wizard on the designer toolbar.
 - Click the Document Actions tab. Select Send to Filesystem on the Send Documents tab.
To fulfill the requirements listed above, we only need to fill in the URL, Submission Directory and File sections of the wizard. Here is an explanation of the fields:
The URL: this is the URL to the location where you installed the Filesystem Connector. Be sure to include the /filesystem/submission in the URL after you change the server and port.
In-house: The location of the Filesystem connector is set for the installation using the frevvo.filesystem.connector.url parameter in the <frevvo-home>\tomcat\conf\frevvo-config.properties file. It defaults to http://localhost:8082/filesystem in the tomcat build. The <localhost:8082> in the default URL can be changed to the <server:port> where you installed the Filesystem connector in your environment. This is a required field. The value entered here overrides the value in the frevvo-config.properties file.
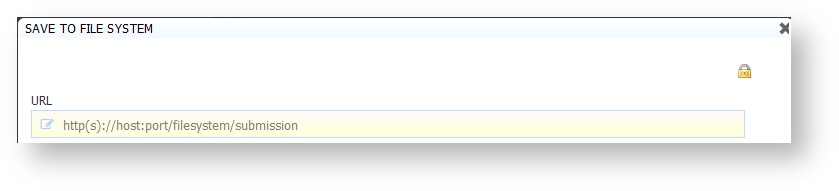
- Cloud customers will see the placeholder http(s)://host:port/filesystem/submission - enter the https url to the location where you installed your
- Submissions Directory - Enter a relative path from the root directory specified by the connector.file.root.dir parameter in the configuration file created above. Control templates are allowed in this field. You can use a control template to store submissions in subdirectories. The template, {Name}, will populate the Template field. Copy the template from the Template field and add it to the Submissions Directory path after the forward or backward slash. Note the forward or backward slash can be used to create subfolders.
Examples - If the value of the connector.file.root.dir parameter in the configuration file is "c:\" then entering Submissions in the Submission Directory field in the wizard saves the files in the local directory c:\Submissions.
- File Section - One or more types of submission content can be specified by checking the Send Snapshot, Files, Gen Forms and Data checkboxes:
- Select the snapshot format to be sent by selecting a choice form the Send Snapshot dropdown. The format choices are PDF, PNG or JPEG.
- Check the Attachments checkbox to send any file attachments uploaded to the form.
- Check the Gen Forms(PDF) checkbox to send the mapped W - 4 PDF.
- Check the Data checkbox to send the form XML document for the form.
- Select the snapshot format to be sent by selecting a choice form the Send Snapshot dropdown. The format choices are PDF, PNG or JPEG.
- Click the Submit button.
- Click the
 save and exit icon to save your changes.
 - Create some submissions by clicking the
 Test button, filling in the form and clicking submit.
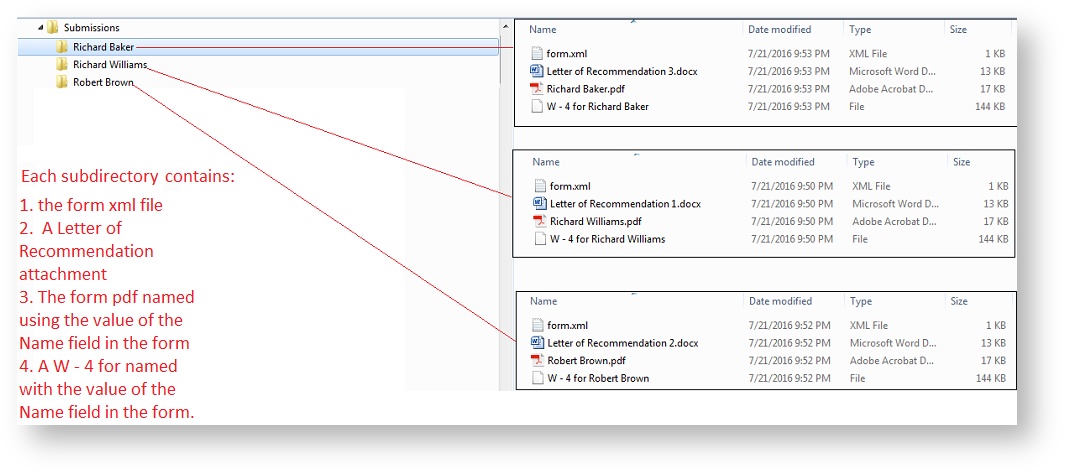
 - The results of 3 submissions are shown in the image.
- Log into your
Generating Metadata
The Filesystem Connector saves the submission form xml, attachments and PDFs in the configured location. In addition, a metadata file, which describes the data, is created. This is helpful if your document management system has the capability to import files.
Generating metadata in xml format is the most common use case.
Follow these steps to connect your form/workflow to the Filesystem Connector:
- Create a descriptor file named file-descriptor.ftl in your <frevvo-home>\tomcat\lib directory. The file MUST be named file-descriptor.ftl.
- Use the Save to File System wizard to generate a map to provide the submission data to the connector
If metadata generation is required, the configuration can become significantly complex. For example, you may need to provide more attributes for a field than just a name or value. For these reasons, we recommend using the Save to File System wizard going forward. The wizard is simpler to implement and maintain.
Create the Metadata Descriptor File Template
The metadata descriptor file template generates a metadata file for every submission using the map that is generated by the wizard and the template. This file will vary depending on the ECM that you are using and your specific requirements.
If you are using the tomcat bundle, it should be located in the <frevvo-home>\tomcat\lib directory.
The content of the file-descriptor.ftl file uses freemarker template language v2.3.23 syntax.
Below are examples of the filesystem descriptor files that integrate with the DocuWare Management System, DocuShare Management System and ImageNow Imaging and Document Management Systems.
If you are not familiar with the freemarker template language or you do not see an example for the Document Management System that you want to use, contact Sales to arrange a help session with frevvo Client Services.
File Descriptor File Examples
Let's take a look at the file-descriptor.ftl file for DocuShare. In general, freemarker syntax is identified by the <# symbols.
- In the file, #compress, #escape, #function, #return, etc... are freemarker instructions
- The characters in this section of the file will be included in the metadata output file interspersed with freemarker instructions.
- The submission.file.name is a special string, that adds a line in the xml file with a full path to the location where attachments, form/mapped PDFs and the form.xml are being saved for the submission.
- The last two lines in the file, </#escape and </#compress are the closing tags for the instructions specified at the top of the file.

These examples are offered as a guide to help you create your filesystem descriptor file. Even if you are working with one of the ECM systems represented by the examples below, you will need to customize the descriptor file to work for you.
Generating Metadata using the Save to File System wizard
Once the file-descriptor.ftl file is in place, the wizard must be configured to specify the Name-value pairs that will be used to generate the metadata file. This is done in the Metadata section of the wizard. The Name and Value columns are required. The Metadata Prefix is used to distinguish submission data fields from metadata fields. The default value of the prefix is md. The Name or Group value is prefixed with the metadata prefix when the doc action is executed. You can configure up to 30 rows in the Metadata table.
The Name column is to used to represent a unique entry on its own or within a Group. The following entry will cause a md.name=Tray Jenkins parameter to be sent to the connector.
Name
Value
name
Tray Jenkins
The Group column is used to group name-value pairs. To represent a metadata entry with attributes you would use the Group column to indicate the entry name. The following entires will cause a md.EMPLOYMENTDATE={"type":"Date","value":"2014-04-03","culture":"en-US","format":"yyyy-MM-dd"} parameter to be sent to the connector.
Value Group type Date EMPLOYMENTDATE value 2014-04-03 EMPLOYMENTDATE culture en-US EMPLOYMENTDATE format yyyy-MM-dd EMPLOYMENTDATE - The Value column can contain one or more control template strings
The Controls dropdown contains the names of all controls in the form or workflow. To create a template string, select a control. This causes the adjacent Template field to be populated with the correct template string. This can then be copied into the fields that support template resolution.
To include values from repeating controls and multi-select controls in your form/workflow, the value should be a template string that resolves to multiple values. The recommended approach is to create a template that results in a JSON array representation such as. ["{","|controlname}"].

- To include the comment values from selection controls with a comment enabled in your form/workflow, the value should be a template string that resolves to multiple values. The recommended approach is to use the syntax
["{,|controlname.commentValue}"].
Filesystem Connector Example:
Let's say you have a small form with the following controls: First Name, Last Name, Address, Date of Birth, a Signature control and a repeating control named State. Using the DocuShare file-descriptor.ftl file and setting up the The Save to Filesystem wizard as shown in the above image results in these files the submission directory.

The generated metadata file contains the following:
<?xml version="1.0" encoding="UTF-8"?>
<Records>
<Record>
<Field id="LF__User" length="-1" type="string">
<Value>administrator</Value>
</Field>
<Field id="my_name" length="-1" type="string">
<Value>{"First Name":"Arnold","Last Name":"Smith"}</Value>
</Field>
<Field id="Address" length="-1" type="string">
<Value>34 Some Street
New City</Value>
</Field>
<Field id="EMPLOYMENTDATE" length="-1" type="string">
<Value>{"culture":"en-US","format":"yyyy-MM-dd","type":"3/31/1954","value":"3/31/1954"}</Value>
</Field>
<Field id="State" length="-1" type="string">
<Values>
<Value>NY</Value><Value>MN</Value>
</Values>
</Field>
<Field id="LF__Document" length="-1" type="document">
<Values>
<Value>c:\Submissions\Arnold Smith\form.xml</Value>
<Value>c:\Submissions\Arnold Smith\Letter of Recommendation 1.docx</Value>
<Value>c:\Submissions\Arnold Smith\Arnold Smith.pdf</Value>
<Value>c:\Submissions\Arnold Smith\W - 4 for Smith</Value>
</Values>
</Field>
</Record>
</Records>
Troubleshooting
Some common issues with solutions are listed below.
Doc Post Failure
If the destination for saving submissions that you have specified cannot be reached, all users with the tenant admin role or a workflow admin (if configured) will receive an Doc Post Failure notification email reporting an HTTP Status error - 404.
Check the connector.file.root.dir parameter in the file.xml file, the URL in the POST data to your web application wizard or the Save to File System wizard screen depending on the wizard you are using.
Determine the version of the Filesystem Connector you are using:
To determine the version of the Filesystem connector that you are using:
- Browse http://<your server:port>/filesystem/info - the version information is returned as shown in the image.
