This documentation is for Live Forms 9.1. v9.1 is a Cloud Only release. Not for you? Earlier documentation is available too.
COVID-19 Response Info: At frevvo, our top priorities have always been employees and customers. We have taken several steps to promote the well-being of our people, to minimize services disruptions, and to help where we can. Visit our website for updates.
Workflow Setting Properties
- Former user (Deleted)
- Megan Ellis
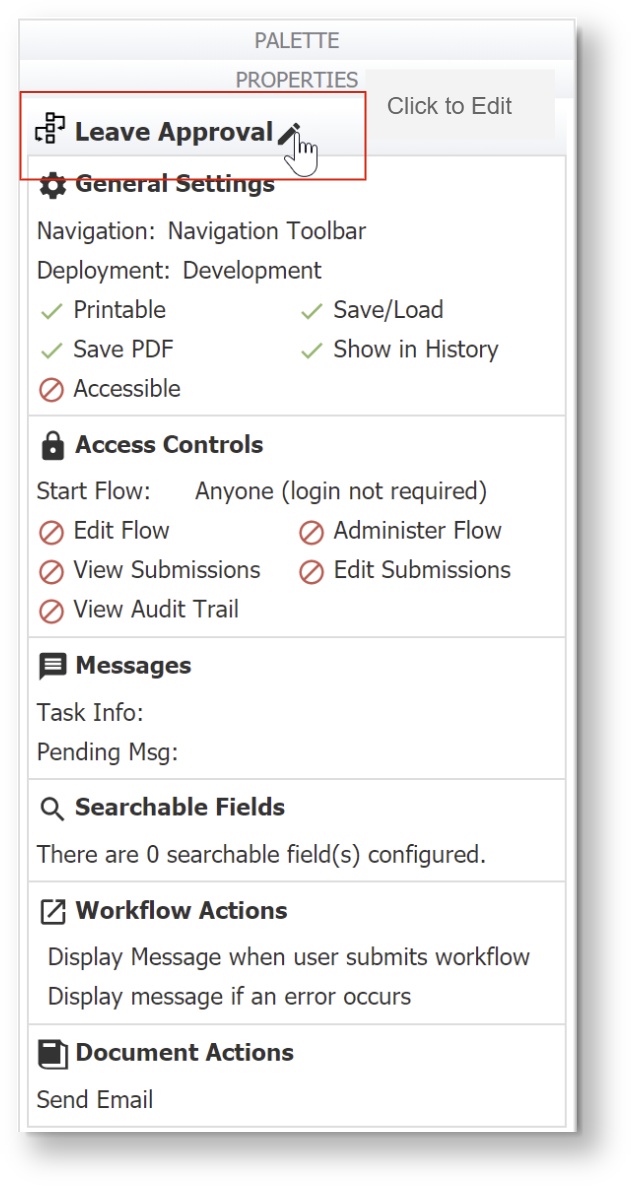
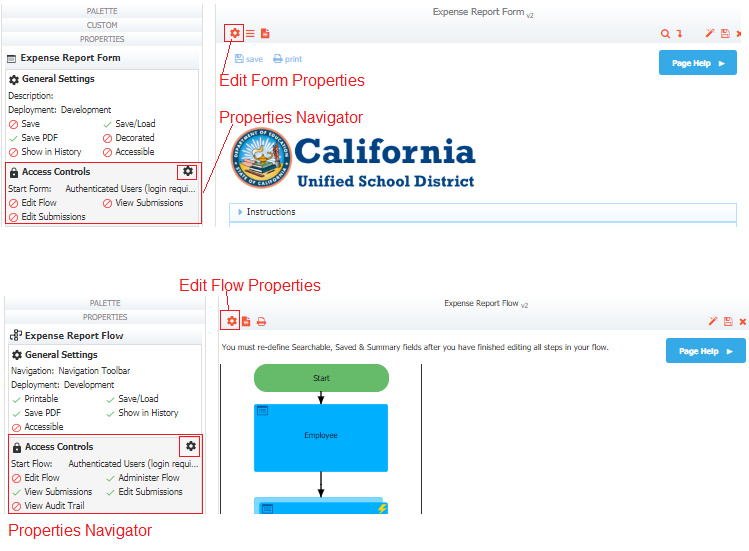
Properties Navigator
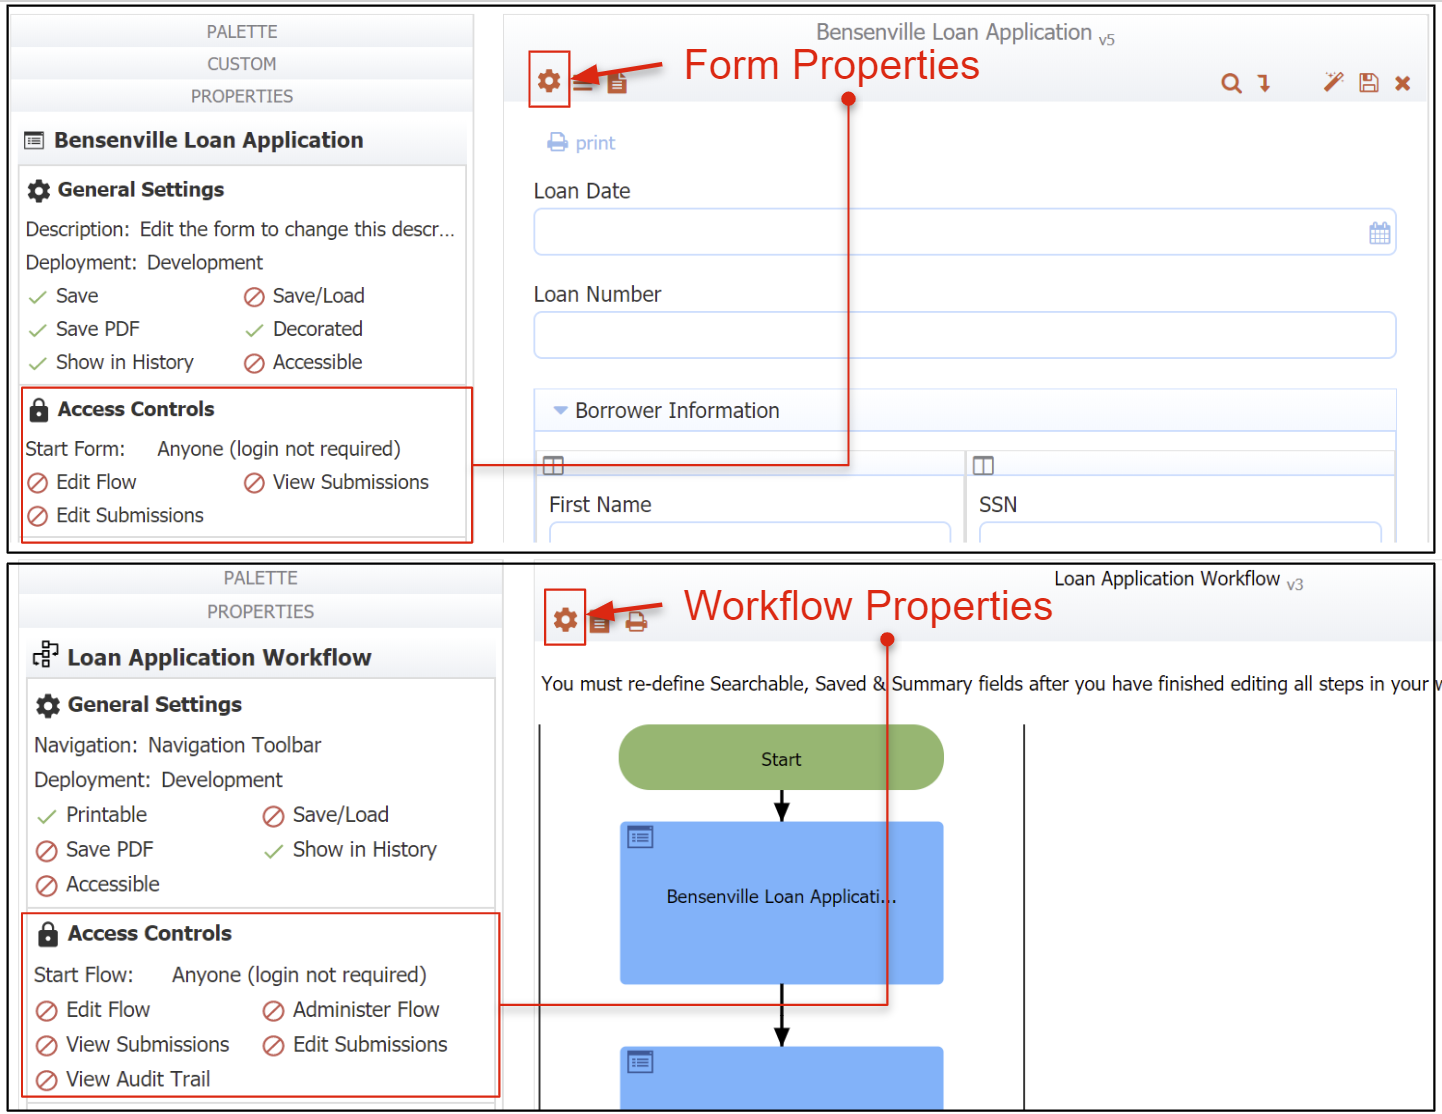
Click the workflow name (or select ![]() Edit from the
Edit from the ![]() Action Menu) on the Forms and Workflows Home page to open the workflow in the
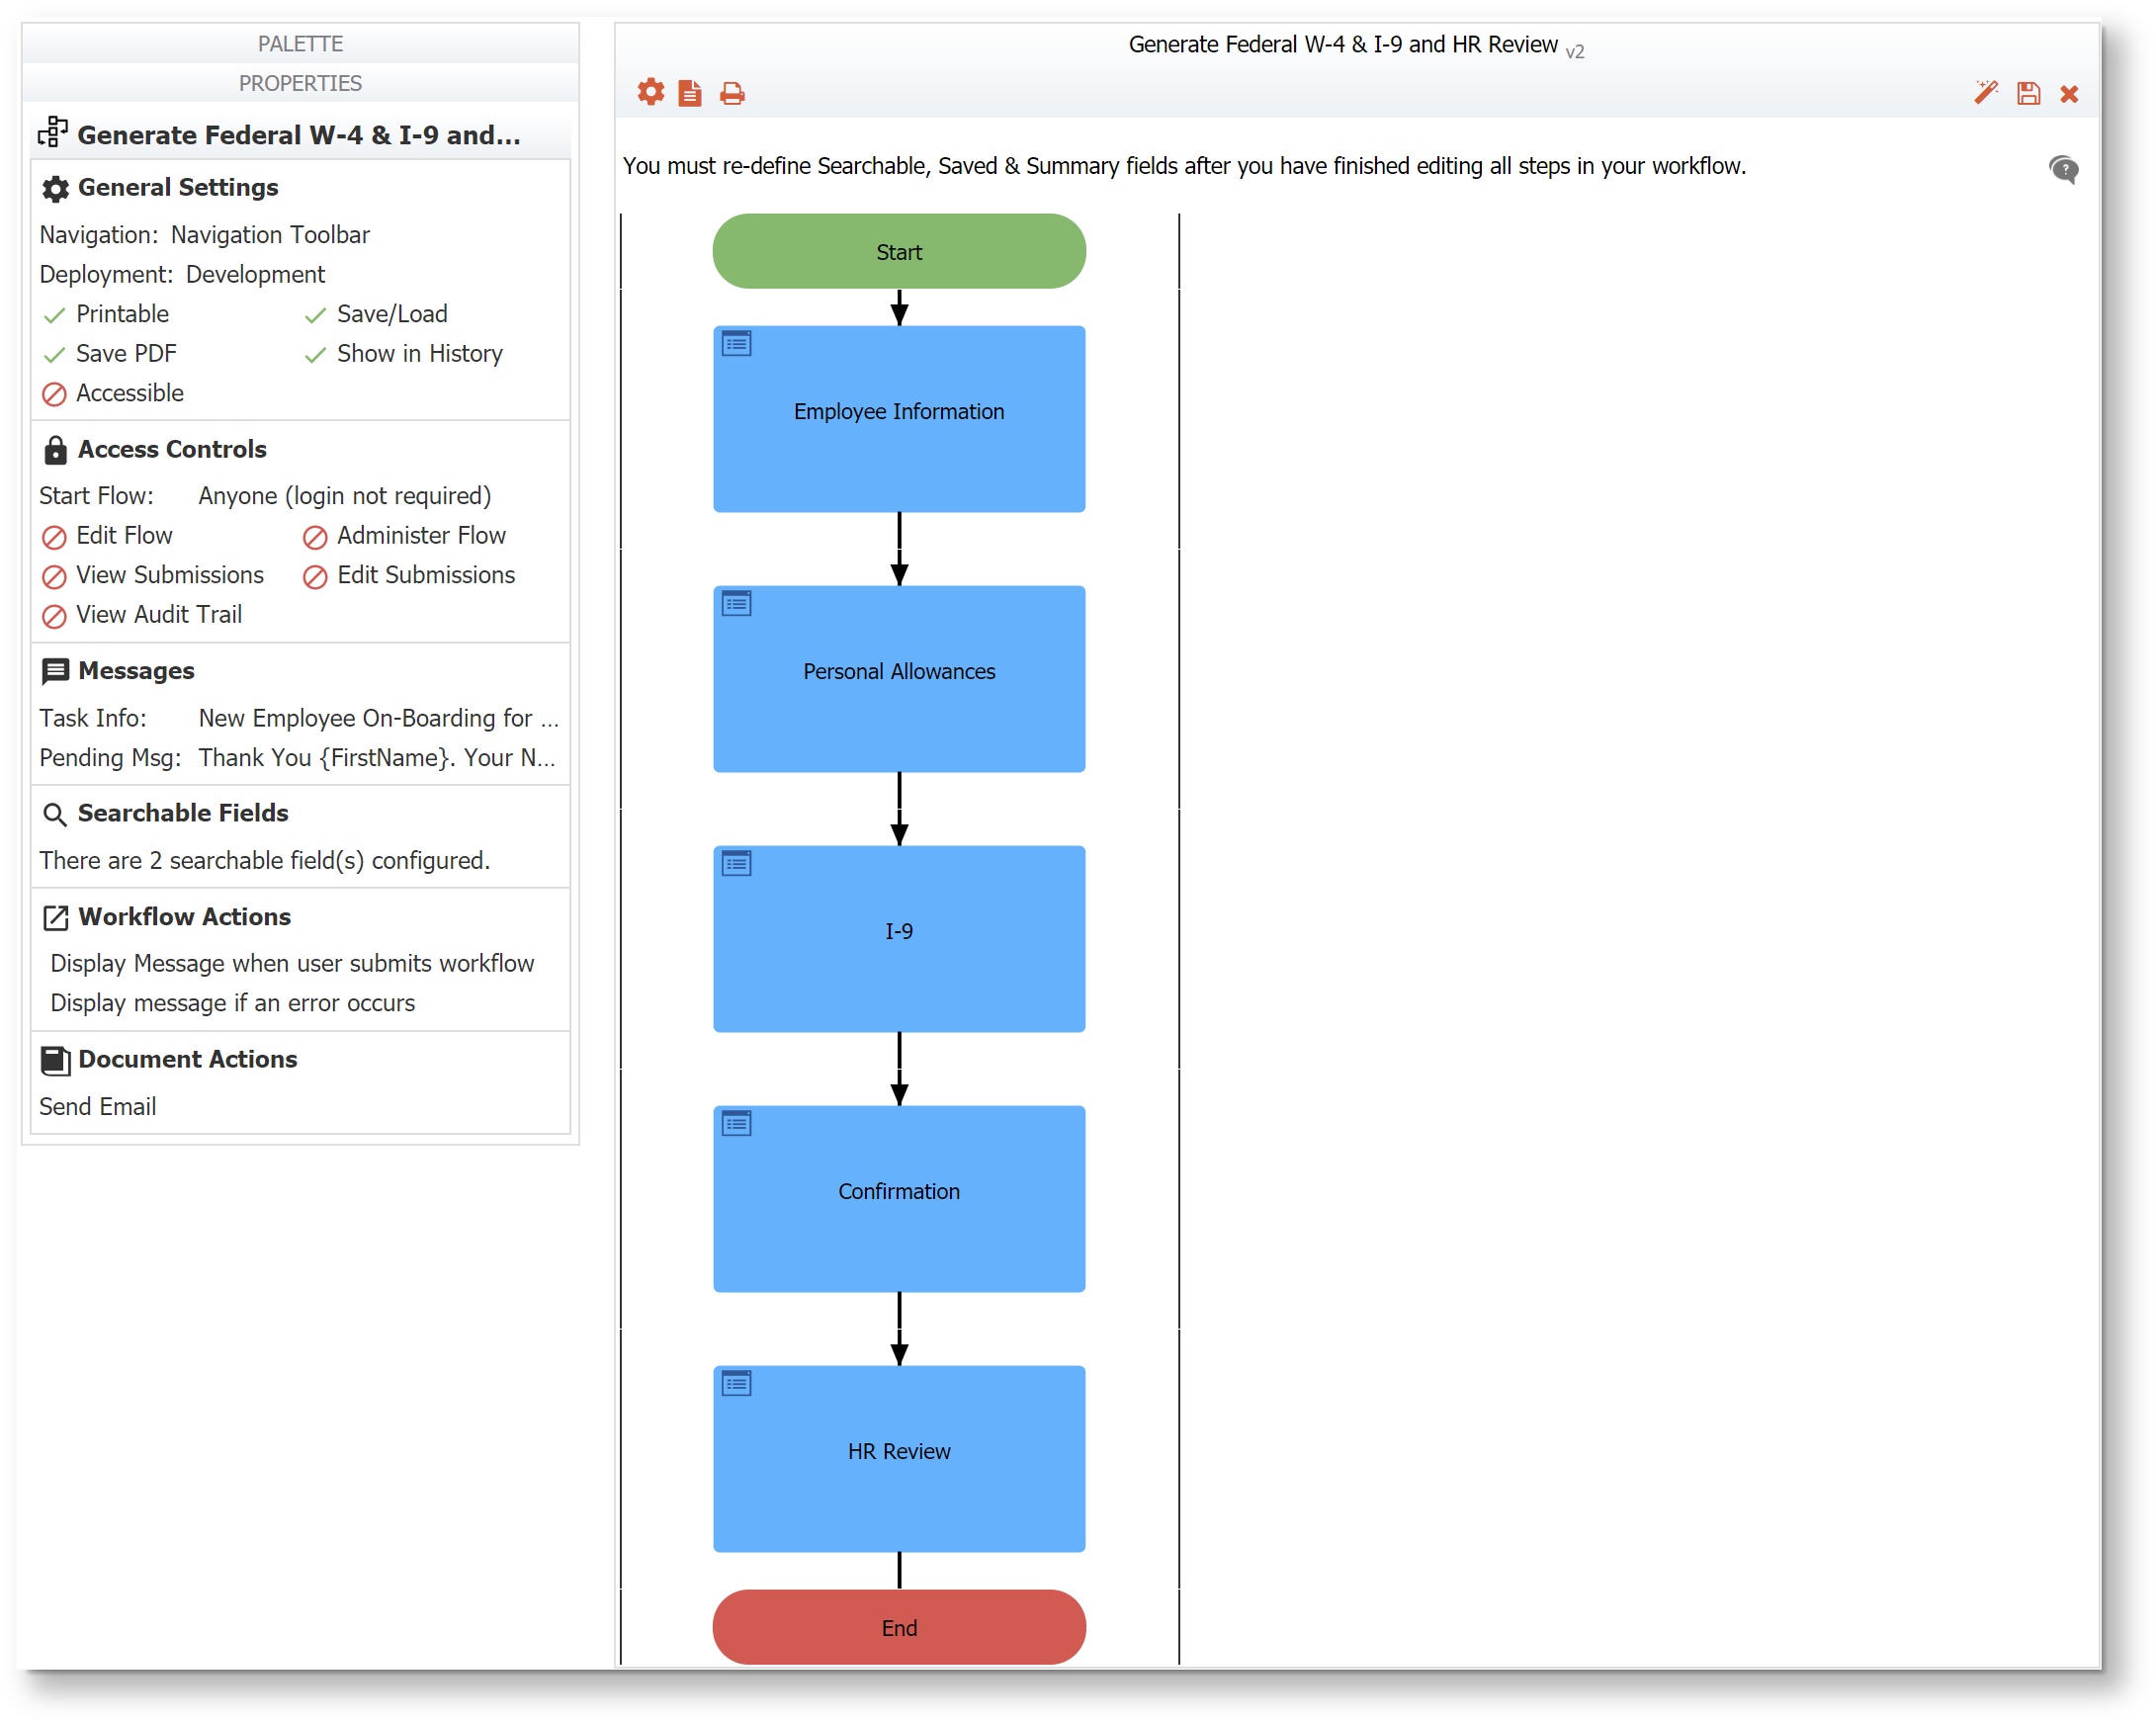
Action Menu) on the Forms and Workflows Home page to open the workflow in the Workflow Designer. The Properties Navigator panel displays in the lower-left portion of the Form Designer. This panel shows information about important properties setup for this workflow step. Not all of the configured properties are shown in this view.
Open the Workflow Properties wizard by:
- Clicking inside a section or clicking on the
 Edit Workflow Properties icon in a section of the Properties Navigator. This immediately displays the property tab for editing.
 - Clicking the
 Edit Workflow Properties icon in the Workflow Designer toolbar
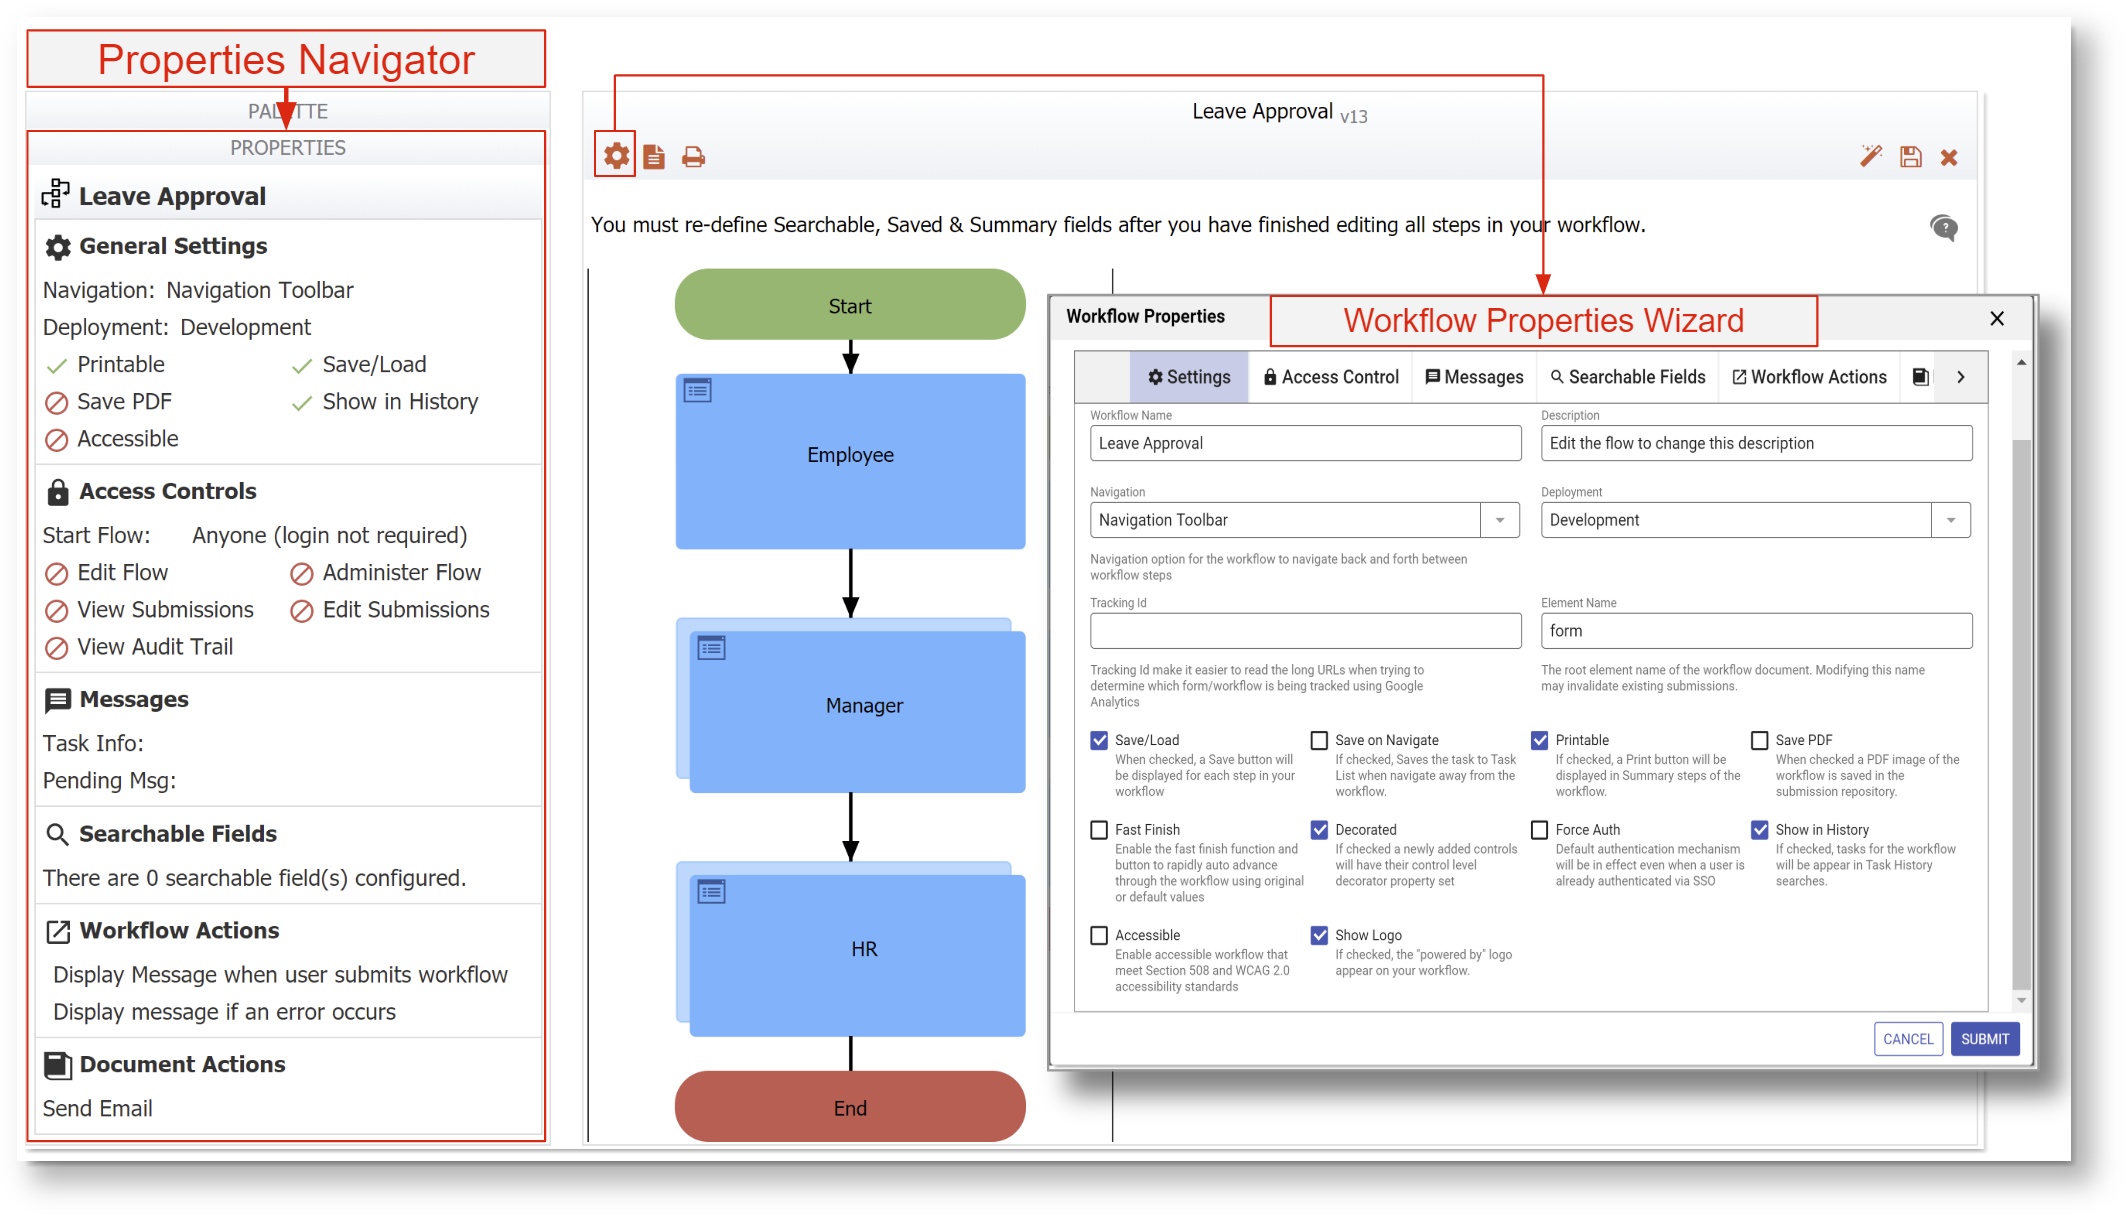
The Properties Tabs work the same way whether you open them from the Navigator or from the Workflow Designer toolbar. Here is what you need to know:
- If you are working on several tabs at one time, you can navigate to other tabs and make changes there. Use the left and right arrows at the top of the screen to display additional tabs. You must click the Submit button when you are finished configuring Step Properties to save your changes. Remember to save the workflow.
will validate the Property Settings when you click Submit. If a property value is invalid, the tab(s) will not close and a message will display telling the designer that there are corrections to be made before saving. The screen will stay on the current tab if there is a validation error. Otherwise, another invalid tab will be auto selected (starting from left to right) if another tab needs attention. Tab labels with invalid entries display in red.
- Clicking on the Cancel button closes the tab(s). You will be asked to confirm if any changes were made.
- Hover over any field on the Properties tabs to see a helpful hint providing information about the property. Some fields contain instructions to guide you.
- Clicking on the
 down arrow for a property shows an unfiltered list of choices applicable to that property. For some properties, you may see templatized controls from your workflow and workflow/special templates provided in
 - In some cases, you can type ahead to narrow down the list. Use the up/down arrows, the Enter key or click an option with your mouse to select an option. Use the Backspace, Delete or click the x on a selected property to delete it.
- Typing a opening curly brace into some fields, followed by the name of a control, show a list of the fields in your workflow that match the entered text and will be added to the field as a control template.
- On some tabs, you may have to slide the
 toggle to the right to turn on a feature.
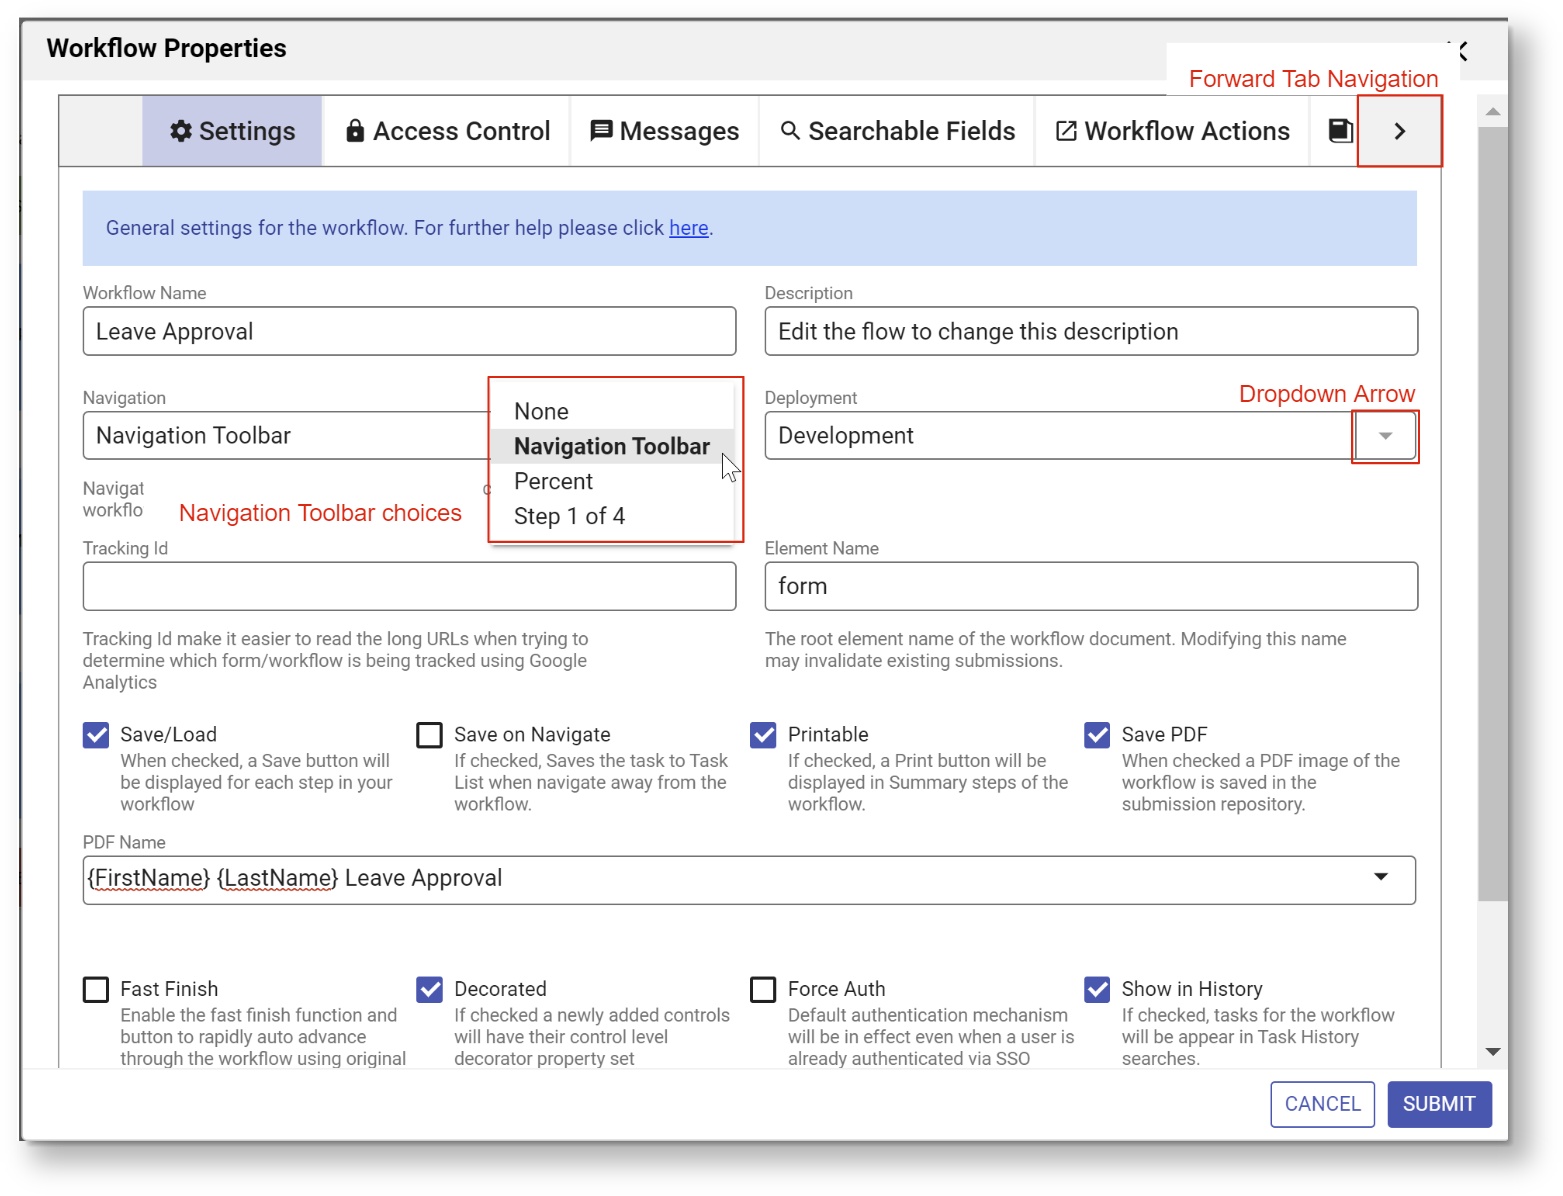
Each workflow property setting is described below.
On This Page:
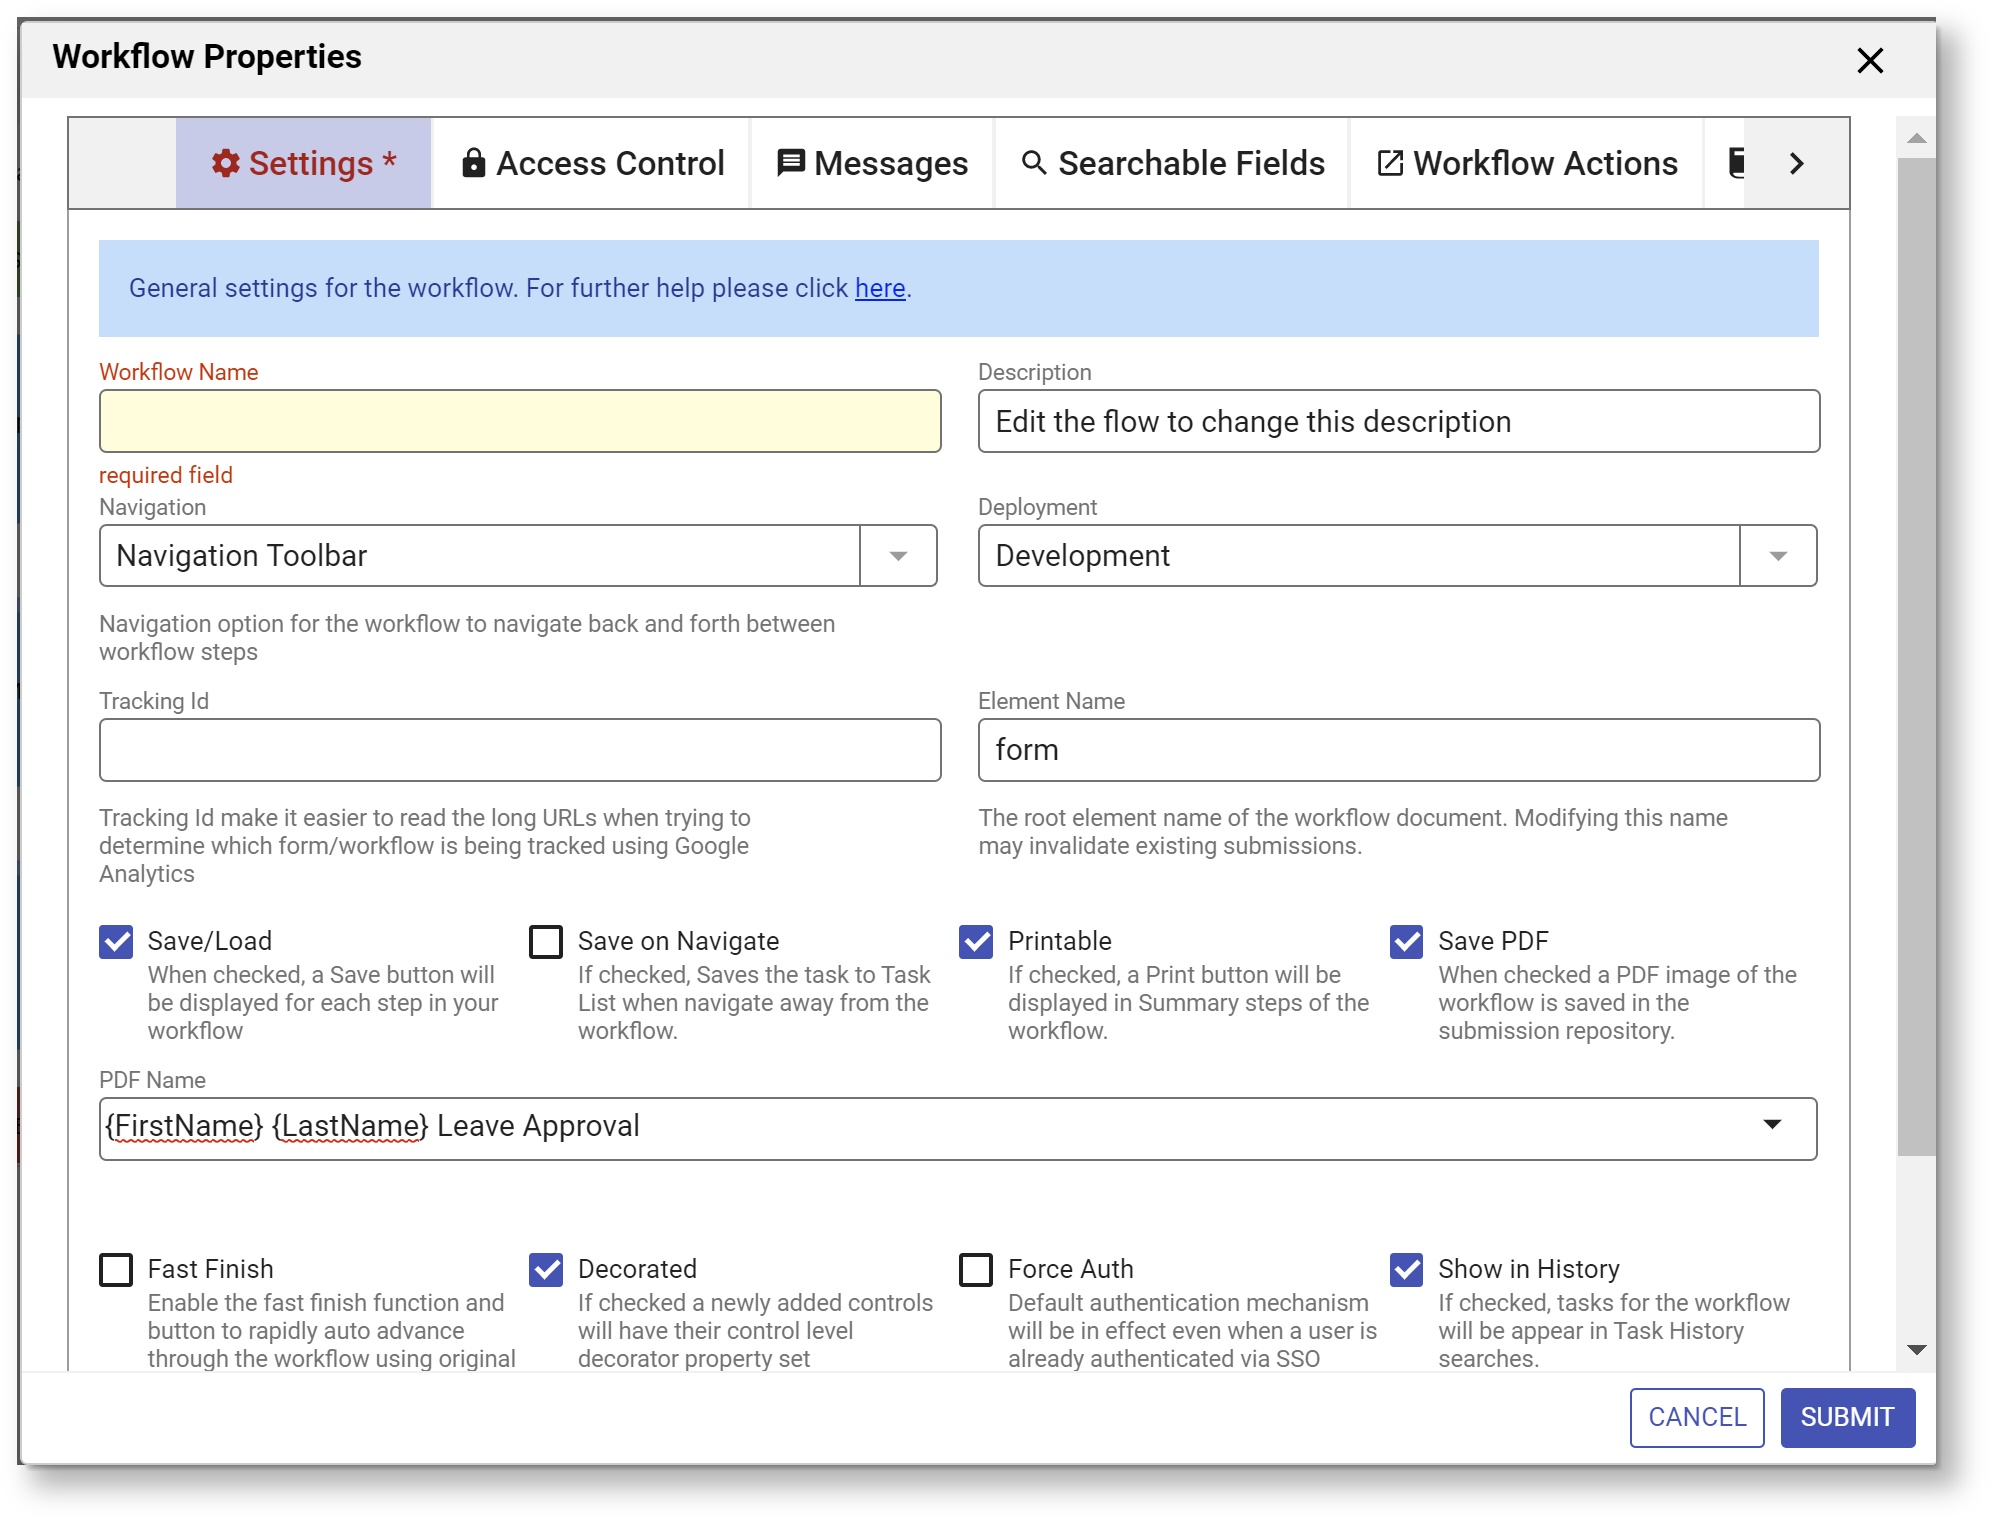
Workflow Name
This is the name you see on the Workflows home page where your workflows are listed. We recommend changing the name to make it more meaningful than the arbitrary name assigned when you create it, but keep in mind it is a working name only, so users will not see it. It is recommended that you name your form/workflows using characters that are suitable for filenames. Following the POSIX filename standard (A–Z a–z 0–9 . _ - ) will ensure it works. Click the ![]() pencil icon above the Properties Navigator to edit the name then click the checkmark to save or the "X" cancel icon to discard your changes. You can also change the name on the Settings tab.
pencil icon above the Properties Navigator to edit the name then click the checkmark to save or the "X" cancel icon to discard your changes. You can also change the name on the Settings tab.
Settings
Use the Settings tab to select general settings for your workflow.
You can access the Settings tab in three ways:
- Click the Edit Workflow Properties icon on the Workflow Designer toolbar. This will launch the Workflow Properties wizard. It defaults to the Settings tab.
- Click anywhere in the General Settings section in the Properties Navigator. This takes you directly to the Settings tab.
- Click the
 inside the General Settings section in the Properties Navigator. This takes you directly to the Settings tab.
 - Select/enter the properties for your workflow
- Click the Submit button to save the changes or navigate to another tab.
Description
By default all workflow descriptions say, “Edit the workflow to change this description,” but you can change this if you wish. You also see this description when you view individual submission documents.
Navigation
can automatically generate and display a navigation toolbar for your workflow which users can use to navigate back and forth between workflow steps. There are four available options:
- None: This option displays no navigation toolbar. This is useful for situations where the same form is being passed between users for signatures e.g. Vacation Request workflow filled in by an Employee and signed by a Manager.
- Navigation Toolbar: this displays a standard navigation toolbar with links for each step.
- Percent: This displays progress through the workflow as a percentage.
- Step 1 of 4: This option displays progress through the workflow as a counter.
The default value for Navigation is Navigation toolbar. When you configure the Navigation toolbar for your workflow, users will see the following:
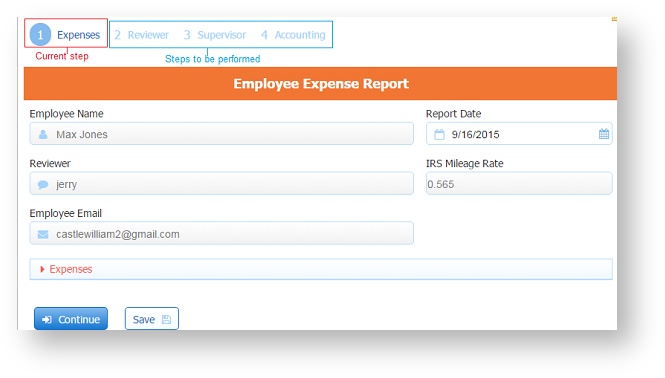
- The name of the current step displays with a bright blue color. Note that the active step number is also circled in bright blue. Steps that have yet to be performed display with a light blue color.
- HTTP Wait-Notify and Anonymous Task steps, once performed, display with a faded blue color indicating that the workflow cannot be reset to this step.
- Skipped steps display with a light blue color and steps that have already been performed display with a black color. For example the Expense Report workflow shown in the image, has four steps: Expenses, Reviewer, Supervisor and Accounting. The employee fills out the Expense report for an amount less than $5000.00. The workflow is routed to a company reviewer and if approved, to Accounting for final processing. If the amount of the expense had been greater than $5000.00 then the workflow is routed to a Supervisor for an additional review before navigating to the Accounting department. The Supervisor step is skipped for Expense reports less than $5000.00. When the Accounting employee performs the task, here is what they will see:
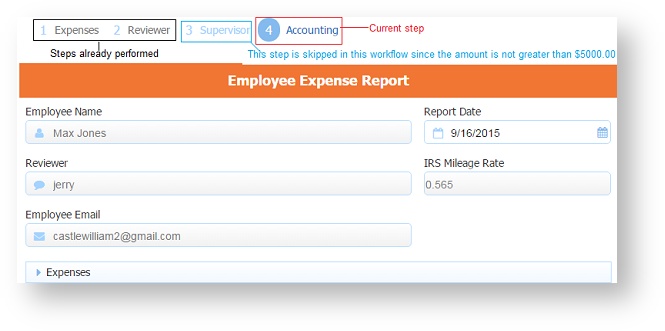
- The Expenses and Reviewer steps display in black since they have already been performed.
- The Supervisor step is displayed in faded blue because it was skipped as the total amount of the expenses was less than $5000.00.
- The name and number of the Accounting step, which is the step that is currently being performed by the Accounting employee, display in a bright blue color.
Refer to the precondition topic to see how to use them to skip a step in a workflow.
Mobile vs Desktop Behavior
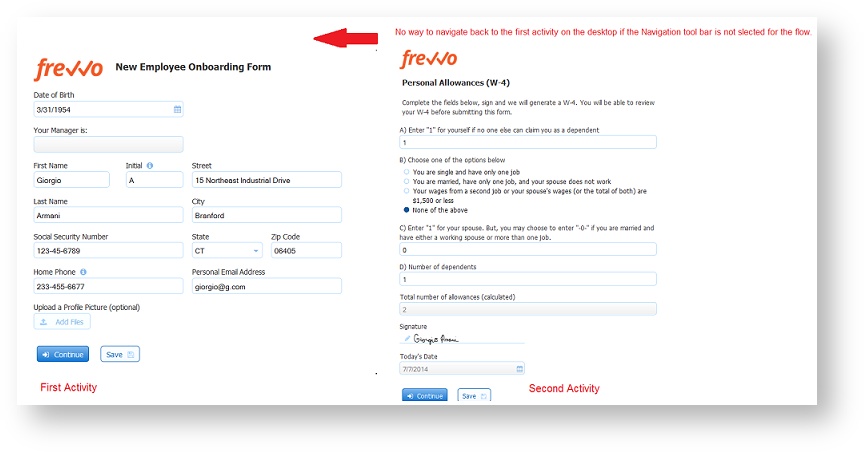
You may notice a difference in behavior when using a workflow on the desktop vs on a phone/tablet. For Example: Imagine a two step workflow where 1st step has 2 Pagebreak controls and neither step has an assigned role/user. On the phone/tablet this translates into a screenflow with 3 steps for 1st step and 1 step for 2nd step. You can use the Previous button to get back to the 1st step from the 2nd step.
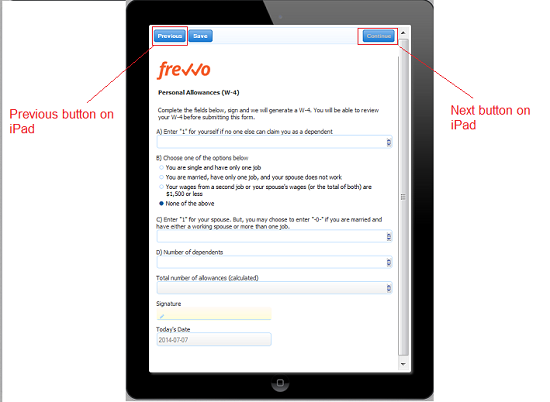
However, on the desktop there is no "Previous" button so once the workflow gets to 2nd step there is no way to get back to 1st step. If the designer does not configure the Navigation Tool Bar in this situation once the user gets to the second step in the workflow, there is no way to return to the first step.
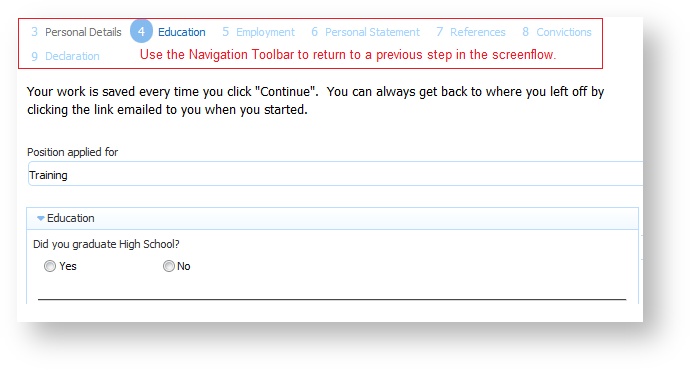
Anonymous Screenflow Navigation
A screenflow is a type of workflow consisting of a collection of sequential steps performed by the same user. What if you wanted that user to be anonymous? Configuring the Navigation Toolbar in an anonymous screenflow allows anonymous users to navigate back to a previous step in a screenflow. The set of available links is restricted to the steps that are executed in sequence by the anonymous user. Links to steps outside of the screenflow are not visible. The steps in the screenflow cannot have a role, dynamic role or user property assigned to them.
Configuring the Save on Navigate feature enables the screenflow to be completed in multiple sessions.Let's consider a Job Application workflow with the following requirements:
- The workflow is going to be performed by anonymous users. Anonymous users do not sign in to
- The anonymous user receives an email that includes a link to the workflow.
- The workflow must collect a lot of information from the applicant: Contact Information, Education and Employment history, References and more. You can create one long form or design a screenflow with an Anonymous Task step and subsequent steps as separate screens to collect the information.
- The user must have the option to compete the screenflow in multiple sessions. Clicking on the email link takes the user back to the last step in the screenflow where the Continue button was clicked.
- The user must be able to navigate back to previous steps to review or update information that was previously entered.
Workflow Designer
- The Save on Navigate checkbox is checked and the Navigation Toolbar is configured on the Workflow Property Panel
- Step 1 of the screenflow has a field named EmailAddress that collects the applicant's email address.
- Step 2 is assigned to an email address. This is the first step that is performed by the anonymous user.
- All remaining steps in the screenflow are designed to collect the applicant's information: Contact Info, Education and Employment history, references etc. Remember, the anonymous user does not login to perform these steps so they cannot have a role, dynamic role or user property assigned to them.
The image shows an example of a possible screenflow design:

Use Mode
Anonymous users return to a previous step by clicking on the Navigation Toolbar if the workflow contains a screenflow performed by an anonymous user.
Deployment
This field is a toggle that sets the state of your workflow to production or development. Functionality is the same as Deployment for forms.
Tracking Id
When your workflow loads, it will send a page view event to your Google Analytics account if you enter your Google account tracking ID into this workflow property. Please refer to Google's documentation for information about finding your Google Analytics tracking ID.
Element Name
By default, this is set to form for newly created forms as well as workflows. The root element name of the from-scratch document is determined by what you put in here. It needs to be a valid XML element name. The designer can now change the name of the workflow without impacting the element name.
Workflow schema and the Submission xml document show the element name. When the workflow name is updated, and 'Element Name' is kept the same, the previous submissions can be initialized successfully. When 'Element Name' is updated, previous submissions cannot be initialized.
If you change the element name, all existing submissions will become invalid and you will get the error message: " Error. Submission is not valid. An incompatible change was made to the form/workflow."
Save/Load
If you check this checkbox on the workflow level and on the step level, a Save button will be displayed for each step in your workflow. If you don’t want users to be able to save partially completed workflows and continue them later, uncheck the checkbox so users will not see this button.
This feature is useful for workflows containing lengthy forms where your users may not have all the information required to complete the form in a single session. By clicking on the Save button, a copy of the workflow with all the current values is saved by .
will also generate an entry in the user's task list from where the user can continue working on the workflow at a later time.
If you are not authenticated, clicking the Save button will display an authentication dialog that requires you to login. See documentation on using forms for more details.
Users can repeat the save/load steps as many times as they wish.
Saved workflows can be monitored in the Submissions Repository. Saved workflows can contain invalid data and can also contain required fields with no values yet entered. When such a workflow is re-loaded the missing and invalid values are again flagged as such by . And the workflow cannot be continued/finished until corrections are made to those fields.
Customizing the Save Button Label for Workflows
The Save button label can be customized for each step in your workflow on the Settings tab of the Edit Step Properties wizard. For example, you can change the button text to Save for Later. This will help clarify the function of the Save/Load feature to your users.
Designers should refer to the Save and Load topic for the details.
Save on Navigate
Imagine you are entering data into a large screenflow and something happens that causes you to navigate away from the workflow.. you just lost all your work!. Checking the Save on Navigate property, saves the task to your Task List. automatically "bookmarks" your place in the workflow.
Users can go to their Task List to retrieve the task and they will be returned to the screen where they were when the browser was closed.
Let's say you have a screenflow with steps A > B> C and the user closes the browser at screen B. When the user performs the task from the Task List, the workflow will open up at step B.
Here is a short synopsis of when the current location is saved. Consider a workflow with the following steps/roles: Role1(A → B → C) → Role2(D) → Role3(E):
- The workflow is instantiated and step A is rendered:
- The user clicks next:
- The user clicks next:
- Role2 performs the task: no need to save here since the workflow is already saved in the db in the PENDING state.
- Role2 clicks continue:
Screenflows consisting of an Anonymous Task step followed by multiple sequential steps that are performed by an anonymous user bring the user back to the workflow at the current/latest anonymous step if the Save on Navigate feature is selected.
Configuring Save on Navigation
In-house customers can turn this feature on globally with a configuration parameter. If configured on a server level, it will apply to all workflows. If you want to save workflow steps that are partially filled in to the Task List, enable the Save/Load feature in your workflow.
Printable
If you check a workflow's printable checkbox a Print button will be displayed in Summary steps of the workflow. If you don’t want users to print your workflow, uncheck the checkbox so users will not see the Print button. You can control which fields are printed by setting up which fields are displayed in the Summary View as described below.
Workflows do not currently support a print icon as is available on forms. This will be added in an up coming release. One solution is to add your own print link as discussed in the chapter Printing Forms.
Each step also has a printable property which controls whether or not that step appears in the PDF document view . See the printable property for workflow steps for full details.
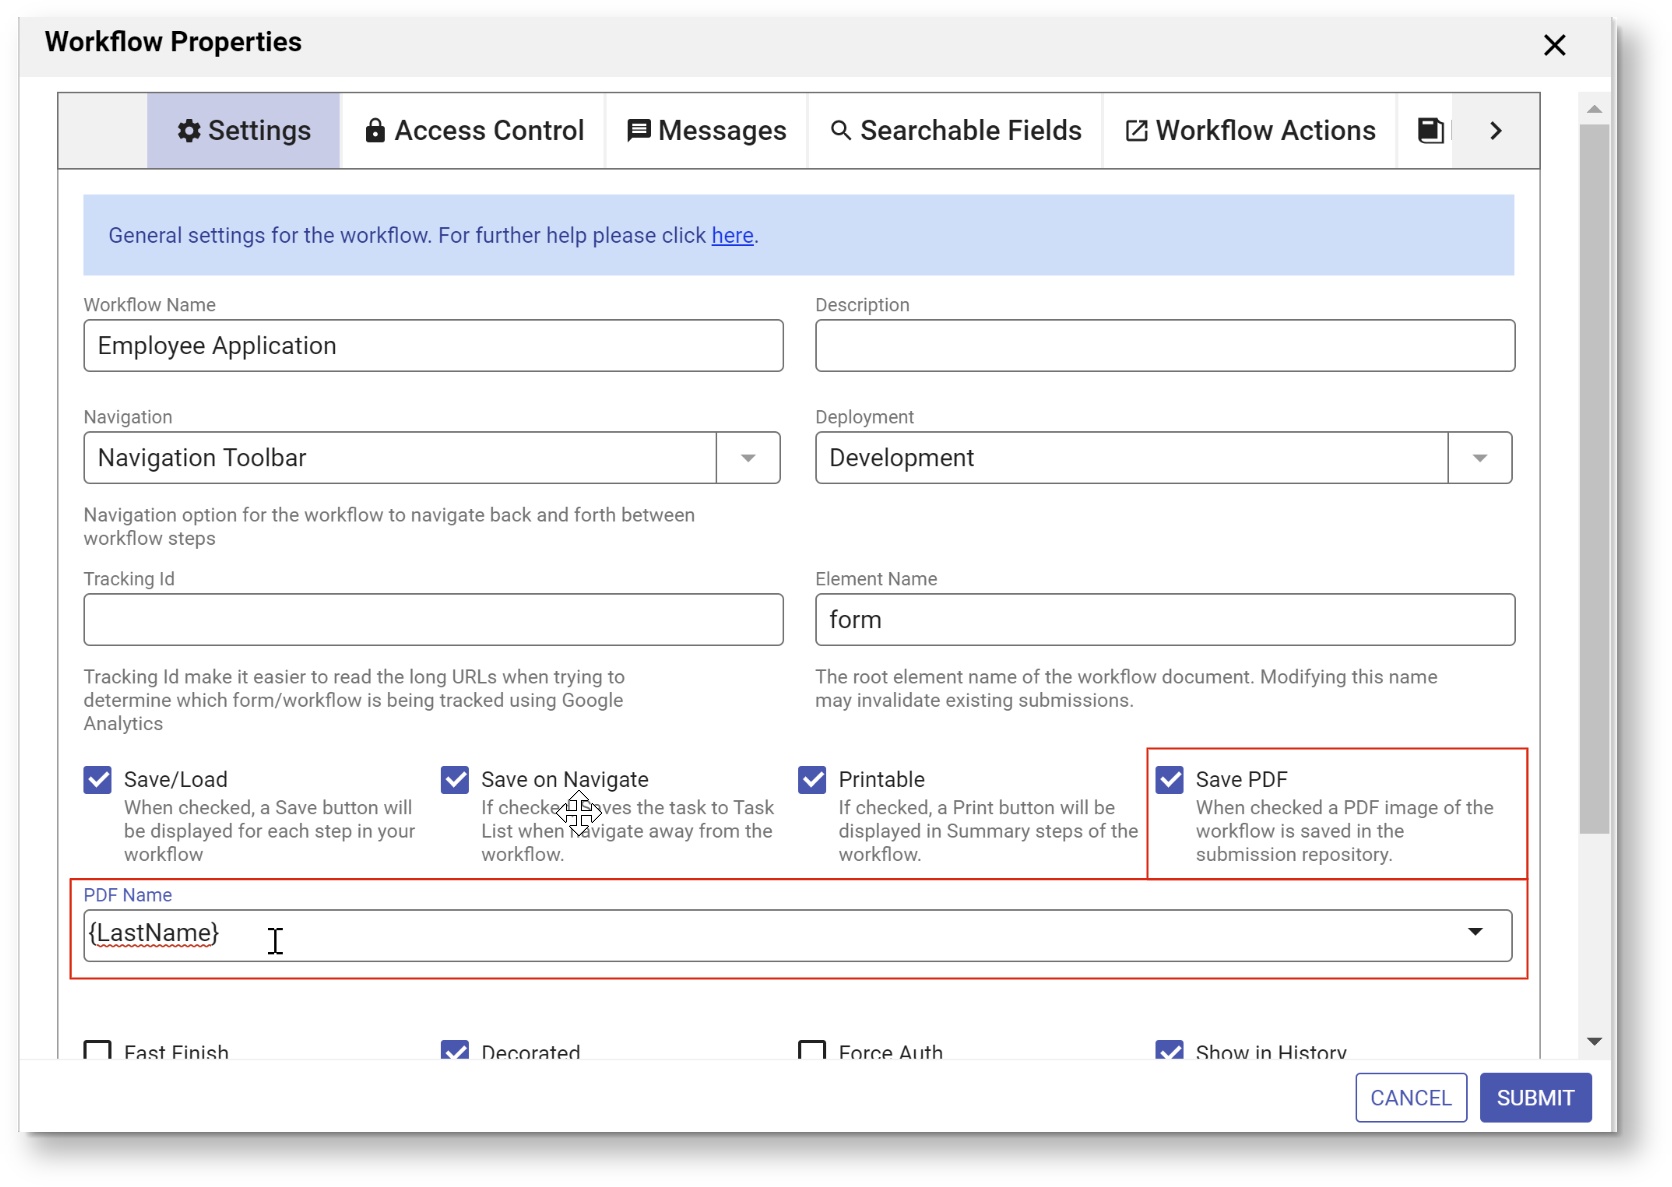
Save PDF
When checked a PDF image of the workflow is saved in ' submission repository. See the documentation for the submissions repository for details on viewing the PDFs saved there.
Since workflows are a combination of multiple forms or a single form visible in multiple steps or a combination of the two, it is important to understand what controls will be printed when the PDF is generated. See the topic discussing the step printable property. Notice all controls, including those disabled or in a signed section, are no longer grayed out in the PDF.
PDF Name
When you check Save PDF on the Workflow Property panel, an optional PDF name field displays. It is only visible when the "Save PDF" property is checked and is disabled when the "Save" property is unchecked. If this property is set, then it is used to name the generated PDF. You can use templates to name the PDFs.For example, let's say you have a New Employee On boarding workflow and you want the PDF in the submissions to be named using the new employee's last name. Simply add the name of the control in your workflow that collects the last name as a template ex: {LastName} in the PDF Name property. The pdf for each Employee On boarding submission will then be named {LastName}.pdf.
If the PDF Name property is empty, then the form name is used as the pdf name. It is recommended that PDF Names use characters that are suitable for filenames. Following the POSIX filename standard (A–Z a–z 0–9 . _ - ) will ensure it works.
PDF names can contain special characters with the exception of curly braces {}.
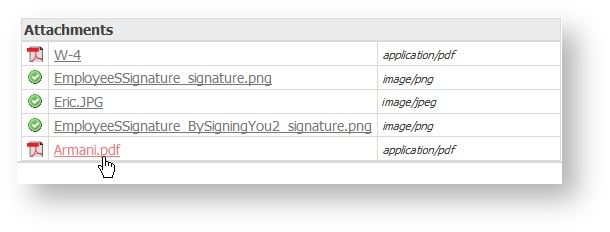
In the submission, the pdf for the Onboarding for new hire Eric Armani is named as shown as shown:
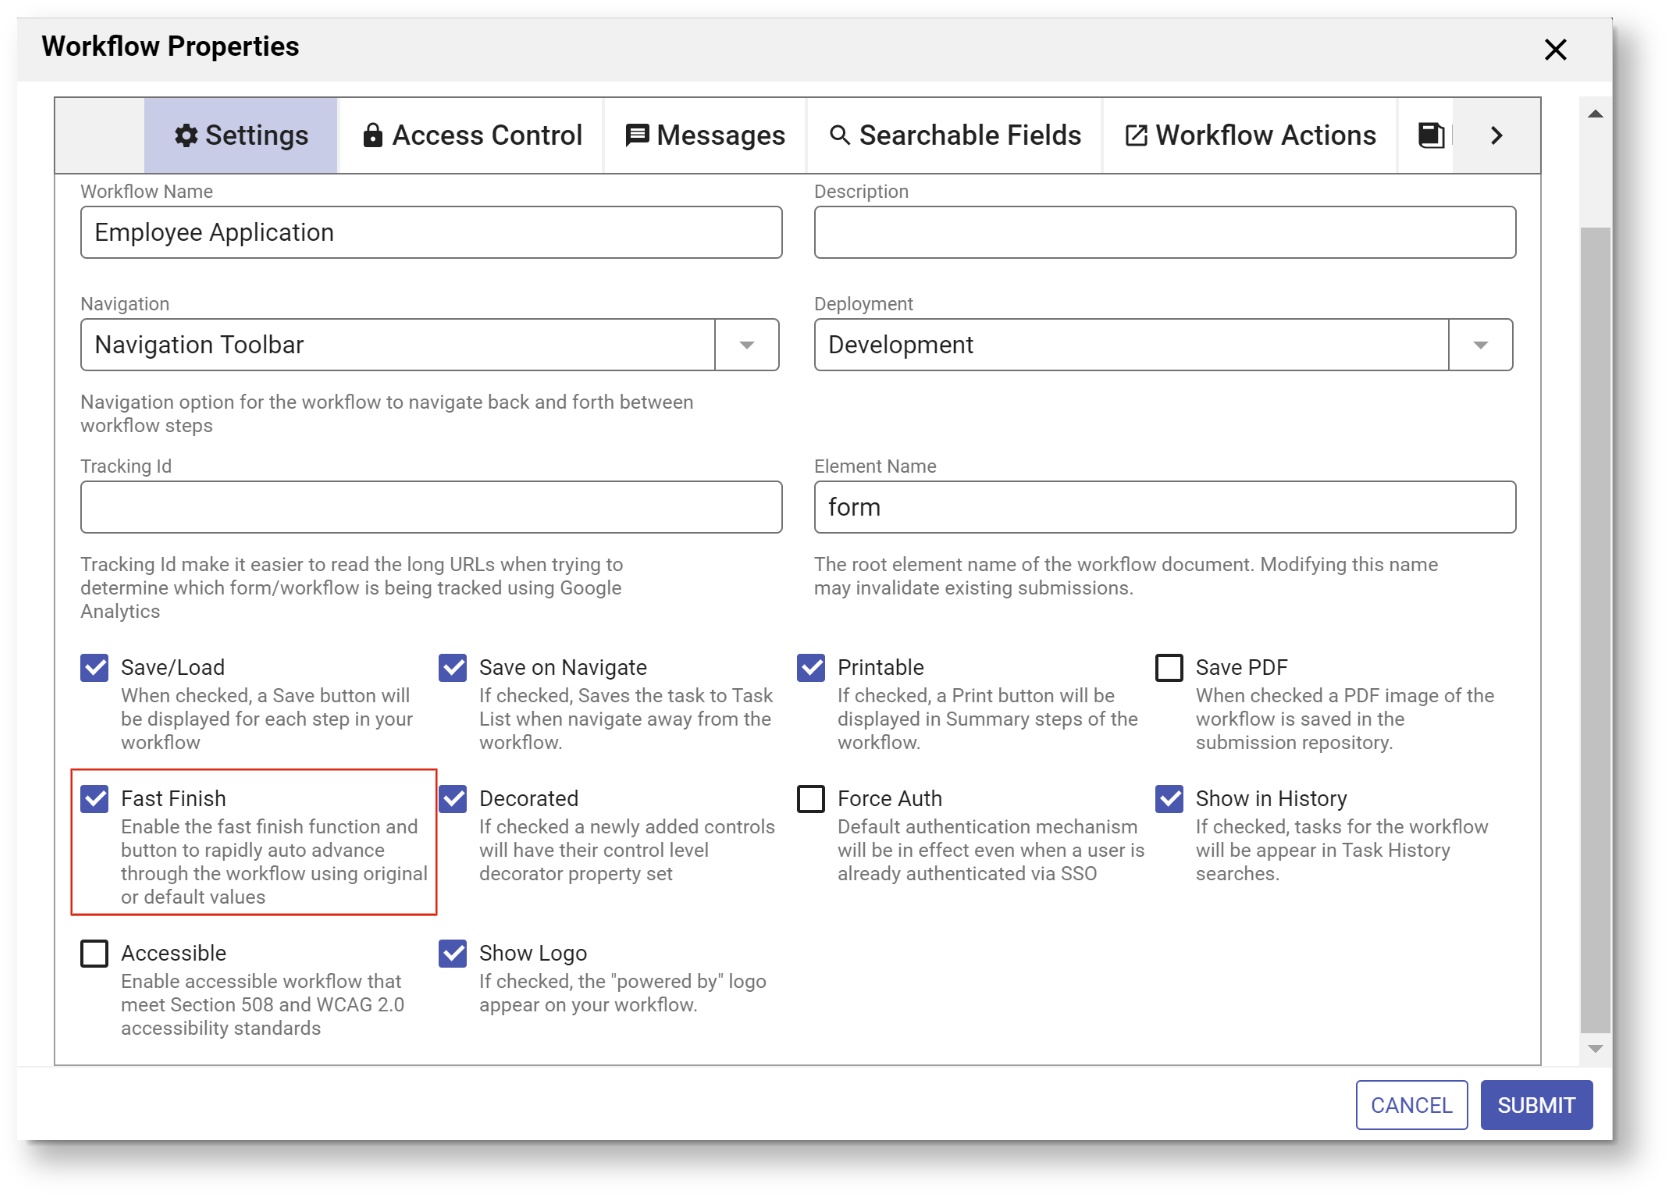
Fast Finish
The Fast Finish feature is very useful when you're filling a lengthy screenflow. workflows consist of steps (steps) performed by the same person or more than one person. Steps in a workflow performed by the same person are called multipage forms or screenflows. The designer can select the Navigation Toolbar or add a Summary step as one of the steps to provide an easy way to move forward and backwards through the steps of a
workflow.
Let's say a user needed to return to a previous workflow step to change entered data. The user clicks the step on the Navigation toolbar or the edit link in a Summary step and the workflow returns to the previous step so the user can make the change. In previous versions, once the change is made, the user would have to click through all of the remaining screen workflow steps in order to resubmit the workflow with the updated data.
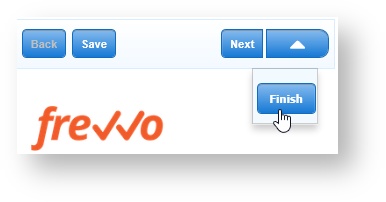
The Fast Finish feature provides a finish button, visible in use mode, in addition to the Submit and Save button (if Save/Load is selected) for the forms in your workflow. The Finish button works the same way as the Continue button. The workflow will not advance to the next step or be submitted If any of the fields are invalid.

Selecting Finish automatically advances through the workflow steps until one of the terminating conditions listed below is true:
- An step is encountered that is not valid - this could be as simple as a required field that was not filled in.
- The next task is assigned to any user/role that is different or the same from the user that selected finish - an example would be the step in the workflow that gets routed to a manager for approval.
- The next task is an Anonymous Task or HTTP step type.
- The last step is valid and submitted.
You can select the Fast Finish property at the workflow level or for the individual steps in the workflow. Selecting Fast Finish at the workflow level enables it for all steps.
To select Fast Finish for all the steps in your workflow:
- Edit the workflow in the Workflow Designer.
- Click the Edit Workflow Properties icon to display the Workflow Properties wizard.
- Check Fast Finish on the Settings tab.
- Click Submit to save.
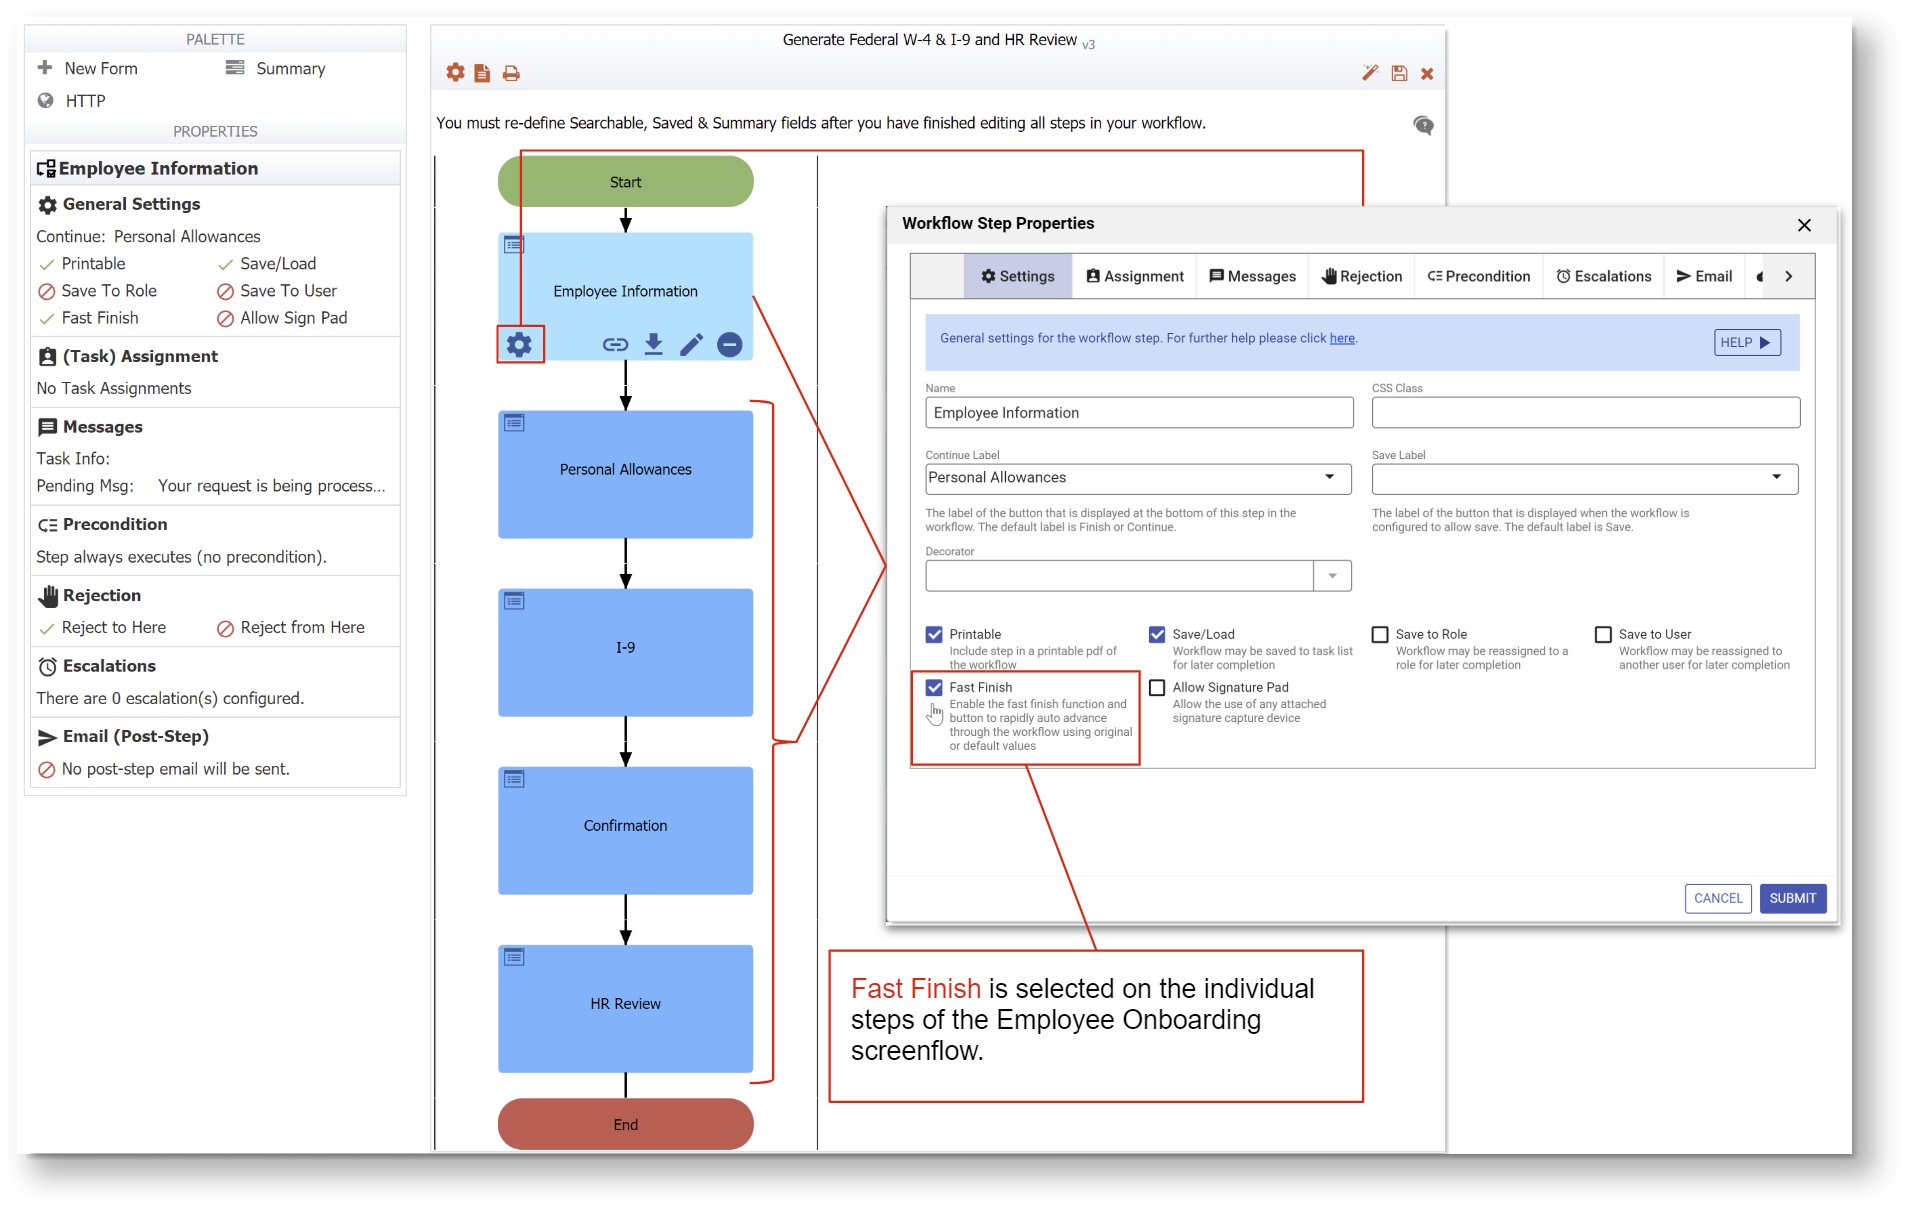
Selecting it on the individual steps makes the Finish button available on the designated steps only.
- Edit the workflow in the Workflow designer.
- Click on the Employee Information step. Click on the Edit Step Properties icon. Click the General Settings tab.
- Check Fast Finish.
- Repeat for all the steps in the workflow where you want the Finish button to display.
- Save your changes.
If the steps in your workflow consist of forms and/or a summary step, Fast Finish forwards through the steps of your workflow until it hits one of the terminating conditions listed above.
Let's consider the Employee On Boarding workflow as an example. This workflow consists of a screenflow that is filled in by the new employee:
- Step 1 is the Employee Information form
- Step 2 is the Personal Allowances form
- Step 3 is the Health Insurance Information form
- Step 4 is the Direct Deposit form
- Step 5 is a Summary step where the employee can review the data. Clicking on the automatically generated Edit links in the Summary View takes the workflow back to that step so the data can be edited.
- Step 6 is a Confirmation form for the employee to review the W - 4 pdf information,
- Step 7 is not part of the screenflow - the workflow is routed to the HR department for final processing.
The new employee has filled in steps 1 - 6 but upon viewing the W - 4 pdf realizes that the Additional amount withheld is incorrect. The user clicks on the Personal Allowances step in the Navigation bar to make the correction. If Fast Finish is not selected for the workflow, the user must click the Continue button on each remaining step of the workflow to submit it with the corrected information.
If Fast Finish, is selected on the workflow or step level, the user can click the Finish button after making the correction and the workflow will fast forward through Step 6. Fast Finish will stop here since step 7 is assigned to the user Sue who is a member of the Human Resources department. The user will see the pending message after Step 6 and the workflow will be routed to Sue for final processing.
If the Fast Finish and Save/Load features are enabled for a workflow, the user can save a partially completed form to their task list. If the saved form still has required fields that have to be filled in, when the user retrieves the saved task from their task list to complete and submit it, clicking the Fast Finish button takes the user to the point in the screenflow where they left off.
Fast Finish on Mobile Devices
The Fast Finish button on an iPhone or iPad is accessed via a dynamic action menu that is activated by the right-most button in the top button bar. The action menu drops down below the button and floats above the form. If Fast Finish is not selected for the workflow or on the current step, then the action button and menu are not present at all.
Refer to this feature announcement for more information.
Decorated
Decorated is checked by default when you create a new workflow. If you uncheck Decorated at the workflow level, newly added controls in the forms of your workflow will not have a decorator. Controls in the forms that already have decorators will retain them. The designer can select a decorator for each of the steps in a workflow that will display on the navigation bar.
Force Auth
If this is checked and the tenant supports SSO (single sign on) such as the LDAP Security Manager enabled tenants, then the
authentication mechanism will be in effect even when a user is already authenticated via SSO.
For example, if you leave force auth unchecked and your form is public in tenant, and you are already authenticated via SSO you will not have to login directly to to use the form. If instead you check force auth
will force you to login directly even though you are already authenticated via SSO.
See /wiki/spaces/frevvo91/pages/901492728 for more details.
This property is currently ineffective for tenants with the default delegating security manager. However the delegating security manager may support SSO in the future.
Show in History
If this checkbox is unchecked, tasks for the form or workflow will not appear in Task History searches. If you want them to appear, make sure this box is checked. Checking or Un-checking it affects all tasks including ones that were created prior to the action.
Accessible
Live Forms can be used to build accessible forms/workflows that meet Section 508 and WCAG 2.0 accessibility standards. Check the Accessible property to turn on this feature. Refer to the Accessibility documentation for the details.
Show Logo
This property is checked by default and causes the “powered by frevvo” logo to appear on your workflow. Uncheck the checkbox to remove the logo from your workflow.
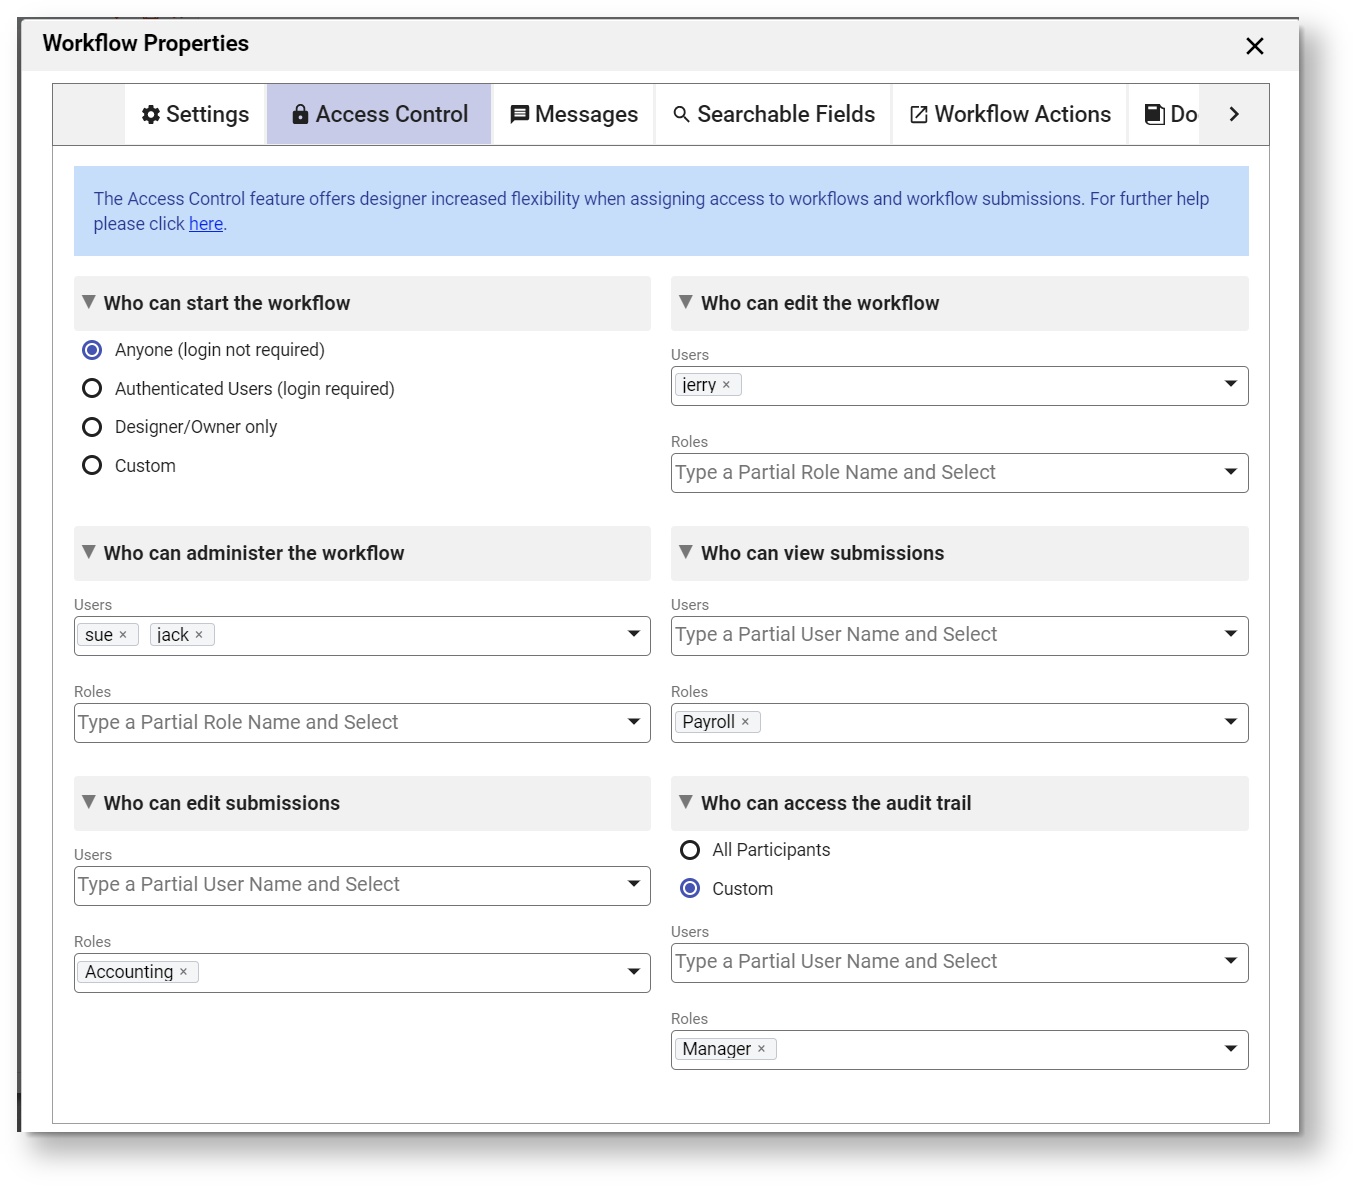
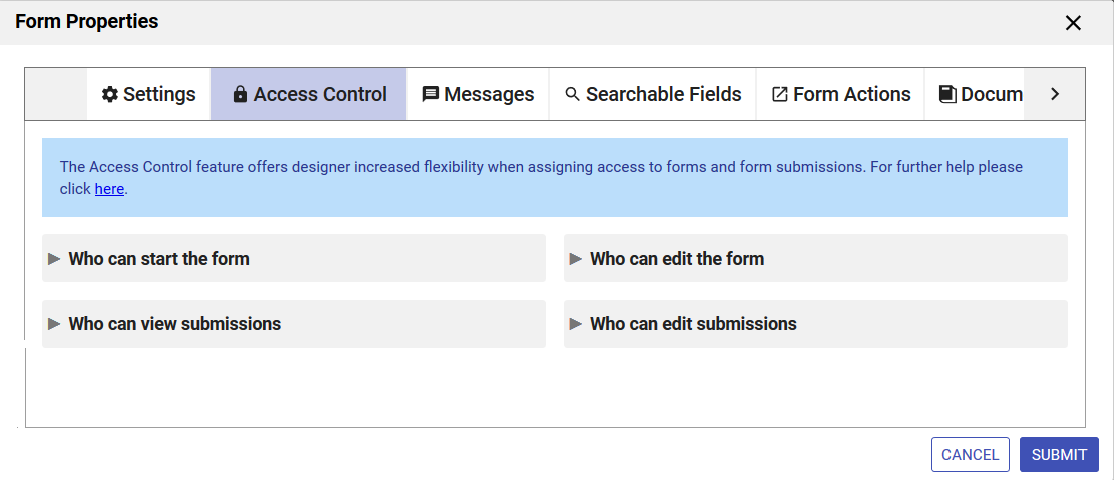
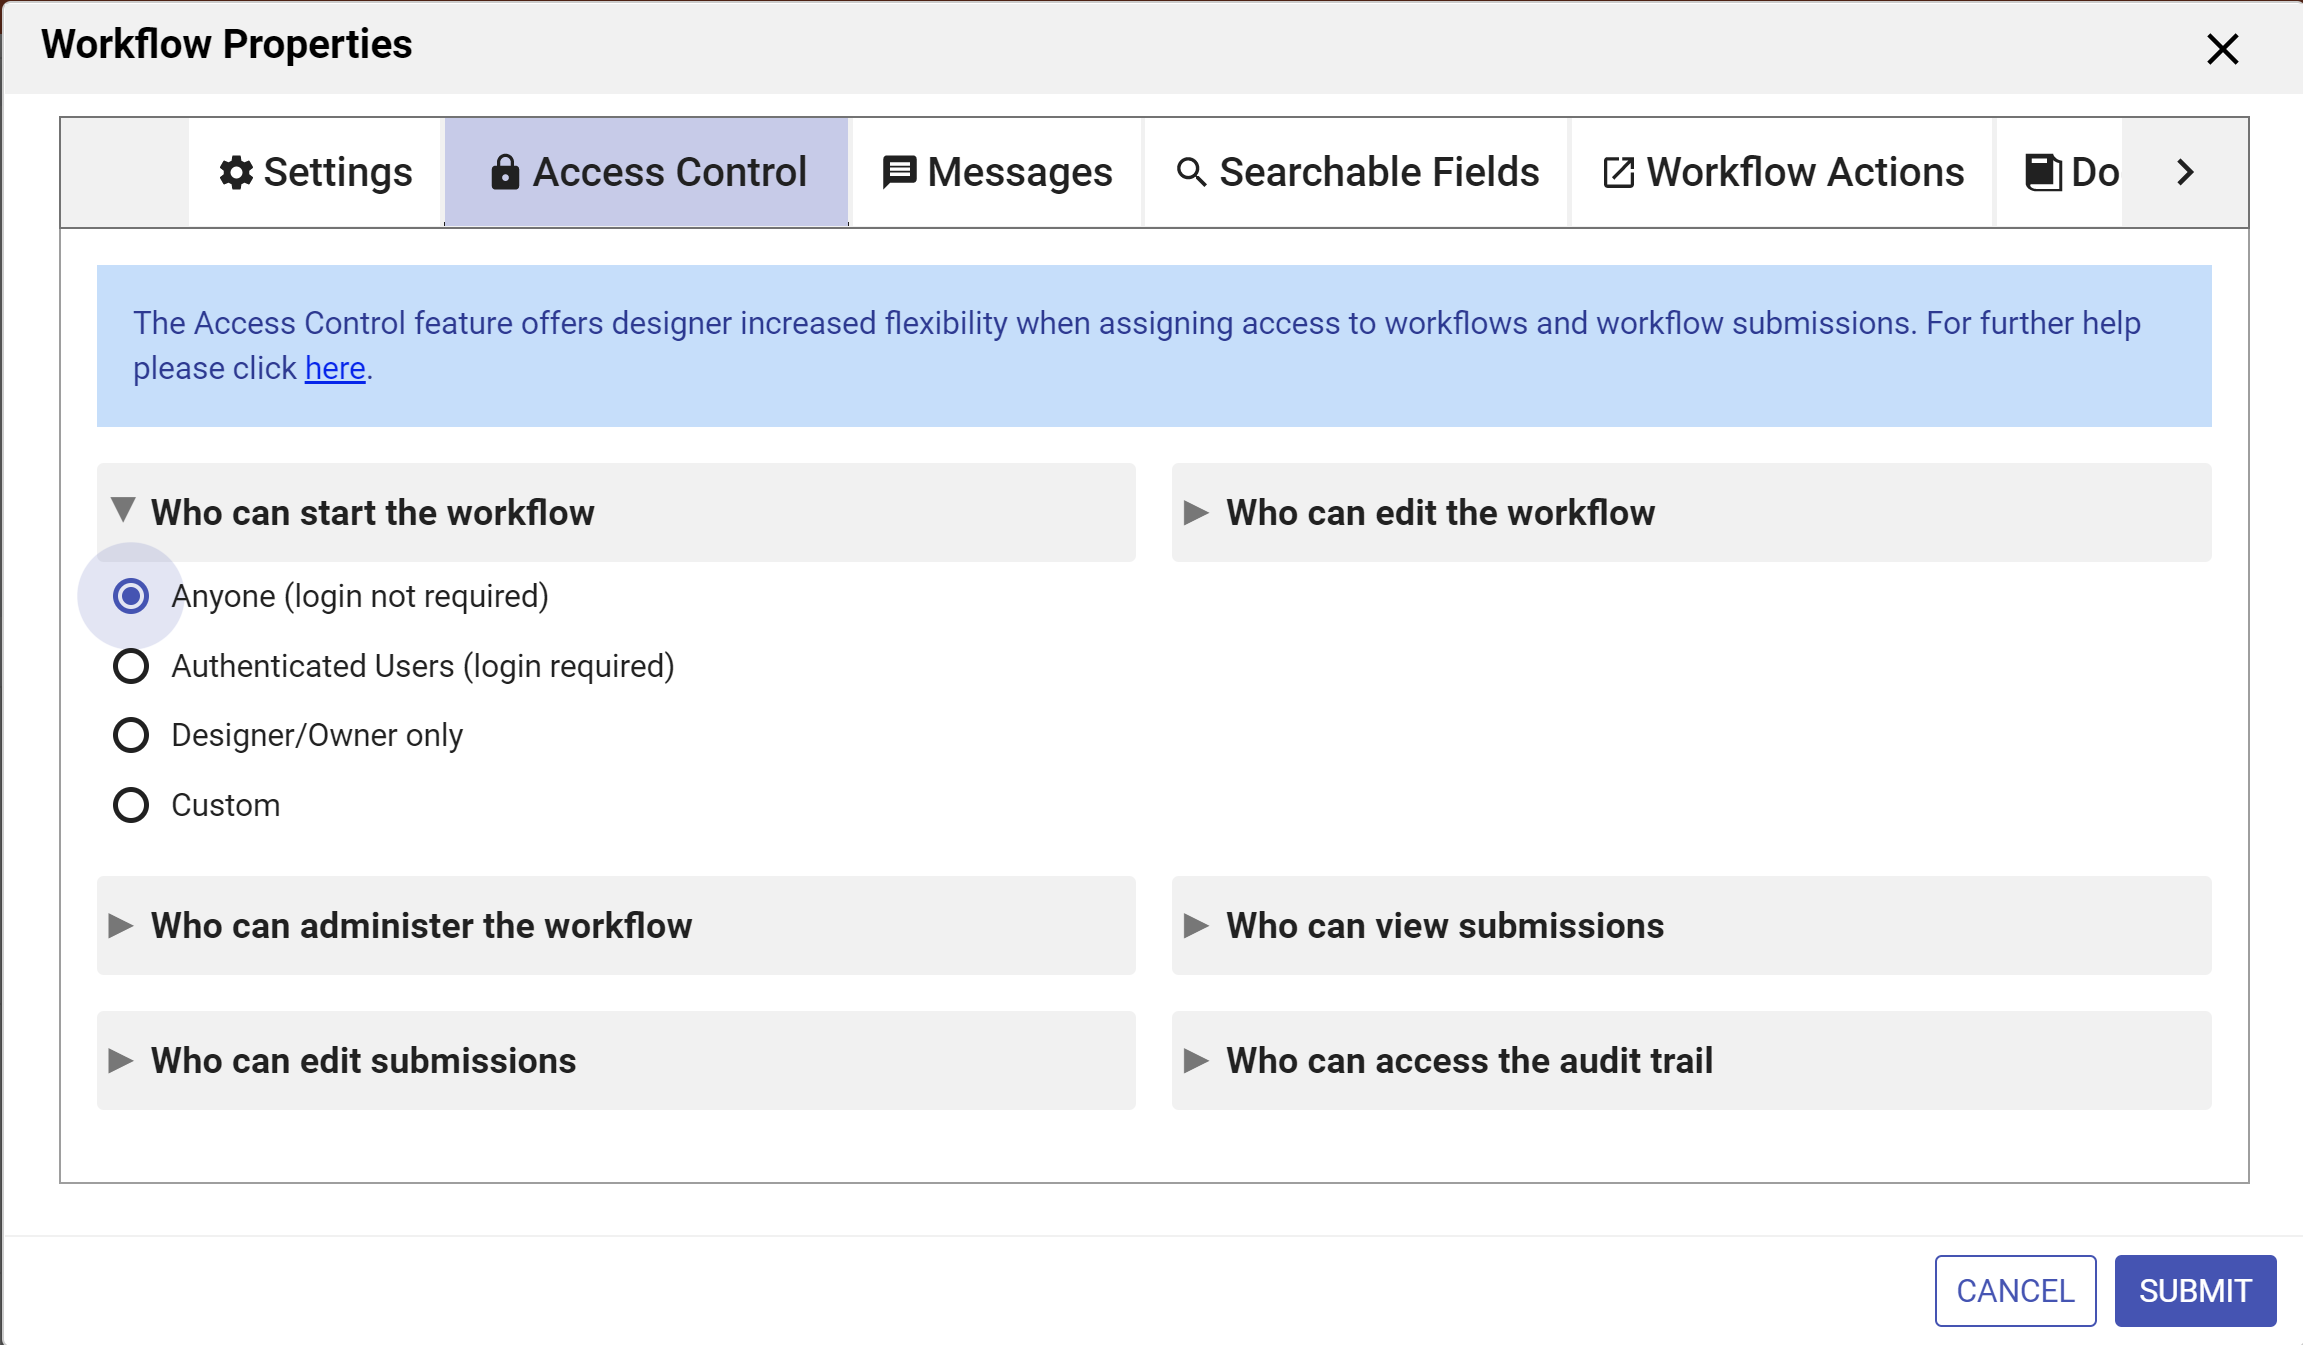
Access Control
Use the Access Control tab to assign workflow permissions to users/roles in your tenant.
You can access the Access Control tab in three ways:
- Click the Edit Workflow Properties icon on the Workflow Designer toolbar. This will launch the Workflows Properties wizard. Click the Access Control tab.
- Click anywhere in the Access Control section in the Properties Navigator. This takes you directly to the Access Control tab.
- Click the inside the Messages section in the Properties Navigator. This takes you directly to the Access Control tab.
- Enter the users and roles for the permissions provided.
- Clicking on the
 down arrow(s) show a list of users, roles and templatized fields from your form. Select the users/roles from the dropdown.
- Type the opening curly brace - {- followed by the control name to enter a field from your form as a template. Selecting an option enters the control name into the field with the closing curly brace.
- Click the Submit button to save the changes or navigate to another tab.
Access Control List User Interface
- Although designer users can click the
 Security icon from the
  Action Menu on the Forms and Workflows Home page, we encourage you to use the Form/Workflow Properties wizards explained below to assign permissions.
Open the Access Control wizard by
- Editing the form/workflow.
- Clicking the Access Controls section or the
cog icon on the Form/Workflow designer Properties Navigator when editing a form/workflow.
- Click the Access Control tab.
Form designers as well as users with the publisher role are authorized to configure access control. The Access Control wizard makes the following permissions available for forms/workflows:
- Who can use the form/workflow?
- Who can edit the form/workflow?
- Who can view form/workflow submissions?
- Who can edit form/workflow submissions?
- Who can access the audit trail - available only for workflows
- Who can administer the workflow - available only for workflows
ACL Permissions for Forms
ACL Permissions for Workflows
ACL settings,set by the designer, are retained when you download/upload a form/workflow/project to another designer user in the same or different tenant and when you copy a form/workflow.
Dynamic ACLs
Templates provide the ability to dynamically determine and restrict access to submissions/ task audit trails when assigning Access Control permissions. Templates are like variables in your form that can be filled in by the user, populated by a business rule or from a back end system. Any item on the Access Control screens contained in curly braces is a form template and will be replaced with the value of the associated control. For example, the list below contains a fixed role (reviewer) and one dynamic template based role - {AcctMgrRole} :
In the example discussed below, templates are used to navigate the workflow to the correct employee in the Accounting department and to define user lists to dynamically control access.
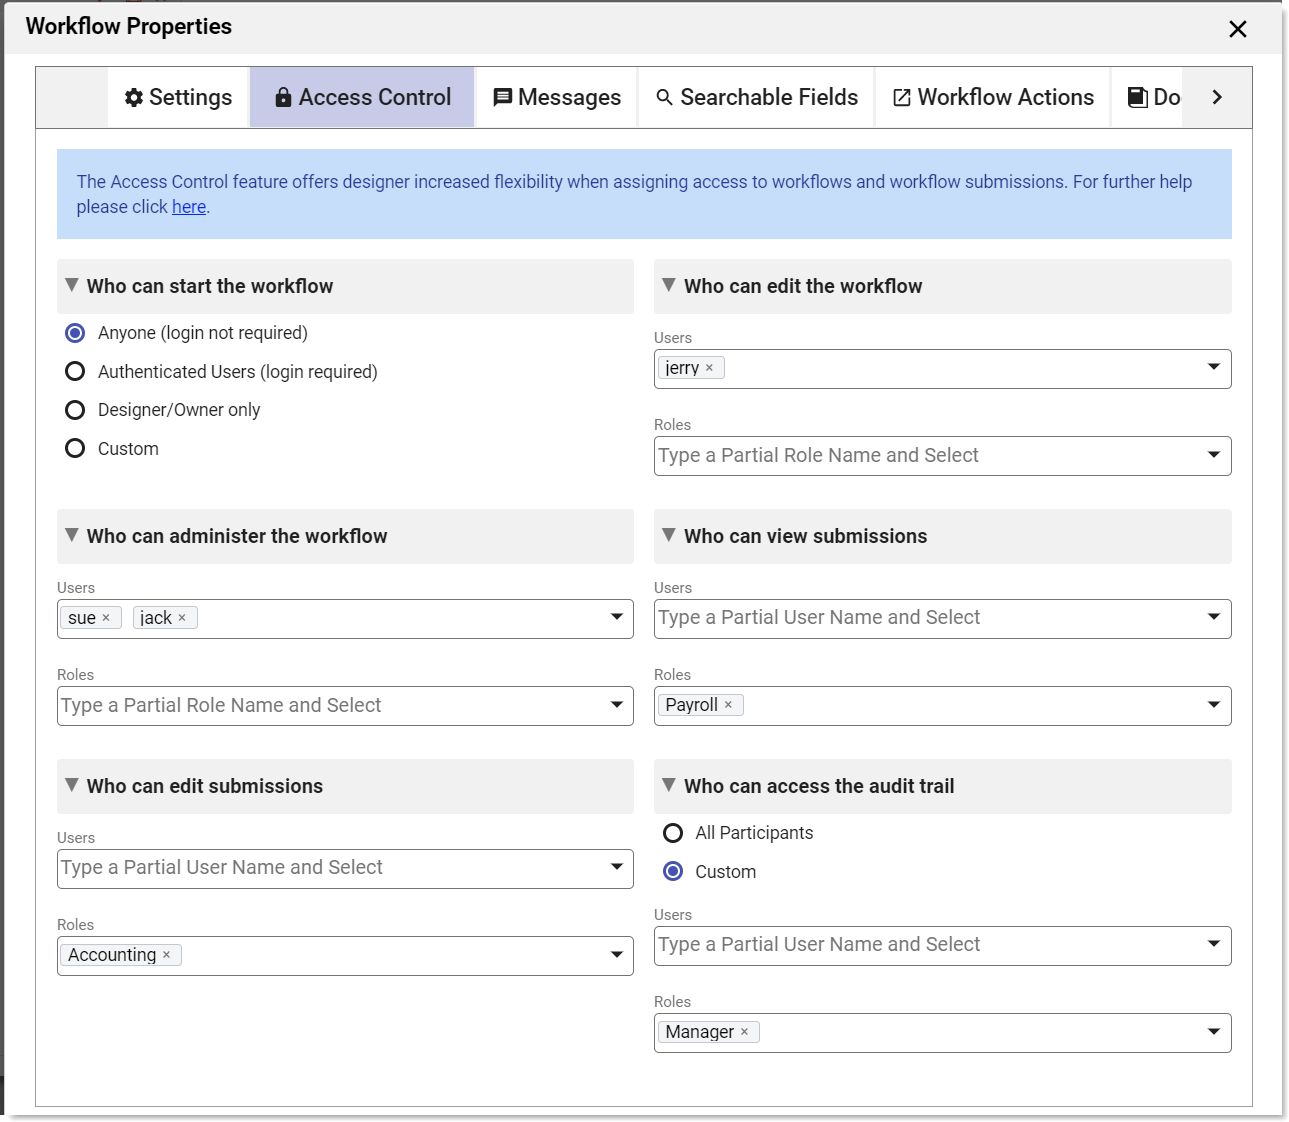
Who can start the form/workflow
Setting this permission determines who is allowed to create form/workflow submissions. The choices for Form/Workflow visibility are:
- Anyone(login not required) - anyone can use it even if they are not logged in. This is the default setting for Forms and Workflows.
- Authenticated Users(login required) - the form is usable to anyone who has an account (username/password) and is logged in to your tenant.
- Designers/Owner Only - the designer user who created the form/workflow (owner) can edit, test or use the form. They must be logged into
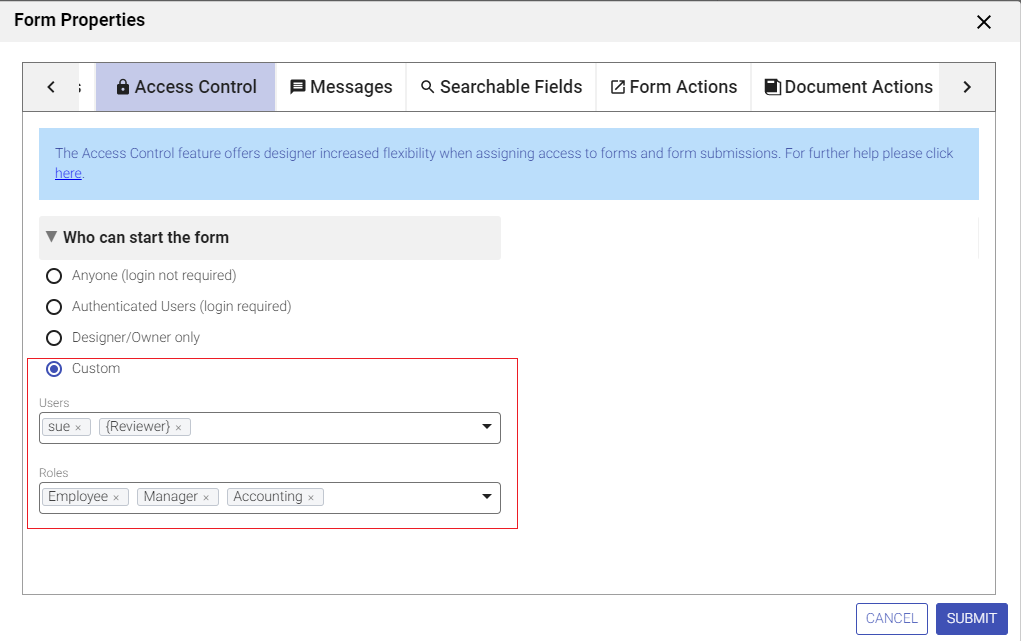
- Custom - The owning designer always has access to the form/workflow. Additionally, the designer may configure selected users and/or roles (i.e. users with these roles) to have runtime access to the form/workflow.
The designer can specify the visibility of a form/workflow from either the Forms and Workflows Homepage or the Form/Workflow Properties wizard.
- On the Forms and Workflows Home Page: Click the Action Menu on a form/workflow and select Set Permissions.
- In the Form/Workflow Properties wizard:
- Click anywhere in the
 Access Control section of the Properties Navigator (quick-view) or
 - Use the cog icon to open the Form/Workflow Properties Wizard and select the Access Control tab.
- Click anywhere in the
Clicking on the icons or in the Access Control section of the Properties Navigator display the same wizard which can be used to set the Visibility of your form/workflow.
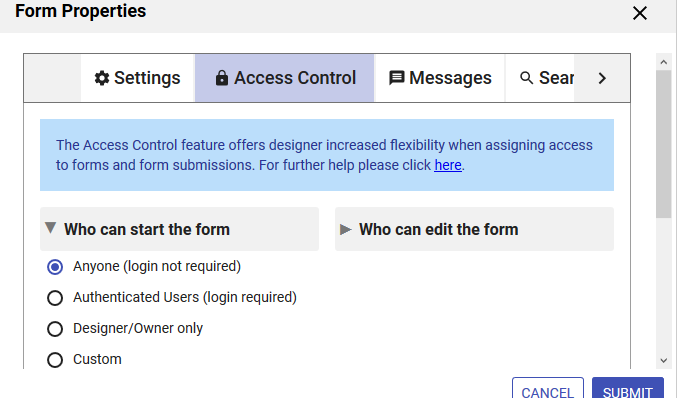

When Who can start the form or Who can start the workflow is displayed in the Permission field, the designer can select one of the dropdown choices to specify form/workflow visibility. The default value for forms is Anyone (login not required) while workflows default to Authenticated Users (login required). The choices for form/workflow visibility are:
- Anyone (login not required) - anyone can use it even if they are not logged in.
- Authenticated Users (login required) - the form is usable to anyone who has an account (username/password) and is logged in to your tenant.
- Designers/Owner Only - the designer user who created the form/workflow (owner) can edit, test or use the form. They must be logged into
- Custom - The owning designer always has access to the form/workflow. Additionally, the designer may configure selected users and/or roles (i.e. users with these roles) to have runtime access to the form. Use this option to auto-start workflows programmatically.
When is embedded in another product such as Atlassian's Confluence wiki, you do not have access to the icons described above.
The designer can grant form/workflow access to explicit users/roles by selecting the Custom option. Roles and users can be selected via an editable combo-box control. As the user types, will try to find any roles and users in the tenant that contain the typed string. Up to 5 matches are displayed below the combo box. Selecting a role/user from the dropdown inserts the selection into the list.

Click Submit or continue with the next option in the Access Control wizard.
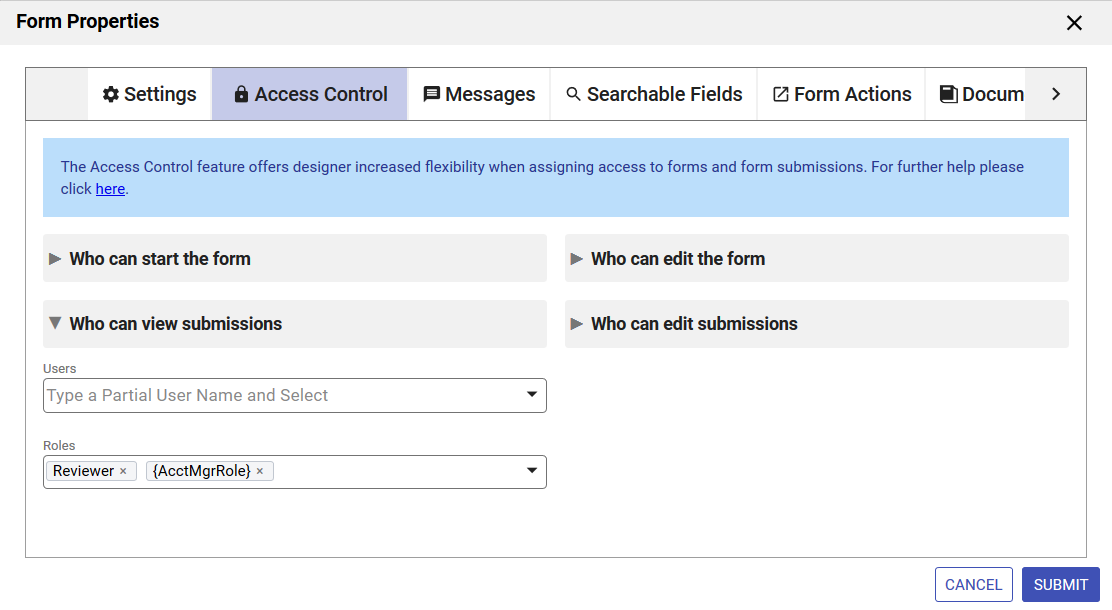
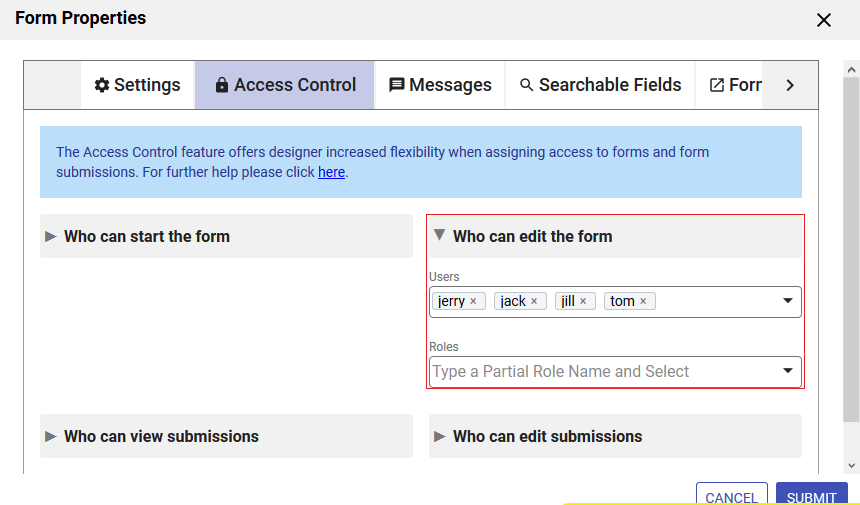
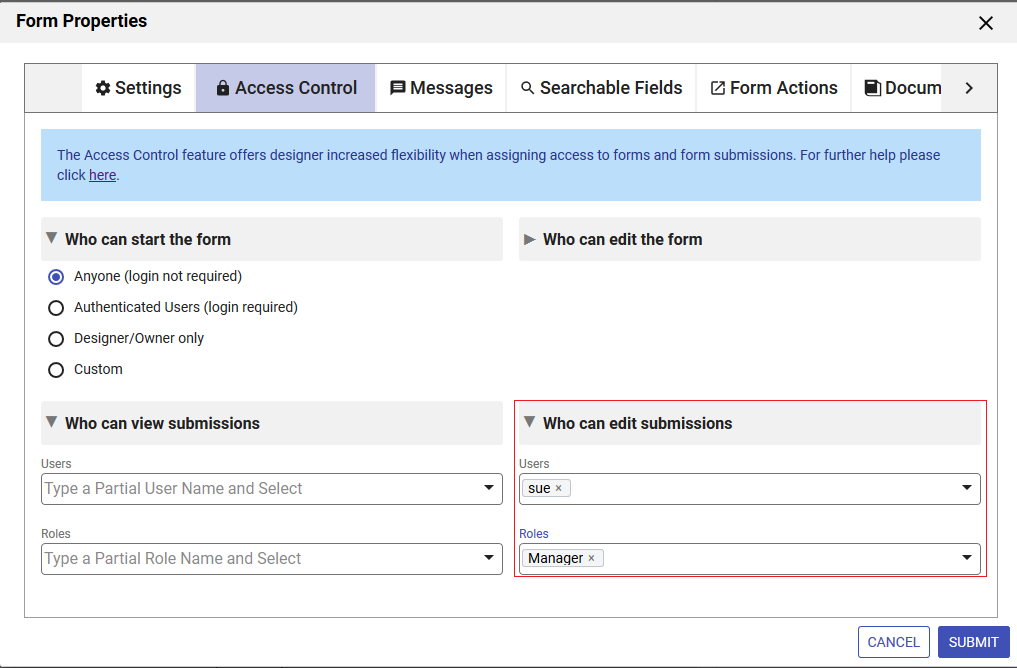
The Expense Report in the above images can be used by anyone in the tenant with the role of Employee, Manager or Accounting, the user id of the Reviewer and the user Sue. Notice the Reviewer role is encased between curly braces. This is an example of a control template. Templates are like variables in your form that will be evaluated at runtime and replaced with the actual values entered. For templates to work, there must be a control in your form with the name given inside the curly braces.
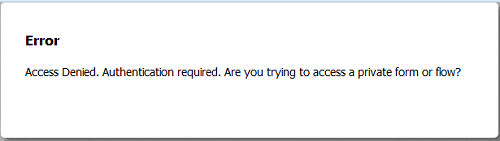
The user, Jack, who has the role of frevvo.Publisher, is not a Reviewer for anyone in the company and of course, is not Sue, will be denied access to the form. He will see this error:
You can publish any form/workflow regardless of whether it can be started by Anyone (No login required) or just the Designer/Owner. If Designer/Owner Only is selected, the person who created it or any user given the Who can edit the form/workflow permission can edit it or test it. It is possible for more than one designer to collaborate on forms/workflows in development if the form/workflow owner (the designer that created the form/workflow) gives this permission to other designers. However, if one designer is working on the form, other designers will be denied access. Form/workflow owners can also designate the Who can view submissions or Who can edit submissions permissions to other users so two or more people may view/edit submissions at the same time.
Similarly, if a form visibility is set to Authenticated Users(login required), only users with accounts in the tenant will be able to access the form.
If you set the form/workflow visibility to Anyone (login not required) and users have begun submitting it, you'll need to use caution when modifying your form. If users access it while you are editing it, they will see error messages indicating that the page is being refreshed or that the form is invalid. A form/workflow made public this way is accessible to anyone with the form/workflow's URL. There are other methods of sharing forms that have increasingly higher levels of security. See form security for details.
You can mark your form/workflow Designers/Owner Only until you are done developing it, which will prevent new users from accessing the form, but if users happen to be completing the form when you switch it from Anyone (login not required) to Designers/Owner Only, they will see error messages. A better approach if feasible is to edit the form in a copy of your project running on a staging server. You can then replace the current form with the new form by removing the original project/form/workflow from the staging server and uploading the new project/form/workflow.
ACL settings set by the designer are retained when you download/upload a form/workflow/project to another designer user in the same or different tenant and when you copy a form/workflow.
The designer can set other permissions, such as who can view/edit submissions for forms and workflows via the Access Control wizard. Roles and users that can view the audit trail or be designated as workflow administrators are specified through the same wizard.
Public forms that include the save/load feature or digital signatures will prompt the user with the login screen when they click to save or sign. These features require a login.
Who can edit the form/workflow
- Edit permissions should not be given to forms or workflows currently in production use. Please see the Admin Best Practices Guide
- Users with this permission have the ability to run the Refresh Searchable Fields process for the forms/workflows they are editing. This process updates existing submissions if changes are made to Searchable Fields.
Form and workflow owners (designer users that created the form/workflow) can give other users (designers/non-designers) the capability to edit form/workflows. This is particularly helpful if a designer user takes a leave of absence or leaves the company. The "backup designer" has the ability to make changes to the form/workflow without having to download the form/workflow(s) from the owner's account to the backup designer's account. The "backup designer" also can view related submissions by clicking on the Submission or Legacy Submission icons. The ability to edit submissions is granted by a different permission.
Users with or without the role of frevvo.Designer can be assigned the permission to edit forms/workflows.
Users given this permission access the shared form/workflow from the Shared Items tab even if they have the frevvo.designer role assigned to them. They can only edit the form/workflow that was shared with them. They will not have the ability to create new forms/workflows from the Shared Items tab. The ability to make changes to a form/workflow is not available from Shared Items on the Important Items menu in a space.
To assign users the ability to edit forms/workflows, follow these steps:
- Open the Access Control wizard.
- Click the
 right arrow to expand the Who can edit the form/workflow section.
 - Enter the roles that you want to grant editing capability to in the Roles section. Begin typing the role name then select the role from the dropdown.
- Enter the users that you want to grant editing capability to in the Users section. Begin typing the user id then select the user from the dropdown.
It is not good practice to use Templates for this permission and is not recommended.
- Click Submit or go to the next permission section in the Access Control List.
Users that have been granted the editing permission, access forms and workflows that have been shared with them via the Shared Items tab on their Home Page. It will not work from the Shared Items selection in a Space or any other embedded scenario.
The Who can edit the form/workflow permission does not apply if you are running with Confluence. Confluence users share form/workflow editing by specifying the Forms Editor group on the /wiki/spaces/frevvo91/pages/901493435 screen. Users who will be sharing the editing function must be assigned to the specified group.
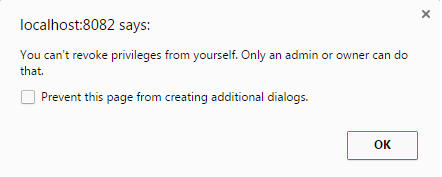
A browser notification message displays if the user who has been granted permission to edit forms/workflows tries to modify their own ACL. will not allow the "backup designer" to remove themselves from the ACL list.
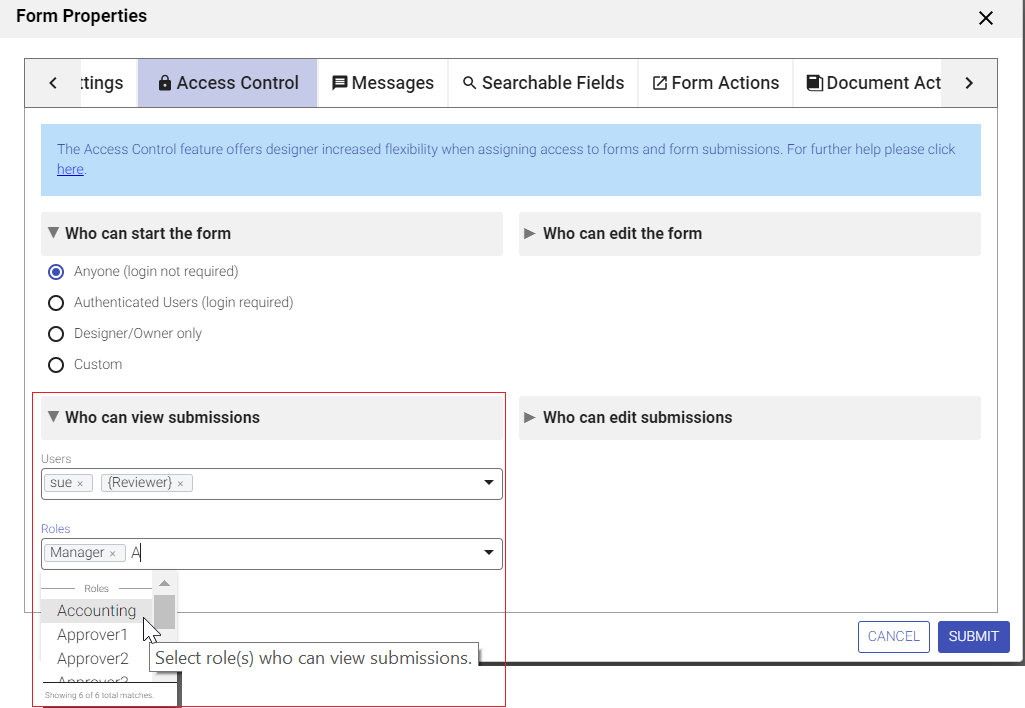
Who can view submissions
The designer can assign permission to view form/workflow submissions to specific roles/users. Any user with view access can view submissions in read-only mode. Submission deletion is not allowed. Templates can be used to dynamically determine at runtime which users and roles are allowed to view submissions.
To assign permission to view submissions, follow these steps:
- Open the Access Control wizard.
- Click the right arrow to expand the Who can view submissions section.
- Enter the roles you want to grant view access to in the Roles section. Begin typing the role name then select the role from the dropdown. You can enter control names from your form/workflow encased in curly braces to act as templates for dynamic access.
- Enter the users you want to grant view access to in the Users section. Begin typing the user id then select the user id role from the dropdown. You can enter control names from your form/workflow encased in curly braces to act as templates for dynamic access.
- Click Submit or go to the next permission section in the Access Control List.
Who can edit submissions
The designer can assign permission to edit form/workflow submissions to specific roles/users. Any user with edit access can view, edit and delete submissions in the SUBMITTED, ABORTED or ERROR states. Submissions in the PENDING, SAVED or WAITING states can only be deleted by the tenant admin, workflow admin or designer user that created the workflow. Refer to the Deleting Submissions for more information.
Templates can be used to dynamically determine at runtime which users and roles are allowed to edit submissions.
To assign permission to edit submissions, follow these steps:
- Open the Access Control wizard.
- Click the right arrow to expand the Who can edit submissions section.
- Enter the roles you want to grant edit access to in the Roles section. Begin typing the role name then select the role from the dropdown. You can enter control names from your form/workflow encased in curly braces to act as templates for dynamic access.
- Enter the users you want to grant edit access to in the Users section. Begin typing the user id then select the user id role from the dropdown. You can enter control names from your form/workflow encased in curly braces to act as templates for dynamic access.
- Click Submit or go to the next permission section in the Access Control List.
Who can access the audit trail - Workflows Only
The audit trail is accessed on a user's Task List by clicking the
 View Task History icon. Roles/Users granted this permission will see theView Task History icon on tasks in their task list.
To assign permission to view the audit trail, follow these steps:
- Open the Access Control wizard.
- Click the right arrow to expand the Who can access the audit trail section.
- Enter the roles you want to grant edit access to in the Roles section. Begin typing the role name then select the role from the dropdown. You can enter control names from your form/workflow encased in curly braces to act as templates for dynamic access.
- Enter the users you want to grant edit access to in the Users section. Begin typing the user id then select the user id role from the dropdown. You can enter control names from your form/workflow encased in curly braces to act as templates for dynamic access.
- Click Submit or go to the next permission section in the Access Control List.
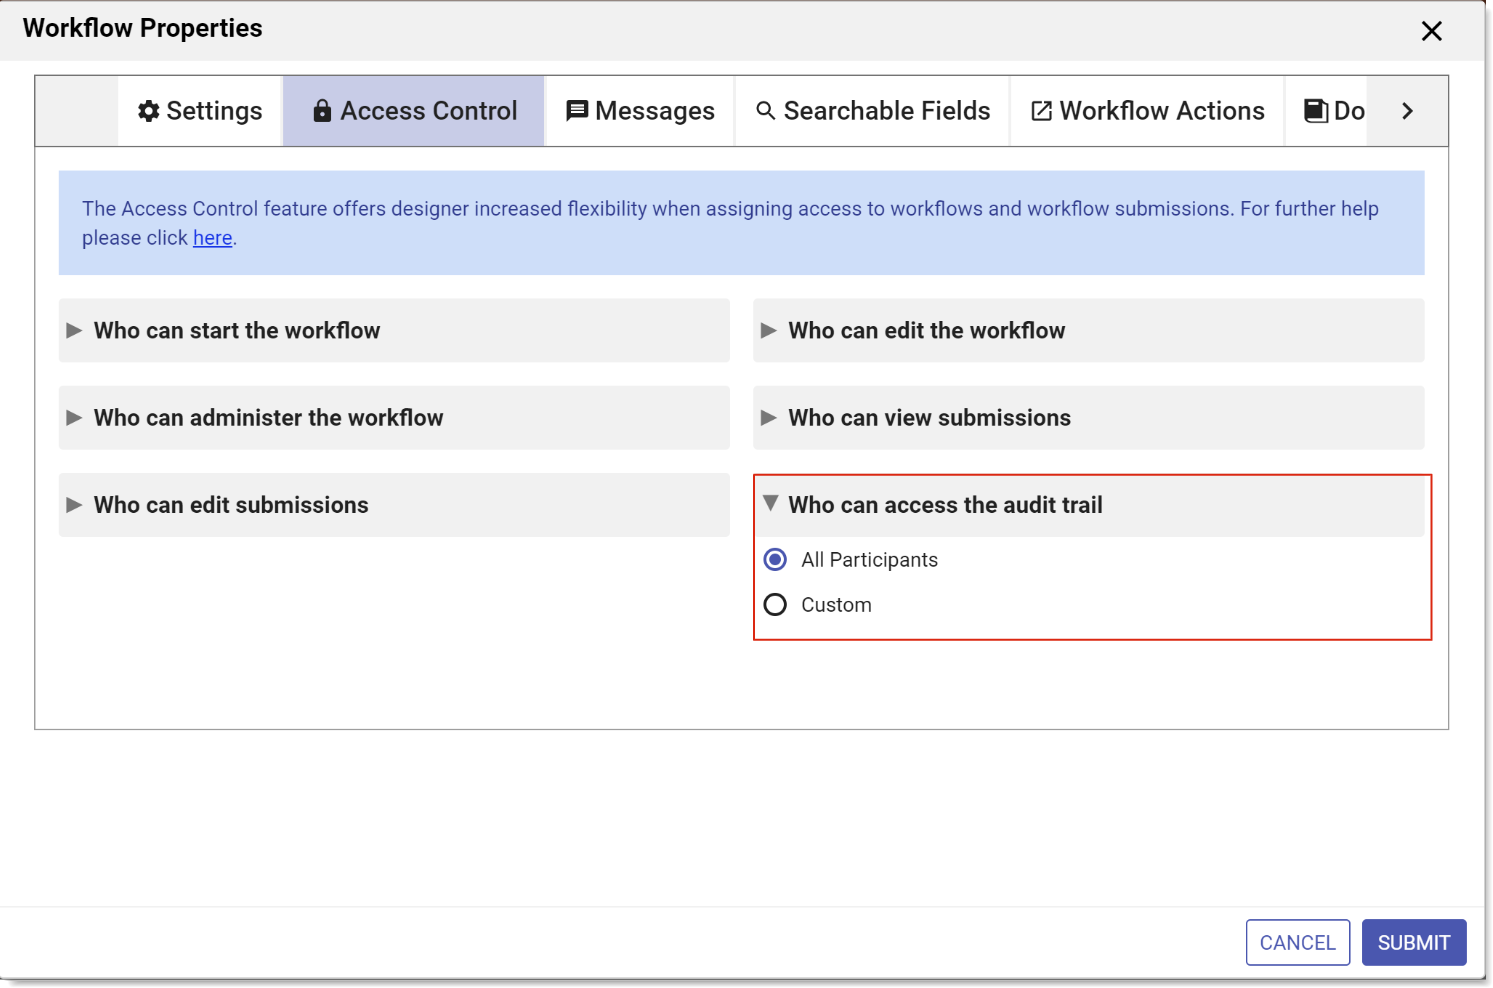
- Custom indicates that only users granted explicit access or with one of the specified roles can view the audit trail for the task (provided they have access to the task). Roles and users can be selected via an editable combo-box control.
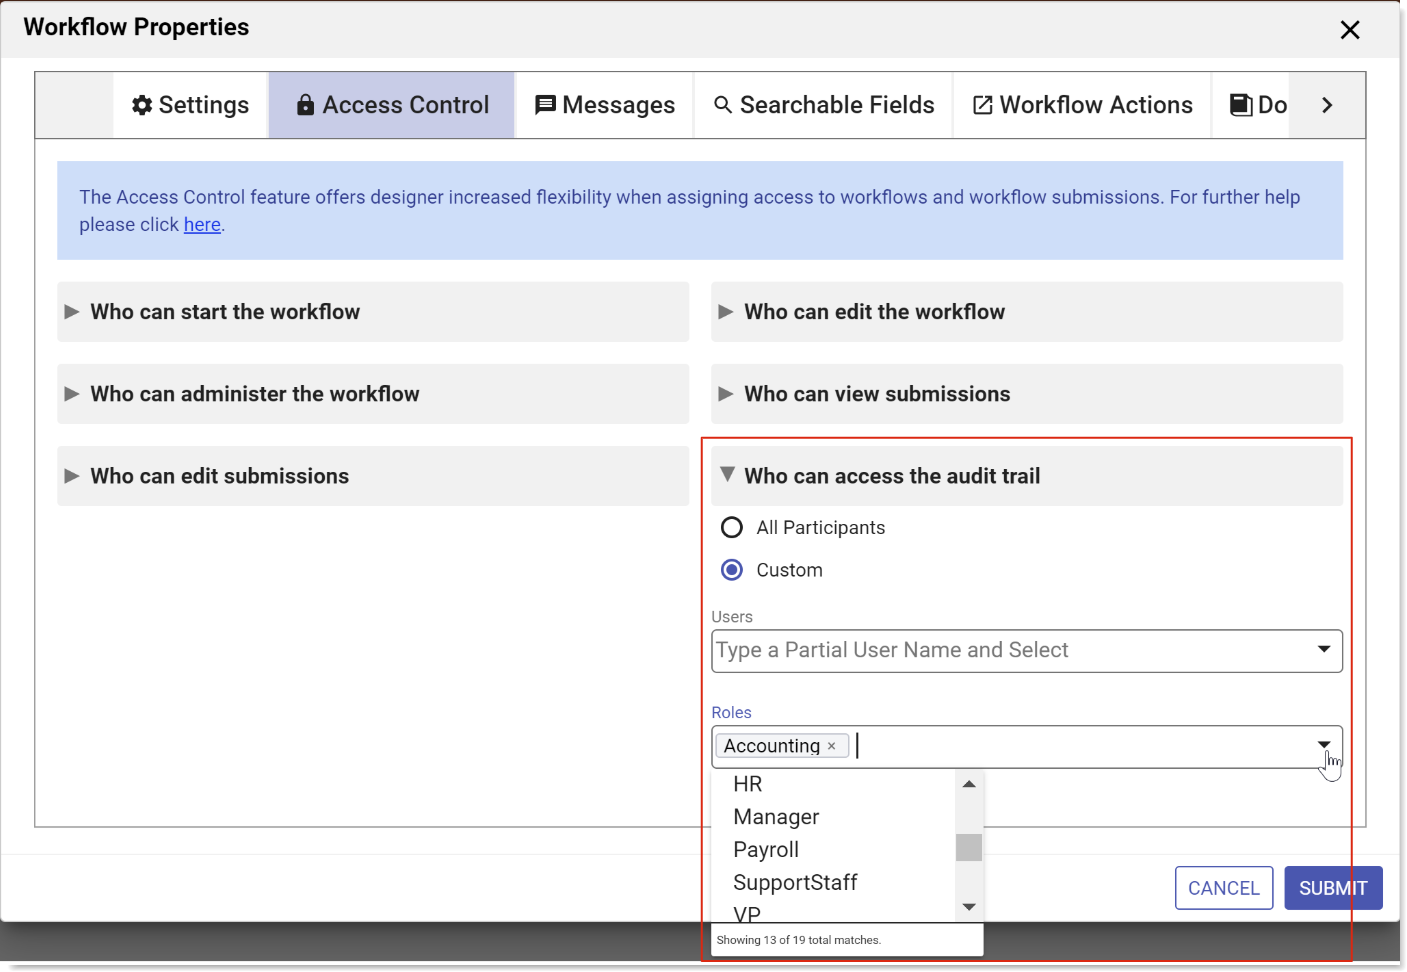
- Enter the roles you want to grant audit trail access to in the Roles section. Begin typing the role name then select the role from the dropdown. You can enter control names from your workflow encased in curly braces to act as templates for dynamic access.
- Enter the users you want to grant audit trail access to in the Users section. Begin typing the user id then select the user id from the dropdown. You can enter control names from your workflow encased in curly braces to act as templates for dynamic access.
- Click Submit or select the next option in the Access Control List.
Who can administer the workflow - Workflows Only
This permission lets a user abort, reassign and reset tasks that are not assigned to them. These administrative tasks are no longer restricted to tenant admins.
The designer can delegate these tasks to additional users/roles by assigning them in the Who can administer the workflow section of the Access Control dropdown. Any user/roles listed here will be considered a Workflow Administrator. As such, the Modify Task icon on a task in the task list will be displayed. Tenant admins and designer users get the Modify Task icon by default.
To assign user/roles as Workflow Administrators, follow these steps:
- Open the Access Control wizard.
- Click the right arrow to expand the Who can administer the workflow section.
- Enter the roles you want to grant workflow admin access to in the Roles section. Begin typing the role name then select the role from the dropdown. You can enter control names from your form/workflow encased in curly braces to act as templates for dynamic access.
- Enter the users you want to grant workflow admin access in the Users section. Begin typing the user id then select the user id role from the dropdown. You can enter control names from your form/workflow encased in curly braces to act as templates for dynamic access.
- Click Submit to complete the ACL setup.
- Be sure to save the workflow if you were accessing the ACL from inside the Workflow Designer.
User jerry has been designated as a workflow administrator for the Expense Report but not for the Time Sheet workflow. When Jerry logs into , his task list will appear as shown:
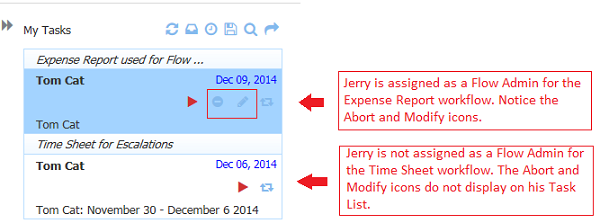
The Modify Task dialog allows a 'workflow admin' to execute any one of abort/reassign/reset functions.
When searching for tasks, if a workflow is chosen, and the user is a workflow admin for it, then all tasks for that workflow display. If no workflow is selected, then all tasks, even those that the workflow admin has not participated in, plus tasks for which the user is a workflow admin will display.
Messages
Use the Messages tab to set up the Task Information and the Pending Message for your workflow.
You can access the Messages tab in three ways:
- Click the Edit Workflow Properties icon on the Workflow Designer toolbar. This will launch the Workflows Properties wizard. Click the Messages tab.
- Click anywhere in the Messages section in the Properties Navigator. This takes you directly to the Messages tab.
- Click the inside the Messages section in the Properties Navigator. This takes you directly to the Messages tab.
- Enter the text for the Task Information and Pending Message.
- Clicking on the down arrow(s) show a list of users, roles and templatized fields from your form. Select the users/roles from the dropdown.
- Type the opening curly brace - {- followed by the control name to enter a field from your form as a template. Selecting an option enters the control name into the field with the closing curly brace.
- Click the Submit button to save the changes or navigate to another tab.
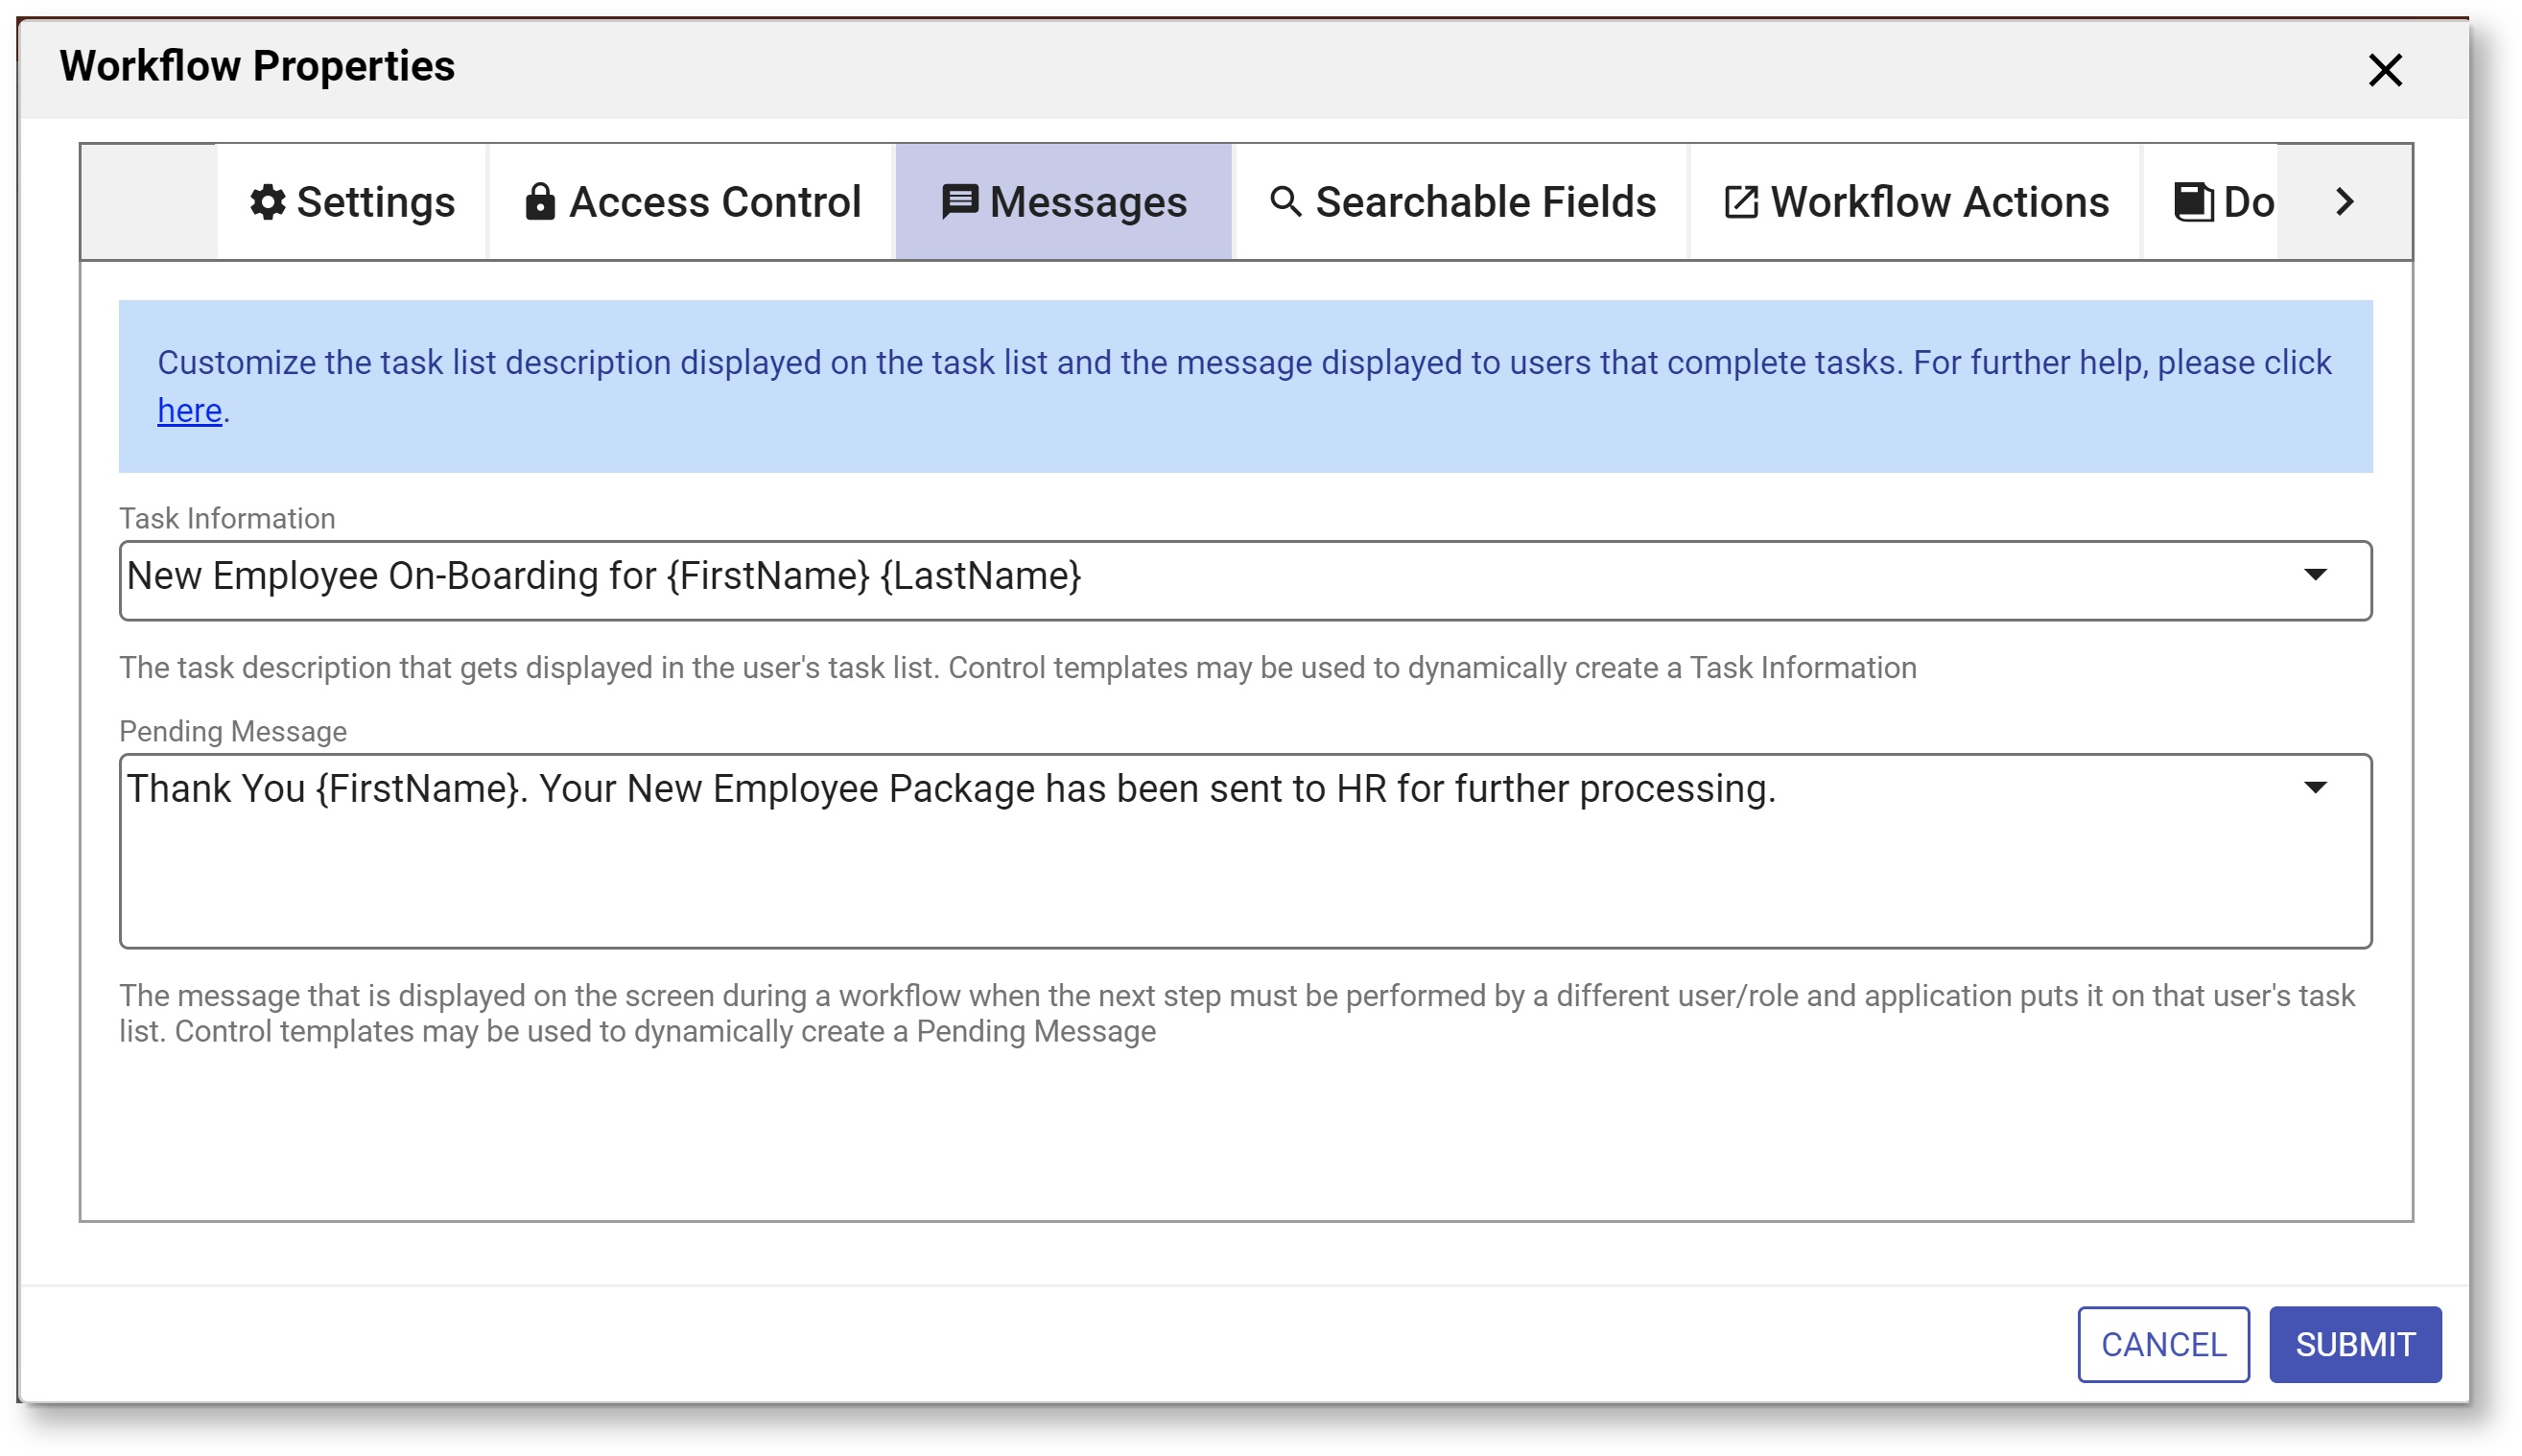
Task Info
When you save a partially filled workflow to continue it later or when puts a task on your task list as part of a workflow, the task is accessed via your task list. This field controls the name that gets displayed in the user's task list. For more details, see the Tasks documentation. This field can use templatized strings for dynamic content, e.g. the Task Info can contain "Vacation Request for {FirstName} {LastName}" where FirstName and LastName are the names of fields in a form from a prior step in the workflow. Before putting the task on a user's task list,
will resolve the Task Info string using the actual values of the FirstName and LastName fields e.g. "Vacation Request for Tom Smith".
will truncate the Task Info data to 250 characters.
You access your Task List from your projects home page. You use the Task list to to perform tasks assigned to you, to view a task's history, or search for tasks you've participated in — a tenant admin can also search for other users' tasks.
Set the Task Information on the workflow level if you want it to be the same for all the steps in your workflow. If you want different text, then customize the Task Information on the workflow step.
Pending Msg
This is the message that is displayed on the screen during a workflow when the next step must be performed by a different user/role and puts it on that user's task list. For example, in an Vacation Request workflow, the first step may be filled in by an Employee but the second step (approval) must be signed by a Manager. When the Employee clicks Continue,
will put the task on the Manager's task list and display this message on the Employee's screen. This message can use templatized strings for dynamic content, e.g. the message can be set to "Thank You {FirstName} {LastName}. Your request has been submitted to your manager for approval." where FirstName and LastName are the names of fields in a form from a prior step in the workflow. Before putting the task on a user's task list,
will resolve the pending message using the actual values of the FirstName and LastName fields e.g. "Thank You Tom Smith. Your request has been submitted to your manager for approval.".
This property can be set at the workflow or workflow step level. If you set up a message at the workflow level, it will display after the Continue button is clicked on each step of the workflow except for the last one. On the last step, you will see the default message, "Thank You!. Your submission has been received" unless you customized the message using the Form Action wizard
This will work if you want the same message to display for all of the steps of your workflow. Typically, designers want to display different customized messages after each step. If this is the case, you must set the Pending Message at the workflow step level.
Searchable Fields
Use the Searchable Fields tab to specify the workflow fields you want to use to search Submissions and Tasks.
You can access the Searchable Fields tab in three ways:
- Click the Edit Workflow Properties icon on the Workflow Designer toolbar. This will launch the Workflows Properties wizard. Click the Searchable Fields tab.
- Click anywhere in the Searchable Fields section in the Properties Navigator. This takes you directly to the Searchable Fields tab.
- Click the inside the Searchable Fields section in the Properties Navigator. This takes you directly to the Searchable Fields tab.
- Select the Searchable Fields for your workflow.
- Click the Submit button to save the changes or navigate to another tab.
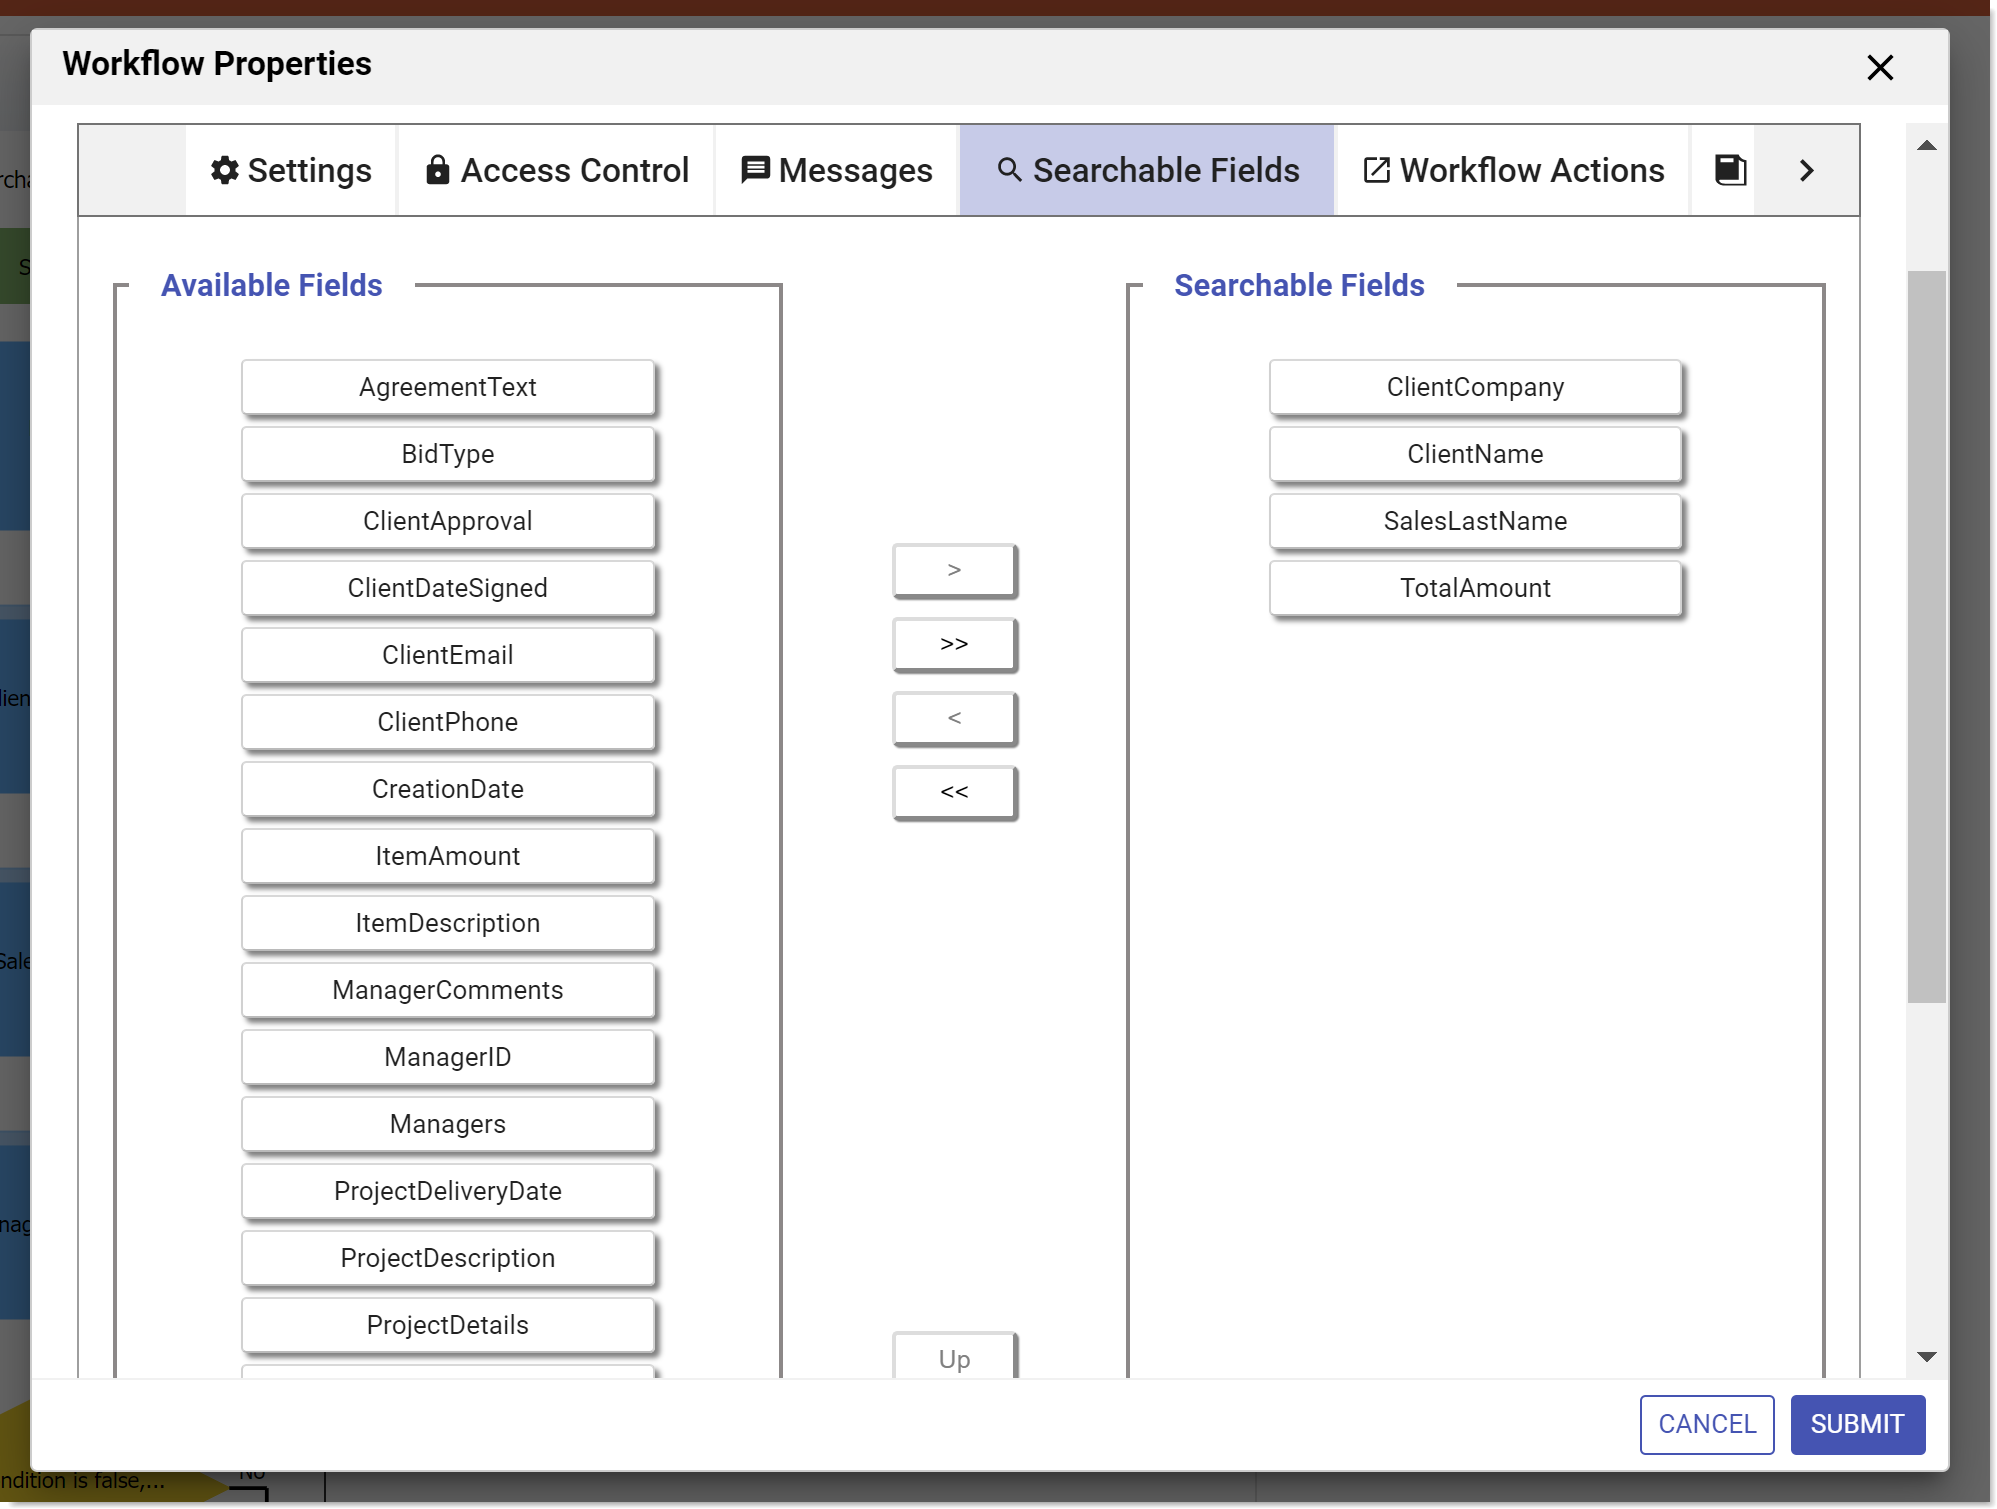
Setup Searchable Fields
Searchable fields configured for a workflow are the fields that may be used to filter submissions in the submissions view. By default, all your data is saved as an XML document. This is the most efficient way to store/access your data both in terms of speed as well as storage. However, if you prefer to view your data via the submissions user interface, you can choose which fields are available to the user as search criteria in addition to the XML data.
Considerations when deciding which types of fields to configure are listed below.
Searchable fields are indexed for easy search of form/workflow Submissions. They can also be used when searching Tasks on a user's Task List. You will see the controls designated as Searchable fields in the Submissions table. This is helpful when trying to locate a particular submission from a long list. They are downloaded into the Export Submissions to a CSV file along with the submission default columns. The maximum number of Searchable fields is 20 in the frevvo Cloud. In-house customers can change the default value by adding the frevvo.max.searchable.fields configuration parameter to the <frevvo-home>\tomcat\conf\Catalina\localhost\frevvo.xml file.
Saved fields do affect performance as they are independently stored in addition to XML data. This can significantly reduce performance, especially for large forms and require additional storage in the repository. Saved fields are not rendered in the submission table and cannot be used as search criteria for submissions. The only reason to configure Saved fields is if you want to use the Export to Excel feature which is available on the Legacy Submissions view
The Submissions Legacy view and the Export to Excel feature will be removed in the next major release. Please use the redesigned Submissions view as soon as possible so you can become familiar with the added functionality and the submission export to a csv file.
Designers should carefully consider which fields to designate as Searchable fields. The selection of the correct fields as search criteria can be very helpful with submission and Task List searches.
The wizard displays the fields from your workflow on the Available Fields tab . Drag and drop or use the arrow keys to move the available fields to the Searchable Fields list. If the Legacy Submissions view is configured, designers will see a Saved fields tab listing the fields used for the Export to Excel feature. The Saved Fields tab will not display when the Legacy Submissions view and the Export to Excel feature are removed in the next major release.
In a workflow, controls are listed in the Available and Saved Lists using the control name. If you change the name of a control in a workflow step, it will unset the saved field. The newly renamed control will now show on the Available list and the designer must move it to the Saved List again.
Workflow Actions
The Workflow Action wizards help set up what the user sees when the form is submitted.
You can access the Workflow Action tab in three ways:
- Click the Edit Workflow Properties icon on the Workflow Designer toolbar. This will launch the Workflow Properties wizard. Click the Workflow Actions tab.
- Click anywhere in the Workflow Actions section in the Properties Navigator. This takes you directly to the Workflow Actions tab.
- Click the inside the Workflow Actions section in the Properties Navigator. This takes you directly to the Workflow Actions tab.
- Set up the Form Actions for your workflow.
- Click the Submit button to save the changes or navigate to another tab.
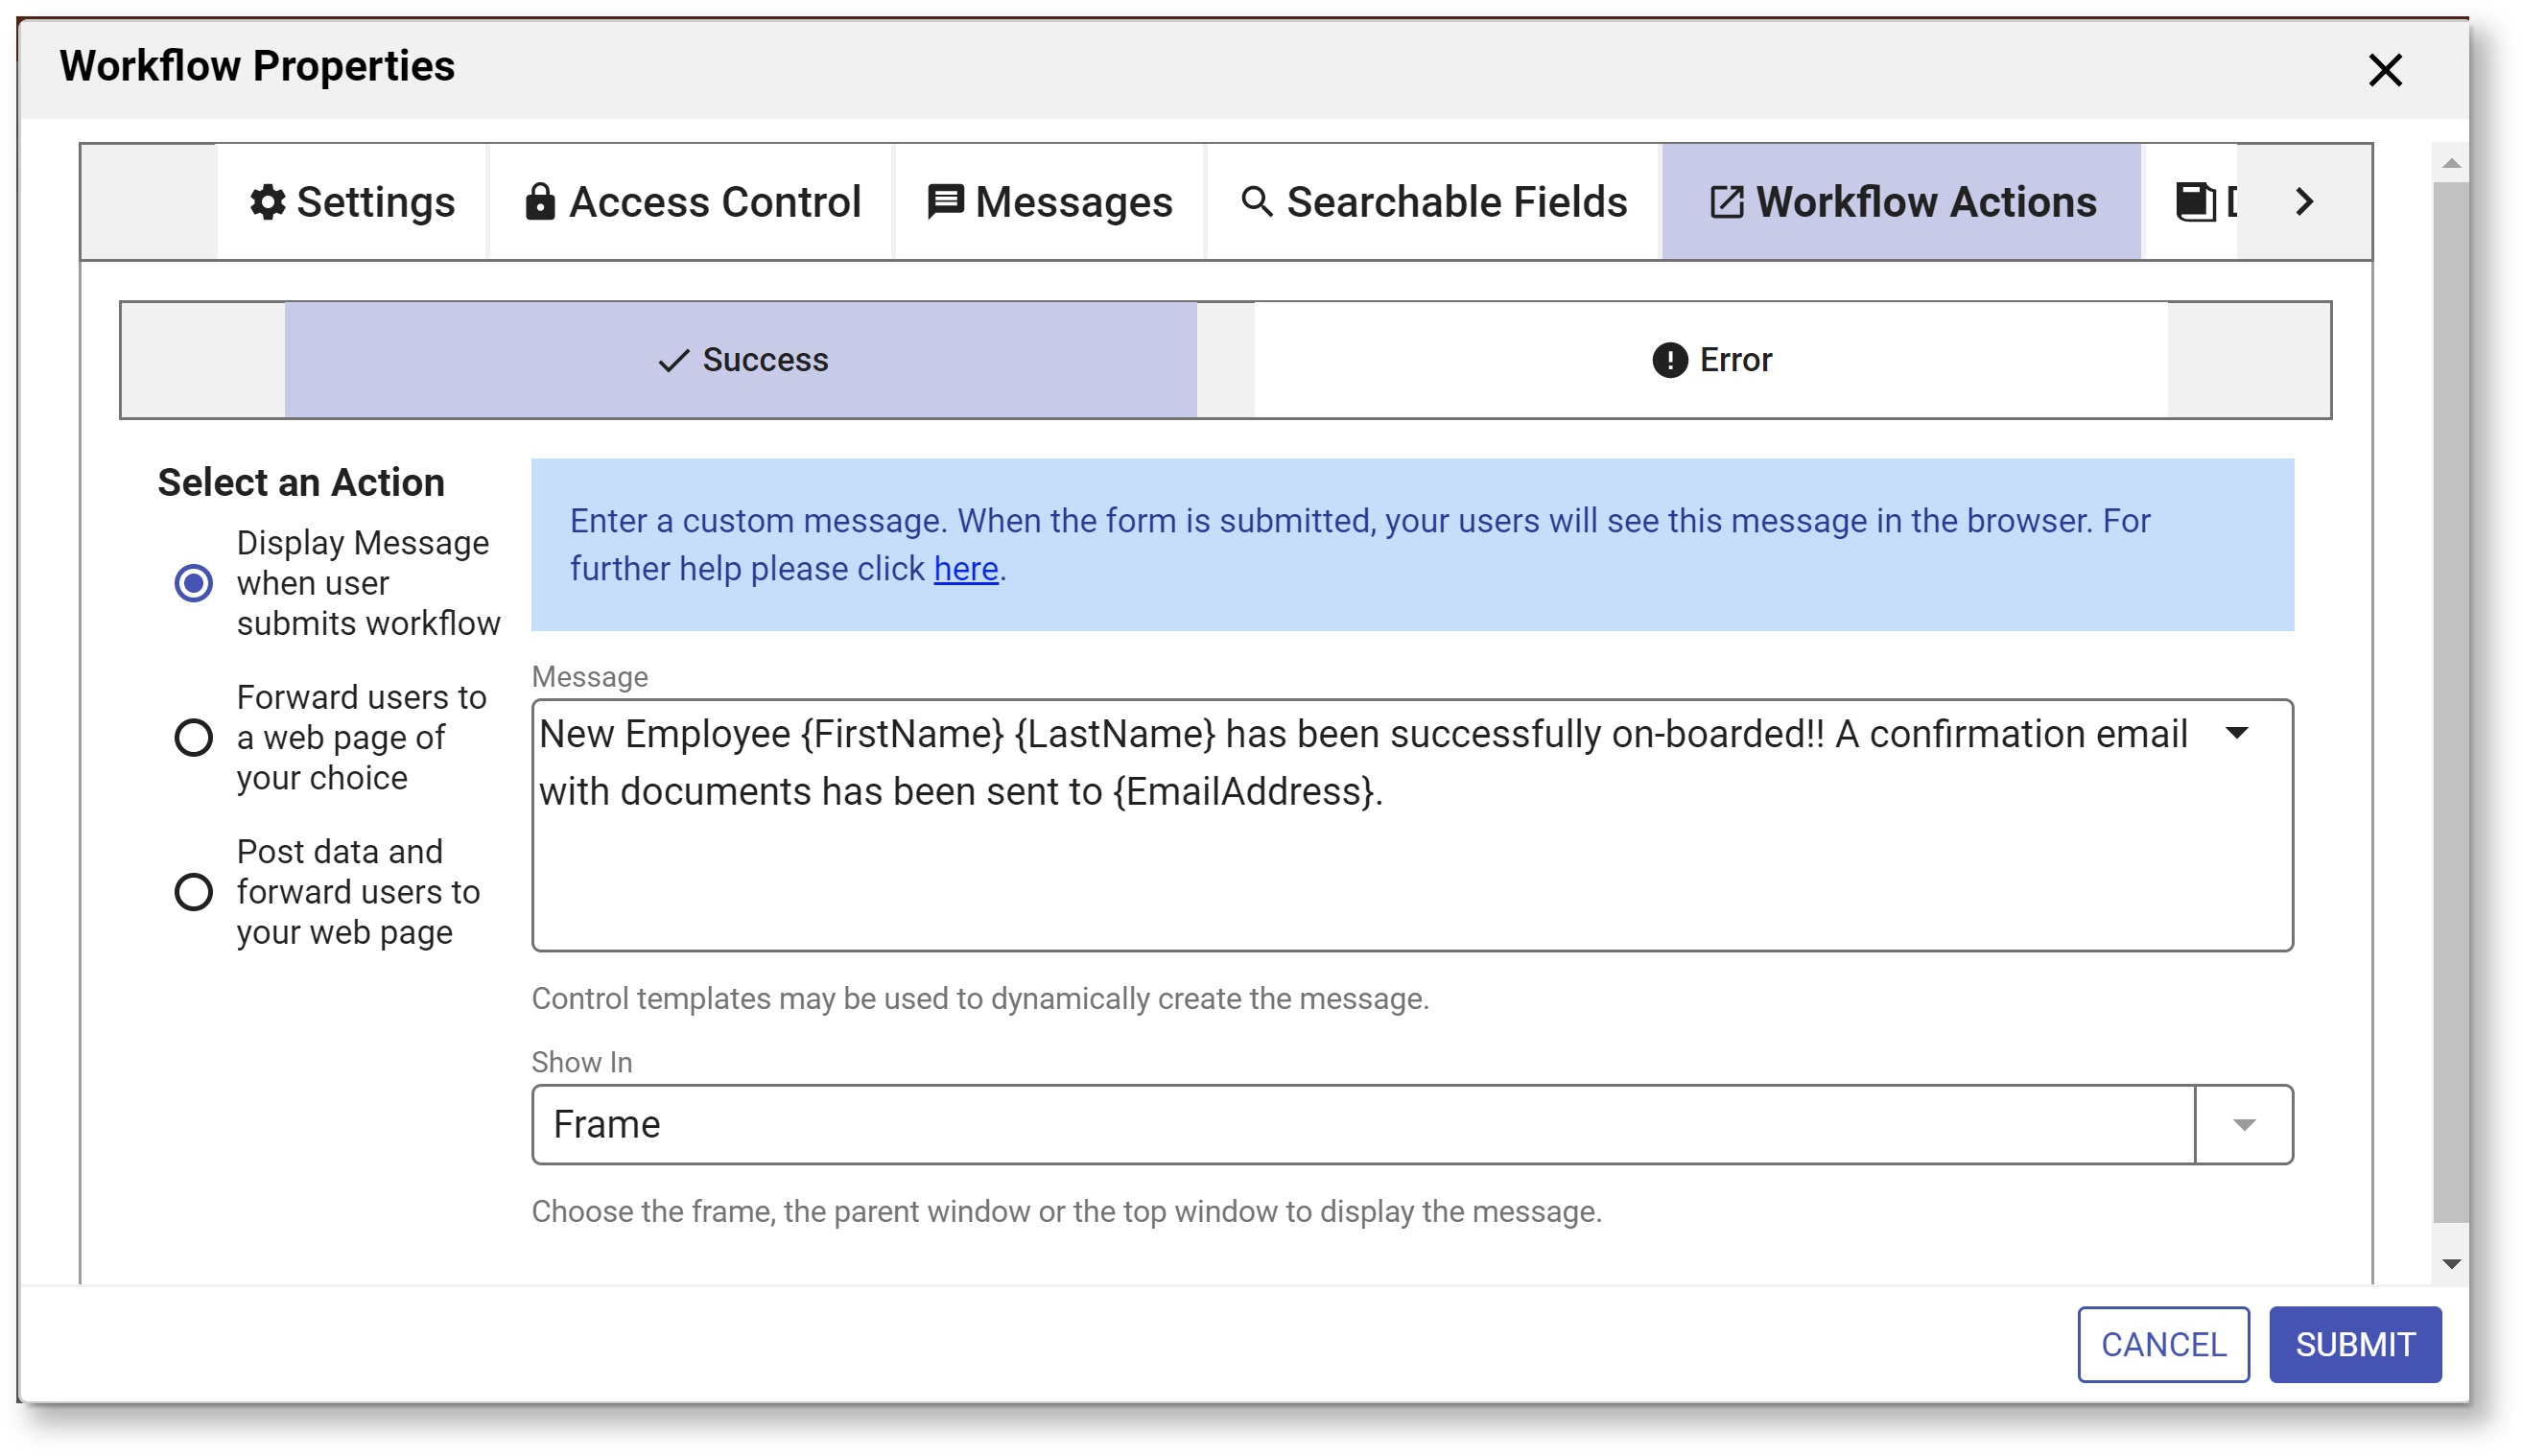
Success
The Workflow Actions available on the Success tab are:
Display Message when User Submits Form
Forward Users to a web page of your choice
Post Data and forward users to your web page
Refer to Form and Doc Action Wizards for the details.
Error
The Workflow Action Wizards available to handle errors are:
- Display Message if an error occurs
- Forward users to an error page of your choice
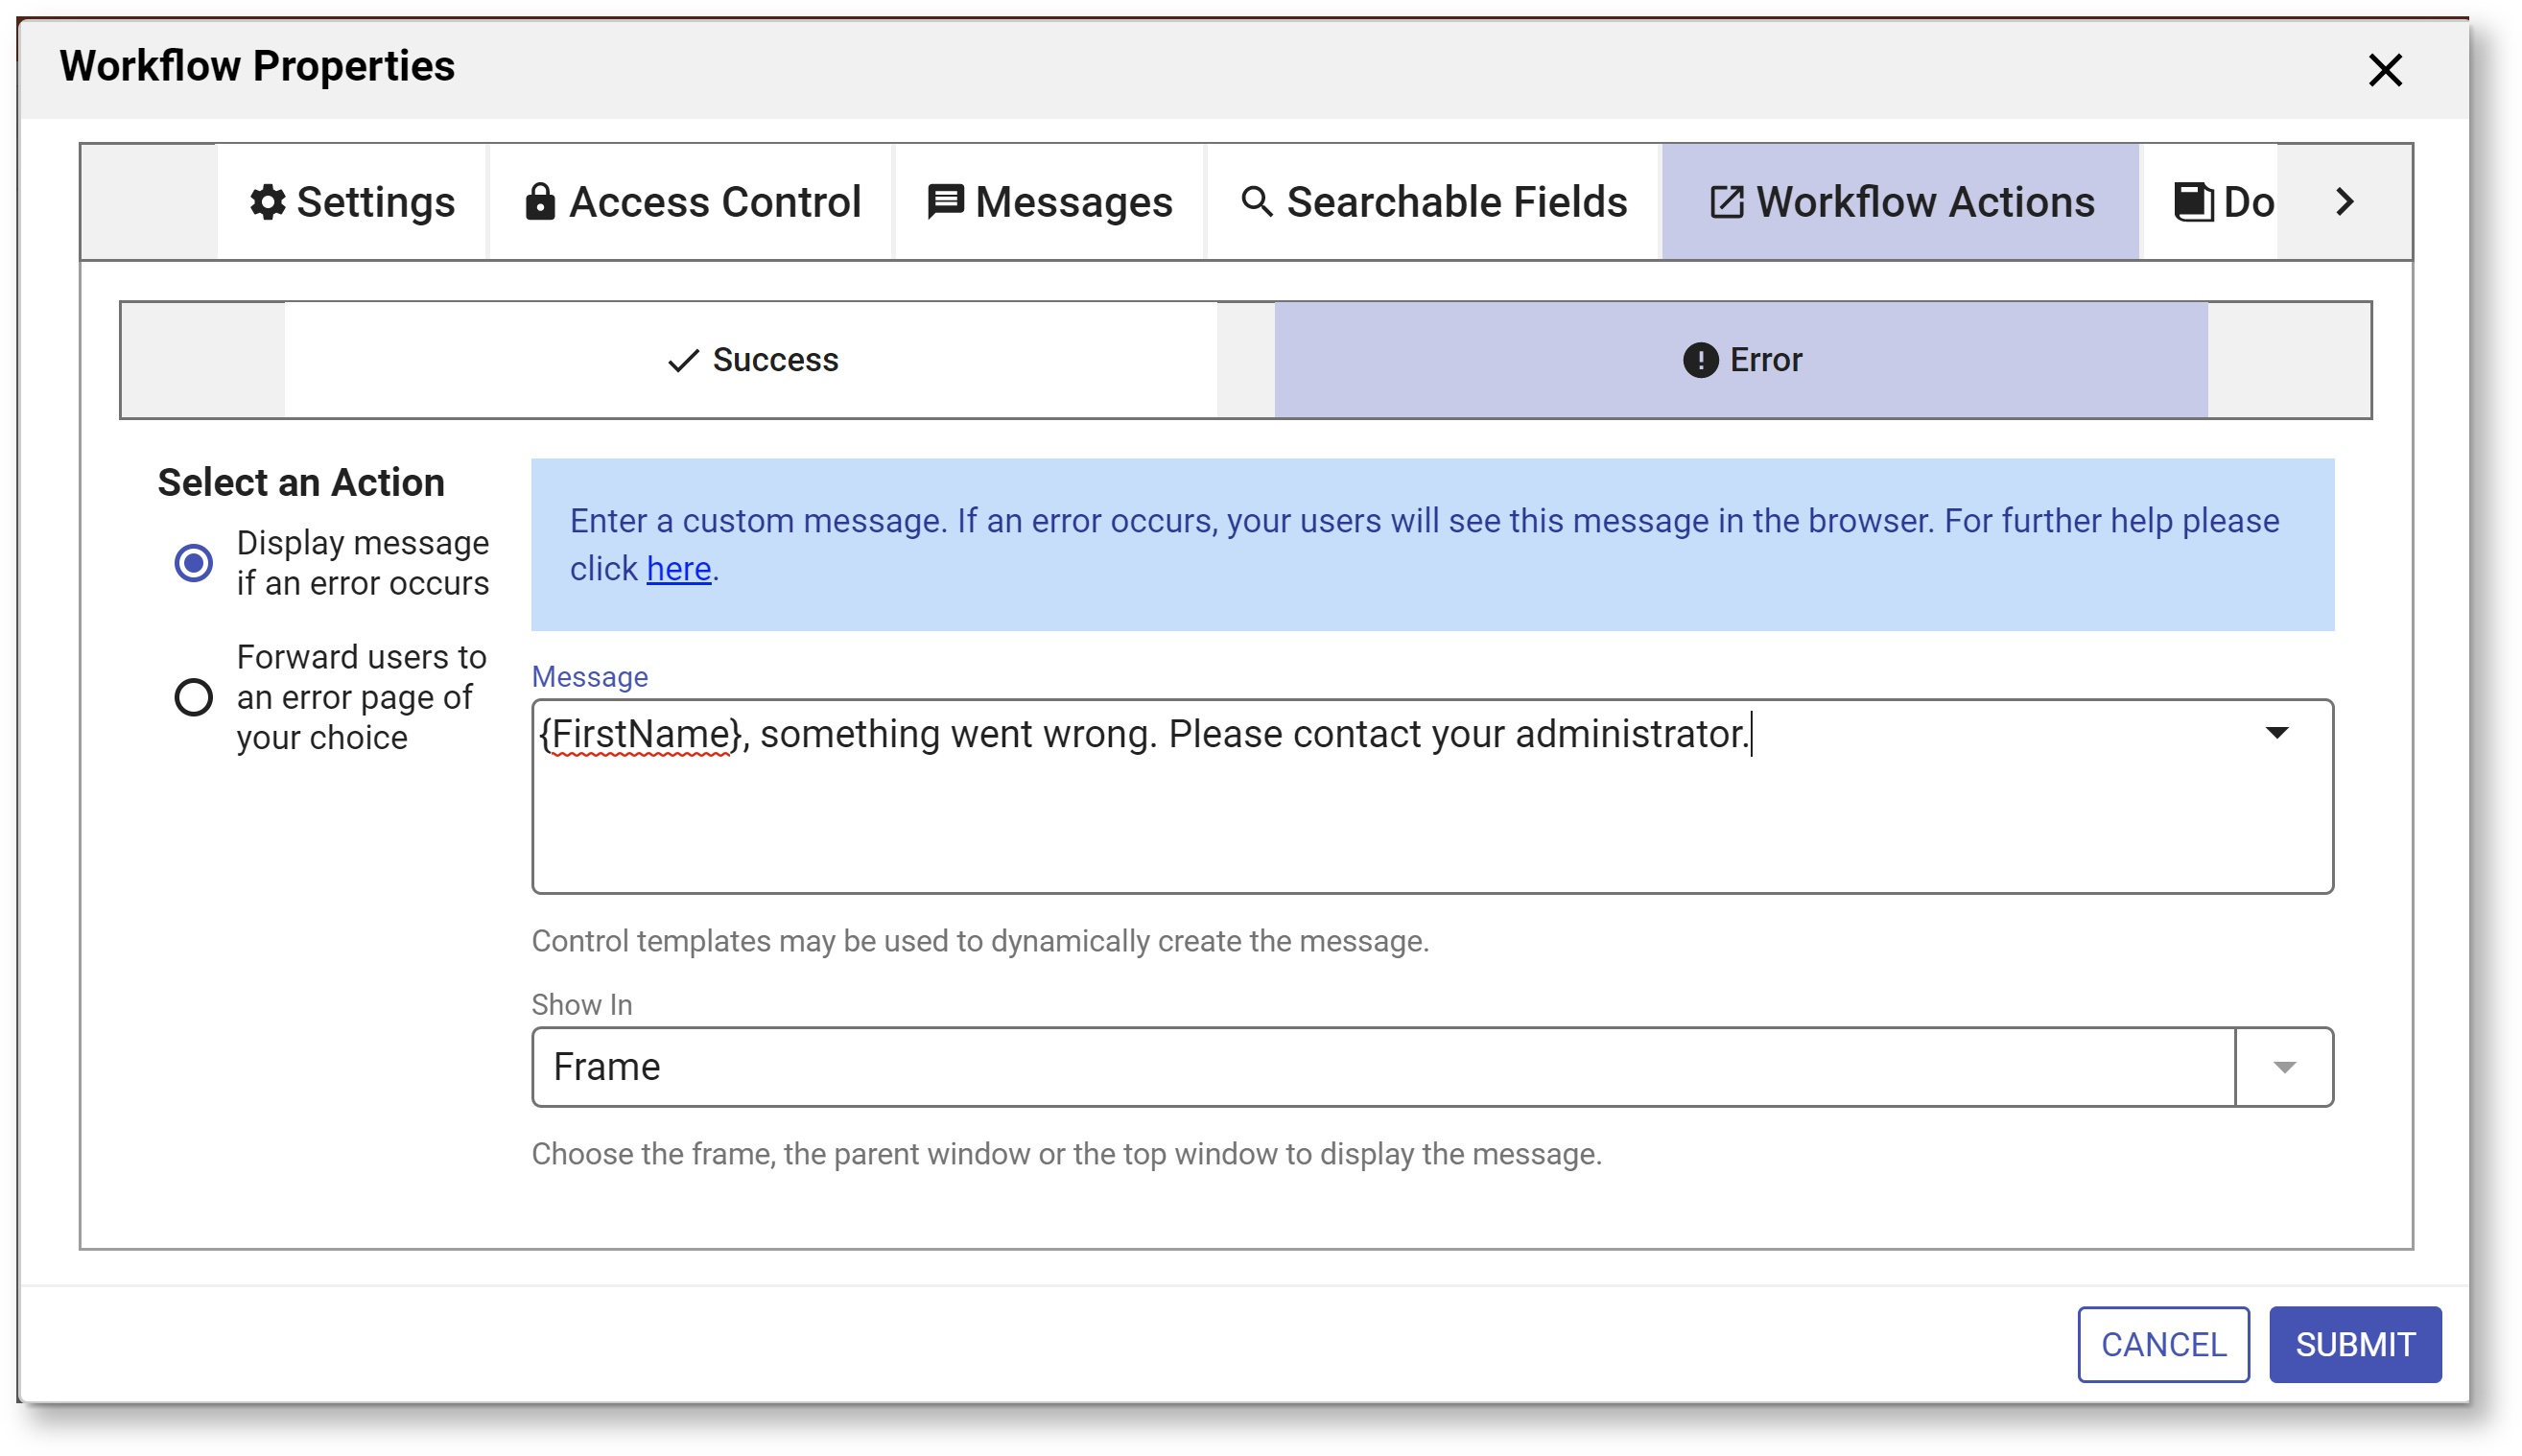
Refer to Form and Doc Action Wizards for the details.
Document Actions
The Document Action wizards help set up what happens to the data when the form is submitted.
You can access the Document Action tab in three ways:
- Click the Edit Workflow Properties icon on the Forms Designer toolbar. This will launch the Forms Properties wizard. Click the Document Actions tab.
- Click anywhere in the Document Actions section in the Properties Navigator. This takes you directly to the Document Actions tab.
- Click the
 inside the Document Actions section in the Properties Navigator. This takes you directly to the Document Actions tab.
 - Set up the Document Actions for your workflow.
- Click the Submit button to save the changes or navigate to another tab.
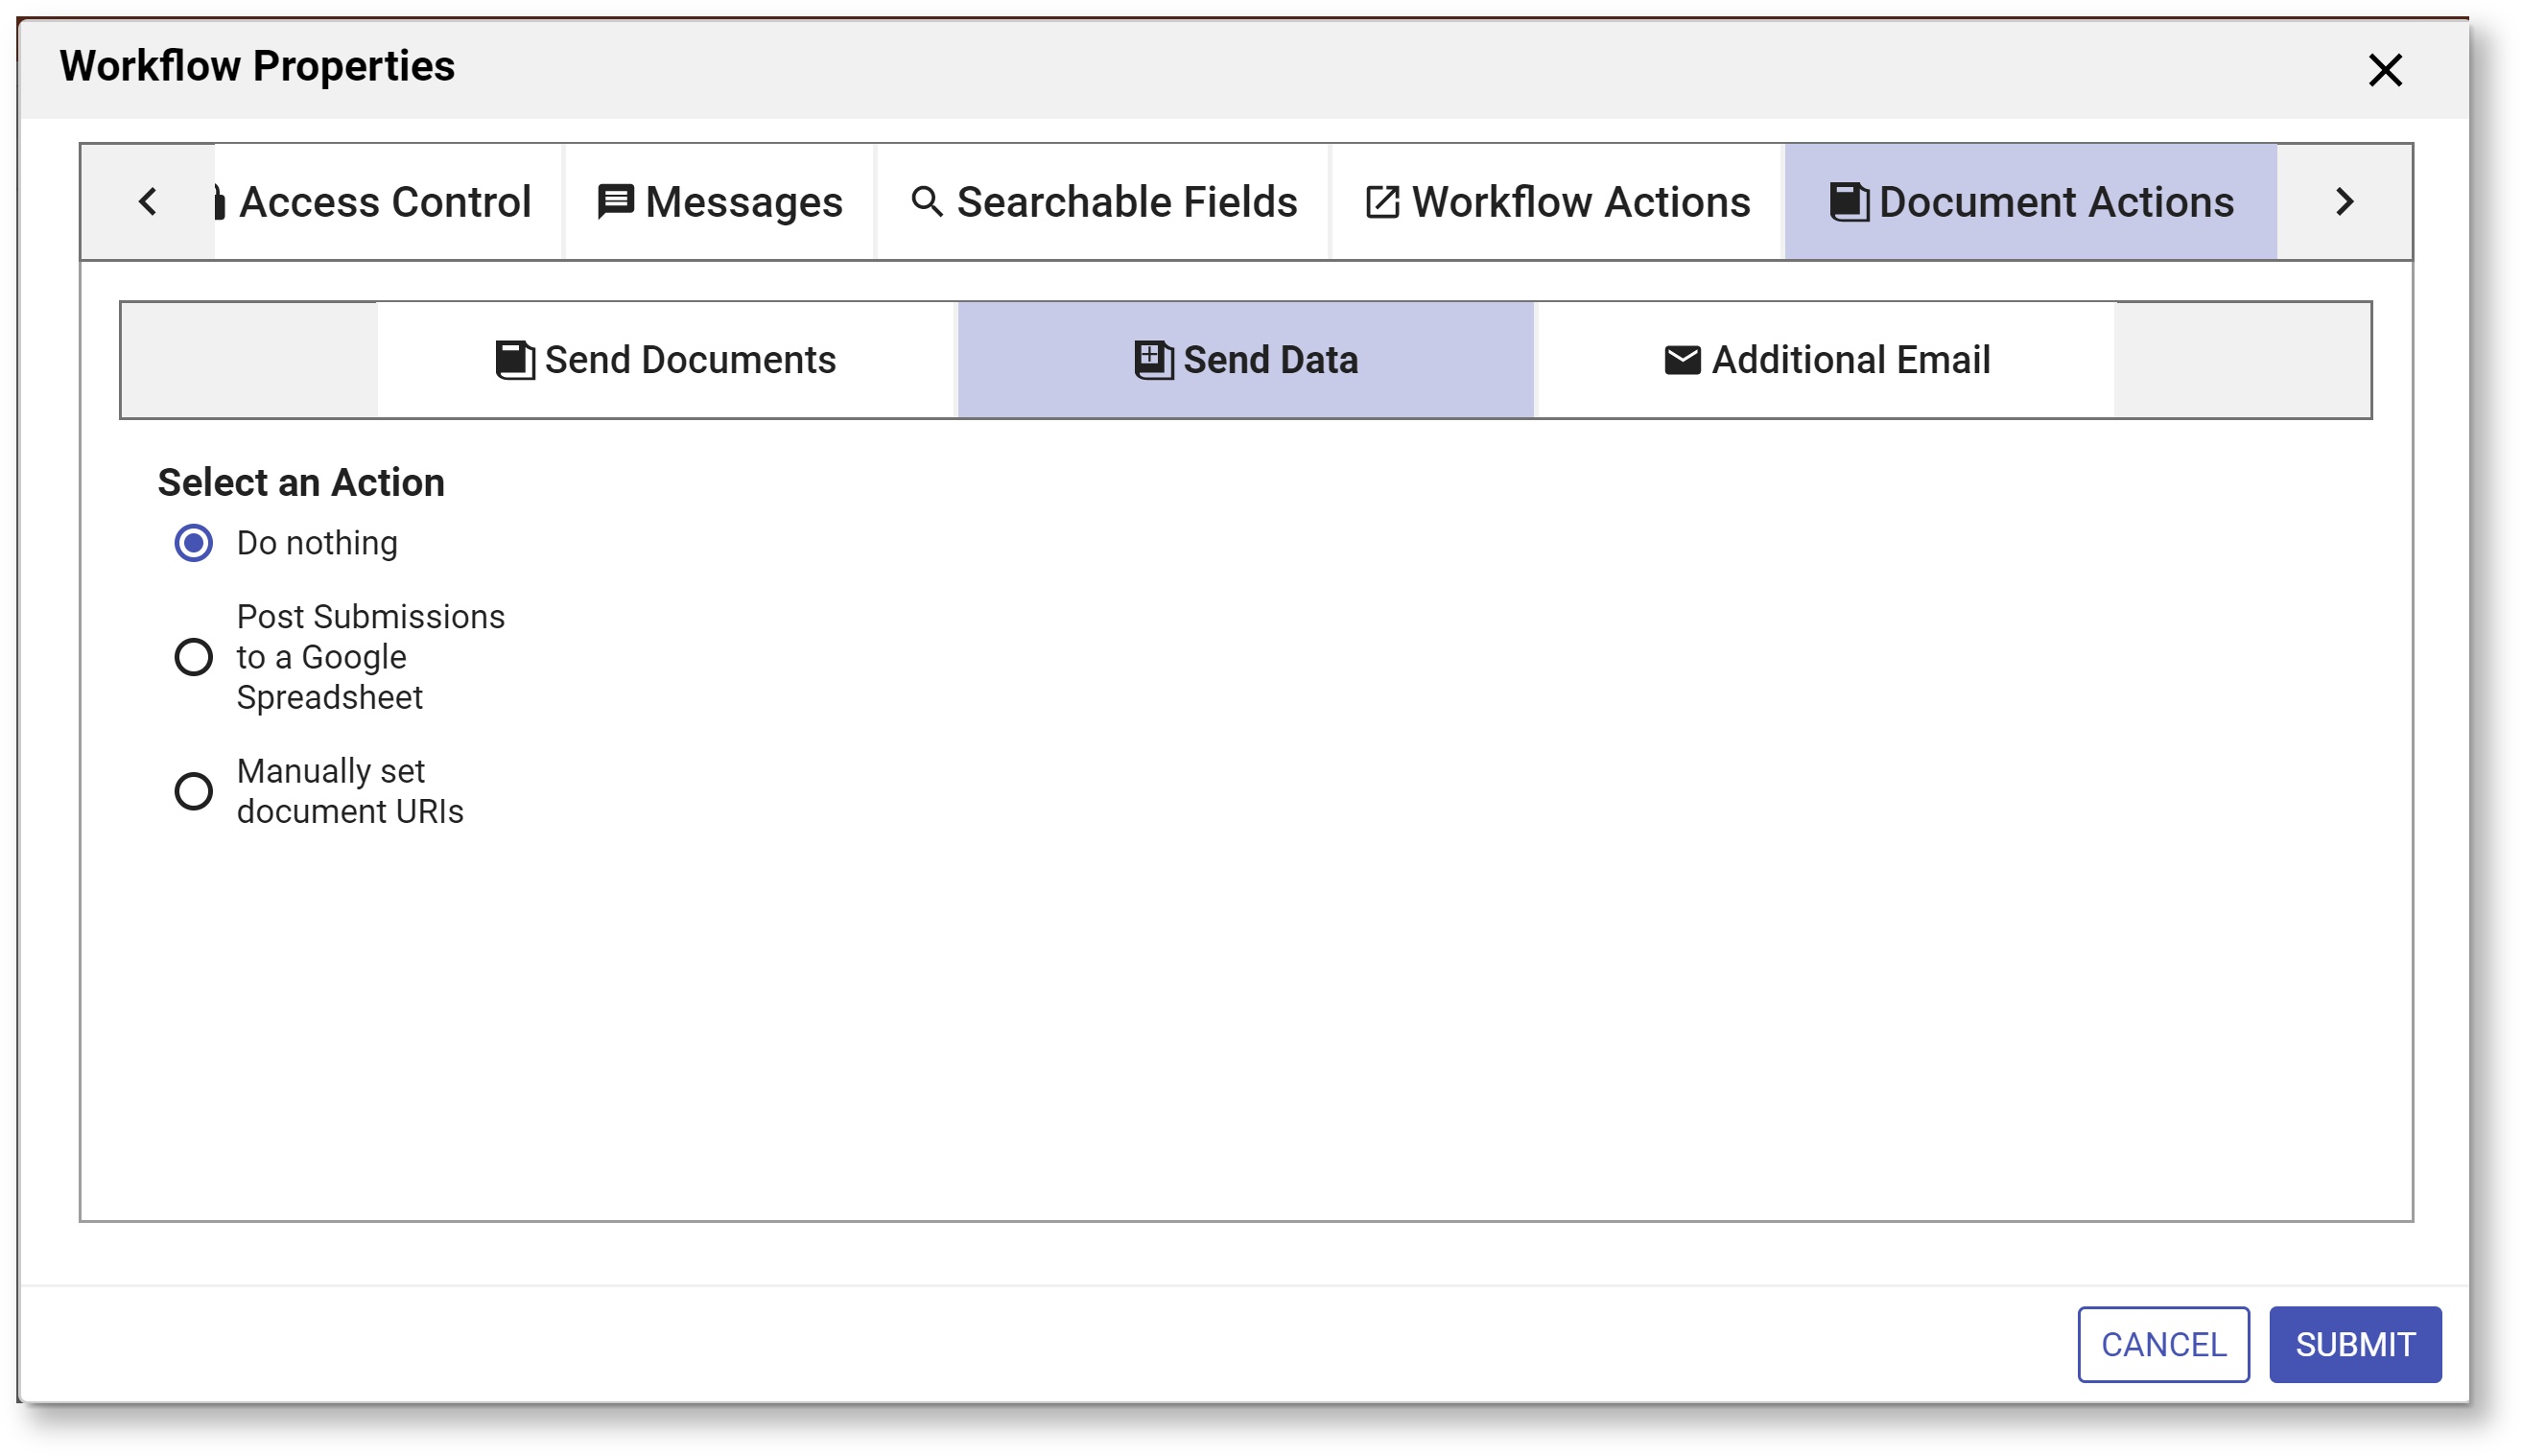
The designer can choose to:
- Send Documents
- Send Data
- Send an Additional Email

Send Documents
The Document Action wizards available on the Send Documents tab are:
- Do Nothing
- Send Email
- POST data to your web application
- Send to ImageSilo or PaperVision Enterprise
- Send to Google Drive
- Send to File System
- Send to SharePoint
Send Data
The Document Action wizards available on the Send Data tab are:
- Do nothing
- Post Submissions to a Google Sheet
- Manually set document URIs
Additional Email
This wizard allows you to send a second email when the form is submitted.
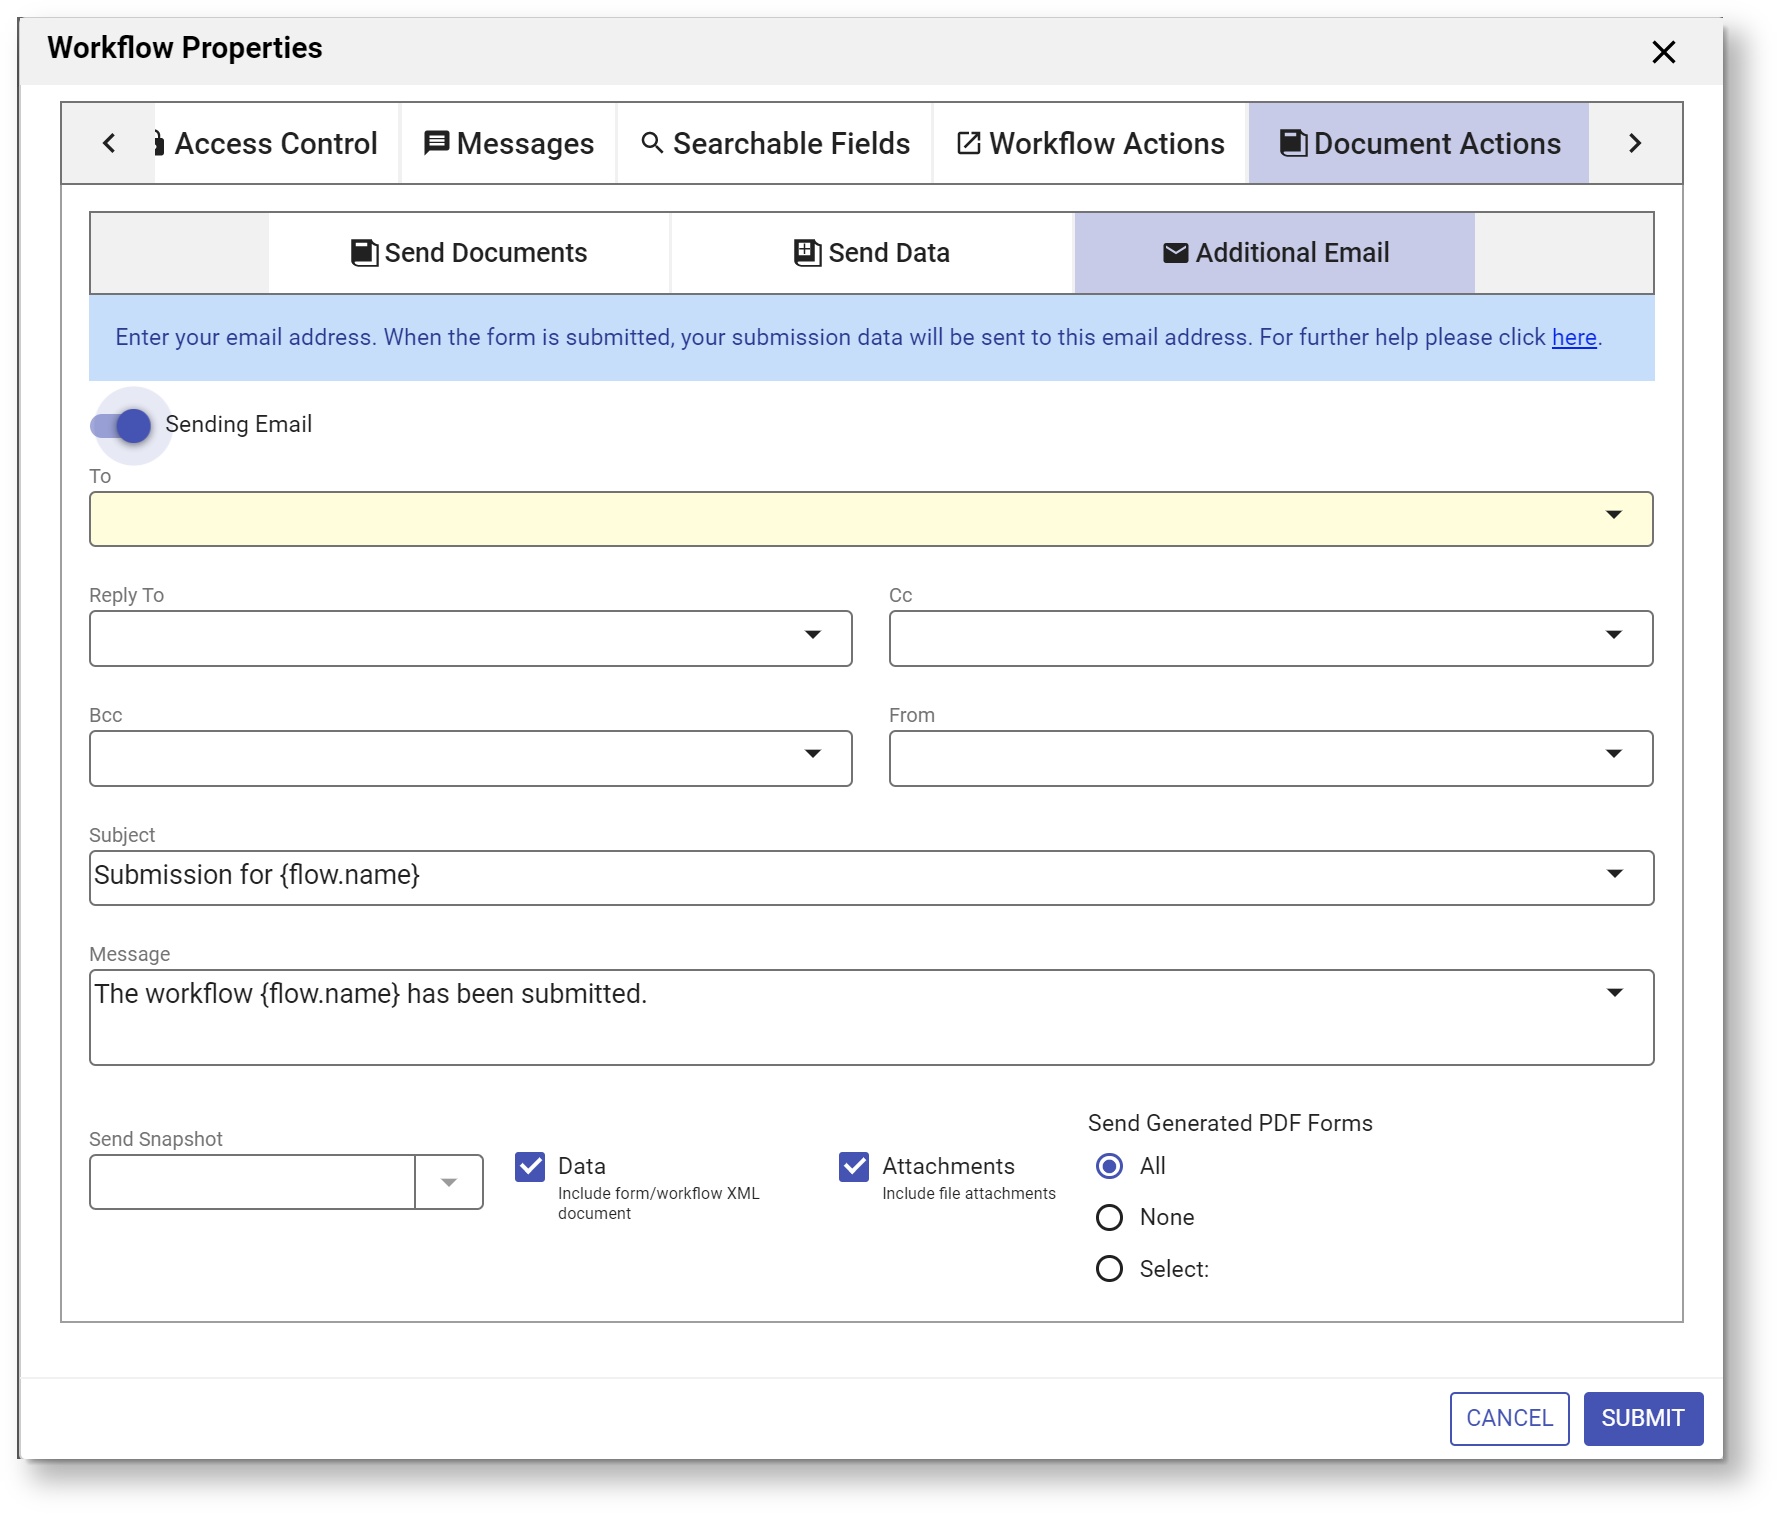
Refer to Form and Doc Action Wizards for the details.
Styles
Select style, layouts and customize the workflow PDF on the Style tab.
You can access the Styles tab by:
- Click the Edit Workflow Properties icon on the Workflow Designer toolbar. This will launch the Workflow Properties wizard. Click the Styles tab.
- This tab does not display in the Properties Navigator
- Select a style, layout and customize the workflow PDF header/footer, if desired.
- Click the Submit button to save the changes or navigate to another tab.
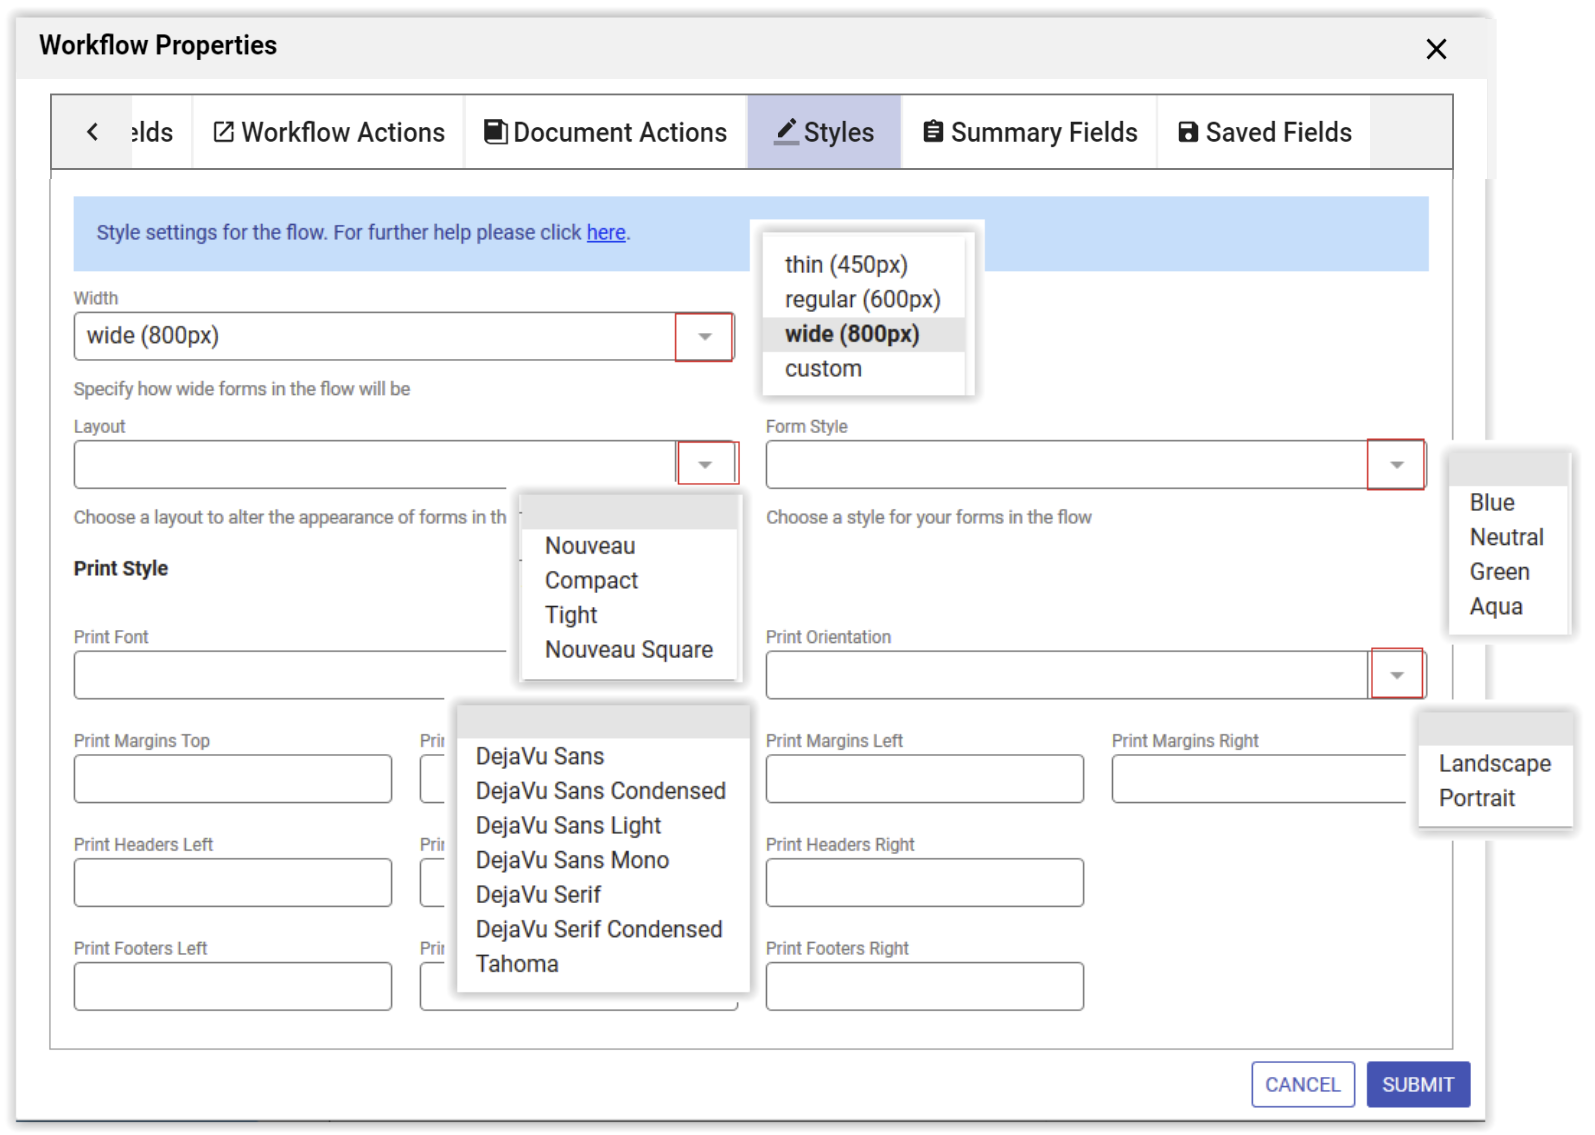
Width
This specifies how wide forms in your workflow will be. The default wide width is 800px, but the dropdown also includes thin (450px) and regular (600px). You also may pick the custom option; this will enable the box to the right of the Width dropdown and let you specify your own width.
Layout
You can choose a layout to alter the appearance of your forms in your workflow. provides four layouts : Nouveau, Compact, Tight and Nouveau Square. Nouveau, the default, gives the forms in your workflow a clear (white) background and a submit and cancel button with rounded corners.
Layouts are selected on the workflow property Style tab and are applied to all the forms in your workflow. This ensures that the look and feel of all the steps in your workflow are the same. Refer to Layouts for more information.
Style
You can apply a style to your workflow by selecting a choice from the Style dropdown. provides 4 styles but designers and admins can create customized styles. Styles are primarily concerned with colors but you can specify other properties such as font name, label, input font and background colors. Refer to Styles for more information.
Print Styles
Live Forms designers can specify the content of headers and footers for the PDF that is generated when the Save PDF property is checked for a workflow. Checking this property creates a PDF:
- when the workflow is submitted
- when the print link in use/test-mode is clicked
- when the print icon in a edit-mode workflow is clicked.
Print margins: Top, Bottom, Left and Right can also be specified. Refer to this Form Print Styles topic for the details.
Summary Fields
Check the individual fields to select the fields you want to appear in the Summary view if you have a Summary step in your workflow. Only checked fields will appear in the Summary. There are also two checkboxes labeled "All" and "None" which will show all the fields or none of the fields, respectively.
You can access the Summary Fields tab by:
- Click the Edit Workflow Properties icon on the Workflow Designer toolbar. This will launch the Workflows Properties wizard. Click the Summary Fields tab.
- This tab does not display in the Properties Navigator
- Make the selections for your workflow.
- Click the Submit button to save the changes or navigate to another tab.
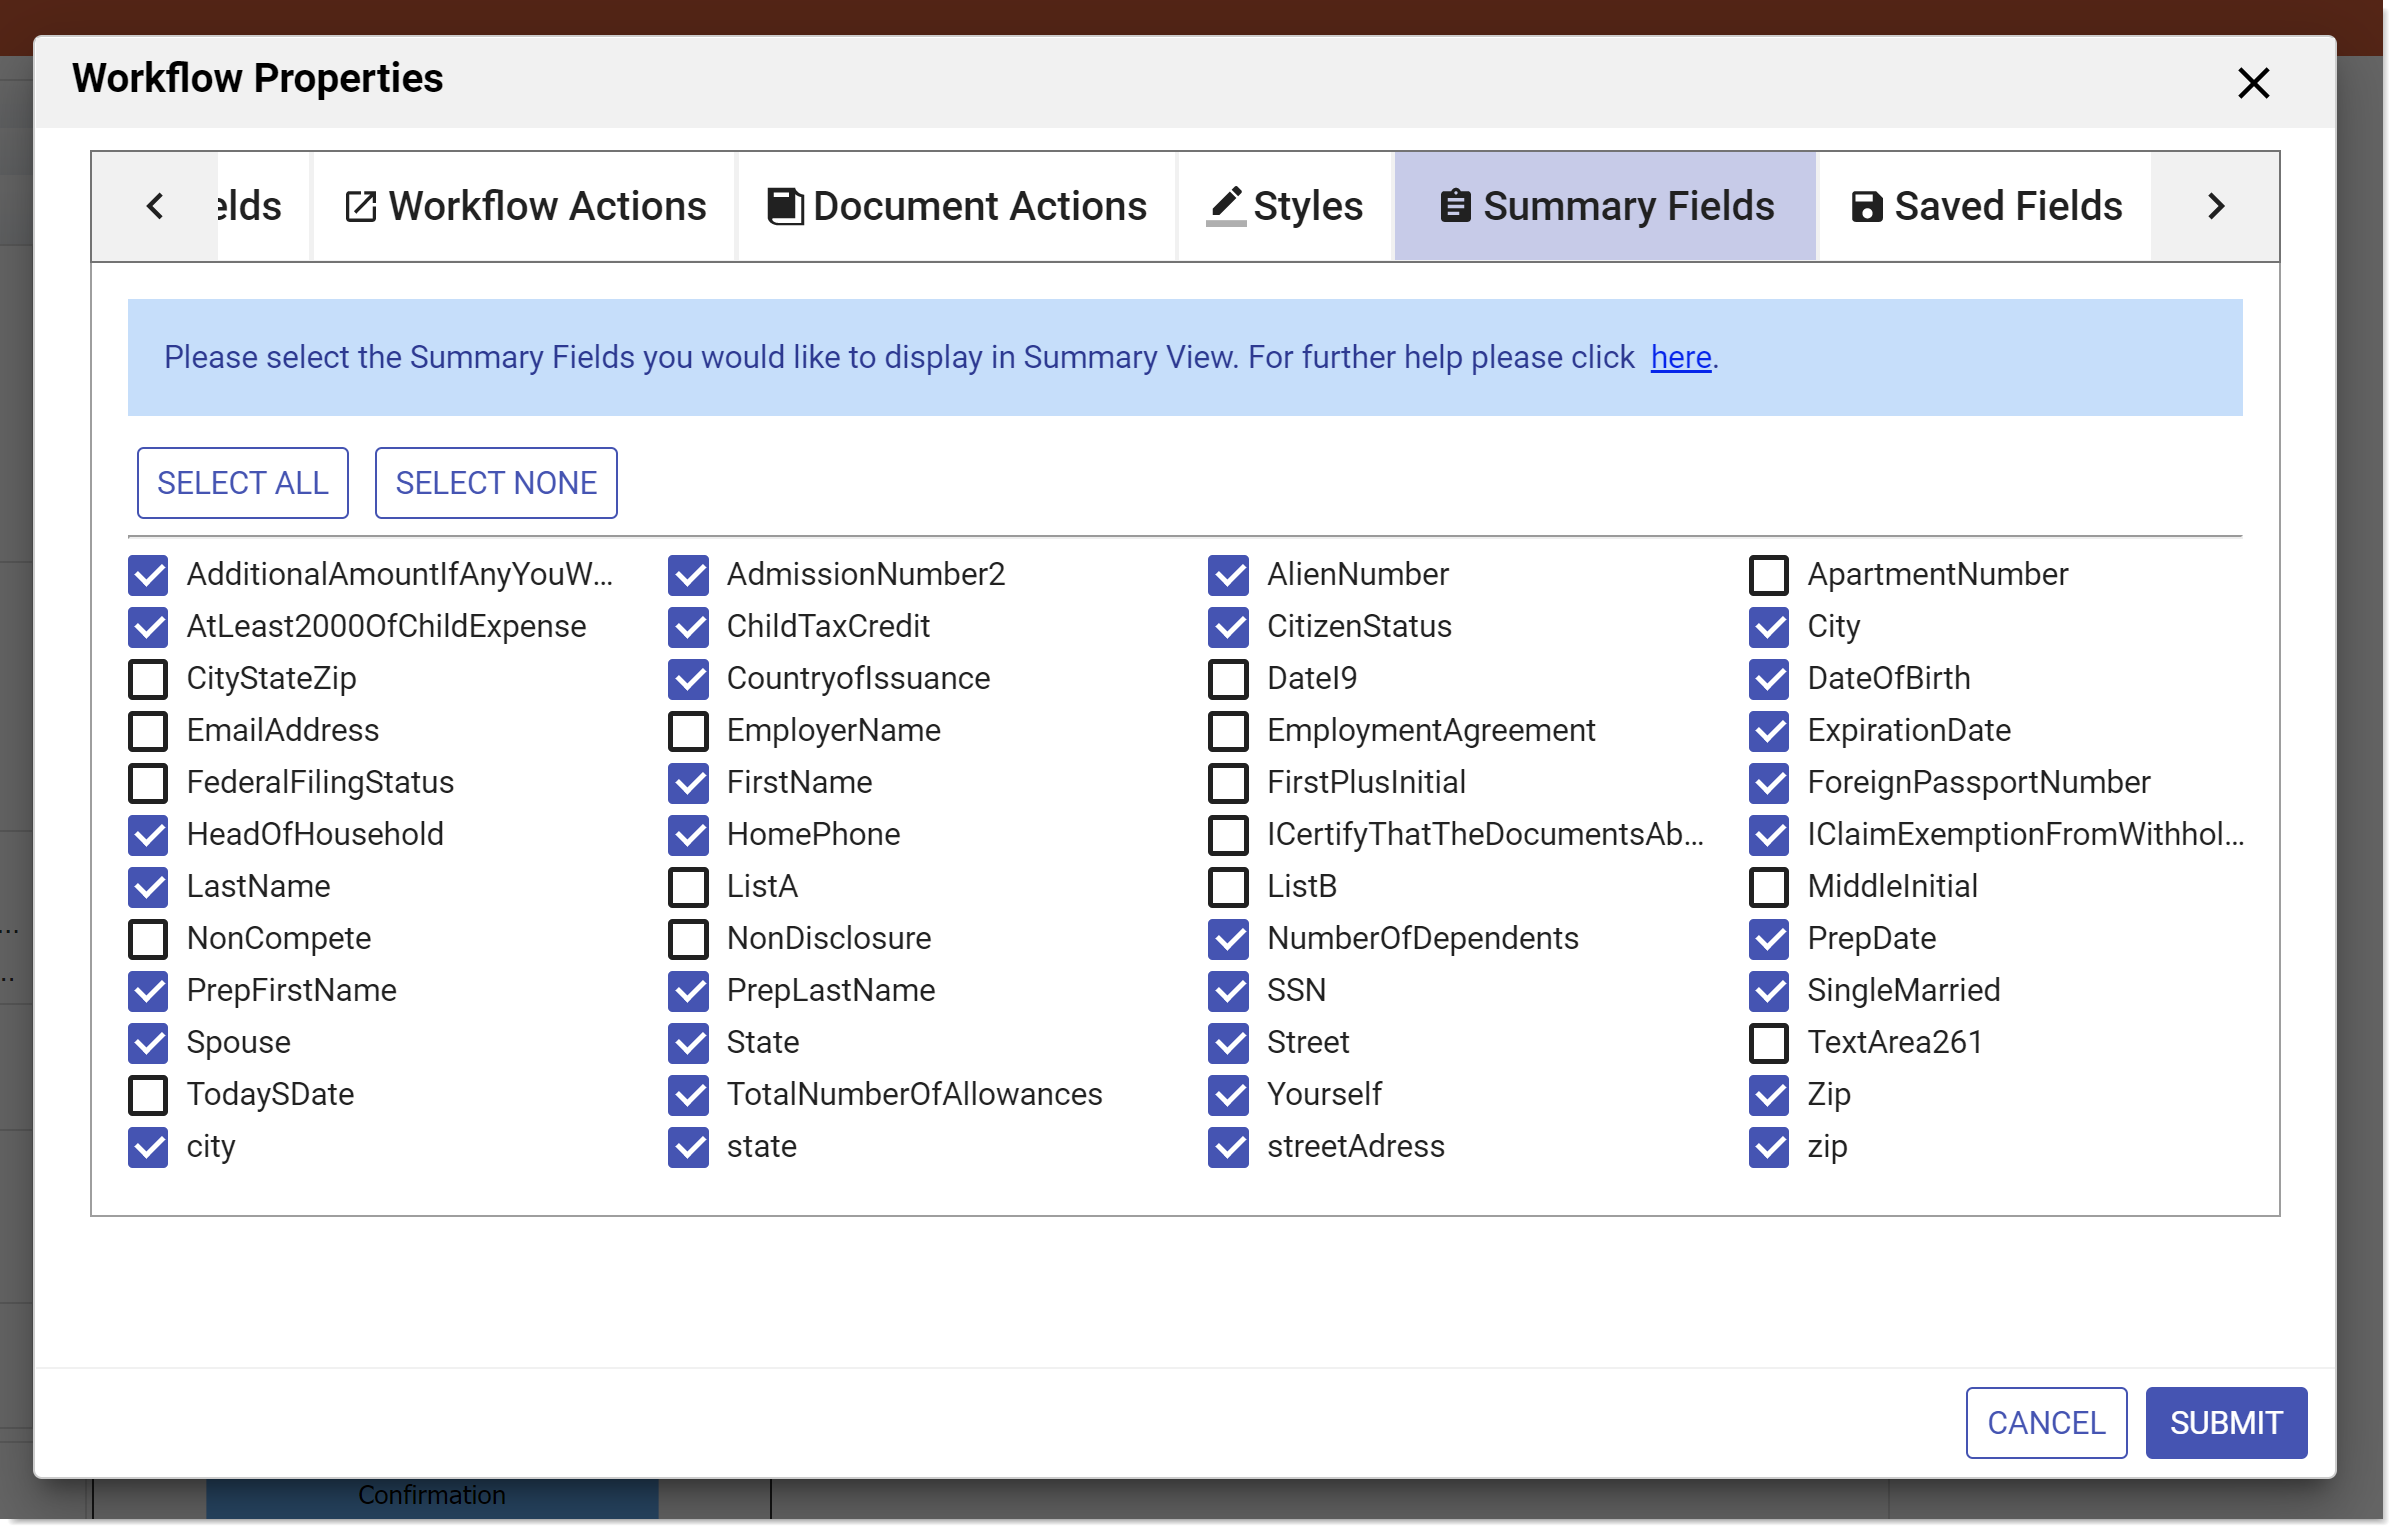
These controls are excluded from the Summary Fields list:
- Signature
- Formviewer
- PageBreak
- Message
- Link
- Trigger
- Image
- Video
Saved Fields
Set up Saved Fields for your workflow on the Saved Fields tab. Be sure to read the information below first.
- Access the Saved Fields tab by clicking the Edit Workflow Properties icon on the Workflow Designer toolbar. This will launch the Workflow Properties wizard. Click the Saved Fields tab.
- This tab does not appear in the Properties Navigator.
- Select the Available Fields and use the arrow buttons to move them to the Saved Fields list. Drag and drop is available for some browsers.
- Hover over a field in the list to see the step of the workflow where the control is located.
- Click the Submit button to save the changes or navigate to another tab.
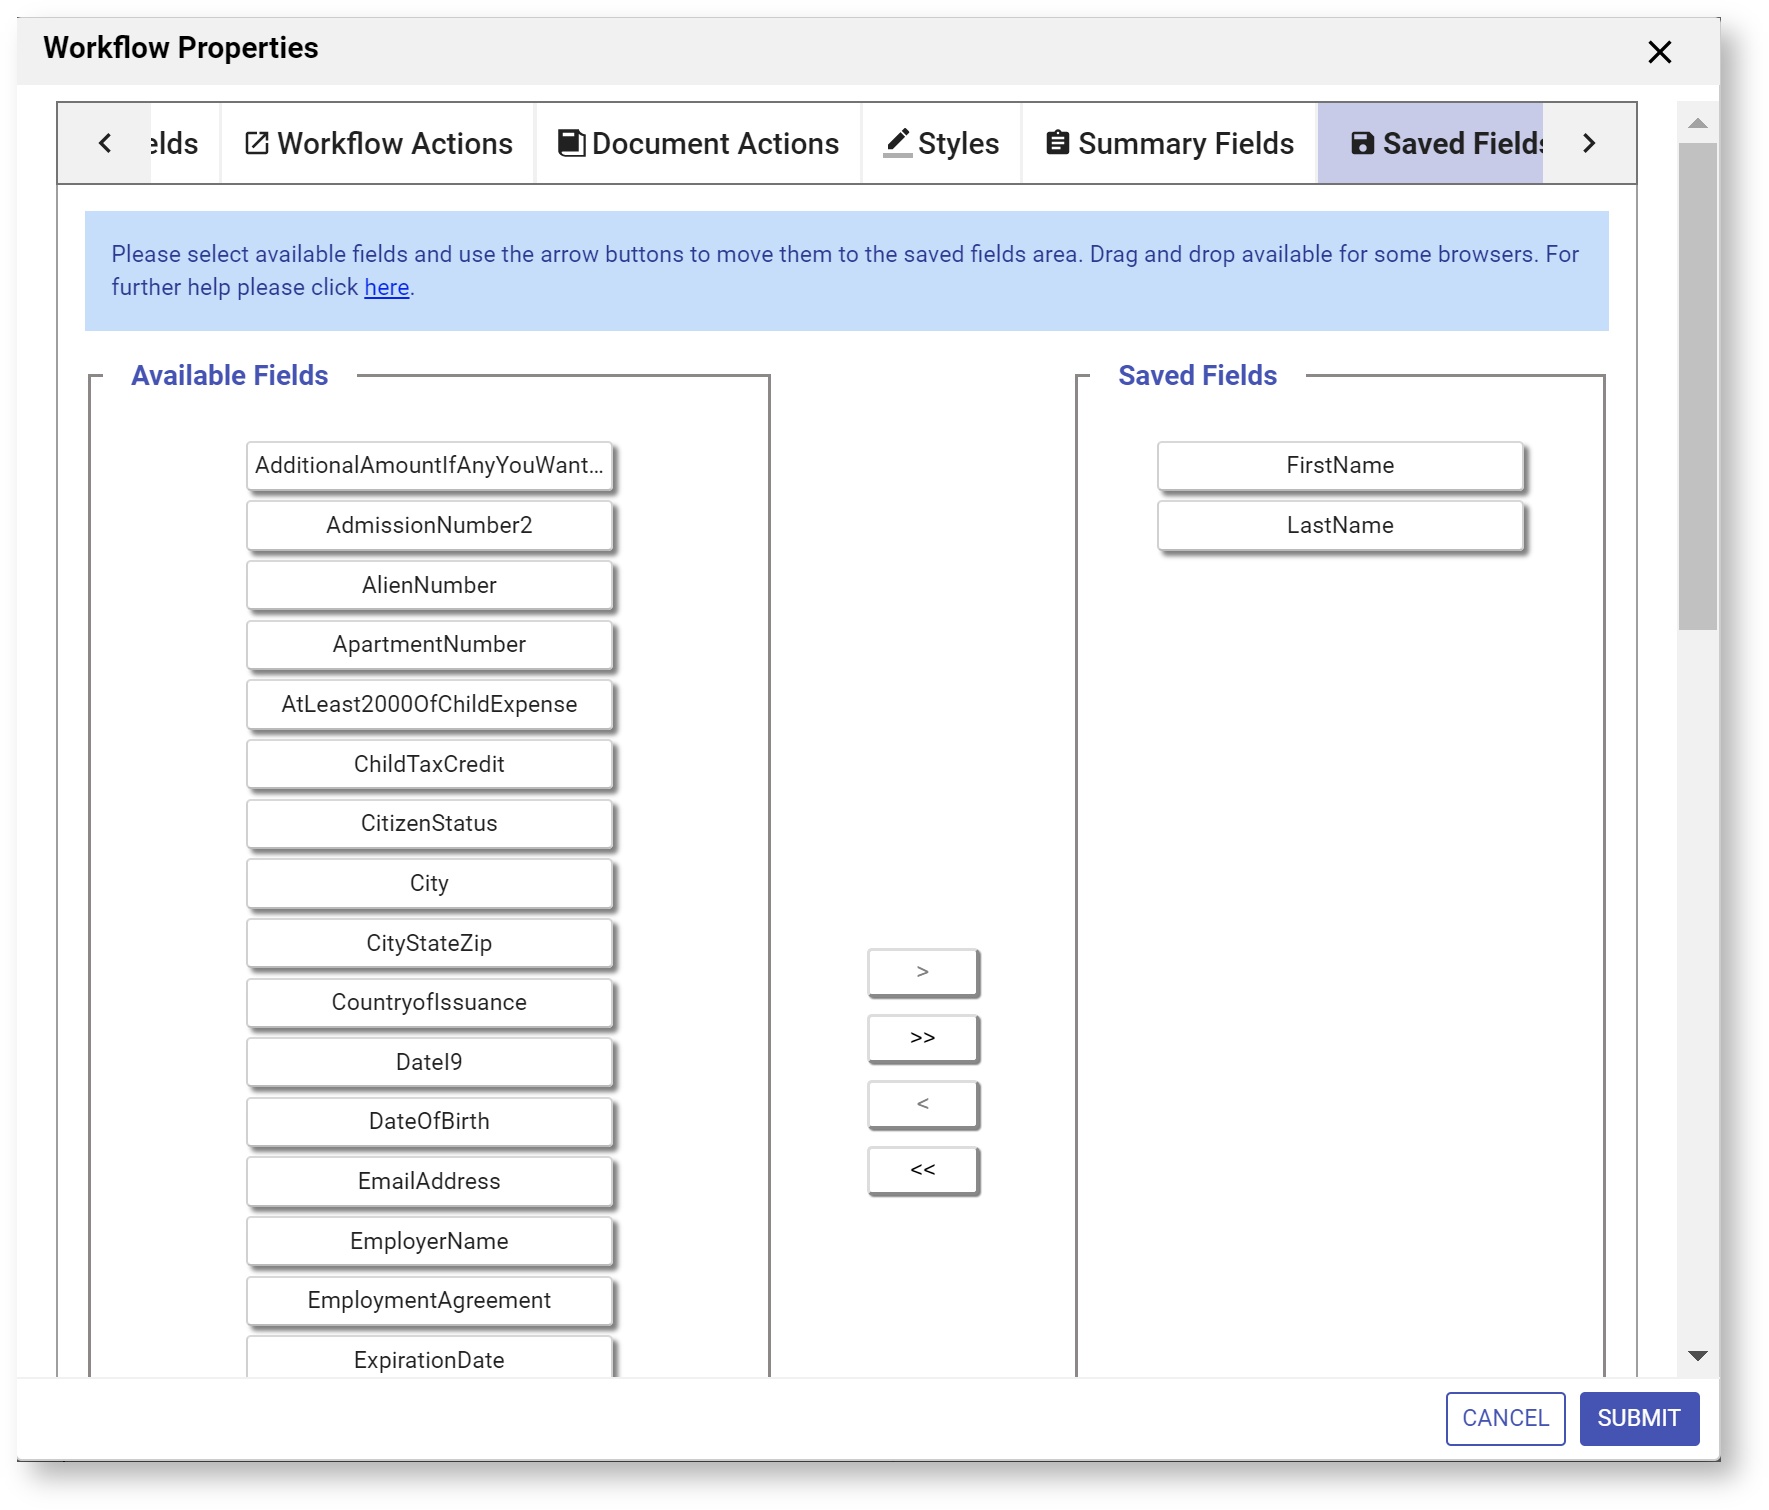
Saved Fields tab
This Saved Fields tab displays only when the Legacy Submissions view is configured as it is in the cloud. The only reason to configure Saved Fields for a form/workflow is if you want to use the Export to Excel which is only available in the Legacy Submissions view. Remember, Saved Fields are stored in the database when the form/workflow is completed. This can significantly reduce performance, especially for large forms and require additional storage in the repository.
In-house customers can choose to hide the Legacy Submissions view with a configuration parameter. If the Legacy submission view is not visible, the Saved Fields tab is not displayed in the Form/Workflow Designers and the Export to Excel feature is not available.
Refer to Submissions Stored Inside of Live Forms - Legacy View for the details about the Legacy Submission view and the Export to Excel feature.