This documentation is for frevvo v10.0. Not for you? Earlier documentation is available too.
Creating a Form Connected to your Database
- Former user (Deleted)
- Megan Ellis
There are two ways of creating frevvo forms:
- dragging and dropping controls from the designer palette
- creating a form from an XML schema. In this case, the controls will be automatically created for you based on the XML schema definitions.
When working with the database connector, you will always use the latter and create the controls from the schema. In the future we intend to relax this requirement.
On this page:
Generating the XML schema
You can use the database connector to generate the schemas you will need to use in the frevvo form.
To fetch the schema, type a URI in the browser that looks like the example below. This is almost identical to the query we used to test the connector, but it tells the connector to GET the schema instead.
http://<host>:<port>/database/<queryset name>/<query name>/schema?<template name>=<template value>
If your SQL Retrieve statement includes template variables, you’ll need to add the variable names as shown below. The schema itself does not require variables but the connector fetches the schema the same way it fetches data for the retrieve statement, so the connector expects the template names and values in the URI.
For the example we've been using so far, point your browser to the url: http://localhost:8082/database/BIRT/allCustomers/schema?customerNumber=237
You should get an XML schema similar to the following:
<?xml version="1.0" encoding="UTF-8" standalone="no"?>
<xsd:schema xmlns="http://www.frevvo.com/database/allCustomers" xmlns:xsd="http://www.w3.org/2001/XMLSchema" targetNamespace="http://www.frevvo.com/database/allCustomers">
  <xsd:annotation>
    <xsd:appinfo xmlns:f="http://www.frevvo.com/database/" f:connectorVersion="2.5.3-r30969" f:digest="4f2c46033e8ff5a221ab7106c4003833157e7f6a" f:last-modified="Sat Aug 19 19:06:45 EDT 2017" source="http://www.frevvo.com/database/"/>
  </xsd:annotation>
  <xsd:element name="allCustomers">
    <xsd:annotation>
      <xsd:appinfo xmlns:f="http://www.frevvo.com/database/" f:autoCreate="true" f:autoDelete="false" f:enabled="true" source="http://www.frevvo.com/database/"/>
    </xsd:annotation>
    <xsd:complexType>
      <xsd:sequence>
        <xsd:element maxOccurs="unbounded" minOccurs="0" name="row">
          <xsd:complexType>
            <xsd:sequence>
              <xsd:element name="customerNumber" type="xsd:int"/>
              <xsd:element name="customerName">
                <xsd:simpleType>
                  <xsd:restriction base="xsd:string">
                    <xsd:maxLength value="50"/>
                  </xsd:restriction>
                </xsd:simpleType>
              </xsd:element>
            </xsd:sequence>
          </xsd:complexType>
        </xsd:element>
      </xsd:sequence>
    </xsd:complexType>
  </xsd:element>
</xsd:schema>
The f:connectorVersion="2.5.3-r30969 attribute in the above example reports the version of the Database Connector that was used to generate the schema. The f:last-modified="Sat Aug 19 19:06:45 EDT 2017 attribute reports the date/time of the last modification to your configuration.xml file. These attributes will help you manage xsd changes.
Save the schema as an .xsd file in your file system.
Your schema may not work correctly if you generated the schema in the Chrome browser and then used the Select All, copy/paste function to create the xsd file. Use the Save Page As function instead.
You can then upload the schema to frevvo and generate controls from the schema elements that map to your database tables. If you have multiple queries in your configuration file, you have two options:
Generate the schemas for an entire queryset. When there are a large number of queries in the configuration.xml, getting the schemas for all of them eliminates having to create a schema one by one for each query. The queryset schema can be uploaded to your project one time and then you can add the relevant schema elements to your forms/workflows as you need them.
http://<server>:<port>/database/BIRT/schema
Generate a schema for each query.
http://<server>:<port>/database/BIRT/allCustomers/schema
The word "schema" is a reserved word for query names. If you have a query in your configuration.xml with a name that includes the word "schema" frevvo will show an error.
Document URI Properties
After you have generated controls from the elements in your database schema, set your form’s Document URI to the database connector query URL. Follow these steps:
- Click the Settings mode.
- Click the Document Actions tab. Click Send Data then select Manually set document URIs.
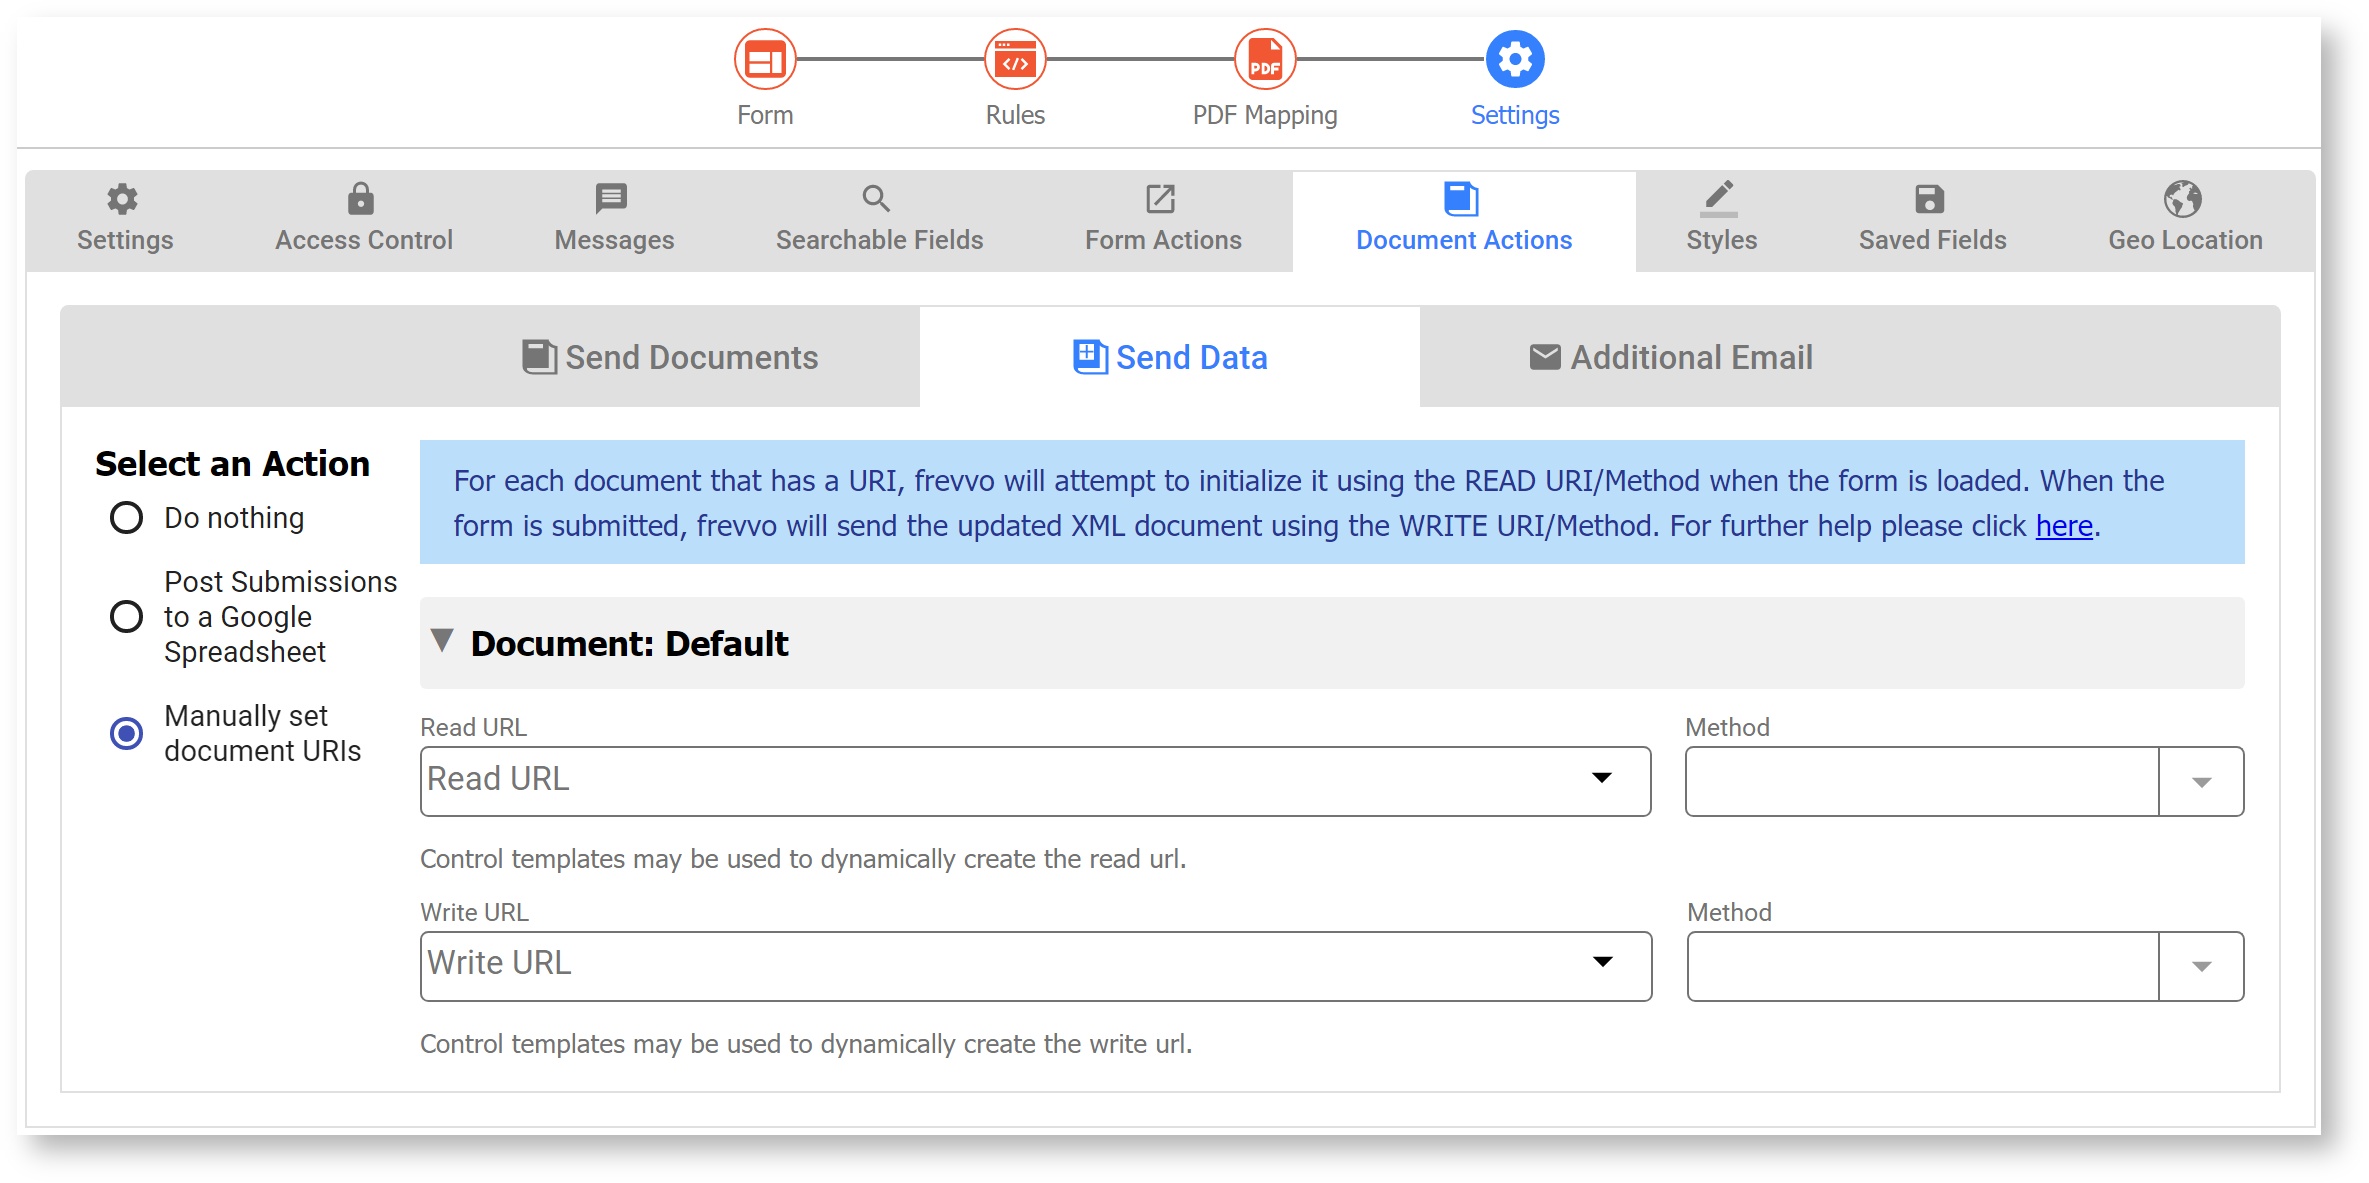
The first section in the wizard is for the form's default document. This is indicated by the Document Name of "default" displayed in the wizard. The default document maps to all of the controls you added to this form by dragging and dropping from the palette. This is typically not the document you want to configure.
- The second section is for the next schema document. You should see the Document name change to your schema's document name.
The next screen has two sections: Read URI and Write URI. Typically, when the form loads, frevvo customers read form data from their database to initialize the form and send the updated XML document to the same database upon form submission. Enter the same URI in the Read URI and the Write URI fields, as shown in the image, with the appropriate SQL statement to run if you are reading from and writing to the same database using the database connector. It is possible to read the form initialization data from one database and then update a different database. Enter different URIs in the Read URI and the Write URI fields if this is your situation.
- Enter the database connector Url to your query in the wizard's URL input. If the database connector is running in the same host and port as the frevvo form server, then you can omit http://<host>:<port>/ from the URL. Use templates to create dynamic URLs. See this example below.

You also must specify which of the four SQL statements to run—you do this by choosing the appropriate values in the Document URI Read Method and Document URI Write Method dropdowns according to the table below. (You may notice in the Forms Designer that the Document URI Read Method drop down box includes a POST option, but it is not shown below because it is not used by the database connector.)
| SQL Statement Type | Document URI Read Method | Document URI Write Method |
|---|---|---|
| Create | Leave blank | POST |
| Retrieve | GET (or leave blank if you are not retrieving data) | Leave blank if your form is read-only |
| Update | Leave Blank | PUT |
| Delete | Leave Blank | DELETE |
You’ll see one set of Document URI properties for each schema in your form. Type the Document URI next to the schema name—make sure not to type it next to the Default schema. To specify which of the four SQL statements to run, choose the appropriate values in the Read Method and Write Method dropdowns, based on the information below.
- Read Method - Choose GET if your form will be initialized with data from your database; leave the dropdown blank if it won’t. (Don’t set the Read Method to POST; this is used for integrating forms with different back ends.)
- Write Method - If your form is read-only, leave this blank. Otherwise, use the chart above chose either PUT or POST. PUT maps to the update method while POST maps to create.
Note that you may choose only one Write Method in the Forms Designer.
Still using the customers example, assume the Document URI for the schema customers is:
http://localhost:8082/database/myStore/customers?customerId={customerId}
If you choose the Write method to be POST, the SQL statement that will be executed is:
<create>
 <statement>
 INSERT into customers (customerId,firstname,lastname)
 VALUES ({customerId},'{firstname}','{lastname}')
 </statement>
</create>
At run time, the values of {customerId}, {firstname} and {lastname} will be replaced by the values of the respective form controls.
What happens at run Time?
Let's assume that you defined the same Document URI in the Read and Write URI fields in the wizard for a schema in the form, a GET Read Method and a PUT Write Method.
When a user loads your form, a GET request for that URI will be sent to the database connector. That will cause the database connector to execute the retrieve operation for the query specified in the URI, take the result of the SQL execution and transform it to XML. The database connector will then return the resulting XML back to the form which will be initialized with the contents of the XML file.
When the user submits the form, the same URI will be executed but now with the PUT (or POST) method. The database connector will than execute the update operation identified by that URI.
Post via Web Hook
In a workflow, the Doc URI writes to the database at the end of the workflow, after the final step is submitted. Perhaps you want to post to the database mid-workflow. You could use the Business Rule Approach, or for a no-code approach, you can simply use the same URL you would use for the Doc URI POST in a Web Hook.
- In Workflow Editing Mode, click the + icon after the step that should post data to your database.
- Select Add web-hook (HTTP POST)
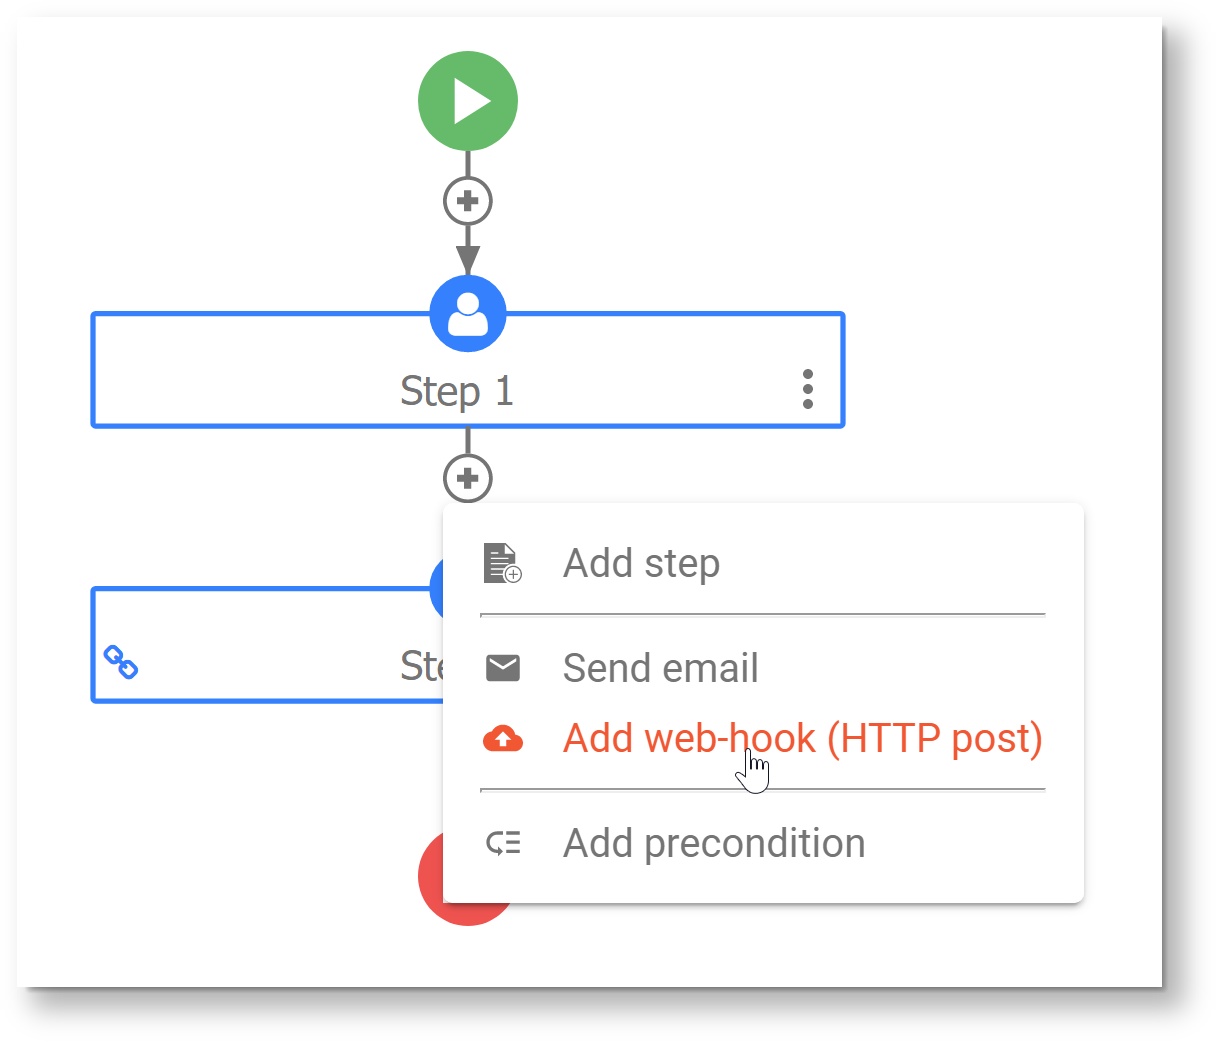
- Enter the Database URL for the query that contains your create statement, e.g. http://localhost:8082/database/products/allProducts. Be sure to check the Data checkbox. Click Submit.

You will see the Web Hook displayed in your workflow diagram, and you can edit it at any time. The Database Connector will run the create statement to post data after the user clicks Continue on Step 1.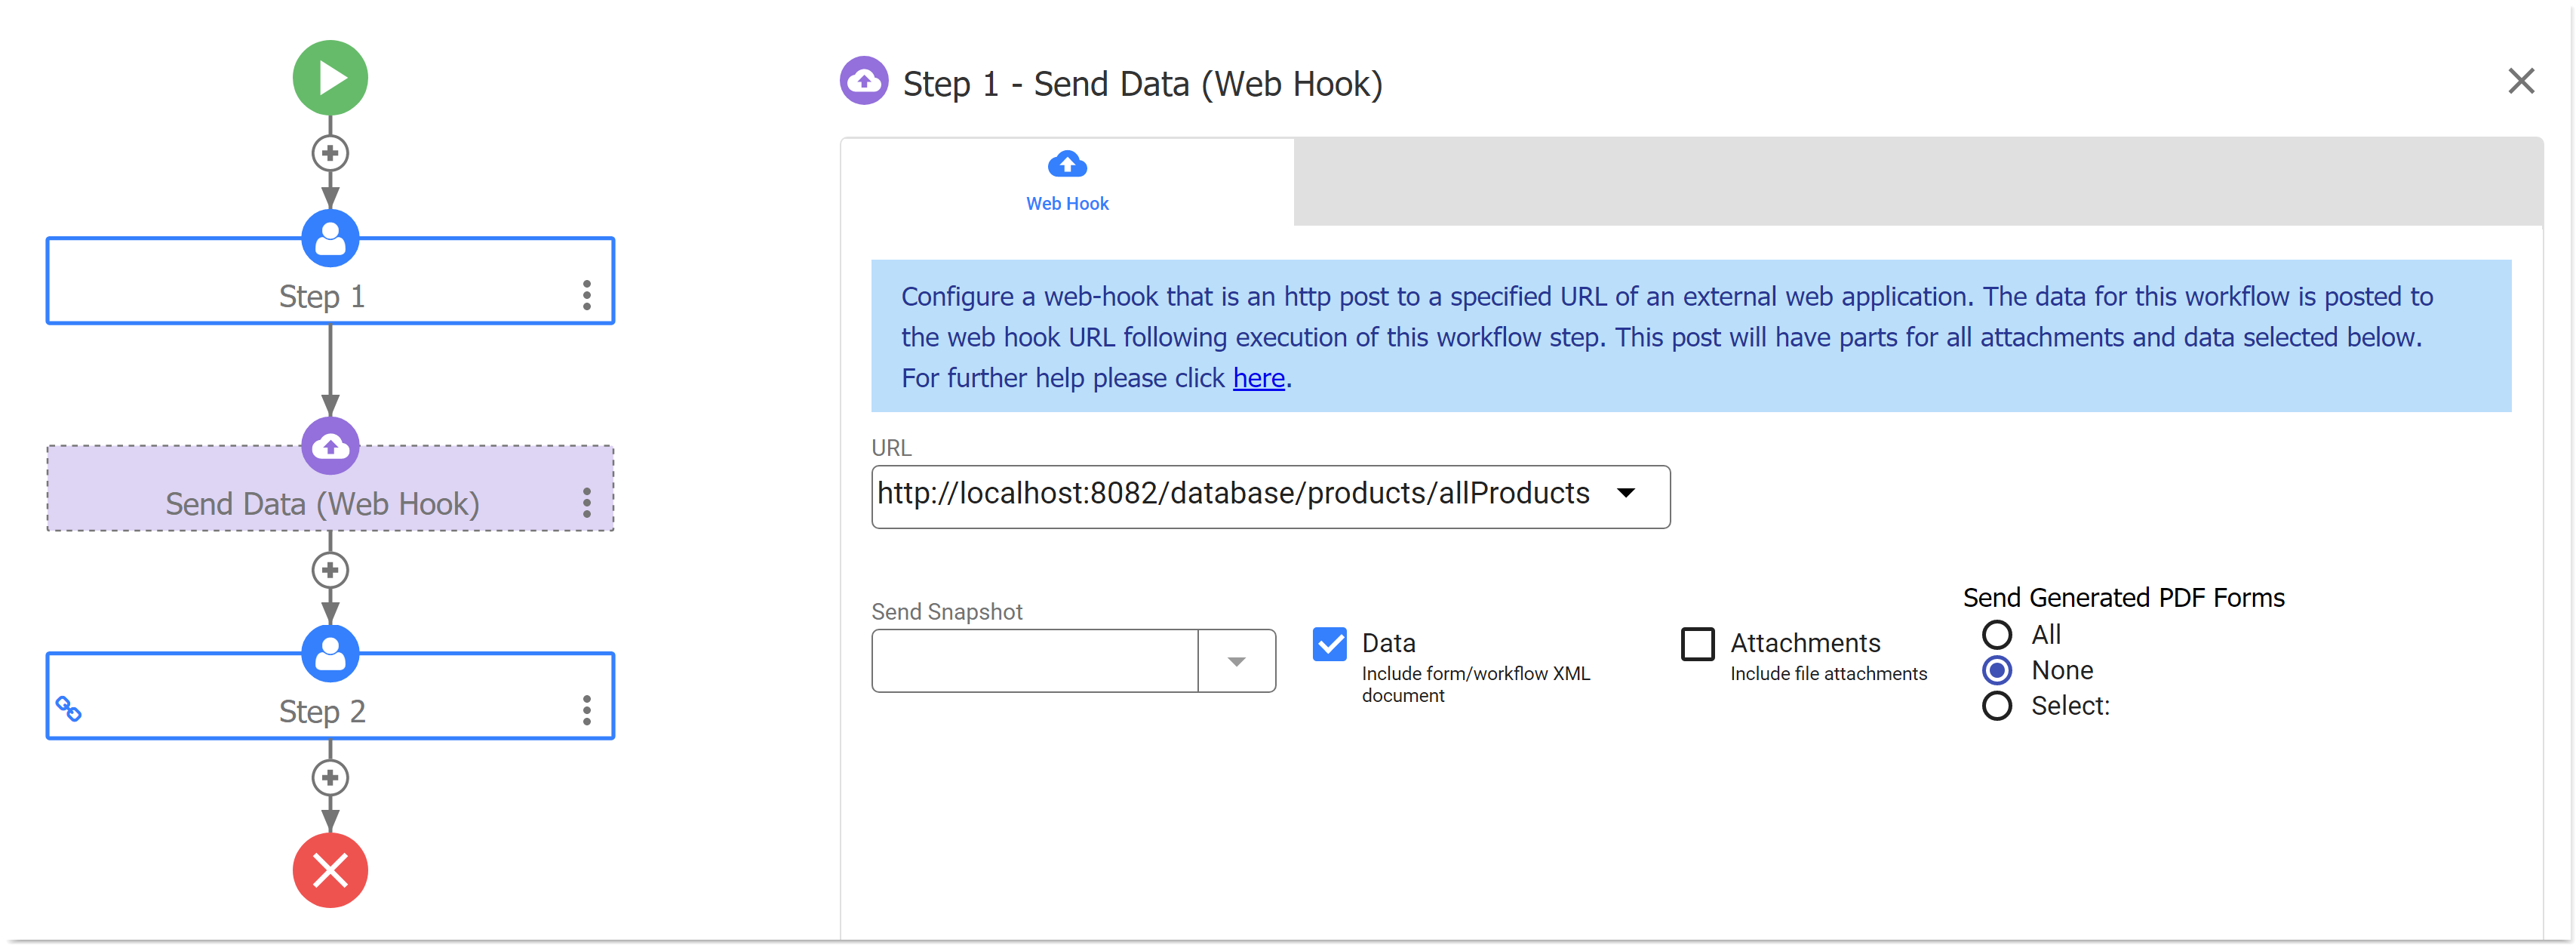
View the Web Hook Documentation chapter for more information.
Customizing the XML Schema
The schema you retrieve from your database will be relatively generic. As a result the controls you generate from this database schema might need some tweaking to suit the specific needs of your form. You can modify a control’s behavior by making changes to the schema after you have retrieved it.
If you have already uploaded the schema to frevvo, you can still make the changes and update the schema.
Common customizations are discussed below.
Adding Dropdown/Radio Options
Suppose you want users to select a specific manager’s name from a dropdown list. Your database has a 50-character limit but naturally does not include specific manager name restrictions, so the schema you retrieve initially might look something like this:
<xsd:element minOccurs="0" name="Manager">
      <xsd:simpleType>
          <xsd:restriction base="xsd:string">
               <xsd:maxLength value="50"/>
          </xsd:restriction>
      </xsd:simpleType>
</xsd:element>
The control you generate from the initial schema will be formatted as a text control. You can make the control a dropdown by changing the control’s Display As property but you must add the actual restrictions to the schema itself, as shown below.
<xsd:element minOccurs="0" name="Manager" type="ManagerType"/>
<xsd:simpleType name="ManagerType">
      <xsd:restriction base="xsd:string">
         <xsd:enumeration value="John Doe"/>
       <xsd:enumeration value="Pat Johnson"/>
       <xsd:enumeration value="Mary Smith"/>
      </xsd:restriction>
 </xsd:simpleType>
You also can populate dropdown boxes dynamically from your database by writing a rule.
Adding Checkbox Options
You may also need a control to allow multi-select options. Like dropdowns and radios controls described above, the control you generate from the initial schema will be formatted as a text control. You can make the control a checkbox by changing the control’s Display As property to Checkbox and changing the actual schema type to xsd:list as shown below: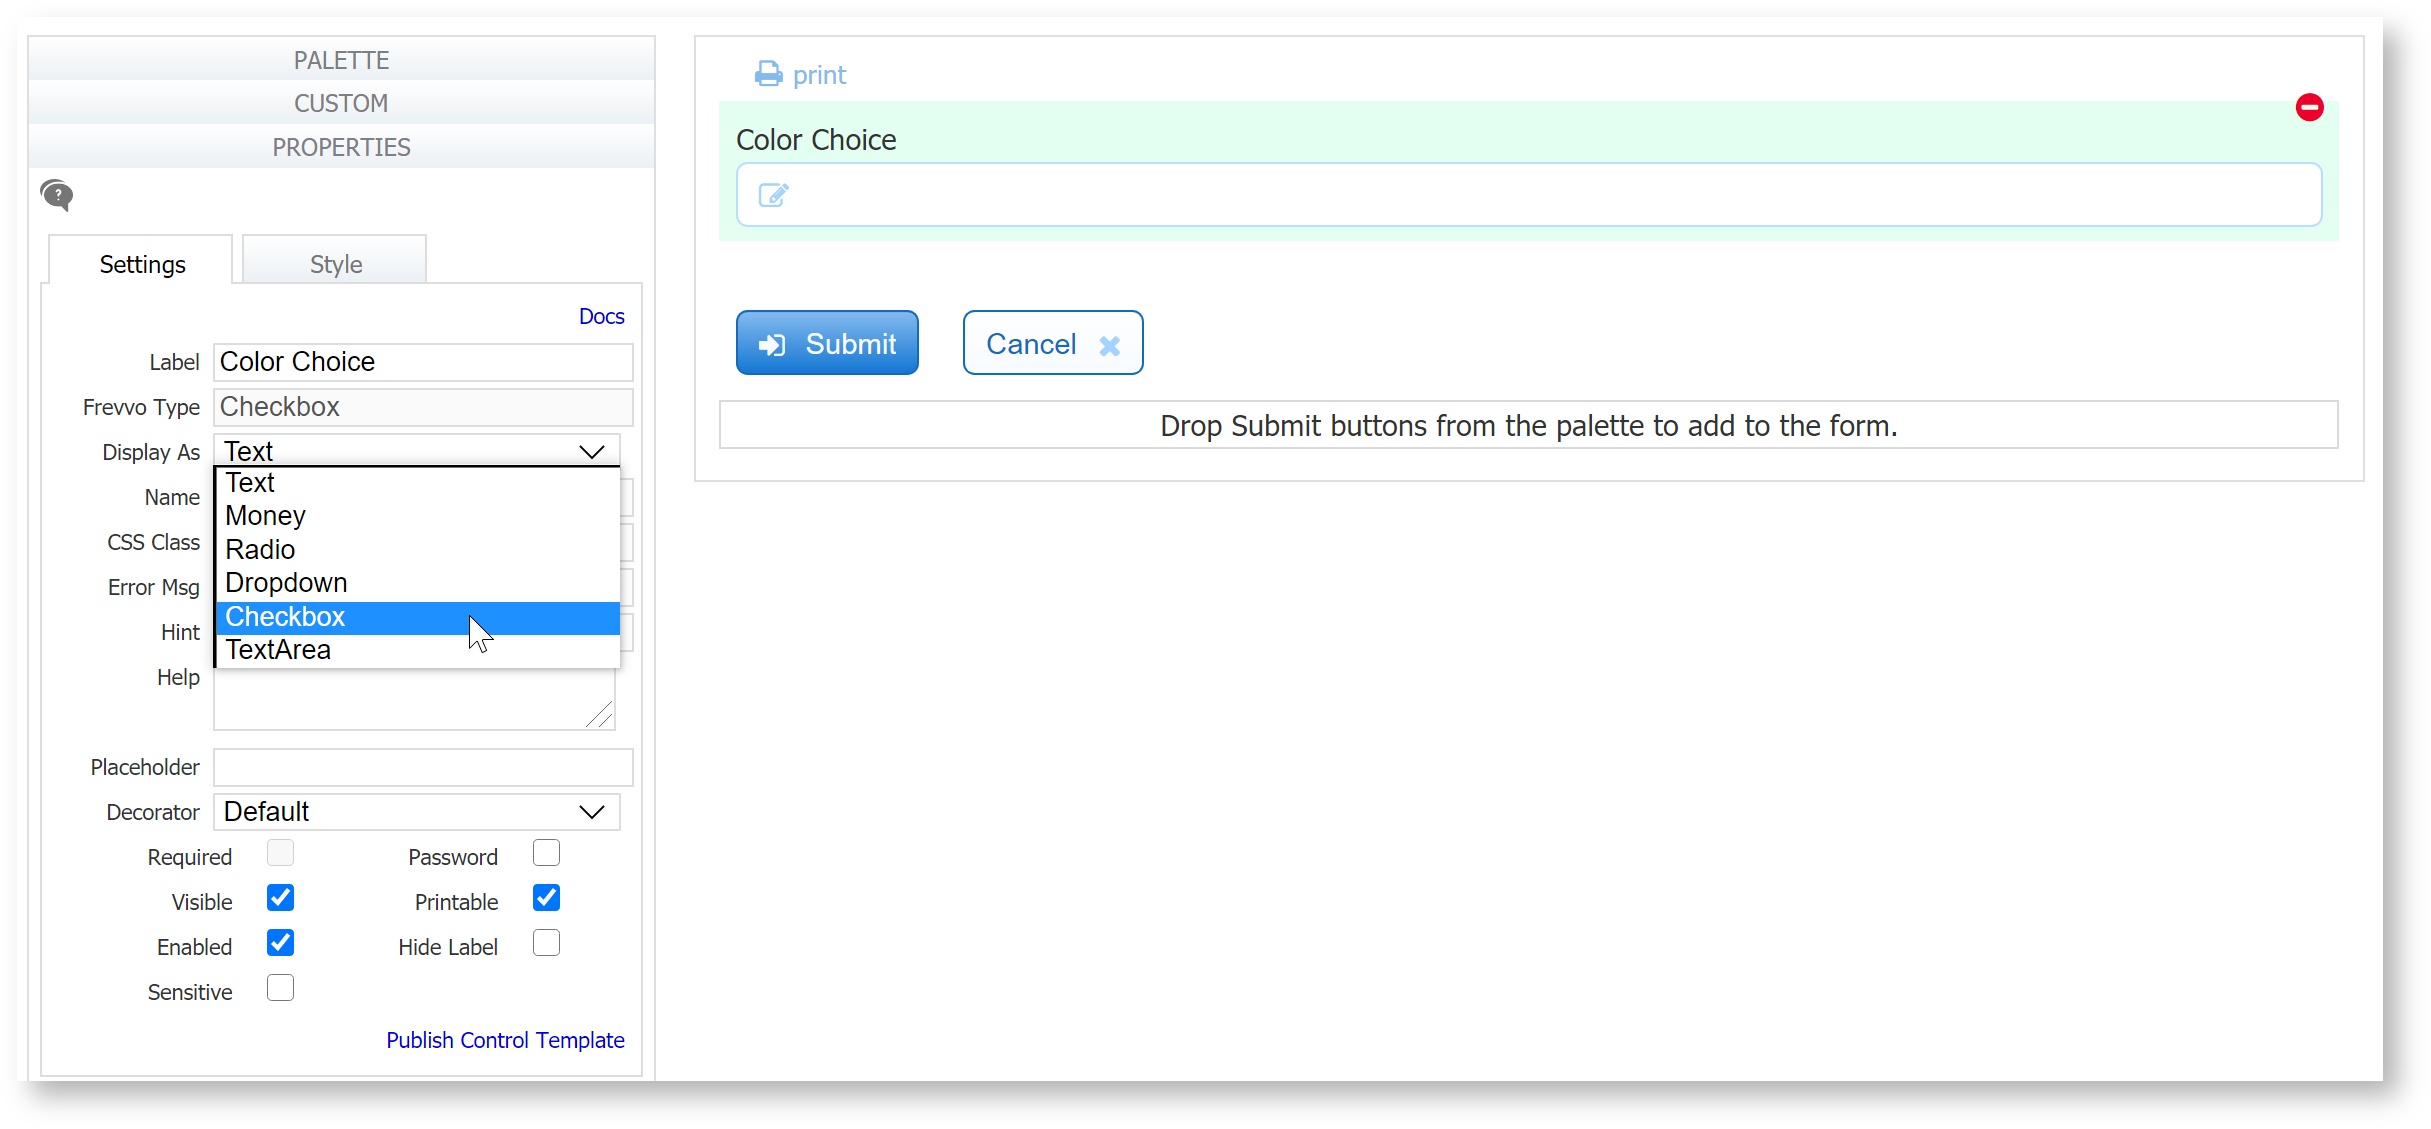
<xsd:element minOccurs="0" name="colorChoice">
      <xsd:simpleType>
           <xsd:list itemType="xsd:string"/>
      </xsd:simpleType>
</xsd:element>
Once the Color Choice control is formatted as a checkbox, a labels property will display in the properties settings tab for this control. Enter your checkbox options here.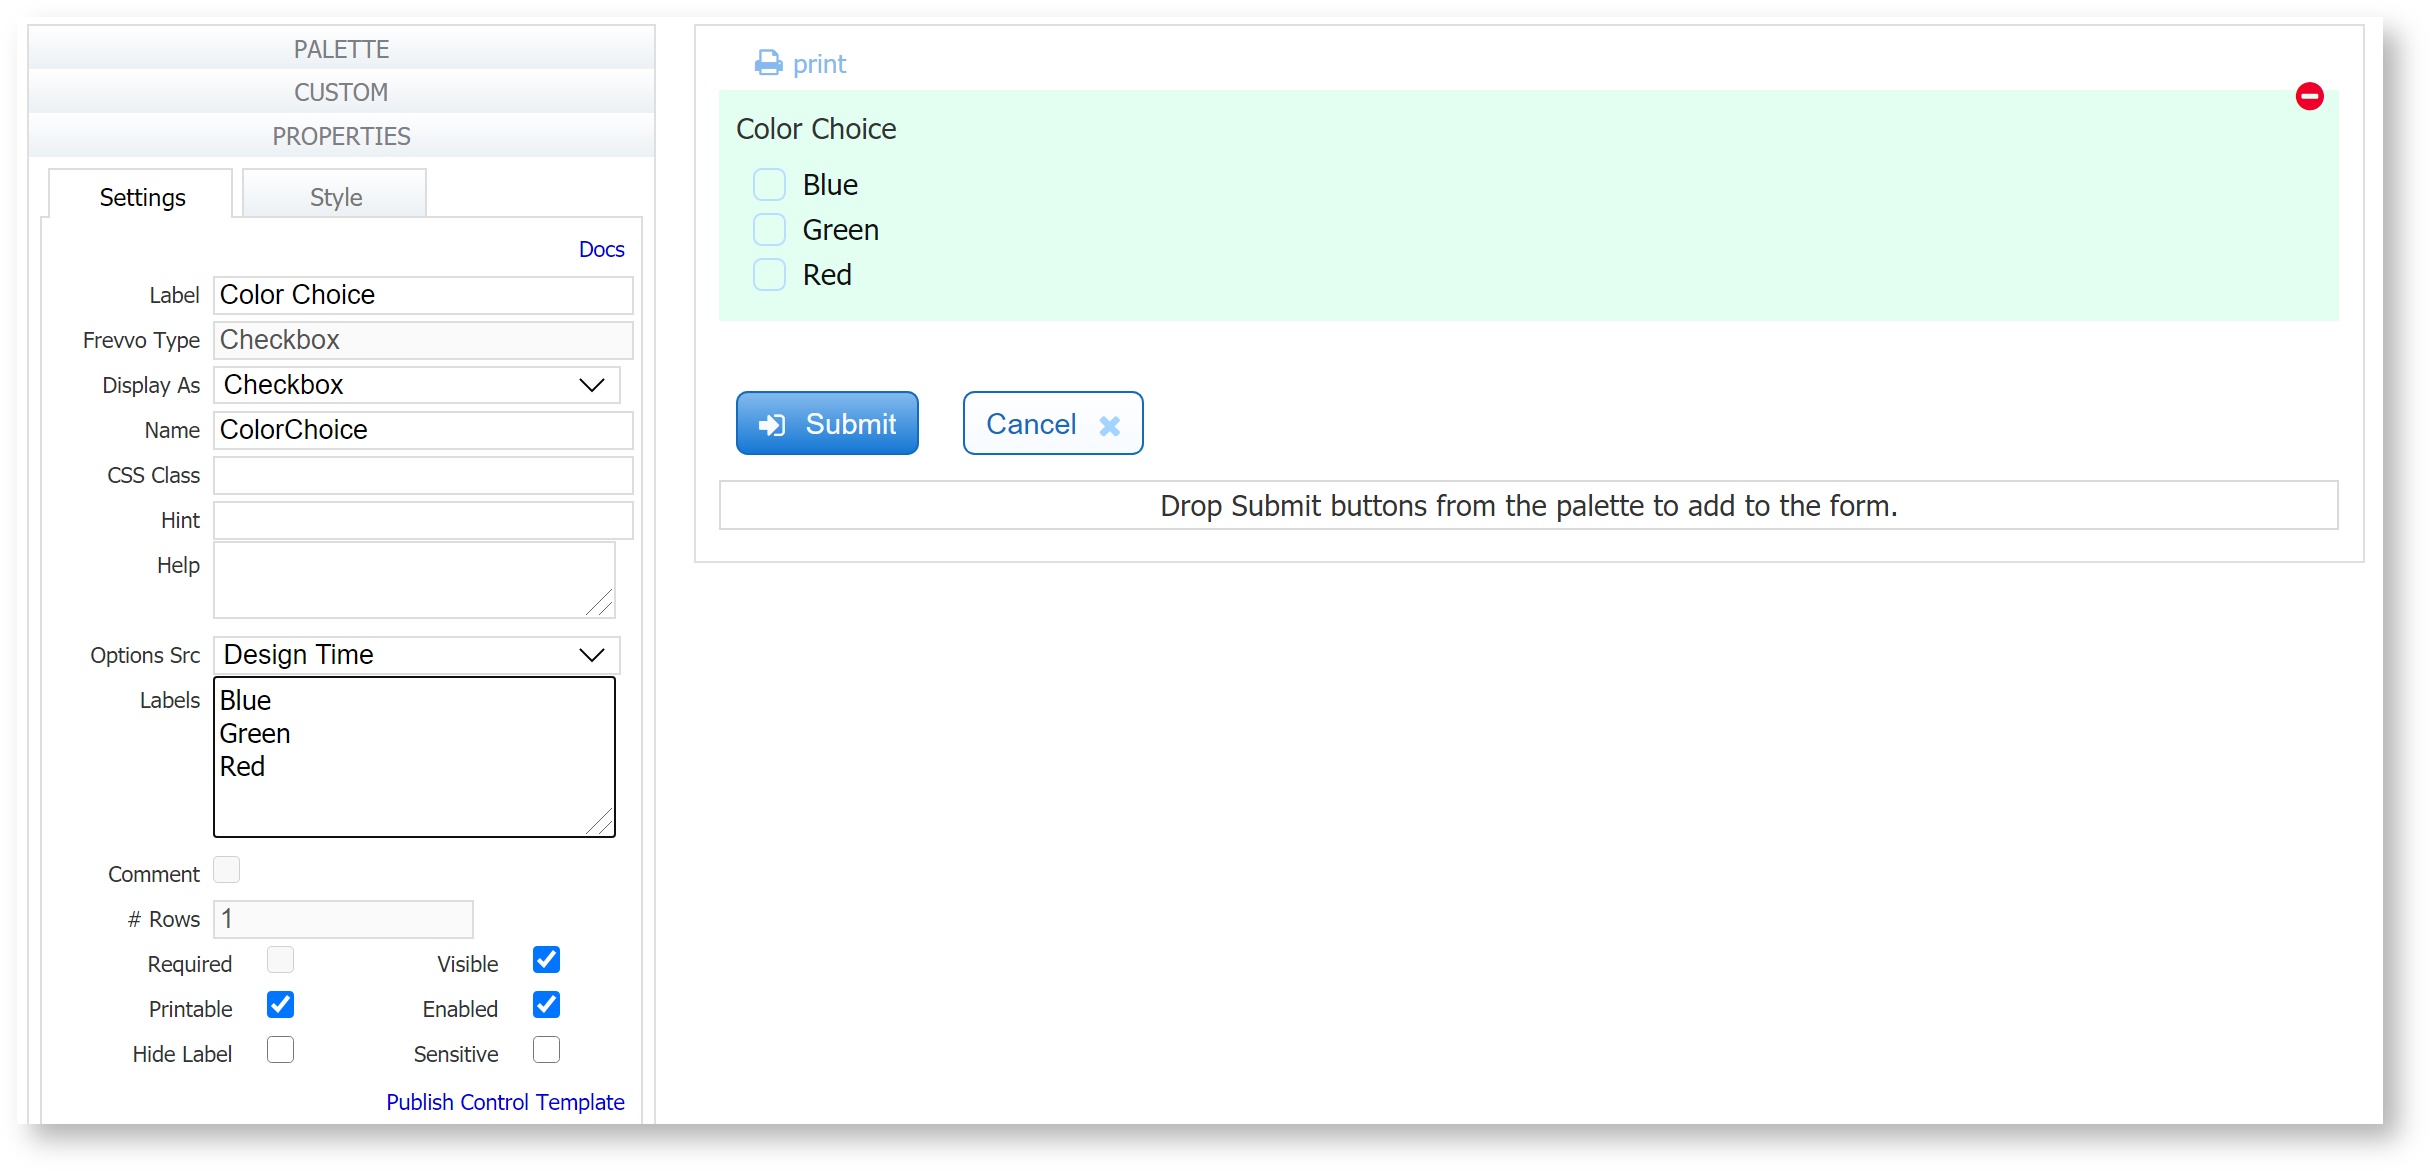
Limitations
Currently it is not possible to list the options directly in the schema or to have a checkbox option containing a space. So a label of "dark blue" will appear in the database as "dark_blue".
Make a control Required
If your database column allows NULL then the XSD schema generated by the frevvo database connector will set minOccurs='0' for this control. When this control is used in your form the field will not be required. To make this field required you have to edit the XSD to set minOccurs='1' which makes the XSD schema more restrictive then your database schema.
See also Data Sources - Required Schema Controls.
Limiting potentially repeating Data
Often the schema from your database will allow any number of elements even though you know your form will never use more than one at a time. Every schema includes the “rows” element as shown in the partial schema below—note that based on the maxOccurs value of “unbounded” in the schema, there can be an unlimited number of customer elements.
<?xml version="1.0" encoding="ISO-8859-1"?>
<xsd:schema xmlns:xsd="http://www.w3.org/2001/XMLSchema" xmlns=http://www.frevvo.com/database/Customer
targetNamespace="http://www.frevvo.com/database/Customer">
   <xsd:element name="Customers">
      <xsd:complexType>
         <xsd:sequence>
            <xsd:element maxOccurs="unbounded" name="row">
               <xsd:complexType>
                  <xsd:sequence
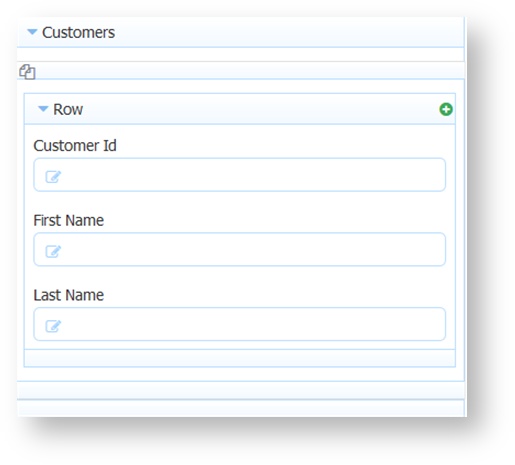
Since the schema says the element is unbounded, the control you generate initially will be a repeat control. You’ll see the the ![]() repeat icon in the Forms Designer and if you don’t make any changes, users will see the + sign that comes with repeat controls.
repeat icon in the Forms Designer and if you don’t make any changes, users will see the + sign that comes with repeat controls.
In this case, change the schema to indicate you only want to work with one customer at a time, as shown below.
<?xml version="1.0" encoding="ISO-8859-1"?>
<xsd:schema xmlns:xsd=http://www.w3.org/2001/XMLSchema xmlns=http://www.frevvo.com/database/Customer
targetNamespace="http://www.frevvo.com/database/Customer">
   <xsd:element name="Customer">
      <xsd:complexType>
         <xsd:sequence>
            <xsd:element maxOccurs="1" name="row">
               <xsd:complexType>
                  <xsd:sequence>
Note that now maxOccurs="1" and that will force the + sign to disappear.
Type Restrictions
Sometimes the database field will let you enter any string such as a VarChar field. However if you field is a phone number you may which to have the form restrict the input to only valid phone numbers. See the section on patterns for more common type restrictions. In this example you still want the form input to be a text box. So we do not change the Format As.
Edit your xsd:
<xsd:element minOccurs="0" name="Home Phone">
      <xsd:simpleType>
          <xsd:restriction base="xsd:string">
               <xsd:maxLength value="12"/>
          </xsd:restriction>
      </xsd:simpleType>
</xsd:element>
Add the following simpleType restriction to your xsd.
<xsd:simpleType name="phoneType">
    <xsd:restriction base="xsd:string">
        <xsd:pattern value="\d{2}-\d{4}-\d{4}"/>
        <xsd:pattern value="\d{4}-\d{3}-\d{3}"/>
    </xsd:restriction>
</xsd:simpleType>
Finally change the existing type for the Home Phone element to:
<xsd:element minOccurs="0" name="Home Phone" type="phoneType"/>
Now the frevvo form will only accept valid phone numbers. If you enter an invalid phone the form will flag the field as invalid.
Dynamic Dropdown Options
Individual controls also may trigger SQL statements, if you’ve customized your form with rules. See Database Connector REST Service for an example of using the ResultSet returned from the Database Connector to dynamically populate the options in a dropdown control.
Adding ComboBox or Message Controls from Schema
In order to add a Message or ComboBox control, you will need to edit your schema and add the appinfo attribute. Define the attribute by adding xmlns:frevvo="http://www.frevvo.com/appinfo" at the end of Line 2 in your schema. Here is an example.
<xsd:schema xmlns="http://www.frevvo.com/database/interns_forschema" xmlns:xsd="http://www.w3.org/2001/XMLSchema" targetNamespace="http://www.frevvo.com/database/interns_forschema">
<xsd:schema xmlns="http://www.frevvo.com/database/interns_forschema" xmlns:xsd="http://www.w3.org/2001/XMLSchema" targetNamespace="http://www.frevvo.com/database/interns_forschema"> xmlns:frevvo="http://www.frevvo.com/appinfo"
Then edit the element for the control you want to convert to a ComboBox as follows. The first line will already exist in your schema. You need to add the lines represented by lines #2-7 below.
Combobox
<xsd:element default="ComboBox" minOccurs="0" name="Department" type="xsd:string">
				         <xsd:annotation>
					         <xsd:appinfo>
						        <frevvo:displaytype>ComboBox</frevvo:displaytype>
						        <frevvo:label>Department</frevvo:label>
					        </xsd:appinfo>
				        </xsd:annotation>
			        </xsd:element>
Here is a screenshot of a schema before and after adding the annotation.

Message Control
Follow the same instructions as above but use this annotation:
<xsd:element default="Message" minOccurs="0" name="MessageControl" type="xsd:string">
                <xsd:annotation>
                 <xsd:appinfo>
                    <frevvo:displaytype>Message</frevvo:displaytype>
                       <frevvo:label>Message Control</frevvo:label>
                  </xsd:appinfo>
              </xsd:annotation>
              </xsd:element>
Show/Hide Required Fields
There are times when you have several fields that you want hidden and then only want to make visible depending on the value entered into another field. Thus only when the fields are visible do you want them to be required. Currently hidden required fields are still required and will prevent form submission. Automatically making hidden fields not-required may be added in a future release of frevvo.
See the documentation for Data Sources and Schemas for a solution to implement show/hide with required controls.