Live Forms v7.4 is no longer supported. Please visit Live Forms Latest for our current Cloud Release. Earlier documentation is available too.
Workflows in Confluence
- Former user (Deleted)
Analytics
View the Workflows in Confluence video for more information if you are using Confluence v4.0 - v4.2. In Confluence v5.1+, the Add Form, Add Flow, Add Submissions, and Add Task functions are located on the Tools Menu.
If your workflow includes an Email step that routes that step to an anonymous user:
- Your Confluence space does not need to be configured to allow anonymous users
- The visibility of the workflow must be set to Public.
- The {task.notify.url} template used in the notification email that is sent to the anonymous user generates a frevvo specific URL
On This Page:
Creating multi-user workflows in Confluence
Using Live Forms for Confluence, you can automate this entire workflow so that it is completely electronic in Confluence.


Consider a Vacation Request workflow. An employee wants to request vacation and fills out the appropriate portion of a paper form. The form is then handed over to a manager who must approve the vacation request, sign the form, notify the employee and file the paper form and/or notify HR.
The steps are as shown in the figure above:
- An employee goes to a Confluence page that contains the workflow.
- Since the employee does not belong to the 'manager' Confluence group, he will only see the relevant portion of the form.
- The employee fills it in and clicks a Continue button.
puts the task on the manager's task list, [optionally] notifies the manager by email and displays a confirmation message to the employee.
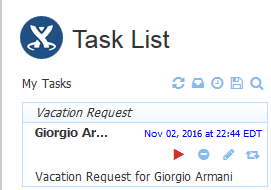
- When the manager logs in, she visits a Confluence page that contains her task list.
- The employee's vacation request will be displayed in the task list.
- The manager performs the task. Since she belongs to the 'manager' Confluence group, she will see the manager-specific portions of the form. The employee-specific portions are automatically pre-filled.
- She approves/rejects the vacation request, digitally signs the form and clicks Finish.
- The employee is notified by email, and [optionally] a PDF image of the form is sent to the internal document management system or to Google Apps or saved in
Now, let's go through the process of building this workflow in Confluence.
Setup roles in
View the multi-user workflows video to see details of creating these roles.
Assume that you have groups in Confluence called 'employee' and 'manager'. To create these roles in :
- Login to
- Click the Manage link at the top right of the page.
- On the page that is displayed, click the 'Manage Roles' link.
- Click the
 icon and in the form that is displayed type in the desired role. Make sure that the role names match exactly (including case).
Create the Vacation Request form
View the multi-user workflows video for more information.
Read the documentation on creating forms in Confluence.
Read the general Live Forms documentation on designing forms for a detailed discussion of forms and their features.
Here are some steps to follow to create the Vacation Request form:
- Add a Confluence Page and Add a form to it.
- Drag and drop controls on the form as desired.
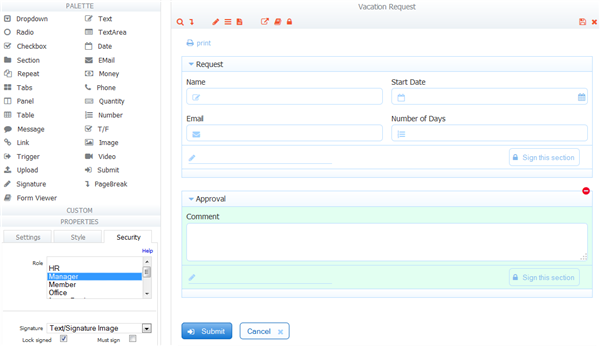
- In the Figure below, we have
- Created a section for the employee called Request.
- Enabled digital signatures for this Section by clicking on the Section header and then on the Security Tab in the properties pane to the left. In the Security Tab, the Must Sign box is checked.
- Created a section for the manager called Manager Approval.
- Enabled digital signatures for this Section.
- Assigned role 'manager' to this Section.
Create the Vacation Request workflow
View the multi-user workflows video for more information.
Read the documentation on adding flows to Confluence pages.
Read the general Live Forms documentation on designing flows for a detailed discussion of Live Forms workflows and their features.
Here are some steps to follow to create the Vacation Request workflow:
- Add a Confluence Page (say, Vacation Request Flow) and Add a flow to it.
- Drag and drop forms into the flow as desired.
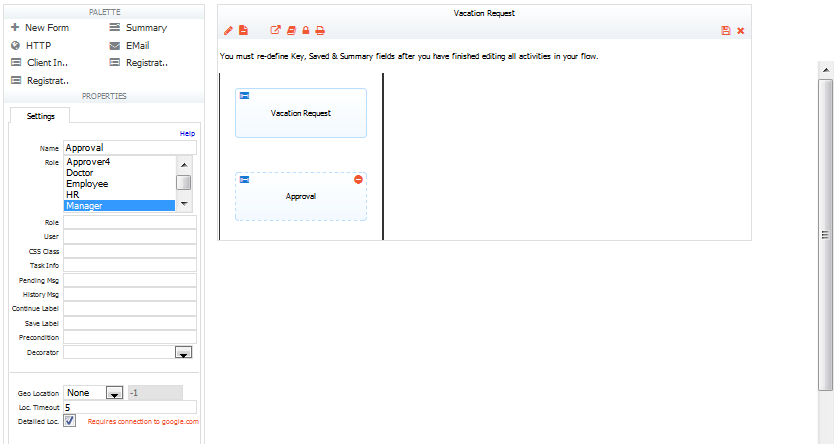
- In the Figure below, we have
- Dropped the Vacation Request form twice into the workflow.
- Left the Role blank for the first step.
- Set the Button Label for the first step to 'Send to Manager'.
- Assigned the Role 'manager' to the second step.
- Set the Task Info for the second step to 'Vacation Request for {Name}'.
- Set the Pending Msg for the second step to 'Your request has been forwarded to your manager.'
- Customized the Task Notification email for the second step to include a link to the Task list page in Confluence (see below).
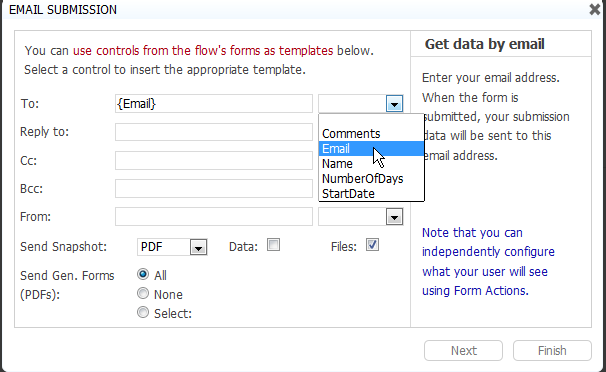
- Click on Doc Action for the flow and select "Email data to a specified address".
- In the wizard, for the To address select the Email control to generate a template. When the flow is completed,
- Select the documents that you want to attach to the email. Minimally, select PDF from the 'Send Snapshot' drop down and uncheck the 'Files' checkbox. The options are described below:
- Send the data as a PDF attachmentPrinting Forms#Submission PDFor other image type using the Send Snapshot dropdown. The image type options are PDF, PNG or JPG. Select the blank option from the dropdown to exclude this attachment in the email.
- Attach an XML data document using the Send Data checkbox. This checkbox is checked by default. Uncheck it to exclude the XML data document in the email.
- Attachments uploaded to your form/flow are included in the email if the Send Files checkbox is checked. This checkbox is checked by default. Uncheck it to exclude attachments in the email.
- Attachments uploaded to your form/flow are included if the Files checkbox is checked. This checkbox is checked by default. Uncheck it to exclude attachments in the submission.
If you have Pixel Perfect mapped PDFs (ex: W-4, I-9 etc…) associated with your forms/flows, choose the action you want to take from the Send Gen Forms control :
•Check All to send all the Pixel Perfect PDFs. This is the default value.•Check None to send none of the PDFs•Check Select to display a list of all the PDFs associated with your form/flow. Click the ones you want to be part of the submission. Hold down the Shift key then click the files in the list to select all PDFs or hold the control key and click specific PDFs.
- Click Next and you can configure the subject and content of the email as desired.
Create the Task List page
View the multi-user workflows video for more information if you are using Confluence v4.0 - v4.2. In Confluence v5.1, the Add Form, Add Flow, Add Submissions, and Add Task functions are located on the Tools Menu.
Read the documentation on adding tasks to Confluence pages.
Read the general Live Forms documentation on designing flows for a detailed discussion on using the task list
To create the Task List page,
- Add a Confluence page (say, Task List) and Add Tasks to it.
Use the workflow
View the multi-user workflows video to see an example flow being used.
To use the Vacation request workflow:
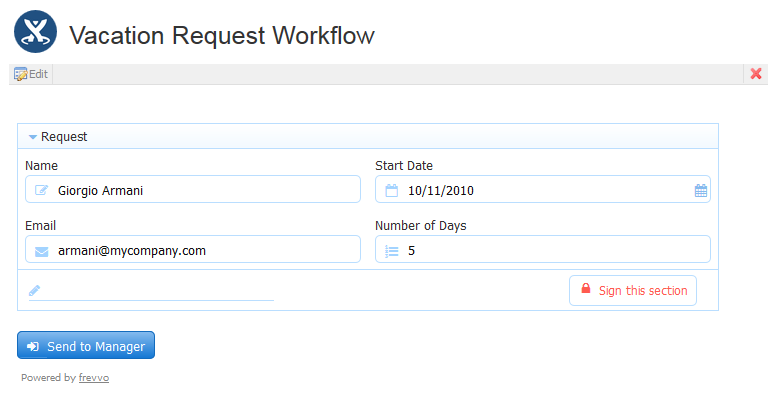
- Login to Confluence as an employee.
- Navigate to the 'Vacation Request Flow' Confluence page, to which you added the workflow.
- You cannot see the Manager Approval section since you do not belong to the 'manager' Confluence group.
- After signing the request, the 'Send to Manager' button will be enabled. Click the button to send the request to a manager. You can also send the request to a specific person rather than any user in the group manager
- Login to Confluence as a manager.
- Navigate to the 'Task List' Confluence page, to which you added the task list above.
- Click the
 icon to perform this task.
 - The form will be displayed in its original Confluence page.
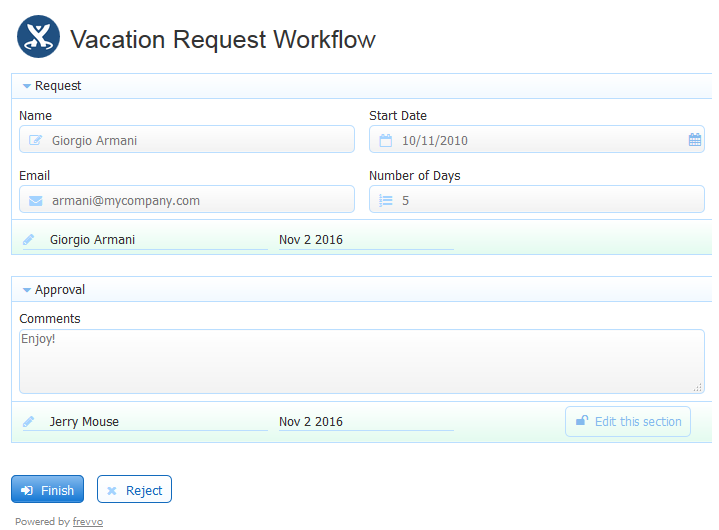
- Fill in the Manager Approval section.
- You must sign the section before the flow can be completed.
- Notice that you cannot edit the employee's request data because of the digital signature. You can override this in the flow designer and allow the manager to remove the signature and edit the section.
- Once completed, the Finish button will be enabled. Finish the flow to send an email to the employee.