Live Forms v7.4 is no longer supported. Please visit Live Forms Latest for our current Cloud Release. Earlier documentation is available too.
Using the Add-on
- Former user (Deleted)
Analytics
The Confluence add-on is available for both Confluence v5.x and v6.x. See
add-on installation for details.
You may notice:
- The submissions view has a new look to allow the user to search submissions using fields in your form/flow. Confluence users will only see this view.
- The submissions Export to Excel feature has been replaced by the Download Submissions to CSV feature which produces a csv file that can easily be opened in Excel. If you have not used the Export to Excel feature in the past, we recommend that you become familiar with the Download to CSV .
- The legacy submissions view is still available if you log directly into your
Confluence tenant. However, the Legacy Submissions view and the Export to Excel may be removed in a future release.
- The Task List also has the capability to search for tasks by specifying fields in your form/flow as search criteria.
On This Page:
Creating Forms
You can create a new form from scratch or add an existing form to any Confluence page.
Add a Form
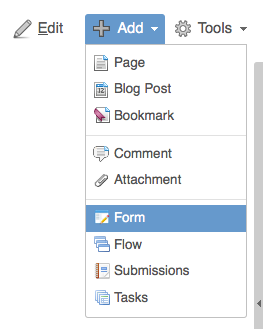
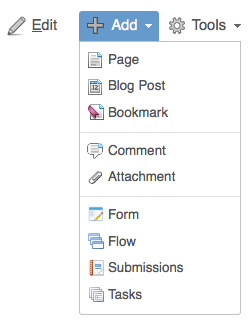
Add a form to a Confluence page by selecting the Form menu item. This menu item is available only when the Confluence add-on is correctly installed and configured and you are logged in to Confluence as a user with the appropriate permissions (you must be able to Edit the Confluence page and, if you configured a Form Designer group in the add-on configuration, you must belong to that group).
The Add Menu in Confluence 4.x is shown in the image below:
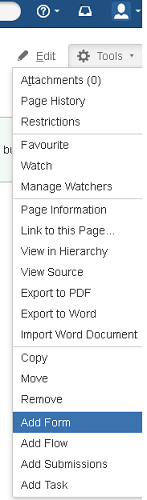
The Add Menu in Confluence v5.1 has changed. Click on the Tools Menu then select Add Form from the menu choices.
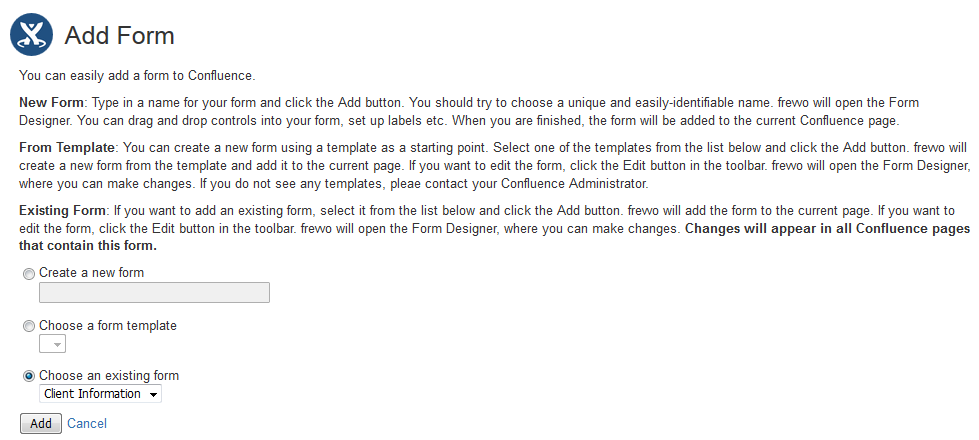
The Add Form page will be displayed. Here you can either:
- Create a new form. Enter a name and click Add. This will launch the Form Designer where you can drag and drop controls, change labels etc. When you click Finish in the Form Designer the form will be added to your Confluence page.
- Choose a form template. Templates are published by the administrative user and serve as starting points for your own forms. See Templates in the
- Choose an existing form. This will show the forms that you have previously created. Select one and click Add; the form will immediately be added to the Confluence page.
Edit a Form
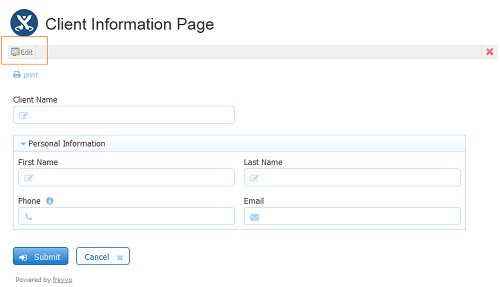
You can edit any form after adding it to a Confluence page by clicking the Edit Form link at the top of the form. This link is only visible if you have permission to edit the form in question. Clicking this link will launch the Form Designer. Make your changes and click Finish in the Designer. The updated form will now be displayed in Confluence.
It is very important to understand that if the same flow is added to multiple Confluence pages, then edits to the flow on one Confluence page will effect that flow on all Confluence pages
Delete a Form
You can delete any form from a Confluence page by clicking the Delete icon at the right end of the toolbar at the top of the form. This icon is only visible if you have permission to delete the form in question.
Designing Forms
The Live Forms Designer is the heart of ' simple, quick, no-coding required form creation. The Forms Designer enables you to add controls quickly to your form, customize their appearance and layout, and add rules that affect the behaviour of the form.
Please refer to the Getting Started Guide and the Designing Forms chapter for detailed instructions on Form Designer usage.
Using and Submitting Form
Where does the form data go when the user clicks the Submit button? Please refer to Document Action Wizards in the documentation.
What does the user see when they click the Submit button? Please refer to Form Action Wizards in the documentation.
Some wizards (Create/Update Confluence Page Wizard and the Merge to Confluence Page Wizard) are only applicable to and visible from Confluence. These are wizards to Create/Update Confluence pages and to Merge form data into a Confluence page.
Styling Forms
can be styled to blend in nicely to the look and feel you choose for your web pages. The form's base layouts/styles depend on the selections for your form. To change the layout/style, select one from the dropdowns of your form's Style Properties. By default
provides four layouts and four styles. You can customize styles for font name, background color, etc. from the
Style tab. In addition, each control on your form can be customized via its own Control Style Properties. Here you can style such things as width, background color, label size and color, bold, italic, etc.
Multiple macros on a Confluence page
You should not add multiple forms, flows, submissions or task lists to a single Confluence page. Each form, flow, submission and task macro must be on its own page. If you do, you may experience one or more issues such as:
- The forms may not automatically resize to the proper size initially. The workaround is to manually set the initial height/width of the form in the Form Designer so that it initially renders correctly. You can find instructions for doing so at Form Style Properties. You only need to manually set the initial height of the form. Subsequent resizing will be performed automatically.
- If the designer deletes one of the forms from the page all of the forms will be deleted.
- If the forms are a mix of public and private visibility you will get access denied.
- If a form and a submission are on the same page you may also experience permission denied to view the submission even when the user does have permission.
Using Roles (Confluence Groups)
Roles must be manually created in the ' server corresponding to the Confluence groups that you actually want to use in your forms or workflows. This is a one-time setup that will have to be performed by an administrator.
uses roles for a variety of reasons including digital signatures on forms and workflows. When used with Confluence, the add-on will automatically map Confluence Groups to
roles. However, in order to use these roles in the Form or Flow Designer, your administrator will have to create the roles in Confluence as a one-time setup task.
Assume that you have groups in Confluence called 'employee' and 'manager'. To create these roles in :
- Login to
- Click the Manage link at the top right of the page.
- On the page that is displayed, click the 'Manage Roles' link.
- Click the
 icon and in the form that is displayed, type in the desired role. Make sure that the role names match exactly (including case).
Access Control
Users that belong to the Form Designers group have access to the Forms and Flow Designers from a Confluence page by clicking the Edit button. The designer also has the option to specify access permissions by adding users/roles to the Access Control List for the following functions:
For Forms/Flows:
- Who can use the form
- Who can edit the form
- Who can view submissions
- Who can edit submissions
For Flows Only:
- Who can view the Audit Trail
- Who can administer the flow
Please refer to the Access Control topic for detailed information.
The Who can edit the form/flow permission can be given to Confluence users by
- Specifying the Forms Editor group on the add-on configuration screen. Users who will be sharing the editing function must be assigned to the specified group.
- OR adding the user to the Who can edit the form/flow permission screen for relevant forms/flows. The frevvo.Designer role is only required for these users if a group is specified in the Forms Designer Group field on the Confluence plugin configuration screen. Users to be given this permission must be members of this group.
Form Submissions
Viewing Form Submissions
Form submissions can be viewed directly in your Confluence page. By default, the designer who created the form/flow can view/edit submissions. If you want non-designer users to have the ability to view/edit submissions, verify the following:
- Those users are assigned the view/edit permission in the Access Control list for the form/flow.
Adding Submissions to a Confluence Page
To add Submissions to any page, select the Submissions menu item. This menu item is available only when the Confluence add-on is correctly installed and configured and you are logged in to Confluence as a user with the appropriate permissions.
The Add Menu in Confluence 4.x is shown in the image below:
The Add Menu in Confluence v5 has changed. Click on the Tools Menu then select Add Submissions from the menu choices.
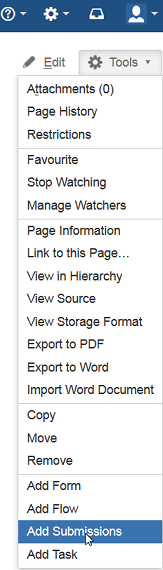
The Add Submissions page displays. Select a form or flow from the dropdown and click "Add".
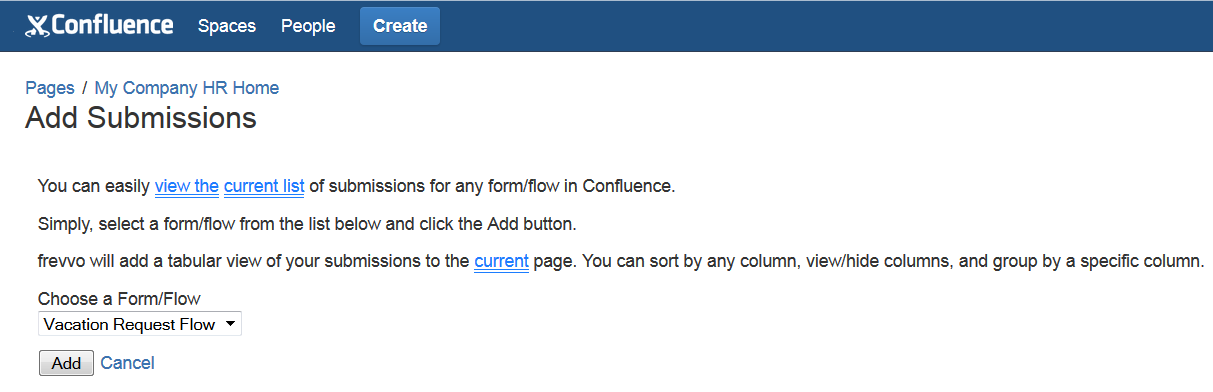
The submissions view will be added to your Confluence page. Submissions are displayed in a table view. Default columns and any fields in your form/flow that have been setup as Searchable Fields display as columns in the table. Columns can be hidden from the table view. Submissions can be searched by form fields. For example, if you are looking for a Vacation Request from employee David Russel it can be located by specifying the Name field in the form/flow and entering the text "David Russell" in the value column in the Submissions Filter section of the screen. Double click on any submission to view all of the data.
Please refer to Viewing Form Submissions in the documentation for a full description of all the features.

Downloading Form Submissions to a CSV file
However, the Legacy Submissions view and the Export to Excel may be removed in a future release.
Click the Download button above the graph to download the submissions csv file.
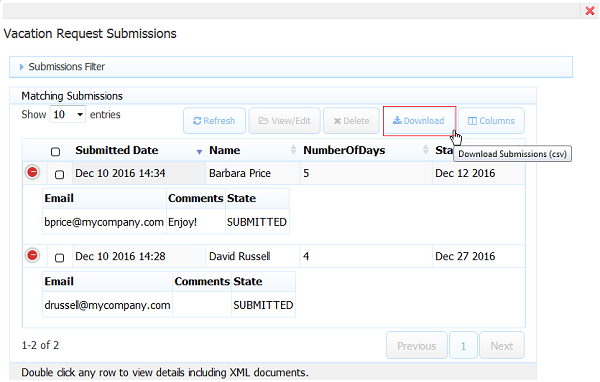
Open the csv file in Excel. .
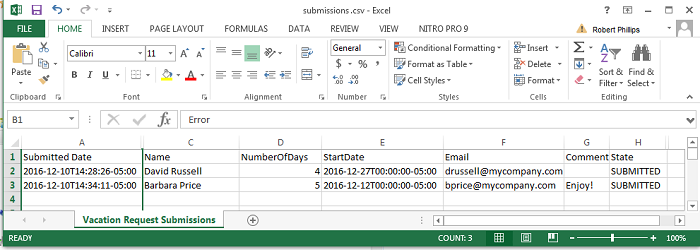
Refer to Viewing Submissions in Excel for information about the legacy Export to Excel feature and to the Download Submissions to CSV file feature topic to review the details about the csv download.
Live Forms Task List
It is very easy to add the Task List to a Confluence page. This page will display the task list of the currently logged in user.
- Create a new page Confluence by clicking the Add Page button for Confluence v4.0 - 4.2. To add a page in Confluence v5.1, click Create Child Page on the Space sidebar.
- Select Add Tasks to the page.
- Your task list is displayed on the page.
Using the Task List
Please refer to the general task list documentation for details on using the task list.
The Quick View feature can be configured in the designer but the icon will not display when the Task List is added to a Confluence page. This may be enabled in a future release.
Searching for Tasks
Tasks can be searched by fields from your forms/flows that have been set up as Searchable Fields. For example, if you are looking for a Vacation Request from employee William Reynolds, simply select the Name field from the Fields dropdown and enter the text "William Reynolds" in the value column of the Filter Form/Flow by data table.
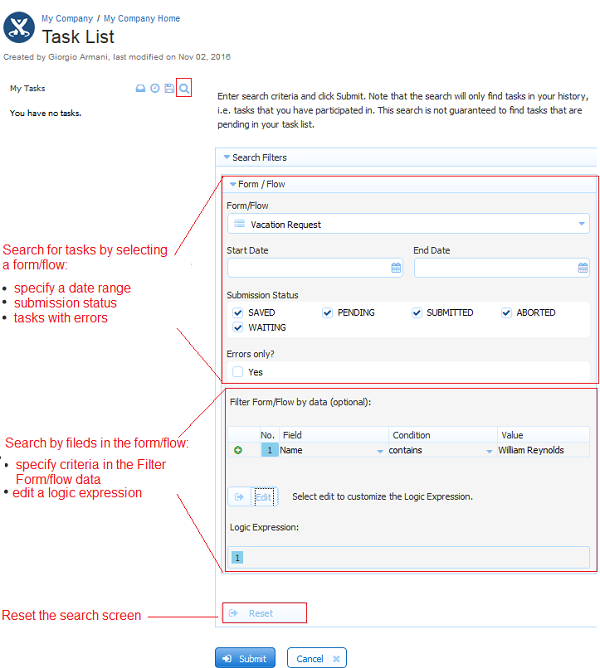
Please refer to Searching the Task List in the documentation for a full description of the feature.
Creating Workflows
Add a Flow
Adding a flow to a Confluence page is exactly like adding a form. Click the Confluence Add button and select the Flow menu item for Confluence v4.0 - 4.2. To add a flow to a page in Confluence v5.1, click on the Tools Menu and select Add Flow from the menu choices.
This menu item is available only when the Confluence add-on is correctly installed and configured and you are logged in to Confluence as a user with the appropriate permissions (you must be able to Edit the Confluence page and, if you configured a Form Designer group in the add-on configuration, you must belong to that group).
The Add Flow page will be displayed. Here you can either:
- Create a new flow. Enter a name and click Add. This will launch the Flow Designer where you can drag and drop forms, create new ones etc. When you click Finish in the Flow Designer the flow will be added to your Confluence page.
- Choose an existing flow. This will show the flows that you have previously created. Select one and click Add; the flow will immediately be added to the Confluence page.
Edit a Flow
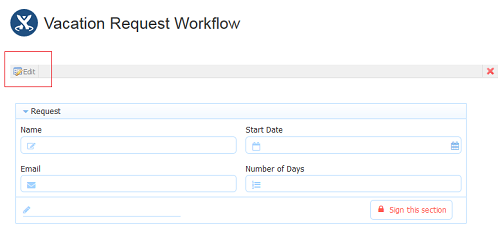
Editing a Flow
You can edit any flow after adding it to a Confluence page by clicking the Edit Flow link at the top of the flow. This link is only visible if you have permission to edit the flow in question. Clicking this link will launch the Flow Designer. Make your changes and click Finish in the Designer. The updated flow will now be displayed in Confluence.
It is very important to understand that if the same flow is added to multiple Confluence pages, then edits to the flow on one Confluence page will effect that flow on all Confluence pages
Delete a Flow
You can delete any flow from a Confluence page by clicking the Delete icon at the right end of the toolbar at the top of the flow. This icon is only visible if you have permission to delete the flow in question.
Designing Flows
The Flow Designer enables you to rapidly assemble multiple forms into workflows that can be routed between users for signatures, corrections etc.
Please refer to the Getting Started guide and the Designing Flows chapter for detailed instructions on Flow Designer usage including setting up email notifications, preconditions and roles on activities, pending messages etc.
Using and Submitting Flows
Where does the flow data go when the user clicks the Finish button? Please refer to Document Action Wizards in the documentation.
What does the user see when they click the Finish button? Please refer to Form Action Wizards in the documentation.
Some Wizards (Create/Update Confluence Page Wizard and the Merge to Confluence Page Wizard) are only applicable to and visible from Confluence. These are wizards to Create/Update Confluence pages and to Merge form data into a Confluence page.
Usage Scenarios
The menu items you see and the actions you can perform depend upon the logged in Confluence user's permissions. Some scenarios are outlined below.
Login as a Designer user
Login to Confluence as a user in the Form Designers group. If you did not select a group, login to Confluence as a user. See Configuring the add-on
Adding Forms
- Create a new page (say, Test Form) in Confluence by clicking the Add Page button for Confluence v4.0 - 4.2. To add a page in Confluence v5.1, click Create Child Page on the Space sidebar.
- Add a Form as described above.
- If you create a new form, you'll be taken to the Form Designer, where you can drag/drop controls, set properties etc. to design your form. Otherwise, the existing form will be added to your Confluence page.
Adding Flows
- Create a new page (say, Test Flow) in Confluence by clicking the Add Page button for Confluence v4.0 - 4.2. To add a page in Confluence v5.1, click Create Child Page on the Space sidebar..
- Add a Flow as described above.
- If you create a new flow, you'll be taken to the Flow Designer, where you can drag/drop forms, set properties etc. to design your flow. Otherwise, the existing flow will be added to your Confluence page.
Adding Submissions
- Create a new page (say, Test Submissions) in Confluence by clicking the Add Page button for Confluence v4.0 - 4.2. To add a page in Confluence v5.1, click Create Child Page on the Space sidebar.
- Add Submissions as described above.
- The list of submissions is visible on the page.
Adding your Task List
- Create a new page (say, Test Tasks) in Confluence by clicking the Add Page button for Confluence v4.0 - 4.2. To add a page in Confluence v5.1, click Create Child Page on the Space sidebar..
- Add Tasks as described above.
- Your task list is displayed on the page.
This page will display the task list of the currently logged in user. If you login as a different user and access this Confluence page, you will see the task list for that user.
Login as a different Designer user
Login to Confluence as a different user in the Form Designers group. If you did not select a group, login to Confluence as a different user. See Configuring the add-on.
Using a Form
- Navigate to the Test Form page.
- You can use the form and submit it but you cannot edit it.
Using a Flow
- Navigate to the Test Flow page.
- You can use the form and submit it but you cannot edit it.
Viewing Submissions
- Navigate to the Test Submissions page.
- You can only view submissions if this designer user was assigned the view permission in the Access Control list for the form/flow.
Viewing the Task List
- Navigate to the Test Tasks page.
- You will see the task list for the current user.
Creating forms/submissions/tasks
- On any Confluence page, where you have permission to Edit the page, you will see the Add Form, Add Flow, Add Submissions and Add Tasks links under the Add Menu for Confluence v4.0 - 4.2. They are located on the Tools Menu in Confluence v5.1.
Login as a non-Designer user
Login to Confluence as a user who is not in the Form Designers group. See Configuring the add-on.
Using a Form
- Navigate to the Test Form page.
- You can use the form and submit it but you cannot edit it.
Using a Flow
- Navigate to the Test Flow page.
- You can use the form and submit it but you cannot edit it.
Viewing Submissions
- Navigate to the Test Submissions page.
- You can only view submissions if this user has been assigned the view permission in the Access Control list for the form/flow.
Viewing the Task List
- Navigate to the Test Tasks page.
- You will see the task list for the current user.
Creating forms/submissions/tasks
- On any Confluence page, where you have permission to Edit the page, you may see only the Add Tasks link under the Add Menu for Confluence v4.0 - 4.2 or the Tools Menu in Confluence v5.1. Users who do not belong to the Form Designers group cannot design forms. If you see the menu items and click on the wrong ones, you will get an error message.
Anonymous User access
Logout of Confluence and do not login. This assumes that you have enabled anonymous access in Confluence. Forms and flows must have visibility set to "public" in order to be used anonymously. See the chapter on Making a Form or Flow Public. If your form/flow is not set to public the anonymous user will see the following error in the page:
Error
Access Denied. Your session may have expired or you may have disabled third party cookies. Please enable cookies and try to refresh the page.
Using a Form
- Navigate to the Test Form page.
- You can use the form and submit it but only if it was marked as a Public form. You cannot edit it.
Using a Flow
- Navigate to the Test Flow page.
- You can use the form and submit it but only if it was marked as a Public flow. You cannot edit it.
Viewing Submissions
- Navigate to the Test Submissions page.
- You cannot view submissions since you ar enot logged in.
Viewing the Task List
- Navigate to the Test Tasks page.
- You cannot view tasks since you are not logged in.
Creating forms/submissions/tasks
- On any Confluence page, you cannot Add Forms, Submissions or Tasks. If the menu items are visible, clicking on any one will result in an error message.