Live Forms v7.4 is no longer supported. Please visit Live Forms Latest for our current Cloud Release. Earlier documentation is available too.
Create and Update Pages
- Former user (Deleted)
Make sure that you have read and understood the the following sections:
- Using frevvoresolve macro.
- Using XML Documents generated by
.
View the video Create/Update Confluence Pages for more information, if you are using Confluence v4.0 - 4.2. The way of adding and parsing templates has changed in v4.3 and v5.1. Refer to this documentation for information about templates in these versions.
On This Page:

Using Live Forms for Confluence, you can create forms/workflows that store the form data in a Confluence page. The Confluence page can also be updated (edited) using the same form/workflow. Consider the page hierarchy in the Figure above. We are creating an internal Client Management application with a Confluence page for each client. In the example, above we have a page for Ford, GM and Toyota. Each page stores information about the client such as Address, Phone Number, Contact Information etc. The goal is to be able to create these pages in a structured manner using a form or workflow and edit these pages using the same form/workflow rather than allow free-form editing of the Confluence page by users.

The steps are as shown in the Figure above.
- Create a Confluence Template with frevvoresolve macros. Optionally, you can embed a macro that will generate a link to edit the page.
- [Optional] Create the parent page of the hierarchy. All pages created/updated by the form will be child pages of this parent page. If you skip this step, all pages will be created as children of the Confluence page which embeds the form or workflow.
- [Optional] Create a confirmation page to display after the form/flow has been submitted. If you skip this step, the child page that is created/updated will be displayed.
- Create a form or workflow, embed it in a Confluence page and run the Form Action > Create/Update Confluence page wizard.
Create a Confluence Template
We assume that you are familiar with Confluence templates. If not, please first read the Confluence documentation and familiarize yourself with Confluence templates.
Create a standard Confluence template and embed frevvoresolve macros in it.
The macro syntax is different if you are using the add-on for Confluence v3.x versus the
add-on for Confluence v4.x
Here is an example template using the frevvoresolve macros in Confluence v3.x for our Client Information example:
h3. This is the client information page for : {frevvoresolve}<ClientName>{frevvoresolve}
h4. [Click here | {frevvoresolve}<form.edit.link>{frevvoresolve}] to edit this information
| First Name | {frevvoresolve}<FirstName>{frevvoresolve} |
| Last Name | {frevvoresolve}<LastName>{frevvoresolve} |
| Email Address | {frevvoresolve}<Email>{frevvoresolve} |
| Telephone | {frevvoresolve}<Phone>{frevvoresolve} |
Here is the same example template using the frevvoresolve macro in Confluence v4.0 - v4.2
<h3>This is the client information page for : <ac:macro ac:name="frevvoresolve">[ClientName]</ac:macro></h3>
h4>[Click here | <ac:macro ac:name="frevvoresolve">[form.edit.link]</ac:macro>] to edit this information.</h4>

<table>
   <thead>
      <tr><th>First Name</th><th>Last Name</th><th>Email</th><th>Phone</th></tr>
   </thead>
   <tbody>
      <ac:macro ac:name="frevvoresolve">
         <tr><td>[FirstName]</td><td>[LastName]</td><td>[Email]</td><td>[Phone]</td></tr>
      </ac:macro>
   </tbody>
</table>
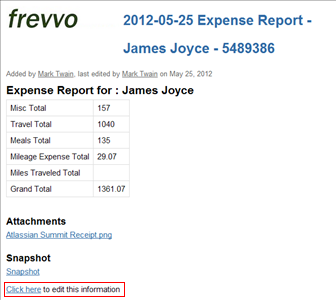
Here is a more complex example template using the frevvoresolve macro in Confluence v4.0 - v4.2 for an Expense Report example:
<h3>Expense Report for : <ac:macro ac:name="frevvoresolve">[EmployeeName]</ac:macro></h3>
<table>
 <tbody>
  <tr><td>Misc Total</td><td><ac:macro ac:name="frevvoresolve">[MiscTotal]</ac:macro></td></tr>
  <tr><td>Travel Total</td><td><ac:macro ac:name="frevvoresolve">[TravelTotal]</ac:macro></td></tr>
  <tr><td>Meals Total</td><td><ac:macro ac:name="frevvoresolve">[MealsTotal]</ac:macro></td></tr>
  <tr><td>Mileage Expense Total</td><td><ac:macro ac:name="frevvoresolve">[MileageExpenseTotal]</ac:macro></td></tr>
  <tr><td>Miles Traveled Total</td><td><ac:macro ac:name="frevvoresolve">[MilesTraveledTotal]
</ac:macro></td></tr>
<tr><td>Grand Total</td><td><ac:macro ac:name="frevvoresolve">[GrandTotal]
</ac:macro></td></tr>

 </tbody>
</table>

<h4>Attachments</h4>
<ac:macro ac:name="frevvoresolve">[form.attachments.links]</ac:macro>
<h4>Snapshot</h4>
<ac:macro ac:name="frevvoresolve">[form.snapshot.link]</ac:macro>
<p><a href="<ac:macro ac:name="frevvoresolve">[form.edit.link]</ac:macro>">Click here</a> to edit this information</p>
Template syntax for Confluence v4.3 thru 5.x
The template syntax changed once again in Confluence v4.3 and v5.x. Here is a video showing how to create a template by adding frevvo macros to the template using the Confluence macro browser. The steps to create a template differ slightly from the video if you are using Confluence v4.3. Refer to the Confluence Documentation for this information. The method to add the macros using the macro browser is the same in v4.3 and v5.x.
Here are the steps to follow to create the Client Information template shown in the video using Confluence version 5.1:
- Logon to Confluence with an Id/password of a user who is authorized to design forms in Confluence.
- Add a Confluence page. Name it Client Information Page
- Add a form to a Confluence Page.
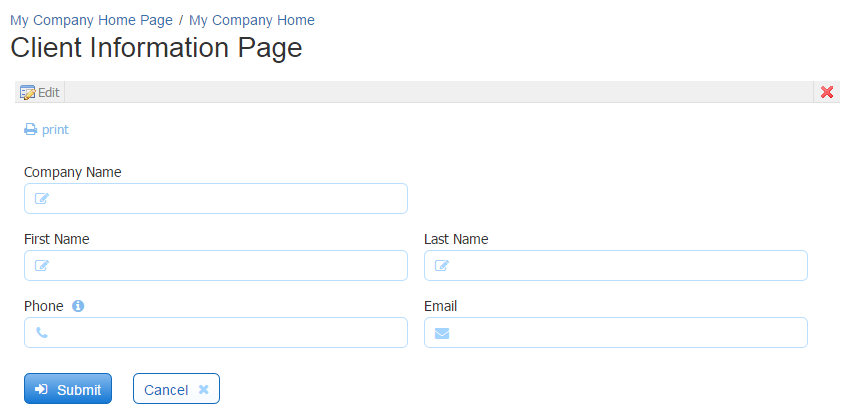
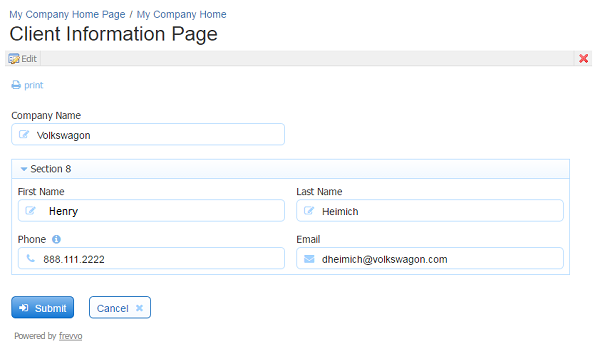
- Design the Client Information form shown below in the designer. Name the controls CompanyName, FirstName, LastName, Email and Phone.
- Navigate to the Create New Template function in Confluence. The location of this function will differ depending on the version of Confluence you are using. Consult the Confluence Documentation for your version of Confluence.
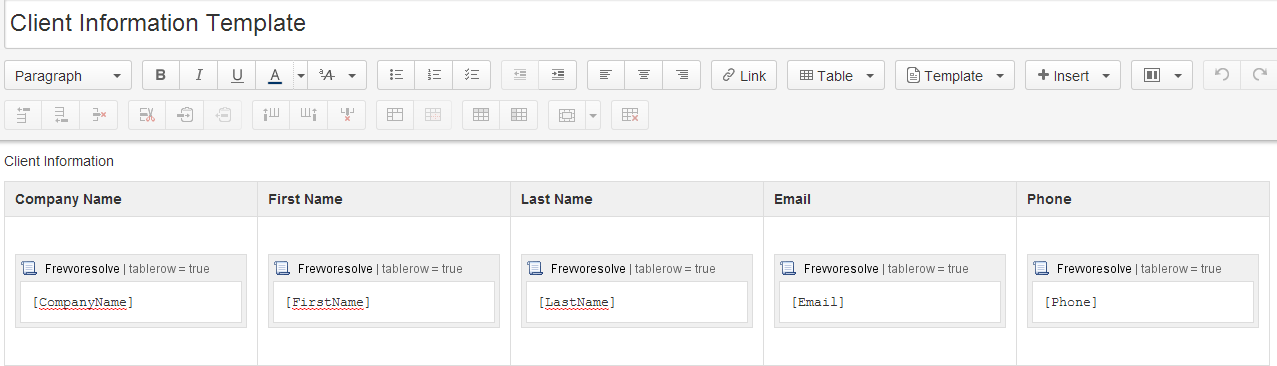
- Create a new template. Name the template Client Information Template.
- Type any descriptive information at the top of the page. The text entered will appear on the results page. In the video, the title Client Information was typed at the top of the template just below the template page name.
- Add a table to the template. Type the labels of the controls in the Client Information form in the header section of the table columns.
- Open the macro browser. Type “frevvo” in the search box. A list of the frevvo macros will display.
- Add the frevvoresolve macro to the first row of the Company Name column in the table. Change the value of the tablerow parameter from false to true if you want the information for each client to display on a new row of the table. You can find more information on this here.
- Add the name of the Company Name control in the frevvoresolve macro in the Company Name column of the table. Enclose the control name in square brackets.
- Add the frevvoresolve macro and the corresponding field names for the rest of the controls in the Client Information form.
- Save the Template.
- On the Client Information Page, click on the Edit button.
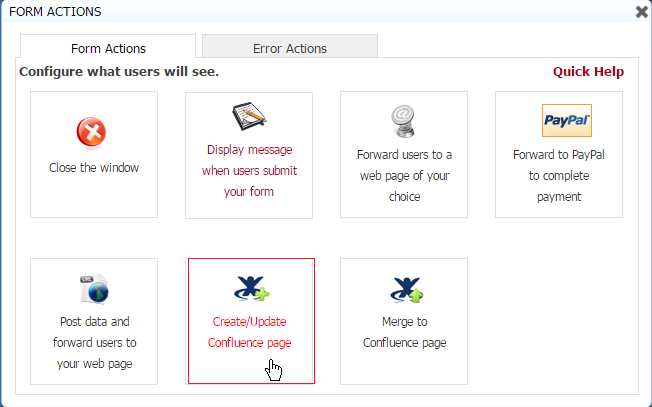
- Select Form Action then click on the Merge to a Confluence Page wizard.
- Type a name for the results page in the Results Page field and the name of the Client Information template in the Template field.
- Click Finish to exit the wizard and save your changes.
- Click Finish to save the changes to the Client Information Form and exit the designer.
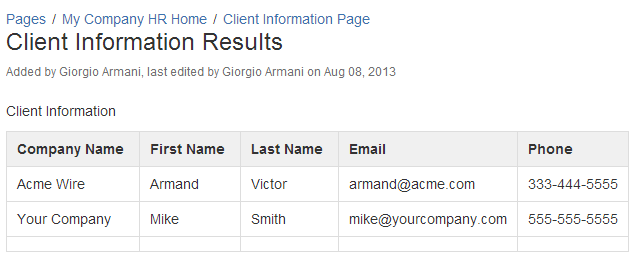
- Enter data into the Client Information form and click Submit.
- The result page displays a table with the entered client information displayed in the first row of the table.
- Access the Client Information Page again. Enter information for a different client.
- The result page displays a table with the Client information from both submissions in the first and second row of the table.
If you make changes to a template, existing result pages will not reflect the changes. This is as-designed. Merge to page only uses the template the first time. In subsequent merges, the macros from the result page are used and not the template. A new version of the template requires a new result page to reflect the updates to the template.
Create a form
Create a Confluence page and add a form or workflow to it. For details on adding a form or workflow to a Confluence page, please see the Creating Forms in Confluence or Creating Flows in Confluence documentation.
Create/Update Confluence Page Wizard
Click on Form Action and select the Create/Update Confluence page form action.
Complete the wizard that pops up as shown below. Make sure that you enter the Template name exactly including spaces. For the Result Page, we are using a template {ClientName}. This is a field in the form. For example, if the field in the form contained Toyota, the generated result page in Confluence will be named Toyota. The Parent and Display pages are optional.


The "Save" property on the Form Properties panel must be checked for Create/Update to work.
Use the form
Fill out the form and Submit it. The result page is shown below.
.png?version=1&modificationDate=1509723714000&cacheVersion=1&api=v2&width=384&height=230)
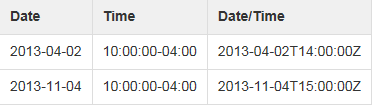
Time and Date/Time controls are displayed in UTC when used on a result page in Confluence. See the image below:
Updating the page
The Confluence pages created from your form submissions can also be updated (edited) using the same form/workflow. In order to update a Confluence page you must have the special frevvoresolve edit link in the page template. See the sample templates in the documentation above as they demonstrate the use of the form.edit.link macro body.
The edit link is resolved to a hyperlink when the Confluence page is created.
When you click on the hyperlink it will open the original form used to create this page. The data values from the page will be used to initialize the form. In other words the form will not load blank but rather will load with all the data as displayed in the Confluence page. Once the data is reloaded in your form or flow the user can edit the form fields and resubmit the form. This will update the Confluence page with the new values.
When a Confluence user clicks the edit link, the submission becomes locked. It will unlock when one of the following occur:
- The form is submitted with the new values
- The user with the edit lock logs out of the
- The user with the edit lock's session expires to the form server
If another user attempts to simultaneously edit the same Confluence, they will see an error message "Error Access Denied. Task locked by user:<username>". If you are using templates with frevvo edit links it is good practice to set the session timeout to some shorter time then the default 8 hours. See setting the default session timeout.
The following restrictions exist:
- Forms submissions from anonymous users (user not logged into Confluence) cannot currently be edited.
Updating the form
Make sure that you have read and understood the section on using XML Documents that generates.
Once your form is in use, your users have submitted the form a few times and Confluence pages have been created from those submissions, you must be careful when making edits to the form. If you make incompatible changes to the form - essentially, if you change the structure of the form in such a way that it is incompatible with the original structure - your users may not be able to Edit their existing Confluence pages using the form. That's because the Edit Confluence page functionality relies on initializing the form with the XML document generated by . Please read the above-mentioned Section on XML Documents that
generates carefully before you edit your forms.
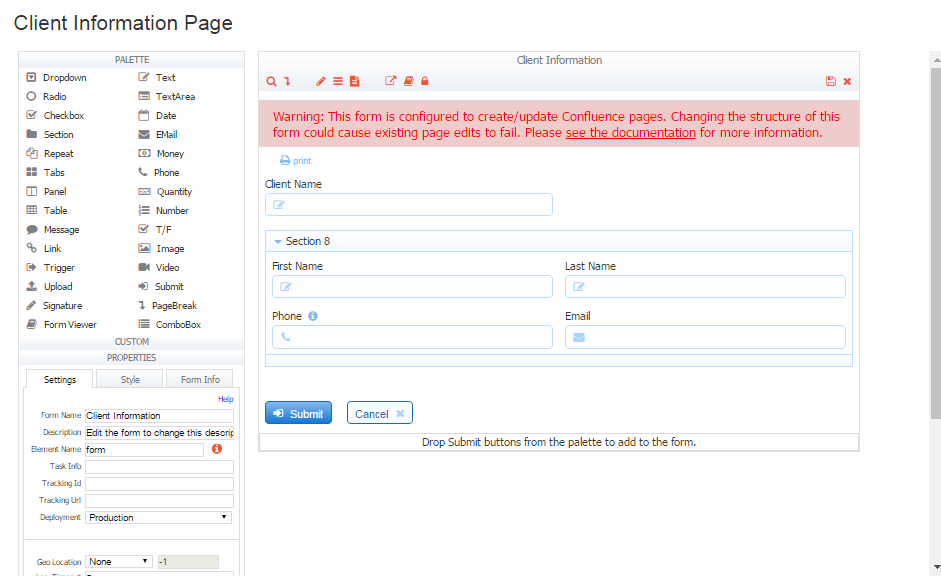
When you edit a form/flow for which form action is setup as create/update, the message shown in the image will display as a warning in the designer.
Moving Pages created by Live Forms/Confluence to a new space
Let's say you had a form in a Confluence space called Space1. When the form is submitted, result pages were created as a result of the form action for the form. The result pages were child pages of the form page and displayed information entered in the form. Also on the page was an edit link to each form so that a user could go back and edit the information if something changed. You move the form and it's child pages to Confluence Space 2. In the second space, you click the edit button on one of the result pages, edit the information and then click the finish button. The following error displays:
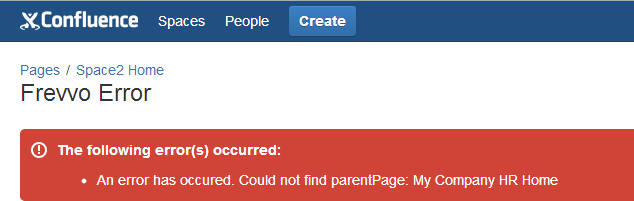
When you move a form page and the child pages associated with it to a new space, will search for the Parent page in the new space. In this case, the parent page did not get moved to the new space.
will not find it in the space where the form is now (new) and an error is displayed. One of the following approaches should prevent the error from happening:
1. Move the form and it's parent page (this will automatically move all the child pages) to the new space. will find the Parent page in the new space and create/update will work correctly.
2. Create the parent page manually in the new space with the same name as the old space before moving the child pages. Move the child pages under this parent page.