This documentation is for Live Forms 9.1. v9.1 is a Cloud Only release. Not for you? Earlier documentation is available too.
COVID-19 Response Info: At frevvo, our top priorities have always been employees and customers. We have taken several steps to promote the well-being of our people, to minimize services disruptions, and to help where we can. Visit our website for updates.
Projects
- Former user (Deleted)
- Megan Ellis
Looking for a section on this page? Hover your cursor over the Table of Contents icon ![]() to the right to quickly navigate this page.
to the right to quickly navigate this page.
A project enables you to conveniently group forms, workflows, schemas and documents together and work with them as a coherent unit. Projects are portable. You can download projects and then upload them to other users or other
servers.
We recommend that tenant admin users not create or edit projects. These users should restrict themselves to administrative tasks
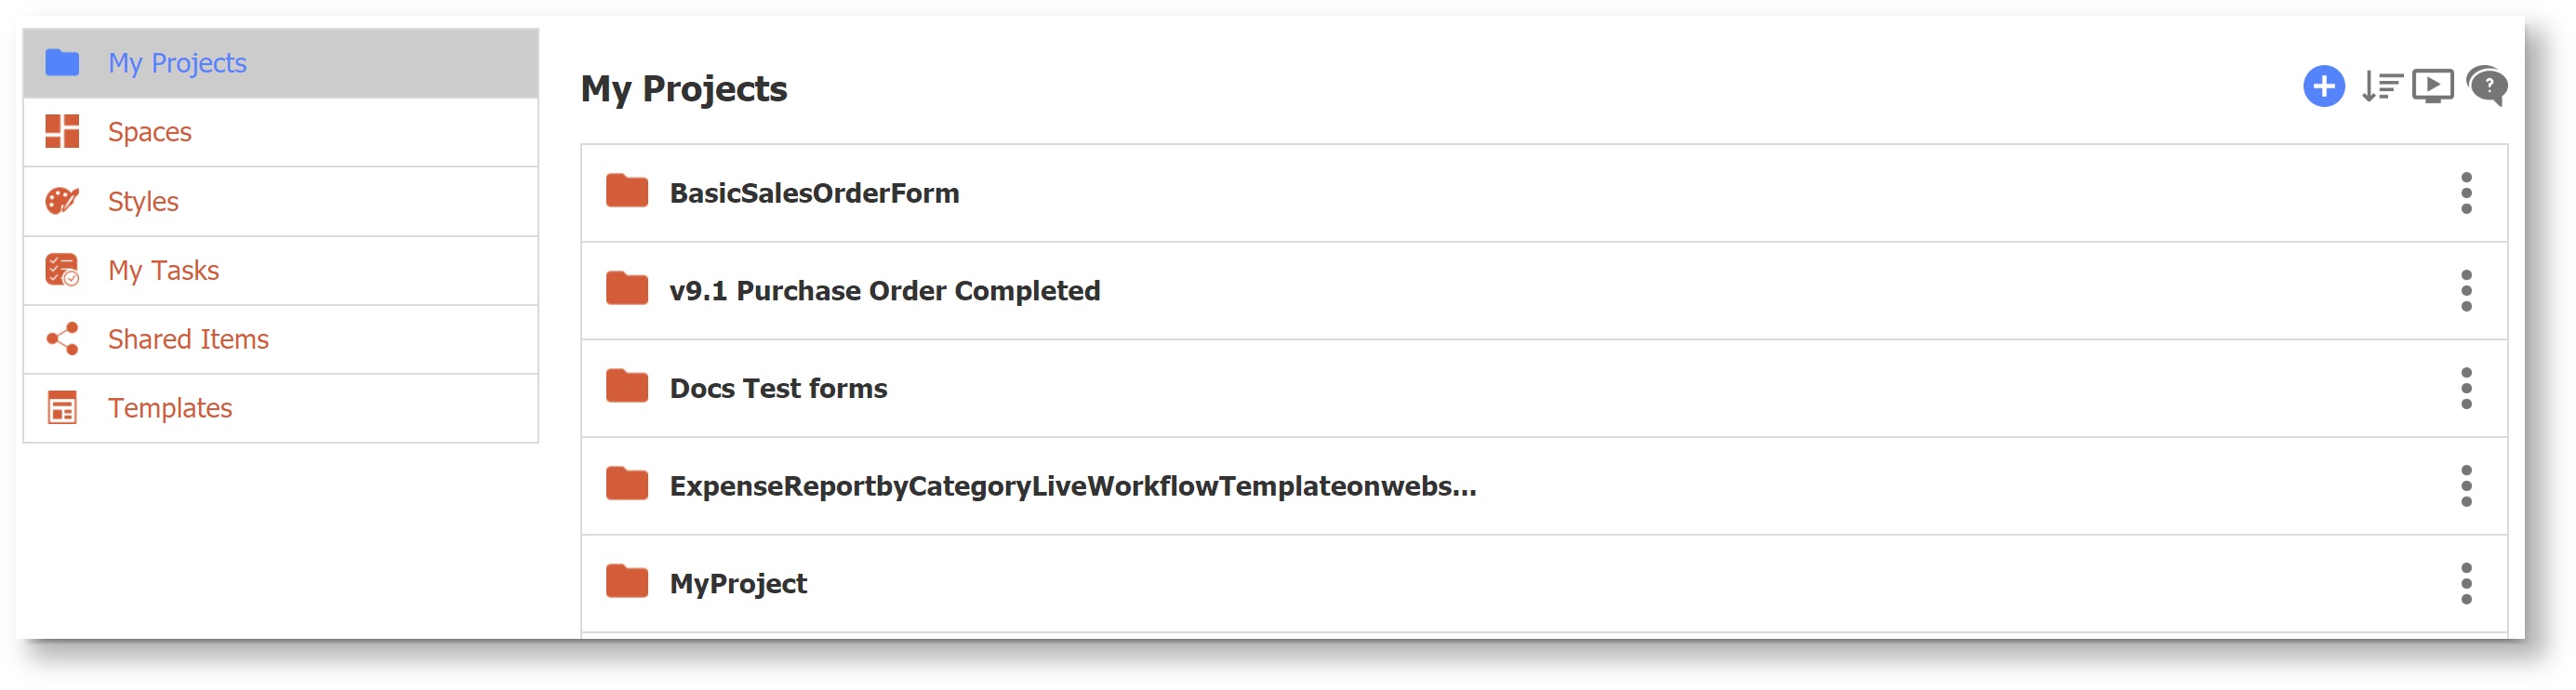
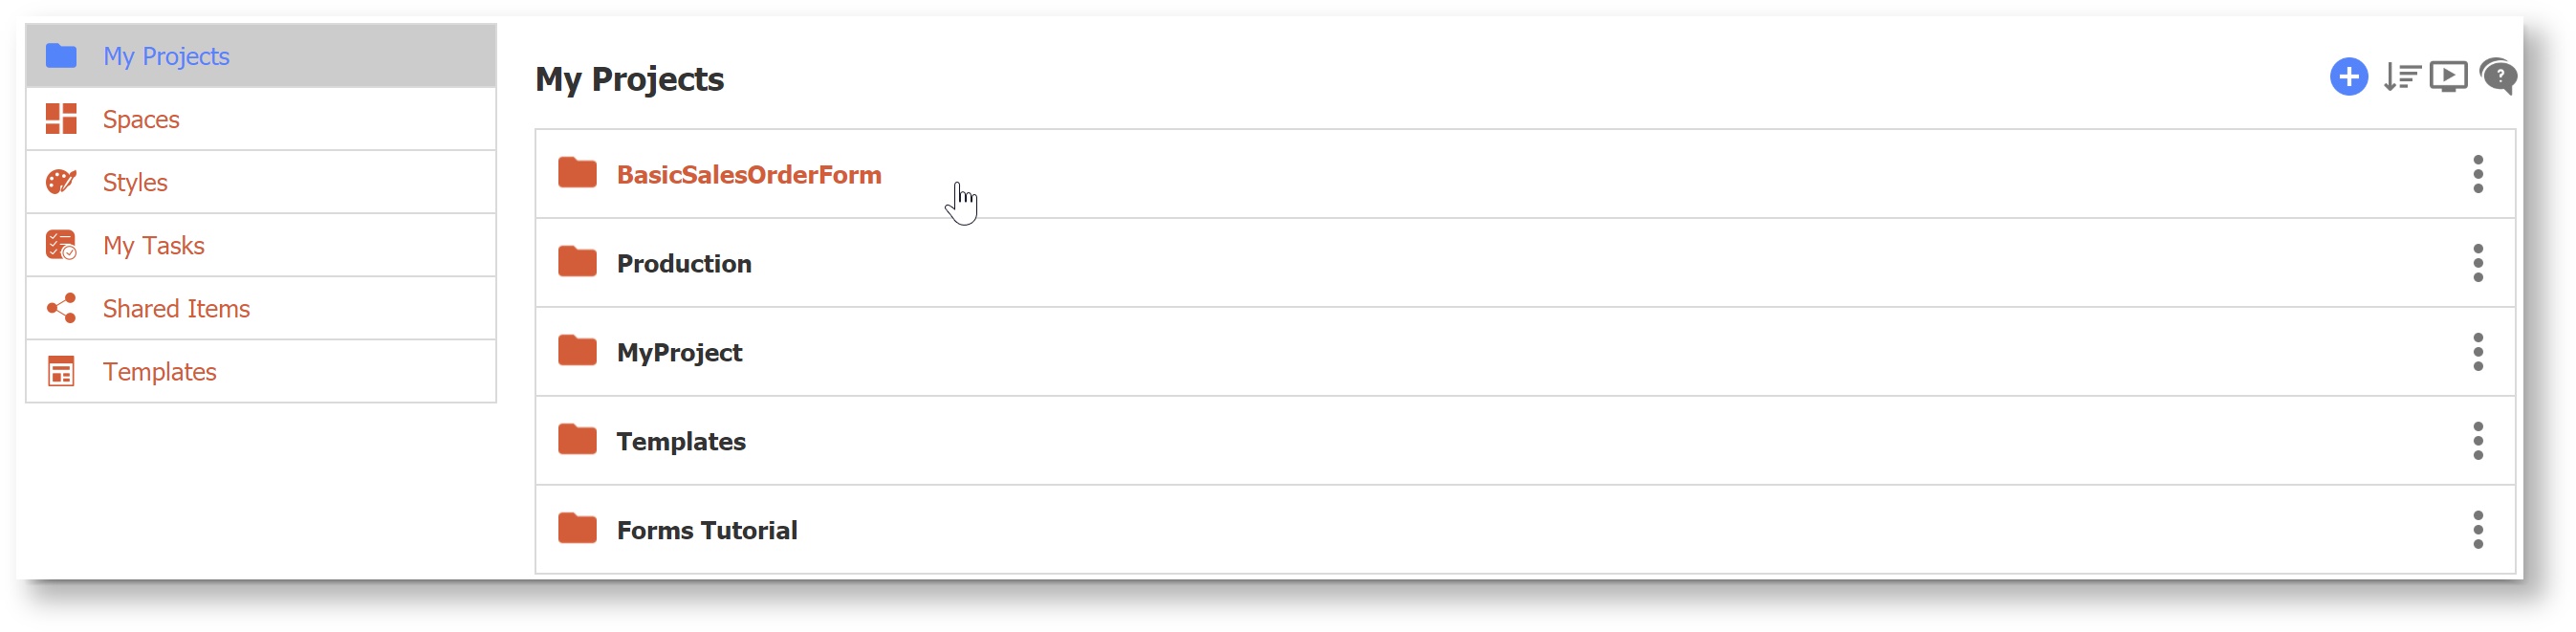
The My Projects page lists the projects that you have created in order of date created, with the newest on top. You can ![]() Sort the list by Created Date or Name. On this page, you can:
Sort the list by Created Date or Name. On this page, you can:
- Click the Add icon
 to add content.
 - Click the Guided Tour icon
 to launch the Guided Tour.
 - Click the Page Help icon
 for information about the features on the Projects Homepage.
 - Click the Action Menu
 icon to view and edit the project.
- Projects were known as Applications in versions prior to v9.1. Please refer to the v9.1 Migration Considerations for more details.
- The Template Projects, Guided Tour and Page Help features are currently not available in the in-house version of
. They may be included in a future release.
Add Content
Click ![]() to add content.
to add content.
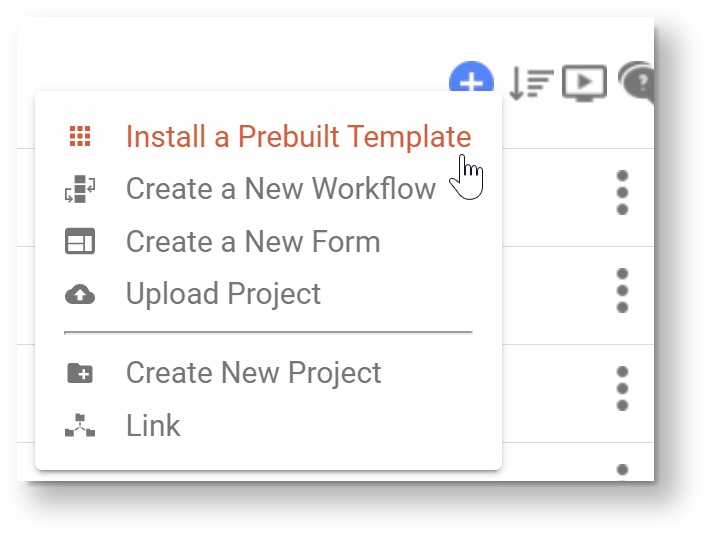
Install a Template
Click ![]() and select Install a Prebuilt Template to select a published template and install it into your
and select Install a Prebuilt Template to select a published template and install it into your Cloud tenant with a single click. Workflow Templates automatically launch a Guided Tour after installation. The Guided Tour will show you how to run the workflow and explain the Workflow Designer screen so that you can make small modifications.
Create a New Workflow or a New Form
Selecting Create a New Workflow or Create a New Form will prompt you to either create a new project or add the new content to an existing project.
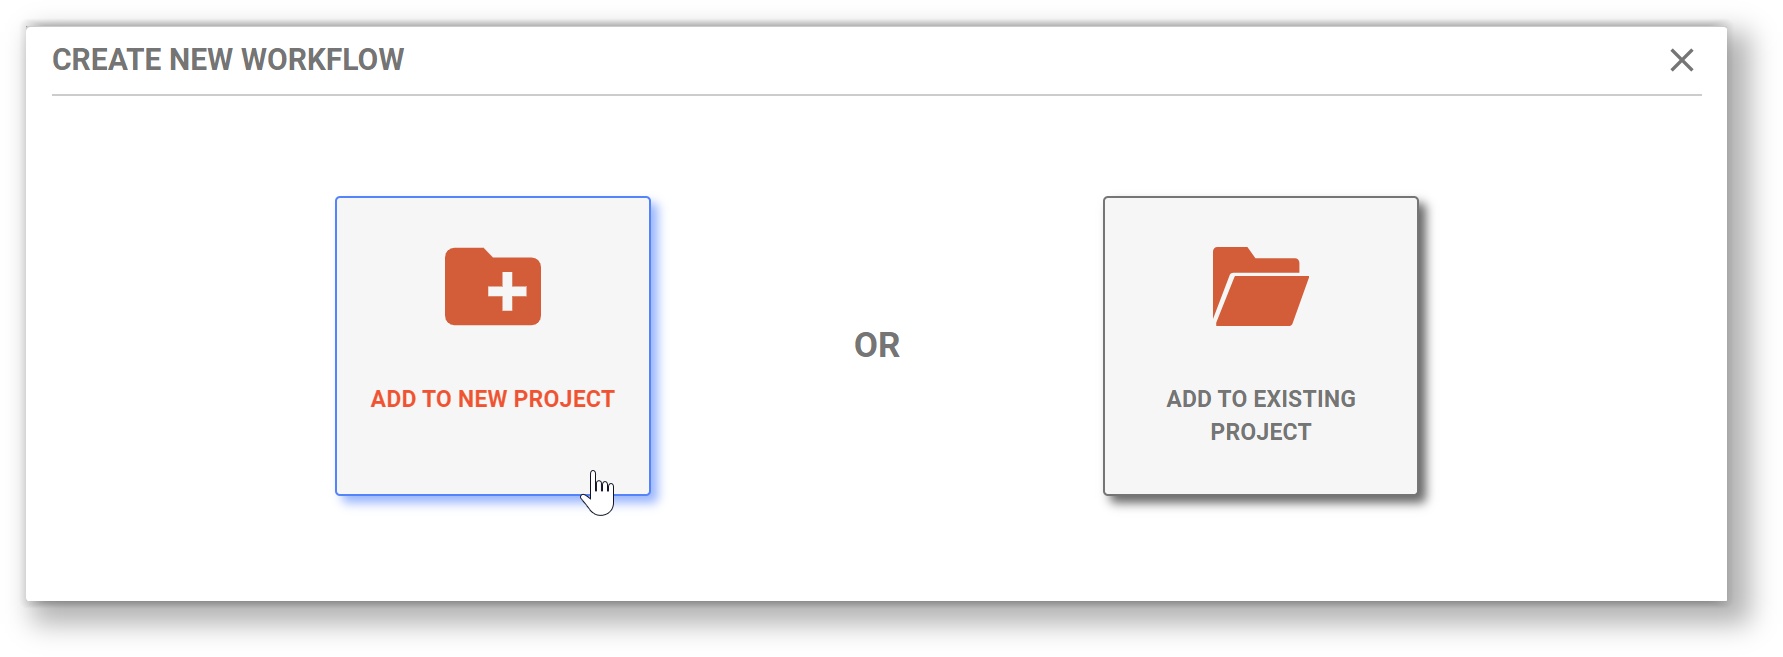
Select Add to New Project to create a project. will prompt you to name the new project. Click Finish to create the project and the new form/workflow. You will be automatically sent to the Form/Workflow Designer where you can rename the Form/Workflow and begin customizing it.
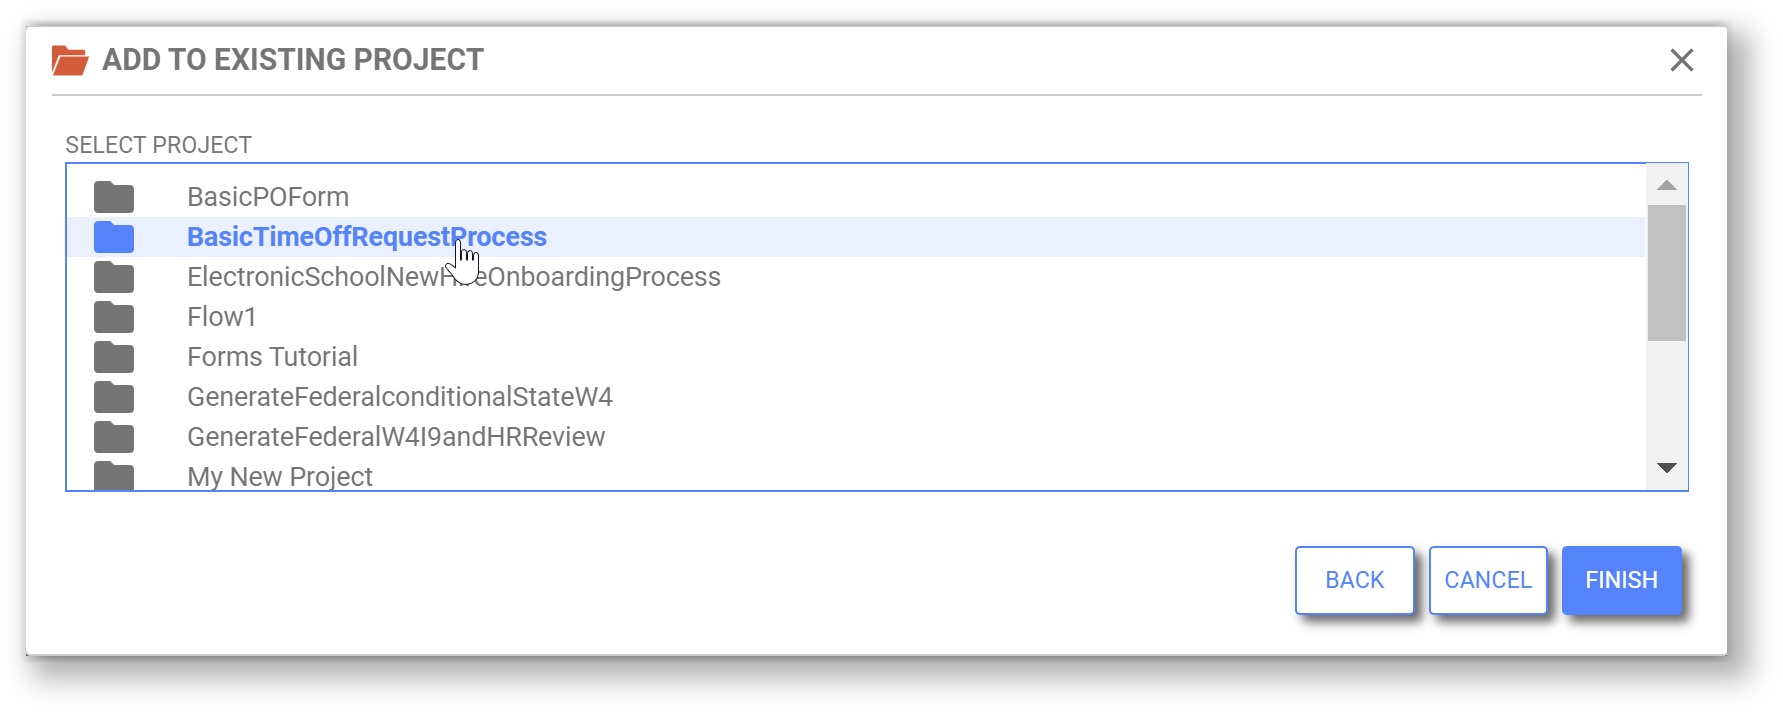
Select Add to Existing Project to select from a list of your existing projects. After you select the project, click Finish to go to directly to the Form/Workflow Designer where you can rename the Form/Workflow and begin customizing it.
Upload a Project
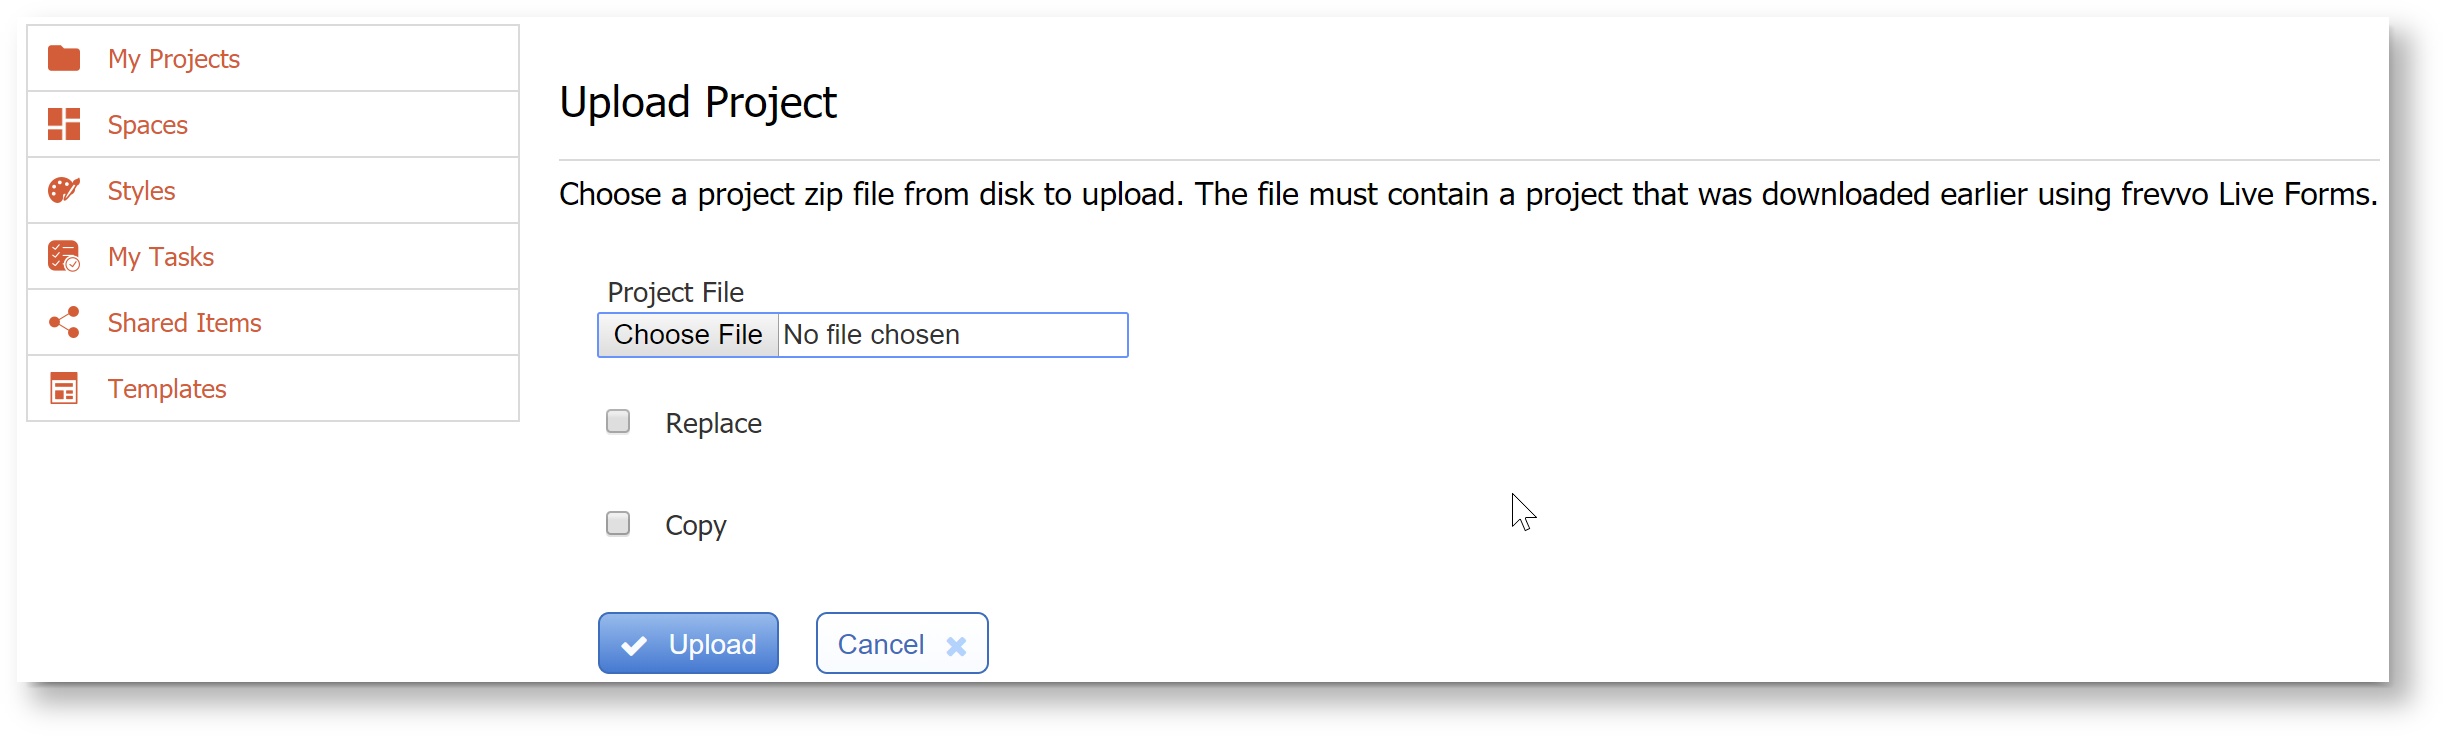
Click the![]() icon and select Upload Project at the top of the My Projects page. Choose a valid zip file that was downloaded earlier using the project download feature or the application download feature in versions prior to v9.1. The file must have the suffix _project.zip or _app.zip. The uploaded project immediately appears in your list of projects. If you are trying to replace an existing project with an updated version, click the Replace checkbox then click Upload. The updated project appears alphabetically in the project list replacing the previous version.
icon and select Upload Project at the top of the My Projects page. Choose a valid zip file that was downloaded earlier using the project download feature or the application download feature in versions prior to v9.1. The file must have the suffix _project.zip or _app.zip. The uploaded project immediately appears in your list of projects. If you are trying to replace an existing project with an updated version, click the Replace checkbox then click Upload. The updated project appears alphabetically in the project list replacing the previous version.
- For an uploaded project that is NOT a replace nor a copy, the contained forms/workflows are set to DEVELOPMENT and not deployed.
- For an uploaded project that is a COPY, the deploy state of the contained forms/workflows are set to DEVELOPMENT.
- For an uploaded project that is a REPLACE, the deploy state of the contained forms/workflows is transferred forward from the corresponding form/workflow in the project being replaced.
Any form/workflow in the replacement project not found in the replaced project is set to DEVELOPMENT. Any form/workflow in the original project not found in the new replacement project will not be included in the replacement application. The production form/workflow count is updated accordingly.
Projects can also be copied by checking the Copy checkbox. The copied project appears in the list with the same name as the original but with a different id, allowing projects to be uploaded multiple times. The newly copied project will be independent from the original; any changes you make to the copy do not affect the original and vice versa.
The newly copied project will appear the top in the list of projects. When a project is uploaded as a copy, all of the forms, images, locales, and schemas which were downloaded in the project zipfile (_project.zip or _app.zip) will be present in the copy.
If the designer uploads a project with same ID as an existing project, they will see following error:

Create a New Project
Create a new project by clicking on the ![]() icon and selecting Create New Project. Your new project is given a randomly generated name which you can change in the Create New Project pop-up window. Click Finish to go to directly to the Forms and Workflows homepage in the newly created project.
icon and selecting Create New Project. Your new project is given a randomly generated name which you can change in the Create New Project pop-up window. Click Finish to go to directly to the Forms and Workflows homepage in the newly created project.
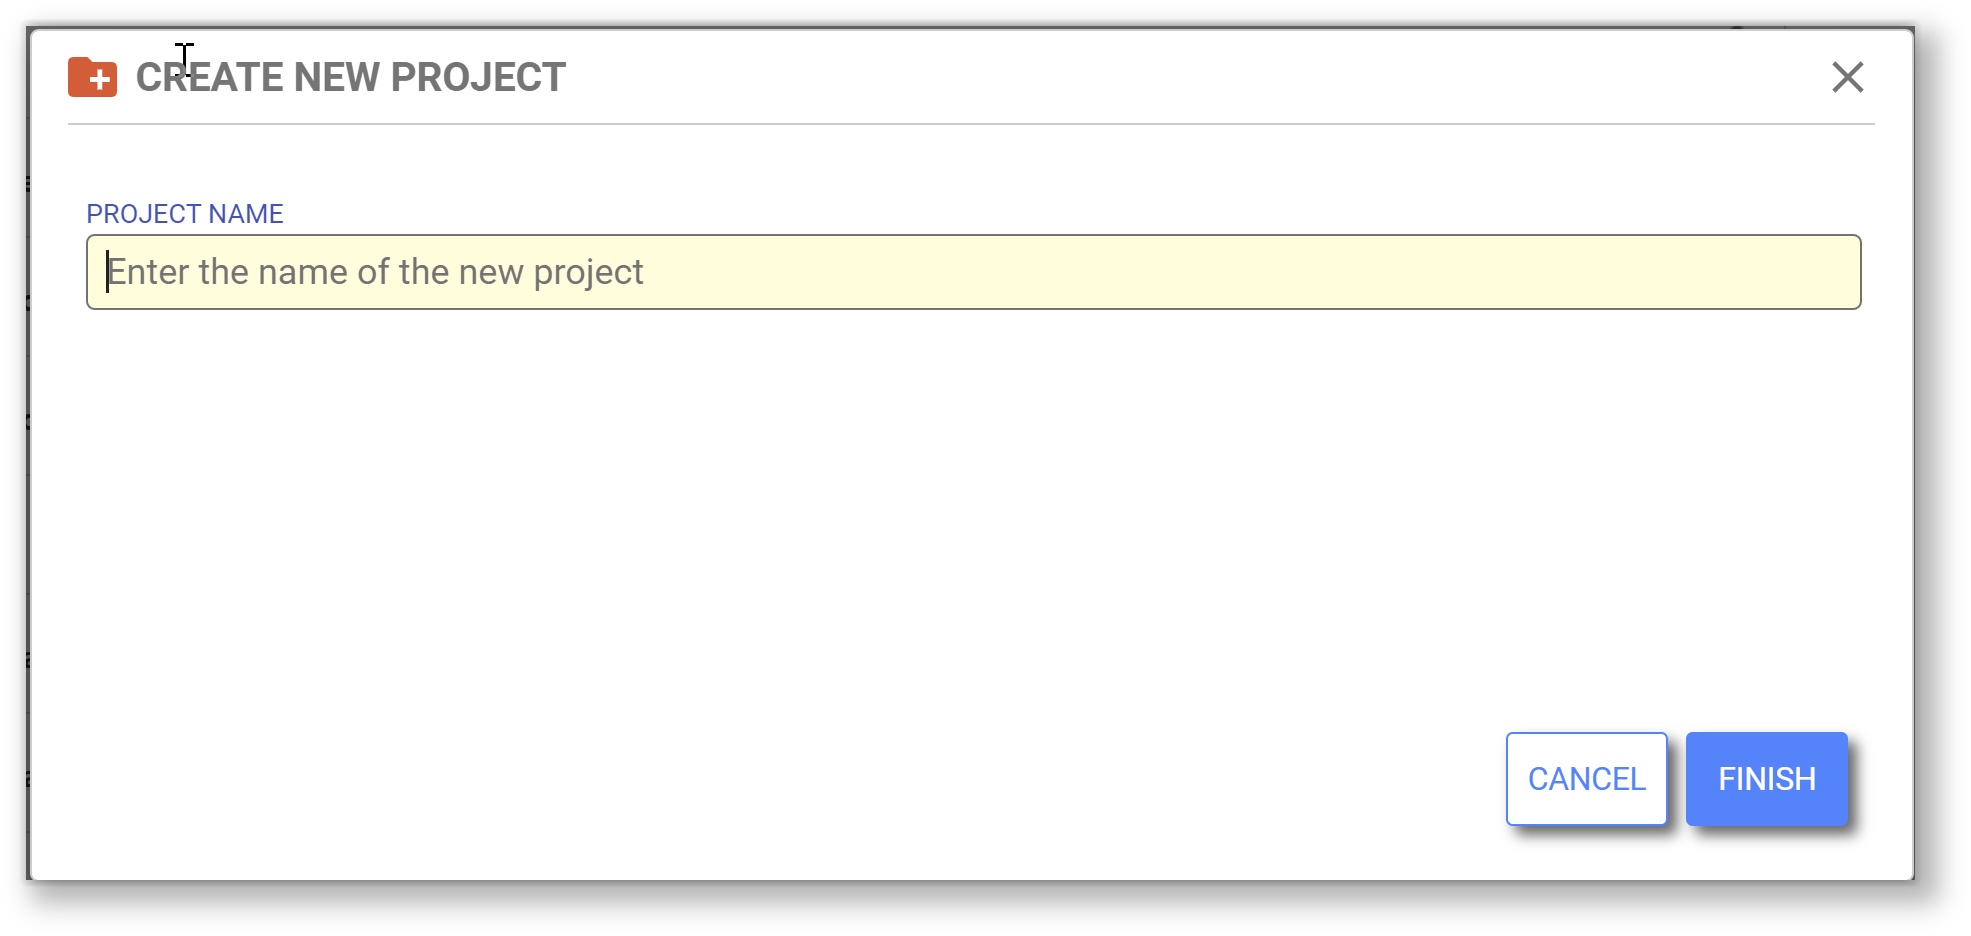
Do not use <> brackets in Project names. Project names that are typed with surrounding <> brackets will be provided a default name instead.
Link to a Project
You can share a project with other users via the Share and Link operations. For example, the manager in a company training department wants to make training forms available to the other trainers to use but not modify. The training manager provides the link to the project. See Sharing a Project below. The other trainers 1) click on the![]() icon, 2) select Link Project, 3) enter the share URL of the manager's project and 4) click Finish. The other trainers will be able to use forms and workflows from the linked project, but cannot modify them or create new ones. If the training manager adds, deletes or makes any updates to the forms/workflows in the original project, the changes will be reflected in the linked project used by the other trainers.
icon, 2) select Link Project, 3) enter the share URL of the manager's project and 4) click Finish. The other trainers will be able to use forms and workflows from the linked project, but cannot modify them or create new ones. If the training manager adds, deletes or makes any updates to the forms/workflows in the original project, the changes will be reflected in the linked project used by the other trainers.
If the project to which you have linked is deleted you will see the error "The project links to a nonexistent project. The original project may have been deleted. You should delete the linked project." If the project to which you have linked is renamed users will not see this name change in the linked project.
Project Actions
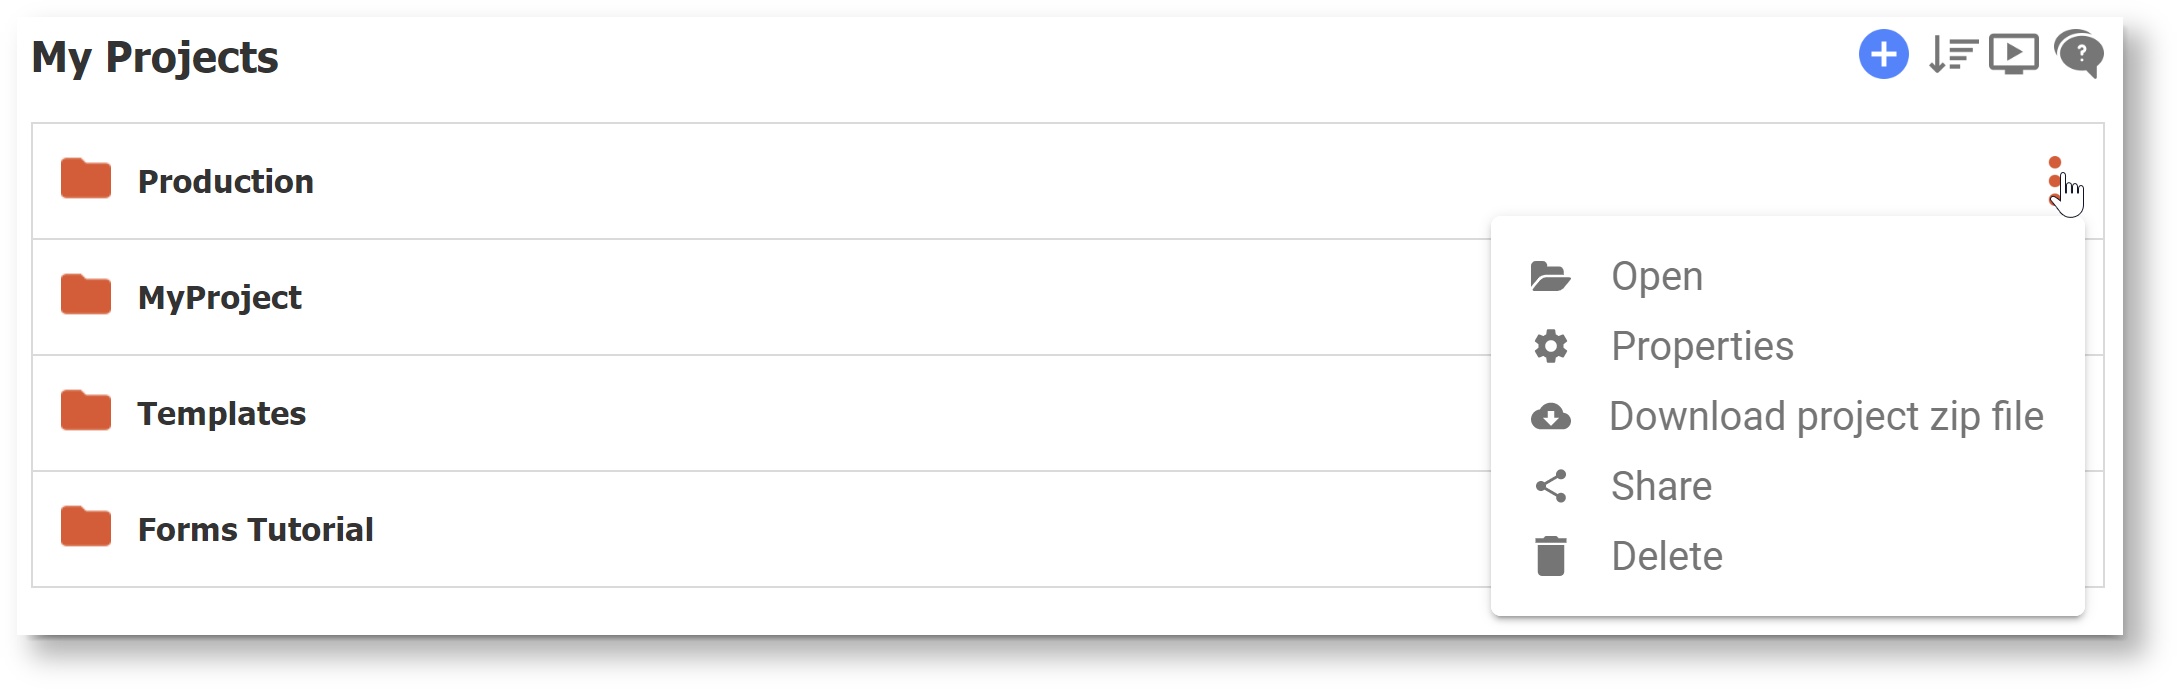
The Action Menu (three dots) icon allows you to Open, edit Properties, Download, Share or Delete a project.
Editing a Project
Click the project name, or select the Action Menu (three dots) icon next to the project name and select Open to edit it. You will be taken to the Forms and Workflows page for that project.
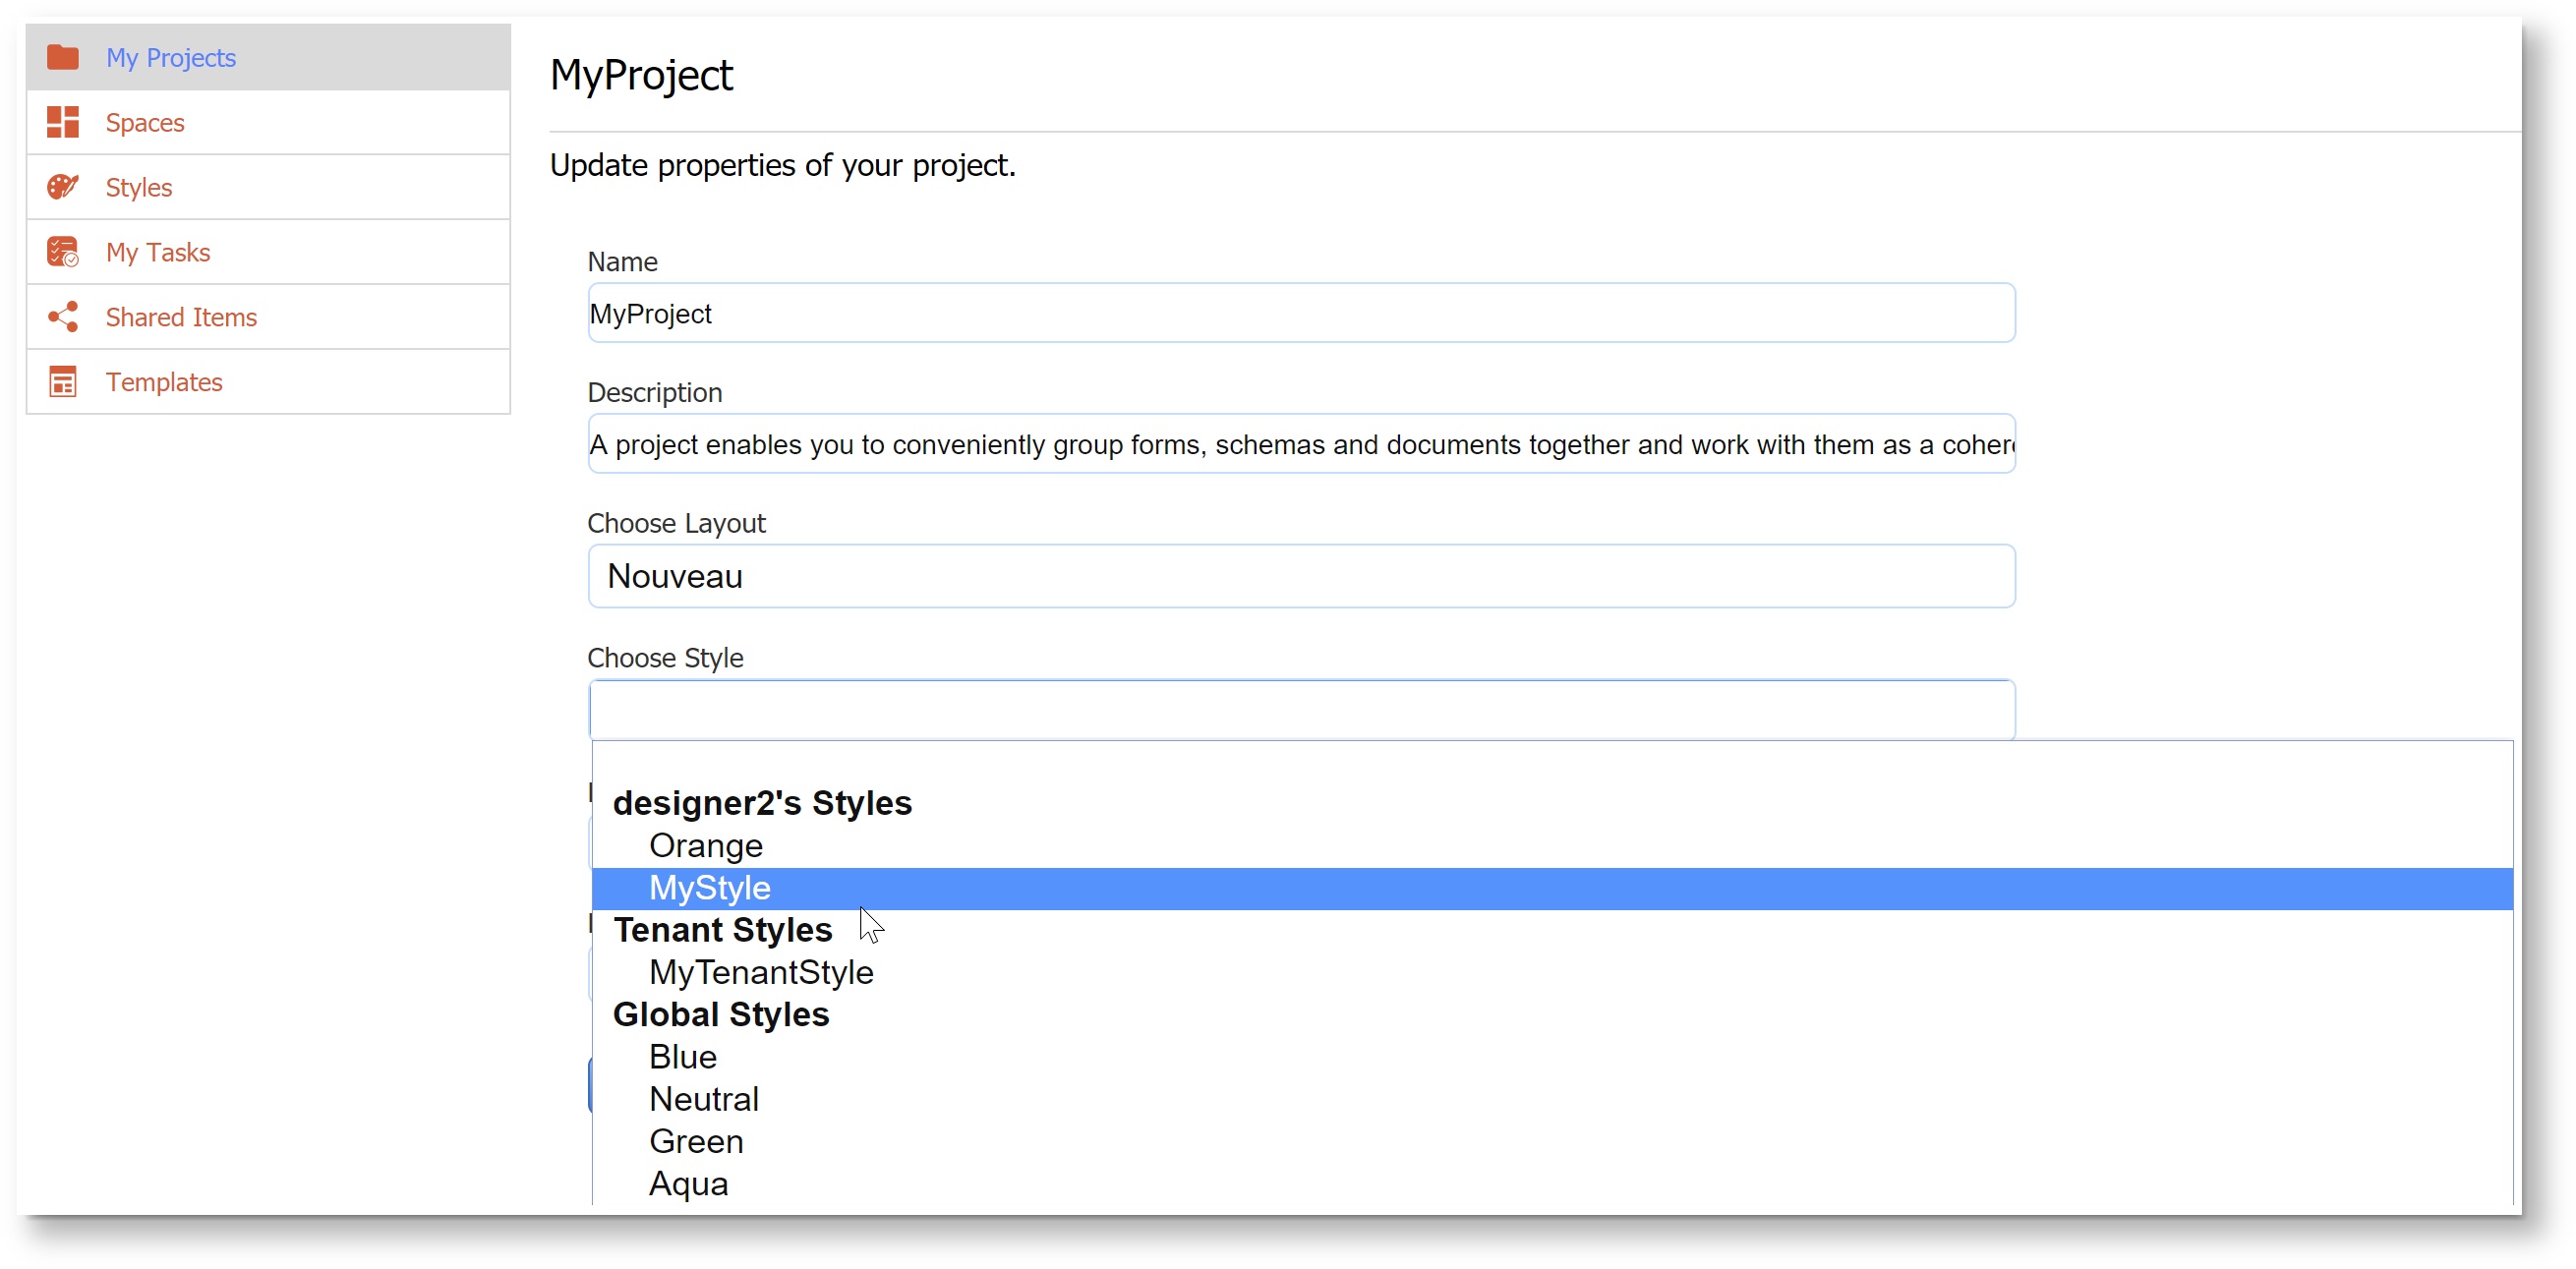
Project Properties
Click the Action Menu (three dots) icon next to the project name and select Properties. On this page, you can update the name and description for your project, choose one of the layouts provided by , and specify a base URL for your Form Action and Doc Action properties.
Styles can be selected from a dropdown that will show all the styles in the tenant as choices including four global styles (Blue, Neutral, Green and Aqua). New and existing projects will always have a color scheme (default is Blue). See Layouts and Styles for more information.
Base URLs: will prepend the base URL to any URLs specified in the form designer Form Action and Doc Action wizards which are not absolute. For example if your project base URL is http://www.myhost.com and your form's doc action is /service then
will prepend the base URL to create http://www.myhost.com/service. If your form's doc action is fully specified however such as http://www.myForms.com/service then this overrides the project's base URL.
Downloading a Project
Click the Action Menu (three dots) icon next to an project's name and select Download to download it. This will download a zip file to your local disk. The file will contain the forms, images, locales and schemas included in the project . Save the file and you can upload it back to a server at a later time.
Access control configuration information for forms/workflows inside your project are retained in the when you download/upload the project.
Sharing a Project
Click the Action Menu (three dots) icon and select Share to share a project with another user. When you click the icon, a wizard appears that contains this project's URL.
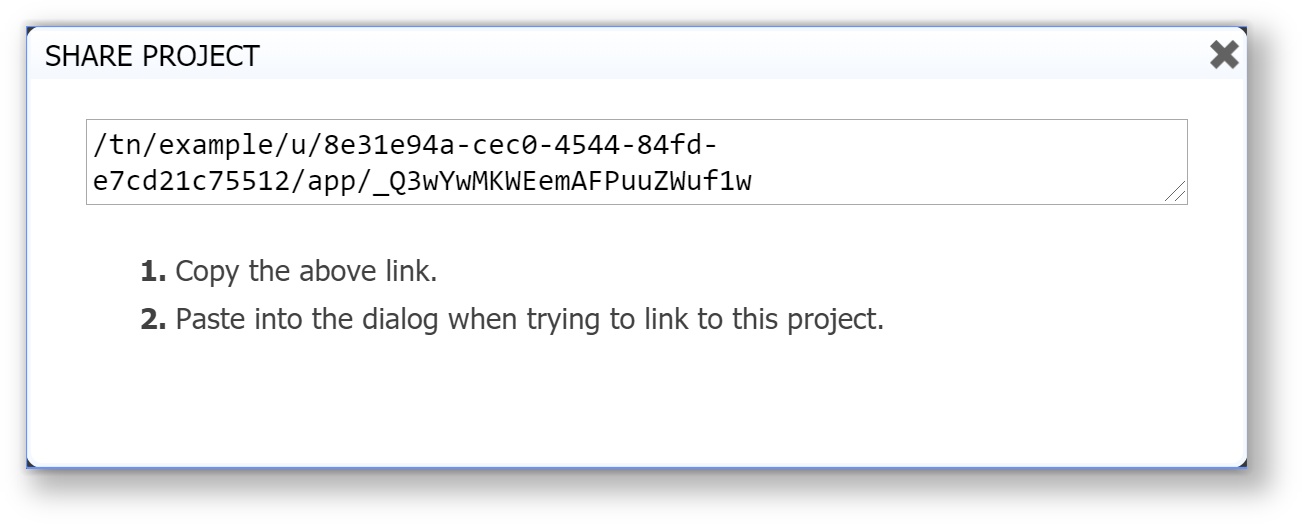
Copy the URL and then paste it into the Link wizard for the user you want to share the project with. This will create a new project linked to the original one.
When replacing a project, submissions from older project versions are saved.
Deleting a Project
Click the Action Menu (three dots) icon next to an project's name and select Delete to delete it. Confirm your choice in the dialog that pops up and the project will be immediately removed. This is an irreversible process so make sure you do not need the project before you delete it. You can always download the project and save it before you delete it.
Remember, deleting an project also deletes all form/workflow submissions.