This documentation is for Live Forms 9.1. v9.1 is a Cloud Only release. Not for you? Earlier documentation is available too.
COVID-19 Response Info: At frevvo, our top priorities have always been employees and customers. We have taken several steps to promote the well-being of our people, to minimize services disruptions, and to help where we can. Visit our website for updates.
Data Sources
- Former user (Deleted)
- Megan Ellis
allows you to generate forms automatically based on one or more pre-existing XML schemas. This enables you to quickly create forms that align with your databases, web services, BPM system, and key business applications.
For practical examples of this approach please refer to Creating a Form Connected to your Database.
In general, can be created via two different methods:
- By dragging Palette Controls onto the form canvas
- By adding controls from a data source
It's very common and easy to create your form by dragging and dropping controls from ' control palette to the form canvas. As you do this
automatically creates an XSD description of your form's controls. You can download this XSD from the Forms and Workflows Home Page. This method is typically used when your forms do not need to integrate with a back end system.
You can mix and match these two approaches of form creation. You can create all the controls in your form from XML schema elements. You can create all the controls in your form from the palette. Or you can create part of the form from schema elements and part from palette controls that have no relation to the elements in your schema.
On this page:
Basic Concepts
When users submit a form that was created wholly or in part from schemas, you will see in the Submissions repository one XML instance document for each global schema element. You also will see one XML document for the form itself, which references any controls you dragged in from the palette. All XML documents are automatically validated against their schemas.
When you upload a schema to , you can use any and all global elements in the schema. If you want items from the schema that are not global elements, edit the schema and make the items global elements before uploading the schema to
.
At a high level, when you work with schemas you do the following:
- Upload your schema to one of your
projects
- Choose the global elements you want and add them to your form’s Data Sources
- Generate form controls from the global elements you added
- Modify the controls (if necessary) to suit your form
These steps are discussed in detail below.
"form" Schema
automatically generates an XSD schema representation of your form as you drop controls from the
palette to the form designer canvas. You can download this XSD by selecting
![]() Download Schema from the
Download Schema from the ![]() Action Menu on the Forms and Workflow Homepage. The XSD elements are named after the control names. The types are based on which control you selected from the palette. For example a Quantity control will appear as an xsd:integer. A dropdown will be an xsd:simpleType restriction. Controls with patterns such as the Zip will have an auto-generated type with your pattern. Click "expand Source" for an example.
Action Menu on the Forms and Workflow Homepage. The XSD elements are named after the control names. The types are based on which control you selected from the palette. For example a Quantity control will appear as an xsd:integer. A dropdown will be an xsd:simpleType restriction. Controls with patterns such as the Zip will have an auto-generated type with your pattern. Click "expand Source" for an example.
Using Your Schema
Before you can use global elements from a schema in a form, you must upload the schema XSD file into one of your projects. To upload a schema:
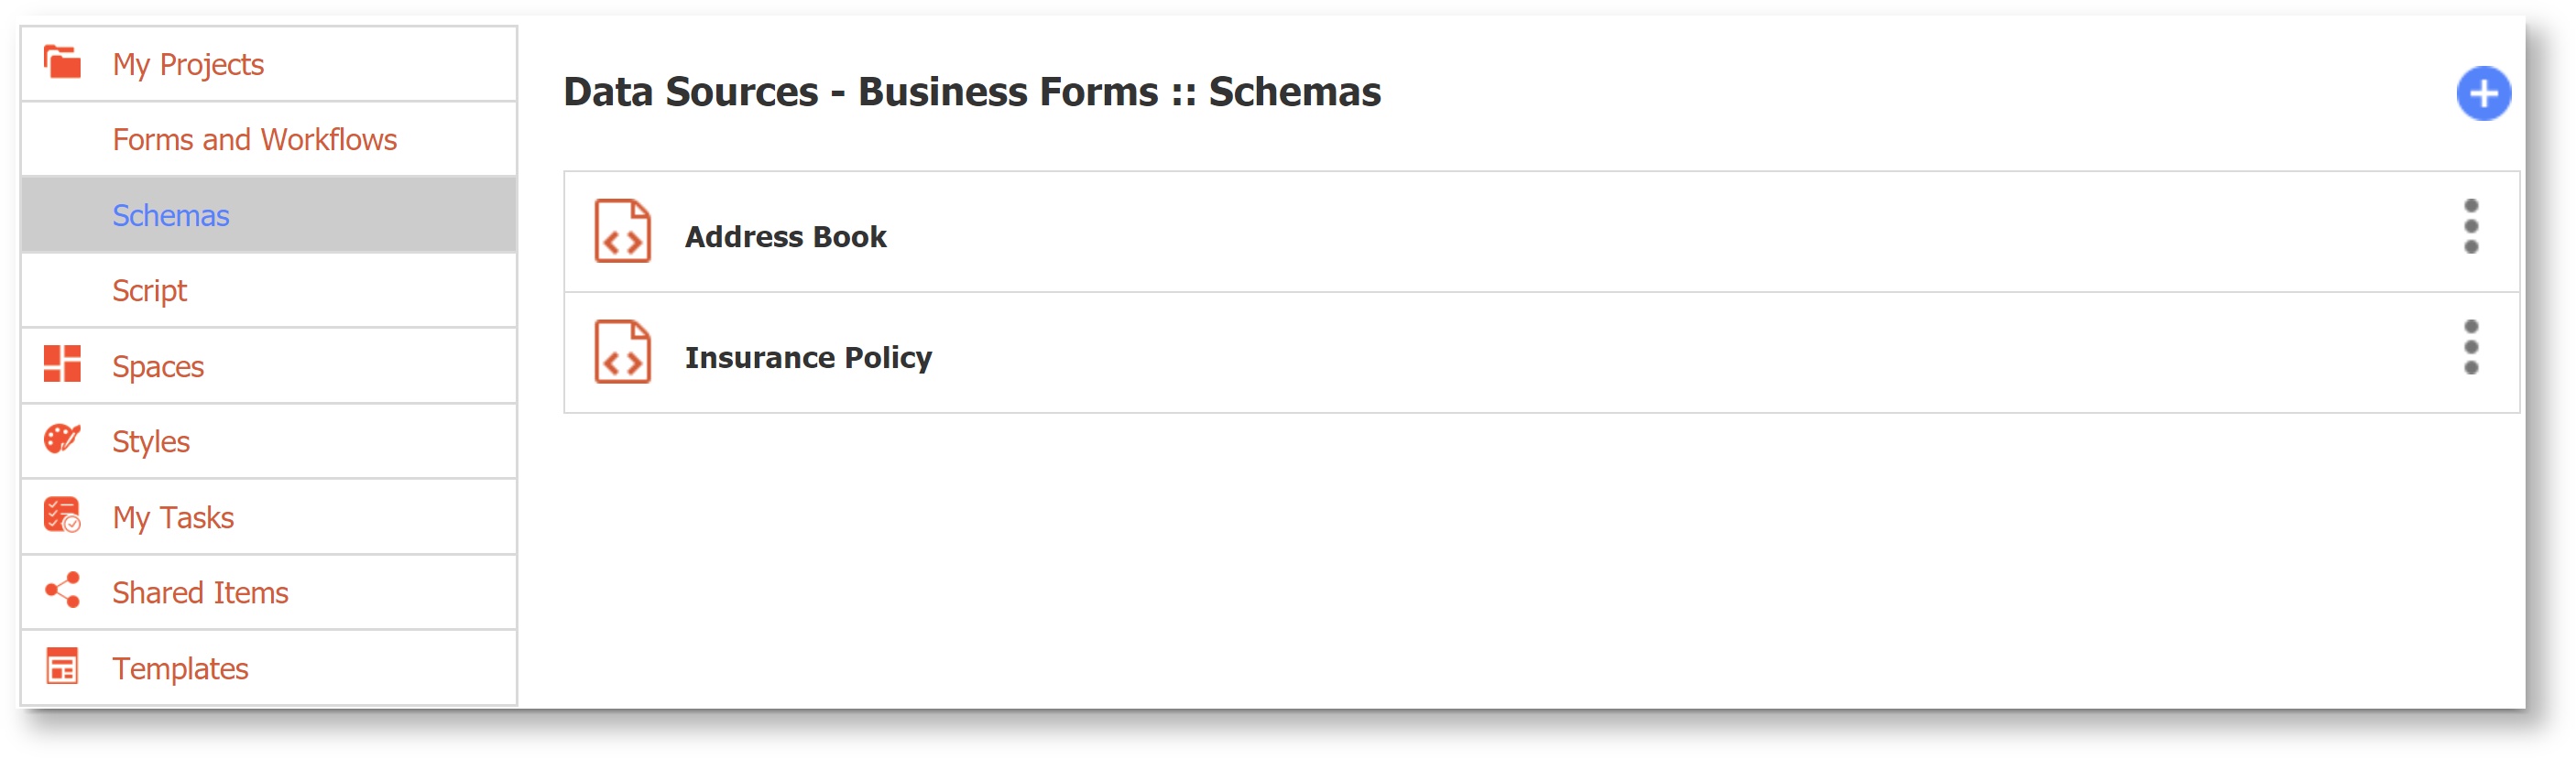
- From the Projects page, click the name of the project with the forms that will use the schema.
- Click Schemas from the left-hand menu.
- From the Schemas page, click the
 Add icon.
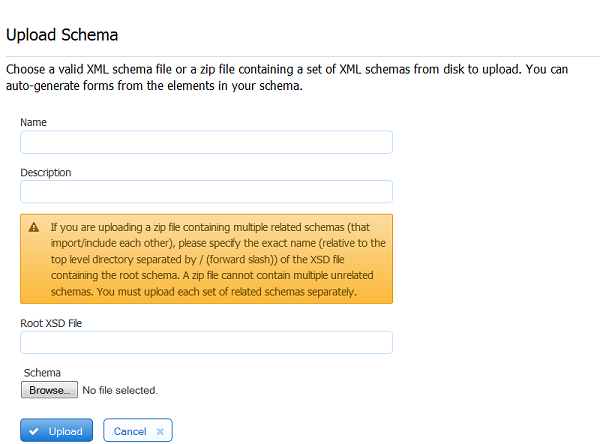
- On the Upload Schema Page, type a meaningful name for your schema and provide a description. (These are optional but highly recommended.)
- Click Browse, locate the schema XSD file or zipfile with multiple related XSDs on disk.
- If there are multiple global elements in the zipfile(s) specify exact name (relative to the top level directory separated by the '/' character of the XSD file containing the root schema.
- Click Upload.
If your schema is valid, its name now will appear on the Schemas page. If you tried to upload an invalid schema, will not allow the upload and display an error message.
Important notes about uploading schemas:
- You may add as many schemas as you require
- You may use global elements from uploaded schemas in any and all forms in the project
- If you want to use the same schema elements in multiple projects, upload the schema to each project separately.
- If your schema references another schema, you must upload all related schemas in a single zipfile
- If you upload a zipfile all the schemas in the zipfile must be related.
- If you have unrelated schemas you must upload them individually or alone in their own zipfile.
Adding Elements to a Form’s Data Sources
Once you’ve uploaded your schema, the next step is to choose the global elements you want for a particular form. The elements you choose will be displayed in the form’s Data Sources area on the lower left portion of the Forms Designer. You may add the elements to as many forms as you wish, but you must work with one form at a time.
To add the elements to a form’s Data Sources:
- Open the form in the Forms Designer (by clicking the form name from the Form and Workflows Homepage).
- In the Data Sources area on the left side of the Forms Designer, click New from XSD
 icon.
icon. - You’ll see all available schemas; click the plus sign
 to expand the schema folders and display the global elements from each.
 - Click the
 icon next to each global element you want. If the element is a complex type, you will see the parent element only, but the child elements will be added automatically to your form’s Data Sources. You may add as many elements as you like.
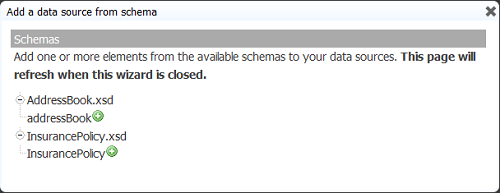
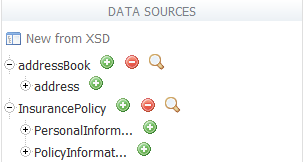
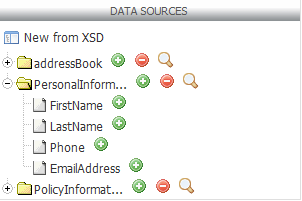
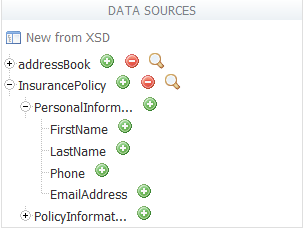
After you close the page, you’ll see in the Data Sources area each element you chose. (We added the Address Book and Policy Information global elements in this example.) For each element you added to your form’s Data Sources, will generate an XML instance document that you will see in the Submissions repository each time users submit your form, even if you do not end up generating a control from the element. Therefore, if you add an element to your form but later determine you don’t need to generate a control from it, make sure to delete the element from the form’s Data Sources.
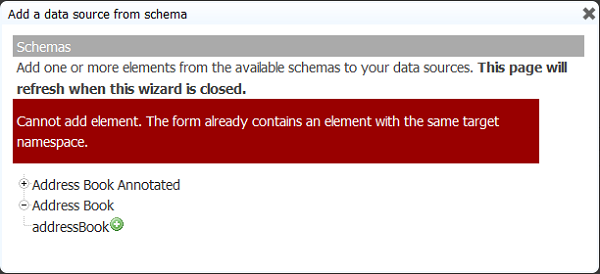
Adding multiple data sources from the same namespace will cause a clash in your form. And in fact will assist you by preventing you from making this mistake. A warning message is displayed in the Add Data Source panel when you click plus.
Generating Controls from Schema Elements
Once the global elements are part of your form’s Data Sources you can generate controls for any or all of them. As shown below complex types are represented by a folder icon; simple types by a document icon.
To generate a group control that automatically includes controls for all of a parent element’s children, click the icon to the right of the complex type’s folder icon. The controls for the children elements will be inside a section control. If the complex type has repeating items, the section will be inside a repeat control.
To create individual controls for specific children of a complex type, click the icon to expand the complex type and click the icon next to each desired child element. For example, in the above example we could generate controls for First Name and Last Name but not for the phone number or email address.
You do not drag the elements from the Data Source tab into your form; instead when you click the icon the generated controls are automatically added to your form.
The controls are added above the currently selected control. The only exception is if the control is part of a repeating group and the currently selected control is not one in that group. must add controls in a repeating group to the same location on the form as the others from that same group. So it will ignore your selection.
You can then place the controls where you want by following the normal drag and drop rules, with one additional restriction: you cannot drag any control into or out of a repeat control generated from a schema element. (If you need to do this, you will have to edit the schema.) Rearranging the controls will not affect the structure of the form’s XML submission documents or how submission data is captured.
When a from palette form's XSD is imported as a Data Source into a new form, tab controls are lost .
Data and Display Types
Most controls generated from schema elements will appear initially as text controls. For example an xsd:integer type will appear as a text input control. However all validation for the controls will be based on the schema datatype. For example an xsd:integer type will only allow numeric values.
Schema elements that specify element restrictions will automatically be displayed as selection controls. It will display as a dropdown if there are four or more valid choices and a radio button if there are fewer than four valid values. You can change the display type between radio and dropdown and checkbox using the Display As property.
Xsd:boolean types will automatically be displayed as a boolean checkbox. If checked, the value will be 'true' and if unchecked it will be 'false' if the element is required and no value if optional. You can set the label of the true and false options via the Labels property. However only the 1st option which maps to the 'true' choice will be displayed. If you add more then 2 labels the extra labels will be auto removed. If you set only a single label a 2d label of 'false' will be auto added for you.
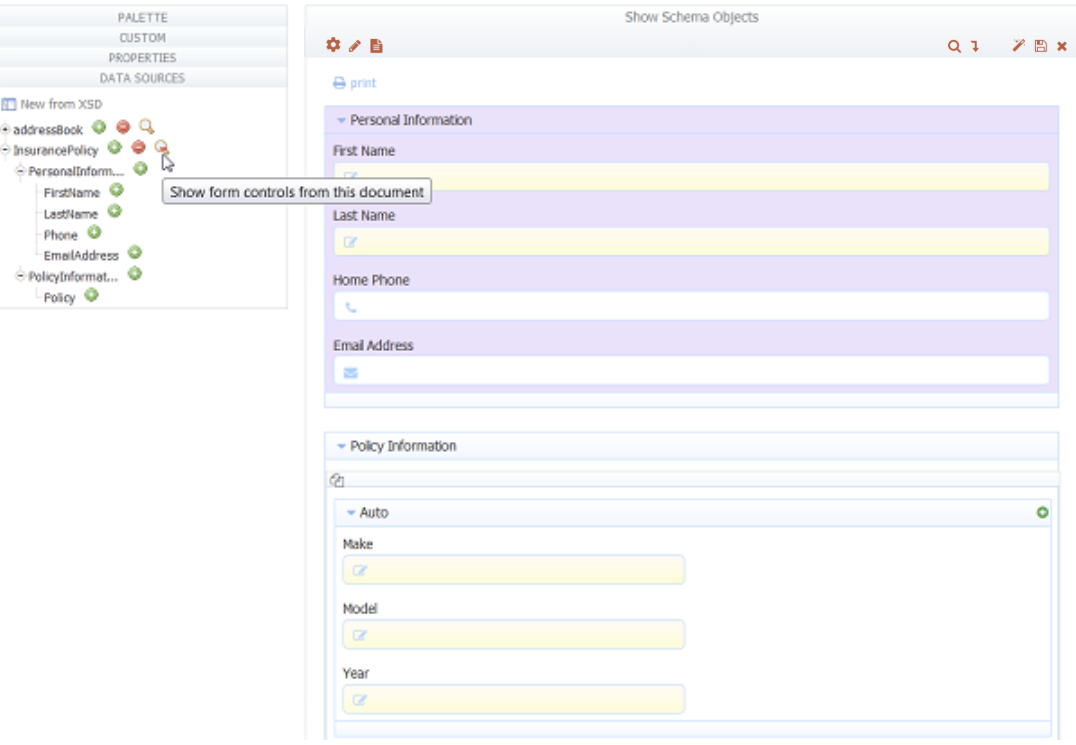
Show Controls from Data Source
To locate the controls on the designer canvas that come from one of the data sources added to the form, click the  icon. This will highlight the associated controls.
Modifying Controls Generated from Schema Elements
There are two ways to modify controls that you generated from schema elements. You can:
- Make changes to the controls in the Forms Designer
- Make changes to the schema, and then update the schema in
Changes You Can Make in the Forms Designer
For controls generated from schema elements, you can make some but not all of the changes that you can for controls you drag in from the palette. Here are the changes you can make in the Forms Designer:
- Change the control Name — although this does not change the underlying XSD element name.
- Create rules that rely on the controls.
- Set default value for the controls.
- Rearrange the location of controls in your form. This includes moving sections into tabs or panels. As noted above, in addition to the normal drag and drop restrictions, you may not drag any control into or out of a repeat control generated from a schema element.
- Modify the control’s Display As property to change how the control looks on the form. The Display As property appears only for controls created from schema elements and appears instead of the Control Type property that you see for controls you have dragged in from the palette.
- Change the control’s label. You’ll see the new label name in the Submissions Repository Data Tab and in Excel if you download the submission results. However, the Submissions XML document for the schema will reflect the original element name.
Note that you cannot change a control’s validation behavior in the Forms Designer as you can for controls you drag in from the palette. You must do this by changing the schema. This is discussed below.
In general, the Forms Designer prevents you from making changes that will violate the integrity of the schema and cause issues when users submit your form. One exception is if you inadvertently generate two controls from the same element—in this case, users would see two controls on the form and could submit two different values, but the Submissions XML document would not be able to capture both values since the element exists only once in the schema.
You also must be careful when deleting elements from the Data Sources area, especially if you have previously created controls from these elements. This is discussed in detail below.
Changes You Cannot Make in the Forms Designer
One of the most important differences between controls generated from schema elements and controls you drag in from the palette is validation behavior. You’ll notice for example that you can’t check or uncheck the control’s Required checkbox in the Form Designer Properties area, nor can you access the control’s Pattern property.
Validation for controls you generate from schema elements is based on the element’s XSD type and other schema-specific information, such as whether the control is required based on the minOccurs value. If you generate a control from an element that is an integer and another from an element that is a string, the two controls initially will be generated as text controls but the first control will require users to enter integers and the second control will not.
You can see an element’s XSD type by clicking the control in your form and hovering over the Properties area of the Forms Designer--the XSD type and the global element to which it is bound will be displayed as a tooltip. See Display As below. The only way to change the validation for a control generated from a schema element is to revise the schema and update the schema in with the new version. The same is true for other changes you wish to make that you cannot accomplish in the Forms Designer.
You also cannot change the number of repeat items on the form. This is because the number is dictated by the minOccur in the schema. If minOccur=2 then there will by default be two repeat items displayed in the form designer, for example. Thus if you click the displayed in the form designer on a repeat from schema, it will display a message indicating that this operation is not permitted. To change the number of items on the form, edit the schema and change minOccurs.
Display As
This property applies only to controls generated from XSD schema elements. If the control was dragged in from the palette, it has a Control Type property. Use the Display As property to change the way your control looks on your form when the control is imported from schema. For example, a text control can be changed to a dropdown or vice versa. Repeat and Table controls only have two options, Table and Repeat, in the Display As dropdown. A Repeat control can be changed to a table control and vice versa by selecting the appropriate option. Refer to the Control Type property for the details.
This will change the control's appearance '''but will not affect how the control validates data'''. If you need to modify the control's validation behavior, you must update the schema.
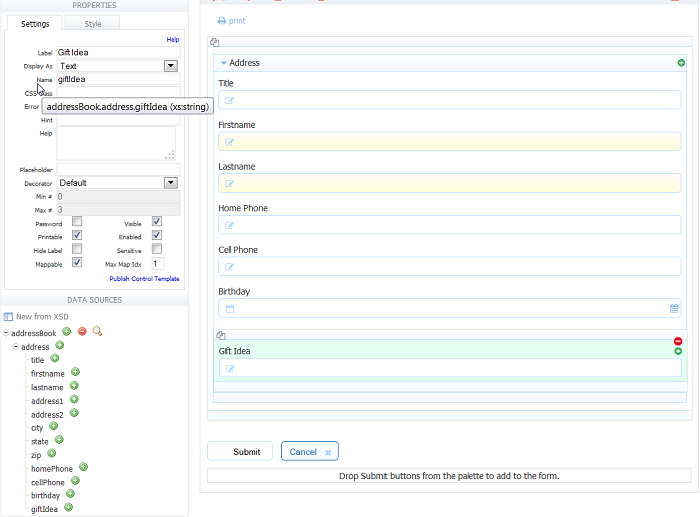
To see the control's underlying data type and the global element to which it is bound, you can hover over the property tab. The expanded Data Source shown in the image below, displays the XSD path stated in the hover - the control named giftidea, is part of a complex type control named address, which is bound to the global element, addressBook. The underlying data type for the giftidea control, which was changed to display as a dropdown, will remain xs:string.
If you change the Display As value to one of the select control types: radio, dropdown or checkbox, a new property called Labels becomes visible. By adding strings into the labels property you can restrict the values allowed to be entered into this control when users use your form. When the form is submitted the value will be equivalent to the selected option label.
Another way to set the labels is via a rule to dynamically initialize the options when the form loads. See the Business Rules chapter for more details. Also see the section on dynamic initialization from database SQL queries.
The Display As property is not available for the following schema controls: Message, Date, Time, Date/Time, T/F, ComboBox.
Required Schema Controls
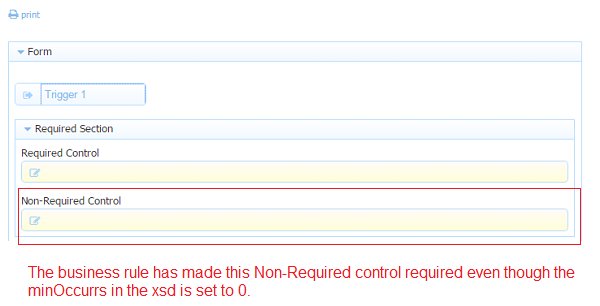
The required property is disabled for controls from XSD. This is because validation is based on the XSD. Values in the xsd for the required property can be overidden with a business rule.
Whether the control is required is based on the minOccurs value. If minOccurs="0" then the control is not required. If minOccurs="1" then the control is required. If minOccurs is greater than 1 then it will be rendered in the form as a repeat control with the minimum number of items set to the minOccurs value.
If you want to change whether or not the control is required:
Write a business rule to make the field required.
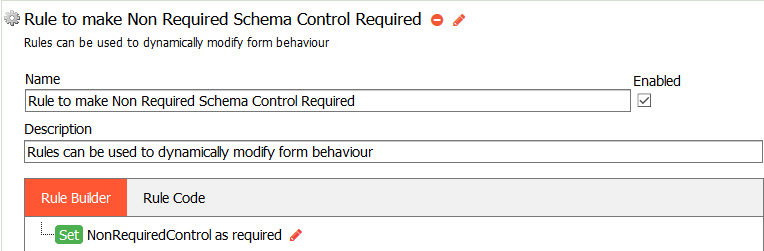
Let's say a designer created a form from a schema that contained a non-required Text field - minOccurs = 0. The designer adds a Trigger control named tr1 and this simple rule to make the field required when the trigger control is clicked.
Here is the relevant section of the xsd:</xsd:element> <xsd:element minOccurs="0" name="NonRequiredControl" type="xsd:string"> <xsd:annotation> <xsd:appinfo> <frevvo:displaytype>Text</frevvo:displaytype> <frevvo:label>Non Required Control</frevvo:label> </xsd:appinfo> </xsd:annotation> </xsd:element>if(tr1.clicked){ NonRequiredControl.required = true; }Same Rule as above built with the Visual Rule Builder
- Edit the XSD and update it in the schema's tab for that project.
There are times when you have several fields that you want hidden and then only want to make visible depending on the value entered into another field. Thus only when the fields are visible do you want them to be required. Currently hidden required fields are still required and prevent the form from being submitted. Automatically making hidden fields not-required may be added in a future release of .
Imagine a form asks if a student speaks Spanish. If the answer is yes you want to make additional fields visible and required. But when the student doesn't speak Spanish the controls should remain hidden and not be required. Here is a solution for this use case:
For each control that needs to be required only when visible, edit the XSD and set minOccurs="1". The control must default to required in the XSD
- Drag/Drop a Section control from the
- Uncheck the visible and required properties on the section control
- Drag all of the from XSD controls that need to be required only when visible into the section control
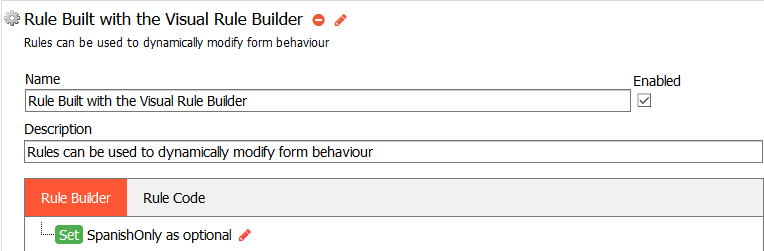
- Add a form.load rule that sets <section>.required=false. It is not enough to set the required checkbox in the section's properties panel. It must also be done in a form.load rule
- Add a 2nd rule that sets <section>.required=true when you make the fields visible, with an else clause to hide the fields that clears all values from those hidden controls AND sets <section>.required=false
Here is an example form.load rule where SpanishOnly is the name of the section control.
if (form.load) {
  SpanishOnly.required = false;
}
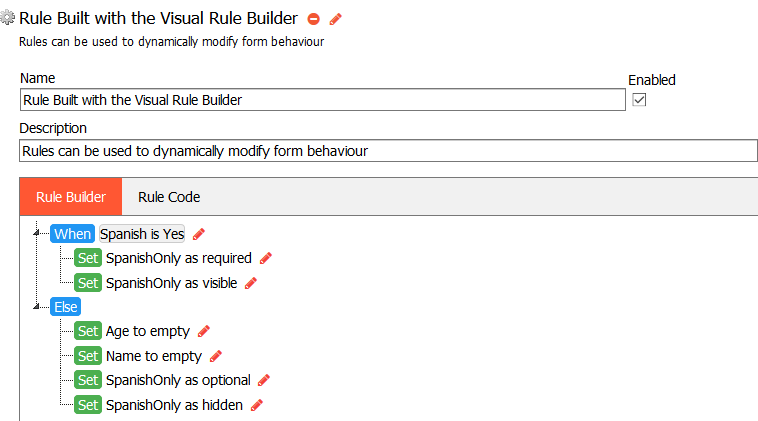
Here is an example show/hide rule where name and age are required fields only for Spanish speaking students.
if (spanish.value == 'yes') {
  SpanishOnly.required = true;
  SpanishOnly.visible = true;
}
else {
  // Must clear values in hidden fields
  // Must be done BEFORE setting <section>.required=false
  name.value = null;
  age.value = null;
  SpanishOnly.required = false;
  SpanishOnly.visible = false;
}
Do NOT add required palette controls into an optional schema section. The from schema section tries to validate controls inside it as if they are inside an optional section, but because the controls are from palette they are not bound to the same schema. Validation will not work as expected. If these controls are needed, update the xsd to add the controls directly to the schema. Refer to Customizing the XMLSchema for examples of common xsd customizations.
Elements with a Nillable Attribute
fully supports nillable element attributes in schema. In previous versions, a required field (minOccurs = 1 or greater) in a form generated from schema, HAD to have a value for the form to be submitted. The control was considered required, ie. the control would display a yellow background color. Nillable attributes override the fact that the field is required and, if present and set to true, required controls will now be considered optional. When you submit a form and do NOT have a value in a minOccurs > 0 nillable field, the XML document generated by
will contain an EMPTY element like this <control name xsi:nil="true"/>.
This is how it works for uploaded schemas:
- Elements that contain both nillable=true and minOccurs=0, will NOT be generated in the
- Elements that are required, minOccurs > 0, and nillable = true will be treated as an optional element. This means that the UI will generate an optional control for this element instead of a required one.
- When the value is not specified in use mode,
Let's take a look at an example with Simple Repeating Elements in the schema:
<element name="simpleRepeatingNillables">
    <complexType>
        <sequence>
            <element name="simpleR_nil_req1" type="string" nillable="true" minOccurs="1" maxOccurs="unbounded"></element>
            <element name="simpleR_nil_req3" type="string" nillable="true" minOccurs="3" maxOccurs="unbounded"></element>
            <element name="simpleR_nil_opt" type="string" nillable="true" minOccurs="0" maxOccurs="unbounded"></element>
            <element name="simpleR_opt" type="string" minOccurs="0" maxOccurs="unbounded"></element>
            <element name="simpleR_req1" type="string" minOccurs="1" maxOccurs="unbounded"></element>
            <element name="simpleR_req3" type="string" minOccurs="3" maxOccurs="unbounded"></element>
        </sequence>
    </complexType>
</element>
The image below shows the form with data entered only in the fields that are required.
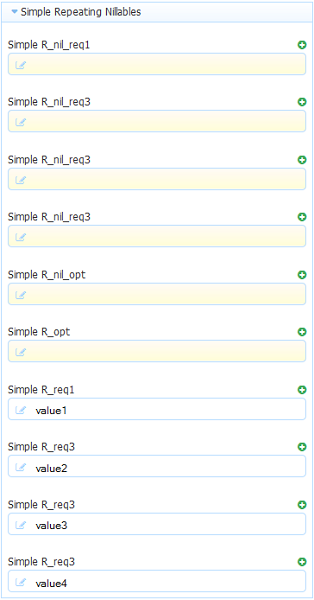
The XML document generated by when the form is submitted looks like this: Notice the xsi:nil="true" for all controls where minOccurs > 0 AND nillable=true and the user did not enter a value into the form.
<p0:simpleRepeatingNillables xmlns:xsi="http://www.w3.org/2001/XMLSchema-instance" xmlns:p0="http://www.example.org/nillables">
  <simpleR_nil_req1 xsi:nil="true"/>
  <simpleR_nil_req3 xsi:nil="true"/>
  <simpleR_nil_req3 xsi:nil="true"/>
  <simpleR_nil_req3 xsi:nil="true"/>
  <simpleR_req1>value1</simpleR_req1>
  <simpleR_req3>value2</simpleR_req3>
  <simpleR_req3>value3</simpleR_req3>
  <simpleR_req3>value4</simpleR_req3>
</p0:simpleRepeatingNillables>
Elements with Enumerations
If you add an element with enumerations from schema to your form, any dynamic options must conform to the schema. For example, you can create a drop down from a schema that restricts values to say red, green, blue and in a rule set the options to Mr, Mrs and Ms. In the form if you choose one of the values from the dropdown (Mr) you will get an Invalid value message since it's not part of the original schema.
Annotations
TBD
Updating a Schema
If you need to make changes beyond those allowed in the Forms Designer, make the changes in your XSD file and replace the old schema in your project with the new one.
To update a schema:
- Click Schemas from the left-hand menu. (Remember, schemas are project-specific, so if you don’t see your schema, it may be in another project.)
- You’ll see a list of all uploaded schemas. Click the
 Action Menu and select
  Update for the schema you are updating.
 - On the Update Schema page, click Browse and locate the new XSD file. You may change the schema name and description but this is optional. Remove the Root XSD file information if it does not apply.
- Click Update.
Note that you can also change the Name, Description and Root XSD File using Update Schema. For example if you only want to change the Name you set for this XSD then use this page to set a new name and click Update. This will only change the name and not the schema itself.

When you open (edit) any form/workflow that used the schema, the Data Sources area will be refreshed automatically. Do not delete the updated elements from the Data Sources area unless you are absolutely sure no controls in your form were generated from the elements in the previous version of the schema. '''Also, do not delete the elements and try to re-add them'''. This will cause any controls that relied on the schema to become unbounded and moved out of the schema XML document into the form's default XML document.
If you do not specify a Name when you first upload your XSD it will default to the file name. However if you leave the Name blank in Update Schema it will retain the original name set when you uploaded the first time.
Update schema will fail if you change the 'global element name' of your schema. You will see this error:

This scenario is not supported by . Changing the global element name changes the schema and cannot be used to replace the previous schema.
Let's say you upload a schema with two controls and build a form and a workflow with this form as a step from that schema. Then you modify your schema and delete one of the controls from the xsd. You update the original schema with the modified one. When you go to the Form/Workflow Home page, the form/workflow is flagged with an error. When schema update is done, any controls that are no longer valid to that schema are "detached" and fall into the default from scratch schema. marks them in error (pink background) to give the designer a visual cue that some investigation is necessary.
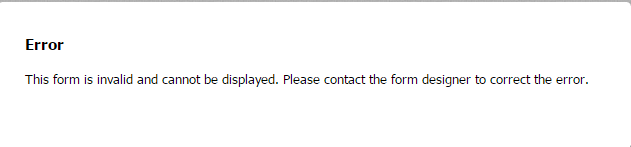
If you click on the  Test icon while the form/workflow is in this state, the following error displays:
Adjusting Your Form after Schema Updates
Although automatically refreshes the elements in the Data Sources area, this does not necessarily mean your form is up to date. You must edit your form, save it, and test it again to make sure the changes to the schema have produced the results you expected.
Depending on how you revised your schema, you may have to adjust the controls in your form. In most cases, you’ll need to delete the control from your form, and then re-generate a replacement control from the refreshed element in the Data Sources area. You’ll have to do this for the following schema changes:
- Changing the name of an element
- Changing an element’s type from a simple type to a complex type and vice versa.
- Moving a child element to a different parent
- Deleting an element
- Adding or removing data type restrictions
- Changing an element from non-repeating to repeating or vice versa
- Increasing maxOccurs from n to n+1 or more where n>0.
- Increasing minOccurs from 0 to 1.
For example, if you add restrictions to limit the possible values in a dropdown control, you will not see the new values until you delete the old control and generate a new one.
The list above is not exhaustive. Generally speaking, the more extensive your schema changes are, the higher the likelihood that you will have to delete the original controls and generate new ones. (Obviously if your schema has changed drastically, you may want to consider creating entirely new forms instead of trying to edit the old ones.)
Some minor schema changes handles automatically and does not require you to replace the control in the form. For example:
- If you change an element from one simple type to another (e.g., a string to an integer), the corresponding control will change validation accordingly
- If you make an un-required element required by changing the minOccurs from 0 to 1, the corresponding control automatically will be required and marked with a yellow background color—and vice versa if you change the minOccurs from 1 to 0.
The Forms Designer alerts you to any controls for which the schema elements were deleted by displaying them with (placeholder: a brown border) after you have updated your schema. However, deleted elements are not the only reason a control can become unbounded from its corresponding schema element. Elements you update to make repeating are a good example—the “old” controls in your form will not be automatically updated to be a repeat control. You must delete the old control and generate a new one by clicking the icon next to the element name in the Data Sources area.
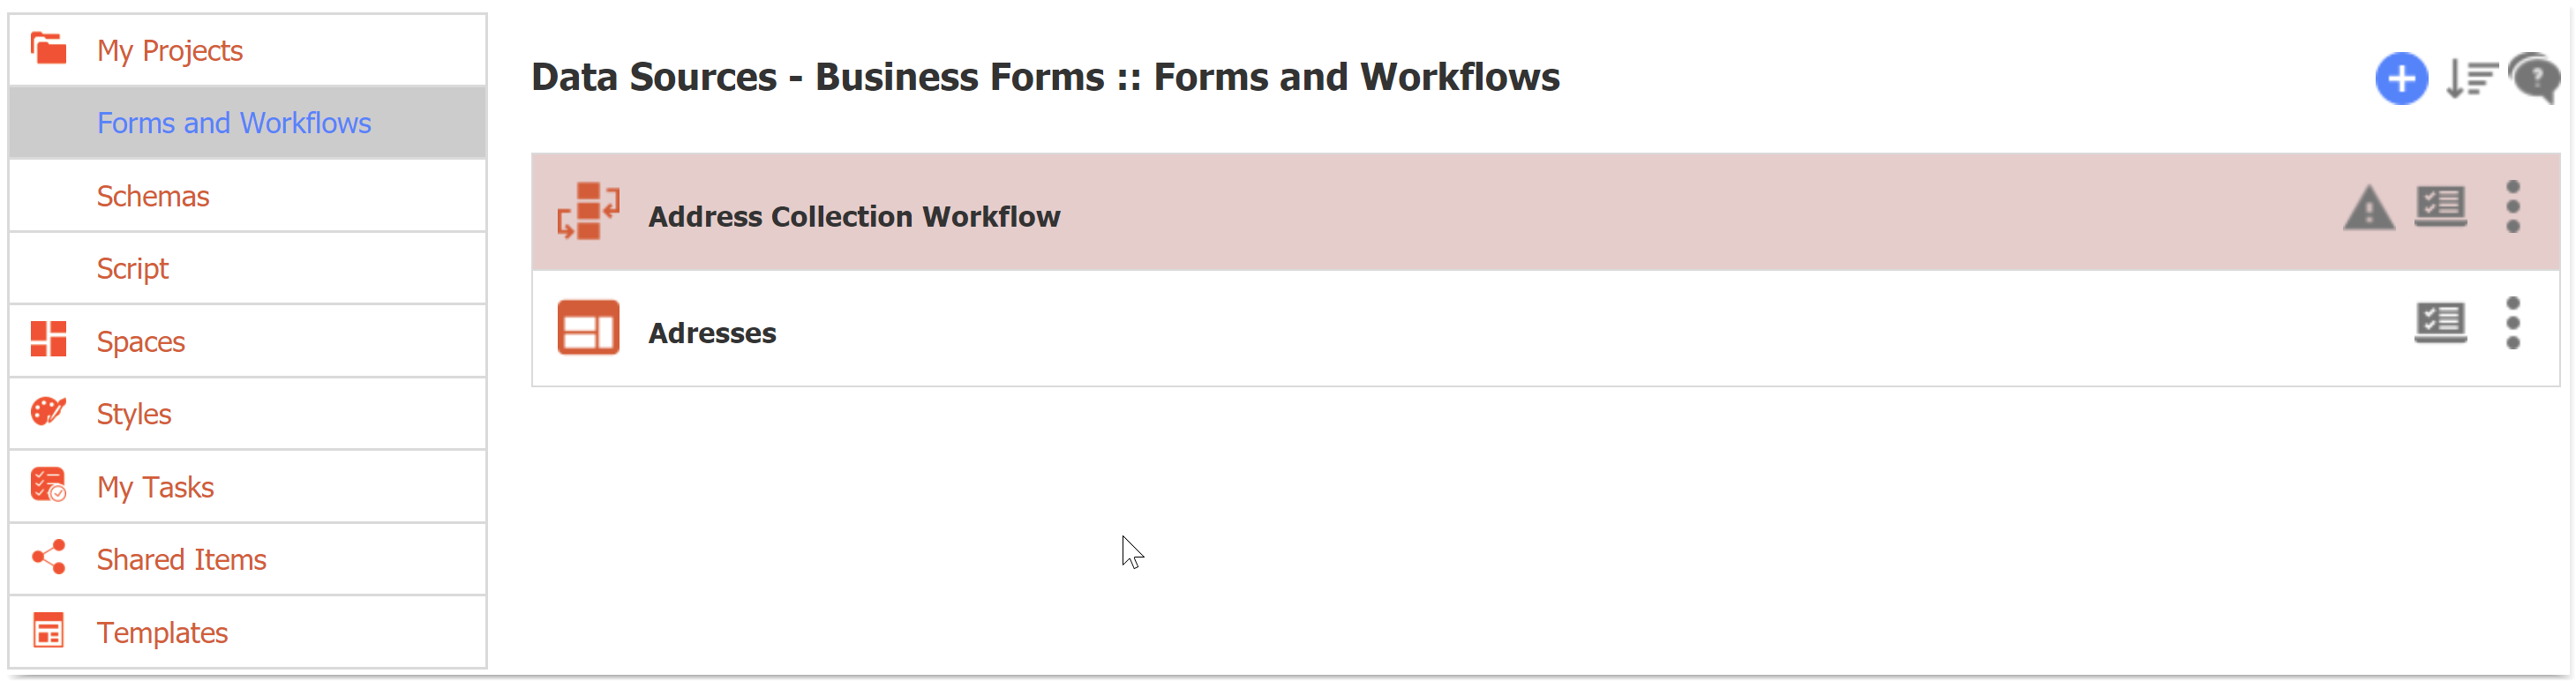
For example, Let's say you create a form and a workflow that uses that form as a step from an Address Book schema. The form created from this schema contains Title, Last Name, Address2, Zip code, Home Phone and Gift Idea fields among others. You make these updates to the schema then update it as described above
- Changed the minOccurs value for the Title field to 1 making it required.
- Deleted the Last Name field from the schema
- Moved the Home Phone field into the Address section and removed the Zip Code field from the Address section
- Added a Number of Members in Family field to the schema.
When you edit the form/workflow step, after updating the schema, warnings and instructions will show for any controls that have become unbound etc. Notice the Number of Members in Family field has been added to the Data Source and now can be added to the form/workflow.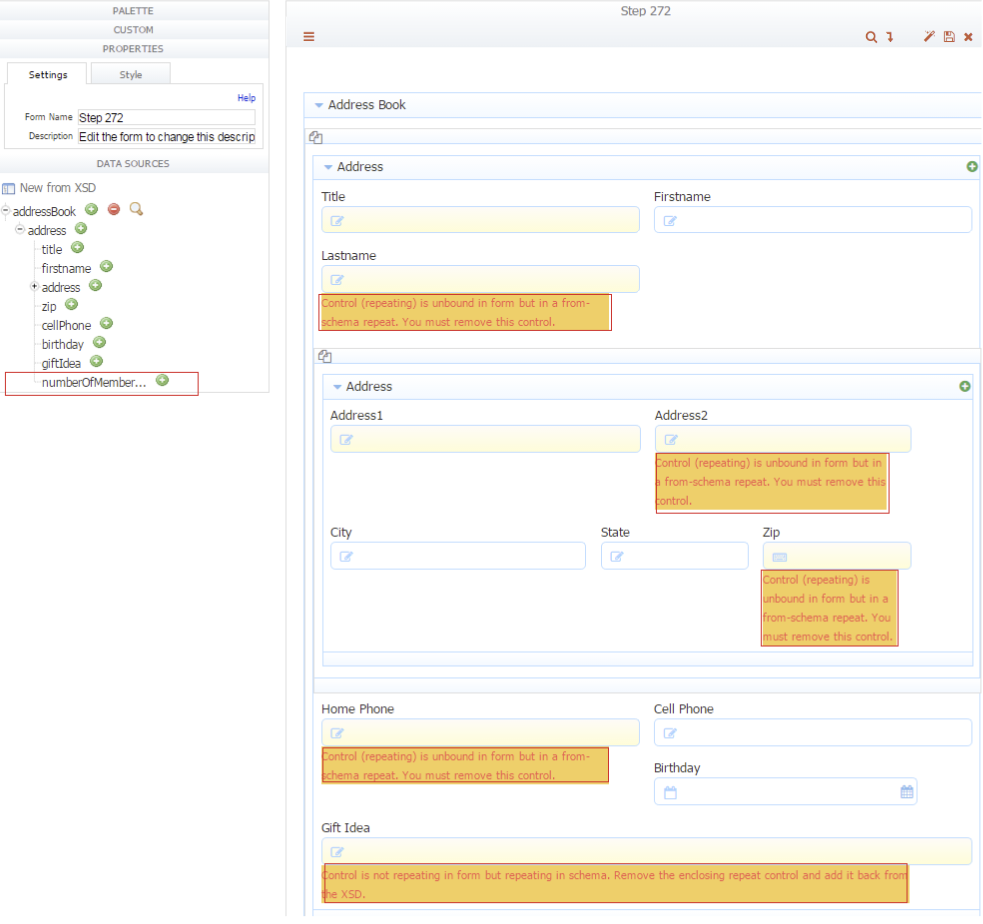
Although we do not recommend leaving unbounded controls in your form, you are not explicitly prevented from doing so. If you save your form with unbounded controls, data submitted in these controls will be included in the default XML Submission document for the form itself as opposed to being captured in the XML document for the schema.
Repeating Elements
One exception is repeating elements. If you edit your schema and delete elements from within a repeating complex type, will automatically remove those deleted elements from your form. This is because a from schema repeating complex type is not allowed to contain any controls from the palette. Once the deleted elements automatically become unbound from the schema
automatically deletes them from the form.
Also elements added to the form from the Data Source that are repeating elements are automatically added into the associated repeat control(s) if any already exist on your form. While all non-repeating controls are simply added to the top of the form when added from the Data Source.
Searching submissions using a Repeat control from schema is not supported.
Deleting Unused Data Source Elements
You do not have to generate a control from every element in the Data Sources area. The Submissions Data tab will show labels only for the controls on your form, and the Submissions XML document will capture only those data elements that users actually entered on your form.
However, keep in mind that a separate XML document is created for each global element you've added to your form, so if you don't need a global element, delete it from the form's Data Sources. Do this by clicking the  icon next to the element's name. As the illustration below shows, you cannot delete child elements of a global element; you must delete the entire parent. If you have created controls for any child element, do not delete the global (parent) element.
Deleting a Schema
If you upload a schema you do not need, you can delete it. Choose Schemas from the left-hand menu and click the icon next to the name of the schema you wish to delete. (If you are working in the Forms Designer, you must finish or cancel your form to access 's left-hand menu.)
If you choose to do this, be certain that none of your forms rely on elements from this schema. Any forms that use elements from the deleted elements will be adversely affected, so will prevent you from deleting any schemas that are currently in use. You will see this message that list all the forms/workflows that are using the schema.

If you still need to delete the schema, edit each form/workflow listed in the warning message and remove it from the form/workflow data source. Then go back to the Schemas tab and delete the schema.
If you leave unused data sources in your form they are still part of your form's document even if you have removed all associated controls from the form designer canvas. You will see that xml documents are created for these unused schemas in form submissions and are visible in the doc action manually set doc Uris. If you do not want them there then delete them from the data source panel.
Download a Schema
To download a schema choose Schemas from the left-hand menu and click the  icon. This will download the schema(s) in a zipfile. Even if the schema was uploaded into the project as a single XSD file, it will be downloaded as a single XSD but will be in a zipfile.
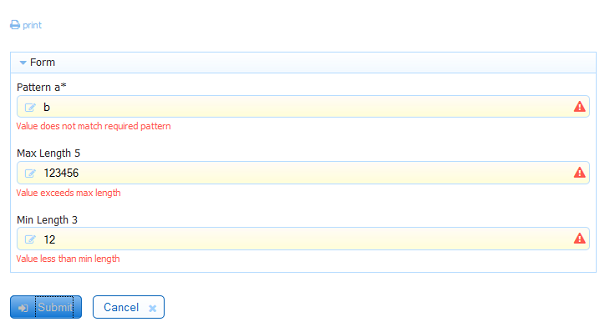
Common Schema Errors
Schema validation error messages are long and complex. Some common schema validation errors have been translated into messages that give the user a hint about why the value is invalid. You may see these errors if you enter a value does not match a required pattern, a value exceeds the maximum length or is less than the minimum length specified in the schema.
Unsupported Types
Schemas with Repeating Model Groups are not yet supported. While repeating elements are supported, xsd constructs like the following currently are not. Do not use elements with repeating model groups in your forms.
<sequence minOccurs="2" maxOccurs="3"/>
Schemas Choice Groups are not yet supported. The 1st choice appear on the form as required even though only one is. Do not use elements of type Choice in your forms.
<xs:element name="promotion">
  <complexType>
    <choice>
       <element name="Discount" />
       <element name="None" />
     </choice>
   </complexType>
</xs:element>
Schemas with Mixed Content are not yet supported.
<xs:element name="letter">
  <xs:complexType mixed="true">
    <xs:sequence>
      <xs:element name="name" type="xs:string"/>
      <xs:element name="orderid" type="xs:positiveInteger"/>
      <xs:element name="shipdate" type="xs:date"/>
    </xs:sequence>
    <xs:attribute name="type" type="xsd:string"/>
  </xs:complexType>
</xs:element>
If you are able to edit the schema, extract the text into new child elements.
Initialization from XML
Schema controls can be initialized from an xml document using the form's doc action and manually set document URIs. See the integration chapter with details on initializing Forms with XML Documents.