Customizing Behavior
- Megan Ellis
You can add custom behaviors by adding JavaScript to your form/workflow. For example, you may want to change the look of your form's submit button when the user hovers the mouse over the button. It is possible to associate a custom JavaScript handler to any form control. See Custom JavaScript Examples for sample code.
Although JavaScript will accomplish the task, it is important to note that your scripts are not subjected to formal testing by the frevvo quality assurance team. Choosing an approach that is part of the frevvo product like Business Rules is a better choice than adding JavaScript since released versions undergo rigorous quality assurance testing. Customizations using JavaScript should only be used under special situations and if there is no other way to customize the form to the requirements.
For example, let's say you have a message control in your form that contains markup to pull a custom JavaScript. The URL for the script contains the frevvo home directory and revision number - (http://localhost:8080/frevvo/js-24487/libs/script.js). An upgrade of frevvo to a new release or revision version could potentially stop the form from working.
If you choose to add JavaScript, we strongly recommend that you are familiar with a JavaScript debugger/web development tool for your browser.
On this page:
Adding JavaScript to your Form
You have the choice of two different approaches:
Method 1: Create a file with your JavaScript. Name it custom.js. The custom.js file can be uploaded to a project or on the tenant level.
- If a designer uploads a custom.js file to a project, it is only available for forms/workflows in that project. Refer to Method 1a below for the details.
- If a frevvo superuser/tenant admin uploads custom.js to the tenant, then the custom.js will be available to all forms/workflows in the tenant. Refer to Method 1b below for the details.
Custom.js scripts can be uploaded at two levels in frevvo:
- Project level (i.e. inside an open project) - At the project level, you must use the CustomEventHandlers JavaScript object.
- Tenant level - The custom.js can only be uploaded to the tenant level by the tenant administrator. At the tenant level, the custom.js file must use the TenantCustomEventHandlers JavaScript object.
- If a custom.js file contains the wrong custom handler for the level you are uploading it to, you may see a delay in loading and the custom.js will not work. Verify that the CustomEventHandler is correct.
Method 2: Add a Message Control that contains your JavaScript. Refer to Method 2 below for the details.
Method 1a: Upload custom JavaScript to a Project
Upload your custom JavaScript to frevvo via the Scripts tab on the left menu inside your project.
Follow these steps:
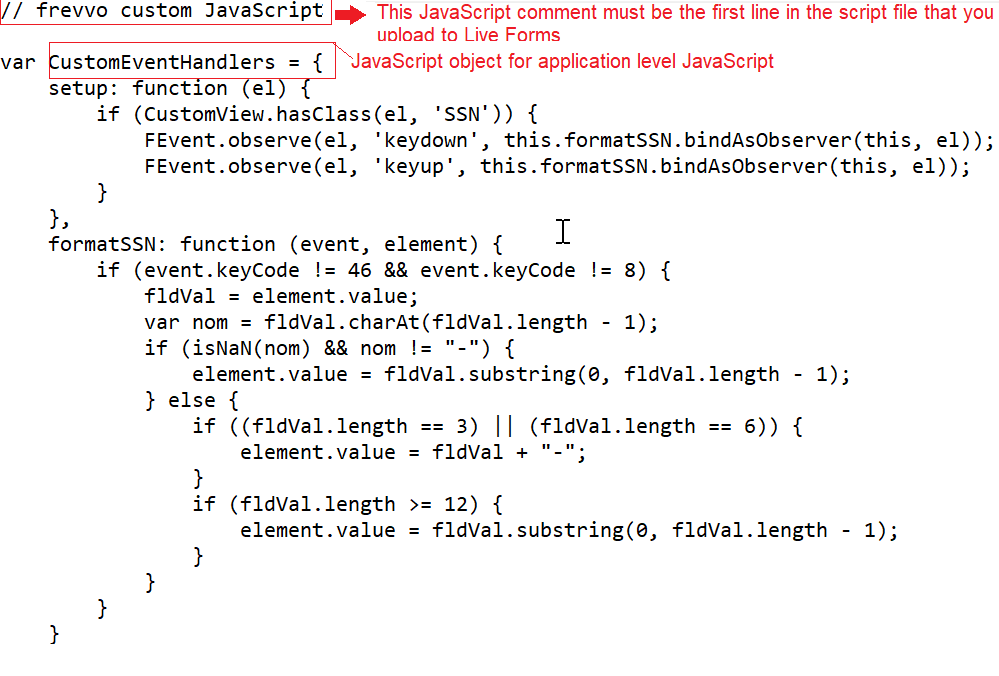
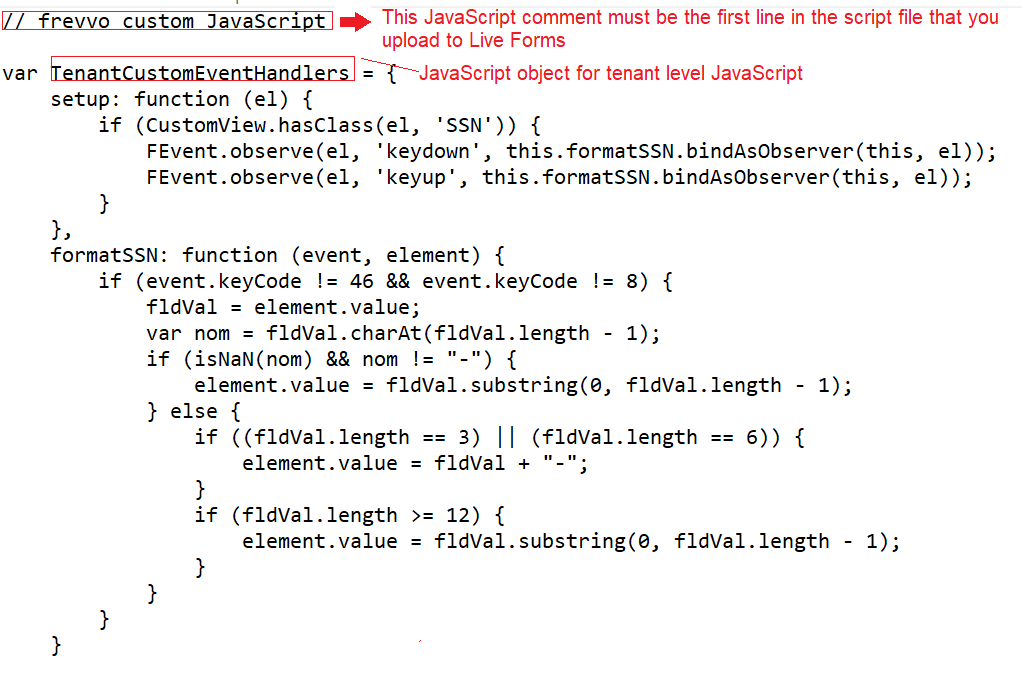
Your custom JavaScript must contain the comment // frevvo custom JavaScript as the first line of the file or the upload will not be successful. Note the CustomEventHandlers JavaScript object. Project level custom js requires that you create a JavaScript object called CustomEventHandlers.
Here is an example of code that will add dashes to a Social Security number control as the user is typing it in. See Custom JavaScript Examples for information on this sample code. Notice the JavaScript comment is the first line in the script file.
Login to frevvo as a designer user. Click the name of the project (or select
 Edit from the Action Menu) where you want to use the JavaScript. Click on the Script tab located on the left menu.
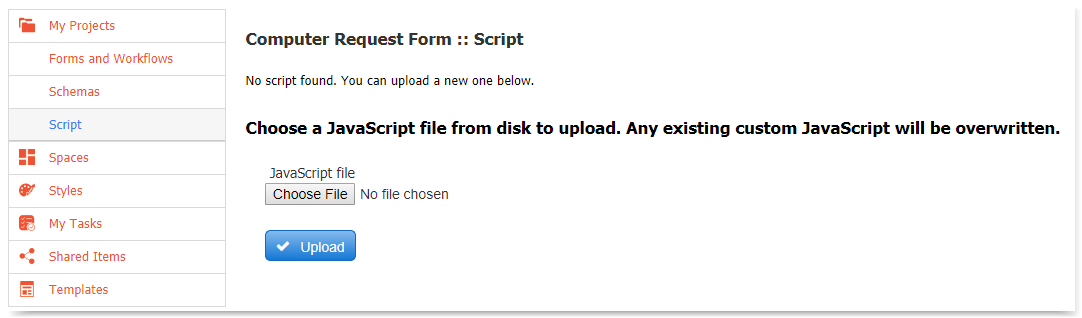
Browse your hard drive for your script file, Click Upload. Your file will be uploaded and it will display with the name Custom Script even though your script file may have another name.
Be Aware that existing JavaScript files will be overwritten. Download the existing custom.js file, append your new code to existing code then upload the combined file if you want to preserve the existing JavaScript.
If you need to modify the script, you must download it, make your modifications and then upload it again. When you download the script by selecting
 Download from the Action Menu, it will be named custom.js.
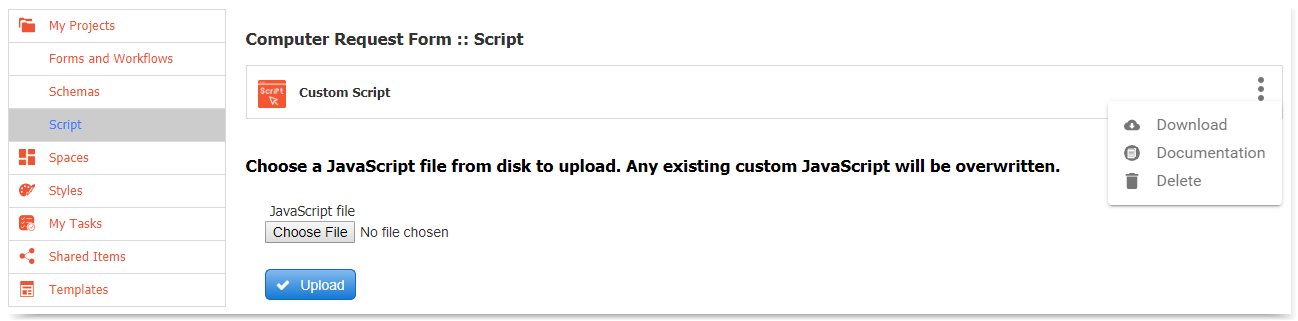
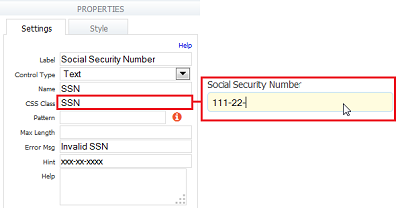
Once you have uploaded the JavaScript, it is available for all forms/workflows in the project. Remember to add the CSS class name to your form controls or your JavaScript may not work. Here is an image of an Employee Information form using uploaded JavaScript to enter dashes in the Social Security Number field while the user is entering the data.
Method 1b - Upload custom JavaScript to a Tenant
The frevvo superuser/ tenant admin can upload custom JavaScript to the tenant. Custom JavaScript uploaded on the tenant level is available to all designer users in the tenant. Let's say you are the frevvo tenant admin and you have written custom JavaScript to include custom fonts in Message controls or format SSN fields that you want to make available to all designers in your tenant. Upload your custom JavaScript to your frevvo tenant via the Scripts link on the Manage Tenants page.
Follow these steps:
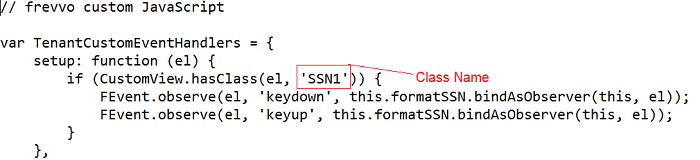
Your custom JavaScript must contain the comment // frevvo custom JavaScript as the first line of the file or the upload will not be successful. Note the TenantEventHandlers JavaScript object. Tenant-level custom js requires that you create a JavaScript object called TenantCustomEventHandlers.
Here is an example of code that will add dashes to a Social Security number control as the user is typing it in. See Custom JavaScript Examples for information on this sample code. Notice the JavaScript comment is the first line in the script file.
Login to frevvo as a superuser/tenant admin. Navigate to the Manage Tenant screen. Click the Manage Script link.
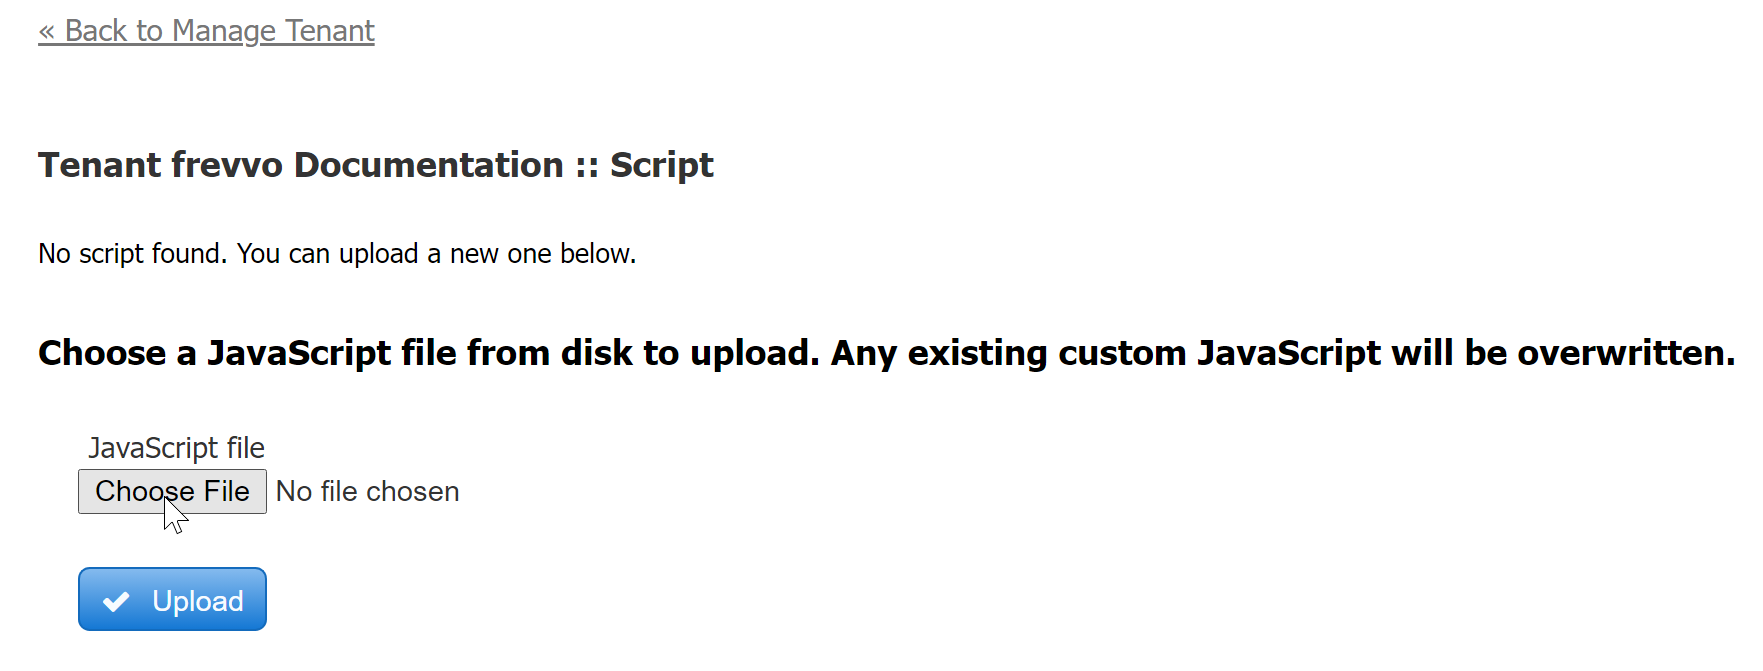
Browse your hard drive for your script file, then click Upload. Your file will be uploaded and it will display with the name Custom Script even though your script file may have another name.
Be Aware that existing JavaScript files will be overwritten. Download the existing custom.js file, append your new code to existing code then upload the combined file if you want to preserve the existing JavaScript.
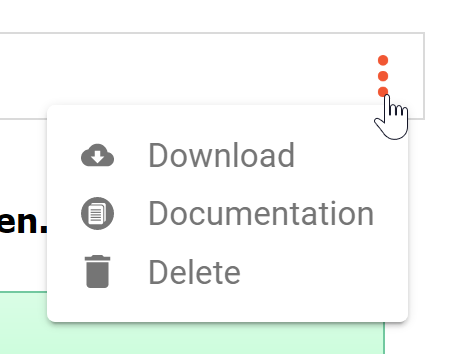
If you need to modify the script you must download it, make your modifications and then upload it again. When you download the script by clicking on the
 Download icon, it will be named tenantcustom.js.
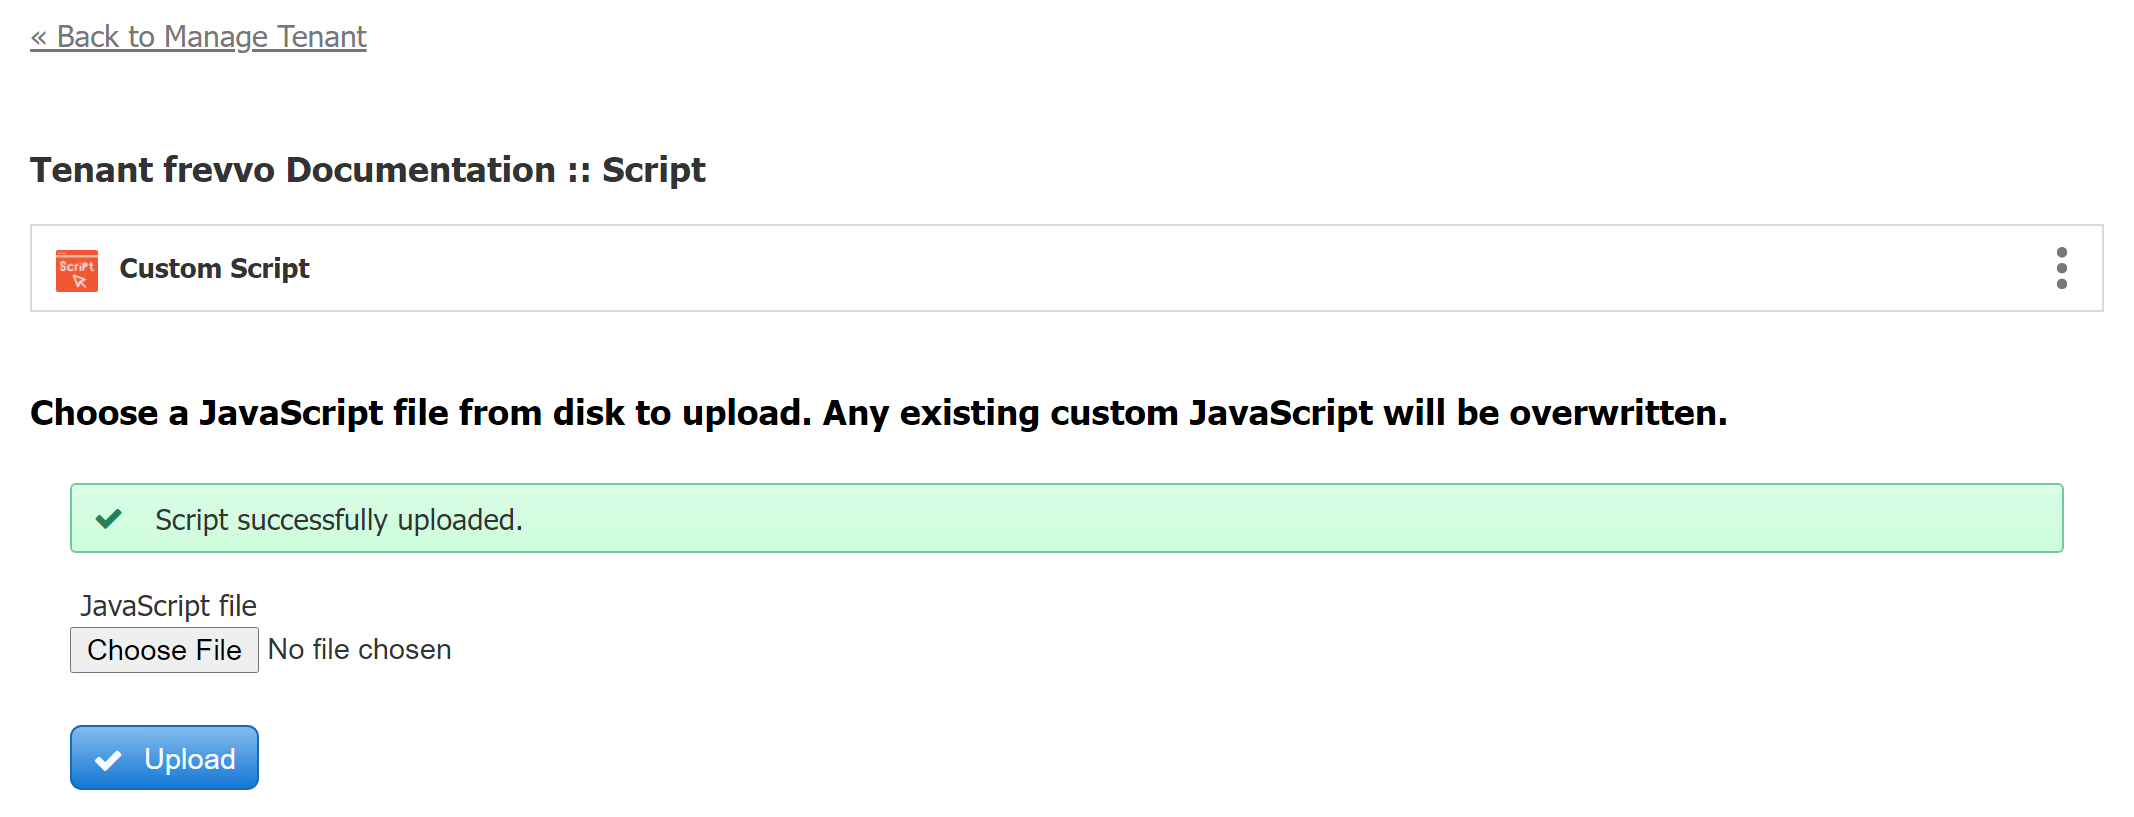
Once you have uploaded the JavaScript, it is available for all designers in your tenant to use in their forms/workflows. Remember to add the CSS class name to your form controls or your JavaScript may not work. Here is an image of an Employee Information form using uploaded JavaScript to enter dashes in the Social Security Number field while the user is entering the data.
- If your JavaScript does not behave as expected after upgrading your version of frevvo, it may be caused by a scrubbing of the custom.js file content by XSS protection. You may notice that all your code is on a single commented-out line upon Inspection of the custom.js file, Upload an "unscrubbed" version of your custom.js file to solve the issue.
- f you upload a custom.js file to the Tenant Level and the event handler is named CustomEventHandlers not TenantCustomEventHandlers you will not see an error message. The function may operate correctly but you may notice a delay in loading the form/workflow in Use mode.
What if I upload different custom JavaScripts to a project and the tenant?
If you upload custom JavaScript to the tenant and then upload a different custom.js file to a project, frevvo will load both files. The functionality of both scripts will be available to a designer creating forms/workflows in the project. For example, let's say you upload custom JavaScript to change the first letter of each word typed into a field to upper case. The class name is CorrectCase. You upload your custom JavaScript to the tenant.
You create another custom script to add the dashes to the Social Security Number as the user is typing. The class name is SSN1. You upload this custom script to a project.
A designer creating forms/workflows in the project will have access to both custom scripts. Both scripts will function properly.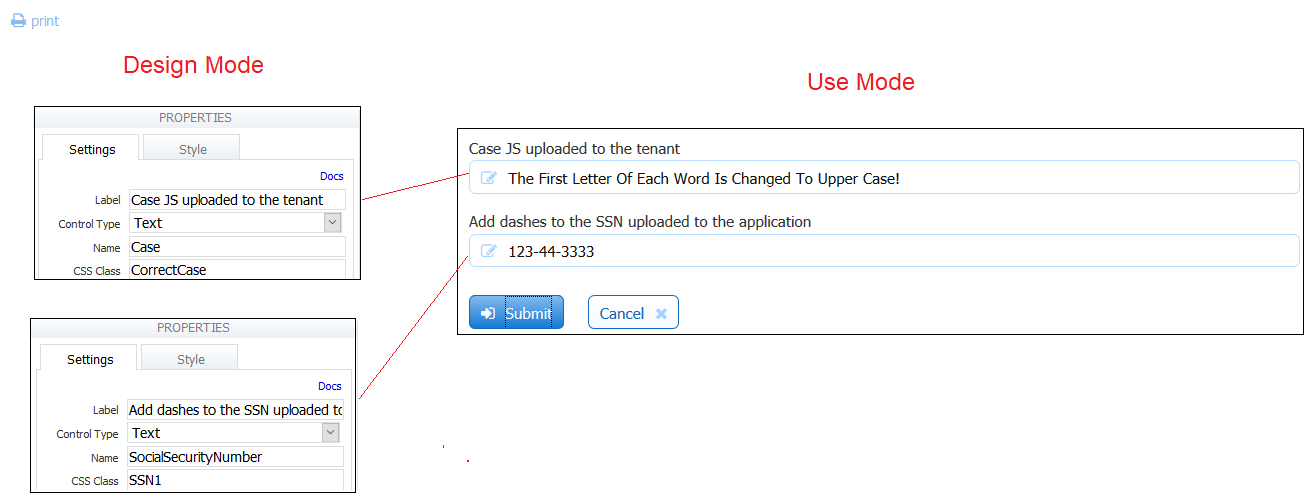
Uploading custom.js files with the same class name on the project and tenant levels
Uploading custom.js files with the same class name on the project and tenant levels is not recommended. This could result in unpredictable behavior. When two custom event handlers are bound to the same event (tenant level and project level), there is no guarantee which handler is called first. This is under the control of the JavaScript engine. Rewrite your JavaScript to avoid this situation.
Method 2
Follow these steps to add JavaScript to your form using the Message control:
- Add a message control to your form.
- Add a <script> tag in the message property.
- Put your JavaScript inside the script tag.
Here is an example of the script tag: Drop your code inside of the script tag.
 <script>
        /* <![CDATA[ */
        code goes here
        /* ]]> */
</script>
If you choose to use the Message Control with a Script tag to load your custom JavaScript for custom fonts, you must add your code inside the Script tag then add the HTML after the Script tag.
What can you do in a handler
You can call any JavaScript code in a handler; you can access the DOM of the page (note that you only have access to the DOM of the iframe in which the form is rendered assuming you're using a standard embedding) or call external code. In addition, you have access to the following methods:
- CustomView.$frevvoControl(el) returns the HTML element corresponding to the frevvo control that triggered the handler. This is typically a DIV HTML element and typically has CSS class 'f-control'
- CustomView.getState (el) returns the state of the control as a JavaScript object. The state contains things like the label, value, hint, help, etc. Use developer tools for your browser with a JavaScript debugger to view it in detail.
- CustomView.getExtId (el) returns the name of the control as set in the Form Designer.
- CustomView.getIndex (el) returns the index of the control in its enclosing repeat control if the control is repeating. If the control is not repeating, it returns -1.
- CustomView.hasClass (el, className) returns true if the control has the indicated CSS class, false otherwise.
Custom Event Handler Example
Here is an example of a custom event handler:
var CustomEventHandlers = {
    setup: function (el) {
        if (CustomView.hasClass(el, 's-submit'))
            FEvent.observe(el, 'click', this.submitClicked.bindAsObserver(this,el));
        else if (CustomView.hasClass(el, 'my-class'))
            FEvent.observe(el, 'change', this.myHandler.bindAsObserver(this,el));
    },
    submitClicked: function (evt, el) {
        alert ('Submit button was clicked');
    },
    myHandler: function (evt, el) {
        alert ('My Class change handler called');
    },
    onSaveSuccess: function (submissionId) {
        alert ("Save complete. New submission id is: " + submissionId);
    },
    onSaveFailure: function () {
        alert ("Save failed");
    }
}
Let's look in a little more detail
- You must have a class called CustomEventHandlers declared. Note that it is case-sensitive.
- It must have a method called setup() which takes a single argument (called el above). When the form is loaded, frevvo will call this setup() method for each control in the form and will pass in the control as the argument.
- For each control we are interested in, the CustomEventHandlers class has a handler method. All handlers are functions that take two arguments: the event that triggered the handler and the control itself.
- The example above uses a custom CSS class on the control in question to figure out if it's the control we are interested in. You can set a custom css class for any control in the Form Designer.
- We're interested in two controls: the Submit button which already has a CSS class s-submit and a user-defined input control with custom CSS class my-class. For each control, we've associated a handler as described above. To associate a handler, call FEvent.observe (el, EVENT_NAME, handler) using the syntax above. The EVENT_NAME can be any standard event. fired by your browser e.g. click (also called onClick) or change (also called onChange).
- When the event is question is fired by the control in question, your handler will be called.
- In addition to the event handlers, you can also provide methods that are called when the form is Saved using the Save/Load feature.
- The onSaveSuccess() method is called when a submission is saved and the resulting submission ID is passed in.
- The onSaveFailure() method is called when the save fails.
More Examples
You can add different event handling to your JavaScript code. This example handles click, mouseover, and mouseout events to the Submit button:
 /*
  * Custom Javascript here.
  */
   var CustomEventHandlers = {
    setup: function (el) {
        if (CustomView.hasClass(el, 's-submit'))
        {
            alert('setting up s-submit events');
            FEvent.observe(el, 'click', this.submitClicked.bindAsObserver(this,el));
            FEvent.observe(el, 'mouseover', this.submitMouseOver.bindAsObserver(this,el));
            FEvent.observe(el, 'mouseout', this.submitMouseOut.bindAsObserver(this,el));
        }
    },
    submitClicked: function (evt, el) {
        alert ('Submit button was clicked');
    },
    submitMouseOver: function (event, element) {
        alert ('Submit mouse over');
    },
    submitMouseOut: function (event, element) {
        alert ('Submit mouse out');
    }
}
Extensions for workflows
In addition to the above, workflows also support a few other methods.
var CustomFlowEventHandlers = {
    onNextClicked: function (name, id) {
        alert ("Next button clicked for activity: " + name);
    },
    onNavClicked: function (name, id) {
        alert ("Nav button clicked for activity: " + name);
    },
    onSaveSuccess: function (submissionId) {
        alert ("Save complete. New submission id is: " + submissionId);
    },
    onSaveFailure: function () {
        alert ("Save failed");
    }
}
As the method names indicate
- onNextClicked() is called when the Continue button is clicked: this button might be labeled Continue or Finish or might have a custom label assigned by you. The parameters are the name and id of the current activity (step) in the workflow.
- onNavClicked() is called when the user clicks on a link in the Navigation toolbar if it is displayed. The parameters are the name and id of the activity (step) in the workflow that is clicked.
- Finally, onSaveSuccess() and onSaveFailure() for workflows must be defined in the CustomFlowEventHandlers class.
It's not currently possible to directly fire a custom.js handler from a business rule. You can write a form.load rule that sets the value of a hidden control and set a change handler for that control in your custom.js Custom Handlers.