Custom JavaScript Examples
- Megan Ellis
Customizing frevvo can be done in several different ways. It is important to consider all the alternatives available when deciding on a method to accomplish form customization.
Although JavaScript will accomplish the task, it is important to note that your scripts are not subjected to formal testing by the frevvo quality assurance team. Choosing an approach that is part of the frevvo product like Business Rules is a better choice than adding JavaScript since released versions undergo rigorous quality assurance testing. Customizations using JavaScript should only be used under special situations and if there is no other way to customize the form to the requirements.
For example, let's say you have a message control in your form that contains markup to pull a custom JavaScript. The URL for the script contains the frevvo home directory and revision number - (http://localhost:8080/frevvo/js-24487/libs/script.js). An upgrade of frevvo to a new release or revision version could potentially stop the form from working.
If you choose to add JavaScript, we strongly recommend that you are familiar with a JavaScript debugger / web development tool for your browser.
Here are some real world situations where custom JavaScript can be used in a form. The custom JavaScript can be added to the form using the message control or the includes.js file in the frevvo.war. Refer to Customizing Behavior and Common Methods for more information.
On This Page:
Automatically format SSN
Your form has a text control requiring a Social Security number. The JavaScript below will automatically add the hyphens while the user is entering the SSN. Add SSN to the CSS Class property of the control to enable this JavaScript.
   var CustomEventHandlers = {
    setup: function (el) {
        if (CustomView.hasClass(el, 'SSN')) {
            FEvent.observe(el, 'keydown', this.formatSSN.bindAsObserver(this, el));
            FEvent.observe(el, 'keyup', this.formatSSN.bindAsObserver(this, el));
        }
    },
    formatSSN: function (event, element) {
        if (event.keyCode != 46 && event.keyCode != 8) {
            fldVal = element.value;
            var nom = fldVal.charAt(fldVal.length - 1);
            if (isNaN(nom) && nom != "-") {
                element.value = fldVal.substring(0, fldVal.length - 1);
            } else {
                if ((fldVal.length == 3) || (fldVal.length == 6)) {
                    element.value = fldVal + "-";
                }
                if (fldVal.length >= 12) {
                    element.value = fldVal.substring(0, fldVal.length - 1);
                }
            }
        }
    }
}
Correct the case of any text
Your form has a text field or a text area where you would like to automatically correct the case of any text entered in it. For example, if you would like to change "I LOVE TO TYPE IN ALL CAPS" to " I Love To Type In All Caps" while the user is entering it, the JavaScript for this would be written as:
var CustomEventHandlers = {
   setup: function (el) {
       if (CustomView.hasClass(el, 'CorrectCase')) {
           FEvent.observe(el, 'input', this.doCorrectCase.bindAsObserver(this, el));
       }
   },
   doCorrectCase: function (event, element) {
       var val = element.value;
       var str = val.toLowerCase();
       var spl = str.split(" ");
       var upstring = "";
       for (var i = 0; i < spl.length; i++) {
           try { //onkeypress will cause an error on first keypress
               upstring += spl[i][0].toUpperCase();
           } catch (err) {}
           upstring += spl[i].substring(1, spl[i].length);
           upstring += " ";
       }
       element.value = upstring.substring(0, upstring.length - 1);
   }
}
Add CorrectCase to the CSS Class property of the control to enable this JavaScript.
Scroll to Top
A Tab control with many fields in each tab, may require a long scroll to switch from one tab to another. You can use a trigger control at the bottom of the first tab with a business rule to navigate the user to the second tab when the trigger is clicked. For example, when you click on the Next Tab trigger control on the Personal Information tab in the Application for Employment form shown a business rule will navigate the user to the Employment History tab.
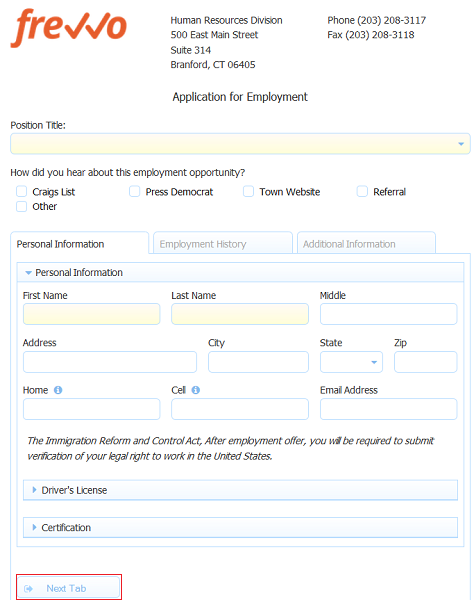
You can use the following JavaScript to force the page to be scrolled to the top after switching to the second tab:
var CustomEventHandlers = {
   setup: function (el) {
       if (CustomView.hasClass(el, 'my-scroll')) {
           FEvent.observe(el, 'click', this.scrollTop.bindAsObserver(this, el));
       }
   },
   scrollTop: function (event, element) {
       document.getElementById("wrapper").scrollIntoView();
   }
}
Add my-scroll to the CSS Class property of the Trigger control which navigates the user to the second tab.
Set focus on a control when the form loads
You may want to set the focus (or cursor position) on a certain control when the form loads. This allows users to start entering data without a mouse click or tab action to reach the control they need to fill. Use this JavaScript to set the focus on a control with the CSS Class 'setFocus'.
// frevvo custom JavaScript
var CustomEventHandlers = {
  setup: function(el) {
    if (CustomView.hasClass(el, 'setFocus')) {
      el.focus();
    }
  }
}
Add setFocus to the CSS Class property of the control you want to focus on when the form loads.
This behavior will only be present when the form is opened using a share URL - you will not see it in Test mode. To test it, copy the form's share URL and paste it into a new browser tab.
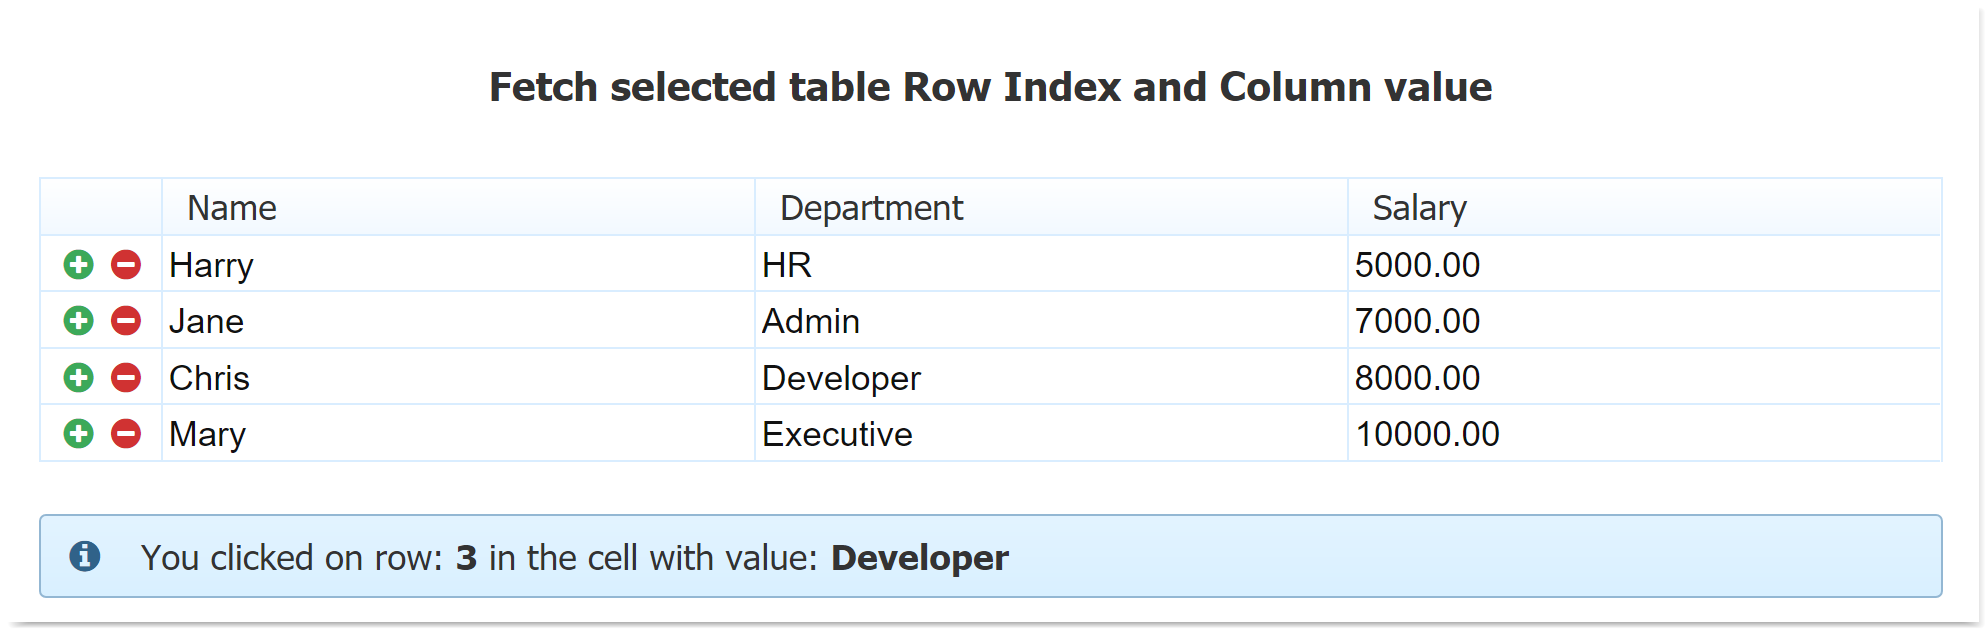
Fetch Selected Table Cell Info
You can use the following custom JavaScript to fetch information about the selected (clicked) table cell at run time, such as the row index and value.
Upload the following Custome JavaScript to your Project.
// frevvo custom JavaScript
var CustomEventHandlers = {
  setup: function (el) {
      if ($j(el).parents('.c-detect-clicks').length) {
         $j(el).on('click', this.onCellClick.bind(this));
      }
  },
  onCellClick: function (e) {
      var row = $j(e.target).parents('.f-table-row').eq(0);
      var index = row.parent().children().index(row)+1;
      //console.log("onCellClick, value = " + e.target.value + " row index = " + index);
      // Put the rowIndex and cellValue into hidden controls
      _frevvo.api.forms.controls.setControlValue($j('.c-row-index').eq(0).attr('extid'), [index]);
      _frevvo.api.forms.controls.setControlValue($j('.c-cell-value').eq(0).attr('extid'), [e.target.value]);
  }
}
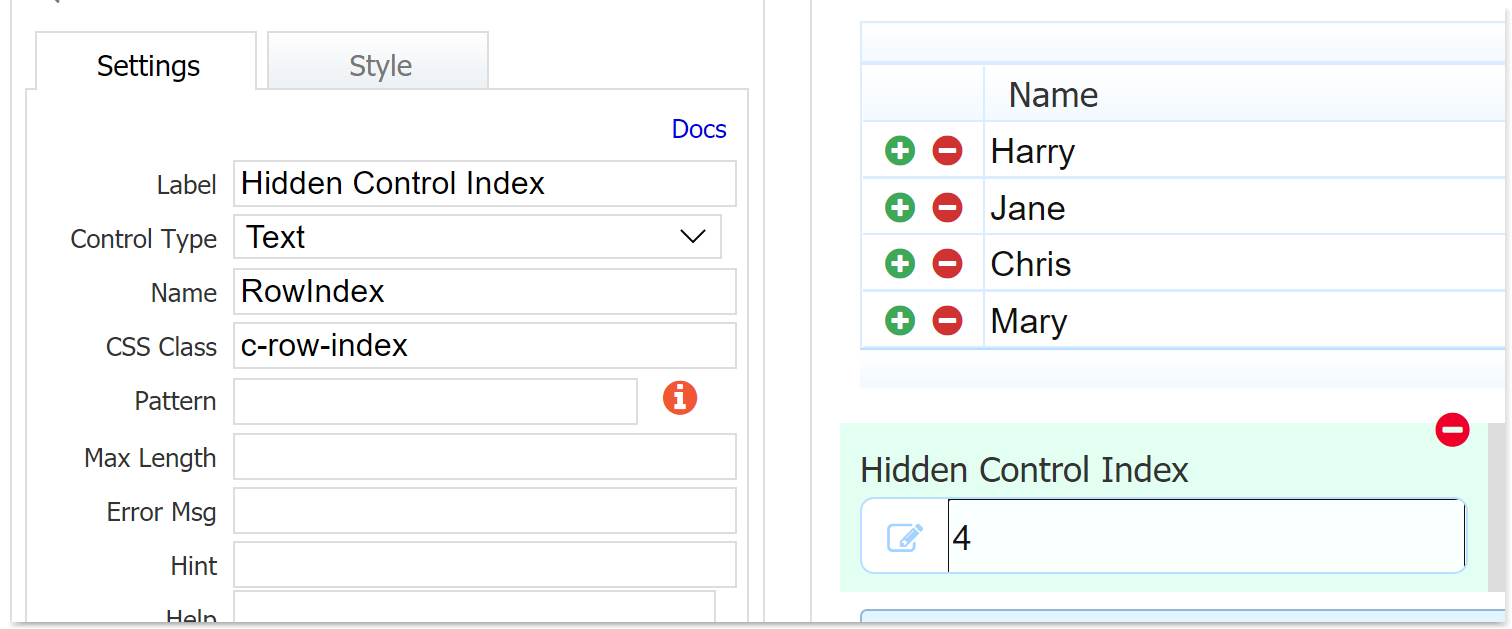
For this example, add two hidden text controls in your form.
- Hidden Control Index - set css class to 'c-row-index'
- Hidden Control Value - set css class to 'c-cell-value'
Add a business rule to display the values of these hidden controls in a Message control at run time.
if (RowIndex.value.length || CellValue.value.length) {
  message.value = "You clicked on row: <strong> " + RowIndex.value + "</strong> in the cell with value: <strong> " + CellValue.value + "</strong> ";
}
At run time, the message control first prompts the user to click a cell in the table. Once a cell is clicked/selected, the Custom JavaScript populates the hidden controls, which triggers the rule to run. The Message control then displays some text with the values of the hidden controls.
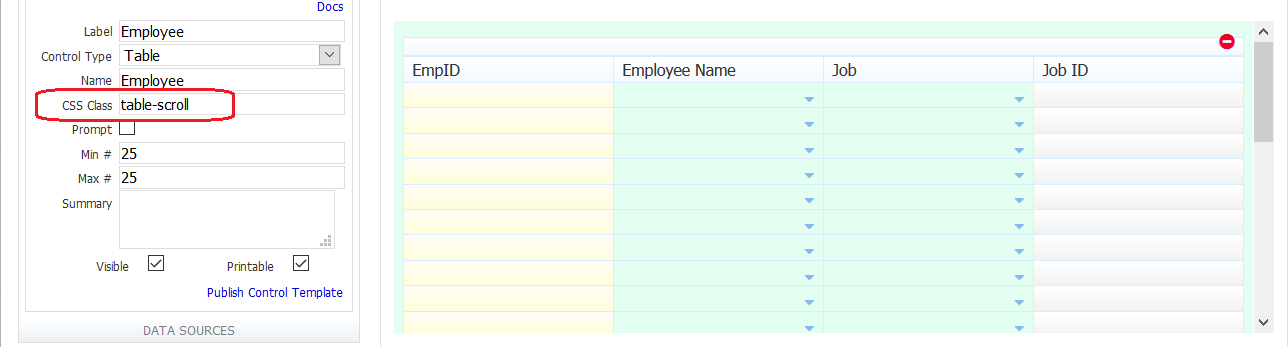
Constrain Visible Table Rows and Add Scrollbar
Let's say you have a table in a read-only form that has 100+ rows. To keep the form user-friendly, you want to restrict the visible table rows to a specific height and force a scrollbar to appear. Upload this custom JavaScript to your Project:
// frevvo custom JavaScript
var CustomEventHandlers = {
   setup: function (el) {
	   document.getElementsByClassName('table-scroll')[0].style.height = "275px";
	   document.getElementsByClassName('table-scroll')[0].style.overflowY = "scroll";
   }
}
Then on your table, set the CSS Class 'table-scroll'.
Add Horizontal Scroll Bars to a Table
Horizontal scrolling of tables works on tablets/phones but not on desktop. Lack of scrolling on desktop greatly limits the number of columns a table may contain. The only solution is the widen the form. However, you can apply this custom javascript at the project level to show horizontal scroll bars on your table control in desktop view.
- This works best when applied using Scripts at project level and has not been tested in a message control.
- For this Custom JS to work properly, table column widths must be set in pixels, not percentages. For example, column widths for a seven-column table could be 100px 200px 150px 250px 100px 100px 200px.
- Only those columns that are visible directly on the form without scrolling are printable.
// frevvo custom JavaScript
var tableScrollSetup = false;
var CustomEventHandlers = {
	setup: function (el) {
		if (!tableScrollSetup) {
			if (document.getElementsByClassName('table-scroll').length > 0) {
				var elements = document.getElementsByClassName('table-scroll');
				for(var i=0; i < elements.length; i++) {
					elements[i].style.overflowX = "scroll";
					elements[i].style.overflowY = "visible";
					elements[i].style.tableLayout = "fixed";
				}
				tableScrollSetup = true;
			}
		}
	}
}
Auto-expand a textArea
This custom JavaScript will automatically expand the visible rows of a textArea when it contains more than the default rows of text (instead of the usual behavior of adding a scroll bar). Add auto-expandable-textarea to the CSS Class property of the textArea controls that should use this behavior.
// frevvo custom JavaScript
var CustomEventHandlers = {
setup: function(el) {
if (CustomView.hasClass(el, 'auto-expandable-textarea')) {
FEvent.observe(el, 'keydown', this.autosize.bindAsObserver(this, el));
this.autosize(null, el);
}
},
autosize: function(event, element) {
setTimeout(function() {
var rows = element.rows;
var defaultRows = element.getAttribute("default-rows");
if(defaultRows==null) {
var defaultHeight = parseInt(getComputedStyle(element).height, 10);
if(defaultHeight==0 || isNaN(defaultHeight)){
return;
}
element.setAttribute("default-rows",rows);
element.setAttribute("default-height",defaultHeight);
}
element.style.height = "auto";
element.style.height = (element.scrollHeight) + "px";
var defaultHeight = element.getAttribute("default-height");
var height = element.getHeight();
var scrollHeight = element.scrollHeight;
var newRows = Math.ceil(scrollHeight / (height / rows));
var max = Math.max(newRows, defaultRows);
if (max === newRows) {
element.rows = newRows;
}
element.style.height = "auto";
element.style.height = Math.max(element.scrollHeight, defaultHeight) + "px";
}, 0);
}
}
Set Max Character Limit on TextArea
By default, TextArea controls let users type any text and are intended for longer, multi-line submissions. However, there may be times you want to limit the characters a user can enter in a TextArea, and you can do this with Custom Javascript. Upload the following custom javaScript to your project, and then set the CSS Class property of your TextArea control to maxChars.
// frevvo custom JavaScript
var CustomEventHandlers = {
    setup: function (el) {
        if (CustomView.hasClass(el, 'maxChars')) {
            FEvent.observe(el, 'keydown', this.limitText.bindAsObserver(this, el));
            FEvent.observe(el, 'keyup', this.limitText.bindAsObserver(this, el));
        }
    },
    limitText: function (event, element) {
        max_chars = 100;
        fldVal = element.value;
		if (fldVal.length >= max_chars) {
		     element.value = fldVal.substring(0, max_chars);
		}
    }
}
Automatically submit a form
This JavaScript example is relevant to Forms only. Let's say you have a new customer registration Form A that is normally forwarded to Forms B and C to complete registration for a new user. Returning Users skip Form B and go directly to form C.
This JavaScript example will automatically submit a form if a certain control has some specific value (say “not-new”) in it when the form is loaded. This might be useful in cases where a form needs to be submitted to post the data in it, but interaction between the form and user is not necessary. If the user's input is not required, this custom JavaScript can submit the form automatically.
Instead of using JavaScript, the same thing can be accomplished with a frevvo workflow with a precondition that skips a step or a templatized value of a control to decide where the user should be forwarded using Business Rules. This is the recommended approach and should be considered.
var CustomEventHandlers = {
   submitEl: null,
   setup: function (el) {
       if (CustomView.hasClass(el, 'conditional-submit')) {
           window.setTimeout('CustomEventHandlers.conditionalSubmit()', 2000);
           this.submitEl = el;
       }
   },
   conditionalSubmit: function () {
       var isValue = "not-new";
       if (this.submitEl.value == isValue) {
           SubmitView.doSubmit("Submit");
       }
   },
}
Add conditional-submit to the CSS Class property of the control whose value is to be compared.
Automatically Submit a Workflow Step
Workflow steps only allow for one Activity Document Action (ADA), but there are cases where you may want to configure a second ADA (such as a second email) from the same workflow step. If the step is at the end of the workflow, you can use Workflow Doc Actions to accomplish this task. For steps in the middle of a workflow, create an additional linked step, set up the second ADA on the added step, and then use a script to automatically submit that step so the users will not see it. The script is similar to that for Automaticallysubmitaform, but one key difference is that you will need a rule on the form that sets your conditional-submit control to the value specified in the script ("next" in the example below) on the step that should auto-submit, and then use the else action to set that control to empty on all other steps. Add conditional-submit to the CSS Class property of the control whose value is to be compared.
var CustomEventHandlers = {
   submitEl: null,
   setup: function (el) {
       if (CustomView.hasClass(el, 'conditional-submit')) {
           window.setTimeout('CustomEventHandlers.conditionalSubmit()', 2000);
           this.submitEl = el;
       }
   },
   conditionalSubmit: function () {
       var isValue = "next";
       if (this.submitEl.value == isValue) {
          FlowView.getFlowButton().onclick();
       }
   },
}
Extra Submit button
By default, each form has a submit button located at the end of the form. The forms designer lets you easily add additional submit buttons in a special area at the end of a form only. You can use the following JavaScript to create an extra submit button. Add a trigger control to your form and set auto-submit in the CSS Class property. Now you can use this trigger control as your Submit button and place it anywhere on your form.
var CustomEventHandlers = {
   submitEl: null,
   setup: function (el) {
       if (CustomView.hasClass(el, 'auto-submit')) {
           FEvent.observe(el, 'click', this.autoSubmit.bindAsObserver(this, el));
       }
   },
   autoSubmit: function (evt, el) {
       window.setTimeout('CustomEventHandlers.doAutoSubmit()', 2000);
   },
   doAutoSubmit: function () {
       SubmitView.doSubmit("Submit");
   }
}
Users expect the submit and cancel buttons to be located at the bottom of a form. Moving the location of the Submit control is not recommended.
Submit on Enter Key Press
This JavaScript example will submit the form when the user presses the Enter key. If you want to do this in a workflow, change SubmitView.doSubmit("Submit"); to FlowView.getFlowButton().onclick();
if (document.layers) {
   document.captureEvents(Event.KEYPRESS);
}

document.onkeypress = function (evt) {
   var keyCode = evt ? evt.which : event.keyCode;
   if (keyCode == 13) {
      SubmitView.doSubmit("Submit");
   } else {
      return true;
   }
};
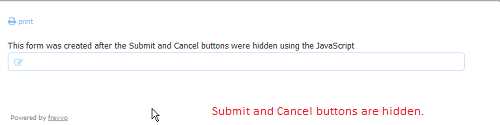
Hide the Submit and Cancel buttons
This Javascript example will hide the submit and cancel buttons for all forms in the project in designer and use modes. This might be useful for customers who want to embed frevvo into their own application. Simply upload the file containing the Javascript via the Script tab or add the code snippet to your existing one.
// frevvo custom JavaScript
var CustomEventHandlers = {
    setup: function (el) {
        if (CustomView.hasClass(el, 's-submit'))
            el.parentNode.parentNode.style.visibility='hidden';
        else if (CustomView.hasClass(el, 's-cancel'))
            el.parentNode.parentNode.style.visibility='hidden';
    }
}
Continue/Finish button on top of the workflow
It is useful to have the Continue/Finish buttons at the top and bottom of lengthy forms in a frevvo workflow. The JavaScript below will display a Continue/Finish button on the top of your workflow. Add a trigger control at the top of your form and set the CSS Class property to extra-submit. Now this trigger control will act as a Continue/Finish button also.
var CustomEventHandlers = {
   setup: function (el) {
       if (CustomView.hasClass(el, 'extra-submit')) {
           FEvent.observe(el, 'click', this.autoSubmit.bindAsObserver(this, el));
       }
   },
   autoSubmit: function (evt, el) {
       FlowView.getFlowButton().onclick();
   }
}
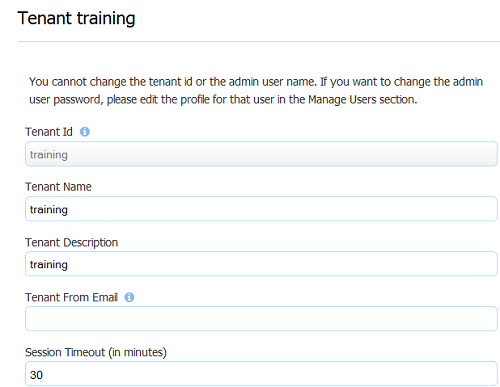
Prevent Session Timeout
Sometimes you may need the session timeout for a particular form to be a lot longer than the default session timeout that makes sense for your entire tenant. Imagine your tenant session timeout in frevvo is set to 30 minutes. One of your forms takes a long time to fill out. You want to allow idle periods greater than 30 minutes for that form only.
This JavaScript will refresh the session every 25 minutes so it never hits the 30-minute session timeout. Change the variable sessionInterval in the script to the desired time period, for example, a 25-minute session refresh would be var sessionInterval = 1000 * 25.
var sessionInterval = 1000 * 25; // milliseconds to minutes
var sessionRefreshURL = "/frevvo/web/login";

refreshFrevvoSession = function () {

   // make the request
   var xmlhttp;
   if (window.XMLHttpRequest) xmlhttp = new XMLHttpRequest(); // IE7+, Firefox, Chrome, Opera, Safari
   else xmlhttp = new ActiveXObject("Microsoft.XMLHTTP"); // code for IE6, IE5
   xmlhttp.open("GET", sessionRefreshURL + "?sessionRefresh=" + new Date().getTime(), true);
   xmlhttp.send();

   // set the timer to run again
   setTimeout(refreshFrevvoSession, sessionInterval);
}
setTimeout(refreshFrevvoSession, sessionInterval); // set the initial timer
In the above Custom js you can also use /frevvo/heartbeat in place of /frevvo/web/login.
Auto Control Validation
frevvo has built-in validation that will instantaneously display an error message, the control background color will turn yellow and you will see a warning icon on the right side of the control when invalid values are entered. For Example, the Quantity control allows only whole numbers. An error message and a  warning icon will display and the background color of the control will change to yellow if a number with a decimal point is entered. The forms designer can restrict users from entering a value with a decimal point using JavaScript. The script below will automatically remove a decimal point from the field and the error message will not display. Similar logic can be used to implement instant validation on other control types as well.
var CustomEventHandlers = {
        setup: function (el) {
            if (CustomView.hasClass(el, 'onlyDigits')) {
                FEvent.observe(el, 'keydown', this.allowOnlyDigits.bindAsObserver(this, el));
                FEvent.observe(el, 'keyup', this.allowOnlyDigits.bindAsObserver(this, el));
            }
        },
        allowOnlyDigits: function (event, element) {
            fldVal = element.value;
            for (var i = 0; i < fldVal.length; i++) {
                var nom = fldVal.charAt(i);
                if (isNaN(nom)) {
                    element.value = fldVal.substring(0, i) + fldVal.substring(i + 1, fldVal.length);
                }
            }
        }
    }
Add onlyDigits in the CSS Class property of the Quantity control.
Detect Browser Information
You can use JavaScript to detect information about the browser you are using. For Example: Wet signatures are not supported in older versions of some browsers. You might want to hide a section in your form that has a wet signature if the browser does not support it. To get details about the browser where your form is loaded, add a text control to your form and set its CSS Class property to detectbrowser. Upload the file containing the Javascript shown via the Script tab or add the code snippet to your existing one.
var CustomEventHandlers = {
  setup: function (el) {
     if (CustomView.hasClass(el, 'detectbrowser')) {
        el.value = navigator.userAgent;
        UberController.valueChangeObserver({target:document.getElementsByName('Browser')[0]}, document.getElementsByName('Browser')[0].parentNode.parentNode);
     }
  }
}
Replace the name Browser in the above JavaScript with the name of the text field you are using.
Write a business rule that checks the browser information populated in your text control to decide if the section of your form that contains the wet signature should be displayed or not.

Save Screenflow to Task List
If two sequential workflow steps are assigned to the same person, this creates a screenflow. Screenflows immediately navigate a user to the next screen in the workflow when they click the Continue button. Sometimes you don't want a user to automatically navigate to the next screen, for example, the next step might be something you want the user to perform days after the first step rather than immediately.
This custom JavaScript will save the workflow to the user's task list instead of displaying that next step to the user immediately. The user can then go back to their task list at a future time to resume their task. The JavaScript is effectively clicking the Save button when the workflow moves to second step. This will create a task in that users task list and then navigate that user to his home page.
saveTask = function () {
    if(document.getElementsByName('temp')[0].value == 0) {
       document.getElementsByName('temp')[0].value = "saved";

UberController.valueChangeObserver({target:document.getElementsByName('temp')[0]},
    document.getElementsByName('temp')[0].parentNode.parentNode);
    FlowView.getSaveButton().click();
    alert ("Task added to task list");
    window.open("<yourhttps://frevvo server host:port>/frevvo/web/tn/<your tenant>/user/"
    + document.getElementsByName('username')[0].value + "/app", "_top");
    }
}
setTimeout(saveTask, 500); // set the initial timer
In order to use this solution you will also need to:
- Add a text control named 'temp' to your form and uncheck the visible property to make it hidden.
- Add a text control named 'username' to your form and uncheck the visible property to make it hidden.
- Add the following business rule to your form.
if (form.load) {
  username.value = _data.getParameter('subject.id');
}
Phone Dash
This custom JavaScript automatically inserts dashes as the user enters a phone number into a Phone control. Characters other than the dash entered into the control are deleted. Add PhoneInsert to the CSS Class property of the Phone control to enable this JavaScript.
var CustomEventHandlers = {
    setup: function(el) {
        if (CustomView.hasClass(el, 'PhoneInsert')) {
            FEvent.observe(el, 'keydown', this.formatPHONE.bindAsObserver(this, el));
            FEvent.observe(el, 'keyup', this.formatPHONE.bindAsObserver(this, el));
        }
    },
    formatPHONE: function(event, element) {
        if (event.keyCode != 46 && event.keyCode != 8) {
            fldVal = element.value;
            var nom = fldVal.charAt(fldVal.length - 1);
            if (isNaN(nom) && nom != "-") {
                element.value = fldVal.substring(0, fldVal.length - 1);
            } else {
                if ((fldVal.length == 3) || (fldVal.length == 7)) {
                    element.value = fldVal + "-";
                }
                if (fldVal.length > 12) {
                    element.value = fldVal.substring(0, fldVal.length - 1);
                }
            }
        }
    }
}
HTTP Call
Although you can't access the http object directly from the WEB-INF/rules/include.js file, you can pass the http object as a reference to the include.js function.
So let's say you have the following function in include.js:
function getCustomerName(http, custId){
    return http.get("http://myservice/customer/" + custId);
}
You can call it from a rule:
if( getCusomterNameTrigger.clicked ){
  customerName.value = getCustomerName(http, customerId.value);
}