Workflow Step Types and Design
- Megan Ellis
This page discusses the various types of workflow steps available in frevvo, as well as when and how to use them.
Step Types
Workflow steps are one of five types:
- New Form
- Approval & Linked Steps
- Workflow Step Types and Design#HTTP
- Workflow Step Types and Design#Summary
- Existing form(s) that you created in the Form Designer
New Form
The Add Step wizard allows you to create a new form directly inside the Workflow Designer. It will come with a My Info section that contains several commonly used controls, and a business rule that auto-fills those controls with the logged-in user's information.
- Select Step Type "New Form".
- Provide a Step Name (this will also be the Form Name). If you do not add a name, frevvo will generate a unique and arbitrary name, i.e. Step 29. You can change the name in the Step Properties: Settings tab.
- Choose an Assignment Type.
The new step will appear in your workflow, and the Workflow Step Properties wizard will open on the page. To add or edit controls on the form, click the Guided Designer: Forms editing mode at the top of your page.
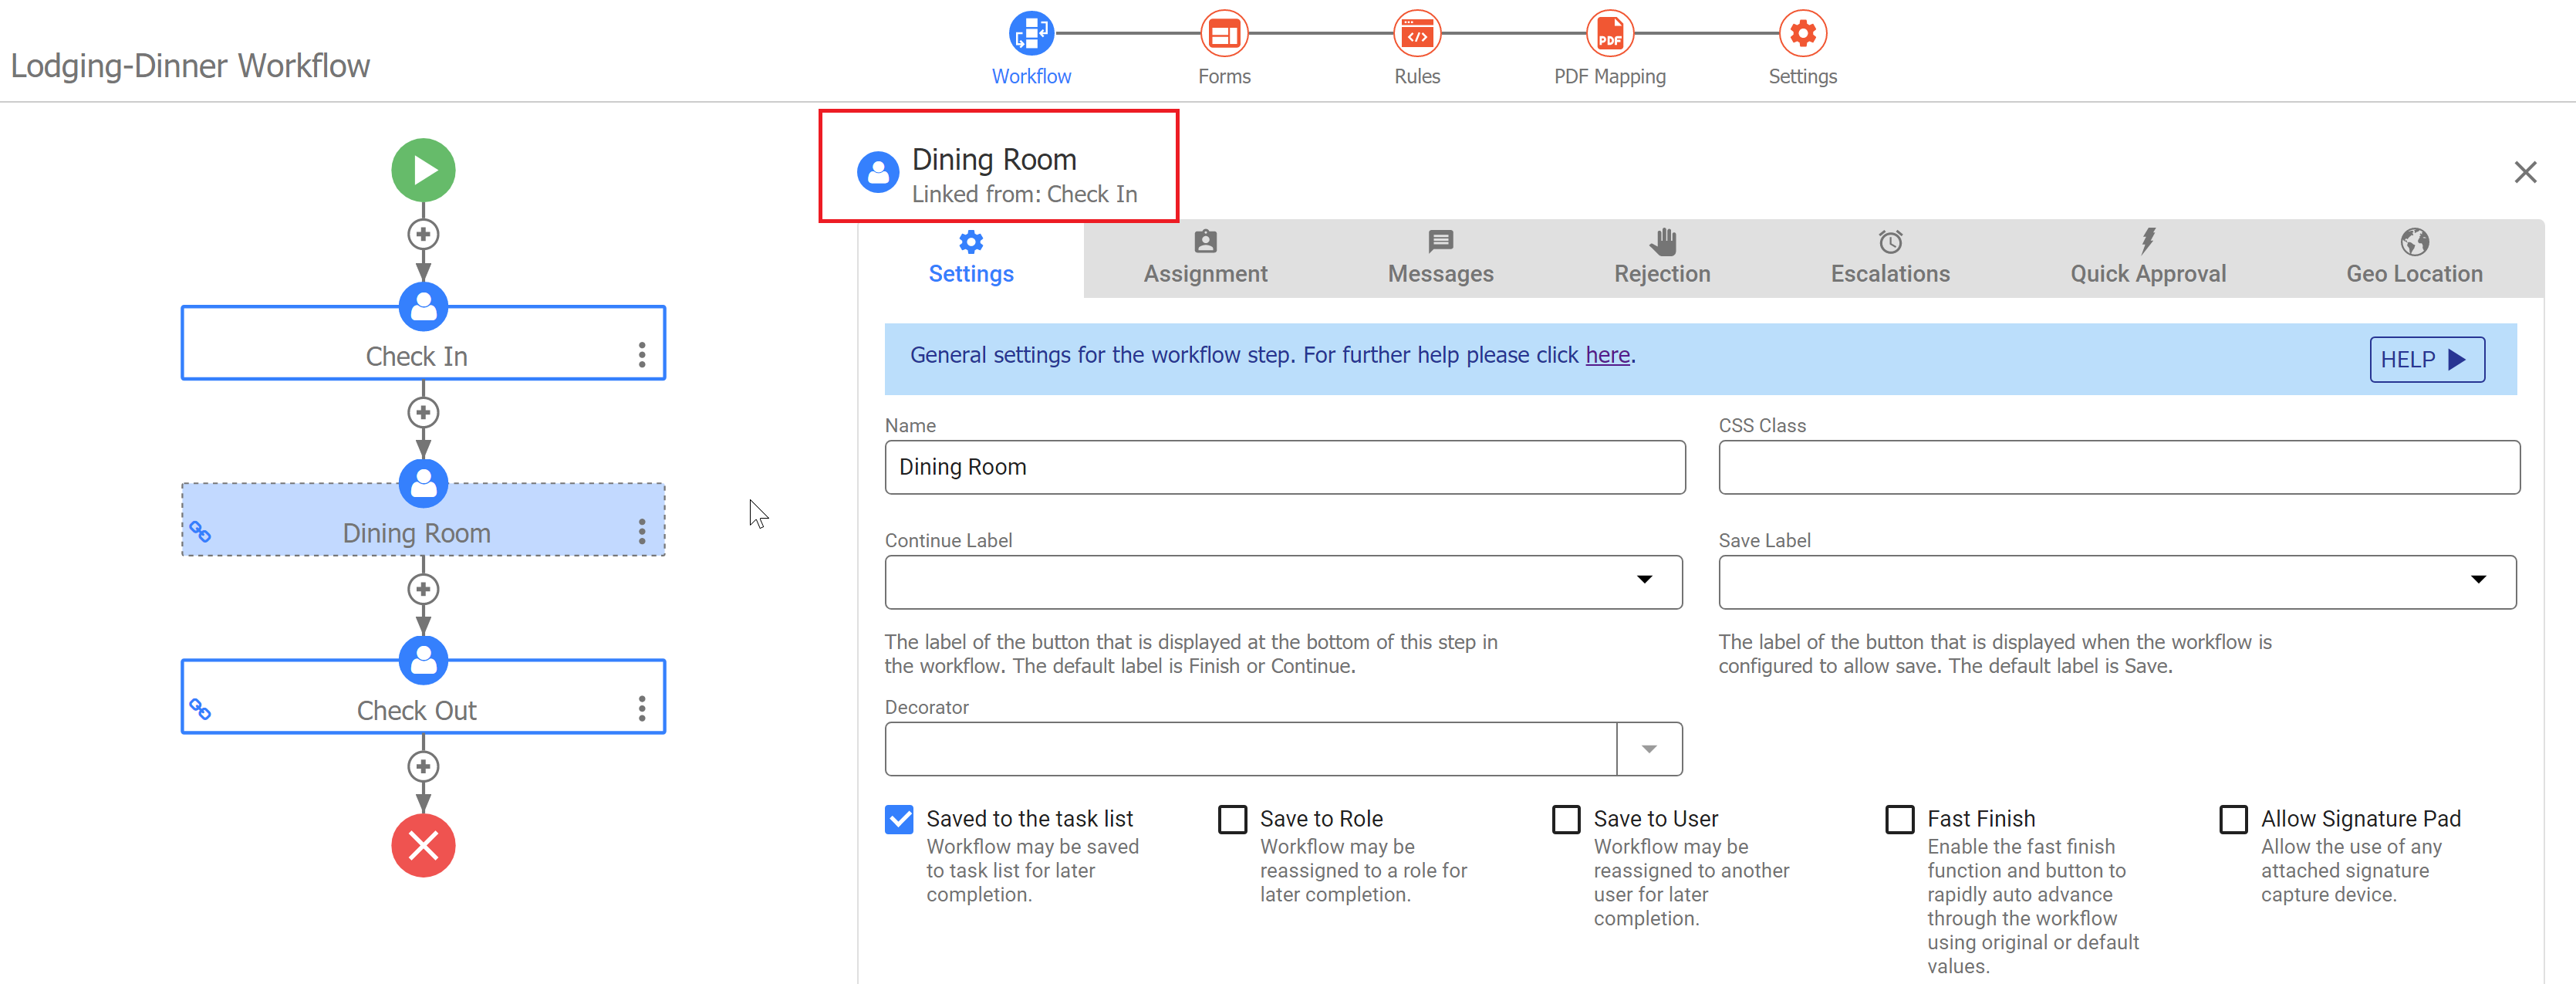
Approval and Linked Steps
Linked Steps
Many workflows often involve a number of people filling out different sections of a single form. When you're designing this type of workflow, the best practice is to use the Linked Steps feature. This method creates a linked version of a form for another step(s) in your workflow. One great advantage of this method is that if you need to make changes to the form step(s) after you've created your workflow, you only have to edit the "parent" form — the editing changes carry over to linked forms in the workflow. Conversely, if you drag multiple copies of the same form into a workflow to create steps, you'd have to make any changes to each copy of the form in each step.
You can easily show or hide different parts of a form for each step using Business Rules.
Approval Steps
An Approval Step is a type of Linked Step that automatically adds an Approval Section and business rules to show/hide that approval section on the step. In the Workflow Design Wizard, this is your only option for a linked step. You can always remove the section and rules later if you prefer. In an existing workflow, you will have the option to add an Approval Step (with the section and rules) or a Linked Step (simple copy, with no added controls or rules.)
One circumstance in which you might not want to use linked forms is a workflow in which each user is filling out a different form. See Linked Steps vs. Separate Forms below.
Create a Linked/Approval Step
- Create a new workflow with linked steps in the Workflow Design Wizard by selecting "Approval" for Step Type. This will also add approval sections to your form and rules that show/hide them on the correct steps.
- On an existing workflow, click the + icon in the workflow diagram to launch the Add Step wizard.
Either option links to the nearest parent form step above.
- Select Step Type "Approval" (comes with approval sections and rules) or "Linked" (does not add any controls or rules).
- Give the step a name; if you do not provide a name, frevvo will automatically name it <Parent Step Name> Copy.
- Select an Assignment Type.
The new step will appear on your workflow diagram and the Step Properties will open on the page. The Step Name and "Linked from: <Parent Step Name>" are listed above the Step Properties wizard.
Linked Steps Workflow Example
Approval workflows lend themselves to a Workflow Design pattern that uses Linked Steps. Any changes made to the parent form propagate to the linked steps. The frevvo Workflow Design Wizard is ideal for creating workflows with linked steps.
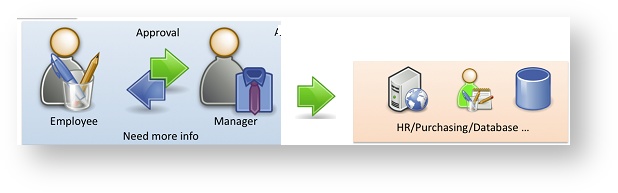
Consider an Expense Report with 3 steps:
- Step 1 is filled in by an employee
- Step 2 is approved/rejected by a Manager
- Step 3 goes to the Finance department for final processing.
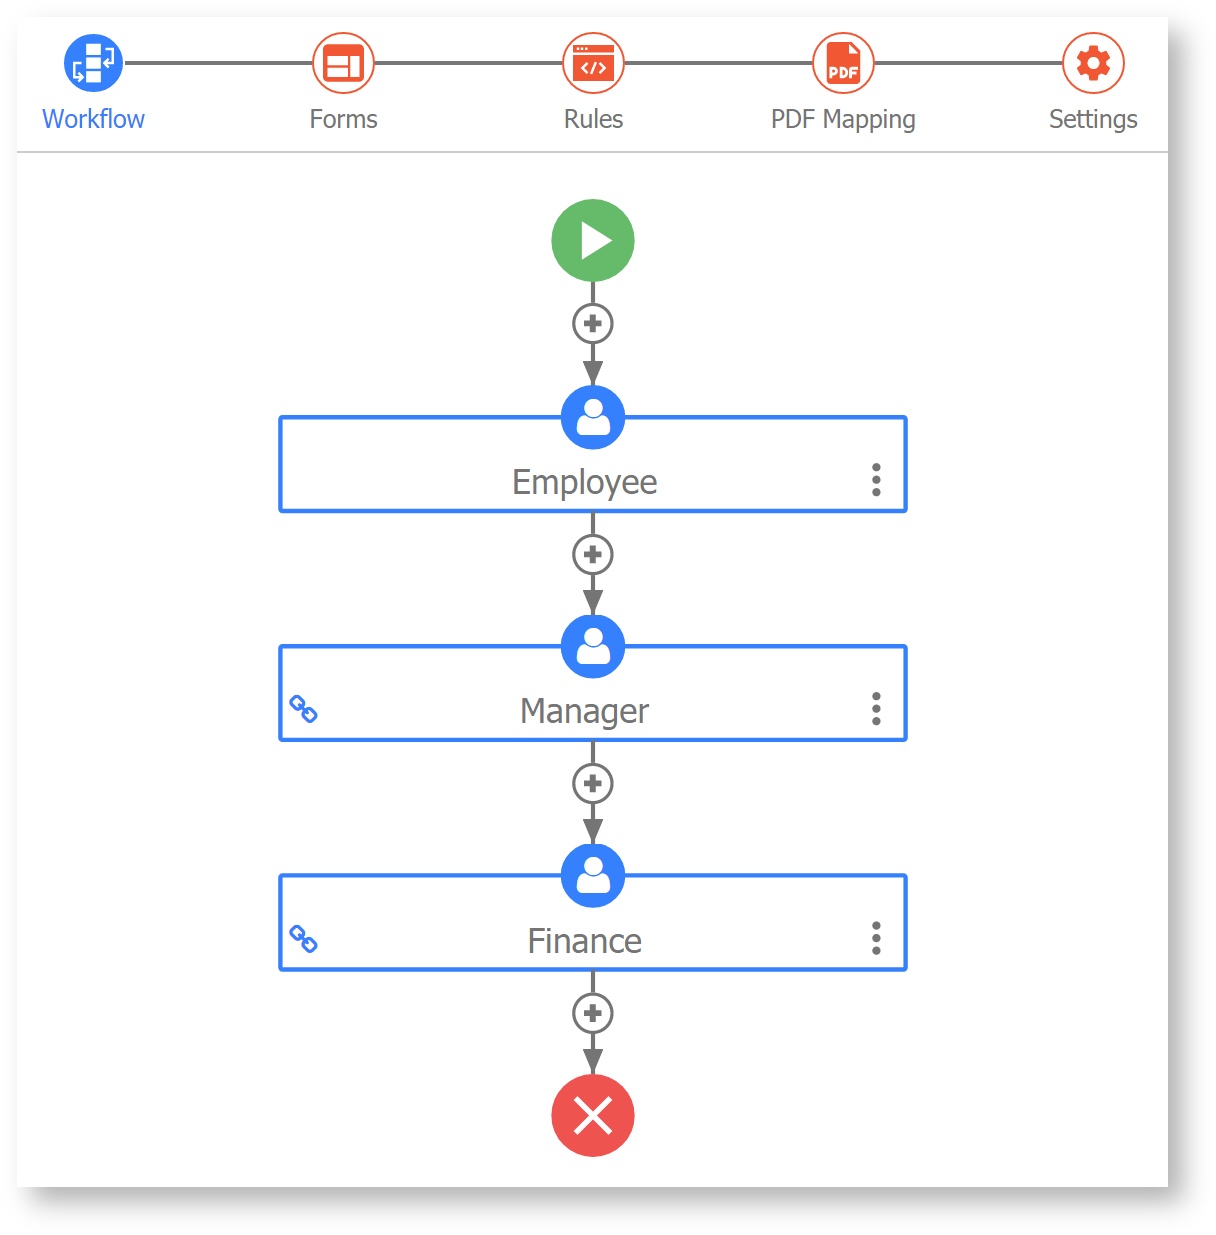
- Click
 Add Content and select Create a New Workflow to launch the Workflow Design Wizard.
 - Step 1: Step Name Employee, Step Type New Form, Assignment None
- Step 2: Step Name Manager, Step Type Approval, Assignment User (select a user id)
- Step 3: Step Name Finance, Step Type Approval, Assignment Role (select Finance role)
Notice the link icon on the Manager and Finance steps, indicating they are linked/approval steps.
- Switch to the Guided Designer: Forms editing mode.
 Notice a My Info section and two Approval sections have already been created. Add or Edit Sections for the Expenses, Manager and Finance to reflect your business requirements. Design the sections using any of the Palette Controls. Minimally, you can use a table to collect the Expenses and a Paid on Date and Reference Number field on the Finance step.
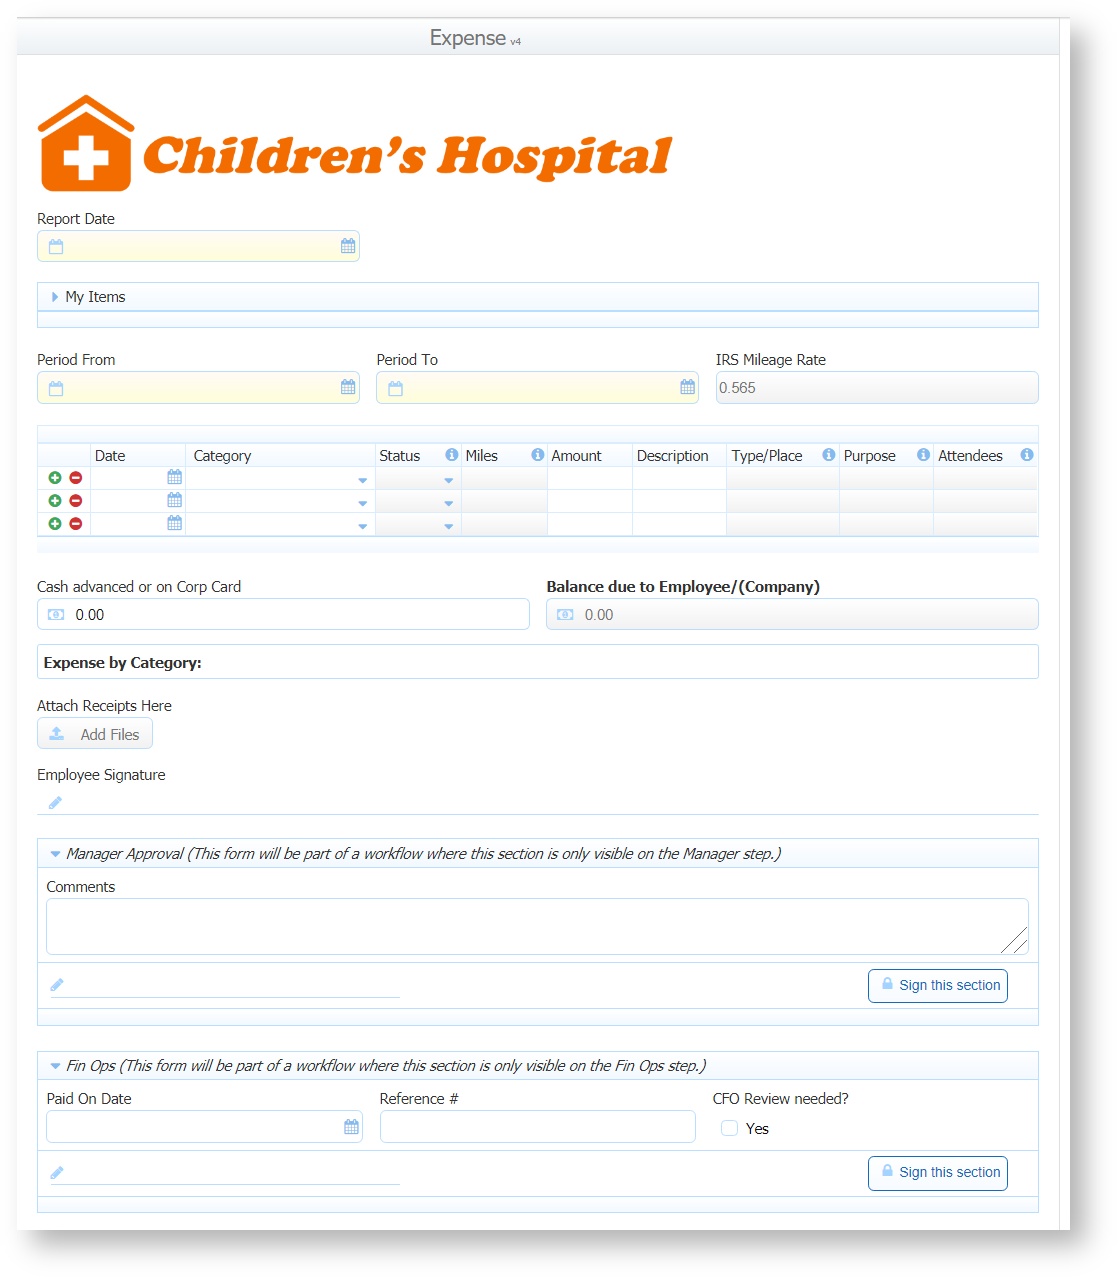
- Switch to Guided Designer: Rules editing mode. Notice that the Workflow Design Wizard already created rules to show/hide each approval section appropriately.
- Save and Test the workflow.
HTTP
HTTP Wait-Notify is a step configured with a post URL that can be added to a workflow. The workflow data is posted to this url when the task is executed. A call back url is included in the post. The workflow and task are suspended until the receiver posts back. The timezone must be added programmatically by the service you are using. HTTP steps can be performed by an anonymous user.
To add an HTTP Wait-Notify step, click the + icon in the place you want to add the step. This launches the Add Step wizard.
- Select Step Type "HTTP Wait-Notify".
- Optionally, add a Step Name. If you do not add a name, frevvo will name the step "HTTP".
The new step will appear in your workflow, and the HTTP Step settings wizard will open on the page.
Consider this scenario. Your company has a purchase process workflow. One of the steps in the workflow requires approval from several other approvers before the workflow can continue to the next step. These approvals should happen in parallel and not one after the other. A web component that would manage those approvals is in place. An HTTP step can be added to the frevvo workflow with a URL to the web component to collect the signatures. The callback URL will be included in that post. The workflow will be suspended until all the signatures are collected. The remote web component will notify the frevvo workflow using the callback URL when the signature task is completed. If the HTTP step in the workflow has doc actions configured, they will be performed and the workflow will proceed to the next step.
Now let’s take a look at a simple workflow that will accomplish the scenario described above. This workflow contains the Purchase Request form submitted by the company purchasing manager as the first step. The second step is an HTTP step that provides the URL to the web component that handles collecting the signatures from all the required approvers. The third step is a Summary step. Remember the workflow will be suspended until all the approval signatures have been collected by the web component. The web program will then use the callback url to proceed to the Summary step of the workflow.
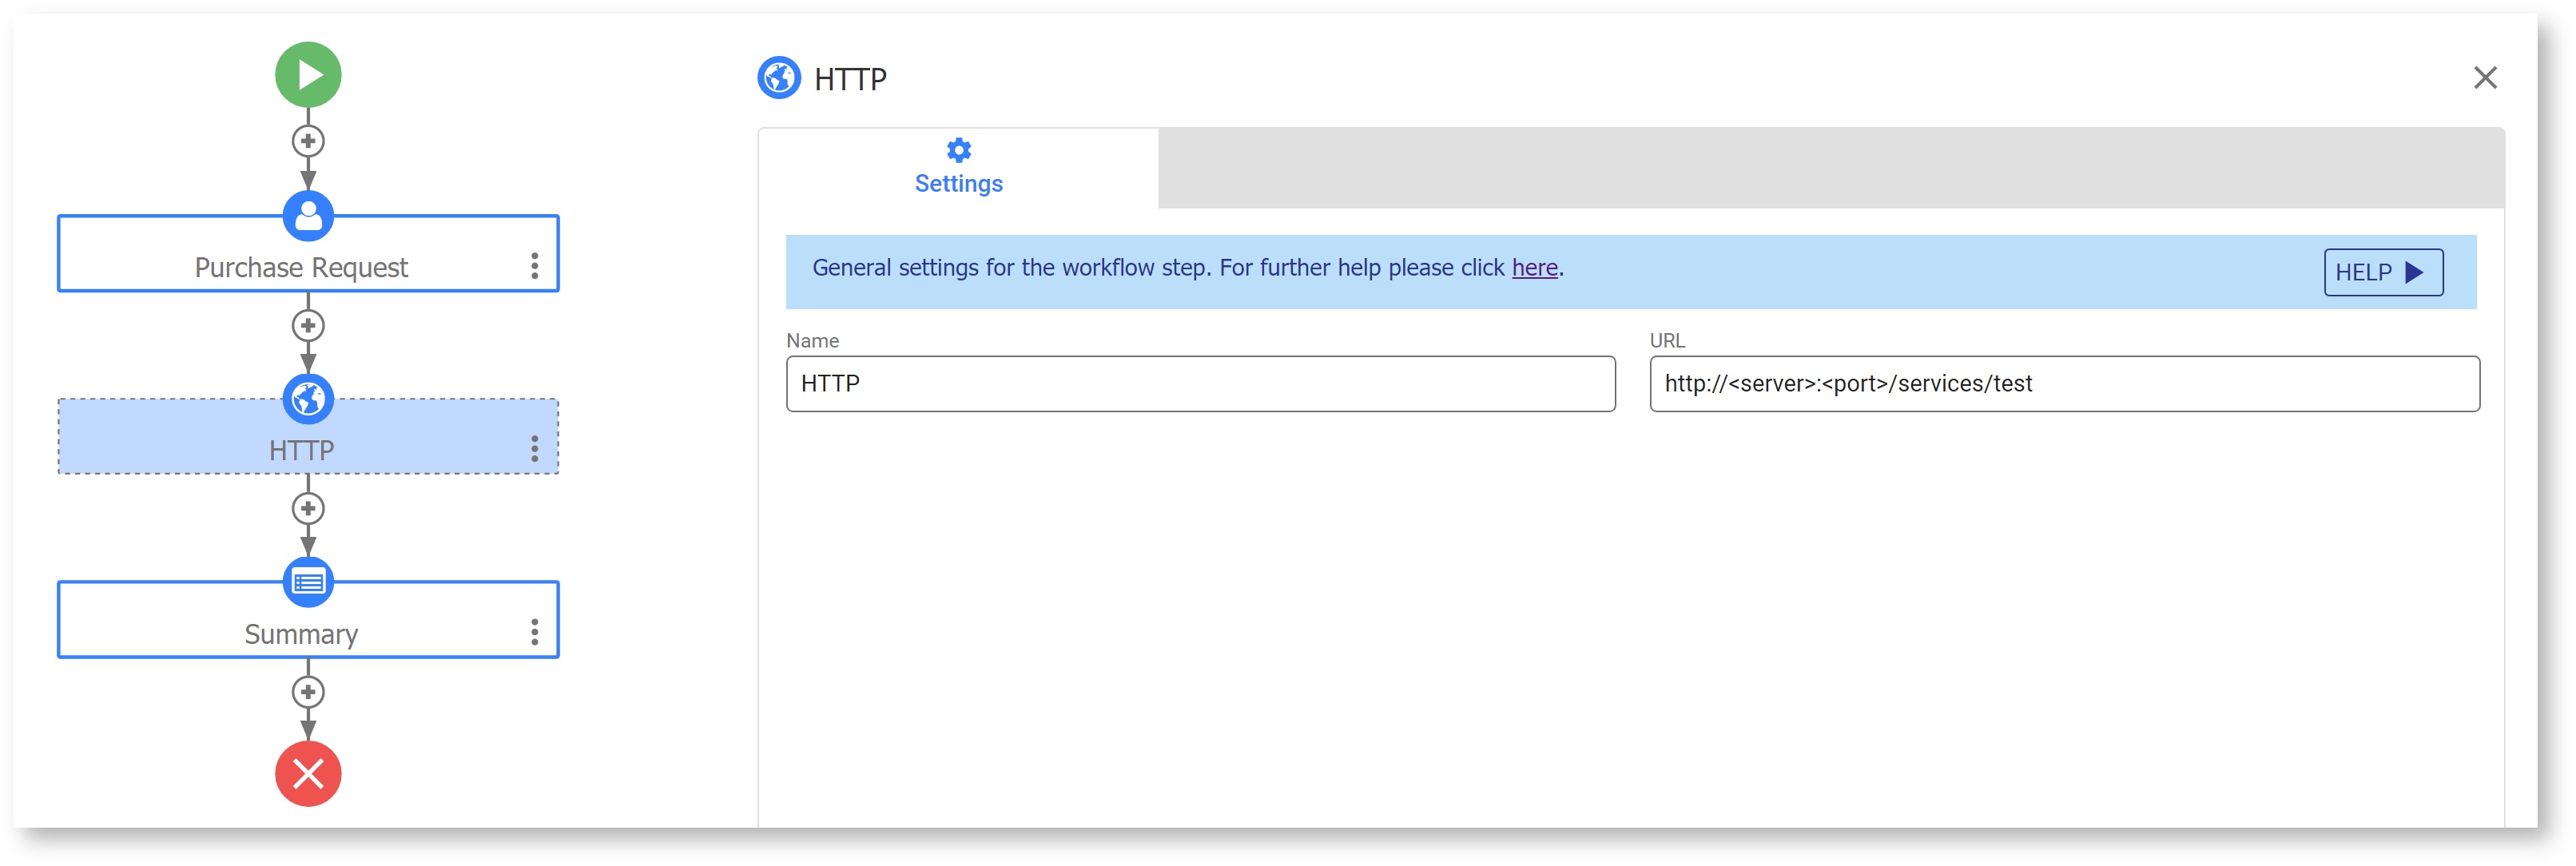
Click on the HTTP step and open the Settings tab. Enter the URL for your post. In the image below, we are entering the URL to a remote test server running a service that can be used to test this feature:
https://app.frevvo.com/services/testyanf
- Configure Email or a post to a web application if required. These actions will be performed when the HTTP step is completed.
When the first step in the workflow is submitted, an outbound message similar to the one shown below is captured in the frevvo.log:
Notice the latter portion of the entry contains the callback URL:

This URL is generated by the frevvo server and will point to whatever host/port the frevvo server is accessed on. If the frevvo.forms.server.external.url property is set in the frevvo-config.properties, it will always use the value of that property.
This URL is used by the remote service to “wake” up the frevvo workflow. Any document actions configured will be performed and the frevvo workflow will resume. Workflow visibility can be set to any of the choices.
You cannot reset a workflow to an HTTP step. Look for the status of WAITING in the Audit Trail to find HTTP steps in a workflow that are in a suspended state.
If navigation is used to go to the previous step, the HTTP step will be skipped. In this case, if a user who has navigated back, makes some changes in a form and proceeds forward through the workflow, the backend system will not have updated data. If you use the HTTP step, it is important to realize that it will not get called again if the user navigates around. The designer may not want to have the navigation bar visible or prior steps' data should be read-only. The HTTP step will get recalled if you reset to a prior step and the workflow continues through its normal steps.
Configure a History Message on the step before the HTTP step if you want to see relevant information in the audit trail.
Summary
The Summary step type will simply display a summary view of the data that has been entered into the various steps of the workflow prior to the Summary step at runtime. Clicking on the Details button navigates to the selected step for viewing/editing. The designer selects the fields to display in the Settings mode Summary Fields tab. Usually, you will choose a sample of the fields that provide a summary of the information entered.
To add a Summary step, click the + icon in the place you want to add the step. This launches the Add Step wizard.
- Select Step Type "Summary"
- Optionally, add a Step Name. If you do not add a name, frevvo will name the step "Summary".
The new step will appear in your workflow, and the Summary Step settings wizard will open on the page.
Previously completed steps in a workflow can be viewed by all users but editing data is only allowed for the user that initiated the workflow. For example, if the Summary step is part of a screenflow performed by the same user, editing is allowed when this user clicks on the Details button. Once the workflow navigates to a different user, previous steps are rendered read-only and cannot be edited. Refer to Navigating Between Steps for more information.
The Print button is available on Summary steps by default. Refer to Printing Workflows for the details. The designer can specify a CSS class, a Button label and a Decorator for the Summary step on the Settings property tab.
Existing Forms
You can also add a form you have already created and which is listed in your current project's forms home page. Adding an existing form to the workflow creates a copy of that form. If you later edit the standalone form, those changes will not affect the step in the workflow. It remains as it was at the time you copied it into the workflow. If you want to update the workflow to have a new copy of the form, delete the step from the workflow and re-add the updated form.
Alternatively, you can edit the form directly in the workflow. Similarly, these changes to the form inside the workflow do not affect the original form in the form home page.
To add an existing form, click the + icon in the place you want to add the step. This launches the Add Step wizard.
- Select Step Type "Use Exisiting Form: <Your Form Name>"
- Optionally, add a Step Name. If you add a name, this will also become the form name in the workflow. If you do not add a name, the existing form name will become the step name. You can change the name anytime in the Step Properties: Settings tab.
- Add an Assignment type.
The new step will appear in your workflow, and the Workflow Step Properties wizard will open on the page. To add or edit controls on the form, click the Guided Designer: Forms editing mode at the top of your page. When you add an existing form as a step in your workflow:
- PDF mappings associated with the form will be copied to the workflow
- If the form has a configured Email data to a specified location doc action it will be copied to the Email tab for that step.
- If the Email data to a specified address wizard is empty but an Additional Email doc action is configured, it will be copied to the Email tab for that step.
If the following properties are selected in your form, they will be unchanged when you drag and drop this form into a workflow as one of the steps:
Settings:
- Save/Load
- Task Info
- Allow Sign Pad
- Printable
Style:
- Orientation
Workflow Step Design
Linked Steps vs. Separate Forms
There are two design patterns to be considered when designing your workflow. Choosing one design pattern over the other really depends on the purpose of your workflow. The choices are:
- Use individual forms as your steps
- Use Linked or Approval steps
For example, if you were creating a workflow from a fifty-tab Excel spreadsheet, you can create forms for each tab and then drag the individual forms into your workflow for your steps.
Workflows where one form gets routed to a lot of people and they all have to work on it collaboratively, typically use the Linked steps approach.
There are several design paradigms for workflows that you may want to consider depending on your workflow requirements. You can find examples of each type here.
Merge Data on Separate Forms
One common design pattern is a workflow with multiple separate forms where you want data entered on one form to be visible on another form. In this case, the frevvo natural behavior of merging data based on Control Name is very helpful. If you have a control with the same name (and, if applicable, nested section name) on Form A and Form B, data entered on Form A will be visible on Form B. However, if the value is edited on Form B, the new value will overwrite the original value in the final submission. A best practice is to disable the control on Form B making it read-only. Please review the Form Control Names & Schemas section below for additional details.
Keeping your Forms and Workflows in Sync
Forms that are used as steps in a workflow can be created in the Form or Workflow designers. There are two approaches a designer can choose from when creating a workflow:
- Create forms in the Forms Designer and then add the form(s) into the workflow as the steps (Existing Forms).
- The designer can edit the standalone in the Forms Designer and then delete and re-add the updated forms as steps in the workflow. This method requires you to reconfigure any properties for that step. (assign users/roles, task information, Pending messages, customized Save and Continue buttons etc).
- Alternatively, the designer can edit the form directly in the workflow by going to the Guided Designer: Forms editing mode . This approach is quicker but the changes that you make to the form from within the workflow designer do not update the original, standalone form.
- Create the workflow by adding a New Form step. Then go to the Guided Designer: Forms editing mode to edit the form within the Workflow Designer.
Extract a Form from a Workflow
Let's say you create the perfect form step in a workflow and now you want to use it in another workflow. How do you extract the form step from the workflow so that it is available as a standalone form?
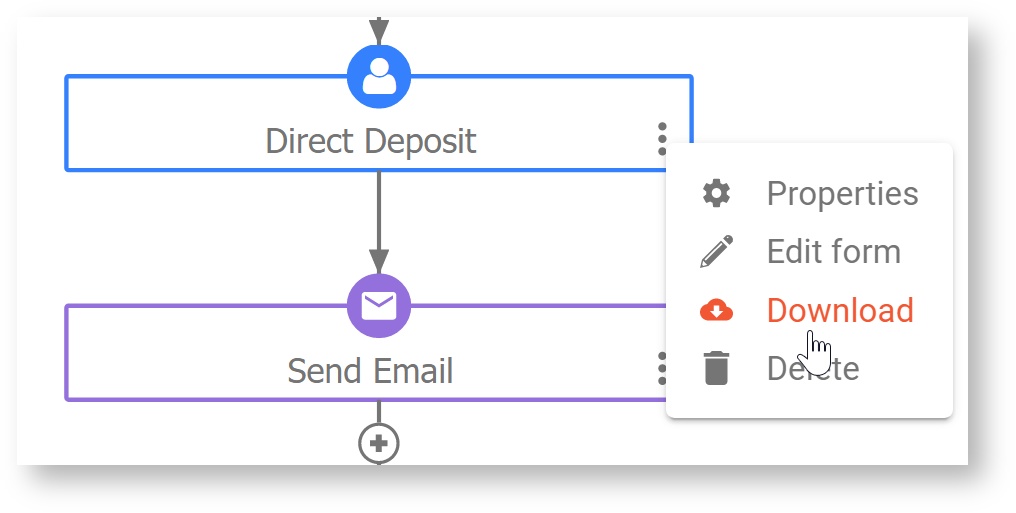
You can download any step from the workflow as a standalone form and upload it into the Forms Designer. Simply click on the step's Action Menu in the workflow then Download Form. The Download option will only appear on parent steps of Linked Steps in a Workflow.
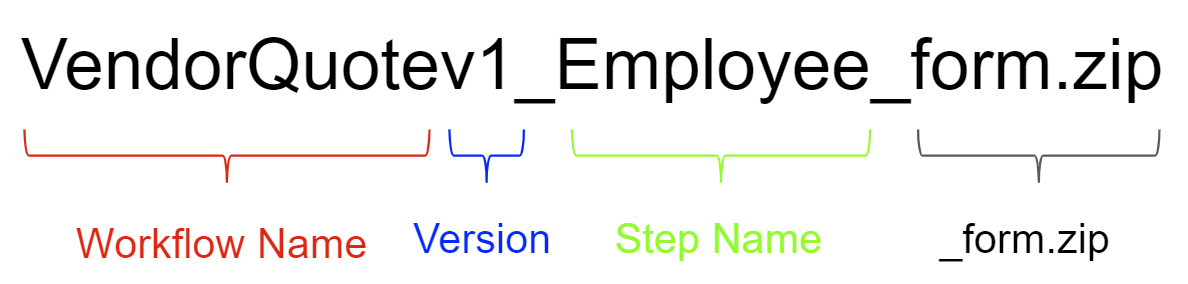
The downloaded file is a _form.zip file and is named according to the convention shown below:
- the workflow name
- the version number of the form step plus 1
- _flow step name
- _form.zip
Here is an example of the downloaded file for step 1 named Employee in a workflow named Vendor Quote.
This is an easy way to keep your forms and workflows in sync and reuse forms created/updated in the workflow designer in other workflows or as standalone forms. Properties are retained in the downloaded step as shown on the chart.
| Step Type | Form Action | Form Doc Action | Webhook | Doc URIs | |
|---|---|---|---|---|---|
| Existing Form | Retained (if configured on original) | Retained (if configured on original) | Retained; shows in Additional Email tab | Retained; shows in Additional Email tab | Cleared when added to workflow; not retained |
| New Form | N/A | N/A | Retained; shows in Additional Email tab | Retained; shows in Additional Email tab | N/A |
- PDF mappings from the workflow will NOT be included in the download of the extracted step.
Form Control Names and Schemas
When you create a workflow, frevvo creates an XSD schema of the workflow that combines all the fields in all the forms in the workflow.
To see how this works, go to the Forms & Workflows Home Page, click the![]() Action Menu for any workflow, and select
Action Menu for any workflow, and select ![]() Download Schema. Open the file in a text editor to see that it contains elements for all the controls in each form in the workflow.
Download Schema. Open the file in a text editor to see that it contains elements for all the controls in each form in the workflow.
When designing the forms you want to use in a workflow, be aware that if controls in different forms have the same name, their data will merge in the XML document that frevvo generates when the workflow runs and is submitted. While the Form Designer automatically prevents you from giving two controls the same name within the same form, it doesn't prevent you from giving controls in different forms the same name.
For example, suppose one or more forms in a workflow have a text control named FirstName. On one form, this might be an employee's first name; on another, it might be a manager's or customer's first name. When the workflow runs and is submitted, the last data entered in the control will be saved in the resulting XML file, overwriting any previously entered data. To avoid this, you should give the fields unique names — such as EMPFirstName' or MGRFirstName' — so they'll be separate elements in the workflow's XSD schema and separate pieces of data in the submitted workflow's XML file.
Another way to avoid data merging is to "nest" controls with the same name within Section controls that have different names. For example, suppose you have one form with a Section Control named Employee' that contains a text field named FirstName. A second form has a Section control named Manager that also contains a text field named FirstName. If you use both of these forms in a workflow, the FirstName data does not merge because the two controls are nested — at the same level — within Sections that have different names.
See Section Controls in Designing Forms for more information on using these controls. Be aware that Section controls can themselves contain Section controls, and that this affects the nesting level of the controls they contain.
Considerations for Forms Generated from Schema
The same data merge consideration is true for form data generated by schemas. For example, suppose you're designing an employee performance review workflow that includes two forms. Form 1 contains past performance review data (perhaps read-only) from a database; Form 2 is the same but blank for the current review.
If both forms update the same database table, they may be generated from the same XSD created by a database connector. The issue is that data in Form 2 (current review) will merge with the Form 1 values (past review) if their schemas are the same.
One solution for this problem would be to write two different queries in the database connector so that the past review and current review schemas have different namespaces, which would prevent them from merging.
Digital and Wet Signatures in Signed Sections named the same in more than one form used in a workflow will not be merged. However, identically named signature controls in two different steps in a workflow share the same wet signature.