Live Forms v7.4 is no longer supported. Please visit Live Forms Latest for our current Cloud Release. Earlier documentation is available too.
Submissions Stored Inside of Live Forms - Legacy View
comes with a built-in submissions repository. The repository can run on top of most SQL databases. By default, your form data is stored in the repository and can be viewed from the Submissions page.
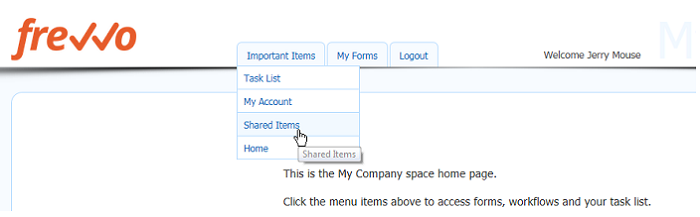
To access submissions for a particular form/flow, the designer user navigates to the Forms Home Page or the Flows Home Page and clicks the  Submissions(legacy) icon for that form or flow. The designer can grant permission to view/edit submissions to non-designer users/roles via the Access Control feature. Non-designers granted view/edit permissions, access submissions from the Shared Items tab.
A Shared Items link is added to newly created Spaces automatically and can be added to existing spaces.
The various items on the Submissions page are explained below.
On this page:
Submission Data
The submissions repository can store your form data in three ways -- as data values; as an xml document; as a pdf form image. By default for efficiency, data is only stored as xml. If you plan to export your form data to an Excel spreadsheet or plan to view your form data in the submission detail view you must configure your form to save the data field values. See the documentation for setting up key/saved fields.
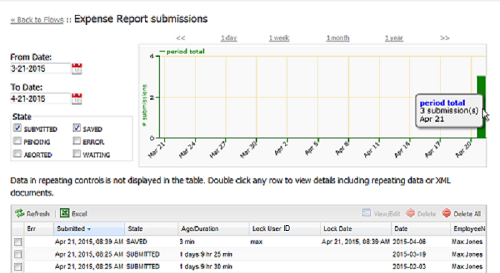
Submission From Date and To Date
The two date controls specify the time period for the submissions you see. The dates default to the current date and one month earlier, so you see one month of submission results when the Submissions page first displays. Adjust the dates if you want a shorter or longer time period.
Submissions Graph
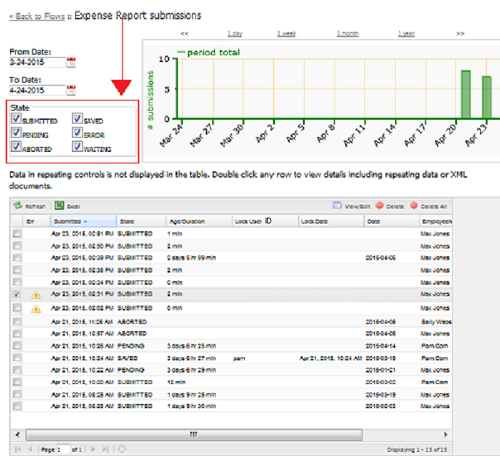
The graph shows you how many submissions you’ve received over a given time period. The green bars provide a breakdown of exactly when you received the submissions. Hover over any green bar to display a tooltip submission count. Forms/flows that have been submitted display by default when you first click on the Submissions icon. If you select additional submission states from the State checkbox on the left, the graph will adjust based on your choices.
Other important details about the graph:
- The graph reflects the time period you see in the two date controls based on the options checked in the State checkbox.
- The time increments along the bottom are calculated automatically to make sense for the time period you view--seven days for the weekly view, for example.
- The green bars (period) reflect the number of submissions in a given period.
- The <<day>>, <<week>>, <<month>> or <<year>> links above the graph are shortcuts to quickly change the date range. The graph will show you the most recent period—for example, if you click <<week>>, you’ll see a week’s worth of submissions, starting from a week ago up to the current date. The dates you see in the To Date and From Date controls also will be adjusted automatically.
- The unlabeled << link to the far left moves the date range back. The exact behavior depends on the dates in the date controls before you click the link. If the date range is May 11th to May 15th, for example, clicking the << link will move the range back to May 7th to May 11th. Similarly, clicking the >> link slides the date range forward.
Submissions Table
The Submissions table will show submissions in the following states: SUBMITTED, SAVED PENDING, ABORTED, ERROR and WAITING. Simply check the appropriate check box in the State section. When you click the  Submissions icon, you will see SUBMITTED items by default. You must choose at least one state or you will see the message "Please select to/from dates and at least one state".
Here is an explanation of the available states:
- SAVED/PENDING: This will give you all the tasks which are saved or pending. This helps when you want to see all open tasks for a certain form/flow
- SAVED: This will return only those tasks which were created when users clicked the Save button on the form/flow to save their partially filled forms
- PENDING: This will return all tasks which are pending, meaning someone else put these tasks in the users task list
- SUBMITTED: This will return all tasks which are completed, i.e. the form/flow for which this task was created has been submitted
- ABORTED: This will return all the tasks that were deleted/aborted so the form/flow never got submitted
- WAITING: The WAITING status can be used to find workflow tasks that have an Email or HTTP activity. A submission will show a state of WAITING when a workflow is routed to an anonymous user and the flow is suspended until the this step is completed.
It would be easy for a manager to check the current status of Expense Report approvals by checking one or all the submission types in the State box.
The table displays the most recent 20 submissions in the selected range. Use the scroll controls at the bottom of the table to see the next 20 submissions or to jump to the first of last batch of 20 in the selected date range.
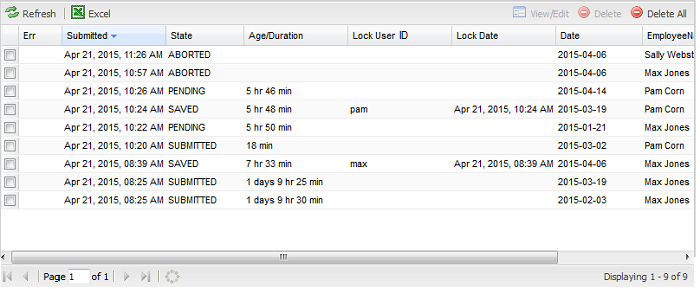
By default the submission table displays columns for submission time/date, state, Age/Duration, Lock User and Lock Date. These columns are explained in the table below:
| Field | Formatted | Default Column | Description |
|---|---|---|---|
| Submitted | Date/time | Yes | Time/date of the submission |
| State | Text | Yes | Submission status: SUBMITTED, PENDING, ABORTED, SAVED, ERROR WAITING. This column displays the submission types selected in the State |
| Age/Duration | Days, Hours, Minutes | Yes | For completed submissions (State=Submitted) this is the time interval for how long it was in process - from the first incomplete submission (Pending, saved, etc.) until it reached SUBMITTED status. If the submission is currently incomplete (i.e. SAVED, PENDING or WAITING), then the time interval shows how long has it been in process so far (Age). |
| Lock User ID | Text | Yes | If the submission is currently locked (and not SUBMITTED), this is the user id who has it locked. |
| Lock Date | Date/Time | Yes | If the submission is currently locked (and not SUBMITTED), this is the time/date when it was locked. |
The submitter is the Live Forms user ID of the logged in tenant user submitting the form or blank if the form was submitted by an anonymous user. The version tells you how many times you have edited the form. This is helpful if you have updated your form and need to track how many users submitted the newest version. (When you create a form the version number starts at 1 but Live Forms increments the version each time you revise your form.)
A  yellow icon in the Err column indicates the data was captured but there was an issue with the request. For example, if you set the form action property to go to a URL after the user clicks Submit but the URL is invalid, you would see a yellow icon. Or if the form action was set to send an email but the email address was missing, this will also cause a yellow icon to appear on the submission.
In addition to the default columns, the table contains a column for each key field that you setup for this form in the designer. If you are viewing a date range that contains multiple form versions and you changed the key fields from one version to the next, you will see a column for both the new and old key fields. If the key field is a repeat control or table control item, the data will appear as a potentially sparsely populated comma separated list of values.
You can show or hide additional column data by hovering over any column header and clicking the dropdown arrow that appears.
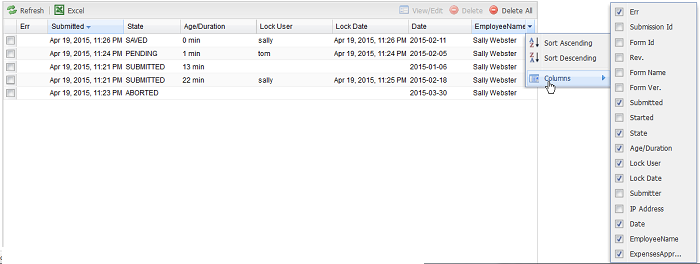
If you want to see when the submission was created, add the Started column to the table.
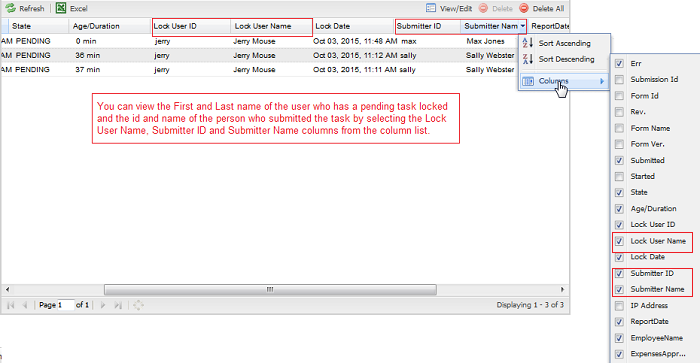
When viewing Pending tasks, you can see the First and Last name of the user who has the task locked and the ID and name of the submitter by adding theLock User name, Submitter ID and Submitter Name columns to the Submission table.
Submissions Detail
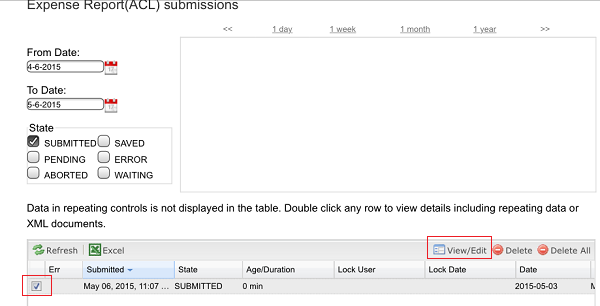
When you click the Submissions icon, you will see submissions that are in the default state of SUBMITTED. Notice the View/Edit and Delete a single submission are greyed out. Checking the checkbox preceding the submission in the table enables these buttons.
To view a particular submission results document, double click the submission row of interest in the table or if viewing/editing submissoins on a moblie device, check the checkbox preceding the submission and click on the enabled View/Edit icon. The image shows the submission table on the iPhone:
You will see a Data, Signature and Document Tab. Click X to exit the form.
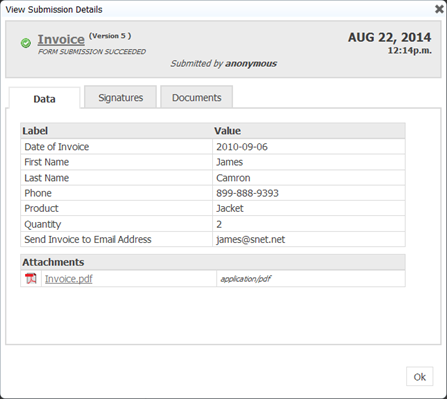
- The Data Tab shows the user’s view of the data. This means for money controls you’ll see dollar signs, decimals and commas, for example. The Label column corresponds to the labels on your form, and the Value column shows you what the user entered in each control. This tab is view-only; you cannot edit any data shown here. This tab displays only form fields setup as saved fields in the form designer. If you do not see a specific form field then go back and edit this form to add the field to the saved fields.
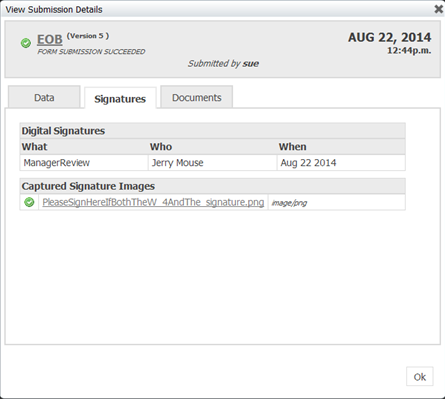
- The Signature Tab shows you all the users that signed the form using
' wet and digital signature features.
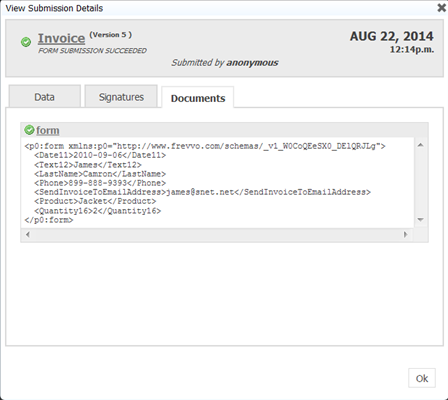
- The Documents Tab shows you the exact XML document that was generated when the form was submitted.
Viewing Attachments & PDF Images
Scroll to the bottom of the Data Tab to see all attachments uploaded to the form submission. If you selected Save PDF for this form in the form designer, you will also see an attachment named <form name>.pdf. This is an image of your form exactly how the user saw it when they filled it in and submitted it to you. Remember, decorators and placeholders do not appear in PDF's. The image below also shows W4-pdf and I-9.pdf attachments. These are additional Pixel Perfect PDFs generated for the Employee's Withholding Allowance Certificate and the Employment Eligibility Verification federal forms. Click the links on the Data Tab to view the PDFs or attachments.
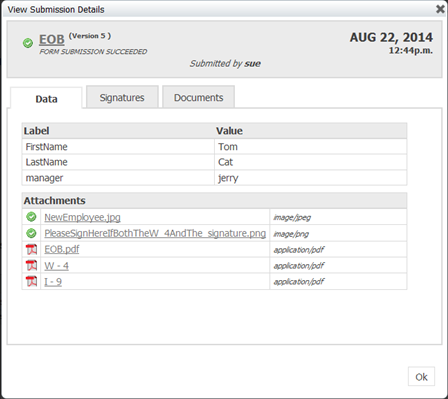
One of the attachments is a Wet Signature image. Clicking on the Signature tab lists the manager, Jerry's digital signture and the and wet signature image of the new employee. The signature image can be downloaded from the Data or Signature tabs of the form submission. There you will find information about any digital signatures that were stored with the form. See Electronic Signatures for more information.
Selecting zip as the Restricted/Mime type, uploading a zipfile and submitting the form may exhibit some unexpected behavior when downloading the zipfile from the submission if you are using IE9+ as your browser. Clicking on the attachment in the submission repository does not save the uploaded zipfile as a zipfile. Instead, it will save it as a file named Upload91. As a workaround, you can open the file using winrar.exe and then save it or simply use right click and and select the 'save as' option.
Currently the layout/style for submission pdfs depends on where the last activity is submitted. For Example, If the first activity in a flow is submitted from a space and the second activity is performed directly from a Task List outside the space, the submission PDF renders in the layout/style the Task List uses. If the last activity in a flow is submitted from a space, the submission pdf renders in the space's layout/style.
You can specify the name for the pdf and margins, header/footer content. Click the links for the details.
Viewing XML Documents
always stores your form data as XML documents. To view the XML data, click the Documents tab in the Submission Details panel.
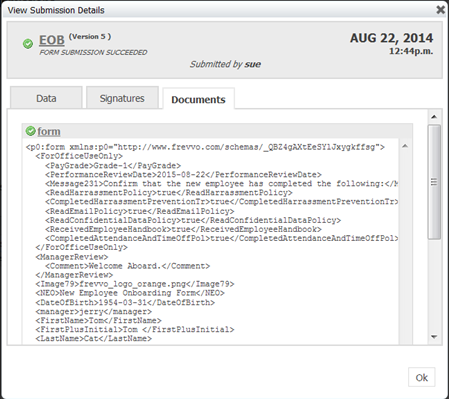
Dates will be stored in the YYYY-MM-DD format. There is no conversion to UTC timezones for the time control in the XML document. Date/Time values will be converted to the XML standard YYYY-MM-DDTHH:MM:SSZ.
Submission Errors
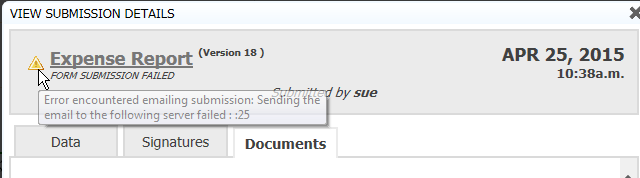
If your submission had an error, you'll see an icon in the Err column in the submissions list. Hover over the icon to get information about the error.

To get more information, double-click on the submission to view its details, and again hover over the icon.
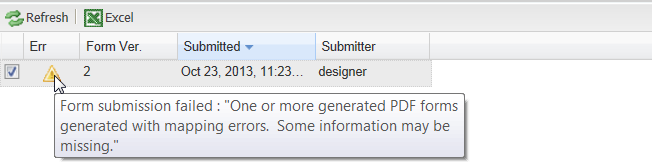
If the mapped pdf has a severe mapping error such as (Invalid E-form field), the flow will submit and the pdf is generated. The submission is marked in error with a icon in the Submissions table. You will see the error: "One or more generated PDF forms generated with mapping errors. Some information may be missing." on the submission.
Submissions created when the Solr is down will show the error "Could not send submission to insight server" and the submission will not display in Reports.

Once the Insight server is restarted and the Insight Data Batch job is run, the submissions will show in the Recent Submissions report.
Editing Submissions
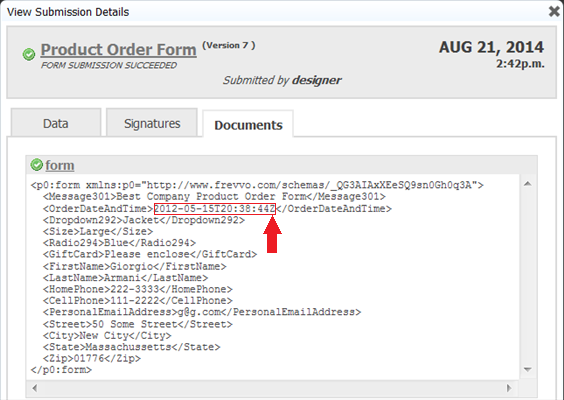
Only submissions in the SUBMITTED state can be edited. If you have the correct permissions, submissions can be edited easily by clicking the form name rendered as a clickable URL on the submission. In this image below click on "Product Order Form" to edit the submission.

This will reload the current version of the form with the data from this old submission. If the form is linked to any back end systems (via Doc URIs) these links will not execute as it would possibly change the submissions data. You can then edit the data in the form. All date/time controls will have the values automatically loaded in your machines local timezone. The submission date/time in the image below shows Aug 21, 2014 2:42 pm. This date/time is the timezone where the form server was running when this form was originally submitted. The <OrderDate>2012-05-15T20:38:44Z</OrderDate> is the date/time value in the OrderDate form field converted to UTC timezone. When this form loads, if the browser's timezone is America/New_York, the OrderDate control will display the value 16:38:44 as America/New_York is -4 hrs from UTC on a date where Daylight Savings Time is in effect.
Forms configured with a Doc URI will not execute the Doc URI when you edit the submission. The data displayed when you edit a form submission is from the submission data at the point in time when the form was originally submitted. Any Doc URIs will not execute and thus will not refresh data from your backend system.
When you click submit on the form the data in submission repository with be updated with the new data. If the form properties are set to save a Pdf then the Pdf will also be replaced. You must perform a refresh to see the updated information for Saved/Key fields for forms/flow on the Data tab after editing a submission.
If the current version of the form is different then when the data you're editing was originally submitted then some of the data may not be visible. For example if your form contained a field for "detailed description", and the current version of your form no longer has that field as the designer removed it, then the detailed description data will exist but will not be visible/editable.
The designer can grant permission to view/edit submissions to non-designer users via the Access Control feature. Once permission is granted, submissions are accessible as Shared Items. It is also possible to build your own application that enables editable access to non-designers using the Data API.
Online users can edit submissions by default. The edit link can be turned off for all users by modifying the frevvo.submission.edit.link configuration property in the <frevvo-home>/WEB-INF/web.xml or the <frevvo-home>/tomcat/conf/catalina/localhost/frevvo.xml files for In-house customers.
Instantiate Older Submissions
Form/flow submissions are grouped by formid and uniquely identified by a submission id. Normally, allows you to instantiate from submission using the formtype or flowtype uri and the _submission parameter. The supplied _submission parameter value corresponds to the latest submission for that formid. If you are instantiating an older submission id, you see the following message: "Access Denied. This submission has already been processed".
The URL parameter (_override=true) allows the re-instantiation to happen even if the _submission does not correspond to the latest for the formid sequence. If you want users to see and potentially re-submit older versions, you will must append the _override=true parameter to the form/flow share link.
Let's say you want your non-designer users to be able to resubmit older versions of a form/flow. For example, imagine populating this year's Budget form with the information from the Budget form that was submitted last year. Now all you have to do is update the information for the current year instead of filling in the form again.
The designer must grant view/edit permissions to the non-designer users via the Access Control feature.
Append the _submission id paramater with the submission id and the override=true parameter to the form/flow share URL. The designer user can locate the submission id by adding the submission - id column to the submissions table.

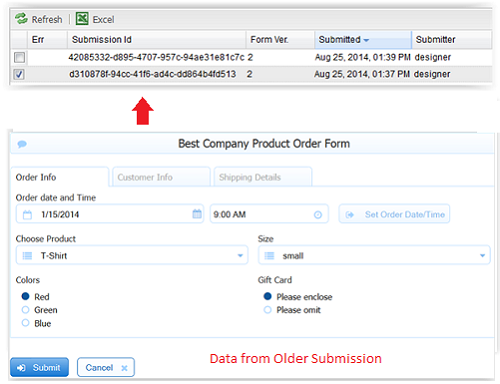
3. Copy the form/flow URL and append _submission=<ID ENTRY FROM FORM SUBMISSION TABLE> - Here is an example of the Product Order Form with the submission id, d310878f-94cc-41f6-ad4c-dd864b4fd513, which references an older submission.
http://localhost:8082/frevvo/web/tn/doctenant/user/designer/app/_zQEN0Cx9EeSLmcVfjx9TOA/formtype/_QG3AIAxXEeSQ9sn0Gh0q3A/popupform?_submission=d310878f-94cc-41f6-ad4c-dd864b4fd513
4. Without the _override=true parameter appended to the URL, the "Access Denied. This submission has already been processed" message will display.
5. To access this submission, append the _override=true to the form/flow share url:
http://localhost:8082/frevvo/web/tn/doctenant/user/designer/app/_zQEN0Cx9EeSLmcVfjx9TOA/formtype/_QG3AIAxXEeSQ9sn0Gh0q3A/popupform?_submission=d310878f-94cc-41f6-ad4c-dd864b4fd513&_override=true
6. The values displayed are from an older submission of the Product Order Form.
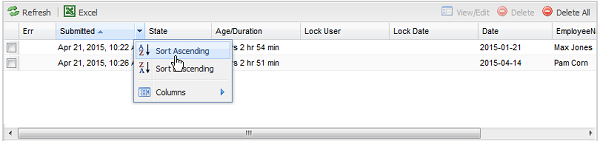
Sorting Submission Results
When you mouse over a column in the Submission area you’ll see the  icon. Click it and choose from several sorting and grouping options:
- Sort Ascending - sorts the results in ascending order, based on the column you selected.
- Sort Descending -- sorts the results in descending order, based on the column you selected.
- Columns -- this will display checkboxes with each column name; uncheck any columns you don’t want to see or check any columns to add columns that you do want to see. Only the fields in your form specified as key fields show as column possibilities.
At any time as a shortcut you also can click the form heading to sort the results in ascending or descending order.
Remember to refresh the Submission page, after making changes to columns.
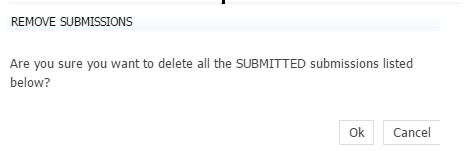
Deleting Submissions
When you click the Submissions icon, only submissions with a status of SUBMITTED display. Notice the View/Edit and  Delete a single submission icons are greyed out and the Delete All icon is enabled. When clicked, the delete all action will only delete SUBMITTED items. You will be asked to confirm.
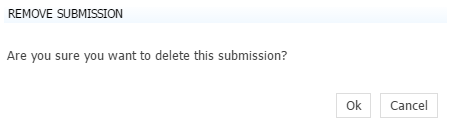
To delete a single submission, check the checkbox preceding the submission in the table. Notice the View/Edit and Delete a single submission icons become enabled. This will only be enabled when a SUBMITTED submission is selected. You will be asked to confirm.
Viewing Submissions in Excel
In order to export data to Excel you must setup your form fields as Saved fields. Click the arrow for information about setting up Saved and Key fields. Form fields, in the order listed on the Saved Fields list, become columns from left to right when the submissions data is exported to Excel.
Saved Fields
Saved Fields are stored in the database when the form/flow is completed. The fields you select will be displayed in the Submission Detail for each submission. You can also search the submissions repository for these fields using the API.
On the Form/flow properties panel, click the Setup Key/Saved fields link to open the wizard.
Let's say you set up the Saved Fields in a Product Order Form as shown below: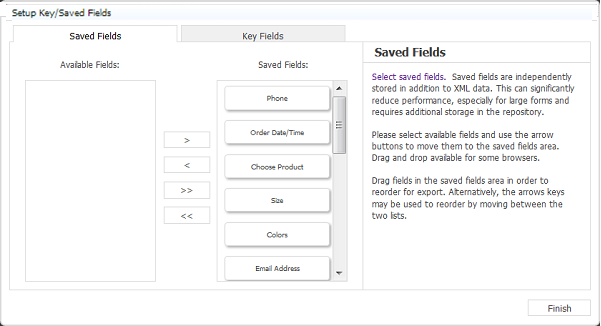
When you click the  Excel icon to export the submissions data to an Excel Spreadsheet, you will be given the option to open or save the file. The file will be named using the range of dates of the Submission data, if you choose to save it to disk . For Example, you might have submission data from February 15th to March 15th of the year 2013 that you want to export. The file name would be something like Submissions%28021513-031513%29(1).xls. Opening the file will show the
 tenant and application name, the date range of the submission data and the number of submissions. The portion of the Excel Spreadsheet shown in the image is an example of a modified output file.

Perhaps, as the form designer, you decide that the Phone column should be between the Color and the Email Address columns.You can change the order of the columns using the arrows or drag and drop to this: 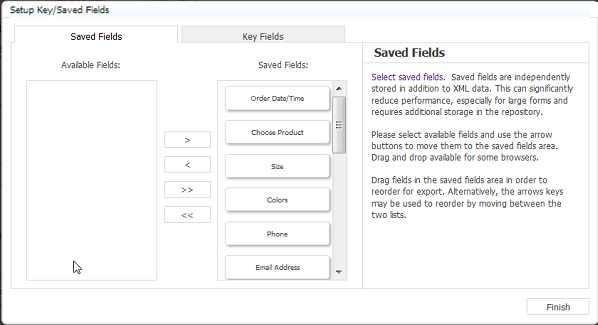
Exporting the submission results to Excel will arrange the columns in the spreadsheet as shown: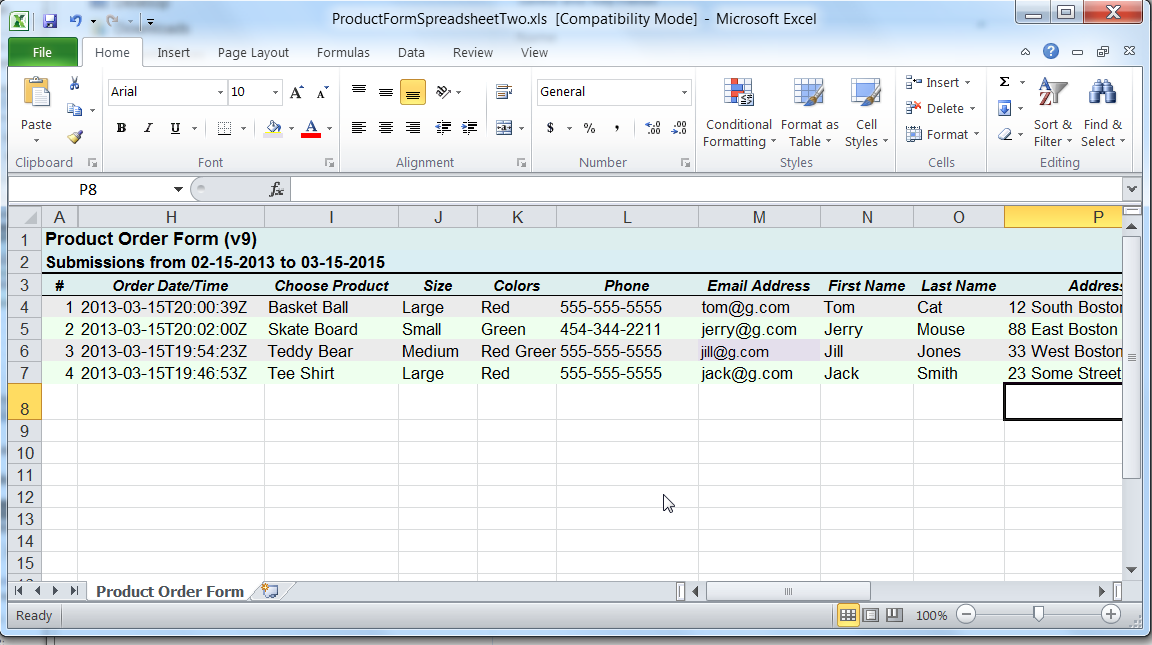
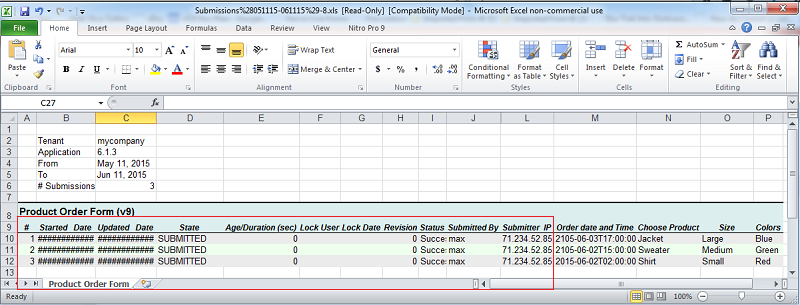
When you first open the Excel spreadsheet, the submissions meta data (Started Date, Updated Date, State, Age/Duration, Lock User, Lock Date, Revision, Status, Submitted By and Submitted IP) makes up the first 11 columns. You cannot reorder the meta data columns.
Fields saved as part of a submission are always included in the export. For example, suppose several submissions of the Product Order Form were created with the Saved Fields list shown in the image: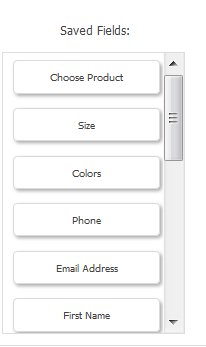
The designer then removes the Phone field from the Saved Fields list. Exporting the previous created submissions after the change, will order the saved fields by the new list. Previously saved fields which are present in the submission but not in the current list are added on as the right-most columns of the spreadsheet.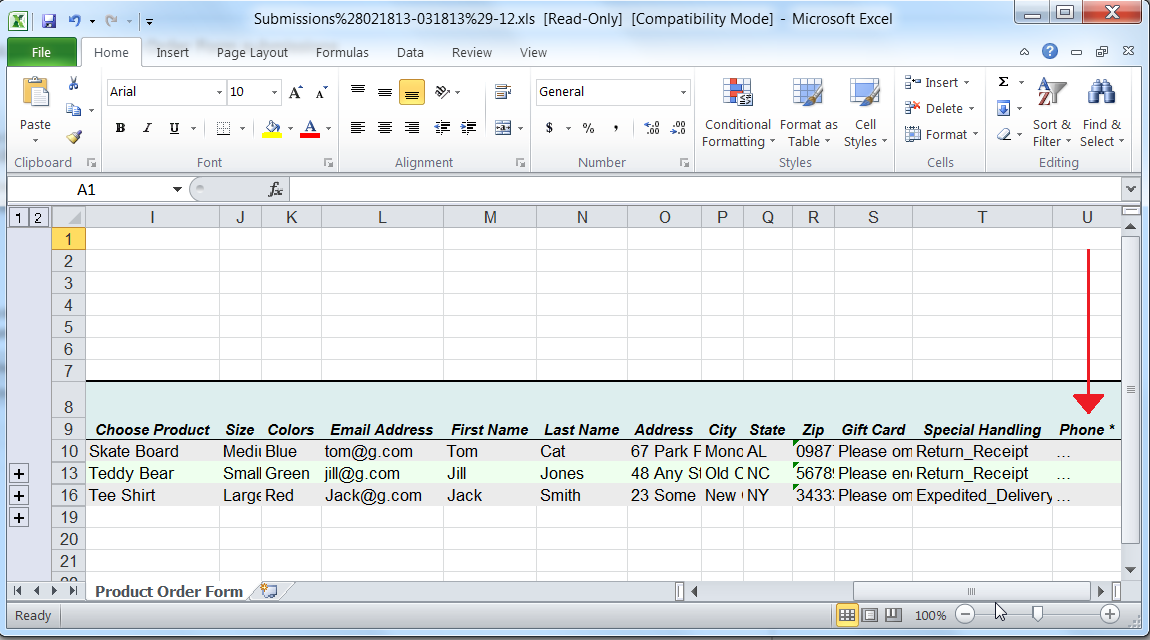
Key Fields
Click the Key Fields tab. Up to five key fields may be efficiently stored along with the form submission. Key fields do not significantly reduce performance nor do they consume significant additional storage in the repository. It is also very efficient to search the submissions repository using these key fields. Key fields are also directly displayed in the Submissions Table so you can easily view them in a tabular view. 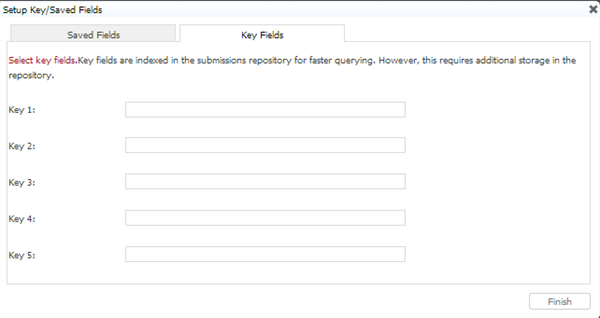
Multiple Controls with Same Name
It is possible that your form contains two or more controls with the same name nested inside different sections. For example if your form has a section control named Parent containing a text control called Name and has another section control named Child also containing a text control called Name, the Key/Saved Fields wizard will display two entries called "Name". In order to to know which is which, simply hover your mouse over each entry in the list for Saved Fields or dropdown for Key Fields and you will see the path to the control. In the example below you see Parent > Child > Name.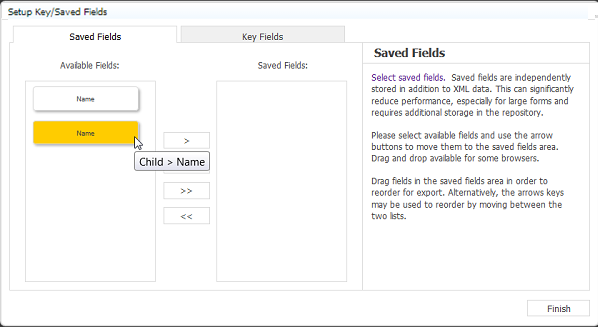
The same name fields will be categorized in the data tab of the form submission like this: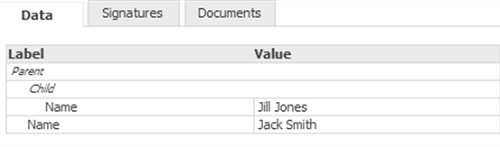
Click the icon at the top of the table to view the submission results in Excel. The spreadsheet reflects the submissions that are displayed in the table (filtered by date and submission type).
.png?version=1&modificationDate=1509723041000&cacheVersion=1&api=v2&width=500&height=223)
The default columns in the submission table appear in the spreadsheet even if you are not displaying them in the table. Default columns for Lock User Name, Submitted By ID and Submitted By Name have been added/renamed to display that information if it is included in your submissions. Hide the columns in Excel if you do not want to display them in your spreadsheet.

Selecting the Excel export feature when viewing submissions from the Shared Items tab (inside or outside of a space) on an IOS device (iPad,iPhone), may have to install an application to edit and save .xls files. This requirement is browser specific.
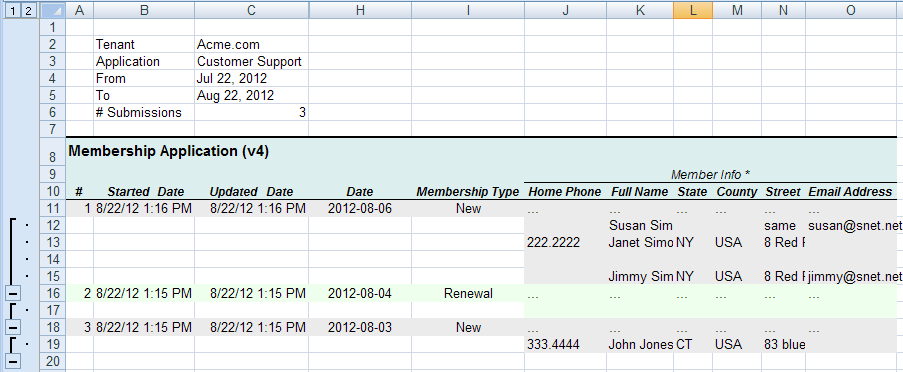
Repeating Data
Forms containing repeat controls will generate multiple rows in the exported Excel worksheet for each form submission -- one row for the submissions itself plus one row for each repeat item added and filled on the form. The Excel workbook groups the data for each submissions. Thus initially it may appear that there is only a single row of data in your workbook with a "..." displayed for the repeating item. Simply click the "+" in the far left-hand side of each row to expand the group and view all your repeating data.
Here is how the Excel workbook looks when you initially open it from the Submission Repository:

Click the "+" to expand the group and see all repeating data.
You should be aware that the table control in a form defaults to three rows. If you only fill in 2 rows, the third row is still part of the submission. The export to Excel shows a blank row in the resulting spreadsheet.

If you remove the empty row from the table in the form by clicking the icon before submitting, the empty row will not display.

Columns added to the Submission Table will not show in the Excel spreadsheet. See Submission Table for information about how to add a column. For Example, adding the form ID column to the Submission Table will not put a Form ID column in the Excel spreadsheet. This is as designed.


Time and date time values exported to Excel are submitted UTC values from the submission doc. Time data will be displayed in the Excel spreadsheet in UTC format. For Example: The Product Order Spreadsheet shows the data from two customer orders entered at 9:00 AM and 2:30 PM in the Eastern Standard Time Zone. Time data will be converted to UTC and stored in the xml document. Exporting the submissions data to Excel will show the time data converted to UTC as it is in the xml document. See the Order Time column in the image.

Processing submission data using the frevvo API
provides a complete API for interacting with the system. Using the API, you can query submissions, download submission PDF/XML etc. Using the API is documented in its own Tutorial.