Live Forms v7.4 is no longer supported. Please visit Live Forms Latest for our current Cloud Release. Earlier documentation is available too.
Access Control and Shared Items
- Former user (Deleted)
- Former user (Deleted)
The Access Control feature offers the designer increased flexibility when assigning access to forms/flows and form/flow submissions. Runtime access can be assigned to specific users/roles as long as they exist in your tenant. Also, the Access Control feature enables the designer to use templates to define user and role lists to dynamically control access.
users assigned the frevvo.publisher role have the ability to assign/change visibility/ACL permissions.
Designer users can give permission to edit forms/flows and monitor submissions to other user(s) by adding them to the Who can edit the form/flow dropdown.
Tenant admins will continue to have full access to all capabilities and will not be subject to Access Control List (ACL) checks.
On This Page:
Access Control List (ACL) User Interface
Open the Access Control wizard by clicking the  Lock icon on the Forms Home Page or the Flows Home Page. It is also accessible by clicking the
  icon on the Form/Flow designer toolbars.

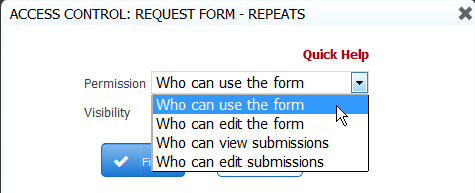
Form designers as well as users with the publisher role are authorized to configure access control. The Access Control wizard makes the following permissions available for forms/flows:
- Who can use the form/flow?
- Who can edit the form/flow?
- Who can view form/flow submissions?
- Who can edit form/flow submissions?
- Who can access the audit trail - available only for flows
- Who can administer the flow - available only for flows
ACL Permissions for Forms

ACL Permissions for Flows
ACL settings,set by the designer, are retained when you download/upload a form/flow/app to another designer user in the same or different tenant and when you copy a form/flow.
Dynamic ACLs
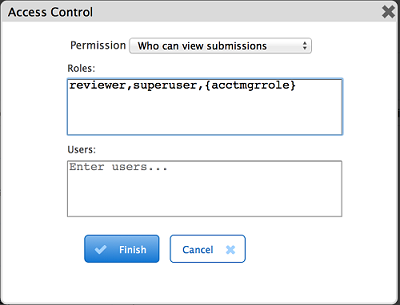
Templates provide the ability to dynamically determine and restrict access to submissions/ task audit trails when assigning Access Control permissions. Templates are like variables in your form that can be filled in by the user, populated by a business rule or from a back end system. Any item on the Access Control screens contained in curly braces is a form template and will be replaced with the value of the associated control. For example, the list below contains two fixed roles(reviewer and superuser) and one dynamic template based role - {acctmgrrole} :
In the example discussed below, templates are used to navigate the flow to the correct employee in the Accounting department and to define user lists to dynamically control access.
Who can use the form/flow
Setting this permission determines who is allowed to create form/flow submissions. The choices for Form/Flow visibility are:
- Private - only the owner can edit, test or use the form. The owner must log in to
.
- Public In Tenant - the form is usable to anyone who has an account (username/password) and is logged in to your tenant.
- Public - anyone can use it even if they are not logged in.
- Custom - The owning designer always has access to the form/flow. Additionally, the designer may configure selected users and/or roles (i.e. users with these roles) to have runtime access to the form/flow.
The designer can specify the Visibility of a form//flow in two ways:
- Clicking the icon on the Forms Home Page or the Flows Home Page.
- Clicking the on the Form/Flow designer toolbars.
Clicking on either icon displays the same wizard which can be used to set the Visibility of your form/flow. Notice the two dropdown fields: Permission and Visibility.
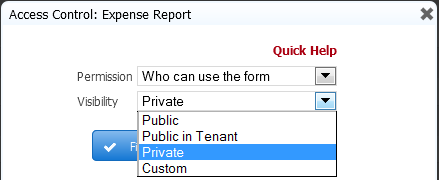
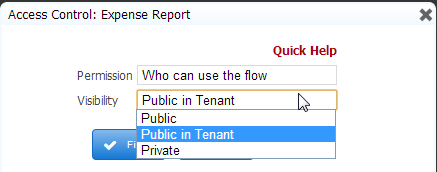
When Who Can Use the form or Who can use the flow is displayed in the Permission field, the designer can select one of the dropdown choices to specify form/flow visibility. The default value for forms is Private while flows default to Public in Tenant. The choices for form/flow visibility are:
- Private - only the owner can edit, test or use the form. The owner must log in to
- Public In Tenant - the form is usable to anyone who has an account (username/password) and is logged in to your tenant.
- Public - anyone can use it even if they are not logged in.
- Custom - The owning designer always has access to the form/flow. Additionally, the designer may configure selected users and/or roles (i.e. users with these roles) to have runtime access to the form. Custom is not supported for flows because roles and users are assigned to the steps in a flow to indicate who has permission to perform that step.
The Visibility property has been removed from the form/flow properties pane in the designer. You can no longer change form/flow permissions in this manner. When is embedded in another product such as Atlassian's Confluence wiki, you do not have access to the icons described above.
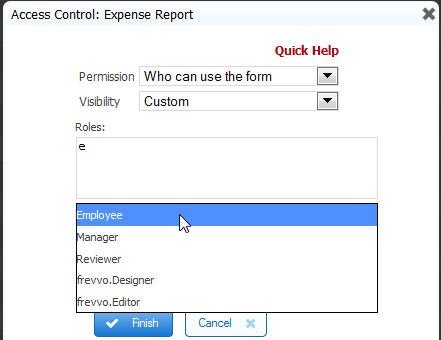
The designer can grant form/flow access to explicit users/roles by selecting the Custom choice from the Visibility dropdown. Roles and users can be selected via an editable combo-box control. As the user types, will try to find any roles and users in the tenant that contain the typed string. Up to 5 matches are displayed below the combo box. Selecting a role/user from the dropdown inserts the selection into the list.
Click Finish or continue with the next option in the Permission dropdown.
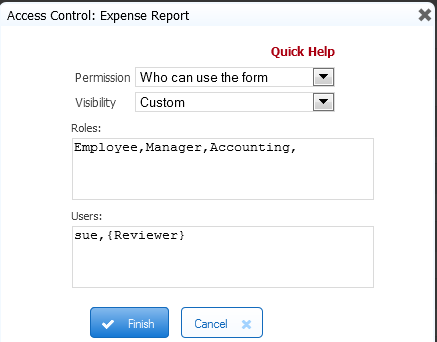
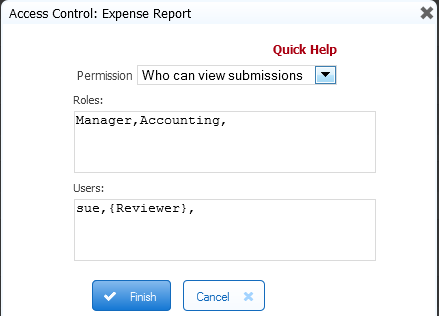
The Expense Report in the above images can be used by anyone in the tenant with the role of Employee, Manager or Accounting, the user id of the Reviewer and the user Sue. Notice the Reviewer role is encased between curly braces. This is an example of a form template. Templates are like variables in your form that will be evaluated at runtime and replaced with the actual values entered. For templates to work, there must be a control in your form with the name given inside the curly braces.
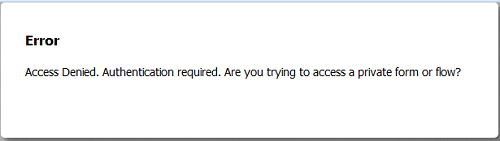
The user, Jack, who has the role of frevvo.Publisher, is not a Reviewer for anyone in the company and of course, is not Sue, will be denied access to the form. He will see this error:
You can publish any form regardless of whether it is public or private, but if it is private, only the person who created it can edit it or test it. It is possible for more than one designer to collaborate on a form under development if the form owner designates the Who can edit the form/flow permission to other designers. If one designer is working on the form, other designers will be denied access. Two or more people may test the form and view submissions at the same time.
Similarly, if a form is public in tenant, only users with accounts in the tenant will be able to access the form.
A form made public this way is accessible to anyone with the form's Url. There are other methods of sharing forms that have increasingly higher levels of security. See form security for details.
If you have made your form public and users have begun submitting it, you'll need to use caution when modifying your form. If users access it while you are editing it, they will see error messages indicating that the page is being refreshed or that the form is invalid.
You can mark your form private until you are done updating it, which will prevent new users from accessing the form, but if users happen to be completing the form when you switch it from public to private, they will see error messages. A better approach if feasible is to edit the form in a copy of your application running on a staging server. You can then replace the current form with the new form by removing the original application/form/flow from the staging server and uploading the new application/form/flow.
ACL settings,set by the designer, are retained when you download/upload a form/flow/app to another designer user in the same or different tenant and when you copy a form/flow.
The designer can set other permissions, such as who can view/edit submissions for forms and flows via the Access Control wizard. Roles and users that can view the audit trail or be designated as flow administrators are specified through the same wizard.
Public forms that include the save/load feature or digital signatures. These features require a login. When the user clicks to save or sign, they will be prompted with the login screen.
Who can edit the form/flow
Edit permissions should not be given to forms or flows currently in production use. Please see the Admin Best Practices Guide
Form and flow owners (designer users that created the form/flow) can give other users (designers/non-designers) the capability to edit form/flows. This is particularly helpful if a designer user takes a leave of absence or leaves the company. The "backup designer" has the ability to make changes to the form/flow without having to download the form/flow(s) from the owner's account to the backup designer's account. The "backup designer" also can view related submissions by clicking on the Submission or Legacy Submission icons. The ability to edit submissions is granted by a different permission.
Users with or without the role of frevvo.Designer can be assigned the permission to edit forms/flows.
Users given this permission access the shared form/flow from the Shared Items tab even if they have the frevvo.designer role assigned to them. They can only edit the form/flow that was shared with them. They will not have the ability to create new forms/flows from the Shared Items tab. The ability to make changes to a form/flow is not available from Shared Items on the Important Items menu in a space.
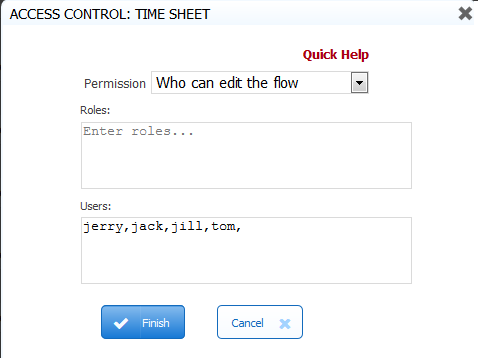
To assign users the ability to edit forms/flows, follow these steps:
- Open the Access Control wizard by clicking the Lock icon on the Forms Home Page, Flows Home Page or on the Form/Flow designer toolbars.
- Select Who can edit the form/flow from the Permission field dropdown.
- Enter the roles that you want to grant editing capability to, separated by commas, in the Roles section. Templates are NOT allowed at this time.
- Enter the users that you want to grant editing capability to, separated by commas, in the Users. Templates are NOT allowed at this time.
- Click Finish or select the next option in the dropdown to continue with the Access Control List.
Users that have been granted the editing permission, access forms and flows that have been shared with them via the Shared Items tab on their Home Page. It will not work from the Shared Items selection in a Space or any other embedded scenario.
The Who can edit the form/flow permission does not apply if you are running with Confluence. Confluence users share form/flow editing by specifying the Forms Editor group on the add-on configuration screen. Users who will be sharing the editing function must be assigned to the specified group.
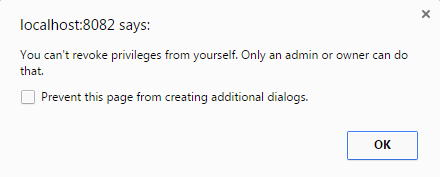
A browser notification message displays if the user who has been granted permission to edit forms/flows tries to modify their own ACL. will not allow the "backup designer" to remove themselves from the ACL list.
Who can view submissions
The designer can assign permission to view form/flow submissions to specific roles/users. Any user with view access can view submissions in read-only mode. Submission deletion is not allowed. Templates can be used to dynamically determine at runtime which users and roles are allowed to view submissions.
To assign permission to view submissions, follow these steps:
- Open the Access Control wizard by clicking the Lock icon on the Forms Home Page, Flows Home Page or on the Form/Flow designer toolbars.
- Select Who can view submissions from the Permission field dropdown.
- Enter the roles you want to grant view access to, separated by commas, in the Roles section. You can enter control names from your form/flow encased in curly braces to act as templates for dynamic access.
- Enter the users you want to grant view access to, separated by commas, in the Users section. You can enter control names from your form/flow encased in curly braces to act as templates for dynamic access.
- Click Finish or select the next option in the dropdown to continue with the Access Control List.
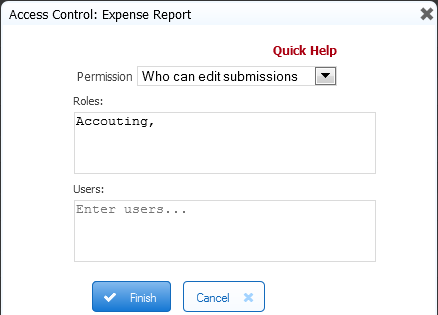
Who can edit submissions
The designer can assign permission to edit form/flow submissions to specific roles/users. Any user with edit access can view, edit and delete submissions in the SUBMITTED, ABORTED or ERROR states. Submissions in the PENDING, SAVED or WAITING states can only be deleted by the tenant admin, flow admin or designer user that created the flow. Refer to the Deleting Submissions for more information.
Templates can be used to dynamically determine at runtime which users and roles are allowed to edit submissions.
To assign permission to edit submissions, follow these steps:
- Open the Access Control wizard by clicking the Lock icon on the Forms Home Page, Flows Home Page or on the Form/Flow designer toolbars.
- Select Who can edit submissions from the Permission field dropdown.
- Enter the roles you want to grant edit access to, separated by commas, in the Roles section. You can enter control names from your form/flow encased in curly braces to act as templates for dynamic access.
- Enter the users you want to grant edit access to, separated by commas, in the Users section. You can enter control names from your form/flow encased in curly braces to act as templates for dynamic access.
- Click Finish or select the next option in the dropdown to continue with the Access Control List for flows.
Who can access the audit trail - Flows Only
The audit trail is accessed on a user's Task List by clicking the
 View Task History icon. Roles/Users granted this permission will see theView Task History icon on tasks in their task list.
To assign permission to view the audit trail, follow these steps:
- Open the Access Control wizard by clicking the Lock icon on the Flows Home Page or on the Flow designer toolbar.
- Select Who can access the audit trail from the Permission field dropdown.
- The Permission dropdown has two choices: All participants and Custom
- All participants indicates that any user that participated in the flow can view the audit trail for the task (provided they have access to the task).
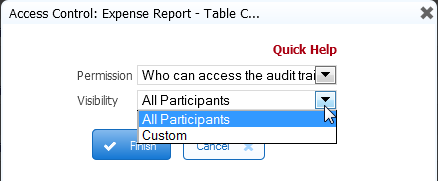
- Custom indicates that only users granted explicit access or with one of the specified roles can view the audit trail for the task (provided they have access to the task). Roles and users can be selected via an editable combo-box control.
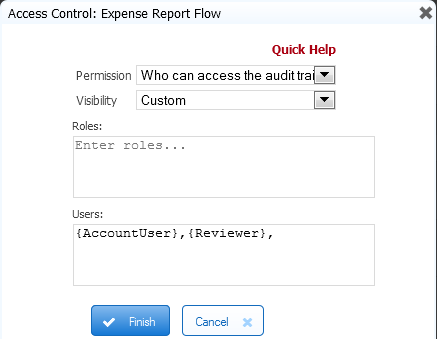
- Enter the roles you want to grant audit trail access to, separated by commas, in the Roles section. You can enter control names from your flow encased in curly braces to act as templates for dynamic access.
- Enter the users you want to grant audit trail access to, separated by commas, in the Users section. You can enter control names from your flow encased in curly braces to act as templates for dynamic access.
- Click Finish or select the next option in the dropdown to continue with the Access Control List for flows.
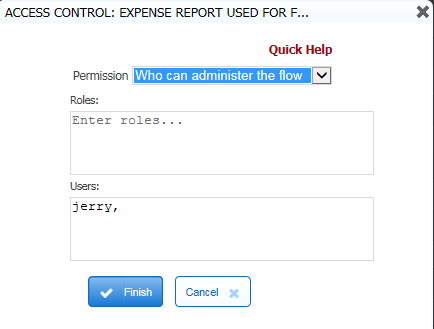
Who can administer the flow - Flows Only
This permissions let a user abort, reassign and reset tasks that are not assigned to them. These administrative tasks are no longer restricted to tenant admins.
The designer can delegate these tasks to additional users/roles by assigning them in the Who can administer the flow section of the Access Control dropdown. Any user/roles listed here will be considered a Flow Administrator. As such, the Modify Task icon on a task in the task list will be displayed. Tenant admins and designer users get the Modify Task icon by default.
To assign user/roles as Flow Administrators, follow these steps:
- Open the Access Control wizard by clicking the Lock icon on the Flows Home Page or on the Flow designer toolbar.
- Select Who can administer the flow from the Permission field dropdown.
- Enter the roles you want to assign as flow administrators, separated by commas, in the Roles section. You can enter control names from your flow encased in curly braces to act as templates for dynamic access.
- Enter the users you want to assign as flow administrators, separated by commas, in the Users section. You can enter control names from your flow encased in curly braces to act as templates for dynamic access.
- Click Finish to save the completed Access Control List.
User jerry has been designated as a flow administrator for the Expense Report but not for the Time Sheet workflow. When Jerry logs into , his task list will appear as shown:
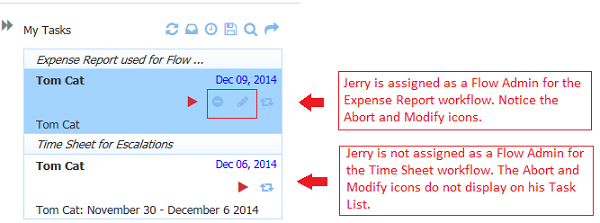
The Modify Task dialog allows a 'flow admin' to execute any one of abort/reassign/reset functions.
When searching for tasks, if a flow is chosen, and the user is a flow admin for it, then all tasks for that flow display. If no flow is selected, then all tasks, even those that the flow admin has not participated in, plus tasks for which the user is a flow admin will display.
Shared Items
Submissions
All users granted Submission Access, either by user id or because they have a granted role, will see the Shared Item tab on their Home Page. Click on the Submissions  or Submissions (legacy)
  icons to view/edit them.
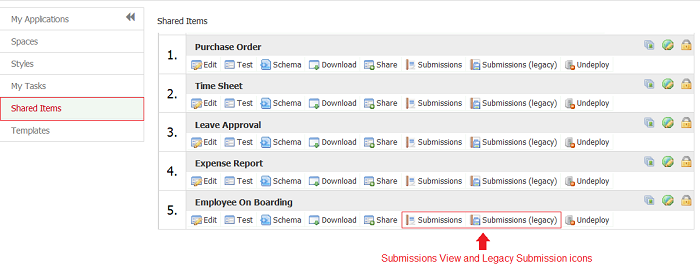
You can add the Shared Item URL to your your existing Space so that a logged in user with the correct permissions will be able to access form/flow submissions from the space menu. The submissions link is automatically added when you create a new space.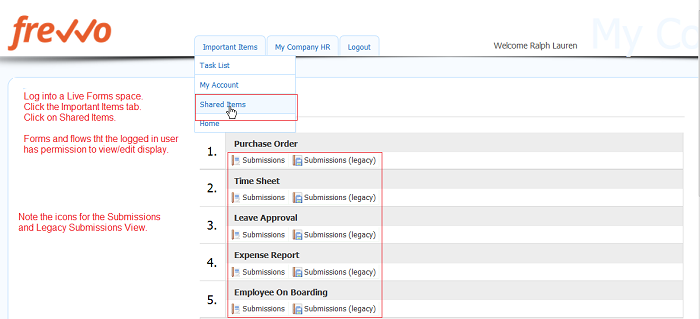
Designer ACL
The functions needed to edit forms/flows are only displayed when users given the permission access the Shared Items tab from their Home Page if they are a designer or by clicking the  icon on the Task List. The ability to make changes to a form/flow is not available from Shared Items on the Important Items menu in a
 space.
Just a reminder, edit permissions should not be given for production forms or flows. Please see the Admin Best Practices Guide.
The functions provided to edit forms/flows from the Shared Items tab, do not include the option to delete or copy them. Deletion of a form/flow is not available to the "backup designer". Forms/flows can be copied by the download/upload functions.

Let's say users Jack and Jill are both given the ability to edit the Expense report workflow. Jack logs into the flow designer and begins to make changes. When Jill logs in, she will see the error shown in the image: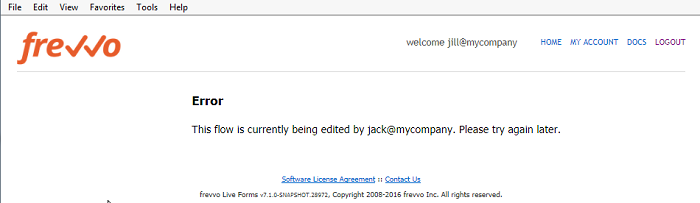
Access Control/Shared Item Example
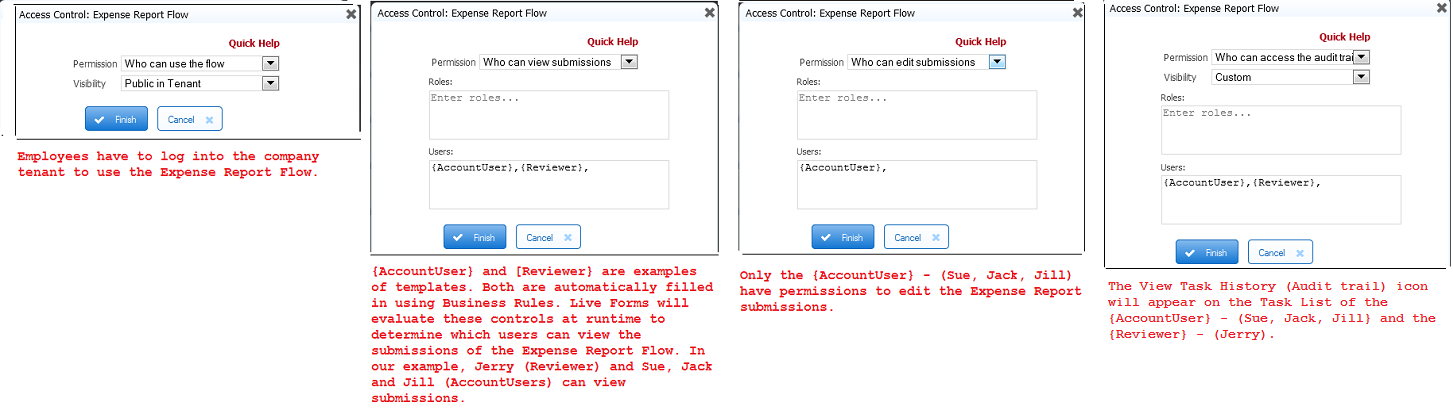
Let's consider an example to illustrate how this feature works. An Accounting Department in a company has three employees, Sue, Jack and Jill. There are three project catagories: Sales Demo, Customer Meetings and Infrastructure. Sue is responsible for processing Expense Reports for the Sales Demonstration project, Jack processes Expense Reports for the Customer Meeting project and Jill process Expense Reports for the Infrastructure project. The Accounting employees must have the ability to view and edit only the Expense Report submissions they processed. Jerry is the manager who approves/rejects the Expense Reports. He can view all the Expense Report submissions but cannot edit them. Any employee in the company can submit an Expense Report. Jerry, Jack, Jill and Sue are flow administrators so you will see the  Modify icon in the images of their task lists.
The designer for the company creates an Expense Report workflow that displays the Expense Report form as the first step, then routes the request to the employee's manager (Jerry). If Jerry approves the expenses, then the workflow is routed to Sue, Jack or Jill based on the project category.
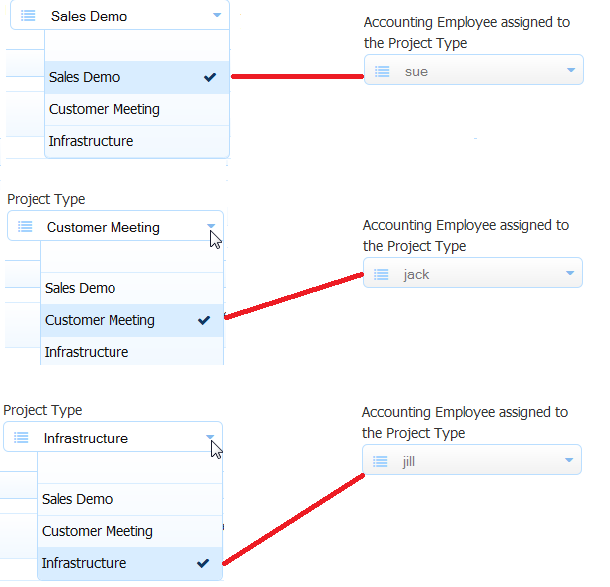
In the Expense report form, there is a dropdown control for the Project Type and a business rule that populates a text control named AccountUser with the user id of Sue, Jack or Jill based on the project type selected. You can populate the AccountUser control from a back end system or by user entry but we will use the business rule for this example.
To comply with these requirements, the company designer has configured the Access Control screens for the Expense Report as shown:
Let's say Tom Cat submits three Expense Reports, one for each project type:
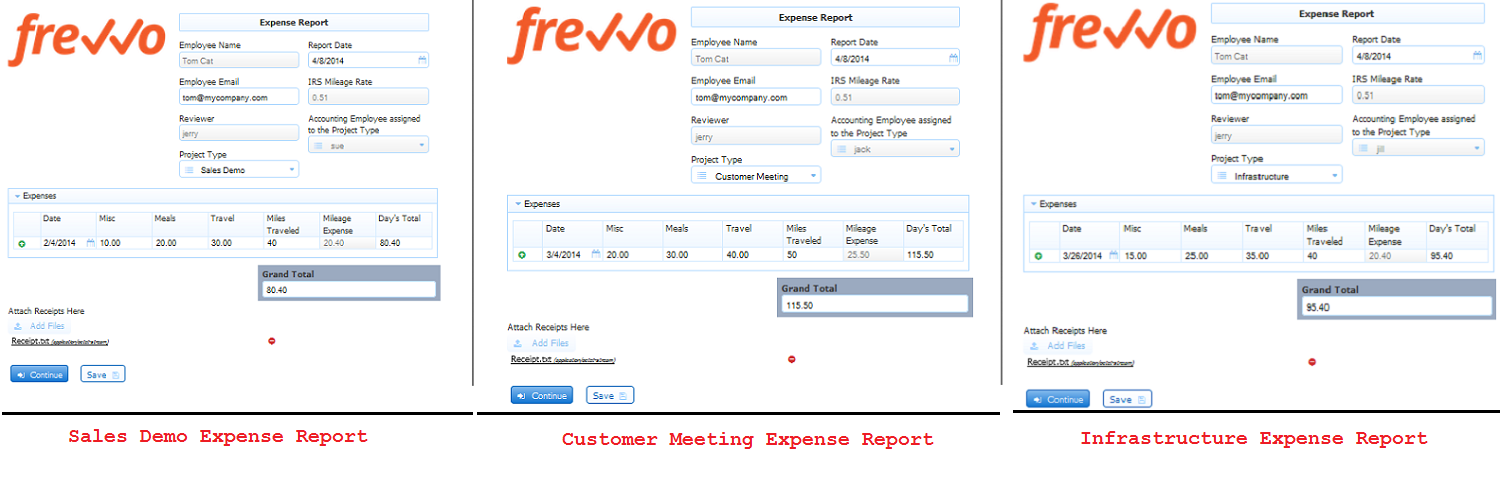
The workflow routes the three tasks to Jerry the Reviewer. It is his responsibility to approve/reject the expenses. When Jerry logs into , Tom's Expense Reports appear on his task list. The Access Control permissions above allow him to view the Audit trail for these tasks as well. Jerry approves all three Expense Reports and the flow is routed to the user id specified in the {AccountUser} template in the Expense Report form. Remember, we used this template when assigning access control. The Sales Demonstration Expense Report goes to Sue for final processing while the Customer Meeting Expense Report is routed to Jack and the Infrastructure Expense Report is routed to Jill.

When Sue logs into , she will see tasks for any employees in the company who submitted an Expense Report for the Sales Demonstration project. Tom's will be among them. She can view the Audit trail for the flow as indicated by the
View Task History icon.

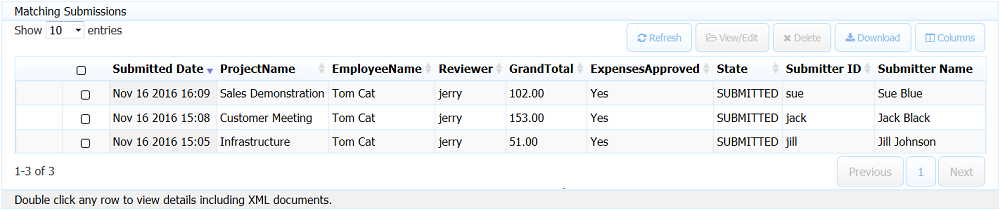
When Sue completes the processing. and clicks on the Shared Item tab, she will see only the Expense Report submissions that she processed. She can edit the submissions or delete SUBMITTED, ABORTED or submissions reporting an error condition, if necessary.

When Jack logs into , Tom's Expense Report for the Customer Meeting project will appear on his Task List along with any others submitted by company employees. Jack can view the Audit trail for the flow as indicated by the
View Task History icon.

When Jack completes the processing and clicks on the Shared Item tab, he will see only the Expense Report submissions that he processed. He can edit the submisions and SUBMITTED, ABORTED submissions or submissions reporting an error condition, if necessary.

When Jill logs into , Tom's Expense Report for the Infrastructure project will appear on her Task List. She can view the Audit trail for the flow as indicated by the
View Task History icon.

When Jill completes the processing and then clicks on the Shared Item tab, she will see only the Expense Report submissions that she processed. He can edit the submisions and SUBMITTED, ABORTED submissions or submissions reporting an error condition, if necessary.

When Jerry signs on to and clicks on the Shared Items tab, all of the Expense Report submissions will be listed in the Submissions Table. Jerry is a Reviewer and can view submissions but he will not be able to edit or delete them.
If Jerry clicks the selects all the submissions and tries to Delete them this deletion confirmation messages will display:

When he clicks OK, the deletion will be denied and one of these error messages will display.

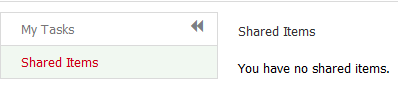
Harry is the company Technical Writer. Since the form/flow visibility is set to Public in Tenant, Harry will be able to access the form/flow if he needs to submit an expense report after he logs onto but he does not need permissions to view/edit the Expense Report submissions. When Harry clicks on the Shared Item tab it will be empty.