Live Forms v8.0 is no longer supported. Please visit Live Forms Latest for our current Cloud Release. Earlier documentation is available too.
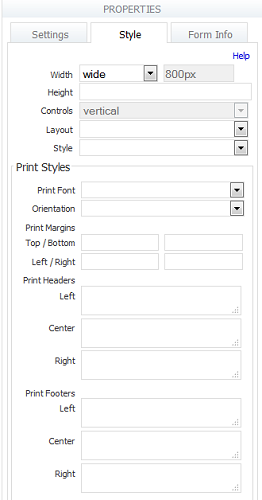
Form Style Properties
- Former user (Deleted)
Each setting property is described below.
See Layouts and Styles and the CSS Class property for more form/flow styling options.
On this page:
Width
This specifies how wide your form will be. The default “wide" is 800px, but the dropdown also includes thin (450px) and regular (600px). You also may pick the custom option; this will enable the box to the right of the Width dropdown and let you specify your own width.
Height
This property specifies an initial height for your form as it is loading into the browser. It does not dictate the actual height. You typically do not have to edit your form’s height property since the form can resize dynamically. However if your form is very small it can improve the appearance as your form loads if you set height to the actual height of your form.
See Embedding and Using Forms for details on configuring the actual form height.
Controls
This property applies whether the options you define for checkbox and radio controls will be displayed vertically or horizontally. In the current version the property is always to set to vertical and cannot be changed.
Layout
You can choose one of the layouts provided by from the Layout dropdown to alter the appearance of your form. The choices are Nouveau, Compact and Tight. Nouveau gives your form a clear (white) background and a submit and cancel button with rounded corners. New forms are created with the Nouveau layout. The Compact and Tight layouts are similar to Nouveau with adjustments made to the horizontal and vertical spacing between the controls. Refer to Layouts and Styles for the details.
Style
You can apply a style to your form by selecting a choice from the Style dropdown. Styles are mainly concerned with colors but you can specify other properties such as font name, size and color as well. gives you four choices: Blue, Neutral, Green or Aqua. The designer/admin can create styles or modify existing ones. See Layouts and Styles for the details.
Print Styles
designers can specify the content of headers and footers for the PDF that is generated when the Save PDF property is checked for a form/flow. When this property is checked, a PDF is created when you submit a form/flow, when a user clicks on the print link in use/test-mode or the print icon in a edit-mode flow. Print margins: Top, Bottom, Left and Right can also be specified.
Headers and footers can contain:
- Templates
- page number
- total page count
- content from any control that can normally be used in a template
- images - either external to the form/flow or from a contained images control via a template
- Plain text
- HTML markup.
Follow these steps to select print fonts and orientation and setup headers, footers and margins for the pdf:
- Logon to
as the designer user.
- Open the form/flow designer.
- Create/edit your form/flow.
- Click on the toolbar to display the form/flow Properties panel.
- Click the Styles tab.
- Don't forget to save your changes.
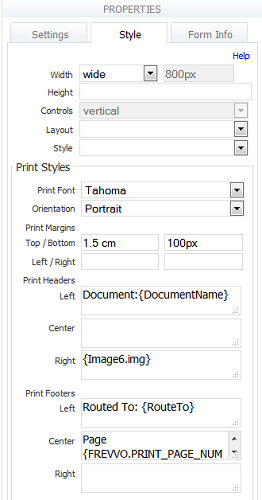
Print Font
Use this property to optionally select the font will use when rendering PDFs generated as part of a submission, Print View or from an acroform as part of a form/flow submission. In-house customers must purchase and install font families for the fonts to show in the dropdown. Refer to this documentation for the details.
Contact customer support for help with this feature if you are a Live Forms Online customer.
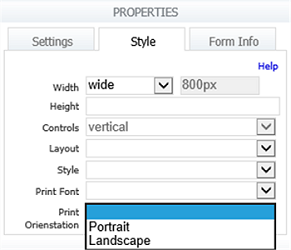
Print Orientation
The designer can choose print orientation when rendering PDFs generated if the Save PDF property is checked or when you click on the  Print icon. Dropdown choices are blank, Portrait or Landscape. When no value is selected, it defaults to Portrait.
Information about inserting page breaks into your form can be found here.
Print Margins
Set the print margins for the pdf by entering values in the Top, Bottom, Left and Right property fields.
| Property Name | Purpose | Notes | Default |
|---|---|---|---|
| Print Margins (Top/Bottom/Left/Right) | Used to configure the width/height of the page margins appearing in the print PDF view. | Specifies a margin in px, pt, cm, etc. To specify a margin in inches, use the abbreviation "in" without the quotes. For example, for a 1 inch margin on the top/bottom of the pdf, enter 1in in the Top/Bottom property fields. | 0. |
If top/bottom margins are not set and a header or footer is specified, then the appropriate margin will be defaulted to 50px.
Print Headers/Footers
Specify the header/footer content using the Print Headers and Print Footer properties at the form or flow level. These properties do not appear on the form designer when inside a flow.
| Property Name | Purpose | Notes | Default |
|---|---|---|---|
| Print Headers | |||
| Left | Used to specify a print header appearing to the left. | Header will appear left justified. Accepts templates for control values. | Empty |
| Center | Used to specify a print header appearing in the center. | Header will appear centered. Accepts templates for control values. | Empty |
| Right | Used to specify a print header appearing to the right. | Header will appear right justified. Accepts templates for control values. | Empty |
| Print Footers | |||
| Left | Used to specify a print footer appearing to the left. | Footer will appear left justified. Accepts templates for control values. | Empty |
| Center | Used to specify a print footer appearing in the center. | Footer will appear centered. Accepts templates for control values. | Empty |
| Right | Used to specify a print footer appearing to the right. | Footer will appear right justified. Accepts templates for control values. | Empty |
Specialized templates values that are supported in headers and footers are detailed in the following table:
| Template | Purpose |
|---|---|
| FREVVO.PRINT_PAGE_NUM | This will be replaced by the current page number in the PDF print output. The template name must be enclosed in curly braces when specified in the header/footer fields - {FREVVO.PRINT_PAGE_NUM} |
| FREVVO.PRINT_PAGE_COUNT | This will be replaced by the total number of pages in the PDF print output. The template name must be enclosed in curly braces when specified in the header/footer fields - {FREVVO.PRINT_PAGE_COUNT} |
| <image_control_name>.img | This will be replaced with an image tag sourced to the internal url of the image for an image control appearing somewhere in the form/flow. This can be used to place an image into the header/footer that is contained in the form/flow (no external dependency). Replace <image_control_name> with the name of the image control.and enclose the template in curly braces - {<image_control_name>.img}. Note that the image will be displayed in its true size. |
| <image_control_name>.url | This will be replaced with the internal url of the image for an image control appearing somewhere in the form/flow. This can be used to place an image into the header/footer using your own markup that is contained in the form/flow (no external dependency). Replace <image_control_name> with the name of the image control and enclose the template in curly braces - {<image_control_name>.url}. Also, this can be used to force the image to a certain size (using width/height attributes). |
FREVVO.PRINT_PAGE_COUNT Template in Headers/Footers
The template works best with flows designed using Linked Activities. These types of flows result in a single linked printable form. It will not work as reliably in a flow design that uses multiple forms.
Images in Headers/Footers
When you use the {image_control_name.img}, outputs <img src="the image's url"/>. This will output the image in its normal size. In this case, that is 174x170 pixels for the color grid.
You can instead use something like: <img src="{<image_control_name>.url}" width="50" height="50"/> to size the image smaller to fit.
If you want the image to be its true size and not be cut off, then you need to set your margin top and bottom accordingly.
If you don't set a margin size for either top or bottom and you also set either a header or footer, then the system picks an arbitrary margin height of 50px, for the header/footer that has the selected value. It is up to the designer to adjust the top or bottom margins to display the image as required.
HTML in Headers/Footers
Invalid markup in a print header/footer field will result in it being rejected and cleared off of the field in the form/flow designers. If there was a previous value in the field it will display. Correct your HTML to continue.
Avoid special characters in the Print Headers/Footers. For example, using an &, <, > or any other special characters in the print header/footer can prevent your form/flow from generating the PDF and submitting successfully.