Live Forms v8.0 is no longer supported. Please visit Live Forms Latest for our current Cloud Release. Earlier documentation is available too.
Generate Pixel Perfect PDFs
- Former user (Deleted)
Checking the Save PDF option for a form/flow saves a a PDF image of the form/flow in the ' submission repository. This generated snapshot is a basic PDF rendering of the form/flow. You can generate additional PDFs' as part of your form/flow, if required. For Example, new employees hired by a company are typically asked to fill out federal forms such as a W-4 or an I-9.
' Pixel Perfect PDF generation feature allows you to design a form/flow with fields that capture the information needed and integrate the data from the e-form controls to an acroform PDF.
adds all generated PDF forms to the document set of a completed form/flow. See Submissions for more details.
On This Page:
' Pixel Perfect PDF generation feature is supported in both the form and flow designers. You will need an "acroform" to generate a pixel perfect PDF. Acroforms (also known as Acrobat forms) are forms that contain writable form fields. You can generate as many PDFs as you like. It is very easy to map
controls to individual acroform fields for each one. The additional PDF forms are generated at the end of a form/flow and all generated PDF forms will be added to the document set of a completed form/flow. This makes it possible for the form designer to specify doc actions on these additional form documents as well. The designer can construct form/flows in which the generated forms may be viewed at any point in the form/flow via the Form Viewer control.
If a form designed in the Forms designer has generated PDFs associated with it, the PDFs will be carried along when the form is added to a workflow. Existing form viewer controls will work in the new step of the flow. However, PDF mappings will NOT be preserved when a flow step is extracted as a standalone form.
Import of forms created in previous versions will preserve all PDFs and mappings. Mappings work as they did in the previous version. This includes mappings for the special items listed:
- Signed section signature and signature date
- Radio, Dropdown and checkbox options and comments
- Table and repeat items by index.
uses a web-based mapping scheme where the designer can map e-form fields to PDF fields within the visual context of the PDF itself in a web page.
Limitations:
- Adobe XFA Forms are not supported.
- Password or sensitive text fields being transferred to a PDF form will be written in plain text if they are mapped to a PDF field.
PDF Form Generation
The designer must follow these basic steps for each Pixel Perfect PDF to be generated as part of a form/flow:
- Obtain the acroform pdf that you want to populate with
data.
- Design your
- Upload one or more PDF acroforms that will serve as PDF form generation templates.
- Map the fields in your form to the fields in the PDF acroform. There are two ways to do this described below.
- Add the Form Viewer control to your e-form/flow
- Test the form/flow and pdfs that are generated
Step 1 - Obtain the acroform
You must have an acroform pdf for successful mapping in . Acroforms are pdfs that contain writable form fields. There are many acroforms available on the internet. For example, the latest acroform for the federal W - 4 Employee's Withholding Allowance Certificate can be downloaded from the U.S. Treasury website.
If you cannot find an acroform to use, there are tools available to create one. PDFescape is a free pdf editor that can be used to create a pdf with writable fields. For more complicated PDFs (tables.etc..), consider using the paid PDFescape Ultimate version. Refer to the mapping rule guide lines in the table below.
The tool that Adobe uses to create PDF's does not support integration with third party software. Use PDFescape to generate acroforms for mapping with Live Forms.
Some acroforms may not have a writable field for all of the data that you want to collect. For example, the signature field on such forms as the I-9 or W-4 acroforms. The Employee On Boarding form/flow collects information to populate the W-4 PDF after the new employee completes the screen flow. Another step of the flow asks the new employee to review the PDF and sign if the information is correct. Mapping the
signature to the generated PDF cannot be accomplished unless there is a writable field in the W-4 template. You can use a PDF editor such as PDFescape to add a writable field for the signature to your acroform template.
signatures are treated as images that can be mapped to text fields so be sure to add the acroform field as a text field. Upload the modified acroform as your PDF template.
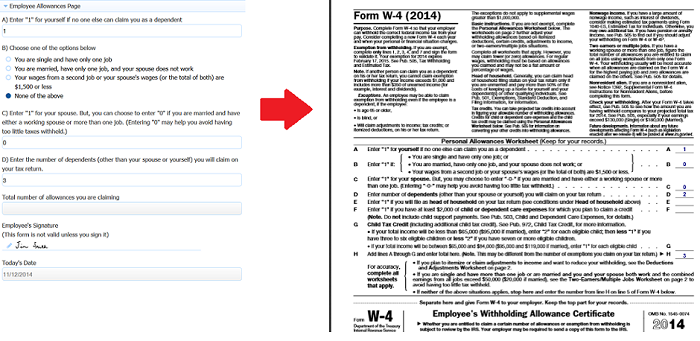
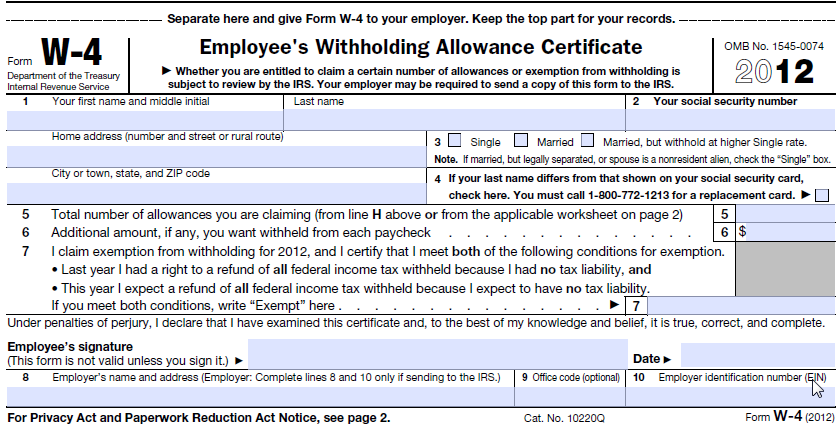
Here is an example of a PDF acroform for the federal Employee's Withholding Allowance. Notice the blue highlighted writable form fields.
Step 2 - Design Forms/Flows to collect the information you need
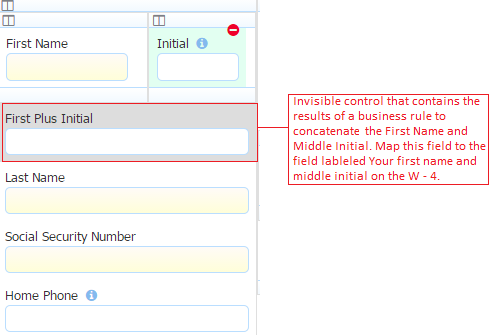
Make sure that you have controls in your forms/flows to collect the information that you need for the pdf . For Example, many forms/flows contain separate fields for the user's First Name and Middle Initial. The first name field on the W - 4 pdf requires the user's first name plus middle initial. To supply this information in this manner, the designer would need to include an invisible control on the form that would be populated by the results of a Business Rule that concatenates the data in the first name and middle initial fields.
Designers should give Group Controls meaningful names whenever possible as it may prove helpful if you are using the Mapping Form Outline.
Step 3 - Upload PDF acroform Templates
When steps 1 and 2 are competed, you are ready to begin the pdf mapping. Launch the form/flow designer.
The form/flow designers have two separate views:
- form/flow View - canvas where the designer can drag/drop/edit controls/forms to create activities in a
- Generated Forms View - canvas where the designer can create/edit PDF forms to be generated.
Clicking on the edit form/flow View and Generated Forms View icons on the toolbar toggles between the two views.
You will not see the  View forms generated by the form/flow icon when editing a form inside a workflow. In the workflow designer, only the control and rules views are available.
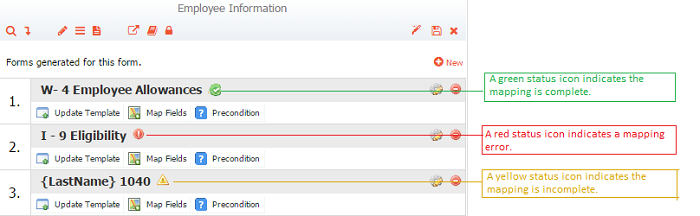
Click the icon to display the PDF forms view for your form/flow. Existing PDFs (if any) to be generated for the form/flow will be listed. For example, the Employee On Boarding form shown below will generate a pixel perfect PDF for the federal W4 and the I-9 Employment Eligibility Verification form when the Employee On Boarding form is submitted or the Form Viewer control is clicked. 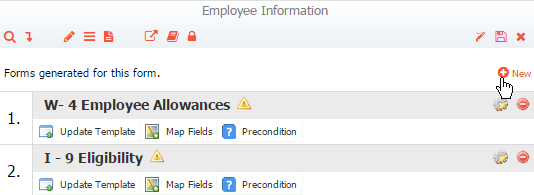
A status of existing pdfs (if any) will be reported using three icons.
- A green status icon indicates the mapping is complete.
- A yellow status icon indicates the mapping is incomplete.
- A red status icon indicates a mapping error.
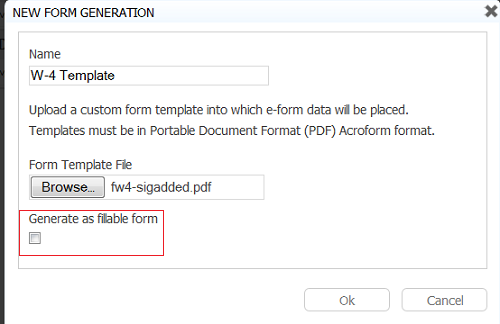
Click the  icon to begin. Upload the acroform for the PDF you wish to fill using
 data using the New Form Generation screen. The acroform serves as a PDF form generation template. If you do not provide a name for your template, the file name will be used. The template name should not exceed 30 characters. You can use Templatized Strings when naming your template. For example, naming the template W-4 {LastName} appends the new employee's last name to the pdf in the submission repository. Of course, you must have a control named LastName in your form/flow.
By default, the PDFs generated using the PDF mapper are written out as "flat" PDFs. This means that the fillable fields are removed, leaving only the data and they are read-only. If you want the fillable fields to remain, for example, you want to use Adobe Reader digital signing on the generated pdf, then check the Generate as fillable form checkbox when uploading your template. When checked, the pdf will be generated with ALL fields remaining in it and editable, including any fields that contain mapped data. It defaults to unchecked/false for backward compatibility.
Fillable pdfs when viewed with the form viewer control are always flattened so that they are viewable on mobile devices.
PDF acroform (non-flattened) that comes from a frevvo submission is external to . There is no way to save changes to the pdf unless the submission is edited, changed and re-submitted.
The uploaded template will be added to the list of the PDFs to be generated.
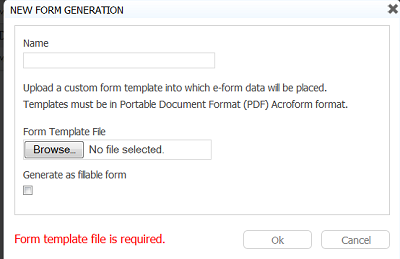
Click the  icon to edit the template name. If you do not select a file and you try to submit this screen, you will see the message "Form Template file is Required".
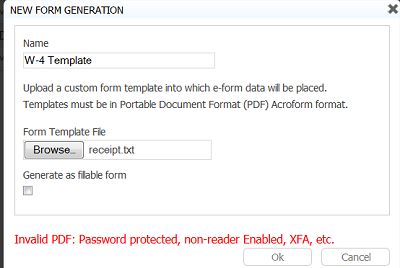
Uploading a file that is not an acroform results in the following error:
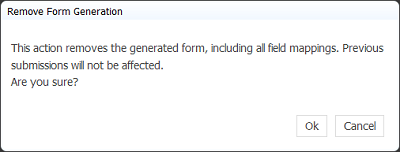
Click the  icon to remove the template. You will be asked to confirm the deletion as the template and all field mappings will be removed.
- Skipped activities do not affect PDF's generated by Live Forms. For example, controls in form/flow activities containing default values, that have been mapped in the pdf mapper, will show up in the PDF even if the activity is skipped due to a precondition. Use a form.load rule to set the "initial state" data dynamically instead.
- A form with mapped pdfs that has been published as a template then is used to create a new form may result in a pdf that is in an error state (red icon). Upload the pdf acroform again to resolve the issue.
- If you are storing submissions on Box.com, be sure to include the file extension in the name of any acroforms uploaded to
Preconditions for PDF
You can set up logic for the PDF via a precondition that will control when the PDF will be generated or it can be used to skip the PDF entirely. For Example, let's say you have a form/flow where you want to generate an English version and a Spanish version of a PDF. Preconditions, in conjunction with Business Rules can be used to determine which pdf is used in the form/flow at runtime.
For example, your form/flow contains a Radio control named Language that has two options: English and Spanish. You have mapped an English PDF and a Spanish PDF. Create the precondition in the Precondition property for the English PDF. Type the JavaScript into the field
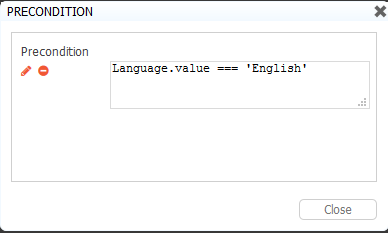
or click the  icon to launch the Precondition Editor to create it. Click this link for the full details about how the Precondition Editor works.
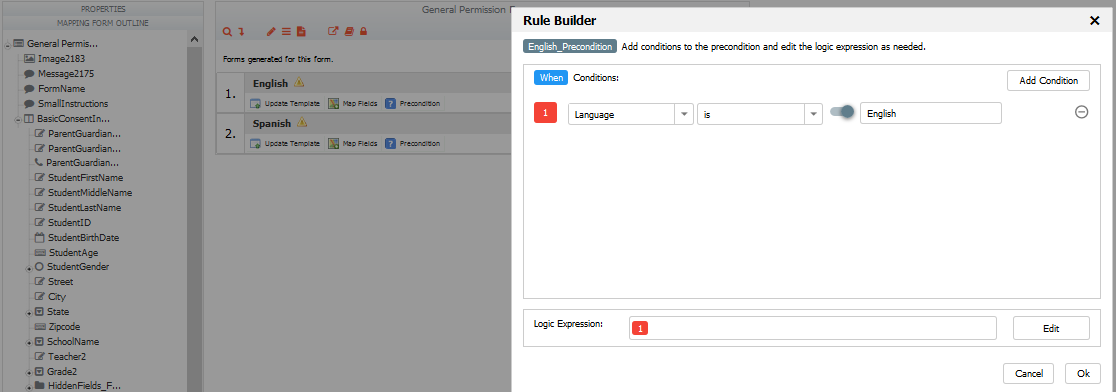
When the precondition is built with the Precondition Editor, the expression displays as shown in the image.
The Precondition Editor checks the expression for valid JavaScript and displays appropriate error messages when necessary. Preconditions are re-validated when you click the  save and test icon and you click on the Generated Forms icon. If there is an error, the designer is notified and given an option to re-edit.
With this precondition in place, the English version of the PDF is generated when the user selects the English option for a Radio control named Language.
Step 4 - Map the Live Form fields to the acroform fields
The PDF mapping screen provides functionality to enable designers to map e-form fields to PDF fields. Mapping is performed a field at a time in the context of a PDF page. Mapping can be accomplished in two ways:
- Dragging mappable fields from the outline and dropping them onto the PDF field (hi-lighted in either yellow or green).
- Clicking on a PDF field to activate the PDF Mapping Dialogue
The quickest way to map your pdf is to use the drag/drop method, but if you need to change an index for a table or repeat control, the Mapping dialogue must be used. Of course, you can change mapping choices on the Mapping dialogue as well.
Click the  Map Fields icon to begin:
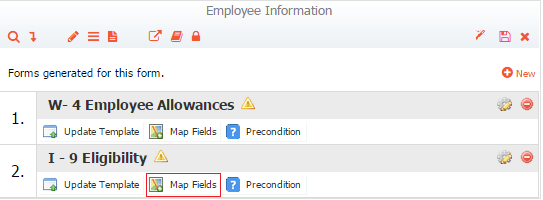
In the forms designer only, the following message will display when you click on the Map Fields link:
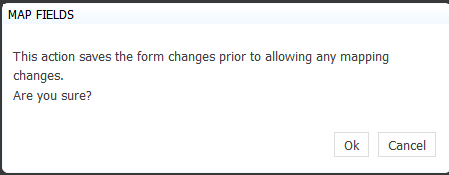
Clicking Ok saves the pdf form before any further mapping is performed. The designer can choose to cancel the mapping operation and not save by clicking the Cancel button.
The prompt and save of the pdf form mapping is controlled by a web.xml context parameter named: /wiki/spaces/frevvo80/pages/975572178. The parameter defaults to true. If set to false, the designer will not be prompted with the save option and the editing instance will not be saved. This parameter applies only to forms, not flows.
Click the Map Fields icon. You may see this message as the pdf mappping screen loads.
The PDF view screen is divided into three areas: the form/flow properties pane, the Mapping Form Outline and the PDF forms editor canvas.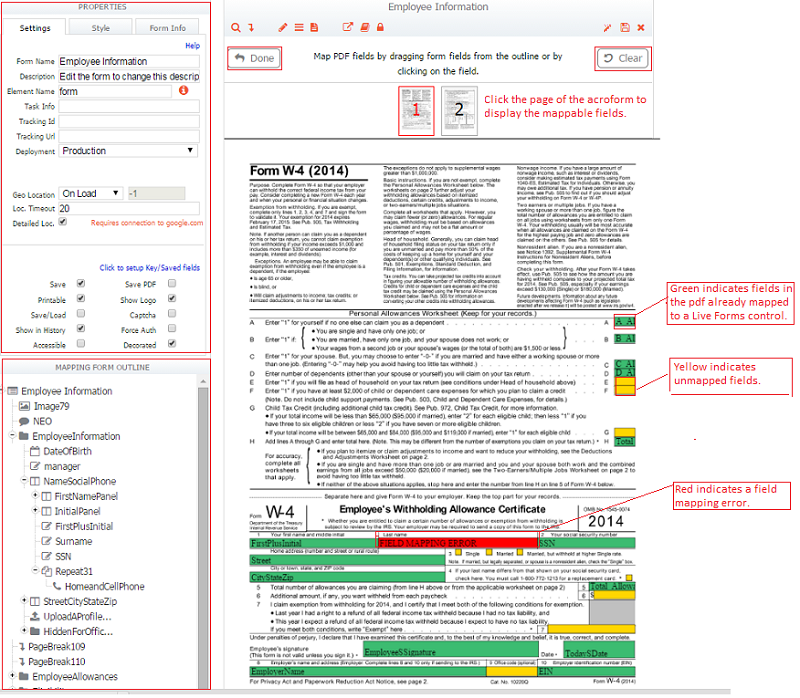
Notice the orange color when you are dragging a control from the Mapping Form Outline over a mappable area on the pdf. Drop the control onto the pdf when you see color change to orange.
Previous mapping selections are retained. Dragging a control from the Mapping Form Outline and dropping it on a field that is already mapped, changes to the new mapping.
Functions for buttons and images on this page are listed below:
| Function | Description |
|---|---|
| Done Button | Click this button when mapping is complete or you wish to exit back to the PDF Generated Forms Screen. Field mappings are saved to the in-memory form/flow as they are performed. Mappings are not persisted until the form/flow is saved. |
| Clear Button | Clicking this button clears all mappings for the whole PDF. All fields are then displayed as not mapped (colored yellow and cleared of all text). |
| PDF Page thumbnail Image | Thumbnail images are displayed for each page found in the PDF with no limit. The HTML element containing the PDF page thumbnails will be scrollable if there are a large number of pages and all cannot fit in the displayable area. Click the thumbnail image for the page in the acroform where you want to map fields. When clicked, that page is selected for mapping and it is displayed along with any previous mappings filled into the fields. |
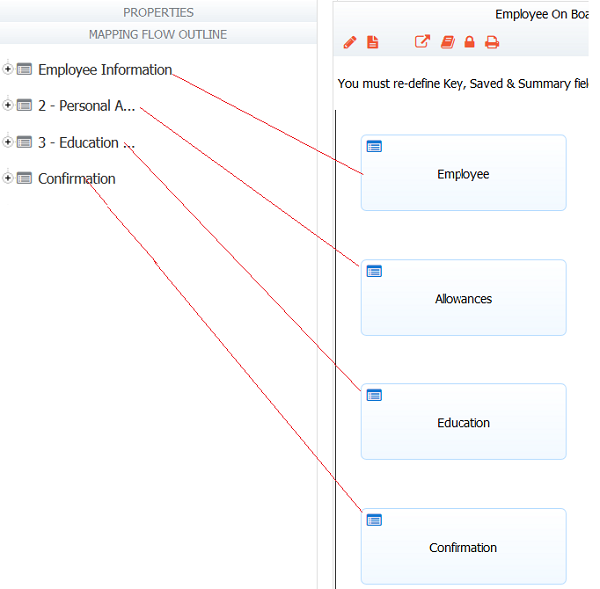
In the flow designer, steps in the flow are shown as top level elements in the tree. The image shows four steps in the Employee On Boarding flow as they appear in the Mapping Form Outline.
Method 1 - Drag and Drop Mapping
The Mapping Form Outline displays below the form/flow property pane on the left of the canvas. The outline contains all mappable controls along with containing sections, panels, and special mapped items: Signed Section signature and date signed, any single select comment field and checkbox, dropdown and radio options.
Click the Properties pane header to display it.
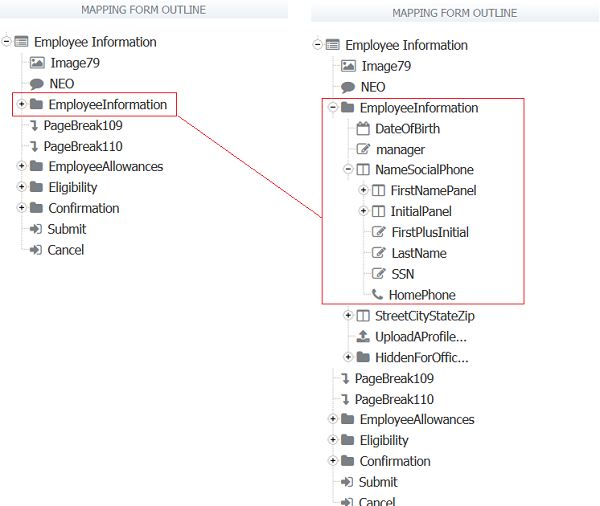
Click the  plus and
 ![]() minus icons in the Mapping Form Outline to expand/contract the Group Controls and display the mappable controls in your form/flow.
minus icons in the Mapping Form Outline to expand/contract the Group Controls and display the mappable controls in your form/flow.
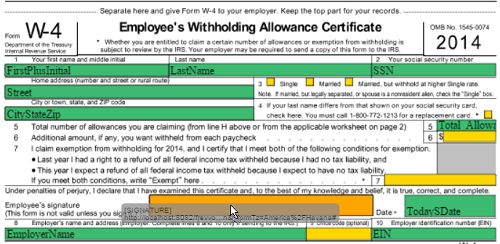
Drag mappable form fields from the Mapping Form Outline and drop them onto the PDF fields.
If the mapping complies with the PDF Mapping Rules, then the PDF field is filled in with the name of the e-form control and colored green to indicate that it is mapped. The color of the hovered field will be changed slightly to indicate that the drop can happen there.
Non-mappable control types can be dragged, but you will not be able to drop it on any PDF field. The image shows the Allowance fields from the Live Form/Flow mapped to the corresponding fields on the W - 4 pdf.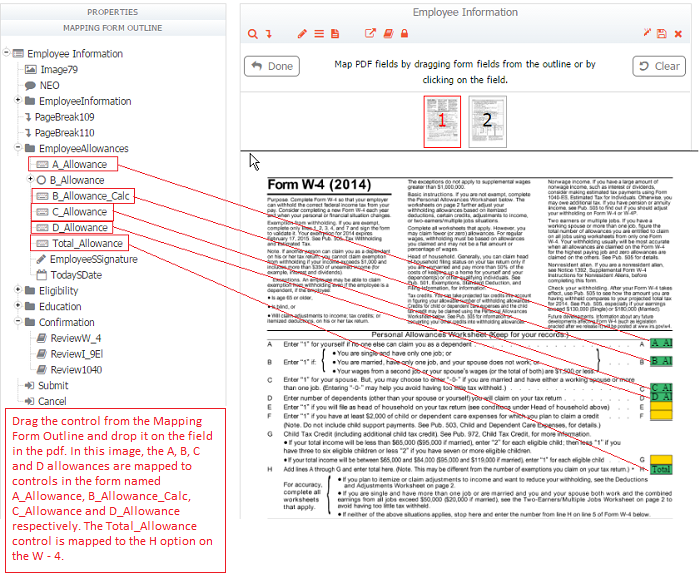
Repeat for all mappable controls on all the pages of the template.
Click the Done button when completed and don't forget to save your form/flow changes.
Method 2 - Clicking on a PDF Field
Mapping can also be accomplished by clicking on a mappable field in the pdf. This activates the PDF Mapping Dialog that is used to
- Create a new mapping by clicking on a yellow unmapped field.
- Modify an existing mapping by clicking on a green mapped field.
The PDF Mapping dialog has an upper portion that names and describes the PDF field being mapped. Below this is a table that shows Live Forms fields. The top row of the table shows any field that is already mapped to the PDF field. Below that is a scrollable table of candidate fields that may be selected for mapping. If there are no mappable fields in your form, you will see the mesage 'No frevvo fields mappable to this PDF field.' Only a single Live Form field may be mapped to a PDF field.
Functions for buttons in the PDf Mapping dialogue box are listed below:
| Action | Description |
|---|---|
| more>> less<< links | Used to hide and show more details about the PDF field being mapped, including Type, selectable values and the name of the field in the acroform. This information is useful when trouble shooting. Selecting more>> shows the details and changes the link to less<<. Selecting less<< hides the details. |
| Clear Mapping | Clears the mapping (if any). Any selected radio button is cleared. Changes take place immediately. |
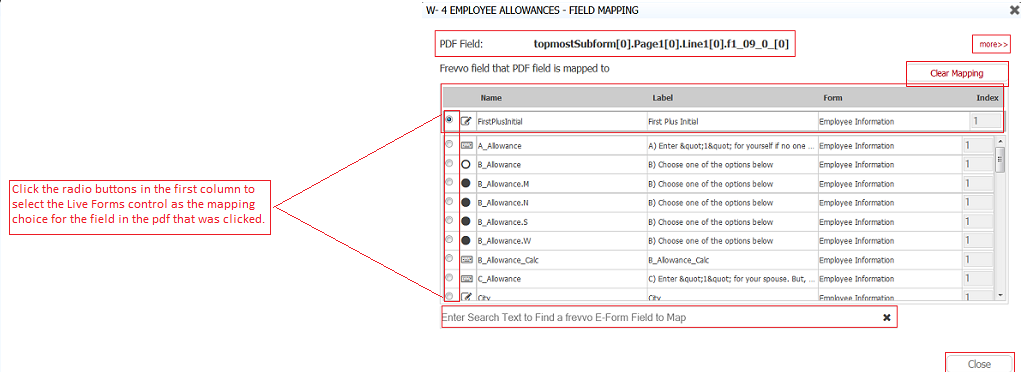
| Selection Radio Buttons | The first column consists of radio buttons for each mapping choice. Click the radio button corresponding to the Live Form control to map it to the field in the pdf. Radios may not be de-selected. Live Form fields are unmapped using the clear button or by selecting another e-form field. |
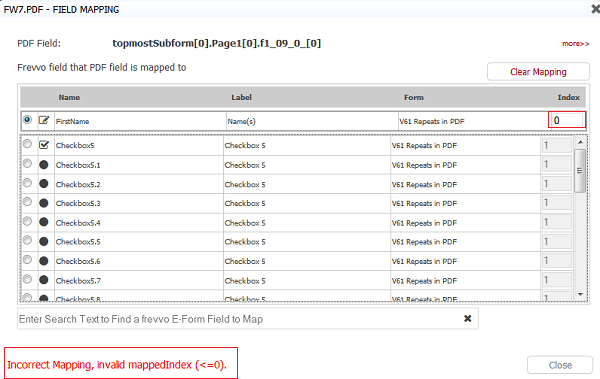
| Index Edit Boxes | For repeating Live Form fields, the 1-based index is used to select the field to be mapped. The value must be ≥ 1. The default is 1. Changes take effect immediately upon tabbing/clicking off the the index field. The index field is disabled for non-repeating Live Form fields. |
| Search Text Box | Use this to search for mapping choices for the pdf field that was clicked. Entering filter text causes the possible mapping selections to change. Only those matching the filter text will be shown. If the name, label or form name (flows) is either a partial or full match of the filter text (case insensitive), then the field is shown in the list of candidate fields selectable for mapping. E-form fields that are incompatible with the PDF field are not shown in the list . Search will find special mapped items such as Signed Section signature, date signed as well as the single select comment field. Use option control values to search for selection control options. |
| PDF Field | The name of the field in the acroform is displayed here. |
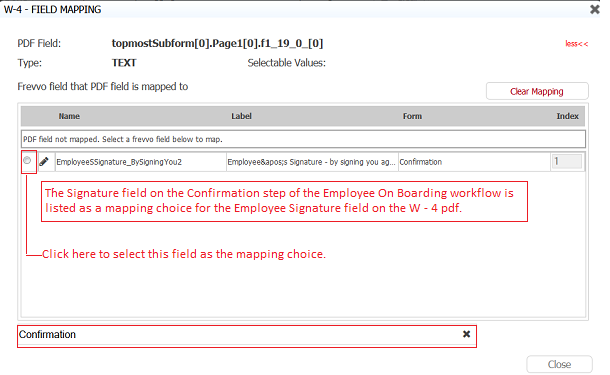
For example, let's say you want to map the Employee Signature on the W - 4 to the signature control on the Confirmation step of the Employee On Boarding flow.
Click the Employee Signature field in the pdf. Type the name of the form in the flow, in this case, Confirmation, into the search box. Mappable fields from the Confirmation step in the flow will display as possible mapping choices.
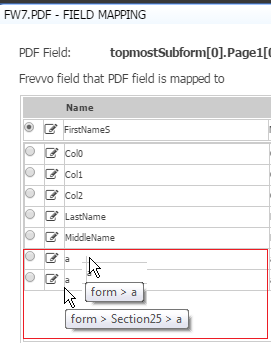
When you hover over the name field on the mapping dialog, a complete path to the control's hierarchy appears as a tooltip. This is helpful when mapping nested controls. For example, Let's say there is a field named a and a field named a inside a section in your form. Hovering over the name column for the controls named a produce the tooltips as shown:
The label and form columns of the Mapping Dialogue displays a maximum of 40 characters. If you have long labels in your form/flow, hover over the displayed text to see the full label text in the tooltip:

Click the Done button when the mapping is completed and don't forget to save your form/flow changes.
Error Conditions:
Mapping validation logic will detect the following conditions and report them as invalid:
- A mapped e-form field that was removed from the form.
- A comment that was mapped and then the control's comment property was deselected.
- A signed section's signature or sign date that was mapped and then the section's signed property was set to none.
- An option value that was mapped and then the option is changed or deleted.
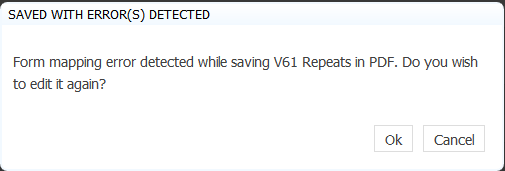
If you try to save a pdf with mapping errors, you will see the message
Changing the nesting levels of mapped controls does not produce this error. For example, mapping for selection control options, signature and date fields and repeats are automatically updated mappings when controls are moved in/out of Sections.
Clicking the OK button will bring you back to the designer canvas. Clicking the Cancel button returns you to the form/flow home page.
Mapping Table and Repeat Controls
E-form controls placed within repeats or tables use the max number property to create multiple "instances" of the e-form field for mapping. Controls within a repeat (or table) are indexed to allow the user to select the specific control for mapping. For example, the first instance of a repeat/table control with a min value of 1 and a max value of 3 has an index of 1, the second instance has an index of 2 and the third instance has an index of 3. There are no restrictions to the number of repeating items or rows in a table. You can map cells in a table or controls in a repeat using the drag and drop method from the Mapping Form Outline or you can click on the table/repeat field in the pdf and change the index value for instances greater than 1 in the PDF Mapping dialogue.
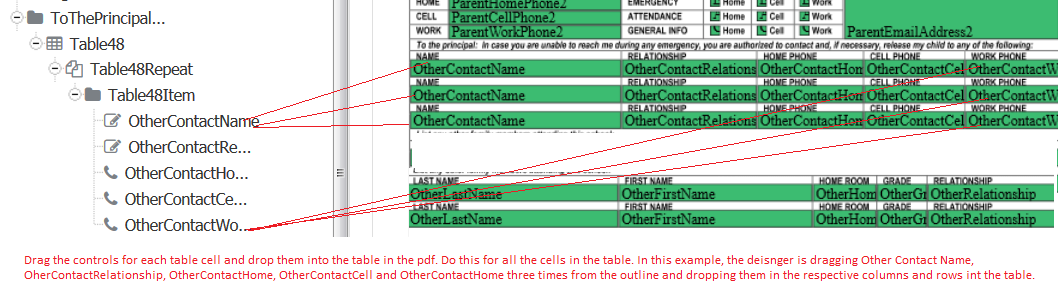
Let's take a look at examples that will clarify the mapping process. An Emergency Contact e-form has a table to list additional authorized individuals that a student can be released to in the event the school is unsuccessful at contacting the parents.This table has a min value of 1 and a max value of 3.

To map the columns of this table to an acroform pdf using the drag and drop method, locate the table in the outline and simply drag the Name, Relationship, Home Phone, Cell Phone and Work Phone controls from the outline and drop them into the correct column in all 3 rows of the table.
To map this table using the PDF Mapping dialogue, click on the table cell in the pdf, check the radio button next to the control that you want to map the table cell to and if it is not the first row in the table you must modify the default value of 1 in the Index column to the index for that row in the table.

Here is an example of an Application for IRS Individual Taxpayer Identification Number (W-7) that has fields for Name and Name at Birth - if different. A Repeat control containing a section with name fields and min/max values of 1 and 2 respectively, can be used in your form to capture both pieces of information.
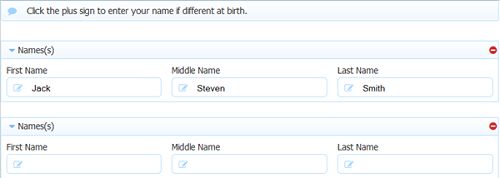
To map the repeat, using the Mapping Form Outline, locate the table in the outline and simply drag the FirstName control and drop it in the Name field in the pdf then drag it again and drop it onto the Name at birth if different field.

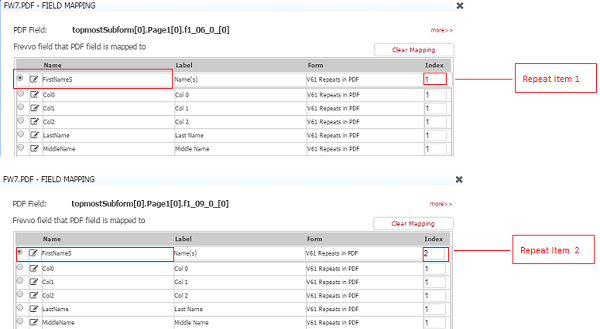
Then click on the First Name, Middle Name and Last Name fields in the pdf, and click the radio button for the e-form field that you want it to map to. Leave the index for the 1st repeat item as 1 and change the index for the second repeat item to 2.
After the user clicks the plus sign, the data is mapped as shown:

Entering an invalid index number displays the error shown in the image
Nested repeats, use the max numbers of each repeating level multiplied to determine the total max index of an item. This is best illustrated with the example below showing repeat 2 nested in repeat 1. Each repeat has a section and each section a text control. Each repeat level has a max of 2. The inner most text control will have an index of 4 (2x2) as shown.
Form
    repeat1
        section1  (max 2)
            text1                     -- index = 1
            repeat2
                section2   (max 2)
                    text2             -- index = 1
                section2
                    text2             -- index = 2
        section1
            text1                     -- index = 2
            repeat2
                section2
                    text2             -- index = 3
                section2
                    text2             -- index = 4
If you have empty rows in a table control or blank repeating items in your form, pdf mapping may shift a bit. To keep the mapping predictable, set the min value equal to the max value for the table/repeat controls. This will give you options to map the missing/blank items in the pdf mapper.
Mapping the Upload Control
Let's say you wants to take a photo using a mobile device and then map the photo to a PDF. supports mapping of the Upload control that can be used to upload the image to a form/flow.
- You can only map one image file per upload control. In the case of upload controls with more than one file, the mapping simply takes the first image file found.
- Common image types supported are: gif, png, jpg/jpeg and bmp.
- Tiff is not supported.
- Non image file types uploaded are ignored.
PDF Form Generation Rules
PDF forms are generated as the last step(s) of a form/flow or when the Form Viewer control is clicked. All other activities are completed prior to the execution of any form generation activities. PDF forms are generated by using the mapping meta data entered by the user to map the e-form field data into the PDF's acroform fields. Precondition properties are supported for form generation activities and operate in a standard fashion, i.e. if the precondition evaluates to true, the activity executes.
The specifics of mapping e-form data fields into acroform fields are detailed in the table below:
- The horizontal columns represent the acroform field types and the vertical rows represent the Live Forms control types.
- Blank cells indicate that mapping is not possible. E-form fields will not be made available for mapping for those types of acroform fields.
- An acroform check box is a single check box and does not correspond one to one to a Live Forms check box.
- An acroform radio button is a single radio button and does not correspond one to one to a Live Forms radio control.
- Checkbox, radio and dropdown options are included in the mapping select controls in the PDF (according to the table below). They will be listed as ControlName.OptionName?.
- Live Forms manual signatures are treated as images. They can be mapped to text fields. The image is linearly scaled to fit within both the vertical and the horizontal dimensions of the text field without any distortion.
| E-Form Field Types | acroform Field Types | ||||||
| Checkbox | Choice/Combobox (Single select) | List | Radio Button | Text | Push Button | Signature | |
|---|---|---|---|---|---|---|---|
| CheckBox | Mapping is done by option value. If the value of any of the selected option(s) on the e-form control matches the 'on' value of the check box, then it is selected. Otherwise it is unchecked. See NOTE below. | Select one item in choice/combo corresponding to selected checkbox options. Equate items/options by the value/option, not label. Only single select supported in some cases (depends on if field is set to multi). | Select items in list corresponding to selected checkbox options. Equate items/options by the value/option, not label. If list box is single select only one option is selected. | Select one item in radio corresponding to selected checkbox options. Equate items/options by the value/option, not label. Only single select supported. | Yes. The label text of the selected option(s) will be comma separated and used. | ||
| CheckBox Option | Yes. If option selected, check box will be selected. | Yes. If selected, then option label text used. | |||||
| CheckBox Comment | Yes. Only if comment is enabled. Multiple lines will be concatenated (new lines not carried over to PDF). | ||||||
| Radio | Mapping is done by option value. If the value of any of the selected option(s) on the e-form control matches the 'on' value of the check box, then it is selected. Otherwise it is unchecked. | Select item in choice corresponding to selected radio option. Equate items to options by the value, not label. | Select items in list corresponding to selected radio option. Equate items to options by the value, not label. | Select one item in radio corresponding to selected radio option. Equate items/options by the value/option, not label. Only single select supported. | Yes. The label text of the selected option will be used. | ||
| Radio Option | Yes. If option selected, check box will be selected. | Yes. If selected, then option label text used. | |||||
| Radio Comment | Yes. Only if comment is enabled. Multiple lines will be concatenated (new lines not carried over to PDF). | ||||||
| Dropdown | Mapping is done by option value. If the value of any of the selected option(s) on the e-form control matches the 'on' value of the check box, then it is selected. Otherwise it is unchecked. | Select item in choice corresponding to selected dropdown option. Equate items to options by the value, not label. | Select item in list corresponding to selected radio option. Only select one by definition. Equate items to options by the value, not label. | Select one item in radio corresponding to selected dropdown options. Equate items/options by the value/option, not label. Only single select supported. | Yes. The label text of the selected option will be used. | ||
| Dropdown Option | Yes. If option selected, check box will be selected. | Yes. If selected, then option label text used. | |||||
| Dropdown Comment | Yes. Only if comment is enabled. Multiple lines will be concatenated (new lines not carried over to PDF). | ||||||
| Text & Text Area | Yes. Simple text transfer. | ||||||
| Date, Time, DateTime | Yes. Use formatted date/time. | ||||||
| Email, Phone | Yes. | ||||||
| Money, Quantity, Number | Yes. | ||||||
| T/F | Yes | Put a 'true' or 'false' in as appropriate. | |||||
| Image | |||||||
| Signature/Signed Section | Yes | Yes | |||||
| Upload | Yes | ||||||
| Combobox | Yes | ||||||
In general, all the controls listed, can be mapped to an acroform text field. Selection controls are mostly handled by mapping the option values as indicated above.
Mapping of dynamically generated selection control options via a rule is not supported at this time. It will be available in a future release of .
Date/Time
Date/time will be derived from the xml and it will be in ISO format and in UTC (time and date/time only). There are two issues to consider:
- Timezone - Times and date/times must be formatted using the form’s timezone.
- Formatting dates (and times) uses the formatting from the e-form set by the designer.
Mapping Selection Controls
When mapping selection controls, you will see the name of the control and the options for that control in the mapping choices. The option values will be listed as ControlName.OptionName?. As an example, let's take a look at the Eligibility field on the I-9 Employment Eligibility federal form. A radio control to collect the eligibility status from the new employee in the Employee On Boarding form/flow is shown in the image:
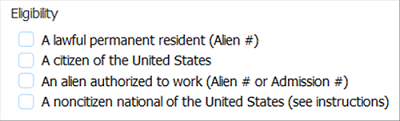
The option/label values for the radio control in the e-form are:
A_lawful_permanent_resident_(Alien_#)=A lawful permanent resident (Alien #)
A_citizen_of_the_United_States=A citizen of the United States
An_alien_authorized_to_work_(Alien_#_or_Admission_#)=An alien authorized to work (Alien # or Admission #)
A_noncitizen_national_of_the_United_States_(see_instructions)=A noncitizen national of the United States (see instructions)
Map each option to the pdf using the drag and drop or mapper dialogue. Notice the options are listed using the Control Name.OptionName format: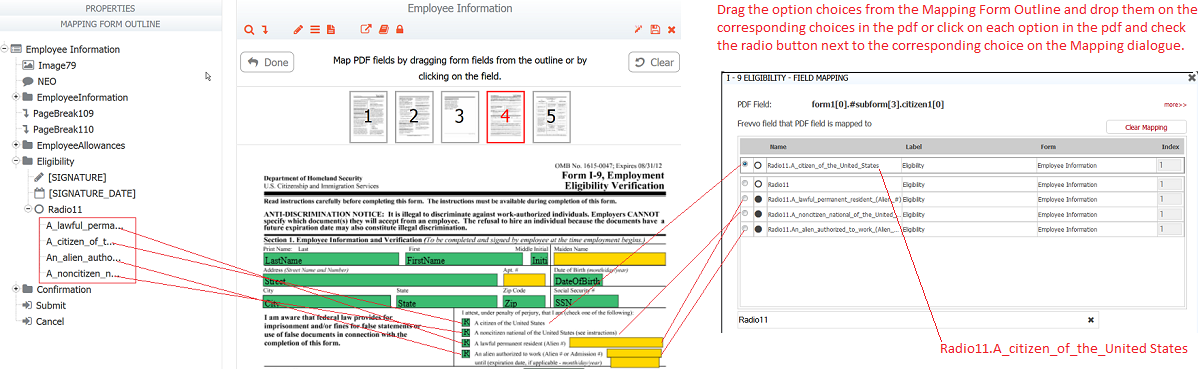
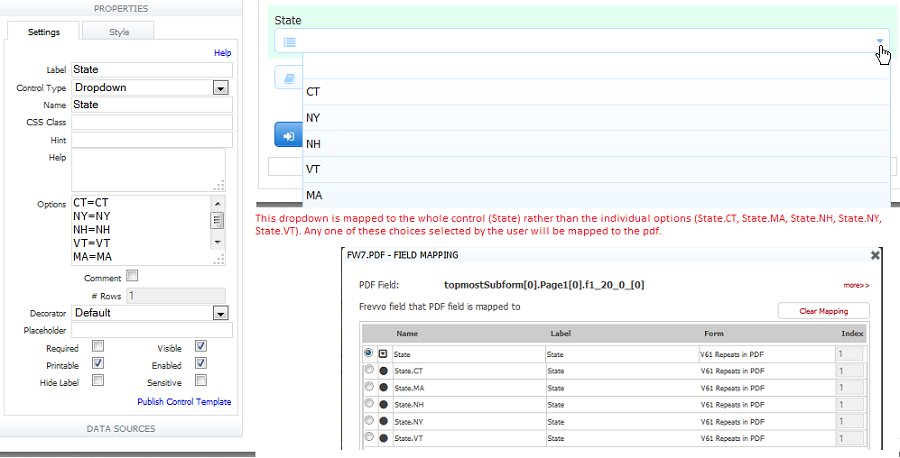
Sometime, you may wish to map to the entire control instead of the individual options. For example, the dropdown control in the image is mapped to the whole control in the pdf. Any choice selected by the user will be mapped.
PDFs and Dynamically Populated Selection Controls in workflows
Depending on which step you view the generated pdf in a workflow you may notice the value of the selected option is displayed instead of the label. For example, let's say you have a two step workflow, where each step is a different form and is performed by a different user. In step 1, there is a Select Supervisor dropdown control populated dynamically by a business rule. The options follow the value=label syntax, mary@mycompany=Mary Jones. There is a Form Viewer control to view the pdf when step 1 is being performed. The pdf is mapped to the Select Supervisor dropdown in step 1. Step 2 of the flow contains only a Form Viewer Control. User 1 selects Mary Jones from the dropdown then clicks on the Form Viewer to see the generated pdf. The pdf displays the option label, Mary Jones. User 1 clicks Continue.
When user 2 picks up the activity for step 2, the form does not contain the Select Supervisor control and therefore does not have the options loaded by the rule. The visible option is not stored in the document for the flow, only the value. The PDF mapping logic tries to get any dynamic labels out of the instance in case there were changes and then use the labels instead of the values. If all this fails to produce a matching label for the value of that mapped control, then the value is used. Clicking on the Form Viewer control in step 2, shows the value for the option, mary.jones.
A simple work-around is to put a control by the same name into the second form and uncheck the visible property. Then add the same rule to the second form to populate it. Workflows designed using Linked Activities, should not exhibit this behavior. Linked steps in flow are like a single form broken into pieces. Flows using this design pattern have a single schema which includes fields from all its steps. So when fields from a flow are mapped to a PDF, there is nothing like future fields from the PDF point of view. It is mapped to the controls in a single schema or document.
Adobe Reader Issue with Grouped Check Boxes
Adobe Reader has an issue with grouped check boxes. In certain pdfs, it only allows a single selection for all of the check boxes in a group. Clicking on the more>> link shows the selectable values for that control. This extra information can be useful when performing the mapping function for a pdf that exhibits this issue. Let's take a look at an example to clarify:
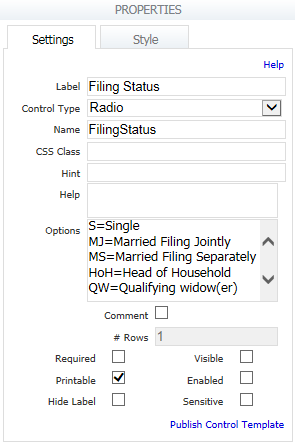
A Filing Status section on the U.S. Individual Income Tax Return acroform (1040) has checkboxes for 5 status choices:
In your form, you have a radio control which will allow only one of the five choices to be selected.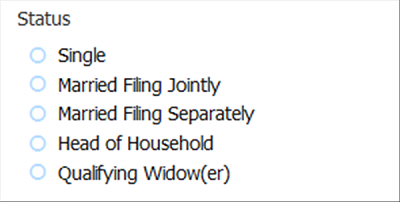
In the designer, the options for the radio control are:
Single=Single
Married Filing Jointly=Married Filing Jointly
Married Filing Separately=Married Filing Separately
Head of Household=Head of Household
Qualifying widow(er)=Qualifying widow(er)
You map each option to the corresponding checkbox on the pdf but when testing discover that no data is mapped. This is a case where the acroform fields look like and are called checkboxes but really are radio controls.
Follow these steps to correct the mapping:
- Click on the Single option checkbox in the pdf to display the Mapping dialogue lightbox
- Click the more link. Details about the pdf field will display including the selectable value of S.
- Determine the selectable values for the other options.
- Change the values for the options in the properties pane of the radio control in the e-form to match the Selectable Values that you saw when you clicked on the more link. The options values of the Live Form Status control in the e-form must match the Selectable Values EXACTLY. The case of the option values is important. The option values MUST be the same case as listed in the mapping dialogue.
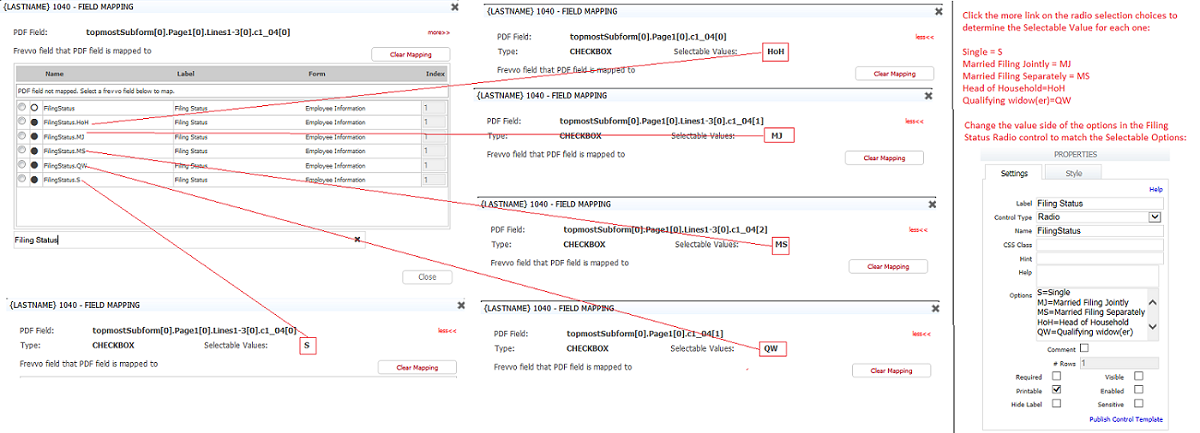
The mapping is done when the user selects one item in the radio corresponding to the selected radio option. The items/options are matched to value/option, not label, of the control. Only one selection is supported. See PDF Form Generation Rules for more information.
Note the Selectable Values from the mapping status are on the option value side of the equal sign.
A user who selects the Head of Household radio button in the Live Form will see that option checked if the mapping is done correctly.

Acroform Field Names with a #
If a field in an acroform has a # in the name , you may see this error message when you click on the Form Viewer control to view the mapped pdf.

This caused by a field name on the acroform PDF that contains a '#' character. To view acroform field names, go into the mapper in the designer and click on acroform fields. The name is shown on the dialog. The image shows a a field named "form1[0].#pageSet[0].Right[0].Educator[0]".
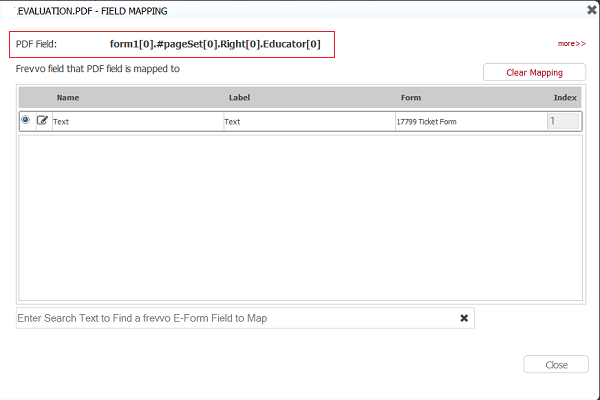
To resolve this issue, remove the "#" from the acroform field name. You can use a tool like PDFescape which is a free pdf editor available online to rename fields. If you use this utility, you must right click and unlock the field first then right click and edit object properties to rename the field.
Step 5 - Form Viewer Control
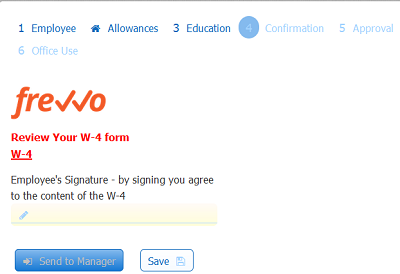
You may have a form/flow where you want the user to view the generated PDFs for accuracy. The Employee On Boarding form/flow requires that the new employee review the generated PDFs and sign to verify that the information is correct. The Form Viewer control allows a generated form to be viewed as part of a form activity. The Confirmation form in the Employee On Boarding form/flow lets the new employee view and approve the generated W-4 form by signing in the provided signature field. Clicking on the generated form name in use mode displays the form in a separate window/tab. The form can then be viewed or downloaded via the Save procedure for the PDF viewer you are using. There may be other methods of downloading/saving the form depending on the browser.
Open the form/flow designer. Notice the addition of the Form Viewer control to the palette. The form viewer control is available in the form editor's palette, as well.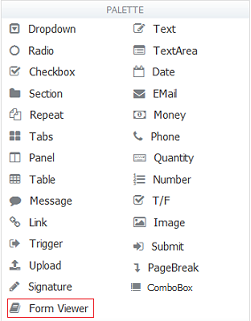
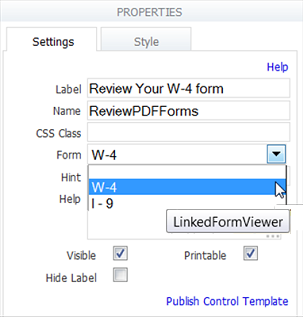
Drag and drop the Form Viewer control from the palette into your form. If you are using the flow designer, select the step in the form/flow where you want the PDFs to be viewed by clicking on it and then click on the  pencil icon to launch the Form Designer. It can not be placed in a repeat or table control. You will need a Form Viewer control for each PDF that you want to be reviewed. The generated form will display in Link Mode. Select the PDF to be viewed for each control from the Form dropdown. If you used templatized strings when naming your template, it will show the template unresolved in the drop down.
Properties on the Style tab work as expected.
If you delete an acroform and then upload a different one, you will have to redo the pdf selection in the Form Viewer control that was configured to view that pdf.
Link Mode
The Form Viewer control defaults to link mode. Link mode offers the generated PDF to the user as a link for viewing/downloading/saving it. Clicking on the generated form name in use mode generates a new PDF form from the latest form entered data and displays the form in a separate window/tab. The form can then be viewed or downloaded via the Save procedure for the PDF viewer you are using. There may be other methods of downloading/saving the form depending on the browser. The download link is inactive in edit mode.
Step 6 - Testing the form/flow
When you are mapping your PDFs, click the save and test icon to test the mapped PDFs in your form/flow without leaving the designer. The form/flow is checked for errors and they are reported before the Test popup displays. This gives the designer the opportunity to make corrections before testing.Refer to Testing Forms or Testing Workflows for more information about this feature.
Of course, you can always click the  icon to save your form/flow when the mapping completed, then click on the
  Test icon to run the form/flow and submit it. When you get to the form with the Form Viewer control, be sure to check the generated Pixel Perfect PDFs such as the W - 4 etc.
If you are using MySql and you are running/submitting a form/flow with a large acroform, you may see this message:

The default value of max_allowed_packet configuration parameter may not be large enough. See this/wiki/spaces/frevvo80/pages/975572178for the solution.