This documentation is for Live Forms 9.1. v9.1 is a Cloud Only release. Not for you? Earlier documentation is available too.
COVID-19 Response Info: At frevvo, our top priorities have always been employees and customers. We have taken several steps to promote the well-being of our people, to minimize services disruptions, and to help where we can. Visit our website for updates.
Control Templates
A control template is a control that was published by the form designer so that it can be reused in other forms and by other designers within the same tenant. You typically want to publish control templates when you create complex control with sophisticated layouts, field patterns, business rules, etc., and want to reuse that work in another form or share it with another form designer. You also may consider using control templates when you need to split the work among a number of form designers, where each designer is responsible for creating a subsection of a complex form and another designer is responsible for assembling these control templates into a final form or workflow.
Click Control Templates for Common Rules to see examples of common custom controls.
On this page:
Custom Tab Area
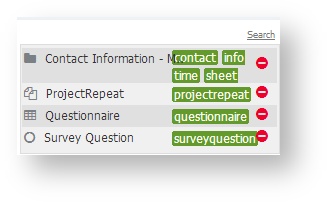
The Custom tab is like a favorite's area for the current designer. Adding control templates to or removing them from the Custom tab is not the same as adding or removing control templates. This removes the templates from the currently logged in designer's favorites. There could be 100's of control templates published by designers in a given tenant, but only 10 of them have been added by the designer to his/her Custom tab favorites.
Each individual designer will have their own Custom tab with their own set of favorite control templates.
Control Template Types
There are two types of control templates that you can create in – modifiable templates and read-only templates. In some cases may you want to publish a control template and allow them to be completely modified when used in other forms. These modifiable control templates are basically a starting point to a slightly or entirely different control at the discretion of the designer using it. Note that by changing the name of a control, you may break rules published with the control. In other cases, you may want to publish read-only control templates. A designer using a read-only control will not be able to remove nested controls nor change any properties that affect the underlying data binding (e.g., the name property). The designer can still change other UI-related properties such as styles and labels, and rearrange any nested controls on read-only templates.
In general, if you have rules associated with the control or it is essential to guarantee a consistent XML binding, then you want to publish your controls as read-only.
Publishing a Control Template
There are two ways you can publish a control in :
- Clicking the Publish Control Template link, in the control properties pane, or
- Dragging and dropping the control onto the Custom tab header
There is small difference between these two ways of publishing controls, though. When clicking the Publish Control Template link, you are only publishing the control as a template, but when you drag & drop you are also adding the published control to the Custom tab, in one shot.
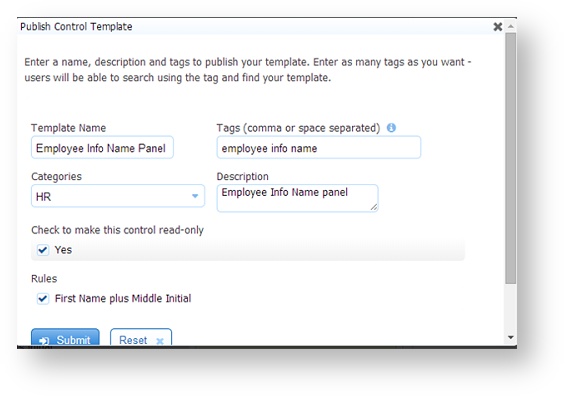
Next, you will see the Publish Control Template dialog where you can enter a name and description for this template, a category, and any number of comma or space-separated tags. See the Manage Control Categories topic for instructions for adding or removing control template categories.
Click Submit and you will see a confirmation page that once closed will refresh the page. If you used the drag & drop approach above, you should see the published control automatically added to your Custom pane.
The image, video, table, upload and pagebreak controls are not allowed in a custom control. You will see this message if you try to publish a section that contains any of these controls: "Sorry - the custom control contains a control that is not allowed in the custom palette."
Publishing Controls with Rules
You can also publish controls that are referenced by rules as long as:
- the control is a Panel or a Section (support for simple controls will be added in the future)
- the rule only references the control being published or any of it's nested controls
When the above conditions are met, the Publish Control Template dialog will list the candidate rules (see next screenshot) allowing you to select the ones you want to publish with the control. Note that as soon as at least one rule is selected the read-only checkbox will also be selected: you can only publish controls with rules in read-only mode. Since it is not possible to edit rules after the control is published, this restriction exists to make sure that no changes that could break the rules will be allowed when using the template.
Prefix Property
If you mark a custom group control read-only=true, then when it is used from the Custom Area and dropped back onto any form, it will not be editable. This means that you cannot delete or rename controls from within a read-only group. You can only delete the entire read-only group, and change the styling, validation, etc.. properties.
Custom group controls marked read-only=false can be edited completely. You can drag other controls into the group and delete any one or more controls from within the group.
Any rules used by a custom group controls can be carried along with the custom group. The wizard will show you all the rules used by the group and will allow you to pick and choose among them. As soon as you choose one or more rules, the group is automatically marked as read-only=true. This is because editing the name of one of the controls in the group could break the rule.
Rules carried along into a custom group control are not visible when dropped into another form. This is because they are not editable. The only rules that can be carried into a custom group control are those that entirely reference controls within the group. If a rule references controls both within and outside the group they cannot be included in the custom group since they would not be functional. The custom group wizard will exclude such rules automatically.
Custom groups with rules included when dropped back onto the same or another form, will contain a special "Prefix" property. The prefix property will automatically be given a unique value if you drop the group onto the same form 2 or more times. This ensures that the group controls have unique element names. You can view the impact the prefix has on the element names by viewing the form's schema or the control's property panel.
The Section control of custom read-only controls are named with a prefix value. The prefix is automatically assigned whenever the custom control is dragged more than once onto the form. In this way, you can write a separate rule to manipulate the controls within the 2nd and greater instances of the custom control. The first custom control dragged into the from will not have an assigned prefix.
For example, let's say you have a Section control named Section 67 which contains a text control named a. There is a rule attached to populate a with the text "sweet" when the form loads. You publish the control as read-only and carry the rule along with it. Then you create a new form and drag Section 67 into your new form three times. The Section control name of the of the first instance will not contain the prefix. However, the second and third instances will include the prefix. Now you can write a rule that will populate the control named a in the second and third instances using the assigned prefix.
The assigned prefixes will show in the Form Outline. This is helpful when writing the rules for the second and third instances.
The rule shown populates the control named a in the second copy of the custom control with the word "sour" and the third copy with the text "sweet and sour" respectively whem the form loads. Notice the a controls in the second and third copies are referenced with the prefix in the rule.
if(form.load)
{
a.value='sweet';
}
if (C196a.value.length > 0) {
C196a.value = 'sour';
}
if (C198a.value.length > 0) {
C198a.value ='sweet and sour';
}
You can edit the Prefix property but will not allow you to make it non-unique.
Adding/Removing Templates to/from the Custom Panel
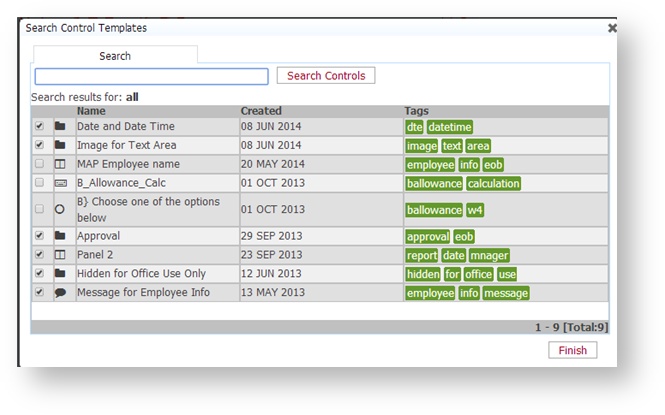
You can add control templates to the Custom pane by clicking the Search link found there. This will show the Search Control Templates dialog where you can search for the template you are looking for.
This search dialog will show, by default, the first 10 templates ordered by the date when the control was published. You can then page through the templates by clicking Next or Previous.
The search result will show a table with 5 columns:
- Column 1: Include/exclude from Custom pane (checked/unchecked)
- Column 2: Control type icon (Section, text, dropdown, etc)
- Column 3: Template name
- Column 4: Template created date
- Column 5: Template tags (space separated)
You also can see who created the template and when by hovering over a given row in the results table.
You can add a control to the Custom pane by selecting (checked state) the check box in the first column in the table and remove a control from the Custom pane by deselecting (unchecked state) it. Click Finish when done and you will see an updated Custom pane after a page refresh.
Searching Control Templates
You can also perform simple case-insensitive searches through all the published control templates using the Search Control Templates dialog. Here are some sample searches:
- perso -- searches for all templates that have the sub-string 'perso' in the name, description, tags or categories (case-insensitive, partial matches).
- name:PersonalInfo -- all templates with name containing '''PersonalInfo''' (partial match)
- descr:Somewhat -- all templates with description containing '''Somewhat'''(partial match)
- author:john -- all templates created by '''john''' (exact match)
- tag:personal -- all templates with a tag '''personal''' (exact match)
- cat:hr -- all templates with a category named hr (exact match)
- type:Checkbox -- all templates of type Checkbox (exact match, options are: Checkbox, Text, Repeat, Section, Dropdown, Panel, TextArea, Number, Phone, Radio, Tabs, Message, Link, Date, Email, Quantity, Image, Video)
The search will be updated by either clicking the Search Controls button or by tabbing off the search field. You can also perform automatic searches by clicking individual columns in the search results: e.g. clicking on a tag will automatically filter the search by that tag and the search field reflects the new search criteria.
Removing Control Templates
If you want to remove control templates (instead of removing from the Custom pane) from , you need to make sure you are logged in as the tenant admin. See Manage Control Templates for the details.


