Getting Started with the Data API - Java Client Library Tutorial
So you've decided to use the frevvo Data Java client library to have a deeper integration between your application and frevvo. Our aim with this tutorial is to quickly get you started in using the Java client library by guiding you through the implementation of a simple application.
We will first help you configure your development environment and then jump straight into the Java code. This tutorial assumes that you have already installed a recent version of the Java JDK (5.0 or 6.0) and that you have already downloaded frevvo Tomcat bundle from LiveForms web site. The Tomcat bundle contains all the required Java Client jars.
In v9.1 and later frevvo's "Applications" are known as "Projects." The API objects and methods still use the word Application.
On this page:
What are we going to build?
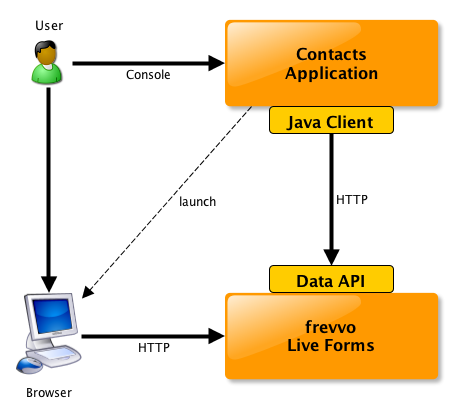
We are going to build a simple contacts project using frevvo and the Data API Java Client Library.
This project will be composed on a single contact form that will be used to add new contacts, view and edit existing ones. For the sake of simplicity and the focus on the APIs, the application will be provided as an interactive command-line executable and contacts will be stored in frevvo's internal submission repository. The command-line executable will automatically open forms using the system's browser (e.g. when editing, viewing or creating a new contact).
This tutorial will help demonstrate how to:
- Login/logout and session management
- Upload a sample project into frevvo
- List the existing submissions for a sample form
- Create a new submission
- View a submission
- Edit a submission
- Query submissions & pagination
- Delete a submission
Installing the Client Library and Dependencies
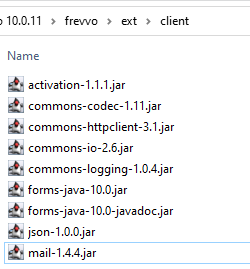
The frevvo Java Client Library has the following dependencies:
- activation-1.1.1.jar
- commons-codec-1.11.jar
- commons-httpclient-3.1.jar
- commons-io-2.6.jar
- commons-logging-1.0.4.jar
- forms-java-10.0.jar
- forms-java-10.0-javadoc.jar
- json-1.0.0.jar
- mail-1.4.4.jar
For your convenience all these required jars can be found in the Tomcat bundle in the /frevvo/ext/client folder. Make sure you include all of them in your classpath when adding them to your application's classpath.
The actual jar versions may be different depending on the version of frevvo being used.
Contacts application
We have created a simple Contacts command-line application and we'll use it to demonstrate some of the API features. The idea is so that the user will start the command-line Contacts application and issue interactive commands to perform the main functions mentioned earlier: create new contact, edit or view a contact, delete contact, list contacts, etc. At times, the Contacts application will need to render a form and will then launch a browser window so the user can see or fill in the Contact form.
The Contacts application described here is comprised of a single .jar file that contains all the required dependencies including the Contacts frevvo project .zip (more details about this below).
Assuming that you have an installation of frevvo up and running (e.g. http://localhost:8082) and a user account (e.g. designer) in a given tenant (e.g. tutorial), you can run the command-line app here, replacing 'forms-cli.jar' with the current jar filename.
java -cp forms-cli.jar com.frevvo.forms.cli.Tutorial -s http://localhost:8082 -t tutorial -u designer -p {designerpwd}
If you are running this for the first time you should see:
Using embedded Contacts application ...
Connecting to tenant demo at localhost:8080 ...
Contacts application doesnt exist. Uploading ...
Application uploaded!
And then the command prompt:
http://designer@localhost:8082/tutorial>
You are now logged into tenant tutorial as user designer connected to server http://designer@localhost:8082.
Enter the list command to list all the submissions for the Contact Form (the first time you should have none):
http://designer@localhost:8080/tutorial> list
List all existing contacts...
URL ! http://localhost:8080/frevvo/web/tn/tutorial/api/submissions?filter=%24formTypeId+eq+%27_pkMVwBH8EeCl2et9BuDRPg%27
    # | ID           | CREATED           | UPDATED           | KIND           | STATE           | PDF?
For the curious among you, you can see the list of commands available by entering the ?list command. We will cover each one of them in the following sections.
But first, let's go over the Contact form and how to get it's API ID...
The Contact Form
Once you are logged in to frevvo, create a project named Contacts and then create a Contact form with a set of contact controls such as first name, last name, address, zip code, etc.
If you have run the command line .jar as instructed above you will already have this and won't need to create them.
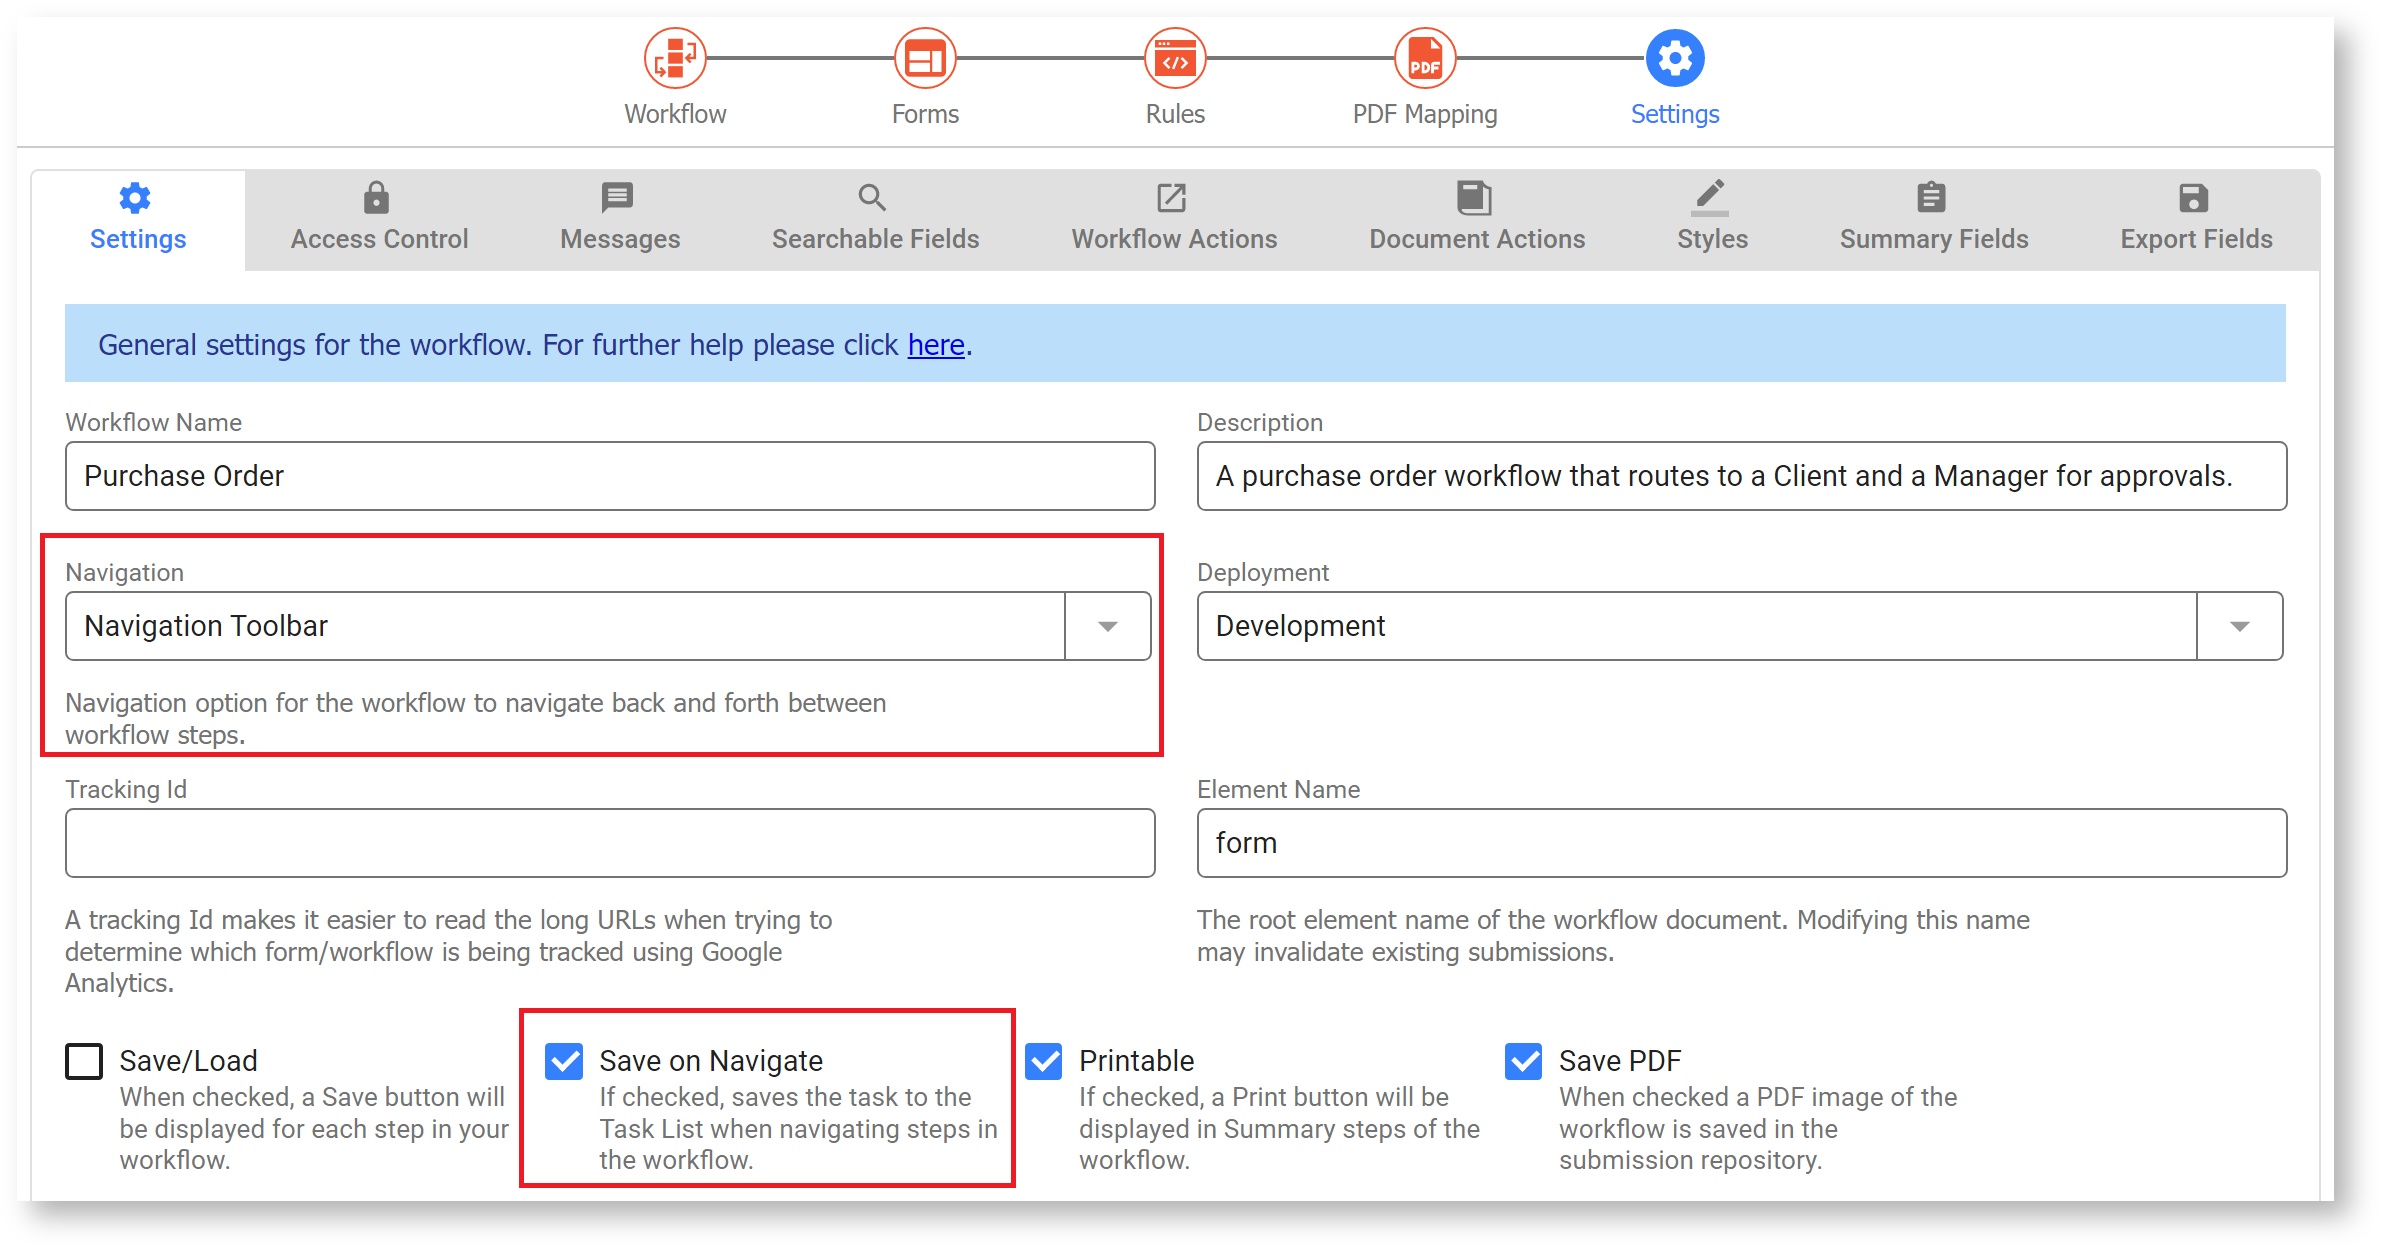
In the Contact form you just created, make sure that you also check the Save PDF in the Settings tab. This will make sure that a PDF snapshot will be automatically saved when the form is submitted (this will be used to show how to get the PDF snapshot using the API).

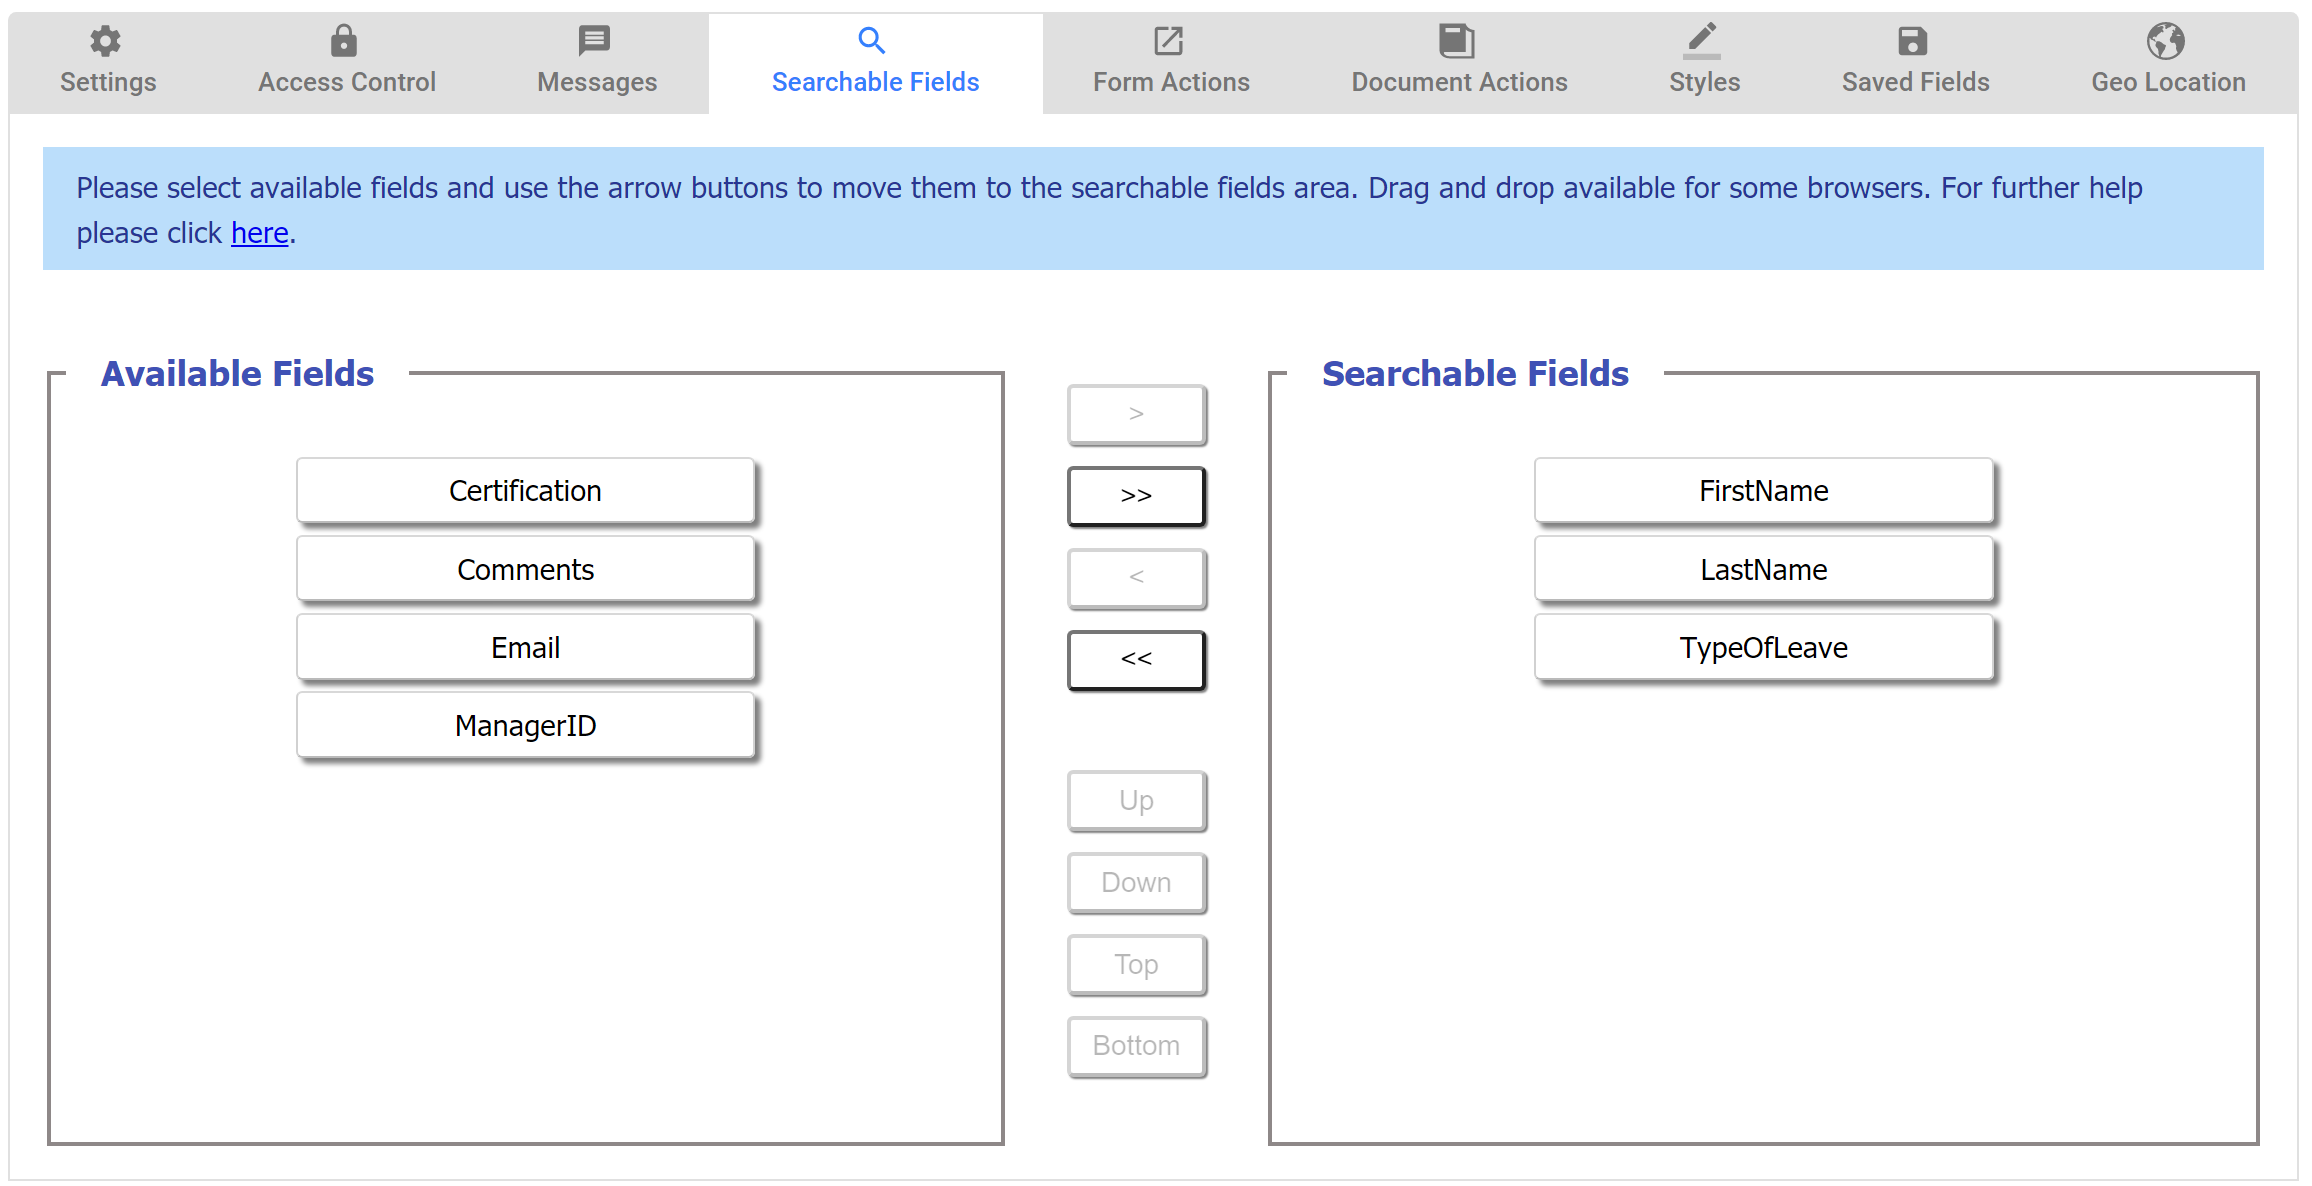
Also, make sure that your configure Searchable Fields. Searchable fields can be used for quick searches when using the API. The first 5 searchable fields listed in the UI are the key fields for the API.
Let's consider a Job Application workflow with the following requirements:
- The workflow is going to be performed by anonymous users. Anonymous users do not sign in to frevvo.
- The anonymous user receives an email that includes a link to the workflow.
- The workflow must collect a lot of information from the applicant: Contact Information, Education and Employment history, References and more. You can create one long form or design a screenflow with an Anonymous Task step and subsequent steps as separate screens to collect the information.
- The user must have the option to compete the screenflow in multiple sessions. Clicking on the email link takes the user back to the last step in the screenflow where the Continue button was clicked.
- The user must be able to navigate back to previous steps to review or update information that was previously entered.
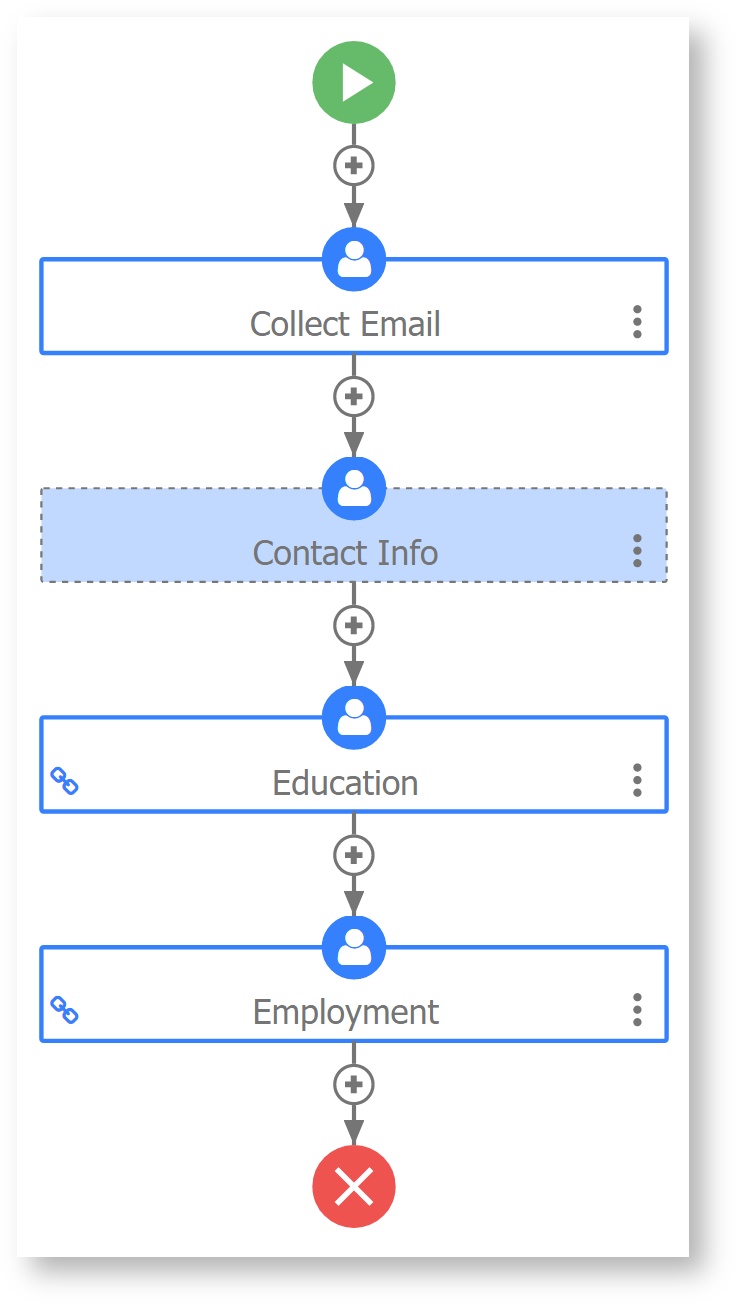
Workflow Designer
- Step 1 of the screenflow has a field named EmailAddress that collects the applicant's email address.
- Step 2 is assigned to an email address. This is the first step that is performed by the anonymous user.
- All remaining steps in the screenflow are designed to collect the applicant's information: Contact Info, Education and Employment history, references etc. Remember, the anonymous user does not login to perform these steps so they cannot have a role, dynamic role or user property assigned to them.
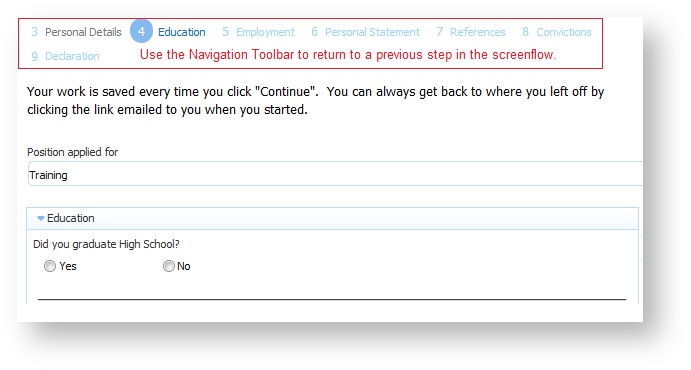
- The Save on Navigate checkbox is checked and the Navigation Toolbar is configured.
The image shows an example of a possible screenflow design:
Use Mode
Anonymous screenflow users return to a previous step by clicking on the Navigation Toolbar..
Now save your form.
Get the Contact Form API ID
When using the Data API, you can find this Contact Form you just created either by getting a list of existing forms and finding the right one by name. This approach works but is a bit error prone in case another form could be created with the same name. In addition, it is also slower than getting the form directly by id.
Here is how you would find a form by name:
public class Contacts {
	...
	protected FormTypeEntry getContactForm2(String formTypeName)
			throws IOException, ServiceException {
		FormsService s = getService();
		try {
			URL formsUrl = s.getFeedURL(FormTypeFeed.class);
			FormTypeFeed forms = s.getFeed(formsUrl, FormTypeFeed.class);
			for (FormTypeEntry form : forms.getEntries()) {
				if (formTypeName.equals(form.getTitle().getPlainText()))
					return form;
			}
			return null;
		} catch (ResourceNotFoundException e) {
			return null;
		}
	}
	...
}
A better approach is to use the FormTypeEntry ID for the form in question. In integrations where forms can be dynamically created using the API, this is just a matter of saving the id found in FormTypeEntry.getId() and then using it to find the form (code shown below).
For this tutorial, though, the Contacts form is known before hand and so we can get it's id manually. This can be done in two ways:
- Manually constructing the entry's ID, i.e. {formtypeid}!{applicationId}!{ownerId} - When designing the form in question you can get all these three ids by looking at the url in the browser's address bar. It will look like something: .../frevvo/web/tn/tutorial/user/designer/app_lJ8_ERH8EeCl2et9BuDRPg/form/_pkMVwBH8EeCl2et9BuDRPg?typeId=_pkMVwBH8EeCl2et9BuDRPg&locale= (in bold, respectively, ownerId, applicationId and formtypeId). The final ID would be _pkMVwBH8EeCl2et9BuDRPg!_lJ8_ERH8EeCl2et9BuDRPg!designer.
- Searching for the entry id in the forms feed. Go to the browser and access the formtype feed .../frevvo/web/tn/tutorial/user/designer api/formtypes. View the page source and search for the entry named "Contact Form". Copy the value of the <id/> element. You should see something like the following feed:
<feed xmlns="http://www.w3.org/2005/Atom" xml:base="http://localhost:8080"
      xml:lang="en">
   <title><strong>Form Types<strong></title>
   <updated>2010-12-29T16:34:41.077-05:00</updated>
   <link rel="self" type="application/atom+xml"
         href="/frevvo/web/tn/tutorial/api/formtypes"/>
   <entry xmlns:fd="http://schemas.frevvo.com/fdata/2008" xml:lang="en">
      <id>_pkMVwBH8EeCl2et9BuDRPg!_lJ8_ERH8EeCl2et9BuDRPg!designer</id>
      <title type="text">Contact Form</title>
      <summary type="text">Edit the form to change this description.</summary>
      <updated>2010-12-27T16:02:44.062</updated>
      <category scheme="http://schemas.frevvo.com/fdata/2008#kind" term="FORM"/>
      <link type="application/atom+xml"
            href="/frevvo/web/tn/tutorial/api/formtype/_pkMVwBH8EeCl2et9BuDRPg!_lJ8_ERH8EeCl2et9BuDRPg!designer"/>
Now that we know the id of our Contact Form, here is how you can find a form by id using the API:
public class Contacts {
	...
	protected FormTypeEntry getContactForm(String formTypeId)
			throws IOException, ServiceException {
		FormsService s = getService();
		try {
			URL url = s.getEntryURL(FormTypeEntry.class, formTypeId);
			return s.getEntry(url, FormTypeEntry.class);
		} catch (ResourceNotFoundException e) {
			return null;
		}
	}
	...
}
Note that we plan to make this a bit more straightforward in future releases.
Download/Upload the Contacts project
Now that we have already created the Contact Form, we will manually download it from the UI, by going to the projects page and clicking the download button, and then use the project.zip to automatically upload it to aForms install the first time our command line app is executed. This simplifies the deployment since you only need to download command-line .jar and run it, i.e. no other configuration steps, and it also shows how you can use the API to upload an project (the same applies to forms, workflows, schemas and themes) programmatically.
I will not get into the details of how this .zip file will be packaged into the command-line .jar, since all the sources for this tutorial are available to be downloaded.
Authentication & Session Management
When interacting with frevvo, the Contacts application will first need to establish a session using the Data API. This is done by using the com.frevvo.forms.client.FormsService class and by providing proper credentials to authenticate.
The commandLoop() method in the Contacts class below shows how this is done in the Contacts application. Note that the FormsService instance is state-full and the same instance needs to be used throughout the session (this is specially the case when rendering form urls in the browser since an API key is automatically appended and bound to the FormsService session - as soon as you logout() the API key becomes invalid). In the case of this command-line application the session spans the life-time of the executable, but in the case of a web application the FormsService instance is usually stored in the HTTP session that the user has with the application.
public class Contacts {
	...
	private void commandLoop() throws IOException, ServiceException {
		// create the FormsService to hold the session with frevvo
		FormsService s = new FormsService(getProtocol(), getHost(), getPort(), null);
		try {
			// login to frevvo
			s.login(getUsername() + '@' + getTenant(), getPassword());
			// save the service to be used in subsequent interactions
			this.service = s;
			// Auto-upload the contact application, if not already there
			if (getContactForm() == null) {
				uploadContactApplication(s);
			}
			// start the interactive shell
			ShellFactory.createConsoleShell(getPrompt(), null, this).commandLoop();
		} finally {
			this.service = null;
			s.logout();
		}
	}
	...
}
When this command-line program is terminating we make sure that we properly log out from frevvo. This ensures that frevvo will release any unneeded resources and the user count will be decremented (licensing).
LoginAs
frevvo supports an additional way of logging into frevvo using the Data API: the loginAs() method. This new method allows you to login to frevvo as any of the existing tenant users provided you can pass in the tenant's admin user and password. This is quite convenient when you want login to frevvo using the same user that is logged into your project without having to know their password.
The following snippet shows how to login as a tenant user:
The loginAs(String, String, String) usage above assumes that you are logging in as a user that was previously created in the specific tenant.
When your tenant was configured with the DelegatingSecurityManager, you can use the overloaded loginAs() method to automatically create virtual users in frevvo. For instance:
    ...
    String tenantAdmin = getUsername() + '@' + getTenant();
    String tenantAdminPwd = getPassword();
    String username = getAsUsername();

    FormsService s = new FormsService(getProtocol(), getHost(), getPort(), null);
    s.loginAs(username, tenantAdmin, tenantAdminPwd, true, null, null, null, null, null);
    ...
This will automatically create a new, non-designer user (i.e. will be able to participate in workflows but not create forms/workflows), if it doesn't yet exist. If you want frevvo to auto create a new virtual user that is also a designer you need to pass in the frevvo.Designer role when calling loginAs(). For instance:
        ...
	String tenantAdmin = getUsername() + '@' + getTenant();
	String tenantAdminPwd = getPassword();
	String username = getAsUsername();
	List<String> roles = new ArrayList<String>();
	roles.add("frevvo.Designer");
	FormsService s = new FormsService(getProtocol(), getHost(), getPort(), null);
	s.loginAs(username, tenantAdmin, tenantAdminPwd, true, roles, null, null, null, null);
	...
Upload Contact form
As described earlier, we have downloaded the frevvo Contacts application .zip file and embedded it in the command-line .jar. This .zip file is available from the JVM Classpath and will be automatically uploaded if it cannot be found in the frevvo server, i.e. usually the first time you connect to a frevvo/tenant install.
The following code snippet shows how we do this. We first try to find the Contact Form form by ID (as we described earlier) and if we cant find it, we will upload the project.zip file.
public class Contacts {
	...
	private void commandLoop() throws IOException, ServiceException {
		...
			// Auto-upload the contact application, if not already there
			if (getContactForm() == null) {
				uploadContactApplication(s);
			}
		...
	}
	...
	private void uploadContactApplication(FormsService s) throws IOException,
			ServiceException {
		System.out.println("Contacts application doesnt exist. Uploading ... ");
		// oops the contacts app doesnt exist, let's upload it
		UserEntry user = ApiHelper.getUserEntry(s);
		ApplicationFeed apps = user.getApplicationFeed();
		InputStream is = Contacts.class.getResourceAsStream(APP_RESOURCE);
		if (is == null)
			throw new IOException("Could not find contacts application file in classpath: " + APP_RESOURCE);
		try {
			ApiHelper.uploadNewApplication(s, apps, is);
		} finally {
			System.out.println("Contacts application uploaded!");
			is.close();
		}
	}
	...
The ApiHelper class referenced above is a helper class containing code that is reusable across applications. Here are the two definitions that are relevant here:
public class ApiHelper {
	...
	static public ApplicationEntry uploadNewApplication(FormsService service, ApplicationFeed feed, InputStream is) throws ServiceException, IOException {
		MediaStreamSource ms = new MediaStreamSource(is, "application/zip");
		ApplicationEntry entry = feed.insert(ms);
		return entry;
	}
	...
	public static UserEntry getUserEntry(FormsService service) throws IOException, ServiceException {
		// strip away the tenant from the user name if any
		String username = service.getUsername();
		if (username.contains("@"))
			username = username.split("@")[0];
		return getEntry(service, UserEntry.class, username);
	}
	...
}
Download the form's XML Schema
Now that you have the Contacts application, you can also get the XML Schema for the Contact form using the API. You can try this out in our sample command line program by entering the view-xsd command:
http://designer@localhost:8080/tutorial> view-xsd
Viewing XML Schema for form Contact Form [rel=schema,type=application/xml; xmlns="http://www.frevvo.com/schemas/_pkMVwBH8EeCl2et9BuDRPg",href=http://localhost:8080/frevvo/web/tn/demo/user/demo/app/_lJ8_ERH8EeCl2et9BuDRPg/formtype/_pkMVwBH8EeCl2et9BuDRPg/schema?apikey=ddxut73apg%252FNhRxDMClyxldCETWBw6Sf3UV5zZo5hjobtt58kllmRXA9OroaCiWfSRqrm66ICIW5vpaMStoztA%253D%253D] ...
Here is how the view-xsd command is implemented using the API:
public class Contacts {
	...
	@Command
	public String viewXsd() {
		try {
			FormTypeEntry contactForm = getContactForm(getContactFormId());
			Link contactXsd = contactForm.getFormTypeSchemaLink();
			if (contactXsd != null && contactXsd.getHref() != null) {
				Util.openURL(contactXsd.getHref());
			}
			return "Viewing XML Schema for form "
					+ ApiHelper.getName(contactForm) + " [rel="
					+ contactXsd.getRel() + ",type=" + contactXsd.getType()
					+ ",href=" + contactXsd.getHref() + "] ...\n";
		} catch (Exception e) {
			return "Could not view XML Schema for form: " + e.getMessage();
		}
	}
}
List existing Contacts
Now that we are logged in to frevvo and have the Contact project uploaded, let's list the current contacts we have in the submission's repository. This is done by entering the list command:
http://designer@localhost:8080/tutorial> list
List all existing contacts...
URL ! http://localhost:8080/frevvo/web/tn/tutorial/api/submissions?filter=%24formTypeId+eq+%27_pkMVwBH8EeCl2et9BuDRPg%27
# | ID                        | CREATED                 | UPDATED                | KIND       | STATE        | PDF?
If this is the first time you are running this sample app, then you will have no contacts in the repository.
The list command is implemented as follows. We find the Contact Form by id as we have been doing already and then get its related SubmissionFeed. When getting submissions related to a specific FormTypeEntry, you are in essence querying for submissions filtered by the current form id (i.e. filter=$formTypeId eq '_pkMVwBH8EeCl2et9BuDRPg'). For your convenience we have included a link in the FormTypeEntry automatically retrieves the submissions for this entry.
Here is the list command implementation:
public class Contacts {
    ...
    public String list() {
            try {
                FormTypeEntry contactForm = getContactForm();
                SubmissionFeed contacts = getContacts(contactForm.getSubmissionFeedLink());
                return ApiHelper.print(contacts);
            } catch (Exception e) {
                    return "Could not get the contacts: " + e.getMessage();
            }
    }
    ...
    protected FormTypeEntry getContactForm() throws IOException,
                    ServiceException {
            FormsService s = getService();
            try {
                    URL url = s.getEntryURL(FormTypeEntry.class, getContactFormId());
                    return s.getEntry(url, FormTypeEntry.class);
            } catch (ResourceNotFoundException e) {
                    return null;
            }
    }
    ...
    private SubmissionFeed getContacts(Link contactsLink) throws IOException,
                    ServiceException {
            URL contactsUrl = new URL(contactsLink.getHref());
            SubmissionQuery q = new SubmissionQuery(contactsUrl);
            if (getFilter() != null)
                    q.setFilter(getFilter());
            if (getOrderBy() != null)
                    q.setOrderby(getOrderBy());
            if( startIndex != null && startIndex >= 1 )
                    q.setStartIndex(startIndex);
            if( maxResults != null && maxResults >= 0 )
                    q.setMaxResults(maxResults);
            if( updatedMax != null )
                    q.setUpdatedMax(updatedMax);
            if( updatedMin != null )
                    q.setUpdatedMin(updatedMin);
            return getService().getFeed(q, SubmissionFeed.class);
    }
    ...
Create a new Contact
At this point we have no contacts in the repository. Let's go ahead and add one. This can be done by entering the create command in the command prompt:
http://designer@localhost:8080/tutorial> create
Opening add contact form...
http://designer@localhost:8080/tutorial>
At this point you should see your system browser pop up and render the Customer Form:
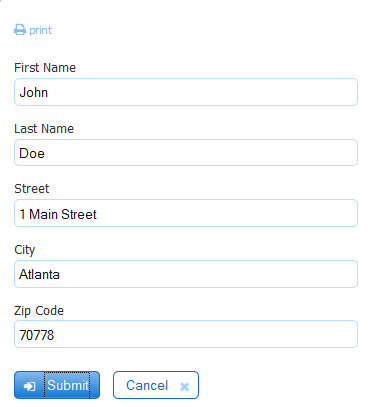
Enter the contact details and press Submit. If you now enter the list command at the command-line prompt, you should see the newly added contact:
http://designer@localhost:8080/tutorial> list
List all existing contacts...
URL ! http://localhost:8080/frevvo/web/tn/tutorial/api/submissions?filter=%24formTypeId+eq+%27_pkMVwBH8EeCl2et9BuDRPg%27
  # | ID                      | CREATED                 | UPDATED                 | KIND   | STATE      | PDF? | LASTNAME         | FIRSTNAME        | ZIPCODE          | CITY             | STREET
  1 | _rvicgBQsEeCkOMNSkDQKVw | 2010-12-30T10:51:36.000 | 2010-12-30T10:51:36.000 | FORM   | SUBMITTED  | true | Doe              | John             | 70778            | Atlanta
The following code snippet shows how the create command was implemented:
public class Contacts {
    ...
    public String create() {
        try {
            FormTypeEntry contactForm = getContactForm();
            Link contactFormLink = contactForm.getFormTypePopupLink(null);
            Util.openURL(contactFormLink.getHref());
            return "Opening add contact form...";
        } catch (Exception e) {
            return "Could not create get the contacts: " + e.getMessage();
        }
    }
    ...
}
As you can see here, we get a hold of the FormType Popup link, which contains a url to an html page with the form embedded, and open it in the browser.
Note also the null parameter in getFormTypePopupLink(null) call: it is here that we can customize the form link by passing in a map of name and value contents for things like:
- Rendering the form in readonly or print view
- Overriding the form action associate with the form (e.g. to redirect the page to one of your app's page when the form is submitted
- Initializing specific controls in the form using _data
- ...
See Url Parameters for more details on these parameters and note that the FormTypeEntry class has a variety of constants that can be of help (FormTypeEntry.EMBED_* and FormTypeEntry.FORMTYPE_*)
View an existing Contact
Now that we have at least one contact in our simple contacts database, lets view one of them. This is done by entering the view command followed by the index of the contact you want to view (the 1st column in the list command).
http://designer@localhost:8080/tutorial> list
List all existing contacts...
URL ! http://localhost:8080/frevvo/web/tn/tutorial/api/submissions?filter=%24formTypeId+eq+%27_pkMVwBH8EeCl2et9BuDRPg%27
  # | ID                      | CREATED                 | UPDATED                 | KIND   | STATE      | PDF? | LASTNAME     | FIRSTNAME     | ZIPCODE     | CITY     | STREET
  1 | _rvicgBQsEeCkOMNSkDQKVw | 2010-12-30T10:51:36.000 | 2010-12-30T10:51:36.000 | FORM | SUBMITTED    | true | Doe          | John          | 70778       | Atlanta  | 1 Main Street
http://designer@localhost:8080/tutorial> view 1
Viewing contact #1 ...
At this point the system browser should pop up a new page with the Contact Form rendered in readonly mode.
Note how the controls are all disabled. The following snippet of code shows how the view command is implemented:
public class Contacts {
    ...
    public String view(int i) {
        try {
            FormTypeEntry contactForm = getContactForm();
            SubmissionFeed contacts = getContacts(contactForm
                            .getSubmissionFeedLink());

            if (i < 1 || i > contacts.getEntries().size())
                    return "Invalid contact #: " + i;

            // Get the contact by index
            SubmissionEntry contact = contacts.getEntries().get(i - 1);

            // open a readonly form in the browser
            Map<String, Object> params = new HashMap<String, Object>();
            params.put(FormTypeEntry.FORMTYPE_READONLY_PARAMETER, Boolean.TRUE);

            Link contactFormLink = contact.getFormTypeLink(params);
            Util.openURL(contactFormLink.getHref());
            return "Viewing contact #" + i + " ...";
        } catch (Exception e) {
            return "Could not view the contact #" + i + ": " + e.getMessage();
        }
    }
    ...
}
Here we get a hold of the SubmissionFeed for the Contact Form, as described earlier in the Contacts.getContacts(Link) method, find the entry identified by its index, and then render the Contact Form in read-only mode. Note a couple of things here:
- We are now using a slightly different link: instead of using the FormTypeEntry.getFormTypePopupLink(Map) we are using the FormTypeEntry.getFormTypeLink(Map). The former embeds the form in an outer HTML page using a script tag and the latter renders the form directly as html (this is the same raw url found in the Share Dialog).
- We are setting the FormTypeEntry.FORMTYPE_READONLY_PARAMETER to TRUE.
View a PDF snapshot of the Contact form
Since we have configured the Contact Form to save a PDF snapshot (see the designer screenshot above) on submission, we have also implemented a variation of the view command that renders the PDF snapshot instead of the readonly form. Using our sample command line program you can view the PDF by entering the view-pdf command with the index of a given entry:
http://designer@localhost:8080/tutorial> list
List all existing contacts...
URL ! http://localhost:8080/frevvo/web/tn/tutorial/api/submissions?filter=%24formTypeId+eq+%27_pkMVwBH8EeCl2et9BuDRPg%27
  # | ID                      | CREATED                 | UPDATED                 | KIND   | STATE      | PDF? | LASTNAME     | FIRSTNAME     | ZIPCODE     | CITY         | STREET
  1 | _MxibGhRzEeCkOMNSkDQKVw | 2010-12-30T19:16:23.000 | 2010-12-30T19:16:23.000 | FORM   | SUBMITTED  | true | Doe          | John          | 70778       | Atlanta      | 1 Main Street
  2 | _QMZ_YRRzEeCkOMNSkDQKVw | 2010-12-30T19:16:46.000 | 2010-12-30T19:49:04.000 | FORM   | SUBMITTED  | true | Smarts       | Dave          | 06511       | New Haven    | 1 Ground Street
http://designer@localhost:8080/tutorial> view-pdf 1
Viewing contact #1 PDF ...
http://designer@localhost:8080/tutorial>
At this point, a browser window should pop up with the latest PDF snapshot rendered there.
And here is how we have done this in the code:
public class Contacts {
    ...
    public String viewPdf(int i) {
        try {
            FormTypeEntry contactForm = getContactForm();
            SubmissionFeed contacts = getContacts(contactForm.getSubmissionFeedLink());
            if (i < 1 || i > contacts.getEntries().size())
                return "Invalid contact #: " + i;

            // Get the contact by index
            SubmissionEntry contact = contacts.getEntries().get(i - 1);

            // open the PDF in the browser
            Link contactPdfLink = ApiHelper.getSubmissionSnapshotLink(contact);

            if (contactPdfLink == null)
                return "Contact #" + i + " has no PDF snapshot";
            Util.openURL(contactPdfLink.getHref());
            return "Viewing contact #" + i + " PDF ...";
        } catch (Exception e) {
            return "Could not view PDF for the contact #" + i + ": " + e.getMessage();
        }
    }
    ...
}

public class ApiHelper {
        ...
        static public Link getSubmissionSnapshotLink(SubmissionEntry entry) {
            List<Link> documentLinks = entry.getDocumentLinks();
            for (Link l : documentLinks) {
                if (l.getType().contains("frevvo-snapshot=true")
                    && l.getType().contains("application/pdf"))
                           return l;
        }
        return null;
    }
    ...
}
This code simply gets the snapshot link from the feed entry and open's it in the browser. Here is the actual link we look for in the submission entry (remember that underlying the Java Client library we are exchanging Atom xml documents over HTTP):
<feed xmlns="http://www.w3.org/2005/Atom"
        xmlns:fd="http://schemas.frevvo.com/fdata/2008"
        xml:base="http://localhost:8080">
    ...
    <entry>
        <id>_8kuHuxK9EeCkOMNSkDQKVw</id>
        <title type="text">Contact Form</title>
        ...
        <link rel="document" type="application/pdf;frevvo-snapshot=true"
        href="/frevvo/web/tn/tutorial/user/designer/app/_lJ8_ERH8EeCl2et9BuDRPg/formtype/_pkMVwBH8EeCl2et9BuDRPg/document/b6281b35-1b01-41c5-9c82-dd12ff75a3b5?
        apikey=naVSbFS9HmazmoxGj3VFKybKGZnAQl2wE8VuS5dOMIfCXlKKUiBhhyhJw%252BWeD9uwftNR1zOQExM%253D"/>
    </entry>
    ...
</feed>
Download the Submission XML
So far we have viewed and edited the submission data, and have opened the PDF snapshot. You can also view the submitted XML document for a given contact.
You can do so by entering the view-xml command at the prompt.
http://designer@localhost:8080/tutorial> list
List all existing contacts...
URL ! http://localhost:8080/frevvo/web/tn/tutorial/api/submissions?filter=%24formTypeId+eq+%27_pkMVwBH8EeCl2et9BuDRPg%27
  # | ID                      | CREATED                 | UPDATED                 | KIND   | STATE      | PDF? | LASTNAME     | FIRSTNAME     | ZIPCODE     | CITY      | STREET
  1 | _QMZ_YRRzEeCkOMNSkDQKVw | 2010-12-30T19:16:46.000 | 2010-12-30T19:49:04.000 | FORM   | SUBMITTED  | true | Smarts       | Dave          | 06511       | New Haven | 1 Ground Street
  2 | _MxibGhRzEeCkOMNSkDQKVw | 2010-12-30T19:16:23.000 | 2010-12-31T14:42:34.000 | FORM   | SUBMITTED  | true | Doe          | Dave          | 70778       | Atlanta   | 1 Main Street
http://designer@localhost:8080/tutorial> view-xml 1
Viewing contact #1 XML (note that this only shows the first XML document) ...
http://designer@localhost:8080/tutorial>
You should see a browser page pop up with the xml document for contact #1.
And here is the code that implements the above behavior:
public class Contacts {
...
        public String viewXml(int i) {
             try {
                FormTypeEntry contactForm = getContactForm(getContactFormId());
                SubmissionFeed contacts = getContacts(contactForm
                                .getSubmissionFeedLink());

                if (i < 1 || i > contacts.getEntries().size())
                        return "Invalid contact #: " + i;

                // Get the contact by index
                SubmissionEntry contact = contacts.getEntries().get(i - 1);

                List<Link> docs = contact.getDocumentLinks("text/xml");
                if( docs == null || docs.size() == 0 )
                        return "Contact #" + i + " has no XML document";

                Link doc = docs.get(0);

                // open the document in the browser
                Util.openURL(doc.getHref());
                // or download it
//              MediaSource source = getService().getMedia(doc.getHref());
//              saveXML(source.getInputStream());

                return "Viewing contact #" + i + " XML (note that this only shows the first XML document) ...";
            } catch (Exception e) {
                return "Could not view PDF for the contact #" + i + ": "
                                + e.getMessage();
            }
    }
    ...
}
The document links (contacts.getDocumentLinks(String contentType)) returns all the documents associated with the submission and this includes file upload attachments in addition to the XML document(s) (note that there could be more than one XML document in cases XML Schema elements are added to the form.
This sample opens the XML in the browser, but you could also download the XML document by using the FormService.getMedia(String) method:
...
                MediaSource source = getService().getMedia(doc.getHref());
                saveXML(source.getInputStream());
...
Edit a Contact
Now that we can list and view contacts, and create new ones, let's edit one. This is done in this sample implementation by entering the edit command at the prompt.
http://designer@localhost:8080/tutorial> list
List all existing contacts...
URL ! http://localhost:8080/frevvo/web/tn/tutorial/api/submissions?filter=%24formTypeId+eq+%27_pkMVwBH8EeCl2et9BuDRPg%27
  # | ID                      | CREATED                 | UPDATED                 | KIND   | STATE          |PDF?     | LASTNAME     | FIRSTNAME     | ZIPCODE     | CITY     | STREET
  1 | _rvicgBQsEeCkOMNSkDQKVw | 2010-12-30T10:51:36.000 | 2010-12-30T10:51:36.000 | FORM   | SUBMITTED      |true     | Doe          | John          | 70778       | Atlanta  | 1 Main Street

http://designer@localhost:8080/tutorial> edit 1
Editing contact #1 ...
You should see a browser page pop up with the Contact Form initialized with the details for contact #1.
Listing the contacts should now show an updated contact:
http://designer@localhost:8080/tutorial> list
List all existing contacts...
URL ! http://localhost:8080/frevvo/web/tn/tutorial/api/submissions?filter=%24formTypeId+eq+%27_pkMVwBH8EeCl2et9BuDRPg%27
  # | ID                      | CREATED                 | UPDATED                 | KIND   | STATE      | PDF?     | LASTNAME     | FIRSTNAME     | ZIPCODE     | CITY     | STREET
  1 | _rvicgBQsEeCkOMNSkDQKVw | 2010-12-30T10:51:36.000 | 2010-12-30T11:26:02.000 | FORM   | SUBMITTED  | true     | Doe          | John          | 70778       | Atlanta  | 100 Main Street
Notice that the street column has a different value and how the updated column reflects the last updated time.
The edit command is also straightforward to implement. It basically gets the form link customizing it with the readonly param set to false (the default anyway) and renders it in the browser:
public class Contacts {
    ...
    public String edit(int i) {
        try {
                FormTypeEntry contactForm = getContactForm();
                SubmissionFeed contacts = getContacts(contactForm
                                .getSubmissionFeedLink());
                if (i < 1 || i > contacts.getEntries().size())
                        return "Invalid contact #: " + i;
                SubmissionEntry contact = contacts.getEntries().get(i - 1);
                Map<String, Object> params = new HashMap<String, Object>();
                params.put(FormTypeEntry.FORMTYPE_READONLY_PARAMETER, Boolean.FALSE);
                Link contactFormLink = contact.getFormTypeLink(params);
                Util.openURL(contactFormLink.getHref());
                return "Editing contact #" + i + " ...";
        } catch (Exception e) {
                return "Could not edit the contacts: " + e.getMessage();
                }
    }
    ...
}
Editing an External Contact
Note that editing a contact here is nothing more than rendering a form and initializing it with the XML document(s) stored in frevvo's submission repository. Since this repository is embedded in frevvo, we have automated some of the work of instantiating a form and initializing it from an XML document(s). However, what if you are integrating frevvo with your own application and have your own database of contacts? Not a problem. You can use the API to instantiate the form passing in a list of XML documents.
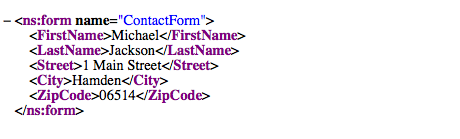
Let's assume that I have an XML document that conforms to the Contact Form located somewhere in my hard-disk:

You can create a new contact using this XML document as a starting point by entering the create-from-xml command at the prompt followed by the full path to the xml file:
http://designer@localhost:8080/tutorial> create-from-xml /Users/ydewit/Downloads/form2.xml
Opening contact form initialized with xml document(s) ...
http://designer@localhost:8080/tutorial>
Note that the form that is rendered by the browser is now pre-populated with the data in the XML:

The API code we used to do this goes as follows:
public class Contacts {
...
    public String createFromXml(String... xmlFiles) {
        try {
                FormTypeEntry contactForm = getContactForm(getContactFormId());
                List<MediaSource> mss = new ArrayList<MediaSource>();
                try {
                         if( xmlFiles != null ){
                                 for(String xmlFile: xmlFiles){
                                          if( !new File(xmlFile).exists() )
                                                 System.out.println("The xml file " + xmlFile + "doesnt exist. Ignoring...");
                                                 InputStream is = new FileInputStream(xmlFile);
                                                 MediaStreamSource ms = new MediaStreamSource(is, "application/xml");
                                                 ms.setName("contactxml");
                                                 mss.add(ms);
                                 }
                         }

                         URL form = contactForm.createFormInstance(null, mss);
                         Util.openURL(form.toString());
                         return "Opening contact form initialized with xml document(s) ...";
               }
               finally {
                       for( MediaSource ms : mss ){
                               ms.getInputStream().close();
                       }
               }
        } catch (Exception e) {
               return "Instantiate form contact form: " + e.getMessage();
        }
    }
    ...
}
Here, we have used another method found in the FormTypeEntry class called createFormInstance(Map<String,Object> urlParams, List<MediaSource> documents). When using this method, we are eagerly instantiating the form from the API, as opposed to using one of the factory urls that instantiates the form only when rendered in the browser) with any number of XML document(s) as MediaSources.
At this point we have taken an external XML document, which in our case was just an xml file sitting somewhere but could have been anywhere or even dynamically generated by your application, and instantiate a form with it. Here the user is in control and can modify the contact data using the form interface. When the Contact Form is submitted, you can also get a hold of the updated XML document to update your own contact database. This can be done by configuring a Doc Action in the form designer or even finding the submission entry for the submission and downloading the XML document.
Delete an existing Contact
How do we remove a contact? This is also quite simple. We do that by entering the delete command at the prompt with the contact index seen when listing the contacts.
http://designer@localhost:8080/tutorial> list
List all existing contacts...
URL ! http://localhost:8080/frevvo/web/tn/tutorial/api/submissions?filter=%24formTypeId+eq+%27_pkMVwBH8EeCl2et9BuDRPg%27
  # | ID                      | CREATED                 | UPDATED                 | KIND   | STATE      | PDF?     | LASTNAME     | FIRSTNAME     | ZIPCODE     | CITY     | STREET
  1 | _rvicgBQsEeCkOMNSkDQKVw | 2010-12-30T10:51:36.000 | 2010-12-30T11:26:02.000 | FORM   | SUBMITTED  | true     | Doe          | John          | 70778       | Atlanta  | 100 Main Street

http://designer@localhost:8080/tutorial> delete 1
Deleted contact _rvicgBQsEeCkOMNSkDQKVw
URL ! http://localhost:8080/frevvo/web/tn/tutorial/api/submissions?filter=%24formTypeId+eq+%27_pkMVwBH8EeCl2et9BuDRPg%27
  # | ID                      | CREATED                 | UPDATED                 | KIND   | STATE      | PDF?
This will delete the contact #1 and automatically list the available contacts, which in this case is none.
The delete command implementation is shown next and is done by finding the correct SubmissionEntry based on the provided index and then calling .delete():
public class Contacts {
        ...
        public String delete(int i) {
             try {
                    FormTypeEntry contactForm = getContactForm();
                    SubmissionFeed contacts = getContacts(contactForm.getSubmissionFeedLink());

                    if (i < 1 || i > contacts.getEntries().size())
                            return "Invalid contact #: " + i;

                    SubmissionEntry contact = contacts.getEntries().get(i - 1);

                    contact.delete();

                    return "Deleted contact " + contact.getId() + "\n" + list();
             } catch (Exception e) {
                    return "Could not edit the contacts: " + e.getMessage();
             }
        }
        ...
}
Querying our simple Contacts repository
By default the list command we have been using so far is a simple query that returns the first page of all Contact Form submissions. There are situations where you may want to customize this query to return a subset of the results. Although we don't provide an extensive query API there are a few things you can do.
The code for the following subsection is very simple and can be found here:
public class Contacts {
	...
	private SubmissionFeed getContacts(Link contactsLink) throws IOException,
			ServiceException {
		URL contactsUrl = new URL(contactsLink.getHref());
		SubmissionQuery q = new SubmissionQuery(contactsUrl);
		if (getFilter() != null)
			q.setFilter(getFilter());
		if (getOrderBy() != null)
			q.setOrderby(getOrderBy());
		if( startIndex != null && startIndex >= 1 )
			q.setStartIndex(startIndex);
		if( maxResults != null && maxResults >= 0 )
			q.setMaxResults(maxResults);
		if( updatedMax != null )
			q.setUpdatedMax(updatedMax);
		if( updatedMin != null )
			q.setUpdatedMin(updatedMin);
		return getService().getFeed(q, SubmissionFeed.class);
	}
	...
}
Now, let's go over some of the query parameters at your disposal in more detail.
Start Index
By default, submission queries will return entries starting from the first one. You can explicitly set a different start-index when paginating through a large set of entries (in SubmissionQuery.setStartIndex(Integer). In our sample program, you can do that by entering the start-index command at the prompt. Note that there is a bug in version 4.1.2 and earlier where start-index is interpreted as a 0-based index. This is fixed in version 4.1.3. So for instance:
- no start-index set: return entries starting from the first one
- 'start-index set to 0: you will get entries starting from the first one
- start-index set to 1: you will get entries starting from the first one
- 'start-index set to N: you will get entries starting from the N one.
http://designer@localhost:8080/tutorial> list
List all existing contacts...
URL ! http://localhost:8080/frevvo/web/tn/tutorial/api/submissions?filter=%24formTypeId+eq+%27_pkMVwBH8EeCl2et9BuDRPg%27
  # | ID                      | CREATED                 | UPDATED                 | KIND   | STATE      | PDF? | LASTNAME         | FIRSTNAME        | ZIPCODE          | CITY             | STREET
  1 | _MxibGhRzEeCkOMNSkDQKVw | 2010-12-30T19:16:23.000 | 2010-12-30T19:16:23.000 | FORM   | SUBMITTED  | true | Doe              | John             | 70778            | Atlanta          | 1 Main Street
  2 | _QMZ_YRRzEeCkOMNSkDQKVw | 2010-12-30T19:16:46.000 | 2010-12-30T19:49:04.000 | FORM   | SUBMITTED  | true | Smarts           | Dave             | 06511            | New Haven        | 1 Ground Street

http://designer@localhost:8080/tutorial> start-index 1
start-index query param updated to 1 ...
URL ! http://localhost:8080/frevvo/web/tn/tutorial/api/submissions?start-index=1&filter=%24formTypeId+eq+%27_pkMVwBH8EeCl2et9BuDRPg%27
  # | ID                      | CREATED                 | UPDATED                 | KIND   | STATE      | PDF? | LASTNAME         | FIRSTNAME        | ZIPCODE          | CITY             | STREET
  1 | _QMZ_YRRzEeCkOMNSkDQKVw | 2010-12-30T19:16:46.000 | 2010-12-30T19:49:04.000 | FORM   | SUBMITTED  | true | Smarts           | Dave             | 06511            | New Haven        | 1 Ground Street
You can unset start-index in this tutorial by setting it to a value less than 1.
http://designer@localhost:8080/tutorial[start-index=1]> start-index -1
start-index query param updated to null ...
URL ! http://localhost:8080/frevvo/web/tn/tutorial/api/submissions?filter=%24formTypeId+eq+%27_pkMVwBH8EeCl2et9BuDRPg%27
  # | ID                      | CREATED                 | UPDATED                 | KIND   | STATE      | PDF? | LASTNAME         | FIRSTNAME        | ZIPCODE          | CITY             | STREET
  1 | _MxibGhRzEeCkOMNSkDQKVw | 2010-12-30T19:16:23.000 | 2010-12-30T19:16:23.000 | FORM   | SUBMITTED  | true | Doe              | John             | 70778            | Atlanta          | 1 Main Street
  2 | _QMZ_YRRzEeCkOMNSkDQKVw | 2010-12-30T19:16:46.000 | 2010-12-30T19:49:04.000 | FORM   | SUBMITTED  | true | Smarts           | Dave             | 06511            | New Haven        | 1 Ground Street
http://designer@localhost:8080/tutorial>
Max Results
You can also control the number of entries returned when executing a query. This is done by setting the max-results query parameter (SubmissionQuery.setMaxResults(Integer)):
http://designer@localhost:8080/tutorial> list
List all existing contacts...
URL ! http://localhost:8080/frevvo/web/tn/tutorial/api/submissions?filter=%24formTypeId+eq+%27_pkMVwBH8EeCl2et9BuDRPg%27
  # | ID                      | CREATED                 | UPDATED                 | KIND   | STATE      | PDF? | LASTNAME         | FIRSTNAME        | ZIPCODE          | CITY             | STREET
  1 | _MxibGhRzEeCkOMNSkDQKVw | 2010-12-30T19:16:23.000 | 2010-12-30T19:16:23.000 | FORM   | SUBMITTED  | true | Doe              | John             | 70778            | Atlanta          | 1 Main Street
  2 | _QMZ_YRRzEeCkOMNSkDQKVw | 2010-12-30T19:16:46.000 | 2010-12-30T19:49:04.000 | FORM   | SUBMITTED  | true | Smarts           | Dave             | 06511            | New Haven        | 1 Ground Street

http://designer@localhost:8080/tutorial> max-results 1
max-results query param updated to 1 (note that the server may override this) ...
URL ! http://localhost:8080/frevvo/web/tn/tutorial/api/submissions?max-results=1&filter=%24formTypeId+eq+%27_pkMVwBH8EeCl2et9BuDRPg%27
  # | ID                      | CREATED                 | UPDATED                 | KIND   | STATE      | PDF? | LASTNAME         | FIRSTNAME        | ZIPCODE          | CITY             | STREET
  1 | _MxibGhRzEeCkOMNSkDQKVw | 2010-12-30T19:16:23.000 | 2010-12-30T19:16:23.000 | FORM   | SUBMITTED  | true | Doe              | John             | 70778            | Atlanta          | 1 Main Street
http://designer@localhost:8080/tutorial[max-results=1]>
In the above interaction, we have listed all the contact submissions (2 in total) and then set the max-results to 1 forcing the query to return at most 1 entry. Note that even if you don't specify a maximum number of results, they server will, by default, force a maximum defined in the frevvo.submission.maxresults context parameter:
<context-param>
	<param-name>frevvo.submission.maxresults</param-name>
	<param-value>20</param-value>
	<description>Limit the maximum number of submissions that can be queried</description>
</context-param>
Order by
One thing you can do is order the results by certain criteria:
- $author - The id of the user that submitted the form/workflow
- $name - The name of the form/workflow
- $updated - the last time the submission was updated
- $revision - This is zero the first time you submit and is incremented every time you edit the submission and submit it again
- $formTypeId - The form/workflow that generated this submission (not so useful here)
- $key{N}Value - The key value for key 1, 2, 3, 4 or 5 (remember that you can select controls from your forms as the first 5 Searchable Fields to be keys in your submission).
You can also specify whether you want to use ascending (asc) or descending (desc) ordering.
For instance, let's order the list of contacts (we have 2 of them so far) based on when they were last updated. Consider the following contacts:
http://designer@localhost:8080/tutorial> list
List all existing contacts...
URL ! http://localhost:8080/frevvo/web/tn/tutorial/api/submissions?filter=%24formTypeId+eq+%27_pkMVwBH8EeCl2et9BuDRPg%27
  # | ID                      | CREATED                 | UPDATED                 | KIND   | STATE      | PDF? | LASTNAME         | FIRSTNAME        | ZIPCODE          | CITY             | STREET
  1 | _MxibGhRzEeCkOMNSkDQKVw | 2010-12-30T19:16:23.000 | 2010-12-30T19:16:23.000 | FORM   | SUBMITTED  | true | Doe              | John             | 70778            | Atlanta          | 1 Main Street
  2 | _QMZ_YRRzEeCkOMNSkDQKVw | 2010-12-30T19:16:46.000 | 2010-12-30T19:49:04.000 | FORM   | SUBMITTED  | true | Smarts           | Dave             | 06511            | New Haven        | 1 Ground Street
Now let's order by $updated time in ascending order (the default):
http://designer@localhost:8080/tutorial> order-by $updated
URL ! http://localhost:8080/frevvo/web/tn/tutorial/api/submissions?filter=%24formTypeId+eq+%27_pkMVwBH8EeCl2et9BuDRPg%27&order-by=%24updated
  # | ID                      | CREATED                 | UPDATED                 | KIND   | STATE      | PDF? | LASTNAME         | FIRSTNAME        | ZIPCODE          | CITY             | STREET
  1 | _MxibGhRzEeCkOMNSkDQKVw | 2010-12-30T19:16:23.000 | 2010-12-30T19:16:23.000 | FORM   | SUBMITTED  | true | Doe              | John             | 70778            | Atlanta          | 1 Main Street
  2 | _QMZ_YRRzEeCkOMNSkDQKVw | 2010-12-30T19:16:46.000 | 2010-12-30T19:49:04.000 | FORM   | SUBMITTED  | true | Smarts           | Dave             | 06511            | New Haven        | 1 Ground Street
http://designer@localhost:8080/tutorial[orderBy=$updated]>
We are now ordering the list of contact by the updated time. Nothing changed here so let's use descending order:
http://designer@localhost:8080/tutorial[orderBy=$updated]> order-by "$updated desc"
URL ! http://localhost:8080/frevvo/web/tn/tutorial/api/submissions?filter=%24formTypeId+eq+%27_pkMVwBH8EeCl2et9BuDRPg%27&order-by=%24updated+desc
  # | ID                      | CREATED                 | UPDATED                 | KIND   | STATE      | PDF? | LASTNAME         | FIRSTNAME        | ZIPCODE          | CITY             | STREET
  1 | _QMZ_YRRzEeCkOMNSkDQKVw | 2010-12-30T19:16:46.000 | 2010-12-30T19:49:04.000 | FORM   | SUBMITTED  | true | Smarts           | Dave             | 06511            | New Haven        | 1 Ground Street
  2 | _MxibGhRzEeCkOMNSkDQKVw | 2010-12-30T19:16:23.000 | 2010-12-30T19:16:23.000 | FORM   | SUBMITTED  | true | Doe              | John             | 70778            | Atlanta          | 1 Main Street
http://designer@localhost:8080/tutorial[orderBy=$updated desc]>
Notice how the order of contact submissions has changed.
What about ordering by last name? If you remember in a previous section, we have set the LastName control as the key 1. Let's order by that key value:
http://designer@localhost:8080/tutorial[orderBy=$updated desc]> order-by $key1Value
URL ! http://localhost:8080/frevvo/web/tn/tutorial/api/submissions?filter=%24formTypeId+eq+%27_pkMVwBH8EeCl2et9BuDRPg%27&order-by=%24key1Value
  # | ID                      | CREATED                 | UPDATED                 | KIND   | STATE      | PDF? | LASTNAME         | FIRSTNAME        | ZIPCODE          | CITY             | STREET
  1 | _MxibGhRzEeCkOMNSkDQKVw | 2010-12-30T19:16:23.000 | 2010-12-30T19:16:23.000 | FORM   | SUBMITTED  | true | Doe              | John             | 70778            | Atlanta          | 1 Main Street
  2 | _QMZ_YRRzEeCkOMNSkDQKVw | 2010-12-30T19:16:46.000 | 2010-12-30T19:49:04.000 | FORM   | SUBMITTED  | true | Smarts           | Dave             | 06511            | New Haven        | 1 Ground Street
http://designer@localhost:8080/tutorial[orderBy=$key1Value]>
Notice how the results are now ordered by last name (hard to show that with only two rows, but...
Let's unset the ordering now:
http://designer@localhost:8080/tutorial[orderBy=FirstName]> order-by ""
URL ! http://localhost:8080/frevvo/web/tn/tutorial/api/submissions?filter=%24formTypeId+eq+%27_pkMVwBH8EeCl2et9BuDRPg%27
  # | ID                      | CREATED                 | UPDATED                 | KIND   | STATE      | PDF? | LASTNAME         | FIRSTNAME        | ZIPCODE          | CITY             | STREET
  1 | _MxibGhRzEeCkOMNSkDQKVw | 2010-12-30T19:16:23.000 | 2010-12-30T19:16:23.000 | FORM   | SUBMITTED  | true | Doe              | John             | 70778            | Atlanta          | 1 Main Street
  2 | _QMZ_YRRzEeCkOMNSkDQKVw | 2010-12-30T19:16:46.000 | 2010-12-30T19:49:04.000 | FORM   | SUBMITTED  | true | Smarts           | Dave             | 06511            | New Haven        | 1 Ground Street
http://designer@localhost:8080/tutorial>
Updated max/min
You can also filter submissions based on a date range using the updated-max and updated-min query parameters (SubmissionQuery.setUpdatedMax(DateTime) and SubmissionQuery.setUpdatedMin(DateTime)). These two parameters will filter submissions based on the last updated date (the updated date changes every time you save or submit a form/workflow). So, back to your sample program, you can set the updated-min parameter as follows:
http://designer@localhost:8080/tutorial> list
List all existing contacts...
URL ! http://localhost:8080/frevvo/web/tn/tutorial/api/submissions?filter=%24formTypeId+eq+%27_pkMVwBH8EeCl2et9BuDRPg%27
  # | ID                      | CREATED                 | UPDATED                 | KIND   | STATE      | PDF? | LASTNAME         | FIRSTNAME        | ZIPCODE          | CITY             | STREET
  1 | _MxibGhRzEeCkOMNSkDQKVw | 2010-12-30T19:16:23.000 | 2010-12-30T19:16:23.000 | FORM   | SUBMITTED  | true | Doe              | John             | 70778            | Atlanta          | 1 Main Street
  2 | _QMZ_YRRzEeCkOMNSkDQKVw | 2010-12-30T19:16:46.000 | 2010-12-30T19:49:04.000 | FORM   | SUBMITTED  | true | Smarts           | Dave             | 06511            | New Haven        | 1 Ground Street

http://designer@localhost:8080/tutorial> updated-min 2010-12-30T19:16:24.000
updated-min query param updated to 2010-12-30T19:16:24.000 ...
URL ! http://localhost:8080/frevvo/web/tn/tutorial/api/submissions?updated-min=2010-12-30T19%3A16%3A24.000&filter=%24formTypeId+eq+%27_pkMVwBH8EeCl2et9BuDRPg%27
  # | ID                      | CREATED                 | UPDATED                 | KIND   | STATE      | PDF? | LASTNAME         | FIRSTNAME        | ZIPCODE          | CITY             | STREET
  1 | _QMZ_YRRzEeCkOMNSkDQKVw | 2010-12-30T19:16:46.000 | 2010-12-30T19:49:04.000 | FORM   | SUBMITTED  | true | Smarts           | Dave             | 06511            | New Haven        | 1 Ground Street
http://designer@localhost:8080/tutorial[updated-min=2010-12-30T19:16:24.000]>
We have set the updated-min query parameter to 2010-12-30T19:16:24.000, which is 1 second after contact #1 was submitted. As you can see, listing the submissions now show only the contact #2 which was submitted after that.
You can also set the updated-max query parameter to something like 2010-12-30T19:49:03.000, which is 1 second before contact #2 was submitted:
http://designer@localhost:8080/tutorial[updated-min=2010-12-30T19:16:24.000]> updated-max 2010-12-30T19:49:03.000
updated-max query param updated to 2010-12-30T19:49:03.000 ...
URL ! http://localhost:8080/frevvo/web/tn/tutorial/api/submissions?updated-min=2010-12-30T19%3A16%3A24.000&updated-max=2010-12-30T19%3A49%3A03.000&filter=%24formTypeId+eq+%27_pkMVwBH8EeCl2et9BuDRPg%27
  # | ID                      | CREATED                 | UPDATED                 | KIND   | STATE      | PDF?
http://designer@localhost:8080/tutorial[updated-min=2010-12-30T19:16:24.000][updated-max=2010-12-30T19:49:03.000]>
As you can see, the min and max range in place now includes none of the contacts and so you see no contacts.
If we remove the updated-min parameter, you should now see the first contact:
http://designer@localhost:8080/tutorial[updated-min=2010-12-30T19:16:24.000][updated-max=2010-12-30T19:49:03.000]> updated-min ""
updated-min query param updated to null ...
URL ! http://localhost:8080/frevvo/web/tn/tutorial/api/submissions?updated-max=2010-12-30T19%3A49%3A03.000&filter=%24formTypeId+eq+%27_pkMVwBH8EeCl2et9BuDRPg%27
  # | ID                      | CREATED                 | UPDATED                 | KIND   | STATE      | PDF? | LASTNAME         | FIRSTNAME        | ZIPCODE          | CITY             | STREET
  1 | _MxibGhRzEeCkOMNSkDQKVw | 2010-12-30T19:16:23.000 | 2010-12-30T19:16:23.000 | FORM   | SUBMITTED  | true | Doe              | John             | 70778            | Atlanta          | 1 Main Street
http://designer@localhost:8080/tutorial[updated-max=2010-12-30T19:49:03.000]>
And if we also remove the updated-max parameter, you should see both contacts again:
http://designer@localhost:8080/tutorial[updated-max=2010-12-30T19:49:03.000]> updated-max ""
updated-max query param updated to null ...
URL ! http://localhost:8080/frevvo/web/tn/tutorial/api/submissions?filter=%24formTypeId+eq+%27_pkMVwBH8EeCl2et9BuDRPg%27
  # | ID                      | CREATED                 | UPDATED                 | KIND   | STATE      | PDF? | LASTNAME         | FIRSTNAME        | ZIPCODE          | CITY             | STREET
  1 | _MxibGhRzEeCkOMNSkDQKVw | 2010-12-30T19:16:23.000 | 2010-12-30T19:16:23.000 | FORM   | SUBMITTED  | true | Doe              | John             | 70778            | Atlanta          | 1 Main Street
  2 | _QMZ_YRRzEeCkOMNSkDQKVw | 2010-12-30T19:16:46.000 | 2010-12-30T19:49:04.000 | FORM   | SUBMITTED  | true | Smarts           | Dave             | 06511            | New Haven        | 1 Ground Street
http://designer@localhost:8080/tutorial>
Filtering
You can also do some basic filtering based on control values using the filter query parameter (SubmissionQuery.setFilter(String...)). This query parameter takes the following syntax: <field> eq '<value> (at this point we only support the equality operator eq). Here <field> can be any of the following:
- $author - The id of the user that submitted the form/workflow
- $name - The name of the form/workflow
- $updated - the last time the submission was updated
- $revision - This is zero the first time you submit and is incremented every time you edit the submission and submit it again
- $formTypeId - The form/workflow that generated this submission (not so useful)
- $key{N} - The key value for key 1, 2, 3, 4 or 5 (remember that you can select controls from your forms as the first 5 Searchable Fields to be keys in your submission).
For instance, considering that we have mapped key1, key2, key3, key4 and key5 to LastName, FirstName, ZipCode, City and Street, respectively (see form screenshot above), we could query for all contacts with key1 (i.e. LastName) equals to 'Doe' by entering the filter "$key1 eq 'Doe" command:
http://designer@localhost:8080/tutorial> list
List all existing contacts...
URL ! http://localhost:8080/frevvo/web/tn/tutorial/api/submissions?filter=%24formTypeId+eq+%27_pkMVwBH8EeCl2et9BuDRPg%27
  # | ID                      | CREATED                 | UPDATED                 | KIND   | STATE      | PDF? | LASTNAME         | FIRSTNAME        | ZIPCODE          | CITY             | STREET
  1 | _MxibGhRzEeCkOMNSkDQKVw | 2010-12-30T19:16:23.000 | 2010-12-30T19:16:23.000 | FORM   | SUBMITTED  | true | Doe              | John             | 70778            | Atlanta          | 1 Main Street
  2 | _QMZ_YRRzEeCkOMNSkDQKVw | 2010-12-30T19:16:46.000 | 2010-12-30T19:49:04.000 | FORM   | SUBMITTED  | true | Smarts           | Dave             | 06511            | New Haven        | 1 Ground Street

http://designer@localhost:8080/tutorial> filter "$key1 eq 'Doe'"
URL ! http://localhost:8080/frevvo/web/tn/tutorial/api/submissions?filter=%24key1+eq+%27Doe%27
  # | ID                      | CREATED                 | UPDATED                 | KIND   | STATE      | PDF? | LASTNAME         | FIRSTNAME        | ZIPCODE          | CITY             | STREET
  1 | _MxibGhRzEeCkOMNSkDQKVw | 2010-12-30T19:16:23.000 | 2010-12-30T19:16:23.000 | FORM   | SUBMITTED  | true | Doe              | John             | 70778            | Atlanta          | 1 Main Street
http://designer@localhost:8080/tutorial[filter=$key1 eq 'Doe']>
You can also combine filters using the and semantic. For instance, filtering by LastName equal to Smarts AND FirstName equal to Dave, i.e. filter "$key1 eq 'Smarts'" "$key2 eq 'Dave" command, you get (note that I edited the John Doe contact and changed the first name to Dave):
http://designer@localhost:8080/tutorial> filter "$key1 eq 'Smarts'" "$key2 eq 'Dave'"
URL ! http://localhost:8080/frevvo/web/tn/tutorial/api/submissions?filter=$key1+eq+%27Smarts%27&filter=$key2+eq+%27Dave%27
  # | ID                      | CREATED                 | UPDATED                 | KIND   | STATE      | PDF? | LASTNAME         | FIRSTNAME        | ZIPCODE          | CITY             | STREET
  1 | _QMZ_YRRzEeCkOMNSkDQKVw | 2010-12-30T19:16:46.000 | 2010-12-30T19:49:04.000 | FORM   | SUBMITTED  | true | Smarts           | Dave             | 06511            | New Haven        | 1 Ground Street
http://designer@localhost:8080/tutorial[filter=$key1 eq 'Smarts'][filter=$key2 eq 'Dave']>
And finally, let's remove the filtering using the filter "" command:
http://designer@localhost:8080/tutorial[filter=$key1 eq 'Smarts'][filter=$key2 eq 'Dave']> filter ""
URL ! http://localhost:8080/frevvo/web/tn/tutorial/api/submissions?filter=%24formTypeId+eq+%27_pkMVwBH8EeCl2et9BuDRPg%27
  # | ID                      | CREATED                 | UPDATED                 | KIND   | STATE      | PDF? | LASTNAME         | FIRSTNAME        | ZIPCODE          | CITY             | STREET
  1 | _QMZ_YRRzEeCkOMNSkDQKVw | 2010-12-30T19:16:46.000 | 2010-12-30T19:49:04.000 | FORM   | SUBMITTED  | true | Smarts           | Dave             | 06511            | New Haven        | 1 Ground Street
  2 | _MxibGhRzEeCkOMNSkDQKVw | 2010-12-30T19:16:23.000 | 2010-12-31T14:42:34.000 | FORM   | SUBMITTED  | true | Doe              | Dave             | 70778            | Atlanta          | 1 Main Street
http://designer@localhost:8080/tutorial>
Paginating
Listing the submissions for the Contacts form will return only the first 20 entries by default, so you will need to paginate through the SubmissionFeed 20 entries at a time. You can configure the max number of submissions shown using the context parameter 'frevvo.submission.maxresults' in the <frevvo home>/conf/frevvo-config.properties file.
To list all of the submissions, you will query the SubmissionFeed using a simple pattern as you can see in the com.frevvo.forms.cli.ApiHelper.print(SubmissionFeed) found in the Tutorial sources.
SubmissionFeed feed = ...;
		for (SubmissionFeed page = feed; page != null && page.getEntries().size() > 0; page = page.getNext()) {
			for (int i = 0; i < page.getEntries().size(); i++) {
				SubmissionEntry e = page.getEntries().get(i);
				// do something with this submission entry
				// ...
			}
		}
What's next?
This very simple application shows how to interact with a static Contact form using the Data API and the browser. Except for when querying the contact submissions, most of the other steps could probably have been implemented by just copying the right form url, adding the correct parameters (readonly, etc) and embedding it directly inside your own web application.
We have used the API here anyway to get you comfortable with using it. However, the power of the API becomes more obvious when providing a more dynamic integration where you want to enable your users to create the forms themselves.