Live Forms v7.4 is no longer supported. Please visit Live Forms Latest for our current Cloud Release. Earlier documentation is available too.
Flow Designer
- Former user (Deleted)
First navigate to the Flows Home Page inside one of your application. See the Flows Home Page for help navigating here.
We recommend that tenant admin users not create or edit flows, nor have roles assigned to them. These users should restrict themselves to administrative tasks.
Once you are in a flows home page, start by clicking New  to add your first application. Then click the name of the application or the Edit
  icon and click New to create your first flow.
A unique and arbitrary flow name will be generated automatically--Flow 31 for example. You'll change this name when you begin working on your flow to something meaningful like Employee On Boarding shown below.
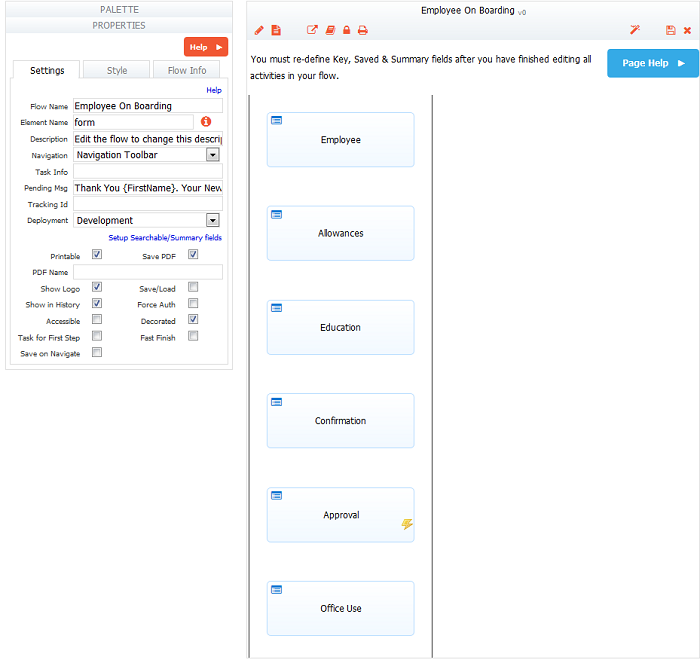
The Flow Designer has several components. Each is described below.
On This Page:
Palette
The palette contains all of the forms in your application's form tab, a new form, an http Wait-Notify, Email and a summary step. Click on the form you want and drag it into your flow. See adding steps to your flow for more information.
The Form Viewer control is used to allow a generated PDF to be viewed as part of a form step in a flow. This control appears on the Forms palette in the flow designer when you click the  icon to edit an step in a flow.
Properties Area
This is where you define workflow navigation, customize button labels, configure task information, pending messages and task notification emails seen by the flow users, and more flow customization. When you click on a step in your flow, the Properties area displays the step's properties so you can view and edit them. There are also flow properties; click the toolbar at the top of the flow work area to access these.
Flow Work Area
The right side of the Flow Designer is the work area for the flows you create. At the top of this area is the toolbar.
Toolbar
The toolbar at the top of the flow work area is visible when you are designing your flows but it is not visible to you when you test your flows or to your users when they access your flows. Notice the icons on the toolbar. Hovering over the icons displays a tool tip which describes it"s function. The toolbar includes the following icons:

- Clickt the
 view the workflow icon to display the steps of your flow on the flow designer canvas. Click this to return to the workflow canvas from the pdf mapping screen.
 - Click the
 view forms generated by the flow icon to view/edit additional pdfs such as the W- 4 Employee's Withholding Allowance Certificate
 - Click the
 what does the user see icon to configure what users will see when they submit your flow.
 - Click the
 what happens to my data icon to configure what happens to the data when the flow is submitted.
 - Click the
 who has access? icon to display the Access control wizard. This wizard is used to specify flow visibility, flow submission and audit trail permissions.
 - Click the
 save and test icon to save the changes and test your flow without leaving the designer.
 - Click the
 save and exit icon to save the changes to your flow and exit back to the Flows Home Page
 - Click the
 print icon to print the whole flow as it appears in the flow designer. Clicking the print icon is helpful when customizing the pdf associated with your form/flow.
 - Click the
 cancel changes icon to discard changes you’ve made to your flow and exit back to the Flows Home Page
 - The current version of a workflow is shown to the right of the flow title. When you create your flow, the version number will be zero. It will increase each time the flow is saved by clicking on the save and exit or
 save and test icons. This feature can help designers ensure they are working with the latest version of the form.