This documentation is for Live Forms 9.1. v9.1 is a Cloud Only release. Not for you? Earlier documentation is available too.
COVID-19 Response Info: At frevvo, our top priorities have always been employees and customers. We have taken several steps to promote the well-being of our people, to minimize services disruptions, and to help where we can. Visit our website for updates.
Azure SAML Security Manager
- Former user (Deleted)
- Megan Ellis
Live Forms supports the Azure Security Manager for Single Sign On. Users/roles are automatically pulled from Azure AD into Live Forms cloud tenants and on-premise installations. Users are redirected to the Microsoft Azure login screen for authentication.
frevvo recommends using the SAML Security Manager for customers who want to manage users/roles from the UI.
On this page:
Prerequisites
- You will need a valid Microsoft Azure subscription
The frevvo.TenantAdmin and frevvo.Designer groups must be specified on your Active Directory server. The group names must be spelled as shown. Upper/lower case may be a factor for Open LDAP systems. These groups are required.
- Tenant admin users must be assigned to the frevvo.TenantAdmin group.
- Designer users must be assigned to the frevvo.Designer group
- Contact the frevvo Customer Success team to schedule your Security Manager configuration.
- frevvo Best Practice recommends that you create a user account in your Active Directory that will house all of your deployed Production forms/workflows. This user can be named anything i.e.frevvoProduction but it must be a member of the frevvo.Designer group
- If you want to preserve Projects/Forms/Workflows developed in your trial/starter tenant to your desktop, perform these steps BEFORE changing the Security Manager. :
- Download the Projects/Forms/Workflows that you want to preserve to your desktop as a backup. Do this for all
user accounts that have Projects/Forms/Workflows that you want to keep.
- When the backup of all Projects/Forms/Workflows is completed, delete the user accounts in your Default Security Manager tenant.
- Download the Projects/Forms/Workflows that you want to preserve to your desktop as a backup. Do this for all
- There are two additional roles in
- In order to give a user the frevvo.publishers role, create the frevvo.Publisher group in your AD and assign users to it. Refer to the Administrator Best Practices for an explanation of this role.
- In order to give a user the frevvo.ReadOnly role, create the frevvo.ReadOnly group in your AD and assign users to it. Following frevvo Best Practice eliminates the need for this role.
- In order to give a user the frevvo.publishers role, create the frevvo.Publisher group in your AD and assign users to it. Refer to the Administrator Best Practices for an explanation of this role.
- frevvo only supports the Azure Security Manager when
Configuring the Azure SAML Security Manager
Follow these steps listed below to create a tenant using the Azure SAML Security Manager:
- Create an Application for Live Forms in Azure
- Create the Live Forms metadata file
- Create the Azure Tenant IDP metadata file
- Create/edit the Live Forms tenant
- Log into your Live Forms tenant
Step 1 - Create an Application for Live Forms in Azure
frevvo assumes that customers have someone on staff that can successfully perform this step of the procedure. Information about is listed below to help you with this process.
The Azure global administrator MUST create the application for in Azure.
If you are familiar with the Microsoft Azure Legacy Portal, review this Microsoft Training Guide before setting up the Azure application for .
Do not include the curly braces in the URLs discussed below.
- Login to the Microsoft Azure Management console: https://manage.windowsazure.com or https://portal.azure.com with your Azure global administrator account.
- Click on the Azure Active directory link on the left side of the screen.
- Click on the App Registrations link.
- Click on the New application registration link for creating a new application.
- Enter the following details:
- Name:- Name of your frevvo Azure application
- Select who can use this application or access this API
- Configure the Redirect URL:
Cloud Customers should use https://app.frevvo.com:443/frevvo/web/saml/SSO/alias/{t} - replace {t} with name of your frevvo tenant.
For example, if you were changing the Security Manager from the Default Security Manager to the Azure SAML Security Manager for a frevvo Cloud tenant named mycompany.com, the REPLY URL would be:
https://app.frevvo.com:443/frevvo/web/saml/SSO/alias/mycompany.com
On-premise customers should use http://<server>:<port>/frevvo/web/saml/SSO/alias/{t} - replace <server> with the ip of your server, <port> with the port number (if applicable) and t with the name of your frevvo in-house tenant.
For example, if you were changing the Security Manager from the Default Security Manager to the Azure SAML Security Manager for a frevvo in-house tenant named mycompany.com, the REPLY URL would be:
https://<server:port>/frevvo/web/saml/SSO/alias/mycompany.com
- Click Register.
- Select the frevvo application from the list.
- Click the Branding tab
- Configure the Home Page URL:
Cloud Customers should use https://app.frevvo.com:443/frevvo/web/tn/{t}/login - replace {t} with the name of your frevvo Cloud tenant.
For example, if you were changing the Security Manager from the Default Security Manager to the Azure SAML Security Manager for a frevvo Cloud tenant named mycompany.com, the SIGN-ON URL would be:
https://app.frevvo.com:443/frevvo/web/tn/mycompany.com/login
On-premise customers should use http://<server>:<port>/frevvo/web/tn/{t}/login - replace <server> with the ip of your server, <port> with the port number (if applicable) and t with the name of your frevvo in-house tenant.
For example, if you were changing the Security Manager from the Default Security Manager to the Azure SAML Security Manager for a frevvo in-house tenant named mycompany.com, the SIGN-ON URL would be:
- Click Save.
- Click on the API Permissions tab.
- Click Add a Permission.
- Select Azure Active Directory Graph from the Supported legacy APIs section.
- For Application Permissions, select Read directory data (under Directory).
- For Delegated Permissions, select Sign in and read user profile (under User) AND Read directory data under (under Directory).
- Click on the Grant Permissions button select "Yes" option and click on the Save button.
- Click on the Expose an API tab.
- Configure the Application ID URI:
Cloud Customers should use https://app.frevvo.com:443/frevvo/web/alias/{t} - replace {t} with the name of your frevvo Cloud tenant.
For example, if you were changing the Security Manager from the Default Security Manager to the Azure SAML Security Manager for a frevvo Cloud tenant named mycompany.com,the AP ID URL would be:
On-premise customers should use http://<server>:<port>/frevvo/web/alias/{t} - replace <server> with the ip of your server, <port> with the port number (if applicable) and {t} with the name of your frevvo in-house tenant.
For example, if you were changing the Security Manager from the Default Security Manager to the Azure SAML Security Manager for a frevvo in-house tenant named mycompany.com, the AP ID URL would be:
- Click Save.
- Configure the Application ID URI:
- Click the Certifiates & secrets tab.
- Generate the Client Secret. COPY/SAVE the VALUE in a notepad - you will need this for the frevvo tenant screen.
There is only one chance to retrieve the client secret key when you create the application for
- Generate the Client Secret. COPY/SAVE the VALUE in a notepad - you will need this for the frevvo tenant screen.
- Click the Overview tab.
- Copy the Application ID into your notepad. This is the value of the Client ID on the frevvo configuration screen.
Copy the Directory ID into your notepad. This is the value of the Tenant ID on the frevvo configuration screen.
Click Endpoints at the top of the screen. Copy the Federation Metadata Document URL from the list to your notepad. This is the URL that you will use to generate the Azure metadataExample of the Federation Metadata Document URLhttps://login.microsoftonline.com/3d532ac1-a43c-45c7-b0e9-cc814400ca11/federationmetadata/2007-06/federationmetadata.xml
- Proceed to Step 2 - Create the Live Forms metadata file
Just a reminder - you will need the Azure tenant ID, the client id and client secret for the frevvo application when configuring your Azure SAML tenant.
Step 2 - Create the Live Forms metadata file
Follow these steps to generate the frevvo metadata for your Azure SAML tenant. You can do this even if the tenant has not been created yet.
Paste this URL into your browsr:
Cloud Customers: https://app.frevvo.com:443/frevvo/web/saml/metadata/alias/{t} - replace {t} with the name of your
On-premise customers: http://<server>:<port>/frevvo/web/saml/metadata/alias/{t} - replace <server> with the ip of your server, <port> with the port number (if applicable) and t with the name of your frevvo tenant.
When the metadata displays, save the page as an xml file.
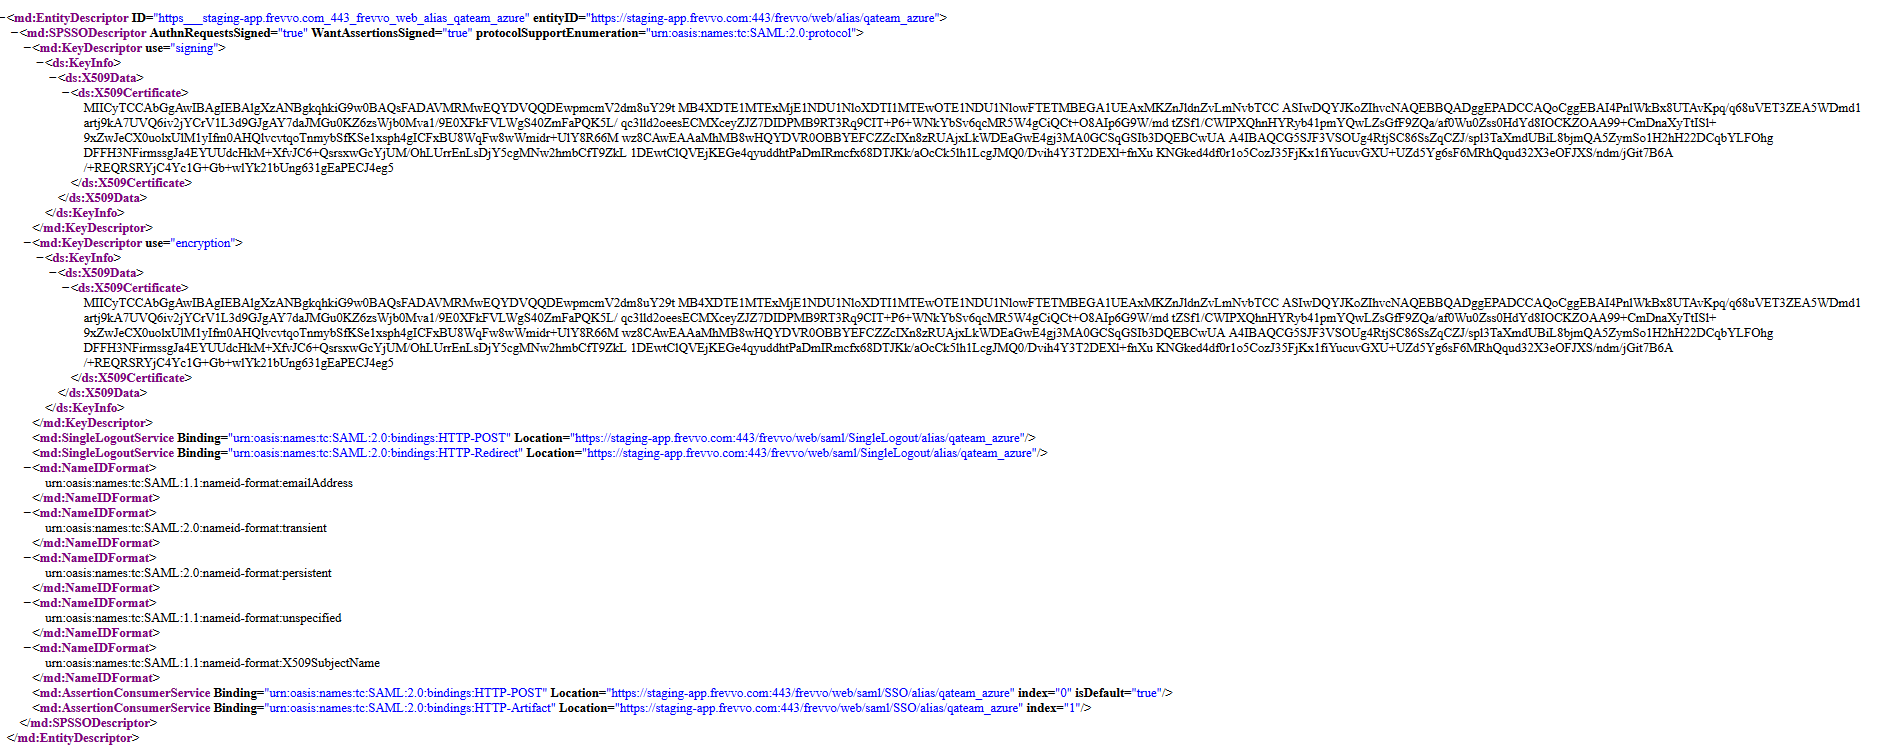
- We will need to copy the entire metadata from this file to the Azure SAML Security Manager configuration screen.
- Metadata must be generated for each Azure SAML tenant. Each tenant will have a unique URL.
Step 3 - Create the Azure Tenant Idp metadata file
Follow these steps:
Browse the Federation Metadata Document URL that you copied to your notepad when creating the Azure application for
Example of Federation Metadata Document URL from Endpointshttps://login.microsoftonline.com/fece6b7e-fbc6-4b3a-8287-fc07c29aa2d2/FederationMetadata/2007-06/FederationMetadata.xml
Save all the metadata returned as an xml file. We will need to copy the entire metadata from this file to the Azure SAML Security Manager configuration screen.
Step 4 - Create/edit the Azure SAML tenant
To successfully create a tenant using the Azure SAML Security manager, you will need the following:
-
- The Azure SAML tenant Idp metadata file
- Attribute mapping information
- The Azure tenant ID, the client id and client secret key that are created as part of registering the frevvo application.
cloud customers, migrating your tenant to the Azure SAML Security Manager, will make the changes via the Edit Tenant screen. Once accessed, follow these steps beginning with step 3.
- Log onto
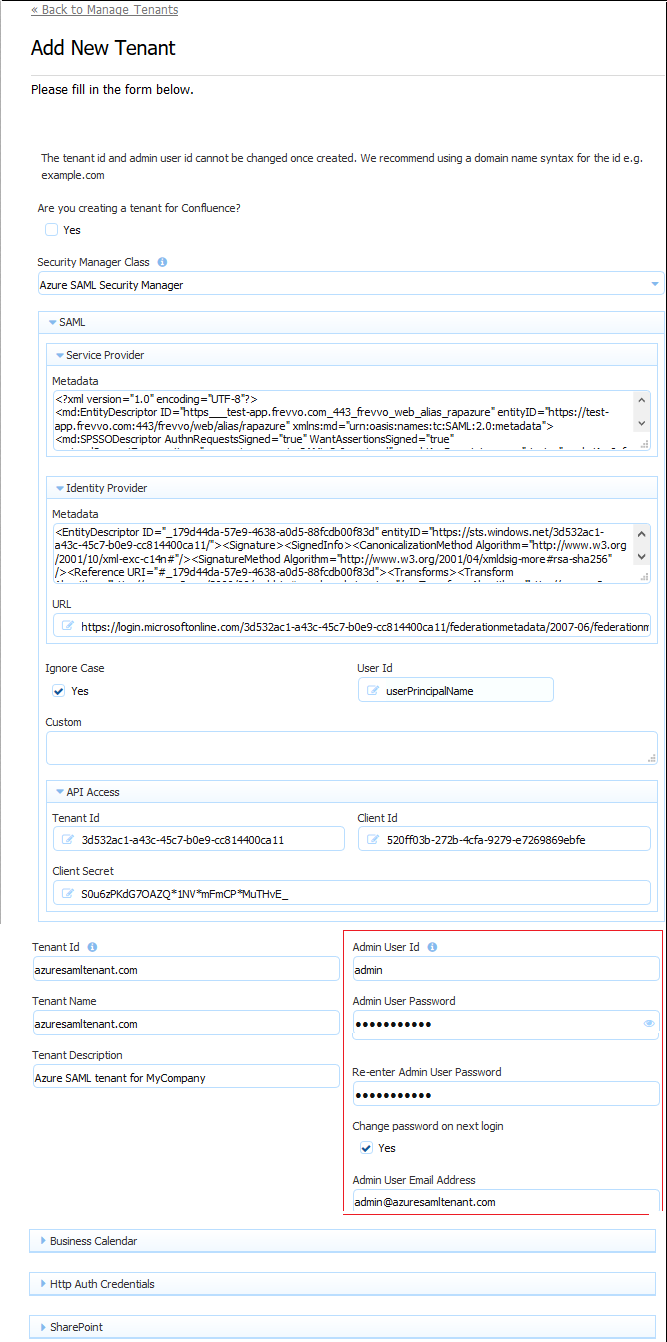
- Access the Add Tenant (on-premise) or Edit Tenant (cloud) screen.
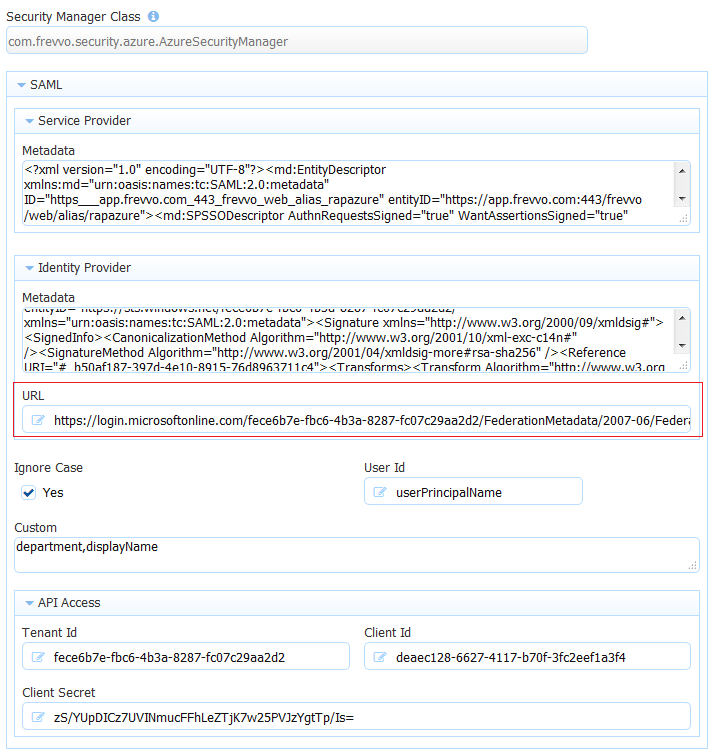
- Select Azure SAML Security Manager from the Security Manager Class dropdown.
- Copy the Service Provider (frevvo) metadata into the Service Provider field. You can include the xml prolog when you paste the Service Provider (frevvo) metadata.
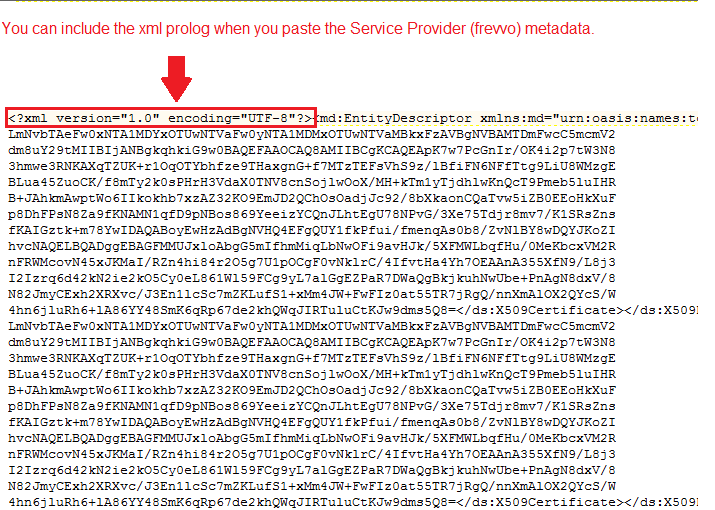
- Copy the metadata from the Azure tenant IDP file previously created and paste it into the Identity Provider field.
Enter the Federation Metadata Document URL that you copied from Endpoints in your frevvo Azure application. The URL is needed to handle Signing key rollover in Azure Active Directory. This URL is polled and refreshes the Azure IDP metadata every 3 hours. The new metadata is stored and automatically used as backup in case the URL is not accessible.
Example of Federation Metadata Document URLhttps://login.microsoftonline.com/fece6b7e-fbc6-4b3a-8287-fc07c29aa2d2/FederationMetadata/2007-06/FederationMetadata.xml
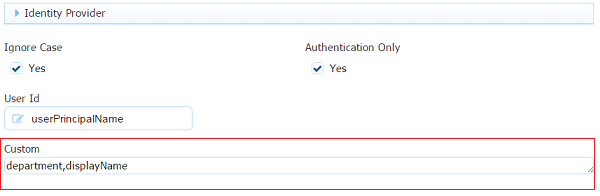
Check the Ignore Case checkbox if you are using LDAP for authentication and you want
Enter the User Id. This should be the User property name that identifies the user. A typical value is userPrincipalName, givenname etc.
- Custom attributes can be mapped by typing the attribute names in the Custom field separated by a comma.
- Enter the following information in the API Access section.
- Enter the Azure tenant identifier into the tenant Id field. This can be obtained by viewing the endpoint Urls listed when you click View Endpoints in your frevvo Azure application.
- Enter the client id and client secret key that were created as part of registering the frevvo application into the respective fields.
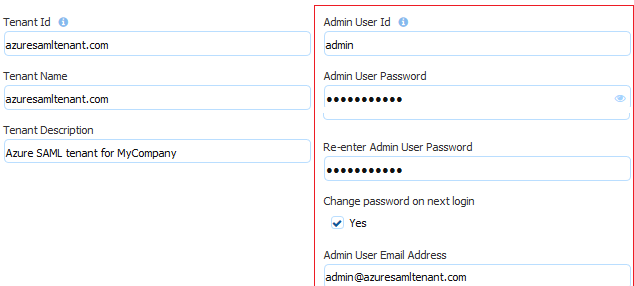
- Configure a tenant admin account. This account does not require Azure SAML authentication. This tenant admin can log directly into
- The tenant admin id, password and email fields are required. The Change password on next login is optional. It is checked by default.
- When this tenant admin performs a form based login i.e. /frevvo/web/login, the password entered on this screen is used for authentication. This is also the URL used by the API. For cloud customers the <base> is always https://app.frevvo.com.
- If the tenant based login url is used i.e. /frevvo/web/tn/{t}/login then the Azure SAML login is used.
The forgot password function works for an Azure SAML tenant admin user. For all others, it will display the error message about not being supported for the tenant.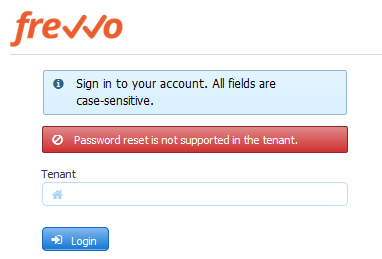
- Configure the Business Calendar for your tenant. The
- Enter HTTP Auth credentials if required. Credentials for external secure web services accessed by the forms and workflows in your tenant can be specified in this section.
- Click Submit.
Step 5 - Logging into a Live Forms Azure SAML Tenant
- Paste this tenant specific URL into your browser:
Cloud Customers: https://app.frevvo.com:443/frevvo/web/tn/{t}/login - Replace {t} with the name of your Azure SAML tenant.
- On-premise Customers:http://<server>:<port>/frevvo/web/tn/{t}/login. Replace <server> and <port> with your server information and t with the name of your Azure SAML tenant.
The user is redirected to the Azure login screen.
If the user is authenticated,
- Clicking the logout link in
- When a user logs in to space, the logout link will not be visible in an Azure AD (SSO) tenant.
- When a user logs in to
- Cloud customers browsing app.frevvo.com or in-house customers browsing http://<servername>:<port>/frevvo/web/login attempting to log into an Azure tenant directly (user@saml tenant name) will automatically be redirected to the Azure IDP login page.
Logged in User Display in Azure SAML Live Forms tenant
If your Azure SAML userIds are in the format <username>@<domain name>, when you login to the
tenant name is appended to the userId . This is as designed. You will see <username@domain name@frevvo tenant name> as the logged in user at the top of the screen. If your domain name is the same as your
tenant name, it will appear as if the domain name is listed twice.
Azure SAML Tenant Built-in Admin User
Just a reminder that the tenant admin account can login directly into Live Forms or use the Azure SAML login.
When you create/edit a new tenant you are prompted to set up/modify a tenant admin user id, password and email address. This tenant admin does not authenticate via your Azure SAML IDP. It only exists in Live Forms. If you experience an issue with your Azure SAML configuration such that you can't login as an Azure SAML authenticated user, use the built-in admin user to login to your tenant as a tenant admin in order to fix your Azure SAML configuration issue. Only one built-in tenant admin account is supported.
Browse this URL to login as the built-in: <base_URL>/frevvo/web/admin/login. When specified, will prepend the base URL to the URLs in your Form/Document Actions. The <base_URL> is typically http(s)://<your servername>:<port>.
- You must use the admin specific URL - <base-url>/frevvo/web/admin/login - to login as the built-in.
- Non admin users can also login using the admin specific URL.
If your tenant originally used the Default Security Manager and then you changed to the Azure SAML Security Manager, this tenant admin account has already been setup. If you have forgotten the password, you can change it by :
- Browsing the admin specific URL - <base-url>/frevvo/web/admin/login. Enter the built-in userid. Click Forgot Password? This error message displays if any other user clicks on the Forgot Password? link after browsing the admin specific URL:
- Logging in as a Azure SAML authenticated tenant admin and changing the password via Manage Users.
The frevvo superuser admin (Cloud customers) and the in-house superuser can change the password for the built-in userid from the Edit Tenant page.
What if you do not remember the userid of your original tenant admin? Follow these steps:
- Login as your authenticated Azure SAML tenant admin
- Click Manage Users and click the
 edit admin icon.
The frevvo (Cloud customers) and in-house superuser can see the built-in tenant userid from the Edit Tenant page.
Session Timeout
Session timeouts are configured in and in your Azure SAML IDP. If a user's session ends before the IDP timeout is reached, they will automatically be logged back into
if they try to access it again. It is recommended that the
session timeout and the IDP session timeout be configured for the same value.
Embedding Forms/Workflows in your website
Embedding forms and workflows into your website when using the Azure SAML Security Manager, will work in the following scenarios :
- The visibility of the form is set to Public.
- The visibility of the form is set to Public in Tenant and the user is already authenticated to Azure SAML
Embedding forms and workflows into your website is NOT supported if the the visibility of the form is set to Public in Tenant and the user is NOT already authenticated to Azure SAML. This is because frevvo must direct the user to the IDP login screen and the browser will not allow loading the IDP login page in frevvo's form iframe.
Troubleshooting
Logging into a Azure SAML tenant as (user@Azure SAML tenant name)
Logging into a Azure SAML tenant as (user@Azure SAML tenant name) displays an application error message.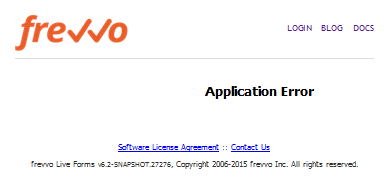
On-premise customers using the tomcat bundle will see the following entry in the error log:
Application error processing /frevvo/web/login?null java.lang.UnsupportedOperationException: null
Accessing a Space in a AzureAD tenant on a mobile device will not display a logout button.
Skew error when logging into an Azure tenant
Users logging into a Live Forms Azure SAML tenant may encounter the error "Access Denied. Authorization Required". Examination of the frevvo.log shows the following entry:
Response issue time is either too old or with date in the future, skew 60, time 2016-06-01T05:49:25.330Z
Follow the instructions listed in the Installation Tasks chapter to add the parameter.
Login into the Azure SAML tenant fails
If the login into your Azure SAML tenant fails and the log reports the following error, you may have to edit your Azure SAML tenant to add the metadata URL. T
org.opensaml.xml.validation.ValidationException: Signature is not trusted or invalid.
The URL is needed to handle Signing key rollover in Azure Active Directory. This URL is polled and refreshes the Azure IDP metadata every 3 hours. The new metadata is stored and used as backup in case the URL is not accessible. Refer to Step 6 above for the details.
Retrieving Custom Attributes from Azure Active Directory in an Azure SAML Tenant
The Azure AD Graph API allows access to users, groups etc... in Azure AD. User entity attribute data exposed by the API for the logged in user can be pulled into fields in your form/workflow with a business rule. If the attribute that you are looking for is not already exposed, you can:
- Sync Azure AD to your in-house AD via the Microsoft provided connector
- Add an extension property
Once the custom attributes are made available, add them to the Custom section of your Azure SAML tenant.
- Login to your Azure SAML tenant as the as the tenant admin.
- Click the Edit Tenant link
- Add the custom attributes to the Custom section as a comma separated list. The image shows the department and displayName attributes listed in the custom attribute section.
- Design your form/workflow with fields to collect the information.
- Write a business rule to populate the controls with the custom attribute information.
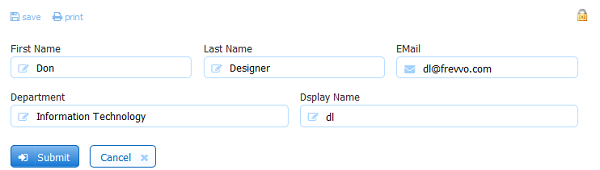
Here is an example of a rule that will retrieve the custom attributes, department and displayName, plus the standard attributes, First Name, Last Name and Email address.
if (form.load) {
    FirstName.value = _data.getParameter('subject.first.name');
    LastName.value = _data.getParameter('subject.last.name');
    EMail.value = _data.getParameter('subject.email');
    department.value = _data.getParameter('subject.department');
    displayName.value = _data.getParameter('subject.displayName');
}
Using the SharePoint Connector in an Azure SAML Security Manager tenant
At least one designer user that is going to be connecting forms/workflows to SharePoint with the Save to SharePoint wizard must also be a SharePoint user with the correct privileges to provide consent if your tenant is configured with the Azure SAML Security Manager .