This documentation is for frevvo v10.0. Not for you? Earlier documentation is available too.
Using Workflows
- Former user (Deleted)
- Megan Ellis
Looking for a section on this page? Hover your cursor over the Table of Contents icon ![]() to the right to quickly navigate this page.
to the right to quickly navigate this page.
Examples of Approving/Rejecting workflow tasks and important topics about the behavior of workflows are discussed below.
- Cloud customers have access to pre-built workflow and form templates. They can be uploaded by clicking
 Add Content and selecting Install a Prebuilt Template. All workflow templates in the Cloud come with short /wiki/spaces/frevvo100/pages/1062995176 that automatically launch and are intended to show you how to run the workflow.
 - On-demand help about the frevvo workflow properties is also available.
Refer to this topic for information about testing workflows
Invalid Form Notification for Users
frevvo provides a method to show validation errors at the time of submission. Click on the Continue or Finish button in a workflow that contains invalid data or required fields that are empty and the invalid controls are highlighted with a background color. Refer to this documentation for the details.
Unsaved Changes Warning Message
Users filling in a lot of data in a long workflow may loose that data if they close the browser/browser tab without saving or submitting. Browser messages will popup to confirm or cancel the window/tab closing action to avoid the loss of data. Refer to Unsaved Changes Warning Message topic to see how this feature works.
Designers should consider the Save on Navigate feature for workflows if you want to save entered data when the browser is closed before Saving or Submitting.
Approval Workflows
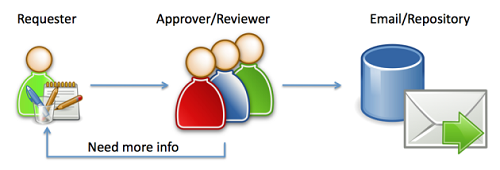
Approval workflows are very easy to automate in frevvo. The requester fills out the original form (or set of forms) electronically and the workflow is then routed it to the appropriate person or persons according to the desired business scenario. They’re notified with an email and can take action instantly using any device e.g. instant approval using a smart phone. E-signatures are collected and PDFs can be generated along the way. frevvo offers multiple integration options so you can save your data.
Approving a Task
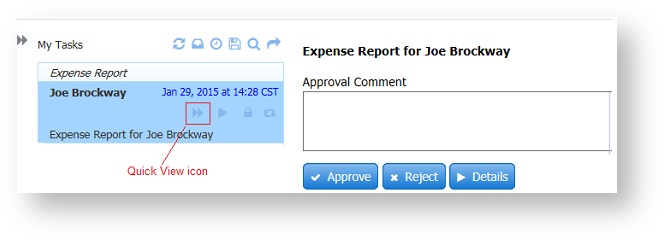
Reviewing a task for approval is very easy in frevvo using the Task List. The approver can use the  Quick Approval or the
  Perform icons to display the approval step. Quick Approval displays a Quick View of the task without displaying the entire form. It allows the user who's responsibility it is to review the task (manager, supervisor, reviewer etc.) to add a comment, approve or reject, sign and pass it to the next user in the workflow. This works well on mobile devices. If the approver wants to see the entire form they can click the Details button.
Follow these instructions to approve a task for the workflow that you downloaded:
- Access the workflow from your space. Log in to frevvo.
- Click the appropriate tab then select the workflow from the choices.
- Run the workflow to a step that requires an approval (manager, VP, Payroll.)
- Check the email for any user whose role is manager. Click on the link in the email.
- Log into frevvo as the user that can perform this step.
- Access the task by clicking the Important Items tab and then click on the Task List.
- For a quick approval, click the Quick View icon. If the task does not have a Quick View icon, click the Perform icon. Notice the task is now locked so no one else can review it.
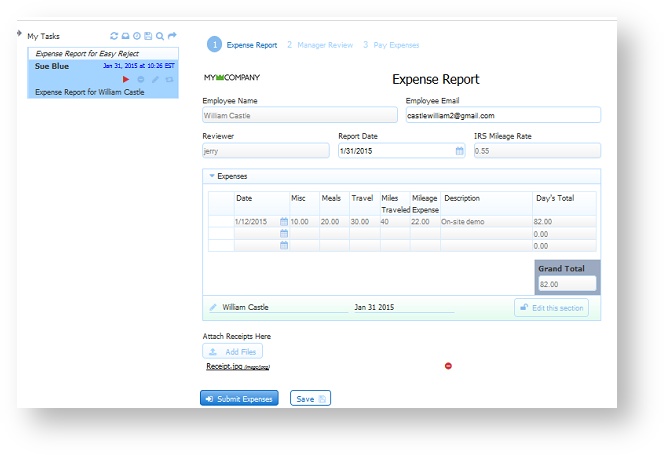
- Here is an example of Quick Approval for the Expense Statement workflow. If the approver wants to see the Expense Statement first, then click the Details button.
- Sign if required. If you clicked on the Quick View icon, click the Approve button. A "Please Wait" message flashes and the "Task successfully approved" message displays. Logout.
- For a quick approval, click the
- If you clicked on the Perform icon, fill in the required fields then click the button on the screen to advance to the next step or complete the workflow. The label of the "Continue" button may differ as this is customizable by the workflow designer. The task disappears from the task list.
- If the workflow has additional steps, check for a task notification email with a link to the task for a user who can perform that step, then login if required. For example, the third step in the Expense Report workflow is performed by a user with the role of Finance and the final step is performed by a user with the role of CFO.
- Access the task by clicking the Important Items tab and then click on the Task List. Approve each step.
- Complete the remaining steps for the workflow. Logout.
Rejecting a Task
A non-admin user can send a task back to a previous step by clicking the Reject button. The Reject button is configurable by the designer so all steps in the workflow may not have one.
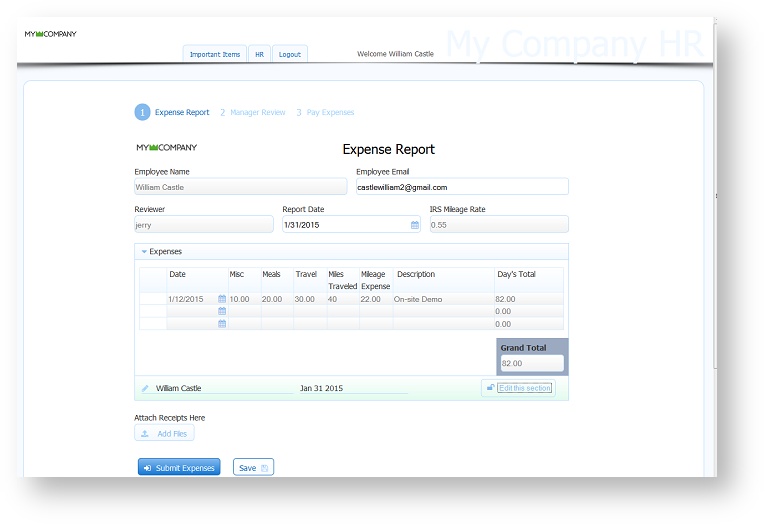
Let's consider an Expense Report workflow where the first step is performed by the employee, then it is routed to the employee's manager for approval/rejection. If approved, the workflow is then routed to the Payroll department for final processing. A Reject button has been configured for the Manager and Payroll steps and email notification is turned on for all participating users.
Employee William accesses his company's HR portal and logs in to frevvo. He fills out and submits his Expense Report, then he logs out of frevvo.
William's manager, Jerry, receives a task notification email informing him there is a task on his task list that requires his attention.
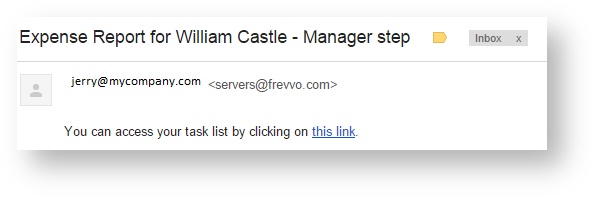
Jerry clicks the link in the email, logs into frevvo from a mobile device and clicks the theQuick View icon.
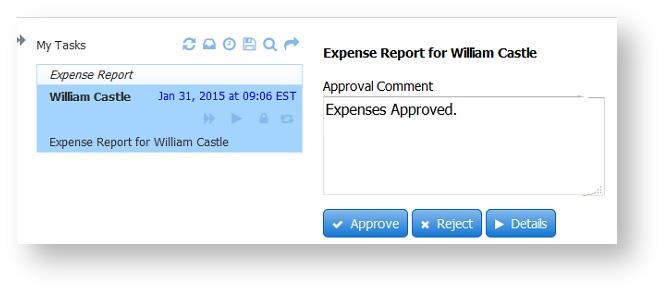
Jerry adds a comment, then approves the task by clicking on the Approve button. The "Task successfully approved" message displays and Jerry logs out of frevvo.

All users who work in the Payroll department receive a notification email and the workflow is routed to their task lists.
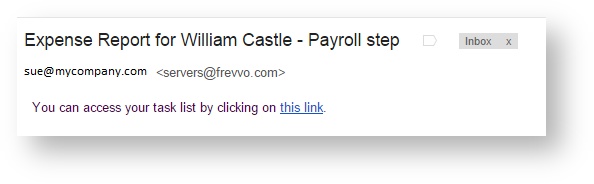
Sue, who is a Payroll department employee, clicks the link in the email, logs into frevvo, performs the task and notices that William neglected to attach images of his receipts.

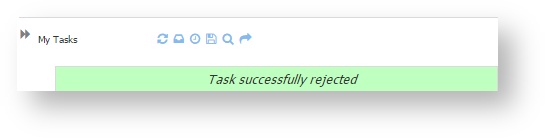
Sue clicks the Reject button. She rejects the task back to the step in the workflow performed by William Castle by selecting that step from the dropdown. Then she provides the reason for the rejection.
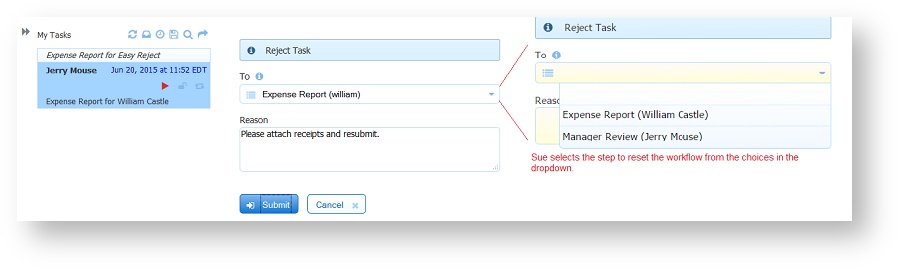
She clicks Submit on the Rejection screen and sees the "Task successfully rejected" message.
The task is removed from Sue's task list and she logs out. William receives a customized email asking him to attach the receipts.

William logs into frevvo and accesses the task from his Task List.
He uploads the receipts then resubmits the Expense Report. The workflow is routed to Jerry, who can reject the task and send it back to William or approve it. If approved, the workflow will once again be routed to the Payroll department employees. Now that the receipts are attached, the first employee in Payroll to perform the task can complete the final processing of William's Expense Report.
Searching for Tasks
Click the  icon on the Task List to search for a form you have saved and want to continue, that you have submitted in the past, or to search for a workflow you have participated in. You can narrow your search to specific forms or workflows, a date range when you performed a task or only tasks that ended with errors. You can check one or more task states (Saved, Submitted, WAITING, PENDING, ABORTED) to include/exclude tasks from the search results.
Search will only show tasks that the user has participated in.
Select a Form/Workflow from the dropdown and Filter Form/Workflow by Data table becomes visible and enabled. You can use this table to optionally select fields that are set up as Searchable Fields in your form/workflow by the designer as search criteria.
The Filter Form/Workflow by data section of the Search screen allows you to optionally setup additional search criteria using the Searchable Fields configured for the form/workflow. The Condition column provides the available conditions based on the type of field, and the Value column allows you to enter matching values. The filter logic can be edited using AND and OR, etc.
Condition Column
The Condition column choices depend on the data type of the selected field. The data types and their corresponding options are shown in the table.
| Data Type(s) | Conditions Available in the Dropdown List |
|---|---|
| Date, Time, Date/Time | is equal to |
| is not equal to | |
| is after | |
| is before | |
| is on or before | |
| is on or after | |
| is within last | |
| contains a value | |
| does not contain a value | |
| Number, Money, Quantity | is equal to |
| is not equal to | |
| is greater than | |
| is less than | |
| is greater than or equal to | |
| is less than or equal to | |
| contains a value | |
| does not contain a value | |
| Text, TextArea, Email, DropDown, Radio, Checkbox | contains |
| does not contain | |
| begins with | |
| ends with | |
| is equal to | |
| is not equal to | |
| contains a value | |
| does not contain a value | |
| Boolean Checkbox | is equal to |
Value Column
The values entered into the Value Column depend on the field type and also sometimes upon the condition chosen. The allowed values for Field Type(s) and conditions are listed in the table.
| Field Type | Condition | Value Entry Field Type | Notes |
|---|---|---|---|
| Date | Any except 'is within last' | Date Picker | |
| Time | Any except 'is within last' | Time Entry | |
| DateTime | Any except 'is within last' | Date and Time Picker | |
| Date, Time, DateTime | 'is within last' | Special time duration entry field. | Enter a duration in Years:Months:Days:Hours:Minutes. Any field to the left may be omitted. For example, 2 days and 4 hours may be expressed as 0:0:2:4:0 or as 2:4:0. |
| Number, Money, Quantity | number field | ||
| Text, TextArea, Email, DropDown, Radio, Checkbox | Text field | ||
| Boolean Checkbox | drop down containing true and false options |
For Example, if you select a Date field, the Date Picker is provided to help enter the value. If you select a Text field from your form/workflow, you will be prompted to "Enter text".
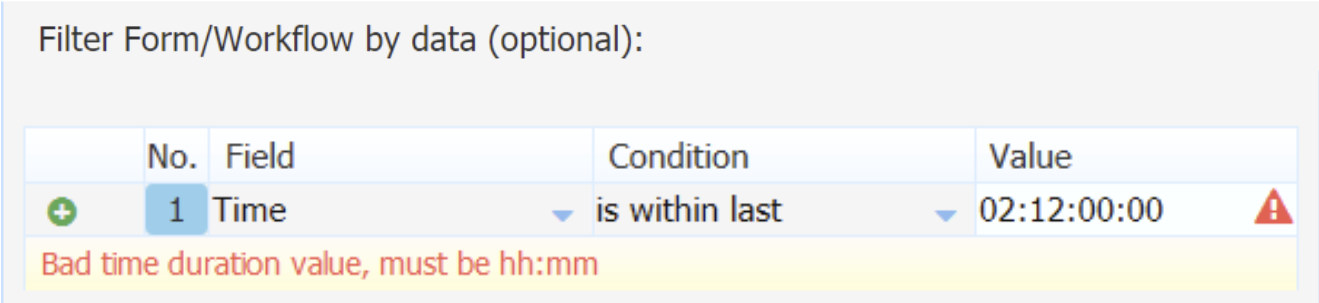
A Date, Time or Date/Time field with the "is within last" condition selected, requires a special time duration entry. The duration must be entered in this format: Years:Months:Days:Hours:Minutes. Fields to the left may be omitted. For example, if you were searching for tasks performed in the last 2 hours you can enter 02:00 or as 2:0. To search for tasks within the last 2 months and 12 days, enter 02:12:00:00.
If you enter an invalid value, an error will display with instructions:
Editing the Logical Expression
If you want to modify the logical expression, click the Edit button. The logic expression becomes editable.
The Logic Expression allows you to customize and combine the filter conditions using ANDs and ORs as well as parenthesis () to group terms of the expression.
- Each filter item (expression) is represented by a letter (A for the Date range or B for the State or a number that corresponds to the row of the sub-expression in the Other Filter Items grid).
- Combine the letters and numbers using parenthesis to group items as needed.
- Build the logic of the overall predicate expression using AND and OR as appropriate.
- Click save when done to save the expression. Please correct any indicated parse errors in order to save.
Searches are initialized with the data entered as part of the previous search performed in the current web session. The one exception to that is the Filter Form/Workflow by data table which will always start out empty.
The Reset button clears all filter fields with the exception of Submission Status which is reset to all checkboxes checked.
Task List Search Example
The image shows an example of a Task search screen and the results displayed. Manager Jerry is searching for:
- Tasks in all submission states for Simple PO Workflows for companies named Alpha or Bravo.
- There is a field in the Simple PO Workflow named ClientName that has been set up as a Searchable field.
- The Purchase Order Workflow is selected from the Form/Workflow search box (type in a keyword, then select from matching options).
- The field named ClientName is selected from the Field dropdown.
- The condition for the ClientName field is contains.
- A value of Alpha is entered in the Value column on the first line.
- Jerry clicks the
 icon and adds another line where the value of the ClientName field is Bravo.
 - Jerry clicks the Edit button and changes the logical expression from 1 AND 2 to 1 OR 2 and clicks Save.
- He can also select the Start and End Dates and verifies that all the submission status checkboxes are checked
- He clicks Submit.
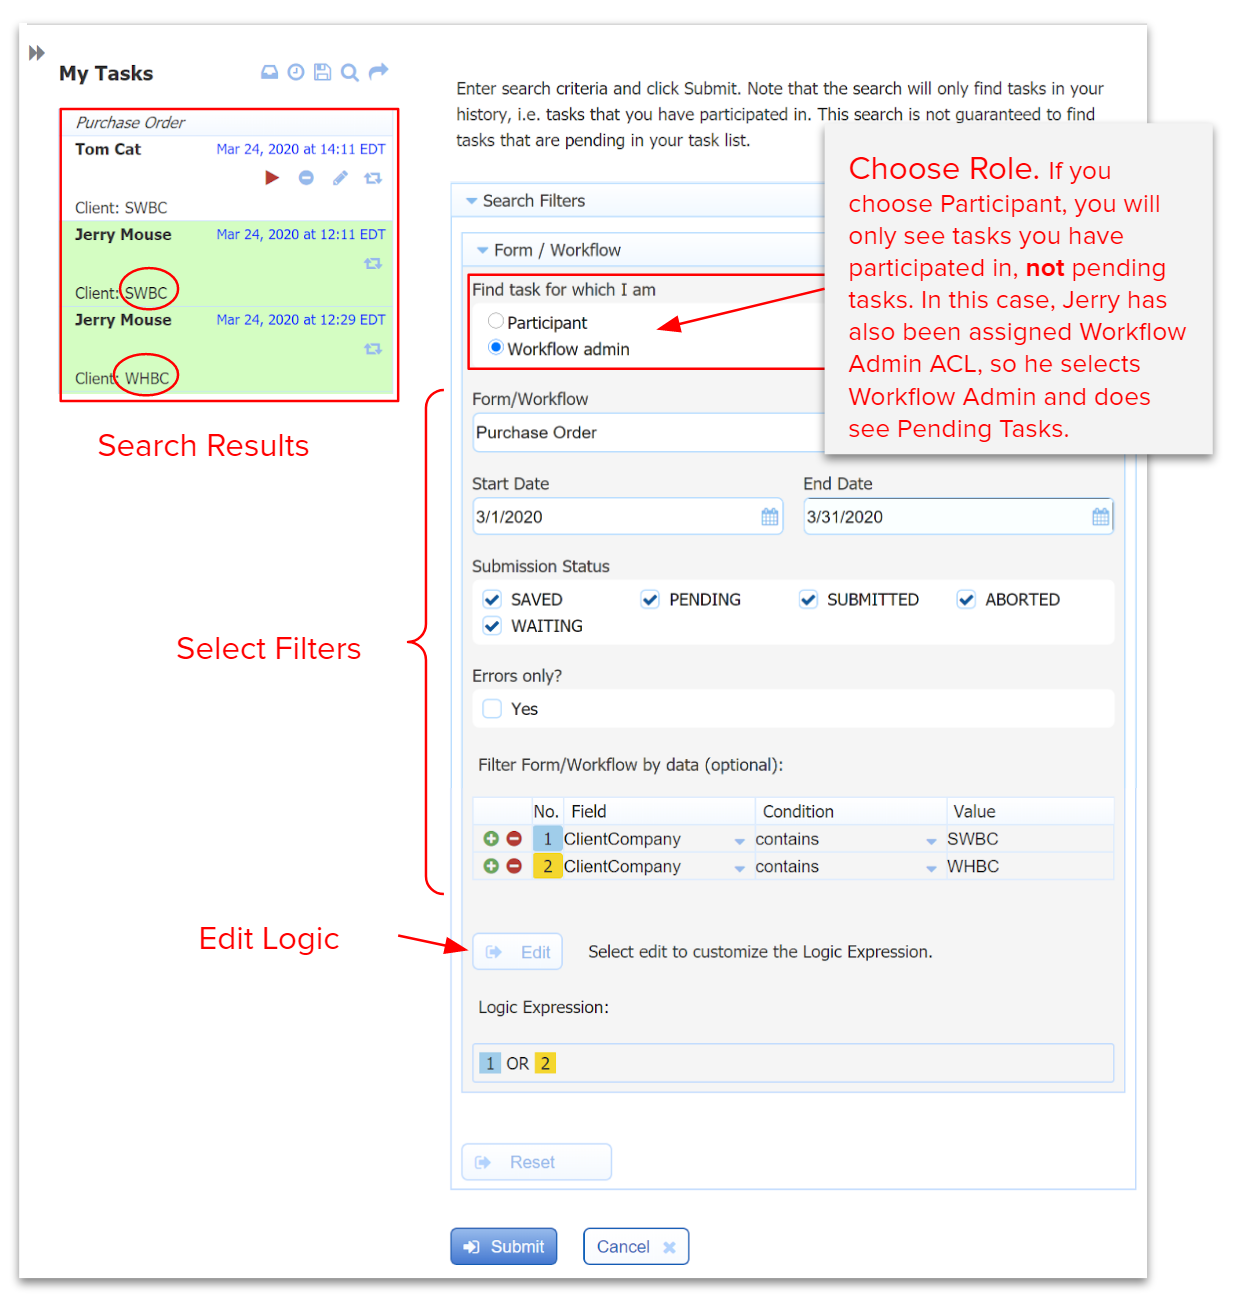
The results show a Simple PO Workflow for each company currently in a pending state. Checking the Audit Trail reveals that the task is on his Task List and is locked by him.
Tenant Admins and users with workflow admin permission are able to search for tasks that were performed by other users. One very common function is to search for tasks that are locked by a particular user so that the workflow admin can modify them and reassign them to another user or role. For example, if a person goes on vacation, the workflow admin may need to move a saved or pending form or workflow to another user.
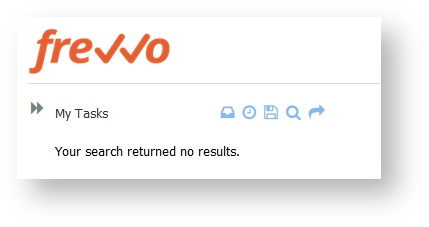
If no matching tasks are found as a result of your search, you will see this message:
If a workflow was renamed after having submissions, the original name will appear in the task list for tasks in PENDING and SUBMITTED status until the instance is saved.
View My Task
Users logged into frevvo are able to view workflow steps that they performed by clicking on the  icon in the Audit trail. When you are viewing your task, you may notice the read-only view watermark. This is to remind you that you can view the information but can not make changes to it.
You will not see this icon for rejected tasks, tasks that have been reset/reassigned/aborted by a tenant or workflow admin, or tasks that have been saved to your Task List.
You will only be able to view tasks that you have participated in.
Let's say you submitted a Leave Approval Request to your manager and you want to view the information that you entered. You are not sure if your manager has approved it or if your request is pending your Manager's approval (pending state).
Here is how you find it:
- Login to your frevvo tenant
- Click on My Tasks or Task List under Important Items if you are using a frevvo space
- Click the Search icon
- Select the workflow from the dropdown
- Search for your task in the Task List
- Click the
 to display the Audit Trail
 - Click the View icon to see the data that was entered
- Click the Audit Trail icon again to return to the Task List

Refer to View My Task for additional information about viewing tasks when workflow steps are performed by the same user or sent to an anonymous user.
Saving forms/workflows to complete at a later time
Users may not have all the information required to complete a form/workflow in a single session. frevvo offers a Save/Load feature that adds a Save button to the bottom of the step. Users can partially complete a workflow step, including leaving required fields blank and even having invalid data in form fields, then click Save. The partially completed step is saved to the user's Task List. Later the user can re-open the step either in the same browser or a different browser or even from a different computer, and reload the partially completed step and continue working on it. You can save the workflow step as many times as you like. Clicking the  Saved Tasks icon displays all tasks partially completed by the user. Each time the Save button is clicked is tracked by creating entries in the Audit Trail. Saved forms are not the same as submitted forms. Saved forms do not appear in the Submissions Repository. Saved forms can contain invalid data and also contain required fields with no values yet entered. When such a form is re-loaded the missing and invalid values are again flagged as such by frevvo. And the form cannot be submitted (the submit button will be grey) until corrections are made to those fields.
Follow these steps to Save a form:
- Logon to your frevvo space as f_tom.
- Select a form/workflow from the tab you created. Fill in some parts of the form/workflow but do not complete it. Click the Save button. The "Save Successful" message will display.
- Click the icon to display your Saved forms.
- Click the Perform icon. Add some more information but do not complete. Click the Save button. The "Save Successful" message will display.
- Save the form a third time then complete the form/workflow.
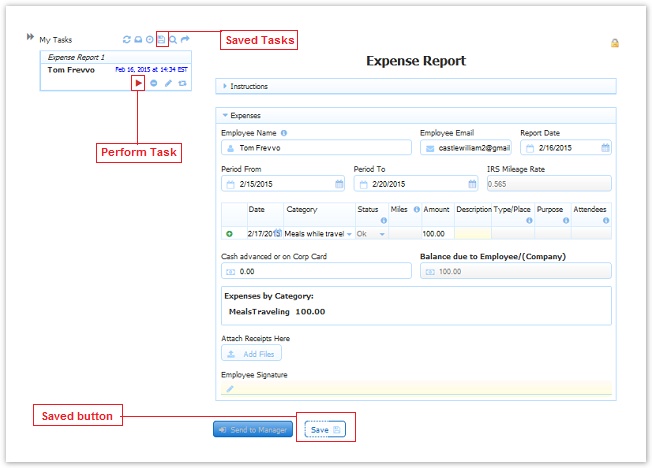
If your form/workflow does not have a Save button, contact the form/workflow designer.
Sending Emails in frevvo
frevvo offers the workflow designer many ways to send emails from workflows. You can:
- Configure Task Notification emails - users receive an email informing them that there is a task on their Task List that requires their attention.
- Send an email when a workflow is completed. This email is configured through the Doc Action wizard and can be customized.
- Send an email when one of the steps in the middle of the workflow is executed. This email is configured through the Activity Doc action wizard and can be customized.
- An email is sent to a user when a task is rejected. This is an automatic function of the rejection feature and the email cannot be customized at this time.
- Escalation emails for tasks that must be completed before a deadline. Designers configure the users that receive reminder emails and an email that is sent when the deadline expires.
- Route a workflow to someone who does not have a frevvo login (anonymous user.) Refer to the Workflow Tutorial for step by step instructions to implement this feature for a Purchase Order workflow.
Clicking the link in the Anonymous Email more than Once
The link in the email sent to an anonymous user can be clicked more than once in a screenflow consisting of an Anonymous Task step followed by multiple sequential anonymous steps. The anonymous user is brought back to the workflow at the current/latest anonymous step if the Save on Navigate feature is selected.For example, imagine a New Listing Agreement workflow where the Real Estate agent can elect to send an email to the seller (anonymous user) to collect the property details. In this scenario, the agent fills in steps 1 and 2 of the workflow supplying the Seller's email address. The Seller receives an email with a link to the first anonymous step (Seller Information). The Seller clicks on the email link, completes the Seller Information and Property Information steps then the workflow is routed back to the agent for review.
In the designer, the workflow would look like this: Notice the Seller and Property information steps represent a screenflow since they are both filled out by the same person (Seller).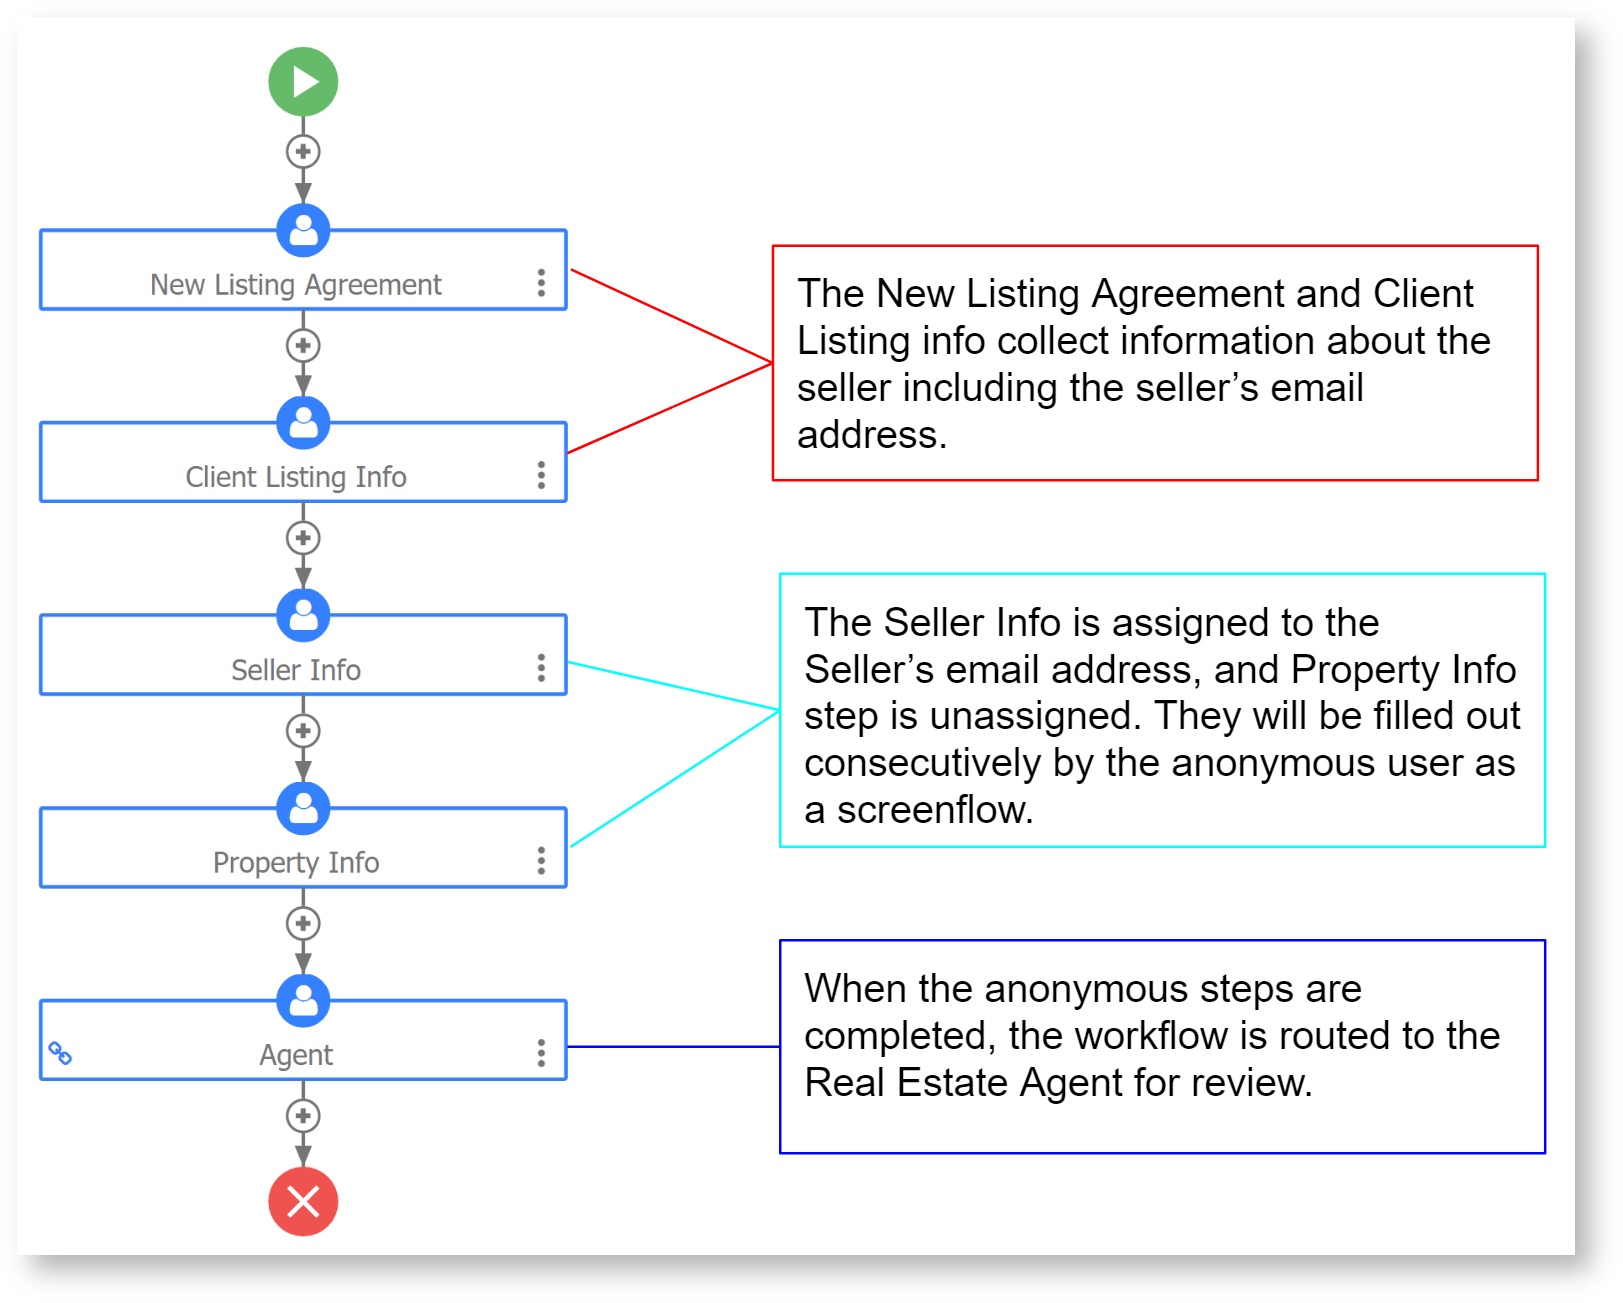
Let's say the Seller completes the Seller Information step then closes the browser. When the seller clicks on the link in the email again, the Seller will be directed to the Seller Information step.
If the Save on Navigate property is checked for this workflow then the anonymous user is brought back to the workflow at the current/latest anonymous step (Property Info) when they click the email link a second time.
Workflow Behavior for Consecutive Steps assigned to the Same User
The designer defines task boundaries by setting assignments (user, role or email address), so each workflow step with an assignment is considered a new task. Any subsequent workflow steps without assignment are considered part of screen workflow of the same task. Having an assignment to a workflow step strictly enforces the task boundary and it is applicable for the first step of workflow as well.
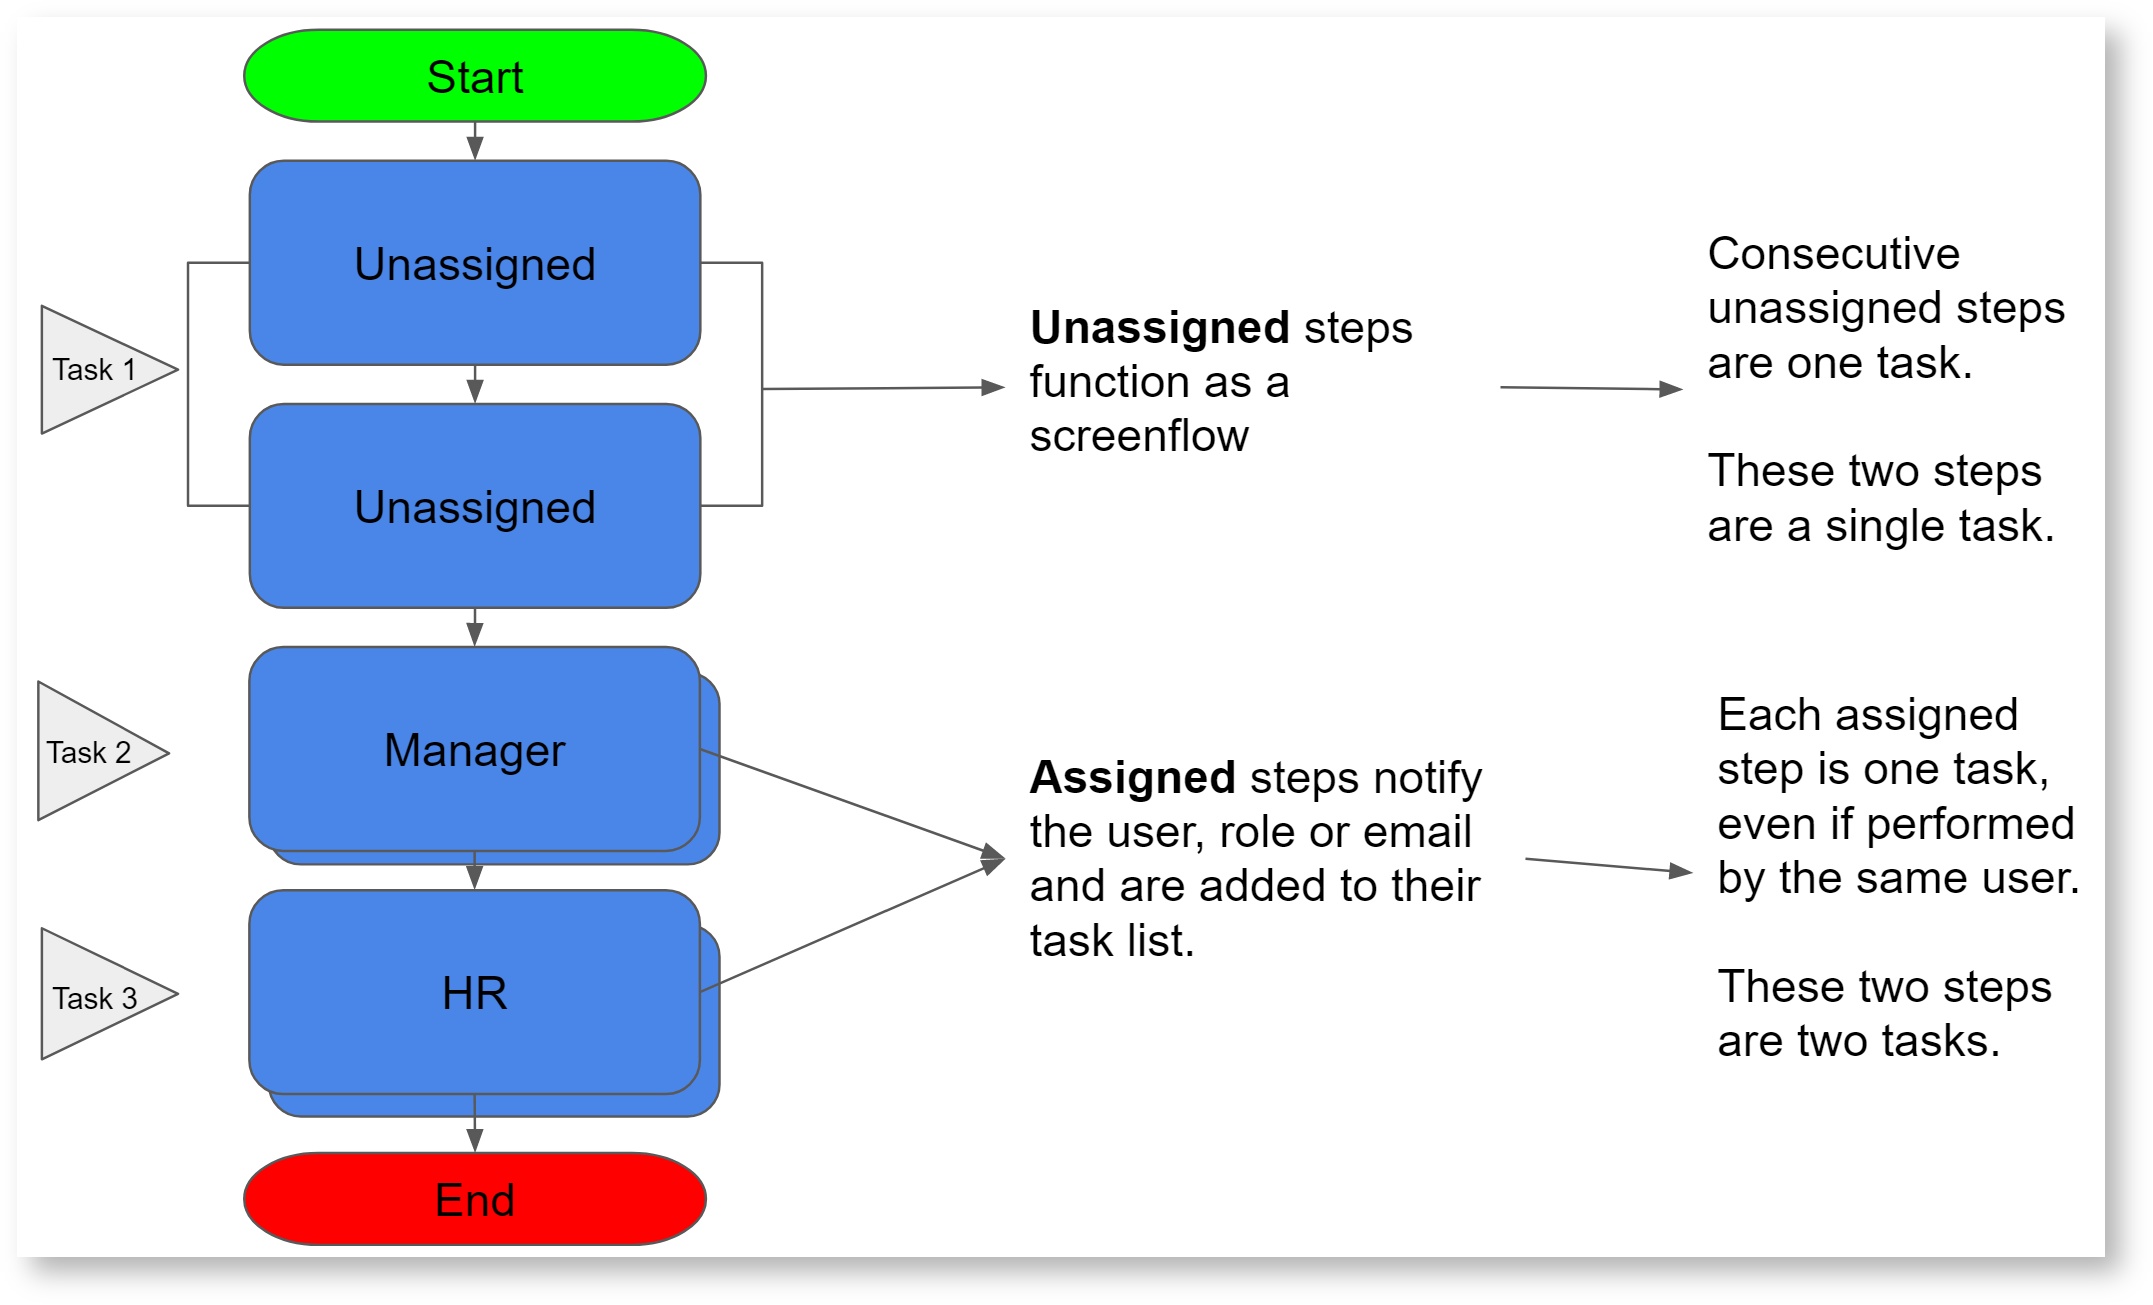
If the next step is assigned to the same user as the current step, the pending message will include a link to perform that step. When the user clicks the link to continue the workflow execution, the workflow will continue like a screenflow but a new task will be created behind the scenes. This is an uncommon design but may occur in cases where the next step is dynamically assigned to a user by a template and that template resolves to the current user.
When navigating back using the navigation bar, consecutive unassigned tasks in a screenflow will be available to edit. Once a user has moved on to a subsequent assigned step, all prior steps will be read only.
Invalid Task Assignment
For workflows created in v9.0.x and later, when a task that is routed to a templatized user, role, or email resolves to null or empty string, the task will be assigned to the "invalid-task-assignment" userId and a notification with be sent to workflow admin users (or the tenant admin user if no workflow admin is configured.) This will enable flow admin users to easily search mis-routed tasks assigned to the "invalid-task-assignment" userId and re-assign to valid user.
Workflows created in v8.x and prior will not inherit the new "invalid-task-assignment" behavior if a templatized user, role or email resolves to null. Instead, they will retain the previous behavior of morphing into a screenflow. To upgrade a workflow to use the v9 Invalid Task Assignment behavior, you will need to manually edit the flowtype property supportNullAssignee="false".
- Download the .zip file of your workflow
- Extract the files to a location of your choice. Open the unzipped folder.
- Edit the flowtype file with a text editor.
- In the code section that begins with '<flt: FlowType' add the attribute 'supportNullAssignee="false"'

- Re-zip the workflow file.
- Upload the edited workflow .zip into a different application and test it.
- Upload/Replace the original workflow when you are ready. Follow these best practices for updating a workflow in production.
Public forms/workflows with Save/Load or Digital Signatures
Anonymous users can access public forms that include the save/load feature or digital signatures. These features require a login. When the anonymous user clicks to save or sign, they will be prompted with the login screen.
Workflow Processing Modes
The Navigation toolbar provides the ability for a user to navigate back and forth between the steps of a workflow. This is helpful if the user needs to return to a previously competed step to make a correction or review the entered data. Editing of previously completed steps in a workflow is no longer possible if the previous step was completed by a different user than the current user. Previously completed steps are now rendered as read only unless it is a prior step for the same user, with no intervening steps belonging to another user. This feature is referred to as View mode.
Navigating through completed steps rendered in View mode using the the Continue button, skips completed steps such as HTTP Wait Notify and anonymous Email. Configured document actions are not re-executed in View mode.
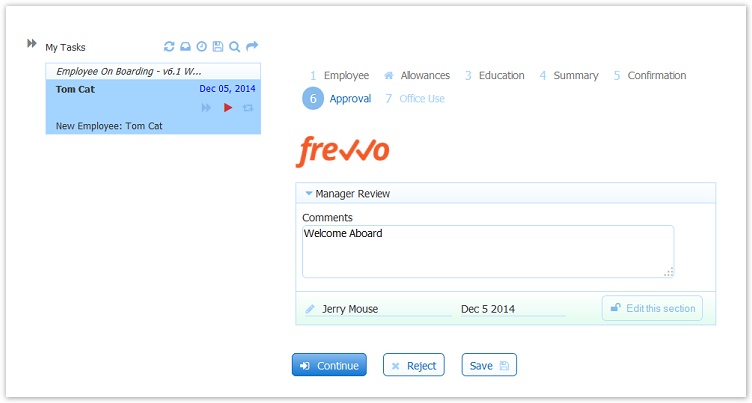
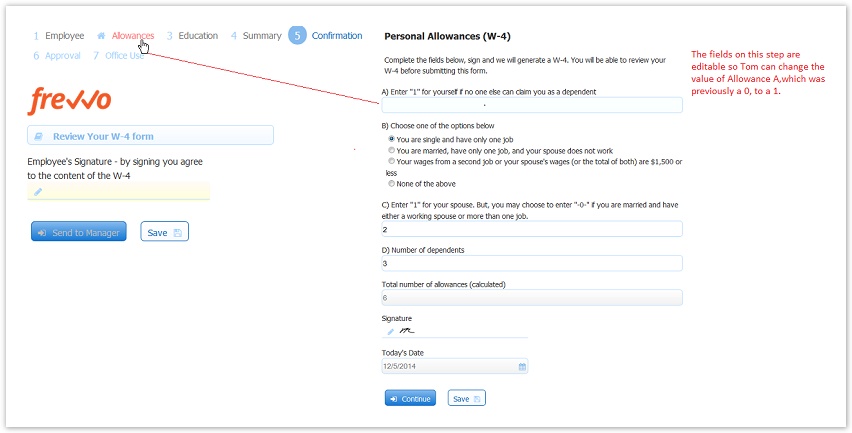
Let's consider the example of a new Employee On Boarding workflow, configured with the navigation toolbar. The first 4 steps in this workflow are referred to as a screenflow since they are all completed by the new employee. The screenflow in this example, consists of an Employee Information, W -4 Allowances, Education, Summary and Confirmation forms. New employee, Tom, realizes when he gets to the Confirmation step(4) that he needs to make a correction on the Allowances step (2).
Tom clicks the Allowance step in the navigation toolbar or the details button on the Summary step and is able to edit the data to make his correction. Tom clicks the Continue button to return to the confirmation step, signs the confirmation form then sends the workflow to his manager.
Before manager Jerry approves the workflow, he wants to review the previously completed steps to ensure all is in order. Jerry clicks on the Employee step of the navigation toolbar and is able to review the information but he will not be able to edit it.

Clicking the Continue button displays the subsequent tasks in View mode and eventually brings him back to the Manager Approval step where he can approve or reject the task.