This documentation is for Live Forms 9.1. v9.1 is a Cloud Only release. Not for you? Earlier documentation is available too.
COVID-19 Response Info: At frevvo, our top priorities have always been employees and customers. We have taken several steps to promote the well-being of our people, to minimize services disruptions, and to help where we can. Visit our website for updates.
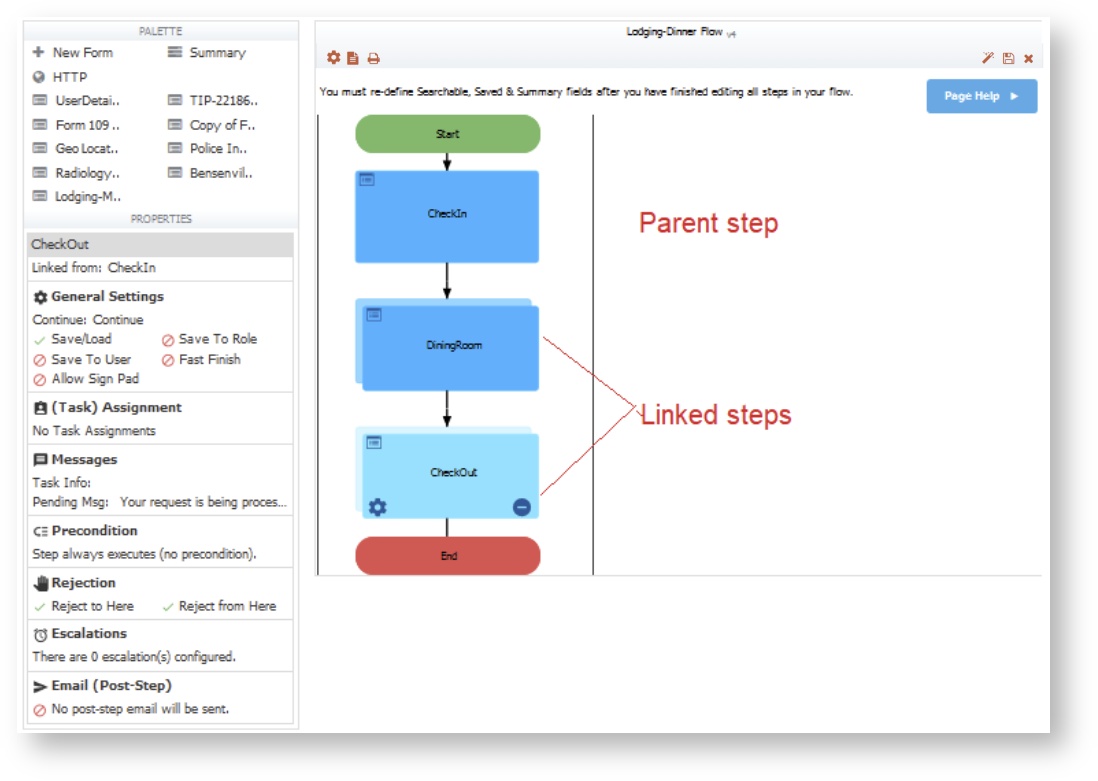
Linked Steps in a Workflow
- Former user (Deleted)
- Megan Ellis
Many workflows often involve a number of people filling out different sections of a single form. So when you're designing this type of workflow, you're most likely dragging the same form into the workflow designer repeatedly to create the different steps in the workflow.
Another way to create this type of workflow is to use the Linked Steps feature of the Workflow Designer. In this method, you create a linked version of a form for each step you want in your workflow. One great advantage of this method is that if you need to make changes to the form step(s) after you've created your workflow, you only have to edit the "parent" form — the editing changes are automatically propagated to its linked forms in the workflow. Conversely, if you drag multiple copies of the same form into a workflow to create steps, you'd have to make any changes to each copy of the form in each step.
If you want to show or hide different parts of a form depending on which user is filling it out, you can easily do this in a workflow designed with linked steps using Business Rules.
One circumstance in which you might not want to use linked forms is a workflow in which each user is filling out a different form.
- To create linked forms in a workflow, add a step to the workflow by dragging a form into the workflow designer.
- Click on the step and then click
 Link to create a linked form.
 - Continue clicking Link to create as many of the linked forms as you want.
On This Page:
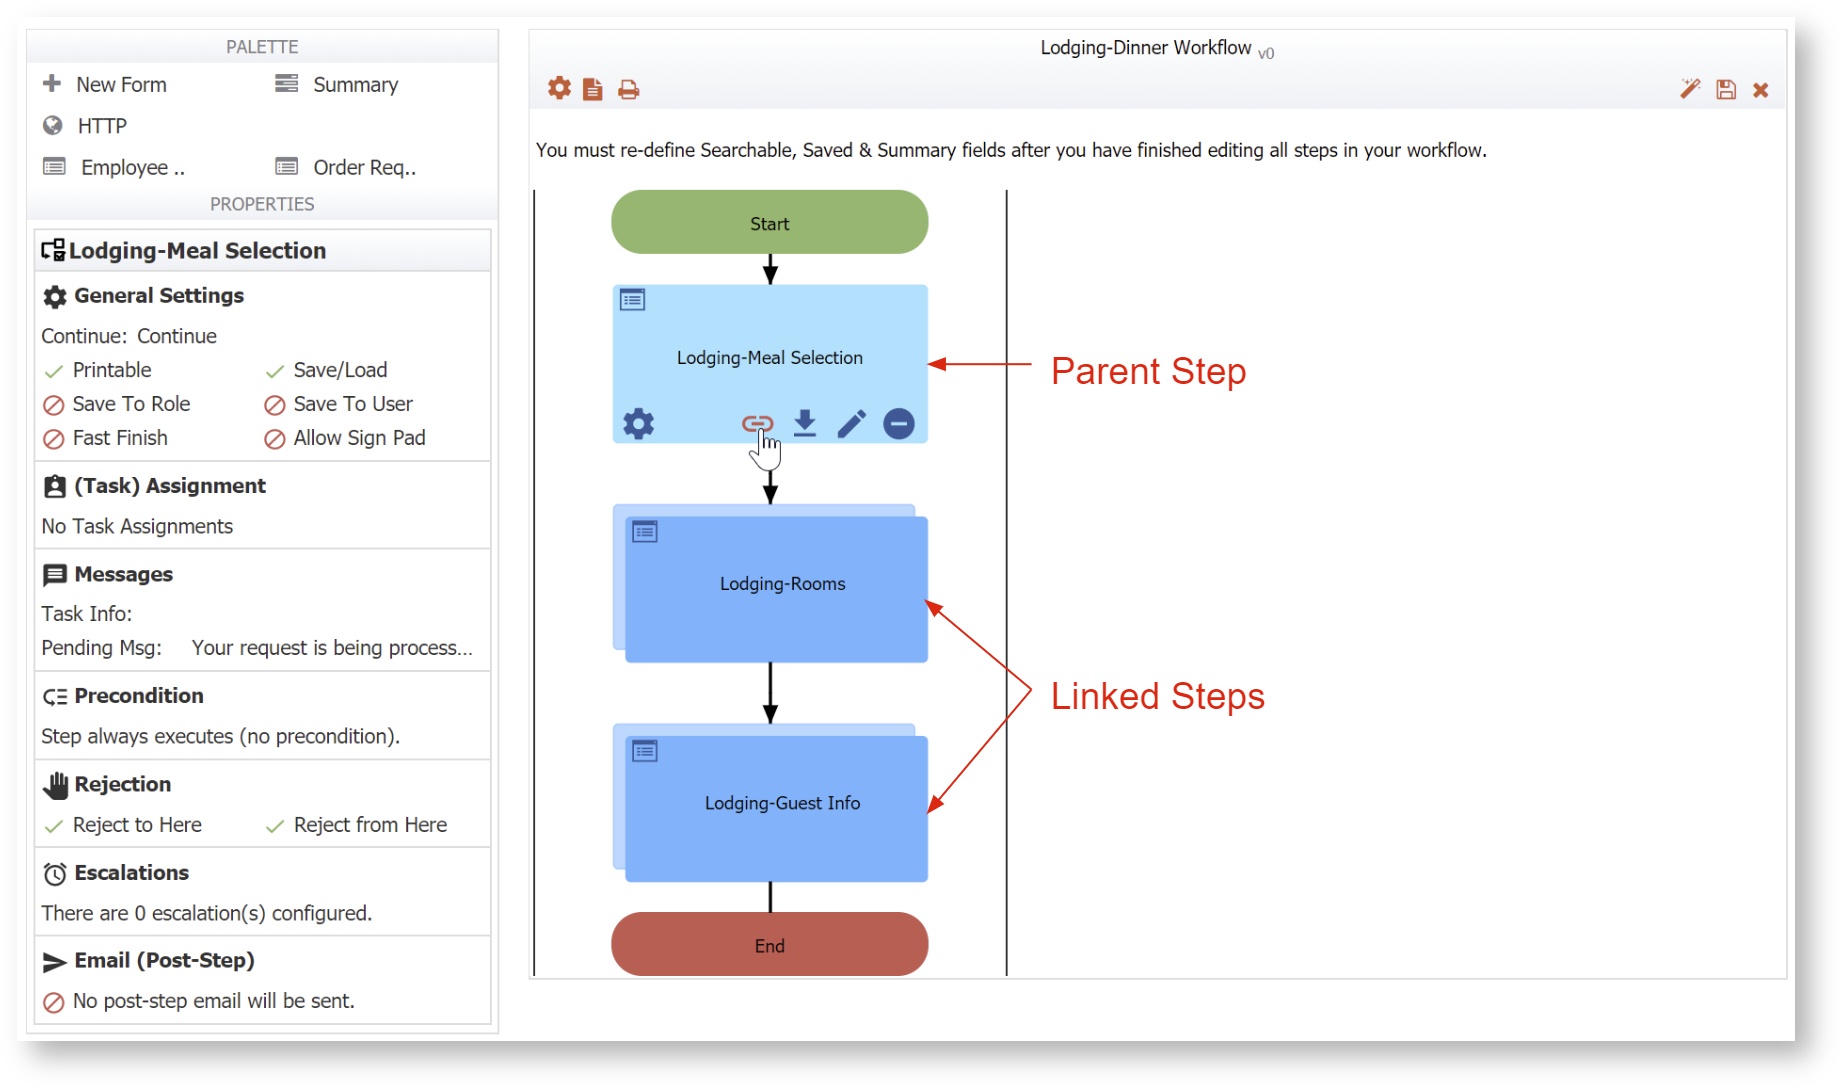
The example below shows the parent Lodging-Meal Selections form and its two linked forms. Notice that the parent form and its linked forms initially all have the same name, but the linked forms are represented by a double box. Remember, a linked step is a copy of the parent form. Parent step shows five icons while the linked steps display only the ![]() Edit Step Properties and
Edit Step Properties and ![]() Delete Step icons.
Delete Step icons.
 Edit Step Properties displays the Properties Wizard for the workflow step.
- Link Step creates a linked step.
 Download the parent step as a standalone form.
- Edit Step opens a step in the Form Designer to edit it.
 Delete Step removes the step.
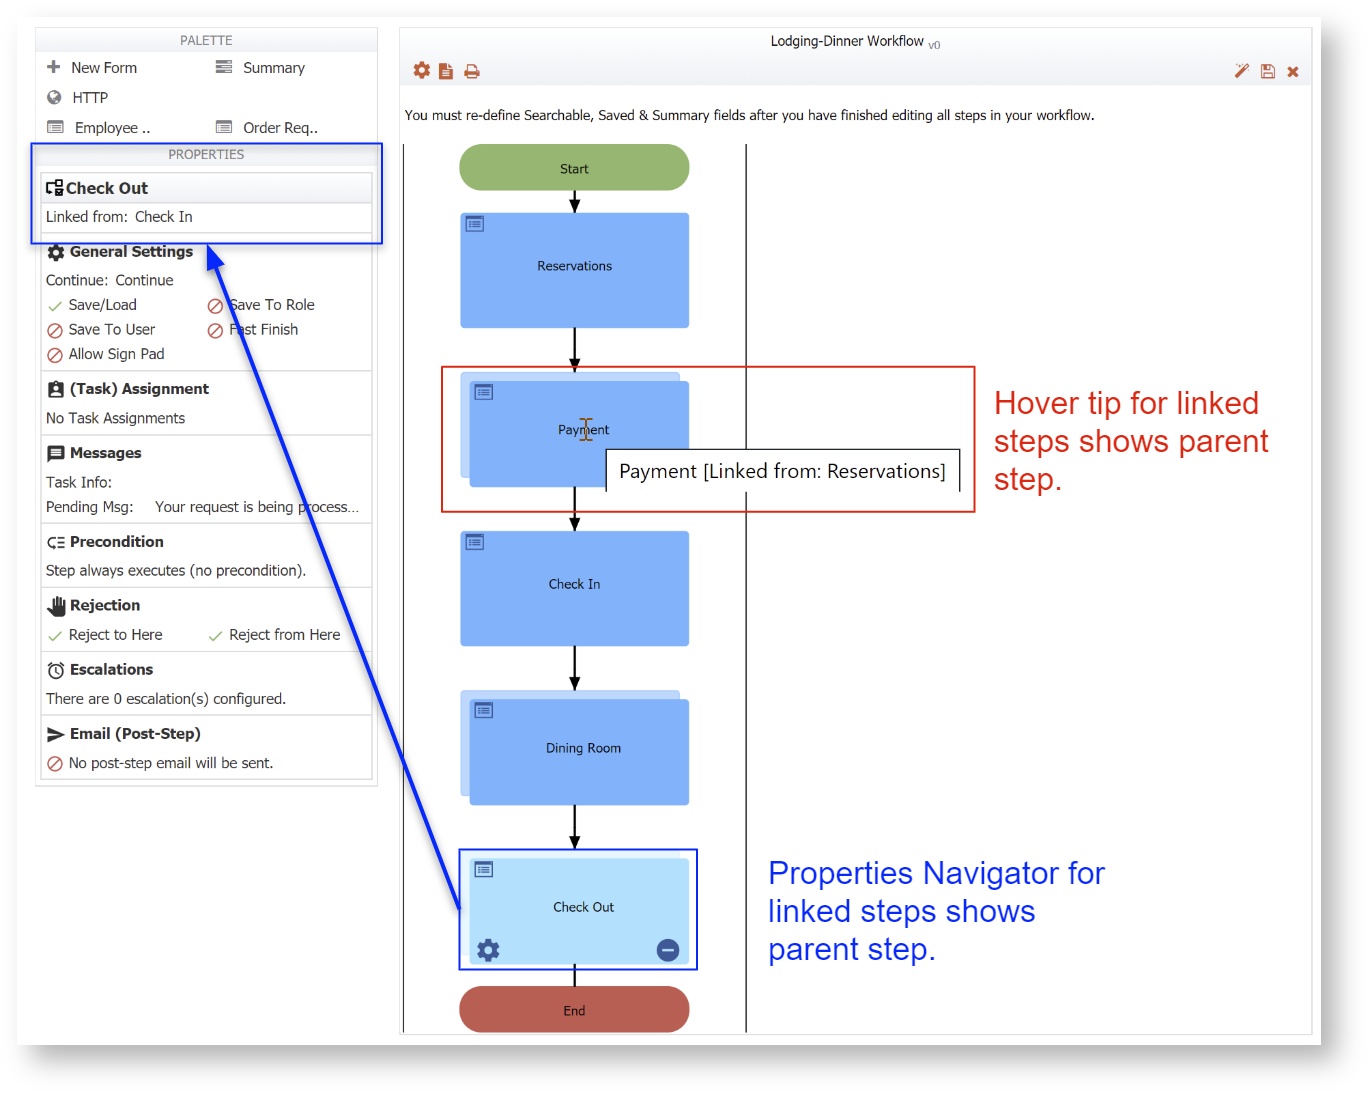
Finding the Name of the Parent Step
Hovering over the workflow step name on a linked step shows the name of the Parent form it was copied from. The Properties Navigator will also list the parent step just beneath the Step Name. This is useful when you have a workflow with more than one step that has additional linked steps.
Linked Steps Workflow Examples
Approval workflows lend themselves to a Workflow Design pattern that uses Linked Steps. You can route your steps via the Security tab or Business Rules. Either way, if workflow steps require modification, changes made to the parent form propagate to the linked steps. In general, the steps to create an Approval Workflow with Linked steps are:
- Create the workflow in the Workflow Designer.
- Drag a New Form or a form from your Forms library into the workflow as the first step.
- Edit Step 1 by accessing the Forms Designer inside of the Workflow Designer.
- Add Sections in Step 1 for the subsequent steps. Save the workflow step.
- Click the Link icon on Step 1 to create linked steps for the additional steps in the workflow. Save the workflow.
- Edit Step 1 in the workflow and use the Visual Rule Builder to write Business Rules to show the sections in Step 1 when the workflow is routed to the associated step i.e. show the Manager section on the Manager step, show the Finance section on the Finance step.
- Save and test the workflow.
Continue reading for more details.
Example 1 - Linked Steps using Business Rules

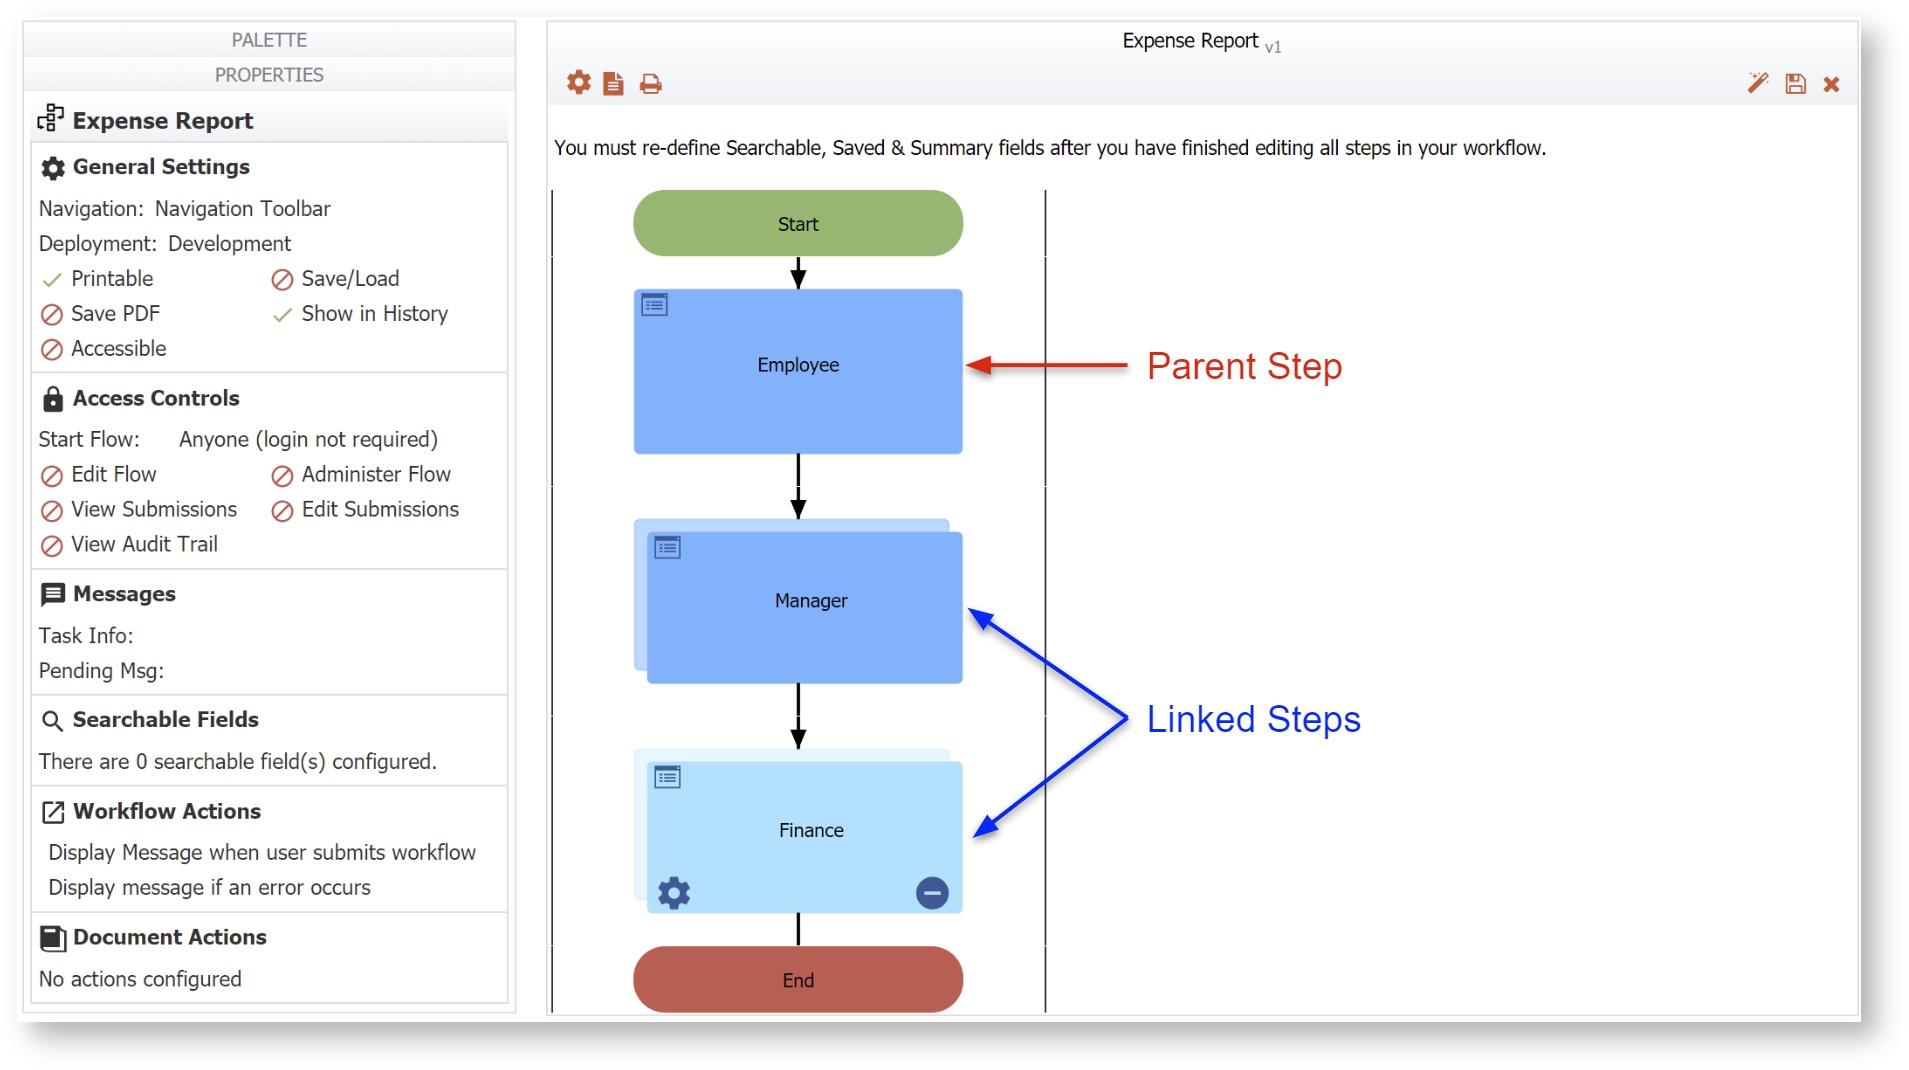
Consider an Expense Report with 3 steps:
- Step 1 is filled in by an employee
- Step 2 is approved/rejected by a Manager
- Step 3 goes to the Finance department for final processing.
Drag a New Form step onto the workflow canvas. Click on it.
Click ![]() Edit to open the Forms Designer.
Edit to open the Forms Designer.
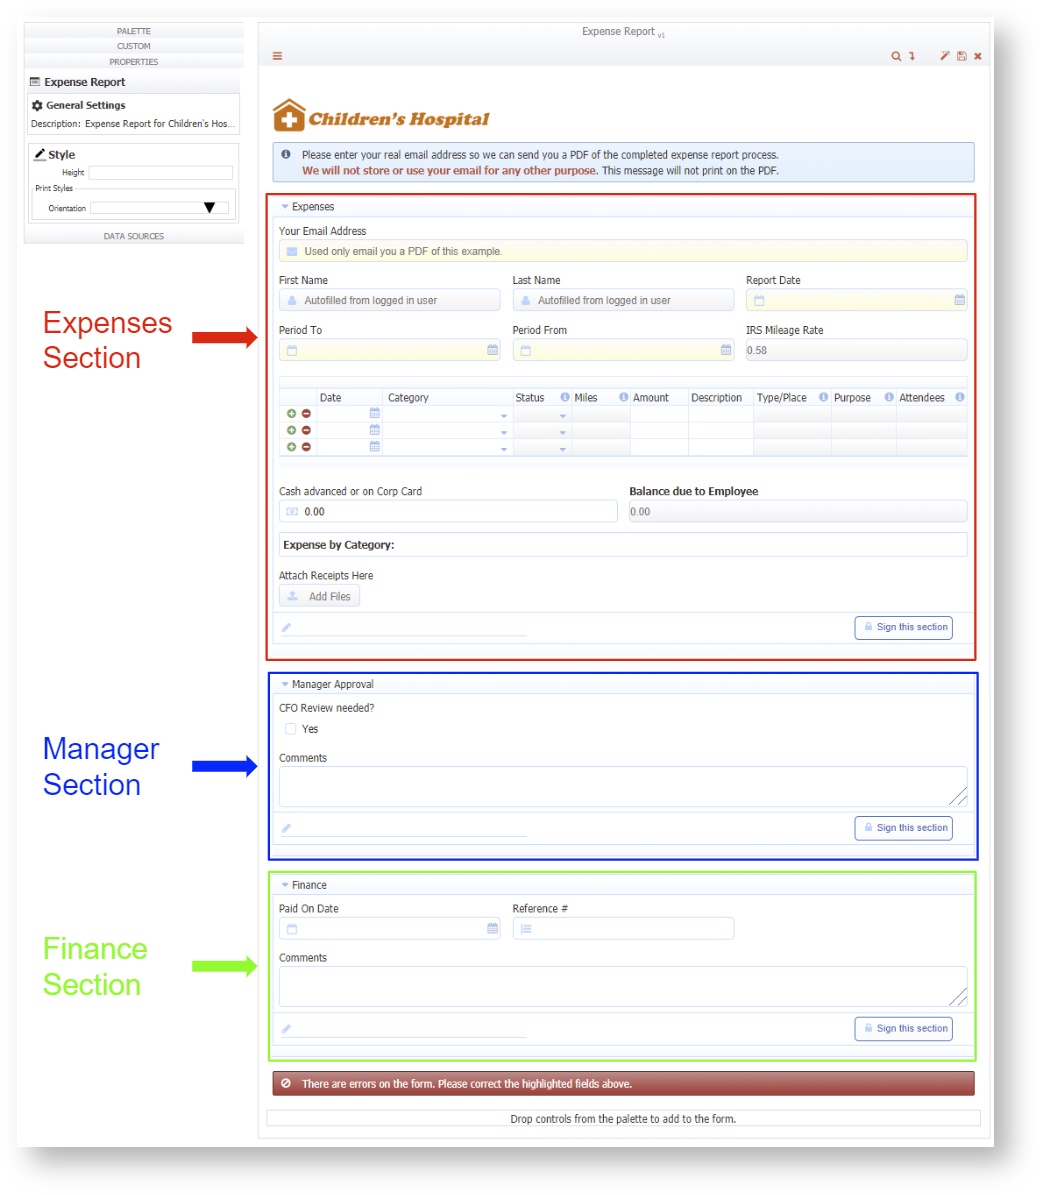
Create Sections in the first step of the workflow for the Expenses, Manager and Finance. Design the sections using any of the Palette Controls. Minimally, you can use a table to collect the Expenses and a Signature control for the employee to sign in the Expense section, a TextArea control and a Signature in the Manager section and a Paid on Date and Reference Number field with a Signature on the Finance step. Save Step 1.
Click on Step 1. Open the Settings tab in one of 3 ways:
- Click the
 Edit Step Properties icon on the step then click the Settings tab.
 - Click the icon in the Properties Navigator on the left side of the screen. This takes you directly to the Settings tab.
- Click anywhere in the General Settings section of the Properties Navigator. This takes you directly to the Settings tab.
- Type the name of the workflow step in the Name field on the Settings tab. For this example, the name of the first step is Employee. Click Submit.
Click the ![]() Link icon twice to create linked steps for the Manager and Finance steps. The linked steps are copies of Step 1. Note they are represented by a double box in the Workflow Designer.
Link icon twice to create linked steps for the Manager and Finance steps. The linked steps are copies of Step 1. Note they are represented by a double box in the Workflow Designer.
Click on the second step and open the Settings tab.
- Type the name of the workflow step in the Name field on the Settings tab. For this example, the name of the second step is Manager.
- Click on the Assignment tab. Add the Manager role to the Assign to Role field. You can begin typing the role name in the field to filter the dropdown choices. Click Submit.
Click on the third step and open the Settings tab.
- Type the name of the workflow step in the Name field on the Settings tab. For this example, the name of the third step is Finance.
- Click on the Assignment tab. Add the Finance role to the Assign to Role field. You can begin typing the role name in the field to filter the dropdown choices. Click Submit.
Save the workflow.
Edit Step 1 of the workflow. Click the ![]() Rules icon on the Form toolbar. Write the Show/Hide rules and any other Business Rules you might need.
Rules icon on the Form toolbar. Write the Show/Hide rules and any other Business Rules you might need.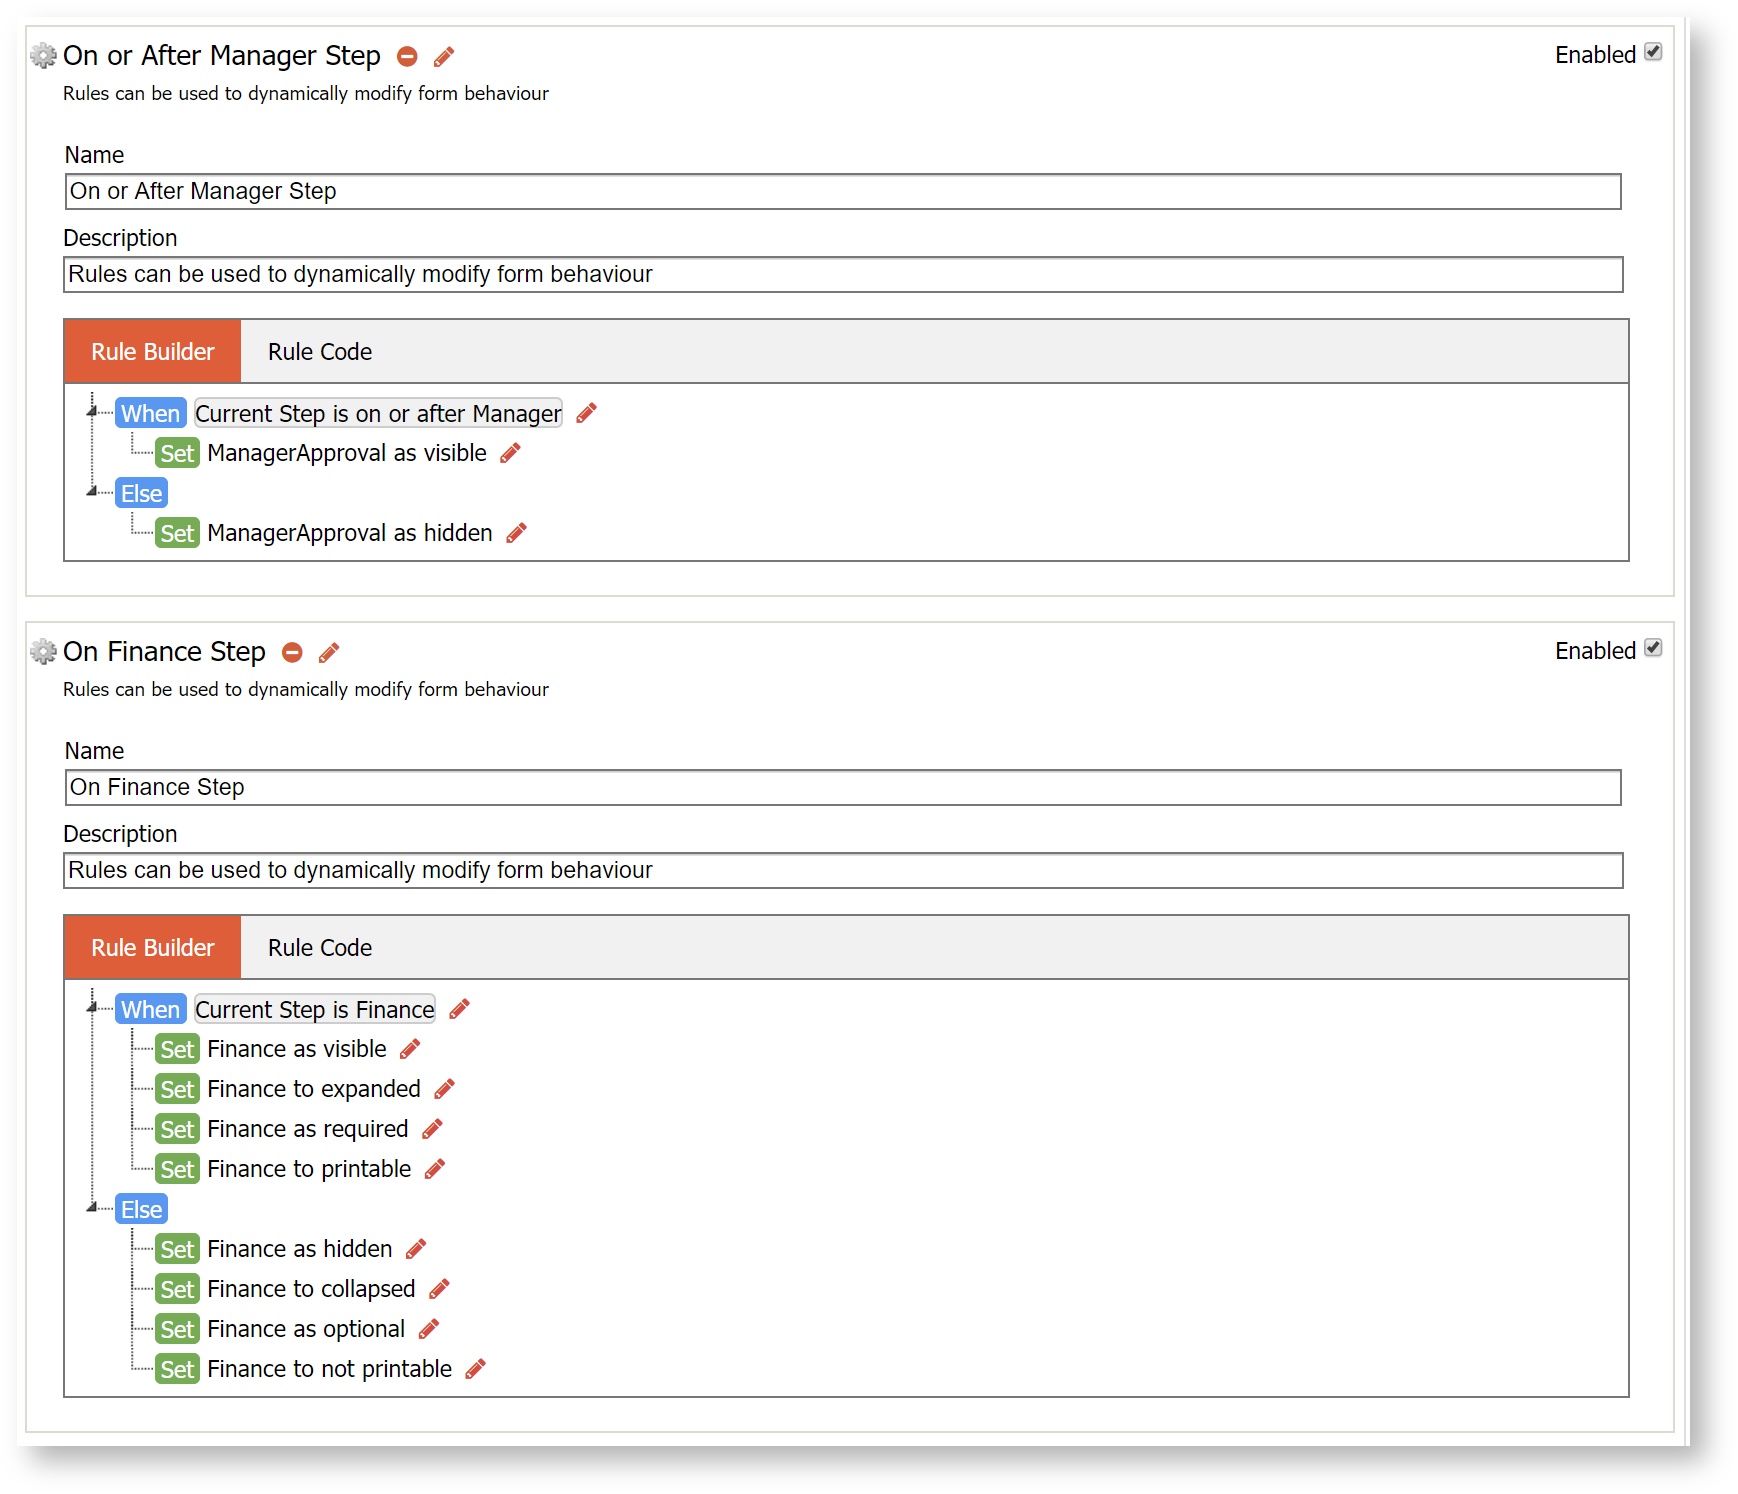
Example 2 - Linked Steps using the Security Tab
The Role selector in the Security tab is a deprecated feature that will no longer be available in a future release. frevvo recommends using show/hide rules based on {flow.activity.name} as a more reliable method that works in every use case. Show/Hide rules are easily created using the Visual Rule Builder. Refer to this example: Show/Hide Controls and Workflow Steps.
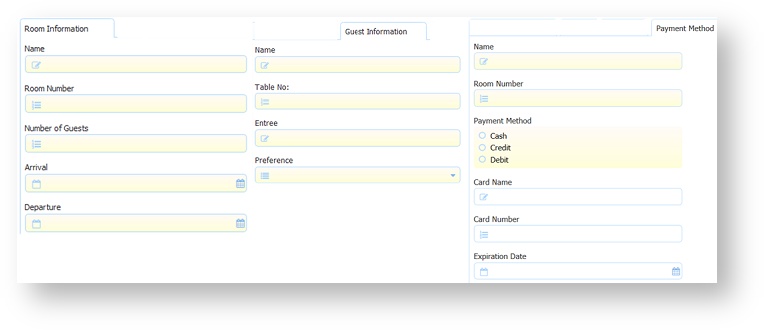
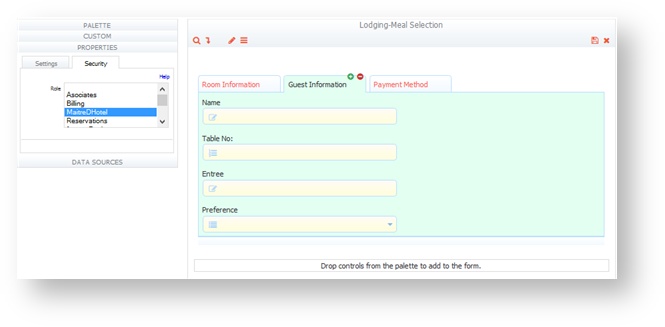
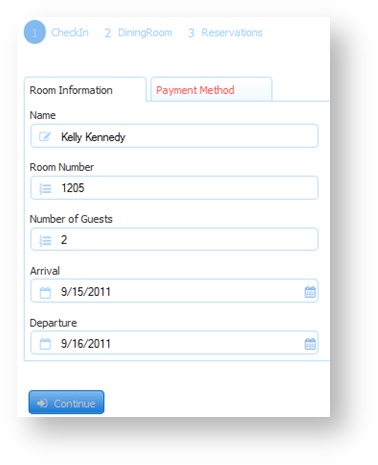
The parent step in this example is a form that contains a Tab control consisting of three tabs: Room Information, Guest Information and Payment Method.
Because the parent forms and its linked forms represent steps, you'll want to give them unique names. The parent form in this example has three tabs used for hotel check in, dinner selection, and hotel check out.
To rename the parent step and its linked steps:
- Click on a workflow step
- Open the Settings tab in one of 3 ways:
- Click the
Edit Step Properties icon on the step then click the Settings tab.
- Click the icon in the Properties Navigator on the left side of the screen. This takes you directly to the Settings tab.
- Click anywhere in the General Settings section of the Properties Navigator. This takes you directly to the Settings tab.
- Type the name of the workflow step in the Name field on the Settings tab.
- Click the
As with other forms you use to create steps, you can assign a linked-form step to a Role, so that the step is performed by someone with that role, or even by a specific user. In this example, we rename all three steps and assign each to a different role.
- CheckIn is assigned to the Reservations role.
- DiningRoom is assigned to the MaitreDHotel role.
CheckOut is assigned to the Billing role.
The Reservations, MaitreDHotel and billing roles must exist in your tenant. Create 3 users and assign one role to each of them.
Click on a workflow step.
Open the Assignment tab in one of 3 ways:
- Click the
- Click the icon in the Properties Navigator on the left side of the screen. This takes you directly to the Assignment tab.
- Click anywhere in the Task Assignment section in the Properties Navigator. This takes you directly to the Assignment tab.
- Add the role name to the Assign to Role field. You can begin typing the role name in the field to filter the dropdown choices. Click Submit. For this example, add the Reservation role to the CheckIn step, the MaitreDHotel role to the DiningRoom step and the Billing role to the Checkout step.
You may also want only certain sections of the form to be visible in an specific step so that only users in a certain role see those sections. For example, in this workflow, perhaps only the dining room staff needs to see the form's Guest Information tab.
To do this, you can edit the the form via the Workflow Designer and use the Security Tab in the Forms Designer to assign a role to sections of the form. Click the form, and then click Edit icon to open the form in the Form Designer.
In this example, we assign the Guest Information tab to the MaitreDHotel role.
When the workflow runs, the first step, CheckIn, is performed by a user with the Reservations role, so that user does not see the form's Guest Information tab, which is only visible to a user with the MaitreDHotel role.
The next step in the workflow, DiningRoom, is assigned to the MaitreDHotel role, so that user sees the Guest Information tab. The third step is assigned to the Billing role so the user sees the Payment Method tab.
You can also use rules to show or hide parts of a form in a step. For example you could write a Business Rule using the Visual Rule Builder to show the Guest Information tab only when a MaitreDHotel role is using the form.
Linked Forms and the Submissions PDF
If you check the Save PDF property on the workflow properties panel, a PDF image of the workflow is saved in the Live Forms' submission repository. It is no longer necessary to uncheck the printable property for all but one of the steps to prevent the form from being printed more than once in the default pdf. This was required in previous versions of Live Forms. Refer to the Printable property for more information.