Creating a Form Connected to your Database
- Megan Ellis
Choose a Design Approach
There are three ways of connecting your form to your database. frevvo recommends that you read and understand each approach carefully before moving forward with form design in order to determine the most efficient approach, and prevent the need to redesign later. This table can help you decide which design approach to use based on your business requirements.
| The Doc URI Approach | Post via Web Hook | The Business Rules Approach | Dynamic Options | |
|---|---|---|---|---|
| Overview | Automatically create the controls in your form based on your database table, and use the Document Action user interface to set up Doc URIs that can perform CRUD Operations. | Automatically post data from your form/workflow to your database mid-workflow using the Web Hook feature. | Write JavaScript business rules to perform CRUD operations. | Dynamically retrieve options at runtime from the Database Connector (or any RESTful web service) using the Options Src control property, no code needed. |
| Recommended Use Cases |
|
|
|
|
| Form Design |
|
|
| Use Checkbox, Dropdown, Radio or ComboBox control with the from palette design method. |
| Performance | Call the DB Connector once for all operations (using the autocreate feature) → fast, reliable performance | Call the DB Connector once after the prior step unloads (Continue is clicked). | Call the DB Connector query for every add/update operation (this can impact performance) | Calls the DB connector for each instance of the selection control. Fast, reliable performance for non-repeating controls. Performance issues may be seen for repeating controls. |
| Technical Skills | No code needed Create/Modify xsd schema document | No code needed Create/Modify xsd schema document | JavaScript code required | No code needed |
| Documentation | Generating XML Schema | Data Sources | CRUD Operations Example | 10-Minute Doc URI Video | Post via Web Hook | Forms Designer | Palette Controls | Integrations | Business Rules HTTP Methods | Rule Examples | Control Property Settings - Dynamic Options |
You can also use a combination of these methods when integrating your forms and workflows with your database.
Design Methods
- Create a form from an XML schema. In this case, the controls will be automatically created for you based on the XML schema definitions, and you can use the Doc URI approach.
- Drag and drop controls from the designer palette. You will have all control properties available in the designer, but you will only be able to use the Business Rule approach for database integration.
- You may also use a combination of the two methods and create some controls from schema and others from the palette.
Our Client Services team can help you determine which approach is right your for business requirements. Contact us to get started.
The Doc URI Approach
This is the recommended approach because it involves automatically generating controls in your form based on the database table you will be integrating with, and using the no-code Document Action: Manually Set Doc URIs to perform CRUD Operations on your database. The Doc URI Approach must be used with the "from an XML schema" design method. Follow these steps.
- Generate the XML Schema based on your SQL Statements that allows you to add form controls that match your database table columns.
- Add Form Controls from Schema in the form/workflow designer.
- Set Doc URIs to automatically read from and write to the database.
Check out this 10-minute video showing how you can perform all CRUD Operations on your database using the no-code Doc URI Approach.
Generate the XML Schema
You can use the database connector to generate the schemas you will need to use in your frevvo form. To fetch the schema, type a URI in the browser that looks like the example below. This is almost identical to the query we used to test the connector, but it tells the connector to GET the schema instead.
http://<host>:<port>/database/<queryset name>/<query name>/schema?<template name>=<template value>
If your SQL Retrieve statement includes template variables, you’ll need to add the variable names as shown below. The schema itself does not require variables but the connector fetches the schema the same way it fetches data for the retrieve statement, so the connector expects the template names and values in the URI.
For the example we've been using so far, point your browser to the url: http://localhost:8082/database/BIRT/allCustomers/schema?customerNumber=237
You should get an XML schema similar to the following:
<?xml version="1.0" encoding="UTF-8" standalone="no"?>
<xsd:schema xmlns="http://www.frevvo.com/database/allCustomers" xmlns:xsd="http://www.w3.org/2001/XMLSchema" targetNamespace="http://www.frevvo.com/database/allCustomers">
  <xsd:annotation>
    <xsd:appinfo xmlns:f="http://www.frevvo.com/database/" f:connectorVersion="2.5.3-r30969" f:digest="4f2c46033e8ff5a221ab7106c4003833157e7f6a" f:last-modified="Sat Aug 19 19:06:45 EDT 2017" source="http://www.frevvo.com/database/"/>
  </xsd:annotation>
  <xsd:element name="allCustomers">
    <xsd:annotation>
      <xsd:appinfo xmlns:f="http://www.frevvo.com/database/" f:autoCreate="true" f:autoDelete="false" f:enabled="true" source="http://www.frevvo.com/database/"/>
    </xsd:annotation>
    <xsd:complexType>
      <xsd:sequence>
        <xsd:element maxOccurs="unbounded" minOccurs="0" name="row">
          <xsd:complexType>
            <xsd:sequence>
              <xsd:element name="customerNumber" type="xsd:int"/>
              <xsd:element name="customerName">
                <xsd:simpleType>
                  <xsd:restriction base="xsd:string">
                    <xsd:maxLength value="50"/>
                  </xsd:restriction>
                </xsd:simpleType>
              </xsd:element>
            </xsd:sequence>
          </xsd:complexType>
        </xsd:element>
      </xsd:sequence>
    </xsd:complexType>
  </xsd:element>
</xsd:schema>
The f:connectorVersion="2.5.3-r30969 attribute in the above example reports the version of the Database Connector that was used to generate the schema. The f:last-modified="Sat Aug 19 19:06:45 EDT 2017 attribute reports the date/time of the last modification to your configuration.xml file. These attributes will help you manage xsd changes.
Save the schema as an .xsd file in your file system.
Your schema may not work correctly if you generated the schema in the Chrome browser and then used the Select All, copy/paste function to create the xsd file. Use the Save Page As function instead.
If you have multiple queries in your configuration file, you have two options:
Generate the schemas for an entire queryset. When there are a large number of queries in the configuration.xml, getting the schemas for all of them eliminates having to create a schema one by one for each query. The queryset schema can be uploaded to your project one time and then you can add the relevant schema elements to your forms/workflows as you need them.
http://<server>:<port>/database/BIRT/schema
Generate a schema for each query.
http://<server>:<port>/database/BIRT/allCustomers/schema
The word "schema" is a reserved word for query names. If you have a query in your configuration.xml with a name that includes the word "schema" frevvo will show an error.
Add Form Controls from Schema
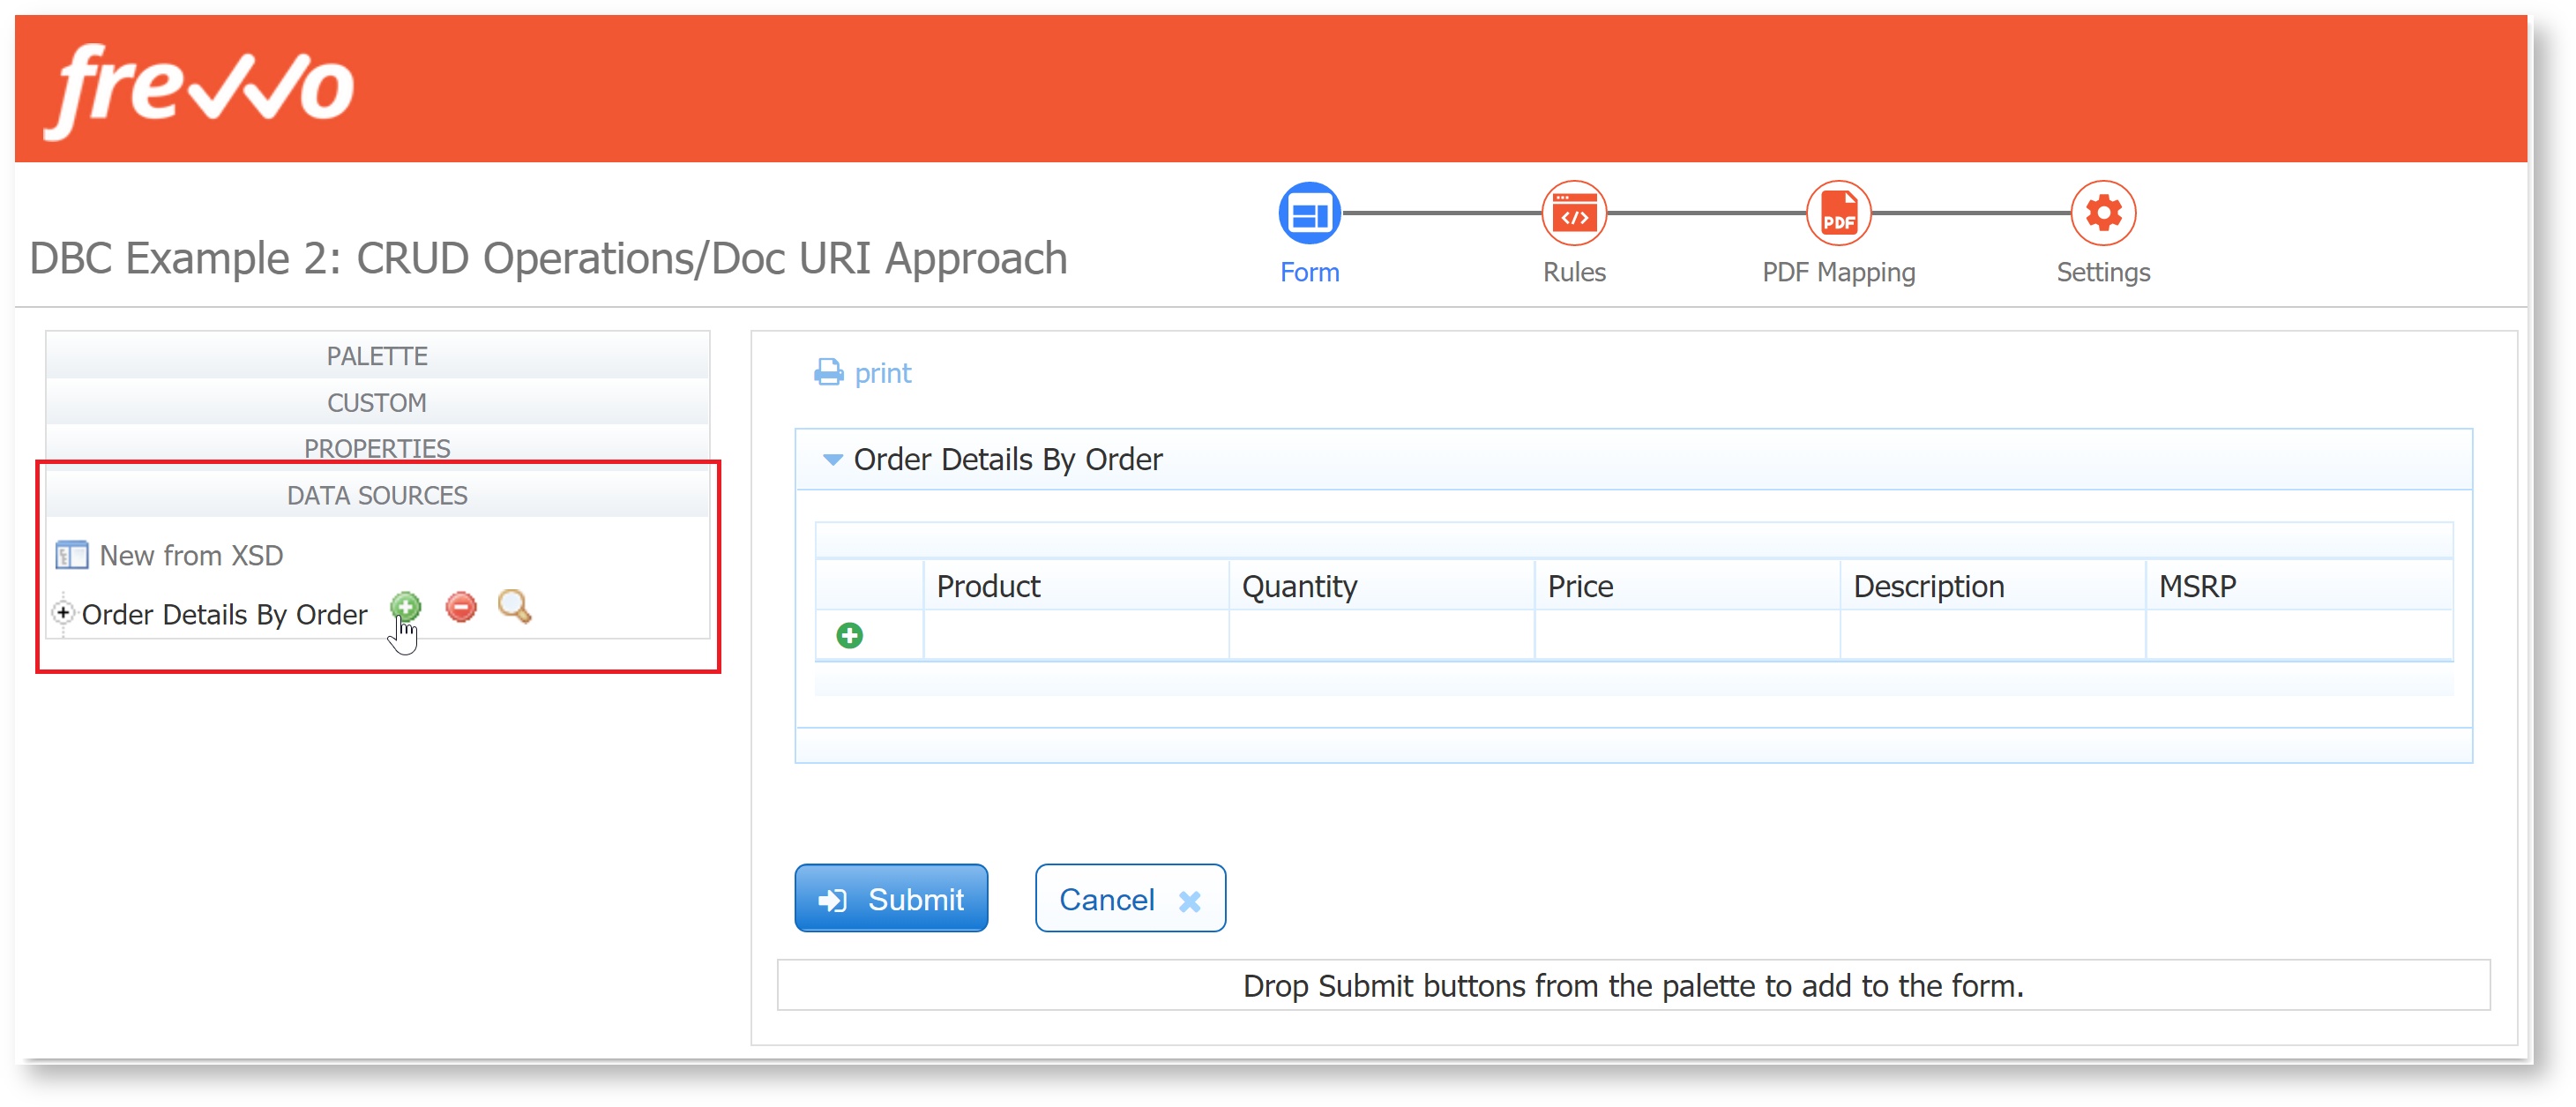
To use your schema, first, upload the schema in the Schemas tab of your frevvo Project. Visit the Using Your Schema documentation for detailed steps.

Next, open your form or workflow and add one or more elements from schema in the Data Sources panel. This allows you to generate controls from the schema elements that map to your database tables. See the Data Sources chapter for detailed steps.
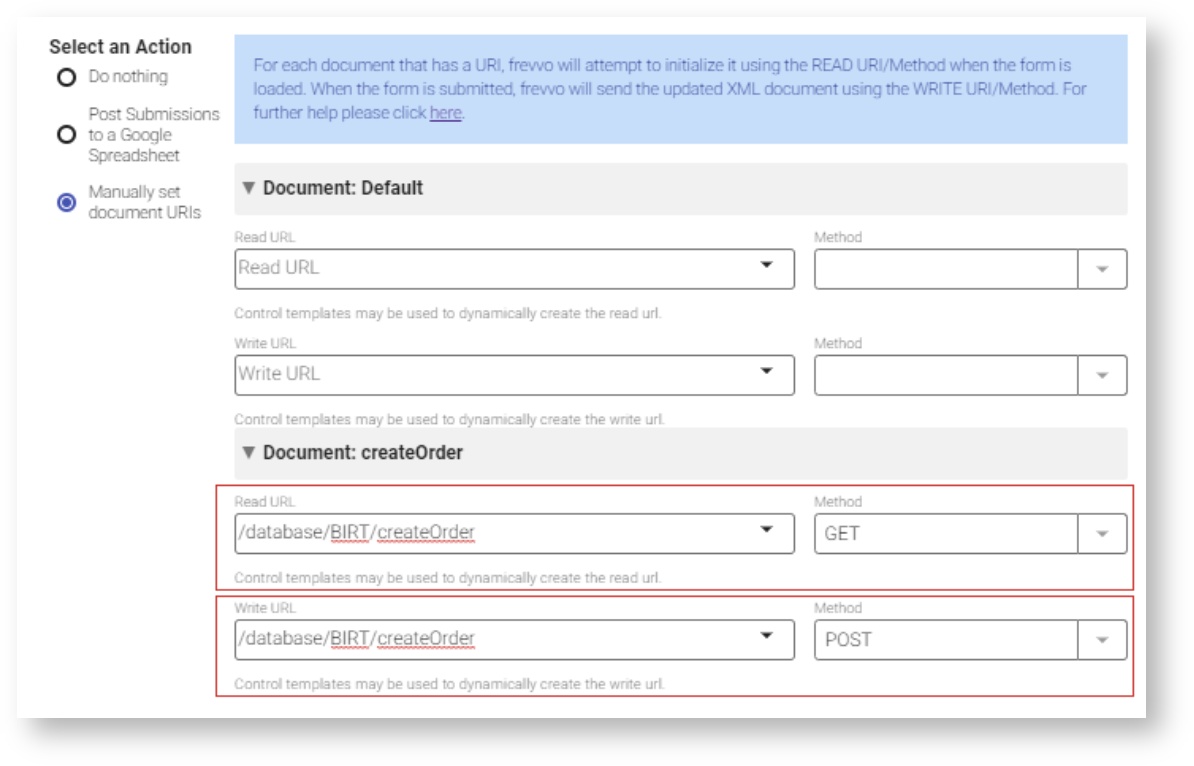
Set Document URI Properties
The first section in the wizard is for the form's default document. This is indicated by the Document Name of "default" displayed in the wizard. The default document maps to all of the controls you added to this form by dragging and dropping from the palette. This is typically not the document you want to configure. The next screen has two sections: Read URI and Write URI. Typically, when the form loads, frevvo customers read form data from their database to initialize the form and send the updated XML document to the same database upon form submission. Enter the same URI in the Read URI and the Write URI fields, as shown in the image, with the appropriate SQL statement to run if you are reading from and writing to the same database using the database connector. It is possible to read the form initialization data from one database and then update a different database. Enter different URIs in the Read URI and the Write URI fields if this is your situation. You also must specify which of the four SQL statements to run—you do this by choosing the appropriate values in the Document URI Read Method and Document URI Write Method dropdowns according to the table below. (You may notice in the Forms Designer that the Document URI Read Method drop down box includes a POST option, but it is not shown below because it is not used by the database connector.) You’ll see one set of Document URI properties for each schema in your form. Type the Document URI next to the schema name—make sure not to type it next to the Default schema. To specify which of the four SQL statements to run, choose the appropriate values in the Read Method and Write Method dropdowns, based on the information below. Note that you may choose only one Write Method in the Forms Designer.
After you have generated controls from the elements in your database schema, set your form’s Document URI to the database connector query URL. Follow these steps:

SQL Statement Type Document URI Read Method Document URI Write Method Create Leave blank POST Retrieve GET (or leave blank if you are not retrieving data) Leave blank if your form is read-only Update Leave Blank PUT Delete Leave Blank DELETE
Still using the customers example, assume the Document URI for the schema customers is:
http://localhost:8082/database/myStore/customers?customerId={customerId}
If you choose the Write method to be POST, the SQL statement that will be executed is:
<create>
 <statement>
 INSERT into customers (customerId,firstname,lastname)
 VALUES ({customerId},'{firstname}','{lastname}')
 </statement>
</create>
At run time, the values of {customerId}, {firstname} and {lastname} will be replaced by the values of the respective form controls.
What happens at run Time?
Let's assume that you defined the same Document URI in the Read and Write URI fields in the wizard for a schema in the form, a GET Read Method and a PUT Write Method.
When a user loads your form, a GET request for that URI will be sent to the database connector. That will cause the database connector to execute the retrieve operation for the query specified in the URI, take the result of the SQL execution and transform it to XML. The database connector will then return the resulting XML back to the form which will be initialized with the contents of the XML file.
When the user submits the form, the same URI will be executed but now with the PUT (or POST) method. The database connector will then execute the update operation identified by that URI.
Customizing the XML Schema
The schema you retrieve from your database will be relatively generic. As a result, the controls you generate from this database schema might need some tweaking to suit the specific needs of your form. You can modify a control’s behavior by making changes to the schema after you have retrieved it. Please visit the Data Sources chapter for more details on modifying the controls generated from schema.
If you have already uploaded the schema to frevvo, you can still make the changes and update the schema.
Post via Web Hook
In a workflow, the Doc URI writes to the database at the end of the workflow, after the final step is submitted. Perhaps you want to post to the database mid-workflow. You could use the Business Rule Approach, or for a no-code approach, you can simply use the same URL you would use for the Doc URI POST in a Web Hook.
- In Workflow Editing Mode, click the + icon after the step that should post data to your database.
- Select Add web-hook (HTTP POST)
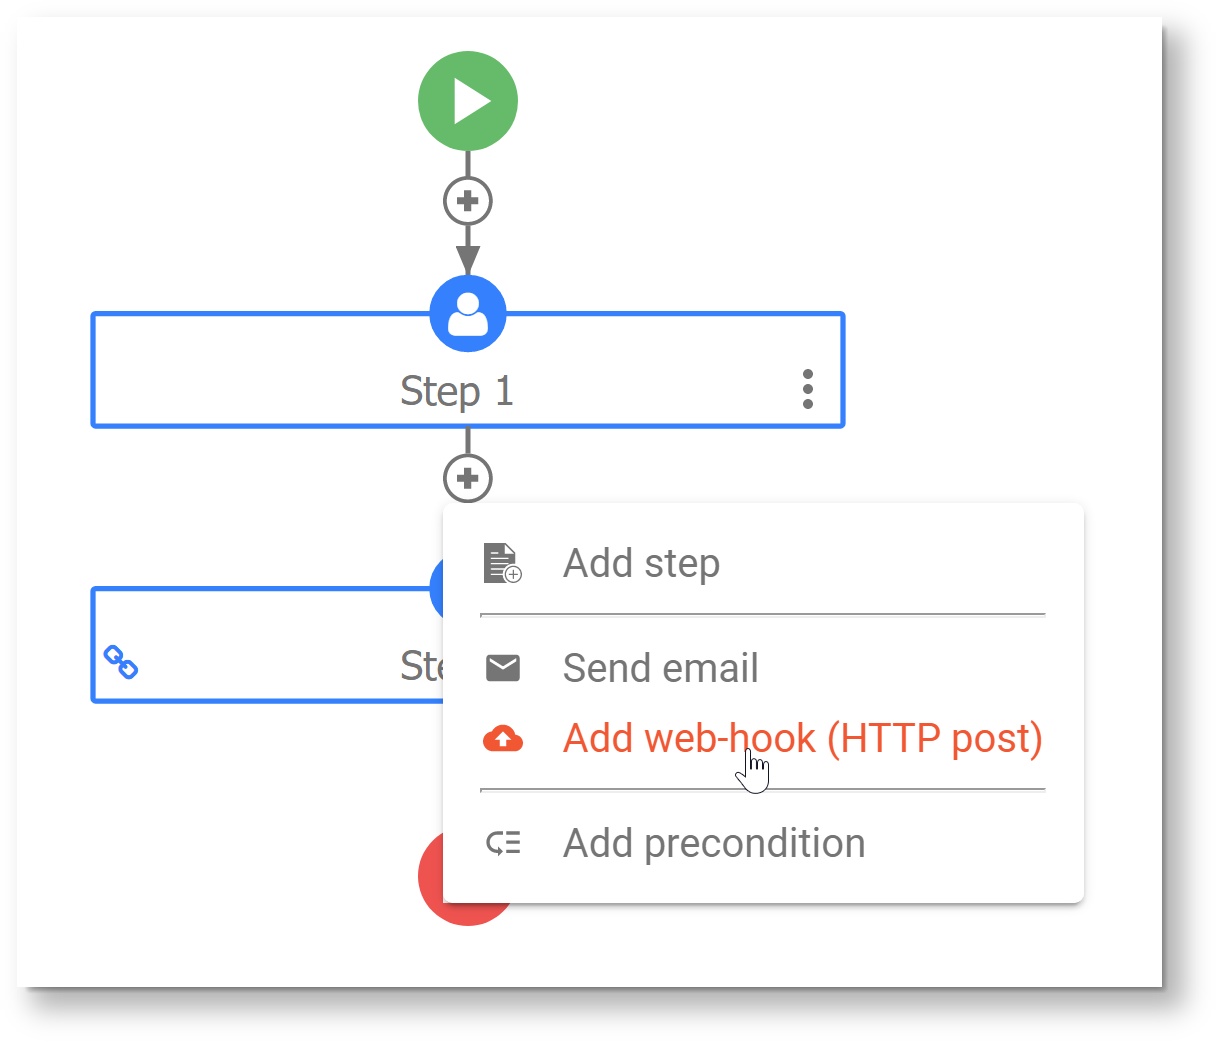
- Enter the Database URL for the query that contains your create statement, e.g. http://localhost:8082/database/products/allProducts. Be sure to check the Data checkbox. Click Submit.
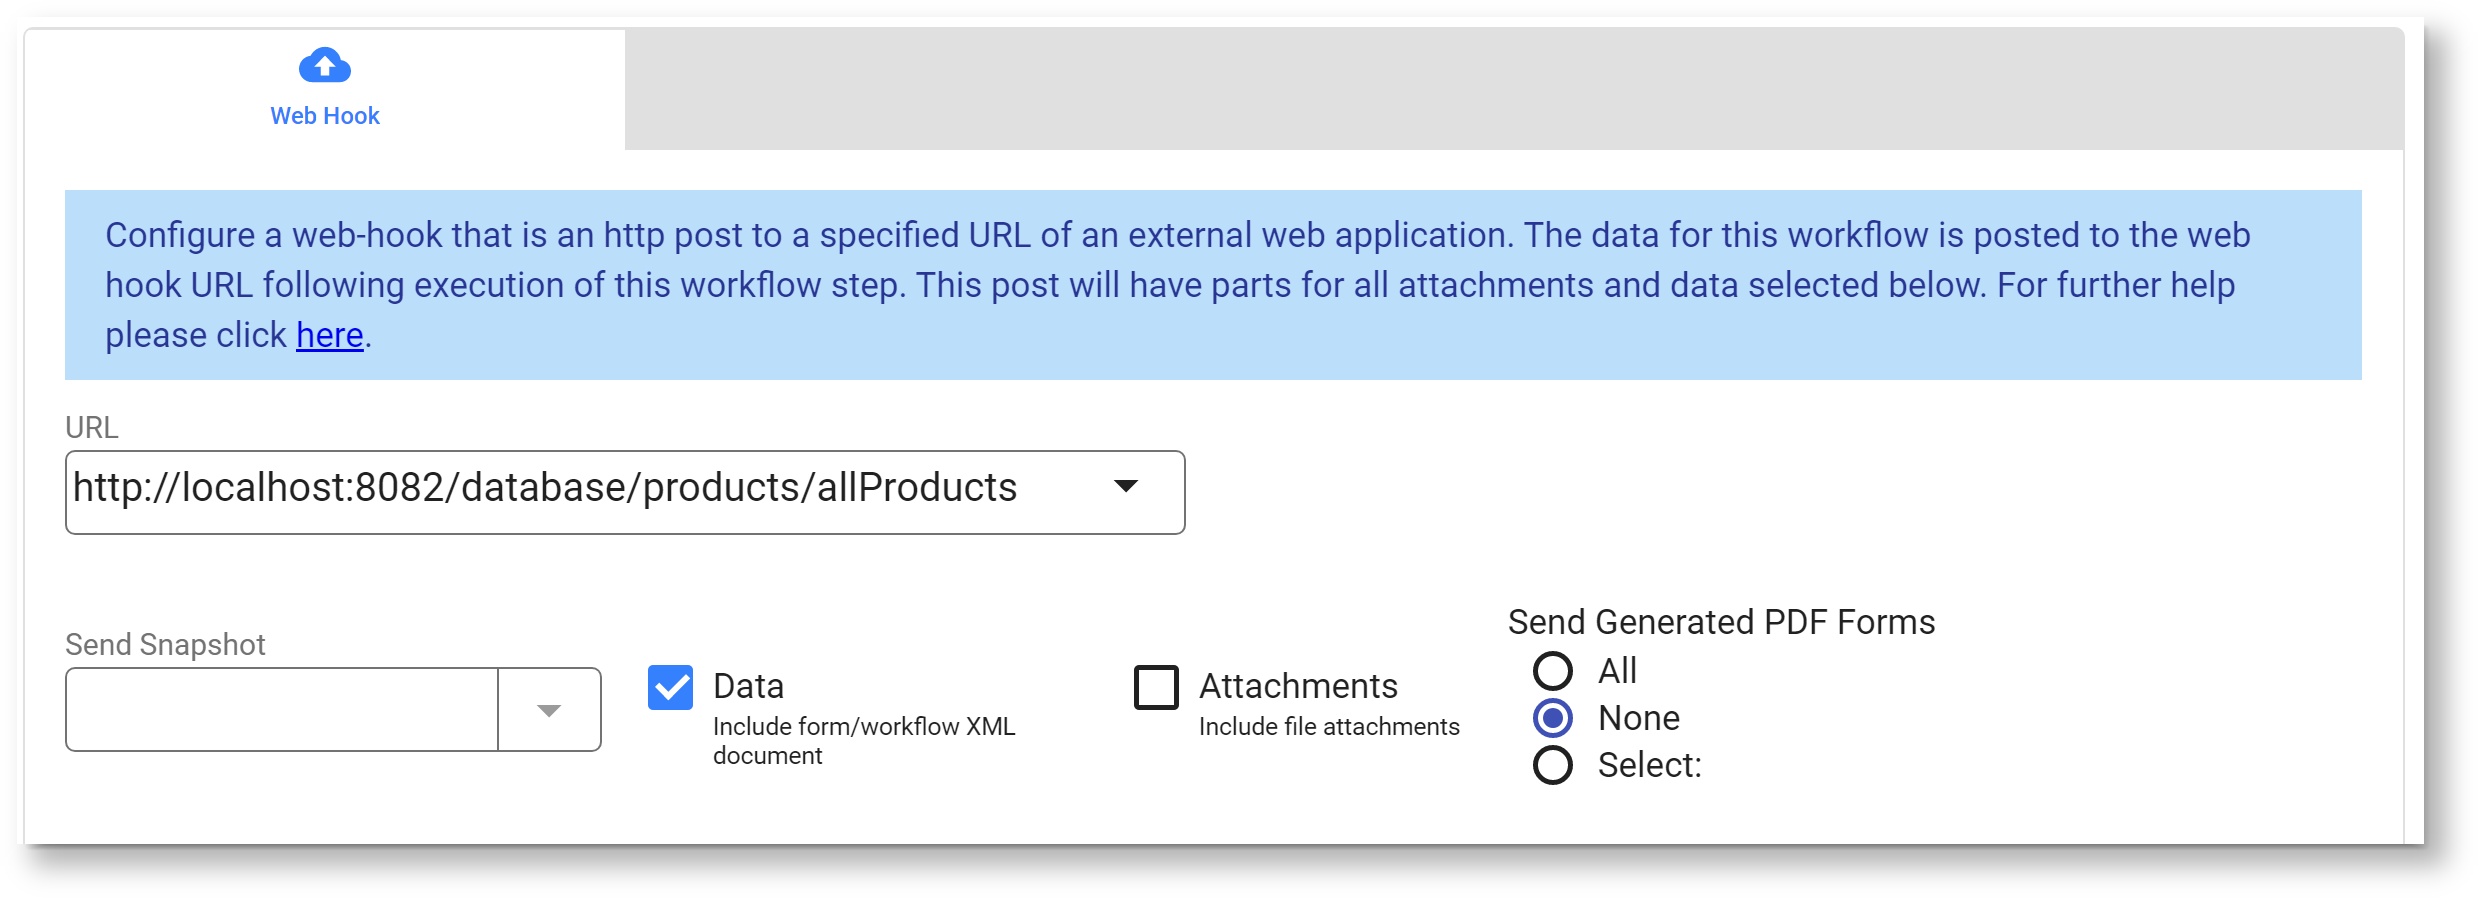
You will see the Web Hook displayed in your workflow diagram, and you can edit it at any time. The Database Connector will run the create statement to post data after the user clicks Continue on Step 1.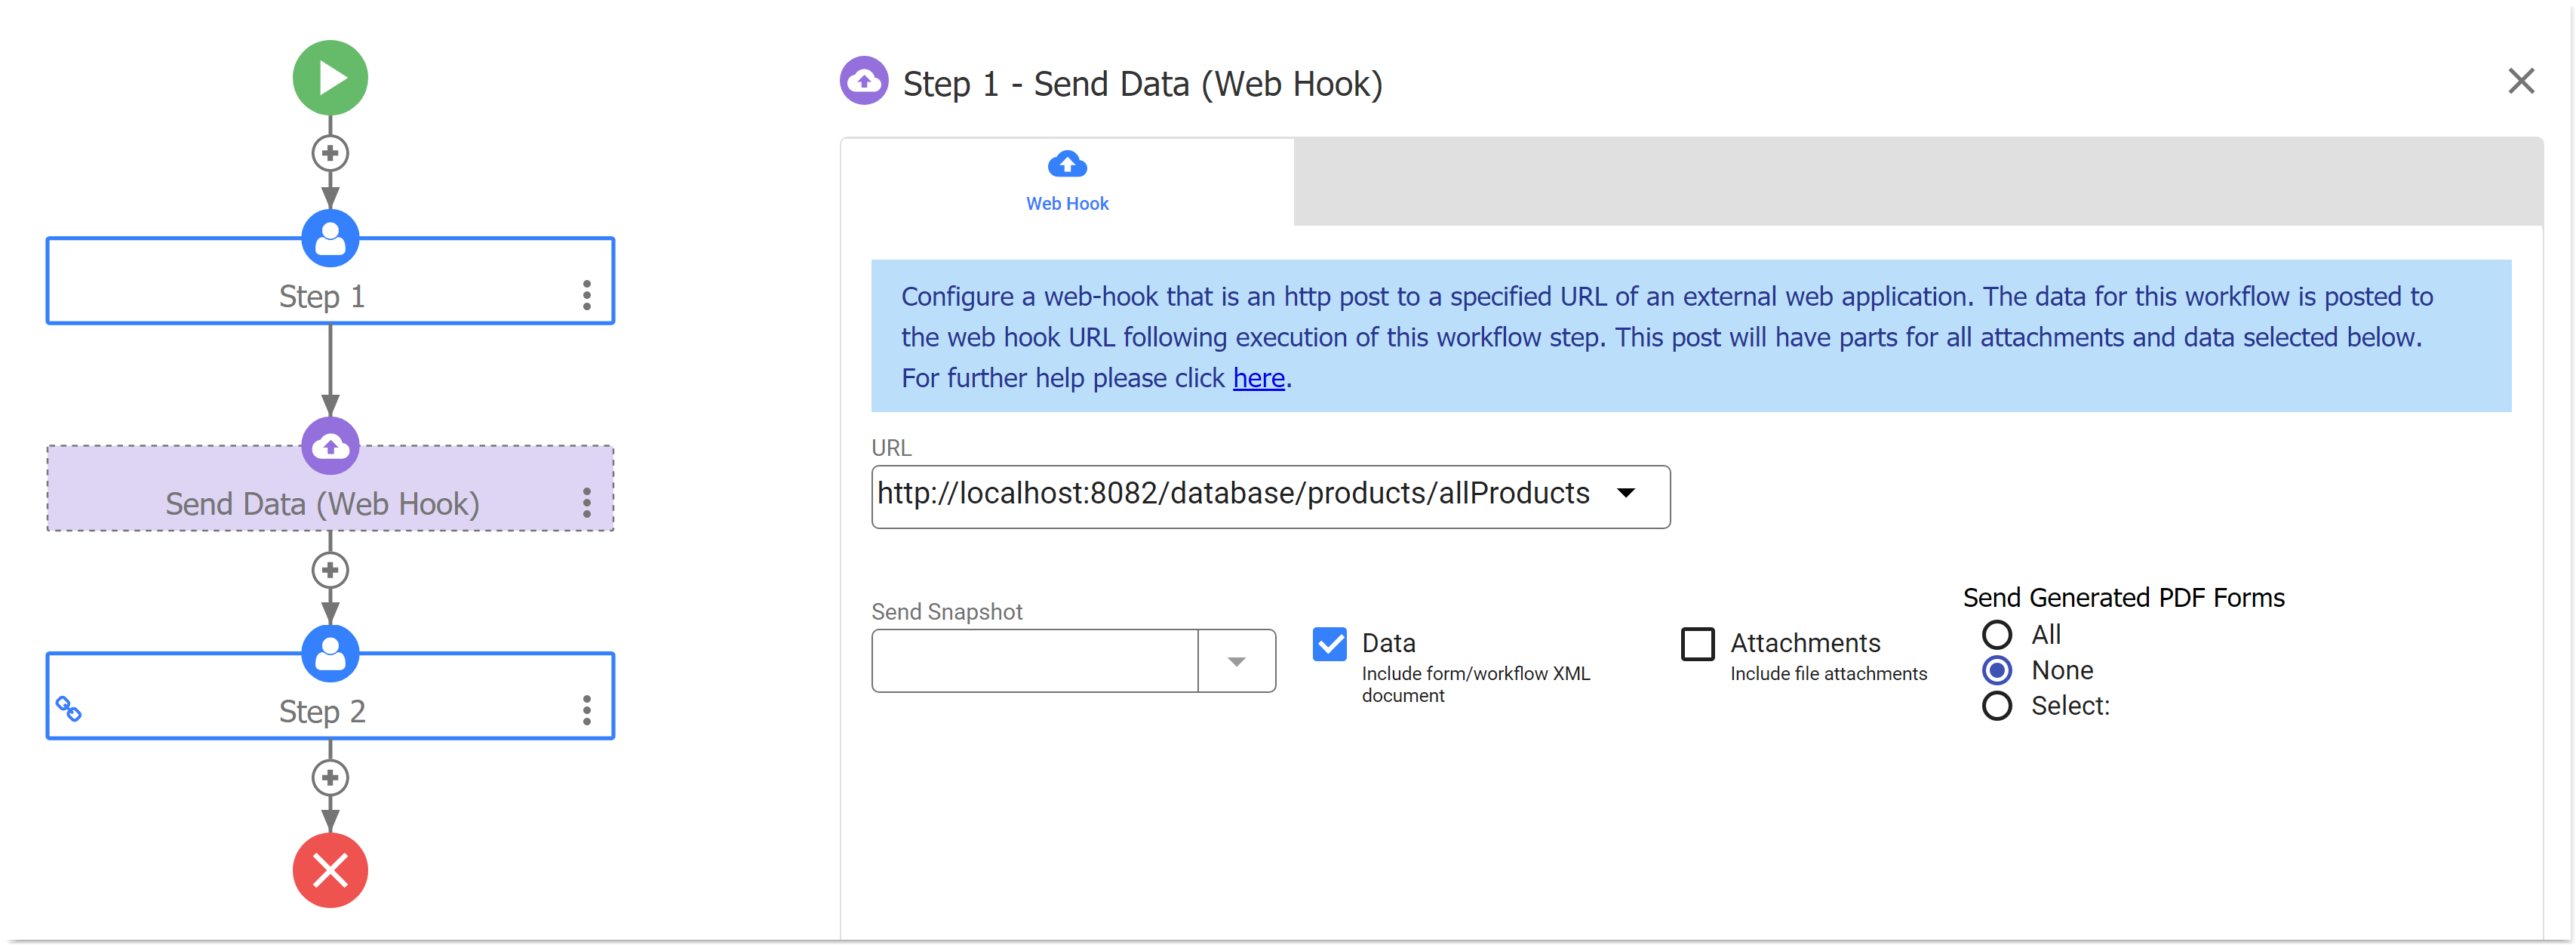
View the Web Hook Documentation chapter for more information.
The Business Rule Approach
It is also possible to write business rules to perform CRUD operations. Business rules tend to be more complex and time-intensive to implement. The Business Rule Approach can be used with either the "from palette" or the "from an XML schema" design method. This approach is discussed in further detail with several examples in the following documentation:
- The Database Connector Tutorial (recommended)
- Business Rules HTTP Methods
- Rule Examples for the Database Connector
Dynamic Options
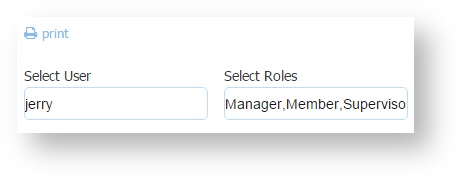
Checkbox, Dropdown, and Radio controls support the ability to dynamically retrieve options at runtime from a RESTful web service. The Dynamic Options feature will NOT work with SOAP web services. Using this feature with the ComboBox control is described below. frevvo supports data returned from RESTful web services formatted in either XML or JSON. The frevvo Database Connector is an example of a RESTful web service. The Dynamic Options feature requires: Watch this 5-minute video example of setting Dynamic Options using the frevvo Database Connector.
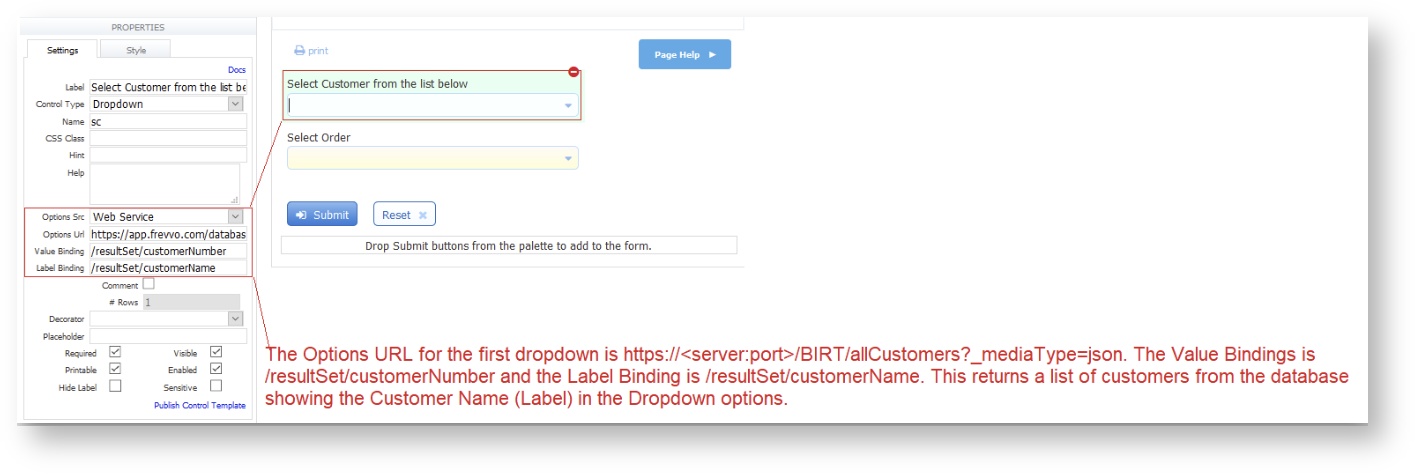
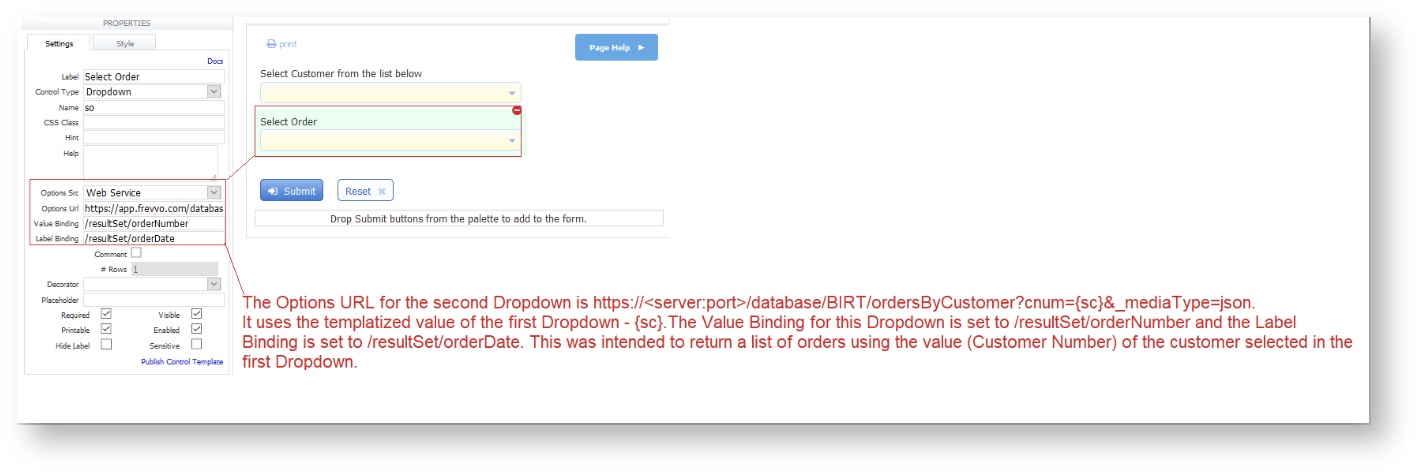
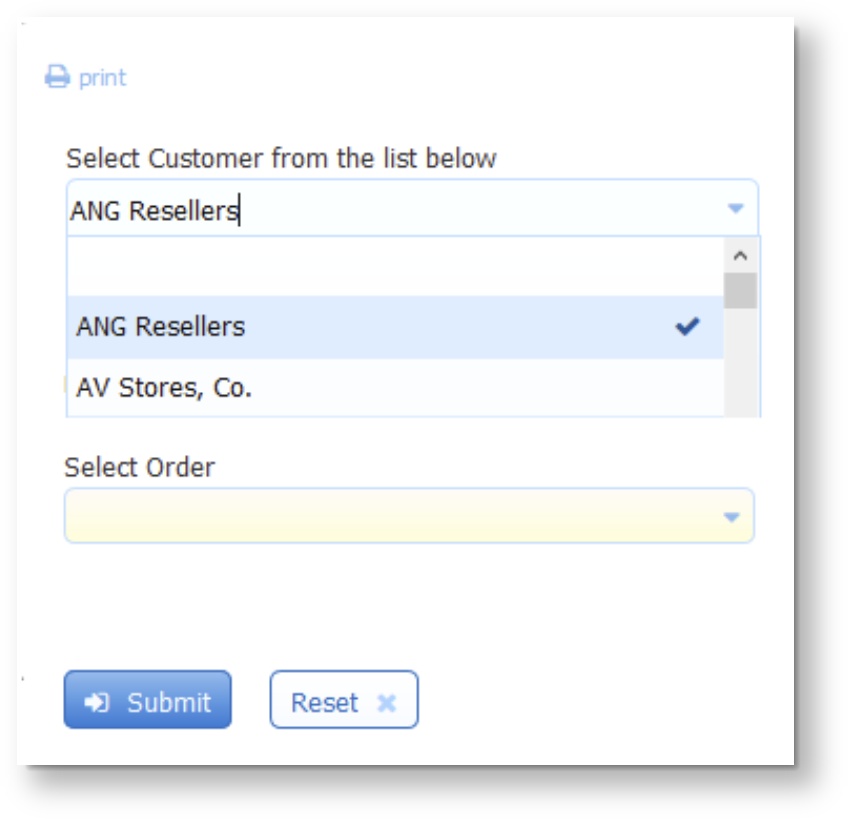
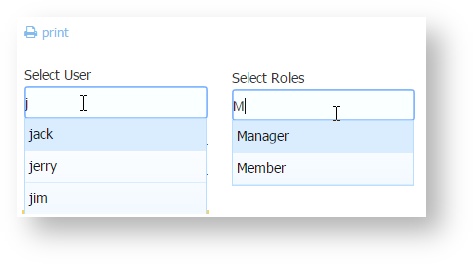
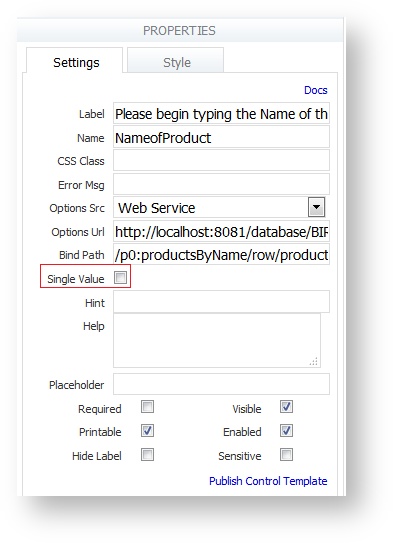
Follow these steps: Enter the URL of the RESTful web service that you are going to retrieve the option data from. Data is retrieved using HTTP GET. The URL can contain templates and the options will be automatically updated whenever the value changes of any control referenced by a template in the URL. Enter the Value Binding - this is bind path of the option VALUES within the XML or JSON returned by the RESTful web service. Binding paths are specified with the '/' character used as a delimiter i.e. /resultSet/CountryID. The path locates the values to be extracted and set into the selection control options. If the data pointed to by the path is repeating, then the data extracted will be a collection of items. This is the value that will be stored in the XML submissions document when the form/workflow is submitted/completed. Enter the Label Binding - this is the bind path of the option display LABELS within the XML or JSON returned by the RESTful web service. This label is displayed in the selection control options in Use mode. The Label Binding can be determined from the debug console by examining the resultSet in the debug console. Type the URL to your WebService in the Options Source property then click the When using an _data parameter template in your options URL in a workflow, it may cause issues in steps that don't load the _data parameter and may even invalidate signed sections. One workaround is to store your _data parameter in a hidden control, and then use the template for that control in your Options Source URL instead. Let's say you have a form/workflow with a Dropdown control named Customer. You want to populate the options of this control with a list of Customers Names. You also would like to store the Customer Number associated with the Selected customer in the form/workflow submission. We will use the Database Connector as our Web Service. For this example, the Database Connector is configured in Standalone mode to work with a MySQL database named classicmodels. The Customer dropdown options can be populated with a business rule but you can also use the Dynamic Options feature. The frevvo Database Connector executes a query against a database named classicmodels that will return a list of Customers in JSON format. We will determine the Value and Label bindings by examining the results returned in the debug console. Follow these steps: The images show the same form with a Radio/Checkbox control replacing the Customer dropdown. Radio Control Options for Selection Controls (Dropdowns, Checkbox, Radio) are set up using the syntax: value=label. When these controls are used in a template, frevvo uses the option label when resolving the template at runtime. This is desirable when you want your users to see the labels as options. If you use a template in the Options URL, the template resolves to the label at runtime. This may cause the query to fail. Template syntax has been expanded to force the use of the true value as opposed to the option label if the template control is a Selection Control. Use {controlName.value} in place of {controlName} in the options URL to substitute the value instead of the label at runtime. Consider this example: Let's say you want to display customer orders for a particular customer in a form/workflow. You have created a form with two Dropdown controls configured to retrieve dynamic options from a database using the frevvo Database Connector. The first Dropdown, named sc for Select Customer, returns a list of customers. The second Dropdown, named so for Select Order, returns orders based on the customer selected in the first Dropdown. The Options URL for the first dropdown is https://<server:port>/BIRT/allCustomers?_mediaType=json. The Value Bindings is set to /resultSet/customerNumber and the Label Binding is set to /resultSet/customerName. This returns a list of customers from the database showing the Customer Name (Label) in the Dropdown options. The Options URL for the second Dropdown uses the templatized value of the first Dropdown - {sc} - https://<server:port>/database/BIRT/ordersByCustomer?cnum={sc}&_mediaType=json. The Value Binding for this Dropdown is set to /resultSet/orderNumber and the Label Binding is set to /resultSet/orderDate. This was intended to return a list of orders using the value (Customer Number) of the customer selected in the first Dropdown. Note the use of the Select Customer template - {sc} in the Options URL. If your options will have spaces, append the URL with !encode=true to accurately list options. An example of the the syntax is {sc.value!encode=true}. When you test the form, the Customer dropdown is successfully populated but when a customer is selected, the Select Order Dropdown does not populate. The Debug console shows this error: This happens because the second dropdown is using the label of the first dropdown (instead of the value) while executing the web service call. Changing the Select Order template - {sc} to {sc.value} in the Options URL for the Select Order Dropdown forces Option URL for the Select Order Dropdown with {controlName.value} Runtime When developing a form/workflow with selection controls with dynamic options, the designer needs to see returned results from an entry point in order to determine bind paths, troubleshoot end point urls, etc. Logging available in the "Debug Console" in test mode includes Web Service events such as: If there is a runtime problem invoking a configured web service entry point, frevvo will log a warning statement with a reason to the <frevvo-home>\tomcat\logs\frevvo_YYYY-MM-DD logfile. For example: A non-responsive web service call for dynamic options can hold-up a form/workflow indefinitely. Two timeouts have been added to frevvo for socket read timeout and connection timeout. Both timeouts default to 30 seconds. They can be overridden by adding these parameters to the URL: http.connection.timeout and http.socket.timeout. Both are specified in milliseconds. These timeouts apply to web service calls from rules as well as doc actions, etc. frevvo supports Secure Web Service entry points that use HTTP basic authentication. The authentication credentials are entered in the HTTP Authorization Credentials section of the Edit Tenant screen by the tenant administrator. These HTTP credentials are used by the web service integration. Other authentication schemes in use by 3rd-party services are not supported. The ComboBox control supports three types of data retrieval: frevvo Users, frevvo Roles and Web Service. Select the data source using the dropdown in the Options Src property. Selecting Web Service makes it possible to use the ComboBox to retrieve values from a database and enable a list of possible partial matches. There is also a blank option. Pick this one if you are going to populate your ComboBox options using a business rule. Here's how it works: Use the ComboBox to return a list of users/roles in the tenant where your form/workflow is located (current tenant). You cannot pull users/roles from a tenant other than the current one due to security restrictions. Selecting frevvo Roles returns the list of ALL roles in the current tenant. frevvo constructs a URL:/frevvo/web/tn/{form.tenant.id}/roles?match= then replaces the form.tenant.id template with the name of the current tenant. 3. The ComboBox supports the ability to specify single or multiple values. Check the Single Value checkbox if you want to limit the choice to one value. Users can typeahead to narrow the choices based on the letters entered. User ids and roles are case sensitive so remember to use the correct case when typing. 4. Check the Options Value Only checkbox to restrict the ComboBox value to available options. Options Value Only is only available when Options Src is set to frevvo Users or frevvo Roles. You cannot test the ComboBox Options in the form/workflow designers. Click the The ComboBox control can be used to retrieve values from a web service and enable a list of possible partial matches. This is helpful when you have database queries that return a large number of options. You can filter the number of options returned from a query based on the text typed into the ComboBox. Users typeahead and are only presented with the matching options as choices. Set the Options Source property of the ComboBox to Web Service then provide the Options URL and Bind Path properties: It is very common to pull options for a typeahead control such as the ComboBox from a database. If you are using the frevvo Database Connector to integrate with your SQL database you already have a Restful service that returns data as resultSets. Let's say you have a classicmodels MySQL database with a Products table that contains 121 records. You have a form with a ComboBox control named NameofProduct and you want to populate the options from the query results. However, you do not expect your users to scroll through 121 choices until they find the one that they are looking for. Ideally, you would like to filter the results coming back from the query based on the characters inserted into ComboBox. Users can then typeahead and select a value from the filtered choices. For this example, the frevvo Database Connector is installed on the same machine as frevvo and configured in Standalone mode running on port 8081. You will need a query to run against the database. This query, which is included in the BIRT queryset in the configuration.xml file, uses the MySQL Like and % wild cards, to return all the products that match the value in the template (pname}. Provide the URL to the datasource - in this case the URL to the database query in the BIRT queryset- productsByName. Add the {<combobox control name>.matchText} parameter to specify the value of the variable - pname - in the query as the matching text typed into the Name of Product control. If your options will have spaces, append the URL with !encode=true to accurately filter options. Using the example above the syntax is {NameofProduct.matchtext!encode=true}. Click the The following ComboBox properties can be used in rules.Setting Up Dynamic Options No Coding Needed

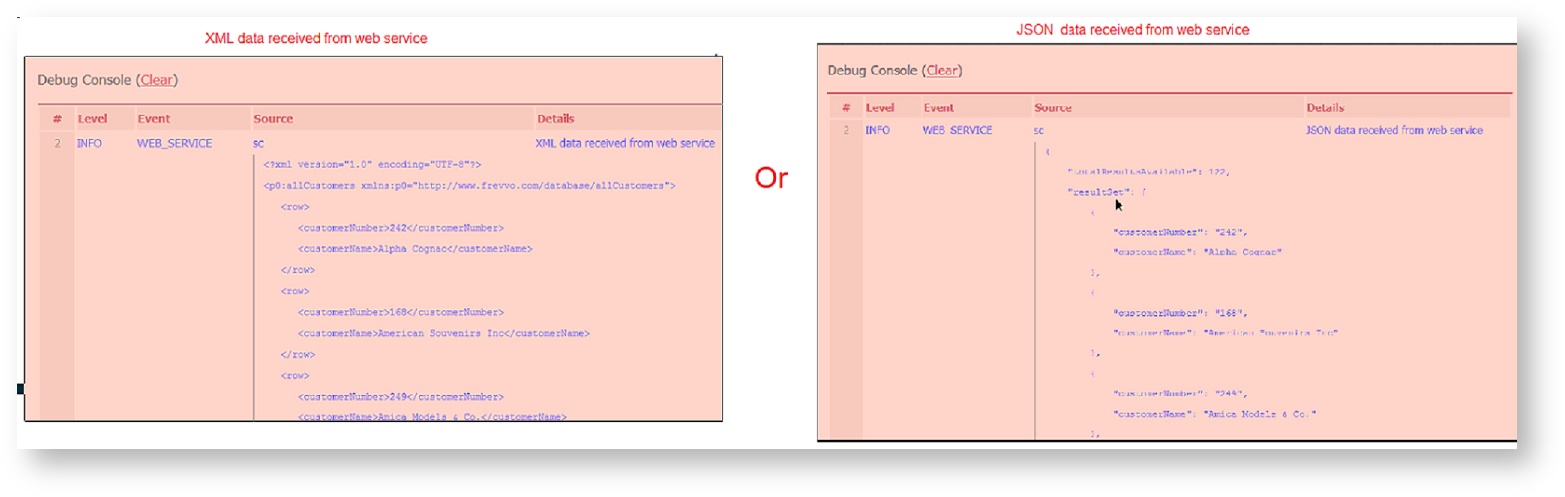
Ex: /http(s)://10.0.0.27/:8081/database/BIRT/allCustomers?_mediaType=json - This URL returns a list of all customers from a database The _mediaType parameter specifies that JSON results are returned. In this example, the Database Connector integrates with the database to execute the query. The Database Connector is a Restful service that returns results in XML or JSON![]() save and test icon. Examine the results in the debug console to determine the Value and Label Bindings.
save and test icon. Examine the results in the debug console to determine the Value and Label Bindings.
The Value Binding can be determined by examining the resultSet in the frevvo debug console.![]() save and test icon. Examine the resultSet in the debug console to determine the Value binding.
save and test icon. Examine the resultSet in the debug console to determine the Value binding. If this is the JSON Data returned: "totalResultsAvailable":2,
"resultSet":[{"CountryName":"Argentina","CountryID":"1"},{"CountryName":"Aruba","CountryID":"12"},{"CountryName":"Bahamas","CountryID":"13"}]}
If the Value Binding property is set to /resultSet/CountryID - the country id of the selected country will be stored in the frevvo submission
If the Label Binding is set to /resultSet/CountryName - the country names are what the user sees as the selection control options - Argentina, Aruba, Bahamas
If the results are returned in XML:   Notice that the XML uses namespaces and that they must be part of the bind path.

<?xml version="1.0" encoding="UTF-8"?>
<p0:allCountries xmlns:p0="http://www.frevvo.com/database/allCountries">
   <row>
      <CountryID>1</CountryID>
      <CountryName>Argentina</CountryName>
   </row>
   <row>
      <CountryID>12</CountryID>
      <CountryName>Aruba</CountryName>
   </row>
   <row>
      <CountryID>13</CountryID>
      <CountryName>Bahamas</CountryName>
   </row>
</p0:allCountries

If the Value Binding and Label Binding properties are be set to the same path: /p0:allCountries/row/CountryName - the Country Name will be included in the submission and Users will see the Country Names as the options of the selection control: Argentina, Aruba, Bahamas
![]() save and test icon to test your form/workflow.
save and test icon to test your form/workflow. Dynamic Options Example
. The results of this query will show the Customer NumbMaer and Customer Name for each customer in the Customers database table in JSON format.
![]() save and test icon.
save and test icon. 
![]() save and test icon to test the form. Note the options display the Customer Name.
save and test icon to test the form. Note the options display the Customer Name.


Checkbox ControlPopulating a Selection Control based on the Value of Another Dynamically Populated Selection Control
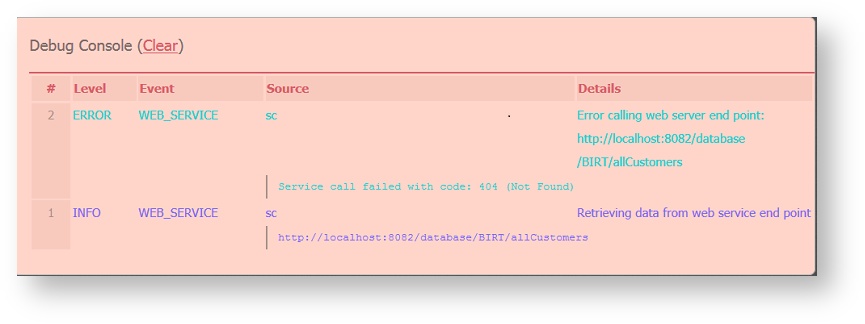
ERROR 	WEB_SERVICE 	so 	Error calling web server end point: https://app.frevvo.com/database/BIRT/ordersByCustomer?cnum=Alpha Cognac&_mediaType=json
Invalid uri 'https://app.frevvo.com/database/BIRT/ordersByCustomer?cnum=Alpha Cognac&_mediaType=json': Invalid query
to evaluate the template to the option value instead of the label and the query will return the expected results. Note the Select Customer template is {sc.value}.
https://<server:port>/database/BIRT/ordersByCustomer?cnum={sc.value}&_mediaType=json


Dynamic Option Runtime Support in the Debug Console

08:03:55.177 |-WARN [http-nio-8080-exec-3] [amicPropertyHolderAdapter] - Error calling web service end point: https://api.edmunds.com/api/vehicle/v2/?state=new&year=2017&view=basic&fmt=json&api_key=p9v6s4uv6998k464u33m8jx3 Error: Service call failed with code: 404 (Not Found)
Timeouts for Non-responsive Web Services
Secure Web Services
Dynamic Options for the ComboBox Control

![]() save and test icon for the quickest way to verify that the ComboBox is working as expected.
save and test icon for the quickest way to verify that the ComboBox is working as expected.Populate Dynamic Pick Lists from a Database with the ComboBox
Example
<query name="productsByName">
<retrieve>
                <!--maps to HTTP GET -->
                <statement> SELECT * FROM Products where productName LIKE '%{pName}%' order by productName </statement>
</retrieve>
</query>
http://<server>:<port>/database/BIRT/productsByName?pName={NameofProduct.matchText}
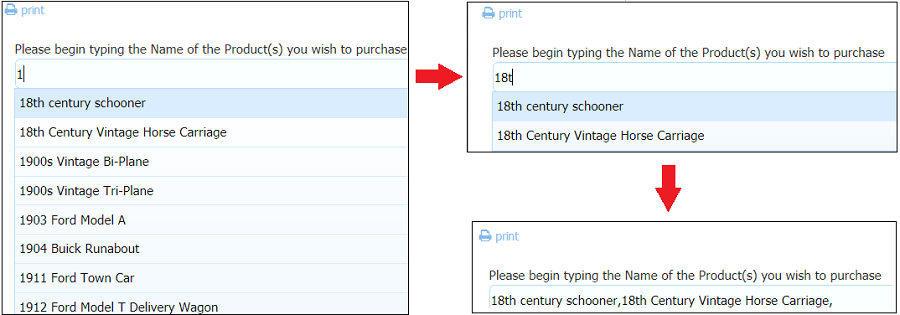
![]() save and test icon. Enter a value into the ComboBox. Determine the Binding Path from the resultSet. In the image, the number 1 was entered into the ComboBox.
save and test icon. Enter a value into the ComboBox. Determine the Binding Path from the resultSet. In the image, the number 1 was entered into the ComboBox.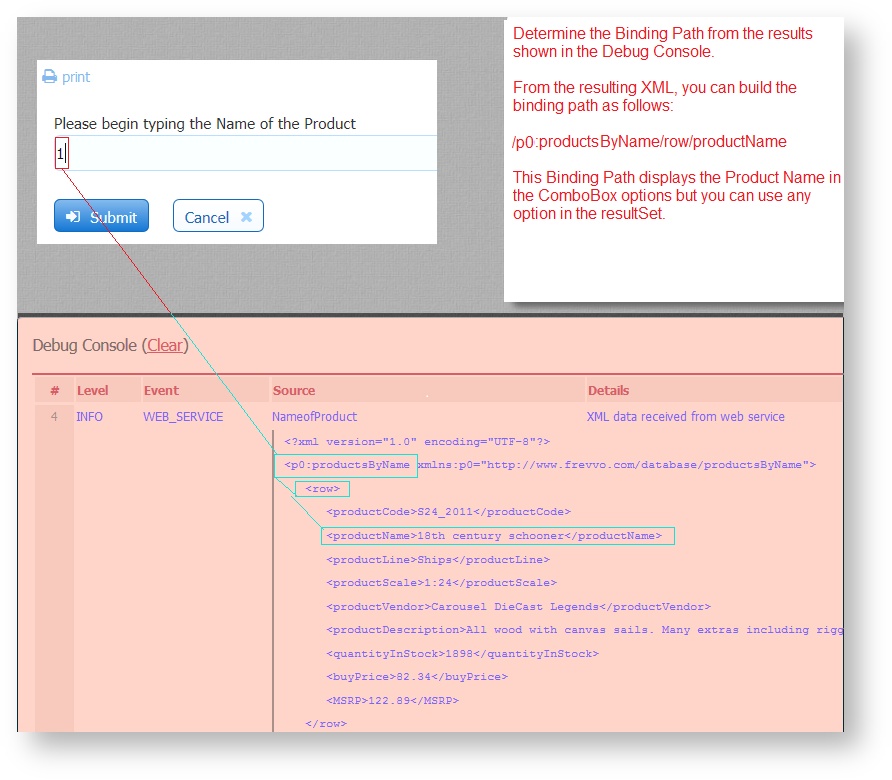
/p0:productsByName/row/productName
ComboBox Control Properties for Business Rules
Property Purpose optionsUrl Allow designers to specify more complex dynamically determined end point urls that cannot be built using control templates within the URL. matchText Read-only. As the user types in the combobox, any rule referencing the matchText property will fire and determine/set options that match. matchingOptions Write-only. Array of strings. The rule can set the options that match and should be presented to the user as choices. Typically used in conjunction with matchText.